

Page 1

SMART Slate WS200
User’s Guide
Page 2

Product Registration
If you register your SMART product, we’ll notify you of new features and software
upgrades.
Register online at www.smarttech.com/registration
.
Keep the following information available in case you need to contact SMART
Technical Support.
Serial Number: ________________________________________________
Date of Purchase: ________________________________________________
FCC Warning
This equipment has been tested and found to comply with the limits for a Class A digital device, pursuant to Part 15 of
the FCC Rules. These limits are designed to provide reasonable protection against harmf ul interference when the
equipment is operated in a commercial environment. This equipment generates, uses and can radiate radio
frequency energy and, if not installed and used in accordance with the manufacturer’s instructions, may cause
harmful interference to radio communications. Operation of this equipment in a residential area is likely to cause
harmful interference in which case the user will be required to correct the interference at his own expense.
Trademark Notice
The SMART logo and smarttech are trademarks or registered trademarks of SMART Technologies ULC in the U.S.
and/or other countries. All other third-party product and company names may be trademarks of their respective
owners.
Copyright Notice
©2009 SMART Technologies ULC. All rights reserved. No part of this publication may be reproduced, transmitted,
transcribed, stored in a retrieval system or translated into any language in any form by any means without the prior
written consent of SMART Technologies ULC. Information in this manua l is subject to change without notice and does
not represent a commitment on the part of SMART.
Patent No. US5448263; US6141000; US6320597; US6326954; US6337681 ; US6741267; US6747636; US7151533;
CA2058219; CA2252302. Other patents pending.
06/2009
Page 3

1| –
1 About Your SMART Slate WS200......................................................1
Tethered Pen ................................ ... ... .... ... ... ... ... ...............................2
USB Charging Cable . .... ... ... ... ....................................... ... .... ... ... ... .... .2
SMART Notebook Software...............................................................2
Bluetooth® USB Wireless Adapter
(Not Included)............................. ... ....................................... ... ... ... .... . 3
2 Attaching the Pen Tether ...................................................................5
Charging your Slate ...........................................................................6
Installing SMART Notebook software and SMART Board Drivers.....6
Establishing a Wireless Connection to Your Computer .....................7
Installing your Bluetooth USB Wireless Adapter (Not Included) ........8
3 Using the Pen.....................................................................................9
Connecting Multiple Slates......................................... ... ... .... ... ... ... .... . 9
Storing the Pen ..................................................................................9
Using the slate buttons.......................................................................9
Using the pen buttons......................................................................10
Storing the USB adapter..................... .... ... ... ... ... .... ... ... ... .... ... ... ... ... 10
4 Paper Underlays .............................. ....................................... ... ... ...11
Waste Electrical and Electronic Equipment Regulations (WEEE Directive)13
Restriction of Certain Hazardous Substances (RoHS Directive)............13
Batteries .................................................................................................13
Packaging...............................................................................................14
Covered Electronics Devices..................................................................14
China’s Electronic Information Products Regulations.............................14
U.S. Consumer Product Safety Improvement Act ..................................14
Online Information and Support..............................................................15
Training................................................................................................... 15
Technical Support...................................................................................15
Shipping and Repair Status....................................................................15
General Inquiries. ... ... ... ... .... ... ... ... .... ...................................... .... ... ... ... ...16
Warranty.................................................................................................16
Registration ............................................................................................ 16
Part No.
Page 4

2| –
Part No.
Page 5
Chapter 1
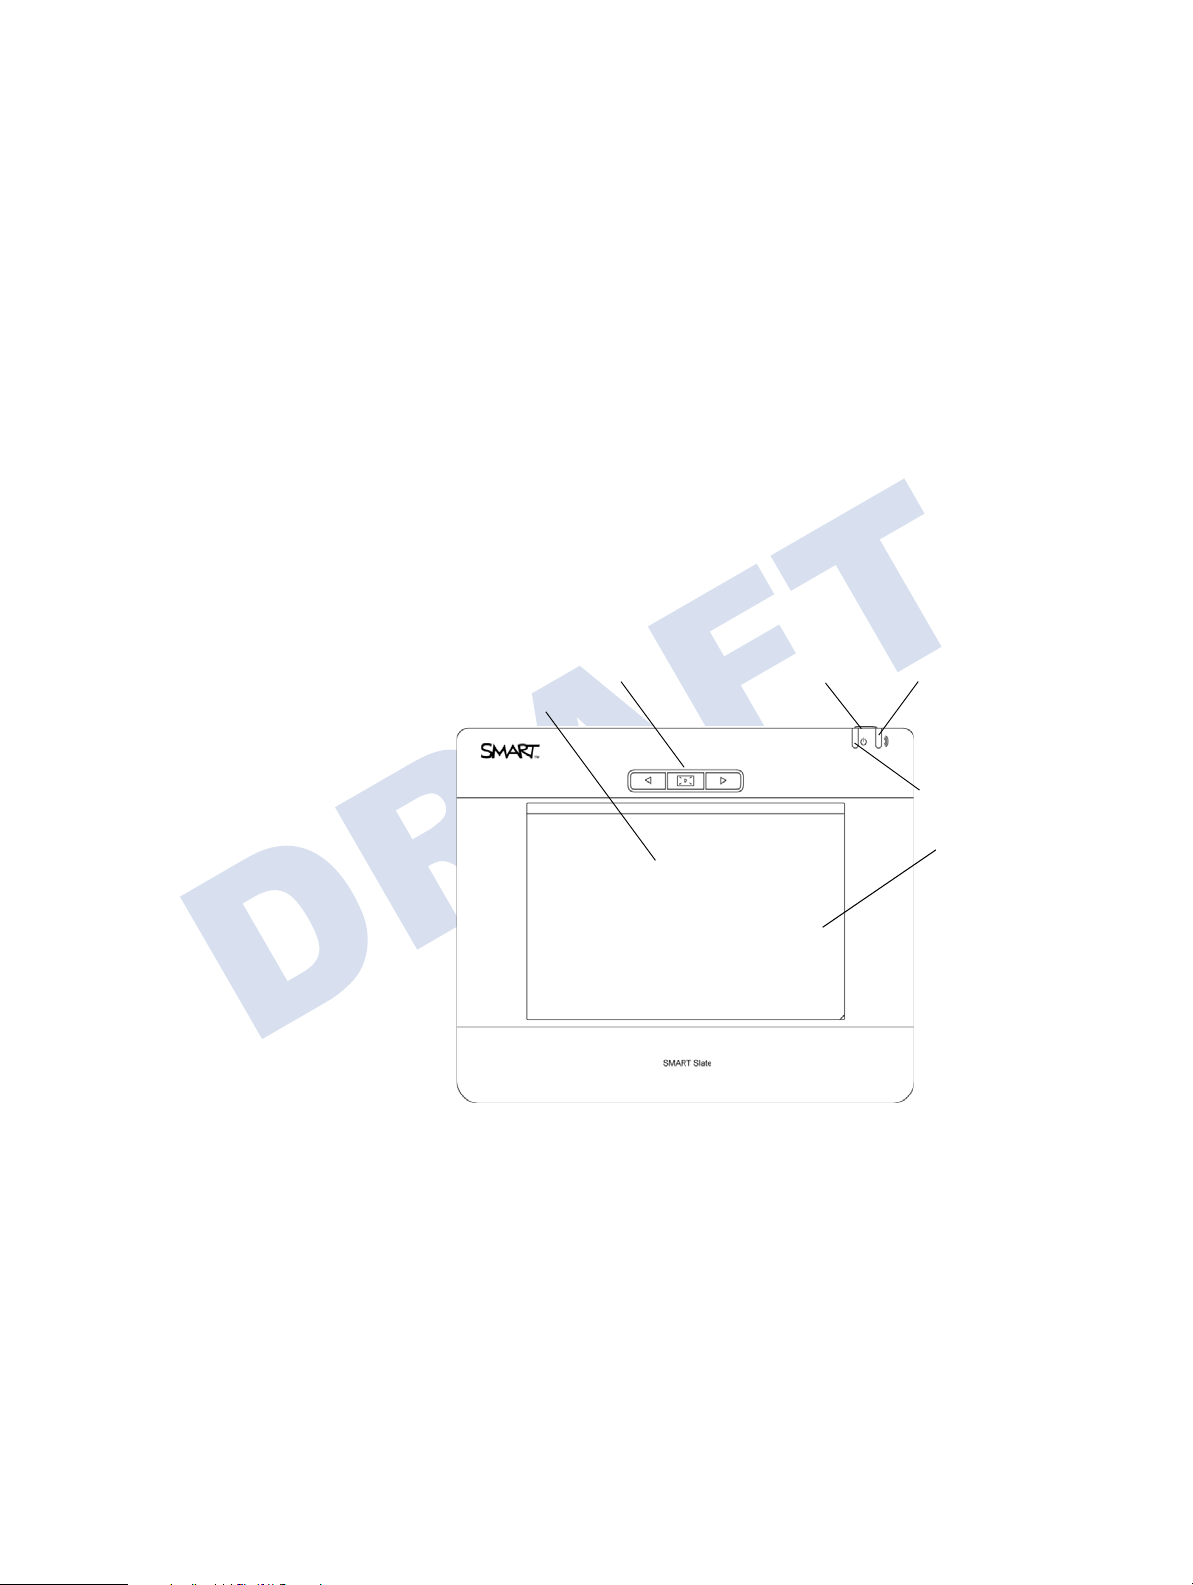
Customizable Buttons Power Switch
Power LED
Wireless Connection LED
Underlay Cover
Workspace
Overview
About Your SMART Slate WS200
The SMART Slate works with your computer and a SMART Board™ interactive
whiteboard and allows you to write notes, use applications and perform normal
computer operations. The slate connects wire lessly to your computer and has a
rage of 33" (10 m), allowing teachers to write notes and use applications from a
distance. You can use up to seven slates at the same time allowing multiple
teachers and students to write on the slate and have their notes appear on the
interactive whiteboard.
Part No.
Page 6

2 | CHAPTER 1 – OVERVIEW
Pen Tether Slot
Pen Storage Compartment
Battery
Compartment
USB Wireless Adapter
Storage Compartment
Connect Button
Charging USB Cable Receptacle
Side Switch
Eraser
Tether
Tethered Pen
The pen controls the pointer on your display.
Move the pen above the surface of the slate to
move the pointer. When you touch the pen to
the slate your computer registers the point of
contact as a left mouse click. Touch the pen to
the slate to write notes and use computer
applications. The pen has a side switch and an
eraser that you can customize. You can attach
the pen tether so that you don’t misplace the
pen.
USB Charging Cable
You r can ch ar ge your slat e by connecting it to your
computer with the USB charging cable. Your slate
comes with an installed lithium ion battery. It takes XX
to fully charge the battery, which lasts for XX hours.
SMART Notebook Software
Your slate comes with a SMART Notebook software CD
pack. The first CD contains SMART Notebook software
and the second CD contains the drivers you need to
connect your SMART Slate to your computer.
Part No.
Page 7

Bluetooth® USB Wireless Adapter
Installation
CD
USB Wireless
Adapter
WS200-BT
(Not Included)
If your computer doesn’t have built-in Blue to ot h
wireless capability, you must purchase the
Bluetooth USB wireless adapter (part # WS200BT) from you local SMART Reseller
Bluetooth USB wireless adapter enables you to
connect your slate to your computer.
. The
Part No.
Page 8

4 | CHAPTER 1 – OVERVIEW
Part No.
Page 9

Chapter 2
Setting Up Your SMART Slate
Before you can use your slate, you must do the following:
• Attach the pen tether (page 5).
• Install the battery (?) (page 6).
• Charge the slate (page 6).
• Install SMART Notebook software and SMART Board drivers on your
computer (page 6).
• Install a paper underlay (page 7).
• Establish a Bluetooth wireless connection (page 7).
To attach the tether to
the pen
• If your computer doesn’t have built-in Bluetooth wireless capability, install the
Bluetooth USB wireless adapter (page 8).
Attaching the Pen Tether
The tether connects the pen to the slate so you don’t misplace the pen.
1. Thread one tether loop through the hole at the end of the pen.
2. Feed the other tether loop through the first loop as shown in the diagram
below, and then pull the tether so the first loop is snug.
Part No.
Page 10

6 | CHAPTER 2 – SETTING UP YOUR SMART SLATE
To attach the tether to
the slate
1. Place the tether loop that is free through the tether slot in the slate.
2. Feed the pen, with the tether attached, through the loop as shown in the
diagram below, and then pull the tether so the loop is snug.
Installing the Battery (?)
Charging your Slate
Y our slate comes with an installed lithium io n battery that powers the sla te so your
movement isn’t restricted by a power cable. You can charge the slate by
connecting it to your computer with the included USB charging cable. It takes XX
hours to charge the slate, and a fully charged slate lasts for XX hours of use.
If the power LED glows green, the slate is fully charged. If the power LED glows
red, the slate needs to be charged.
To charge your slate 1. Turn on your computer.
2. Connect the USB A connector of the charging cable to your computer.
3. Connect the USB B connector of the charging cable to your slate.
The slate starts to charge and the power LED glows green.
Installing SMART Notebook software and SMART Board Drivers
Your SMART Slate WS200 comes with a SMART Notebook softwar e and SMAR T
Board drivers CD pack. SMART Notebook is presentation and collaboration
software that is designed to work with your slate. The SMART Boar d drivers
enables your computer to connect to the slate.
Part No.
Page 11

7 | CHAPTER 2 – SETTING UP YOUR SMART SLATE
S
M
A
R
T
S
l
a
t
e
To install SMART
Notebook Software
To install SMART Board
drivers
Insert the SMART Notebook sof tware CD into your computer’s CD drive, and then
follow the on-screen instructions.
Insert the SMART Board drivers CD into your computer’s CD drive, and then
follow the on-screen instructions.
Installing a Paper Underlay
An underlay is a sheet of paper with a tool strip that you can place on the
workspace under the underlay cover. To uch the too l you want to u se with the pen.
You can customize the tools that you use most often to appear on the tool strip
and then print the underlay.
To print an underlay 1. In the SMART Notebook Control Panel, press SMART Hardware Settings.
2. Select Set Up Underlay and Icon Strip from the drop-down menu.
3. Select an existing underlay from the color scheme drop-down menu.
OR
4. Press Print Screen to print the underlay.
To install the underlay 1. Lift the underlay cover from the lower right corner with your finger.
2. Slide the underlay beneath the underlay cover.
3. Lower the underlay cover.
Part No.
Page 12

8 | CHAPTER 2 – SETTING UP YOUR SMART SLATE
Establishing a Wireless Connection to Your Computer
The SMART Slate WS200 uses Bluetooth technology to connect wirelessly to
your computer. In order to use your slate, you computer must have built-in
Bluetooth wireless capability.
NOTE
If your computer doesn’t have built-in Bluetooth wireless capability, you must
purchase the Bluetooth USB wireless adapter (Part # WS200-BT) from your
local SMART Reseller
more information) before you establish a wireless connection with your
computer.
. Install the Bluetooth wireless adapter (see p age 8 for
To establish a wirele ss
connection
1. Move the power switch to the left to turn on the slate.
2. Press the Connect button on the back of the slate.
The wireless connection LED on the slate flashes green.
3. Double-click the Bluetooth icon in your computer’s notification area.
The Bluetooth Settings window appears.
4. Press New Connection.
The Add New Connection Wizard appears.
5. Select the Express Mode check box, and then click Next.
6. Select the SMART Slate WS200 from the list of devices, and then complete
the steps in the connection wizard.
When your slate is wirelessly connected to your computer, the connection
LED on the slate stops flashing and glows green.
Part No.
Page 13

9 | CHAPTER 2 – SETTING UP YOUR SMART SLATE
Installing your Bluetooth USB Wireless Adapter (Not Included)
If your computer doesn’t have built-in Bluetooth wireless capability, you must
install the Bluetooth USB wireless adapter (Part # WS200-BT) before you can
establish a wireless connection to your computer.
To install the Bluetooth
USB wireless adapter
1. Connect the USB wireless adapter to your computer’s USB receptacle.
2. Place the Bluetooth USB wireless adapter installation CD into your
computer’s CD drive, and then follow the on-screen instructions.
Part No.
Page 14

10 | CHAPTER 2 – SETTING UP YOUR S MART SLATE
Part No.
Page 15

11 | CHAPTER 3 – USING YOUR SLATE
Chapter 3
Using Your Slate
The slate’s workspace is a mapped r epresentation of your display. If you move the
pen to the top right corner of the slate’s workspace, the pointer will move to the
top right corner of your display.
Turning on the Slate
To turn on the slate Slide the power switch to the left.
The power LED glows green.
To move the pointer on
your display
Connecting the Slate
After you’ve created a wireless connection between your slate and your computer
(see page 7), your slate automatically establishes a wireless connection with your
computer when you turn the slate on (is this true? if not, what needs to be done?
etc.).
Using the Pen
The pen to controls the pointer on your display. The slate detects the pen’s
movement from a distance of XX mm. The pen has a side switch with an upper
and lower position. You can also flip the pen on its end and use the top of the pen
to use the eraser function.
NOTE
You can cha ng e the fu nctions of the side switch and the top of the pen. See
page 11 for more information.
Move the pen a few millimeters above the surface of the slate to move the pointer
on your display.
To write on your display Hold the lower side switch down as you touch the pen to the slate to write on your
display.
If the program that you are writing on is non-Aware (that is, isn’t integrated with
SMART Notebook softwa re) whatever you write or draw a ppears on a transp arent
layer over the current program. Y ou can close the transparent layer at any time by
clicking the Close button in the upper right corner of the screen.
Part No.
Page 16

12 | CHAPTER 3 – USING YOUR SLATE
To perform a left-click Touch the pen to the surfa c e of the slate to perform a left-click.
To perform a right-click Touch the pen to the surface of the slate while pressing the upper side switch
button to perform a right-click.
To use the eraser
Flip the pen upside down and touch the pen to the slate to use the eraser.
Using the Slate Buttons
The slate has three buttons above the workspace. You can change the functions
of these buttons so that the tools you use most often are easily accessible.
To open SMART Notebook
software
To move back one page Press the left arrow button (need to get graphic) to move back one page.
To move forward one page
Press the center slate button (need to get graphic) to open SMART Notebook
software.
SMART Notebook software opens.
Press the right arrow button (need to get graphic) to move forward one page.
Checking the Charge Status of the Battery
S toring the Pen
You can store the pen in the pen storage compartment when you’re not using the
pen.
Part No.
Page 17

13 | CHAPTER 3 – USING YOUR SLATE
Storing the Bluetooth USB adapter
You can store the Bluetooth USB wireless adapter in the storage compartment on
the back of the slate. There is a foam pad in the storage compartment so that the
USB wireless adapter doesn’t rattle when you move the s lat e.
Part No.
Page 18

14 | CHAPTER 3 – USING YOUR SLATE
Part No.
Page 19
15 | CHAPTER 4 – CUSTOMIZING YOUR SLATE
Chapter 4
Customizing Your Slate
You can customize the functions of the slate buttons, the pen side switch, the pen
eraser. You can also create a tool strip with the tools you most often use on a
paper underlay.
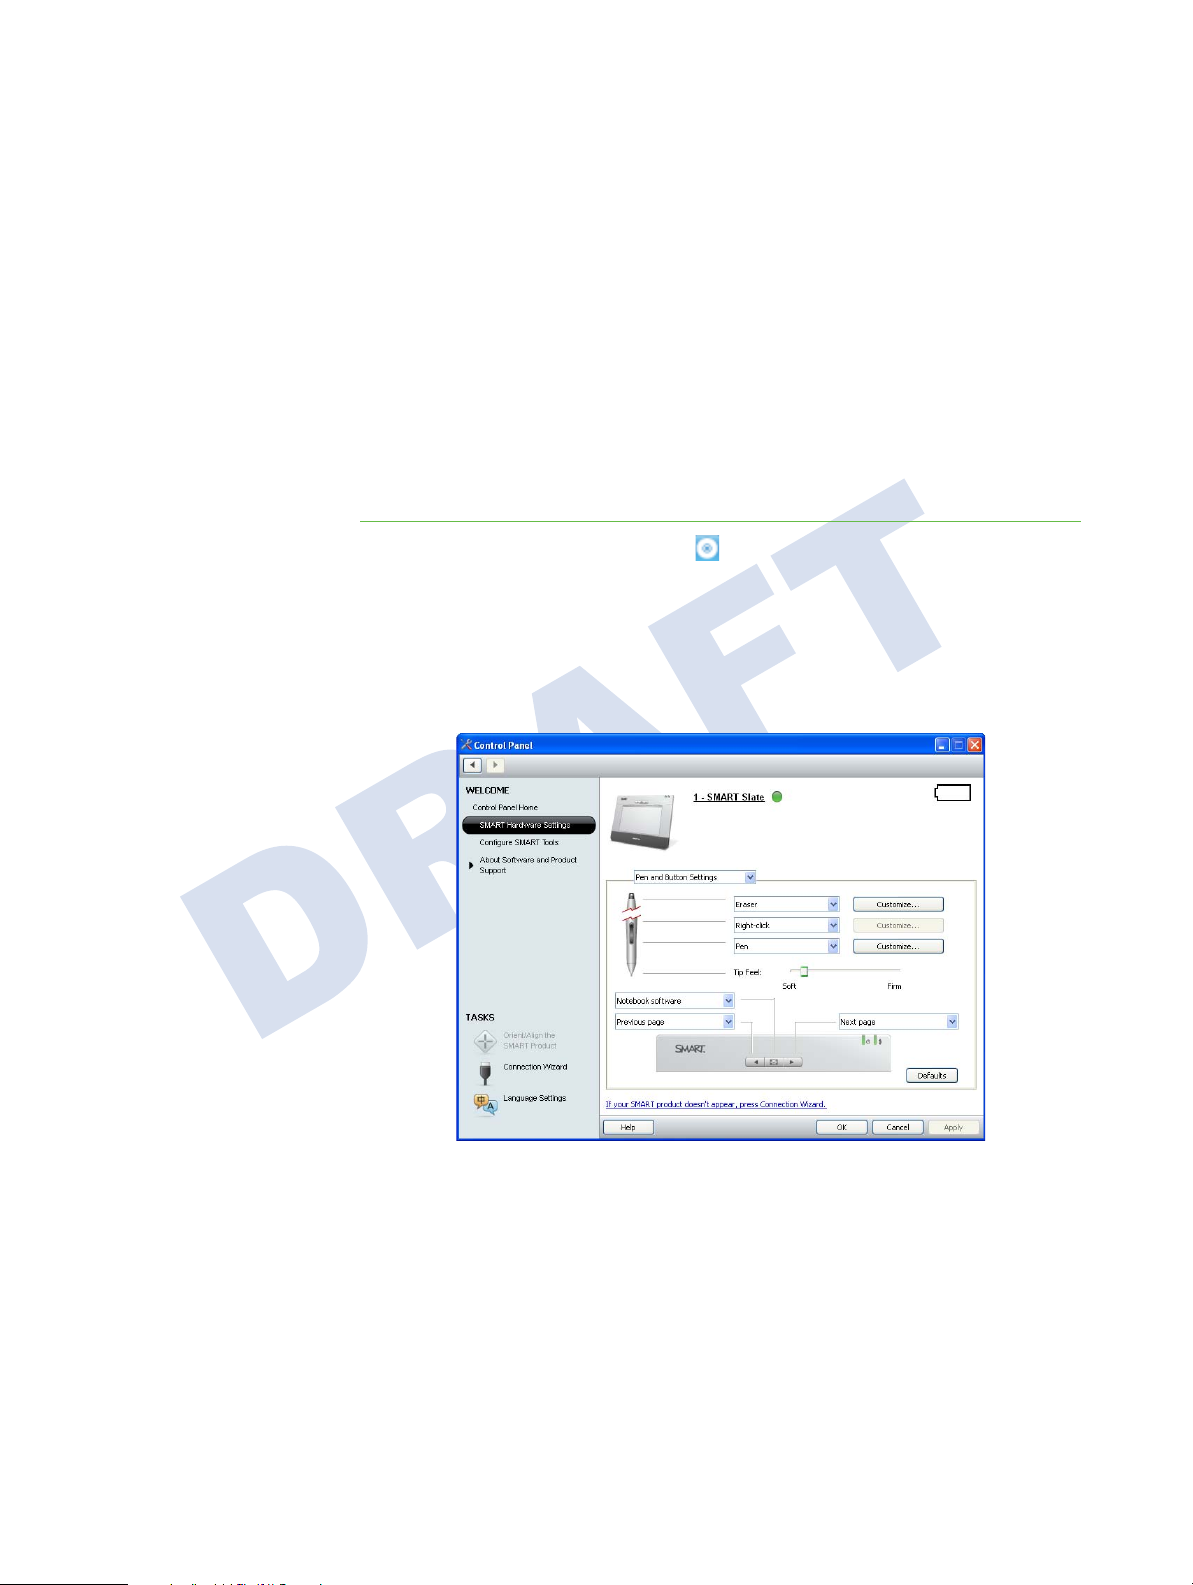
T o customize the slate a nd
pen buttons
1. Press the SMART Notebook icon in your system tray (Windows operating
systems) or the doc (Mac computers), and then sele ct Control Panel from
the list.
The Control Panel appears.
2. Press SMART Hardware Settings.
3. Do they have to select the slate from a list if there is more than one SMART
product connected?
4. Use the drop-down menus to select a function for the pen side switch, the top
of the pen, and the three slate buttons
5. Press Customize... to further customize the selected function.
Part No.
Page 20

16 | CHAPTER 4 – CUSTOMIZING YOUR SLATE
Customizing your Paper Underlay
1.
2. Press Configure Icon Strip to customize the tools that you use most of ten on
the icon strip.
3.
Part No.
Page 21

17 | APPENDIX A – HARDWARE ENVIRONMENTAL COMPLIANCE
Appendix A
Hardware Environmental Compliance
SMART Technologies supports global efforts to ensure that electronic equipment
is manufactured, sold and disposed of in a safe and envir onm e ntally friendly
manner.
Waste Electrical and Electronic Equipment Regulations (WEEE Directive)
Waste Electrical and Electronic Equipment regulations apply to all electrical and
electronic equipment sold within the European Union.
When you dispose of any electrical or electronic equipment, including SMART
Technologies products, we strongly encourage you to properly recycle the
electronic product when it has reached end of its life. If you require further
information, please contact your reseller or SMART Technologies for information
on which recycling agency to contact.
Restriction of Certain Hazardous Substances (RoHS Directive)
This product meets the requirements of the European Union’s Restriction of
Certain Hazardous Substances (RoHS) Directive 2002/95/EC.
Consequently, this product also complies with other regulations that have arisen
in various geographical areas, and that reference the European Union’s RoHS
directive.
Batteries
Batteries are regulated in many countries. Check with your reseller to find out how
to recycle used batteries.
Part No.
Page 22

18 | APPENDIX A – HARDWARE ENVIRONMENTAL COMPLIANCE
Packaging
Many countries have regulations restricting the use of certain heavy metals in
product packaging. The packaging used by SMART Technologies to ship products
complies with applicable packaging laws.
Covered Electronics Devices
Many U.S. states classify monitors as Covered Electronic Devices and regulate
their disposal. Applicable SMART Technologies products meet the requirements
of the Covered Electronic Devices regulations.
China’s Electronic Information Products Regulations
China regulates products that are classified as EIP (Electronic Information
Products). SMART Technologies products fall under this classification and meet
the requirements for China’s EIP regulations.
U.S. Consumer Product Safety
Improvement Act
The United States has enacted the Consumer Product Safety Improvement Act
which limits the lead (Pb) content in prod ucts. SMART Technologies is committed
to complying with this initiative.
Part No.
Page 23

19 | APPENDIX B – CUSTOMER SUPPORT
Appendix B
Customer Support
Online Information and Support
Visit www.smarttech.com/support to view and download user’s guides, how-to
and troubleshooting articles, software and more.
Training
Visit www.smarttech.com/trainingcenter for training materials and information
about our training services.
Technical Support
If you experience difficulty with your SMART product, please contact your local
reseller before contacting SMART Technical Support. Your local reseller can
resolve most issues without delay.
NOTE
To locate your local reseller, visit www2.smarttech.com/st/en-US/
Where+to+Buy.
All SMART products include online, telephone, fax and e-mail support:
Online www.smarttech.com/contactsupport
Telephone +1.403.228.5940 or
Toll Free 1.866.518.6791 (U.S./Canada)
(Monday to Friday, 5 a.m. – 6 p.m. Mountain Time)
Fax +1.403.806.1256
E-mail support@smarttech.com
Shipping and Repair Status
Contact SMART’s Return of Merchandise Authorization (RMA) group, Option 4,
+1.866.518.6791, for shipping damage, missing part and repair status issues.
Part No.
Page 24

20 | APPENDIX B – CUSTOMER SUPPORT
General Inquiries
Address SMART Technologies
3636 Research Road NW
Calgary, AB T2L 1Y1
CANADA
Switchboard +1.403.245.0333 or
Toll Free 1.888.42.SMART (U.S./Canada)
Fax +1.403.228.2500
E-mail info@smarttech.com
Warranty
Product warranty is governed by the terms and conditions of SMART’s “Limited
Equipment Warranty” that shipped with the SMART product at the time of
purchase.
Registration
To help us serve you, register online at www.smarttech.com/registration.
Part No.
Page 25

Federal Communication Commission Interference Statement
This equipment has been tested and found to comply with the limits for a Class B digital device,
pursuant to Part 15 of the FCC Rules. These limits are designed to provide reasonable protection against
harmful interference in a residential installation. This equipment generates, uses and can radiate radio frequency
energy and, if not installed and used in accordance with the instructions, may cause harmful interference to radio
communications. However, there is no guarantee that interference will not occur in a particular installation. If this
equipment does cause harmful interference to radio or television reception, which can be determined by turning
the equipment off and on, the user is encouraged to try to correct the interference by one of the following
measures:
- Reorient or relocate the receiving antenna.
- Increase the separation between the equipment and receiver.
- Connect the equipment into an outlet on a circuit different from that to which the receiver is connected.
- Consult the dealer or an experienced radio/TV technician for help.
This device complies with Part 15 of the FCC Rules. Operation is subject to the following two conditions: (1) This
device may not cause harmful interference, and (2) this device must accept any interference received, including
interference that may cause undesired operation.
FCC Caution: Any changes or modifications not expressly approved by the party responsible for compliance
could void the user's authority to operate this equipment.
IMPORTANT NOTE:
FCC Radiation Exposure Statement:
This equipment complies with FCC radiation exposure limits set forth for an uncontrolled environment. End users
must follow the specific operating instructions for satisfying RF exposure compliance.
This transmitter must not be co-located or operating in conjunction with any other antenna or transmitter.
IC Statement
Operation is subject to the following two conditions: 1) this device may not cause interference and 2) this device
must accept any interference, including interference that may cause undesired operation of the device.
Page 26

Toll Free 1.866.518.6791 (U.S./Canada)
or +1.403.228.5940
www.smarttech.com
Part No.
 Loading...