

Page 1

QUICK START GUIDE
Page 2
WELCOME TO YOUR
Sharing your screen with your SlimPort
NANO·CONSOLE is as easy as using your phone.
Use this quick start guide to begin.
2
Page 3

HERE’S WHAT COMES WITH YOUR NANO·CONSOLE.
Battery Tray
(Inside the remote)
Batteries (2)
Type: CR2032 3V
(located inside the remote)
NANO
Remote
Tower
Base
HDMI Cable
Micro-USB Charging Cable
3
Page 4

SETTING UP YOUR NANO·CONSOLE
Your NANO·CONSOLE is designed to hold
your device as it connects to larger displays.
One side of the base has a raised lip.
Attach the tower to the base so the
writing on the top of the tower (“SlimPort
NANO·CONSOLE”) reads from left to right
when aligned with the lip.
The NANO Remote is designed to
rest on the surface of the tower.
See page 8 for more information
on how to use the NANO Remote.
Raised Lip
4
Page 5
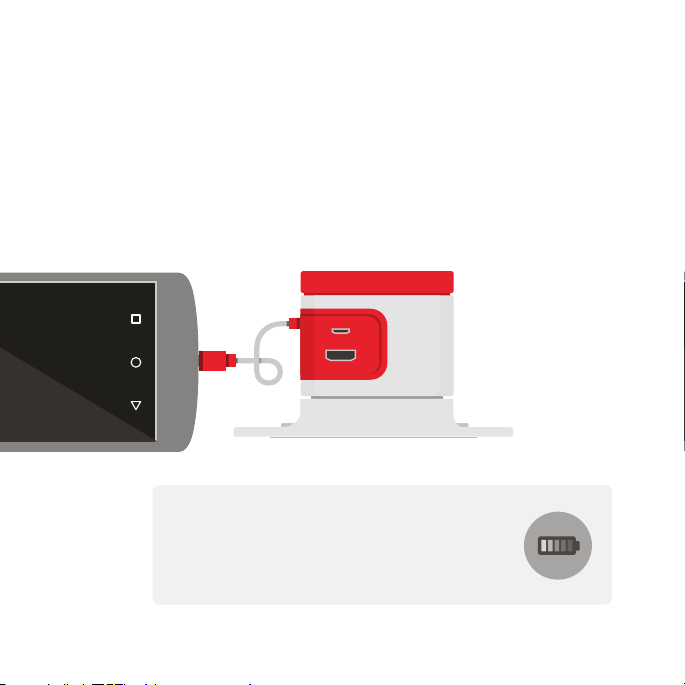
CONNECTING YOUR DEVICE TO THE NANO·CONSOLE
Plug the Micro-USB connector that
is permanently attached to the
NANO·CONSOLE into the Micro-USB port
on your SlimPort-enabled device.
Tip: You can also charge your device by plugging
the provided untethered Micro-USB cable into the
NANO·CONSOLE and then into your device’s USB
wall charger as normal.
5
Page 6

CONNECTING YOUR NANO·CONSOLE
TO YOUR TV OR MONITOR
Connect your NANO·CONSOLE
by running an HDMI cable from
the HDMI OUT port on the
NANO·CONSOLE to an HDMI IN
port on your big screen.
To your device’s wall charger or
USB port on your TV
Tip: The NANO·CONSOLE includes an auxiliary
port you can use to connect other devices that
have a high-definition video output to your TV or
monitor as needed. However, when a SlimPortenabled device and another device are both
plugged in, the NANO·CONSOLE will select the
video from the SlimPort-enabled device to show on
the big screen.
6
SlimPort-enabled Device
Other Device
Page 7

SEEING YOUR SMALL SCREEN ON THE BIG SCREEN
Set the input on your TV or monitor to the HDMI
port the NANO·CONSOLE is connected to.
After a few moments, the device’s screen should
now be visible on the TV or monitor.
INPUT SETTING
TV
AV
HDMI
PC
7
Page 8

YOUR NANO REMOTE
The NANO Remote is how you
interact with your device on the big
screen. It’s designed to mimic the
experience of using your device in
your hand.
Note: If your device is not running Android
5.1 or later, the Recent Apps button will
not do anything when you press it.
Main Touchpad
Back
Button
Home
Button
Recent Apps
Button
Battery Tray
(2) Batteries
Type: CR2032 3V
(located inside the remote)
8
Battery Tray
+/- Volume Button
LED Light
Page 9

SETTING UP YOUR NANO REMOTE
The NANO Remote comes with two CR2032
coin batteries. To activate the batteries
and power the remote, pull the plastic tab
sticking out of the battery tray. This allows the
batteries to power the remote.
Note: You should not need to remove the tray for this.
Note: There is no on/off switch on the NANO Remote;
the remote will automatically go into sleep mode after
3 minutes of inactivity. It will wake up when you click
on the touchpad.
PULL TAB
9
Page 10

CHANGING YOUR NANO REMOTE’S BATTERIES
When you need to replace the
batteries, remove the tray, discard the
old batteries and fit new ones into the
tray with the + side facing down.
The battery tray only fits into the
remote one way. If you try and put the
battery tray in upside-down it will not
slide in easily.
Note: With average use, the batteries should last
approximately 3 months before needing to be
replaced.
10
Page 11

CONNECTING THE NANO REMOTE TO YOUR DEVICE
NANO.CONSOLE Remote
Wireless Keyboard
My Computer
BLUETOOTH SETTINGS
The NANO Remote connects to your device
via a version of Bluetooth® called, Bluetooth
Smart (also referred to as Bluetooth Low
Energy). Once the batteries have been
installed, hold the volume + button and the
touchpad button simultaneously for
3 seconds. The LED light on the remote will
begin to blink. The remote is now Bluetooth
discoverable.
Next, go to your device’s settings panel and
turn on Bluetooth. Wait a moment and the
remote will show up as “NANO·CONSOLE
Remote”. Select the remote to connect
and your remote will be connected to your
device. You can now start using your NANO
Remote to control your device.
Note: If your device’s hardware or operating system
does not support Bluetooth Smart, it will not be able
to connect with the NANO Remote.
11
Page 12

USING THE VOLUME BUTTON
The +/- Volume Button on the right side of
your NANO Remote allows you to increase
and lower the volume of your audio out from
your phone.
Tip: Depending on your device manufacturer and
the version of Android you are using, pressing the
Volume Button will increase and decrease volume
a little bit at a time, or it can turn on sound or mute
the sound.
Fun tip: When using the standard Android
camera app, pressing “+” on the Volume
Button will take a picture. Your NANO
Remote can be used as a selfie remote!
12
Page 13

GETTING THE HANG OF THE NANO REMOTE
The touchpad of the remote works like
the screen of your device. When using the
remote, a cursor will indicate where your
finger would be on the screen.
Click the main touchpad to reproduce a
tap, click and hold to drag items and scroll
through documents and screens.
Take a moment to practice clicking, dragging
items, navigating from one screen to another
and scrolling through documents. Using
apps you’re familiar with should shorten the
learning curve a bit.
Fun fact: Our favorite way of learning
the finer points of clicking, dragging and
manipulating objects with the NANO Remote
is playing Angry Birds!
13
Page 14

THE LED LIGHT ON YOUR NANO REMOTE
The LED light on the front of your NANO Remote
will blink several different ways to communicate
different things.
- When the remote is woken up, it will blink once
- When the remote is in pairing mode, it will blink
for 2 minutes
- When the remote’s batteries are low, it will blink
rapidly for 3 seconds every time you wake it up
14
Page 15

TROUBLESHOOTING
If your device screen does not appear on the TV or monitor:
• Check that the HDMI cable is firmly and securely plugged into the HDMI OUT port
of the tower and an HDMI IN port on your TV or monitor. Check that the Micro-USB
cable from the tower is firmly and securely inserted into the mobile device.
• Check that the correct input is selected on the TV.
• Make sure your device’s screen is on.
If you cannot view video from a device attached to the VIDEO IN port on the tower:
• Disconnect the SlimPort-enabled device from the NANO·CONSOLE to allow the
tower to auto-switch to the VIDEO-IN port.
• If you are using an optional adapter to plug your non-SlimPort-enabled phone into
the NANO·CONSOLE, check that the Micro-USB connector from the Micro-USB
to HDMI adapter is properly inserted into the mobile device and it is the correct
adapter for your device.
• Try steps from question 1 of this guide.
If you are streaming video from the Internet using a Wi-Fi network:
• For best results, try to use a 5 GHz Wi-Fi network instead of a 2.4 GHz Wi-Fi
network. 2.4 GHz is a radio frequency that is used by Wi-Fi networks,
Bluetooth devices, computers, microwave ovens, cordless phones, and many other
electronic devices, which can cause interference and reduce Wi-Fi performance to
your device.
15
Page 16

If you are having trouble pairing the NANO Remote to your device:
• Make sure your NANO Remote is in Bluetooth pairing mode. In the Bluetooth
settings screen on your device, press the “Search for devices” menu item so your
device can look for the discoverable NANO Remote.
• Turn off Bluetooth on your device, turn back on Bluetooth on your device, and start
the pairing process again.
• Another device may have been previously paired to the NANO Remote. Turn off
Bluetooth on that previously paired device and start the pairing process again
• Make sure your device supports Bluetooth Smart (also referred to as Bluetooth
Low Energy).
• If you have just installed new batteries in the NANO Remote, check that the new
batteries are installed correctly.
If the volume switch only turns the volume on and off (mute):
• Depending on your device manufacturer and the version of Android you are using,
pressing the Volume Button will increase and decrease volume in steps, or it can
turn on sound or mute.
For additional troubleshooting tips, Frequently Asked
Questions (FAQs), customer support, and to sign up for the
NANO·CONSOLE Email Newsletter, visit:
www.nanoconsole.com/support
16
Page 17

SAFETY, COMPLIANCE, AND WARRANTY
United States
Federal Communication Commission Interference Statement
This equipment has been tested and found to comply with the limits for a Class B digital
device, pursuant to Part 15 of the FCC Rules. These limits are designed to provide reasonable
protection against harmful interference in a residential installation. This equipment generates,
uses and can radiate radio frequency energy and, if not installed and used in accordance with
the instructions, may cause harmful interference to radio communications. However, there is
no guarantee that interference will not occur in a particular installation. If this equipment does
cause harmful interference to radio or television reception, which can be determined by turning
the equipment off and on, the user is encouraged to try to correct the interference by one of the
following measures:
• Reorient or relocate the receiving antenna.
• Increase the separation between the equipment and receiver.
• Connect the equipment into an outlet on a circuit different from that to which the receiver
is connected.
• Consult the dealer or an experienced radio/TV technician for help.
This device complies with Part 15 of the FCC Rules. Operation is subject to the following two
conditions: (1) This device may not cause harmful interference, and (2) this device must accept
any interference received, including interference that may cause undesired operation.
FCC Caution: Any changes or modifications not expressly approved by the party responsible for
compliance could void the user’s authority to operate this equipment.
Radiation Exposure Statement:
The product complies with the US/Canada portable RF exposure limit set forth for an
uncontrolled environment and is safe for intended operation as described in this manual. Further
RF exposure reduction can be achieved if the product can be kept as far as possible from the
user body or the device is set to lower output power if such function is available.
CAUTION: Any changes or modifications not expressly approved by the party responsible for
compliance of this device could void the user’s authority to operate the equipment.
17
Page 18

Responsible party information
Analogix Semiconductor, Inc.
3211 Scott Boulevard, Suite 100
Santa Clara, CA 95054 USA
+1-408-988-8848
Canada
This device complies with RSS-247 of the Industry Canada Rules.
Operation is subject to the following two conditions:
(1) this device may not cause harmful interference, and
(2) this device must accept any interference received, including interference that may cause
undesired operation.
Ce dispositif est conforme à la norme CNR-247 d’Industrie Canada applicable aux appareils
radio exempts de licence.
Son fonctionnement est sujet aux deux conditions suivantes:
1) le dispositif ne doit pas produire de brouillage préjudiciable, et
2) ce dispositif doit accepter tout brouillage reçu, y compris un brouillage susceptible de
provoquer un fonctionnement indésirabl
Radiation Exposure Statement:
The product complies with the US/Canada portable RF exposure limit set forth for an
uncontrolled environment and is safe for intended operation as described in this manual. Further
RF exposure reduction can be achieved if the product can be kept as far as possible from the
user body or the device is set to lower output power if such function is available.
Déclaration d’exposition aux radiations:
Le produit est conforme aux limites d’exposition pour les appareils portables RF pour les EtatsUnis et le Canada établies pour un environnement non contrôlé.
Le produit est sûr pour un fonctionnement tel que décrit dans ce manuel. La réduction aux
expositions RF peut être augmentée si l’appareil peut être conservé aussi loin que possible du
corps de l’utilisateur ou que le dispositif est réglé sur la puissance de sortie la plus faible si une
telle fonction est disponible.
18
Page 19

Korea
해당무선설비는전파혼신가능성이있으므로인명안전과관련된서비스는할수없음.
이기기는가정용(B급) 전자파적합기기로서주로가정에서사용하는것을목적으로하며,
모든지역에서사용할수있습니다.
Taiwan
低功率電波輻射性電機管理辦法
第十二條
經型式認証合格之低功率射頻電機,非經許可,公司、商號或使用者均不得擅自變更頻率、加大功率或變
更原設計之特性及功能。
第十四條
低功率射頻電機之使用不得影響飛航安全及干擾合法通信﹔經發現有干擾現象時,應立即停用,並改善
至無干擾時方得繼續使用。前項合法通信,指依電信法規定作業之無線電通信。
低功率射頻電機須忍受合法通信或工業、科學及醫療用電波輻射性電機設備之干擾。
製造者: 東莞東聚電子電訊製品有限公司
進口商: Analogix Taiwan Oce
進口商地址: 6F., No. 75, Zhouzi Street, Nei Hu District, Taipei 114, Taiwan
進口商電話: +886 2 8751 5196
Limited Warranty:
Analogix warrants to the original retail purchaser this product to be free from defects in
materials and workmanship under ordinary consumer use for one (1) year from the date of
original retail purchase. If this product is found to be defective within that time, we will repair
or replace it. The warranty period is not extended if we repair or replace the product. This
limited warranty does not cover accidental damage, wear and tear, misuse, neglect, fire, or
other external causes, modifications, repair, commercial use, or consequential or incidental
loss. Under no conditions is Analogix liable for loss of, or damage to devices; nor loss of, or
damage to, programs, records, or data; nor any consequential or incidental damages, even
if Analogix has been informed of their possibility. This limited warranty does not affect your
statutory rights.
If you have any questions, comments, or concerns about your Analogix product or your limited
warranty, please contact us.
Email: support@analogix.com
Web: www.nanoconsole.com/support
19
Page 20

BEFORE RETURNING THIS PRODUCT
If you have any questions or concerns about your
SlimPort NANO·CONSOLE, please go to
www.nanoconsole.com/support for help,
or email us at support@analogix.com.
©2015 Analogix Semiconductor, Inc. All rights reserved. SlimPort and NANO•CONSOLE logos
are trademarks of Analogix Semiconductor, Inc.; SlimPort is a trademark of Analogix Semiconductor, Inc., which may be registered in various jurisdictions. Reg. U.S. Pat. & Tm. Off. Android
is a trademark of Google Inc. The Bluetooth® word mark and logos are registered trademarks
owned by Bluetooth SIG, Inc. and any use of such marks by Analogix Semiconductor is under
license. Angry Birds is a trademark of Rovio Entertainment Ltd. All other trademarks are the
property of their respective owners. Patents pending. v072915
 Loading...