

Page 1
Wi-Fi MOUSE
User Guide
Introduction
Thank you for your purchase of the Wi-Fi Mouse. The mouse uses Wi-Fi technology to seamlessly and
securely connect to your computer
Contents
• Wi-Fi Mouse
• 2 x AAA Energize r ® Max ® Alkaline Batteries
• Installation Software
• User Guide
System Requirements
Hardware
• WIN7 Certified Wi-Fi Network Adapter
Operating System
• Microsoft Windows® 7
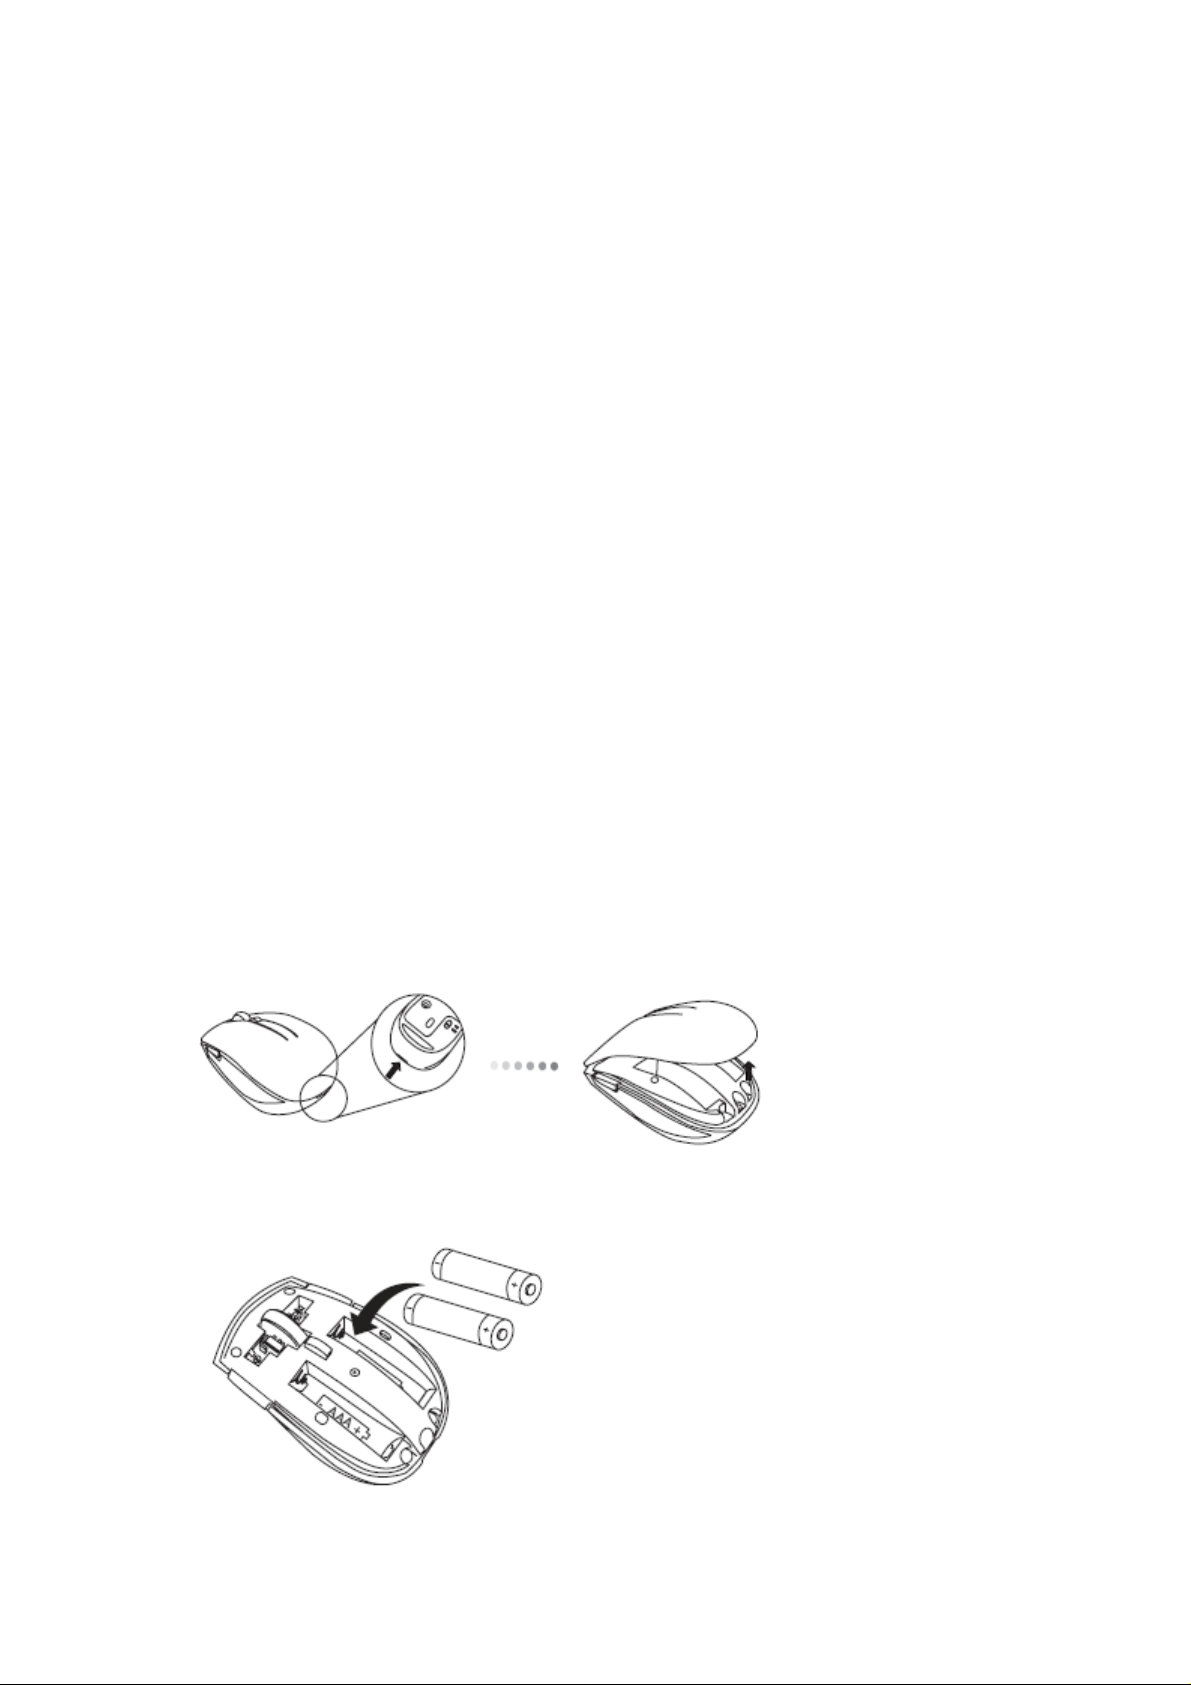
Installing the Batteries
1. Remove the battery cover from the top of the mouse by using the notch on the back. Carefully lift
the cover up as shown in the diagram.
2. Insert two AAA batteries, making sure that the positive (+) and negative (-) ends match the polarity
indicators inside the battery compartment.
Page 2
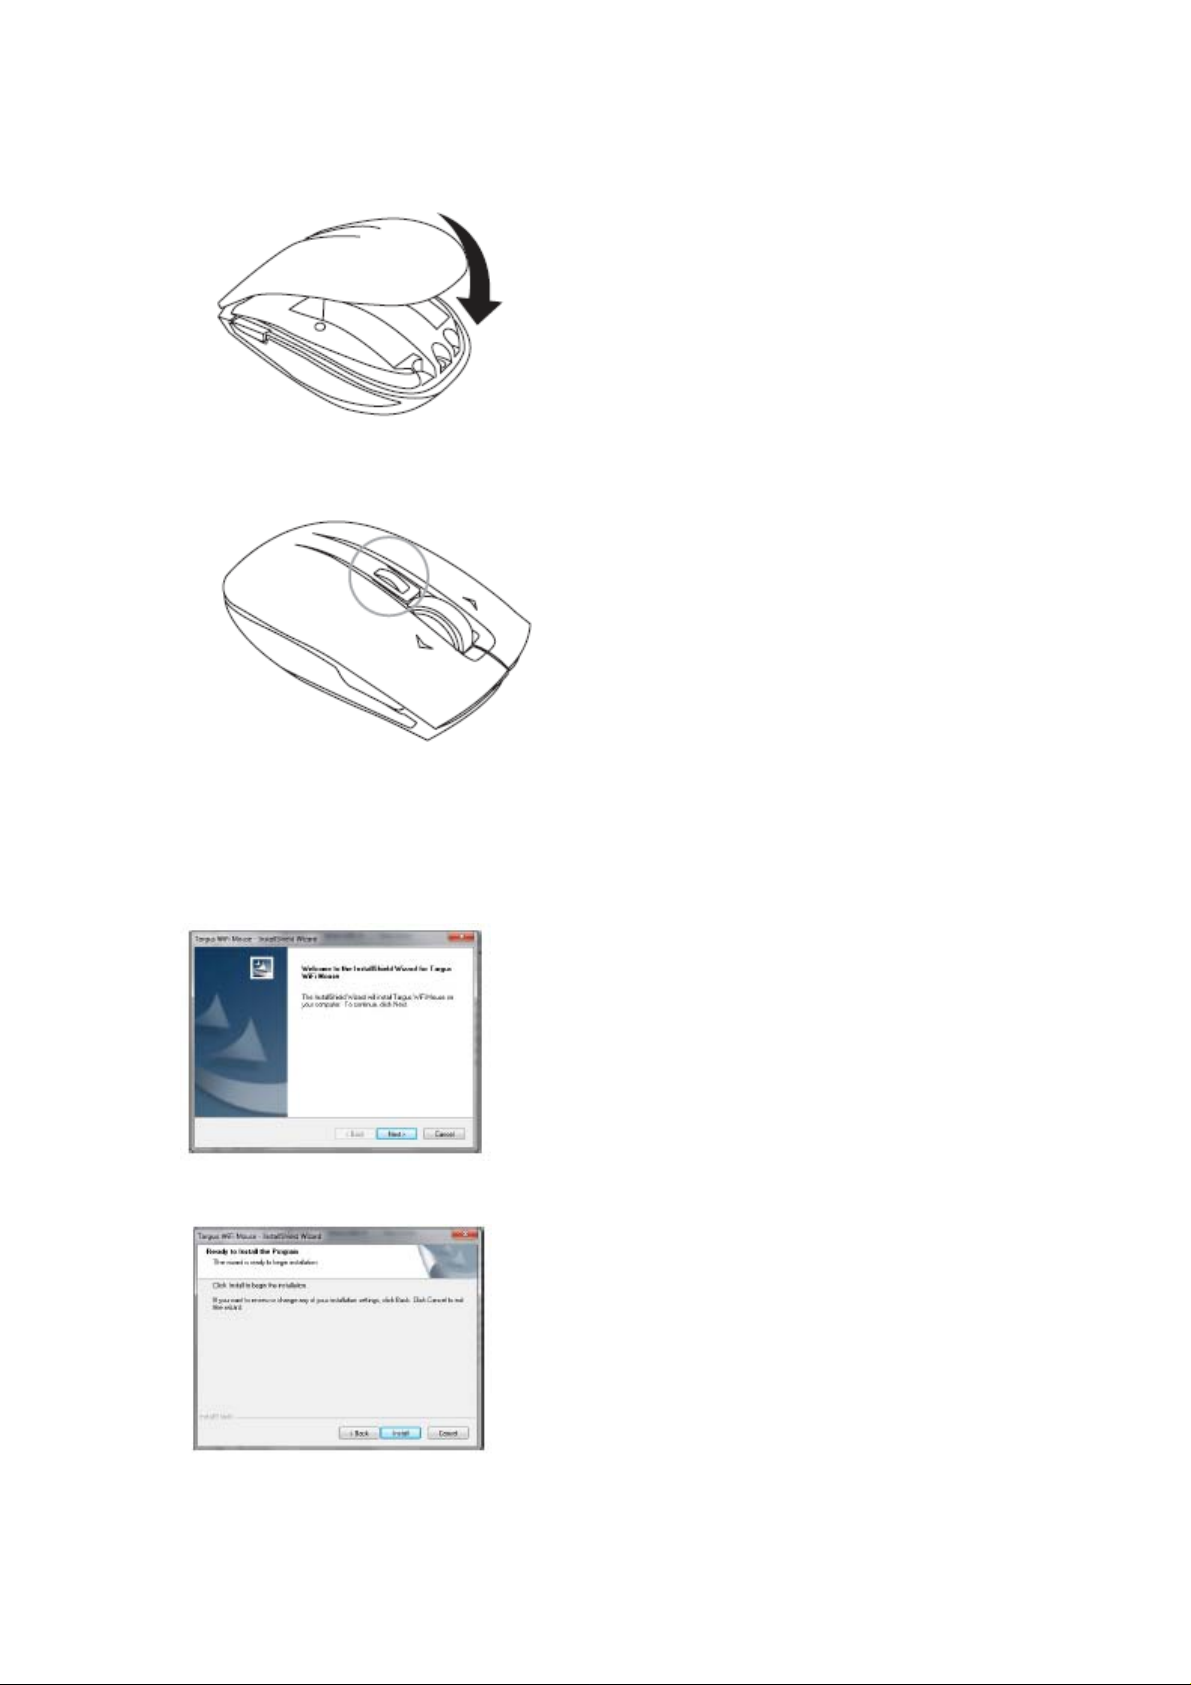
3. Replace the battery cover.
4. The Battery Indicator will light up after it is activated.
Installing the Driver
1. To Install the Wi-Fi Wireless Mouse on your PC, insert the supplied Set-up CD in your CD or
DVD drive. The driver installation will start automatically.
2. The Wi-Fi Mouse - InstallShield Wizard will pop up. Select Next to continue with the installation.
3. This will start the installation of the Wi-Fi Mouse driver. Please click Install to begin the
installation
Page 3
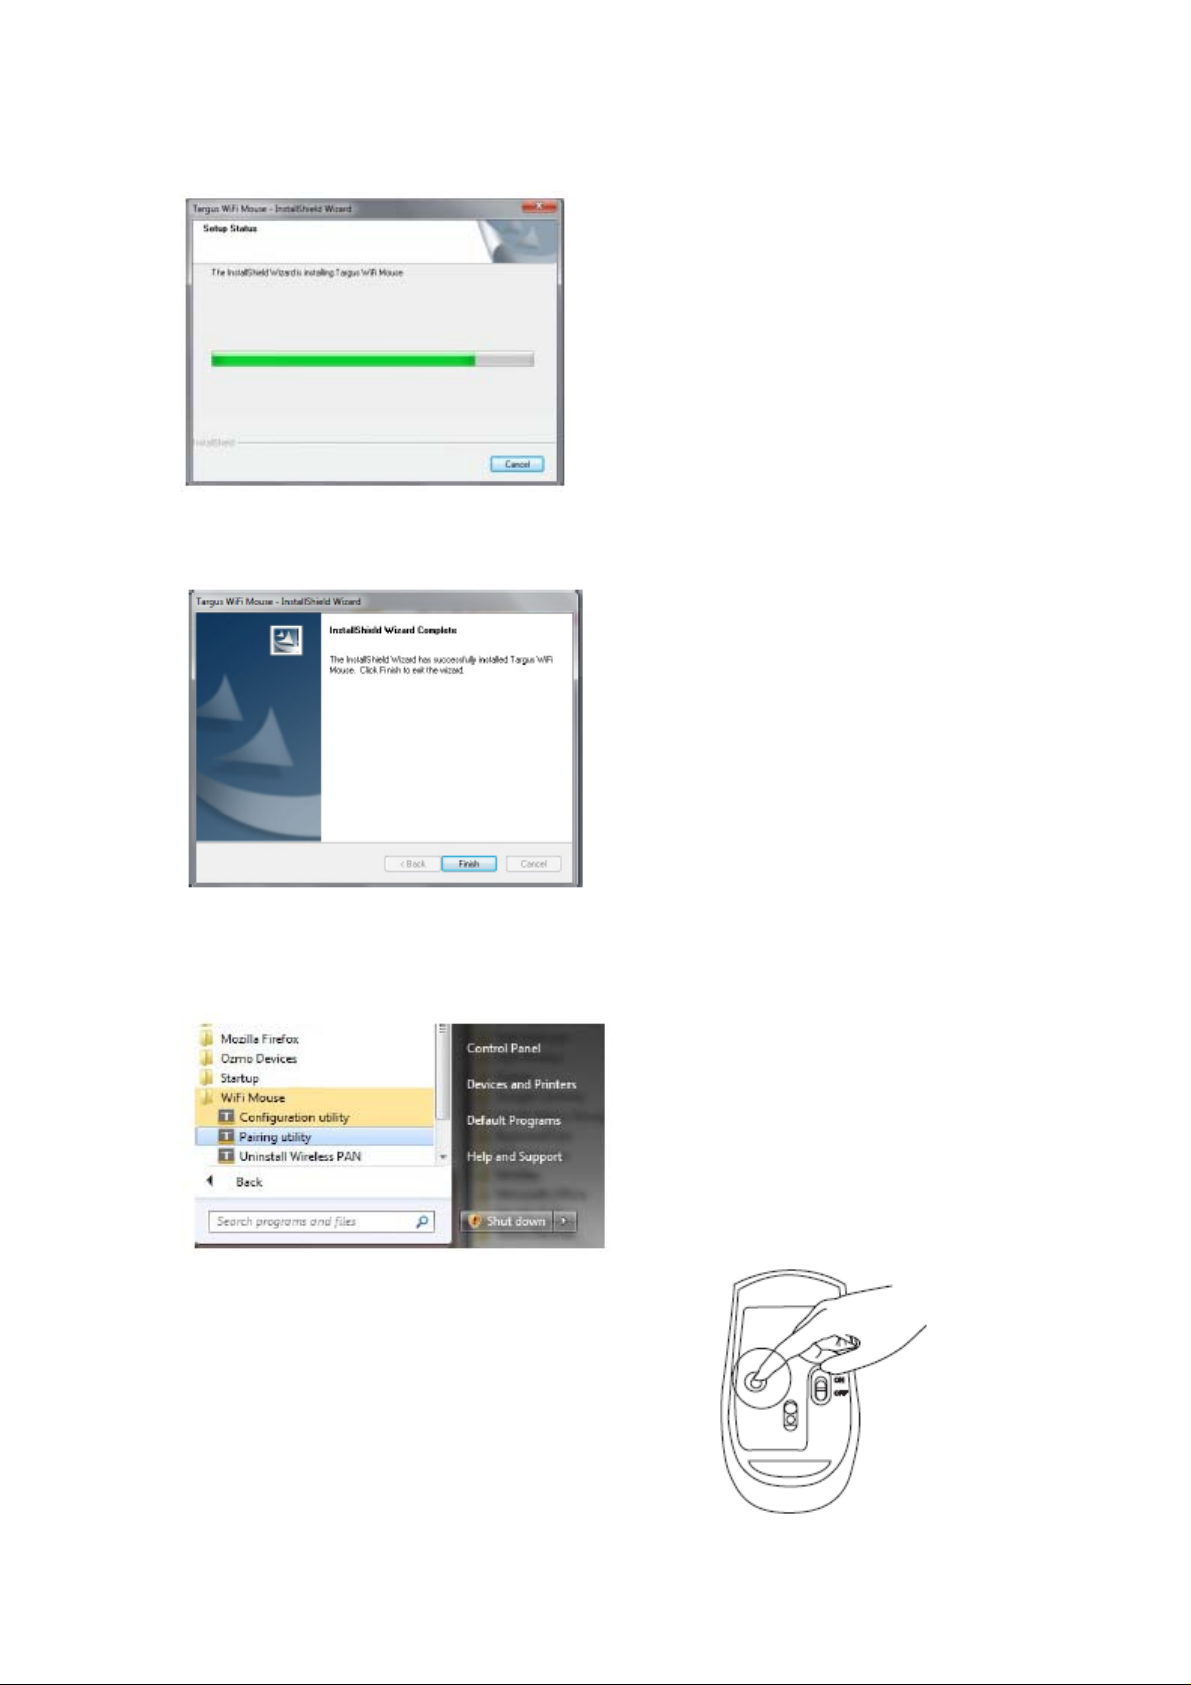
5. Installation begins.
6. A message will pop up indicating that the installation process is complete. Click Finish to exit the
window.
Pairing Instruction
Wi-Fi Mouse driver is now installed on your system. To pair your Wi-Fi Mouse with your computer:
1. Open the Wi-Fi Mouse Pairing Utility.
2. To activate the mouse in discovery mode, push the pairing
button under the mouse for at least 5 seconds and release.
Then the battery indicator light on the top of the mouse
will flash once per second. Now the mouse is in pairing
mode.
Page 4

3. Click Start Discovery to pair your mouse to the computer.
4. The computer will list discovered Wi-Fi devices in the bottom box. Once your mouse is in the
bottom box, highlight it and click Start Pairing. The computer will start pairing with your mouse.
5. Windows® 7 will detect the mouse and find the driver automatically. Your mouse is ready to use
now.
Power Saving Mode
If the mouse is not used for an extended period of time, it will automatically enter power saving mode
to conserve power and increase the battery life. Click on any mouse button to resume the normal
operation. The mouse may take a few seconds to reconnect with your computer. To ex tend the life of
your battery, turn the mouse off while travelling or when not in use.
Page 5

Battery Indicator
When the mouse is switched on, the battery indicator light will light up:
• When the mouse is powered on, the blue light will
turn on and fade out in 2 seconds
• Wi-Fi Connection: Blue light will flash 2 times per second
• Pairing: Blue light will flash once per second when the
pairing button is held for over 1 second
• Low-Battery Warning: An amber colored light will flash
once per second
Mouse Keys and Functions
Page 6

DPI Setting and Indication
The Wi-Fi mouse provides a driver-free selectable tracking resolution function so that users can tune
the tracking precision of their mouse.
Two kinds of DPIs, 1200dpi and1600dpi, can be toggled by pressing and holding the DPI switch button
on the top of the mouse for 2 seconds. The default factory setting is 1200 dpi.
The power indicator light will be leveraged to indicate the DPI setting value in two kinds of colors;
1200dpi will light up orange and 1600dpi will light up blue. As long as the DPI value is changed
successfully or the mouse is woken up from sleep mode, this indicator light will turn on and then fade
out in 2 seconds.
Windows 7 Task Switching
The Windows Task Switching button on the top of the Wi-Fi mouse supports the most efficient way to
switch among the opened windows on your computer. With a single click of the Ta sk Switching button,
the mouse emulates the Ctrl+Alt+Tab command to open the application switching window showing all
of the launched task windows with small thumbnails accordingly.
With a double click of the Task Switching button, the mouse emulates the Ctrl+Win+Tab command to
activate the Flip-3D effect showing all of the launched task windows in a 3D effect. Users can switch
to the target task window by either moving the mouse cursor to the top of the task window and then
clicking the right mouse button, or by scrolling the mouse wheel to move the target task window to the
front and then clicking the right mouse button
Page 7

Warranty
Mouse warrants this product to be free from defects in materials and workmanship for one year. If your
Mouse accessory is found to be defective within that time, we will promptly repair or replace it. This
warranty does not cover accidental damage, wear and tear, or consequential or incidental loss. Under
no conditions is Mouse liable for loss of, or damage to devices; nor loss of, or damage to, programs,
records, or data; nor any consequential or incidental damages, even if Mouse has been informed of
their possibility. This warranty does not affect your statutory rights.
Federal Communication Commission Interference Statement
This equipment has been tested and found to comply with the limits for a Class B digital device,
pursuant to Part 15 of the FCC Rules. These limits are designed to provide reasonable protection
against harmful interference in a residential installation. This equipment generates, uses and can
radiate radio frequency energy and, if not installed and used in accordance with the instructions, may
cause harmful interference to radio comm unicat i ons. However, there is no guarantee that interference
will not occur in a particular installation. If this equipment does cause harmful interference to radio
or television reception, which can be determined by turning the equipment off and on, the user is
encouraged to try to correct the interference by one of the following measures:
- Reorient or relocate the receiving antenna.
- Increase the separation between the equipment and receiver.
- Connect the equipment into an outlet on a circuit different from that to which the receiver is
connected.
- Consult the dealer or an experienced radio/TV technician for help.
This device complies with Part 15 of the FCC Rules. Operation is subject to the following two
conditions: (1) This device may not cause harmful interference, and (2) this device must accept any
interference received, including interference that may cause undesired operation.
FCC Caution: Any changes or modifications not expressly approved by the party responsible for
compliance could void the user's authority to operate this equipment.
For operation within 5.15 ~ 5.25GHz frequency range, it is restricted to indoor environment, and the
antenna of this device must be integral.
IMPORTANT NOTE:
Radiation Exposure Statem ent :
The product comply with the US/Canada portable RF exposure limit set forth for an uncontrolled
environment and are safe for intended operation as described in this manual. The further RF exposure
reduction can be achieved if the product can be kept as far as possible from the user body or set the
device to lower output power if such function is available.
This transmitter must not be co-located or operating in conjunction with any other antenna or
transmitter.
IC S tatement
Operation is subject to the following two conditions: 1) this device may not cause interference and 2)
this device must accept any interference, including interfe rence that may cause undesire d operation of
the device.
Radiation Exposure Statem ent :
The product comply with the US/Canada portable RF exposure limit set forth for an uncontrolled
environment and are safe for intended operation as described in this manual. The further RF exposure
reduction can be achieved if the product can be kept as far as possible from the user body or set the
device to lower output power if such function is available.
Page 8

Caution:
The device for the band 5150-5250 MHz is only for indoor usage to reduce potential for harmful
interference to co-channel mobile satellite systems.
Ce dispositif est conforme à la norme CNR-210 d'Industrie Canada applicable aux appareils radio
exempts de licence. Son fonctionnement est sujet aux deux conditions suivantes: (1) le dispositif ne
doit pas produire de brouillage préjudiciable, et (2) ce dispositif doit accepter tout brouillage reçu, y
compris un brouillage susceptible de provoquer un fonctionnement indésirable.
NOTE IMPOR TANTE: (Pour l'utilisation de dispositifs mobiles)
Déclaration d'exposition aux radiations:
Le produit est conforme aux limites d'exposition pour les appareils portables RF pour les Etats-Unis et
le Canada établies pour un environnement non contrôlé.
Le produit est sûr pour un fonctionnement tel que décrit dans ce manuel. La réduction aux expositions
RF peut être augmentée si l'appareil peut être conservé aussi loin que possible du corps de l'utilisateur
ou que le dispositif est réglé sur la puissance de sortie la plus faible si une telle fonction est disponib le.
les dispositifs fonctionnant dans la bande 5 150-5 250 MHz sont réservés uniquement pour une
utilisation à l’intérieur afin de réduire les risques de brouillage préjudiciable aux systèmes de satellites
mobiles utilisant les mêmes canaux.
Declaration of Conformity
Hereby, Targus, declares that this device is in compliance with the essential requirements and other
relevant provisions of Directive 1999/5/EC.
LASER RADIATION. DO NOT STARE INTO THE BEAM OR VIEW DIRECTLY WITH
OPTICAL INSTRUMENTS. CLASS I LASER PRODUCT.
NEVER POINT A LASER BEAM INTO A PERSON’S EYES OR VIEW A LASER BEAM
DIRECTLY, AS PROLONGED EXPOSURE CAN BE HAZARDOUS TO THE EYES.
MOMENTARY EXPOSURE FROM A LASER POINTER, SUCH AS AN INADVERTENT SWEEP
OF THE LIGHT ACROSS A PERSON’S EYES, MAY CAUSE TEMPORARY FLASH BLINDNESS
SIMILAR TO THE EFFECT OF A CAMERA FLASH BULB. ALTHOUGH THIS CONDITION IS
TEMPORARY, IT CAN BECOME MORE DANGEROUS IF THE EXPOSED PERSON IS
ENGAGED IN A VISION-CRITICAL ACTIVIT Y SUCH AS DRIVING.
Page 9

Microsoft, Windows, and Windows V ista are either registered trademarks or trademarks of Microsoft
Corporation in the United States and/or other countries. Wi-Fi is a registered trademark of the Wi-Fi
Alliance. All trademarks and registered trademarks are the property of their respective owners. All
rights reserved. Features and specifications are subject to change without notice.
 Loading...