

Page 1

Page 2

Page 3

User's Manual
Table of Contents
Welcome ...................................................................1
Features ............................................................ 1
Specifications ......................................................1
Functions & Indicators ..................................................2
Indicators ...........................................................3
Setting Up..................................................................3
Installing the iConfig™ Software.......................................4
Customizing Settings ....................................................5
Launching the iConfig™ Software ............................... 5
Assigning Button Functions....................................... 6
Adjusting the Scroll Speed ....................................... 9
Adjusting the Mouse Speed ...................................... 9
Configuring Advanced Settings .................................10
Uninstalling the iConfig™ Software ............................10
Troubleshooting ........................................................ 11
Page 4

Page 5

User's Manual
Welcome
Congratulations on your purchase of this mouse. This product features a
revolutionary design and customizable function buttons that allow you to navigate
your favorite programs with ease and comfort. Read the following sections for
information and instructions on how to set up and use your mouse. Should you
experience any problems while using the mouse, refer to “Troubleshooting” on
page 11 for assistance.
Features
• FastFind™ for quick Internet search
• Advanced wireless LaserStream™ technology
• Efficient 4-way Scrolling
• Ergonomic design for comfortable handling
• iConfig™ software for configuring and managing mouse settings
Specifications
Sensor Resolution Laser 800 dpi
Connectivity Wireless 2.4 GHz RF
Number of Buttons 4
Receiver USB micro receiver
Battery Life Up to one year with two AA batteries
Compatibility Windows 2000, XP, Vista
1
Page 6
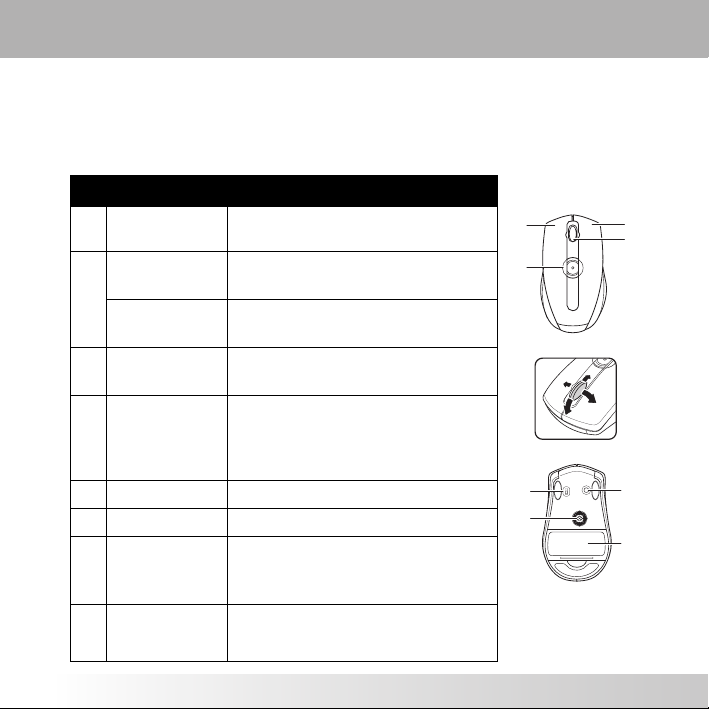
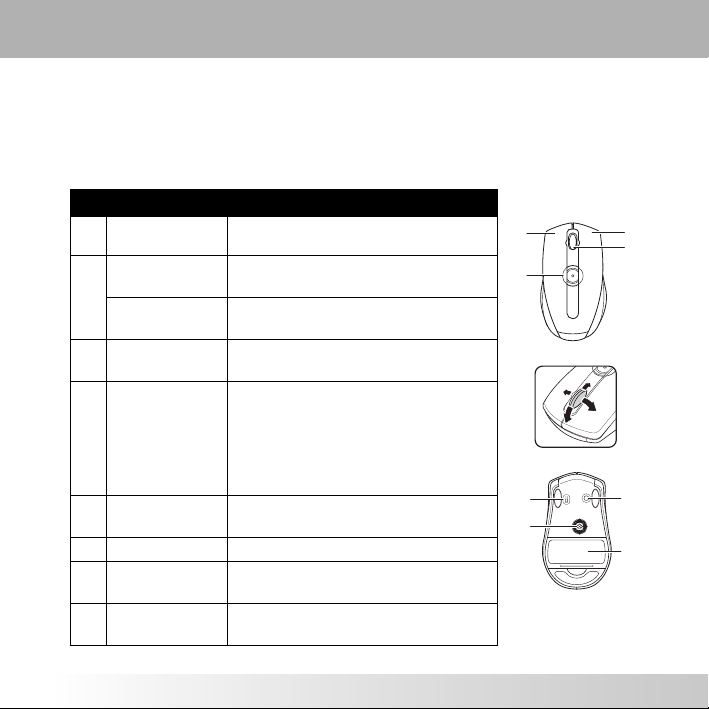
Functions & Indicators
See the following for descriptions of the mouse’s main features and default button
functions. To change these functions to better suit your preferences and needs,
see “Customizing Settings” on page 5 for details.
No. Name Function
1 Left Button Press to activate the left button
function
2 Top Button Press to activate the top button
function
Power LED LED illuminates when mouse is
turned on
3 Right Button Press to activate the right button
function
4 Middle Button /
Scroll Wheel
Press to activate the middle button
function, and move to scroll up,
down, left and right (Vista
compatible)
5 Power Switch Switch to turn the mouse on and off
6 Laser Sensor Navigation on surface
7 Connect Button Press to establish a connection
between the mouse and USB
receiver
8 Battery
Houses two AA batteries
Compartment
1
2
5
6
3
4
7
8
2
Page 7

User's Manual
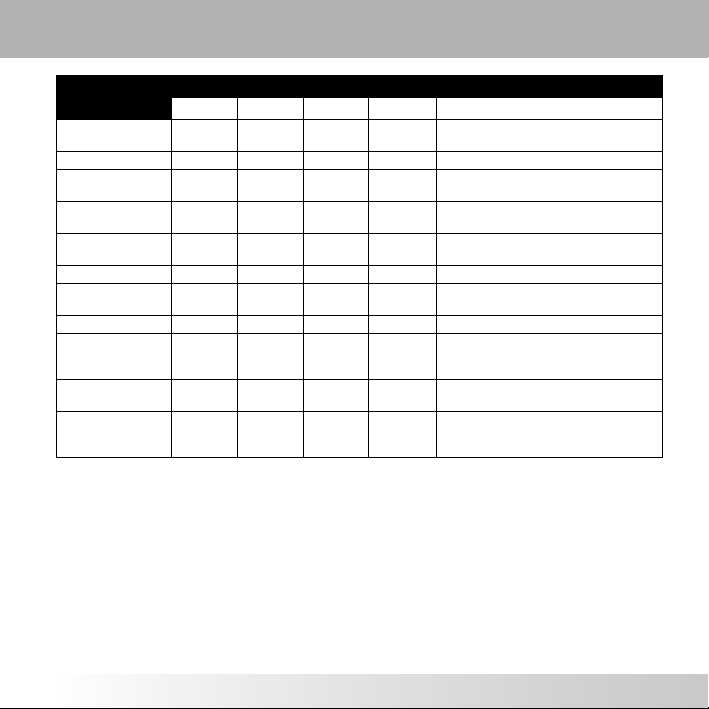
Indicators
LED Color Battery Status
D500 LED Orange Battery level normal
Orange, blinking
slowly
Orange, blinking
rapidly
USB
Receiver
LED
Green Battery level normal (steady)
Red Low battery (flashing)
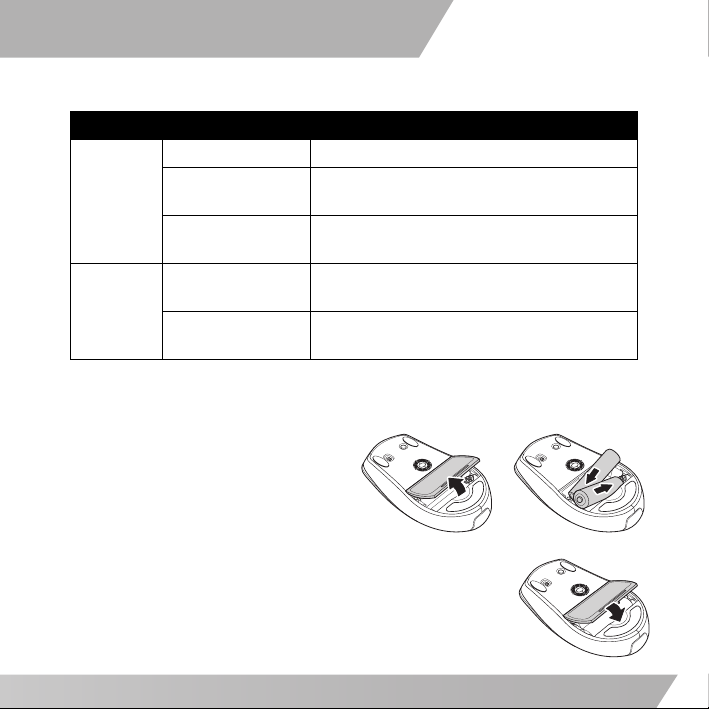
Setting Up
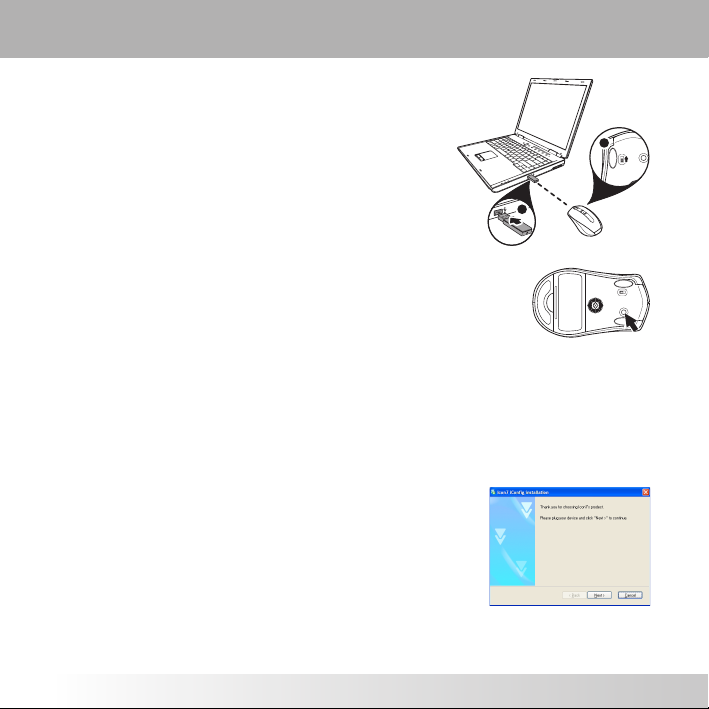
Before you can use your mouse, you must first insert two AA batteries.
1. Turn over the mouse and open the battery cover as shown.
2. Insert two AA batteries, observing the polarity markings, as shown.
3. Replace the battery cover so it clicks into place.
Battery level running low
Battery level critically low
Detecting mouse movement (flashing)
Channel has been changed (flashes once)
3
Page 8
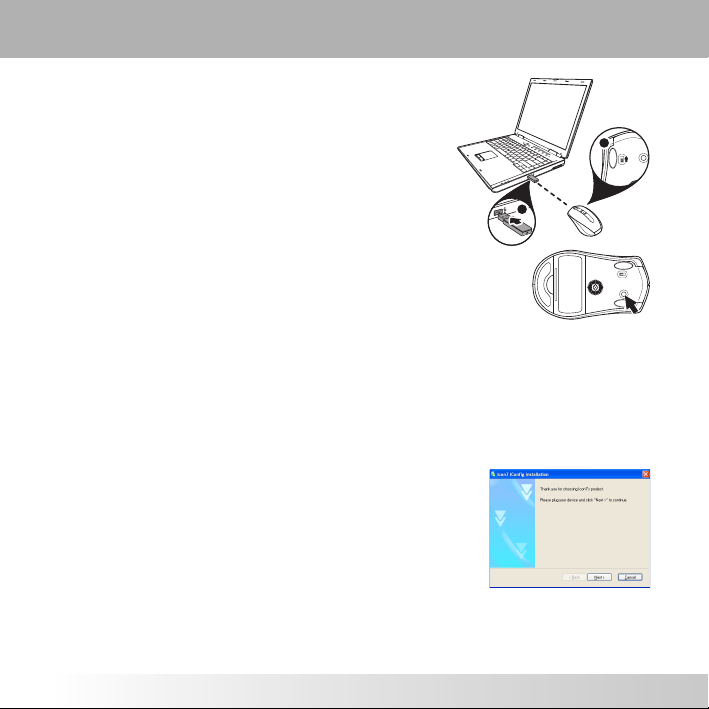
4. Insert the USB micro receiver into a free USB port on your PC.
5. Turn on the mouse by using the switch on the bottom of the mouse. The mouse will connect automatically and is now ready to use.
1
2
ON
OFF
NOTE: If the mouse does not connect automatically,
press to establish a connection between the mouse and USB
receiver.
Installing the iConfig™ Software
Insert the supplied software CD into your CD-ROM drive. The driver and software
installation program should load automatically.
If it does not, click Start > Run, enter the path of your CD-ROM drive (D: for
example) and browse for the setup.exe file. Double-click the file to load.
1. Click Next to continue.
4
Page 9
User's Manual
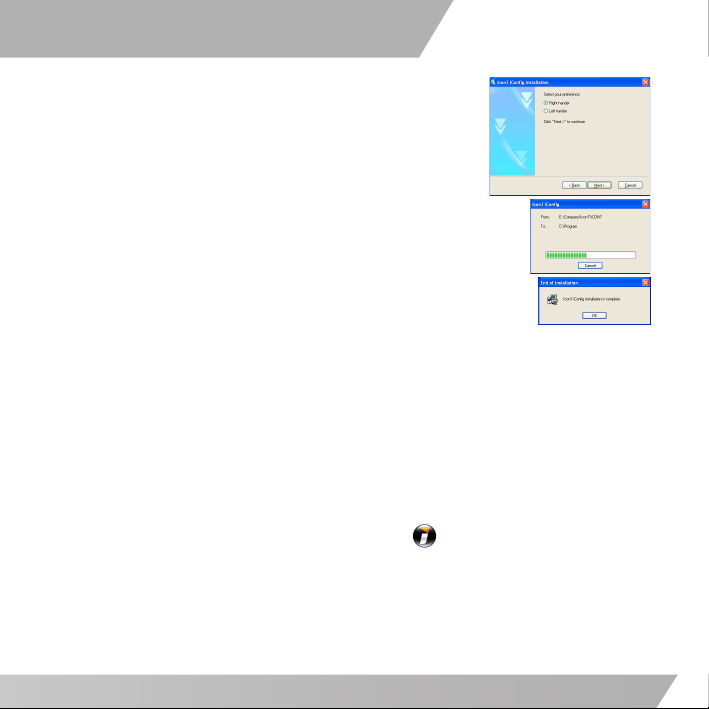
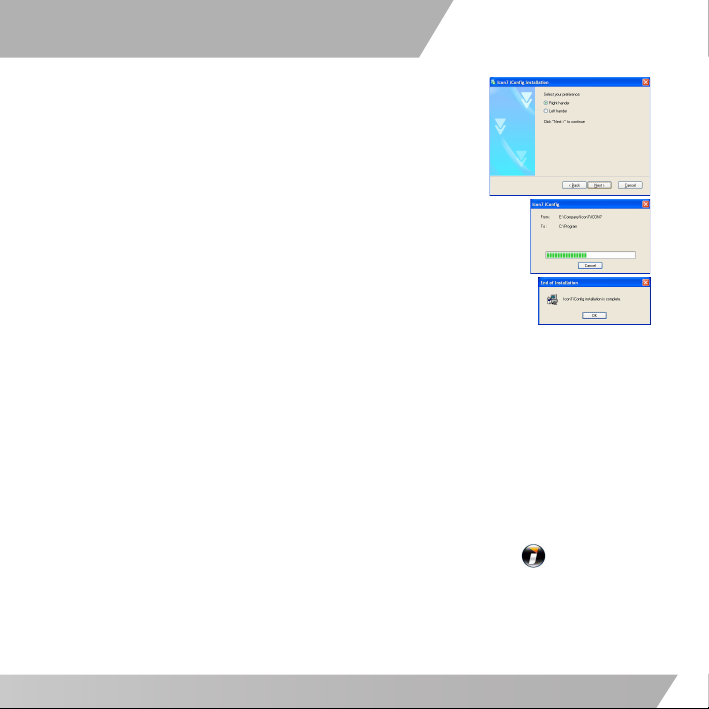
2. Specify the location of your mouse; whether it is to the right or the left of the keyboard. Click Next to begin installation.
3. Installation begins. Click Cancel to quit at any time.
4. Click OK to complete the installation.
Customizing Settings
You can select functions for each button, set scroll speed, mouse speed and
configure other advanced settings through the iConfig™ software.
Launching the iConfig™ Software
You can open the iConfig™ software in three different ways:
• Double-click the Icon7 iConfig icon in the system taskbar.
• Double click the Icon7 iConfig shortcut icon on your desktop.
• Click Start > Settings > Control Panel > Icon7 iConfig.
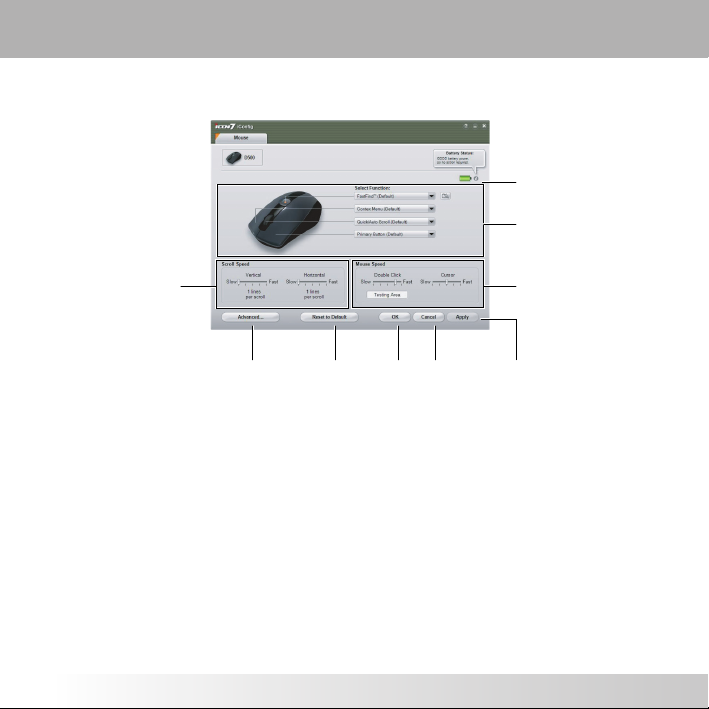
Once the main screen opens, click the Mouse tab at the top of the screen, and
click the D500 icon.
5
Page 10

Move the sliders
to adjust scroll
speed
Displays remaining
Displays remaining
battery power
battery power
Click the drop down
menus to assign a
specific function to each
mouse button
Move the sliders to
adjust the mouse speed
Click to exit
Click to configure
advanced settings
NOTES:
•A star symbol * denotes that a function has been assigned to a button that is different from its allocated default.
Click to
restore all
settings to
defaults
Click to
confirm a
setting
change
without applying
any changes
Click to save and apply
any changes
Assigning Button Functions
You can assign functions to each of the mouse buttons under the Select Function
section in the iConfig™ software.
Aside from traditional button functions, such as performing a left-click or rightclick action, you can also configure a specific button to act as a shortcut to a
frequently used program or application, such as Internet Explorer.
To assign a function to a button, do the following:
1. Click the drop down menu and select the function you wish to assign to the button.
6
Page 11
User's Manual
2. Click Apply to save and apply any changes.
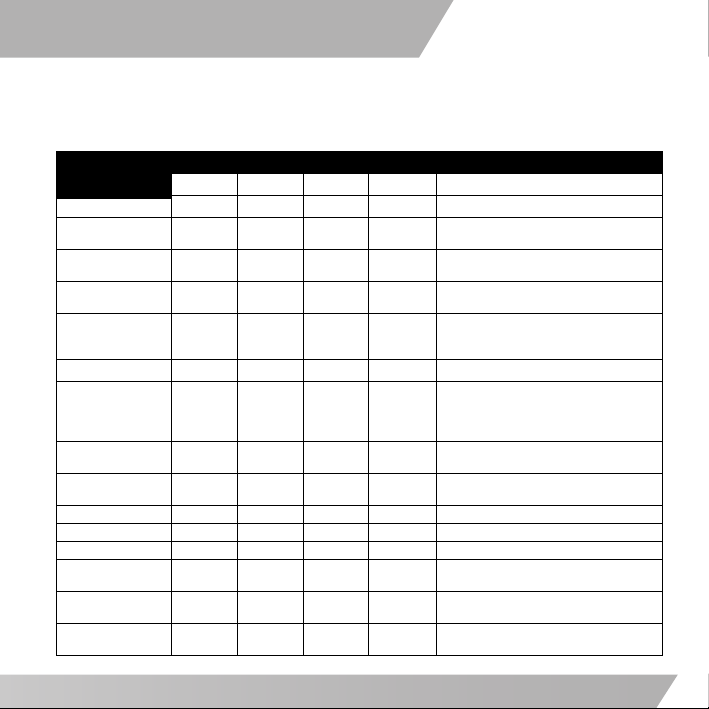
See the following table for all available functions, and to which buttons they can
be assigned.
Function
None
Primary Mouse
Button
Context Menu /
Alternate
Middle Mode
Button
Quick / Auto
Scroll
Double-click 333 Performs a double-click action
Drag lock 333 Pressing the button will enable the
Maximize
window
Minimize
window
My Computer 3333Opens the My Computer screen
Control Panel 3333Opens the Control Panel
Start Button 3333Opens the Windows Start menu
Internet
Explorer
Page Forward
(Alt+Right)
Page Backwar d
(Alt+Left)
Left Right Middle Top
3333
Default 33 Functions as the primary mouse
3 Default 3 Opens the context menu
333 Performs the assigned middle mode
33Default Scrolls up and down the page
333 Maximizes the active window
333 Minimizes the active window
Button Description
button for selection and dragging
button function
automatically when held and the
mouse is moved
drag lock feature of the primary
mouse button. Pressing again will
disable drag lock
3 Opens Internet Explorer
3 Moves forward one page
3 Moves backward one page
7
Page 12
Function
IE7 QuickTab
(Ctrl+Q)
Save (Ctrl+S) 333 Saves the current document or file
Copy (Ctrl+C) 333 Copies the selected item or text to
Cut (Ctrl+X) 333 Cuts the selected item or text to the
Past e (Ctrl+ V) 333 Pastes the item or text from the
Undo (Ctrl+Z) 333 Undo the previous action
WMP / Play &
Paus e
Launch Program 3 Opens a specified program
FastFind™ Default Opens a specified Internet search
Application
Switch (Alt+Tab)
Vista Flip-3D
(Windows+Tab)
Left Right Middle Top
3 Opens the Internet Explorer 7
QuickTab feature
the clipboard
clipboard
clipboard
3 Opens Windows Media Player / Plays
and pauses tracks during playback
engine to search online websites,
3333Switches to another open application
3333Launches the Vista Flip-3D function
pictures, or blogs
to help you change between open
windows
Button Description
8
Page 13

User's Manual
Adjusting the Scroll Speed
You can configure the speed at which you can scroll horizontally and vertically
around the screen.
1. Under the Scroll Speed section, move the Vertical slider to the right to
increase vertical scrolling speed, or to the left to decrease vertical scrolling
speed. The number of lines at which the screen will scroll vertically is
displayed under the slider.
2. Move the Horizontal slider to the right to increase horizontal scrolling speed, or to the left to decrease horizontal scrolling speed. The number of characters at which the screen will scroll horizontally is displayed under the slider.
3. Click Apply to save and apply all changes.
Adjusting the Mouse Speed
You can configure the speed at which the mouse cursor moves around the screen,
as well as response time when you double click a button.
1. Under the Mouse Speed section, move the Double Click slider to the right to increase the double-click speed, or to the left to decrease the double-click speed.
2. Move the Cursor slider to the right to increase the response time when you double-click a button, or to the left to decrease the response time.
3. Click Testin g A r ea to test out your new settings.
4. Click Apply to save and apply all changes.
9
Page 14
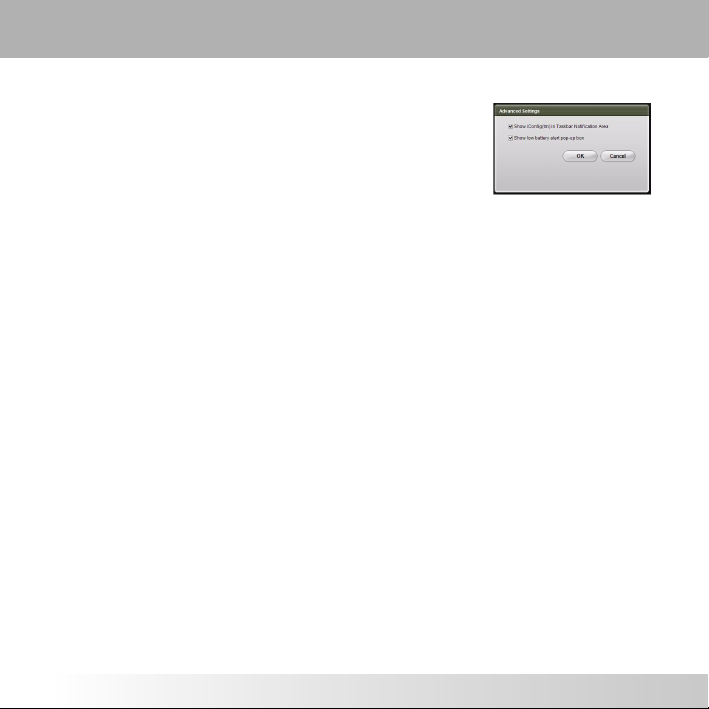
Configuring Advanced Settings
Click Advanced to view the advanced settings screen.
Here you can adjust settings for display icons and
notification messages. To adjust more advanced settings,
click the Control Panel and then Mouse Setting from the
window that appears.
Show iConfig in Taskbar Notification Area
Check this option to display the iConfig icon in the system taskbar.
1. Check Show iConfig in Taskbar Notification Area to display the icon in the system taskbar.
2. Click OK to save the setting.
Show low battery alert pop-up box
1. Check this option to display a notification message when battery power is low.
2. Click OK to save the setting.
Uninstalling the iConfig™ Software
1. Click Control Panel.
2. Double-click Add or Remove Programs.
3. Locate the iConfig™ program in the program list.
4. Click Remove.
5. A confirmation message will appear. Click Yes to uninstall or No to cancel.
10
Page 15

User's Manual
Troubleshooting
If you have any problems with your mouse, please check the following:
• Check the system requirements to make sure that your system is compatible.
• Check to see if the USB micro receiver is securely connected to your PC via a
USB port. A loose connection may cause the mouse to malfunction.
• When the mouse LED is lit orange, it indicates battery power is low. Replace
with new batteries immediately.
• If the mouse fails to work, check the USB mouse function in your system’s
BIOS. The function should be enabled for normal use.
• If your PC BIOS setup has mouse options, make sure they are set to default
settings. Refer to your PC’s manual for more information on your PC BIOS.
• Only use the mouse on a clean, flat, non-slippery surface in order to ensure
smooth and accurate cursor action. If you use a mouse-pad, darker colors
require more battery power.
For further assistance with any other questions you may have, please contact your
dealer for technical support.
11
Page 16

Page 17

Español
Tabla de contenido
Bienvenido.................................................................1
Características ..................................................... 1
Especificaciones técnicas ........................................ 1
Funciones e indicadores ................................................ 2
Indicadores ......................................................... 3
Preparar el ratón para su uso.......................................... 3
Instalar la aplicación iConfig™ .........................................4
Personalizar la configuración.......................................... 5
Iniciar la aplicación iConfig™ ....................................5
Asignar funciones a los botones ................................. 6
Ajustar la velocidad de desplazamiento ....................... 9
Ajustar la velocidad del ratón................................... 9
Definir la configuración avanzada .............................10
Desinstalar la aplicación iConfig™ .............................10
Solucionar problemas ................................................. 11
Page 18

Page 19

Español
Bienvenido
Felicidades por la compra de este ratón. Este producto cuenta con un
revolucionario diseño y botones de función que puede personalizar para navegar
por sus programas favoritos con facilidad y comodidad. Lea las siguientes secciones
para obtener información e instrucciones sobre el modo de configurar y usar el
ratón. Si tiene problemas al usar el ratón, consulte la sección “Solucionar
problemas” en la página 11 para obtener ayuda.
Características
• Función FastFind™ para agilizar la búsqueda en Internet
• Tecnología LaserStream™ inalámbrica avanzada
• Desplazamiento eficaz en 4 direcciones
• Diseño ergonómico que proporciona un manejo cómodo
• Aplicación iConfig™ para ajustar y administrar la configuración del ratón
Especificaciones técnicas
Resolución del sensor 800 ppp láser
Conectividad Radiofrecuencia inalámbrica de 2,4 GHz
Número de botones 4
Receptor Receptor diminuto USB
Autonomía de las
pilas
Compatibilidad Windows 2000, XP y Vista
Hasta un año con dos pilas AA
1
Page 20
Funciones e indicadores
Consulte la tabla siguiente para obtener las descripciones de las principales
funciones del ratón y de las funciones predeterminadas de los botones. Si desea
cambiar estas funciones a su gusto y según sus necesidades, consulte la sección
“Personalizar la configuración” en la página 5 para obtener más detalles.
Nº Nombre Función
1 Botón izquierdo Presiónelo para activar la función
del botón izquierdo
2 Botón superior Presiónelo para activar la función
del botón superior
LED de
encendido
El LED se ilumina cuando el ratón
está encendido
3 Botón derecho Presiónelo para activar la función
del botón derecho
4Botón central y
rueda de
desplazamiento
Presiónelo para activar la función
del botón central y muévalo para
desplazarse hacia arriba, hacia
abajo, hacia la izquierda y hacia la
derecha (compatible con el sistema
operativo Vista)
5 Conmutador de
alimentación
Conmútelo para encender y apagar
el ratón
6 Sensor láser Navegación por la superficie
7 Botón Conectar Presiónelo para establecer conexión
entre el ratón y el receptor USB
8Compartimento
Aloja dos pilas AA
para las pilas
1
2
5
6
3
4
7
8
2
Page 21
Indicadores
LED Color Estado de las pilas
LED D500 Naranja Carga normal de las pilas
LED del
receptor
USB
Naranja, con
parpadeos lentos
Naranja, con
parpadeos rápidos
Verde Carga normal de las pilas (encendido)
Rojo Carga baja de las pilas (parpadea)
Carga baja de las pilas
Carga muy baja de las pilas
Detección de movimiento (parpadea)
El canal se ha cambiado (parpadea una vez)
Preparar el ratón para su uso
Para poder usar el ratón, primero debe insertar dos pilas AA.
1. Dé la vuelta al ratón y abra la tapa de las pilas tal y como se muestra en la figura.
2. Inserte dos pilas AA. Tenga en cuenta las marcas de polaridad tal y como se muestra en la figura.
3. Vuelva a colocar la tapa de las pilas hasta que escuche un clic y quede ajustada en su posición.
Español
3
Page 22
4. Inserte el receptor diminuto USB en un puerto USB disponible de su PC.
5. Encienda el ratón mediante el conmutador situado en la parte de abajo del mismo. El ratón se conectará automáticamente y estará listo para usarse.
1
2
ON
OFF
NOTA: si el ratón no se conecta automáticamente, presione el
botón para establecer una conexión entre él y el receptor USB.
Instalar la aplicación iConfig™
Inserte el CD de software suministrado en la unidad de CD-ROM. El controlador y el
programa de instalación de la aplicación se deben cargar automáticamente.
Si no es así, haga clic en Inicio > Ejecutar, escriba la ruta de acceso de la unidad
de CD-ROM (D: por ejemplo) y busque el archivo setup.exe. Haga doble clic en
este para cargarlo.
1. Haga clic en Next (Siguiente) para continuar.
4
Page 23
Español
2. Especifique la ubicación del ratón (si se encuentra a la derecha o a la izquierda del teclado). Haga clic en Next (Siguiente) para iniciar la instalación.
3. La instalación se iniciará. Haga clic en Cancel (Cancelar) para salir de la instalación en cualquier momento.
4. Haga clic en OK para completar la instalación.
Personalizar la configuración
Mediante la aplicación iConfig™, puede seleccionar las funciones de cada botón,
establecer las velocidades de desplazamiento y del ratón y definir otras
configuraciones avanzadas.
Iniciar la aplicación iConfig™
Puede abrir la aplicación iConfig™ de tres formas diferentes:
• Haga doble clic en el icono Icon7 iConfig de la barra de tareas del sistema.
• Haga doble clic en el icono del acceso directo Icon7 iConfig ubicado en el
escritorio.
• Haga clic en Inicio > Configuración > Panel de control > Icon7 iConfig.
5
Page 24
Cuando la pantalla principal se abra, seleccione la ficha Mouse (Ratón) situada en
la parte superior y, a continuación, haga clic en el icono D500.
Muestra la carga restante
Muestra la carga restante
de las pilas
de las pilas
Haga clic en los menús
desplegables para
asignar una función
específica a cada botón
Mueva los
controles
deslizantes para
ajustar la
velocidad de
desplazamiento
del ratón
Mueva los controles
deslizantes para ajustar
la velocidad de
desplazamiento
Haga clic para
Haga clic para
definir la
configuración
NOTAS:
•Un símbolo de estrella * indica que se ha asignado una función a un botón diferente a la que tiene asignada de forma predeterminada.
avanzada
Haga clic para
restaurar los val ores
predeterminados de
toda la configuración
Haga clic para
confirmar un
cambio de
configuración
salir sin aplicar
los cambios
Haga clic para guardar y
aplicar los cambios
Asignar funciones a los botones
Puede asignar funciones a cada uno de los botones del ratón mediante la sección
Select Function (Seleccionar función) de la aplicación iConfig™.
Aparte de las funciones tradicionales de los botones, como hacer clic con el botón
izquierdo o derecho, también puede configurar un botón específico para que actúe
como acceso directo a un programa o aplicación que use con frecuencia, como por
ejemplo Internet Explorer.
Para asignar una función a un botón, realice el siguiente procedimiento:
1. Haga clic en el menú desplegable y seleccione la función que desee asignar al botón.
6
Page 25

Español
2. Haga clic en Apply (Aplicar) para guardar y aplicar los cambios.
Consulte la tabla siguiente para conocer las funciones disponibles y a qué botones
se pueden asignar.
Función
Ninguna
Botón principal
del ratón
Menú contextual/
Alternar
Botón central del
ratón
Desplazamiento
rápido y
automático
Doble clic 333 Realiza la acción de doble clic.
Bloquear el
arrastre
Maximizar
ventana
Minimizar ventana 333 Minimiza la ventana activa.
Mi PC 3333Abre la pantalla Mi PC.
Panel de control 3333Abre el Panel de control.
Botón Inicio 3333Abre el menú Inicio de Windows.
Internet Explorer 3 Abre Internet Explorer.
Avanzar pá gin a
(Alt+Derecho)
Retroceder página
(Alt+Izquierdo)
Izquierdo Derecho Central Superior
3333
Predeter
minada
3 Predeter
333 Realiza la función del botón del modo
33Predeter
333 Al presionar el botón se habilitará la
333 Maximiza la ventana activa.
Botón Descripción
33 Funciona como el botón principal del
minada
3 Abre el menú contextual.
minada
ratón para seleccionar y arrastrar.
central asignada.
Hace retroceder y avanzar la página
automáticamente cuando se mantiene
presionado y se mueve el ratón.
función de bloqueo del arrastre para el
botón principal del ratón. Si se
presiona de nuevo el bloqueo, el
arrastre se deshabilitará.
3 Se desplaza hacia delante una página.
3 Se desplaza hacia atrás una página.
7
Page 26

Función
Fichas rápidas de
IE7 (Ctrl+Q)
Guardar (Ctrl+S) 333 Guarda el documento o archivo actual.
Copiar (Ctrl+C) 333 Copia el elemento o texto
Cortar (Ctrl+X) 333 Corta el elemento o texto
Pegar (Ctrl+ V) 333 Pega el elemento o texto seleccionado
Deshacer (Ctrl+Z) 333 Deshace la acción anterior.
RWM /Rep rod uc ir y
Pausar
Iniciar programa 3 Abre un programa especificado.
FastFind™ Predeter
Conmutador de
aplicaciones
(Alt+Tab)
Vista Flip-3D
(Windows+Tab)
Izquierdo Derecho Central Superior
3 Abre la función Fichas rápidas de
Internet Explorer 7.
seleccionado en el portapapeles.
seleccionado al portapapeles.
del portapapeles
3 Abre el Reproductor de Windows Media
y reproduce y pausa las pistas durante
la reproducción.
minada
3333Cambia a otra aplicación abierta.
3333Inicia la función Vista Flip-3D que le
Abre un motor de búsqueda de
Internet para buscar sitios Web en
línea, imágenes o bitácoras (blogs).
ayuda a cambiar entre ventanas
abiertas.
Botón Descripción
8
Page 27

Español
Ajustar la velocidad de desplazamiento
Puede configurar la velocidad con la que desplazarse horizontal y verticalmente
por la pantalla.
1. En la sección Scroll Speed (Velocidad de desplazamiento), mueva el control
deslizante Vertical hacia la derecha o hacia la izquierda para aumentar o
reducir la velocidad de desplazamiento vertical, respectivamente. El número
de líneas que la pantalla se desplazará verticalmente aparece bajo este
control deslizante.
2. Mueva el control deslizante Horizontal hacia la derecha o hacia la izquierda
para aumentar o reducir la velocidad de desplazamiento horizontal,
respectivamente. El número de caracteres que la pantalla se desplazará
horizontalmente aparece bajo este control deslizante.
3. Haga clic en Apply (Aplicar) para guardar y aplicar los cambios.
Ajustar la velocidad del ratón
Puede configurar la velocidad a la que el cursor del ratón se mueve por la pantalla,
así como el tiempo de respuesta cuando hace doble clic con un botón.
1. En la sección Mouse Speed (Velocidad del ratón), mueva el control deslizante Double Click (Doble clic) hacia la derecha o hacia la izquierda para aumentar o reducir la velocidad de doble clic, respectivamente.
2. Mueva el control deslizante Cursor hacia la derecha o hacia la izquierda para aumentar o reducir el tiempo de respuesta cuando hace doble clic, respectivamente.
3. Haga clic en Testin g A rea (Áre a d e prueba) para probar la nueva configuración.
4. Haga clic en Apply (Aplicar) para guardar y aplicar los cambios.
9
Page 28

Definir la configuración avanzada
Haga clic en Advanced (Configuración avanzada) para ver
la pantalla de configuración avanzada. En esta pantalla
puede ajustar la configuración de los iconos de
visualización y los mensajes de notificación. Para ajustar
la configuración más avanzada, haga clic en Panel de
control y, a continuación, en Configuración del ratón en
la ventana que aparece.
Mostrar iConfig en el área de notificaciones de la barra de tareas
Active esta opción para mostrar el icono de iConfig en la barra de tareas del sistema.
1. Active la casilla Show iConfig in Taskbar Notification Area (Mostrar iConfig en el área de notificaciones de la barra de tareas) para mostrar el icono en la barra de tareas del sistema.
2. Haga clic en OK para guardar la configuración.
Mostrar el cuadro emergente de la alerta de carga baja de las pilas
1. Active esta opción para mostrar un mensaje de notificación cuando las pilas tengan poca carga.
2. Haga clic en OK para guardar la configuración.
Desinstalar la aplicación iConfig™
1. Haga clic en el Panel de control.
2. Haga doble clic en Agregar o quitar programas.
3. Localice el programa iConfig™ en la lista de programas.
4. Haga clic en Quitar.
5. Aparecerá un mensaje de confirmación. Haga clic en Sí para desinstalar la aplicación o en No para cancelar la operación.
10
Page 29

Español
Solucionar problemas
Si tiene problemas con el ratón, compruebe lo siguiente:
• Compruebe los requisitos del sistema para asegurarse de que este es
compatible.
• Compruebe si el receptor diminuto USB está perfectamente conectado a su PC
a través del puerto USB. Una mala conexión puede provocar un mal
funcionamiento del ratón.
• Cuando el indicador LED se ilumina en color naranja, indica que las pilas
tienen poca carga. Reemplace las pilas por otras nuevas inmediatamente.
• Si el ratón no responde, compruebe la función de ratón USB en el BIOS del
sistema. Esta función debe estar habilitada para que el ratón pueda usarse con
normalidad.
• Si la configuración del BIOS de su PC tiene opciones para ratón, asegúrese de
que tienen establecidos sus valores predeterminados. Consulte el manual de
su PC para obtener más información sobre el BIOS.
• Utilice el ratón solamente en una superficie limpia, plana y adherente para
que las acciones del cursor funcionen sin problemas y de forma precisa. Si usa
una alfombrilla para ratón, los colores oscuros agotarán antes la carga de las
pilas.
Si tiene cualquier otra pregunta y sigue necesitando ayuda, póngase en contacto
con su distribuidor para obtener asistencia técnica.
11
Page 30

Page 31

Português
Sumário
Bem-vindo .................................................................1
Características ..................................................... 1
Especificações .....................................................1
Funções e indicadores ..................................................2
Indicadores ......................................................... 3
Instalação ..................................................................3
Instalação do software iConfig™....................................... 4
Personalização das configurações ....................................5
Iniciação do software iConfig™ .................................. 5
Atribuição das funções do botão ................................6
Ajuste da velocidade de rolagem ............................... 9
Ajuste da velocidade do mouse .................................9
Configurações avançadas........................................10
Desinstalação do software iConfig™ ...........................10
Solução de problemas ................................................. 11
Page 32

Page 33

Português
Bem-vindo
Parabéns por adquirir este mouse. Este produto possui um design revolucionário e
botões de função personalizáveis que permitem navegar por seus programas
favoritos com facilidade e conforto. Leia as seguintes seções para as informações e
instruções sobre como configurar e usar o mouse. Caso tenha algum problema ao
usar o mouse, consulte “Solução de problemas” na página 11 para obter
assistência.
Características
• FastFind™ para busca rápida na Internet
• Tecnologia sem fio avançada LaserStream™
• Eficiente rolagem de quatro direções
• Design ergonômico para manuseio confortável
• Software iConfig™ para configurar e gerenciar as configurações do mouse
Especificações
Resolução do sensor Laser, 800 dpi
Conectividade RF de 2,4 GHz sem fio
Número de botões 4
Receptor Receptor micro USB
Duração das pilhas Até um ano com duas pilhas AA
Compatibilidade Windows 2000, XP, Vista
1
Page 34

Funções e indicadores
Consulte a tabela abaixo para as descrições das principais características do mouse
e as funções padrão dos botões. Para alterar estas funções de forma que melhor se
adapte a suas preferências e necessidades, consulte “Personalização das
configurações” na página 5 para os detalhes.
Núm. Nome Função
1 Botão esquerdo Pressione para ativar a função do
botão esquerdo
2 Botão superior Pressione para ativar a função do
botão superior
LED de
funcionamento
O LED acende quando o mouse
está ligado
3 Botão direito Pressione para ativar a função do
botão direito
4 Botão do mei o /
roda de rolagem
Pressione para ativar a função do
botão do meio, e mover para
rolar para cima, para baixo. para
a esquerda e para a direita
(compatível com Vista)
5Interruptor
Para ligar e desligar o mouse
liga/desliga
6 Sensor a laser Navegação sobre a superfície
7Botão de
conexão
Pressione para estabelecer uma
conexão entre o mouse e o
receptor USB
8Compartimento
Comporta duas pilhas AA
de pilhas
2
1
2
5
6
3
4
7
8
Page 35

Indicadores
LED Cor Status das pilhas
LED do D500 Laranja Nível normal das pilhas
LED do
receptor USB
Laranja, piscando
lentamente
Laranja, piscando
rapidamente
Verde Nível normal das pilhas (constante)
Vermelho Pilhas fracas (piscando)
Nível das pilhas baixo
Nível das pilhas criticamente baixo
Detectando o movimento do mouse
(piscando)
O canal foi mudado (pisca uma vez)
Instalação
Antes de usar o mouse, deve-se primeiro instalar duas pilhas AA.
1. Inverta o mouse e abra a tampa do compartimento das pilhas como mostrado.
2. Instale duas pilhas AA, observando as marcas de polaridade, como mostrado.
3. Reinstale a tampa do compartimento das pilhas de maneira que trave em posição produzindo um clique.
Português
3
Page 36

4. Instale o microrreceptor USB numa porta USB livre no PC.
5. Ligue o mouse usando o interruptor na parte inferior do mouse. O mouse se conectarà automaticamente e estarà pronto para uso.
1
2
ON
OFF
NOTA: Se o mouse não se conectar automaticamente,
pressione para estabelecer uma conexão entre o mouse e o
receptor USB.
Instalação do software iConfig™
Insira o CD de software fornecido na unidade de CD-ROM. O programa de instalação
do driver e do software deve ser carregado automaticamente.
Do contrário, clique em Iniciar > Executar, insira o caminho da unidade de CD-ROM
(por exemplo, D:) e procure o arquivo setup.exe. Clique duas vezes no arquivo
para carregar.
1. Clique em Next (Avançar) para continuar.
4
Page 37

Português
2. Especifique o local do mouse; se está à direita ou à esquerda do teclado. Clique em Next (Avançar) para iniciar a instalação.
3. A instalação será iniciada. Clique em Cancel (Cancelar) para sair a qualquer momento.
4. Clique em OK para concluir a instalação.
Personalização das configurações
É possível selecionar funções para cada botão, definir a velocidade de rolagem, a
velocidade do mouse e outras configurações avançadas através do software
iConfig™.
Iniciação do software iConfig™
É possível abrir o software iConfig™ de três maneiras diferentes:
• Clique duas vezes no ícone Icon7 iConfig na barra de tarefas do sistema.
• Clique duas vezes no ícone de atalho Icon7 iConfig na área de trabalho.
• Clique em Iniciar > Configurações > Painel de controle > Icon7 iConfig.
Quando a tela principal abrir, clique na guia Mouse na parte superior da tela, e
clique no ícone D500.
5
Page 38

Mova os controles
deslizantes para
ajustar a
velocidade de
rolagem
Exibe a carga res tante
Exibe a carga res tante
das pilhas
das pilhas
Clique ns menus
suspensos para atribuir
uma função específica a
cada botão do mouse
Mova os controles
deslizantes para ajustar a
velocidade do mouse
Clique para sair
Clique para configurar
as configurações
avançadas
NOTAS:
•Um símbolo de estrela * indica que uma função foi atribuída a um botão que é diferente do padrão alocado.
Clique para
restaurar todas
as configurações
aos padrões
Clique para
confirmar a
alteração da
configuração
sem aplicar
nenhuma
alteração
Clique para salvar e
aplicar quaisquer
alterações
Atribuição das funções do botão
É possível atribuir funções a cada botão do mouse sob a seção "Select Function"
(Selecionar função) no software iConfig™.
Além das funções tradicionais do botão, como realizar a função de clique com o
botão esquerdo ou direito, também é possível configurar um botão específico para
que funcione como um atalho para os programas ou aplicativos usados com
freqüência, como o Internet Explorer.
Para atribuir uma função a um botão, faça o seguinte:
6
Page 39

Português
1. Clique no menu suspenso e selecione a função que você deseja atribuir ao botão.
2. Clique Apply (Aplicar) para salvar e aplicar quaisquer alterações.
Consulte a tabela abaixo para todas as funções disponíveis, e a quais botões podem
ser atribuídos.
Função
Nenhum
Botão primário do
mouse
Menu de contexto/
Alternar
Botão de modo do
meio
Rolagem rápida/
automática
Duplo clique 333 Realiza a ação de duplo clique
Bloqueio de arrasto 333 Pressione o botão para habilitar o
Maximizar janela 333 Maximiza a janela ativa
Minimizar janela 333 Minimiza a janela ativa
Meu computador 333 3Abre a tela Meu computador
Painel de control e 333 3Abre o Painel de controle
Botão Iniciar 333 3Abre o menu Iniciar do Windows
Internet Explorer 3 Abre o Internet Explorer
Página seguinte
(Alt+Direita)
Esquerdo Direito Do meio Superior
333 3
Padrão 33 Funciona como o botão primário
3 Padrão 3 Abre o menu de contexto
333 Realiza a função atribuída do
33Padrão Rola automaticamente a página
Botão Descrição
do mouse para seleção e arrastar
botão de modo do meio
para cima e para baixo quando
segurado e o mouse for movido
recurso de bloqueio de arrasto do
botão primário do mouse.
Pressione novamente para
desabilitar o bloqueio de arrasto
3 Avança uma página
7
Page 40

Função
Página anterior
(Alt+Esquerda)
Guias Rápidas do
IE7 (Ctrl+Q)
Salvar (Ctrl+S) 33 3 Salva o documento ou o arquivo
Copiar (Ctrl+C) 333 Copia o item ou o texto
Recortar (Ctrl+X) 333 Recorta o item ou o texto
Colar (Ctrl+V) 333 Cola o item ou o texto da área de
Desfazer (Ctrl+Z) 333 Desfaz a ação anterior
WMP/ Reproduzir e
Pausar
Iniciar programa 3 Abre um programa específico
FastFind™ Padrão Abre um mecanismo de busca de
Alternar aplicativo
(Alt+Tab)
Vista Flip-3D
(Windows+Tab)
Esquerdo Direito Do meio Superior
3 Volta uma página
3 Abre o recurso de Guias Rápidas
do Explorer 7
atual
selecionado para a área de
transferência
selecionado para a área de
transferência
transferência
3 Abre o Windows Media Player /
Reproduz e pausa as faixas
durante a reprodução
Internet específico para buscar
websites, imagens, ou blogs on-
333 3Alterna para outro aplicativo
333 3Iniciar a função Vista Flip-3D para
line
aberto
ajudá-lo a alterar entre as janelas
abertas
Botão Descrição
8
Page 41

Português
Ajuste da velocidade de rolagem
É possível configurar a velocidade de rolagem horizontal e vertical na tela.
1. Sob a seção Scroll Speed (Velocidade de rolagem), mova o controle
deslizante Vertical para a direita para aumentar a velocidade de rolagem
vertical, ou para a esquerda para diminuir a velocidade de rolagem vertical. O
número de linhas que a tela rolará verticalmente é exibido sob o controle
deslizante.
2. Mova a controle deslizante Horizontal para a direita para aumentar a
velocidade de rolagem horizontal, ou para a esquerda para diminuir a
velocidade de rolagem horizontal. O número de caracteres que a tela rolará
horizontalmente é exibido sob o controle deslizante.
3. Clique Apply (Aplicar) para salvar e aplicar todas as alterações.
Ajuste da velocidade do mouse
É possível configurar a velocidade do movimento do cursor do mouse na tela, assim
como o tempo de resposta ao clicar duas vezes num botão.
1. Sob a seção "Mouse Speed" (Velocidade do mouse), mova o controle deslizante "Double Click" (Duplo clique) para a direita para aumentar a velocidade do duplo clique, ou para a esquerda para diminuir a velocidade do duplo clique.
2. Mova o controle deslizante Cursor para a direita para aumentar o tempo de resposta ao clicar duas vezes num botão, ou para a esquerda para diminuir o tempo de resposta.
3. Clique em Testin g A r ea (Área de teste) para testar as novas configurações.
4. Clique Apply (Aplicar) para salvar e aplicar todas as alterações.
9
Page 42

Configurações avançadas
Clique em Advanced (Avançadas) para exibir a tela de
configurações avançadas. Aqui, é possível ajustar as
configurações para exibir ícones e mensagens de
notificação. Para ajustar mais configurações avançadas,
clique em Painel de controle e, a seguir, em Mouse a
partir da janela que surgir.
Show iConfig in Taskbar Notification Area (Mostrar o iConfig na área de
notificação da barra de tarefas)
Verifique esta opção para exibir o ícone do iConfig na barra de tarefas do sistema.
1. Verifique a opção Show iConfig in Taskbar Notification Area (Mostrar o iConfig na área de notificação da barra de tarefas) para exibir o ícone na barra de tarefas do sistema.
2. Clique em OK para salvar a configuração.
Show low battery alert pop-up box (Mostrar caixa pop-up de alerta de
pilhas fracas)
1. Verifique esta opção para exibir uma mensagem de notificação quando as pilhas estiverem fracas.
2. Clique em OK para salvar a configuração.
Desinstalação do software iConfig™
1. Clique em Painel de controle.
2. Clique duas vezes em Adicionar ou remover programas.
3. Localize o programa iConfig™ na lista.
4. Clique em Remover.
5. Aparecerá uma mensagem de confirmação. Clique em Sim para desinstalar, ou em Não para cancelar.
10
Page 43

Português
Solução de problemas
Se você tiver algum problema com o mouse, verifique o seguinte:
• Verifique os requisitos do sistema para certificar-se de que seja compatível.
• Verifique se o microrreceptor USB está devidamente conectado ao PC através
da porta USB. Uma conexão inadequada pode causar o mau funcionamento do
mouse.
• Quando o LED do mouse está acesa em laranja, indica que as pilhas estão
fracas. Troque por pilhas novas imediatamente.
• Se o mouse não funcionar, verifique a função de mouse USB no BIOS do
sistema. A função deve estar habilitada para uso normal.
• Se o a configuração do BIOS do PC tem opções de mouse, certifique-se de que
estejam definidas para as configurações padrão. Consulte o manual do PC para
mais informações sobre o BIOS do PC.
• Use o mouse apenas numa superfície limpa, plana e não escorregadia para
garantir uma ação suave e precisa do cursor. Se você usa um mouse-pad,
cores escuras exigem mais energia das pilhas.
Para mais assistência com quaisquer outras questões que pode possa ter, entre em
contato com o revendedor para suporte técnico.
11
Page 44

Page 45

Deutsch
Inhaltsverzeichnis
Willkommen ...............................................................1
Merkmale ........................................................... 1
Spezifikationen .................................................... 1
Funktionen und Anzeigen ..............................................2
Anzeigen ............................................................3
Einrichtung ................................................................3
Installation der iConfig™ Software ....................................4
Anpassung der Einstellungen .......................................... 5
Starten der iConfig™ Software .................................. 5
Zuweisung von Tastenfunktionen ...............................6
Einstellung der Bildlaufgeschwindigkeit .......................9
Einstellung der Mausgeschwindigkeit........................... 9
Konfiguration der erweiterten Einstellungen ................10
Deinstallation der iConfig™ Software..........................10
Fehlersuche ............................................................. 11
Page 46

Page 47

Deutsch
Willkommen
Wir beglückwünschen Sie zu Ihrer neuen Maus. Ihre neue Maus bietet neben einem
völlig neuartigen Design auch individuell programmierbare Funktionstasten für
einfache, schnelle Navigation in Ihren meist genutzten Programmen. Lesen Sie die
folgenden Abschnitte mit Informationen und Hinweisen zur Einrichtung und zum
Gebrauch Ihrer Maus bitte aufmerksam durch. Bei Problemen mit Ihrer Maus
beachten Sie bitte die Hinweise unter “Fehlersuche” auf Seite 11.
Merkmale
• FastFind™ für schnelles Suchen im Internet
• Modernste LaserStream™-Funktechnik
• Praktischer Bildlauf in vier Richtungen
• Ergonomisches Design für ermüdungsfreies Arbeiten
• iConfig™ Software zur Konfiguration und Verwaltung Ihrer Mauseinstellungen
Spezifikationen
Sensorauflösung Laser 800 dpi
Konnektivität Wireless 2,4 GHz HF
Anzahl Tasten 4
Empfänger USB-Mikroempfänger
Batterielebensdauer Bis zu einem Jahr mit zwei AA-Batterien
Kompatibilität Windows 2000, XP, Vista
1
Page 48

Funktionen und Anzeigen
Es folgt eine Beschreibung der Hauptfunktionen der Maus und der
Standardfunktionen der Tasten. Hinweise zur Anpassung der Funktionen an Ihre
individuelle Arbeitsumgebung siehe “Anpassung der Einstellungen” auf Seite 5.
Nr. Name Funktion
1 Linke Maustaste Drücken, um die Funktion der
linken Maustaste zu aktivieren.
2 Obere Maustaste Drücken, um die Funktion der
oberen Maustaste zu aktivieren.
Power-LED Leuchtet, wenn die Maus
eingeschaltet wird.
3 Rechte
Maustaste
4 Mittlere
Maustaste /
Scroll-Rad
Drücken, um die Funktion der
rechten Maustaste zu aktivieren.
Drücken, um die Funktion der
mittleren Maustaste zu aktivieren
bzw. den Bildlauf nach oben,
unten, links und rechts zu nutzen
(Vista-kompatibel).
5 Ein-/Ausschalter Zum Ein- und Ausschalten der
Maus.
6 Lasersensor Zur Navigation auf ebenen
Flächen.
7 Verbindungstaste Drücken, um eine Verbindung
zwischen der Maus und dem USBEmpfänger herzustellen.
8 Batteriefach Für zwei Batterien vom Typ AA.
2
1
2
5
6
3
4
7
8
Page 49

Deutsch
Anzeigen
LED Farbe Batteriestatus
D500 LED Orange Batterieladestand normal
Orange, langsam
blinkend
Orange, schnell
blinkend
USBEmpfängerLED
Grün Batterieladestand normal (leuchtet
Rot Batteriestand niedrig (blinkt)
Einrichtung
Vor Gebrauch der Maus müssen zuerst 2 Batterien vom Typ AA eingelegt werden.
1. Die Maus auf den Kopf drehen und das Batteriefach öffnen, siehe Abbildung.
2. Legen Sie zwei Batterien vom Typ AA ein und achten Sie dabei auf die korrekte Polarität, siehe Abbildung.
3. Schließen Sie das Batteriefach, indem Sie es einrasten lassen.
Batterieladestand lässt nach
Batterieladestand erreicht eine kritische
Grenze
dauerhaft)
Mausbewegung erkannt (blinkt)
Kanal wurde geändert (blinkt einmal)
3
Page 50

4. Stecken Sie den USB-Mikroempfänger an einem freien USB-Anschluss an Ihrem PC an.
5. Schalten Sie die Maus am Schalter an der Unterseite der Maus an. Die Verbindung wird automatisch hergestellt, und die Maus ist dann einsatzbereit.
1
2
ON
OFF
HINWEIS: Falls sich die Maus nicht automatisch verbindet,
drücken Sie auf die Verbindungstaste, um eine Verbindung
zwischen der Maus und dem USB-Empfänger herzustellen.
Installation der iConfig™ Software
Legen Sie die mitgelieferte Software-CD in Ihr CD-ROM-Laufwerk ein. Treiber und
Software installations programm sollten nun automatisch geladen werden.
Andernfalls klicken Sie auf Start > Ausführen, geben den Pfad zu Ihrem CD-ROM-
Laufwerk ein (z. B. D: ) und suchen nach der Datei setup.exe. Doppelklicken Sie
auf die Datei, um sie auszuführen.
1. Klicken Sie auf Next (Weiter), um fortzufahren.
4
Page 51

Deutsch
2. Geben Sie die Position Ihrer Maus an (links oder rechts neben der Tastatur). Klicken Sie auf Next (Weiter), um den Installationsvorgang zu starten.
3. Der Installationsvorgang beginnt. Durch Anklicken von Cancel (Abbruch) kann der Installationsvorgang jederzeit abgebrochen werden.
4. Klicken Sie auf OK, um die Installation fertig zu stellen.
Anpassung der Einstellungen
Mit der iConfig™ Software können Sie für jede Taste eine Funktion festlegen, die
Geschwindigkeit des Scroll-Rades und der Maus einstellen sowie andere
Einstellungen vornehmen.
Starten der iConfig™ Software
Die iConfig™ Software kann auf dreierlei Weise geöffnet werden:
• Doppelklick auf das Symbol Icon7 iConfig in der Taskleiste Ihres Systems.
• Doppelklick auf das Shortcut-Symbol Icon7 iConfig auf Ihrem Desktop.
• Anklicken von Start > Einstellungen > Systemsteuerung > Icon7 iConfig.
Klicken Sie, nachdem sich der Hauptbildschirm geöffnet hat, auf die Registerkarte
Mouse (Maus) am oberen Bildschirmrand und dann auf das Symbol D500.
5
Page 52

Ziehen Sie an den
Schiebereglern, um die
Bildlaufgeschwindig keit
einzustellen
Zeigt die verbleiben de
Zeigt die verbleiben de
Batterieleistung an
Batterieleistung an
Klicken Sie auf die
Dropdown-Menüs, um
jede Maustaste mit einer
spezifischen Funktion zu
belegen
Ziehen Sie an den
Schiebereglern, um die
Mausgeschwindigkeit
einzustellen
Klicken Sie hier, um
Klicken Sie hier, um
weitere Einstellungen
vorzunehmen
ANMERKUNGEN:
•Ein Sternchen * zeigt an, dass die Maustaste mit einer anderen Funktion als der Standardfunktion belegt wurde.
Klicken Sie hier, um
alle Einstellungen auf
ihren ursprünglichen
Wert zu rückzus etzen
Klicken Sie
hier, um eine
Einstellungsän
derung zu
bestätigen
diesen Bildschirm zu
verlassen, ohne die
Änderungen zu
übernehmen
Klicken Sie hier, um Ihre
Änderungen zu
speichern und zu
übernehmen
Zuweisung von Tastenfunktionen
Im Abschnitt Select Function (Funktionsauswahl) der iConfig™ Software können Sie
jede Maustaste mit einer eigenen Funktion belegen.
Neben den konventionellen Mausfunktionen, d. h. linker und rechter Mausklick,
können Sie Tasten auch als Shortcuts einrichten, die sie zu häufig benutzten
Programmen wie z. B. dem Internet Explorer führen.
So weisen Sie einer Taste eine Funktion zu:
1. Klicken Sie das Dropdown-Menü an und wählen Sie die gewünschte Funktion, mit der Sie die Taste belegen möchten.
6
Page 53

Deutsch
2. Klicken Sie auf Apply (Übernehmen), um Ihre Änderungen zu speichern und zu übernehmen.
Die folgende Tabelle enthält eine Aufstellung aller verfügbaren Funktionen und die
Tasten, denen Sie diese Funktionen zuweisen können.
Funktion
Keine
Primäre
Maustaste
Kontextmenü /
Umschalten
Mitteltaste 333 Führt die zugewiesene Funktion der
Schneller /
Autom. Bildlauf
Doppelklick 333 Führt einen Doppelklick aus
Klick einrasten 33 3 Durch Drücken dieser Taste wird die
Maximieren 333 Maximiert das aktive Fenster
Minimieren 33 3 Minimiert das aktive Fenster
Arbeitsplatz 33 33Öffnet den Arbeitsplatz
Systemsteuerung 33 33Öffnet die Systemsteuerung
Start-Taste 333 3Öffnet das Startmenü von Windows
Internet
Explorer
Bild vor,
(Alt+Rechte
Maustaste)
Links Rechts Mitte Oben
333 3
Standard 33 Fungiert als primäre Maustaste zum
3 Standard 3 Öffnet das Kontextmenü
33Standard Automatischer Bildlauf nach oben
Ta st e Beschreibung
Auswählen und Ziehen
mittleren Maustaste aus
bzw. unten, wenn die Taste
gehalten und die Maus bewegt wird
Klick einrasten-Funktion der
primären Maustaste aktiviert.
Erneutes Drücken auf die Taste
deaktiviert die Klick einrastenFunktion
3 Öffnet den Internet Explorer
3 Blättert eine Seite vor
7
Page 54

Funktion
Bild zurück,
(Alt+Linke
Maustaste)
IE7 QuickTab
(Ctrl+Q)
Speichern
(Ctrl+S)
Kopieren
(Ctrl+C)
Ausschneiden
(Ctrl+X)
Einfügen
(Ctrl+V)
Rückgängig
(Ctrl+Z)
WMP /
Wiedergabe &
Paus e
Programm
starten
FastFind™ Standard Öffnet eine Internet-Suchmaschine,
Programmtaste,
Alt+Tab
Vista Flip-3D
(Windows+Tab)
Links Rechts Mitte Oben
3 Blättert eine Seite zurück
3 Öffnet die QuickTab-Funktion der
333 Speichert das aktuelle Dokument
333 Kopiert das markierte Element oder
333 Schneidet das markierte Element
333 Fügt das Element oder den Text aus
333 Macht den zuletzt ausgeführten
333 3Wechselt zu einer anderen
333 3Öffnet die Vista Flip-3D-Funktion,
Internet Explorer-Version 7
oder die Datei
den Text in die Zwischenablage
oder den Text aus und legt ihn in die
Zwischenablage
der Zwischenablage ein
Vorgang rückgängig
3 Öffnet den Windows Media Player /
Startet oder unterbricht die
Wiedergabe
3 Öffnet ein bestimmtes Programm
um nach Websites, Bilder oder Blogs
zu suchen
geöffneten Anwendung
um zwischen geöffneten Fenstern zu
wechseln
Ta st e Beschreibung
8
Page 55

Deutsch
Einstellung der Bildlaufgeschwindigkeit
Sie können die Bildlaufgeschwindigkeit für die horizontale und vertikale Navigation
am Bildschirm anpassen.
1. Ziehen Sie im Abschnitt Scroll Speed (Bildlaufgeschwindigkeit) den
Schieberegler Vertical (Vertikal) nach rechts, um die vertikale
Bildlaufgeschwindigkeit zu erhöhen bzw. nach links, um die vertikale
Bildlaufgeschwindigkeit zu vermindern. Die Anzahl an Zeilen in vertikaler
Richtung wird unter dem Schieberegler angezeigt.
2. Ziehen Sie den Schieberegler Horizontal (Horizontaler) nach rechts, um die
horizontale Bildlaufgeschwindigkeit zu erhöhen bzw. nach links, um die
horizontale Bildlaufgeschwindigkeit zu vermindern. Die Anzahl an Zeichen in
horizontaler Richtung wird unter dem Schieberegler angezeigt.
3. Klicken Sie auf Apply (Übernehmen), um Ihre Änderungen zu speichern und zu übernehmen.
Einstellung der Mausgeschwindigkeit
Sie können die Geschwindigkeit, mit der sich der Mauscursor auf dem Bildschirm
bewegt sowie die Reaktionszeit für Doppelklicks einstellen.
1. Ziehen Sie im Abschnitt Mouse Speed (Mausgeschwindigkeit) den Schieberegler Double Click (Doppelklick) nach rechts, um die Doppelklickgeschwindigkeit zu erhöhen bzw. nach links, um die Doppelklickgeschwindigkeit zu vermindern.
2. Ziehen Sie den Schieberegler für den Cursor nach rechts, um die Reaktionszeit bei einem Doppelklick zu erhöhen bzw. nach links, um sie zu vermindern.
3. Klicken Sie auf Test i n g Area (Testbereich), um Ihre neuen Einstellungen auszuprobieren.
4. Klicken Sie auf Apply (Übernehmen), um Ihre Änderungen zu speichern und zu übernehmen.
9
Page 56

Konfiguration der erweiterten Einstellungen
Klicken Sie auf Advanced (Erweitert), um den Bildschirm
mit den erweiterten Einstellungen zu öffnen. Hier können
Sie die Einstellungen für die Anzeigesymbole und die
Mitteilungen anpassen. Um weitere Einstellungen
vorzunehmen, klicken Sie auf Systemsteuerung und in
dem sich öffnenden Fenster auf Maus.
Show iConfig in Taskbar Notification Area (iConfig im
Mitteilungsbereich der Taskleiste anzeigen)
Markieren Sie diese Option, um das iConfig-Symbol in der Taskleiste Ihres Systems
anzuzeigen.
1. Markieren Sie Show iConfig in Taskbar Notification Area (iConfig im Mitteilungsbereich der Taskleiste anzeigen), um das iConfig™ Symbol in der Taskleiste Ihres Systems anzuzeigen.
2. Klicken Sie auf OK, um die Einstellung zu speichern.
Show low battery alert pop-up box (Batteriestand-Warnung anzeigen)
1. Markieren Sie diese Option, um sich bei niedrigem Batteriestand eine Warnmeldung anzeigen zu lassen.
2. Klicken Sie auf OK, um die Einstellung zu speichern.
Deinstallation der iConfig™ Software
1. Öffnen Sie die Systemsteuerung.
2. Doppelklicken Sie auf Software.
3. Suchen Sie das Programm iConfig™ in der Liste der Programme.
4. Klicken Sie auf Entfernen.
5. Es erscheint eine Bestätigungsmeldung. Klicken Sie auf Ja, um das Programm zu deinstallieren oder auf Nein, um den Vorgang abzubrechen.
10
Page 57

Deutsch
Fehlersuche
Bei Problemen mit Ihrer Maus prüfen Sie bitte Folgendes:
• Kontrollieren Sie die Systemvoraussetzungen, um sicherzustellen, dass Ihr
System kompatibel ist.
• Kontrollieren Sie, ob der USB-Mikroempfänger richtig am USB-Anschluss Ihres
PCs angesteckt ist. Eine lockere Verbindung kann zu Fehlfunktionen führen.
• Wenn die Maus-LED orange leuchtet, ist der Batteriestand niedrig. Legen Sie
unverzüglich neue Batterien ein.
• Falls die Maus nicht funktioniert, überprüfen Sie die USB-Mausfunktion im
System-BIOS. Die Funktion muss für normalen Gebrauch aktiviert sein.
• Spezielle Mausoptionen Ihres PC BIOS müssen auf die Standardeinstellungen
gesetzt sein. Ausführliche Informationen über das BIOS finden Sie im
Handbuch Ihres PCs.
• Benutzen Sie Ihre Maus nur auf sauberen, ebenen und griffigen Oberflächen,
um eine einwandfreie und korrekte Cursorfunktion sicherzustellen. Bei
Verwendung eines Mauspads beachten Sie bitte, dass dunklere Pads mehr
Batterieleistung beanspruchen.
Bei weiteren Fragen wenden Sie sich bitte an Ihren örtlichen Fachhändler.
11
Page 58

Page 59

Français
Table des matières
Bienvenue .................................................................1
Caractéristiques ................................................... 1
Spécifications ......................................................1
Fonctions et indicateurs ................................................2
Voyants..............................................................3
Installation.................................................................3
Installation du logiciel iConfig™ .......................................4
Personnaliser les paramétrages .......................................5
Lancer le logiciel iConfig™ ....................................... 5
Assigner une fonction à un bouton ............................. 6
Régler la vitesse de défilement ................................. 9
Régler la vitesse de la souris .................................... 9
Configurer les paramétrages avancés .........................10
Suppression du logiciel iConfig™ ...............................10
Diagnostic des pannes................................................. 11
Page 60

Page 61

Français
Bienvenue
Nous vous remercions d’avoir acheter cette souris. Ce produit arbore un design
révolutionnaire et dispose de boutons de fonction personnalisables qui vous
permettent de naviguer dans vos programmes favoris avec facilité et confort.
Veuillez lire les sections suivantes pour plus d’informations sur l'installation et
l'utilisation de votre souris. En cas de problème lors de l’utilisation de la souris,
veuillez vous référer au paragraphe “Diagnostic des pannes” à la page 11.
Caractéristiques
• FastFind™ pour une recherche sur Internet rapide
• Technologie sans fil de pointe LaserStream™
• Molette de défilement efficace, 4 directions
• Conception ergonomique pour une prise en main confortable.
• Logiciel iConfig™ pour la configuration et la gestion des paramétrages de la
souris.
Spécifications
Résolution du capteur 800 ppp laser
Connectivité RF 2,4 GHz sans fil
Nombre de boutons 4
Récepteur Micro récepteur USB
Durée de vie des piles Jusqu’à un an avec deux piles AA
Compatibilité Windows 2000, XP, Vista
1
Page 62

Fonctions et indicateurs
Voir ci-dessous pour la description des caractéristiques principales de la souris et
les fonctions par défaut des boutons. Pour modifier ces fonctions de façon à
répondre à vos préférences et vos besoins, se reporter au paragraphe
“Personnaliser les paramétrages” à la page 5.
No. Nom Fonction
1 Bouton de gauche Appuyer sur ce bouton pour activer
la fonction du bouton de gauche.
2 Bouton du haut Appuyer sur ce bouton pour activer
la fonction du bouton du haut.
Voyant DEL de
mise sous tension
Le voyant DEL s’allume lorsque la
souris est mise sous tension.
3 Bouton de droite Appuyer sur ce bouton pour activer
la fonction du bouton de droite.
4Bouton du milieu
/ molette de
défilement
Appuyer sur ce bouton pour activer
la fonction du bouton du milieu et
bouger la molette vers le haut,
vers le bas, vers la gauche et vers
la droite (compatible avec Vista).
5 Interrupteur
d’alimentation
Actionner l’interrupteur pour
mettre la souris sous tension et
hors tension.
6 Capteur laser Navigation sur une surface.
7Bouton de
connexion
Appuyer sur ce bouton pour établir
une connexion entre la souris et le
récepteur USB.
8Compartiment
Contient deux piles AA.
des piles
2
1
2
5
6
3
4
7
8
Page 63

Voyants
DEL Couleur États des piles
DEL D500 Orange Niveau des piles normal
DEL du
récepteur
USB
Orange, le voyant
clignote lentement
Orange, le voyant
clignote rapidement
Vert Niveau des piles normal (fixe)
Rouge Piles faibles (clignote)
Niveau faible des piles
Niveau très faible des piles
Détection d’un mouvement de la souris
(clignote)
Le canal a été modifié (clignote une fois)
Installation
Avant de pouvoir utiliser votre souris, insérez deux piles AA.
1. Retournez la souris et ouvrez le compartiment, comme indiqué.
2. Insérez deux piles AA, en respectant le sens de polarité indiqué.
3. Replacez le couvercle du compartiment à piles de façon à ce qu'il s'encastre en place.
Français
3
Page 64

4. Insérez le micro récepteur USB dans un port USB libre de votre PC.
5. Mettez la souris sous tension en actionnant
l'interrupteur sous la souris. La souris se
2
connecte automatiquement. Elle est prête à
être utilisée.
1
NOTE : Si la souris ne se connecte pas automatiquement,
appuyez sur ce bouton pour établir une connexion entre la
souris et le récepteur USB.
Installation du logiciel iConfig™
Insérez le CD du logiciel fourni dans votre lecteur de CD-ROM. Le programme
d’installation du logiciel et du pilote devrait se charger automatiquement.
Si ce n’est pas le cas, cliquez sur Démarrer > Exécuter, et entrez le chemin de
votre lecteur de CD-ROM drive (D: par exemple), et recherchez le fichier
setup.exe. Double-cliquez sur le fichier à charger.
1. Cliquez sur Next (Suivant) pour continuer.
ON
OFF
4
Page 65

Français
2. Spécifiez l’emplacement de votre souris ; à droite ou à gauche du clavier. Cliquez sur Next (Suivant) pour lancer l’installation.
3. L’installation commence. Cliquez sur Cancel (Annuler) pour interrompre l’installation à tout moment.
4. Cliquez sur OK pour finaliser l’installation.
Personnaliser les paramétrages
Le logiciel iConfig™ vous permet de choisir les fonctions pour chaque bouton, de
régler la vitesse de défilement de la molette, la vitesse de déplacement du curseur
et de configurer d’autre paramétrages avancés.
Lancer le logiciel iConfig™
Trois options s’offrent à vous pour ouvrir le logiciel iConfig™ :
• Double-cliquez sur l’icône Icon7 iConfig dans la barre des tâches du système.
• Double-cliquez sur l’icône raccourci Icon7 iConfig de votre bureau.
• Cliquez sur Démarrer > Paramètres > Panneau de configuration > Icon7
iConfig.
Une fois l’écran principal ouvert, cliquez sur l’onglet Mouse (Souris) en haut de
l’écran, puis sur l'icône D500.
5
Page 66

Déplacez la case
pour ajuster la
vitesse de
défilement
Affiche l’état des pilesAffiche l’état des piles
Cliquez sur les menus
déroulants pour assigner
une fonction spécifique
à chaque bouton de la
souris
Déplacez les cases pour
ajuster la vitesse de la
souris
Cliquez pour
configurer les
paramétrages
avancés
NOTES :
•L’astérisque * indique qu’un fonction autre que celle allouée par défaut a été assignée à un bouton.
Cliquez pour
restaurer tous les
paramétrages par
défauts
Cliquez pour
confirmer une
modification de
paramétrage
Cliquez pour
quitter sans
appliquer les
modifications
Cliquez pour
sauvegarder et appliquer
les modifications
Assigner une fonction à un bouton
Il est possible d’assigner des fonctions à chaque bouton de la souris, en utilisant la
section Select Function (choisir une fonction) du logiciel iConfig™.
Outre les fonctions traditionnelles des boutons, comme cliquer à gauche ou cliquer
à droite, vous pouvez également configurer un bouton spécifique de façon à ce
qu'il agisse comme un raccourci dans un programme ou une application
fréquemment utilisé, comme par exemple Internet Explorer.
Pour assigner une fonction à un bouton, suivre la procédure ci-dessous :
6
Page 67

Français
1. Cliquez sur le menu déroulant et choisissez la fonction que vous voulez assigner au bouton.
2. Cliquez sur Apply (Appliquer) pour sauvegarder et appliquer les modifications.
Consultez le tableau suivant pour la liste complète des fonctions disponibles et les
boutons auxquels elles peuvent être assignées.
Fonction
Aucun
Bouton de souris 1 Défaut 33 Agit comme le bouton de souris 1 pour
Menu contextuel /
Alternative
Bouton mode
milieu
Défilement
rapide/
automatique
Double-clic 333 Pour double-cliquer
Verrou il lage p our
faire glisser une
sélection
Agrandir la
fenêtre
Diminuer la
fenêtre
Poste de travail 333 3Ouvre l'écran Poste de travail
Panneau de
configuration
Bouton Démarrer 333 3Ouvre le menu Démarrer de Windows
Gauche Droit Milieu Haut
333 3
3 Défaut 3 Ouvre le menu contextuel
333 Exécute la fonction assignée au bouton
33Défaut Pour faire défiler automatiquement la
333 En appuyant sur ce bouton, la fonction
333 Agrandit la fenêtre active
333 Diminue la fenêtre active
333 3Ouvre le panneau de configuration
Bouton Description
sélectionner et glisser
mode milieu
page vers le haut et vers le bas,
lorsque la molette est maintenue
appuyée et que la souris est déplacée.
de verrouillage pour faire glisser une
sélection du bouton de souris 1 est
activée. Appuyer à nouveau pour
désactiver le verrouillage
7
Page 68

Fonction
Internet Explorer 3 Ouvre l’Internet Explorer
Page suivante
(Alt+Droit)
Page précédente
(Alt+Gauche)
IE7 QuickTab
(Ctrl+Q)
Enregistrer
(Ctrl+S)
Copier (Ctrl+C) 333 Copie la sélection ou le texte dans le
Couper (Ctrl+X) 333 Coupe la sélection ou le texte dans le
Coller (Ctrl+V) 333 Colle l'objet ou le texte du presse-
Annuler (Ctrl+Z) 333 Annule l’action précédente
WMP / Lecture &
Pause
Lancer un
programme
FastFind™ Défaut Ouvre un moteur de recherche
Changer
d’application
(Alt+Tab)
Vista Flip-3D
(Windows+Tab)
Gauche Droit Milieu Haut
3 Va à la page suivante
3 Va à la page précédente
3 Ouvre la fonction QuickTab d’Internet
333 Enregistre le document ou le fichier
333 3Passe d’une application à une autre
333 3Lance la fonction Vista Flip-3D qui
Explorer 7
ouvert
presse-papiers
presse-papiers
papiers
3 Ouvre Windows Media Player / Lit et
met la lecture des pistes en pause
3 Ouvre un programme spécifié
Internet spécifié pour la recherche en
ligne de sites Web, d’images ou de
blogs.
application ouverte
vous permet de jongler entre les
fenêtres ouvertes
Bouton Description
8
Page 69

Français
Régler la vitesse de défilement
Vous pouvez configurer la vitesse de défilement horizontal et vertical de l’écran.
1. Dans la section Scroll Speed (Vitesse de défilement) section, déplacer la
case Vertical vers la droite pour augmenter la vitesse de défilement vertical,
ou vers la gauche pour la diminuer. Le nombre de lignes qui vont défiler
verticalement sur l’écran s’affiche sous la case de défilement.
2. Déplacer la case Horizontal vers la droite pour augmenter la vitesse du défilement horizontal, ou vers la gauche pour la diminuer. Le nombre de caractères va défiler horizontalement sur l’écran s’affiche sous la case de défilement.
3. Cliquez sur Apply (Appliquer) pour sauvegarder et appliquer les modifications.
Régler la vitesse de la souris
Vous pouvez configurer la vitesse de déplacement du curseur de la souris à l’écran,
ainsi que le temps de réponse lorsque vous double-cliquez sur un bouton.
1. Dans la section Mouse Speed (vitesse de la souris), déplacez la case Double Click (double-clic) vers la droite pour augmenter la vitesse du double-clic, ou vers la gauche pour la diminuer.
2. Déplacer la case Cursor (curseur) vers la droite pour augmenter le temps de réponse lorsque vous double-cliquez sur un bouton, ou vers la gauche pour le diminuer.
3. Cliquez sur Testi n g A rea (Zo n e t est) pour tester vos nouveaux paramétrages.
4. Cliquez sur Apply (Appliquer) pour sauvegarder et appliquer les modifications.
9
Page 70

Configurer les paramétrages avancés
Cliquez sur Advanced (Avancé) pour afficher l’écran des
paramétrages avancés. Vous pouvez alors modifier les
paramétrages concernant les icônes et les messages de
notification. Pour modifier plus de paramétrages avancés,
cliquez sur Panneau de configuration puis dans la fenêtre
qui s’affiche, sur Souris.
Afficher iConfig dans la zone de notification de la barre de tâches
Cochez cette option pour faire apparaître l’icône iConfig dans la barre de tâches
du système.
1. Cocher Show iConfig in Taskbar Notification Area (afficher iConfig dans la zone de notification de la barre des tâches) pour faire apparaître l’icône dans la barre de tâches du système.
2. Cliquez sur OK pour sauvegarder le paramétrage.
Boîte contextuelle d’alerte : piles faibles
1. Cocher cette option pour afficher un message de notification dés que l'alimentation par pile est faible.
2. Cliquez sur OK pour sauvegarder le paramétrage.
Suppression du logiciel iConfig™
1. Cliquez sur Panneau de configuration.
2. Double-cliquez sur Ajout ou suppression de programmes.
3. Localisez le programme iConfig™ dans la liste.
4. Cliquez sur Supprimer.
5. Un message de confirmation apparaît. Cliquez sur Oui pour le supprimer, ou sur Non pour annuler.
10
Page 71

Français
Diagnostic des pannes
Si vous avez des problèmes avec votre souris, vérifiez ce qui suit :
• Vérifiez les exigences minimum requises du système et assurez-vous que le
système est compatible.
• Vérifiez la bonne connexion du micro récepteur USB à votre PC via un port
USB. Une mauvaise connexion peut entraîner le mauvais fonctionnement de la
souris.
• Lorsque le voyant DEL de la souris est orange, cela indique une alimentation
faible. Remplacez les piles immédiatement.
• Si la souris ne marche pas, vérifiez la fonction souris USB dans le BIOS de votre
système. La fonction doit être activée pour une utilisation normale.
• Si l’installation BIOS de votre PC présente des options pour la souris, assurezvous qu’elles sont paramétrées par défaut. Pour plus d’informations sur le
BIOS de votre PC, reportez-vous au manuel de votre PC.
• N’utilisez la souris que sur une surface propre, plane et non glissante de façon
à assurer un mouvement régulier et précis du curseur. Si vous utilisez un tapis
de souris, sachez que les couleurs foncées utilisent plus d’énergie.
Le support technique pour toute assistance ou toute autre question est assuré par
votre fournisseur. Veuillez le contacter.
11
Page 72

Page 73

Italiano
Contenuti
Benvenuto .................................................................1
Caratteristiche..................................................... 1
Specifiche .......................................................... 1
Funzioni ed Indicatori...................................................2
Indicatori ........................................................... 3
Preparazione..............................................................3
Installazione del software iConfig™................................... 4
Personalizzare le impostazioni........................................5
Avvio del software iConfig™ ..................................... 5
Assegnazione delle funzioni ai tasti ............................6
Regolare la velocità di scorrimento ............................ 9
Regolare la velocità del mouse.................................. 9
Configurazione delle impostazioni avanzate .................10
Rimozione del software iConfig™ ..............................10
Risoluzione dei problemi ............................................. 11
Page 74

Page 75

Italiano
Benvenuto
Congratulazioni per l'acquisto di questo mouse. Questo prodotto ha un design
rivoluzionario e tasti di funzione personalizzabili che consnetono di navigare con
facilità e comodità tra i programmi preferiti. Leggere le sezioni che seguono per
informazioni ed istruzioni su come impostare ed usare il mouse. Se si riscontrano
dei problemi con il mouse, fare riferimento a “Risoluzione dei problemi” a
pagina 11 per l’assistenza.
Caratteristiche
• FastFind™ per ricerche rapide su Internet
• Tecnologia wireless avanzata LaserStream™
• Efficiente scorrimento a 4 vie
• Design ergonomico per la comodità d’uso
• Software iConfig™ per configurare e gestire le impostazioni
Specifiche
Risoluzione sensore Laser 800 dpi
Connettività Wireless 2,4 GHz RF
Numero di tasti 4
Ricevitore Ricevitore USB micro
Durata della batteria Fino ad un anno con due batterie AA
Compatibilità Windows 2000, XP, Vista
1
Page 76

Funzioni ed Indicatori
Fare riferimento alle seguenti descrizioni delle funzioni principali del mouse ed
alle funzioni predefinite dei tasti. Per cambiate queste funzioni ed adattarle alle
esigenze personali, fare riferimento a “Personalizzare le impostazioni” a pagina 5
per i dettagli.
No Nome Funzione
1 Tasto sinistro Premerlo per attivare la funzione
tasto sinistro
2 Tasto superiore Premerlo per attivare la funzione
tasto superiore
LED
alimentazione
Il LED si illumina quando il mouse è
acceso
3 Tasto destra Premerlo per attivare la funzione
tasto destra
4Tasto centrale /
rotella di
scorrimento
Premere per attivare la funziona e
tasto centrale e muovere per
scorrere verso l'alto, il basso,
sinistra e destra (compatibile Vista)
5 Interruttore
d’alimentazione
Interruttore per accendere/
spegnere il mouse
6 Sensore laser Navigazione su superficie
7Tasto
collegamento
Premerlo per stabilire il
collegamento tra il mouse ed il
ricevitore USB
8Scomparto
Alloggia due batterie AA
batterie
2
1
2
5
6
3
4
7
8
Page 77

Indicatori
LED Colore Stato batteria
LED D500 Arancione Batteria normale
LED ricevitore
USB
Arancione,
lampeggiante
lentamente
Arancione,
lampeggiante
rapidamente
Verde Batteria normale (acceso)
Rosso Batteria scarica (lampeggiante)
Batteria scarica
Batteria quasi esaurita
Rilevamento movimento del mouse
(lampeggiante)
Il canale è stato cambiato (lampeggia una
volta)
Preparazione
Prima di usare il mouse è necessario installare due batterie AA.
1. Girare il mouse ed aprire il coperchio dello scomparto batterie, come mostrato.
2. Inserire due batterie AA, osservando la polarità, come mostrato.
3. Rimettere il coperchio dello scomparto batterie.
Italiano
3
Page 78

4. Inserire il ricevitore USB micro in una porta USB del PC.
5. Accendere il mouse usando l’interruttore sulla parte inferiore del mouse. Il mouse si collegherà automaticamente ed è pronto all’uso.
1
2
ON
OFF
NOTA: Se il mouse non si collega automaticamente,
premere per stabilire il collegamento tra il mouse ed il
ricevitore USB.
Installazione del software iConfig™
Inserire il CD fornito in dotazione nell'unità CD-ROM. Il programma d’installazione
del driver e del software dovrebbe caricarsi automaticamente.
In caso contrario, fare clic su Start > Esegui, inserire il percorso dell’unità CD-ROM
(D: ad esempio) e cercare il file setup.exe. Fare doppio clic sul file per caricarlo.
1. Fare clic su Next (Avanti) per continuare.
4
Page 79

Italiano
2. Specificare la posizione del mouse; se si trova sulla destra o sulla sinistra della tastiera. Fare clic su Next (Avanti) per iniziare l’installazione.
3. L’installazione inizia. Fare clic su Cancel (Annulla) per uscire in qualsiasi momento.
4. Fare clic su OK per completare l’installazione.
Personalizzare le impostazioni
Si può selezionare la funzione di ciascun tasto, impostare la velocità di
scorrimento, la velocità del mouse e configurare altre impostazioni avanzate
usando il software iConfig™.
Avvio del software iConfig™
Il software iConfig™ può essere aperto in tre modi:
• Fare doppio clic sull’icona Icon7 iConfig nella barra degli strumenti del
sistema.
• Fare doppio clic sull'icona del collegamento Icon7 iConfig sul desktop.
• Fare clic su Start > Impostazioni > Pannello di controllo > Icon7 iConfig.
5
Page 80

Una volta che si apre la finestra, fare clic sulla scheda Mouse in alto sullo schermo
e poi fare clic sull’icona D500.
Visualizza il livello
Visualizza il livello
residuo di carica della
residuo di carica della
batteria
batteria
Fare clic sul menu a
discesa per assegnare
una funzione specif ica a
ciascun tasto del mouse
Spostare il
dispositivo di
scorrimento per
regolare la velocit à di
scorrimento
Spostare il dispositivo di
scorrimento per regolare
la velocità del mouse
Fare clic per uscire
Fare clic per
configurare le
impostazioni
NOTE:
•Il simbolo dell’asterisco * denota che la funzione è stata assegnata ad un tasto che è diverso dall'assegnazione predefinita.
avanzate
Fare clic per
ripristinare tutte e
impostazioni sui
valori predefiniti
Fare c lic p er
confermare la
modifica delle
impostazioni
senza applicare
alcuna modifica
Fare cl ic per s alvare ed
applicare le modifiche
Assegnazione delle funzioni ai tasti
Le funzioni possono essere assegnate a ciascun tasto del mouse nella sezione
Select Function (Selezione funzione) del software iConfig™.
Oltre alle funzioni tradizionali, come l’azione clic tasti destro e clic tasto sinistro,
si può anche configurare un tasto specifico come collegamento a programmi o
applicazioni usati di frequente, come Internet Explorer.
Fare come segue per assegnare una funzione ad un tasto:
1. Fare clic sul menu a discesa e selezionare la funzione che si vuole assegnare la tasto.
6
Page 81

Italiano
2. Fare clic su Apply (Applica) per salvare ed applicare le modifiche.
Fare riferimento alla tabella che segue per tutte le funzioni disponibili ed a quali
tasti possono essere assegnate.
Ta s to Descrizione
superiore
Funziona come il tasto
principale del mouse per la
selezione ed il trascinamento
Apre il menu contestuale
Esegue la funzione assegnata al
tasto centrale
Scorre automaticamente la
pagina verso l’alto o il basso
quando è premuto ed il mouse è
mosso
Esegue l’azione del doppio clic
Premendo il tasto si abiliterà la
funzione di blocco
trascinamento del tasto
principale del mouse.
Prem endolo d i nuovo s i
disabilita il blocco
trascinamento
Ingrandisce la finestra attiva
Riduce a icona la finestra attiva
Apre la schermata Risorse del
computer
Aprire il pannello di controllo
Apre il menu Start di Windows
Funzione
Nessuna
Tast o p ri nci pa l e
del mouse
Menu contessutale
/ Alternativo
Tast o c en tra le
Scorrimento
rapido /
automatico
Doppio clic
Blocco
trascinamento
Ingrandisci
finestra
Riduci a icona
Risorse del
computer
Pannello di
controllo
Tast o S ta rt
Sinistro Destro Medio Parte
3333
Predefinito 33
3 Predefinito 3
333
33Predefinito
333
333
333
333
3333
3333
3333
7
Page 82

Funzione
Internet Explorer
Pagina successiva
(Alt+Destra)
Pagina
precedente
(Alt+Sinistra)
IE7 QuickTab
(Ctrl+Q)
Salva (Ctrl+S)
Copia (Ctrl+C)
Tagl ia (C trl +X )
Incolla (Ctrl+V)
Annulla (Ctrl+Z)
WMP / Esecuzione
e Pausa
Avvia programma
FastFind™
Cambio
applicazione
(Alt+Tab)
Vista Flip-3D
(Windows+Tab)
Sinistro Destro Medio Parte
333
333
333
333
333
3333
3333
superiore
3
3
3
3
3
3
Predefinito
Ta s to Descrizione
Apre Internet Explorer
Va avanti di una pagina
Va indietro di una pagina
Apre la funzione Internet
Explorer 7 QuickTab
Salva il documento o il file
corrente
Copia negli appunti il testo o
l'elemento selezionato
Taglia ed inserisce negli appunti
il testo o l'elemento selezionato
Incolla dagli appunti il testo o
l'elemento selezionato
Annulla l'ultima azione
Apre Windows Media Player /
Esegue e mette in pausa le
tracce durante la riproduzione
Apre un programma specificato
Apre un motore di ricerca
Internet specificato per cercare
siti, immagini o blog in linea
Permette di passare ad un’altra
applicazione attiva
Avvia la funzione Vista Flip-3D
che aiuta a passare tra le
finestre aperte
8
Page 83

Italiano
Regolare la velocità di scorrimento
Si può regolare la velocità con la quale si esegue lo scorrimento orizzontale e
verticale dello schermo.
1. Nella sezione Scroll Speed (Velocità scorrimento), spostare verso destra il
dispositivo di scorrimento Vertical (Verticale) per aumentare la velocità di
scorrimento verticale, oppure verso sinistra per diminuire la velocità di
scorrimento verticale. Sotto il dispositivo di scorrimento è visualizzato il
numero di righe che saranno scorse verticalmente.
2. Spostare verso destra il dispositivo di scorrimento Horizontal (Orizzontale)
per aumentare la velocità di scorrimento orizzontale , oppure verso sinistra
per diminuire velocità di scorrimento orizzontale . Sotto il dispositivo di
scorrimento è visualizzato il numero di caratteri che saranno scorsi
orizzontalmente.
3. Fare clic su Apply (Applica) per salvare ed applicare tutte le modifiche.
Regolare la velocità del mouse
Si può configurare la velocità di movimento del cursore del mouse, come anche il
tempo di risposta quando si fa doppio clic su un tasto.
1. Nella sezione Mouse Speed (Velocità mouse), spostare verso destra il dispositivo di scorrimento Double Click (Doppio clic) per aumentare la velocità del doppio clic, oppure verso sinistra per diminuire la velocità del doppio clic.
2. Spostare verso destra il dispositivo di scorrimento Cursor (Cursore) per aumentare il tempo risposta quando si fa doppio clic su un tasto, oppure verso sinistra per diminuire il tempo di risposta.
3. Fare clic su Testing Area (Area di prova) per provare le nuove impostazioni.
4. Fare clic su Apply (Applica) per salvare ed applicare tutte le modifiche.
9
Page 84

Configurazione delle impostazioni avanzate
Fare clic su Advanced (Avanzate) per visualizzare la
schermata delle impostazioni avanzate. Qui si possono
regolare le impostazioni per visualizzare icone e messaggi
d’avviso. Per regolare altre impostazioni avanzate, fare
clic su Pannello di controllo e poi, nella finestra che
appare, fare clic su Impostazioni mouse.
Mostra iConfig nell’area di notifica
Selezionare questa opzione per visualizzare l’icona iConfig nell’area di notifica del
sistema.
1. Selezionare Show iConfig in Taskbar Notification Area (Mostra iConfig nell’area di notifica) per visualizzare l’icona nell’area di notifica.
2. Fare clic su OK per salvare le impostazioni.
Mostra la finestra d’avviso batteria scarica
1. Selezionare questa opzione per visualizzare una finestra d’avviso quando la batteria è scarica.
2. Fare clic su OK per salvare le impostazioni.
Rimozione del software iConfig™
1. Fare clic su Pannello di controllo.
2. Fare doppio clic su Installazione applicazioni.
3. Nell’elenco, trovare il programma iConfig™.
4. Fare clic su Rimuovi.
5. Apparirà un messaggio di conferma. Fare clic su Sì per rimuovere il programma oppure su No per annullare.
10
Page 85

Italiano
Risoluzione dei problemi
Se si riscontrano problemi con il mouse, controllare quanto segue:
• Controllare i requisiti del sistema ed accertarsi che il sistema sia compatibile.
• Verificare che il ricevitore USB micro sia collegato in modo appropriato alla
porta USB del PC. Un collegamento lasco può provocare anomalie nel
funzionamento del mouse.
• Quando il LED del mouse è di colore arancione, significa che la batteria è
scarica. Sostituire immediatamente le batterie.
• Se il mouse non funziona, controllare la funzione USB del mouse nel BIOS del
sistema. La funzione deve essere abilitata per l’uso normale.
• Se il BIOS setup del PC ha opzioni del mouse, assicurarsi che siano congiurate
sulle impostazioni predefinite. Fare riferimento al manuale del PC per altre
informazioni sul BIOS del PC.
• Usare il mouse solo su superfici pulite, piatte, non scivolose per assicurare una
azione regolare ed accurata del cursore. Se si usa un tappetino per il mouse, i
colori scuri consumano più energia delle batterie.
Per qualsiasi altra domanda ed altra assistenza, mettersi in contatto con il
rivenditore che fornirà l’assistenza tecnica.
11
Page 86

Page 87

Page 88

Page 89

FCC Statement
This equipment has been tested and found to comply with the limits for a Class B digital
device, pursuant to Part 15 of the FCC Rules. These limits are designed to provide reasonable
protection against harmful interference in a residential installation. This equipment generates
uses and can radiate radio frequency energy and, if not installed and used in accordance with
the instructions, may cause harmful interference to radio communications. However, there is
no guarantee that interference will not occur in a particular installation. If this equipment
does cause harmful interference to radio or television reception, which can be determined by
turning the equipment off and on, the user is encouraged to try to correct the interference by
one of the following measures:
- Reorient or relocate the receiving antenna.
- Increase the separation between the equipment and receiver.
- Connect the equipment into an outlet on a circuit different from that to which the receiver
is connected.
- Consult the dealer or an experienced radio/TV technician for help.
FCC Caution: Any changes or modifications not expressly approved by the party responsible
for compliance could void the user's authority to operate this equipment.
IMPORTANT NOTE:
FCC Radiation Exposure Statement:
This equipment complies with FCC radiation exposure limits set forth for an uncontrolled
environment. This equipment should be installed and operated with minimum distance 20cm
between the radiator & your body.
This transmitter must not be co-located or operating in conjunction with any other antenna
or transmitter.
This device complies with Part 15 of the FCC Rules. Operation is subject to the following two
conditions: (1) This device may not cause harmful interference, and (2) this device must accept
any interference received, including interference that may cause undesired operation.
 Loading...