

Page 1
RocketFish Desktop 2.4G Laser
Mouse
User Manual
Page 2
RocketFish Desktop 2.4G Laser Mouse
Federal Communication Commission Interference Statement
This equipment has been tested and found to comply with the limits for a Class B digital
device, pursuant to Part 15 of the FCC Rules. These limits are designed to provide
reasonable protection against harmful interference in a residential installation. This
equipment generates, uses and can radiate radio frequency energy and, if not installed
and used in accordance with the instructions, may cause harmful interference to radio
communications. However, there is no guarantee that interference will not occur in a
particular installation. If this equipment does cause harmful interference to radio or
television reception, which can be determined by turning the equipment off and on, the
user is encouraged to try to correct the interference by one of the following measures:
- Reorient or relocate the receiving antenna.
- Increase the separation between the equipment and receiver.
- Connect the equipment into an outlet on a circuit different from that to which the
receiver is connected.
- Consult the dealer or an experienced radio/TV technician for help.
This device complies with Part 15 of the FCC Rules. Operation is subject to the following
two conditions: (1) This device may not cause harmful interference, and (2) this device
must accept any interference received, including interference that may cause undesired
operation.
FCC Caution: Any changes or modifications not expressly approved by the party
responsible for compliance could void the user's authority to operate this equipment.
IMPORTANT NOTE:
FCC Radiation Exposure Statement:
This equipment complies with FCC radiation exposure limits set forth for an uncontrolled
environment. End users must follow the specific operating instructions for satisfying RF
exposure compliance. This transmitter must not be co-located or operating in
conjunction with any other antenna or transmitter.
Canada-Industry Canada(IC)
Operation is subject to the following two conditions: 1) this device may not cause
interference and 2) this device must accept any interference, including interference that
may cause undesired operation of the device.
Regulatory Information
FCC Compliance Statement
This device complies with part 15 of the FCC Rules. Operation is
subject to the following two conditions: (1) This device may not cause
harmful interference, and (2) this device must accept any interference
received, including interference that may cause undesired operation.
This equipment has been tested and found to comply with the limits
for a Class B digital device, pursuant to part 15 of the FCC Rules.
These limits are designed to provide reasonable protection against
harmful interference in a residential installation. This equipment
generates, uses and can radiate radio frequency energy and, if not
installed and used in accordance with the instructions, may cause
harmful interference to radio communications. However, there is no
guarantee that interference will not occur in a particular installation. If
this equipment does cause harmful interference to radio or television
reception, which can be determined by turning the equipment off and
on, the user is encouraged to try to correct the interference by one or
more of the following measures:
- Reorient or relocate the receiving antenna.
- Increase the separation between the equipment and receiver.
- Connect the equipment into an outlet on a circuit different from
that to which the receiver is connected.
- Consult the dealer or an experienced radio/TV technician for
help.
Eye Safety of Laser Devices
This RocketFish Desktop 2.4G Laser Mouse is a class 1 laser product
in accordance with ICE 60825-1.
i
Page 3

RocketFish Desktop 2.4G Laser Mouse
Contents
Regulatory Information ................................... i
Introduction .................................................1
Package List .................................................................... 1
Features .......................................................................... 2
Hardware ......................................................................... 3
Installing the Batteries ....................................5
Installing and Uninstalling Mouse Suite ................6
Installing the Mouse Suite ............................................... 6
Uninstalling the Mouse Suite ........................................... 7
Setting up the Mouse ......................................8
Connecting to a PC ......................................................... 8
Using the Laser Mouse. ................................. 10
Mouse Status LED ......................................................... 10
Changing the Mouse Resolution ................................... 10
User Configurable Buttons ............................................ 11
Using the Mouse Suite ................................... 12
Using the Mouse Suite for the First Time ...................... 12
Configuring Mouse Buttons ........................................... 13
Available Functions ....................................................... 14
HyperGrid ...................................................................... 16
Hyperlink ........................................................................ 17
Magnifier Function ......................................................... 17
Button Defaults .............................................................. 17
Slowing Down the Double-Click .................................... 18
Orientation Setup ........................................................... 19
ii
Page 4

RocketFish Desktop 2.4G Laser Mouse
Tilt Scroll Wheel Setup ...................................................20
Pointer Utility ..................................................................23
Configuring Mouse Suite Settings ..................................24
Troubleshooting ..........................................25
iii
Page 5
RocketFish Desktop 2.4G Laser Mouse
1 Introduction
Congratulations on your purchase of the RocketFish Desktop 2.4G
Laser Mouse.
Your mouse features an innovative tilt scroll wheel that let’s you scroll
windows up and down, and side to side. The smooth navigation is a
more efficient way to navigate your documents and web pages.
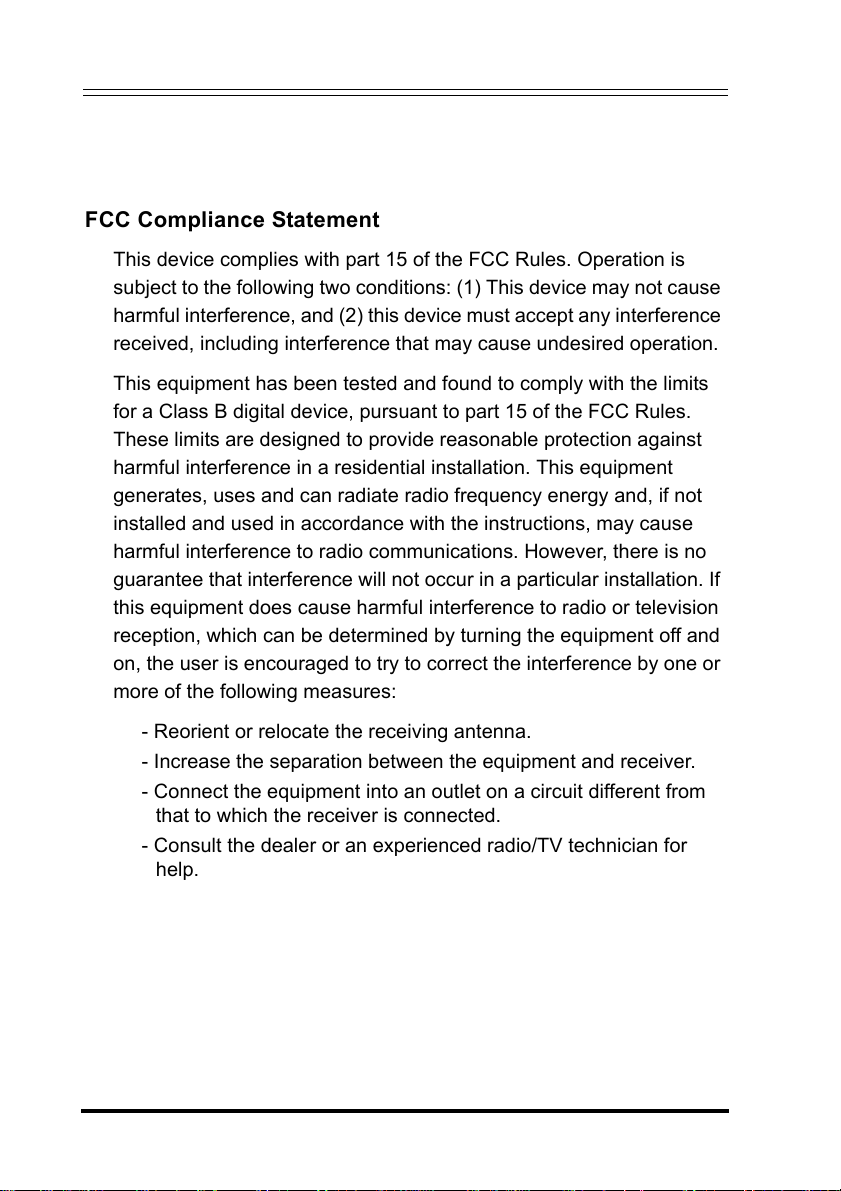
1.1 Package List
Before you start using the set, check the following contents in your
package. If anything is missing, contact your retailer.
Laser Mouse CD
User Manual
(Slim) USB Receiver User Manual
AA Batteries x 2
1
Page 6

RocketFish Desktop 2.4G Laser Mouse
1.2 Features
Optical Mouse Features
• Tilt scroll wheel
• Five programmable buttons
• Resolution setting button
• Power saving mode
• LED indicator
Slim USB Receiver
System Requirements
• USB mouse supported computer
• Microsoft Windows 2000/XP/Vista or later
Software Features
• Windows 2000/XP/Vista compatible
• Mouse Suite for configuring and managing mouse settings
2
Page 7
RocketFish Desktop 2.4G Laser Mouse
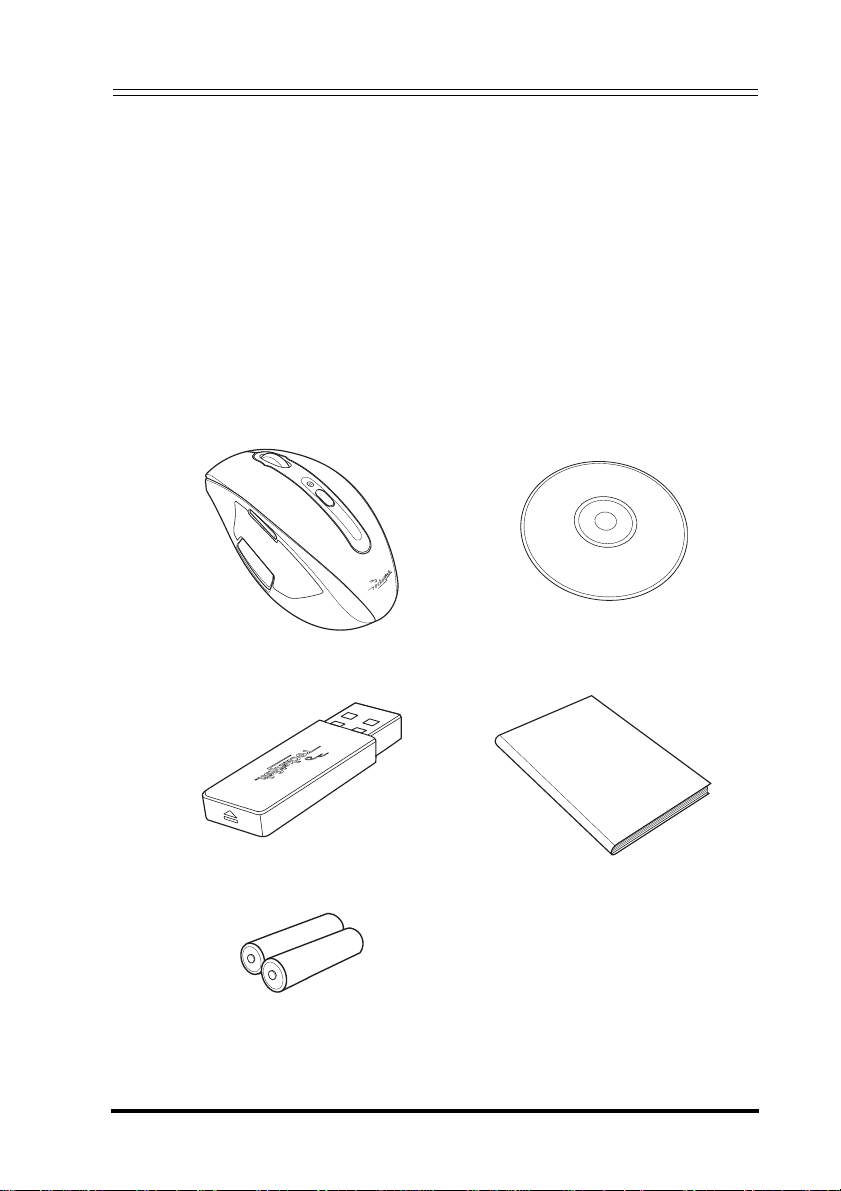
1.3 Hardware
Profile
1
2
3
4
5
Item Description
1 Left button
2 Right button
3 Tilt/Scroll Wheel button
4 Status LED
5 Resolution button
6 Programmable Button A
6
7
7 Programmable Button B
3
Page 8

RocketFish Desktop 2.4G Laser Mouse
LED Status
The following table lists the status of each LED, and their
descriptions.
LED Color Description
Mouse LED Green Mouse is turned on, battery level nor-
mal (illuminates for 5 seconds).
Red Low battery (flashes for 1 minute).
USB Receiver
LED
Green Wireless connection active and operat-
ing correctly (lit when mouse is in use).
Red Connection in progress (flashing).
4
Page 9
RocketFish Desktop 2.4G Laser Mouse
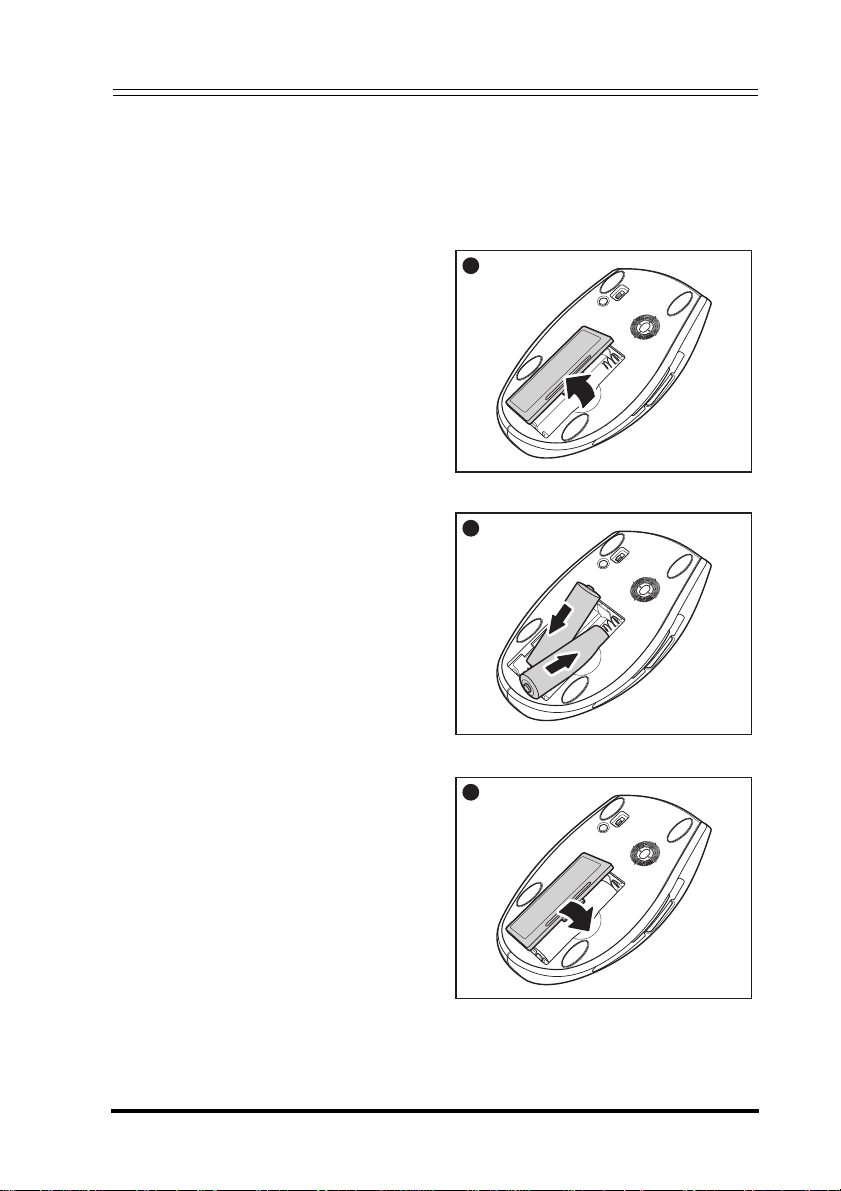
2 Installing the Batteries
The mouse needs two AA size batteries. Follow the steps below to
install the batteries.
1. Push the tab to release the
battery cover.
2. Install two "AA" batteries
observing the polarity (+ and -)
indicated inside the housing.
3. Replace the battery cover.
1
2
3
p
5
Page 10

RocketFish Desktop 2.4G Laser Mouse
3 Installing and Uninstalling Mouse
Suite
3.1 Installing the Mouse Suite
Before installing the Mouse Suite, insert the USB receiver into an
available USB port of your computer.
1. Insert the provided Installation CD in the CD ROM drive.
2. The software starts automatically. If not, click the Setup.exe in the
bin folder of the CD ROM.
3. The welcome screen introduces the installation process. Click
Next to continue.
4. Review a summary of items to be installed, and then click Next to
continue.
6
Page 11

RocketFish Desktop 2.4G Laser Mouse
5. The program installed successfully and requires you to reboot
your computer before using the Mouse Suite.
3.2 Uninstalling the Mouse Suite
Follow the steps below to uninstall the Mouse Suite from your
computer.
1. Remove the USB receiver.
2. Click Start > Settings > Control Panel > Add/Remove
Programs.
3. Select Mouse Suite from the program list and click Remove.
4. The system starts to remove the program, it may take a while to
uninstall.
5. When the program has been removed, a prompt requires you to
restart the computer. Click Yes to restart your computer now or No
to restart later.
7
Page 12

RocketFish Desktop 2.4G Laser Mouse
4 Setting up the Mouse
4.1 Connecting to a PC
After instaling the batteries, your mouse is ready to use.
1. Insert the USB receiver into an available USB port of your
computer.
2. Now slide the power switch of the mouse to turn the mouse on.
2
1
3. If this is the first time you have connected the USB receiver to your
computer, the Found New Hardware Wizard automatically
launches. Cancel the Wizard and follow the steps below.
4. Move the mouse to check it is connected.
8
Page 13

RocketFish Desktop 2.4G Laser Mouse
5. If the mouse does not respond, press
and hold the Pairing button as shown
until the LED flashes every second. This
indicates the Bluetooth dongle has
started to search for device to be paired.
Ea c h time yo u turn on y our co m p u ter,
the mouse is automatically detected.
Enabling the USB Mouse Function in BIOS
If the mouse fails to work (refer to “7 Troubleshooting” on page 25
for possible solutions), check that the USB function of the mouse has
been enabled in the BIOS.
Some older PC systems do not support the USB keyboard/mouse
in BIOS/DOS environment.
Pairing
button
9
Page 14

RocketFish Desktop 2.4G Laser Mouse
5 Using the Laser Mouse
• The scroll wheel on the mouse is automatically disabled when
the mouse is pairing.
• The mouse enters a power saving mode when not in use for a
period of time.
5.1 Mouse Status LED
The Laser Mouse has a battery
status LED. When the battery is low,
the LED flashes red for 1 minute.
You should change the batteries
immediately.
1
2
3
Status
4
LED
5
5.2 Changing the Mouse Resolution
Your mouse can operate in
resolutions of 800 dots per inch (dpi)
or 1600 dpi. Push the Resolution
button located in the center of top
view of the mouse to toggle
between resolutions. The higher
resolution is more accurate but may
be more difficult to control.
It is recommended to use higher
resolutions for gaming, and lower resolutions for normal operation.
1
2
3
4
5
Resolution
Button
10
Page 15

RocketFish Desktop 2.4G Laser Mouse
5.3 User Configurable Buttons
There are two mouse
buttons located on the left
side of the mouse. Both
can be configured to
perform user defined
functions. For a list of
available functions please
see “6.2 Configuring
Mouse Buttons” on
page 13.
Configurable Buttons
6
7
11
Page 16

RocketFish Desktop 2.4G Laser Mouse
6 Using the Mouse Suite
6.1 Using the Mouse Suite for the First Time
To start using the Mouse Suite, double-click the Mouse icon in the
system tray or right-click to view the context menu, and then click
Adjust Mouse Properties.
If the mouse icon is not in your system tray, click Start > Settings >
Control Panel > RocketFish to start using the software.
About the Mouse Suite icon
1. The mouse icon indicates the USB receiver and mouse are
connected.
2. A red icon indicates the mouse battery is low.
3. A white icon indicates the battery is ok.
About the Mouse Suite Dialog
The main dialog is divided into six tabs. Click each tab to view related
settings.
Under each tab there are three common buttons:
• Click OK to save your settings and close the dialog.
• Click Cancel to exit this dialog without saving.
• Click Apply to have your changes take effect without closing this
dialog.
12
Page 17

RocketFish Desktop 2.4G Laser Mouse
6.2 Configuring Mouse Buttons
Click the Buttons tab to view an image of your mouse and a
description of button functions.
There are two ways you can assign functions to each of the buttons:
1. Click the drop down menu next to the button you wish to
customize in the button overview screen.
2. Select the function you wish to assign to the button from the list.
3. Click Apply to start using this function or Cancel to exit the Mouse
Suite without making changes.
OR
1. Click the Button drop down menu. Select the button you wish to
customize from the list.
2. Click the Function drop down menu. Select the function you wish
to assign to the button from the list.
3. Click Apply to start using this function or Cancel to exit the Mouse
Suite without making changes.
13
Page 18

RocketFish Desktop 2.4G Laser Mouse
The following table lists the fields in this screen.
Function Description
Mouse Click this combo box to select your mouse from a list of com-
patible devices.
Use Default Click this button to return the settings on this screen to sys-
tem defaults.
Button Click this combo box, and then select the button to configure.
See “Available Functions” on page 14 for a list of functions
and their descriptions.
Function Click this combo box to display a list of functions to assign
the button selected in the Button field.
Settings This button is only available when the selected function has
a configurable setting. Click this button to edit that setting.
6.3 Available Functions
You can assign one of the following functions to each button on your
mouse.
Function Description
Primary Mouse
Button
Context Menu Opens the context menu
Page Down Scrolls down the screen one page
Page Up Scrolls up the screen one page
Next Window Makes the next window active
Close Window Closes the active window
Maximize Window Maximizes the active window
Minimize Window Minimizes the active window
Quick/Auto Scroll Scrolls the page up and down when held and the
Functions as the primary mouse button for selection
and dragging
mouse is moved
14
Page 19

RocketFish Desktop 2.4G Laser Mouse
Function Description
Copy (Ctrl+C) Copies the selected item or text to the clipboard
Cut (Ctrl+X) Cuts the selected item or text to the clipboard
Undo (Ctrl+Z) Undo the previous action
Redo (Ctrl+Y) Redo the previous action
My Computer Opens the My Computer screen
Enter Emulates pressing the Enter key
Escape Emulates pressing the Escape key
Tab Emulates pressing the Tab key
Shift Emulates pressing the Shift key
Alt Emulates pressing the Alt key
Ctrl Emulates pressing the Ctrl key
Delete Emulates pressing the Delete key
Backspace Emulates pressing the Backspace key
Save Saves the current document or file
Start Button Opens the Windows Start menu
Web Browser Opens your default web browser
Windows Explorer Opens Windows Explorer
Control Panel Opens the Control Panel
Printers Opens the Printers folder
HyperGrid Opens a menu with access to nine most commonly-
performed actions. See “HyperGrid” on page 16
for details
Double-click Performs a double-click action
15
Page 20

RocketFish Desktop 2.4G Laser Mouse
Function Description
Drag Lock Pressing the button will enable the drag lock feature
of the primary mouse button. Pressing again will disable drag lock
Hyperlink Opens a specified program. See “Hyperlink” on
page 17 for details
Magnifier Enables the Magnifier function. See “Magnifier
Function” on page 17 for details
6.4 HyperGrid
The HyperGrid function, when assigned to one of the buttons on your
mouse, opens a menu with easy access to nine of the most
commonly used functions.
Click and hold the button to open the menu. Move the pointer to the
function you need and release the button to select.
Press the button again to exit the selected function.
Maximize active window
Minimize active window
Make next window active
Open Start menu
16
Close active window
Vertical scroll
Resize active window
Horizontal scroll
Page 21

RocketFish Desktop 2.4G Laser Mouse
6.5 Hyperlink
The Hyperlink function, when assigned to one of the buttons on your
mouse, opens up a specified program.
1. Assign Hyperlink to one of the buttons.
2. Click Settings.
3. Enter or browse for the program
you want to open. You can add a
description if you wish.
4. Click OK and then Apply on the
main screen.
5. When you click the assigned button, the program you have
specified will load.
6.6 Magnifier Function
The Magnifier is a unique feature of the mouse. It allows you to zoom
in on a specific area of the screen for viewing in closer detail.
1. Check the Magnifier checkbox.
2. Assign Magnifier to one of the buttons.
3. Click Apply to have your changes take effect.
6.7 Button Defaults
Each button is assigned a default function.
Function Description
Left Button Primary Mouse Button
Right Button Context Menu
Wheel Button Quick/Auto Scroll
Programmable
Button A
Programmable
Button B
To restore these default functions at any time, click Use Default.
Scroll up the document window one page at a time /
Go back to previous visited page in the browser
Scroll down the document window one page at a time /
Go to next (previously visited) page in the browser
17
Page 22

RocketFish Desktop 2.4G Laser Mouse
6.8 Slowing Down the Double-Click
Many items in Windows require that you click the left mouse button
twice in quick succession to be activated. This is called a ‘double
click’.
If you experience difficulty double clicking on items, this is because
the time in which you have to preform two clicks of the left mouse
button is too short.
Click the Double-Click tab to set the delay between clicks for which a
double-click is registered.
Double-click on the icon in the test area. If the icon does not animate,
you will need to slow down the double click.
The following table lists the fields in this screen.
Function Description
Double-Click Speed Click and drag this slider towards Slow or Fast to
set the double-click speed.
Reset to Default Value Click this button to return the double-click speed
to the original value.
18
Page 23

RocketFish Desktop 2.4G Laser Mouse
Test Area Double-click this icon to test the double-click
speed. If successful the icon animates.
If the icon does not animate, adjust the Double-
Click Speed.
6.9 Orientation Setup
Click the Orientation tab to set the desired angle to hold your mouse.
The following table lists the fields in this screen.
Function Description
Set Orientation Hold the mouse at the desired angle of use, and then
click this button. Now move the mouse to your right and
make the animated dog run across the screen.
The mouse orientation is now matched to the angle at
which you held the mouse.
Reset Orientation Click this button to return the mouse orientation to its
default setting.
19
Page 24

RocketFish Desktop 2.4G Laser Mouse
6.10 Tilt Scroll Wheel Setup
Your mouse comes with an advanced scroll
wheel that enables horizontal window
scrolling as well as vertical.
Click the Wheel tab to configure how the scroll and tilt wheel on your
mouse is used in the windows environment.
20
Page 25

RocketFish Desktop 2.4G Laser Mouse
Wheel
You can choose to enable Universal Scrolling or Microsoft Office 97
emulation scrolling.
1. Select Enable Universal Scrolling or Use Microsoft Office 97
Scrolling Emulation only.
Universal
Scrolling
Microsoft Office
97 Scrolling Emulation
Select to enable scrolling in all applications, not only
those that support IntelliMouse functionality.
Select to enable scrolling in older applications that are
only Office 97 compatible.
2. If you select universal scrolling, click Exceptions to
configure applications in which it will not be available.
3. Click Apply to have your changes take effect.
Exceptions
Click the Exception button in the Wheel tab to display a list of
applications that use Microsoft Ofice 97 Scrolling Emulation
regardless of whether universal scrolling is enabled.
1. Select an item in the list, and then click Remove to delete that
item.
21
Page 26

RocketFish Desktop 2.4G Laser Mouse
2. Click Add, and then click Browse to select the application to add
to this list.
Wheel Button
You can assign a separate function to the wheel button itself, apart
from the scroll function.
1. Select Quick/Auto Scroll Control or Button Function.
Quick / Auto Scroll
Control
Button Function Select and choose a function from the drop down
Select to enable the button to act as a scroll speed
control when pressed.
menu to assign to the wheel button.
2. Click Apply to have your changes take effect.
Scrolling Speed
You can specify the speed at which the window will scroll when using
the scroll wheel.
1. Select Scroll x lines per notch or Scroll one screen per notch.
Scroll x lines per
notch
Scroll one screen
per notch
2. Click Apply to have your changes take effect.
Select to set the number of lines to scroll when the
scroll wheel is moved one notch. Specify the number of
lines with the up and down arrows.
Select to scroll the entire window when the scroll wheel
is moved one notch (i.e. page up/down).
22
Page 27

RocketFish Desktop 2.4G Laser Mouse
6.11 Pointer Utility
Click the Pointer Utility tab to configure additional pointer
functionality.
Pointer Wrap Enable this function to allow the pointer to exit one side of
the screen and appear on the opposite side.
Slow Motion Enable this function to have the pointer slow down when
the Shift key is held down.
X Focus Enable this function to make the window under the pointer
the active window.
1. Select the function(s) to apply to the pointer.
2. Click Apply to have your changes take effect.
23
Page 28

RocketFish Desktop 2.4G Laser Mouse
6.12 Configuring Mouse Suite Settings
Click the Mouse Suite tab to add the Mouse Suite icon to the system
tray or uninstall the Mouse Suite software.
1. Check Show mouse icon in systray to display the icon in the
system tray.
2. Click Apply to have your changes take effect.
Uninstalling the Mouse Suite
1. Click Uninstall.
2. A confirmation message displays. Click Yes to uninstall or No to
cancel.
24
Page 29

RocketFish Desktop 2.4G Laser Mouse
7 Troubleshooting
If you have any problems with your mouse, please check the
following:
• Check the system requirements to make sure that your system
is compatible.
• Check to see if the batteries in the mouse are installed
correctly. Make sure the polarity of the batteries corresponds
with the polarity signs inside the mouse battery compartments.
• When the mouse LED is lit red, it indicates battery power low.
Replace them with new batteries immediately.
• Once the Mouse Suite (see “Installing the Mouse Suite” on
page 6) is installed on your computer, the battery status of your
mouse is displayed my moving the mouse over the mouse icon
in your system tray. See “About the Mouse Suite icon” on
page 12.
• If the mouse fails to work, check the USB mouse function in
your system’s BIOS. The function should be enabled for
normal use.
• If your PC BIOS setup has mouse options, make sure they are
set to default settings. If you are not familiar with the BIOS,
refer to your PC’s manual for more information.
• Only use the mouse on a clean, flat, non-slippery surface in
order to ensure smooth and accurate cursor action. If you use
a mouse-pad, darker colors require more battery power.
For further assistance with any other questions you may have, please
contact your dealer for technical support.
25
 Loading...