

Page 1
THANK YOU
Thank you for purchasing the GA-6290-15 SPYDER 5-Button
Wireless Laser Mobile Mouse. This manual will provide you
with what you will need to know about your new mouse.
THIS PACKAGE INCLUDES
USER GUIDE
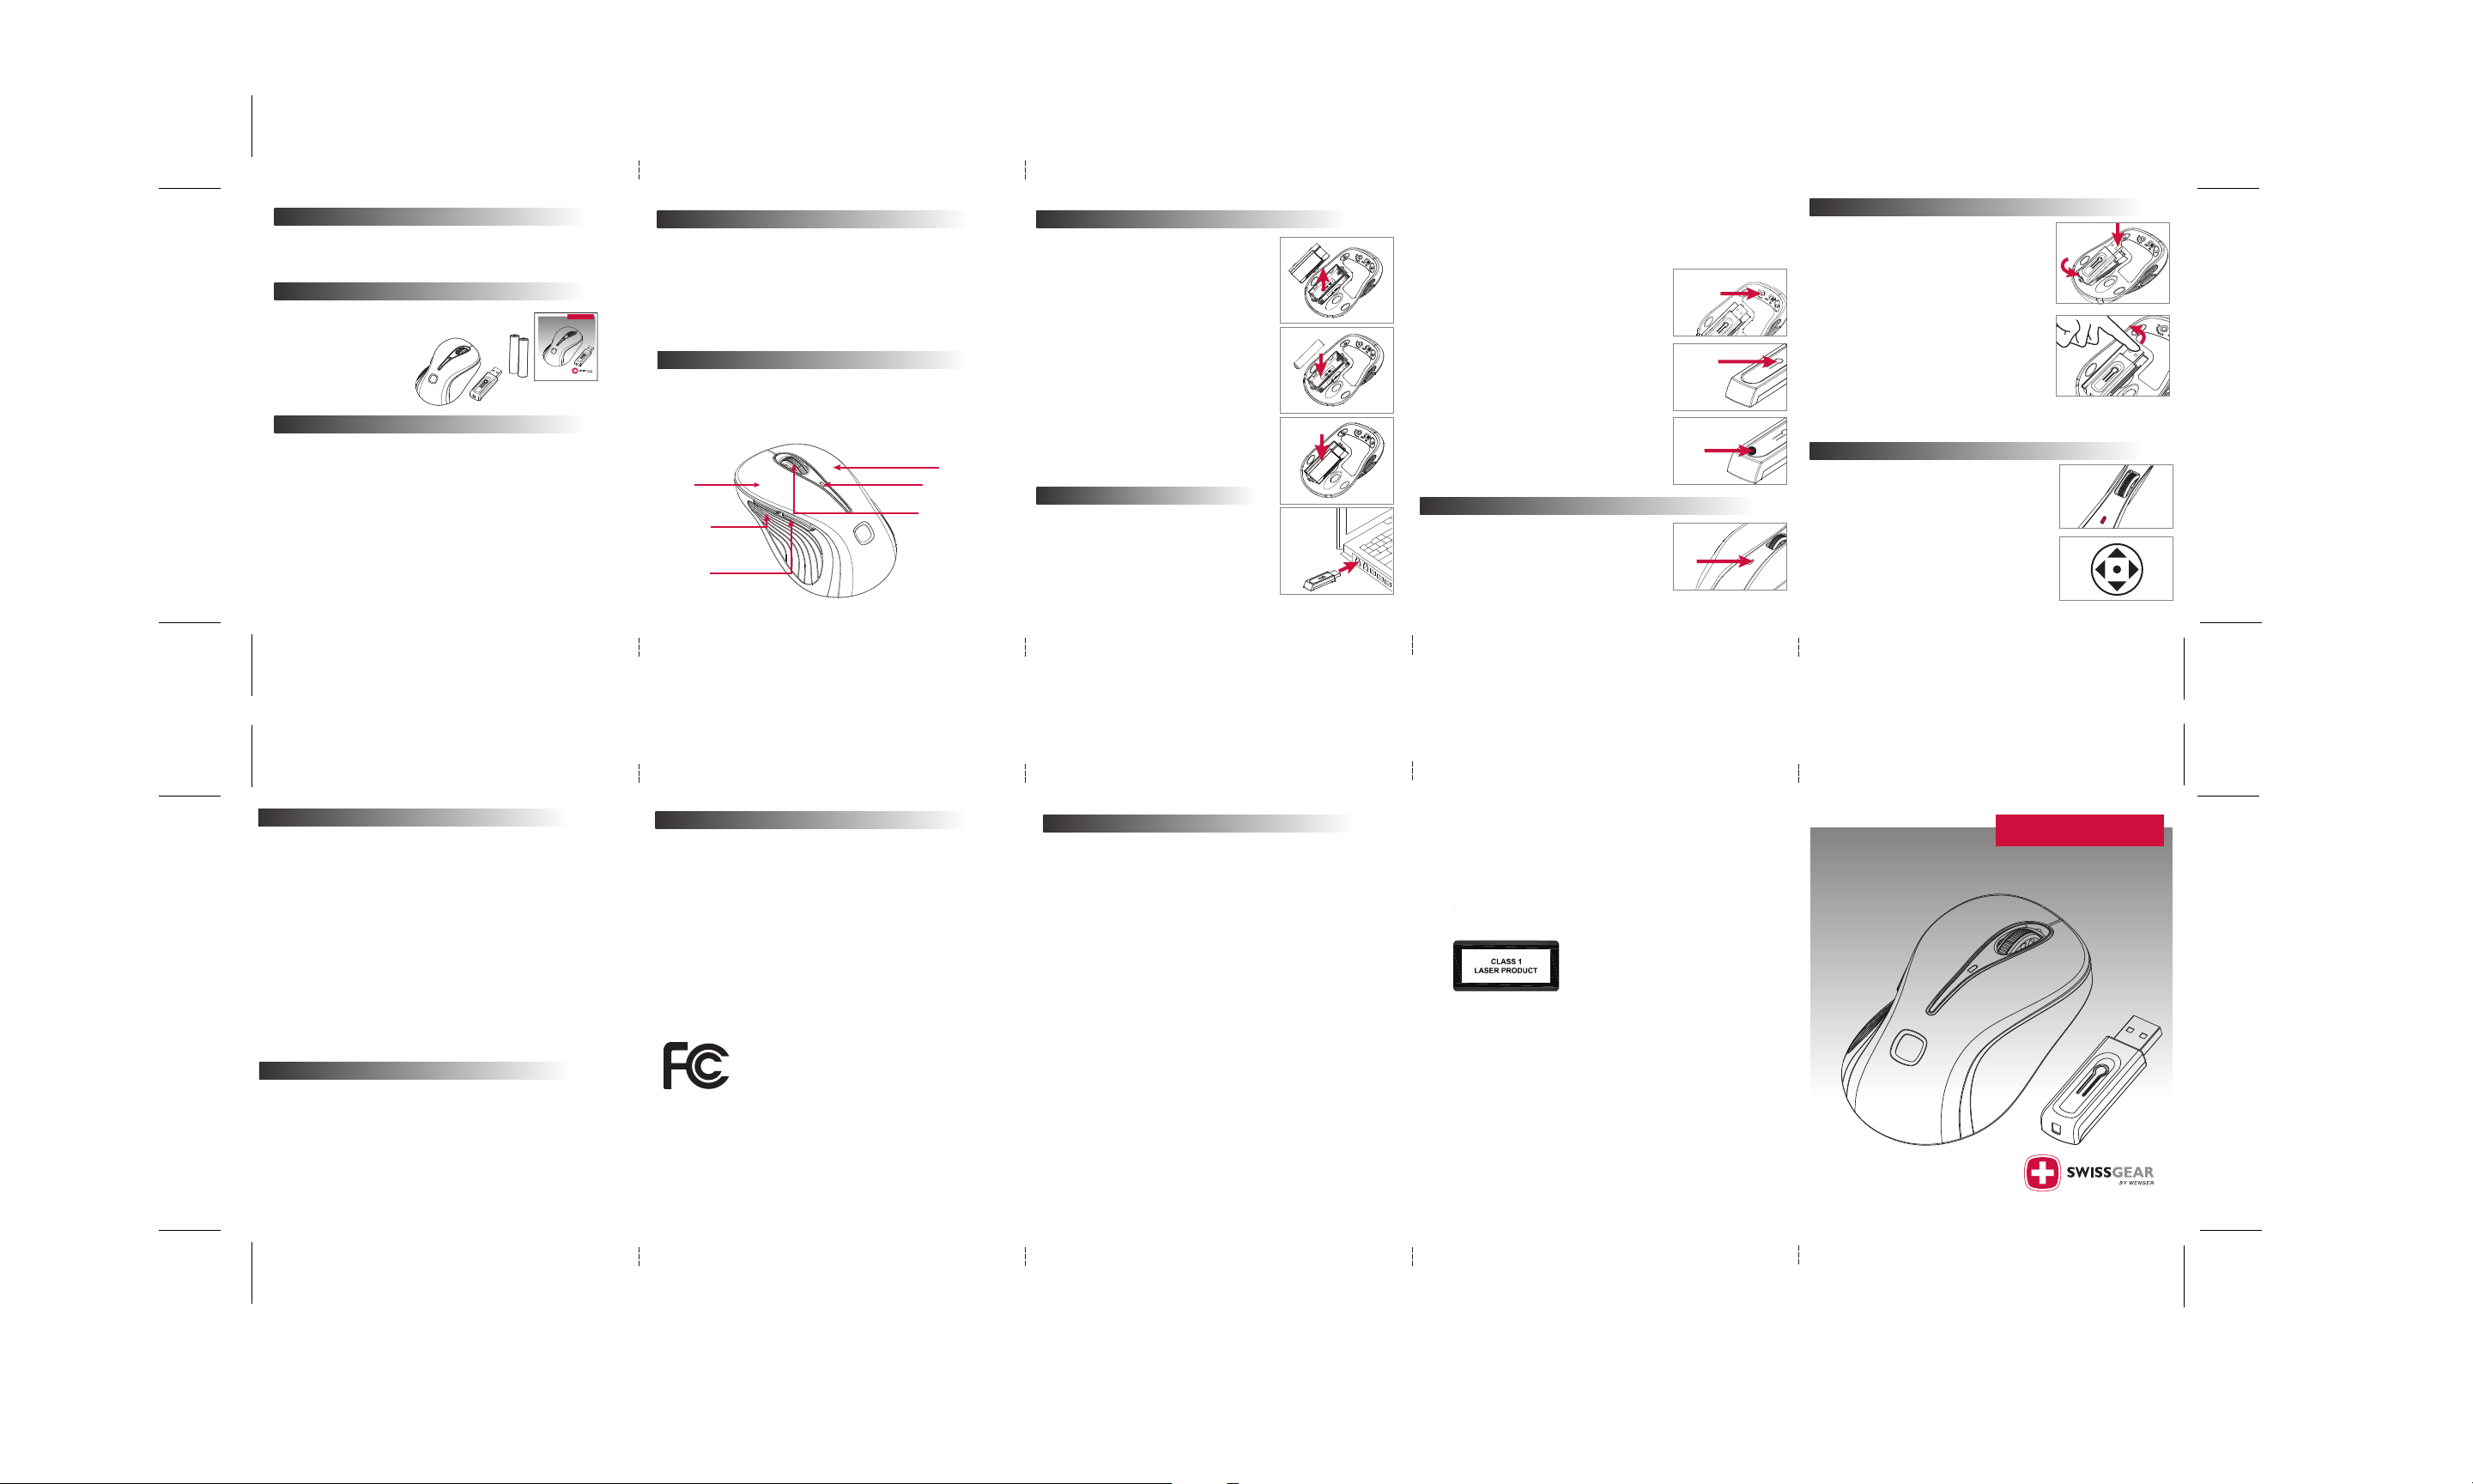
The SPYDER
• One GA-6290-15 SPYDER 5-Button
Wireless Laser Mobile Mouse
5-Button
Wireless Laser
Mobile Mouse
GA-6290-15
• One USB Storable Receiver
• User Guide
• 2 AAA Alkaline
FROM TH E M AKE R O F THE GE NUI NE SW ISS AR MY KN IFE ™
Batteries
MANUAL CONTENTS
Features . . . . . . . . . . . . . . . . . . . . . . . . . . . . . . . . . . . . . . . . . . .
Overview . . . . . . . . . . . . . . . . . . . . . . . . . . . . . . . . . . . . . . . . . .
Installation/Trouble Shooting . . . . . . . . . . . . . . . . . . . . . . . .
4/5
Battery Indicator . . . . . . . . . . . . . . . . . . . . . . . . . . . . . . . . . . . .
Receiver Storage/Turn Mouse On-Off. . . . . . . . . . . . . . . . . . . .
Center Scroll Function . . . . . . . . . . . . . . . . . . . . . . . . . . . . . . . .
Important . . . . . . . . . . . . . . . . . . . . . . . . . . . . . . . . . . . . . . . . . .
Technical Specifications . . . . . . . . . . . . . . . . . . . . . . . . . . . . . . .
FCC Compliance Statement . . . . . . . . . . . . . . . . . . . . . . . . . . .
Product Registration . . . . . . . . . . . . . . . . . . . . . . . . . . . . . . . . .
1 Year Limited Warranty . . . . . . . . . . . . . . . . . . . . . . . . . . . . . .
Tech Support/Laser Warning Statement . . . . . . . . . . . . . . . . .
10
FEATURES
• PC - MAC USB Compatible
• Range 27 MHz Wireless Connection
• Low Battery Indicator
• 2 AAA Alkaline Batteries
• Mobile 27 MHz USB receiver
• 5 Function Buttons
1. Left, 2. Right, 3. Center Scroll, 4. Internet Backward, 5. Internet Forward
• Ergonomic design (universal left and right handed)
• Compatible with USB V1.1 low-speed & USB 2.0 High Speed protocol
OVERVIEW
This GA-6290-15 SPYDER 5-BUTTON Wireless Laser Mobile Mouse is the
latest in Laser mouse technology. Its high resolution is 1000 DPI that
provides the smoothest and most accurate tracking possible. Please
read this manual thoroughly and follow the instruction procedures to
prevent any damage to the mouse and any harm to yourself.
3
3
5
6
6
7
7
8
9
9
Funct ions :
Left
Internet
Forwards
(Non-programmable)
Internet
Backwards
(Non-programmable)
Right
Low Battery
LED Light
Center Scroll
INSTALLATION & TROUBLESHOOTINGINSTALLATION
Battery Installation:
Remove the battery compartment cover. (1)
1.
Install batteries with the positive (+) &
2.
negative (-) in the correct direction indicated
by the battery compartment label. (2)
Replace battery compartment cover. (3)
3.
Turn on mouse. Note: There will not be a red
4.
LED on the bottom of this mouse. Laser mice
do not emit a red LED light.
point Laser Hole into your eyes or look directly into the
Laser emitter. Keep away from young children.)
Connecting the Mouse to the Receiver:
Plug in the USB Receiver to any available USB
port or hub connected to your computer. (4)
(Windows will now detect the mouse and install the
required drivers automatically and the light will blink
when in use.)
YOUR MOUSE IS NOW READY TO BE USED!
(CAUTION: Do not
TROUBLESHOOTING
Synchronization:
Windows should have installed the drivers,
recognizing the mouse. If not, mouse may be in
sleep mode. Click any button once to wake it up.
If this does not work, Changing Wireless
Connection Channel or a Manual Re-Connect
Mouse to Receiver may be needed.
1
2
3
4
32 4 5 6
Manual Re-Connect Mouse to Receiver -
Changing the Wireless Connection Channel:
Note: Turn mouse on first.
Plug in USB Reciever.(4)
1.
While USB receiver is plugged in, press button
2.
on the top of the receiver (6) within 5 seconds
after clicking the connect button on the
mouse.
Click mouse “CONNECT” button once on
3.
bottom of mouse. (5)
Note: Click the receiver’s button FIRST, then
click the mouse bottom button!
Receiver LED will start blinking (7), when
4.
connection is established.
Move the mouse around to test if successful.
5.
If the synchronization is not successful:
6.
a.Remove batteries and unplug receiver
b.Wait 20 seconds and try steps 1 to 5 again.
If mouse still won’t work, re-start computer
and follow above instructions.
BATTERY INDICATOR
Note: To conserve battery power, turn mouse off.
When battery voltage level goes under the preset
level, battery indicator LED on top of the mouse
(8) will flash at least three times when moving or
clicking the mouse. Mouse will continue to
operate for a period, but batteries should be
replaced immediately.
5
Mouse
Connect
Button
6
Receiver
Connect
Button
7
Receiver
LED
8
Mouse
LED
RECEIVER STORAGE/ TURN MOUSE ON-OFF
For travel and loss prevention, store receiver in
cavity on the bottom of the mouse.
Storing receiver:
To store in the mouse bottom, (9) place back end of
receiver (A) into place then snap USB plug flush into
position with logo facing outwards. Receiver will
now be locked into position.
Removing Receiver:
Using the tip of your finger, lift receiver from
USB plug end first (10) and remove from cavity.
The USB is now active and ready to be inserted
into your computer’s USB port.
Turn Mouse On-Off:
Switch to “ON” position,
red LED on the bottom of this mouse.
red LED on top of the mouse body, will stay red for
3-4 seconds indicating power on. To turn off switch
to “OFF” position.
Note: There will not be a
Instead, the
CENTER SCROLL FUNCTION
1.
Move the scroll wheel (11) up to scroll up, and
down to scroll down.
2.
Press scroll wheel down until it clicks and scroll
icon appears on the application screen. (12)
This will temporarly place the mouse cursor
into scroll mode.
3.
Move the mouse to scroll up, down, left or right
depending on the application function. Press
scroll wheel down again to exit scroll mode.
9
10
Pull
Out
11
12
Push
Down
(A)
IMPO RTANT
1.
For optimal performance, mouse should be no more than 3 ft. from receiver.
2.
Due to orientation of USB ports on your notebook or hub, the combined
connect button/status light may not be in view.
3.
When Receiver is stored in bottom of the mouse, it automatically shuts
off to save battery power. If the mouse is not moved, it will go into sleep
mode. Mouse will wake when moved or button clicked.
4.
Laser sensors are rated for most surfaces. Avoid using the mouse on a
reflective or mirrored surface as this might cause the mouse to function
poorly or not at all.
5.
Before boarding an aircraft, remove batteries from the mouse or store
the receiver in bottom of mouse (turning it off). The mouse can transmit
radio frequency energy when it is activated.
6.
The scrolling wheel/3rd button only works with the operating systems
listed. If it is used with operating systems not listed, enhanced functions
and features as a five-button mouse will be lost.
7.
The 4th and 5th buttons are not programmable.
8.
Mice laser beams do not emit a red LED light like optical sensor mice. Do
not stare into the laser hole on bottom of this mouse.
See Laser Warning Statement.
TECHNICAL S PECIF ICATION S
5-BUTTON Laser Mobile Mouse w/ Storable USB Receiver
Standards: USB 1.1 and 2.0 Specification compatibility
Wireless Specification: 27 MHz
Operating Systems: MS Windows 98/SE/ME,
2000,XP, Vista, MAC OS X & above
Receiver Power: USB Per-Port Current: Self-Power 500mA
Mouse Power: 2 AAA Alkaline Batteries
Dimension: (LxWxH): 106mm x 63m x 38mm
Weight: 2.5 oz.
Operation Temperature: 0ºC ~ 40ºC
Humidity: 5-90% RH non-condensing
FCC COMPLIANCE STATEMENT
This equipment has been tested and found to comply with the limits for
a Class B digital device, pursuant to Part 15 of the FCC Rules. These limits
are designed to provide reasonable protection against harmful interference in a residential installation. This equipment generates, uses and can
radiate radio frequency energy and, if not installed or used in
accordance with the instructions, may cause harmful interference to
radio communications. However, there is no guarantee that interference
will not occur in television reception, which can be determined by
turning the equipment off and on. The user is encouraged to try and
correct the interference by one or more of the following measures:
(1) Reorient or relocate the receiving antenna.
(2) Increase the separation between the equipment and the receiver.
(3) Connect the equipment into an outlet on a circuit different from
that to which the receiver is connected.
(4) Consult the dealer or an experienced technician for help.
Tested To Comply With FCC Standards
FOR HOME OR OFFICE USE
This device complies with Part 15 of the FCC Rules. Operation is subject to the following
two conditions:
(1) This device may not cause harmful interference, and
(2) this device must accept any interference received, including interference that may
cause undesired operation.
IMPORTANT NOTE: FCC Radiation Exposure Statement:
This equipment complies with FCC RF radiation exposure limits set forth for an
uncontrolled environment. To maintain compliance with FCC RF exposure compliance
requirements, please avoid direct contact to the transmitting antenna during
transmitting.
REGISTRATION & WA RRAN TY
PRODUCT REGISTRATION
Avenues suggests you register your SWISSGEAR accessory shortly after
your purchase. To register your SWISSGEAR accessory, please go to:
http://www.AvenuesUSA.com/registration
LIMITED WARRANTY:
This product is warranted to be free from manufacturing defects for a
period of 1 year from the original date of consumer purchase. This
warranty is limited to the repair or replacement of this product only and
does not extend to consequential or incidental damage to other
products that may be used with this unit. This warranty is in lieu of all
other warranties expressed or implied. Some states do not allow
limitations on how long an implied warranty lasts or permit the
exclusion or limitation of incidental or consequential damages, so the
above limitations may not apply to you. This warranty gives you specific
rights, and you may also have other rights which vary from state to state.
If unit should prove defective within the warranty period, contact us
with your proof of purchase/date at the following:
SWISSGEAR Products, c/o AVENUES IN LEATHER
750 Hope Road, Tinton Falls, NJ 07724
or call toll free: 1-877-SWS-GEAR (797-4327)
www.WengerNA.com contactus@AvenuesUSA.com
©2007 Avenues In Leather, Inc. Avenues is an authorized licnesee of Wenger Licensing.
Avenues/Wenger are not responsible for technical or editorial errors or omissions
contained herein. The information contained herein is subject to change without
notice. Only warranties for SWISSGEAR products are set forth in accompanying
warranty statements.
For technical assistance please dial:
1-877-750-TECH
Or email us at: TechSupport@AvenuesUSA.com
CAUTION
LASER RADIATION. DO NOT STARE INTO THE BEAM OR
VIEW DIRECTLY WITH OPTICAL INSTRUMENTS. CLASS I
LASER PRODUCT. NEVER POINT A LASER BEAM INTO A
PERSON’S EYES OR VIEW A LASER BEAM DIRECTLY, AS
PROLONGED EXPOSURE CAN BE HAZARDOUS TO THE
EYES. MOMENTARY EXPOSURE FROM A LASER
POINTER, SUCH AS AN INADVERTENT SWEEP OF THE
LIGHT ACROSS A PERSON'S EYES, MAY CAUSE TEMPORARY FLASH BLINDNESS.
Mice laser beams do not emit a red LED light like optical sensor mice.
Do not stare into the laser hole on bottom of this mouse.
7 8 9 10
The SPYDER
USER GUIDE
5-Button
Wireless Laser
Mobile Mouse
GA-6290-15
FR OM T HE M AKE R OF TH E GE NU IN E S WI SS A RM Y K NI FE ™
 Loading...