

Page 1

RF-CMBO_10-0213_MAN_V1_English.fm Page 1 Monday, March 29, 2010 9:40 AM
2.4 GHz Wireless Combo
RF-CMBO
User Guide
Page 2

RF-CMBO_10-0213_MAN_V1_English.fm Page 2 Wednesday, March 31, 2010 3:35 PM
2.4 GHz Wireless Combo
Contents
Important safety instructions ..................................... 3
Introduction ...................................................................... 4
Features............................................................................... 4
Package contents ..................................................5
System requirements ........................................... 5
Keyboard top .......................................................... 5
Keyboard status LED............................................. 7
Keyboard bottom .................................................. 7
Mouse top ................................................................8
Mouse status LED .................................................. 8
Mouse bottom........................................................ 9
Setting up the keyboard and mouse......................10
Installing keyboard batteries...........................10
Installing the mouse batteries ........................11
Setting up the keyboard and mouse............13
2
Page 3
RF-CMBO_10-0213_MAN_V1_English.fm Page 3 Wednesday, March 31, 2010 3:35 PM
Using the combo driver ..............................................13
Installing the combo driver .............................14
Configuring the mouse.....................................14
Uninstalling the combo driver........................19
Maintaining .....................................................................20
Troubleshooting ............................................................20
Specifications..................................................................20
Legal notices ...................................................................22
One-year limited warranty......................................... 25
Important safety instructions
1 Read these instructions.
2 Keep these instructions.
3 Heed all warnings.
4 Follow all instructions.
5 Do not use this apparatus near water.
6 Clean only with dry cloth.
7 Do not install near any heat sources such as radiators, heat registers,
stoves, or other apparatus (including amplifiers) that produce heat.
8 Only use attachments/accessories specified by the manufacturer.
9 To reduce the risk of fire or electric shock, do not expose this device to
rain, moisture, dripping, or splashing, and no objects filled with liquids,
such as vases, shall be placed on it.
10 Batteries should not be exposed to excessive heat such as sunshine, fire,
or the like.
Caution: Danger of explosion if battery is incorrectly replaced. Replace only with the
same or equivalent type.
3RF-CMBO
Page 4

RF-CMBO_10-0213_MAN_V1_English.fm Page 4 Wednesday, March 31, 2010 3:35 PM
Introduction
Congratulations on your purchase of a Rocketfish 2.4 GHz Wireless
Combo.
This guide explains how to correctly operate and get the best
performance from your wireless keyboard and mouse. Read this user
guide carefully before using your product, then keep it next to your
computer for quick reference.
Features
•Keyboard
•104-key design
• Eighteen hotkeys
• One connect button
• Power switch
•Soft palm rest
• Laser mouse
• Tilt/ scroll wheel
• Three mouse buttons
• Two hotkey buttons
• One pairing button
• Power switch
•Power saving mode
•Working range up to 10 meters (line-of-sight)
• Dual color status LED indicator
If any item is missing or damaged, contact Rocketfish at
1-800-620-2790.
4
Page 5
RF-CMBO_10-0213_MAN_V1_English.fm Page 5 Wednesday, March 31, 2010 3:35 PM
Package contents
Before you start using your keyboard and mouse the first time, verify
that your package contains the following:
•Keyboard
•Laser Mouse
• 2.4 GHz receiver
• Installation CD
• Batteries for the keyboard and mouse
•Quick setup guide
System requirements
• Computer with a USB port
• Microsoft Windows® XP Service Pack 3 or higher, Windows® Vista,
Windows® 7
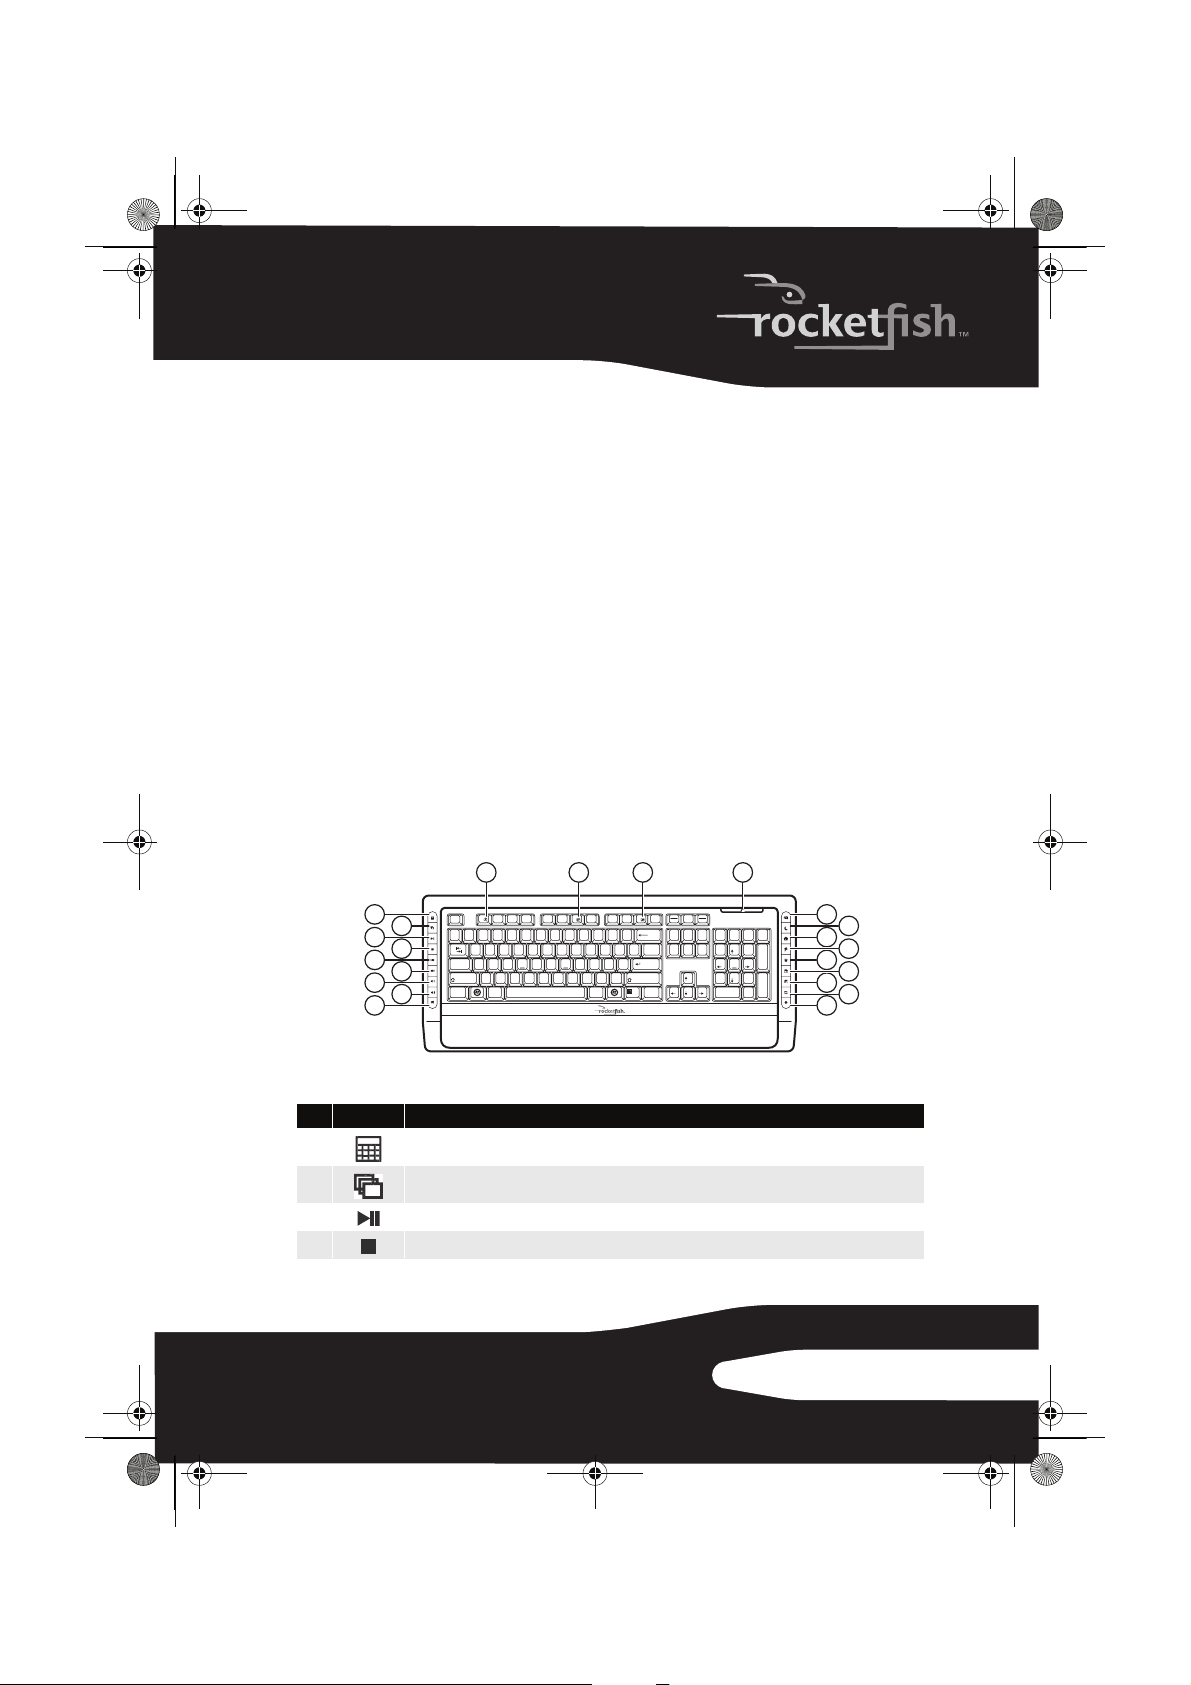
Keyboard top
1
2
3
4
5
6
7
8
9
# Icon Description
1
2
3
4
Calculator button. Press to open the open the calculator.
Application Switch button. Press to switch between open programs.
Play/Pause button. Press to start or pause CD or DVD playback.
Stop button. Press to stop CD or DVD playback.
Esc F1 F2 F3 F4 F5 F6 F7 F8 F9 F10 F11 F12
1
5
6
4
23
`
WE RT YU I O
QP
Tab
A
SDFGHJKL
Caps Lock
ZXCVBNM
Shift Shift
AltCtrl
&^%$#@!~
7
*
9
8
<
,
_
)(
-
0
:
;
>
.
Alt Ctrl
Prt Scr
Screen
+
Backspace
Insert
=
--
{
{
Delete
[
[
\
"
Enter
'
?
/
13121110
Scroll
Pause
Break
Lock
Num
Page
Home
/
Lock
Up
*
798
Page
End
Down
PgUp
Home
4
65
1
3
2
End
PgDn
.
Ins0Del
14
_
+
Enter
15
16
17
18
19
20
21
22
5RF-CMBO
Page 6

RF-CMBO_10-0213_MAN_V1_English.fm Page 6 Wednesday, March 31, 2010 3:35 PM
# Icon Description
5
6
7
8
9
10
11
12
13
14
15
16
17
18
19
20
21
22
Previous track button. Press to go to the previous track on a CD or previous chapter on a DVD.
Next track button. Press to go to the next track on a CD or next chapter on a DVD.
Increase volume button. Press to increase the volume.
Decrease volume button. Press to decrease the volume.
Mute volume button. Press to mute the sound. Press again to unmute the sou nd.
Help button. Press to open online help for the currently active application.
Spelling button. Press to run the spell checker for the currently active program (if available).
Slideshow button. Press to enter slideshow mode in Wondows Picture and Fax Viewer.
Status LED. For more information, see “Keyboard status LED” on page 7.
E-mail button. Press to open your e-mail program.
Sleep button. Press to put your computer in sleep mode. Press again to wake your computer.
Home button. Press to go to your home page in a Web browser.
Search button. Press to open the Search window.
My Favorite button. Press to open the list of your favorite Web sites.
Back Web page button. Press to go to the previous page in a Web browser.
Forward Web page button. Press to go to the next page in a Web browser.
Refresh Web page button. Press to refresh (reload) a page in a Web browser.
Stop Web page button. Press to stop loading a page in a Web browser.
6
Page 7

RF-CMBO_10-0213_MAN_V1_English.fm Page 7 Wednesday, March 31, 2010 3:35 PM
Keyboard status LED
Color Description
Green
Flashing red
Flashing red and green
The keyboard is turned on and the battery level normal.
The battery level is low.
The keyboard is pairing.
Keyboard bottom
CONNECT
ON
OFF
# Item Description
CONNECT button Press to put the keyboard in pre-pairing mode.
1
OFF ON switch Slide to turn the keyboard on or off.
2
7RF-CMBO
Page 8

RF-CMBO_10-0213_MAN_V1_English.fm Page 8 Wednesday, March 31, 2010 3:35 PM
Mouse top
# Item Description
Left button Press to perform left-button actions like selecting items or opening programs.
1
Forward button Press to go to the next page in a Web browser.
2
Back button Press to go to the previous page in a Web browser.
3
Right button Press to perform standard right-mouse actions such as opening pop-up
4
Tilt/scroll wheel Roll to move the screen image up or down or tilt to move the screen left or
5
LED indicator Status LED. For more information, see “Mouse status LED” on page 8.
6
Mouse status LED
Color Description
Green
Flashing red
Flashing green
8
menus or viewing help information.
right. If you press down on the scroll wheel, a four-way icon appears on the
screen. Move the mouse up, down, left, or right to scroll.
The mouse is turned on and the battery level normal.
The battery level is low.
The mouse is pairing.
Page 9

RF-CMBO_10-0213_MAN_V1_English.fm Page 9 Wednesday, March 31, 2010 3:35 PM
Mouse bottom
CONNECT
OFF ON
# Item Description
Laser sensor Detects the mouse movements and sends signals to the computer to
1
CONNECT button Press to put the mouse in pre-pairing mode.
2
OFF ON switch Slide to turn the mouse on or off.
3
Battery compartment Provides storage for the batteries and receiver.
4
move the mouse pointer on the screen.
9RF-CMBO
Page 10

RF-CMBO_10-0213_MAN_V1_English.fm Page 10 Wednesday, March 31, 2010 3:35 PM
Setting up the keyboard and mouse
Installing keyboard batteries
To install keyboard batteries:
1 Remove the battery compartment cover.
2 Insert two AA batteries into the battery compartment. Make sure that
the + and – symbols on the batteries align with the + and – symbols in
the battery compartment.
10
3 Replace the battery compartment cover.
Page 11

RF-CMBO_10-0213_MAN_V1_English.fm Page 11 Wednesday, March 31, 2010 3:35 PM
Installing the mouse batteries
To install mouse batteries:
1 Press the tab to release the battery compartment cover, then remove the
cover.
2 Pull the receiver out of the battery compartment.
11RF-CMBO
Page 12

RF-CMBO_10-0213_MAN_V1_English.fm Page 12 Wednesday, March 31, 2010 3:35 PM
3 Insert two AA batteries into the battery compartment. Make sure that
the + and – symbols on the batteries align with the + and – symbols in
the battery compartment.
4 Replace the battery compartment cover.
12
Page 13

RF-CMBO_10-0213_MAN_V1_English.fm Page 13 Wednesday, March 31, 2010 3:35 PM
Setting up the keyboard and mouse
To set up the keyboard and mouse:
1 Plug the 2.4 GHz receiver into an available USB port on your computer.
1
2
OFF ON
2 Slide the power switch of the mouse to ON, to turn the mouse on.
3 Slide the power switch of the keyboard to ON, to turn the keyboard on.
The computer recognizes the keyboard and mouse automatically.
The keyboard and mouse are ready to use.
Using the combo driver
To use advanced functions, such as tilt wheel driver, dynamic search
and magnifier, you need to install the mouse driver and software.
13RF-CMBO
Page 14

RF-CMBO_10-0213_MAN_V1_English.fm Page 14 Wednesday, March 31, 2010 3:35 PM
Installing the combo driver
To install the combo driver:
1 Insert the installation CD (provided) in the CD drive on your computer.
The installation program should start automatically. If it does not start
automatically, open Windows Explorer, browse to the CD, then doubleclick autorun.exe. The Rocketfish Wireless combo screen opens.
2 Click Install Combo Driver. The Welcome screen opens.
3 Click Next. The Start installation screen opens.
4 Click Next. An installation progress bar appears.
When the installation is complete, the Setup Complete screen opens.
5 Click Finish.
Configuring the mouse
To configure the mouse:
• Double-click the mouse icon on the system tray to open the mouse
program, then click a tab to adjust a mouse function. You can select any
of the following tabs:
• Buttons—See “Configuring mouse buttons” on page 15.
• Double-Click—See ”Adjusting the double-click speed” on page 16.
• Orientation—See ”Adjusting the orientation” on page 16.
• Wheel—See ”Adjusting the wheel settings” on page 17.
• Pointer Utility—See “Adjusting pointer behavior” on page 18.
• Mouse Suite—See “Hiding the system tray’s mouse icon” on page 18.
14
 Loading...