

Page 1
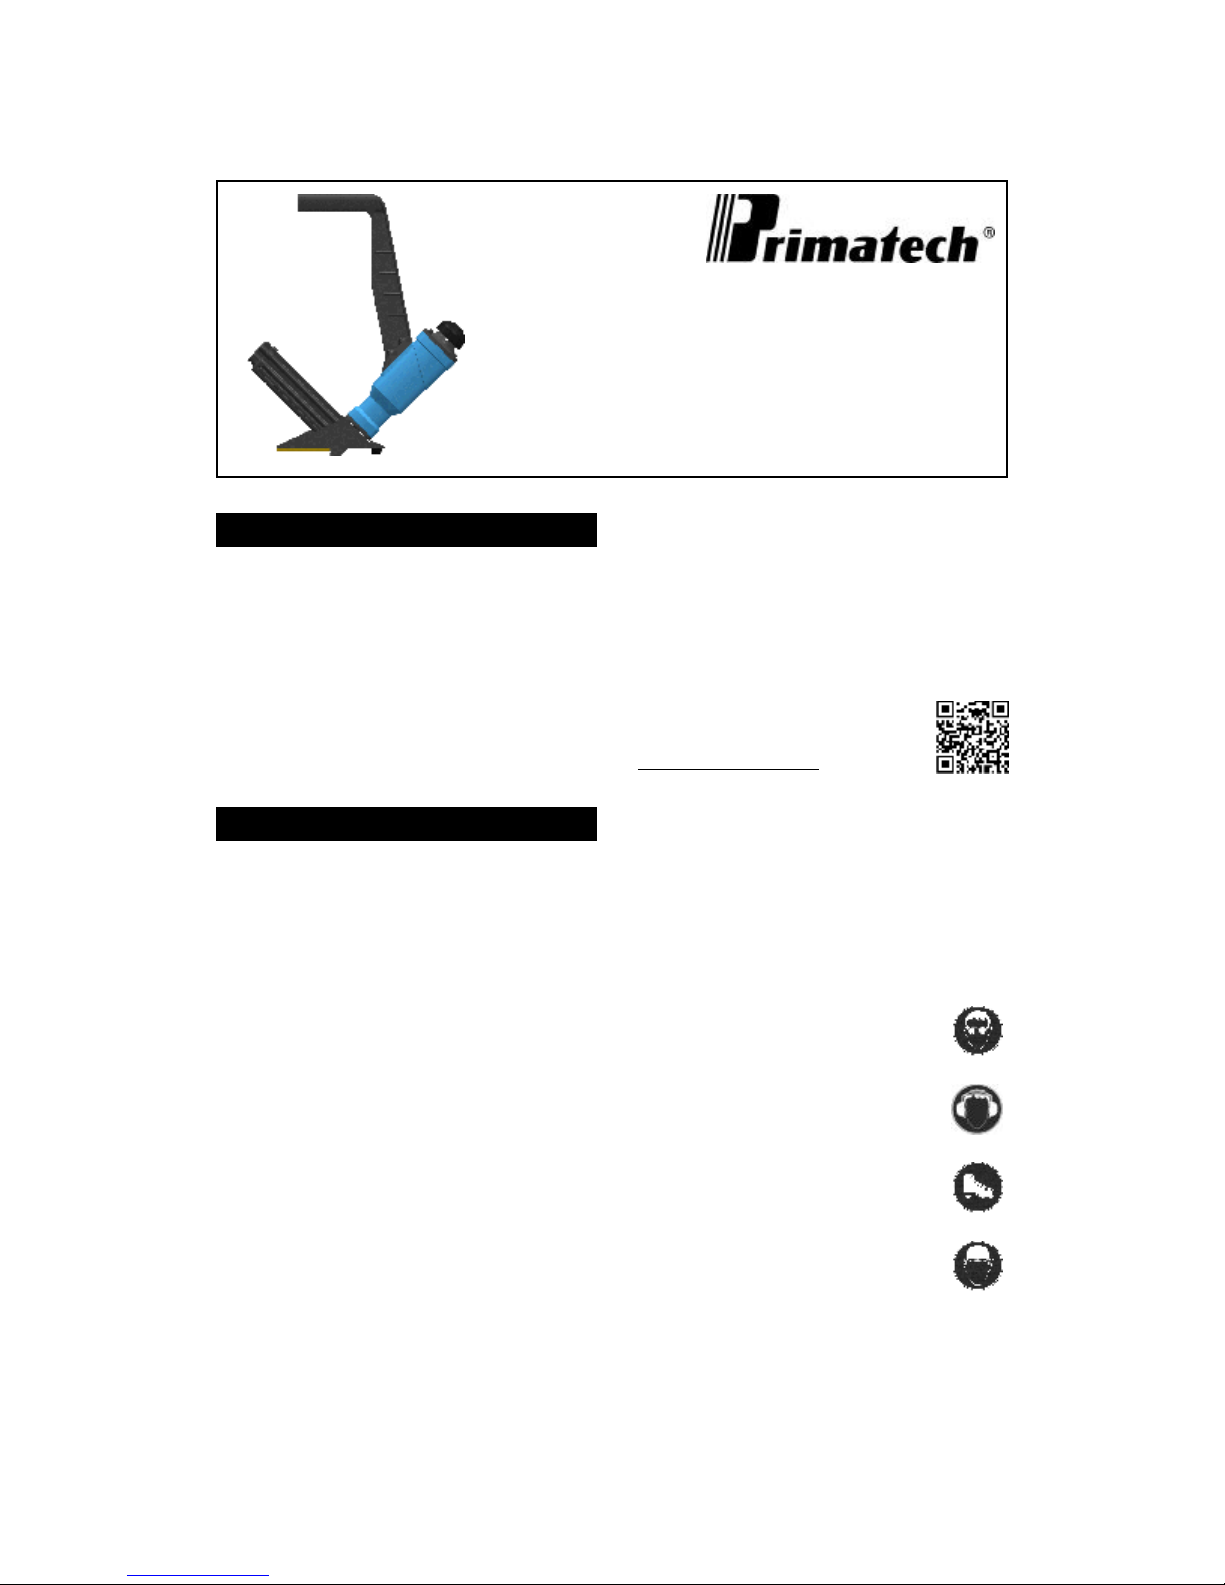
PNEUMATIC FLOORING TOOL
OPERATING INSTRUCTIONS
PNEUMATIC TOOL P145
The pneumatic flooring tool P145 is a tool specially
developed for the installation standard 3/4" to 1/2"
hardwood flooring. It has been designed for easy
maintenance where major components can be easily
accessed. It makes the installation of hardwood floor
very easy, allowing the operator to set and fasten the
boards in the standing position.
P145
Complete documentation specific to your tool can be
retrieved by scanning the QR-Code applied on the tool.
You will find updated information such as Operation
Manual, Part list, Schematic specifics and Technical
Notes specific to your tool as it was manufactured; as
well as useful information for ordering replacement
parts.
The P145 nailer/stapler takes both standard L-type
16GA flooring nails and ½" crown 15½GA flooring
staples.
SAFETY MEASURES
These important guidelines should always be followed
to work safely with the Primatech pneumatic tool P145:
•Read these instructions thoroughly before using this
tool and keep it handy for reference if necessary.
•Always keep hands, feet or other body parts away
from the fastener ejection area.
•Never aim the tool in any direction other than the
working area.
•Always carry or manipulate the tool by its handle
while the air supply hose is connected.
•Never hit the head cap of the actuator if the base is
not sitting perfectly on the working surface.
•Never leave the tool laying down on its side while the
air supply hose is connected; the tool should always
be left on the floor, standing on its base.
•Always disconnect the air supply hose when the tool
is not in use or when move to another work area.
•Never service or repair the tool, clear obstructions or
make adjustments while the air supply hose is
connected.
•Only compressed air should be used to power this
tool; do not exceed 110 psi (7.6 bar).
•Never use oxygen or any other compressed gas as a
power source for this tool. Explosion may occur.
•Always wear OSHA-required Z-87 safety glasses with
side shields.
Printed in Canada v180 12/18
Technical support, information &
schematics at
http://ts.primatech.ca/145
•Always wear proper ear and foot protection while the
air supply hose is connected.
•Always remove fasteners from the magazine before
servicing tool.
Eye protection is recommended and should
be worn by the operator and other in
working area. Accidental ejection of
fasteners or wood debris could cause
severe eye injury.
In some environments, ear protection might
be required, as working condition may
include exposure to high noise levels which
lead to hearing damage.
Wearing safety boots and safety hat is also
highly recommended.
Note: All the personal protection
equipments must meet national standards.
Page 2
CONNECTION & AIR SUPPLY
LOADING THE TOOL
This tool requires clean & dry air. The use of a filter and
a pressure regulator is recommended.
Use a detachable male coupler with 3/8" NPT male
treads. The use of a 3/8" (1 cm) diameter air supply
hose is recommended. A smaller hose or a hose longer
than 50' (15 m) could cause a pressure drop when the
tool is activated repeatedly.
Always use a free-flow connection for the
compressed air supply to prevent that the
tool stays charged after disconnecting the air
supply hose.
Unload tool before connecting air to prevent
accidental discharge.
To prevent injury or accidental damage to the
finished surface of the installed floor, rest the
tool onto the subflooring when connecting air,
moving tool to a different work area, loading
the tool or performing any maintenance to the
tool.
Dirt, dust, and other particles in the air supply can
cause sluggish operation or premature wear. Drain
water from the compressor tank regularly. The
compressor start-stop limits should be set to deliver an
air pressure of at least 100 psi (7 bar) at all times.
Consult the compressor manual or dealer for
instructions on how to make this adjustment.
This tool is designed to be operated with a compressed
air pressure of 80 to 100 psi (5.5-7.0 bar). Air pressure
of 90 psi (6.2 bar) is adequate for most situations,
although occasionally, a higher pressure could be
necessary. Never not use a compressed air pressure
higher than 110 psi (7.6 bar).
This tool can be used with either standard 16ga
flooring cleats or with 15½ga flooring staples:
•L-type 16GA nails in lengths of 1½" (38 mm), 1¾"
(45 mm) or 2" (50 mm)
•½" crown 15½GA staples in lengths of 1½" (38 mm),
1¾" (45 mm) or 2" (50 mm)
Use only the type of fasteners identified on
the magazine. The use of any other type of
fasteners will damage the tool.
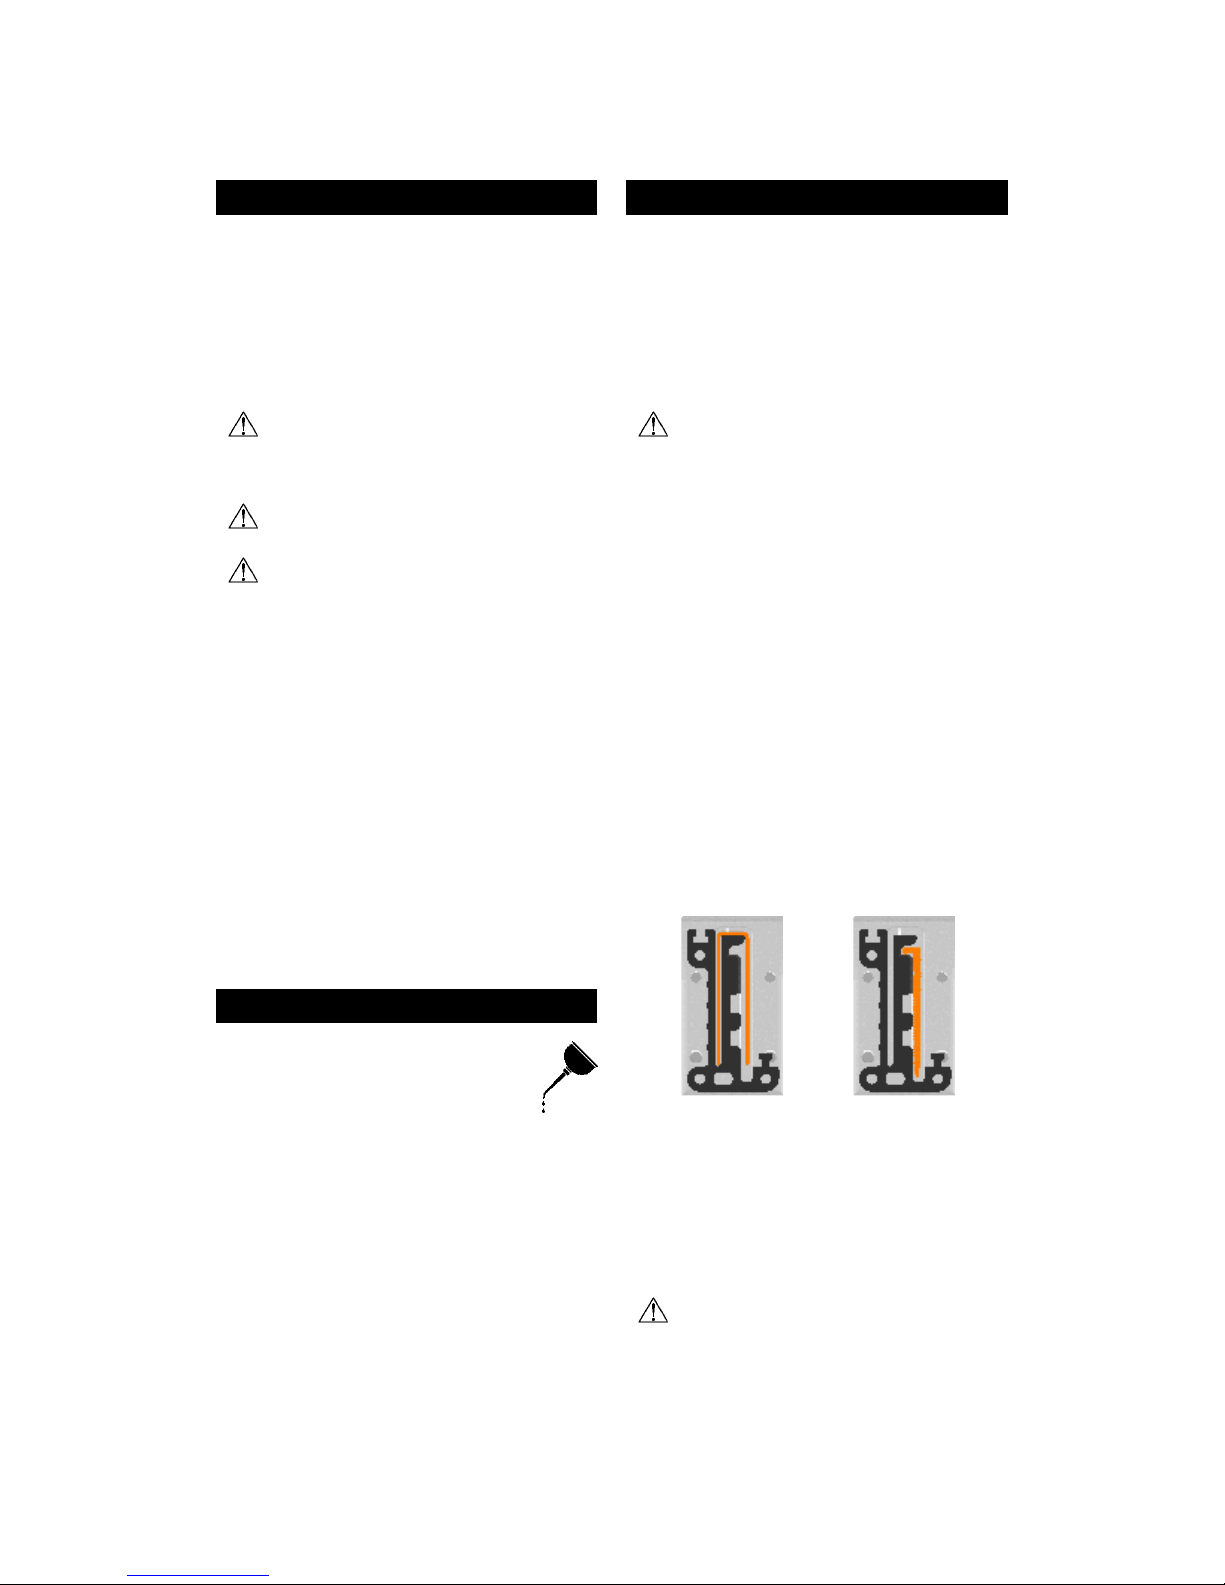
Loading the tool with flooring staples:
•Press the lock and open the magazine cover.
•Insert one or two strips of flooring staples over the
central guide of the magazine as illustrated below
(left).
•Push the magazine cover forward into its locked
position.
Loading the tool with L-type 16GA flooring nails:
•Press the lock and open the magazine cover.
•Place a strip of flooring cleats against the inner side
of the magazine, the “L” head of the cleats engaging
the groove as illustrated below (right). Small magnets
will hold it in place.
•Push the magazine cover forward into its locked
position.
PREVENTIVE MAINTENANCE
This tool requires minimal lubrication. Use
only detergent-free oil such as Primatech
P-090. Few drops of oil weekly in the air inlet
is sufficient. Other types of lubricant may
degrade the seals.
Check periodically to make sure that the head
assembly is fully screwed onto the main body. A loosen
head will damage the tool.
Unloading cleats or staples
•To remove fastener from the magazine, press the
lock and open the magazine cover
•Tilt the tool to slide back remaining fastener and take
them out.
Always operate the tool with fasteners in
magazine. Damage may occur if the tool is
operated without fasteners.
Page 3

OPERATION
DISASSEMBLING THE TOOL
Unload tool and rest it onto the subflooring, Connect
the hose and cycle tool once or twice without fasteners.
After loading the tool, the P145 nailer/stapler is ready
for use.
Use only the hammer supplied with the tool. The use of
other type of hammers may affect performance. The
rubber face of the hammer can be used with care to
help position the boards.
With the flooring firmly in place, position the tool onto
the flooring and apply downward pressure to ensure
proper seating of the fastener. Strike the head cap with
the hammer to activate the tool, Use only the RUBBER
FACE of the hammer to activate the tool. Using the
steel end will damage the tool and void the
warranty. If wood is slightly twisted, hitting the tool with
more force will assist in pulling the board up snugly.
NEVER strike the head cap when the tool is not sitting
on the working surface.
Before starting an installation, fasten down
few boards to ascertain that the tool is
properly adjusted. Always comply with all
manufacturers recommendations.
MAINTENANCE & REPAIR
Most maintenance to the tool can be made with the
5 mm Allen wrench supplied with the tool.
Disassembly of the tool must be done in a clean
environment. Some parts can be easily damaged if
disassembled with improper tools or by inadequate
methods. Maintenance should only be performed by
trained personnel. Use only genuine Primatech
replacement parts.
To prevent injury, ALWAYS disconnect the
air supply hose when servicing or
disassembling the tool.
When servicing the tool, do not twist or force any parts.
Damage may result from such abuse. Contact your
Primatech distributor for more information.
When opening the tool for maintenance, always clean
all components of dirt, grit, or particles. Inspect the tool
carefully for broken parts or excessive wear, and
replace if necessary. When ordering parts, be sure to
specify the right part number, as well as the tool serial
number.
After any maintenance to the tool, REMOVE
ALL Fasteners before connecting air and
actuate the tool repeatedly over a piece of
wood or subflooring to insure proper
operation.
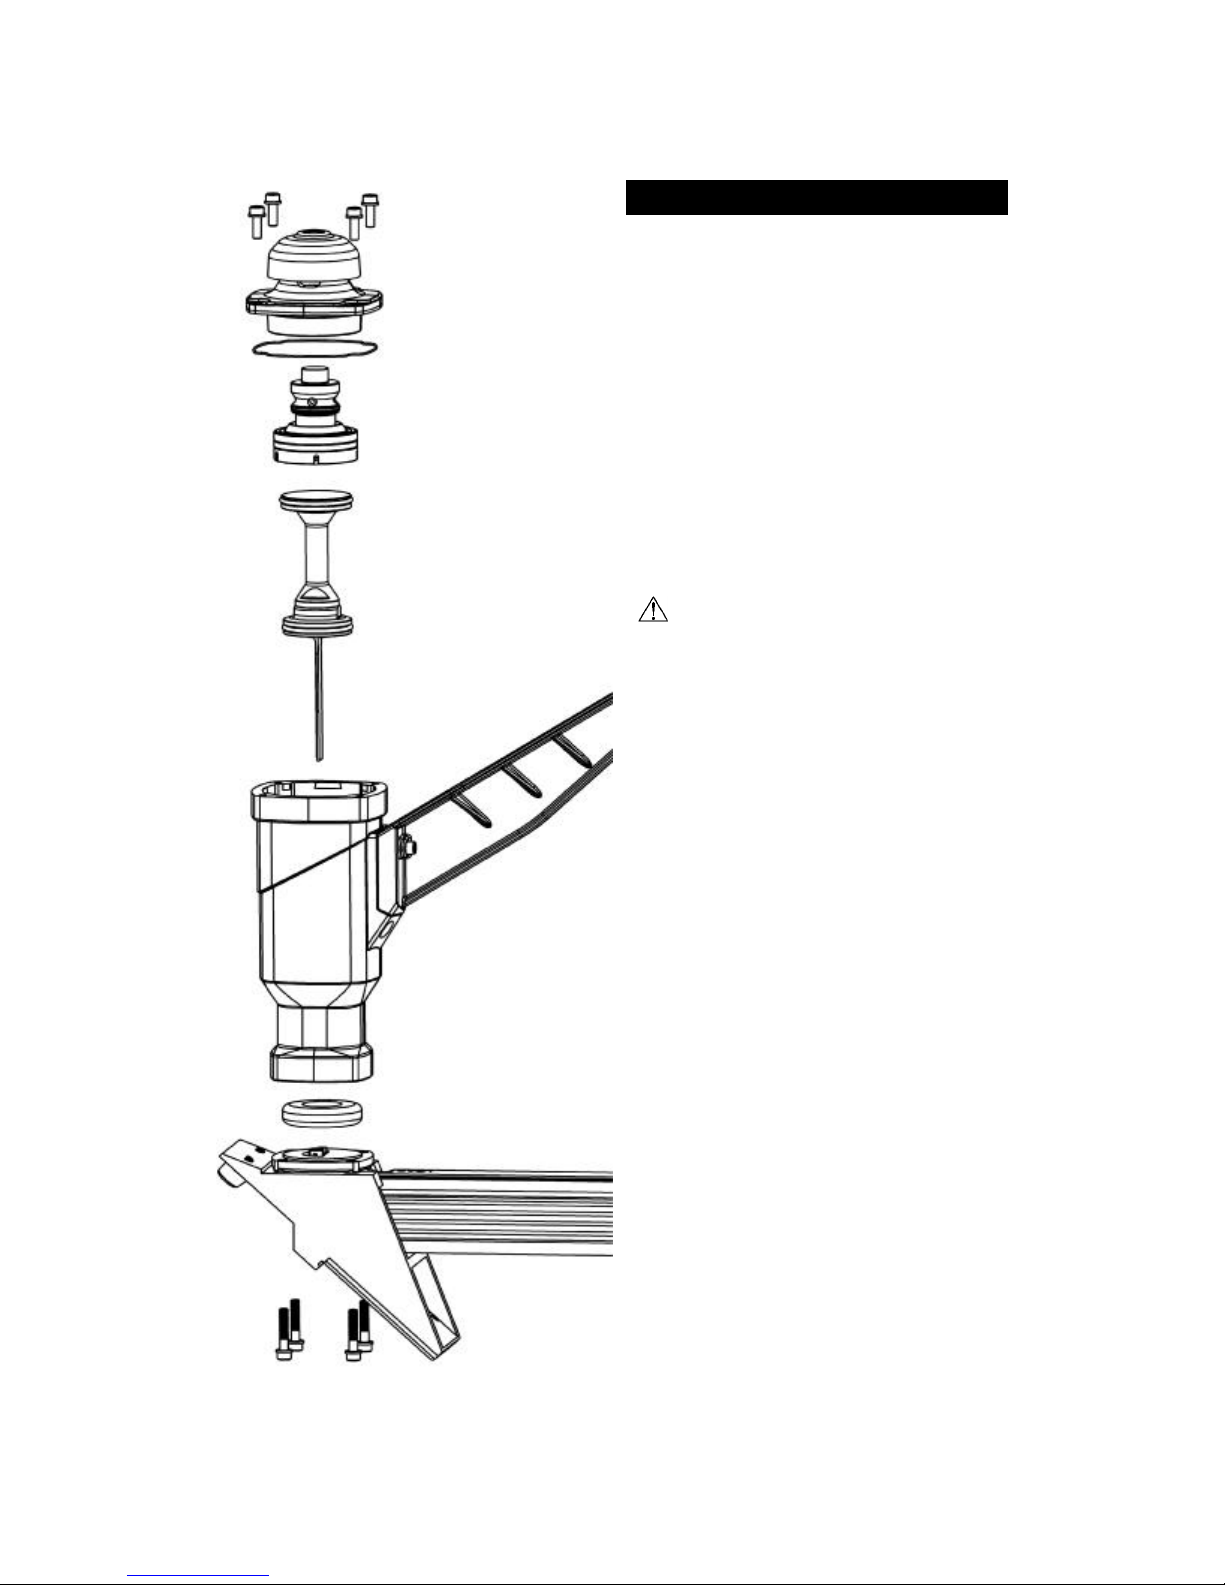
All pneumatic components can be easily accessed with
the use of an Allen key. This section describes how to
disassemble the tool to access its internal components.
To access valve and piston assemblies:
•Remove the 4 screws and take off the head.
•Pull out the valve assembly. Inspect wear ring &
lubricate. Do not attempt to disassemble the valve
assembly.
•Pull out the piston assembly. Inspect wear ring and
lubricate.
It is usually not necessary to pull-out the bumper for
maintenance. To replace the bumper:
•Remove the 4 screws and take off the base/magazine
assembly.
•Pull out and replace the bumper.
CLEANING THE VALVE
If the tool becomes sluggish or does not set the
fastener correctly, it may indicate excessive dirt, dust,
other particles, or even water, in the tool. The first step
in troubleshooting is to clean up the head assembly.
•Disassemble the head assembly as described in
previous section.
•Perform a visual inspection of the valve assembly.
Ensure that the actuator is sliding easily. Clean and
lubricate lightly. Do not attempt to take apart the
actuator assembly.
•Clean the inside wall of the head and lubricate lightly
with a non-detergent oil. Insert the valve assembly
into the head and ensure that it is sliding easily.
•Ensure the piston assembly is sliding easily into the
cylinder. It should offer some resistance, but if it
moves too easily, it may be required to replace the
piston wear-ring.
Page 4
ASSEMBLING THE TOOL
This section describes how to re-assemble the tool
after maintenance. The following procedure assumes
that the base/magazine is already installed.
•Insert the piston assembly into the tool and engage
the driving blade thru the opening of gate/foot
assembly guiding channel.
•Insert the valve assembly into the head.
•Inspect the head gasket; replace if necessary. Place
the gasket into the groove on the head flange. Some
oil or grease will help to keep it in place during
assembly.
•Insert the head assembly onto the body, making sure
that the gasket stays in place. Screw in place.
After reassembly, always actuate the tool
repeatedly WITHOUT FASTENERS against
a piece of wood to insure proper operation.
Page 5
TROUBLESHOOTING
TO PREVENT INJURY, ALWAYS
DISCONNECT THE AIR SUPPLY HOSE
WHEN ADJUSTING, SERVICING OR
DISASSEMBLING THE TOOL.
FIRST: CHECK THE COMPRESSED AIR SUPPLY
Many of problems come from a faulty or inadequate
compressed air supply system. Before attempting to
repair the tool, the following points should be
checked:
•Check the pressure at the output of the compressor;
adjust to 80-100 psi (5.5-7.0 bar) as required.
•Check the tank pressure of the compressor & adjust
the start/stop limits.
•Check the air delivery system; a 3/8" hose is
recommended.
•Use fewer tools simultaneously; do not exceed the
capacity of the compressor or of the delivery
system.
•Drain water from the compressor.
SECOND: CHECK FOR AIR LEAKS
At rest, this tool should not have any air leaks. Before
attempting to repair the tool and replace parts, check
the following:
•Check all seals in head, valve and piston
assemblies; replace if necessary.
•Check the top edge of main cylinder for burrs or
dents.
•Clean & lubricate the head and valve assemblies;
re-assemble the head assembly carefully.
•Check the interior of the head for scratches.
A more comprehensive list of tips and
hints at
http://ts.primatech.ca/tips
SCHEMATICS
With your tool Serial Number at hand,
go to our support web site to retrieve
the schematic specific to your tool:
http://ts.primatech.ca/145
For more information, contact technical support:
TOOL WARRANTY AND LIMITATIONS
Primatech warrants that newly purchased fastening
tools, parts and accessories will be free from defects in
material and workmanship (excluding wear parts) for
the period shown below, after the date of purchase by
the original user as evidenced by a valid purchase
invoice.
ONE-YEAR LIMITED WARRANTY will apply to all
parts, except those subjected to normal wear
WARRANTY STATEMENT
Primatech ‘s sole liability hereunder will be to replace
any part or accessory which proves to be defective
within the specific time period. Any replacement part or
accessories provided in accordance with this warranty
will carry a warranty for the remainder of the period of
warranty applicable to the part it replaces. When repair
or replacement of part or tool is required, the complete
tool or part(s) must be returned to Primatech or at such
authorized warranty service point of Primatech,
transportation prepaid, with a copy of proof of purchase
evidencing that the part or tool is within the warranty
period. Serial # must be intact and legible for warranty
to apply.
This warranty is void as to any tool which has been
subjected to misuse, abuse, accidental or intentional
damage, used with fasteners not meeting Primatech
specifications, size or quality, improperly maintained,
repaired with other than genuine Primatech
replacement parts, damaged in transit or handling, or
which, in Primatech ‘s sole opinion, has been altered,
modified or repaired in a way that affects or detracts
from the performance of the tool.
PRIMATECH MAKES NO WARRANTY, EXPRESSED
OR IMPLIED, RELATING TO MERCHANTABILITY,
FITNESS, OR OTHERWISE, EXCEPT AS STATED
ABOVE, and Primatech‘s liability AS STATED ABOVE
AND AS ASSUMED ABOVE is in lieu of all other
warranties arising out of, or in connection with, the use
and performance of the tool, except to the extent
otherwise provided for by applicable law.
PRIMATECH SHALL IN NO EVENT BE LIABLE FOR
ANY DIRECT, INDIRECT, OR CONSEQUENTIAL
DAMAGES WHICH MAY ARISE FROM LOSS OF
ANTICIPATED PROFITS OR PRODUCTION,
SPOILAGE OF MATERIALS, INCREASED COST OF
OPERATION, OR OTHERWISE. Any liability, if any,
connected with the use of the tool shall terminate upon
the expiration of the warranty period specified above.
 Loading...