


ECO Valve
Uses:
• Back Pressure valve
• Anti-Siphon valve
• Pressure Sustaining valve
• Pressure Relief valve
Instruction Manual
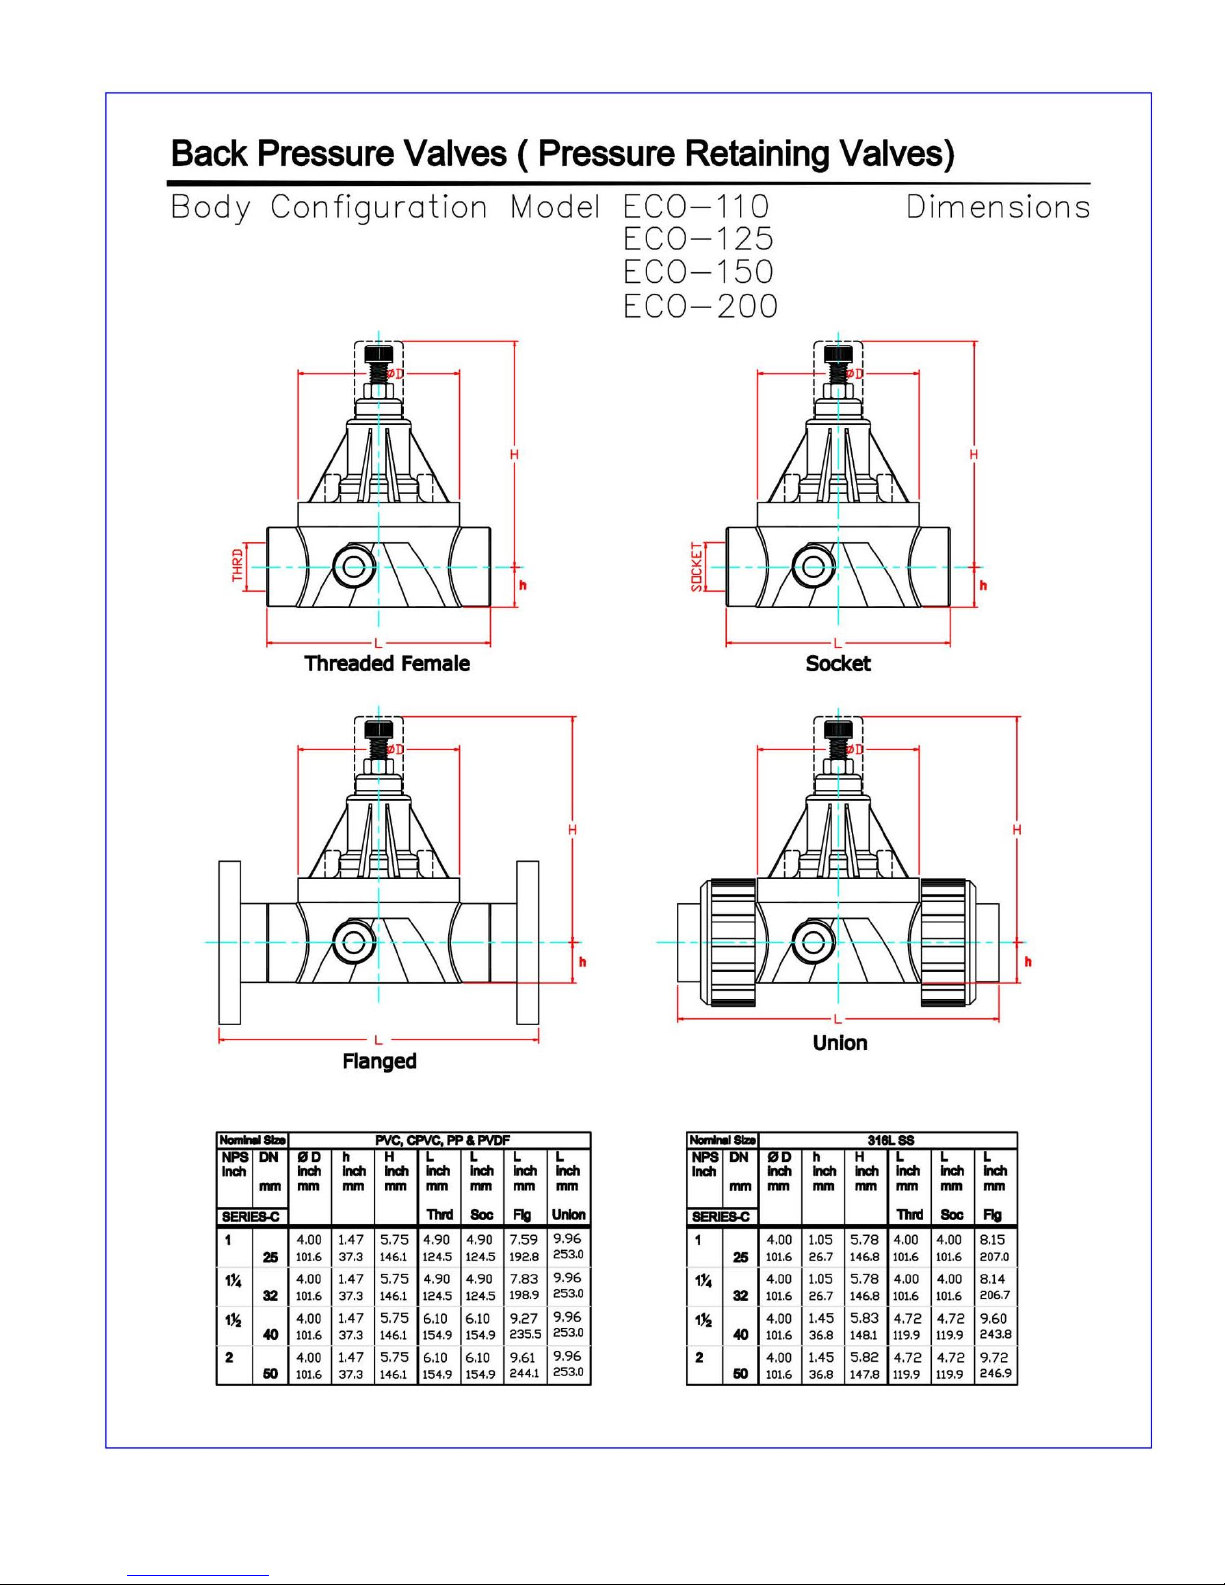
1” (High Flow), 1 ¼”, 1 ½” and 2” (“C” Series)
ECO-110, ECO-125, ECO-150 and
ECO-200
06/2017
Rev. 4
Please note:
This instruction manual provides detailed information and instructions that must be read, understood and
followed to ensure that the equipment is installed, operated and serviced in an appropriate manner.
Failure to do so before using may result in hazardous consequences and/or improper operation.
Manufactured by:
PRIMARY FLUID 1050 Cooke Blvd., Burlington, Ontario, L7T 4A8
SYSTEMS INC. Tel: (905) 333-8743 Fax: (905) 333-8746
Call Toll Free: 1-866-324-6422
E-Mail: sales@ecovalve.ca
http:www.ecovalve.ca

2
Introduction
The following instructions are to provide information on the Installation, operation and
maintenance of ECO Valve, diaphragm style valves, manufactured by Primary Fluid Systems
Inc. The valves are designed to help improve the performance and safe operation of most
positive displacement pumps.
Various materials of construction are available dependent on the requirements of the
application and the type of fluids being transferred.
The valve(s) are factory set at 50 PSIG with a field adjustment range of 7-150 PSIG. Other
factory set pressure ranges (within the range of the valve) is available upon request.
Features of ECO Valve:
• PVC, PP, CPVC (Corzan), PVDF and 316L S/S wetted construction
• PVC diaphragm with PVC valve bodies
• PTFE laminated to EPDM backer diaphragm standard on all other material
• Optional Viton or EPDM wetted diaphragm materials
• only one elastomer is present in the wetted end
• Turn down handle limits pressure to 150 PSIG
• Locking adjustable pressure screw
• Color-coded caps indicate size at a glance
• Built-in gauge port on both sides of valve body (pre-drilled & threaded optional)
• Specially designed spring provides consistent pressure adjustments through the range
(7-150 PSIG)
• Eco valve is available in several configurations to meet your needs, such as threaded,
socket, flanged, union in DIN, BSPT and American Standard
• Built-in downstream manual air release, for ease of pump priming
• Built-in anti-siphon
Back Pressure Valve/Anti-siphon:
Diaphragm Back Pressure Valves serve two primary functions. The first is to provide a
constant discharge pressure on the pump, which improves the performance, efficiency and
consistency of the delivered volume. Secondly, the valve performs as an anti-siphon
mechanism against positive or negative pressures in the downstream line. The valve is
designed to allow for the venting of air into the downstream pipeline. This provides for easier
priming of metering pumps that function under a suction lift. This is accomplished by a simple
adjustment of the handle.
The valve comes complete with a gauge port located on both sides of the valve body; the ports
are normally not drilled or tapped for a gauge connection. (See gauge installation
instructions on page 5)
Caution:
The gauge port is solely for the installation of the gauge and must not be used for the
bleeding or venting of the system. Improper operation of the valve and/or hazardous
consequences could result. (See gauge installation instructions)

3
Back Pressure /Pressure Sustaining Valve: Reason for Selection and Use
Metering pumps having an atmospheric discharge system pressure or less than 20 psi will
benefit from the installation of a back pressure control valve. Metering pumps in general
require downstream back pressure to ensure smoother function of the discharge check
assemblies, which enhances the accuracy of the discharge flow.
Pressure Relief Valves:
Diaphragm Pressure Relief Valves are designed to relieve excess line pressure that exceeds
the set pressure of the valve. This protects the system piping from overpressure that could
result in hazardous leakage and/or damage to the pump and other system components.
The Pressure Relief Valves are normally recommended to be set between 5 and 10 PSIG
above the system operating pressure.
When ECO valves are used as a pressure relief valve it is a two port valve, thus designed for
off line installations. This requires the valve to be installed on a tee branch of the discharge line
of the pump for piping back to supply tank or feed side of pump.
The valve comes complete with a gauge port located on both sides of the valve body; the ports
are normally not drilled or tapped for a gauge connection. (See gauge installation
instructions on page 5)
Caution:
The gauge port is solely for the installation of the gauge and cannot be used for the
bleeding or venting of the system. Improper operation and/or hazardous consequences
could result. (See gauge installation instructions)
Pressure Relief Valves: Reason for Selection and Use
Most positive displacement pumps require the use of a pressure relief valve; it should always
be installed on the downstream side of the pump to protect the system from over pressure
which can cause pipe leakage and/or rupture. There should not be any type of valve located
between the pump discharge or the pressure relief valve, for the pressure relief valve to
function properly.
Installation and Maintenance of Back Pressure Valves:
Back pressure control valves are installed on the discharge line of the pump. The valve should
be located as reasonable close as possible of the pump discharge to ensure check valve
seating. When pumping to a process line without an injection valve, the back pressure valve
should be installed as close as possible to the injection point to prevent siphoning.
When used in conjunction with a pressure relief valve, always locate the back pressure valve
on the downstream side of the relief valve.

4
The valve is supplied from the factory pre-set at 50 psig. To increase the pressure setting,
back off the lock nut located beneath the colour coded bonnet cap. Turn the Allan bolt using a
5/16” or #8 hex key clockwise to increase pressure setting or counter clockwise to reduce
pressure setting. Approximately one (1) full turn of the handle is equal to 10 psig.
If maintenance is required on the valve:
1. Ensure that the valve is properly isolated from the line, not under pressure and
properly flushed of chemical before proceeding to disassembly.
2. Turn Allan bolt on the top of valve, counterclockwise until all spring pressure is released
before proceeding to undo retaining nuts, to remove top of valve for diaphragm
replacement.
3. All working components ie. diaphragm, spring can be accessed by removing the four
retaining bolts located on the bottom of the valve (item # 9 of parts breakdown).
4. When replacing a PTFE coated diaphragm, ensure the PTFE coated side of the
diaphragm is facing down when viewed from the top of the valve. The installed
diaphragm also functions as the body seal. (Torque nuts to 40 inch pounds when
reassembling )
Installation and Maintenance of Pressure Relief Valves:
Pressure relief valves are installed on the discharge line of a pump and should be located as
close as possible to the metering pump. The valve is of an two port design and is required to
be installed on a branch tee for piping back to the supply tank or feed side of the pump.
Never install shut-off/isolation valves between pump discharge and in-line pressure relief
valves. When using in conjunction with a back pressure control valve, always install back
pressure valve downstream of pressure relief valve. The relief port on the pressure relief valve
should be piped back to the feed tank or suction side of the pump (see typical installation
schematics).
Caution: The plastic valve bodies have standard threads, which are tapered.
When installing pipe into the body, hand tighten only to avoid cracking.
Gauge Installation Instructions:
For the convenience of pressure setting and reading, there are two ports provided one on
either side of the valve body. These ports are normally not drilled or tapped unless initially
ordered that way. To drill and tap the ports it is recommended that you first disassembly the
valve so as to not leave any foreign particles in the valve. You will require a 1/8” or 3.264 mm
drill bit to drill out the centre point of the gauge port opening into the body of the valve. The
port is already the correct diameter for the tapping of a ¼” or M10 thread. It is recommended
that you use a regular tap then a bottoming tap to open the port up, this will allow for the
proper number of gauge threads.

5
Manual Air Release
The valve is shipped with a factory set pressure
of 50 psig. The diagram to the left shows a cut
away view of the position of the diaphragm on
the seat.
To adjust the valve to relieve air or gas
downstream:
1. Back off lock nut located beneath the
colour coded handle.
2. Turn handle counter clockwise until
approximately 1 inch of thread is exposed.
3. At this adjustment, the spring has relieved
all tension from the diaphragm allowing air
or gas to be vented downstream.

6
Typical Installations
The installations below are typical installation examples only. Consult your engineering department for
the appropriate installation for your application or call the factory for advice
Example A: Solenoid Driven Pumps Rated Under 150 psig
Example B: System arrangement for solenoid driven (above 150 psig) or motor driven pumps.

7

8
Parts Ordering Information
KEY
1 EVT-1CPVC- 51
2 EVB -2* * * - * *- * *
3 EVD-3- 51- * *
Connection:
A= NPT
B= BSPT
C= S/W N.A.
D= S/W Metric
E= Flg. ASME
F= Flg. DIN
G= Union Thr’d
Size:
110= 1” valve
125= 1 ¼” valve
150= 1 ½” valve
200= 2” valve
4 EVAB-4-51
5 EVS-5- 51
6 EVBD-6- 51
7 EVBD-7- 51
8 EVSB-8-51
8A EVSB-8A-*
9 EVBN-9- 51
10 EVBC-10- 51
11 EVGC-11- 51
12 EVTC-12-* *-51
13 EVO-13-51*
14 EVUN-14-* * -51
Material:
PTFE=TFE/EPDM
P =PVC
E =EPDM
V =viton
Size:
110 = 1” S/S valve
125 = 1 ¼” S/S valve
150 = 1 ½” S/S valve
200 = 2” S/S valve
Material:
PVC =polyvinyl chloride
CPVC=Corzan
PP =polypropylene
PVDF=polyvinyldene fluoride
S/S6 =316L stainless steel
Colour:
B= Blue =1” valve
S= Silver =1 ¼” valve
BL= Black =1 ½” valve
W= White =2” valve
“O” Ring seal:
V= viton
E= EPDM
T= PTFE encapsulated viton
Material:
PVC =polyvinyl chloride
CPVC=Corzan
15 EVUI- 15- * * - * *- * *
PP =polypropylene
PVDF=polyvinyldene fluoride
Material:
PVC =polyvinyl chloride
CPVC=Corzan
PP =polypropylene
PVDF=polyvinyldene fluoride
Connection:
NPT=NPT
BSPT=BSPT
SOC=S/W Imperial
SOC-M=S/W Metric
Size:
110= 1” valve
125= 1 ¼” valve
150= 1 ½” valve
200= 2” valve

9
Flow
Rates
Subject: Flow capacity through ECO VALVE, back pressure/pressure sustaining and pressure
relief valves.
Under continuous flow conditions: @ 100 PSI with ambient temperature water with the valve
set@ 50PSIG.
1” valve
35
USGPM
1 ¼” valve
38
USGPM
1 ½” valve
57
USGPM
2” valve
59
USGPM
Note: Capacities will increase with pressure.(if pressure is doubled, flow rate will
approximately double)
For capacities of valves with pulsating flow use approximately 1/3 of the above given flow
values.
TEMPERATURE EFFECTS: Thermoplastics and thermosets will decrease in tensile strength as the
temperature increases; therefore, the working pressure must be reduced accordingly. The following
factors will apply:
Temperature Correction Factors
Thermoplastics
Operating
Temperatures
{Factors}
F C PVC
CPVC
PP
PVDF
70
21
1.00
1.00
1.00
1.00
80
27
1.00
1.00
1.00
1.00
90
32
1.00
1.00
1.00
1.00
100
38
.90
1.00
1.00
1.00
110
43
.83
1.00
.91
1.00
115
46
.75
1.00
.87
1.00
120
49
.66
1.00
.83
1.00
125
52
.58
.97
.79
1.00
130
54
.50
.95
.75
1.00
140
60
.33
.90
.66
1.00
150
66
NR
.80
.60
.97
160
71
NR
.70
.53
.93
170
77
NR
.60
.43
.86
180
82
NR
.50
.33
.80
200
93
NR
.33
NR
.66
210
99
NR
NR
NR
.60
240
116
NR
NR
NR
.40
280
138
NR
NR
NR
.16
Example:
Maximum Pressure for PVDF valve at 280°F (138°C)
Factor = 0.16 x 150psig = 24psig max. pressure
Factor = 0.16 x 1034kPa = 165.44kPa max. pressure
The maximum pressure rating for valves regardless of size
is 150 PSIG (1034 kPa) at 73° F (22°C)
NR = not recommended
Primary Fluid Systems, Inc. takes no responsibility for the
enclosed data.
10

11
LIMITED WARRANTY
Primary Fluid Systems Inc. (Primary) warrants its products against defects in workmanship or materials for one (1) year under
normal use. Three-(3) year available when application card is completed and returned to factory.
Primary’s obligations and liabilities under this warranty shall be limited to replacement of the product, or a refund of an amount
not to exceed the purchase price of the product(s) to which such warranty claim is made. Repairs or replacements are made
subject to our inspection of the returned product(s). Primary’s decision of one of these alternatives shall be the buyer’s
exclusive remedy.
This warranty does not extend to damage by corrosion or other decomposition by chemical action. Primary does not warrant
damages caused by (a) improper use of the product, (b) unauthorized modification or attachment to product, (c) misuse,
abuse, accident or negligent handling or installation of product, or (d) alterations or repairs made by purchaser.
The materials of construction offered are recommendations only, subject in all cases to acceptance by purchaser. These
recommendations do not constitute any guarantee against corrosion or decomposition, but are based on previous experience
and best available information of the industry.
Statements and instructions set forth herein are based on the best information and practices known to Primary, but it should
not be assumed that every acceptable safety procedure is contained herein. Of necessity Primary cannot guarantee that
actions in accordance with such statements and instructions will result in the complete elimination of hazards and it assumes
no liability for accidents that may occur.
Except as specifically provided herein, Primary makes no warranty, representations, promise or guarantee, either express or
implied, statutory or otherwise, with respect to the product and technical information provided, including the products’ quality,
performance, merchantability, or fitness for a particular purpose.
In no event will Primary be liable for indirect, special, incidental, economic, covert or consequential damages arising out of the
use or inability to use the product, including without limitation, damages or costs relating to the loss of profits, business and
good will even if advised of the possibility of such damages. In no event shall Primary’s liability exceed the amount paid by you
for the product.
The warranty and remedies set forth herein are exclusive and in lieu of all others, oral or written, express or implied. No
Primary dealer, distributor, agent or employee is authorized to make any modification or addition to this warranty. This
warranty gives you specific legal rights and you may also have other rights which vary from state to state.

12
Notes
 Loading...