

PrimaLuceLab EAGLE3, EAGLE3 S, EAGLE3 PRO User Manual

VERSION 1.0
Update10-12-2018
EAGLE is made by PrimaLuceLab iSRL (Italy). For any matters relating to the use, service and warranty, please refer to the
addresses given in the relevant documents.!
PrimaLuceLab iSrl • Via Roveredo 20/B, 33170, Pordenone • www.primalucelab.com
EAGLE3!
control unit for telescopes and astrophotography

PrimaLuceLab iSrl EAGLE3 user manual
English
CAUTION
To avoid the danger of electric shock and malfunctions, do not expose EAGLE to rain or moisture. The electronics are not
waterproof so in bad weather and rain, snow or the like, it is required not to use EAGLE outdoor.
WARNING
If improperly handled, EAGLE may damage. So please follow the instructions below:
•
Do not disassemble
•
Do not open, damage or subject to electric shock or excessive impact any part of EAGLE. Do not drop.
•
Do not short the electronic elements
•
Do not expose at temperatures above 50 ° C
•
Do not burn or incinerate any component.
•
Do not wet any electronic or electric component
•
Do not bend, modify or force any part of EAGLE
NOTICE
In case you check any malfunction, please contact us immediately (+ 39-0434-1696106 or support@primalucelab.com).
Do not try to disassemble, repair or modify yourself EAGLE, without our written approval, in order not to loose the Producer Warrantee!
"
pagina !1
PLEASE NOTE
EAGLE is designed to control telescopes and accessories for astronomy and it’s not a normal computer. Please do not modi-
fy EAGLE settings (such as user name or password) since this could stop some of the Eagle features. Also updates on ope-
rative system are not needed for telescope use.
FIRST CONNECTION
For the wireless connection, EAGLE creates a WiFi network at the same frequency as those of usually modems / routers
used to connect to the internet. So if you use EAGLE at home (for example the first time, to install your software) you might
notice a low signal or, in some cases, have connection problems. You can move it to an area with fewer WiFi connections or
connect it to a monitor (HDMI), keyboard (USB) and mouse (USB) to install your software.
QUALITY CONTROL
Each EAGLE unit, after created in our laboratories, it’s tested by PrimaLuceLab technical experts to check all components. We verify the
correct operation of the integrated computer, stability and speed of the wireless connection and the power bridge.

PrimaLuceLab iSrl EAGLE3 User Manual
Index
CAUTION 1
Components Identification 3
First use: power 4
First use: switch on and activation of wireless network 5
First use: Setting the wireless control device 9
First use: backup your SSD drive before installing your software 12
First use: install your software 17
First use: turn off EAGLE 18
First use: installing EAGLE on the telescope 19
First use: power other instruments connecting to the EAGLE 22
First use: remotely control devices with EAGLE Manager 24
-!connect or disconnect every power out port of EAGLE 26
-!set power out tension of the 3 power out ports with adjustable tension 27
-!connect or disconnect connection to devices connected to the 4 USB 2.0 ports 28
-!check for power in tension and battery lifetime 28
-!set WiFi connectivity 29
-
remotely turn on/off the entire telescope 31
Advanced use: program connection and power to devices 33
Advanced use: remotely turn on EAGLE with wired connection 34
Controlling the telescope remotely with Cartes du Ciel 38
Autoguiding with PHD2 Guiding 45
Drift Alignment using PHD Guiding 50
Q & A 58
"
page !2
PrimaLuceLab iSrl EAGLE3 User Manual
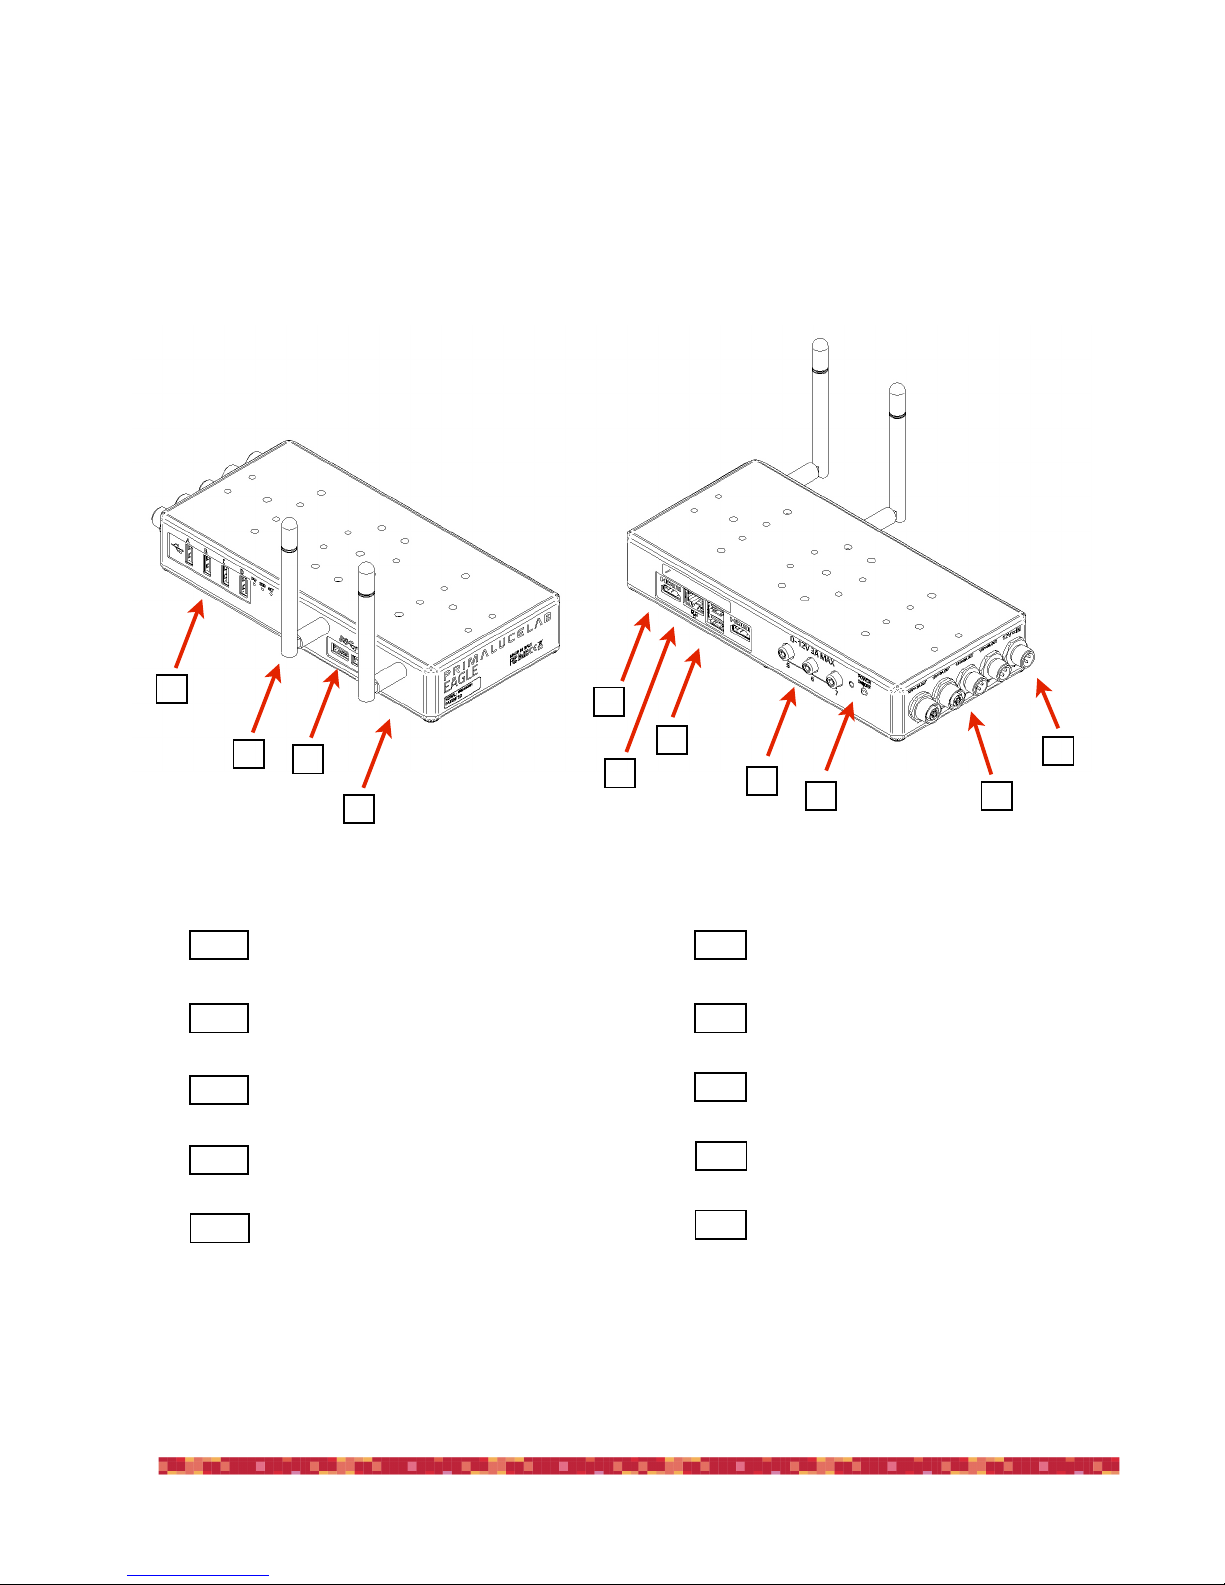
Components Identification
The numbers indicate the name of the specific component. Read the paragraphs below for detailed operations descrip-
tion.
"
"
page !3
Power IN 12V
HDMI port for external monitor
3
4
n.2 USB 3.0 ports
5
n.2 USB 3.0 ports
7
On / Off switch
8
9
10
n.4 12V power OUT
2
Network port
n.4 USB 2.0 ports
WiFi Antenna
16n.3 power out ports with regulated tension
1071
6
3
4
2
9
5
9
8

PrimaLuceLab iSrl EAGLE3 User Manual
First use: power
EAGLE allows you to distribute power to many devices used in telescopes astrophotography (such as mount, camera, filter wheel, electronic focuser, dew heaters, etc.), thus eliminating the need for many different power supplies and using
only one. It is therefore necessary to select the correct power source for EAGLE so that it can properly power all the devices you want to use.
Which battery or power supply have I to use for my equipment?
The power supply or battery you need to use to power the EAGLE and all peripherals connected to it depend on the sum
of the electric current needed to power the instruments and the EAGLE. Considering the EAGLE3, it needs for an average
of 0,6 Ampere. For example:
- EAGLE: 1,2A maximum consumption (average consumption: 0,6A)
- Cooled CCD camera: 4A maximum consumption (average consumption: 3A)
- Skywatcher AZ-EQ6 SynScan mount: 2A maximum consumption (average consumption: 1A)
- Guide camera: QHY5L-II mono: 0 consumption (power from the USB port of EAGLE)
Total maximum power consumption: 7,2A.
So, for this setup, you should use the 12A AC adapter. If you want to use a battery (WARNING: The battery must have a
12V voltage regulator with protection system) that can power the entire system for 8 hours (for example for the duration
of an astronomical night), you will need this battery capacity:
7,2A (consumption per hour) x 8 (hours duration) = 57,6 Ah!
"
page !4
CAUTION
EAGLE must be powered with 12V stabilized voltage. You can power it via a 12V external power supply or with
an external battery. If you use an external battery, this MUST be provided with a proper voltage stabilizer. In
case of any malfunction, immediately unplug the power supply. DO NOT CONNECT TO THE EAGLE A BAT-
TERY WITHOUT 12V VOLTAGE REGULATOR since it may damage the other instruments powered by EAGLE (
like the CCD camera). Immediately disconnect power supplies or battery if there’s any malfunction of the unit.
TIP
Since EAGLE distributes power to many devices, when many devices are powered through the EAGLE
(and Ampere consumption exceeds 5A /hr) we recommend using a power supply or battery with 12,8V
tension instead of 12V.
PrimaLuceLab iSrl EAGLE3 User Manual
First use: switch on and activation of wireless network
The control unit EAGLE is designed to be controlled from an external device (not included in the package). You can use any
mobile device (tablet or smartphone) with any operating system (iOS, Android or Windows Mobile) or from any computer
(Windows or Mac). For remote control, you need to download the App "Microsoft Remote Desktop" to the device you will
use to control EAGLE (smartphone, tablet computer or external). Depending on the store of your system the App can also
be found under the name "RD Client Microsoft ". The app is free and compatible with all operating systems iOS, Android,
Windows Mobile, Windows and Mac OSx.
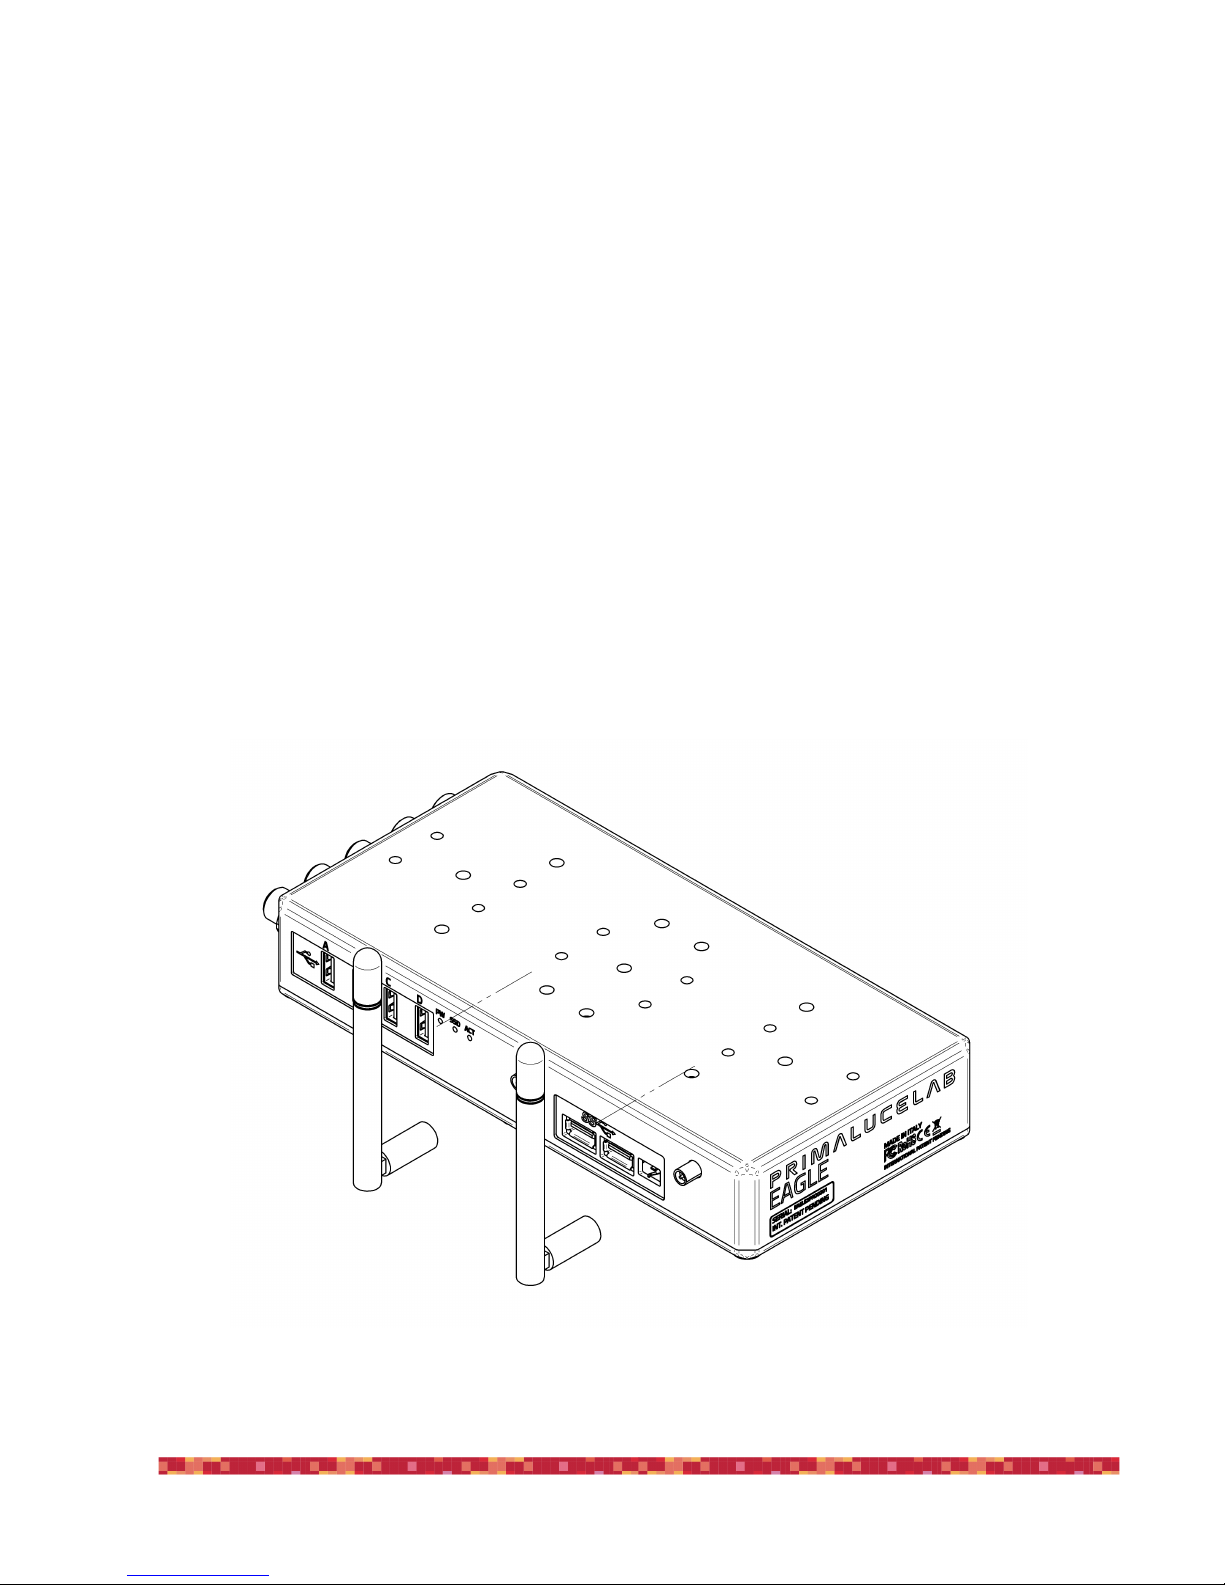
Take the 2 WiFi antenna (9) included in the package of EAGLE and screw in the proper ports as in the picture (image 1).
"
page !5
Image 1: Screw the WiFi antennas to the proper ports

PrimaLuceLab iSrl EAGLE3 User Manual
To power EAGLE from the wall Insert the "Power supply 12V for Eagle" into the socket (1 - Power Input 12V); insert the
"Power cable for 12V Eagle with banana plug" in case of battery power (image 2). Then press the power button (7). A red
LED will light up; the brightness is calibrated not to be annoying during the night so in daylight it might be difficult to notice.
"
page !6
Image 2: Connect the power plug into the socket (1)
Image 3: press the Start button (7) to switch EAGLE on
PrimaLuceLab iSrl EAGLE3 User Manual
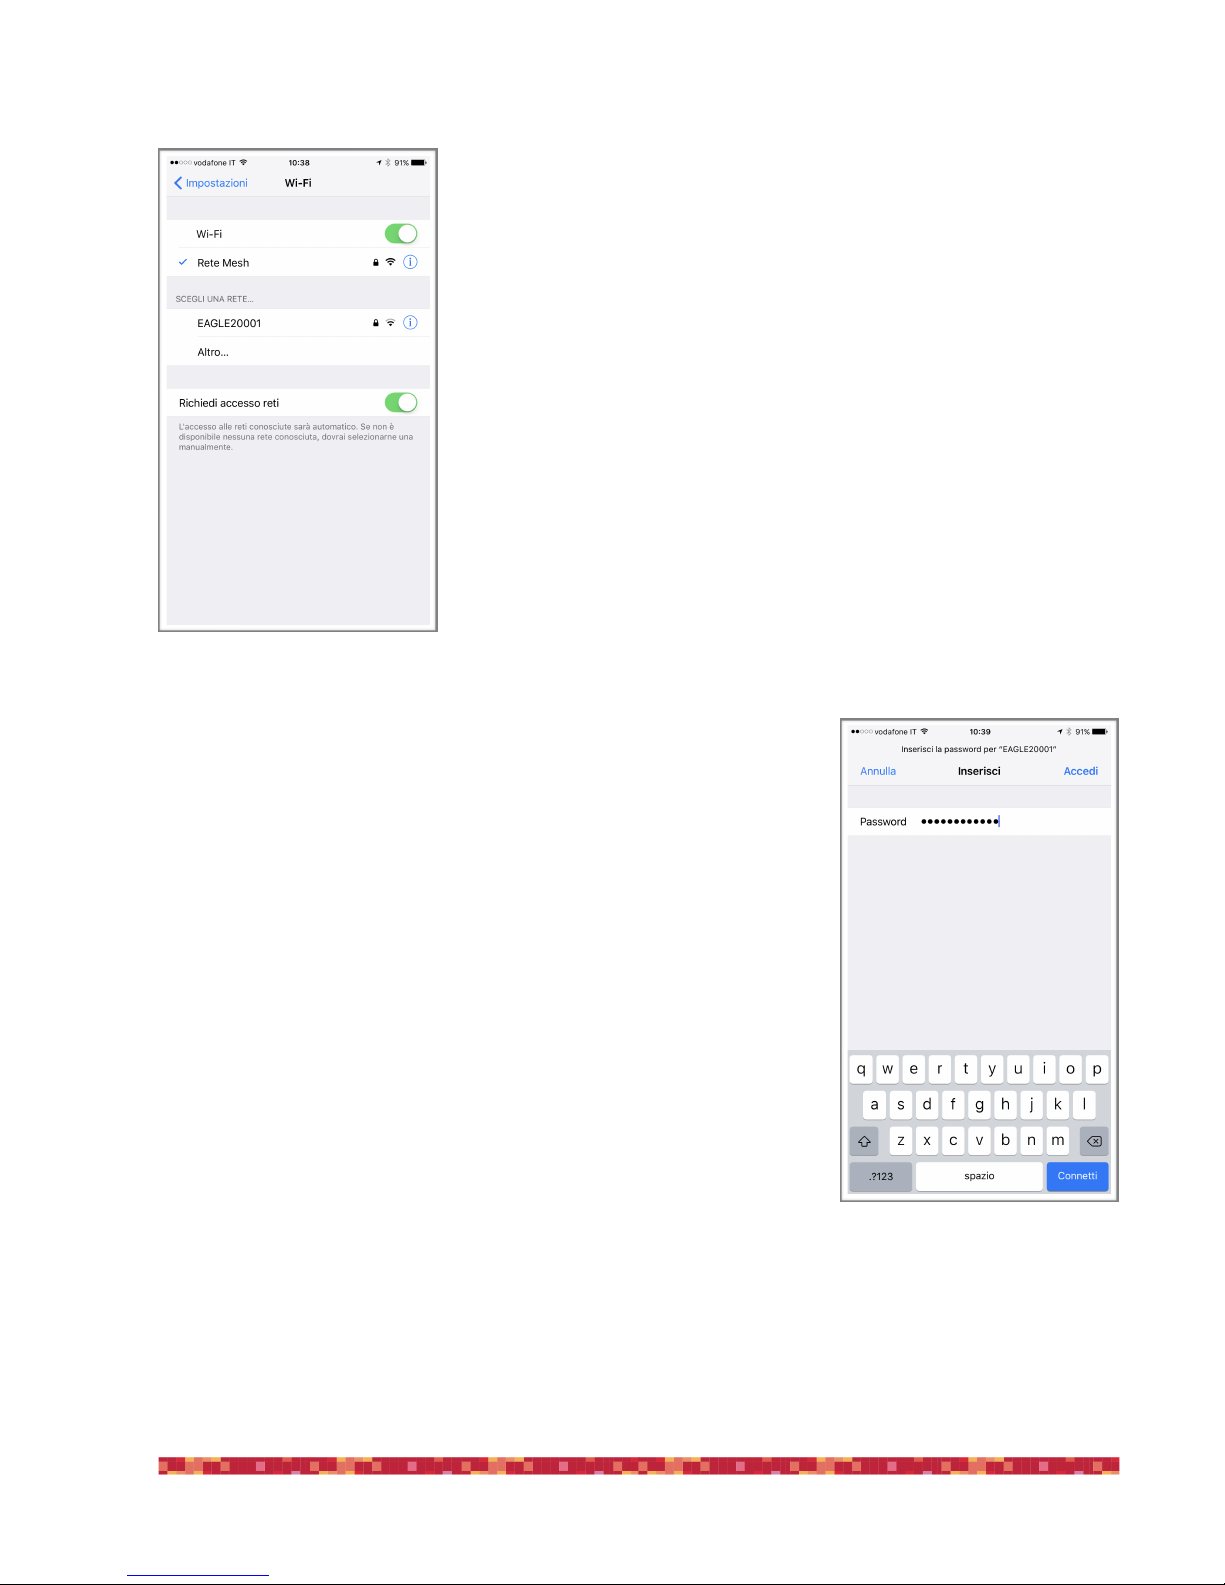
Now wait about one minute and turn on your WiFi device you choose to control
EAGLE. In about 30 seconds EAGLE creates the WiFi network to access to. The network name is EAGLExxxxx (where the xxxxx is the serial number of your EAGLE as
written also is also on the front side of EAGLE.
Look at the list of WiFi networks displayed by your device (identification mode of
wireless networks depends on the control device you use, so if you do not know
how to search for WiFi networks, please read the manual of your device) and select
the network created by EAGLE. The network name matches the serial number of
your EAGLE (picture 4).
A window will appear where you will be asked to enter the password of your network (image 5). The password is primalucelab. The same information is also on the
front of EAGLE. Using the keyboard (virtual or physical) of your device, enter the
password paying attention to appropriate upper or lower case. Then press the
CONNECT.
EAGLE has a own password to log on to Windows that you only know. (Each EAGLE
has a different password to log Windows; the password is shown on the EAGLE
box). This way it is possible and completely safe for you to use your EAGLE even
when many others are working (for example during a StarParty).
"
page !7
Image 4: select the WiFi net created by
EAGLE
Image 5: insert network password

PrimaLuceLab iSrl EAGLE3 User Manual
Then EAGLE WiFi network connection is confirmed (image 6). The network setting
is finished and the next time you want to access the EAGLE you will no longer need
to enter your password: your device will connect automatically when you select
the network created by EAGLE.
"
"
page !8
Image 6: connection to WiFi network
confirmed.
NOTE
Using the EAGLE, sometimes you can have a WiFi connection drop out and then connection restarts. This is
normal, then the EAGLE will automatically reconnects to the WiFi and you will normally be able to continue re-
mote control.

PrimaLuceLab iSrl EAGLE3 User Manual
First use: Setting the wireless control device
Download to your control device (smartphone, tablet computer or external) the
"Microsoft Remote Desktop" app. Depending on the store of your system it can
also be found under the name "RD Microsoft Client". How to download and install
the application of remote control depends on your control device; so if you do not
know how to install the app from the Store, please read the manual of your device.
Thanks to the remote control App, you have Eagle with all your software on your
device screen: the remote control App uses a special mode so you can use your
finger on the touch screen as if it were a mouse: simple and fast. After setting the
acquisition parameters and started the auto-guide, you can launch shooting and
turn off the controller: Eagle will make shooting automatically.
Start the "Microsoft Remote Desktop" app. You will see a screen like the one visible in the image 7.
Now link to your EAGLE: Click the + button, then select "Desktop".
In the window that opens, in "PC name" enter 192.168.137.1
Then select the "Username" field and choose
"Add user account". a window will open (picture 8) where you can enter your username
and password to log on to Windows.
The values are:
- Username: PrimaLuceLab;
- Password: (that shown on the first page of
this manual)
Then press the button "Save" to save the access data.
WARNING: when entering your data check
that your device does not automatically insert
a space after the word "username" and "password".
Then (image 9), press the "Save" button to confirm and save the access data.
"
page !9
Image 7: Press the + button to add the
parameters to access your EAGLE.
Image 9: Press “Save” to confirm ac-
cess data.
Image 8: Insert User name and
Windows access password.
PrimaLuceLab iSrl EAGLE3 User Manual
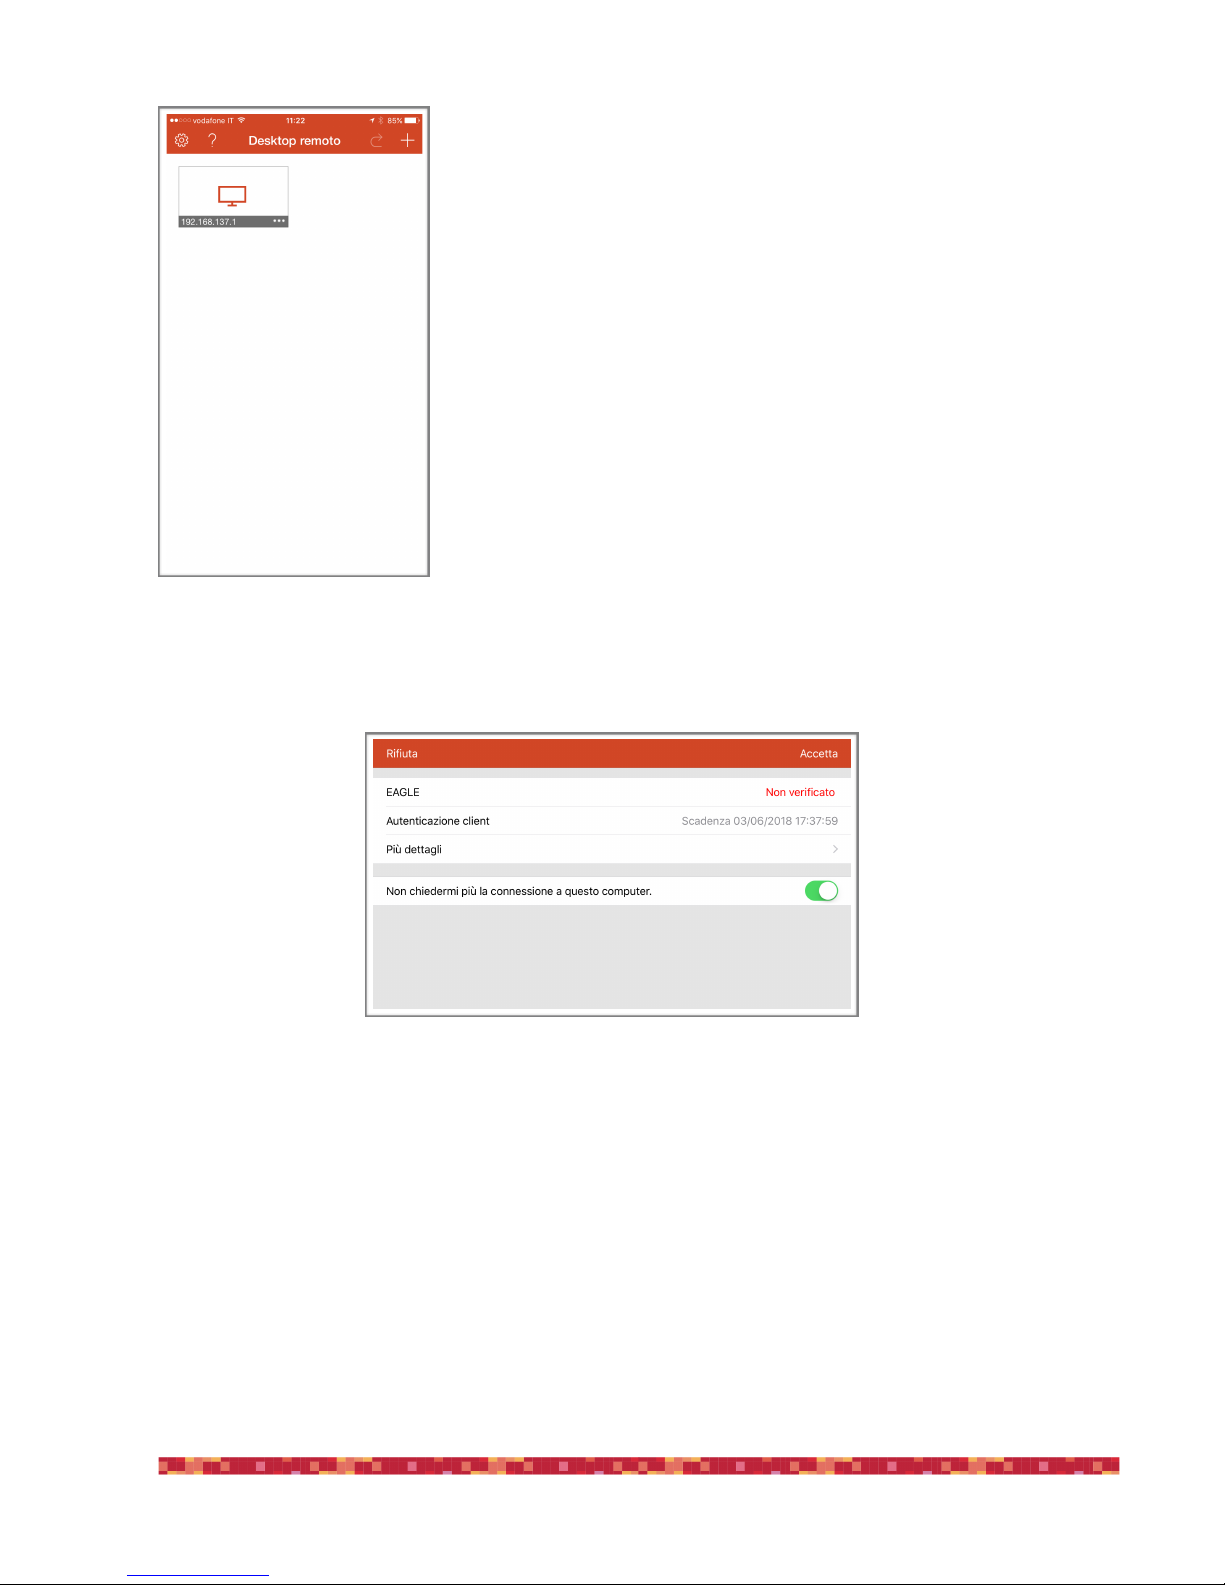
Returning to the main page you will find a new connection (picture 10)
Select it and the screen will change to the following (picture 11):
Select the option "Do not ask me again for connections to this computer" and press the "Accept" button.
"
page !10
Image 10: Select the recently created
link
Image 11: Click “Connect” to confirm the link.

PrimaLuceLab iSrl EAGLE3 User Manual
Wait a few seconds and you'll see on your device's desktop EAGLE (image 12). Now you are ready to use the software you
prefer to control your telescope.
If you use the app "Microsoft Remote Desktop" from a tablet or a smartphone, you can use the screen of your device looking like mouse and keyboard of EAGLE. There are two modes of use, that can be selected by pressing the central-up button (between the magnifying glass and the keyboard) to see the options. Press it, and several options will appear (Figure
13).
By default, the app works in "touch" with which you can directly use your finger to click on icons and buttons visible on the
screen (as you usually do with your tablet or smartphone). If you prefer to view the classic arrow Windows select the
"Mouse Pointer". On the screen a mouse pointer will appear that you can move with your finger.
This is the mode we recommend because it allows to have a higher accuracy (especially useful for the control of EAGLE
from devices with small screens). To simulate a single mouse click (like pressing the left button of the mouse) just "tap" on
the screen. To simulate the right mouse button, place a finger on the screen (and do not move it), and then "tap" with another finger to make options appear.!
"
page !11
Image 13: Click on the central-up button (between the magnifying
glass and the keyboard) to see the options.
Image 12: EAGLE start screen
PrimaLuceLab iSrl EAGLE3 User Manual
First use: backup your SSD drive before installing your software
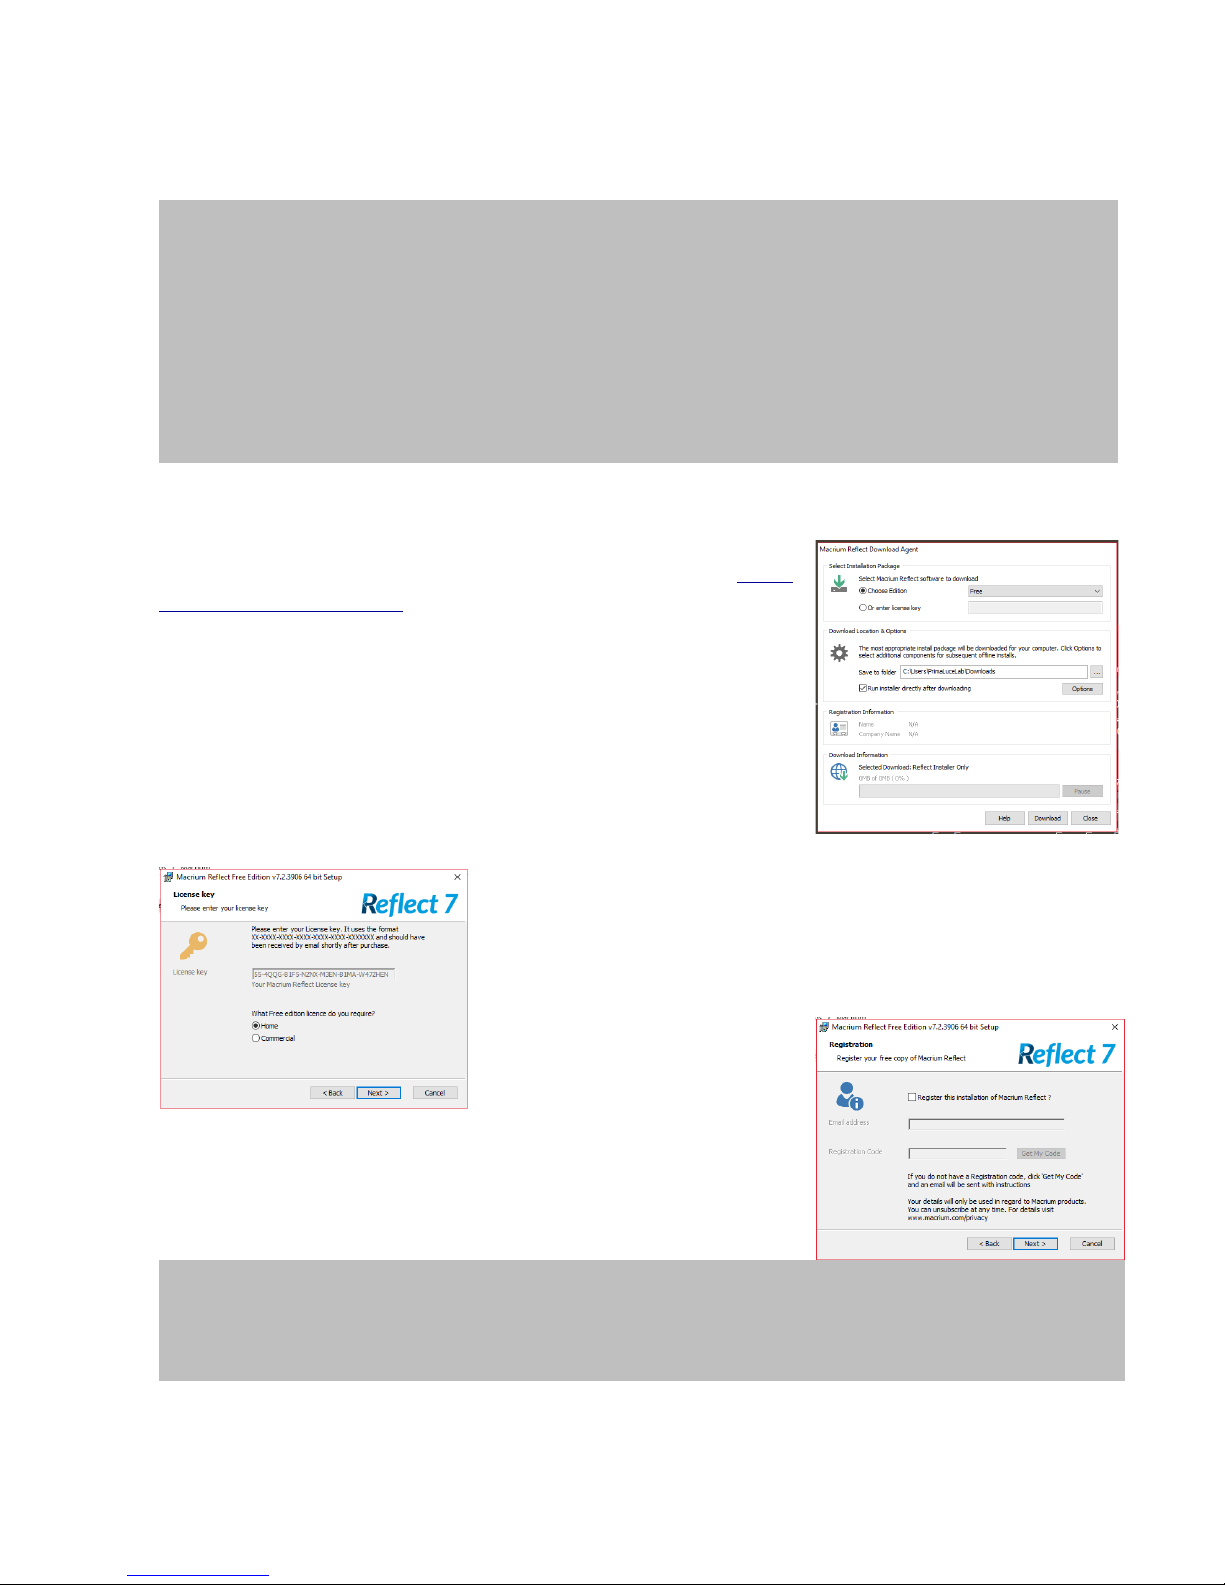
There are plenty of services to back up your files, but we'll be using Macrium
Reflect Free. It's free and easy to use. To install Macrium Reflect, go to https://
www.macrium.com/reflectfree, click on "Home Use" button. Your EAGLE has to
be connected to the internet (for example, by connecting the EAGLE to your
router by using an Ethernet cable) in order to correctly download and install
Macrium Reflect.
Once you downloaded the installation file, please double click on it in order to
start the installation procedure, as you can see in the picture on the right. You
can safely delete all the installer files from your Downloads folder once the wizard has finished.
Once it's installed, it'll automatically launch the Macrium software, you will see
this windows (left) and please press Next button to proceed.
A new window will open, you can deselect “Register the installation of Macrium
Reflect” and press Next button to proceed.
"
page !12
Before installing your devices driver and your astronomy software in the Windows operative system of
the EAGLE, we suggest you to create a backup copy of your SSD. In fact, after production and testing of
your EAGLE, we always record a “Windows Restore Point” that you can use if the software and driver you use
create problems in Windows and you want to come back to factory settings. But, since main Windows Updates
automatically delete recovery points, we recommend you also to make a backup copy of your SSD drive.
If you don’t do a backup copy of your SSD drive and if in the future you will have problems with the Windows
installation of your EAGLE, you will have to ship us back the entire unit (since every EAGLE is different because,
for example, every EAGLE has its remote control codes) because we can only do this reset in our laboratory.
NOTE: Before starting the backup of your SSD drive, please connect a USB 3.0 pen or an external USB 3.0
drive (with enough capacity to make the backup of your SSD drive) in one of the USB 3.0 ports of the EA-
GLE. Slower USB 2.0 pen or drive will also work but will need a longer time to perform the backup.

PrimaLuceLab iSrl EAGLE3 User Manual
Macrium Reflect will start and you'll see a detailed list of the disks of your EAGLE. Select the SSD disk of the EAGLE (the
first line) by checking the leftmost box option and click"Image This Disk”.
In the next window, choose your destination disk (the one that will house your SSD copy). Note that this will erase all data
on the disk, so be careful which one you choose.
"
page !13
PrimaLuceLab iSrl EAGLE3 User Manual
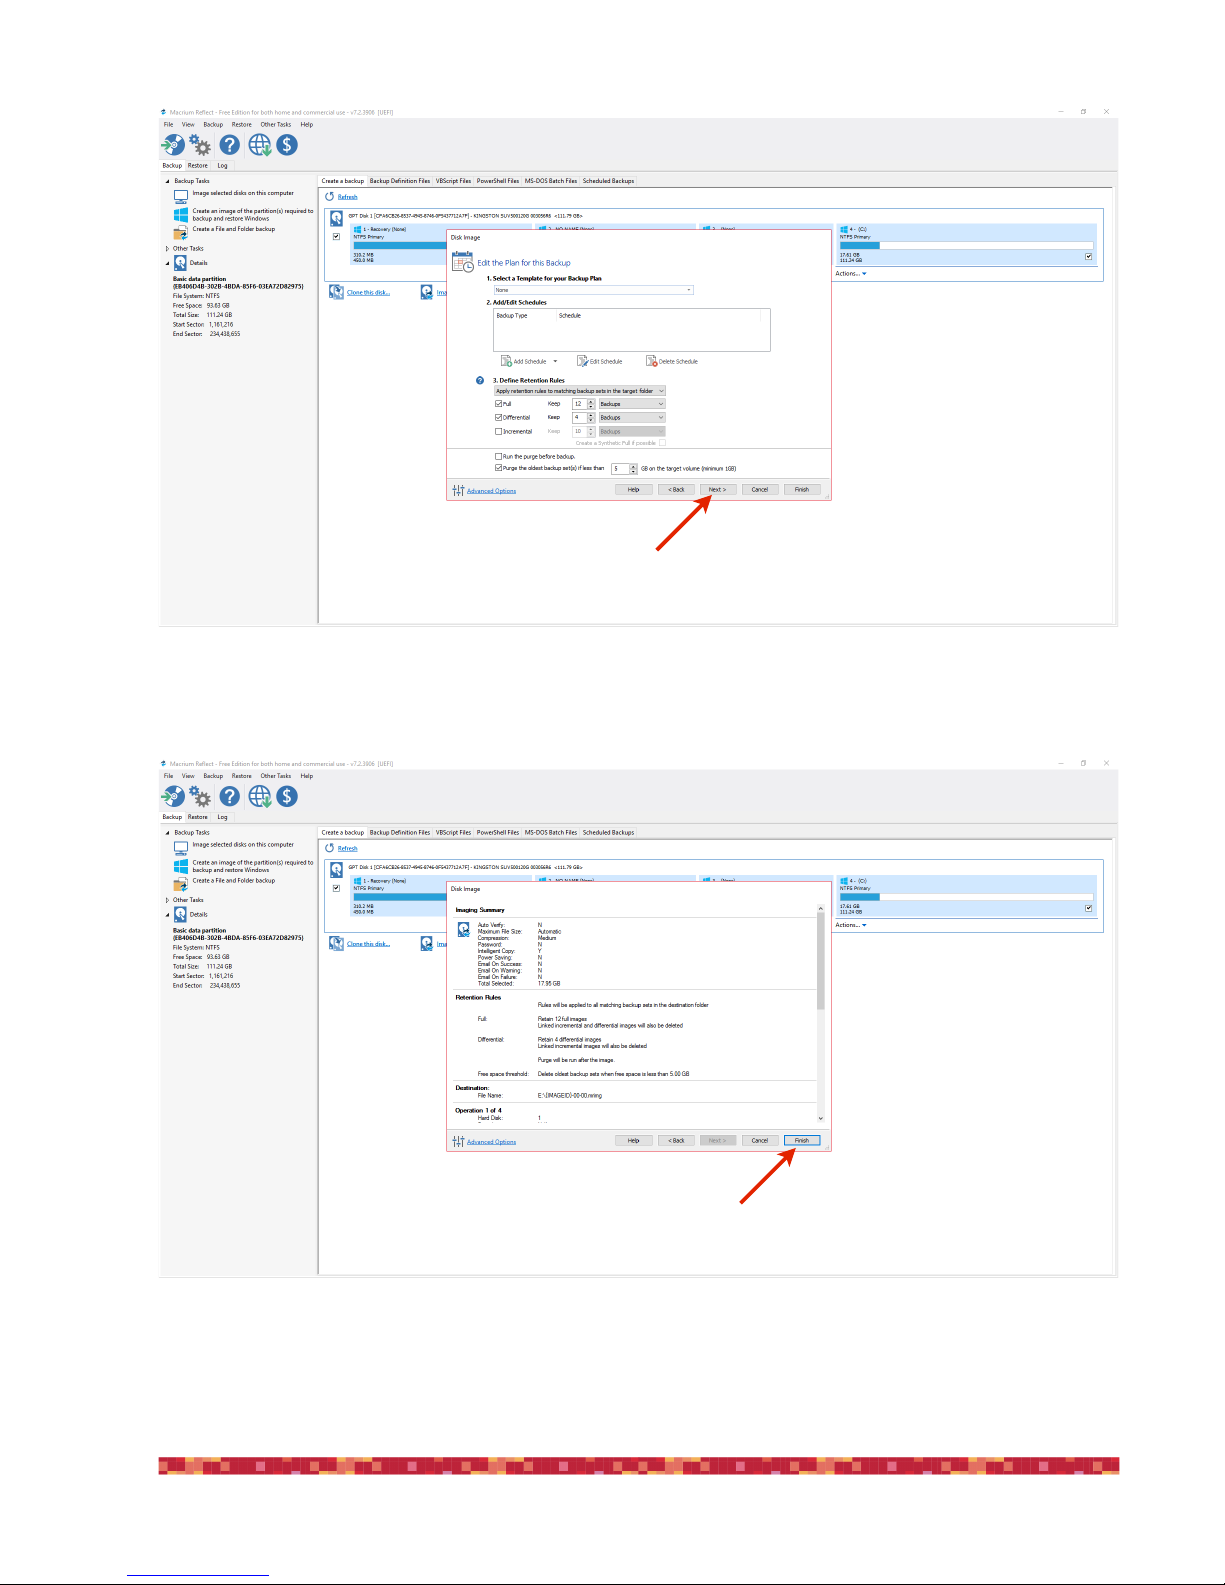
In the next window, please leave the options as they are and press Next to continue.
In the next window, please press Finish button finish the backup wizard.
"
page !14

PrimaLuceLab iSrl EAGLE3 User Manual
In the next window, please press OK button to start the backup of your SSD drive.
Finally, Macrium Reflect will begin the cloning process. This can take some time depending on the size of your SSD unit
and on the speed of the USB pen or drive you use to make the backup, so give it time to do its thing.
"
page !15
PrimaLuceLab iSrl EAGLE3 User Manual
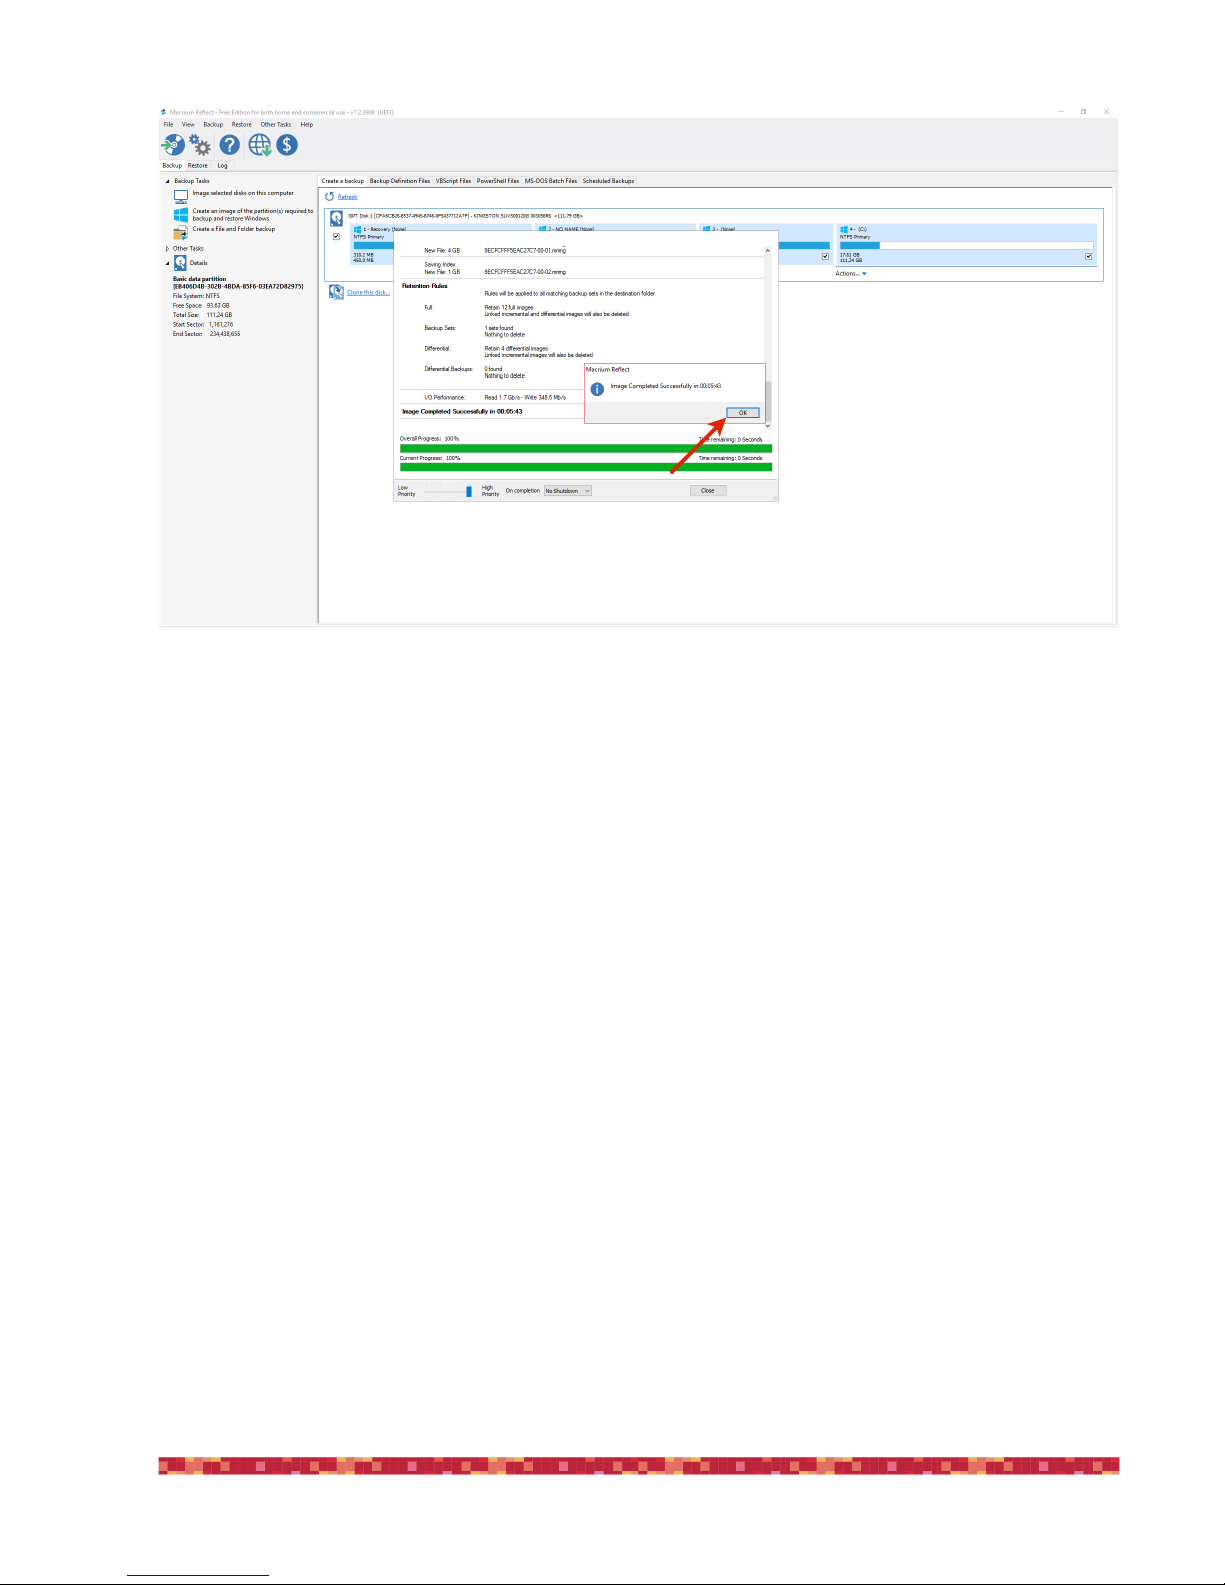
At the end of the procedure, you will get a confirmation message. You can press OK and exit from Macrium Reflect and
disconnect your drive from the EAGLE. Now you have a full backup copy of your SSD drive that you can use if you will have
troubles with Windows in the future. In order to use this backup, just reconnect the external drive in the EAGLE, start Macrium Reflect and select the “Restore” option on the left of the window.
"
page !16
PrimaLuceLab iSrl EAGLE3 User Manual
!
First use: install your software
EAGLE uses a Windows O.S. This way it is compatible with all the software for astronomy. You are then free to install EAGLE on all the software that you want.
1) EAGLE does not have a CD or DVD integrated player. If you have to install a software on CD or DVD, you may connect the CD
or DVD external reader to a USB port of EAGLE. Then insert the CD or DVD of your software and follow the on-screen instructions to complete the installation (as if EAGLE were a normal desktop computer).
2) If you have an USB drive software to install: connect the USB stick to a USB port of the EAGLE and follow the onscreen instructions to complete the installation (as if EAGLE were a normal desktop computer).
For a better organization of your software and to get quick access to frequently used applications, you can add your software to the "START" of Windows. To do this, select your software and do the same movement as to simulate the right
mouse button (place a finger on the screen and without moving it "tap" with another finger on the screen). Select the option "Add to Start" (picture 14).
The icon of your software will appear in the "START" button that appears pressing the screen bottom left button (picture 15).!
"
page !17
Image 14: Select your software “Add and Start”
Image 15: In Start you find your software’s icon
PrimaLuceLab iSrl EAGLE3 User Manual
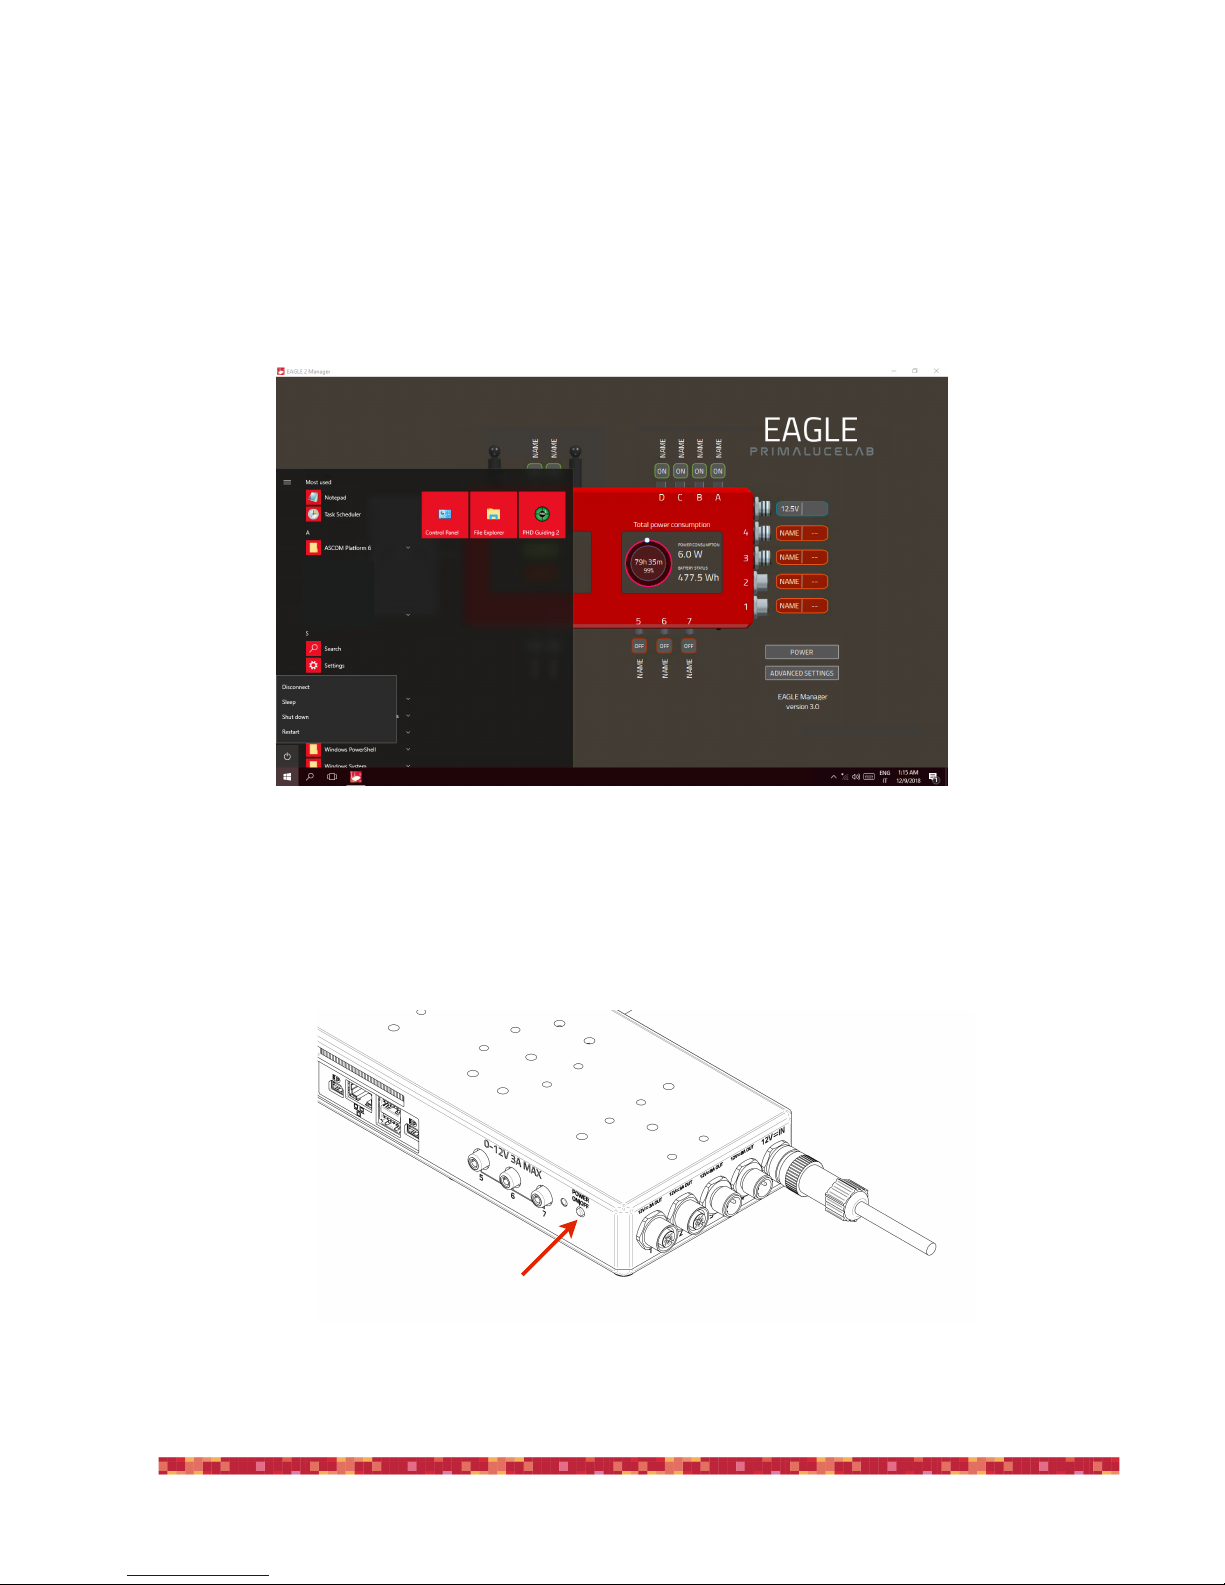
First use: turn off EAGLE
When you want to turn off EAGLE, first disconnect your remote control device. From the START screen, select the "options
off" and then press "Disconnect" (picture 16).
This way you can close the remote connection of your device. You can then exit the "Microsoft Remote Desktop". Then
press the power button (7 - picture 17). Take a look at the LED at the right of the 4 USB 2.0 ports: when the central SSD
LED and the right ACT one will be off, the EAGLE will be off and you can disconnect the power supply.!
"
page !18
Image 17: push the ON / Off button (7) to switch EAGLE off.
Image 16: Select “Disconnect” to terminate session
 Loading...