

Primal RC QICKSILVER Instruction Manual

1/5th SCALE ELECTRIC DRAGSTER

1
1/5 SCALE ELECTR IC DR AGS TER
Safety Guidelines
WARNING: RISK OF FIRE, INJURY OR DEATH
The dragster is not a toy. The dragster requires an advanced set of skills and is not intended for use by children or minors under the age of
18. The dragster is intended to be purchased and operated by competent, adult R/C users possessing qualified skills and experienced driving
ability. The user of this vehicle should be practical, mature, intelligent, and display good sense.
Caution must be taken to ensure the safety of yourself and others around you. This dragster is very large and is capable of high speed and
quick acceleration. Collisions of a critical nature (injury, death, severe property damage) can result if the dragster is operated in a careless or
unsafe manner. Always take great care to make sure all systems are working properly before operating. The user must be aware of their
limits and abilities. Make certain to have adequate space where the dragster can be run safely.
Terms of Use
This product is sold by Primal RC with the understanding that the buyer accepts full responsibility for all actions associated with its use.
Serious injury, property damage, or death can result from driving the dragster or using any of the included accessories in an unsafe or
irresponsible way. The buyer assumes all liability with this product including any actions that occur due to a failure to follow its safety and
operating instructions resulting in unsafe or improper use or any action that violates pertinent laws or regulations. Primal RC, and all Primal
RC dealers, will not be held accountable under any circumstances with the use of this product resulting in property damage, personal injury,
or death. This includes any willful or unintentional damages that may arise out of the assembly or use of the product or its accessories. The
user accepts all liability by the act of using and operating the dragster and releases Primal RC, and all Primal RC dealers of any and all
liability associated with its use. Primal RC requests that you do not use this product if you as a user do not accept liability of ownership. If you
don’t accept liability, please do not open any of the enclosed accessories, do not attempt to start it, and contact us to make arrangements to
return the product. Used vehicles cannot be accepted for returns or exchanges under any circumstances. The material included in this
manual can be changed without notice. Primal RC reserves the right to make improvements to the products with no commitment to integrate
those improvements into products sold previously. If you have any questions regarding this Terms of Use, stop and do not go any further. Do
not run your vehicle and contact Primal RC at sales@primalrc.com.
Safety is your responsibility
• Your radio may be subject to radio interference from many sources that are out of your control. Please be aware that radio
interference may cause a temporary loss of control. Allow adequate space in all directions when running your model to prevent
collisions if radio interference should occur.
• Test the range of your radio in the area to be driven in. Make sure not too drive too far and go out of range. After testing the range,
start by driving slowly in the area to make sure there is no interference that can cause temporary losses of control.
• Always test the failsafe system every time before use to ensure it’s working properly (instructions are in the radio manual).
• Use new or freshly charged batteries in order to boost signal output power and range.
• Drive in the proper area. This product is not designed to be used in heavy traffic areas where its operation would cause pedestrian
and vehicle interruptions. This is recommended to prevent collisions causing property damage, injury, or death.
• Try to always bring a friend while driving. Another set of eyes is helpful to identify potential hazards such as an animal or person
crossing in the driving path.
• Always have a clear view of the model when driving. Don’t drive at night or when your vision may be blocked in any way.
• Don’t drive the model too close to you, other persons, or property where collisions may occur. Allow a comfortable amount of space
to maneuver the vehicle.
• Be sure to check over the model after each session used. Check for damage or any loose parts and correct any issues right away
before using again. Make sure to check and tighten the wheel nuts before each session.
• Do not pick up the model by its wheels or tires. Keep your hands free and clear of any moving parts when the batteries are in use.
• Gravel, dirt, sticks, and other debris can be kicked up from the rear wheels during aggressive starts. Avoid standing directly behind
the dragster and make sure other watchers are at a safe distance to avoid being hit. Eye protection is always recommended.
• Avoid making changes not shown or suggested in the instruction manual. You can cause damage to the model and injury to others
if the product is altered in a way not intended.
• VERY IMPORTANT: Always turn off the dragster first, then the transmitter. Otherwise throttle servo damage will occur if dragster is
left on.
• Remember: safety first. Create a safe environment to run in and use good common sense always. This will ensure maximal
enjoyment while using the product.
Copyright 2016 Primal RC

2
1/5 SCALE ELECTR IC DR AGS TER
Thank you for purchasing the Primal RC 1/5 Scale Electric Dragster.
This manual contains the instructions you need to operate and
maintain your dragster. It is very important that you take the time
to read and understand the instruction and radio manual. Make
sure you read and follow the precautions and warnings in
the
Safety Guidelines section which can be found on the back of the
front cover. These guidelines will educate you on how to run your
dragster safely and maximize its longevity and performance.
This dragster requires advanced R/C user experience and
expertise. You must be 18 years of age or older to operate this
vehicle. Even if you are an experienced R/C driver, it is important
to read and follow the safety guidelines in this manual.
If you have any questions regarding this vehicle or this manual:
Stop, do not use this vehicle and contact us at
www.PrimalRC.com.
Thank you again for your purchase and we look forward to
exceeding your expectations.
Before You Drive
It is extremely important that you read, understand, and follow all instructions in the manuals included
with this product in order to prevent serious damage to your dragster, yourself, and your property. If the
user fails to follow these instructions, it will be considered negligence.
Before starting your dragster, read and understand all manuals and familiarize yourself with the model
completely. If you decide this model is not the right choice for you or you do not want to assume
responsibility for your safety, then do not attempt to start it. Do not run the vehicle at all and please
contact us to make arrangements to return your vehicle.
If your vehicle arrives with damage from transit please do not run the vehicle and contact us.
Used vehicles cannot be accepted for returns or exchanges under any circumstances.
If you have any questions about your dragster, please email us at Sales@PrimalRC.com. Maintenance
and replacement parts may be purchased directly from www.PrimalRC.com.
Your satisfaction is our primary goal at Primal RC!
Table of Contents
2 Before you Drive
3 Receiver connection
4 Radio Operations
5 Assembly
5 Gear Box
6 Chassis
7 Rear Arm
9 Motor assembly
10 Gear mesh
13 Brake system
14 Front End
19 Lower Chassis
20 Body
23 Front Tire
23 Rear Tire
25
Exploded View
27
Parts List

3
1/5 SCALE ELECTR IC DR AGS TER
To preve nt serious personal injury and/or property damage, operat e all rem otely c ontro lled models in a
responsible manner as outlined herein.
CHOOSE THE RIGHT PLACE TO OPERATE YOUR R/C MODEL .
INSPECT YOUR MODEL BEFOR E OPERATION.
AFTER OPERATION OF YOUR R/C MODEL.
Do not run on public streets or highways. This could cause serious accidents, personal inju ries, a nd/or d amage .
Never run R/C models near people or animals.
To avoid injury, do n ot run in confined spaces.
Do not run where loud noises can disturb others, such a s hospi tals an d resid entia l areas.
Never run indoors. There is high risk of fire and/or damage.
●
●
●
●
●
Make sure that screws and nut are properly tightene d. It is al so a good i dea to us e remov able thread lock wherever metal
screws go into metal, especially for engine mount s and the e ngine p ilot sh aft.
Always use fresh batteries for your transmitter a nd for yo ur rece iver to a void losing control of the model.
Always test the brakes and throttle before starti ng your e ngine t o avoid l osing c ontrol of the model.
Make sure no one else is using the same radio frequency as you are u sing.
●
●
●
●
Turn off receiver first, then turn off transmitter, this will prevent runaways.
Be careful when handling batteries, they will be hot after r unnin g.
Replace any batteries that have been dented or have frayed w ires, s hort ci rcuit s can cause fire.
Be sure to keep your R/C model clean of excess dirt and gre ase, th is will i ncrea se the li fe.
●
●
●
●
CAUTIONS
Equipment needed
14.8V 4S Li-Po bat ter y
Receiver Connection
×2
Charger
AA ba tte ry
×4
14.8V 4S Li-Po bat ter y
Negative
Black
Negative
Black
+
Positive
Red
+
Positive
Red
14.8V 4S Li-Po bat ter y
QS2136
Brushless Moto r 960 KV
Steering Servo
Receiver
QS2135
Brushless ESC 20 0A
4
1/5 SCALE ELECTR IC DR AGS TER
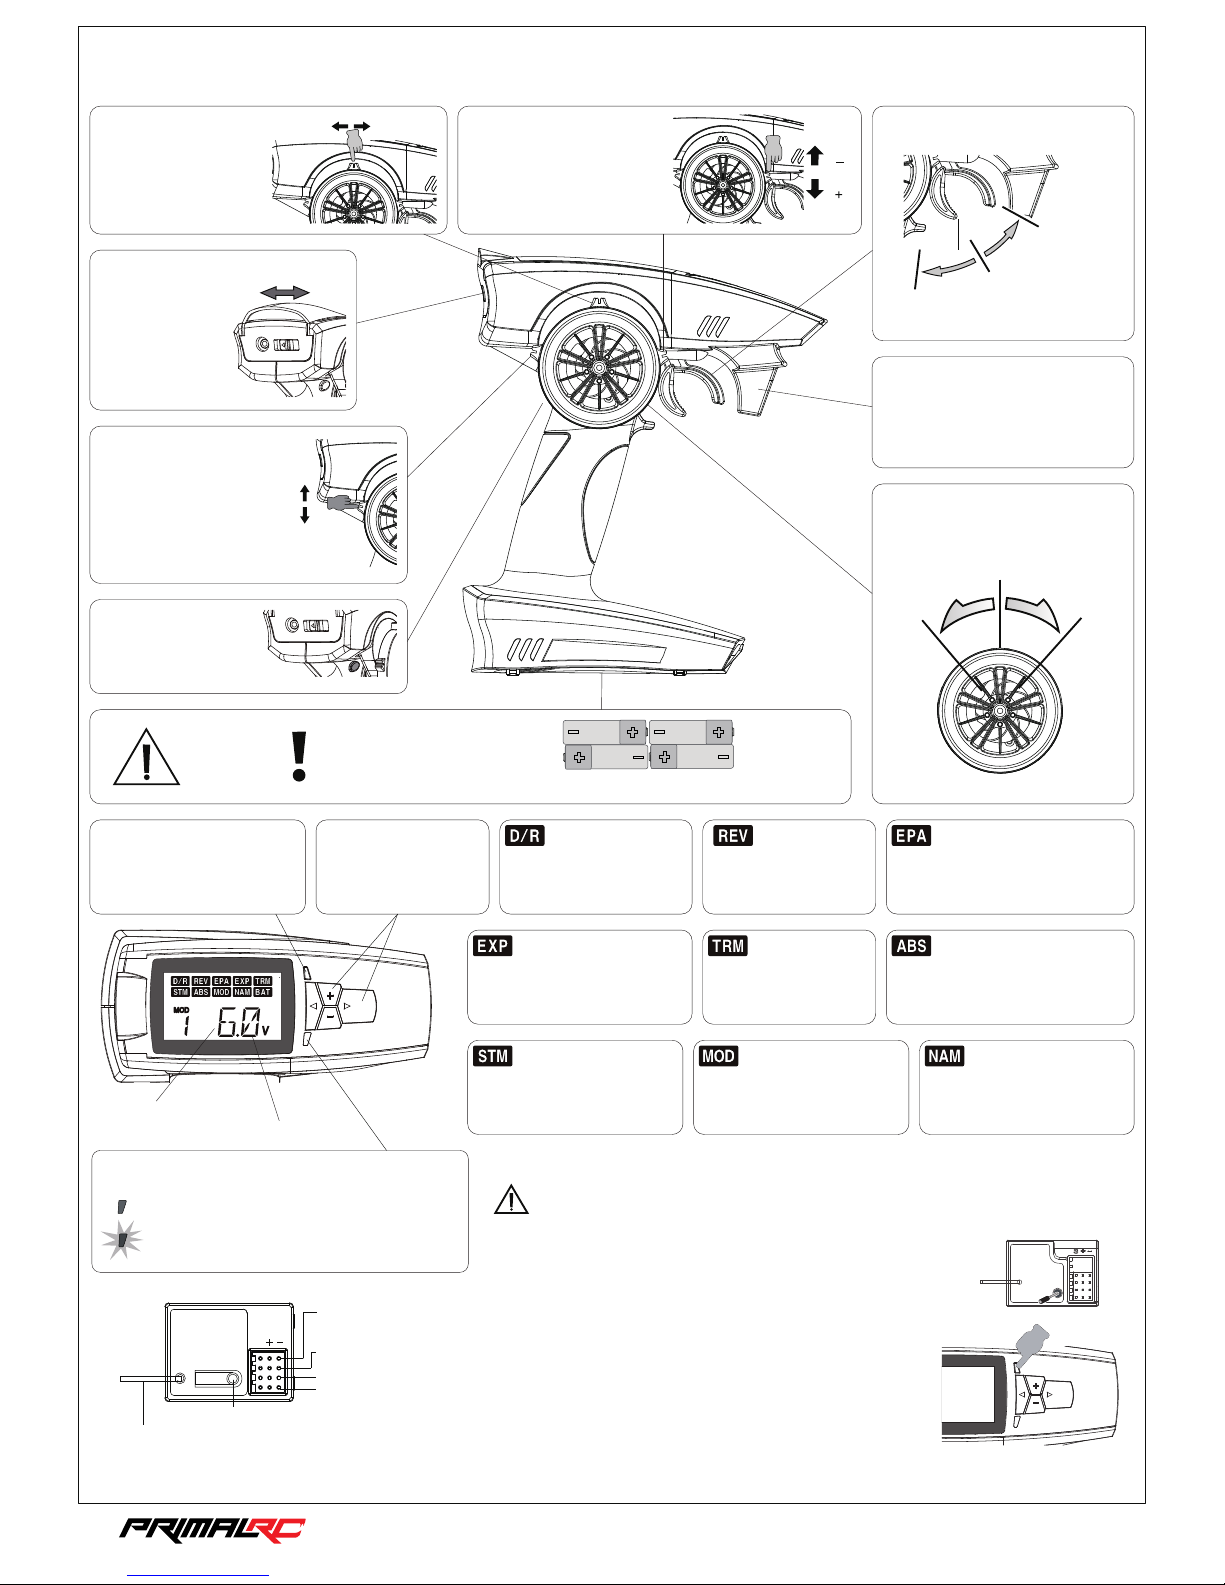
Steering Wheel
Servo Sub-Trim
To be used for centering
the steering and throttle.
Model Select
Allows you to store and retrieve
programming Data for any
model 0 through 9.
Programming a receiver to
recognize the code of only
one specific transmitter.
Selecting menus and
programming the
transmitter.
Steering Dual Rate
Adjustment the throttle
and steering when it is
reverse.
To be used to adjust
steering servo throw.
End point adjustments allow you to
set the limits of all channels.
To be used to adjust steering
and throttle channel control
exponential.
Exponential
To be used for centering
the steering and throttle.
Servo Trim
Anti-Lock Braking System
Primarily used on gasoline or glow
models that feature a throttle servo.
Model naming
Allows you to name each of the
10 different models.
Binding
Fail-safe setup
Before b egin nin g the bi nding pro cess , con nect t he switch h arne ss, s ervo s, and the re ceiv er ba tter y
to your MR -3D re cei ver. Ma ke sure tha t both t he tr ansm itter and t he rec eiv er are t urned OFF.
1. Tu rn the tran smitter O N.
2. Press a nd hol d the r ecei ver setup b utto n, th en tur n the power s witc h on th e
ON posit ion. T he re ceiv er LED will fl ash qu ick ly. Releas e the se tup butto n
after 1 se cond .
3.Pres s and ho ld th e bind ing butto n on the t ran smit ter for 1 sec ond un til the
LED on the r ecei ver i s cont inuousl y lit.
1. Move th e stee rin g whee l or thrott le tri gge r to the p osition w here y ou wa nt
the serv o to mov e, pr ess an d hold the re ceiv er se tup bu tton for 2 se cond
until th e red LE D on th e rece iver flash s lowl y, the n press and h old th e
receiv er set up bu tton a gain with in 5 sec ond s unti l the recei ver LE D is
contin uous ly li t, tha t's mean th e F/S fu nct ion ha s been corr ectl y set .
2.Verif y if th e fail safe func tion h as been cor rectly se t. Tur n off th e
transm itte r, the n chec k if the serv os mov es to t he pos ition tha t you se t.
Attention
Note Direction
Do not mix batteri es of d ifferent ages or ty pes .
Bind Switch
Throttle Tr im
3CH Switch
Power Switch
Steering Tr im
Steering Dual Ra te
Throttle Tr igg er
To be u sed fo r throttl e operati on.
Forwar d
Stop(N eutr al)
Brake / Re vers e
Straig ht (Ne utr al)
Left tur n
Right tu rn
Antenna
Built- in
Radio Function & Operations
To be u sed fo r centeri ng
the stee ring .
To be u sed to a djust ste ering
servo th row.
ON OFF
L R
F
DEC
INC
B
To be u sed fo r centeri ng
the thro ttle .
This swi tch is u sed f or
option al par ts.
Programming
End Point / EPAReverse Switch
Programming Wi ndo w
Battery Level In dic ato r
Exchange Batte rie s
Batter y/Sw itc h Harn ess
Setup bu tton
Antenn a Wire
Receiver
Auxili ary( Cha nnel 3 )
Thrott le(C han nel 2)
Steeri ng(C han nel 1)
When the b atte ry le vel in dicator (LED )
blinks i n red, r epl ace th e batteri es wit h
new ones i mmed iat ely.
Good Bat teri es
Low Batt erie s
(Light B link s)
Vol tag e Monitor
S
5
1/5 SCALE ELECTR IC DR AGS TER
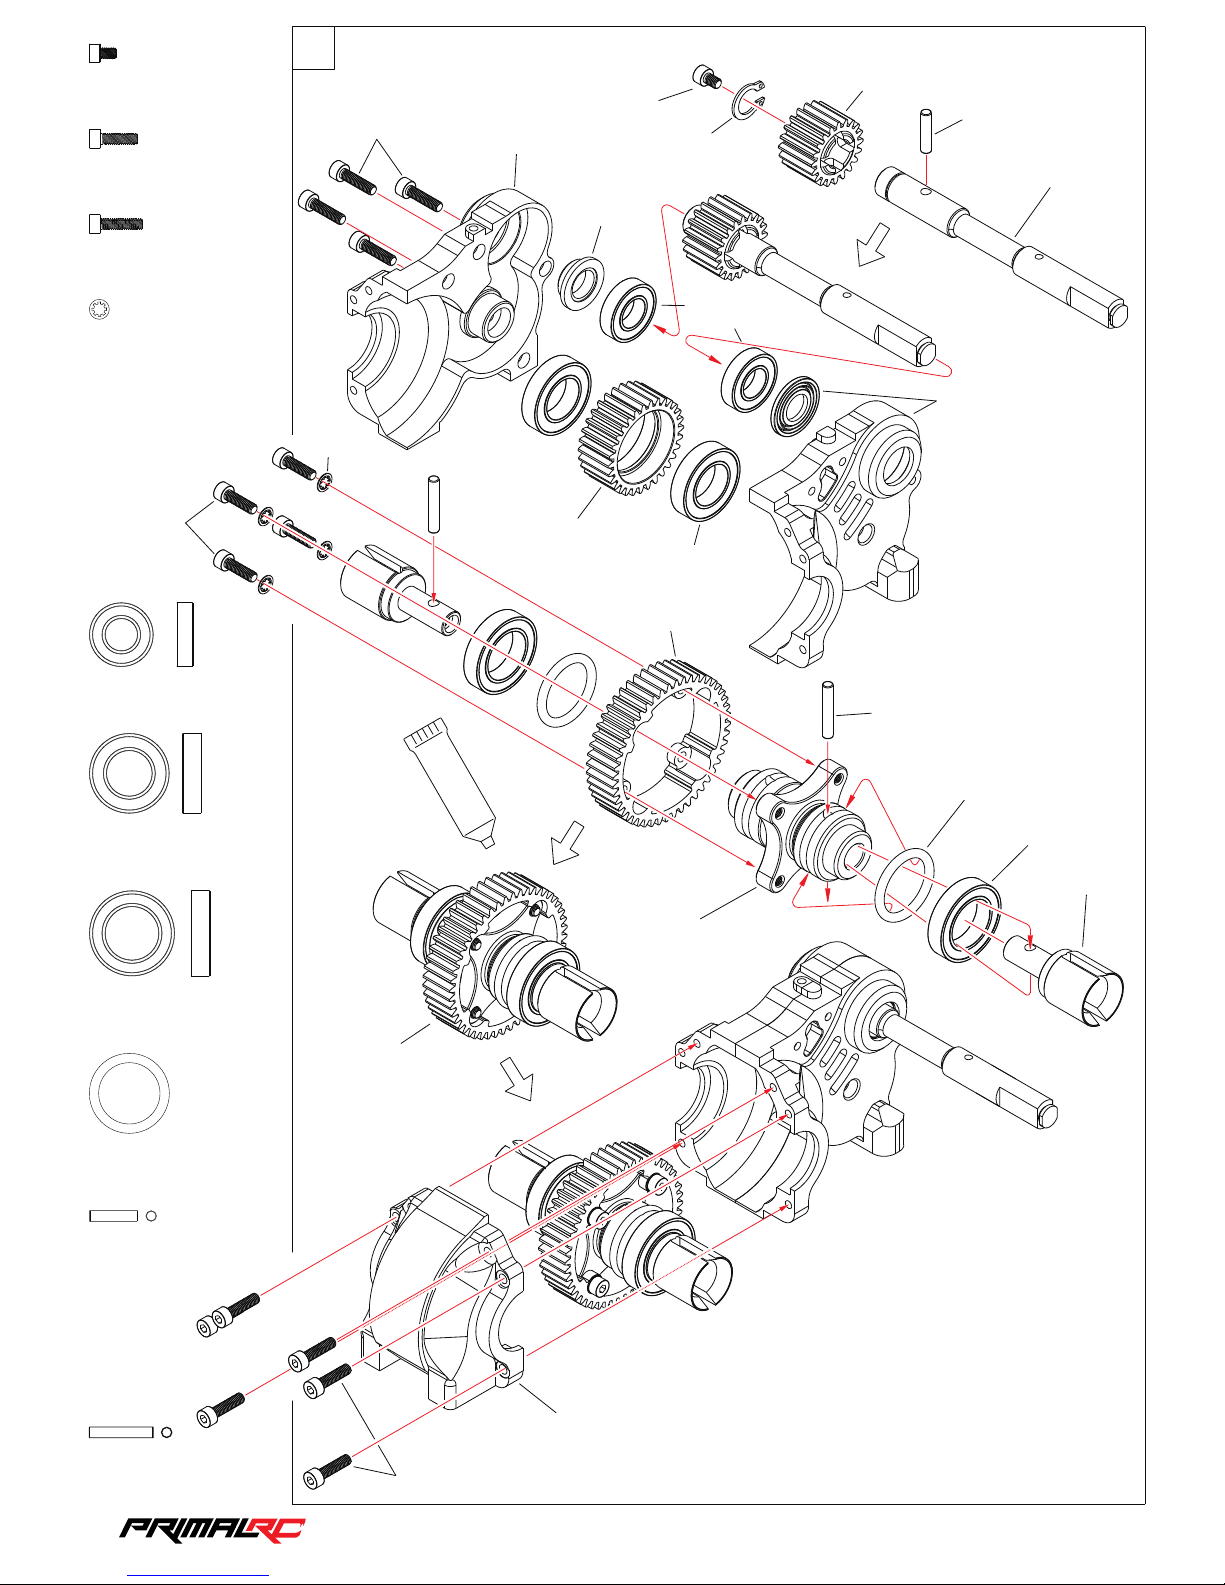
Gear Box
M4×6mm
M4×14mm
QS2217
QS2218
Bearing 20×32×7mm
QS2098
QS2096
Bearing 12×24×6mm
O-Ring
23×30×3.5mm
QS2012
M4 Locking Washer
QS2201
M4×16mm
QS2219
Bearing 17×30×7mm
QS2097
PIN 4×18mm
QS2059
PIN 4×24mm
QS2012
QS2219
M4×16mm
QS2217
M4×6mm
QS2051
Drive gear 20
Tooth
QS2059
Drive gear shaft
QS2052
Idler gear 30
Tooth
QS2046
Diff shaft
QS2012
Pin 4×24mm
×1
×4
×10
×1
×2
×2
×2
×2
×1
×2
QS2096
Bearing 12×24×6mm
QS2218
M4×14mm
QS2201
M4 locking
washer
QS2047
Gear box set
QS2059
Pin 4×18mm
QS2059
C-Clip 10.5mm
QS2050
Gear 48 Tooth
QS2047
Gear box set
QS2047
Gear box set
QS2097
Bearing 17×30×7mm
QS2098
Bearing 20×32×7mm
QS2012
O-Ring 23×30×3.5mm
QS2012
Gear mount
QS2219
M4×16mm
QS2047
Gear box set
QS2113
Completed
gear set
G
RE
A
SE
1
6
1/5 SCALE ELECTR IC DR AGS TER
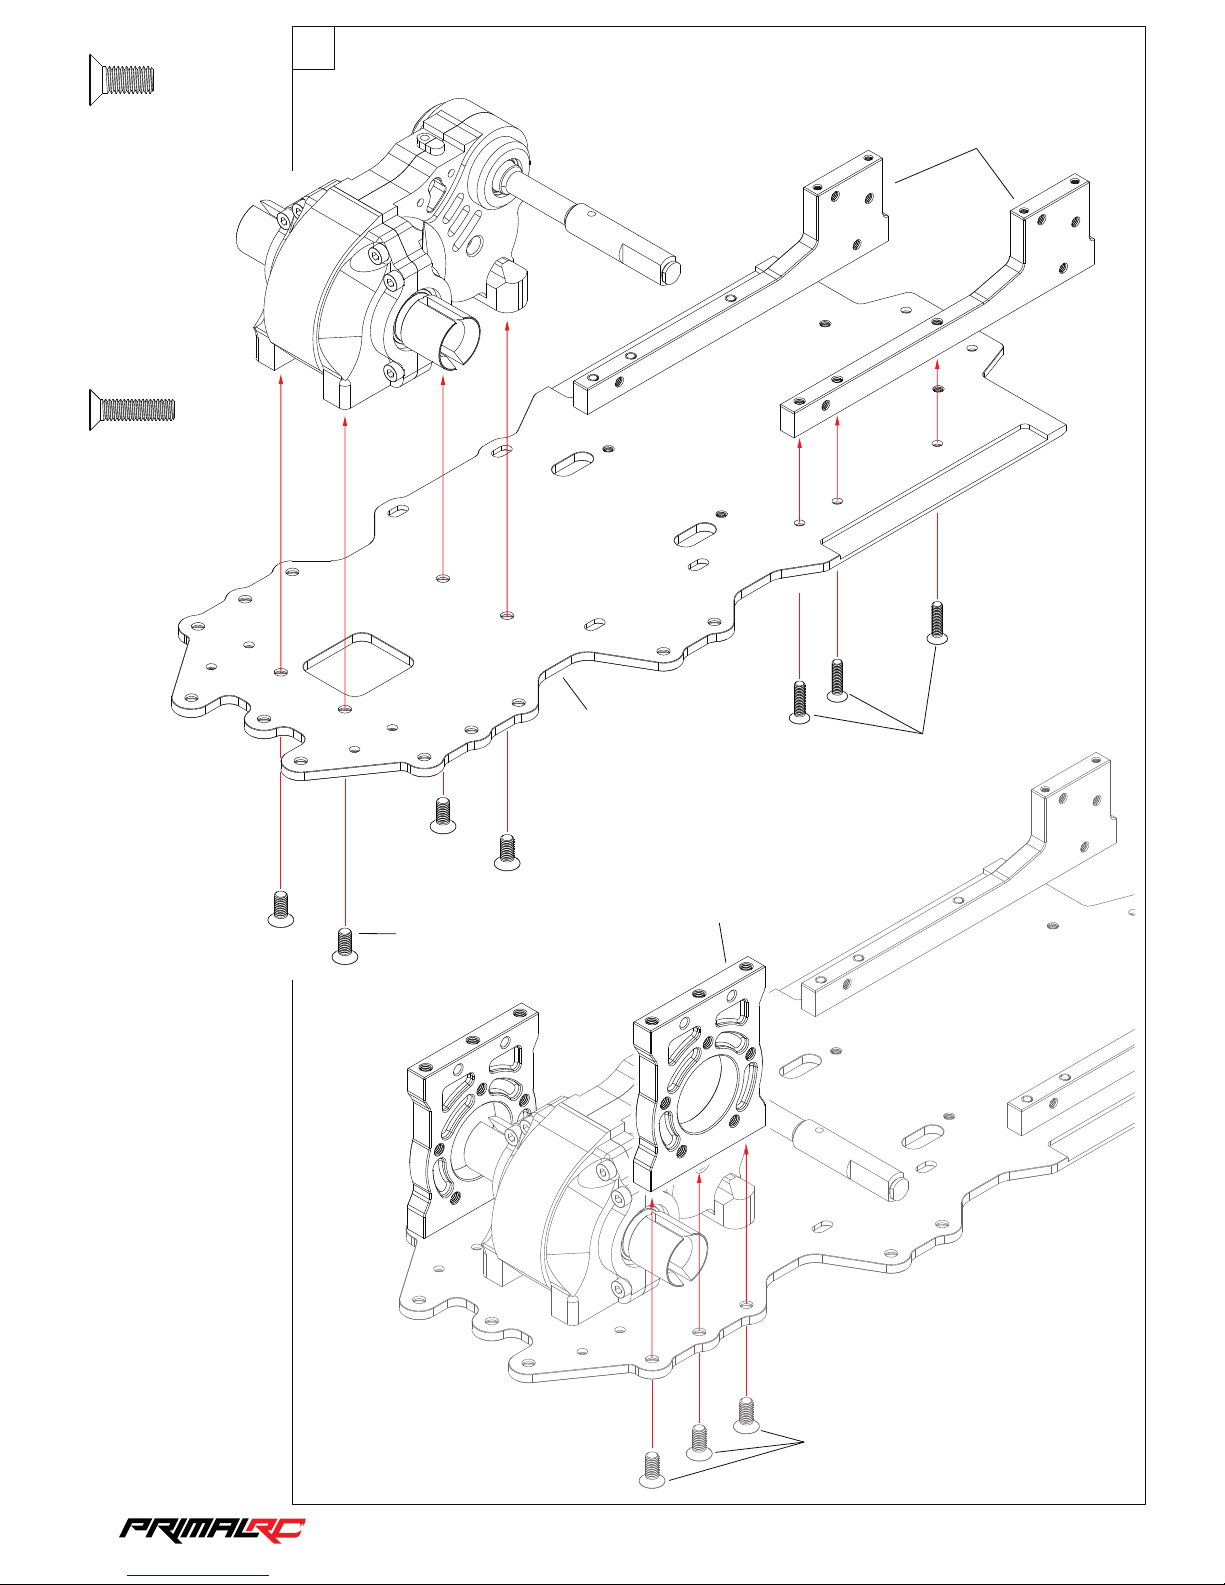
Chassis Assembly
M5×12mm
QS2232
M4×16mm
QS2231
QS2024
Reinforcement
plate
QS2011
Rear chassis
plate
QS2231
M4×16mm
QS2232
M5×12mm
QS2232
M5×12mm
QS2013
Rear arm mounting seat
2
×10
×6

7
1/5 SCALE ELECTR IC DR AGS TER
Rear Arm
Rear Arm
Caution : Adjust the Drive Shaft
into the groove.
M4×6mm
M4×14mm
QS2217
QS2218
QS2096
Bearing 12×24×6mm
PIN24mm
QS2053
M5×14mm
QS2221
QS2014
Rear arm
QS2054
Drive axle
QS2060
Rear hub carrier
QS2053
Wheel hex hub
24mm
QS2001
Drive shaft 15×88mm
L / R
QS2217
M4×6mm
QS2218
M4×14mm
QS2096
Bearing 12×24×6mm
QS2053
PIN 4× 24mm
QS2221
M5×14mm
3
4
×2
×2
×8
×4
×2
×10

8
1/5 SCALE ELECTR IC DR AGS TER
M4×12mm
QS2230
M4×12mm
QS2212
M5×12mm
QS2214
QS2019
Rear wing mounting
seat
QS2230
M4×12mm
QS2212
M4×12mm
QS2019
Rear wing mounting seat
QS2129
Rear upper plate
QS2214
M5×12mm
5
6
7
×4
×4
×6
 Loading...