

Page 1
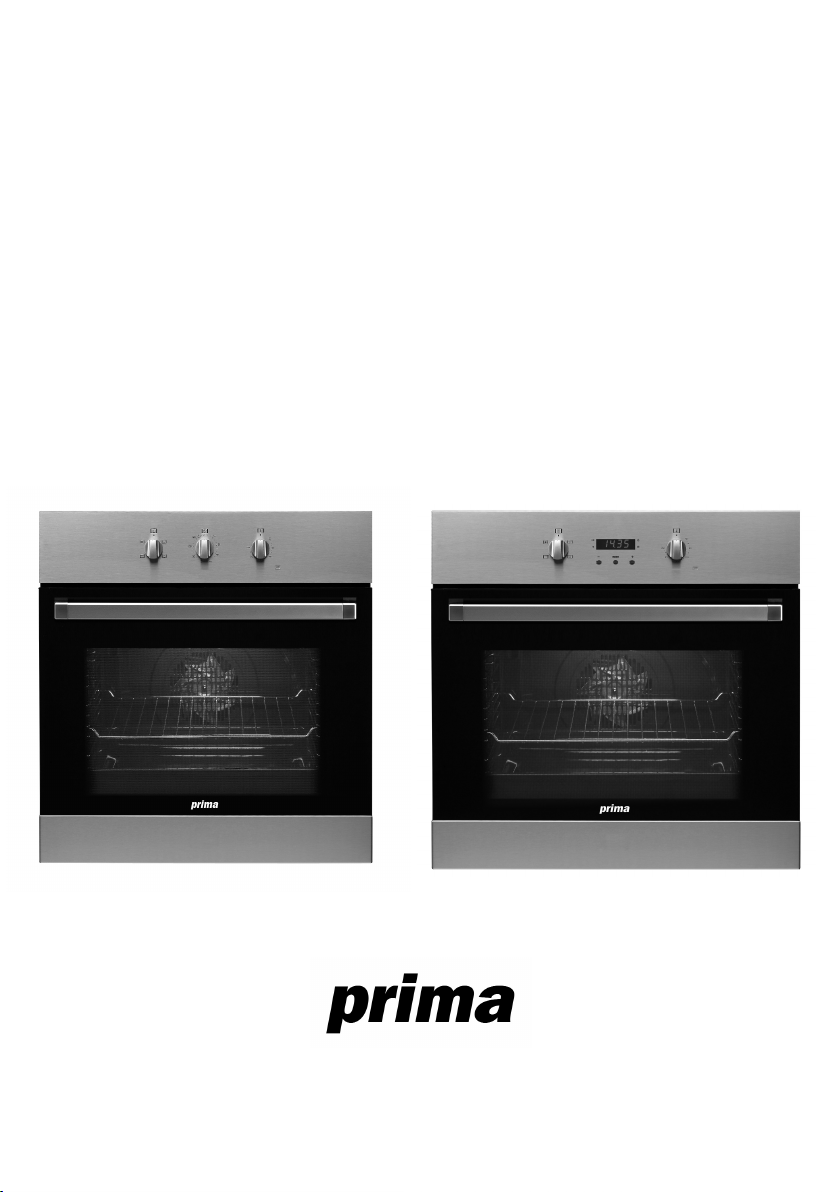
Feature List
PRSO102
PRSO104
Page 2

Page 3
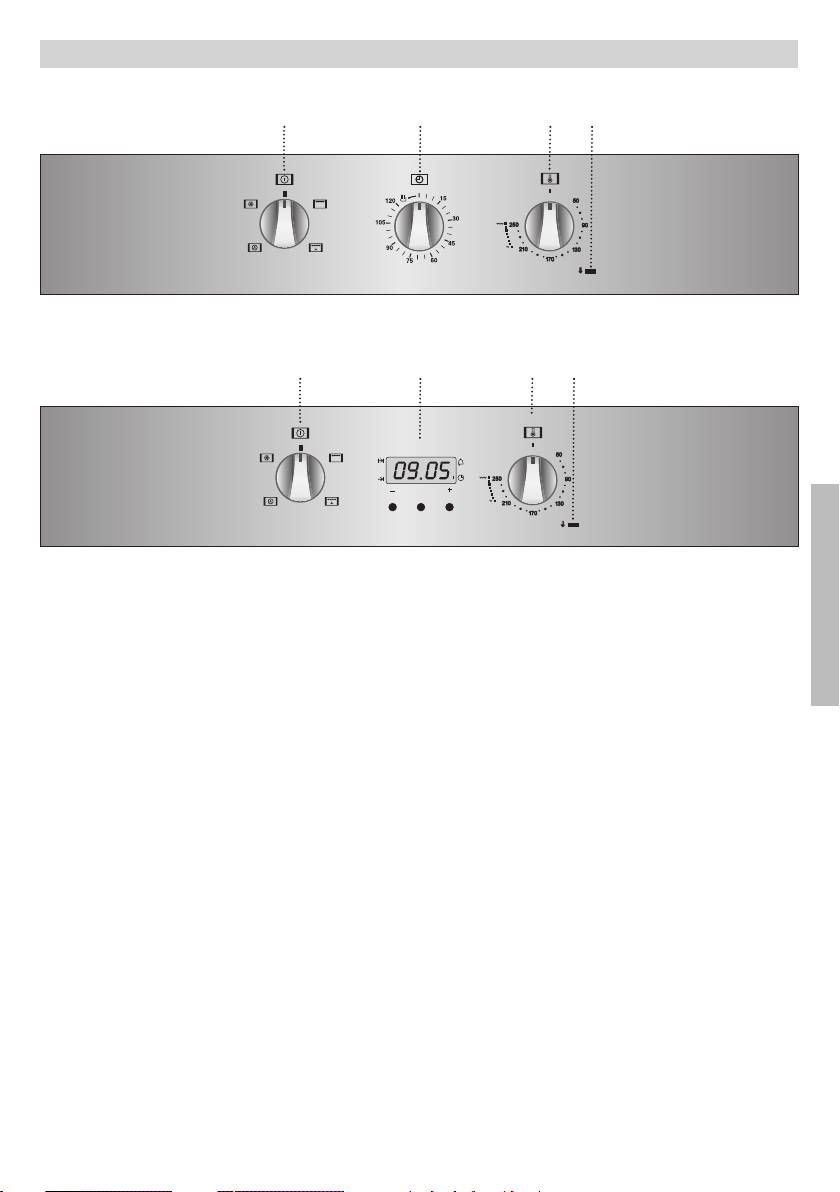
Control Panel
MODE
Model PRSO 102
Model PRSO 104
1 Function selector.
2 Electronic clock.
3 Temperature selector.
5 41 3
2 41 3
4 Heating indicator light. Indicates that heat is
being passed to the food and it goes out
when the set temperature is reached.
5 Timer switch
ENGLISH
3
Page 4

15
30
45
60
75
90
105
120
Oven Functions
Switch off oven
Grill
For preparing dishes with superficial roasting.
It allows the outer layer to be browned without
affecting the inside of the food. Ideal for flat
food, such as steaks, ribs, fish, toast.
Grill with fan
Allows uniform roasting at the same time as
surface browning. Ideal for grills. Special for
large volume pieces, such as poultry, game
etc. It is recommended to put the item on a
rack with a tray beneath to collect the stock
and juices.
Caution
While using the Grill or Grill with fan, the door
must be kept closed.
Use of the Oven
Model PRSO102
Turbo
The fan distributes the heat produced by an
element located at the rear of the oven. Due to
the uniform heat distribution, it allows roasting
and baking to take place at two heights at the
same time.
Defrosting
This cooking mode is suitable for gently
defrosting of delicate food to be consumed
unwarmed, e.g.: cream, custard, pastr y, tarts,
cakes, fruit,...
Note
The pilot light remains on in any cooking
function.
Manual use of the oven
1 Turn the timing switch to the left to the
position .
2 Select a temperature and a cooking
function.
3 Set the controls in position to switch off
the oven.
Using the timer switch
Allows cooking during a pre-established time.
To do this,
1 Select the function and the cooking
temperature.
2 Turn the timer control clockwise as far as
4
the position “120 minutes” and then turn it
backwards to the required cooking period.
3 When the time has finished, there will be an
acoustic signal and the oven will stop
heating.
4 Set the controls to the position to switch
off the oven.
Page 5

Model PRSO104
Setting the time on the clock
On connecting the oven, you will notice that
12:00 appears on the clock and that a light
begins to flash above the symbol. Pressing
the “+” and “–“ buttons the correct time can
be set on the clock, which is subsequently
stored and the flashing light goes out.
Manual use
After setting the correct time, the oven is ready
for use. Select a temperature and a cooking
function.
To switch off the oven, set the controls to the
position .
Functions of the Electronic Clock Programmer
Warning function: This function generates a
warning tone at a specified time.
Cooking time: This function allows to
programme the oven to cook for a specified
time, after which it will switch itself off.
End of cooking time: This function allows to
establish the exact hour, after which the oven
will switch itself off.
Duration and automatic stop: This function is
used to control the duration and the time at
which the oven will turn itself off. This function
allows the oven to start and stop
automatically.
Warning function
1 Press the MODE button until the signal
above the symbol begins to flash.
2 Choose the time when you want the alarm
to sound, pressing the “+” or “–“ buttons.
3 Subsequently, the light will remain on
indicating that the alarm is programmed.
4 At the end of the programmed time, an
alarm will sound and the light will begin to
flash.
5 Press any button to turn off the alarm and
the screen shows the current time again.
Programming the cooking time
1 Press the MODE button until the indicator
above the symbol begins to flash.
2 Select the length of time, pressing the “+”
or “–“ buttons.
3 Subsequently, the indicator that was
flashing will light, indicating that the oven
will switch itself off automatically.
4 The clock will then show the current time.
5 Select a temperature and cooking function.
6 When the set time has elapsed, the oven
will disconnect, an alarm will sound and the
indicator will begin to flash.
7 Press any button to switch off the alarm,
reconnecting the oven.
8 Set the controls in the position to switch
off the oven.
Programming the end of cooking time for the
oven
1 Press the MODE button until the indicator
above the symbol begins to flash.
2 Select the time that cooking is to finish,
pressing the “+” or “–“ buttons.
3 Subsequently, the indicator that was
flashing is lit, indicating that the oven will
switch itself off automatically.
4 The clock will then show the current time.
5 Select a temperature and a cooking
function.
6 When the programmed time is reached, the
oven will disconnect, an alarm will sound
and the indicator will begin to flash.
7 Press any button to switch off the alarm and
the oven will reconnect.
8 Set the controls to the position to switch
off the oven.
This function may be used even though you are
already cooking in your oven. To do so, follow
the instructions given except Nº 5.
ENGLISH
5
Page 6

MODE
Programming the duration and automatic
stop
1 Press the MODE button until the indicator
above the symbol begins to flash.
2 Select the length of cooking time pressing
the “+” or “–“ buttons.
3 Subsequently, the indicator that was
flashing will remain lit.
4 Press the mode button until the indicator
above the symbol begins to flash.
5 Select the time that cooking should finish
pressing the “+” or “–“ buttons.
6 Subsequently, the indicator that was
flashing will remain lit.
7 Select a function and cooking temperature.
8 The oven will remain disconnected with the
indicators above the and symbols lit.
Your oven is programmed.
9 When the time to begin cooking is reached,
the oven will switch itself on and will
continue cooking during the programmed
time.
10
When the programmed finishing time is
reached, the oven will disconnect, an alarm
will sound and the light above the
symbol will begin to flash.
11
Press any button to switch off the alarm
and the oven will reconnect.
12
Set the controls to the position to
switch of the oven.
Caution
Pressing the MODE button the display on the
screen shows any function programmed. It can
be changed by pressing the “+” or “–“ buttons.
On selecting the desired function, the indicator
above the corresponding signal will light.
In the event of a power cut, all the
programming of the electronic clock will be
erased. The correct time has to be reset and
the watch reprogrammed.
6
Page 7

Page 8

BROCHURE
Manufacturer PRIMA
Model
Energy
efficiency
class on a
scale of A
(more efficient)
to G (less
efficient).
Heating
function.
Conventional.
Forced air
convection.
Energy
consumption.
Conventional.
PRSO104
PRSO102
A
Forced air
convection.
Usable volume
(litres).
Size:
Small
Medium
Large
Time to cook
standard load.
Conventional.
Forced air
convection.
Baking area.
Noise (dB (A)
re 1 pW).
0,79
Kwh
59
47 min.
1250 cm
2
Our contribution to enviromental protection: we use recycled paper.
Cod.: 83172610/3172610-001
 Loading...