

Page 1
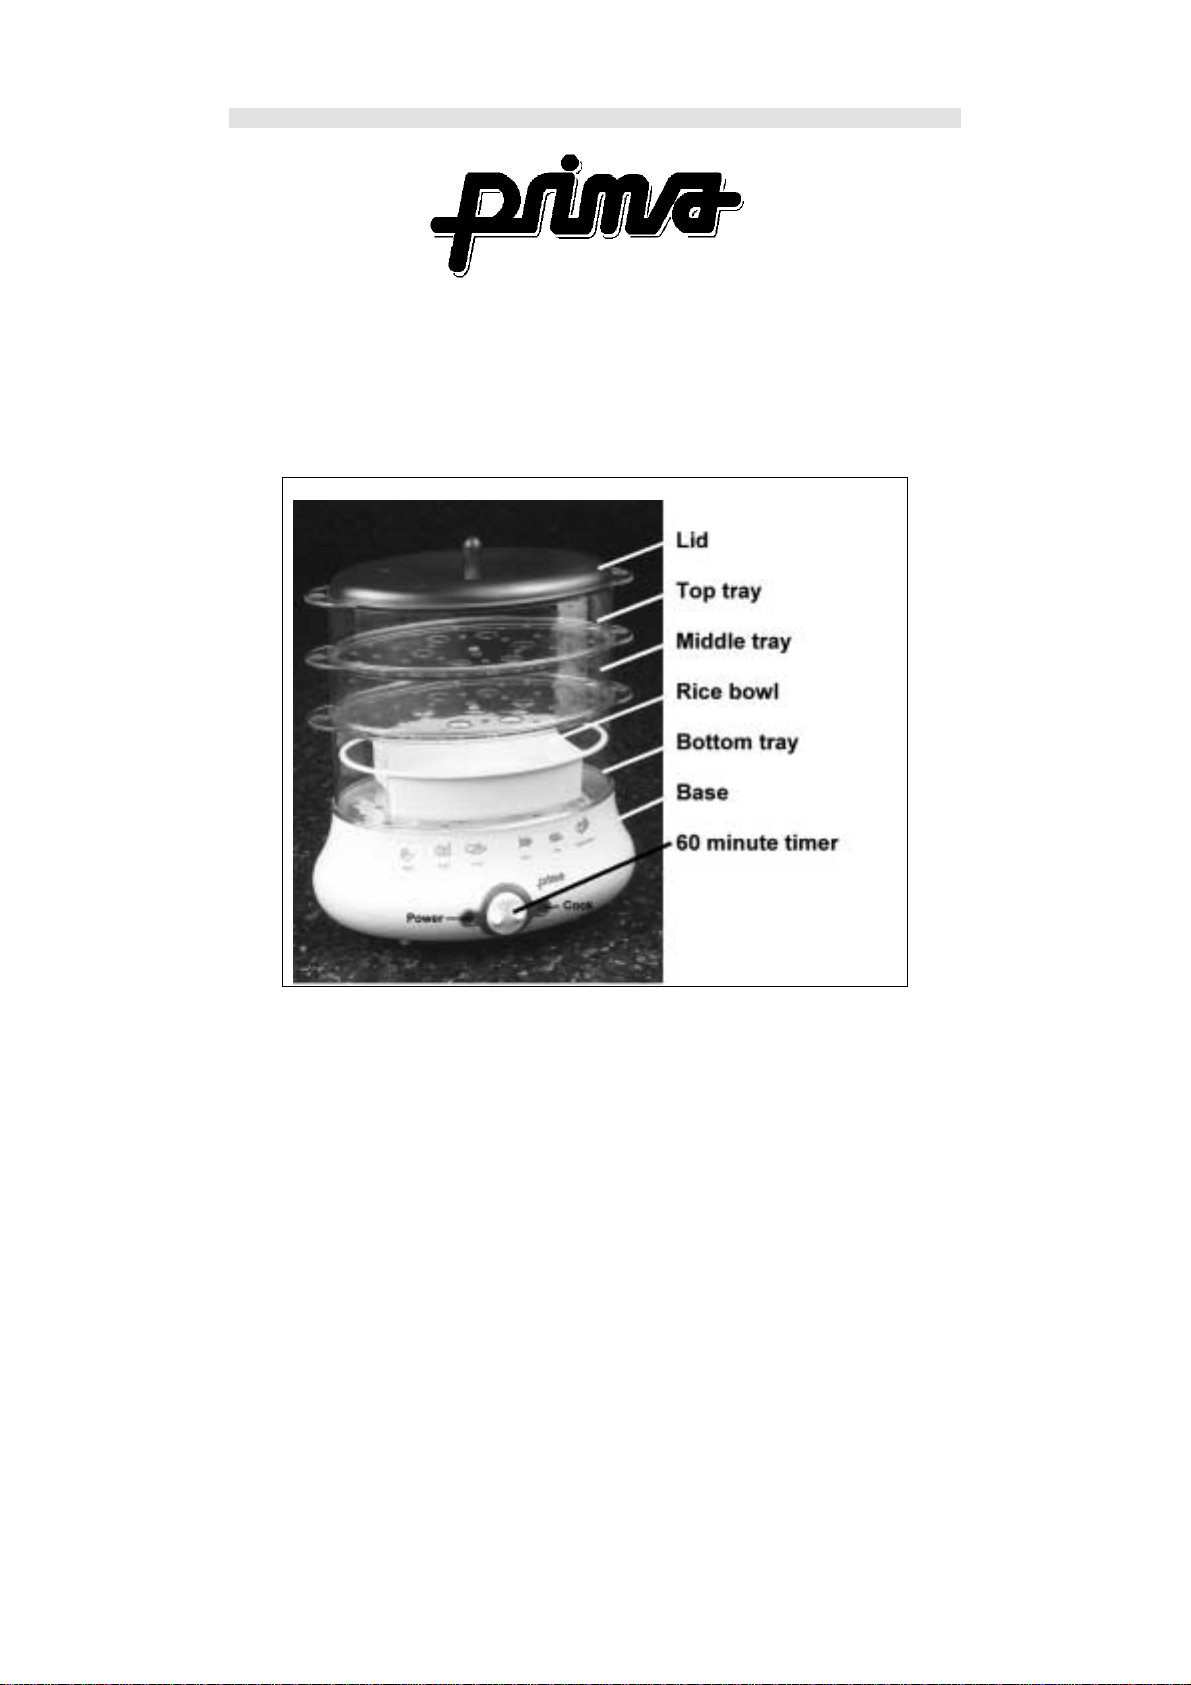
FOOD STEAMER
MODEL: PRS200
User Guide
Visit our web site!
Page 2

www.prima-international.com
Page 3
r
y
BEFORE THE FIRST USE
Remove the appliance and all accessories from the
packaging. Peel off any adhesive labels. Wash the lid, rice
bowl, steamer bowls and drip tray in warm, soapy water
before first use. Rinse and dry thoroughly.
Wipe the inside of the base with a damp cloth.
USE
1.Place the appliance on a stable, level surface away from
walls and overhanging cupboards.
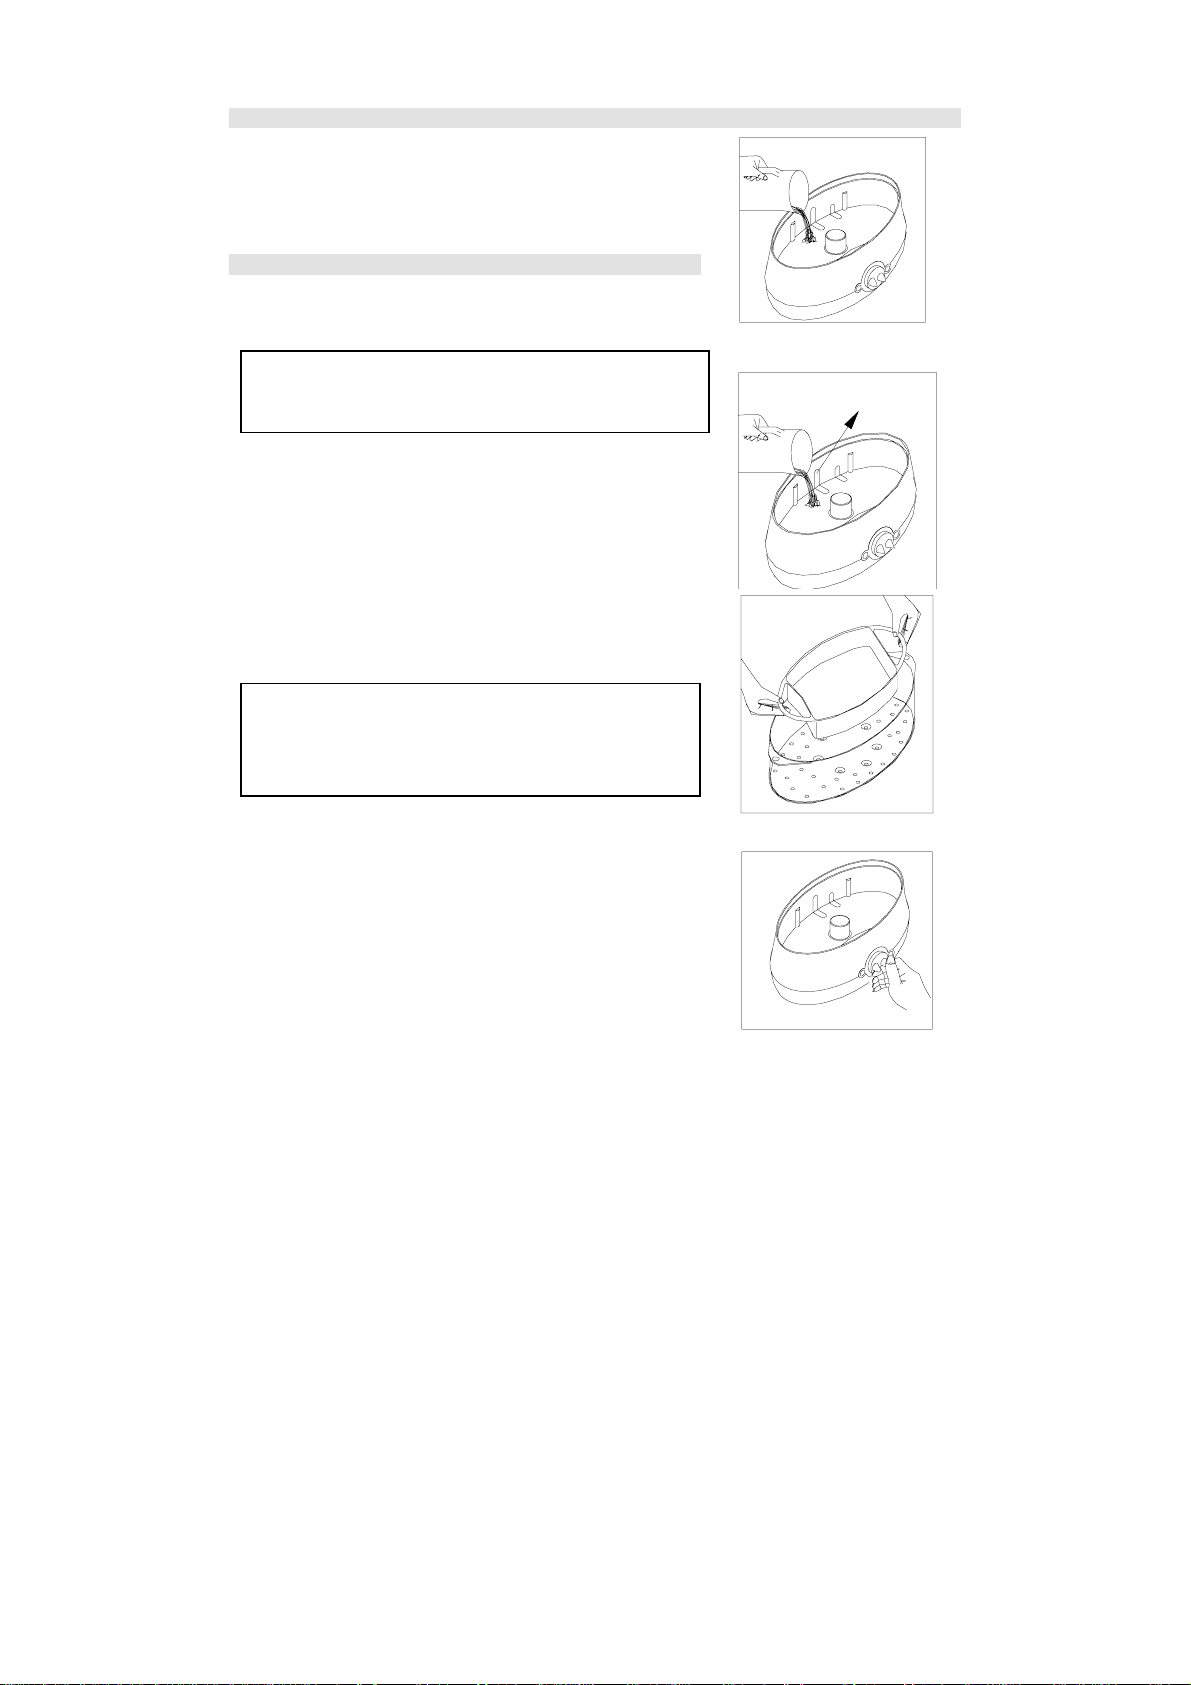
2.Pour in cold water up to the maximum mark (Fig.2).
Fig.1
WARNING: do not add any salt, pepper,
seasonings, herbs, wine, st oc k or any liqui d othe
than tap water to the base.
3.Place drip tray in base and be sure it sits flat.
4.Using the rice bowl
a) Place a steamer bowl on the base.
b) Place 1volume of rice and 1.5 volume of water in the rice
container (220 grams rice max, 200ml water).
c) Place the rice bowl in the steamer bowl (Fig.3).
5.Cover the steamer bowl with the lid.
6.Plug into electricity supply. Do not operate the appliance
without the steaming bowl and lid in place.
WARNING: make sure that the appliance is
correctly assembled before using. Never use
bowls and parts other than those speciall
designed for use with the appliance.
7. Set timer for the recommended time. The power and cook
lights illuminate. After about 3-4 minutes steaming will begin.
Condensation during steaming is normal (Fig.4).
NOTE: The timer operates regardless of whether the Food
steamer is plugged into the electrical outlet or not. Be sure
the power & cooking lights come on when setting the timer.
8.The cook indicator light cycles on and off during cooking.
Fig.4
MAXIMUM
LEVEL
Fig.2
Fig.3
Page 4

WARNING: during use do not touch the base, bowls or lid as they get very hot.
9. When steaming is complete, the timer will give a single ring and the cook indicator light
will go out. The appliance switches off automatically.
WARNING: to prevent burns, always use oven gloves or a cloth when removing the lid
or steaming bowls as hot steam will escape. Remove the lid slowly with the inside of
lid pointing away from you and let the steam escape gradually. Hold lid over unit to
allow the condensation to drain into the steamer.
Do not reach into the unit while steaming. If you need to check on cooking progress or
to stir, use a long handled utensil.
10.In order to prevent foods from being overcooked, remove the steamer bowl immediately,
using a cloth and place it on a plate or on the reversed lid. If you have used the rice
container, remove this carefully, holding it by the sides and if necessary using a kitchen
utensil long enough for this.
11.After use, unplug the appliance and allow it to cool completely before putting it away.
USEFUL HINTS AND TIPS
! Steaming times stated in the charts are only a guide. Times may vary depending on
the size of food pieces, spacing of the food in the steamer trays, freshness of food
and personal preference. As you become familiar with the steamer, adjust cooking
times.
! A single layer of food steams faster than several layers. Therefore, the cooking time
for a larger quantity of food will be increased, for example 2lb of cauliflower florets will
need longer to steam than 1 lb.
! For best results, be sure pieces of food are similar in size. If pieces vary in size and
layering is required. Place smaller pieces on top.
! Do not crowd food in the steaming tray or rice bowl. Arrange the food with spaces
between pieces to allow for maximum steam flow.
! When steaming large quantities of food, remove lid about halfway through the
steaming time and stir using a long handled utensil, protecting your hands from the
steam with oven gloves.
! Never steam meat, poultry or seafood from frozen. Always thaw completely
first.
! All the times stated in the Steaming Charts and Recipes are base d on the us e of col d
water, but to slightly reduce the steaming time you may begin using warm (but not
boiling) water.
! The rice bowl is an ideal container for steaming other foods such as fruit, vegetables,
vegetable pates, puddings, etc.
Page 5

Page 6

USING SEVERAL TRAYS
! Always place the largest pieces or food with the longest cooking time in the lower
basket.
! You may place a different food in the upper and lower basket, but as condensation will
drip from the upper basket be sure the flavours compliment each other.
! If steaming meat or poultry and vegetables, always place the meat or poultry in the
lower bowl so that juices from raw or partially cooked meat cannot drip onto other
foods.
! Steaming ti mes for food in the upper trays are usually slightly longer so allow an extra
5 minutes.
! If foods with different cooking times are being steamed, start the food with the longest
cooking time in the lower tray. Then when the remaining steaming time reaches that of
food with the shortest cooking time, carefully remove the lid with oven gloves and
place the next tray containing the food to be cooked on top. Cover with the lid and
continue steaming.
CLEANING YOUR STEAMER
! NEVER IMMERSE THE BASE, CORD OR PLUG IN WATER.
! Unplug at the wall socket and leave the appliance to cool completely before cleaning.
! Do not clean any part of the unit with abrasive cleaners e.g. scouring powders,
scouring pads, wire wool, washing soda, or bleach.
! Do not clean clear plastic bowls and baskets with the abrasive pad of a cleaning
sponge.
! We recommend washing the lid, rice bowl, baskets and drip tray in hot water and
washing-up liquid. Rinse and dry thoroughly. The transparent plastic parts may dull
with time if they are regularly washed in a dishwasher.
! Empty the water basin and change the water after each use.
! Do not immerse the base in water. Fill the water basin with warm, soapy water and
wipe with a cloth. Rinse thoroughly. Descale the interior after every 7 to 10 uses (see
directions below).
! Wipe the base with a damp cloth.
DESCALING THE WATER BASIN
After 7 to 10 uses in hard water areas, scale deposits may build up on the heating element.
This is a normal process and the build-up will depend on the degree of water hardness in
your area. It is essential the appliance be descaled regularly to maintain steam production
and extend the life of the unit.
1.Fill the water container and the heating element compartment with white vinegar or
vinegar
water up to the maximum mark.
2.Plug in at wall socket. Drip tray, baskets, lid and rice bowl are not used during this
procedure.
3.Set timer for 20-25 minutes. Warning: if vinegar begins to boil over the edge of base,
unplug and switch off timer. Reduce the quantity of vinegar slightly.
4.When timer rings, unplug from the wall socket and allow to cool completely before
pouring
out the vinegar.
5.Rinse the water basin several times with cold water.
Page 7

WARNINGS FOR YOUR SAFETY
For your safety please read and follow the warnings below:
! Read all the instructions carefully before using the appliance.
! Burns can occur from touching hot parts, hot water, steam or food.
- Position appliance away from walls and cabinets to prevent damage from steam.
- To prevent burns, remove lid slowly with the inside of lid pointing away from you
and let steam escape gradually.
- Use oven gloves or a cloth when removing lid rice bowl and steam trays.
- Do not reach over appliance while it is generating steam.
- When checking food, use a long handled spoon or tongs.
! Always use sufficient water for the steaming time.
! Keep the appliance out of the reach of children when in use.
! Never immerse the appliance, cord or plug in water or any other liquid.
! Use the appliance on a stable, level work surface away from water.
! Do not unplug the appliance by pulling on the supply cord.
! Do not place the appliance or any part of the unit near a heat source or in an oven.
! Do not allow the cord to hang over the edge of the work surface, as it could be
accidentally pulled.
! Do not use the appliance:
- If the appliance or cord is damaged.
! Do not line the water basin with aluminium foil.
! Do not use outdoors.
STEAMING CHARTS AND RECIPES
! The steaming times stated in the charts are only a guide. Times may vary depending
on the size of food pieces, spacing of the food in the steamer tray, freshness of food
and personal preference. As you become familiar with the steamer, adjust cooking
times.
! Steaming ti mes are for the quantity stated in the chart or recipe. For larger or smaller
quantities, adjust the time accordingly.
! The steaming times are all based on food cooked in the lower basket, unless
specifically stated otherwise. Food cooked in the upper basket may take slightly
longer to cook.
! All times stated in the charts and recipes are based on the use of cold water.
ADDING MORE WATER DURING COOKING
! For recipes with long cooking times, reset the timer and top up with more water. When
refilling, always switch off the appliance first and empty the drip tray carefully as the
liquid may be hot. Add sufficient warm water (but not boiling water) for the remaining
steaming time.
Page 8
r
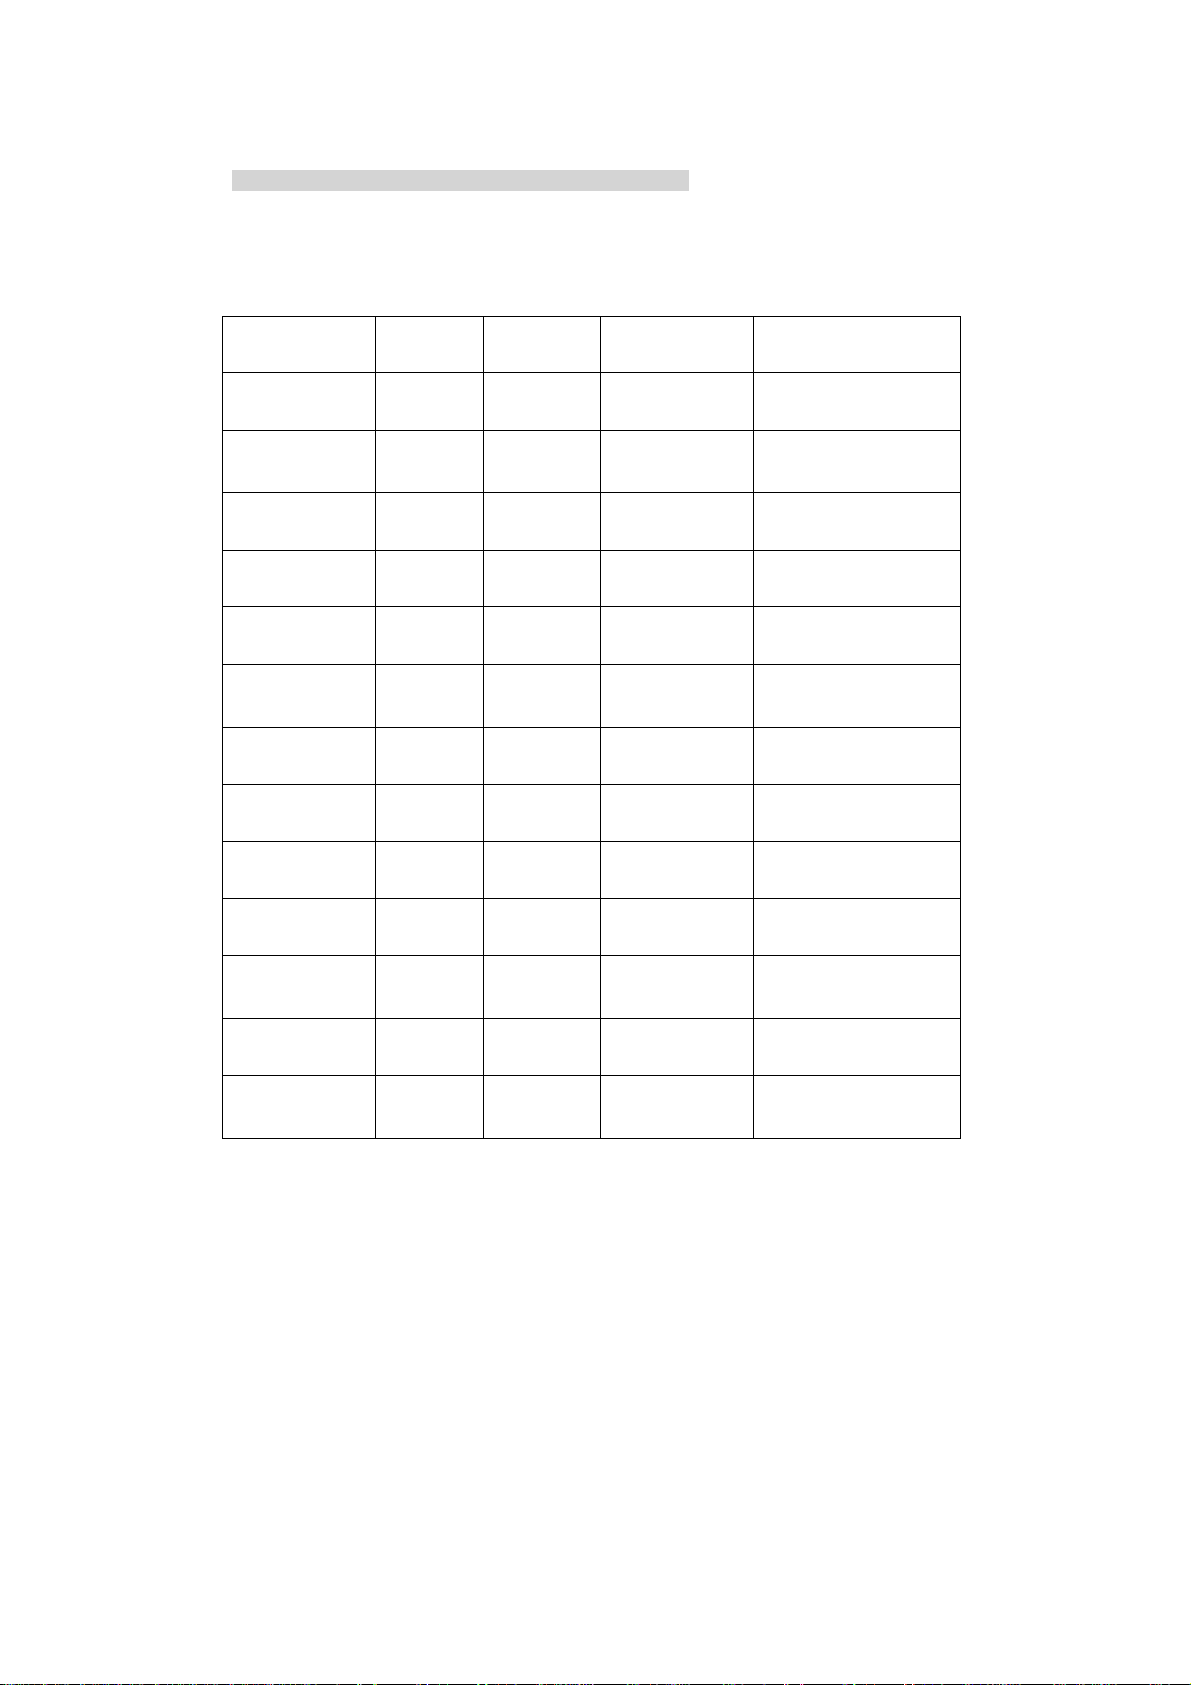
VEGETABLES
! Cut off thick stems from cauliflower, broccoli and cabbage.
! Steam leafy, green vegetables for the shortest possible time as they loose colour
easily.
! Salt and season vegetables after steaming for best results.
! Frozen vegetables should not be thawed before steaming.
FOOD TYPE QUANTITY STEAM TIMES SPECIAL NOTES
ARTICHOKES Fresh 3 Med. 45-50 min Cut off base.
ASPARAGUS
BABY
SWEETCORN
BEANS, green
BEANS, runner Fresh, slices 400g 45-50min
BROCCOLI
CABBAGE Fresh, sliced 400g 35-40min
CARROTS
CAULIFLOWER
COURGETTES
MUSHROOMS,
button
PEAS Frozen 400g 15-18min
POTATOES, new
Fresh
Frozen
Fresh 230g 30-35min
Fresh, whole
Frozen
Fresh, florets
Frozen
Fresh,
1/4 in slices
Fresh, florets
Frozen
Fresh,
1/4in slices
Fresh 200g 12-15min
Fresh, very
small
400g
400g
400g
400g
400g
400g
400g 20-22min
400g
400g
400g 15-18min
400g 20-22min
13-15min
16-18min
38-40min
25-28min
16-18min
15-18min
16-18min
18-20min
Lie flat in basket
Criss cross 2nd layer
to allow steam flow.
Stir halfway through
Steam time
Stir halfway through
Steam time.
Stir halfway through
steam time.
Remove stalk. Sti
halfway. Through steam
time.
Stir halfway through
steam time.
Stir always through
steam time.
Stir halfway through
steam time.
Stir halfway through
steam time.
Stir halfway through
steam time. Use stock
for gravy, sauce or stock
Stir halfway through
steam time.
Turn each potato over
Halfway through
cooking.
Page 9

SPINACH
Fresh
Frozen
250g
400g
8-10min
18-20min
Page 10
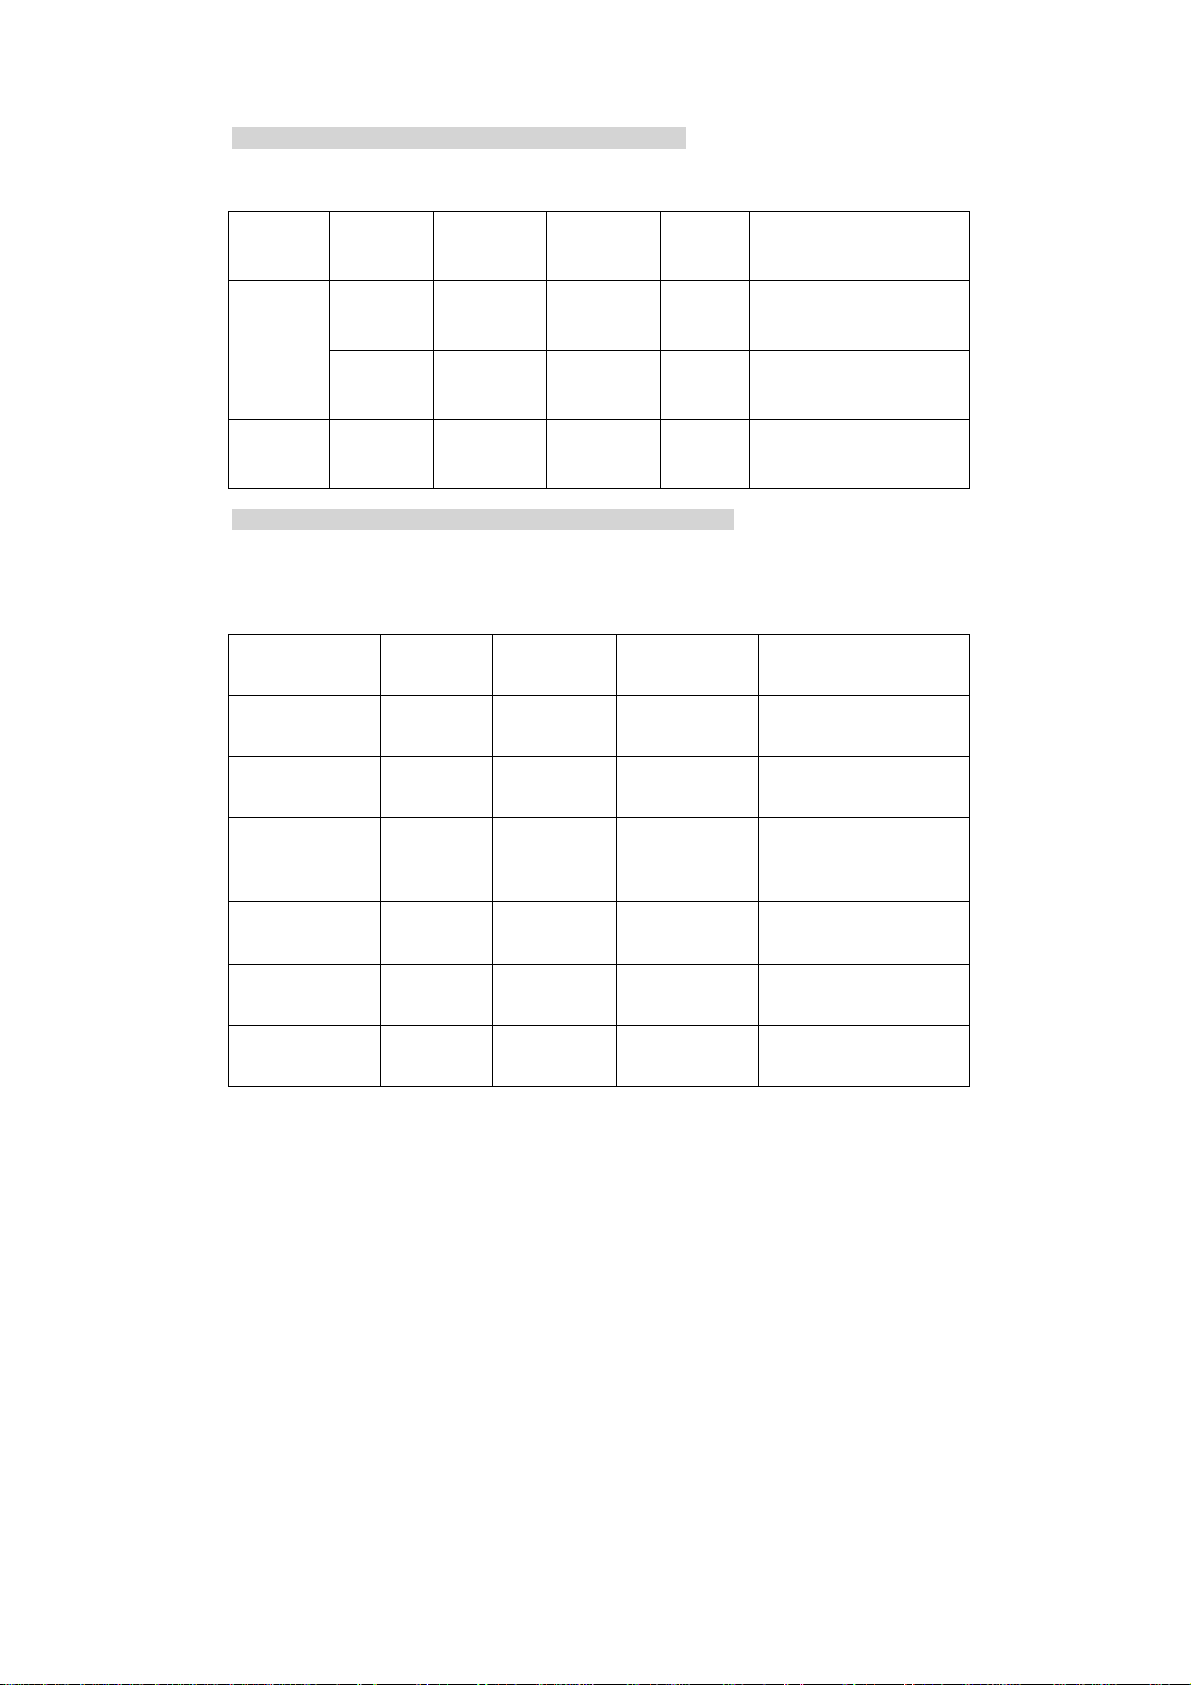
RICE/GRAINS
! If you prefer stickier rice, remove the drip tray.
! Use the rice bowl and add the required quantity of liquid together with the rice.
QUANTITY
FOOD TYPE
RICE OR
GRAIN
WATER
LEVEL
STEAM
TIME
SPECIAL NOTES
White
easy cook
200g
400g
1 cup/ 300ml
2cups/ 600ml
20 min
30 min
Serves 2
Serves 4
RICE
Brown 200g 1 cup/ 300ml 35min Serves 3
RICE
PUDDING
Pudding
rice
100g rice
+30g
caster sugar
1 pt / 0,5L
warm
milk
75 min
Reset timer after 60 min s
and add more water to
Max level.
FISH AND SEAFOOD
! Fish is cooked when it is opaque and flakes easily with a fork.
! Frozen fish may be steamed without defrosting if separated before steaming and the
cooking time is extended.
! Add lemon wedges and herbs while steaming to improve flavour.
FOOD TYPE QUANTITY STEAM TIME SPECIAL NOTES
FISH, fillets
FISH, ¾” thick
steaks
Frozen
Fresh
Cod, salmon
Tuna
250g
250g
250/400g
250/400g
10-12min
6-8 min
10-12min
12-15min
Layer shells for maximum
CLAMS Fresh 400g See notes
Steam flow. Steaming is
done when shells are
Completely open.
Meat will be opaque when
LOBSTER, tails Fresh 2 tails 20-22min
Done. Cook longer if
necessary.
MUSSELS Fresh 400g 8-10min
Steaming is done when
shells completely open.
OYSTERS Fresh 6 16-10min
Steaming is done when
shells completely open
Page 11
A
Stir halfway through
SCALLOPS Fresh 400g 8-10min
MEAT AND POULTRY
! Steaming has the advantage of allowing all the fat to drip away during cooking. Due to
the gentle heat only choose tender lean cuts of meat and trim off all ft. Meat suitable
for grilling is ideal for steaming.
! Serve steamed meat and poultry with flavoursome sauces or marinade before
steaming.
! Thoroughly cook all food before serving. Pierce with a knife or skewer to check that
the centre is cooked and juices run clear.
! Sausages must be completely cooked before steaming.
! Use fresh herbs while steaming to add flavour.
steam time, Meat opaque
and flaky when done.
FOOD TYPE QUANTITY
In slices of rump,
BEEF
sirloin or
250g 8-10min
fillet steak
Boneless breast 4 pieces 12-15min
CHICKEN
Drumsticks 4 pieces 20-25min
Chops with or
without bone
4 chops
(in thick)
LAMB
PORK
SAUSAGES
(pre-cooked)
Loin cut into
pieces
Tenderloin, fillet,
loin steaks or
loin chops
Frankfurters
Knockwurst
400g 10-15min Trim off all fat.
400g or 4 pieces
(in thick)
400g
400g
STEAM
TIME
SPECIAL NOTES
Trim off all fat.
Steamed beef has a firm
texture.
Remove skin before
cooking. Layer for
maximum steam flow.
fter steaming brown skin
under grill, if desired.
10-15min Trim off all fat.
5-10min Trim off all fat.
15min
10min
Pierce skins before
steaming.
Page 12

Page 13

~~~~~~Warranty~~~~~~
This product is guaranteed for 12 months from the date of purchase when the appliance is used solely
for domestic purposes. For commercial use the product is guaranteed for 90 days from the date of
purchase. The guarantee is valid against mechanical or electrical defects if the product is used in
accordance with the instructions and provided that it is not connected to an unsuitable electricity
supply or dismantled, interfered with or damaged in any way.
IMPORTANT, PLEASE RETAIN THIS WARRANTY
Under this guarantee any parts found to be defective will be repaired or replaced free of
charge.
Please ask your retailer to either stamp this warranty or simply attach your store receipt. Keep
this warranty somewhere safe. DO NOT SEND TO PRIMA.
This guarantee in no way affects your rights under statutory law.
NAME____________________________________________________________
ADDRESS_________________________________________________________
___________________________________________________________________
PURCHASED FROM_________________________________________________
Page 14

DATE OF PURCHASE ___________________MODEL_____________________
CONNECTION TO THE MAINS SUPPLY
The wires in the mains lead are coloured in accordance with the following code:
BROWN - LIVE (L)
BLUE - NEUTRAL (N)
GREEN/YELLOW - EARTH (E)
As the colours of the wires in the mains lead of this appliance may not correspond
with the coloured markings identifying the terminals in your plug, proceed as
follows:
• The BLUE wire is the NEUTRAL and must be connected to the terminal which
is marked with the letter N or coloured BLACK
• The BROWN wire is the LIVE and must be connected to the terminal, which is
marked with the letter L or coloured RED.
• The wire which is coloured GREEN/YELLOW must be connected to the
terminal which is marked E or coloured GREEN or GREEN/YELLOW.
Always ensure that the cord grip is positioned and securely fastened.
Page 15

WARNING: THIS APPLIANCE MUST BE EARTHED.
 Loading...