

Page 1
®
USER MANUAL
IN / IN
MULTIPARAMETER
DIAGNOSTIC DEVICE
PRIMA® SELF-TESTING KIT
TRIGLYCERIDES
CHOLESTEROL
GLUCOSE *
ENGLISH
PL300 / PL311
Made in Italy.
PRIMA Lab SA
Via Antonio Monti 7
6828 Balerna
Switzerland
()
info@primahometest.com
primahometest.com
* ONLY FOR THE PRIMA® IN.
0344
Page 2

1 2
Thank you for choosing the system PRIMA® 2in1/3in1 test for cholesterol, triglycerides, and glucose* directly to your home. This manual contains instructions
on how to use step by step the instrument and its maintenance. Please read the
manual carefully before per forming the test.
Before carrying out the measurement we recommend that you become familiar
with the instrument and procedures.
Please also read the instructions inside the boxes of dierent types of stripes. In
case of any questions please call customer ser vice.
INDEX
What’s the Prima® 2in1/3in1 system for? 3
Contents of the packaging 4
The digital meter 5
Display and symbols 6
Setting up the meter for the rst time 7
Inser ting the batteries 8
Meter settings (SET ) 9
Requirements to perform a measurement 11
Introduction to test strips and data-chips 11
Programming the device 12
How to obtain a blood sample 13
Performing a measurement 16
Quality control recommendations 18
Memory 18
Care and maintenance 19
Error messages 19
Performance specications 21
Warranty 22
Impor tant Notes 22
Ordering informations 23
Product limitations 24
Page 3

3 4
CONTENTS OF THE PACKAGING
• One digital meter,
• 5 cholesterol strips (a box of 25 strips is available to purchase separately),
• 5 triglycerides strips (a box of 25 strips is available to purchase separately),
• 10 glucose strips* (a box 50 strips* is available to purchase separately),
• Three Data-chips: one for the choleste rol, one for triglyceride and one
for glucose* testing. The chip contains lot-specic information of the
calibration curve for either cholesterol, triglycerides or glucose* test,
• One lancing device,
• 25 sterile lancets,
• One user manual,
• One carrying case.
Articles non included within the packaging:
• Control solutions (available separately),
• Logbook,
• PC cable (available separately) and software.
WHAT’S THE PRIMA® 2IN1/3IN1 SYSTEM FOR?
The PRIMA® 2in1/3in1 kit is a new system designed for the self-monitoring in vitro
(therefore outside of the body), through the blood obtained from a nger prick, of
the quantitative determination of the levels of cholesterol, triglycerides and glucose*. These parameters are often measured together as they are the key factors
for the estimation of the risk of cardiovascular disease. It is designed for home
use by people who want to monitor these parameters and on the basis of their
levels to understand whether it is necessary to consult a doctor; and / or control
the same parameters if they are too high.
Cholesterol is a waxy substance that acts as a precursor of bile acids, steroids
and vitamin D. It is synthesized primarily in the liver and in the intestinal wall. In
normal conditions, the liver maintains the balance between the amount of cholesterol and draw to that excreted. This balance, however, can be altered by certain diseases such as diabetes, hyper tension, hypercholesterolemia and family
factors also linked to an unhealthy lifestyle such as smoking, alcohol abuse and
a diet rich in saturated fats in combination with a lack of physical activity . In addition, stress, oral contraceptives and pre gnancy can cause elevated cholesterol
levels. A high concentration of choleste rol is a major risk factor for cardiovascular
events.
The Canadian Cardiovascular Society recommends the frequent measurement
of blood cholesterol for men above the age of 40 and women over the age of 45,
unless there are other risk factors. If, on the contrary, there are other factor s, it is
recommended to perform the test above 25 years of age.
The triglycerides (consisting of three molecules of fatty acids and a glycerol) are
the most common form of fat that our body digests. To be absorbed these molecules are broken down in the small intestine, and then reassembled with cholesterol to form chylomicrons. Therefore in blood triglycerides are present in the
form of plasma lipids related to cholesterol. While cholesterol is used to build cell
membranes and some hormones, the main function of triglycerides is to store
energy. All the extra calorie s that come from carbohydrates are converted into
triglycerides and stored as fat to be burned later as a source of energy. Although
it is not yet clear how, high levels of triglycerides are placed in relation to the
thickening and hardening of the ar tery walls - atherosclerosis - which increases
the risk of heart attack and hear t disease. The disease is known as hypertriglyceridemia, and ignoring the high-calorie foods, can be caused by diabetes, kidney
failure or genetic derivation.
The test cannot be used on infants since it has not been validated for this purpose. It does not diagnose any disease, and like any other test, the compliance
with instructions is critical to obtain accurate results.
Page 4
5 6
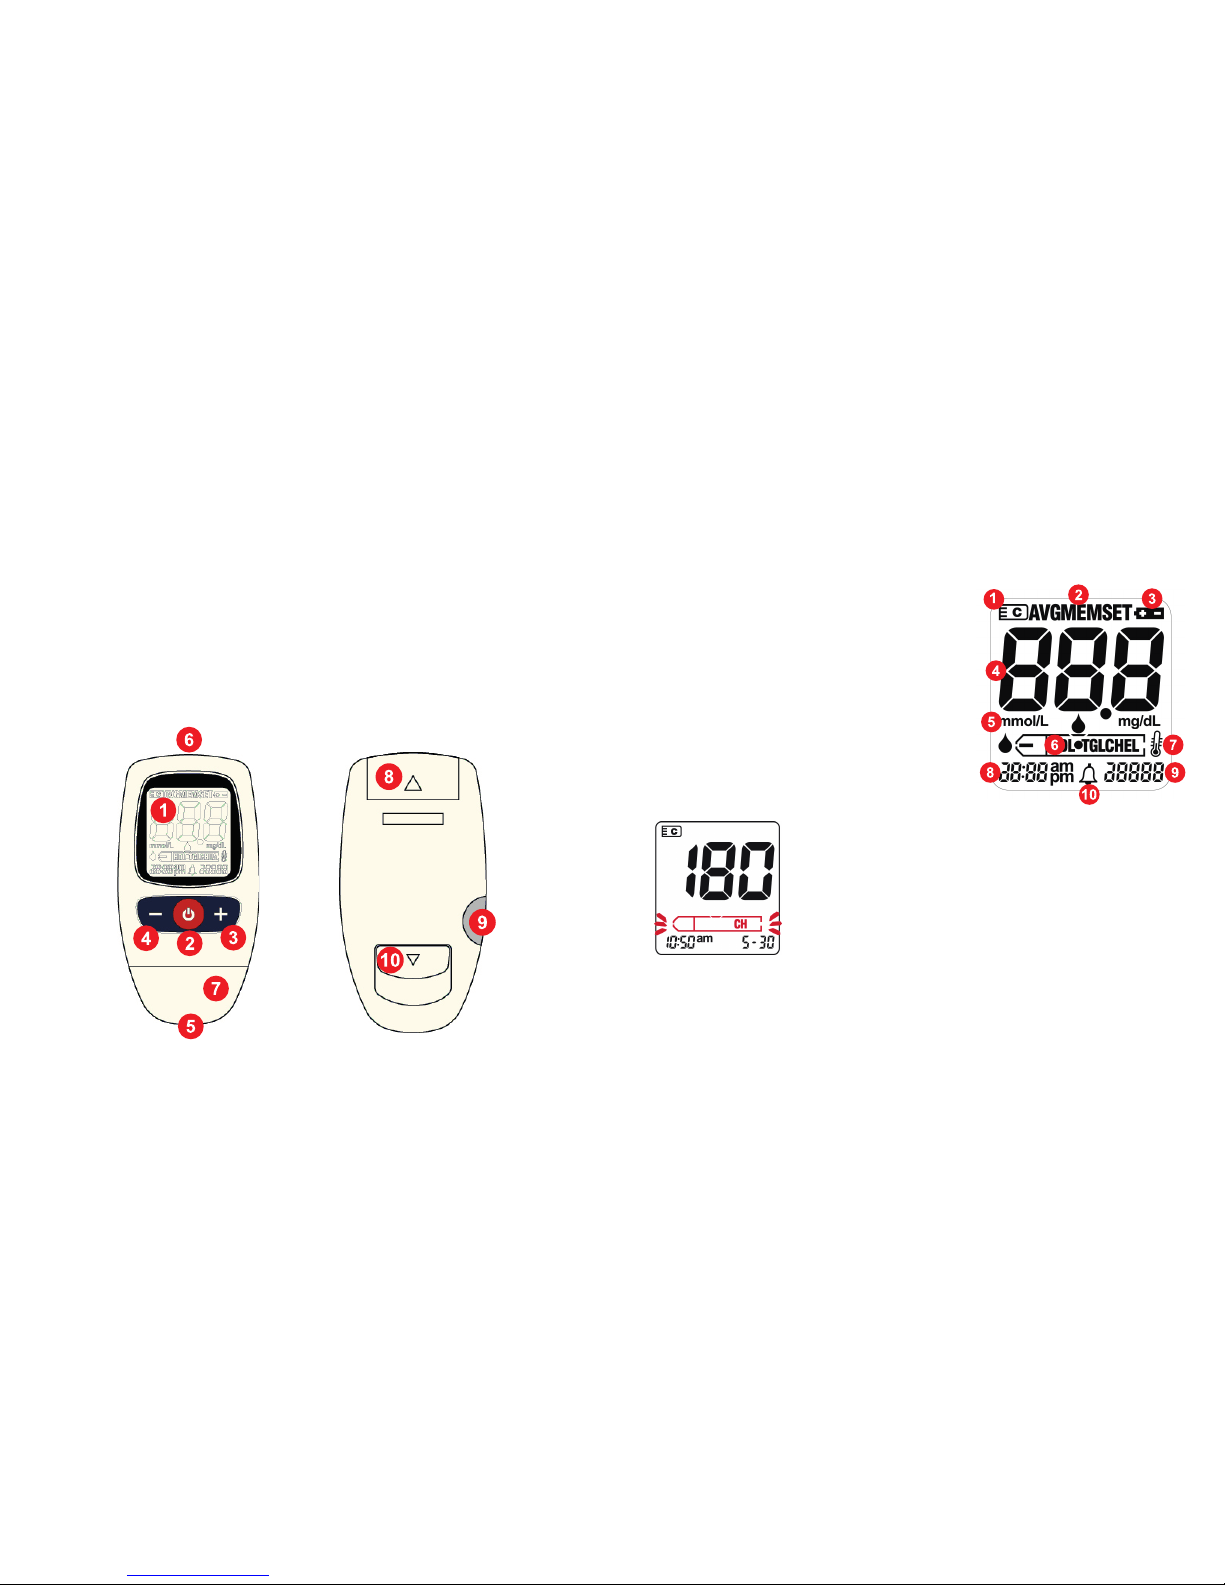
DISPL AY AND SYMBOLS
The display should be checked ever y time you turn on the instrument. The meter
momentarily shows all the symbols that may appear in the display. Regular monitoring of all the display symbols prevents a misinterpretation of the instrument
due to defects in the display.
The symbols on the display have the following meanings:
1. Data-chip inser ted
2. Meter mode in use
3. Battery level indicator
4. Test results and other messages
5. Units of measure
6. Parameter being tested
7. Temperature indicator
8. Time
9. Day, Month, Year
10. Beeper
Meter’s modalities
The meter has three modalities:
STANDBY
It’s the default mode that appears every time you turn
on the instrument by pressing the ON switch. The strip
symbol will ash and the display will show the number of
the data chip, the date and time.
RearFront
THE DIG ITAL METER
General over view of the meter
1. Display
2. Switch on button
3. ‘+’ button
4. ‘-’ button
5. Test strip slot
6. PC cable por t
7. Cover
8. Battery space
9. Data-chip slot
10. Strip ejection button
Page 5
7 8
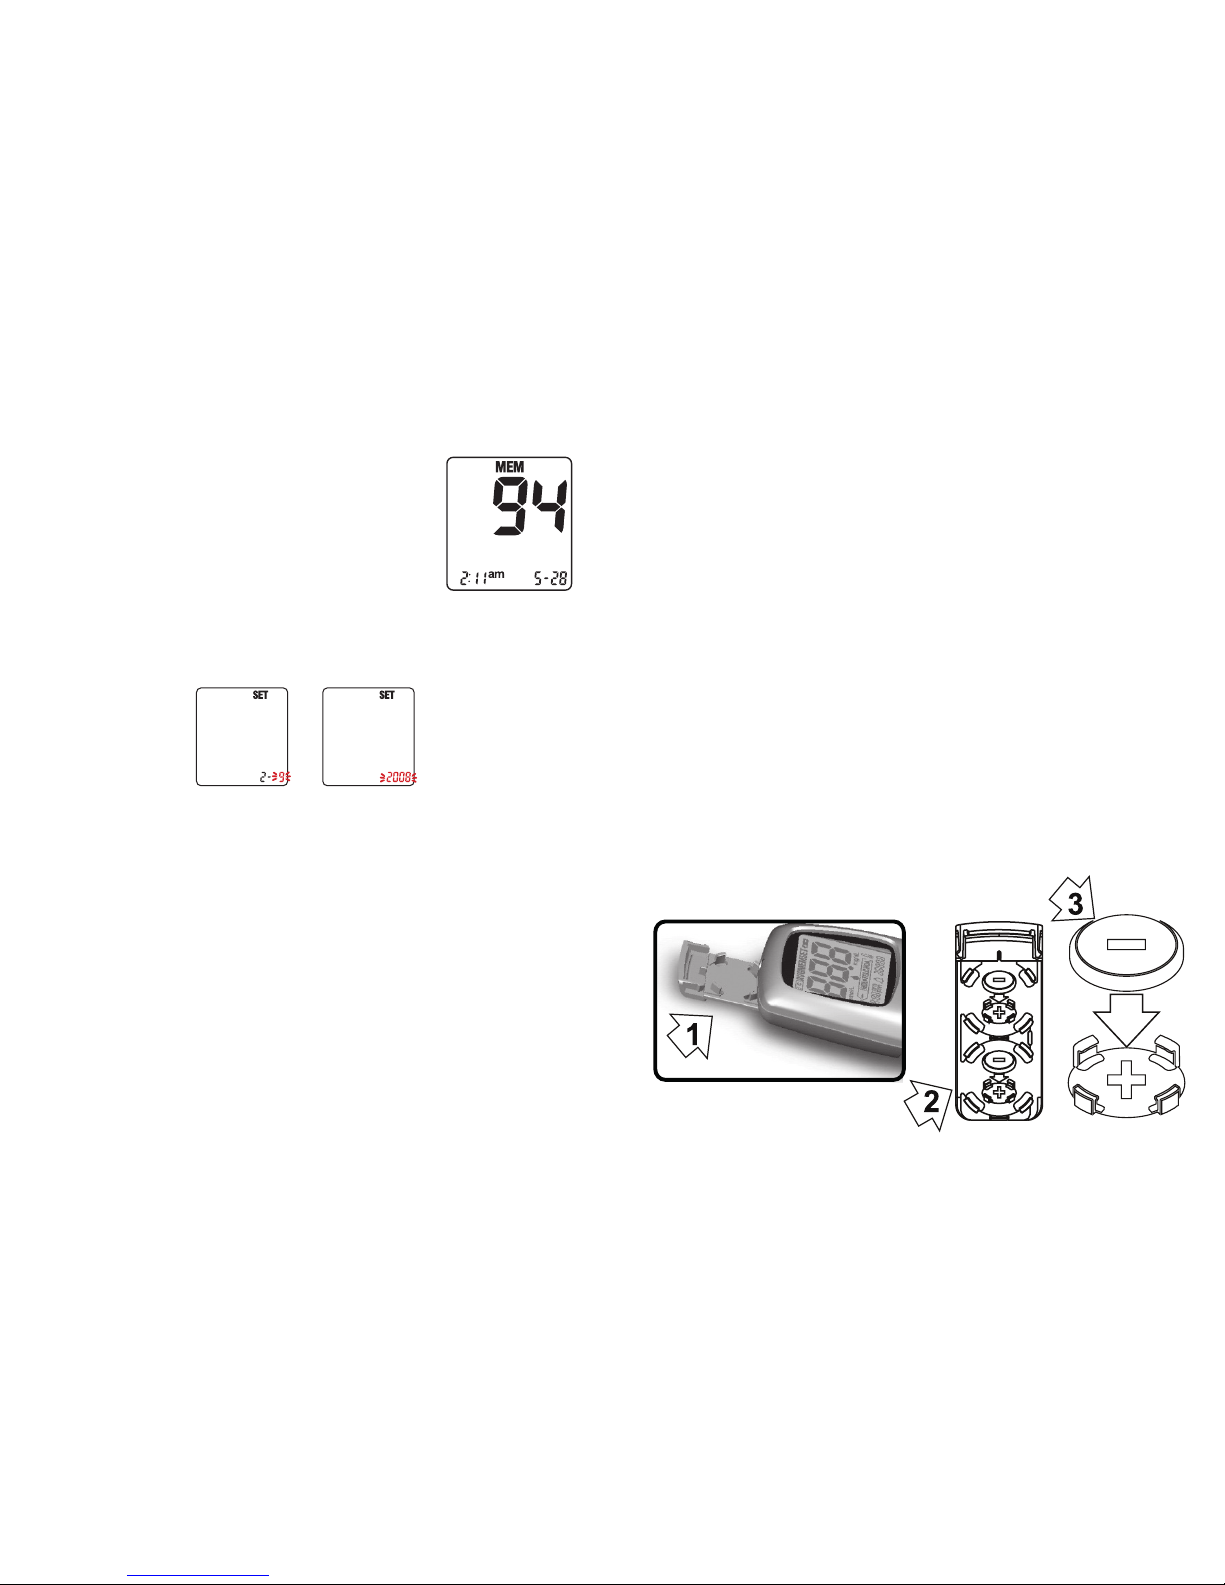
MEMORY
When in Standby mode by pressing the ‘+’ or ‘-’ is entered
in memory mode. The instrument will show the MEM symbol in the upper part of the display.
SETTINGS
Press and hold for 3 seconds the power button when the instrument is turned
on. The instrument will display the SET symbol in the upper part of the display.
SETTING UP THE METER FOR THE FIRST TI ME
When you use the tool for the rst time before turning to perform the following
steps:
1. Insert the batteries.
2. Setting the time, date, and unit.
3. Insert the data-chip (it can also be done just before the measurement).
INSERTING THE BATTERIES
1. Ensure that the instrument is turned o. Open the battery cover by sliding
the cover.
2. Insert two 3V lithium bat teries (CR 2032) in the slot as shown, paying at-
tention to the symbols “+” and “-” ends of the batteries. Use only 3V lithium
batteries (CR 2032). Remember to always change both batteries at the same
time as batteries with dierent capacity may interfere with the functionality
of the instrument.
3. Close the battery compar tment by sliding the cover until you hear a “click”.
4. Turn the instrument to test the operation of the new batteries.
5. When you change the batteries, you have to insert the new ones within 1
minute to keep the same settings for date and time. If you exceed the minute
you have to set new date and time. The results of the various measurements,
including date and time, as well as the other set tings are retained even if the
batteries are not included.
To respect the environment dispose of used batteries in accordance with the
requirements of local laws of your own country. Do not throw batteries on ames
as they may explode.
Page 6
9 10
• When an error occurs.
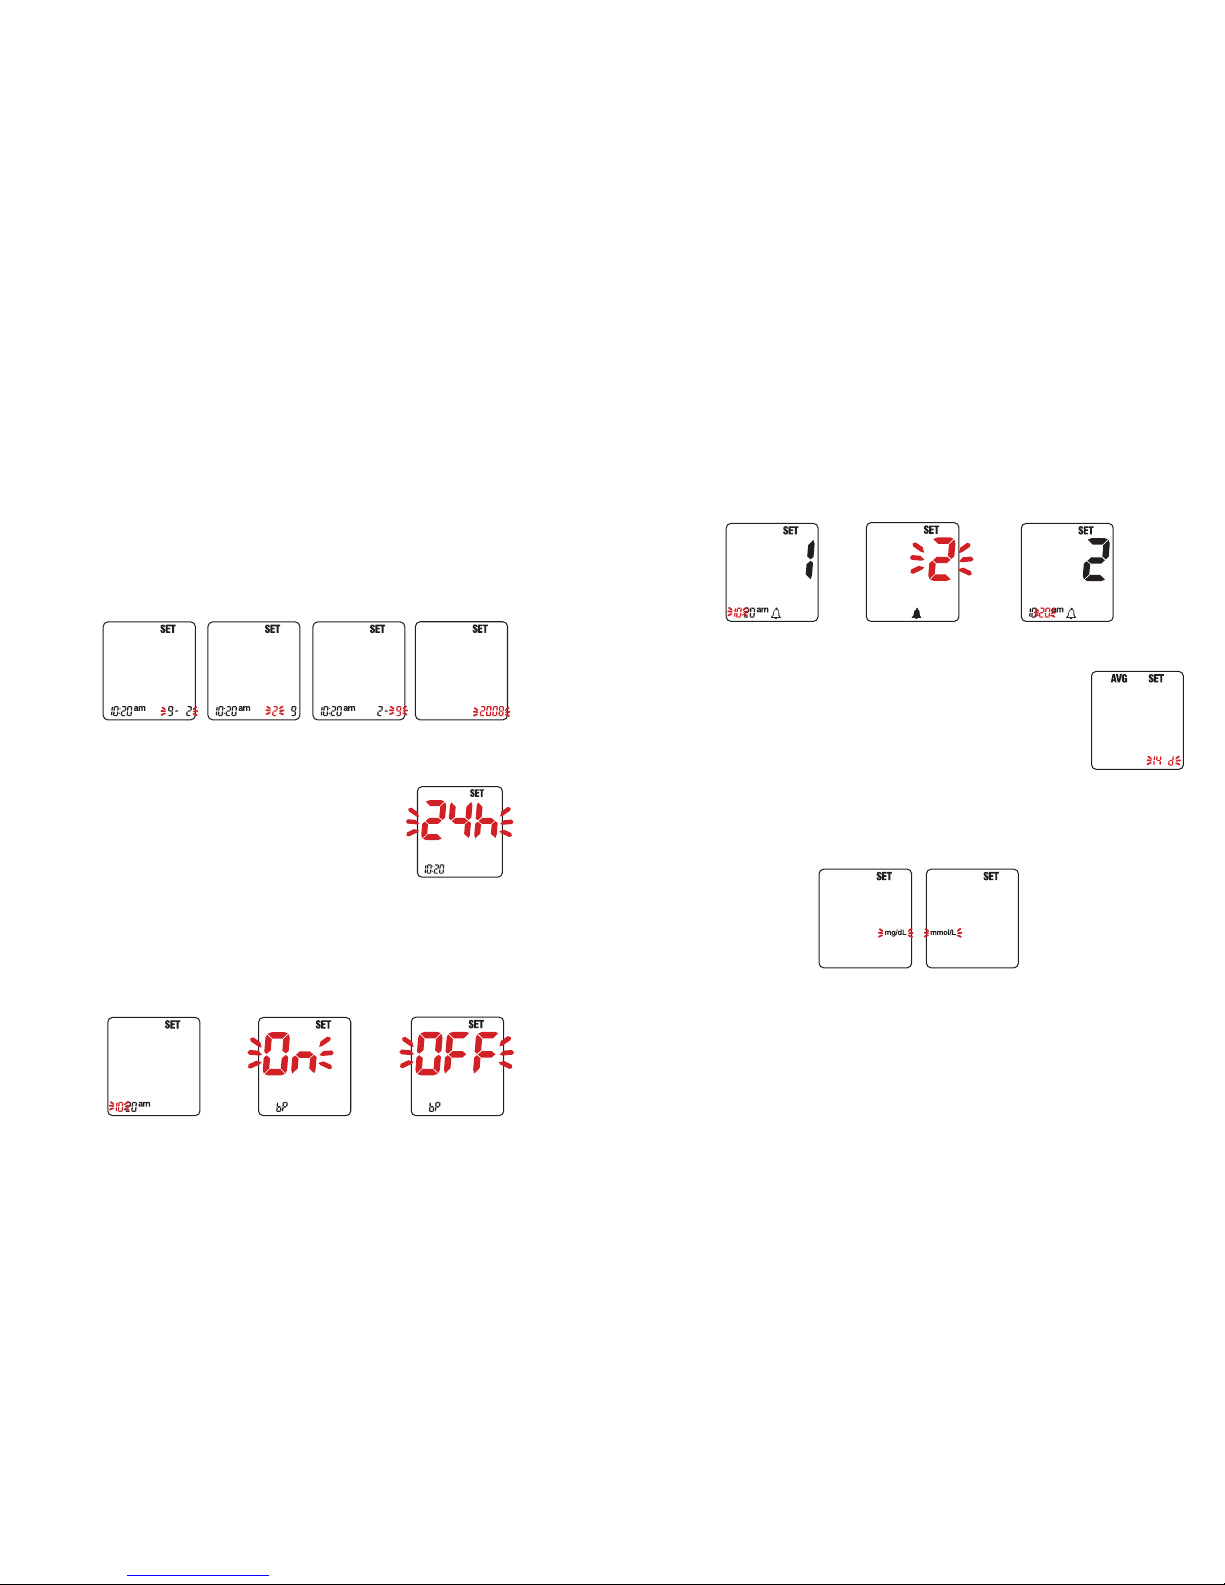
ALARM
You can also set an alarm on the device in case you wish to be notied before the
test. You can program up to 3 alarms. Attention, the alarm does not work when
set to 12:00 or to 0:00.
AVER AGE
You can set the device to store an average of the results of tests
performed during a par ticular period of time. For example, an
average of 14 days as shown. The principle of the setting is the
same: pressing the power button with the buttons ‘+’ and ‘-’.
UNITS
The device allows you to view the test results in international units such as mmol /
L (used in Canada) and Anglo-A merican as mg / dL. You can choose the preferred
unit by setting the device in SET mode and pressing the ’+’ and ‘-’ buttons.
METER SETTINGS (SET)
DAY, MONTH AND YEAR
There are 2 formats: day-month and month-day. They appear on the display in
the lower right corner. To set the preferred format press and release the power
button to access the SET until you see the format blink. Press the ‘+’ or ‘-’ to
select date formats.
To select the month, day and year, press and release the power but ton until the
signal does not blink. Press ‘+’ or ‘-’ buttons to set the correct month. Press
power to conrm and go to the next setting. Similarly also set the date and year
by pressing the ‘+’ and ‘-’ buttons.
TIME
There are also 2 setups for the time:
• International format of 24H;
• Anglo -American format: 12H with AM or PM.
To set the preferred format press and release the
power button for 3 seconds to ente r the SET mode.
Press power until you see the time format screen.
Press ‘+’ or ‘-’ to choose your preferred format.
BEEPER
After setting the time, you can set the beeper and select ON or OFF. It is recommended to leave the beeper always active (default setting). If the beeper is on,
you hear a beep in the following situations:
• When the instrument detects a test strip inser ted;
• When the results appear on the display;
Page 7
11 12
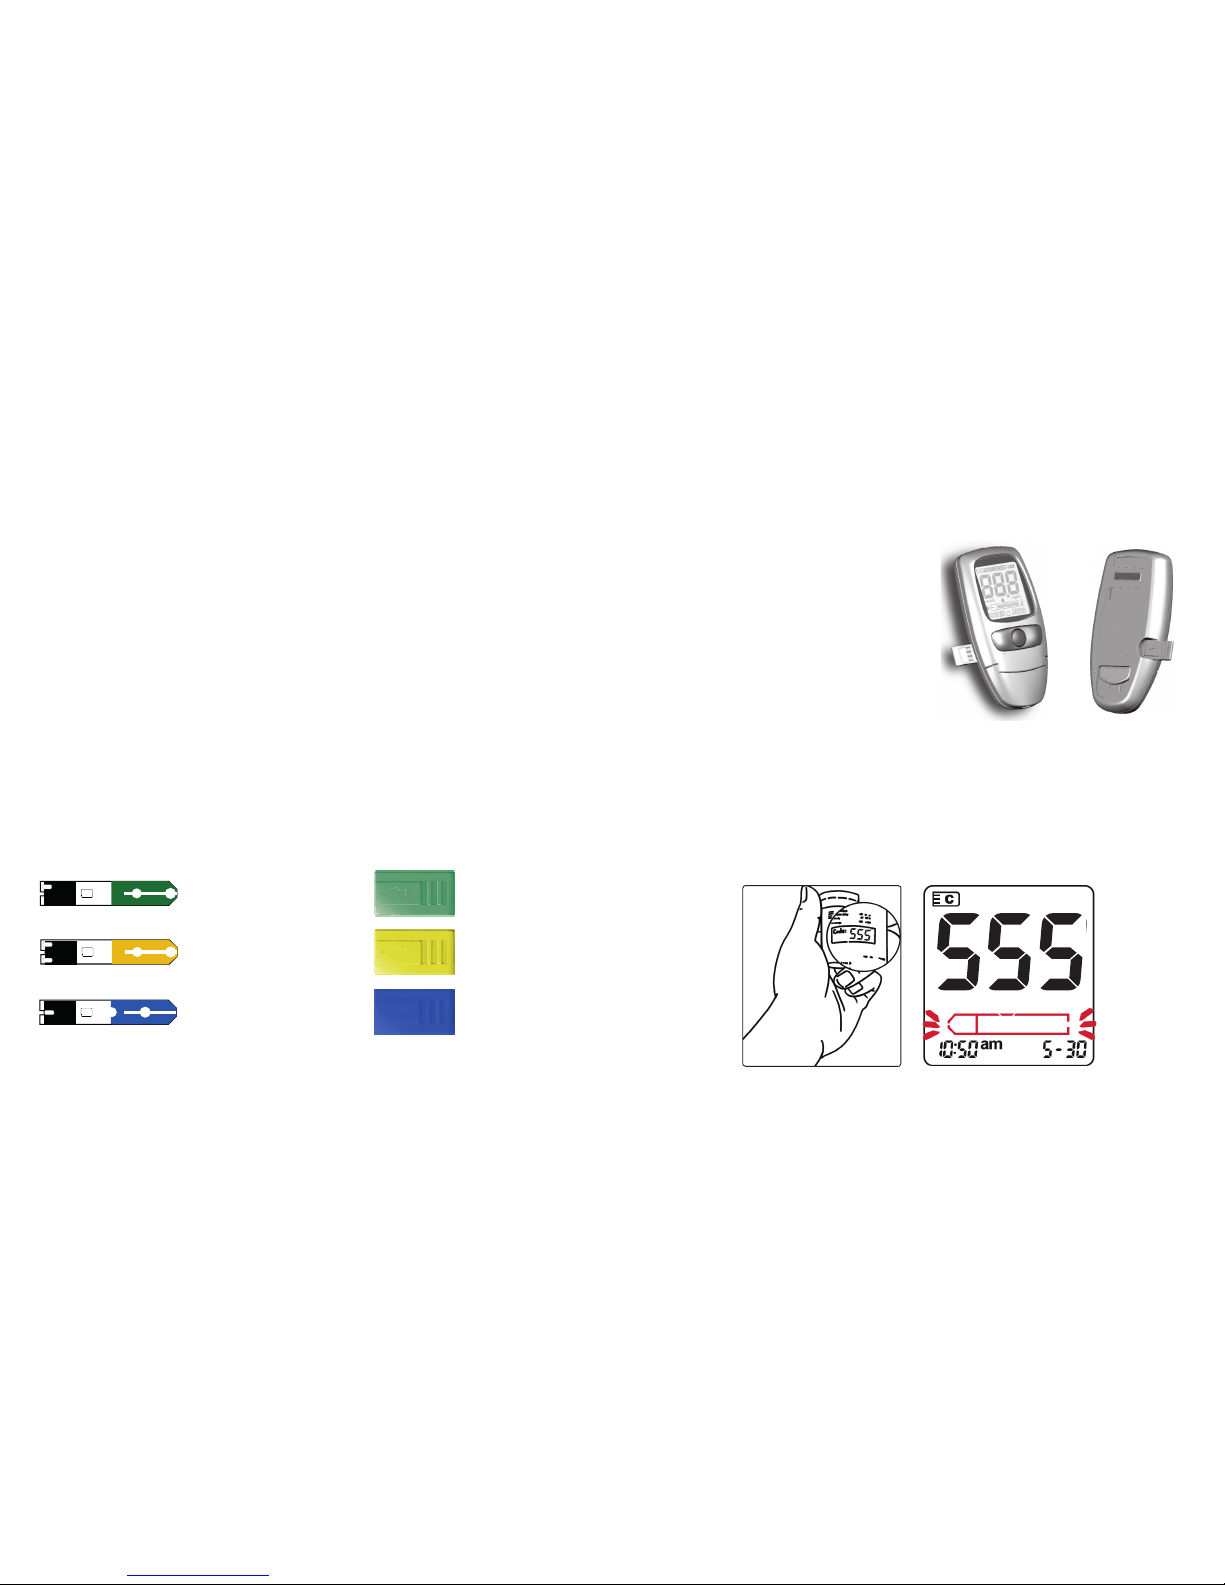
Do not forget to have the data-chip on hand, which is supplie d with each con-
tainer, prior to the rst measurement. Ever y data-chip belongs to a particular lot
or container. If possible, keep the container of test strips along with the date chip
so it’s always available.
PROGRAMMING THE DE VICE
1. Remove the Data-chip from the
container.
2. Insert the chip into the appropriate
slot.
3. Gently push the chip into the slot.
4. Press the button power (on/o).
5. If the meter reads the information of
the chip properly, a shor t beep con-
rms the programming correct (if the
beeper is enabled). The three-digit
code should appear on the display.
Check if this code is the same that is on the container.
6. If you have inserted the cholesterol chip, a symbol in the shape of the strip
with the ‘CH’ characters blinking.
7. if the chip is inserted for triglycerides should see the letters ‘TGL’.
8. if you inserted the glucose chip*, you should see the letters ‘GLC’.
In case of problems with the programming, the device reports an error E05 (see
the Error Messages section of this manual). If an error occurs, repeat the insertion of the chip after a few seconds.
INTRODUCTION TO THE LANCET DEVICE
The test system includes the PRIMA® lancing device, a handy tool for collecting
capillary blood samples for tests, which require one or two drops of blood. An ad-
CH
REQUIREMENTS TO PERFORM A ME ASUREMENT
• Your PRIMA® Self-Testing device (2in1 or 3in1)
• Test strips for measuring the desired parameter on-chip data
• Lancing Device
• Sterile Lancet
• User’s manual
• Cotton swab or gauze (not included)
• Diar y where you record the results (not included).
INTRODUCTION TO TEST STRIPS A ND DATA-CHIPS
The basic package of PRIMA® Self-testing Kit includes a container with 5 test
strips for measuring cholesterol, one container with 5 strips for measuring triglycerides and one with 10 test strips to measure glucose*. There are also containers
with 25/50 strips sold separately.
The test strips are chemically modied with enzymes. The test strip changes
color by reacting with cholesterol or triglycerides present in a drop of blood and
the device measures this change of color. The overall level of cholesterol or triglycerides in the blood is then shown on the display. Each new container of test
strips includes a data-chip. The chip provides the device with important infor-
mation about the specic properties of the respective control strips (calibration
data). The chip is essential before use of the test strips. This means that you need
to inser t the data-chip each time you want to change parameter measurement
(cholesterol, triglyceride s or glucose* may to or vice versa).
Cholesterol Strip (CH)
Cholesterol
Data-chip
Triglycerides Strip ( TGL)
Triglycerides
Data-chip
Glucose Strip (GLC)*
Glucose
Data-chip*
Page 8
13 14
justable tip allows 5 levels of skin penetration for individual comfort and lancets
are ejected with ease and condence.
HOW TO OBTAIN A BLOOD SAMPLE
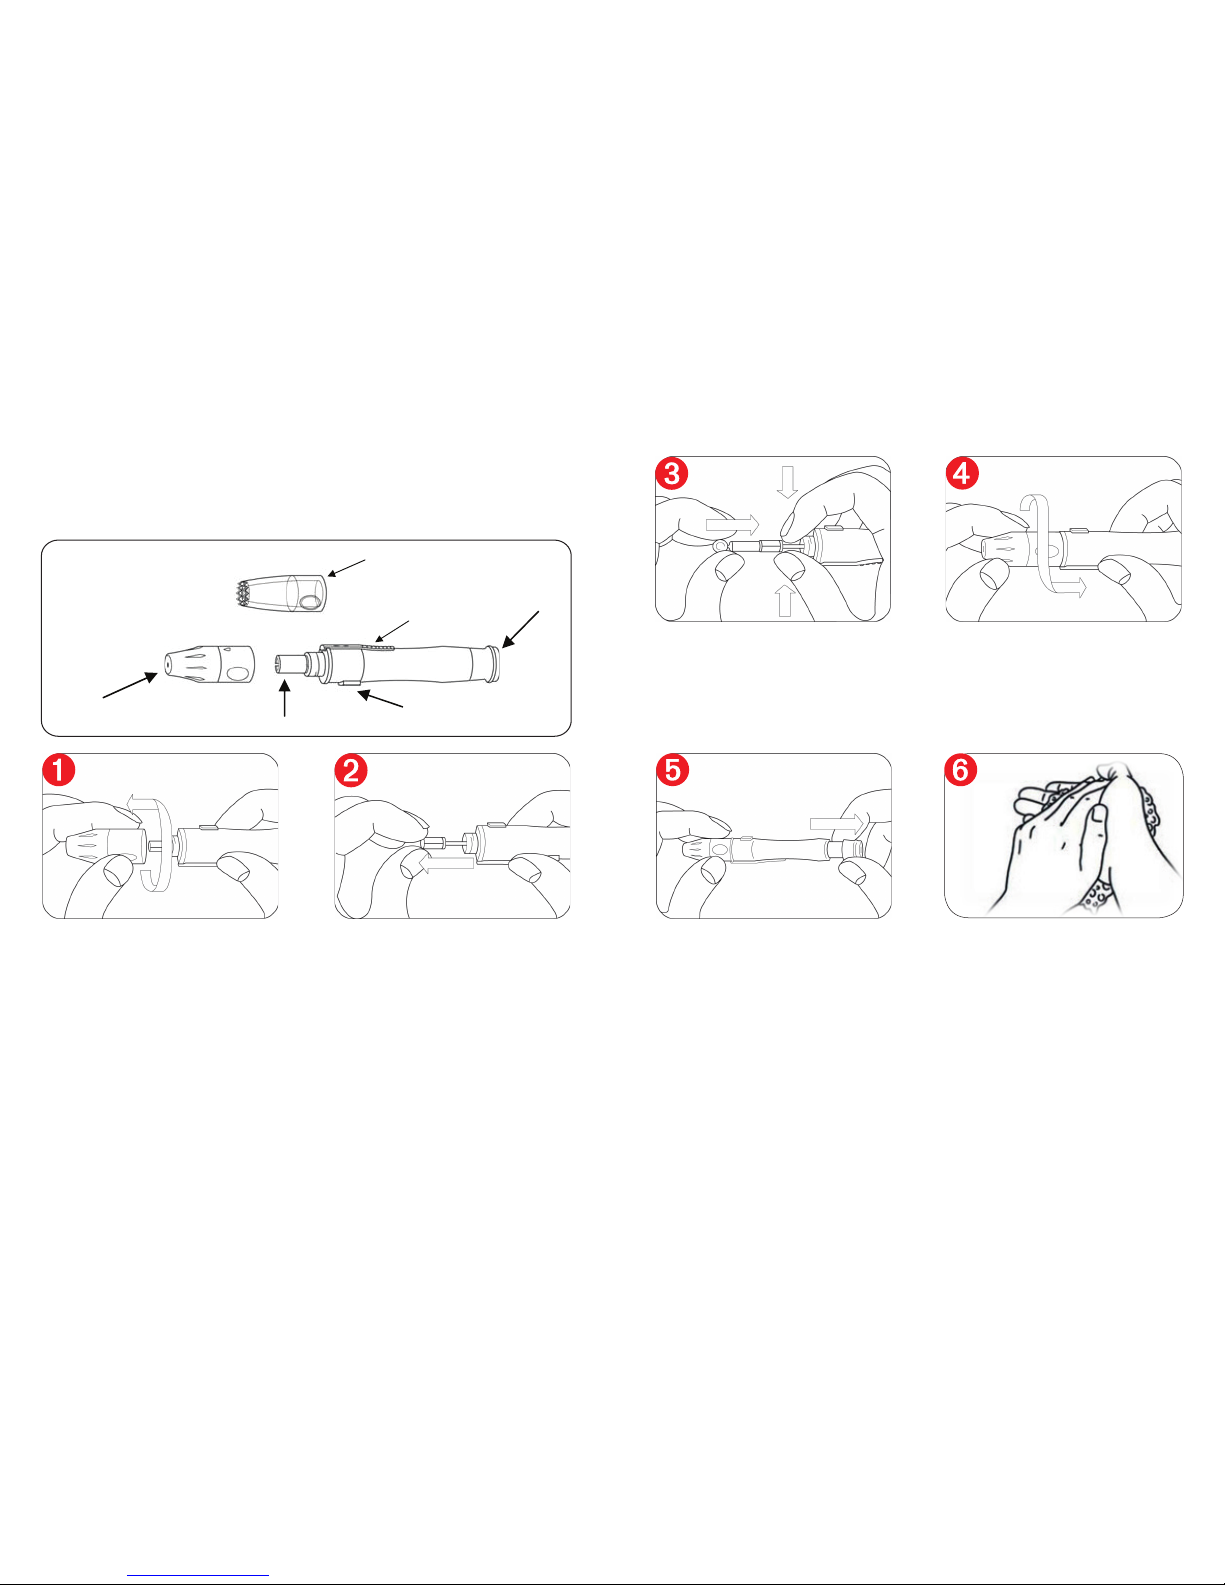
Prepare the lancing device by inserting a new sterile lancet.
COMPONENTS
Depth indicator
Adjustable Tip
Lancet Holder
Release button
Sliding Barrel
Ejection System
Clear Tip
1. Unscrew the tip of the lancing de-
vice by turning it counterclockwise
while holding the base.
3. While holding the lancet carrier,
inser t a new sterile lancet into the
bottom of lancet carrier.
Twist the cap of the lancet o.
5. Hold the tip rmly in one hand
then pull out the sliding barrel with
the other hand. This will cock the
lancing device.
2. With t wo ngers, pull out the lan-
cet carrier and hold it in place.
4. Put the tip of the lancing device
back on and turn it clockwise.
6. Wash your hands with warm wa-
ter. Ensure hands are warm and dry
before lancing. If needed, massage
your ngertip.
Page 9
15 16
PERFORMING A MEASUREMENT
• Get the test strip container for the required measurement.
• Check the expiry date of the test strips. Always use the strips be-
fore their expir y date has passed.
• Make sure that Data-chip belonging to the se test strips is at hand
unless the instrument has already been coded (see the section
“Coding the Instrument” of this manual). Note: Environmental in-
uences (e.g. air humidity and light) on the test strips may damage
test strips integrity and lead to false measurements or error messages. Do not remove the test strips from the strip container until
immediately before performing a test.
• Turn on the meter. Check the display before running the test. Are date and time
correct? If the measured values must be stored with time information, enter
the correct setting. Does battery symbol appear? If it appears, only a few more
measurements can be performed. Replace batteries as soon as possible.
• If the instrument has not been coded yet, inse rt a respective Data- chip into
designed slot. When the chip is entered correctly you will hear a beep.
• Verify if the code digit on the display corresponds to the code printed on the
strip container. Now take the test strip from the test strip container. Close the
container immediately after removing strip to protect the desiccants and remaining strips, otherwise, the test strips may become unusable before expiry
date. Liquids must not ente r the test strip container.
• Hold the test strip with thumb and index nger so that the blood sample application area is facing upwards.
• Inser t the test strip into the designated strip slot. From the printing on the
reverse side of the strip, the meter dete cts which test parameter is to be measured and which code is needed for the test strip. If the code has not been
entered via data chip yet, an error message is displayed after inserting the
test strip.
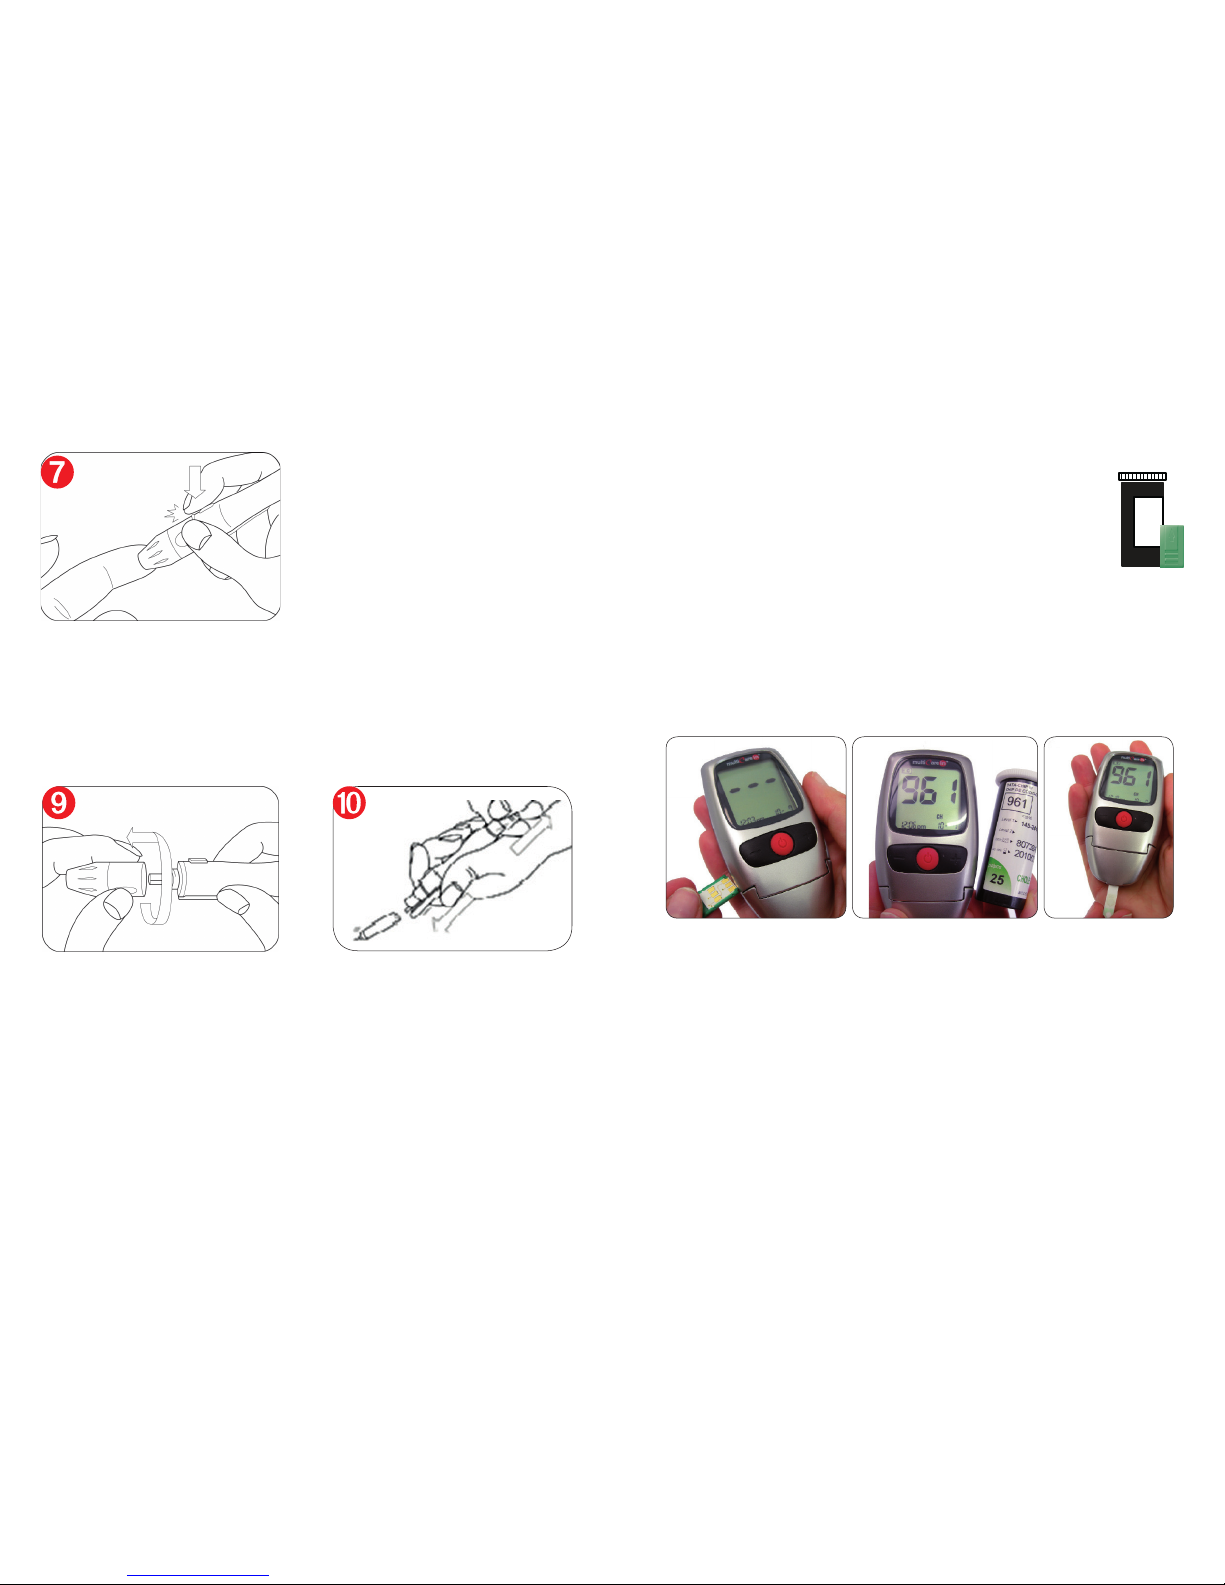
7. Hold the lancing device rmly
against the side of the nger, with
the cap resting on the nger. The
harder it is pressed the deeper is the
puncture. Press the release button
to prick.
8. After lancing yourself try obtain-
ing a hanging drop of blood. Always
wipe o the rst drop with a cotton
ball and use the second drop for the
testing.
The rst drop of blood usually contains extracellular tissue uids that
may dilute your real capillary blood
and cause erroneously low results.
9. After you nished with the meas-
urements unscrew the tip of the
lancing device by turning it counter-clock wise.
10. Push the lancet ejector forward
with the thumb and simultaneously
pull out the sliding barrel to dispose
of the used lancet in a proper container.
Page 10
17 18
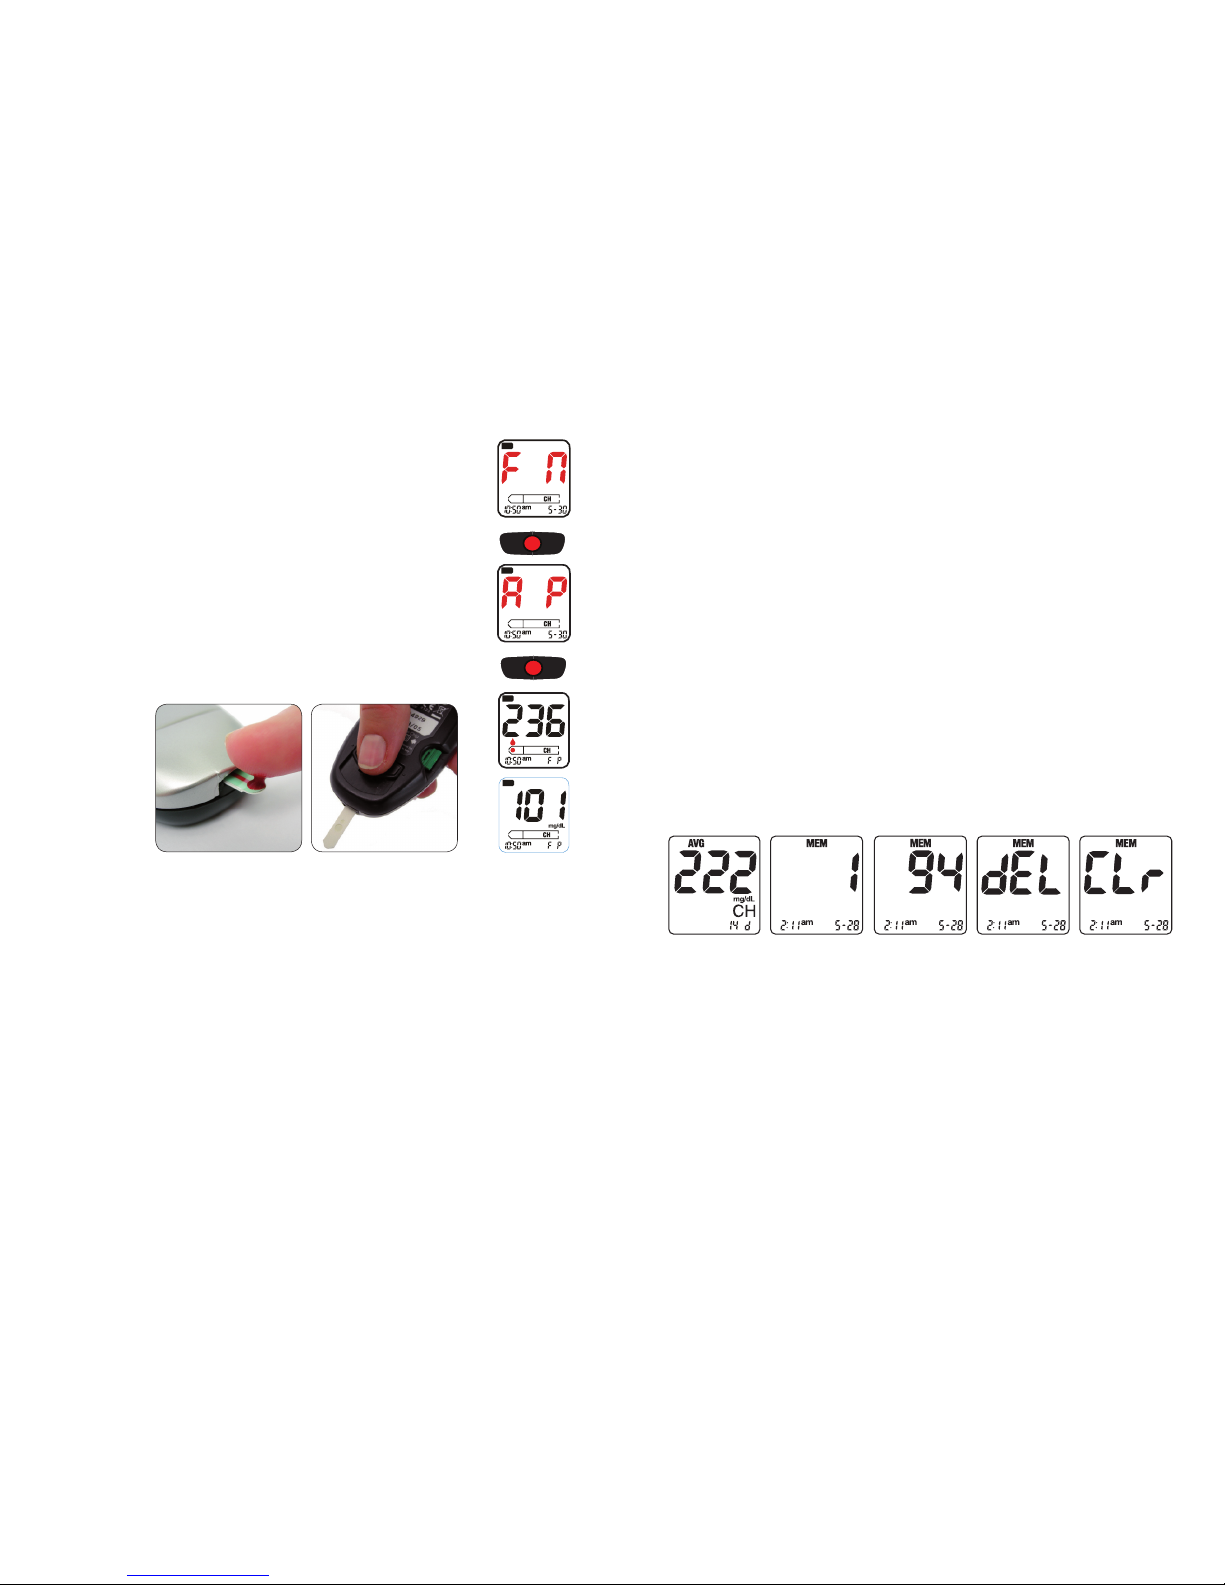
• Cholesterol test strips only: After inserting the strip, “F” (Fe -
male) on the lef t and “M” (Male) on the right will appear on the
display. Press the corresponding button (“- “ for”F” or “+” for
“M”) to select the gender. After about two seconds, “A” (before
meal) on the left or “P” (after meal) on the right will appear on
the display. Press the corresponding button (“- “ for”A” or “+” for
“P”) to select the let ter. The selected letter will remain two seconds on the display. After that, the code and the blinking drop
will appear on the display, indicating that the device is ready to
take the blood sample.
• Lance the oute r side of the ngertip with the lancing device and
a sterile lancet to obtain a large hanging drop of blood. Wipe o
the rst drop with the cotton ball or gauze and use the second
hanging drop of blood to apply to the test strip.
• The meter displays a drop symbol on the screen window, indi-
cating that the strip is inser ted and ready for the blood sample. Apply a large
hanging drop of blood directly from the nger to the white sample application
area of the strip. For measuring glucose*, apply a drop of blood on the end of
the test strip. Let the strip aspirate the blood sample. Do not touch the appli-
cation area with the nger. The drop of blood must be applied to the test strip
immediately after lancing the ngertip. Blood which is applied later may lead to
inaccurate result. For cholesterol and triglycerides testing it is critical to wipe
away the rst drop and immediately apply the second drop.
• Read and record your result. If the displayed result does not match your state
of the health or seems to be unusually high or low, check the meter function
using a new test strip and a control solution (not provided in the starter pack-
age). If this check conrms proper functioning of the instrument, read again
the proceeding instructions of this manual. Perform another measurement using a new test strip. If the new result also seems to be not plausible, consult
your doctor.
• When measurement is complete, use the ejector key on the back of the meter
to remove the used strip.
• Press power button until the instrument powers o.
• Properly dispose of the used lancets and test strip according to your local laws
and guideline s.
• Clean the instrument if necessary (see the se ction “Care and Maintenance”
of this manual).
QUALIT Y CONTROL RECOMMENDATIONS
To ensure that meter is functioning properly, you should consider using control
solutions for a function check. For each test parameter, separate control solutions are available to purchase. A function check is performed in the same way as
a regular measurement except that control solutions are used instead of blood.
Make a habit of carrying out a function check in the following situations:
• If you leave the test strips container opened for a long time, or if the container
integrity was compromised
• If you drop the meter
• If you repeated a test and the result is still not plausible, higher or lower than
expected
• When you opened a new lot of the test strip container
• When you want to check the per formance of the meter and the test strip.
MEMORY
The meter is capable of storing up to 500 test results and lets you review results
in order from the most recent (1) to the oldest (500). When you insert a Data-chip
into the CH meter, you can recall previous results. While in the standby, press
and release ‘+’ and ‘-‘ button to enter MEMORY mode. The average result will
be displayed. If you press ‘+’ or ‘-‘ button the memory number can be displayed.
If you hold down ‘+’ or ‘-‘ the meter scrolls quickly and displays memory. A result corresponding to the memory position will be shown when you release the
button. To delete one of the stored results press the power button and ‘-‘ button
simultaneously for one second. To clear all the test results stored, continue to
press power and ‘-‘ buttons for ve seconds.
+
-
+
-
Page 11
19 20
the test being attempted. Alternatively, re-code the instrument for the respective
test strip.
E05 error indicate s data- chip error.
Solution: remove the chip and re-insert properly. If the E05 error remains, call
Customer care.
E06 error appears when insucient blood sample was applied to the test strip
application area.
Solution: remove the used test strip and repeat the measurement applying a
large drop of blood.
E07 error indicates that the data-chip is not inserted.
Solution: Insert a data-chip for proper coding of the instrument. L0 error indi-
cates that the result falls outside of the lower limit of the instrument sensitivity
(e.g. too low values).
Solution: Perform a control function check. If control passes the check, repeat
the test applying a large drop of blood and ensuring that the rst drop was wiped
out and only the second drop was te sted. If the control check fails, your instrument is not functioning properly. Contact the Customer care.
HI error appears when the result falls outside of the highe r limit of the instru-
ment’s sensitivity (e.g. too high values).
Solution: Perform a control function check. If control passes the check, repeat
the test. If the repeated result is still high make a visit to your doctor. If the control
check fails, your instrument is not functioning properly. Contact the Customer
care.
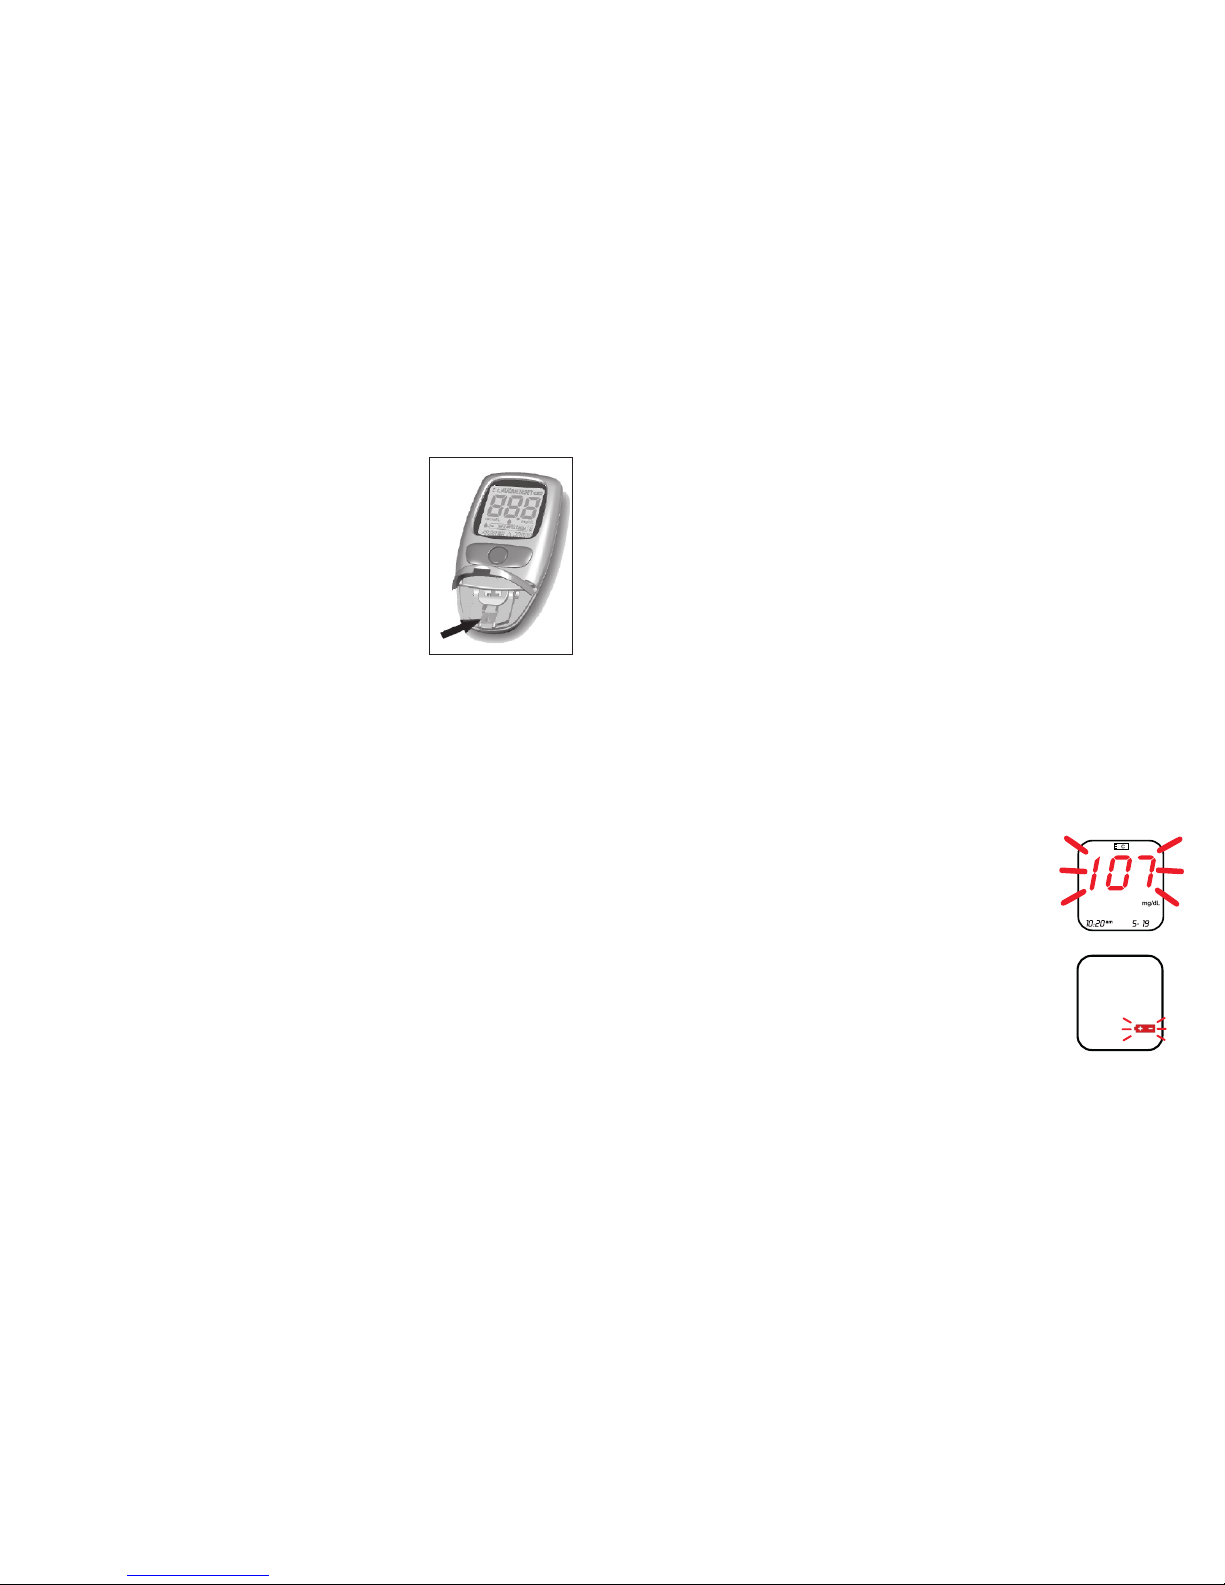
Flashing results are indicative that the test strip is too old
and may be expired. Note that ashing results are not
stored in the memory.
Battery is dying and needs replacement.
CARE AND MAINTENANCE
A clean optical measuring system is a basic prerequisite
for obtaining accurate and precise values for cholesterol and triglycerides. Therefore, regular cleans are highly
recommended.
• Always power o the meter before cleaning.
• Use ordinary lint-free cotton balls or gauze or cotton
clean tissue or cloth.
• Mild soap as well as 70% alcohol or isopropanol alcohol are suitable to moisten the cotton cloth to clean
plastic surfaces.
• Lift the front cover and gently clean glass sur faces of
the optic with a dry gauze or cotton ball.
• Clean plastic cover support of the meter with moistened and then dr y gauze or cloth.
• Do not use any disinfectant sprays or cloth/cotton balls which are dripping wet
as the liquid may penetrate and damage the instrument.
ERROR MESSAGES
In certain circumstances error messages may appear on your display.
E01 error means that the instrument or ambient temperature does not fall within
the acceptable range for the selected test.
Solution: move the instrument to an environment which has an appropriate tem-
perature (18°-35°C) and wait for the meter to equilibrate before repeating meas-
urement. Do not articially heat or cool the meter by any means.
E02 error can imply several things. First, the test strip is compromised because
of coloration of the reactive area. This might happen when a used or dirty strip is
inser ted or when a new strip was stored inappropriately. It can also mean that the
blood sample was applied too soon, before the meter displayed ashing symbol
of a blood drop.
Solution: remove and discard the used strip, open the plastic lid covering the test
strip clot and clean plastic window with a slightly moistened with water gauze.
Take a new test strip, insert it into the designate d slot and apply a blood sample
only after a blood symbol is displayed on the screen.
E03 error indicates that the strip was removed prematurely, without applying a
blood sample.
Solution: power o the meter and repeat the test after a few seconds.
E04 error appears when the test strip belongs to a dierent lot than the container
which was last coded for this parameter, or when the meter was coded for cholesterol test but a strip for triglycerides was inserted for testing.
Solution: remove the strip and repeat using a test strip matching the last code for
Page 12
21 22
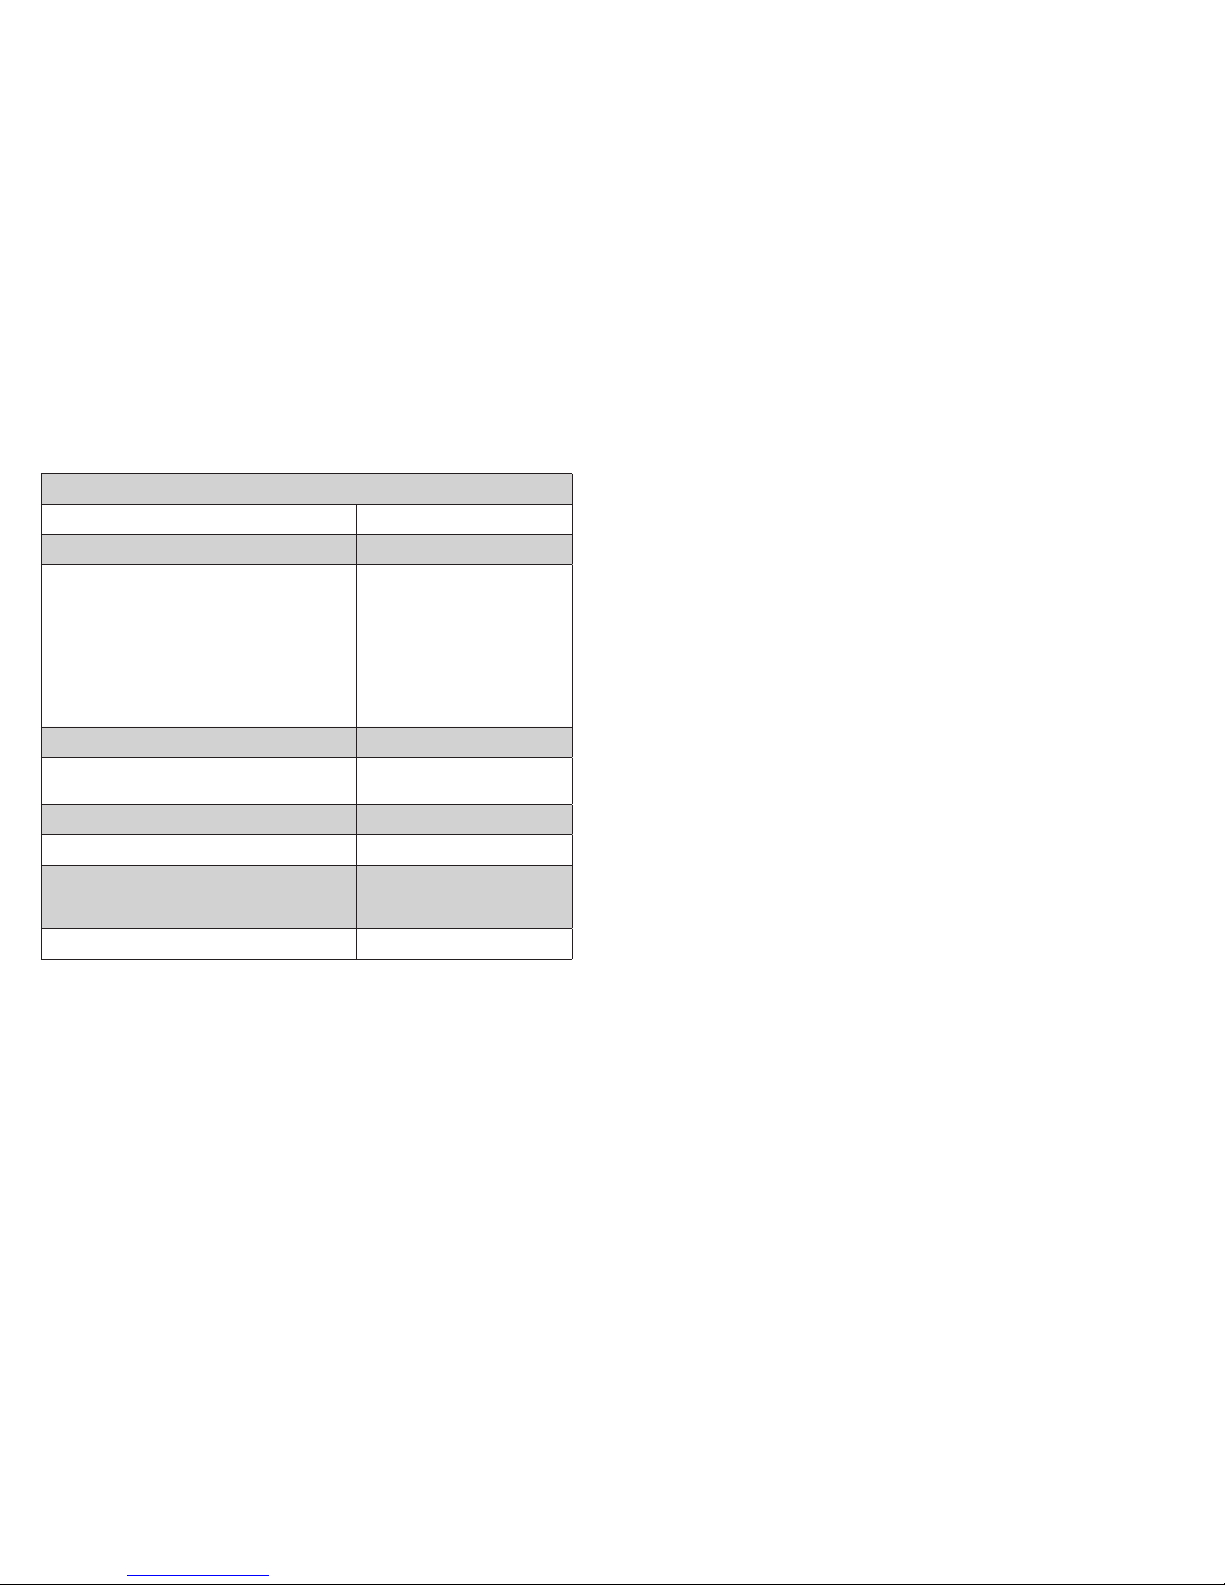
Operating conditions
Relative humidity 0-90%
Temperature range for measurement 10°C-40°C
Measurement range Cholesterol:
3.3-10.2 mmol/L
(130-400 mg/dL)
Tri gly cer ide s:
0.56 - 5.6 mmol/L
(50-500 mg/dL)
Glucose:
0.6 - 33.3 mmol/L
(10 - 600 mg/dL)
Memor y capacity Up to 500 tests
Battery 2 x 3V button cells
Type CR 2032
Number of measurements with new batteries Approximately 1000
Weight 65 g (batteries included)
Dimensions Length 97 mm
Width 20.5 mm
Height 49 mm
Display LCD
PERFORMANCE SPECIFICATIONS WARRANTY
The meter comes with three years of limited manufacturer warranty. The warrant y
does not cover damages caused by improper usage and handling, accident
and/or negligent care.
IMPORTANT NOTES
Always
• Operate the instrument within the acceptable temperature range.
• Place the instrument on a level sur face or hold it steady in your hand.
• Make sure that all display elements are functioning during the self-test.
• Read the test strip inserts.
• Keep the meter and the test strip container clean and tidy.
• To get less variable results fast at least 10 hours before measurement.
Never
• Touch or remove the test strip during actual measurement.
• Delay starting the measurement af ter lancing.
• Subject the instrument to sudden movements and shakes during a
measurement.
• Store the meter and test strips at extreme temperatures.
• Store the instrument and strips under humid or damp conditions without
suitable protection.
• Failure to comply with the above notes may lead to inaccurate and false
results.
Page 13
23 24
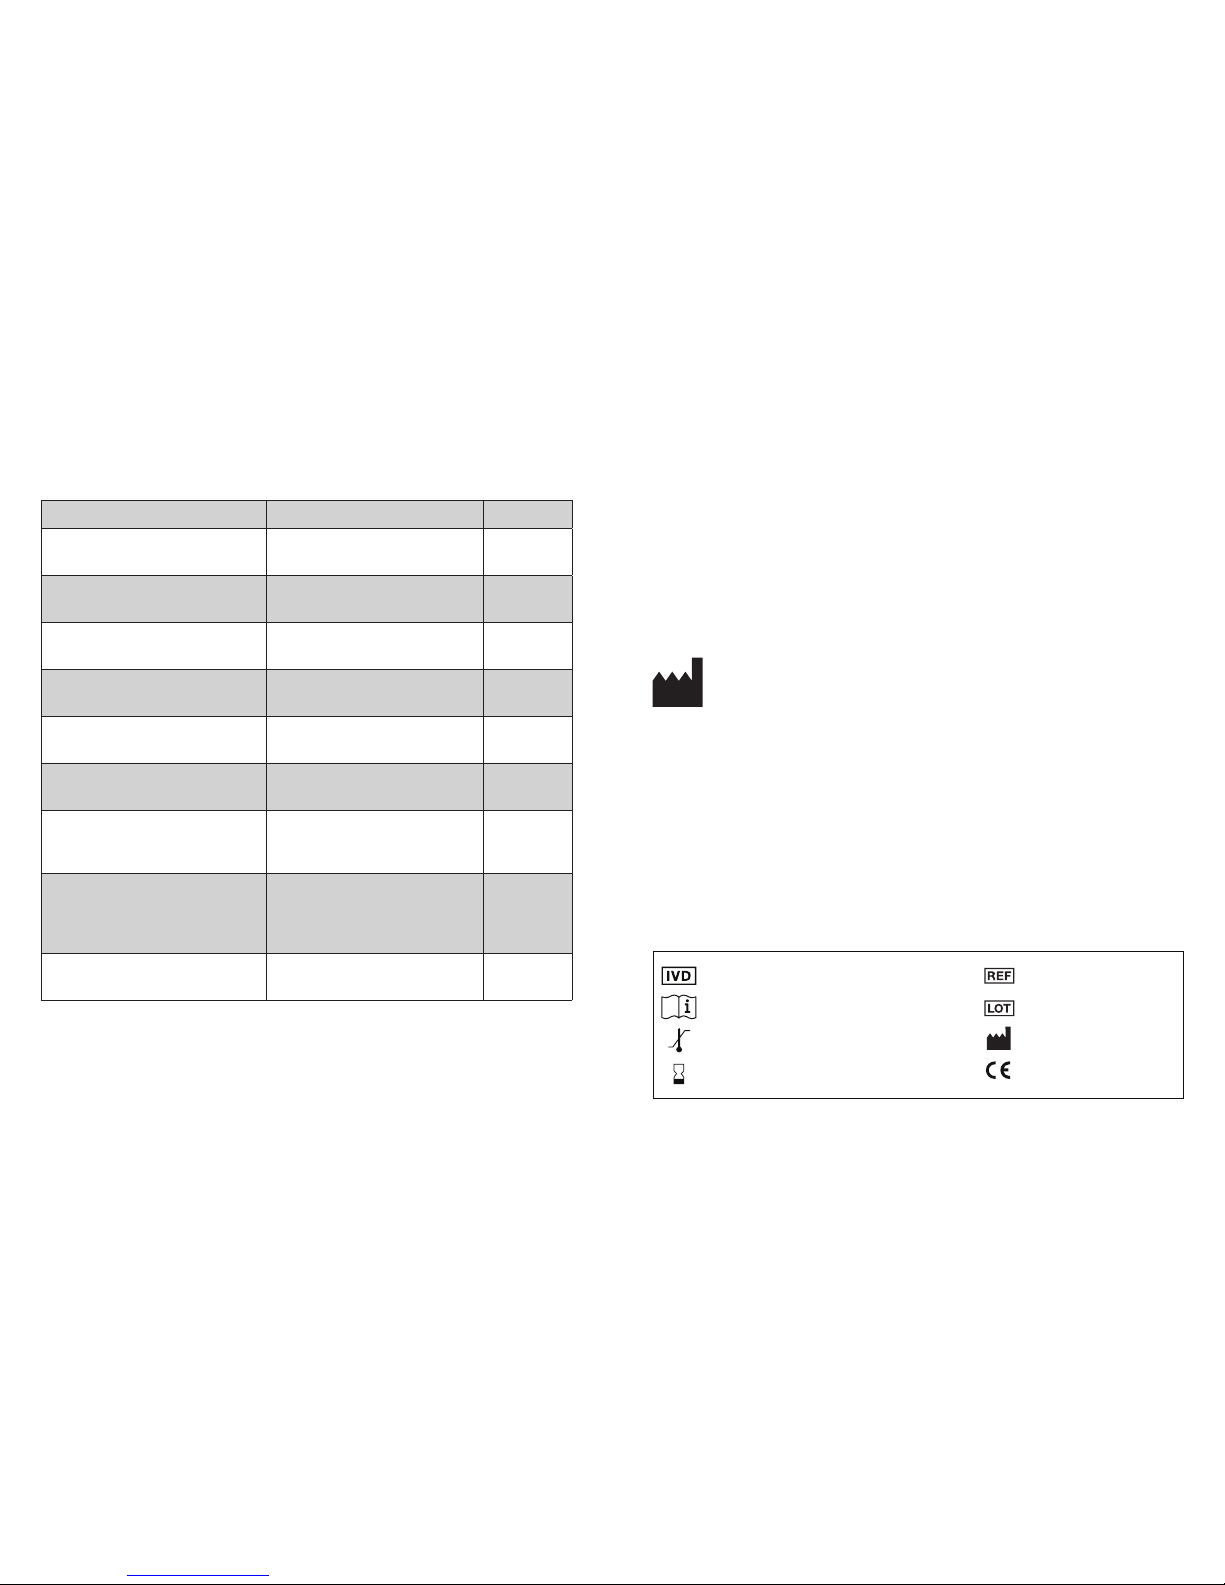
Article Description REF
Prima® Cholesterol Test Strips 25 test strips for determining
blood cholesterol
PL301
Prima® Triglycerides Test Strips 25 test strips for determining
blood triglycerides
PL303
Prima® Glucose* Test Strips 50 test strips for determining
blood glucose
PL305
Prima® Cholesterol Control
Solution
Control solution to be used
with the cholesterol test strips
PL308
Prima® Triglycerides Control
Solution
Control solution to be used
with the triglyceride s test strips
PL309
Prima® Glucose* Control
Solution
Control solution to be used
with the glucose test strips
PL307
Prima® 2in1 Multi-parameter
Diagnostic Device
Device, 25 sterile lancets,
5 cholesterol strips,
5 triglycerides strips
PL300
Prima® 3in1 Multi-parameter
Diagnostic Device**
Device, 25 sterile lancets,
5 cholesterol strips,
5 triglycerides strips,
10 glucose strips
PL311
Sterile lancets for Lancing
device
50 Sterile lancets
100 Sterile lancets
PL313
PL314
PRODUCT LIMITATIONS
Please read the instructions of use for the test strips and control solutions for
detailed information on product data and the respective limits of the test.
* PRIMA Gluc ose test strips with the blue data-chip and PRIMA Gl ucose Control Solutio ns are
only com patible with PRIMA® 3in1 Self-Testing Kit and ar e not includ ed in the 2in1 Self-Testing
Kit.
**The PRIMA 3in1 Self-Testing Kit canno t be sold i n the USA .
Manufactured by:
Biochemical Systems International s.r.l
52100 Arezzo - ITALY
Distributed by:
PRIMA Lab SA
Via Antonio Monti 7
6828 Balerna - Switzerland
www.primahometest.com
Made in Italy
0344
ED2015 APRILE EN
In vitro diagnostic medical device
Read instructions before use
Range temperature
Expiry date
Reference number
Batch code
Manufacturer
CE mark
ORDERING INFORMATIONS
primahometest.com
Page 14

25 26
LOGBOOK
Write down the results you get with the PRIMA® device.
 Loading...