

Page 1
2 Slice Cool Touch
TOASTER
MODEL PCT130
INSTRUCTION LEAFLET
Visit our web site
www.prima-international.com
PCT130 Rev.1 0801
Page 2
USER INSTRUCTIONS
Please keep these instructions
Please read these instructions carefully and familiarise yourself with your new Prima
Toaster before using for the first time.
1. POWER
• 230V~50Hz 800W
• Ensure that the voltage indicated on the identification plate corresponds with the
mains voltage.
2. FITTING OF 3 PIN PLUG
WARNING: THIS APPLIANCE MUST BE EARTHED
IMPORTANT:
following code:
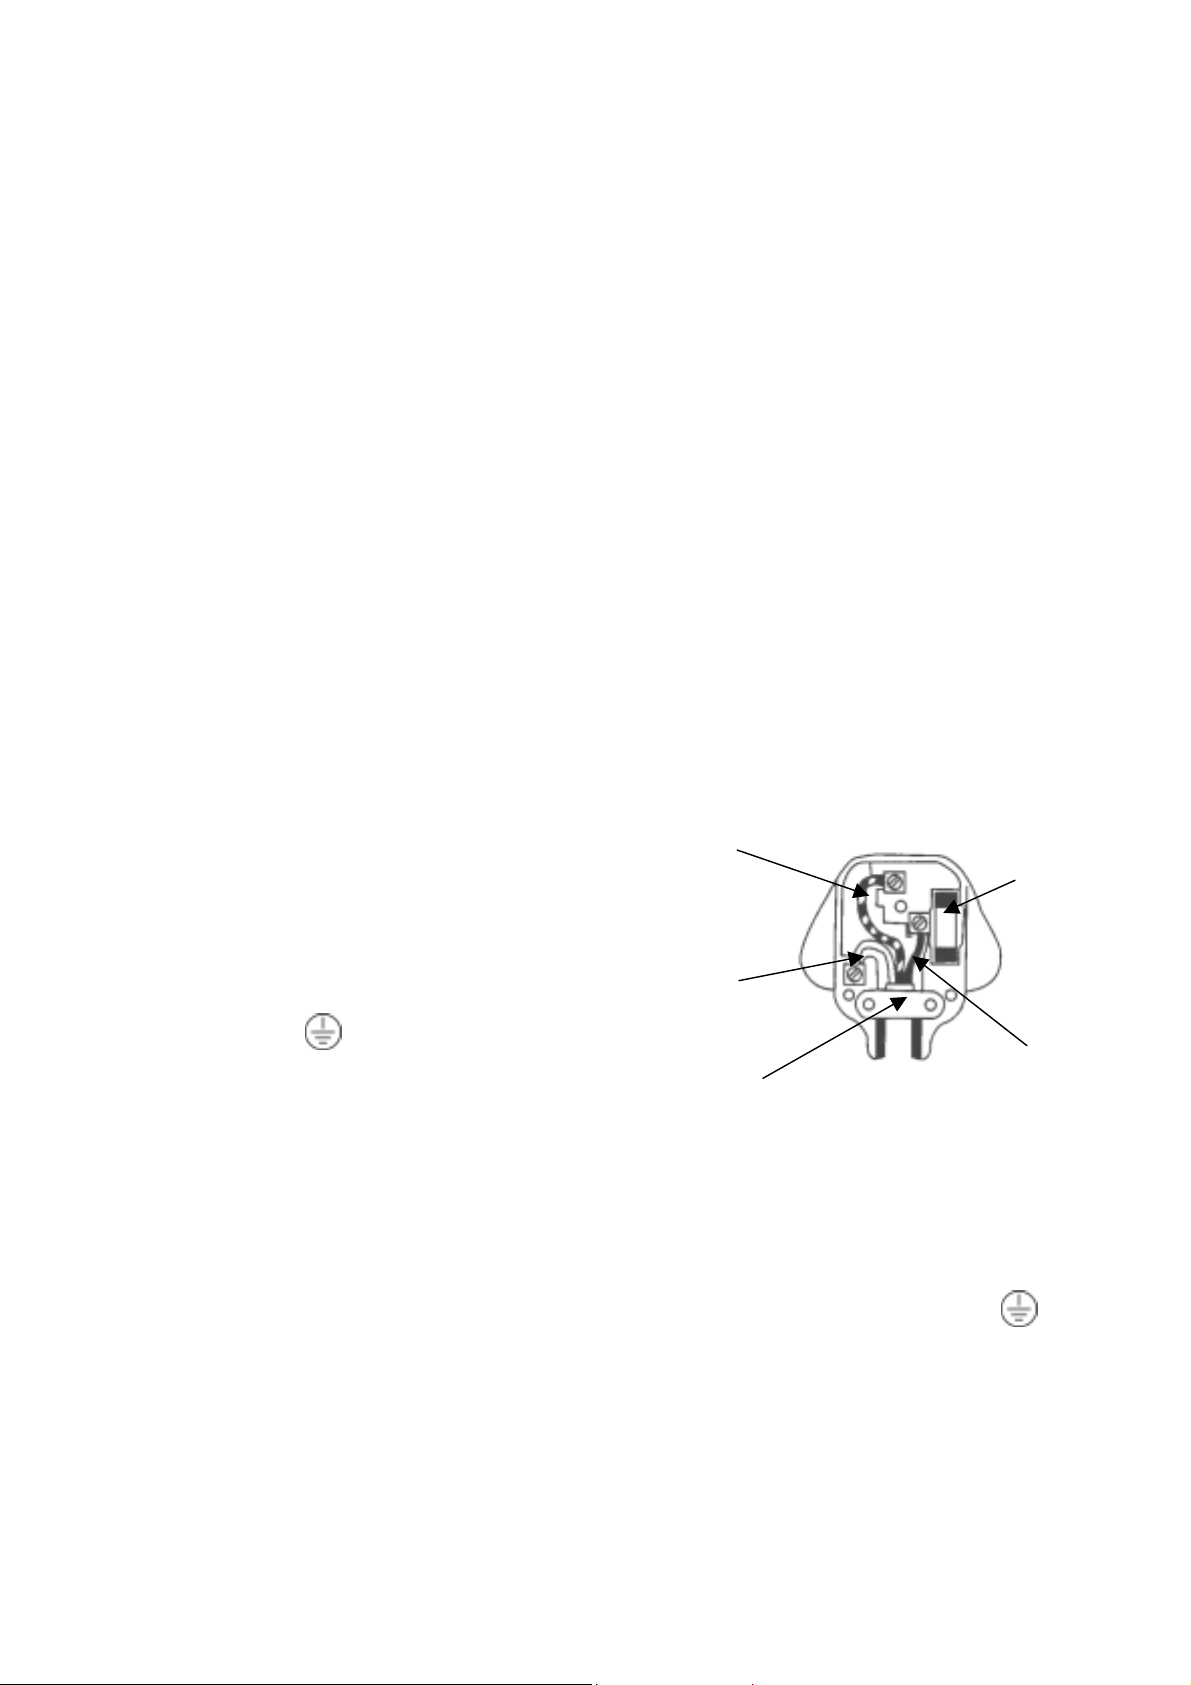
UNITED KINGDOM: FITTING OF A 13A FUSED PLUG
As the colours of the w ires in the mai ns lead
of this appliance may not correspond with
the coloured markings identifying the
terminals in your plug, proceed as follows:The wire which is coloured green & yellow
must be connected to the terminal in the
plug which is marked with the letter 'E' or
the earth symbol ‘ ‘ or colo ur ed
green & yellow
The wire, which is coloured
connected to the terminal which is marked
with the letter ‘N’ or coloured
The wire which is coloured
connected to the terminal which is marked
with the letter 'L' or coloured
The wires in this mains lead are coloured in accordance with the
Green and Yellow:
Blue:
Earth
-
Neutral
-
Brown: - Live
E
EARTH FUSE
(GREEN & YELLO W
or GREEN)
N
NEUTRAL
green or
.
blue
must be
(BLUE or BLACK)
CORD GRIP
WIRING FOR A 13 AMP PLUG (BS 1363)
black
.
If a 13A (BS 1363) fused plug is used it
brown
must be
must be fitted with a 13A fuse. If in doubt consult a qualified electrician.
red
.
Please note: The Earth Terminal is marked
with the letter ‘E’ or
Earth Symbol
(BROWN or RED)
‘ ’.
L
LIVE
PCT130 Rev.1 0801
Page 3

IMPORTANT SAFEGUARDS
When using your toaster or any electrical appliance, basic safety precautions should always
be followed, including the following:
1. Read all instructions.
2. Do not touch hot surfaces. Use handles or knobs.
3. To protect against electric shock, do not pl ace any part of this toas ter in water or any
liquid. See instructions for cleaning.
4. Close supervision is necessary when any appliance is used by or near children.
5. Do not leave appliance unattended.
6. To reduce the risk of fire or electrical shock, do not insert oversized foods, metal foil
packages, or metal utensils into the toaster.
7. Unplug the toaster from outlet when not in use and before cleaning. Allow it to cool
down before cleaning, putting on or taking off parts.
8. Do not operate any ap pli ance w ith a damag ed cor d or pl ug or a fter t he appli ance h as
malfunctioned or been damaged in any manner. Take the appliance to a repairing
centre or examination, repair or adjustment.
9. The use of accessory attac hm ents not recommended by the appliance manufacturer
may cause injuries.
10. Do not use outdoors.
11. Do not let the cord hang over the edge of the table or counter or touch hot surfaces.
12. Do not place on or near a hot gas or electric burner or in a heated oven.
13. Failure to clean crumb tray may result in fire hazard.
14. Be sure the toaster is turned off before plugging into or unplugging from an outlet.
15. Do not use this toaster for other than intended use.
16. Do not operate in the presence of explosive and/or flammable fumes.
17. Use toaster in an open area with 4-6 inches air space above and on all sides for air
circulation. A fire may occur if toaster is covered or touching flammable material,
including curtains, draperies, walls and the like, while in operation.
18. Do not attempt to dislodge food when toaster is plugged into an outlet. Should it be
necessary to dislodge food, unplug the toaster and use only a wooden utensil.
19. Do not clean with metal scouring pads. Pieces can break off the pad and touch
electrical parts involving a risk of electrical shock.
20. This appliance is for house hol d use onl y .
21. Bread may bur n. Ther e fore the toaster must not be used near or below curtains and
other combustible materials. They must be watched.
22. If the supply cord is damaged, it must be replaced by the manufacturer or its service
agent or a similarly qualified person in order to avoid a hazard.
SAVE THESE INSTRUCTIONS
PCT130 Rev.1 0801
Page 4

F
A
B
C
D
E
A. LEVER
B. “FROZEN” BUTTON AND LIGHT INDICATOR
C. "REHEAT" BUTTON AND LIGHT INDICATOR
D. "STOP" BUTTON AND POWER ON INDICATOR
E. BROWNING SELECTOR DIAL
F. BREAD WARMER SWITCH
Your toaster makes toasting easy…..it will evenly toast variety of breads, toaster pastries
and waffles.
The thermostatically controlled heat selector lets you select the toasting...from light to dark.
BEFORE YOUR FIRST USE
Carefully unpack the product and remove all packaging materials, To remove any dust that
may have accumulated during packaging, simply wipe the toaster exterior with a clean,
damp cloth. Do not use abrasive cleansers, Do not put the toaster, cord, or plug in water.
Check that the voltage on th e applianc e's rating plate correspo nds to the v oltage m arked on
your mains supply meter . Before using for the first time, oper ate the toaster o nce or twice on
level 7 to eliminate the "new" smell. You can do this with the toaster empty.
USING YOUR TOASTER
1. Place your toaster on a flat, dry, stable surface.
2. Make sure that the lever is in the uppermost position, insert the plug into a standard
electrical outlet.
3. For ease of selection, the br owning selector dial may be rotated to var y the toasting time
and therefore the degree of browning. Set anywhere on the band to suit the type of
bread. Setting 1 is the shortest toasting time. Setting 7 is the longest.
4. The handle will not latch if the unit is not connected to the mains, and may not latch if the
browning control is set to its mi nimum positi on. Press the toasting lev ers downwar d until
they lock into place. This will lower the bread into position and automatically begin
toasting. The toast will pop up when it has reached the selected colour. Should you
desire to stop the toasting before reaching the selected color, press the STOP button
and the toast will pop up.
5. DO NOT LIFT UP THE BREAD WARMER RACK IF YOU ARE TOASTING BREAD
IN THE TOASTING SLOTS.
PCT130 Rev.1 0801
Page 5

SELECTING THE BROWNING LEVEL
Select the setting of y our choice from the possible brow ning level s. The degree of brow ning
increases in relation to the numbers on the selection dial. For your guidance, the
relationship between the levels and the type of bread is as follows:
DIAL SETTING TYPE OF BREAD
1-3 Thin bread or using bread warmer rack
3-5 Ordinary bread
6-7 Whole meal bread
After having plugged the appliance in, press the bread carriage LEVER down until it
automatically locks.
The toast is automa tically released when the prev iously selected browning level is reach ed.
If you wish to interrupt the browning process at any time, return the carriage knob to its
original position or push the STOP button.
Frozen Bread
Setting the brow ning lev el to your normal p osition, low er the br ead c arriag e knob to st art the
toasting, then press th e Frozen but ton. Additional time will automatic ally be selecte d and the
frozen bread LED indicator will grow.
Reheat
If your bread has been cooled down inside the toaster, press the bread carriage knob to
lower the bread, then press the Reheat button. The bread will be reheat and the re-heat
LED will grow.
Bread Warmer rack
You can warm your bread with the bread warmer rack. Firstly, switch off the toaster, then
press down the bread warmer switch to lift up the bread warmer wire rack, place the bread
on the wire rack. Make sure that you leav e enough sp ace between the bread and the to aster.
Do not to cover the toaster rack with soft bread as it will block the ventilation and may
damage your toaster.
Finally switch ON the t oaster by tur ni ng the s el ector dial between 1 -3, the n press down the
LEVER.
Do not turn the selector beyond 3 when using bread warmer rack
as it may
cause overheating of the toaster or even melting of the plastic housing.
Cord Storage
The power cord can be wound around the cord storage when not in use.
SUGGESTIONS FOR BETTER TOASTING
To loosen broken or bent toast wedged in your toaster: Unplug the toaster, turn it upside
down and shake it gently. DO NOT insert forks or other sharp instruments as this may
damage the toaster and create a possible safety hazard.
Because everyone’s ta ste is different r ecommending ex act toaster s ettings is di fficult. A littl e
testing on your part will giv e you the best s etting for y our taste. You s hould check the heating
instructions on the packages of the convenience foods that you wish to toast.
Different breads have different moisture content requiring different settings for toasting.
Press the stop button at any time to check the colour.
PCT130 Rev.1 0801
Page 6

All breads do not toast alike. When toasting dark or other rich breads use a slightly higher
setting than used for plai n w hite br eads. U se a low er setti ng for fruit l oav es as wel l as sw eet
bread.
The best toast is made from bread that is one or two days old.
When slicing bread by hand, slices should be cut evenly allowing for better, more even
toasting.
Toast thin sliced bread on a lighter toasting setting.
Toaster pastries should be toasted in your toaster using a low setting. DO NOT place
foil-wrapped food (r emove all protectiv e wrapping s before placing in toaster) or pastries with
runny fillings or open frostings in the toaster slots.
Your toaster should only be used to toast bread that will fit freely into the toaster slot.
CLEANING AND CARE INSTRUCTIONS
LET THE TOASTER COOL COMPLETELY BEFORE CLEANING.
1. Unplug toaster from electrical outlet.
2. DO NOT USE COARSE OR ABRASIVE CLEANERS OR STEEL WOOL to clean
your toaster. Never spray or apply cleaners directly to your toaster instead apply
cleaner to a soft cloth.
3. Wipe the outside of the toaster with a soft, damp cloth...polish with a soft, dry cloth.
CRUMB REMOVAL
It is important to remov e crumbs from y our toaster r egularly . To remove loose crumbs i nside
of the toaster, slide the crumb tray from the bottom of the far side of the toaster. Empty the
crumbs and slide the cr umb tray back i nto the toaster . Do not oper ate the toast er without t he
crumb tray in place.
NOTE: Never immerse the toaster in water. Never use a metal implement to dislodge
crumbs.
PCT130 Rev.1 0801
Page 7

~~~~~ Warranty ~~~~~
This product is guaranteed for 12 months from the date of purchase when the appliance is
used solely for domestic purposes. For commercial use the product is guaranteed for 90
days from the date of purchase.
The guarantee is valid against mechanical or electrical defects if the product is used in
accordance with the instructions and provided that it is not connected to an unsuitable
electricity supply or dismantled, interfered with or damaged in any way.
IMPORTANT, PLEASE RETAIN THIS WARRANTY
Please ask your retailer to either stamp this warranty or simply attach your store
receipt. Keep this warranty somewhere safe. DO NOT SEND TO PRIMA.
This guarantee in no way affects your rights under statutory law.
IF THE PRODUCT MALFUNCTIONS DURING IT’S WARRANTY PERIOD IT MUST BE
RETURNED TO THE RETAILER FROM WHOM IT WAS PURCHASED FOR
REPLACEMENT. IF YOU BOUGHT THIS PRODUCT VIA MAIL ORDER, PLEASE KEEP
ALL THE DOCUMENTATION THAT CAME W HEN THE UNIT WAS DELI VERED.
NAME______________________________________________________________
ADDRESS___________________________________________________________
____________________________________________________________________
PURCHASED FROM_________________________________________________
DATE OF PURCHASE _________________MODEL_______________________
Prima International PLC.
Prima House, Premier Park, Oulton, LEEDS LS26 8ZA. United Kingdom
© Copyright 2000 Prima International PLC. All rights reserved.
PCT130 Rev.1 0801
 Loading...