

Page 1

Café Press
Instruction Leaflet
MODEL PCP100
Visit our website at www.BuyPrima.com
Page 2

CAFÉ PRESS MODEL: PCP100
USER INFORMATION
(PLEASE KEEP THESE INSTRUCTIONS)
Please read these instructions carefully and familiarize yourself with your new café
press before using for the first time.
1. POWER
230V-240V~50Hz 1200 WATTS
IMPORTANT – PLEASE NOTE THE CAFÉ PRESS MAY SMOKE THE FIRST
TIME THAT IT IS USED. IT IS NOT DEFECTIVE. NORMAL MANUFACT URING
PROCESS INCLUDES THE USE OF OIL – THE SMOKE WILL BURN OFF
SAFELY WITHIN A FEW MINUTES.
2. IMPORTANT SAFEGUARDS
When using electrical appliances, basic safety precautions should always be
followed, including the following.
• Read all the instructions carefully even if you are familiar with the appliance.
• NEVER IMMERSE THE CAFÉ PRESS OR SUPPLY CORD IN WATER.
• Close supervision is necessary when the appliance is used by or near
children. Never leave your café press unattended when it is plugged in.
• Do not touch hot surface. USE THE HANDLES FOR MOVING THE
APPLIANCE.
• Ensure the café press is used on a firm, flat surface.
• Do not place the café press on a highly polished wooden surface as
damage may occur to the surface.
• Always ensure that the appliance is ‘OFF’ and unplugged from the wall
electrical socket when not in use. Allow it to cool before putting on, and
taking off parts, and before cleaning.
• Ensure that the power supply cord does not come into contact with the hot
surface of the café press. If the cord is scratched or damaged, have it
replaced by an electrician with a special manufacturer’s spare.
• Do not use harsh abrasives, caustic cleaners or oven cleaners, when
cleaning the appliance.
• Do not place the appliance on or near hot gas or electric burner, or permit to
touch a heated oven.
• This appliance is for household use only. It should not be used outdoors, in
the bathroom or allowed to stand in a damp area.
• When using this appliance, provid e adequate air space above and on all
sides, for air circulation. On surfaces where heat may cause damage, an
insulated hand pad is recommended.
• Do not use this appliance for anything other than the intended use.
Page 3
Personal Safety
• Hot air and steam will be ejected from the food d uring cooking. When the appliance
is hot take extreme care when opening and closing.
• Your café press will get hot during use, particula rly the plates. Touch only the
handles during and immediately after cooking and not the plates.
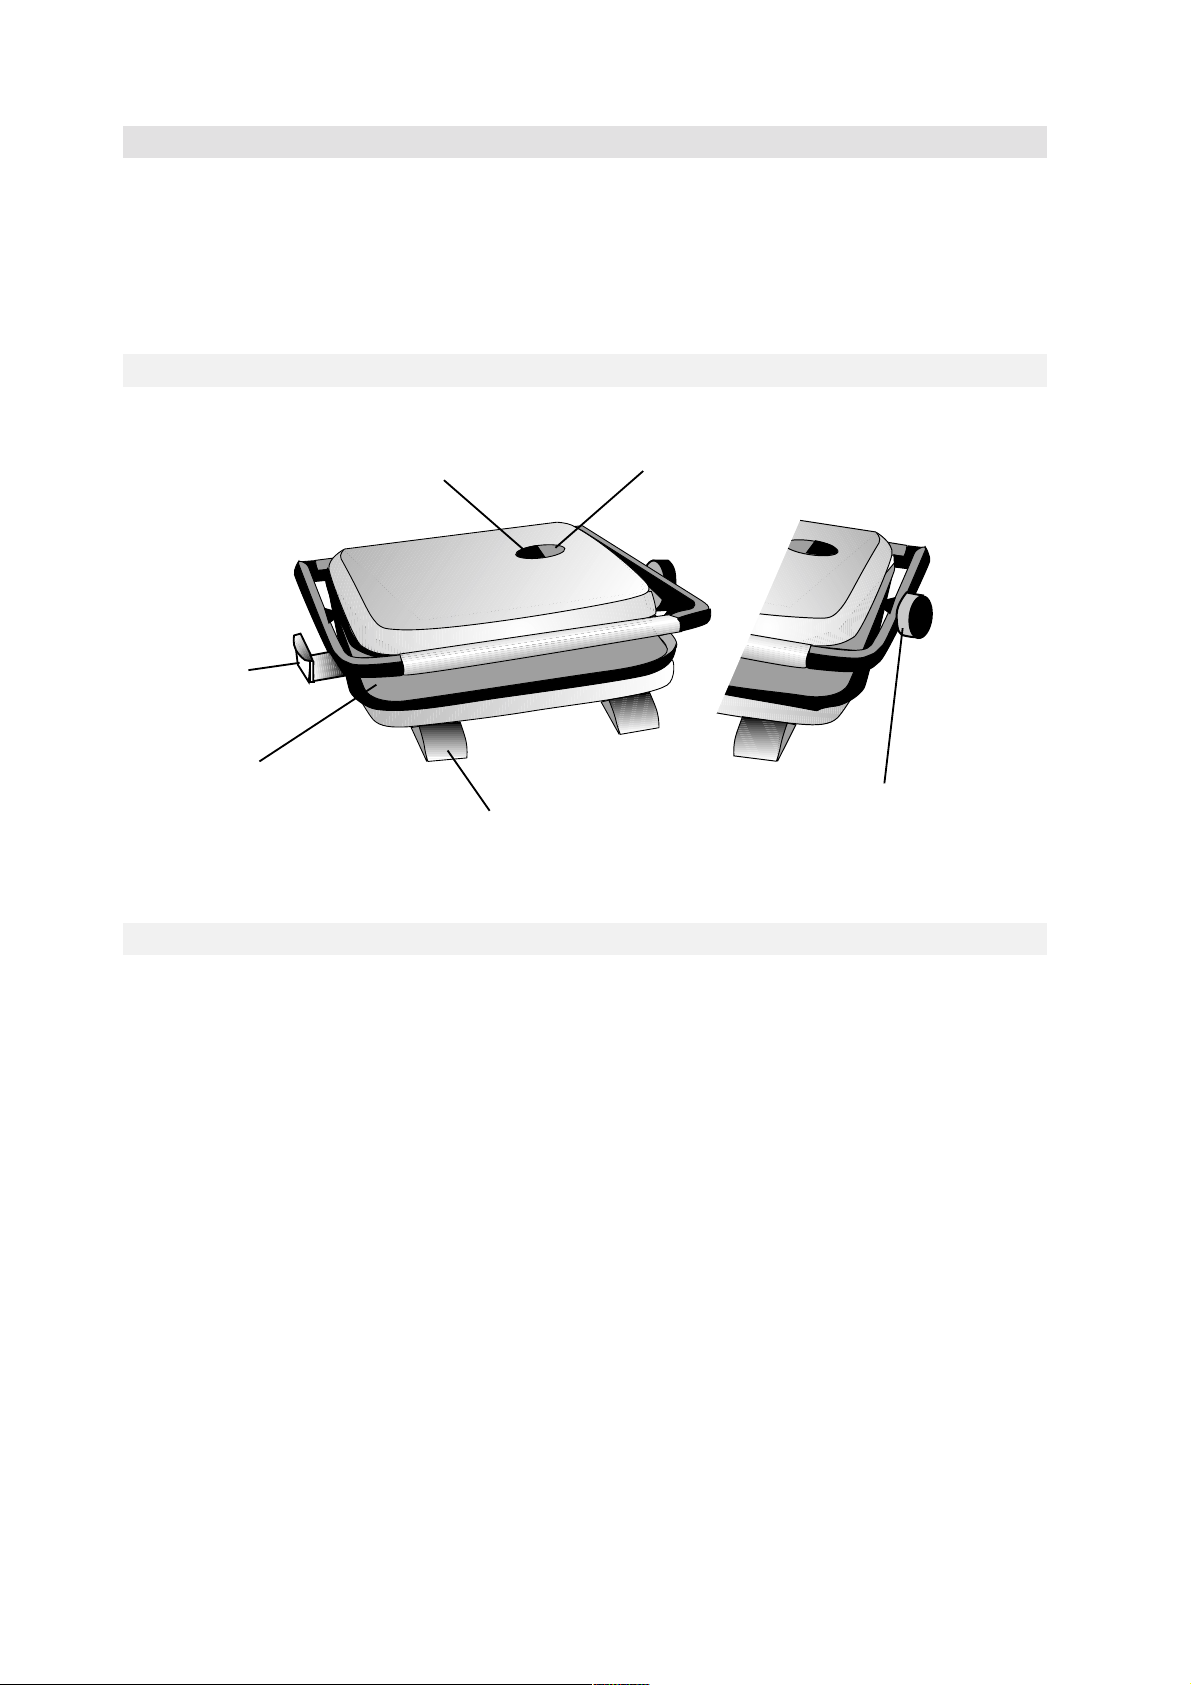
Features
Power on neon (Red)
Locking clip
Ready to cook neon (Green)
Plates
Height adjustment knob
Non slip feet
Using your Café Press
To open the café press undo the locking clip on the left side of the café press and
raise the upper half of the press with the handle.
Check that the cooking plates are clean and dust free. Wipe with a damp cloth if
needed.
For pre-heating your café press should be in the closed position.
Use the sandwich that you have prepared earlier and follow the instructions below.
1. Plug the café press into the mains socket and switch on. The red light will glow
this indicates that the café press is switched on.
2. Keep the café press closed while preheating. The café press is ready for use
when the orange light comes on. Please note that this light will cycle on and off
during use.
3. Open the press and place your sandwiches on the hot plates. REMEMBER
THAT THE PLATES ARE VER Y HOT.
4. Pull down the handle until it rests on the sandwich.
Note: The locking clip must not be used to clamp the café press together when
the sandwiches are in the press. The weight of the top plate is sufficient.
Page 4

5. The sandwiches will take approximately 5-7 minutes to cook. However this time
should only be used as a guide, as cooking times will vary depending on the
type of bread, ingredients and personal preference.
6. Once the sandwich is finished, push open the lid using the handle. Never use a
metal implement when removing sandwiches from the press. Always use a
heat proof wooden or plastic spatula.
REMEMBER TO TAKE CARE AS THE PLATES AND BODY OF THE
APPLIANCE ARE VERY HOT.
7. Reheat the café press before cooking more sandwiches.
Making open sandwiches and melts
Your café press has an adjustable height facility that enables you to make open
sandwiches or to melt toppings of your choice.
1. Preheat your café press with the lid closed until the orange ready to cook neon
light comes on.
2. Place your sandwich on the plates.
3. To fix the height of the café press turn the adjustable height knob in a clockwise
direction to fix the top sandwich plate in position.
4. Melting will take approximately 3 to 4 minutes. The melting times will vary
depending on the height of the top plate and desired taste.
Hints and tips
Breads
You can use a wide variety of breads including focaccia, ciabbatta baguettes,
wholemeal, plain white, sliced bread, raisin loaf, brioche and rye bread.
Fillings
CAUTION - fillings such as jam, fruit and tomatoes may be hot and can burn if eaten
immediately.
Cleaning and storage
BEFORE CLEANING, SWITCH OFF AND UNPLUG THE MAINS LEAD.
Allow the plates to cool down and wipe them with a damp cloth. Never use abrasives
or cleaners.
NEVER IMMERSE THE CAFÉ PRESS IN WATER.
After cleaning the café press, close the lid and click the locking clip into position to
secure the handle.
Page 5

SANDWICH RECIPES
To make the following sandwiches butter the bread, add your desired
quantity of ingredients and place on the café press plates, lower the
top plate to the required height and cook to desired browning or taste.
You can use most breads such as a French stick, bagel, focaccia or
ciabbatta, plus you can use plain sliced bread and close the café press
completely to create a closed sandwich.
Salmon and Tuna
Bread: Plain Bagel
Ingredients: Smoked salmon, tuna, onions and cream cheese.
Spread the cream cheese onto the bagel, slice and add the onions, next add the
salmon, tuna and cook in the café press.
Tuna and Cream Cheese
Bread: French
Ingredients: Tuna, onion, peppers, tomato and cream cheese.
Spread the cream cheese onto the French bread and add the tuna. Slice the
tomato, peppers and onion, add to the sandwich, then cook in the café press.
Ham and Cream Cheese
Bread: French
Ingredients: Ham, onion, peppers, tomato and cream cheese.
Spread the cream cheese onto the French bread and add the ham. Slice the
tomato, peppers and onion, add to the sandwich, then cook in the café press.
Blue Cheese
Bread: Plain Bagel
Ingredients: Onions and blue cheese.
Spread the blue cheese onto the bagel and then add the onion and cook in the
café press.
Page 6

Beef Pastrami
Bread: Plain Bagel
Ingredients: Beef pastrami, Mustard and 1 sliced gherkin.
Place the beef pastrami onto the bagel, add the mustard and slice the gherkin and
add to the sandwich, then cook in the café press.
Mediterranean
Bread: Sun-dried tomato bagel
Ingredients: Feta cheese, ham, chopped spring onion and pepper.
Add the ham and thinly sliced/crumbled feta cheese to the bagel. Chop the spring
onion and pepper, add to the sandwich and cook in the café press.
Turkey and Brie
Bread: French
Ingredients: Roast turkey, Brie, mustard and mayonnaise.
Slice the roast turkey and Brie add to the French bread. Next add the mustard and
mayonnaise, cook in the café press.
Turkey Club
Bread: Plain or onion bagel
Ingredients: Turkey, cooked bacon, to mat o an d may onnai se .
Cook the bacon, slice the turkey, next add the cooked bacon and turkey to the
bagel. Chop the tomato and place over the meat, spread with mayonnaise and
cook in the café press.
Cheese and Mango
Bread: Ciabbatta
Ingredients: Medium cheese, mango chuckney, tomato, lettuce and mayonnaise.
Slice the cheese and add to the ciabbatta with the mango chuckney. Slice the
tomato. Cook and when ready add the lettuce and mayonnaise.
Cheese and Cranberr y
Bread: French
Ingredients: Cheese and Cranberry sauce.
Place the cheese onto the French bread. You can either add the cranberry sauce
before or after cooking.
Page 7

Roast Beef
Bread: Ciabbatta
Ingredients: Sliced roast beef, onion, lettuce, tomato, mayonnaise and
horseradish.
Slice the roast beef, cut the onion and tomato and add to the ciabbatta. Add the
mayonnaise and horseradish and cook in the café press. After cooking add the
lettuce.
Turkey and Cheese
Bread: Thick sliced white
Ingredients: Turkey, cheddar cheese, mozzarella cheese, Parmesan cheese,
tomato, onions and garlic.
Tip. Stir-fry the onion with garlic until golden brown. Slice the turkey and add the
cheese to the bread. Next add the onions, cheeses and cook in the café press.
Goats Cheese
Bread: Plain Bagel
Ingredients: Goats cheese, onions, avocado, peppers, olives and mushrooms.
Add mayonnaise, mustard or horseradish if desired.
Add the goat’s cheese to the bagel. Slice the olives, onions, peppers and
mushrooms.
Place onto the sandwich with the avocado (mashed) and cook in the café press.
If desired you can mix the avocado, pepper, onion, olives and mushrooms
together.
Roast Pork
Bread: Focaccia
Ingredients: Roast pork, onions, peppers and mustard.
Slice the roast pork and add to the focaccia with the onions, pepper and mustard.
Cook in the café press.
Burger Special
Bread: Breadcake
Ingredients: Cooked beef burger and onions, mushrooms, cheddar cheese and
sour cream.
Cook a beef burger under the grill or in th e oven. Chop and fry the onions and
mushrooms. Add the burger, onions and mushrooms along with the cheddar
cheese and sour cream. Cook in the café press.
Page 8

Cajun Sandwich
Bread: French
Ingredients: Cooked chicken, spicy cheese, onions, chilli peppers, black pepper,
and Tabasco.
Spread the Tabasco over the chicken and grill. Cut or grind the chilli peppers until
small. Slice the onion and add everything to the French bread, top with cheese and
add lots of black pepper. Cook in the café press.
Salami Sandwich
Bread: White
Ingredients: Salami, tomato, onions, lettuce, chilli peppers, mushrooms, cheese,
mayonnaise and pepper.
Fry the onions and mushrooms. Layer the bread with the mayonnaise and add the
salami and cheese with the fried vegetables. Add the tomatoes and chilli peppers.
Cook in the café press. Last of all add the lettuce after the sandwich is cooked.
Apple and Cheese
Bread: Baguette
Ingredients: Cream cheese and blue cheese, sweet apple and lettuce.
Mix the cream cheese with the blue cheese. Slice the apple and lettuce.
Spread the cheese and place the apple onto the baguette and heat in the café
press.
When finished heating the sandwich add the lettuce.
Chocolate and Marshmallow
Bread: Any
Ingredients: Marshmallows, peanut butter an chocolate syrup
Spread the peanut butter onto the bread. Add the marshmallows, next cook in the
café press. When finished add the chocolate syr up.
Peanut Butter and Banana
Bread: Rye
Ingredients: Peanut butter and banana
Spread the peanut butter onto the bread and add sliced banana. Cook in the café
press.
Page 9

U.K. PLUG WIRING INSTRUCTIO NS
The wires in the mains lead are coloured in accordance with the following code:
BROWN - LIVE (L)
BLUE - NEUTRAL (N)
GREEN/YELLOW - EARTH (E)
As the colours of the wires in the mains lead of this appliance may not correspond
with the coloured markings identifying the terminals in your plug, proceed as follows:
• The BLUE wire is the NEUTRAL and must be connected to the terminal which is
marked with the letter N or coloured BLACK
• The BROWN wire is the LIVE and must be connected to the terminal that is marked
with the letter L or coloured RED.
• The wire which is coloured GREEN/YELLOW must be connected to the terminal
which is marked E or coloured GREEN or GREEN/YELLOW.
Always ensure that the cord grip is positioned and securely fastened.
WARNING: THIS APPLIANCE MUST BE EARTHED.
If a 13A (BS1363) fused plug is used it must be fitted with a 13A fuse. If in doubt
consult a qualified electrician.
WIRING FOR A 13AMP PLUG
(GREEN & YELLOW)
EARTH
NEUTRAL
(BLUE)
LIVE
13 AMP
(BROWN)
Page 10

~~~~~ Warranty ~~~~~
This product is guaranteed for 12 months from the date of purchase when the
appliance is used solely for domestic purposes. For commercial use the product is
guaranteed for 90 days from the date of purchase.
The guarantee is valid against mechanical or electrical defects if the product is used
in accordance with the instructions and provided that it is not connected to an
unsuitable electricity supply or dismantled, interfered with or damaged in any way.
IMPORTANT, PLEASE RETAIN THIS WARRANTY
Please ask your retailer to either stamp this warranty or simply attach your
store receipt. Keep this warranty somewhere safe. DO NOT SEND TO PRIMA.
This guarantee in no way affects your rights under statutory law.
IF THE PRODUCT MALFUNCTIONS DURING ITS WARRANTY PERIOD IT MUST
BE RETURNED TO THE RETAILER FROM WHOM IT WAS PURCHASED FOR
REPLACEMENT. IF YOU BOUGHT THIS PRODUCT VIA MAIL ORDER, PLEASE
KEEP ALL THE DOCUMENTATION THAT CAME WHEN THE UNIT WAS
DELIVERED.
NAME____________________________________________________________
ADDRESS_________________________________________________________
__________________________________________________________________
PURCHASED FROM_________________________________________________
DATE OF PURCHASE ___________________MODEL_____________________
Prima International Plc, Prima House, Premier Park, Oulton,
LEEDS LS26 8ZA, United Kingdom Tel: 0113 251 1500
© Copyright 2002 Prima International PLC. All rights reserved.
 Loading...