

Prima LPR 9020, LPR 9022 Instructions For Use Manual
LPR 811/0 I - LPR 812/0 I LPR
Top
shelf
!I
0
OVEN
OFF
9020-
LPR 9022
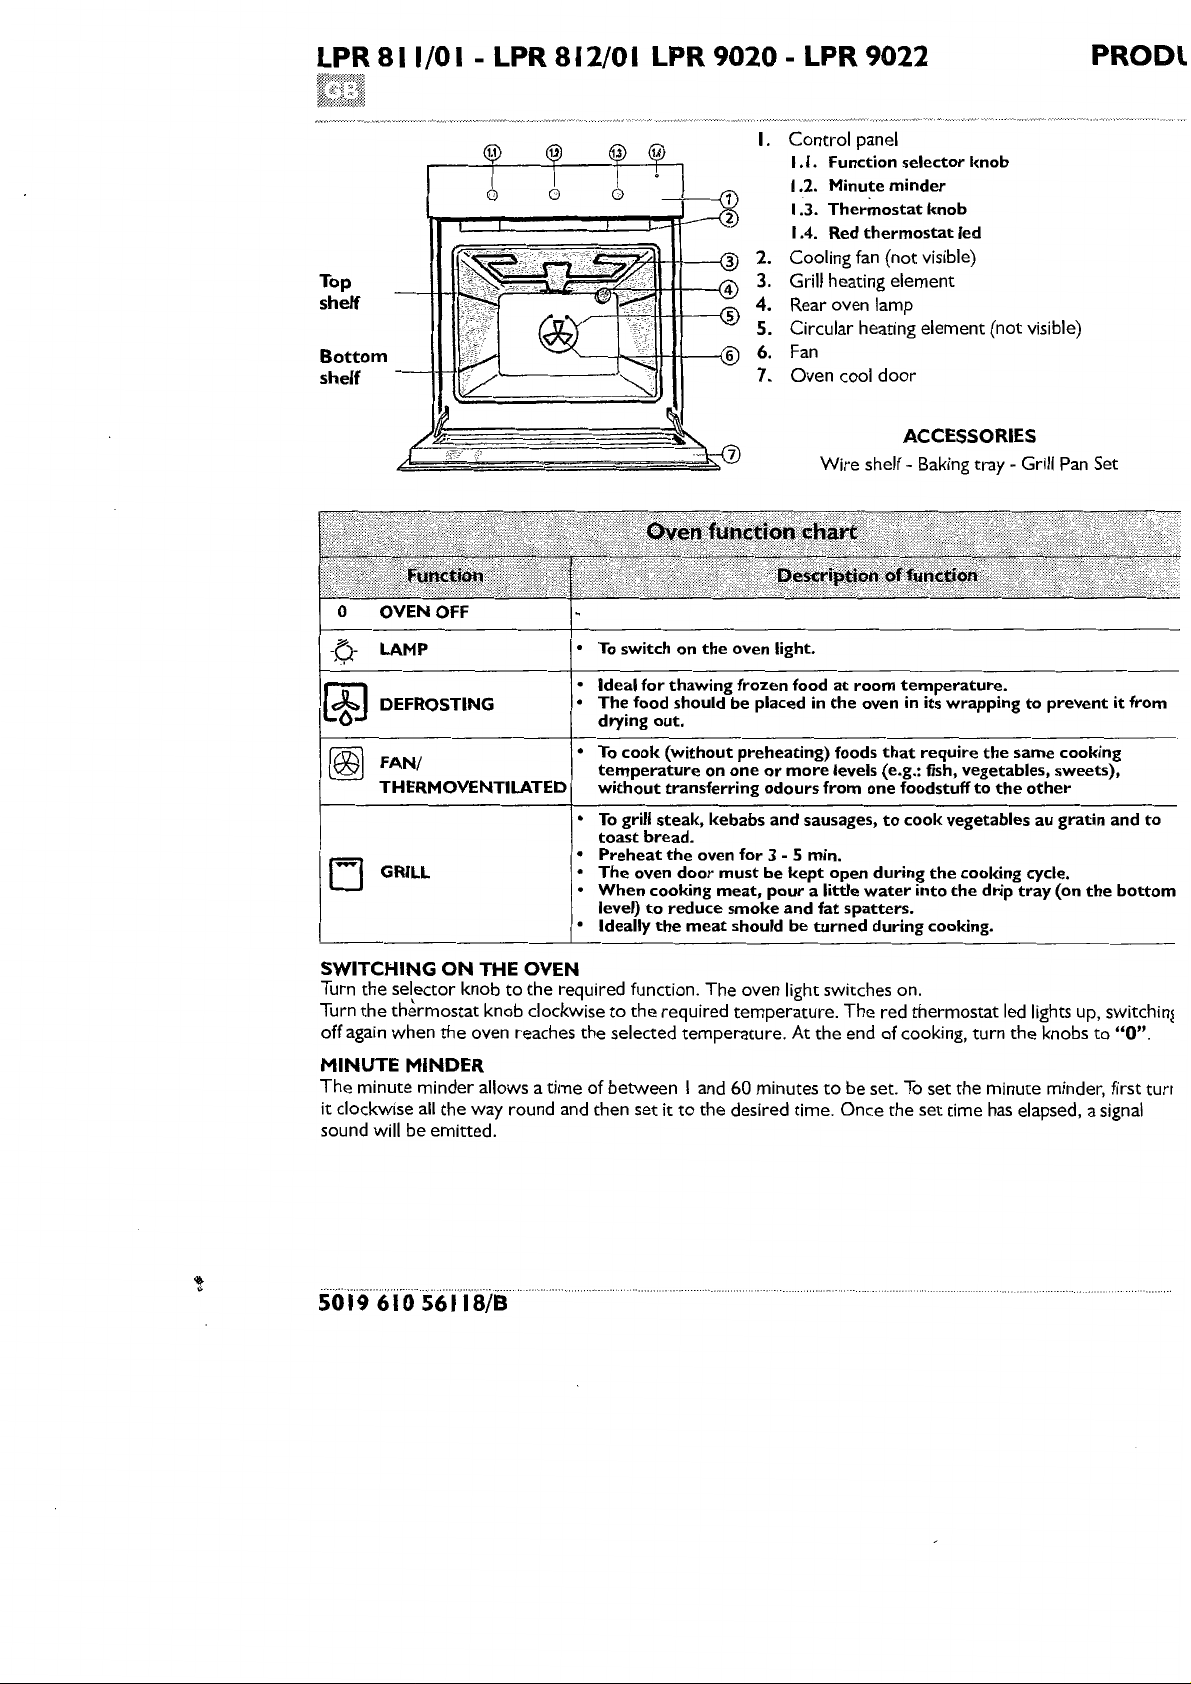
I. Control panel
1.1.
Function
I .2.
Minute
1.3.
Thermostat
I .4. Red
2. Cooling
3.
Grill
heating element
selector
minder
thermostat
fan
(not visible)
knob
knob
led
4. Rear oven lamp
5. Circular heating element (not visible)
6.
Fan
1. Oven cool
door
Wire shelf -
ACCESSORIES
Baking
tray -
PRODl
Grill
Pan
Set
················•···•
·•········
·•···•·•
\i;···
I••
LAMP
-0.-
DEFROSTING
FAN/
THERMOVENTILATED
1
.....
1 GRILL
SWITCHING
Turn
the
Turn
the
off again when
ON
THE OVEN
selector knob to
thermostat knob clockwise
the
oven reaches
MINUTE MINDER
The
minute minder allows a time
it clockwise
sound
will
be emitted.
all
the
way round and then
•
To
switch
on
the
oven
light.
Ideal
for
•
•
The
drying
•
To
temperature
without
• To grill
toast
•
Preheat
The
•
When
•
level)
• Ideally
the
required function. The oven light switches on.
the
of
thawing
food
should
out.
cook
(without
transferring
steak,
bread.
the
oven
cooking
to
reduce
the
to
the
required temperature.
selected temperature. At
between
set
it
frozen
be
placed
preheating)
on
one
or
more
odours
kebabs
oven
door
meat
for
must
meat,
smoke
should
and
3 - 5 min.
be
pour a little
and
I and 60 minutes
to
the desired time.
food
at
in
the
foods
levels (e.g.: fish,
from
sausages,
kept
open
fat
spatters.
be
turned
The
the
to
Once
room
temperature.
oven
in its
that
one
to
during
water
during
wrapping
require
foodstuff
cook
vegetables
the
into
the
cooking.
vegetables,
cooking
the
to
drip
the
to
same
other
au
cycle.
tray
prevent
cooking
sweets),
gratin
(on
the
red thermostat led lights up, switchinl
end of cooking, turn
be
set.
To
set
the
set time has elapsed, a signal
the
knobs
the
minute minder, first
and
to
it
from
to
bottom
"0".
tun
50
19
61
0 561
18/B
CT
DESCRIPTION SHEET
pr1ma
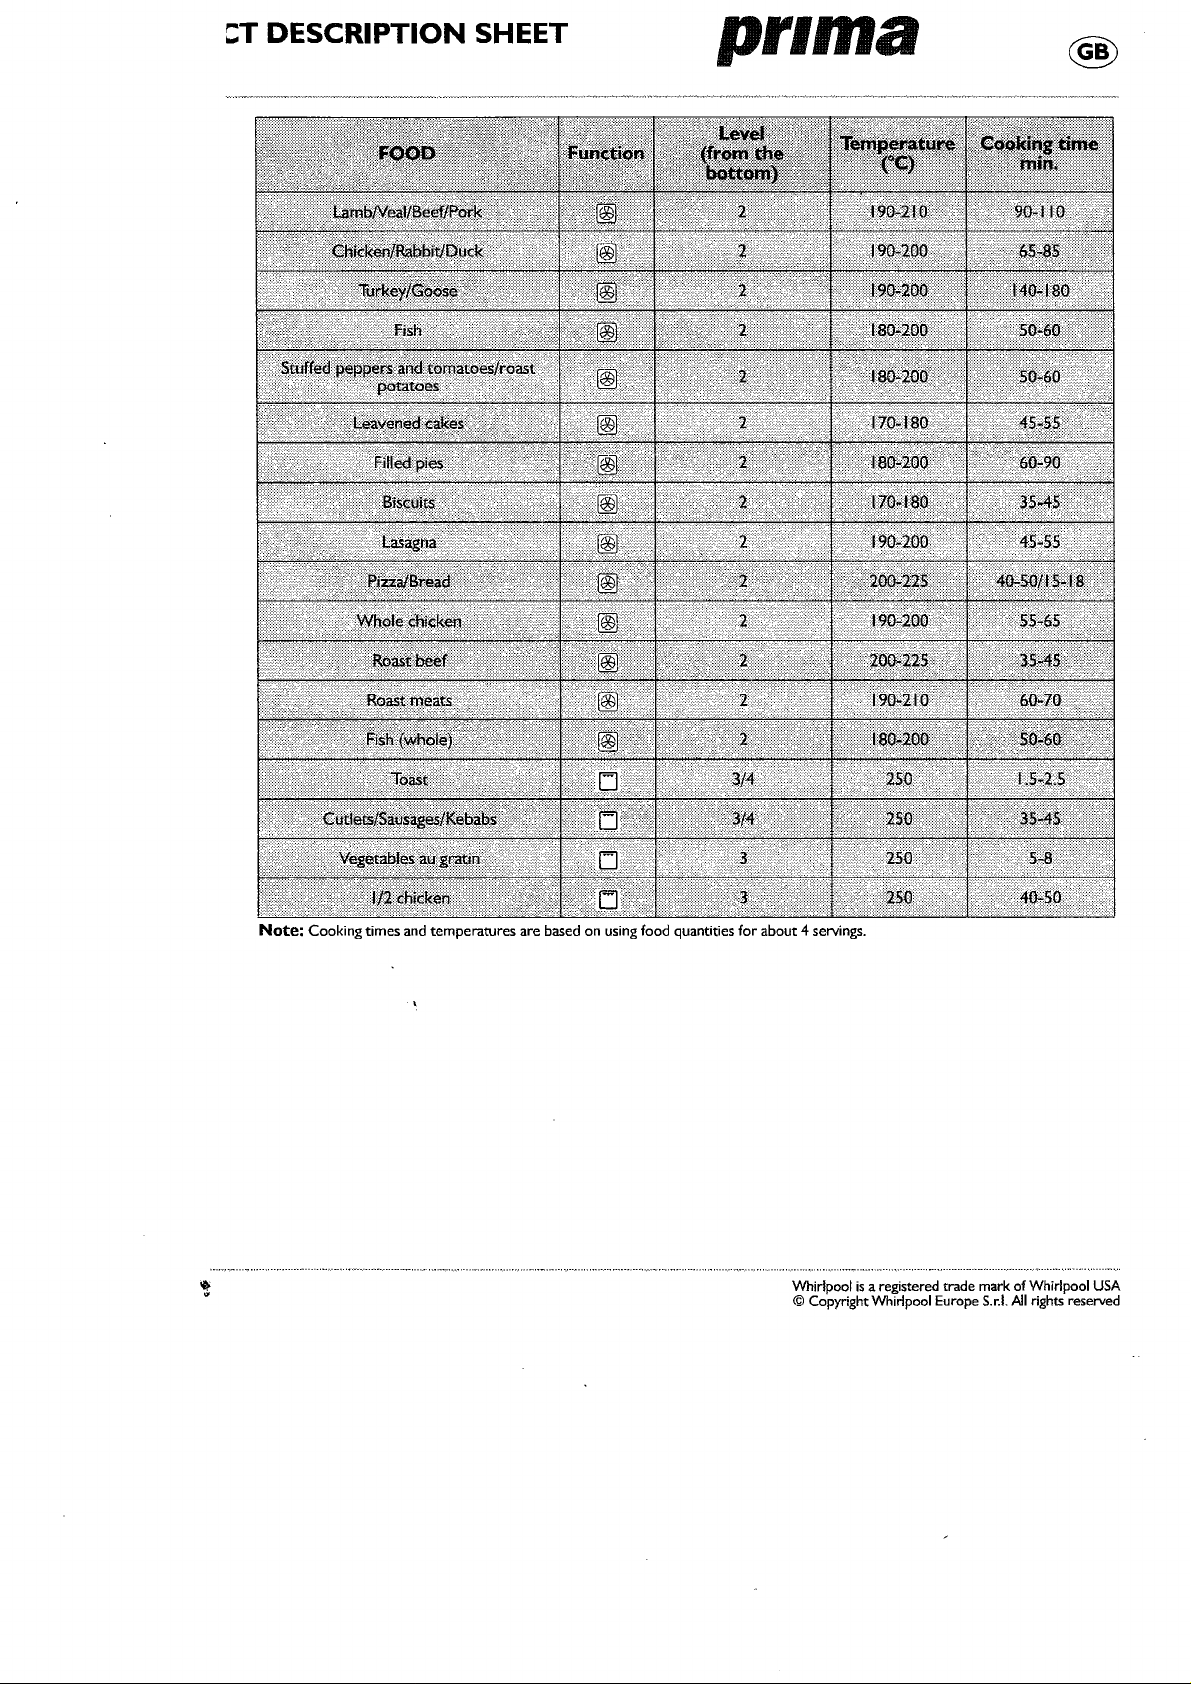
Note:
Cooking times and
temperatures
are
based on using food quantities for
about
4 servings.
Whirlpool
© Copyright Whirlpool Europe
is
a registered trade mark of Whirlpool
S.r.l.
All
rights reserved
USA
""0
-.
•
'
\
f·,:z6:.1;Ji~iN'~~~;k"P().uzitr··•
.:::;.·:
{,:·;,,:
'
';:~.;:
•
N~vod
·<t,
(/~:
:>;·).'.'
¥
/Y~~:~·...
.
..
· · ·
'·.
J":ti··~:,~Hasznalat1·.
l/1HC"rpYJ<41i1~
na
·.·
:
utasitas
·
pouzitie
aa
' '
' .
'
'
'
'
'
'
' .
•
•
'
\
' '
'\ '
,,
INSTRUCTIONS
FOR USE
INSTALLATION
SAFEGUARDING
IMPORTANT
BEFORE
OVEN
CARE
USING
ACCESSORIES
AND
MAINTENANCE
TROUBLESHOOTING
proUD
THE
NOTES
THE
ENVIR_ONMENT
•••.•••••••••••••.••••.•.•••••••••••••
OVEN
••••••••••.•••••.•••••.•.••••••••.•••
GUIDE
AFTER SALES SERVICE
..................................
•..••••
4
7
7
••••.•••••••••••••••••••••.
8
9
••••••••.••••••••.••••••
.....................
••••••••.••.••••••••••.••••••.•.
I 0
12
12
To
make
for
consultation
the
most
in
of
the
your
future.
new
oven,
read
the
user's
instructions
carefully
and
keep
them
on
hand
3
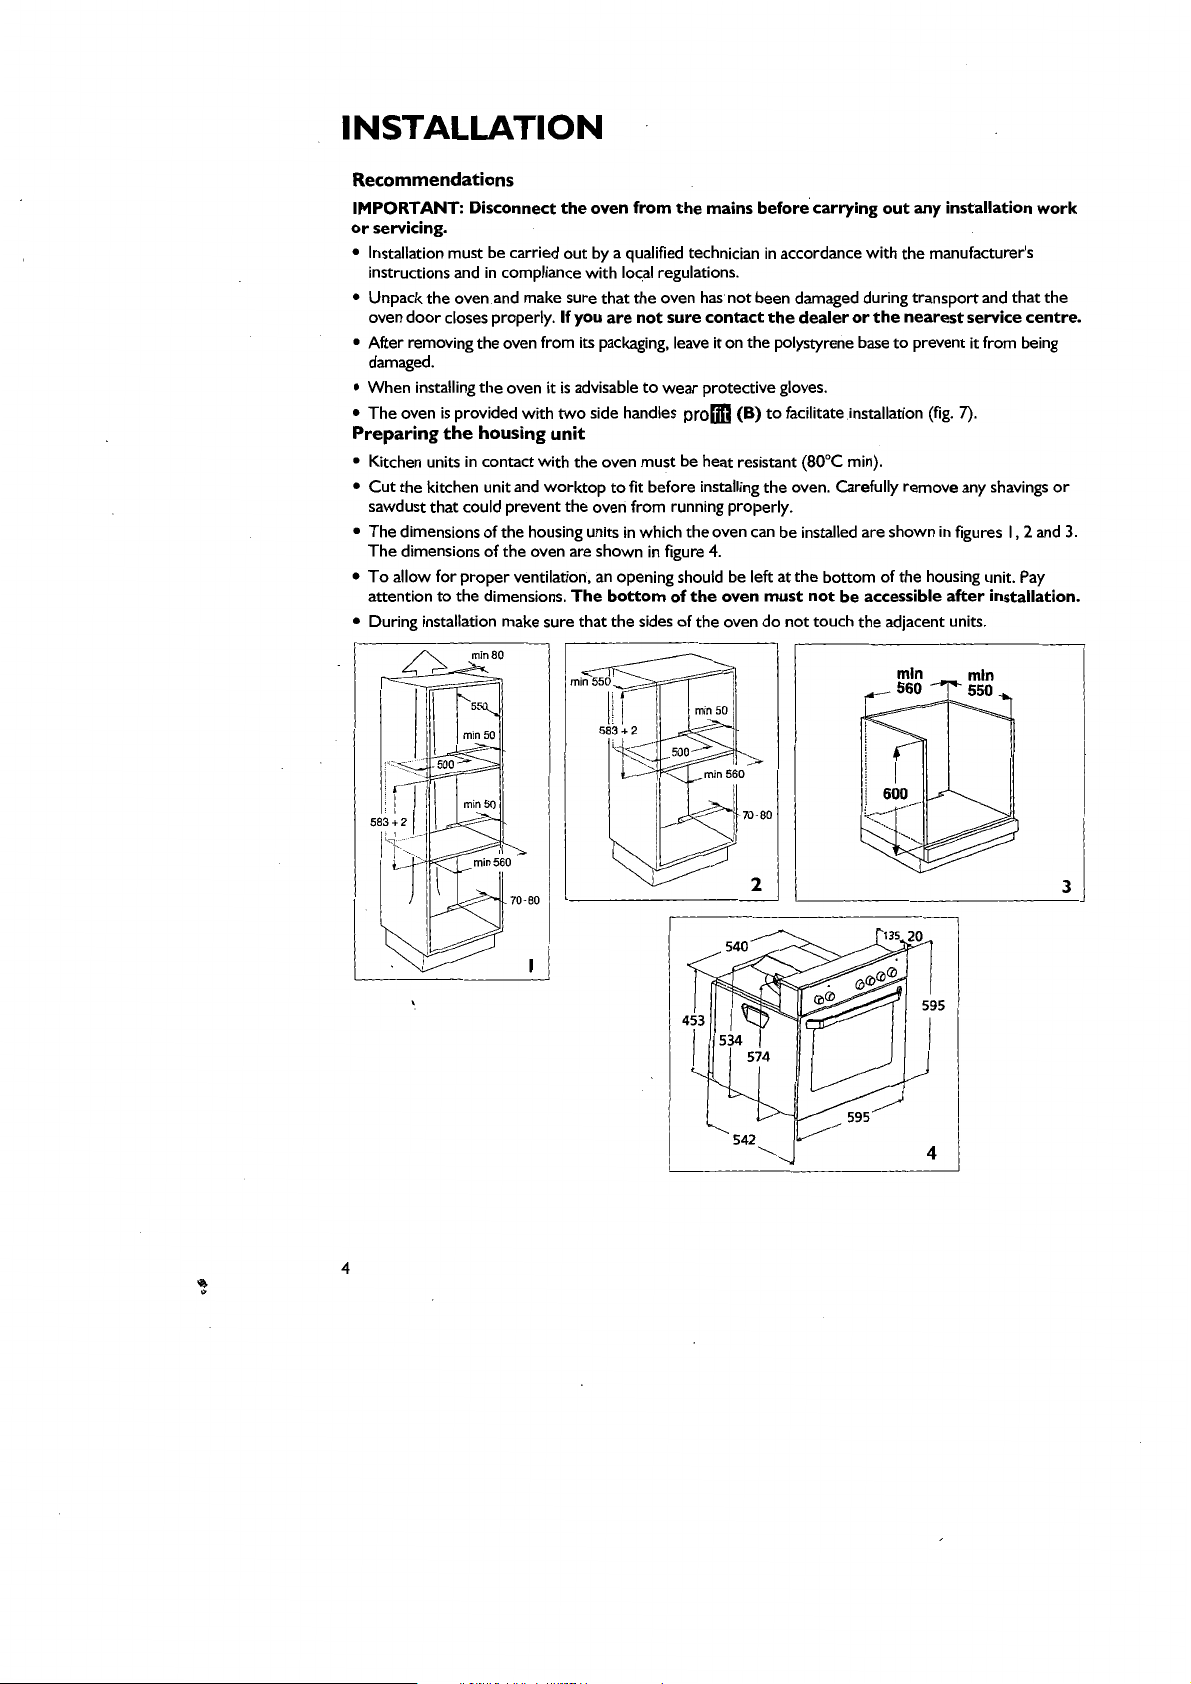
INSTALLATION
Recommendations
IMPORTANT: Disconnect
or
servicing.
• Installation must be carried
instructions and
• Unpack
door
oven
•
After
removing the oven from its packaging, leave
damaged.
• When installing
• The oven
Preparing
• Kitchen units in contact
•
Cut
the
sawdust that could prevent
• The dimensions
The dimensions
•
To
allow
attention
• During installation make sure that the sides
in
the
oven.and make sure that the oven
closes properly.
the
is
provided
the
housing unit
kitchen unit and
ofthe
of
for
proper
to
the
dimensions.
the
oven from
out
compliance
oven
with
housing units in which the oven
the oven are shown in figure
ventilation,
by a qualified technician
with
local regulations.
If
you are not sure contact
it
is
advisable
two
side handles
with
the oven must be heat resistant (80°C min).
worktop
to
the
fit
oven
from
an
opening should be left at
The
bottom
the
mains before. carrying
has
not
it
on the polystyrene
to
wear
protective gloves.
proDD
before installing
running properly.
4.
of
the
oven must
of
the oven
out
any installation work
in
accordance
been damaged during transport
the
dealer
(B)
to
facilitate installation (fig. 7).
the
oven. Carefully remove any
can
be installed are shown in figures
the
do
not
with
the manufacturer's
or
the
nearest service centre.
base
to
prevent
bottom
of
the
not
be
accessible after installation.
touch the adjacent units.
housing unit.
and
that the
it
from being
shavings
I, 2 and
Pay
or
3.
3
4
 Loading...