

Page 1
LPR659A
9 place set tings
10 place se ttings
half-load fu nction
Alt function
PrimaAppliances
The PJHGroup,AlderHouse,Slackey Brow,Ke arsley,Bolton,BL4 8SL
Page 2
De ar Custo mer,
Plea se carefully read this manual b efo re using the
dishwas he r, it will help you to us e and maint ain the
dishwas he r properly.
Keep it a s a refe r in the later days .
Pass it on to any subse quent owner of t he appli ance.
This manua l con tains sections o n safet y Instruction s ,
Oper ating Instructio ns ,
Install ati on In str uctions an d
Tro ubleshooting Tips, etc.
To review th e sect ion on tr oublesho oting Tips
will help you t o solve some co mmon p ro blems
by your self .
If y ou can n ot solve the pr oblems by your self ,
please ask f or th e h el p of professiona l t echnic ian s.
Co ntrol Panel.......... ... .................. .................. ..6
Dishwa she r F eat ures. ... ... ... .. .......... ... ... ........ .. .6
A Water S oftener..... ..... ... ...... ... ......... ... ...... ...7、
B Loadi ng the S alt into th e S oft ener......... ... ... ..8、
C Fill the Rinse A id Di spenser................. ........ 8、
D Fu nct io n of De ter gen t ... ... ...... ... ... ... ... .........9、
Attention b ef or e or after loading the Di s h washe r
Baskets... ... .................. ... ................. . ........... 12
Lo ading the upp e r .. ......... ........... . ........13Ba sk et
Lo ading the Lower .. ............ ... ..............13B a sket
Was h Cycl e Tab le.. ... ... ... .................. ... ... ........1 4
Tur ning on t h e Ap plianc e......... ... .................. .. 1 4
Ch ange t he Programm e.. ... . ........ .. ..............15....
At th e e nd of the Wash Cycle.. ... ...... ... ... ... ... ... .1 5
Fi ltering Sys tem....... ... ... ..................... . ..........1 6
Ca ri n g for the Dishw asher..................... .........17.
The man ufa ct urer, fol low in g a p oli cy of c o nstan t
de ve lopment and u pda ting of the product, may
ma ke mo dific ati ons with out g iv ing p rio r notice.
This user ma nual shall al so be go t from the
ma nufac turer or respons ible vendor.
......... ... ... ... ......... ... .... 18In stall ation pre para tion
...19A est hetic pan el's dimensions and ins tall ation
..............21Tensio n a djustm ent of the doo r s pring
.. ................... ......... 2 1Connection of d rai n hoses
.. .............. . ........ 22Dish washer ins t allatio n steps
About Elec tri city Connecting..... ... ... ... ... ... ... ... .23
Co ld Wate r Connecti on..... ... ... ...... ..... ... ......... 24
Befor e ca l ling for service........ .................. . . ... .25.
Erro r codes.... ... ... ... ........ ....... ....... . ............ ..26.
Technica l i n formation. ...... ... ............... ... .. .. ...2 7..
Page 3

When using your dishwasher,
follow the precautions listed below:
This appliance has been designed for use in a
domestic environment. Commercial use will invalidate
the warranty
.
This appliance can be used by children aged from 8
years and above and persons with reduced physical,
sensory or mental capabilitie s or lack of experience
and knowledge if they have been given supervision
or instruction concerning use of the appliance in a
safe way and understand the hazards involved.
Children must not play with the appliance. Cleaning
and user maintenance shall not be made by children
without supervision. For EN60335-1
( )
This appliance is not intended for use by persons
(including children )with reduced physica l, sensory
or mental capabilities, or lack of experien ce and
knowledge ,unless they have been given supervision
or instruction concerning use of the appliance by a
person responsible for their safety. For IEC60335-1
( )
This appliance is for indoor use only, for household
use only.
To protect against the risk of electrical shock, do not
immerse the unit, cord or plug in water or other liquid.
Please unplug before cleanin g and maintenance the
appliance .
Use a soft cloth moisten with mild soap, and then use
a dry cloth to wipe it again.
1
Page 4

This appliance must be earthed. In the event of a
malfunction or breakdown, earthing will reduce the risk
of an electric shock by providing a path of least
resistance of electric current. This appliance is equipped
with a cord having an equipment-earthing conductor
and a grounding plug.
The plug must be plugged into an appropriate outlet that
is installed and earthed in accordance with all local
codes and ordinances.
Improper connection of the equipment-earthing
conductor can result in the risk of an electric shock.
Check with a qualified electrician or service
representative if you are in doubt whether the appliance
is properly grounded.
Do not modify the plug provided with the appliance;
If it does not fit the .
Have a proper installed by a qualified
power socket
power socket
electrician.
Do not abuse, sit on, or stand on the door or dish rack of
the dishwasher.
Do not operate your dishwasher unless all enclosure
panels are properly in place.
Open the door very carefully if the dishwasher is
operating, there is a risk of water .
spilling out
Do not place any heavy objects on or stand on the door
when it is open. The appliance could tip forward.
When loading items to be washed:
1) Locate sharp items so that they are not likely to
damage the door seal;
2
Page 5

2) Warning: Knives and other utensils with sharp points
must be loaded in the basket with their points down or
placed in a horizontal position.
Check that the detergent powder is empty after
completion of the wash cycle.
Do not wash plastic items unless they are marked
dishwasher safe or the equivalent.
For plastic items n
ot so marked,
check the manufacturer's
recommendations.
Use only detergent and rinse additives designed for
an automatic dishwasher.
Never use soap, laundry detergent, or hand washing
detergent in your dishwasher.
Children should be supervised to ensure that they do not
play with the appliance.
The door should not be left open, since this could increase
the risk of tripping.
If the supply cord is damaged, it must be replaced by the
manufacturer or its service agent or a similarly qualified
person in order to avoid a hazard.
During installation, the power supply must not be
excessively or dangerously bent or flattened.
Do not tamper with controls.
The appliance is to be connected to the water mains using
new hose sets and that old hose-sets should not be reused.
The maximum number of place settings to be washed
is 10.
The maximum permissible inlet water pressure is 1MPa.
The minimum permissible inlet water pressure is 0.04MPa.
3
Page 6

Dispose of the dishwasher packagin g material
correctly.
All packaging materials can be recycled.
Plastic parts are marked with the standard
international abbreviations:
PE for polyethylene, e.g. sheet wrapping material
PS for polystyrene, e.g. padding material
POM polyoxymethylene, e.g. plastic clips
PP polyp ropylene, e.g. Salt filler
ABS Acrylonitrile Butadiene Styrene, e.g. Contr ol
Panel .
Packaging material could be dangerous for children!
For disposing of package and the a ppliance please
go to a recycling centre. Therefore cut off the power
supply cable and make the door closing device
unusable.
Cardboard packaging is manufactured from recycled
paper and should be disposed in the waste paper
collection for recycling.
By ensuring this product is disposed of correctly, you
will help prevent potential negative consequences
for the environment and human health, which could
otherwise be caus ed by inappropriate waste handling
of this product.
For more detailed information about recycling of this
product, please contact your local c ity office and your
household waste disposal service.
DISPOSAL: Do not dispose this product as unsorted
municipal waste. Collection of such waste separately
for special treatment is necessary.
4
Page 7

For deta iled op erating method rea d the co rrespond ing con ten t on the inst r uction manual.
Switch on the ap pliance Open the door,press th e On/Off b utton to switch on the appliance .
With each wash cycle.
Fill the detergent dispenser
Compartment
For programmes with pre-wash only.
(Follow the user instructions!)
Check the rinse aid level
Check the regeneration
salt level
Load the baskets
Select a programm e
Changing the programme
Electric indicator on control panel (if provided).
(On models with water softener system only.)
Electric indicator on control panel (if provided).
If there is no salt warning light in the control panel
(for some models), you can estimate when to fill the salt into
the softener by the number of cycles the dishwasher has run.
Scrape off any large amount of leftover food. Soften remnants of burnt food in pans,
then load the baskets. Refer to the dishwasher loading instructions.
Press the program button to select a desired w ash cycle, also you can select a function;
.( See the section entitled Operation instruction )“ ”
Turn on the water ta p ,close t he door . The machine will star t working after about 10 seconds.Running the dish washer
1. A running cycle c an only be modified i f it has be en running for a short time. Otherwise the detergent
may have already been released and the water already drained. If this is the case, t he detergent
dispenser must be refilled.
2. Open th e door.
3. Press the button which prog ram you w ant to change more than 3 sec onds, new program indicator l ights.
4. Close the door. Restart the dishwasher.
Add forgotten dishes in the
dishwash er.
If the appliance is sw itched
off during a wash cycle.
Switch off the appliance
Turn off the water tap,
unload the baskets
1.Open the door a li ttle to stop the dishwasher.
2.After the spray arms stop wo rking, you can open the door completely.
3.Add the forgotten dishes.
4.Close the door, the dishwash er will start running a gain after 10 seconds.
If the appliance is sw itched off during a wash cycle, when sw itched
on again, please re-select the washing cycle and o perate the dishwasher
according to the original Power-on state ).
When the working c ycle has fi nished, the buzzer of the dishwasher wil l sound 8 times, then stop.
Turn off the appliance using th e ON/OFF button.
Since the appliance is standing by, it will power off automaticly after 30 minutes without any operation.
Warning: wait a few minutes ( about 15 m inutes) be fore unloading the d ishwasher to avoid h andling
the dishes and utensils while t hey are still hot and more susceptible to break.
They will also dry be tter.Unload the appliance, star ting from the lower b asket.
Open the door care full y.
Ho t steam may es c ape
wh en t he door is op ened!
5
Page 8

To get t he best p erfo r mance from y our d ishwasher, re ad all oper atin g instruction s
be fore us in g it f or the first tim e .
1. P rog ra m Button : To Pre s s the butt on to select a
wa sh Prog ram.
2. De lay Button : To Press the butt on to delay.
3. Extra d rying Butto n : To select Extra dr ying fu nction.
Extr a drying function Onl y b e used wi th Inten siv e,
Normal, E CO,Glass ,9 0mi n.);
4. Ha lf load funct ions Button: To select Half load
functions . ( With th i s Hal f l oa d function you can
only use it whe n yo u have only about or less than
6 pl ace sett ing dish wa re , a nd you wil l s ee less
wa te r a nd energy con sumpt ion , can only be used
with I nte nsi ve, Normal, ECO, Glas s a nd 90 min .)
5. On /Off Button: To t urn on/off the po wer supply.
6. Power indicator : To show when the power on.
Front view
1
7.H af t lo ad indic ato r : To show wh en yo u s ele ct the
haf t load fu nction .
8. Extra d rying in dic ator: To show w hen you select the
extr a drying function .
9. Salt and r inse aid warning indi ca tor s: To show
wh en th e s alt conta ine r or dis pen se r need t o be
refill ed
10 .Displa y s creen : t o s how the re mindi ng time and delay
time,error cod es etc .
11.Prog ram i nd ica tor s: to sho w which pr og ram
you have cho s e;
Back View
2
3
4
5
6
Cu p shelf
1
2
In ner p ipe
3
Lo wer basket
4
Salt contain er
5
Disp ens er
6
8
7
9
10
Cu tl ery r ack
7
Spra y arms
8
Fi lter ass embly
9
6
In let pipe c onnec tor
10
Drain p ip eUp per basket
11
11
Page 9

Before usi ng your dishwasher f or the first time:
A. Set the water sof ten er
B. A dd 1.5Kg dishwa sher salt a nd then full fi ll the s alt cont ainer with wate r
C. Fi ll the rin se aid dispen se r
D. Fi ll in de terge nt
The water so fte ner m ust be s et manuall y, using the water hardness dial.
The water so fte ner is designed to remo v e miner als and salts fr om th e w at er, whi ch would h ave
a detrimental o r adverse effec t on the o per at i on of the appli anc e.
The higher t he conte nt of th ese mine ra ls and s alt s, the harder y our wa ter is.
The softener shou l d be adjusted according to t he hardn ess o f the wa ter in your area . You r local Water Auth ori ty
can advis e y ou on the har dn ess of the wa ter in y o ur area .
Adjusting Salt Consumption
The dis hwasher is de signed t o allow fo r adj ustmen t in the amount of salt consumed b ased on th e hardne ss of
th e wat er used. Thi s is int end ed to optimis e and custo mise the l ev e l o f salt cons umptio n.
Plea se follow the steps belo w for adjustment i n s al t c ons umption.
1. Ope n t he door ,Switch on th e applia nce;
2. Press the button for more t han 5 seconds to s tar t the wa ter softener
set mod el within 60 sec onds af ter the applianc e w as sw itched o n( Th e Sal t and
Rinse aid warning li g hts will be on per iod ically w hen i t get in the set mode l );
3. Press the button to se lect the prop er set a ccord ing to y our local environm ent,
the set s will change in the followi ng se que nce: H1->H2->H3->H4->H5->H6;
4. Press the P ower button to end the set up mo del.
Ra pid
Ra pid
WATER H AR DN ES S
dH
6-1 1
12- 17 2. 1- 3. 0
18- 22 31- 40 22- 28 3. 1- 4. 0
35- 55 61- 98 43- 69 6. 1- 9. 8
dH =1.25 Cl a rk e=1. 78 f H=0.1 78 mmol/l
1
fH
0~ 90~ 5 0~ 0.94
10- 20
21- 30
41- 6023- 34 4. 1- 6. 0
Clarke
0~ 6
7-14
15- 21
29- 42
mm ol /l
1. 0- 2. 0
Sel ec t or Po si ti on
H1
H2
H3
H4
H5
H6
Sal t consump t ion
(gram/cyc le)
0
9
12
20
30
60
D H: G er ma n degree
fH : French de gree
C lark: Briti sh de gr ee
Th e ma nuf acto ry se tt ing: H 3 (EN 50 2 42)
Co ntact y o ur loca l w ater boa rd for inf ormation on the ha r dness of your water sup ply.
If your model d o es not have an y water softener, y ou m ay sk ip th is se ctio n .
WATER SOF TEN ER
The hardn ess of t he wa ter varie s fro m p lace to pl ace. If hard water is used in the d i sh washer, deposit s will
fo rm on the dis hes and utensils.
The app lianc e i s e quipp ed with a spe cial softener that use s a salt cont ainer speci fi call y designed to el im inate
lime an d m inerals from the w ater.
7
Page 10
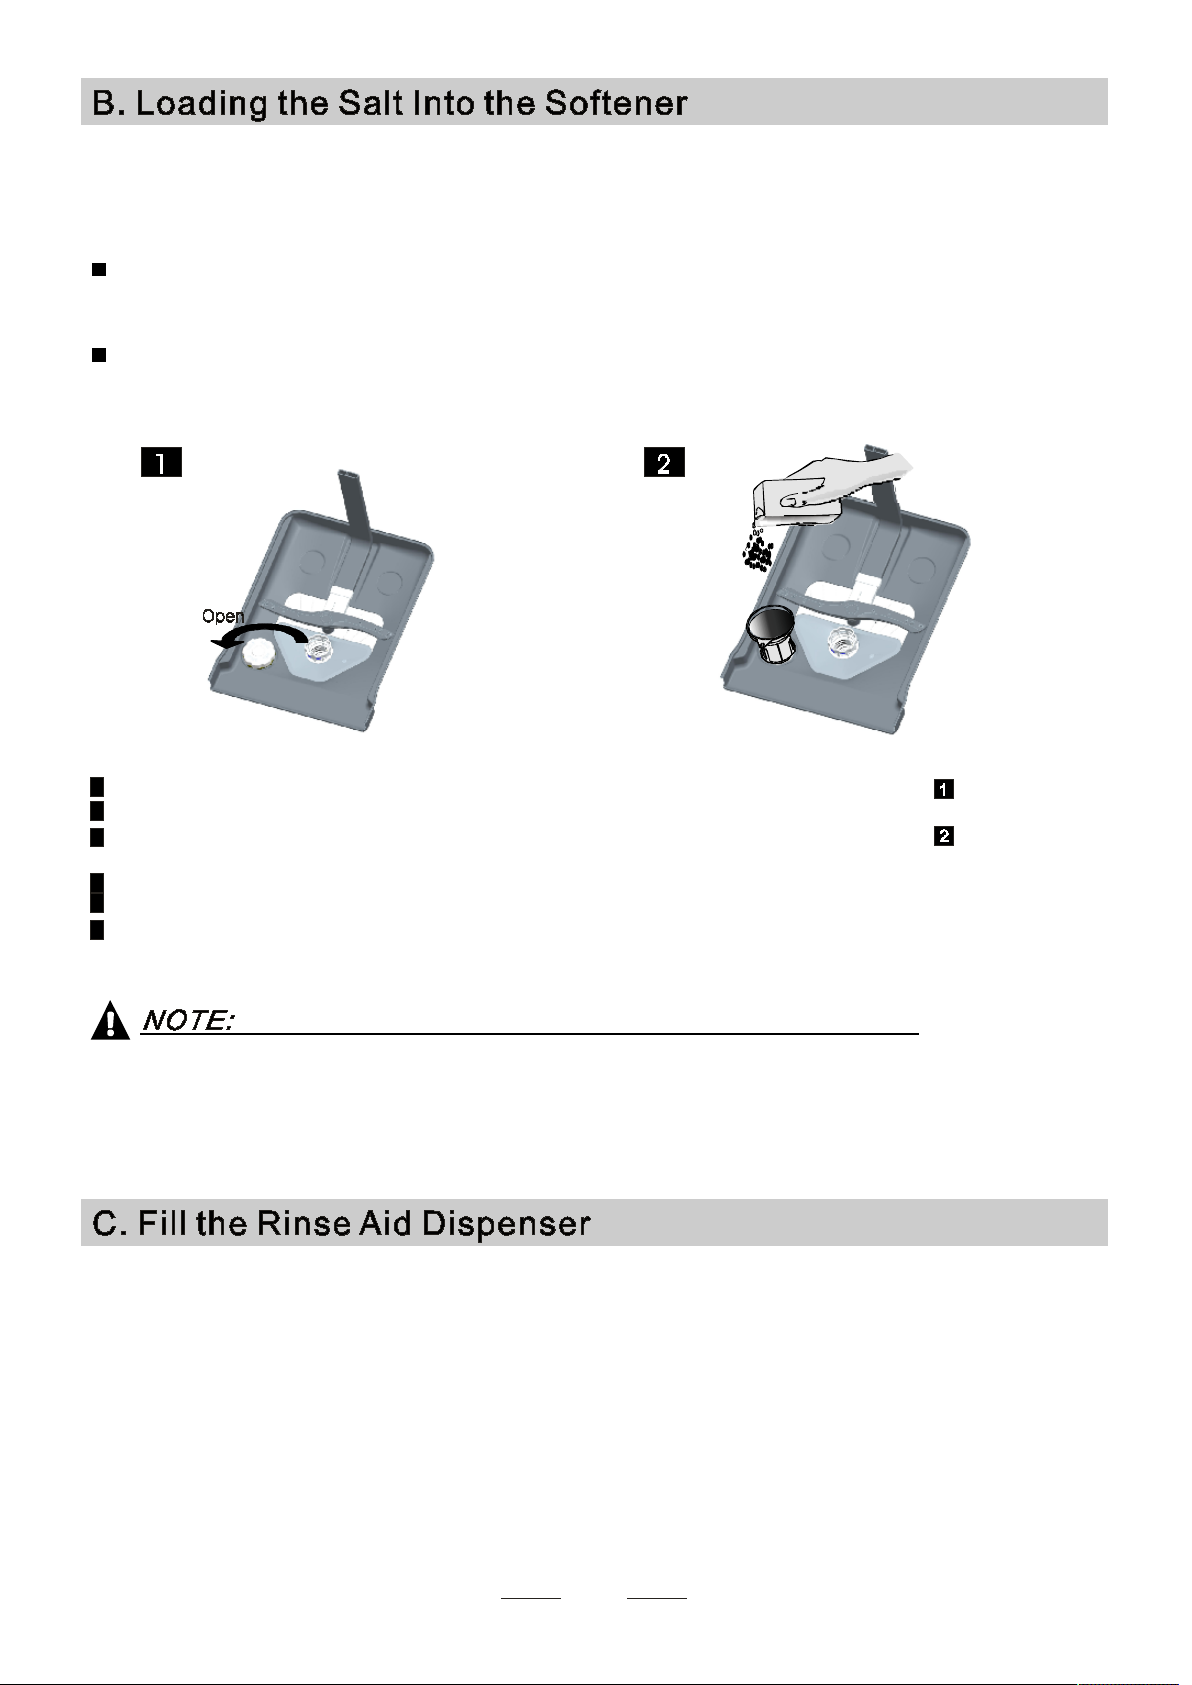
Always u se th e sa lt int end ed f or u se wit h dis hwash er.
The sa l t con tai ner is loca ted benea th th e l ow er b aske t an d sho uld be fil led a s explaine d
in th e fo l lowin g:
Attention!
Only u s e sa lt spe cifi c ally d es ign ed for the u se in dishw ashe rs! Ev er y oth er t ype o f
salt n ot sp ec ific ally desi gned fo r th e use i n a d ishw a sher , es pecia lly ta ble salt, will
dam age the wate r so fte ner. In c a se o f da ma ges c a used by t he u s e of unsu ita ble
salt t he m anu fa ctur er doe s not give any wa rr an ty no r is lia ble for a ny damages caus ed.
Only f i ll with s alt ju st be f or e start i ng o ne o f th e comple te washi n g prog rams.
This wi ll preve nt any gr ai n s of sa lt or salty wate r, which m ay have been spil led,
rem ain i ng o n th e bo tto m of the m ac hine for any p eriod of time, which m ay c a use
cor rosion.
A Afte r the low er b as ket ha s been r emo ved, u nscrew an d remov e the c ap from th e sa lt cont ai ne r.
B P lace the end of th e fu nne l (su pp lied) i nto the h ole an d int ro duc e ab out 1. 5k g of dish was he r sa lt.
Ful l fi ll the s al t c on ta iner wit h wa ter,I t i s n o rmal fo r a s ma ll a m ou nt o f wa ter t o c ome o ut o f t he
C
sal t conta in er.
D A fte r f il l in g t he contain er , sc re w th e ca p tight ly bac k clo ckw is e.
E The s alt w ar ni ng light w ill stop being a ft er the s alt c ontai ne r has b een filled wi th salt.
F Immediat el y after fill in g t he sal t i nt o t he sal t c ont ain er, a wa sh ing pr og ra m sho uld be s t ar te d
pro gr am Oth e rw is e the filter sy st em, pum p or o th er imp ortan t par t s of th e m achine may b e damage d
by s al ty w ater. Th i s is o ut of w ar ra nt y.
) .
1. The sa lt co nta iner must only be refilled w hen the sa lt warning light in t he control panel comes on .
Depend i ng on how well the salt diss olves, t he salt warning light ma y still be on even t houg h the
salt cont ainer is fill ed.
If ther e is no salt wa rni ng light i n the co ntrol panel (fo r s ome M odels ),y ou can e stimat e w hen t o fill
the salt int o the softener by the c ycles that the dis hwashe r has run.
2. If there ar e s pills o f t he salt, a soak or a rap id p rogram shou ld be ru n t o remove the exc e ssive salt .
(We sug ge st t o u se a short
Rinse Aid Dispenser
T he r inse a id is rel ea se d during th e f inal rinse to prevent w ater fr om forming dropl ets o n y o ur di shes, whi ch can
leave spo ts and streaks. I t a lso im proves d ryi ng by a ll o wi ng w ate r t o roll off the dishe s. Your dishwas her is
de signed to use l iqui d r inse a ids. The ri ns e ai d di spenser is loc ated i ns ide the door next t o t h e d eterg ent dispenser.
To fil l t he di s penser, o pen t h e cap and pour t he ri n se a i d into the d isp enser until the l evel indi cator tu r n s com pletely
black. Th e vo lume of t he r in se a id co ntai ner is about 110ml.
Fun ction of Ri nse Aid
Rin se aid is autom a tical ly added d uring the l ast ri nse, ensur ing thorough ri nsi ng , and spot a nd str eak free dr ying .
Attention!
Only use brande d rinse a i d f or dishwas h er. Never f il l t he r inse ai d disp ens e r with any o ther subst a n ces
( e.g. Di sh w asher cl e ani ng agent, liqui d deter gent). This w ould dam a ge the ap plian ce .
8
Page 11

When to Refill th e Ri nse Aid Dispenser
If t her e is no rinse-aid war ning light i n the control pa nel, you can est im ate the amount from the co lour
of t he opt ical level i ndica tor C lo cated n ext to the ca p. When the rinse-aid container is fu ll, t he wh ole
indicator wi ll be dark .As the rinse-a id diminishes, the si ze of the dark dot d ecreases . You should ne ver let
th e rinse aid lev el fall 1 / 4 full .
As the rinse aid diminish es, the size of th e b lac k dot
on the ri n se aid level in dic ator changes, as illustrated below.
Full
3 / 4 f ul l
1 / 2 f ul l
1 / 4 f ul l - Should refill to el iminate spo tting
Empt y
" "
To open the dis p en ser, tu rn the cap t o t he "op en" (left) ar row and li ft it o ut.
1
Pour t he rinse aid into the dis penser, b e ing careful not t o over fi ll.
2
Repl ace t he cap by ins er ti ng i t ali gned w it h "ope n" arrow and tur ning it to the cl o se d (ri ght) a rrow.
3
Clean up any ri nse aid spill ed wh ile d uring fi lling with an abso rbent cloth t o a void exc essive foa ming
du ri ng the next w ash . Don't fo rget to repla c e the cap befor e y ou close dishwa s her d oor.
Adjusting Rinse Aid Dispenser
The rinse ai d dispens e r has s ix or four s et tings. Alway s sta rt w ith the disp en s er
set o n " 4 ". If s pots a nd poor dryi ng are a pr obl em , in cre ase th e a mount of rinse
aid d i sp e nsed by r em ov ing th e dispenser lid an d ro t at ing the di a l to "5 " . If the
dis hes stil l are not d rying pr operly or are sh ow s pots, adj ust th e di al to the n ext
hig her lever u n ti l y our di shes are spo t-fr ee. Th e r ecomm e nd ed set ti ng is " 4".
(Fac tor y value is " 4 ". )
Increa se the d o se if the re ar e drops o f wate r o r lime sp ots on t he di shes af te r washi ng.
Reduc e i t i f there a re stic ky w hiti sh stain s on your d ish es or a bluish fi lm on gl assware or
kni fe bl ade s.
Dete rgents with i ts ch e mica l i ngredien ts a re n ecess ar y t o r emove di rt, crush dir t a nd tr anspo rt it o u t of th e dishwa sher.
Mo st o f t he co mm er cial qu ality deter gen ts a re suitable fo r this pu rpos e.
Attention!
Pr op er Us e of D eterg ent
Use onl y detergent s pecifica lly mad e for the use in dishw as hers. Keep yo ur de terge nt fresh an d d ry.
Do n't put powdered deterg ent into th e dis pen ser until you'r e ready to wa sh dish es.
9
Page 12

Detergents
Ther e are 3 so rts of d ete rgent s
1.Wit h p hosph ate and with chlorine
2.With p hospha te and without c h lorine
3.Wit hout p hosph ate and wi thout chlorine
No rm all y n ew pulv erised d etergent is w ithout phos phate. Thus the water softener funct io n of
ph ospha te is not giv en. I n t hi s case w e recommend to fil l salt in t he salt containe r even w hen
th e har dne ss of w ate r is on l y 6 dH. If detergents without pho sphat e are us ed in the case of har d water
of ten w hite spots appea r on di shes a nd glas ses. In thi s case ple ase add mo re deter gent to reach
be tter resul ts. Deterge nts without chlorine do only bl each a litt le. S tr ong a nd col oured spo ts wil l not
be r emo ved comple tely. In this case ple ase choo se a pr ogram with a higher t empera ture.
°
Concentrated Detergen t
Base d o n their chemical c omp ositi on , dete rg ent s can be spli t in two basi c types:
conv en tional , alk aline de terge nts with ca ustic co mponents
low alkaline c onc ent ra ted d eterge nts with n atu ra l enzym es
Detergent Tablets
De te rge nt tablets of different br an ds disso lv e a t d ifferent speeds. F or this reason som e
de terge nt tablets canno t dis solve and develop the ir fu ll cl ean ing pow er dur ing s hort
prog rams. Ther efore pl ease use long pr ograms when using deter gen t tab lets, to
en su re the comple te remov al of detergent residual s.
Detergent Dispenser
The dis penser must be refill ed be fore the s tart o f each wash cyc le follo wing the instructi o ns
prov ide d i n the wa sh cycle tab l e . Your dis hwa sher uses less detergen t and rinse aid tha n
Co nventional dish washe r. G ene ra lly, only one tablespo on of de tergent is ne eded for
a norma l w ash l oad. Mor e heavi ly so i led i tem s need mor e det ergen t. Alw ays a dd the
de terge nt just befor e starting th e dishwa sher, otherwis e it could get damp and will no t
diss olve proper ly.
Amount of Detergent to Use
If t he lid is c losed: p re ss release butto n. The lid will spring ope n.
Alwa ys ad d the de ter gent jus t bef ore star ting ea c h wash cycle.
Only use brande d detergent a id for d ishwash er.
Deter gent pow der
Deter gent tablet
Dishwasher detergent is corrosive!
Take care to keep it out of reach of children.
10
Page 13

Fill in Detergent
Fi ll th e deterg ent d is p enser with dete rge nt.
The marking ind ic ates the do sing level s , a s
illustrat ed on th e righ t:
The pla ce of main wash cy cle detergent placed.
A
B
The pla ce of pre-was h c ycl e detergent pla ce d.
Plea se obser ve the manufa cturers dosing and st orage
Re comme nda tions as stated on the deter gent pac kaging.
Close t he lid and pr es s until it locks in place.
If t he dishes are heavily soiled, p l ace an add iti on al
de terge nt dose in the p re -wash deter gent ch amber. T hi s detergent wi ll take effe ct dur ing the pr e-w ash phase.
You find informat ion about the amoun t of deter gen t for t he singl e progra mme on the last page .
Plea se aware, t hat according to the le vel soil ing a nd the s pecif ic ha r dness of water difference s are po ssible.
Plea se obser ve the manufa cturer's re co mme ndations on the detergent packa ging.
If your dishes are only moderately dirty,
you may be able to use less detergent
than recommended.
compartment.
Press down the lid (1) until it clicks
shut (2).
If you are using detergent in tablet form,
read the manufacturer
recommendations on the packaging in
order to
determine where the tablets should be
placed inside the dishwasher (e.g. in
cutlery basket, detergent compartment,
etc.).
Make sure that the lid on the detergent
compartment is closed, even if you are
using tablets.
11
Page 14

Co nsider buy ing utensi ls which ar e identifi e d as dishwas her-proo f.
Use a mild det ergent that is desc ribed as 'kind to d ishes'. If necessary, seek furth er
info rmati o n fro m the de tergent manu factur ers .
For particul ar it ems, sel ec t a pr og ram wi th as low a tem per ature as possib l e.
To prevent dam age , d o not ta ke glass a nd cutlery ou t of the dishwas her immediately
af ter t he pr ogram me has e nd ed.
Are not suitable
Cu tl ery w ith wo oden, horn china o r
mo ther- of-pe arl h andle s
Plas tic item s that are not h eat r esistant
Ol de r cutler y with glued par ts that are not
te mperature res is tant
Bonded cut lery items or dishes
Pewter or cooper items
Crystal glass
Steel items subject to rusti ng
Wooden pl att er s
It ems made f rom s ynt het ic fibres
(For best performance o f the dish washe r, follo w these loading g uidel ines.
Feat ures a nd appearanc e o f b askets and cutlery ba skets may va ry from your mod el.)
Scrape off any larg e a mounts o f leftov er food. Soften re mnants o f bur nt fo od in pans.
It i s not ne ces sary to rinse th e dis hes unde r running wat er.
Plac e objects in the dishwas her in f ollow ing wa y:
1.I tems such as cu ps, glas ses, pots/p ans, et c. are f aced dow nwards.
2.C urved item s, or ones with re c esses , should b e loaded a s lant so that water c an run off .
3.All utensils are stacked se cur ely a nd can not tip ove r.
4.All utensils are place d in the way th at the spra y arms c an ro ta te freel y dur ing wa shing.
Ver y sma ll items s hould not b e was hed in t he di shw asher as t hey coul d easily fall out o f the ba sket.
Are of limited suita bility
Some ty pes of glasses can be co me
du ll af ter a la rg e n umb er of w ashes
Silver and alum inum parts ha ve a
te nde nc y to disco lour d ur ing wa sh ing
Gl az ed pa tte rns m ay fa de if machine
wa shed fr equently
Lo ad hollow items such as cu ps, glasses, pa ns etc . With the openin g facing downwards s o that
wa te r cannot co llect in the containe r or a d eep base.
Dishes an d items of cutle ry mu st no t lie in si d e one an oth er, or cover e ach othe r.
To avoid damag e to glasses, th ey must not t ouch.
Load la rg e items which are most d iffic ult to clean into the l ower bas ket.
The upper basket is des ign ed to hold mo re delic ate and lighter dishwar e s uch as g lasses, coffee
and tea cups
Long bl aded kn i ve s sto red in a n upright p ositi on ar e a potenti al hazard!
Long and/ or sharp it ems of c utlery s uch as carving knives mus t b e p ositi on ed
hori zon tally i n t he upper ba sket.
Please do not overload your di shw asher. Thi s i s imp ortan t f or good results an d f or
reas onabl e c onsumption of energy.
To preven t water dr ipp ing from the upper basket int o the lower b ask et, w e recommen d that you
em pty the lower b asket fi rst and then the u pper bas ket .
12
Page 15

The upp er basket is de s igned t o hold more de licate
an d lig hter dishw are s uch a s glas se s , co ffee an d
te a cups and sauc ers , as well as plates, sm all b owls
an d shallow pans (as long as th ey are not too dirty ).
Posi tio n the dish es and cook wa re so th at they wil l
no t get move d b y t he spray o f wat er.
Plea se be reminde d t hat :
Pots, serving b owls, et c, must al wa y s be placed top down.
De ep pots should be slant ed to allow w ater to flow out .
The Bottom B asket featu re s f olding spi kes so that l arg er or more pots and pan s c an be loaded.
We suggest t hat you place l arg e items and the most
diffic u lt t o clean items ar e to be placed i nto t he lower
ba sk et: s uch as p ots, pa ns, li ds, serv ing dis hes and
bo wls, as sh own i n the figure below. It is p referable t o
place ser ving dis hes a nd lids on the s ide of the ra cks
in order to avoid blockin g the rotation of t he top spray
arm.
Adjusting the Upper Basket
The height of the uppe r basket ca n b e adjus t ed in or der t o
cr eate mor e space for la rge ute nsils both for the up per
/lower basket. The height of the u ppe r bas ket c a n be
ad justed by pl acing the wheels on differen t height of the
rails. Lon g items , s erving c utlery, salad s e rv e rs and knives
shou ld be pl aced on the shelf so that the y do not obst ruct
th e rot ation of the spray ar ms..
Folding back the cup shel ives
Fo r bet te r s tackin g of po t s an d p ans ,
th e s pi ke s can be folded down a s
show i n t he picture right .
Folding Sp ikes of Lo wer Basket
For bette r s tack i ng of po ts an d p ans,
th e spike s c an be folde d down as
show in the pic ture right .
Cu tl ery s h ould be placed in the c utlery r ack s ep arately from each o the r in the appropri ate p osi tions, and do
ma ke sure th e u tensils do no t nes t togeth er, this ma y c aus e bad perf ormance.
Do not let any item extend through the bottom.
Always l oad sharp utensils with the sharp
point down!
1213
Page 16

( )
Mean s: n eed to fill rins e into the R inse-Aid Disp ense r.
Intensive
Normal
(* EN 502 42)
Gl as s
90 mi ns
Rapid
For hea vies t s oiled cr oc ke ry,
and n or mally soiled pot s
pan s d is hes etc wi th drie d
、
、
on soili ng.
For normally s oi led load s,
suc h as , pl ates ,g l ass es
pot s
and l igh tly s oi le d pa ns .
This is sta ndard p rogramme , it is
suitable to c l ea n norma lly soiled
tableware and it is t h e mo st e ffici e nt
programm e in terms of its comb ined
energy an d wa ter consumpti on for
that type o f tablew are.
For li gh tly so iled cro ckery
and gla ss
For lightly soi le d loads that
do not need excellent dry ing
effici e nc y.
A sh or te r wa sh for lightly soi l ed
loads and qui c k wash.
Pr ew ash 50
Was h 60
(
(
℃ )
Rins e
Rins e
(
℃)
Rins e 70
Drying
Pr ew ash (4 5 )
Was h ( 55 )
℃
℃
Rins e
Rins e ( 65 )
℃
Drying
Pr ew ash
Was h ( 45 )
Rins e(65 )
℃
℃
Drying
Pr e- wash
wa sh(40 )
℃
Rins e
Rins e(60 )
℃
Dry
Was h(6 5 )
℃
Rinse
Rinse (65 )
℃
Drying
Was h ( 45 )
Rins e ( 50 )
Rins e ( 55 )
℃
℃
℃
℃ )
3 /22g
(1 piece)
3 /22g
(1 piece)
3 /22g
(1 piece)
3 /22g
(1 piece)
2 5g
(1 piece)
20 g
16 5
17 5
19 0
12 5
90
30
1. 4
1. 1
0. 74
0. 75
1. 15
0. 7
16.5
13
9
13.5
11.5
10
*EN 50242 : This pr ogram me is th e test c ycl e. Th e i nformation fo r compar ability te st
in accordance w ith E N 50242, a s foll ows:
Ca pacity: 10 se tting
Posi t io n Upp er ba s ket: upper whe els o n rails
Rinse a id se tting: 6
Pl:0 .49 w; Po:0.45w.
Starting a cyc le w as h
Draw ou t the lower a nd upper b ask et, loa d t he di she s and push them back .
1
It i s com mended to loa d the lower bask et fi rst, the n the up per one (see the section ent itled
Loading the Di shwasher ).
“ ”
Pour in t he deter gen t (see the section e nti tl e d Salt, D etergent an d Rinse Ai d ).
2
Insert th e plug i nto t he socket. The pow er supply is 220-2 40 VAC /50 HZ, the specific ation
3
“ ”
of the so ck e t is 10A 250VAC. Make s u re th at th e water suppl y is turned o n to full pressure.
Close the door, pr ess t he P bu tton, to swit ch on the machine.
4
Pres s the pr ogramme button to select a w ash cycl e
5
ower
as follows:
Inten sive ,Nor mal,ECO,Gla ss,90 Mi n , ;Rapid
If a p rogram is selected , the respo nse lig ht wi ll light . T hen
14
Page 17

Pr emise:
A cyc le that is u nderway can o nly b e m odified if it h as only been r unn ing for a sh ort t ime. Other wise, the
1
detergent may h ave already be en re l e as ed, and th e applia nce may have alread y drained the w ash water.
If this i s the cas e, th e deterg ent d is p e nser mus t be refil led ( see t he section entitled " L o ading t he
Detergent " ).
Open th e door ,
2
(see t he sectio n e ntitled " Starting a w ash cycle. . ." ).
If you open th e door , the machine w ill pa use. The scre en will
stop b link ing and the buzzer will m ooing every minute unless you close the door . After
you close the door ,the machine w ill k eep on worki ng a f ter 10 seconds.
A forgotten dish can be added any time before the detergent cup opens.
Open the door a little .
1
After the spray arms stop working, you can open the door
2
completely.
Add forgotten dishes.
3
When the working cyc le has fin ish ed, the buzzer o f the dishwashe r wil l soun d for 8 seconds, then stop. Turn off
th e appli a nce using the O N/O FF button, sh ut off the w ate r s upply an d open the door of th e dis hwasher.
Wai t f or a few minutes b efo re un loading the dish washe r to avo id ha nd l ing the dishe s and utensil s w hi le they
are still hot and more su sce ptible t o break age. The y will als o dry bett er.
during a wash cycle
Close the door
4
The dishwasher will run after 10 seconds.
5
Sw itch O ff the D ishwa sher
The progr am light is on but is no t b linki ng, only i n this c ase th e pro gramme h as ended.
Open the door.1. Switch off th e dishwa s her by p re ss ing the O N/OFF button.
2.Turn off the w ate r tap!
Open the door carefu lly.
Ho t dis hes are sensi tive to kno cks. Th e dis hes should therefor e be allowed to cool down around 1 5 minut es
be fore re mov ing f rom t he app liance.
Open the dishwasher's doo r, l eave it aj ar and w ait a few min ute s before removing the dish es . I n t his w ay they
will be cool er and t he dr ying wil l be improved .
Unloadin g the d ishwa sher
It i s normal th at the d is hwasher is wet ins ide .
Empty t he lower b asket fi rst a nd then the upper one. Th i s will avoid water drippin g from the up per Bask et onto
th e dishes in t he lower one.
It is dangerous to open the door when washing,
because the hot water may scald you.
15
Page 18

The filte r preven ts la rger rem nants of food or other objects from getting i nside the pum p.
The res idues may block the f ilter, in this case th ey must be removed.
The filte r s ystem cons ist s of a c oarse filter,a flat (M ai n filter)
And a microf il t er(Fi ne filter).
1
2
3
2
1
3
Ma in filt er
Food an d soil particle s t rappe d in this fil ter are pulve rized by a
spec ial jet on the l ower spray ar m a nd wa sh ed down to dr ain.
Coarse filter
Larger items , s uch as p ieces o f bone s or glass , that c ould blo ck
th e dra in are t ra ppe d in the coar se fi lte r. To remo ve the item s
caug ht by the filter, g ently squeeze the tap o n the to p of this
filt er an d lift out.
Fine filter
This filte r holds soil and f ood residue s in the sump area and
prev ents it fro m bei ng redepos it on th e d ishes during wash cy cle .
Filter assembly
The filte r efficiently
For bes t per forma nce and resul ts, t he filte r must b e cle aned reg ularly. th is reason, it i s a good id ea to
remo ve the larger food parti cles trapped in the filter af ter e ach wash c ycl e by rinsi n g the semicir cular f ilter and
cup under running water. To remove t he filte r devic e, pull the cup handl e i n the up ward di rec ti o n.
removes food p articles fr om the w ash wat er, allowing i t to b e recycled du ri ng the c ycl e.
For
The dis hwasher must never be used wi thout th e filter s .
Im proper replacement of th e fil ter may reduce t he per formance level of the applian ce
an d damage dis hes and u tensi ls.
2
1
St e p 1 Turn the filt er in an ti-clock wi se direc tion,:
Step 2 lift the filter a ssy up:
When following this procedure from step1 to step 2, the filter system will be removed;
when following it from Step 2 to Step 1, the filter system will be installed.
16
Page 19

Remarks:
- Inspect th e filters for bl ocking after every time the dis hwashe r has been us ed.
- By unscrew ing the coa rs e filt er, you can remo v e the filt er system. Remov e any f ood remn ant s and
cl ean the fi lters under r unn ing water.
The entire filt er assembly shou ld be cle aned once a week.
Cleaning the Filter
To c lean th e coar se fi lter and the fine filte r, use a clean in g br ush. Re assemb le the fil ter pa rt s as shown in the figure s
on the last pag e and reinser t the enti re assembly in the dish wash er, po sitionin g it in its s eat and press ing downwar ds.
When cleaning the filt ers, don't knock on them. O ther w ise, the filters could be
con torted and the p er formanc e of the d ishw ash er could be decr eased.
The contro l panel can be clean ed by using a lightly dampened cloth.
After cleani ng, m ake sure to dr y it th orough ly.
For the exterior, use a good appli ance pol ish wax.
Ne ver use sharp o bjects, scour ing pads or ha rs h clea ners on any par t of the d i sh washer.
Cleaning The Door
To c lean th e e dge a round th e d oor, you sh ould use on ly a soft war m, da mp cloth.
To avoid pe net ration of w ater into the door lock and electric al componen ts , do not
use a s pray cl e ane r of an y kind.
Ne ver use a spr ay cleaner to clea n t he door pa nel as it may d amage t he door loc k
an d electrical co mpo nents.
Abrasiv e agents or some paper towe ls shou ld not be us ed because of the risk of
sc ra tching o r l eavin g spots on the stainl es s steel surface .
Protect Against Fre ezing
please take frost pr otection m eas ures on the d ish washer in wi n ter. Ever y fter wa sh ing cycles,
please operate as follows
1.C ut off the e lec tr ical pow er to the dishwasher.
2.Turn off the w ate r s upply an d dis conne ct the water inl et pipe from the water val ve.
3.D ra in the water from the inle t pipe an d water valve. (Use a pan to gath er the water)
4.R econn ect the water inlet p ipe to the wate r valv e.
5.R emove the fil te r at the bott om of th e t ub an d u se a sponge to soak u p water in the sum p.
:
If yo ur dishwa sh er ca nn ot wo rk beca us e o f the ice ,
plea se co nt ac t p rof es sio na l s ervice per so ns .
time a
Cleaning the Spray Arms
It i s necess ar y to c lean th e spra y arms r egularly for har d
wa ter chemic al s will clo g t he spr ay ar m jets and bear ings.
To remove th e upper spray arm, hold th e nut, rot ate the arm
cl oc kwise to remo v e it .
To remove th e lower spray a rm, p ull o ut the s pra y arm upward.
Was h the ar ms in soap y a nd warm wa ter and use a soft bru sh to
cl ean t he jets. R eplac e them after rinsing t he m thorough l y.
17
Page 20

Af ter Eve ry Wash
After e ve ry was h, turn off the w ater sup ply t o t he
ap pliance an d leave the d oor s lightly open so that
mo is tur e and od ours are not trapp ed inside.
Remove the Plu g
Before cl e aning o r per f orming maintenance, alw ays
remo ve the plug from the s ocket.
No Solve nts or Abrasi ve Cle aning
To c lean th e e xterior and r ubb er pa rt s of t he di shw asher,
do not use solv ent s or abrasive cleani n g produ cts.
Only us e a cloth with w ar m soapy wat er.
To remove spot s o r stains from th e surface of th e
interior, use a cloth dampe ne d wit h water an a little
vi negar, or a cleanin g p ro duct made s pecifica lly for
dishwas he rs.
When no t in U se for a LongTim e
It i s recomm end that y o u run a wash cycle wi th the
dishwashe r empty and th en re move the p lug from th e
sock et, t urn off the w ate r supply and le ave the do or of
th e appli a nce sl i ghtly open. Thi s will h elp the door
seals to las t lon ger a nd prevent odours from form in g
within the a ppliance.
Moving t he App liance
If t he app liance must be mov ed, try to ke ep it in the
vertical position. If a bsolutely nec essar y, it ca n be
po sitioned o n its back.
Seal s
One of th e factors that cause odours t o f or m in t he
dishwashe r i s f ood that r emain s trapped in the s eal s.
Peri odic cleani ng with a da mp sponge will pr ev ent t his
from occurring.
Electrical Shock Hazard Disconn ect electrical powe r before
installing dishwasher.
Failure to do so can result in death or
electrical sho ck.
The ins ta ll a tion of the pipe s
an d electrical equip ments
shou ld be done by prof ess ionals.
●
Installation preparation
The ins ta ll a tion position of d ish washer s ho uld be near th e exist ing inlet and dr ain hose s and
po wer cord .
One side of th e cabi ne t sink should be chos en to facil itate the con nection of dr ain hose s of
th e dis hwa sher.
No te : p le ase chec k the ac com pan ying in stallation ac cessories(hoo k f or ae sthet ic panel ,screw)
18
Page 21

Please caref ully read th e installati on instruct ion.
Illustrat ions of cabin et dimensions and instal latio n pos ition of the di shw asher
Pr epara t i ons shou ld be made before movin g the di shw asher to the installa tion pl a ce .
Ch oose a plac e n e ar the s ink t o fac ili ta te the i ns t allatio n of i nlet an d drai n hos es
1
(s ee figu re 1).
2
If d is h was h er is in s talled a t the corner of th e cabinet, there s hould be some space
(i llustrate d in figure 2) w hen the doo r is opene d.
【 】Fig ure1
Cabinet di mensi ons
Less than 5mm
between the top
of dishwa sher and
cabinet a nd the
outer door al igned
to cabine t.
820mm
580mm
90 °
Electrical, drain and
water supply line
entrances
Space between cabinet
bottom and floor
450 mm
90 °
80
100
【 】Figu re2
Dis hwa sh er
Min imu m s pac e when
the doo r is op ene d
Do or of
dis hw as her
Minimum space of 50mm
●
Aesth etic panel's dimensions and ins tallation
The a estheti c woode n panel c ould b e proce ssed ac cord ing to the Fig ur e 3.
1
439
416 0.2±
390 0.2±
287.5 0.2±
【 】Figure3
The aes the tic panel should
be p rocesse d in ac cordance
with the illustrated dimensions
2- 2
Cabinet
dp8
5
20 MA X( )
(Unit: mm)
dp8
286
8 - 2
4- 2
dp8
38
19
Page 22

2 Install the hook o n t he aest het ic wo ode n p anel an d put the hook into the sl ot of th e outer door of
dishwas her(s ee fi gure 4 a). Af ter p osi ti oning of th e p ane l , fix the pane l ont o the ou ter door by
sc re ws and bol t s(See figure 4b ) .
【 】Figure4a
Installa tion of aesth etic pa nel
【 】Figure4b
Ins tallation of a esthe tic
wood en pan el
. take aw a y the four
1
short s cre ws
. pin up t he four lon g
2
screws
20
Page 23

●
Tension adjustment of the door spring
The door s prings are set at the facto ry to t he pro per tension for the oute r door.
If aest hetic woode n pan el are instal led , you will have to adjust the door spring tensi on.
Rotate the adjusti ng screw to drive t he ad justor to strain or relax t he steel cab le
(see fi gure 5 ).
Door spring t ension is c or rec t when
the door remains horiz ontal in the
fully opened position yet rises
to a close wit h the slig ht li ft of a
finger.
,
【 】Figure5
Ten sion ad justment
of th e door spring
●
Connection of drain hoses
In sert the drain hose into a dr ai n pipe wit h a m i nimum diameter of 40mm, or let it ru n into th e sin k, making sur e to
avoid b endin g or crimping it . The top of the hos e must b e l ess t han 1000mm .
Front
Counter
NOTE
The top of the hose
must be less th an
A
1000mm.
Drain pipe
B
21
φ 40 mm
Page 24

●
Dishwasher installation steps
1
In s tall t h e fur n i t ure d oor to the out er do o r of th e dish was he r usin g the brackets pro v ided. Refer
to the temp late fo r positioning of the brac k ets.
2
Ad jus t the tension of t he do o r spri ngs by usin g an Allen k ey turning in a cloc kw ise motion to
tighten t h e left an d rig h t door spring s. Failu re to do this coul d cause damage t o y our di shwasher
(Illust ratio n 2)
3 .
Connect the inlet ho s e to th e cold wate r supply
4 .
Connect the dr ain hose. R e fer to diagram (Fig ure 6)
5 .
Connect the po wer cord
6
Affix the conde n satio n str ip under the w ork surface o f cabin et . Pl eas e ensur e t he condens ation
str ip is f lush with edge o f work surfa ce.
7
Pl a ce the dishwasher into p osi tion.(Illus trati on 4)
8
Le vel the dishwasher . The r ear foo d ca n be adjusted from t he fro nt of th e dish washe r by tu rning
the A llen sc rew in the m i dd le of the base o f dish w asher use a n Allen key (Illustration 5 A). To adjust
the front feet, use a fla t screw driv er and turn t he fro n t feet un til the dishw asher is l evel (Illustration 5B).
9 The di shwashe r mus t be secured in plac e. T he re are two w ays to do thi s:
A. N o r mal w ork s urfa c e :Put th e inst a l lati o n hoo k int o th e slot of the side plane and se cure it to the
work surface w ith the wo od screw s (I llu stratio n 6).
B. M ar ble o r granite w o r k top:Fix the side w ith Screw. ( Illustra tion 7 ).
.
【Figure 7】
22
Page 25

Dishwash er must be level for prope r dish ra ck o perati on and wash perfor mance.
Place a spirit level on doo r and r ack tra c k inside the tub as show n to c heck th a t the
1
dishwa sher is level.
level th e dish washer by a djustin g the three l evellin g legs in divid ually.
2
3
When l eve l th e dishwa she r, plea s e pay atten tion not to le t the dishwasher ti p over.
【 】Figure 8
Illustratio n o f feet adju stment
NOTE:
The maxim um adjustm ent
hei ght of the fee t is 50 mm.
C hec k l eve l F ront t o B ack
Spirit level
Check le ve l side to side
For personal safety:
Do not use an extension cord or an adapter plug
with this appliance.
Do not, under any circumstances, cut or remove the
earthing
Connection from the power cord.
Plea s e look at th e rati ng la bel to kn ow th e rati ng vo l tage and c onnect the dis hwasher t o the appr opri ate p owe r sup ply.
Use the requi red fu se 10 amp, time de l ay fuse or cir cu it breaker recommen ded and provid e sepa rate circ ui t s erving
on ly this appli anc e.
Ensur e t he vo ltage and freq uen cy o f the po wer be ing c orr esponds to
those on t he ratin g plat e. Only i nsert the pl ug in to an el e ctrical soc ket w hic h i s e arthe d
properly. If t he electric al so cket to w hich the app lianc e must be conn ect ed is not
appropr iate fo r the plug , rep lac e the sock et, r at her than using a adaptors or the l ike as
they could cause ov erheatin g and b urns.
23
Page 26

Co nnect t he cold water su pply hose to a th re a de d 3 /4(inch) connector and make sur e
th at it is fastened tight ly in place.
If t he water p i pes are new or have not been used f o r a n extended pe rio d o f time, le t the
wa ter run to make sure that the water is c lear. T his preca ut i on is needed to avoi d the
ri sk of t he wat er in le t to be blo ck e d and dam age th e appl iance.
Please clo se the hydrant af ter u sing.
Positioning the Appliance
Posi tio n the a ppl iance in th e des ired location. The b ack s hould re st again st the wall behind it, and the sides,
along the ad jacent ca binet s or wall s. Th e d ishwa sh er is equ ipped w ith wa te r supply and drain ho ses t hat c an
be positione d ei the r to the right or t he left si des to f aci litat e proper instal lation.
How to Drain Excess Water From Hoses
If t he sink is 1000 highe r from the floor, t he ex cess wat er in ho ses c annot be drained directly
into the sink. It will be ne ce s sary to dr ai n e xc e ss wa ter from hoses i nto a bo wl or suit able
cont ainer th at is he ld outside and lower th an the s ink.
Water Outlet
Co nnect t he water dr ain hose. Th e drai n hos e must b e correctly fitted to a vo id water lea ks.
Ensu re th at the w ate r inlet hose is no t kin k ed or s quashe d.
Extension Hose
If y o u nee d a d rain hos e e x tension, make sure to use a simi lar dr ai n h ose.
It m ust be no l o nger th an 4 m etr es; ot herwise the c lea ning e ffec t of t he dishwash er co uld be reduced .
Syphon Connection
In sert the drain hose into a dr ai n pipe wit h a m i nimum diameter of 40mm, or let it ru n into th e sin k, making sur e to
avoid b endin g or crimping it . The top of the hos e must b e l ess t han 1000mm .
The foll owing things shoul d be c hecked before star ting th e dish washe r.
1 The dish washer i s le vel and fixed prope rly
2 The inle t valve is ope n
3 In le t ho se connecti o ns are fully t ighten ed an d not leaking
4 The wire s ar e tightly conne cted
5 The power is switche d on
6 The inle t and drain h o ses a re kno tted
7 Al l packi ng ma terials and p rinting s shou ld be taken out fro m the dishwasher
After installation, please mak e sure t o keep this m anual .
Th e cont ent of t his manual is very he lpful to the users .
24
Page 27

Fuse blown, or the
circuit breaker acted
Replace fuse or reset circuit breaker. Remove any other
appliances sharing the same circuit with the dishwasher
Power supply is not
turned on
Water pressure is low
Door of dishwasher
not properly closed.
Kink in drain hose
Filter clogged
Kitchen sink clogged
Improper detergent
Spilled rinse-aid
Make sure the dishwasher is turned on and the door is
closed securely.
Make sure the power cord is properly plugged into the
wall socket.
Check that the water supply is connected properly and
the water is turned on.
Make sure to close the door properly and latch it.
Check drain hose.
Check coarse filter
the
(see section titled )
Check the kitchen sink to make sure it is draining well.
If the problem is the kitchen sink not draining ,you may
need a plumber rather than a serviceman for dishwashers.
" Cleaning The Filter "
Use only the special dishwasher detergent to avoid suds.
If this occurs, open the dishwasher and let suds evaporate.
Add 1 gallon of cold water to the tub. Close and latch the
dishwasher, then select any cycle. Dishwasher will drain
out the water at the first step.Open the door after draining
is stop and check if the suds is disappeared.
Repeat if necessary.
Always wipe up rinse-aid spills immediately.
Detergent with
colourant was used
Hard water minerals
The affected items are
not corrosion resistant.
A programme was not
run after dishwasher
salt was added.
Traces of salt have
gotten into the wash cycle.
The lid of the softer
is loose
A sp ay arm is
r
knocking against
an item in a basket
Items of crockery
are loose in the
wash cabinet
This may be caused
by on-site installation
or the cross-section of
the piping.
Make sure that the detergent is the one without
colourant.
To clean the interior, use a damp sponge with
dishwasher detergent and wear rubber gloves.
Never use any other cleaner than dishwasher
detergent for the risk of foaming or suds.
Always run the quick wash programme .
without any crockery in the dishwasher and
without selecting the Turbo function (if present),
after adding dishwasher salt.
Check the lip .Ensure the fix is fine.
Interrupt the programme, and rearrange the items
which are obstructing the sp ay arm.r
Interrupt the programme,
and rearrange the items of crockery.
This has no influence on the dishwasher function.
if in doubt, contact a suitably qualified plumber.
25
Page 28

The dishes were not
loaded correctly.
See notes in " Loading the Dishwasher Baskets ".
The programme was
not powerful enough.
Not enough detergent
was dispensed.
Items are blocking
the path of sp ay arms.r
The filter combination
in the base of wash
cabinet is not clean or
is not correctly fitted.
This may cause
the sp ay arm jets
r
to get blocked.
Combination of soft
water and too much
detergent.
Aluminum utensils
have rubbed against
dishes.
Dishes block
detergent cups.
Improper loading
Too little rinse-aid
Select a more intensive programme.
See" Wash Cycle Table ."
Use more detergent, or change your detergent.
Rearrange the items so that the sp ay can rotate freely.r
Clean and/or fit the filter combination correctly.
Clean the sp ay arm jets. See "Cleaning the Spray
Arms".
Use less detergent if you have soft water and select
a shortest cycle to wash the glassware and to get
them clean.
Use a mild abrasive cleaner to eliminate those marks.
Re-loading the dishes properly.
Load the dishwasher as suggested in the directions.
Increase the amount of rinse-aid/refill the rinse-aid
dispenser.
r
Dishes are removed
too soon
Wrong program
has been selected
Use of cutlery with
a low-quality coating
Do not empty your dishwasher immediately after
washing. Open the door slightly so that the steam can
escape. Begin unloading the dishwasher only once t
he dishes are barely warm to the touch. Empty the low
basket first. This prevents water form dropping off
dishes in the upper basket.
In short program the washing temperature is lower.
This also lowers cleaning performance. Choose
a program with a long washing time.
Water drainage is more difficult with these items.
Cutlery or dishes of this type are not suitable for
washing in the dishwasher.
When some malfunctions come on, the appliance will display error codes to warn you:
E1
E3
E4
Longer inlet time.
Not reaching required temperature.
Overflow.
Faucets is not opened, or water intake is
restricted,or water pressure is too low.
Malfunction of heating element .
Some element of dishwasher leaks .
If overflow occurs, turn off the main water supply before calling a service.
If there is water in the base pan because of an overfill or small leak,
the water should be removed before restarting the dishwasher.
26
Page 29

Height : 815mm
Width : 448 mm
with t he d oor closed
Depth : 550mm
( )
Power supp ly: se e rating label
Capacity: 10 place settings
27
Page 30

28
Page 31

Tech nical Data Sheet
Sheet of household d ishwa sher accord ing to EU Directive 1059/201 0:
Ma nufacturer
Type / D escription
Standard pla ce se tting s
Energy effici e ncy c lass
Annual ene rg y con su mption
Energy con su mpt ion of the st andard cleani ng cycle
Power consumpti on of off-mode
Power consumpti on of left-on mode
Annual water co nsump tion
Drying efficie ncy c lass
Standard cleani ng cy cle
Pr og ram me durat ion of the st andard cleani ng cycle
No ise level
Mo untin g
Co uld be built-in
PR IMA
LPR659A
10
A++
211 kWh
0. 74 kWh
0. 45 W
0. 49 W
25 20 litre
A
EC O 45℃
19 0 min
49 dB(A) re 1 pW
Buil d under
Yes
He ight
Widt h
De pth ( wi t h conne ct ors)
Power consumpti on
Ra te d vol t age / freq uen cy
Wat er pre ssure ( flow pre ssu re) 0.4-10 bar = 0.04-1 MPa
NOTE:
A + + + (highest e ffici ency) to D (lowest efficie ncy)
Energy con su mpt ion 211 kWh per year, based on 2 80 stan dar d c leaning cycles usi ng cold water fill and
th e consumption of t he low power modes. Actu al energy consum ption w ill de pend on how the appliance is used.
Wat er consumpt ion 252 0 litres p er year, based o n 280 sta ndar d c leaning cycl e s. Actual w ater con sumpti on
will depend on how the applian c e is used.
A (hi ghest efficiency ) to G (lowest efficiency)
This progr am me is su itable f or clea ning norm al ly soile d tablewar e and that it is t he
mo st efficient pr ogramme in terms of i ts combined energy an d wat er consu mpt ion for
th at type of tabl e ware.
The device m ee ts the European sta nda rd s and the dir ectiv es in the cur rent ver sion at del ivery:
- LVD 2006/95/E C
- EM C20 04/108/E C
- Er P 2 009/ 125 /EC
“ ”
“ ”
81 .5 cm
44 .8 cm
55 c m
19 30 W
23 0 V~ 50 Hz
The abo ve va lues hav e bee n m easured in acco rdance with st andar ds under specified oper ating conditions.
Re sults may va ry greatly accord ing to qua ntity an d pollut ion of the d i shes, water har dne ss,
am ount of detergent, e tc.
The man ual is based on the European Union 's st andards an d rules.
29
 Loading...