

Prima DV2018, DV2418 Owner's Manual
Before operating the unit, please read this manual thoroughly.
DV2018
DV2418
COMBINATION FLAT COLOR TELEVISION
AND DVD/VCD/CD PLAYER
Owner's Manual

Important Safety Instructions--------------------1
Getting Started----------------------------------------3
Front ------------------------------------------------------3
Back-------------------------------------------------------4
Remote Control ----------------------------------------5
Installing batteries -------------------------------------6
Effective range of the Remote----------------------6
Installation----------------------------------------------7
Antenna connections ---------------------------------7
Cable (CATV) satellite connections ---------------8
Using an Audio Amplifier -----------------------------9
Using an AV Amplifier with
built-in digital surround -------------------------------9
Connecting AV1 inputs------------------------------10
Connecting AV2 inputs------------------------------10
TV Operation Guide
Power on/off------------------------------------------11
Turning on----------------------------------------------11
Turning off----------------------------------------------11
Select the Video Input-----------------------------12
Watching AV program -------------------------------12
Switching from AV to TV ----------------------------12
Tuning --------------------------------------------------13
To enter the TUNING menu -----------------------13
Setting the TV/Cable option -----------------------13
Auto Search -------------------------------------------13
Erasing an unnecessary channel ----------------14
Fine tuning ---------------------------------------------14
Setting the Color System---------------------------15
Channel Selection----------------------------------16
Adjusting Picture -----------------------------------17
To enter the PICTURE menu----------------------17
Adjusting picture--------------------------------------17
Selecting picture mode -----------------------------17
Setting SVM option ----------------------------------18
Setting Blue background option ------------------18
Setting Noise reducer option ----------------------18
Sound---------------------------------------------------19
Adjusting volume -------------------------------------19
To enter the SOUND menu ------------------------19
Adjusting sound --------------------------------------20
Selecting sound mode ------------------------------20
Setting S.woofer item -------------------------------20
Timer----------------------------------------------------21
To enter the TIMER menu--------------------------21
Setting Clock ------------------------------------------21
Setting Sleep timer ----------------------------------21
Setting Off Time --------------------------------------22
Setting On Time --------------------------------------22
System Setup ----------------------------------------23
To enter the SET UP menu ------------------------23
Selecting a language--------------------------------23
Menu Demo--------------------------------------------23
Setting Closed Caption(CCD)---------------------24
Selecting audio mode -------------------------------24
Recalling On-screen display ----------------------24
Parental Control-------------------------------------25
Child lock----------------------------------------------25
To enter Child lock submenu ----------------------25
Setting Child lock-------------------------------------25
Changing password ---------------------------------25
Setting V-chip----------------------------------------26
To enter V-chip menu -------------------------------26
MPAA RATING SET-UP ----------------------------26
TV RATING SET-UP --------------------------------27
Setting individual Content Categories
for TV Rating ------------------------------------------28
CANADIAN ENGLISH RATING SET-UP-------28
CANADIAN FRENCH RATING SET-UP -------29
Changing password ---------------------------------29
DVD Operation Guide
Disc Information ------------------------------------31
Basic Playback --------------------------------------32
Using On-screen Menu ---------------------------34
Locating Desired Scene--------------------------35
Displaying Status of Disc------------------------36
Special Functions ----------------------------------37
Zooming ------------------------------------------------37
Setting soundtrack language----------------------37
Repeat playback -------------------------------------37
Changing Angles [DVD] ----------------------------38
Changing Subtitle languages [DVD]-------------38
Initial Settings ---------------------------------------39
GENERAL SETUP-----------------------------------39
AUDIO SETUP----------------------------------------41
VIDEO SETUP----------------------------------------42
PREFERENCE SETUP ----------------------------43
Playing Back MP3 disc ---------------------------45
PLAYBACK OPERATIONS ------------------------45
PLAY MODE selection ------------------------------46
Playing Back Kodak Picture CD ---------------47
PLAYBACK OPERATIONS ------------------------47
PLAY MODE selection ------------------------------47
Setting picture transition effects ------------------48
Zooming picture --------------------------------------48
Rotating/Mirrorring picture -------------------------48
Browsing pictures ------------------------------------48
Other Information
Setting the Universal Remote Control Unit ----49
Troubleshooting Guide------------------------------55
Reception Disturbances ----------------------------57
Specifications -----------------------------------------58
Table of Contents
Important Safety Instructions
PORTABLE CART WARNING
(symbol provided by RETAC)
S3126A
The lightning flash with arrowhead symbol,
within an equilateral triangle is intended to
alert the user to the presence of uninsulated
dangerous voltage within the product's
enclosure that may be of sufficient
magnitude to constitute a risk of electric
shock to persons.
The exclamation point within an equilateral
triangle is intended to alert the user to the
presence of important operating and
maintenance (servicing) instructions in the
literature accompanying the appliance.
RISK OF ELECTRIC SHOCK
DO NOT OPEN
CAUTION
WARNING: To reduce the risk of fire or electric shock, do not expose this apparatus to rain or moisture.
CAUTION-These servicing instructions are for use by qualified
service personnel only. To reduce the risk of
electric shock, do not perform any servicing other
than that contained in the operating instructions
unless you are qualified to do so.
1
Before using the unit, be sure to read all operating instructions carefully. Please note that these
are general precautions and may not pertain to your particular unit. For example, this unit may not
have the capability to be connected to an outdoor antenna.
1. Read these instructions.
2. Keep these instructions.
3. Heed all warnings.
4. Follow all instructions.
5. Do not use this apparatus near water.
6. Clean only with dry cloth.
7. Do not block any ventilation openings. Install in accordance with the manufacturer instructions.
8. Do not install near any heat sources such as radiators, heat registers, stoves, or other apparatus
(including amplifiers) that produce heat.
9. Do not defeat the safety purpose of the polarized or grounding-type plug. A polarized plug has
two blades with one wider than the other. A grounding type plug has two blades and a third
grounding prong. The wide blade or the third prong are provided for your safety. If the provided
plug does not fit into your outlet, consult an electrician for replacement of the obsolete outlet.
10. Protect the power cord from being walked on or pinched particularly at plugs,
convenience receptacles, and the point where they exit from the apparatus.
11. Only use attachments/accessories specified by the manufacturer.
12. Use only with the cart, stand, tripod, bracket, or table specified by the
manufacturer, or sold with the apparatus. When a cart is used, use
caution when moving the cart/apparatus combination to avoid injury from
tip-over.
13. Unplug this apparatus during lightning storms or when unused for long
periods of time.
14. Refer all servicing to qualified service personnel. Servicing is required when the apparatus has
been damaged in any way, such as power-supply cord or plug is damaged, liquid has been
spilled or objects have fallen into the apparatus, the apparatus has been exposed to rain
ormoisture, does not operate normally, or has been dropped.
2
Important Safety Instructions
15. Do not overload wall outlets and extension cords as this can result in a risk of fire or electric shock.
16.
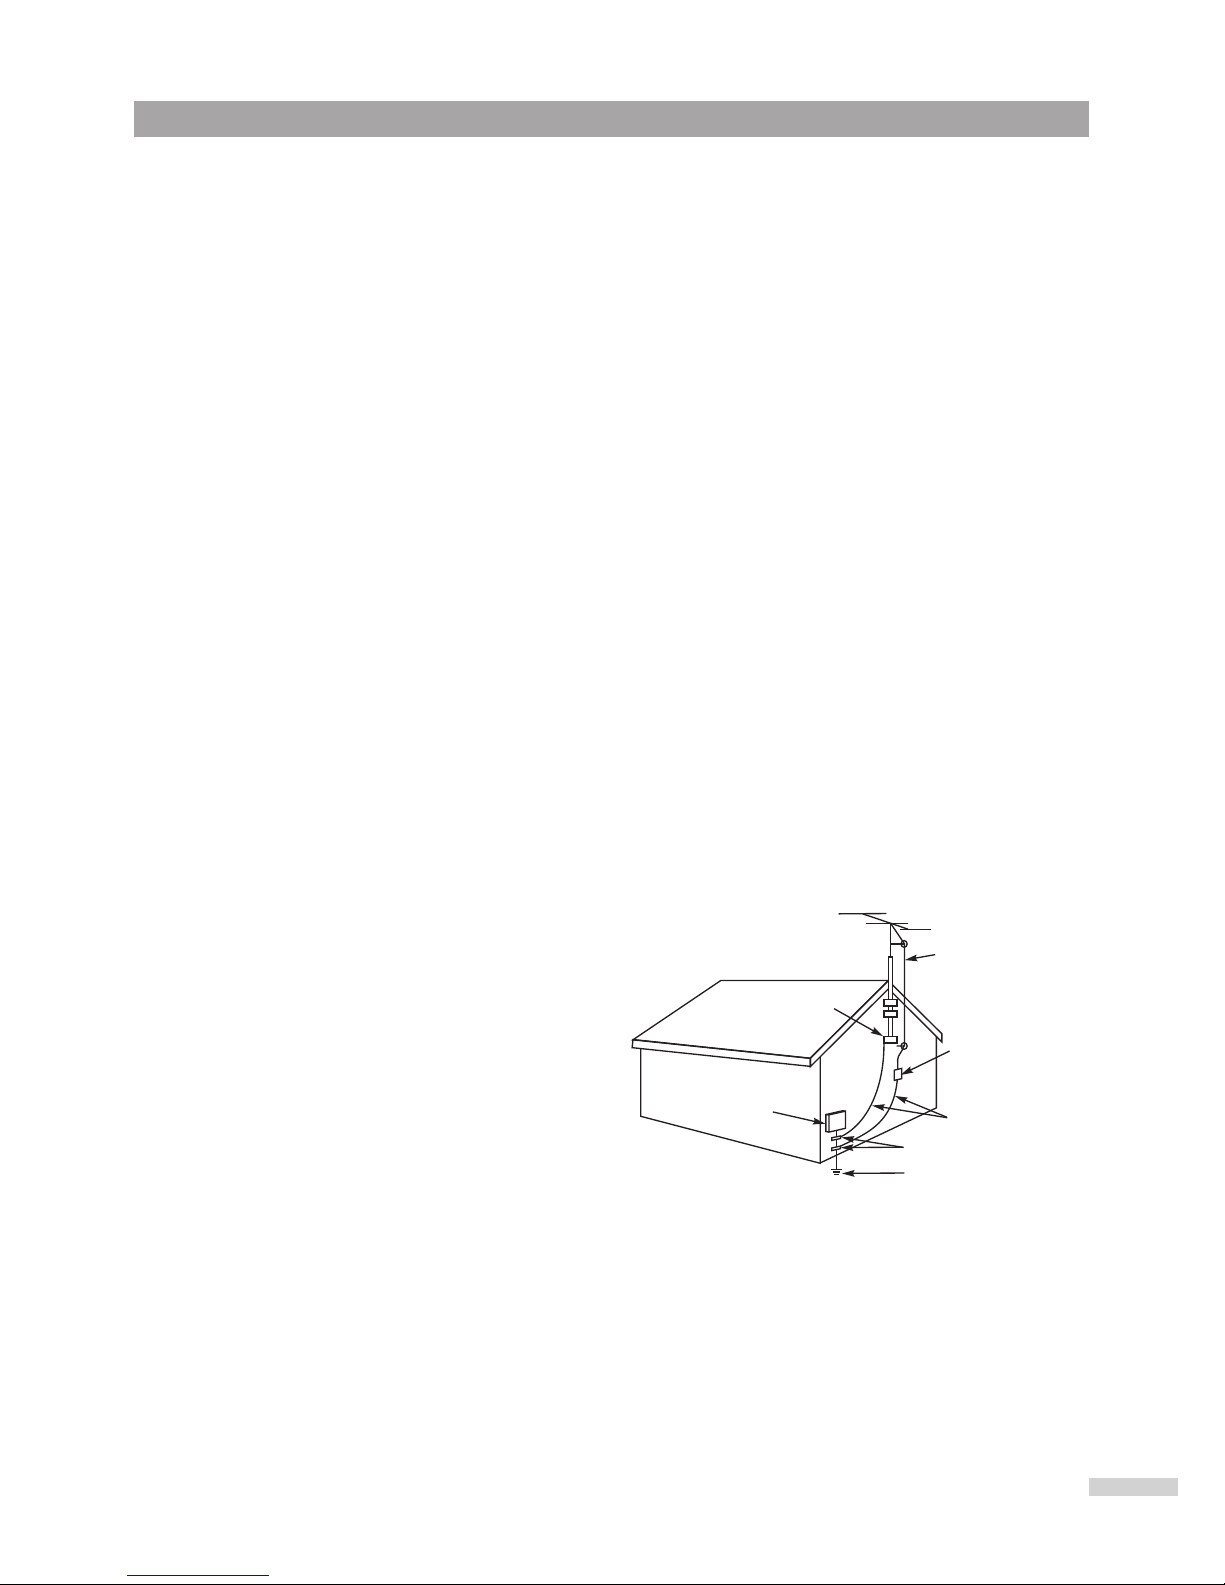
17. If an outside antenna is connected to the product, be sure the antenna system is grounded so as to
provide some protection against voltage surges and built-up static charges. Section 810 of the
National Electric Code, ANSI/NFPA 70, provides information with respect to proper grounding of
the mast and supporting structure, grounding of the lead-in wire to an antenna discharge product,
size of grounding conductors, location of antenna discharge product, connection to grounding
electrodes, and requirements for grounding electrodes.
18.
19. When replacement parts are required, be sure the service technician uses replacement parts
specified by the manufacturer or those that have the same characteristics as the original part.
Unauthorized substitutions may result in fire, electric shock or other hazards.
20. Upon completion of any service or repairs to this product, ask the service technician to perform
safety checks to determine that the product is in proper operating condition.
21. The product should be mounted to a wall or ceiling only as recommended by the manufacturer.
22. Unplug the product from the wall outlet and refer servicing to qualified service personnel under
the following conditions:
a. When the power-supply cord or plug is damaged.
b. If liquid has been spilled, or objects have fallen into the product.
c. If the product has been exposed to rain or water.
d. If the product does not operate normally after installation by following the operating
instructions. Adjust only those controls that are covered by the operating instructions, as
adjustment of other controls may result in damage and will often require extensive work by a
qualified technician to restore the product to its normal operation.
e. If the product has been dropped or the cabinet has been damaged.
f. When the product exhibits a distinct change in performance.
23. This reminder is provided to call the Cable
system installer's attention to Article 820-40
of the NEC that provides guidelines for
proper grounding and, in particular, specifies
that the cable ground shall be connected to
the grounding system of the building, as
close to the point of cable entry as practical.
24. Product complies with DHHS rule 21 CFR
subchapter J in effect at date of manufacture.
CAUTION: use of any controls, adjustments, or procedures other than those specified herein may
result in hazardous radiation exposure.
Apparatus shall no t be exposed to dripping or splashing and no objects filled with liquids, such as
vases, shall be placed on the apparatus.
Refer all servicing to qualified service personnel. Servicing is required when the apparatus has
been damaged in any way, such as power-supply cord or plug is damaged, liquid has been spilled
or objects have fallen into the apparatus, the apparatus has been exposed to rain or moisture, does
not operate normally, or has been dropped.
ANTENNA
LEAD IN
WIRE
GROUND
CLAMP
ELECTRIC
SERVICE
EQUIPMENT
NEC-NATIONAL ELECTRICAL CODE
S2898A
ANTENNA
DISCHARGE UNIT
(NEC SECTION 810-20)
GROUNDING CONDUCTORS
(NEC SECTION 810-21)
GROUND CLAMPS
POWER SERVICE GROUNDING
ELECTRODE SYSTEM
(NEC ART 250, PART H)
EXAMPLE OF ANTENNA GROUNDING AS PER
NATIONAL ELECTRICAL CODE
WARNING: FOR CONTINUED SAFETY, REPLACE SAFETY CRITICAL COMPONENTS
ONLY WITH MANUFACTURER'S RECOMMENDED PARTS (REFER TO SERVICE
LITERATURE).
Front
3
1
+C
H
+
VOLCH
MENU
STOP
PLAY
OPEN/ CLOSE TV/AV TV/ DVDVOL
VIDEO L /MONO-AUDIO-R
()
2
2
3
4
5
6
7
8 9 10 11
13 14 15 16
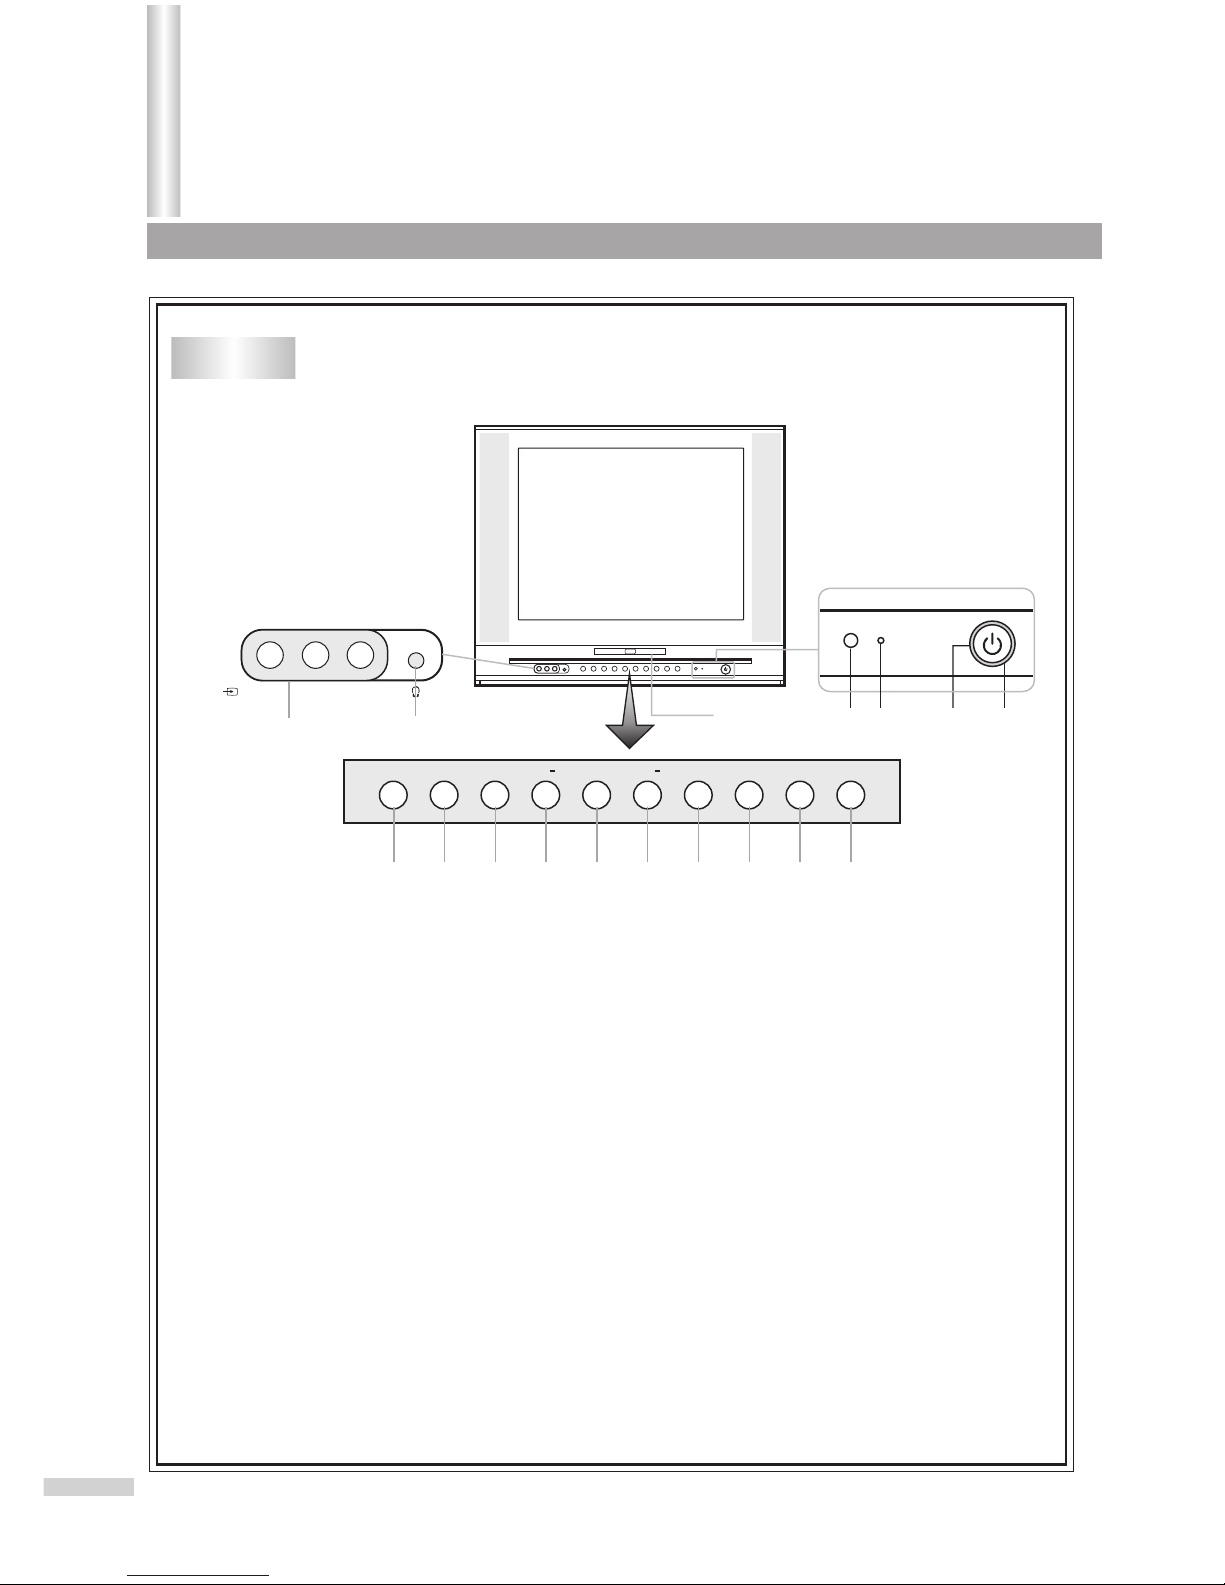
1. AV2 inputs (VIDEO, AUDIO L/MONO, R)
2. Earphone jack
3. Open/close disc tray
4. Playback
5. Stop playback
6. Channel down select; menu item select
7. Channel up select; menu item select
8. Volume down adjust; menu item adjust
9. Volume up adjust; menu item adjust
10. Display MENU of TV
11. Video input select
12. Switch between TV/AV and DVD
13. Remote sensor
14. Power indicator (red)
15. Purple indicator
16. Power button
Disc tray
Getting Started
12

Back
4
3
L /MONO
AUDIO
DIGITAL
AUDIO
COAXIAL
-
S VIDEO
R
VIDEO
OUT
1
2
4
1. AV1 inputs (S-VIDEO, VIDEO, AUDIO L/MONO, R)
2. Monitor outputs (VIDEO, AUDIO L/MONO, R)
3. Antenna input
4. DIGITAL AUDIO COAXIAL OUTPUT jack
Getting Started(continued)
DV2418
DV2018
5
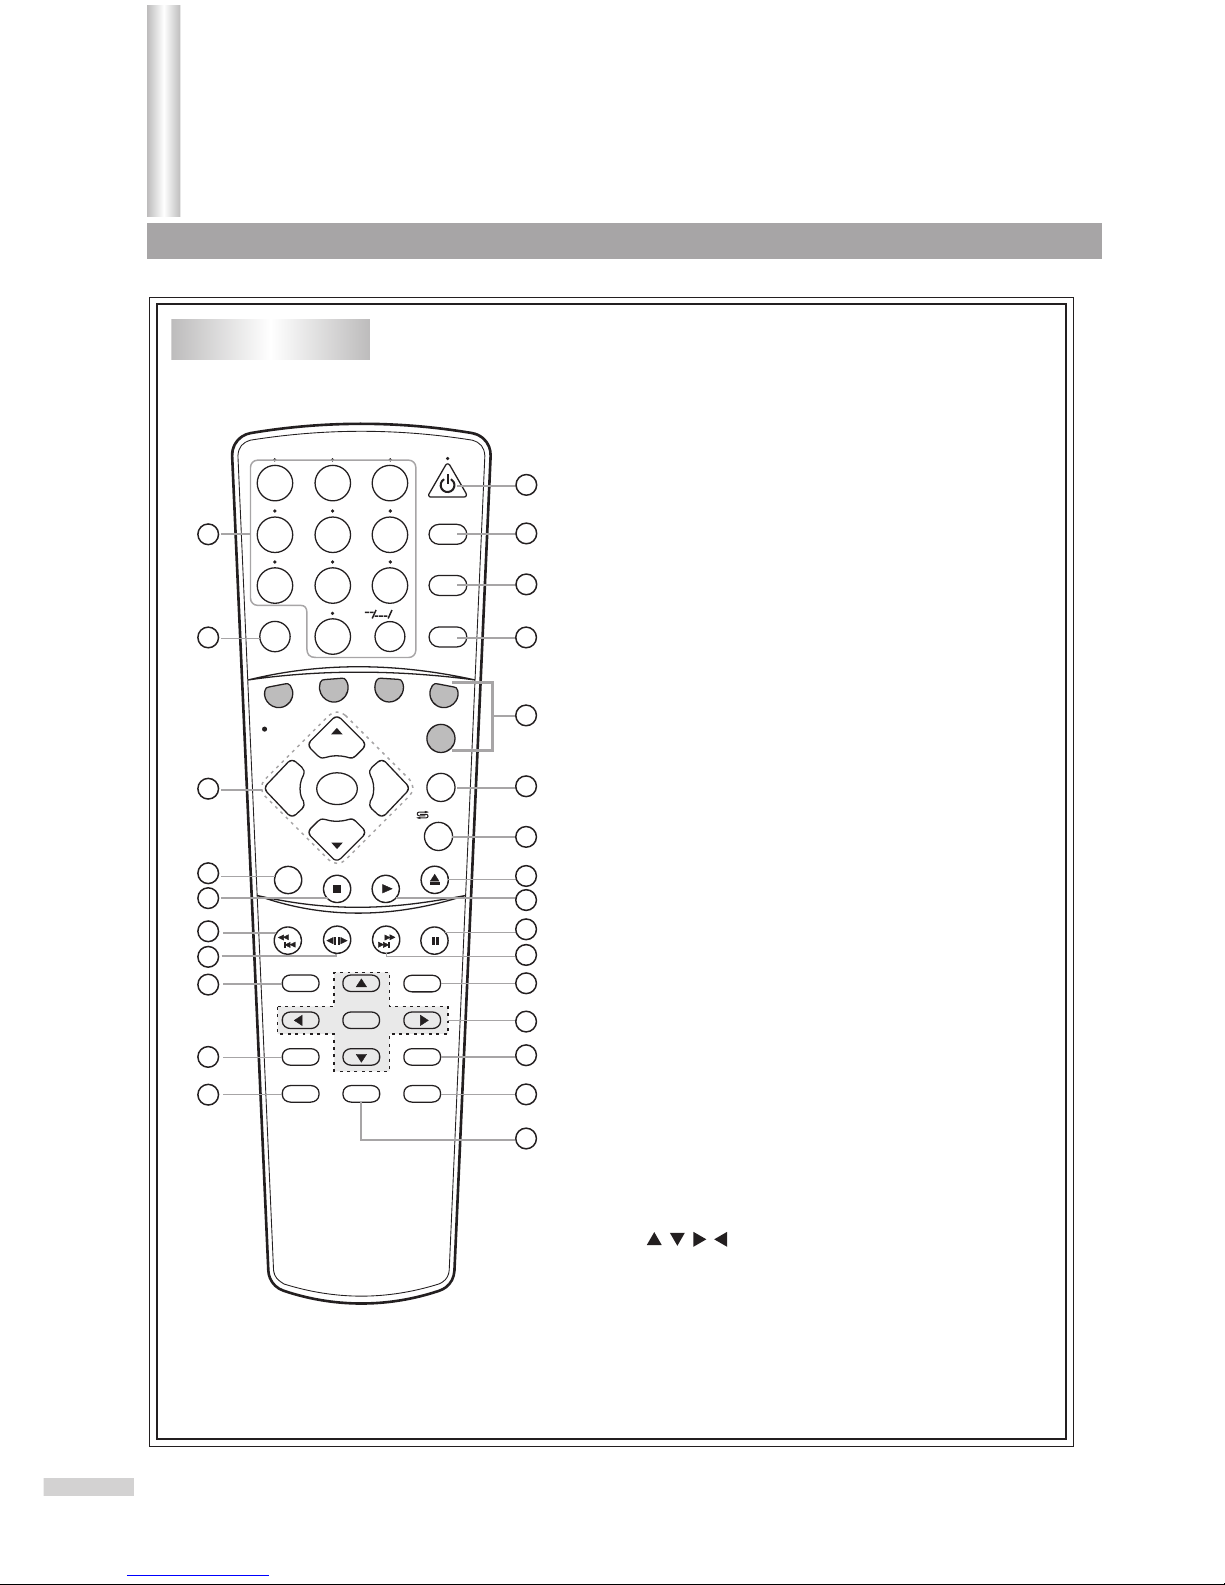
Remote Control
SEARCH
1
2
3
4
5
6
7
8
9
0
DVD MENU
TITLE
ENTER
PLAY
STOP
SR/SF
REW/PREV
RETURN
OPEN/CLOSE
DSP/OSD
STEREO/AUDIO&CH
FWD/NEXT
PAUSE/STEP
REPEAT A-B
ANGLE
SUBTITLE
CH
MENU
CH
Cable/SAT
DVD COMBO
SET
MUTE
AV/SETUP
+10
SLEEP
VCR
TV
VOL
VOL
TV/DVD
+
-
1. Power on/off
2. Sleep timer
3. Switch between TV/AV and DVD
4. Video input select
Display initial setup menu
5. Number buttons (Keyboard)
6. Mute the sound
7. Remote control unit selection
8. Display TV information
Display DVD information
9. Switch between present/previous channel
Zoom (DVD)
10. Open or close the DVD disc tray
11. VOL+/-: adjust volume; adjust menu item
CH+/-: Select channel; Select menu item
MENU: Display menu of TV
12. Switch the sound of TV
Change DVD language selection
13. Stop playback
14. Playback
15. Reverse playback
Chapter Back
16. Pause playback
Step playback
17. Forward/Reverse-slow motion
18. Forward playback
Chapter forward
19. Locate desired scene
20. Return to previous menu screen
21. DVD MENU: Display DVD menu
: Cursor buttons
22. Enter information in menu
23. Repeat playback between A and B
24. Change playback angle
25. Set subtitle
26. Go to DVD title menu
1
2
3
4
5
6
7
8
9
10
11
12
13
14
15
16
17
18
19
20
21
22
23
24
25
26
Getting Started(continued)
/ZOOM
11
5m5m
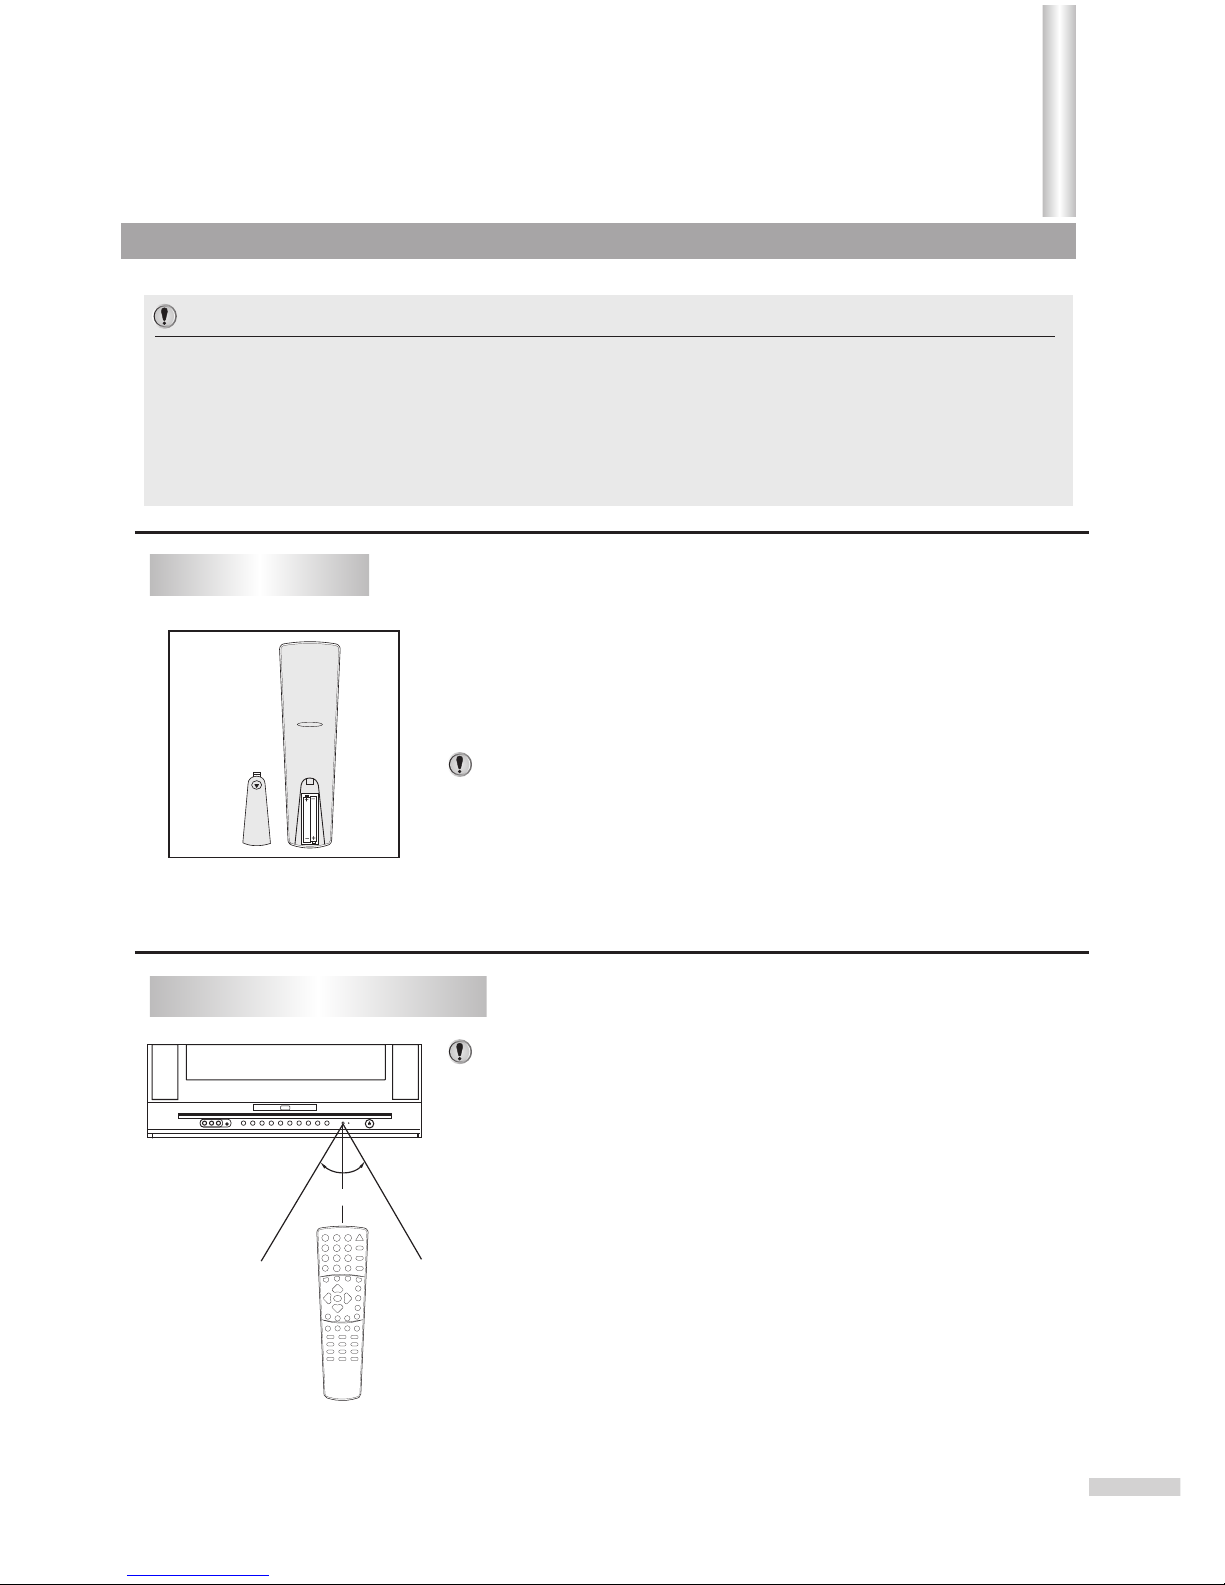
Install two "AAA" batteries matching the +/- polarities of the battery to the
+/- marks inside the battery compartment.
Slide the battery compartment cover in the direction of the arrow.
Replace the compartment cover.
Notes:
Aim the remote control at the remote sensor and press control buttons to
*
operate.
o
Operate the remote control within 30 angle on either side of the remote
*
sensor, up to a distance of approx. 5 meters or 16 feet.
When there is an obstacle between the TV/DVD and the transmitter, the
*
transmitter may not operate.
When direct sunlight, and incandescent lamp, fluorescent lamp or any
*
other strong light shines on the REMOTE SENSOR of the TV/DVD, the
operation of the remote may be unstable.
Do not try to recharge batteries they are not rechargeable.
*
Use only the size and type of batteries specified. Do not mix different
*
types of batteries together or old batteries with fresh ones.
When the remote control will not be used for a long period of time or when
*
the batteries are worn out, remove the batteries.
Do not throw the batteries into a fire. Do not drop, dampen or disassemble
*
the remote control. Dispose of used batteries in the specified manner.
Installing batteries
Effective range of the Remote
6
1
2
3
Important:
Your remote control has been preprogrammed. If your remote controller does not work
correctly, maybe the setting is wrong, please try the following steps.
1. Press and hold the “SET ” button, followed by the “DVD COMBO ” button at the same
time until the indicator lights up.
2. Press 1, 4, 7 buttons one by one. As a response, the indicator of the remote control
will twinkle twice, otherwise please repeat the above 2 steps.
Notes:
Getting Started(continued)
7
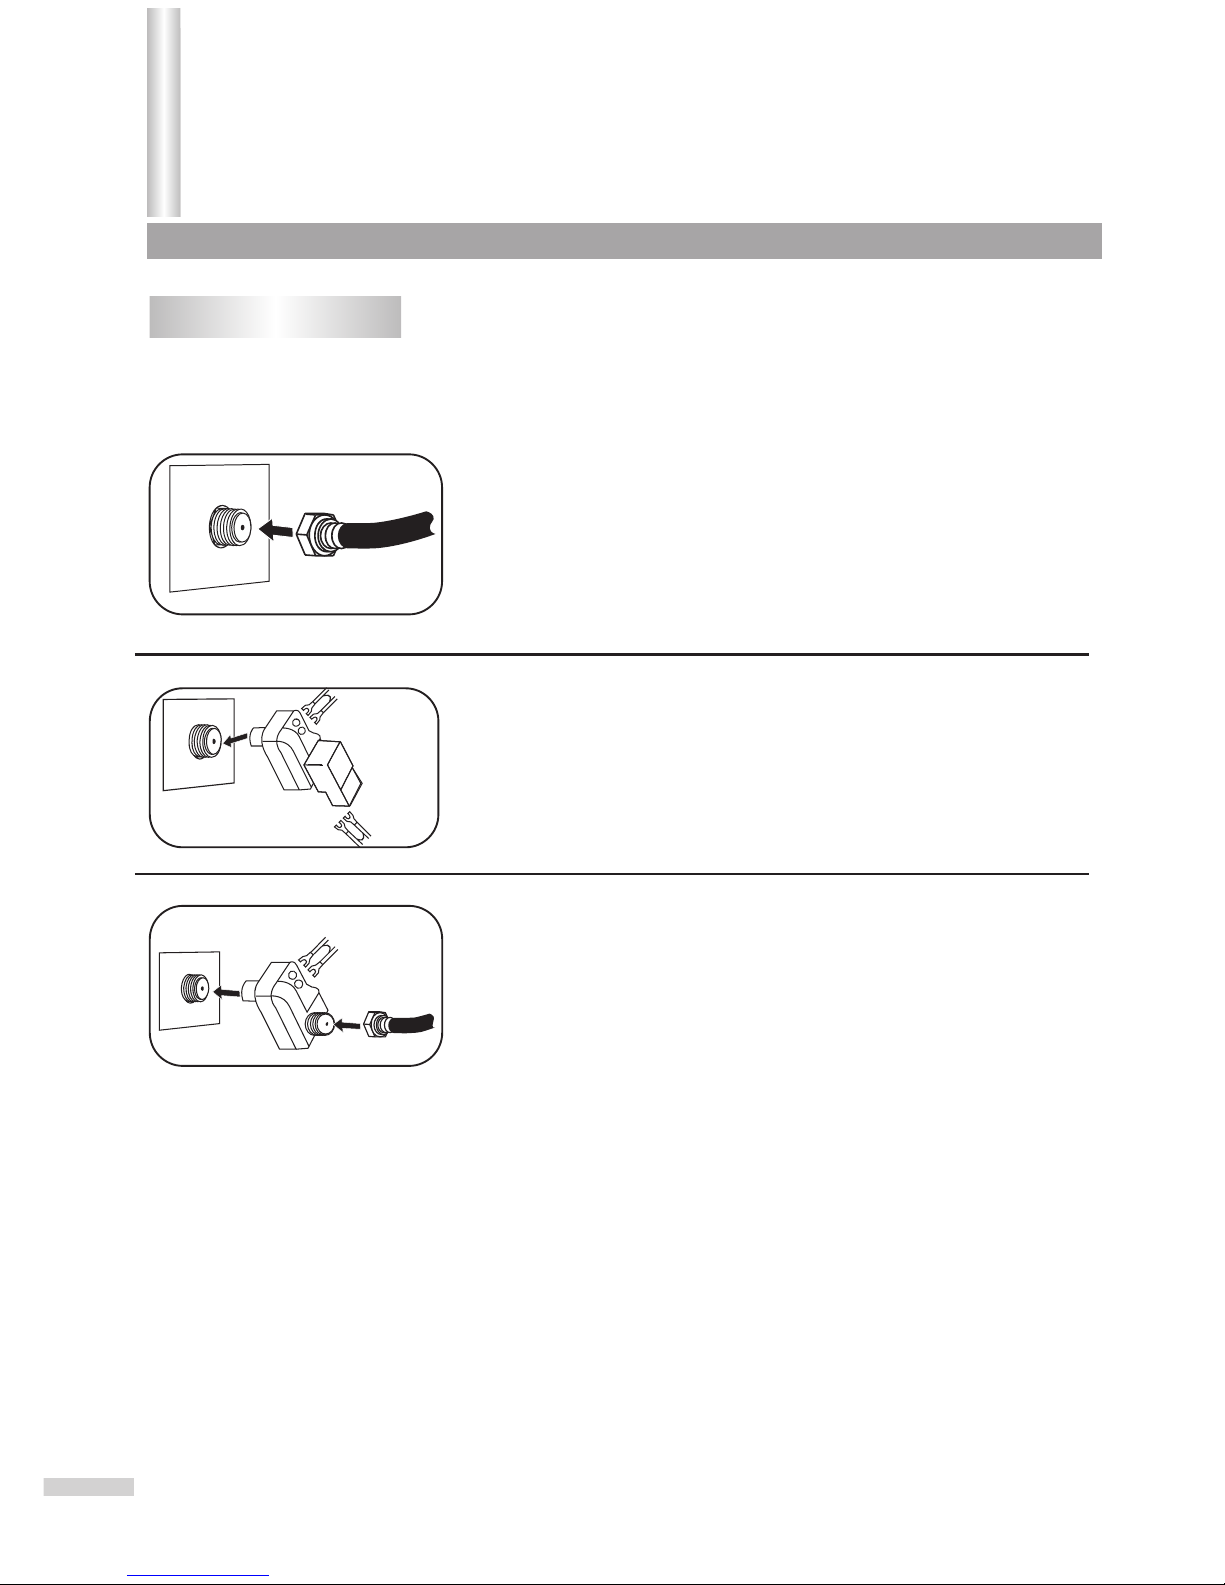
Antenna connections
OUTDOOR VHF/UHF ANTENNA CONNECTION (ANTENNA NOT INCLUDED)
Follow the instructions for the type of antenna system you intend to use. If using Cable or satellite, see
the next page.
Combination VHF/UHF
Antenna (Single 75 ohm cable or 300 ohm twin-lead wire)
Connect the 75 ohm cable from combination VHF/UHF antenna to the
antenna jack.
OR
If your combination antenna has a 300 ohm twin-lead wire, use a 300-75
ohm matching transformer (NOT SUPPLIED).
Connect the UHF twin-lead wire to a combiner (NOT SUPPLIED).
Connect the VHF twin-lead to a 300-75 ohm matching transformer (NOT
SUPPLIED). Attach the transformer to the combiner. Attach the
combiner to the antenna jack.
Connect the 75 ohm cable from the VHF antenna and the UHF antenna
twin-lead wire to a combiner (NOT SUPPLIED). Attach the combiner to
the antenna jack.
NOTE: If your VHF antenna has a twin-lead wire use a 300-75 ohm
matching transformer, then connect the transformer to the combiner.
Combination VHF/UHF
Antenna (Separate VHF and UHF 300 ohm twin-leads)
Separate VHF/UHF Antennas
VHF/UHF
75 OHM
VHF 300
OHM
VHF 75 Ohm
Combiner
Combiner
UHF 300 Ohm
UHF 300 Ohm
Installation
INSTALL the unit in a room where direct light will not fall upon the screen.
Tip: Total darkness or a reflection on the picture screen may cause
eyestrain. For best results, soft, indirect lighting is recommended.
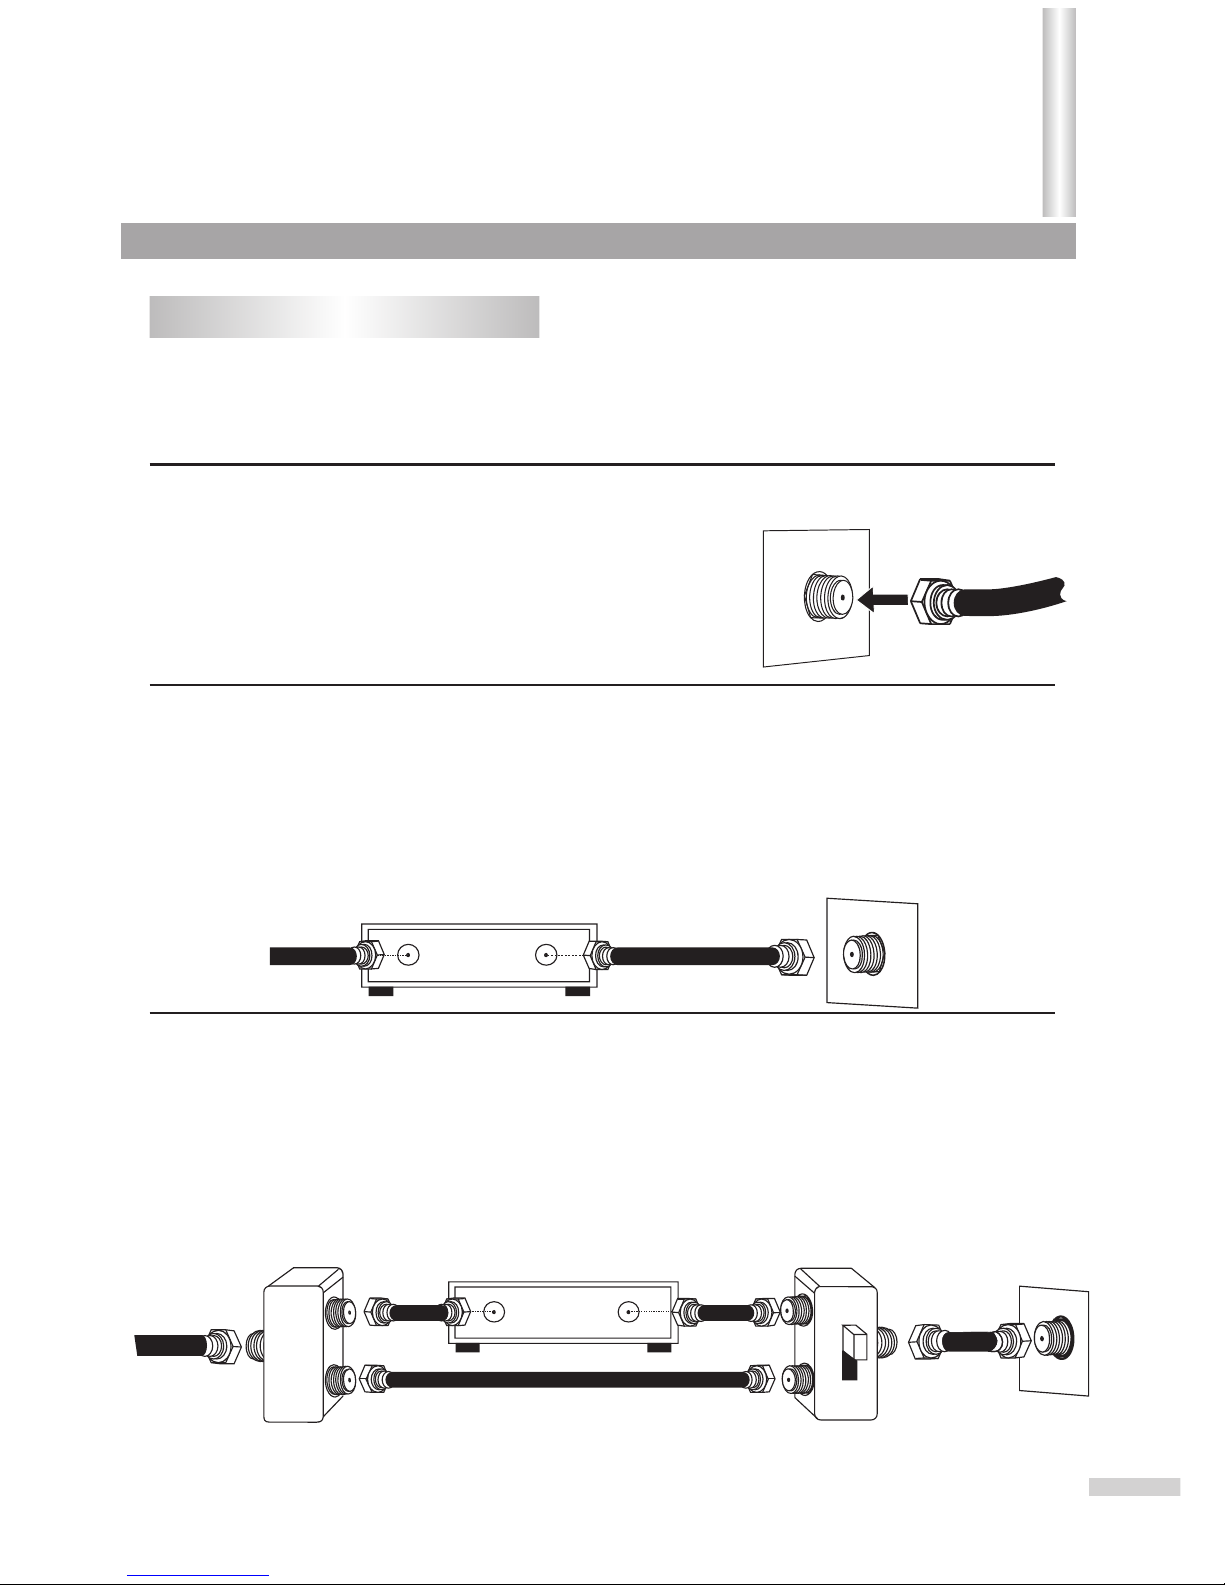
FOR SUBSCRIBERS TO SCRAMBLED CABLE TV SERVICE OR SATELLITE
FOR SUBSCRIBERS TO UNSCRAMBLED BASIC CABLE TV SERVICE
WITH SCRAMBLED PREMIUM CHANNELS
If you subscribe to a satellite service or a cable TV service which requires the use of a converter/
descrambler box, connect the incoming 75 ohm coaxial cable to the converter/descrambler box. Using
another 75 ohm cable, connect the output of the converter/descrambler or satellite box to the antenna jack
on the DVD Combo. Follow the connections shown below. Set the DVD Combo to the output channel of the
converter/descrambler or satellite box (usually 3 or 4) and use the converter/descrambler or satellite box to
select channels.
If you subscribe to a satellite service or a cable TV service in which basic channels are unscrambled and
premium channels require the use of a converter/descrambler box, you may wish to use a signal splitter
and an A/B switch box (available from the cable company or an electronic supply store). Follow the
connections shown below. With the switch in the "B" position, you can directly tune any nonscrambled
channels on your DVD Combo. With the switch in the "A" position, tune your DVD Combo to the output of
the converter/descrambler box (usually channel 3 or 4) and use the converter/descrambler box to tune
scrambled channels.
Cable (CATV)/satellite connections
This TV has an extended tuning range and can tune most cable channels without using a Cable TV converter box.
Some Cable TV companies offer "premium pay channels" in which the signal is scrambled. Descrambling these
signals for normal viewing requires the use of a descrambling device and is generally provided by the cable company.
FOR SUBSCRIBERS TO BASIC CABLE TV SERVICE
For basic cable service not requiring a converter/descrambler box,
connect the CATV 75 ohm coaxial cable to the VHF/UHF jack on the
rear of the DVD Combo.
8
75 OHM CABLE
TO DVD Combo
INCOMING
75 OHM
CATV CABLE
INCOMING
75 OHM
CATV CABLE
75 OHM
CABLE
CONVERTER/DESCRAMBLER
OR SATELLITE BOX
CONVERTER/DESCRAMBLER
SPLITTER A/B SWITCH
Installation (continued)

L /MONO
AUDIO
DIGITAL
AUDIO
COAXIAL
-
S VIDEO
R
VIDEO
OUT
WW
WW
RR
RR
Signal
WW
RR
White (audio L/MONO)
Red (audio R )
To audio (L) input To audio (R) input
Rear of TV/DVD
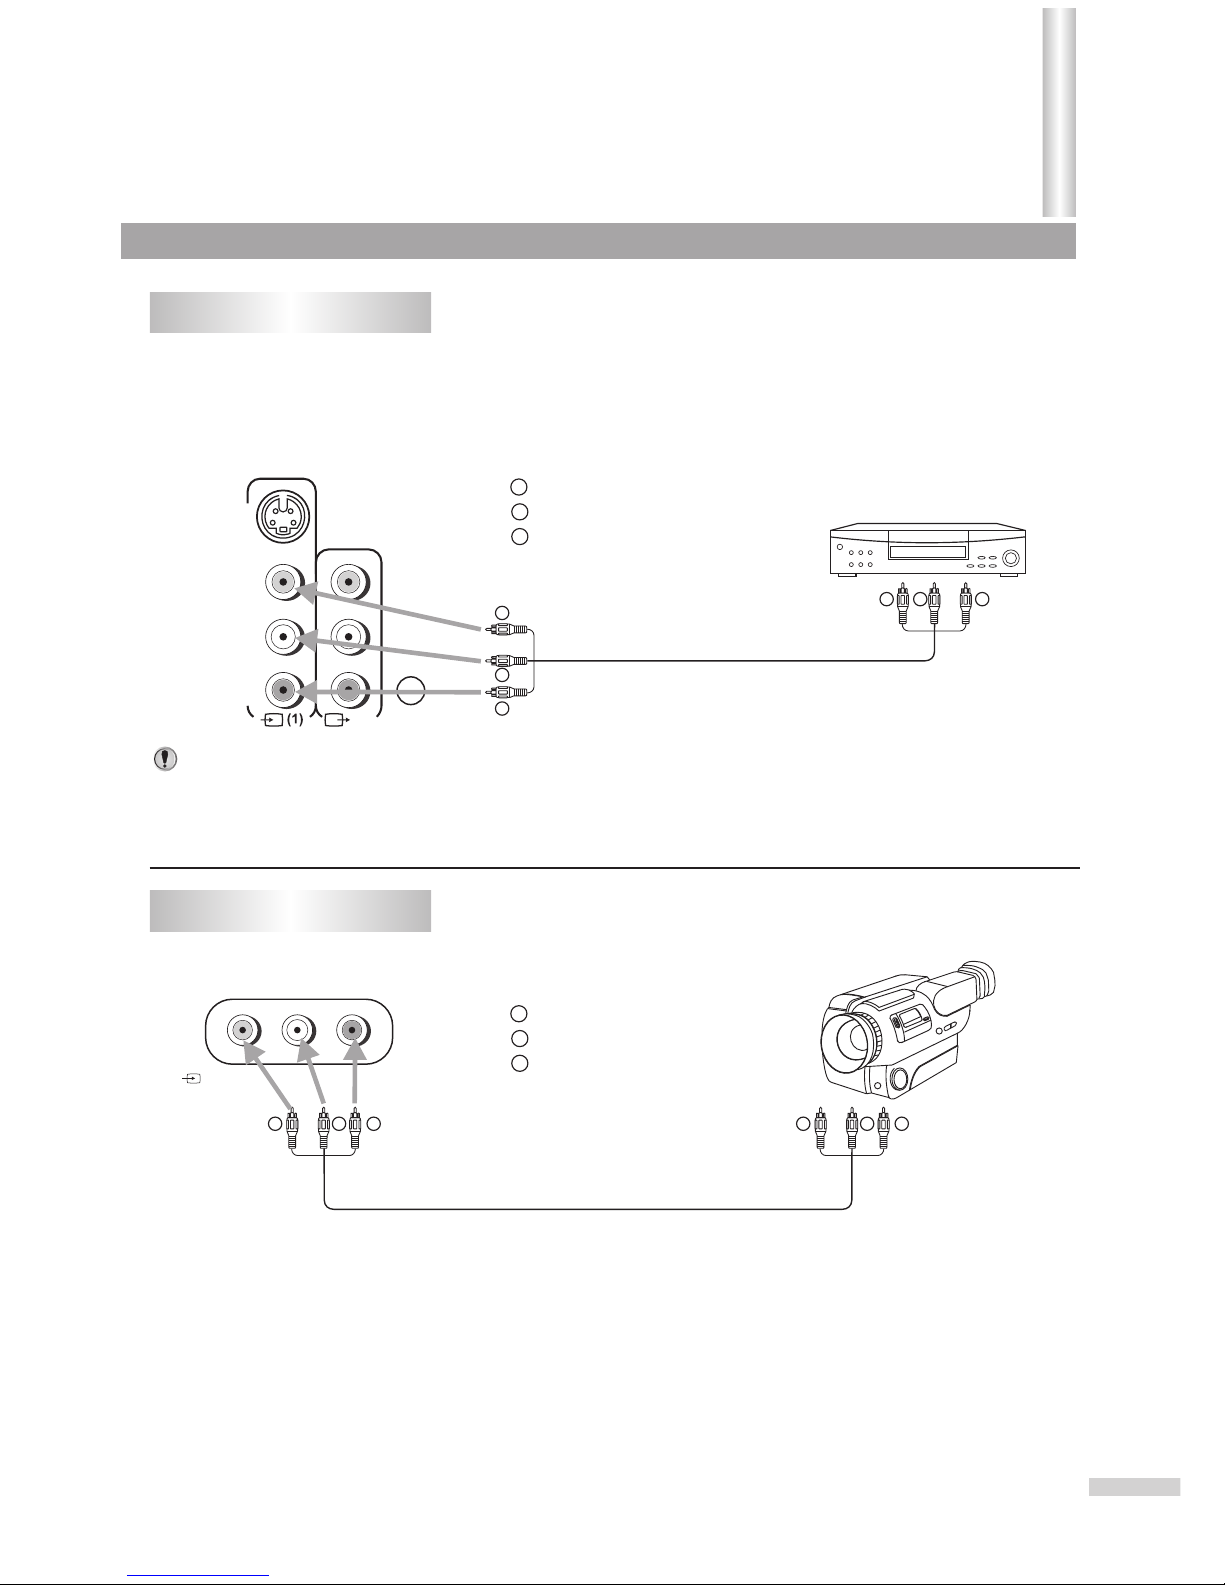
This TV set provides 2 groups of AV inputs (including S-VIDEO) and 1 group of MONITOR outputs for your
convenient connection to VCR, Camcorder, Amplifier or other equipment. Check the Owner's Manual of the
equipment to be connected as well.
Using an Audio Amplifier
Using an AV Amplifier with built-in digital surround
L /MONO
AUDIO
DIGITAL
AUDIO
COAXIAL
-
S VIDEO
R
VIDEO
OUT
Rear of TV/DVD
Coaxial digital cable
(not supplied)
To Coaxial Digital
Audio Input
AV Amplifier with built-in digital surround
Front
Speaker
(Left)
Front
Speaker
(Right)
TV/DVD
Subwoofer
Center Speaker
Surround
Speaker (Left)
Surround
Speaker
(Right)
Manufactured under license from Dolby Laboratories. “Dolby” and the double-D symbol are trademarks of Dolby
Laboratories. Confidential unpublished works. © 1992-1997 Dolby Laboratories, Inc. All rights reserved.
“DTS” and “DTS Digital Out” are trademarks of Digital Theater System, Inc.
9
Installation
To video
output
To audio
outputs
WW
YY
RR
Notes:
Connecting AV1 inputs
L /MONO
AUDIO
DIGITAL
AUDIO
COAXIAL
-
S VIDEO
R
VIDEO
OUT
Rear of TV/DVD
If you connect the TV/DVD to VCR or camcorder, you can select by pressing the AV/SETUP button. Press
this button repeatedly to select the desired mode. “Video 1”, “Video 2” or TV channel will display on the
screen.
In the DVD mode this button will not operate.
VCR
WW
YY
RR
VIDEO L /MONO-AUDIO-R
()
2
Front of TV/DVD
Connecting AV2 inputs
To video
output
To audio
outputs
To video
input
To audio
inputs
WW
YY
RR
To video
input
To audio
inputs
WW
YY
RR
WW
YY
RR
Yellow (video)
white (audio L/MONO)
red (audio R )
WW
YY
RR
Yellow (video)
white (audio L/MONO)
red (audio R )
10
Installation (continued)
With the AV1 input terminals, the S-VIDEO terminal takes precedence to the Video 1 input. When an S-Video
cable is plugged in the AV1 input is disabled. To view the video signal from the AV1 terminals, disconnect the
S-VIDEO connection.
Turning on
Turning off
1
In STANDBY mode, you can also turn on the set by pressing the
TV/AV, Channel up/down or Volume up/down button on the
set's panel.
If there is no input signal, then a blue background appears.
The TV set can turn off automatically by:
A. Sleep timer function (needs to be set in advance).
B. OFF timer function (needs to be set in advance).
2
In STANDBY mode, press the power button on the
TV set or on the remote controller to turn on the unit.
If the red indicator lights up and no picture appears, then the TV
set is in STANDBY mode. Now please follow step 2.
Notes:
Notes:
Notes:
11
Press the Power button on the remote controller
or on the TV set to turn off the TV set.
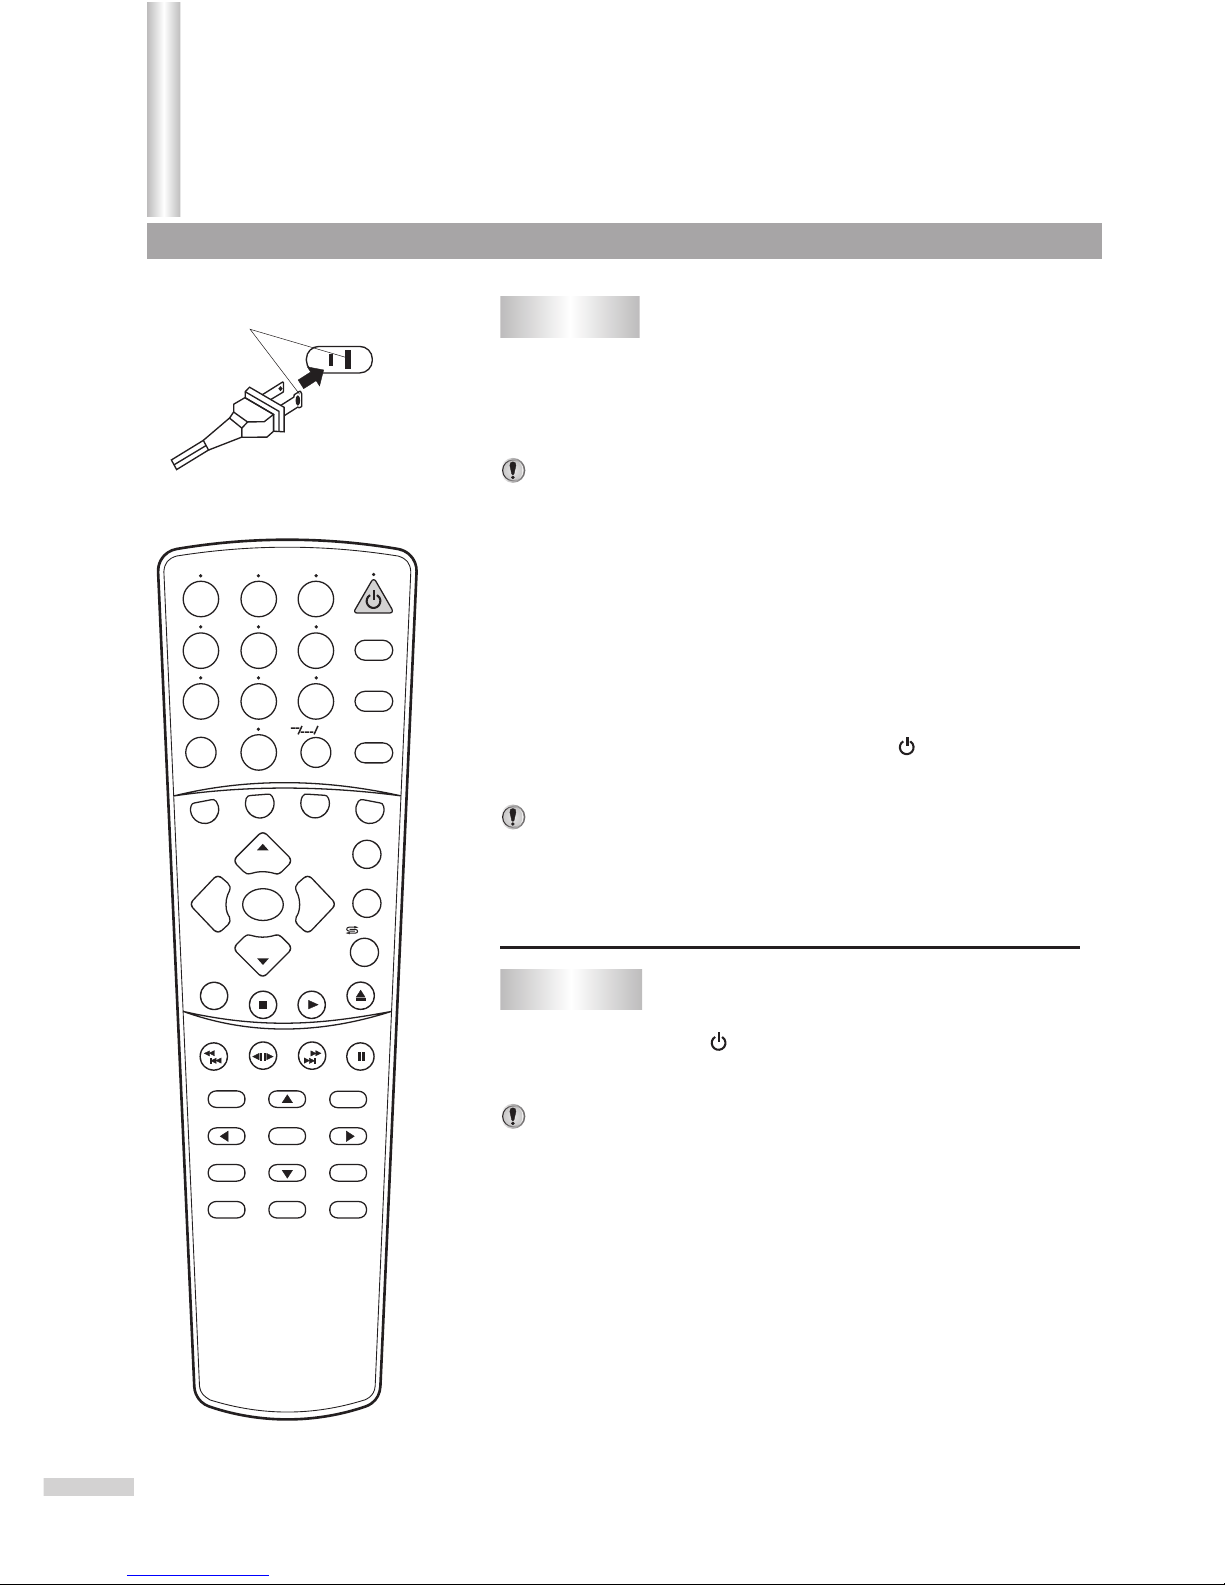
Polarized AC cord plug
(One blade is wider than the other)
AC Outlet
Insert the AC plug (with the 2 blades) into a
conveniently located AC outlet having 120V, 60Hz.
The AC plug supplied with the unit is polarized to help minimize
the possibility of electric shock. If the AC plug does not fit into a
non-polarized AC outlet, do not file or cut the wide blade. It is the
user's responsibility to have an electrician replace the obsolete
outlet.
11
To prevent electric shock, do not use a
(polarized) plug with an extension cord
receptacle or other outlet unless the blades
can be fully inserted.
Wider Hole
and Blade
SEARCH
1
2
3
4
5
6
7
8 9
0
DVD MENU
TITLE
ENTER
PLAY
STOP
SR/SF
REW/PREV
RETURN
OPEN/CLOSE
DSP/OSD
STEREO/AUDIO&CH
FWD/NEXT
PAUSE/STEP
REPEAT A-B
ANGLE
SUBTITLE
CH
MENU
CH
Cable/SAT
DVD COMBO
SET
MUTE
AV/SETUP
+10
SLEEP
VCR
TV
VOL
VOL
TV/DVD
+
-
Power on/off
/ZOOM
1
11
22
33
44
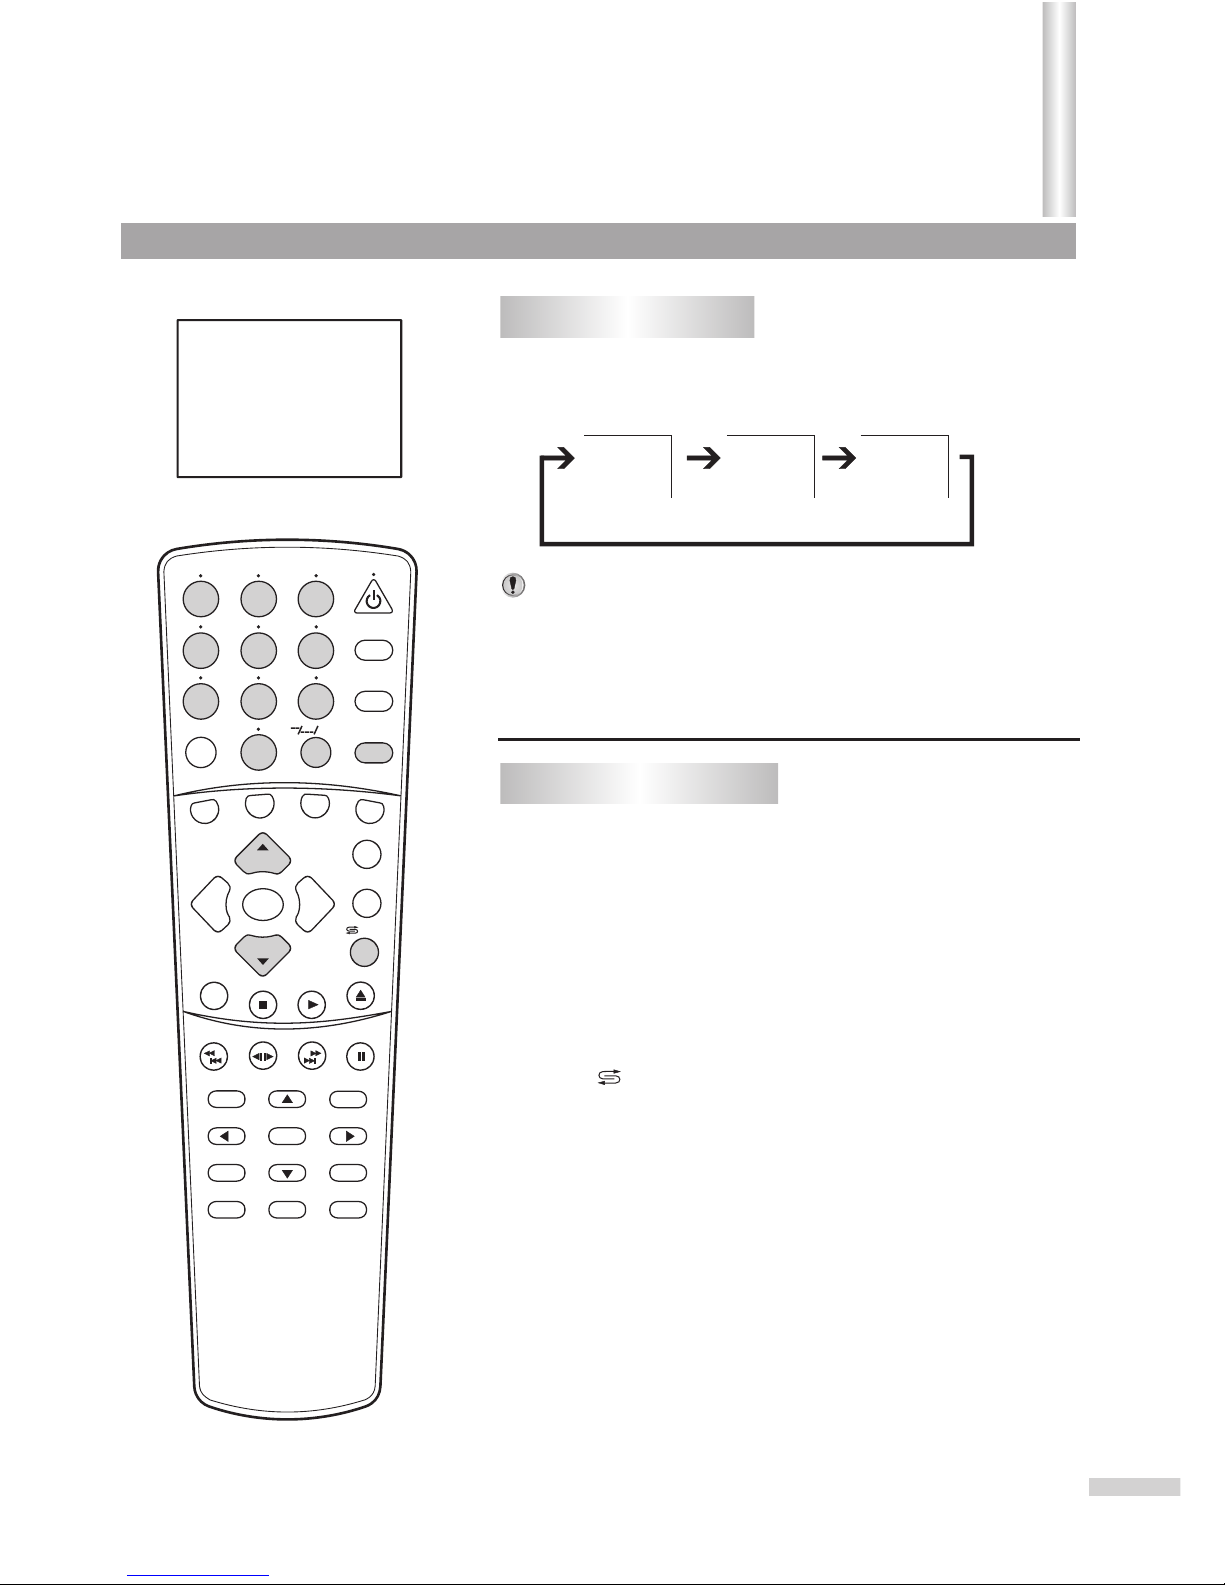
To watch video program from AV inputs, Press
AV/SETUP repeatedly to select the desired mode.
Press AV/SETUP repeatedly until the TV program
appears.
Press digit buttons to switch back to TV mode.
Press CH+ or CH- to switch back to TV mode.
Press /ZOOM to switch back to TV mode.
When the TV set is in AV mode, there are four ways for you to switch
back to TV mode.
Watching AV program
Switching from AV to TV
Video1
12
Video1
Video2
TV 10
MONO
Notes:
SEARCH
1
2
3
4
5
6
7
8 9
0
DVD MENU
TITLE
ENTER
PLAY
STOP
SR/SF
REW/PREV
RETURN
OPEN/CLOSE
DSP/OSD
STEREO/AUDIO&CH
FWD/NEXT
PAUSE/STEP
REPEAT A-B
ANGLE
SUBTITLE
CH
MENU
CH
Cable/SAT
DVD COMBO
SET
MUTE
AV/SETUP
+10
SLEEP
VCR
TV
VOL
VOL
TV/DVD
+
-
Selecting the Video Input
With the AV1 input terminals, the S-VIDEO terminal takes
precedence to the Video 1 input. When both S-video and AV1 cables
are connected, the S-video signal is automatically selected and the
On-screen display is "S-Video". To view the video signal from the AV1
terminals, disconnect the S-VIDEO connection.
/ZOOM
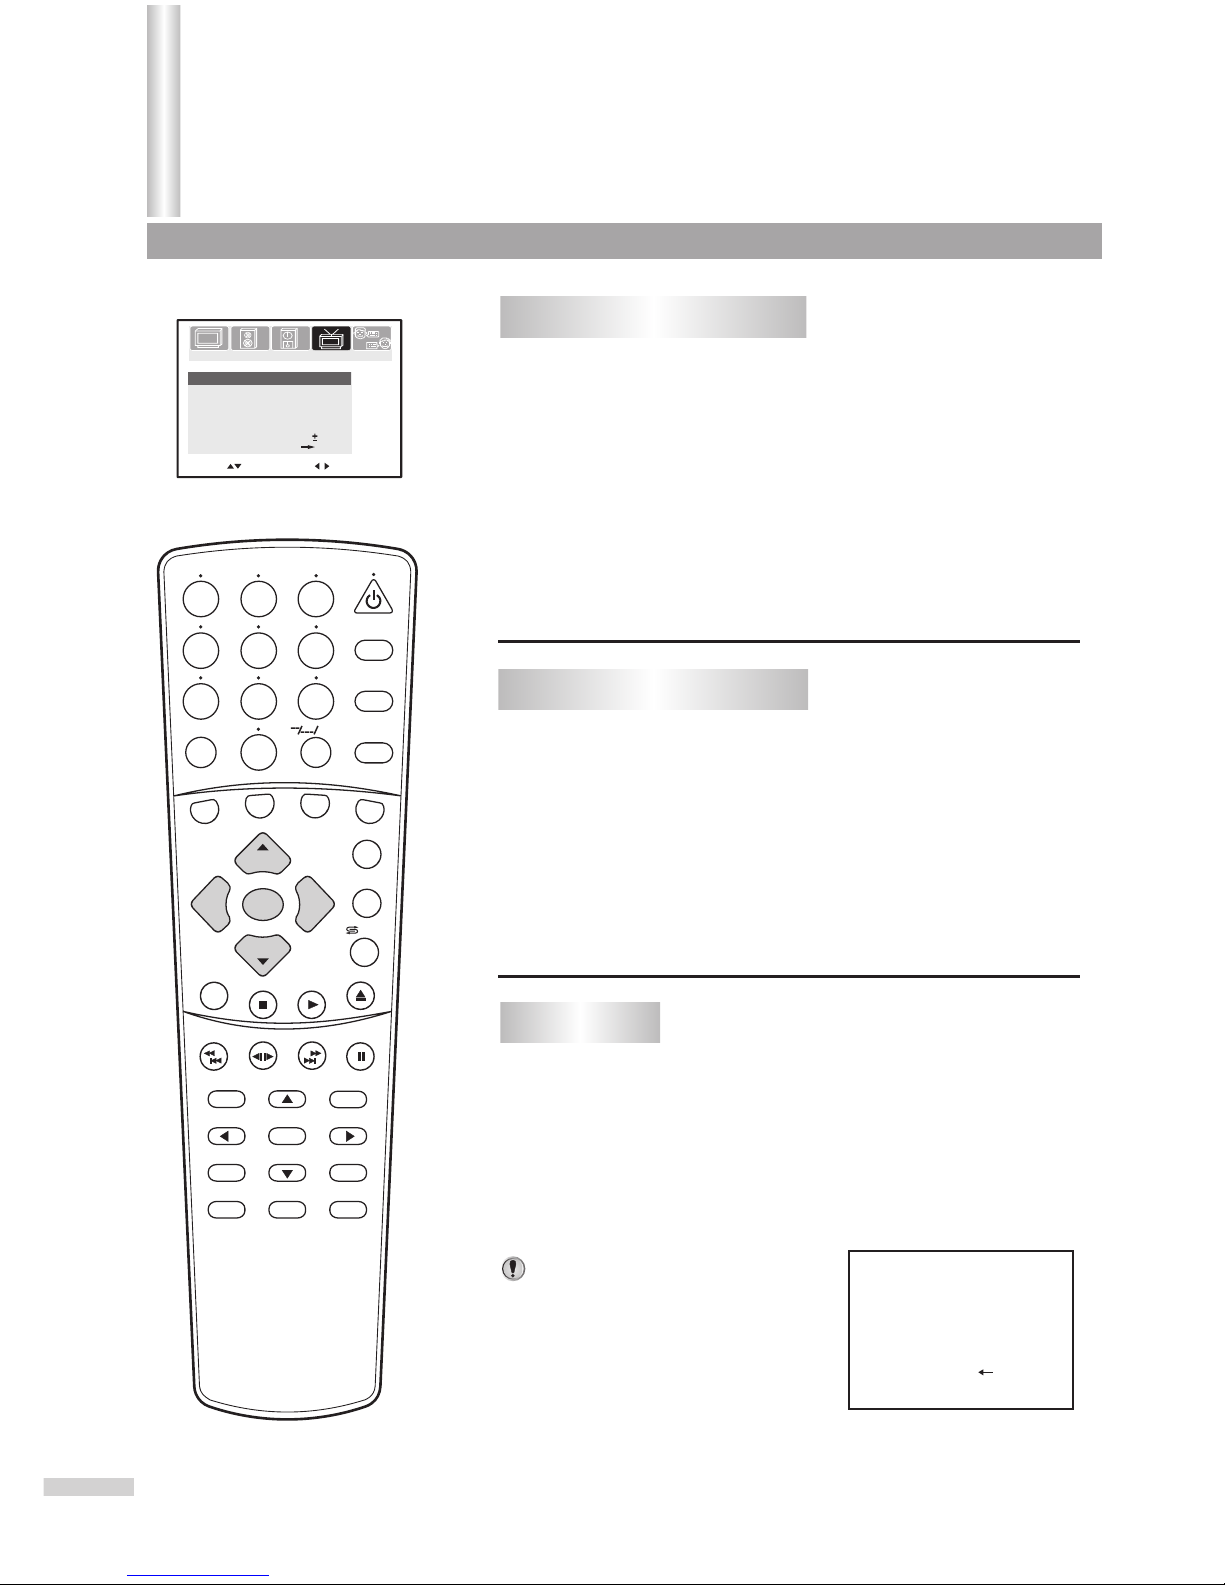
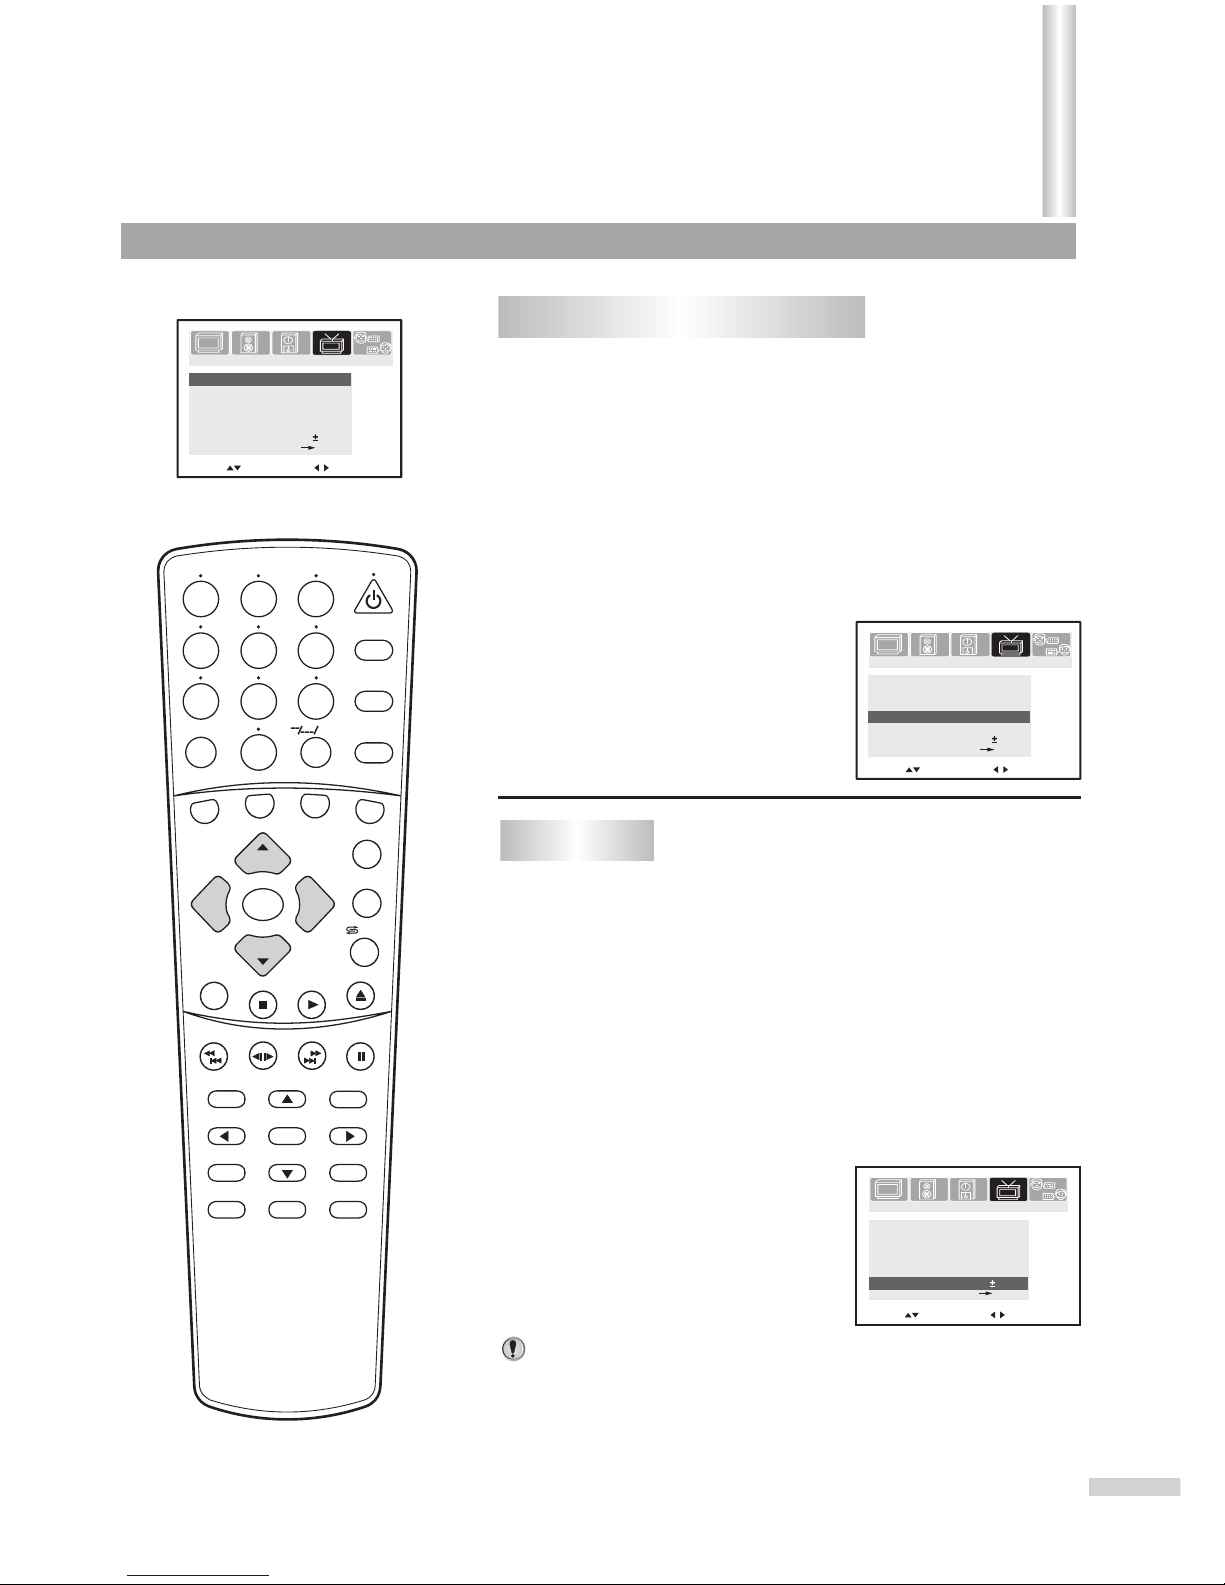
To enter the TUNING menu
Auto Search
TV
18
Auto memory
Stop
11
22
From the TUNING menu, press CH+ or CH- repeatedly
to highlight Auto Search item.
Press VOL+ to start Auto Search.
All active channels will be preset and stored into the memory
automatically. After presetting, the TV will go to the channel
before the Auto Search started.
During the process of Auto Search,
pressing the VOL- button will stop
the process and the TV will return to
the original channel when Auto
Search started.
Notes:
PICTURE
TIMERSOUND
TUNING
Channel
7
AUTO
TV/Cable
TV
Add/Erase
Add
AFT
Fine
Auto search
Color system
0
On
Move[ ] Adjust[ ]
SET UP
13
Press the MENU button.
Press VOL+ or VOL- to select TUNING icon.
Press CH- to display the TUNING menu.
SEARCH
1
2
3
4
5
6
7
8 9
0
DVD MENU
TITLE
ENTER
PLAY
STOP
SR/SF
REW/PREV
RETURN
OPEN/CLOSE
DSP/OSD
STEREO/AUDIO&CH
FWD/NEXT
PAUSE/STEP
REPEAT A-B
ANGLE
SUBTITLE
CH
MENU
CH
Cable/SAT
DVD COMBO
SET
MUTE
AV/SETUP
+10
SLEEP
VCR
TV
VOL
VOL
TV/DVD
+
-
1
2
3
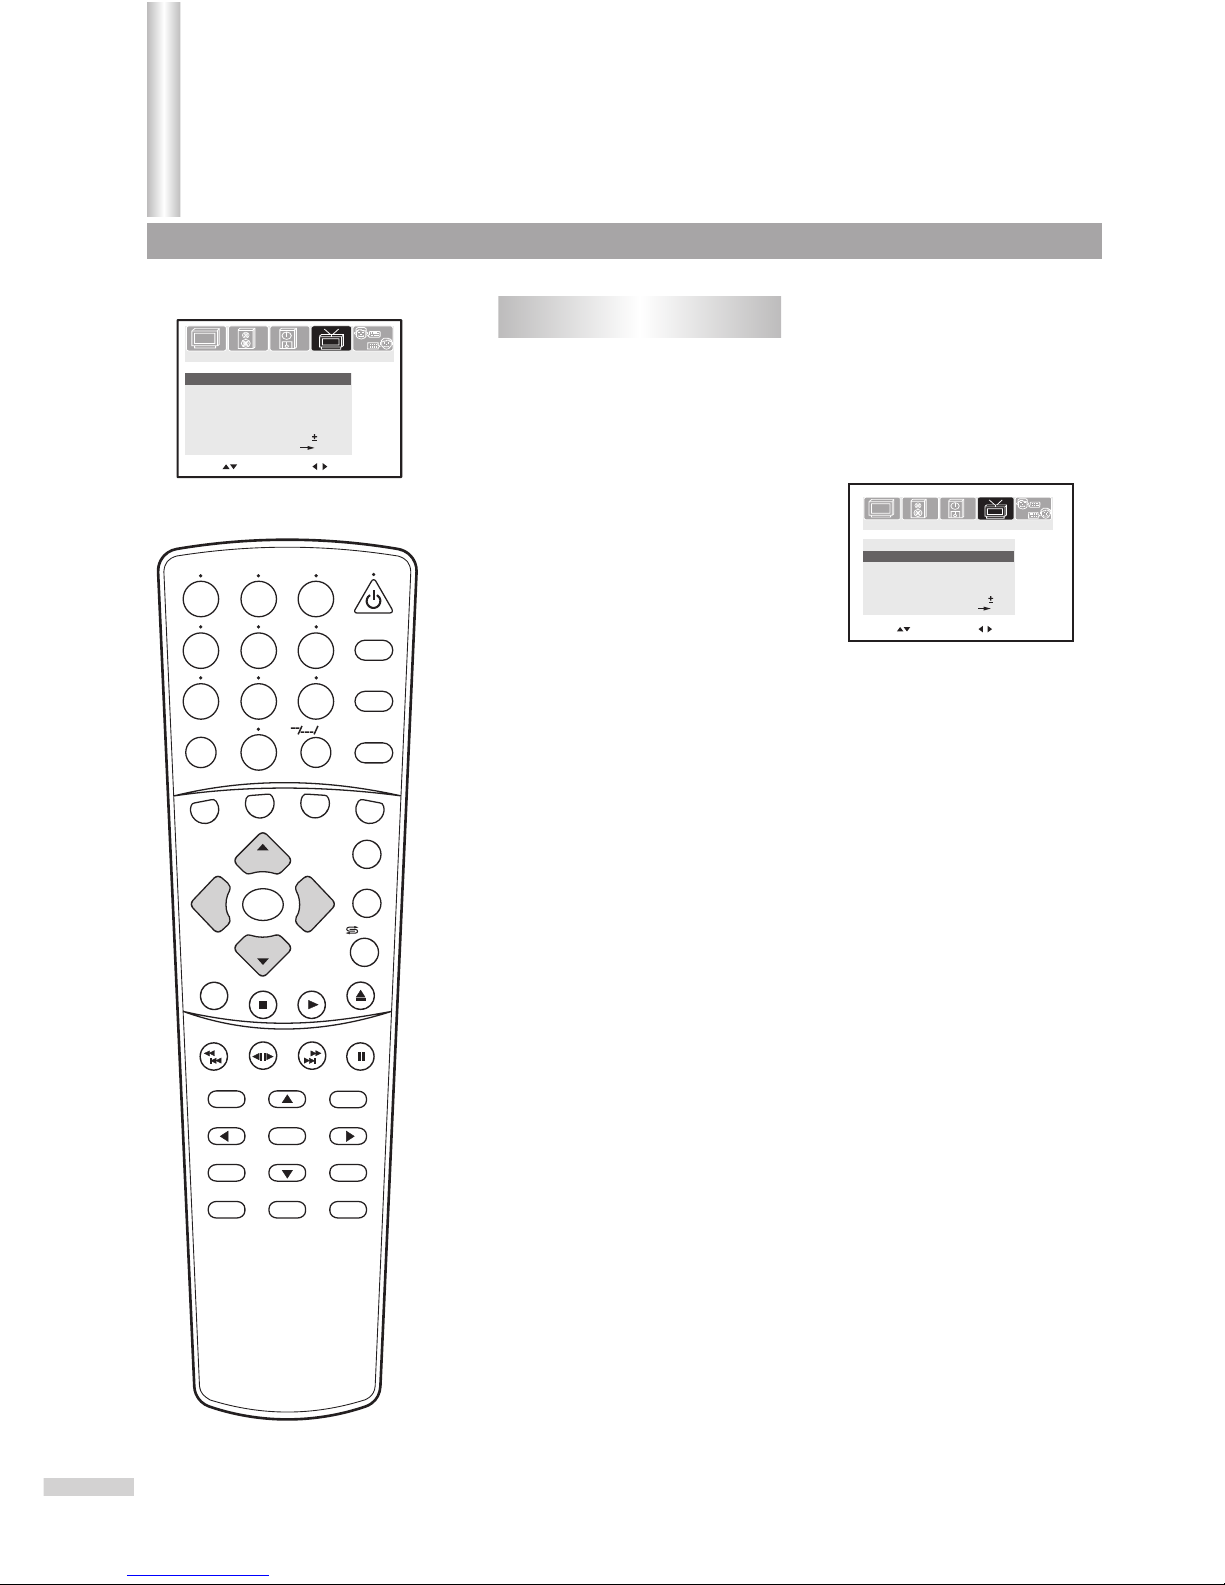
Tuning
If the TUNING icon is not present on the menu group, the
TV/DVD may be in AV mode. Press the AV/SETUP button till
TV mode appears. Press MENU again and the TUNING icon
should appear.
22
Press VOL+ or VOL- to select TV or Cable.
In TV mode, the set receives antenna signals. In Cable mode the
set receives Cable TV programs. Please select:
TV: If using VHF/UHF antenna. Only channels received on
antenna can be selected.
Cable: If using Cable TV. Only channels received on cables can be
selected
Setting the TV/Cable option
11
From the TUNING menu, press CH+ or CH- repeatedly
to highlight TV/Cable item.
/ZOOM
2
4
3
From the TUNING menu, press CH+ or CH- repeatedly
to highlight Channel item.
From the TUNING menu, press CH+ or CH- repeatedly
to highlight Channel item.
Press CH+ or CH- repeatedly to highlight Fine item.
Press CH+ or CH- repeatedly to highlight Add/Erase
item.
Press VOL+ or VOL- to select a channel number (for
example, channel10)
Press VOL+ or VOL- to select a channel number you
want to Fine tune (for example, channel10).
Press VOL+ or VOL- to fine
tune till the best possible
picture and sound are
obtained.
Press VOL+ or VOL- to set to Erase.
Now channel 10 will be skipped when
you browse channels by the CH+ or
CH- button.
The AFT can be set to On or Off. When the AFT is set to On, the TV set
will automatically tune the program frequency to provide the best
possible picture and sound.
To restore a skipped channel, please
use the digit buttons to select the
skipped channel, then repeat the
above steps 3 and 4 from above and
set the Add/Erase item to Add.
Fine tuning is unnecessary under normal conditions. However, in areas of
inferior broadcast conditions where adjustment is necessary for a better
picture and sound, use Fine tuning.
Erasing an unnecessary channel
1
Fine tuning
1
3
4
2
Notes about AFT item:
Channel
Channel
7
7
AUTO
AUTO
TV/Cable
TV/Cable
TV
TV
Add/Erase
Add/Erase
Erase
Erase
AFT
AFT
Fine
Fine
Auto search
Auto search
Color system
Color system
0
0
On
On
Move[ ] Adjust[ ]
Move[ ] Adjust[ ]
14
PICTURE
TIMERSOUND
TUNING
SET UP
PICTURE
TIMERSOUND
TUNING
SET UP
SEARCH
1
2
3
4
5
6
7
8 9
0
DVD MENU
TITLE
ENTER
PLAY
STOP
SR/SF
REW/PREV
RETURN
OPEN/CLOSE
DSP/OSD
STEREO/AUDIO&CH
FWD/NEXT
PAUSE/STEP
REPEAT A-B
ANGLE
SUBTITLE
CH
MENU
CH
Cable/SAT
DVD COMBO
SET
MUTE
AV/SETUP
+10
SLEEP
VCR
TV
VOL
VOL
TV/DVD
+
-
Channel
7
AUTO
TV/Cable
TV
Add/Erase
Erase
AFT
Fine
Auto search
Color system
0
On
Move[ ] Adjust[ ]
PICTURE
TIMERSOUND
TUNING
SET UP
Tuning (continued)
/ZOOM
Press VOL+ or VOL- to select
a proper color system.
If the picture color is abnormal, maybe the color system setting is wrong.
You can select a proper color system as follows.
The color system switches between
AUTO, NTSC358 and NTSC443.
Setting the Color System
1
2
Channel
7
AUTO
TV/Cable
TV
Add/Erase
Erase
AFT
Fine
Auto search
Color system
0
On
Move[ ] Adjust[ ]
Channel
7
NTSC443
TV/Cable
TV
Add/Erase
Erase
AFT
Fine
Auto search
Color system
0
On
Move[ ] Select[ ]
15
PICTURE
TIMERSOUND
TUNING
SET UP
PICTURE
TIMERSOUND
TUNING
SET UP
SEARCH
1
2
3
4
5
6
7
8 9
0
DVD MENU
TITLE
ENTER
PLAY
STOP
SR/SF
REW/PREV
RETURN
OPEN/CLOSE
DSP/OSD
STEREO/AUDIO&CH
FWD/NEXT
PAUSE/STEP
REPEAT A-B
ANGLE
SUBTITLE
CH
MENU
CH
Cable/SAT
DVD COMBO
SET
MUTE
AV/SETUP
+10
SLEEP
VCR
TV
VOL
VOL
TV/DVD
+
-
From the TUNING menu, press CH+ or CH- repeatedly
to highlight Color System item.
Tuning (continued)
/ZOOM
TV 10
Mono
16
SEARCH
1
2
3
4
5
6
7
8 9
0
DVD MENU
TITLE
ENTER
PLAY
STOP
SR/SF
REW/PREV
RETURN
OPEN/CLOSE
DSP/OSD
STEREO/AUDIO&CH
FWD/NEXT
PAUSE/STEP
REPEAT A-B
ANGLE
SUBTITLE
CH
MENU
CH
Cable/SAT
DVD COMBO
SET
MUTE
AV/SETUP
+10
SLEEP
VCR
TV
VOL
VOL
TV/DVD
+
-
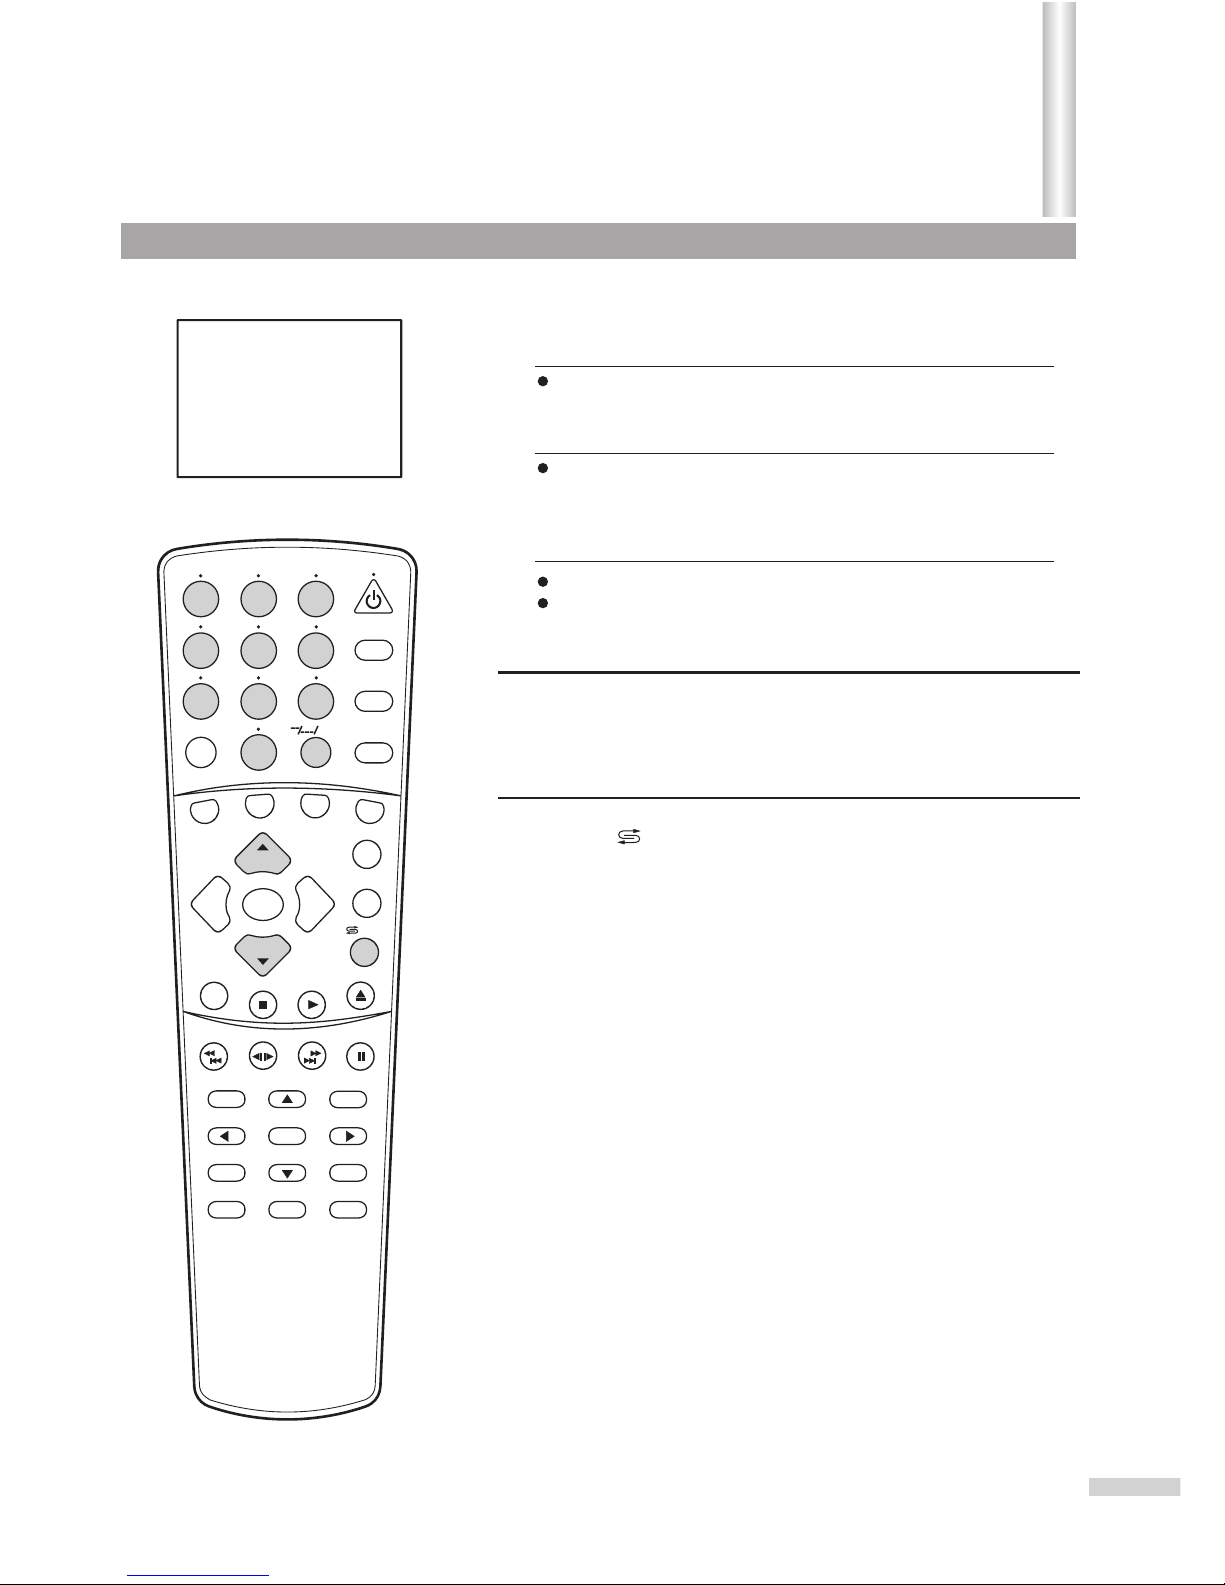
3
Use 0~9 digit buttons and the --/---/+10 button
Use the CH+ or CH- button
Press one of the 0-9 digit buttons and wait for 2 seconds.
Input the channel using the digit buttons. Be sure to enter the
channel within 2 seconds.
Press the "--/---/+10” button to display "1--".
Press two digit buttons to input the remaining two digits of the
channel. For example, to select channel 124, press "--/---/+10”,
press 2, then press 4.
Press the CH+ button, the channel number increases;
Press the CH- button, the channel number decreases.
Press this button to switch between the current channel and the
previous channel.
To select two-digit channel:
To select three-digit channel:
Use the /ZOOM button
1
2
To select one-digit channel:
Channel Selection
/ZOOM
 Loading...