

Page 1
P
R
I
M
A
A
I
R
A
W
N
I
N
G
For Models: Deluxe 260, 390 | Ripstop 150, 260, 390
PRIMA AIR AWNING
USER MANUAL
horizons
Page 2

WHAT’S IN
THE BOX
Your awning package will contain:
• PRIMA Awning
• Air Struts
• Draught Skirt
• Hand pump
• Pegs and bag
• Rear Poles (Deluxe only)
• Oversized carry bag
• Grey peg ladders - these need to be
attached to the awning peg points before
pitching for the first time
for choosing PRIMA to compliment your caravan.
We carefully design our awnings in the UK to deliver
quality and comfort season after season. Your new
awning is backed by over 65 years of caravanning
heritage and brings thoughtful touches, practical
design, and pleasing aesthetics to your pitch.
Before using your awning for the rst time please
read this user manual thoroughly, and keep
it in a safe place for future reference.
THANK YOU
Page 3

INITIAL SET UP
1.
Choose a at pitching site for the best nished results.
If possible, choose a location with some protection
from the wind. To protect your awning from becoming
dirty or damaged, consider laying a ground sheet
down before unpacking.
Attaching to the Caravan1.1
Choosing the best site
PRIMA AIR AWNING | USER MANUAL
Awning channel
Awning beading
Pocket
Locate the awning channel on the caravan and ensure it
is free from debris or damage. Slide the awning beading
through the caravan awning channel until it is in your
desired position. The awning should sit level with the
caravan. Adjust the awning position allow suitable
clearance for windows and doors to be opened.
Rear Poles1.2
If using rear poles, these should be installed before
inating the awning. Insert the at rubberised head of
the pole into the pocket behind the end of the Air Pole
and rest the pole at against the bumper pads. Pushing
the bumper pads against the caravan, adjust the height
of the pole to achieve a loose tension between the
ground and the top of the awning. Clamp the pole and
secure it in place with the hook and elastic fastenings.
We recommend you pitch your awning
as a trial run before rst use. This will
allow you to familiarise yourself with
the set-up process, dimensions, and
features of your new awning.
i
Page 4
INFLATING
THE AWNING
2.
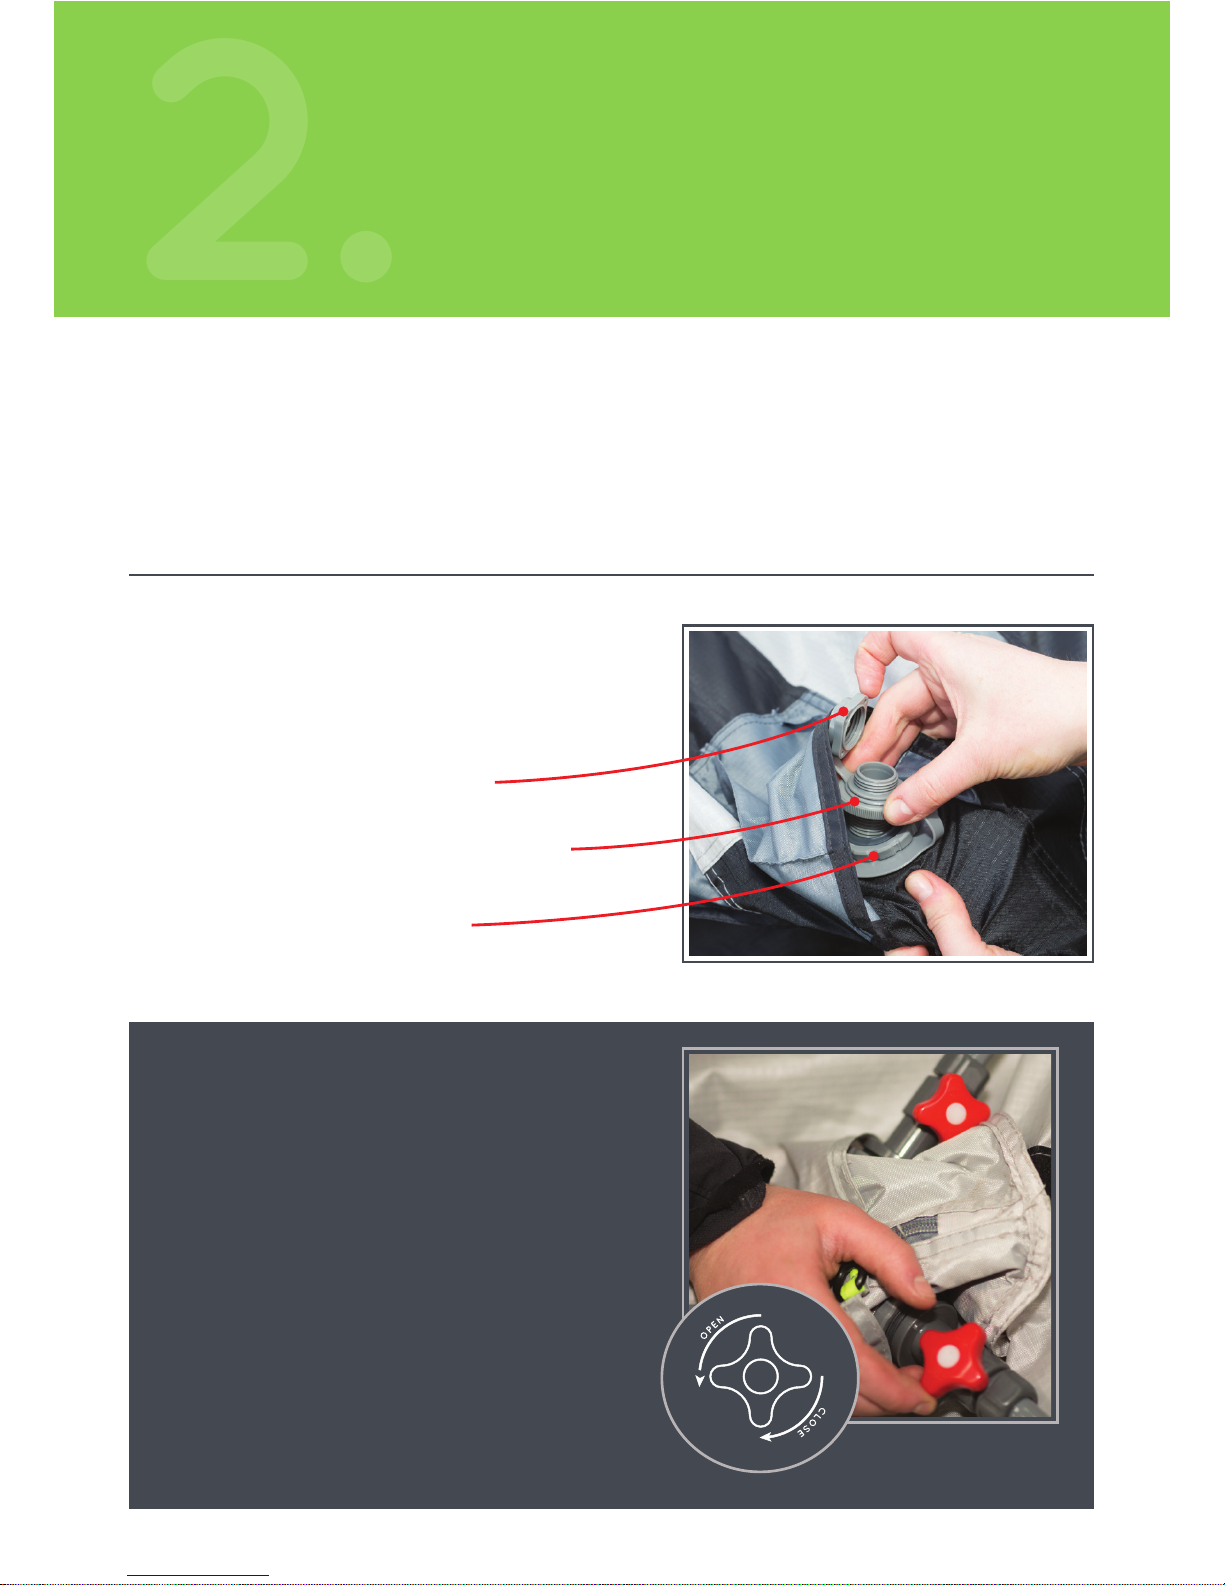
A.
Ensure the top cap is open
B.
The secondary valve ring must be
screwed on to the base of the valve
C.
Ensure the base is screwed
tightly to the fabric
Flexi-inflation isolation valves
The isolating valves are located at the top rear of
the awning roof, connecting the Air Poles. Valves are
adjusted by turning the red valve fully anti-clockwise
to open, and fully clockwise to shut.
To inate the poles all-in-one:
Ensure isolation valves at the top of the
awning are open.
To inate poles individually:
Ensure isolation valves at the top of the awning
are closed. You can choose to inate dierent
sections of the awning by opening or closing
valves on each pole. Monitor your exertion
whilst pumping and take a break if needed.
PRIMA awnings are equipped with a patent-pending Flexi-ination* system,
which allows the awning frame to be inated in dierent ways to suit you.
In some situations, it is helpful to isolate individual Air Poles - each one can
be shut o or opened with individual isolation valves.
*UK Patent Application Number GB1704733.3
Inflation valves2.1
Flexi-inflation System
The ination valves are located on the outer Air Poles in
pockets on the outside of the awning. Before inating:
D.
Shut all other ination valves.
Page 5

Pump nozzle
Attachment point
Air strut
Inflating Air Poles2. 2
Attach pump nozzle rmly into one of the ination
valves and begin inating. Once the Air Poles begin to
take shape, gently pull the awning body away from
the caravan and the semi-inated Air Poles will spring
outward into shape.
Inserting Air Struts2. 3
Inate the Air Struts in the same manner as the
Air Poles. When all Air Struts have been inated,
insert the Struts between the Poles at the
dedicated attachment points.
Final Steps
2. 4
Ensure all ination valves face away from
the outer awning fabric to prevent abrasion.
Ination valve
The Air Poles and Struts cannot be overinated with the supplied hand
pump, so continue to inate until Air Poles are very rm. If using an electric
pump, the ideal ination pressure is between 9 and 11 PSI (0.62 -0.76 bar).
Ensure valve top caps are screwed in tightly.
i
PRIMA AIR AWNING | USER MANUAL
Page 6

PEGGING
DOWN
3.
Pegs should be driven into the
ground at 45° angle away from
the awning for maximum hold
Peg ladders
Guy line
Pegs and Peg Points3.1
Your awning is supplied with peg ladders that need to be
attached to the awning before pitching for the rst time.
Each peg ladder has a range of pegging points to
adjust tension. Select a point that pulls the fabric
taut without overstressing.
Pegging the Awning3. 2
Ensure all awning windows and doors are fully
closed before pegging to maintain a taut shape.
Ensure edge of the awning runs as a straight
plumb line from the top of the awning to the
ground. Peg the back corners rst, pulling the
corners slightly underneath the caravan to draw
the awning edge close to the caravan body.
Peg the front corners of the awning, ensuring
these are in line with the back edge so the
awning sits squarely on the caravan.
Peg the rest of the awning evenly so there is good
tension between the awning and the ground.
Guy Lines3. 3
We recommend the guy lines are always used when
pitching your awning. Guy lines should run in line with
the awning seams, and be pegged so the awning is
tensioned rmly without warping the shape. The guy
line length can be adjusted with the in-line tension
buckles and toggles.
Page 7

ADDITIONAL
SET UP
4.
Side vent
PRIMA AIR AWNING | USER MANUAL
Rear Draught Skirt4.1
The supplied PRIMA draught skirt can be threaded
through the lower awning rail on your caravan to
reduce draughts.
Additional set up for the Deluxe Model
No-Trip Door PanelsD.1
Deluxe door panels roll up and leave a No-Trip
door skirt that lies ush with the oor (and
can be pegged down). The door skirt can also
be folded up and is secured with a toggle to
create a draught-reducing ‘bathtub’ edge.
AnnexD. 2
Both side door panels on the Deluxe model
can be removed and replaced with a PRIMA
Annex. The Annex must be attached after
pitching the awning with the original doors
zipped shut to maintain shape.
Side Vents4. 2
The mesh side vents on the top corners of
the awning can be opened or closed to vary
air ow and reduce condensation.
Page 8

DEFLATING AND
PACKING DOWN
5.
Secondary valve ring
Before packing down, inspect the awning thoroughly
- remove any debris and ensure all windows and doors are shut.
Deflating the Awning5.1
Preparing the Awning
Ensure all contents are removed from within the awning
and un-peg the guy lines. The awning can be quickly
deated by partially unscrewing the secondary valve
rings on both the Air Poles and Air Struts.
CAUTION - the Air Poles are under moderate pressure and unscrewing the
valve causes the air to be released rapidly.
!
Packing Away5. 2
Once deated, remove the rear poles if used,
remove pegs, and slide the awning bead out of
the caravan awning rail. Fold the awning in half
so the roof is folded under the main body and
lies on the ground. The front door panels should
be folded on top, facing upward. Fold each end
inward to create a rectangle. Roll up the awning
and t it in the oversized bag.
For tips of how to store, clean and care for
your awning please see the following page.
i
Page 9

Condensation
All awnings will experience internal condensation under certain
conditions. Ground moisture and atmospheric conditions aect
the level of condensation. Heavy condensation can sometimes
be mistaken for water leakage. Increasing ventilation in the
awning and laying a waterproof groundsheet can reduce this.
An optional PRIMA Roof Liner can help reduce condensation
and catch drips from condensation build-up.
Waterproofing
The awning surface has been coated with a waterproof PU
coating and a Hydrostatic Head of 3000mm. The main seams
have been taped to prevent leaking. For extra protection or use
in prolonged periods of wet weather, seams can been treated
with seam sealant which will prevent water ingress.
Adverse weather
Your PRIMA awning is designed for light to moderate weather
conditions. We advise taking down the awning down during
adverse weather conditions such as strong winds or snowfall.
Safety
Do not use naked ames or cook in the awning. Guy ropes can
be dangerous, children should be discouraged from playing near
the awning. DO NOT UNZIP POLE SLEEVES WHEN POLES
ARE INFLATED.
UV degradation
Awning fabric can be weakened by prolonged exposure to
sunlight. For periods of prolonged use, we recommend pitching
your awning in a shaded area.
Warranty
Your PRIMA awning comes with a two year warranty.
The warranty does not cover:
• Permanent or semi-permanent use, displays, or commercial use
• UV degradation
• Accidental or storm damage.
IMPORTANT
CONSIDERATIONS
AWNING
CARE
2
YEARS
Zips
Zips should be handled with
care. Always use two hands to
relieve tension and never force
zips open or closed.
Awnings should be fully aired
and dried before being stored.
Keep the awning in a dry,
dark, well ventilated area,
preferably unfolded.
Storage
Cleaning
Your awning can be gently
washed with clean warm water
and a soft brush or sponge.
Never use detergent.
Page 10

To replace a bladder
1. Isolate the Air Pole by fully
closing its isolation valve(s),
then fully deate.
2. Unzip the outer harness
and pull out the Air Pole
inner casing.
3. Unzip the inner casing to
reveal the bladder.
4. Unscrew the isolation vale
and the ination valve and
remove bladder.
5. Lay the new bladder out
inside the inner casing,
ensuring it lies fully at.
6. Push the bladder valve
attachment rings through
the inner casing.
7. Re-attach the valves and
screw on tightly.
8. Ensure the bladder is not
kinked or twisted in any way.
Zip the inner casing closed.
9. Insert the inner casing back
into the Air Pole housing
on the awning main frame.
You may nd this easier
to do if the Air Pole is
partially inated.
10. Ensure the ination vale is
housed within its outer
pocket. Ensure the zips of
the inner casing and outer
housing align so the inner
casing is not twisted.
IF THE AWNING DEFLATES
If the awning deates, this is almost always due to valves not being correctly tightened. Before
inating the awning, check every valve ring is fully screwed in. If a section continues to deate, you
may have a puncture. The Awning Air Poles and Air Struts have replaceable air bladders that can be
easily removed and replaced if a puncture occurs. Please contact us to obtain a replacement bladder.
2. 3. 5.
6. 7. 10.
To locate and x an air leak
1. Tighten every red Flexi-
ination valve inside the
awning to isolate each
Air Beam. Re-inate each
section and leave to deate.
This will allow you see which
section of the awning is
leaking.
2. Fully unscrew and fully
remove the ination valve
rings on the isolated section.
Inspect bladder opening for
damge.
3. Carefully screw the valves
rings back on tightly,
ensuring they are not crossthreaded.
4. Re-inate awning.
Page 11

TROUBLE SHOOTING
1.1 The awning is dicult to inate
• Check the ination valves are screwed in tightly.
• Check the relevant Flexi-ination isolation
valves are open.
• Move the awning body around so that air can
move freely up the full length of the Air Poles.
1. IINFLATING THE AWNING
OPTIONAL
EXTRAS
A range of exclusive PRIMA
Air Awning accessories can be
purchased to enhance your
awning experience:
Roof Liner
Roof liners insulate and regulate
temperature in the awning,
reduce condensation, and stop
drips from the ceiling.
Annex and sleeping tent
The Deluxe model side doors
can be replaced with Annexes to
expand the space. An additional
inner tent can be purchased
to transform the annex into a
sleeping compartment.
Floor tiles and carpet
Durable tiles are available, as well
as a carpet groundsheet tted to
your awning footprint to reduce
condensation and keep your living
area dry.
Rear Poles
Additional rear poles can be
purchased for the Ripstop model
to improve the seal between the
awning and the caravan to help
prevent draughts.
For more information, speak to
your local dealer or visit:
www.bailey-parts.co.uk/prima
1.2 Part of the awning doesn’t inate or deate
• Check the Flexi-ination isolation valves
are fully open or closed.
2.1 There is a high level of condensation on
the inner fabric
• Lay down a breathable groundsheet throughout the
awning area.
• Ensure adequate ventilation by opening air vents at
the top corner of the awning.
• Fit the optional PRIMA Roof Liner - available to
purchase separately.
2. WATER INGRESS IN THE AWNING
2.2 There are water leaks at specic points
• The awning fabric is entirely waterproof, and the main
seams have been taped to prevent water ingress.
• Seam sealant can be applied throughout the awning,
especially on seams that have been damaged or
where the factory taping has peeled away through
wear and tear.
2.3 Air Poles or Struts lose air
• Check all ination valves are properly closed and
screwed tightly.
• If you think there may be a puncture in an air pole,
follow the instructions opposite.
Page 12

PRIMA Leisure Accessories
Unit 600 The Quadrant,
Ash Ridge Road, Bristol, BS32 4QA
T: 0344 326 4000
E: support@primaleisure.com
www.primaleisure.com
PRIMA stands for fuss-free adventures, however
big or small. With decades of experience in the
caravan and leisure industry, we combine fresh
ideas and agile product development to deliver
the design and quality you expect.
Whenever and wherever you travel,
take PRIMA with you.
 Loading...