

Page 1

page
1
Home Bakery
Home Bakery
Instruct ion Manual & Recipes
ABM 8
www.prima-international.com
2001 ABM8 rev.0
Page 2

Use your loaf!
Use your loaf!
Use your loaf!Use your loaf!
Please read the instructions
Please read the instructions
Please read the instructionsPlease read the instructions
START HERE
START HERE
START HERESTART HERE
page
2
Home Bakery
+
+
++
INTRODUCTION
Your Prima Home Bakery is the result of Prima’s many years of experience with bread
making machines. Whether you have never made bread before or if you have made your
own bread for years, the information in this booklet is essential if you are to obtain the
best from your machine.
There are a number of key differences between manual bread making and machine bread
making. It is best to approach the subject without any pre-conceived ideas or
expectations.
This book has been designed to ensure that you get outstanding results right from the
first loaf you make. There are a number of recipes included, which use all the various
programmes and functions of the machine. These recipes have been designed to give you
an instinctive feel for the machine. This will create a pattern of success that will
eventually lead to your adapting or creating your own recipes. Indeed, you will probably
find that most other recipes are variations of those found within this book.
PLEASE KEEP THE BOX AND PACKAGING
THE PACKAGING IS SPECIALLY DESIGNED TO TRANSPORT THE APPLIANCE SAFELY. IF YOU EVER NEED TO
RETURN THE UNIT FOR A SERVICE IN THE FUTURE THERE IS A GOOD CHANCE IT WILL ARRIVE DAMAGED IF ANY
OTHER TYPE OF PACKAGING IS USED.
2001 ABM8 rev.0
Page 3

page
3
Home Bakery
Important safety information
•
Please read & retain for future reference.
• Please read through all the instructions before using the bread maker.
• Be sure to use suitable ma i ns s upply 220-240V ~ AC
• DO NOT touch hot surfaces during operation.
• DO NOT allow children to operate this machine unsupervised.
• NEVER place hands/fingers into the bread pan whilst the machine is in use.
• DO NOT immerse plug, cord or base in water or other liquids.
• DO NOT use the bread maker outdoors
• KEEP the bread maker at least 50mm away from walls or any other objects when in
use.
• ALWAYS unplug the appliance when not in use or before cleaning.
• ALWAYS use on an even surface & check that the rubber feet have a secure grip.
• DO NOT allow power cord to hang over edge of counter or work surface.
• ALWAYS use two hands when moving the machine.
• CLEAN the outside of the bread maker with a damp cloth only. The bread pan should
be cleaned after each use with mild detergent solution, rinsed and dried thoroughly.
• IF the unit is dropped or becomes damaged in any way, do not use but call Prima
Service first (number at back of book).
.
THIS APPLIANCE IS FOR HOUSEHOLD USE ONLY
PLEASE SAVE THESE INSTRUCTIONS
2001 ABM8 rev.0
Page 4
••••
ABOUT BREAD 1
page
4
Home Bakery
Bread is one of the oldest foodstu ffs we know. Soon after human s first learnt to plant
seeds, bread became the staple food of many cultures world wide. Since then each
culture has developed it’s own method of making bread using local ingredients and
processes unique to them. This trend continues today. Even pre-packed supermarket
bread di ffers in taste an d texture from country to country. No matter how varied the
range of breads on offer in bakers shops or supermarkets, there is nothing quite like the
warm fragrance and taste of fresh home-made bread.
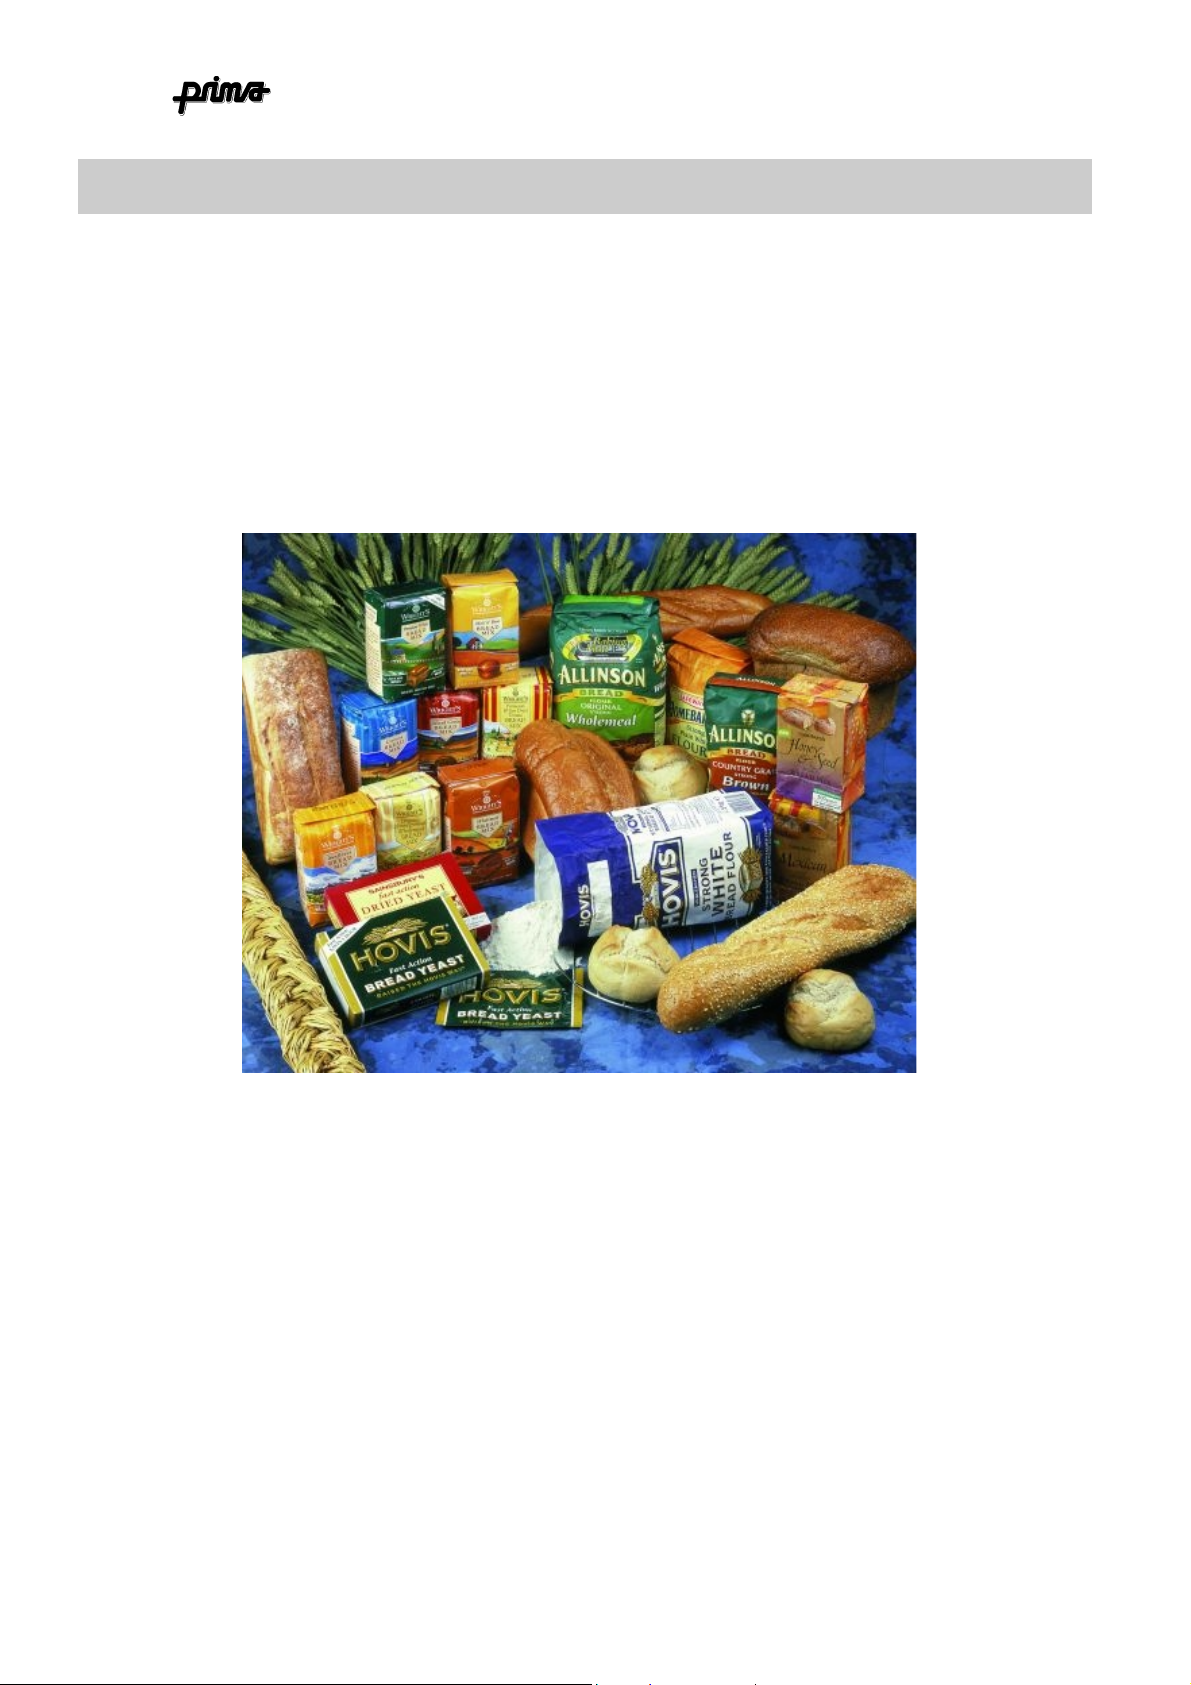
Just a few of the ingredients available from local shops & supermarkets
2001 ABM8 rev.0
Page 5
••••
ABOUT BREAD MAKERS 2
page
5
Home Bakery
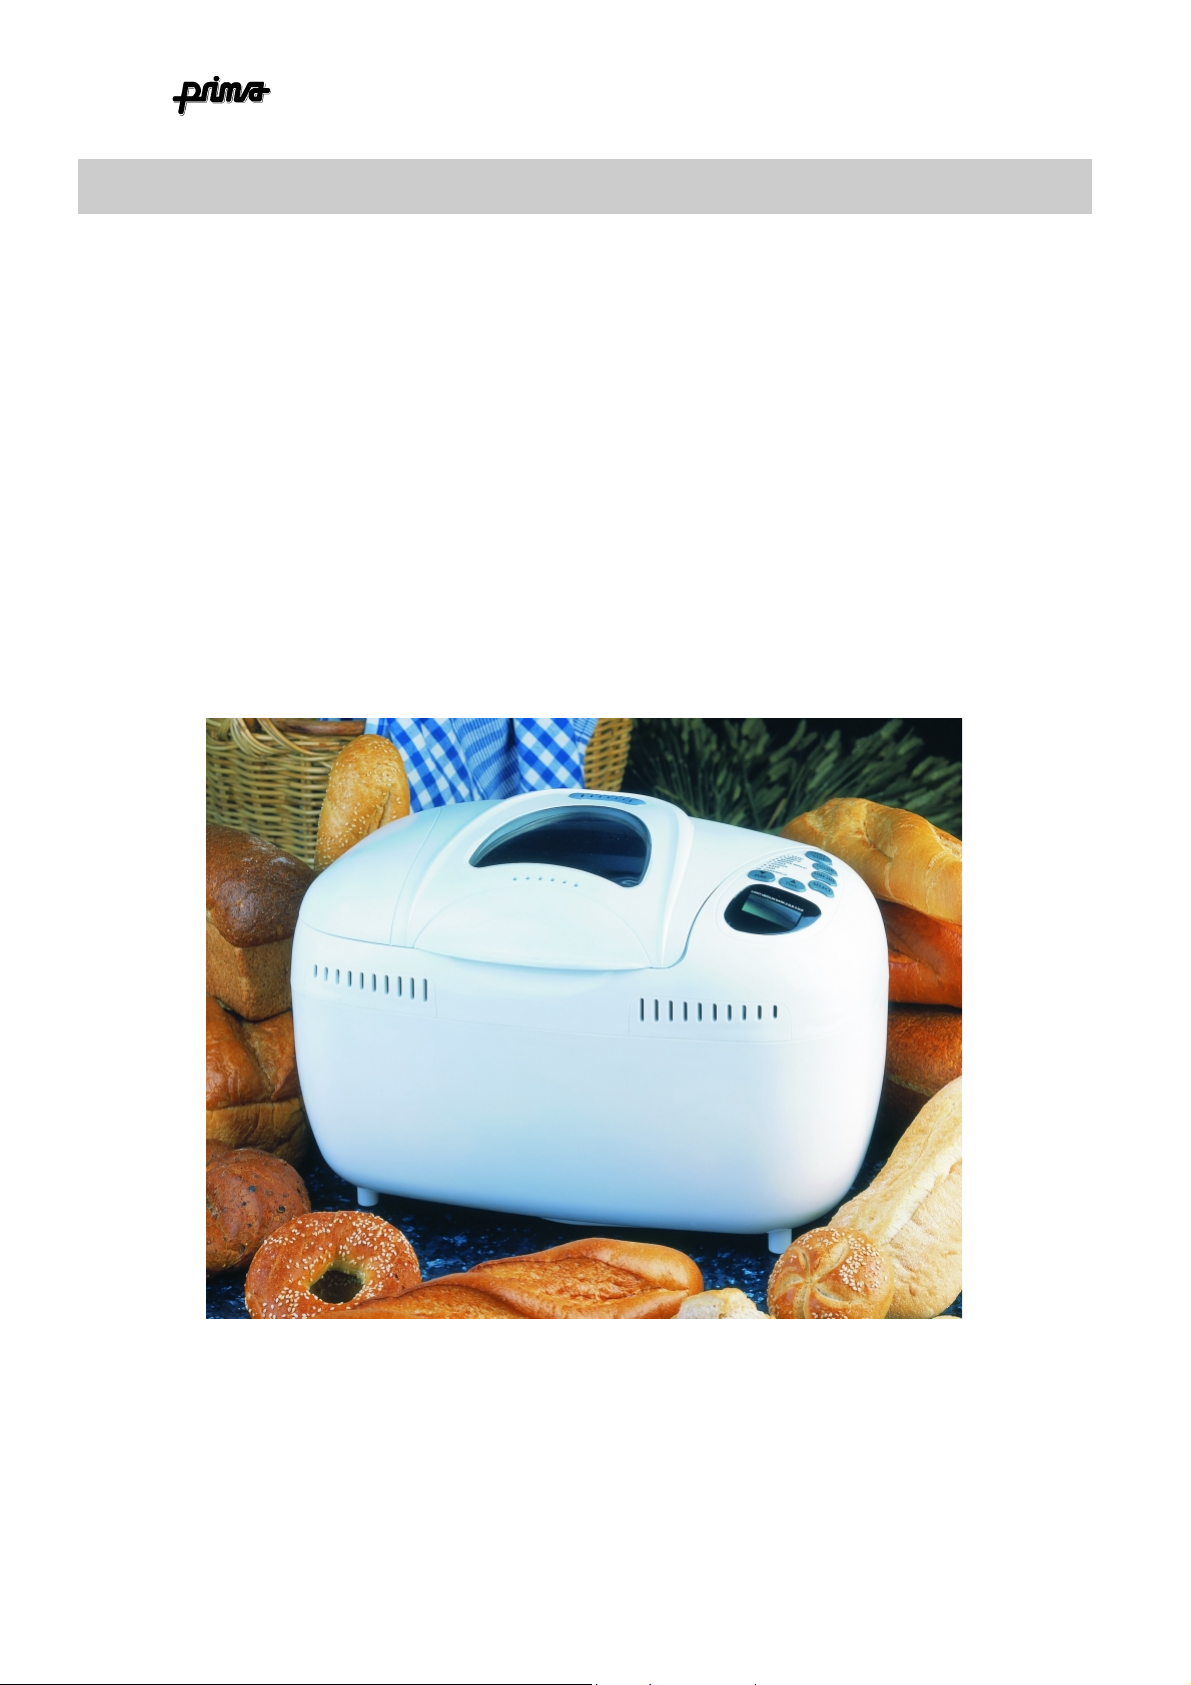
With the continued success of the
Prima Home Bakery
it is nice to know that
technology is ac tually helping to pre serve the art of hom e bread making for
generations to come.
Like most kitchen appliances, your bread maker is a labour-saving device.
The principal benefit is tha t all the kneadin g, rising and ba king is performed
within a space saving, self-contained unit. Your
Prima Home Bakery
will
easily produce superb loaves time and again provided the user follows the
instructions and unde rstands a few basic princi ples. Unless y ou enjoy e ating
breeze b locks , it is not wise to expect t he machine t o think for you. It cannot
tell you th at y ou’ve f orgot ten the y eas t or th at the flou r was the wron g type
or measured incorrectly.
Prima A BM 8
2001 ABM8 rev.0
Page 6

••••
INGREDIENTS 3
The most important part of the bread making process is the wise selection of ingredients. You
and your Prima Home Bakery will produce outstanding results with the right ingredients. Just
apply this simple rule: Best ingredients - best results, poor ingredients - poor results. For
example; if good yeast, good flour and cold water were thrown together and mixed in an old
bucket the mixture would still rise! Nothing the bread maker does will prevent the dough from
rising so if your loaf does not rise it is most unlikely that the bread maker is to blame. It is
probably due to the ingredients. In order to save you time we have included information on
each major element used in the making of bread which will enable you to obtain perfect results
first time every time. See the appendix at the end of this book for a list of suppliers of quality
ingredients.
••••
FLOUR 4
In bread making the most important element in the flour is the protein called gluten, which is
the natural agent that gives the dough the ability to hold its shape and retain the carbon
dioxide produced by the yeast. The term ‘
It has probably been milled from hard wheat and is particularly suitable for bread making.
In the UK the taste and gluten content of flour varies with each brand. At Prima we use
Allinsons Strong White, Strong Brown or Wholemeal flour for product testing because it gives
consistently good results. Other good brands are Sainsbury’s own brand, Hovis bread machine
flour or McDougals strong white flour. Safeway’s own brand of bread flour is also quite good.
You may wish to approach your local mill for flour. If you do, be sure to specify that you require
a fine ground flour with a high protein content if you want light well-risen loaves. See the
appendix at the end of this book for suppliers of good quality flour.
page
strong flour’
6
Home Bakery
means that it has a high gluten content.
••••
Brown flour contains about 85% of the wheat kernel. Much of the bran part of the wheat kernel
has been removed. Loaves made with all brown flour tend to be smaller than white loaves due
to the lower gluten content but there tends to be more flavour and texture to brown loaves.
When buying this type of flour the strong, finely ground type will give better results in the bread
maker.
•
This type of flour contains all of the original wheat kernel including the bran; the tough outer
skin of the wheat which is an excellent source of fibre. As with the brown flour, you should
specify a strong fine ground variety when using your bread maker. The bran in the wholemeal
flour inhibits the release of gluten so wholemeal loaves tend to be smaller and more dense
than white loaves. However, the flavour is superb (try the honey wholemeal recipe). Your
Prima Home Bakery has a special process for wholemeal bread, which devotes more time to
the kneading and rising processes.
BROWN FLOUR (or FARMHOUSE FLOUR) 5
WHOLEMEA L OR WHOLE -WHEAT F LOUR 6
2001 ABM8 rev.0
Page 7

••••
YEAST 7
Yeast is the living organism that multiplies in the dough. It produces the carbon dioxide
bubbles that make the dough rise. For bread making machines it is best to use the ‘Easy
Blend’ dried yeast that comes in sachets. This yeast does not rely on sugar in order to ferment
so it is easier to reduce the sugar content of your loaf without any adverse effects. Good
brands of dried yeast are Homepride, Sainsbury’s, Hovis (7g sachet) or McDougals. Other
supermarket own brands also give satisfactory results. Avoid yeast in tubs or tins as these
tend to perform less well once opened. Sachet yeast is very sensitive to moisture so do not
store part used sachets for more than a day.
•
SALT 8
Salt adds to the flavour of the bread of course but it can also be used to slow down a
particularly lively yeast.
••••
BUTTER (or fat) 9
Enhances the flavour and makes the loaf softer. Alternatives to butter are margarine or olive
oil. Avoid low fat spreads as these may be as little as 40% fat and will not have the same
effect.
page
7
Home Bakery
•
SUGAR 10
Sugar adds to the flavour of the bread and goes some way to making the crust go brown.
Note: Most sachet yeasts do not rely on sugar to become active.
••••
WATER 11
Use soft water if you can but your Prima Home Bakery will still make good bread with hard
water. There is often much debate on what temperature the water should be. The answer is
simple. If you put your hand in the water and it feels cool then it’s fine. There is no need to
warm the water first. If you’re worried the water may be too cold from the tap just leave it to sit
for an hour in the kitchen before you use it. Making the water warm could kill the yeast
prematurely. The Prima Home Bakery takes the guesswork out of bread making.
2001 ABM8 rev.0
Page 8

••••
OTHER INGREDIENTS 12
Other ingredients could mean anything from dried fruit, cheese, eggs, nuts or yoghurt to other
cereals like rye flour, corn meal or any number of herbs and spices. It’s up to you. There are a
couple of things to consider for best results. Always be aware of the moisture content and
adjust accordingly.
Things like cheese, milk and fresh fruit contain quite a lot of water, which will determine the
look of the finished loaf. At first you can stick to dry substitutes like Parmesan cheese, dried
milk or dried fruit. As you become more proficient with the machine you will instinctively know
whether the dough looks too wet or too dry and can add flour or water during the process.
Remember to consider the salt content of the ingredients you add. Salt can slow down the
yeast.
Finally, as a rule of thumb, if the added ingredients are wet like yoghurt or powdered like dried
herbs they can go into the mixture at the start of the process. For things like nuts or dried fruit
there is a time during the process where the machine will beep to let you know it’s time to add
these to the dough mixture. Refer to the CYCLE TIME table so you know when to expect the
beep.
page
8
Home Bakery
••••
ENVIRONMENT 13
Last but not least of the ingredients is the environment in which the bread is made. The Prima
Home Bakery will work well in a wide range of temperatures but there could be a difference of
15% in loaf size between a very warm room and a very cold room. Do not site your bread
maker in a draughty part of the house. The machine will offer some protection to the dough
against draughts but it does have limits. If the humidity in the room is high this too could affect
the loaf. As a general rule, if the room is comfortable for you it will be comfortable for your
bread maker.
••••
STORING YOUR BREAD 14
Homemade bread contains no artificial preservatives. However, if you store the bread in a
clean, air-tight container in the refrigerator it should keep for 5-7 days. The bread is also good
to freeze but allow finished loaves to go cold before placing into a polythene bag and storing in
the freezer.
2001 ABM8 rev.0
Page 9

page
9
Home Bakery
•
CHECK THE ACCESSORIES 15
At this point it might be a good idea to familiarise yourself with the bread maker and
setting the controls.
When you unpack your Home Bakery you should have the following items:
4 kneading blades
comprising one small & one large kneading blade.
1 measuring cup
your own measuring jug as long as it’s graduated in ml.
1 measuring spoo n.
are based upon this metric tablespoon (15ml – large end) and metric teaspoon (5ml –
small end)
This book.
Open the lid & familiarise yourself with removing & replacing the bread pan. Note that the
pan must be properly inserted into the machine before the drive cogs can make proper
contact with the kneading shafts. Next, insert the kneading blades (1 large & 1 small). It
doesn’t matter which way round they go. As you place them over the kneading shaft,
rotate them until they lock into pl ace.
...which you wouldn’t be reading if it wasn’t included of course!
, (2 large & 2 small). This represents 2 sets of blades, each set
Keep the spare set in a safe place.
. You can use this cup for measuring the liquid ingredients or you can use
The quantities of sugar, oil & some other ingredients in these recipes
2001 ABM8 rev.0
Page 10
page
10
Home Bakery
••••
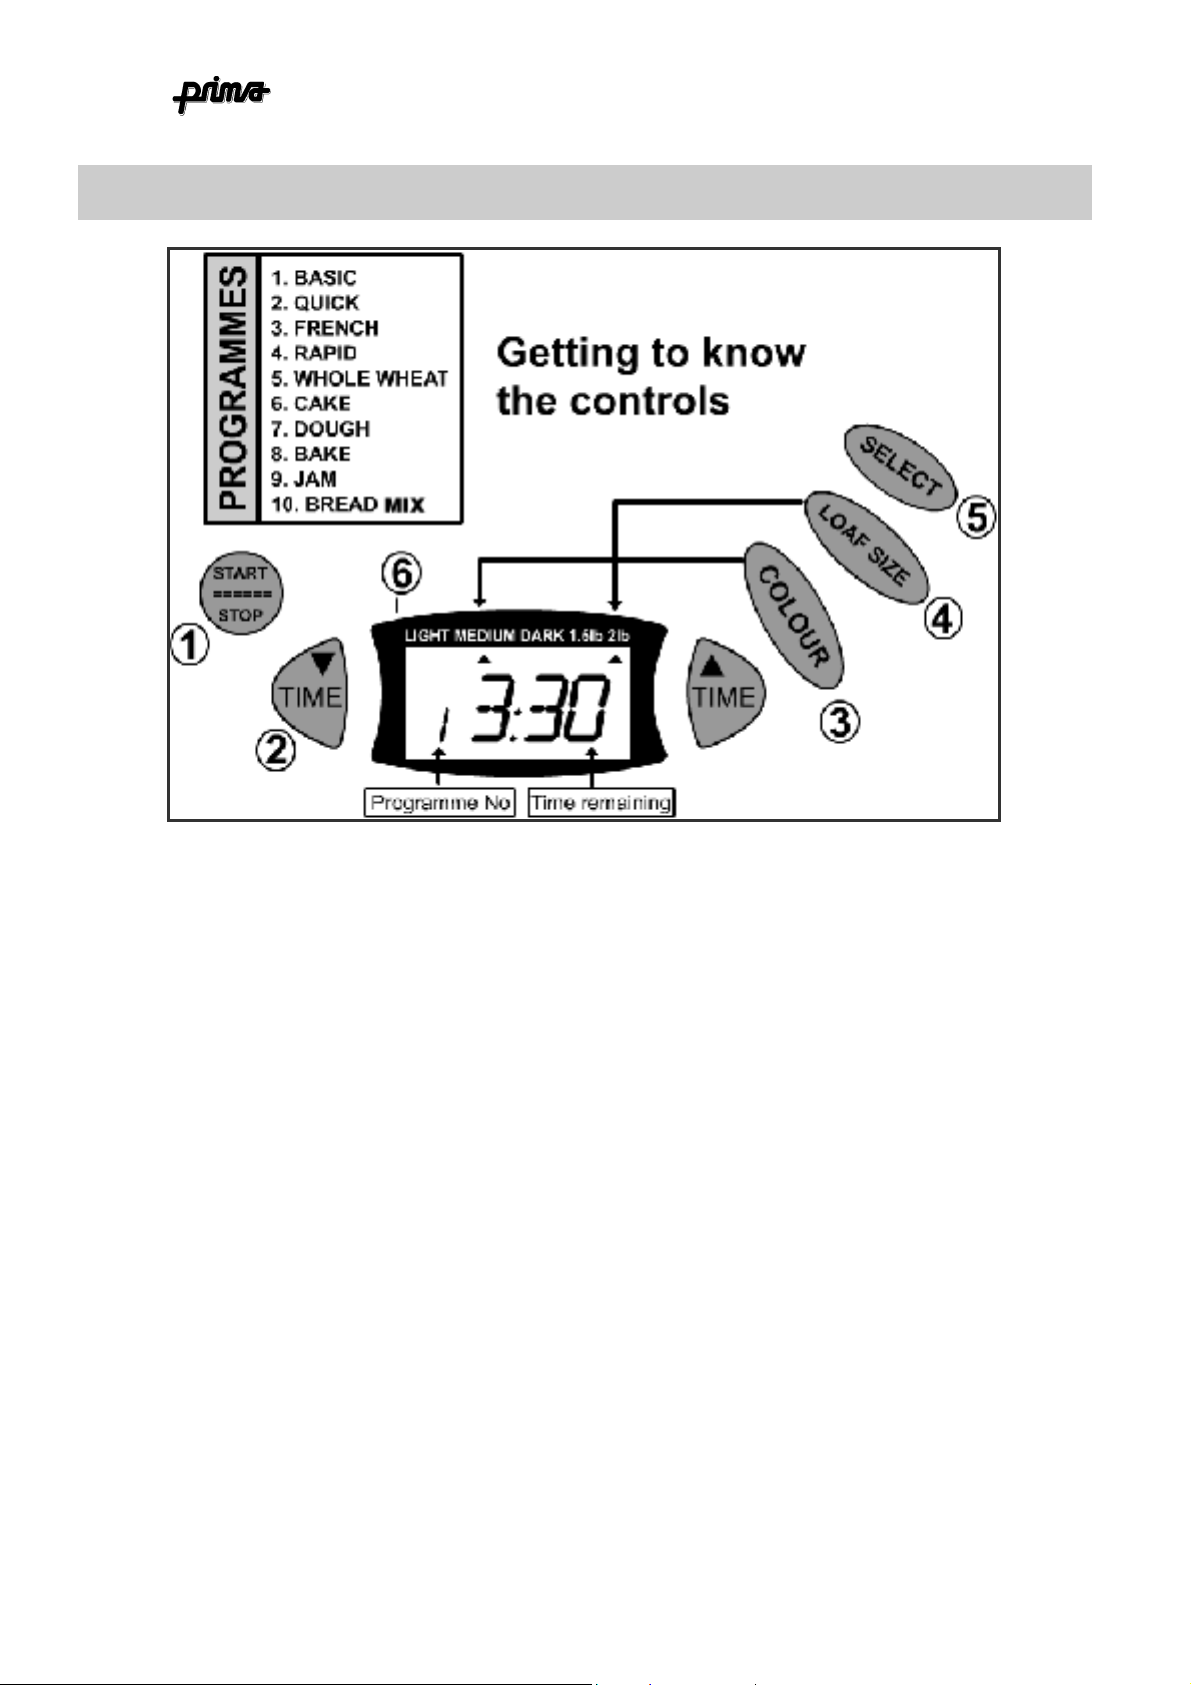
THE CONTROLS 16
1.
START/STO P b utton
part way through you need to press and hold this button for 3 seconds. After
which, the machine will reset to programme 1.
2.
Time selector
3.
Colour
the display (6) will point to the colour you have selected.
be changed in ‘BREADMIX’ mode.
4.
Loaf size
indicate your current selection.
5.
Select.
programme number is shown on the display (6)
6.
Display.
. Press to select crust colour between light, medium & dark. The arrow on
Main selector control. Press to cycle through each programme. The
. For use when setting the delay timer (see section of timer operation
. Select between 1.5lb and 2lb loaf size. The small arrow will move to
Shows time remaining, programme selected, crust colour and loaf size.
. Starts the programme (of course). To stop the programme
NB: crust colour cannot
2001 ABM8 rev.0
Page 11
••••
LET’S PRESS SOME BUTTONS! 17
page
11
Home Bakery
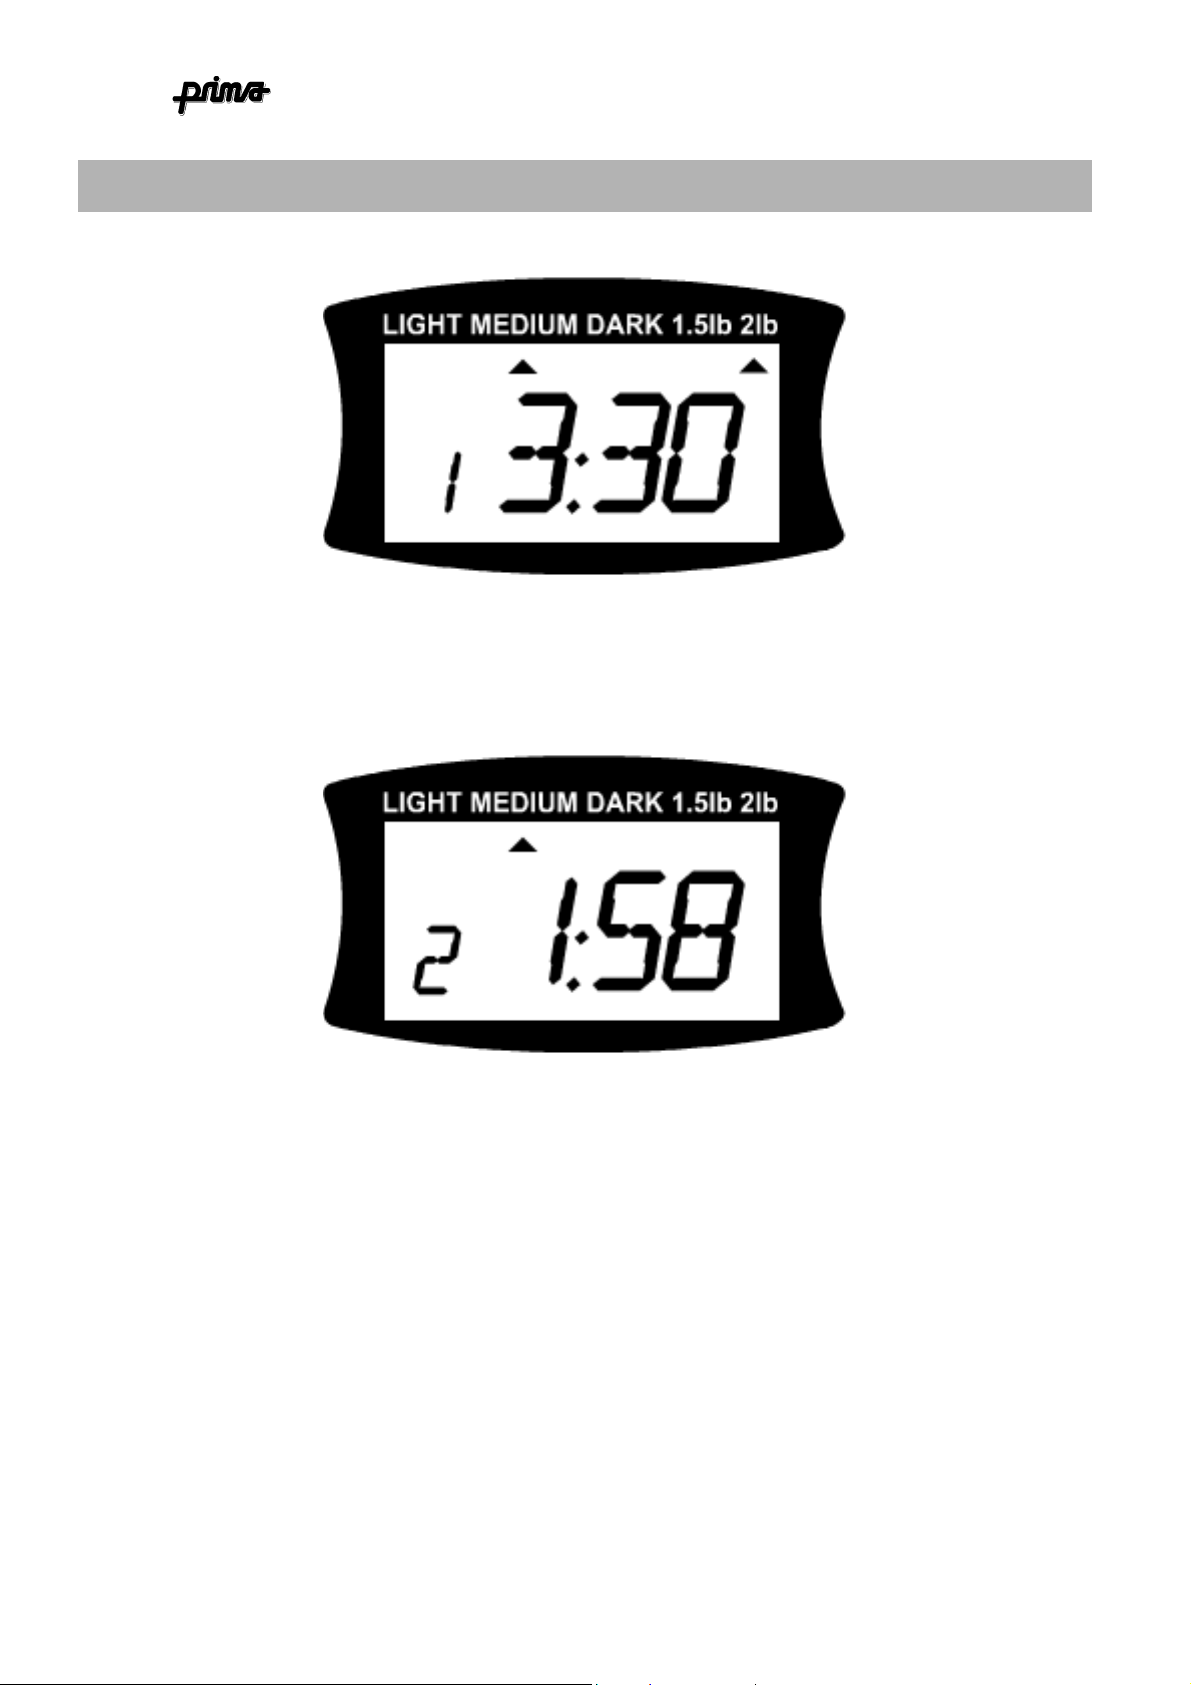
Connect the machine to the mains for the first time & see the following display:
This indicates that the BASIC programme (1) for the 2LB loaf at MEDIUM crust is
selected. The process time is 3 hours 30 minutes.
Press the
SELECT
button once. The display will look like this:
This indicates that the QUICK programme (2) is selected. The process time has decreased
to 1hour 58 minutes. And the MEDIUM crust colour is selected.
option is not available in quick mode.
indicating the crust colour selection will move across and point to DARK, indicating that
dark crust is selected. Pressing again will move the arrow to the LIGHT setting. Press
once more and the arrow will go back to the MEDIUM setting.
Feel free to press some more buttons to familiarise yourself with the control interface.
2001 ABM8 rev.0
If you p ress the
COLOUR
NOTE: The l oa f s i z e
button the arrow
Page 12
••••
THE PROGRAMMES 17
Please s ee below a summary of a l l the other modes/programmes.
DISPLAY FUNCTION
page
1. BASIC
shown when the machine is first
switched on. This is a good, generalpurpose
prog ramme for white or brown bread.
Most of the recipes use this
programme.
2. QUICK
steps to ma ke bread in a shor t er
time.
Note:
mode.
Loaf size is not available in this
12
. This is the programme
bread setting. Uses shorter
Home Bakery
3. FRENCH.
longer than the BASIC programme
due to the extra kneading and rising
time re quired to gi ve the loaf a ‘a i ry’
texture charact eristic of Frenc h
bread. (Does not come out in sticks!)
NOTE:
this mode.
4. RAPID.
QUICK pr ogramme in that the steps
are shorter for a faster process time.
NOTE:
this mode.
Quick mode is good for the glutenfree recipes.
5. WHOLE WHEAT
spreads the kneading and rising steps
to giv e be tter results wi th the low
gluten content whole wheat/whole
meal flour.
Loaf size cannot be altered in
Loaf size cannot be altered in
This setting is slightly
This mode is similar to the
. This mode
2001 ABM8 rev.0
Page 13
••••
PROGRAMMES cont. 17
DISPLAY FUNCTION
page
6. CAKE
cakes. Note: The crust colour
control
7. DOUGH.
of kneading and rising but omits the
bake cycle.
control and loaf size selection are
not available.
13
. Programme for making
available in this mode.
is
Performs all the steps
Note:
Crust colour
Home Bakery
8. BAKE.
Good for baking pre-made dough
etc.
9. JAM
progr amme ideal for jam making.
10. BREAD KIT.
specially designed for pre-packed
bread mixes.
Stand-alone bake cycle.
. Mixing and heating
Programme
2001 ABM8 rev.0
Page 14

Page
14
CYCLE CHART FOR MODEL ABM8 – all figures in hours/minut es
Home Bakery
BASIC QUICK FRENCH RAPID W/WHEAT CAKE DOUGH BAKE JAM BREADMIX
2LB
3:30
PREHEAT
Motor is
idle
STIRRING
KNEAD 1
KNEAD 2
Heater at
°°°°
25
c
RISE 1
Heater
on/off @
°°°°
25
C
RISE 2
RISE 3
BAKE
KEEP
WARM
Not incl’d
in total
time
TIMER 13HR N/A 13HR N/A 13HR N/A 13HR 13HR N/A 13HR
20
Fruit signal at
2:50 (1.5lb )
62
1.5LB
3:20
17
3
2
13
2:57 (2lb)
45
19
46
55
60
1:58 3:50 1:52 2/2.5LB
3:40
5
3
2
20
Fruit
signal at
1:33
Skip
7
26
55
60
22
3
2
16
Fruit
signal at
3:12
45
26
51
65
60
3
3
2
5
No fruit
signal
Skip
7
27
65
Skip
Fruit signal at
1.5LB
3:30
40
2:47 (2lb)
2:40 (1.5lb )
62
37
3
2
13
45
19
36
60
55
2:00 1:50 1:00 1:20 2LB
Skip
3.5
20
Fruit signal
1:49
Skip
Skip
Skip
Skip
80 plus 16
mins idle
time
Skip
22
3
2
16
Fruit signal
at 1:12
Skip
45
22
Skip
Skip
Skip
Skip
Skip
Skip
Skip
Skip
Skip
60
60
15
45+
(heater on)
Idle
20
(heater off)
N/A
N/A
N/A
N/A
N/A
N/A
1.5LB
3:20
22
3
2
13
Fruit signal at
2:45 - both loaf
sizes
45
19
40
56
60
3:09
11
2001 ABM8 rev.0
Page 15

Page
15
Home Bakery
z
HOW TO USE THE TIM ER 19
The most common use for the timer is to make a loaf overnight so it will be ready in
the morning. Many people also programme the timer so the loaf is ready when they
get home from work. However you use the timer, it’s a lot easier to set than most
video recorders!
Once you have selected your desired programme, simply press the
on the control panel and the figure on the display will increase by 10 minutes. This
way you can delay the
important thing to remember is that whatever the display reads is the time from
pressing START to when the loaf will be ready.
For example:
button until the display reads 5:00 then press START it will be 5 hours before the loaf
is ready. If you press the
then (you’ve guessed it) the loaf will be ready in 8 hours and 10 minutes.
To save wear & tear on your index finger you can press & hold the
buttons to scroll quickly to your desired setting.
NOTES:
After se lecting the req uired progr amme, if you ke ep pressing th e
of the programme to suit your requirements. The
end
TIME
(up) button some more and the display reads 8:10
(up) button
TIME
TIME
TIME
(up/down)
•••• The maxi mum time you can selec t i s 13:00.
•••• Once you have pressed START you cannot alter the timer.
•••• If you need to reset the timer press START/STOP button for 3 seconds and the
machine will reset, after which you can re-select your programme and delayed time
accordingly.
You should not do this if the process is past the first kneading.
NB.
•••• Do not use perishable ingredients like milk or eggs when using the delay timer as
these will spoil whilst sitting in the bread pan.
•••• You cannot reduce the delayed time to less than the process time.
2001 ABM8 rev.0
Page 16

••••
YOUR FIRST LOAF 20
Before we sta rt, i f yo u hav e ski pped for ward to th is pa rt of the bo ok an d not re ad th e
preceding pages like the rest of us then shame on you! You may be about to waste
some flour!
The following recipe is for a basic white loaf. Even if you do not usually eat white
bread we strongly recommend you make this as your first loaf because it is easiest. It
will give you a good feel for the machine and when you remove your perfect loaf
you’ll want to show it off to your friends or relatives who invariably waste no time at
all in eating it!
Follow the steps in the exact order shown on the next page. The illustrations should
help you stay on the right track. You will need the following ingredients to hand:
Page
16
Home Bakery
Water 250ml
Strong white bread flour 460g
Butter or margarine 2tbps
Sugar 2tbsp
Salt 2 tsp (NOT tbsp!)
Yeast (sachet type) 2½ tsp (usually 1 full 7g s achet)
This will make a 1½ lb loaf
Use good kitchen scales to measure the flour. Use the
measuring cup provided for the liquid or, if you prefer, any
measuring jug that’s calibrated in ml.
2001 ABM8 rev.0
Page 17

Page
17
Home Bakery
Tip: When measuring the water and the flour it is a good idea to check your
measurement twice to make sure you are adding the right amount. Model illustrated is
ABM6.
••••
METHOD 20.1
1. REMOVE BREADPAN FROM
MACHINE BY HOLDING BOTH
SIDES AND PULLING UPWARDS
4. ADD THE FLOUR AND ENSURE
THAT IT COVERS THE WATER AS
MUCH AS POSSIBLE.
2. FIT THE KNEADING BLADES. 1 LARGE
& 1 SMALL – MAKE SURE THEY’RE
FITTED PROPERLY OVER THE SHAFTS
OR THEY WON’T MIX THE DOUGH
5. ADD THE SUGAR USING THE SPOON
PROVIDED. IT IS BEST TO PUT THE
SUGAR IN ONE OF THE CORNERS OF
THE BREADPAN.
3. ADD THE WATER FIRST. THIS IS VERY
IMPORTANT.
6. ADD THE BUTTER/MARGARINE
7. ADD THE SALT, PREFERABLY
NEAR AN EDGE OR IN A CORNER
8. MAKE A SMALL HOLE IN THE FLOUR
WITH YOUR FINGER, AWAY FROM THE
SALT, BUT NOT DOWN TO THE WATER.
9. POUR THE YEAST INTO THE HOLE. THIS
KEEPS THE YEAST DRY & AWAY FROM THE
SALT.
Notes:
2001 ABM8 rev.0
Page 18

Page
18
Home Bakery
METHOD cont. 20.1
10. PLACE THE BREADPAN INTO THE
MACHINE & ENSURE IT LOCKS FI RMLY
INTO PLACE.
THE MOTOR DOES NOT RUN RIGHT AWAY
12.
BRINGS THE PAN AND IT’S INGREDIENTS UP TO ROOM TEMPERATURE BEFORE THE PROCESS STARTS.
11. CLOSE THE LID & SELECT
THE MACHINE THE BASIC MODE WILL BE SELECTED ALREADY. THE DISPLAY
SHOULD READ AS SHOWN ABOVE.
SMALL ARROW IS POSITIONED UNDER THE 1.5LB SETTING. PRESS
THE FIRST STEP IS PREHEAT. THIS IS WHERE THE MACHINE
BASIC
MODE (1) IF YOU’VE JUST SWITCHED ON
PRESS THE LOAF SIZE (4) BUTTON
13. CHECK THE DOUGH 5-10
MINUTES INTO THE KNEADING – IT
SHOULD LOOK SOMETHING LIKE THIS.
14. WHEN THE PROCESS IS
COMPLETE THE DISPLAY TIME WILL
READ ZERO. YOU CAN NOW
REMOVE YOUR FINISHED LOAF.
OVEN GLOVES OR A THICK TEA
TOWEL TO REMOVE
PAN WILL BE VERY HOT!
- THE BREAD
USE
15. REMOVE THE LOAF FROM THE PAN AS
SOON AS POSSIBLE. THE BEST WAY TO
DO THIS IS TO TURN THE PAN UPSIDE
DOWN AND SHAKE IT GENTLY WHILE
SUPPORTING THE LOAF.
LEAVE TO COOL ON A WIRE TRAY FOR AT
LEAST 20 MINUTES BEFORE SLICING.
SO THE
START
If the loaf proves difficult to remove try turning the small drive pegs under the pan.
This will loosen the kneading blade slightly and allow for easier removal of the loaf.
TIP: It’ s common, after a few uses for th e kne ading blade s to co nsistentl y s tay on the
drive s haft rather th an come out in the loaf. If you fi nd the kneadin g blades are firmly
fixed to the shaft, don’t worry – most people leave them there because there’s less
chance of losing them that way! If you really must remove the blades, fill the pan
with warm water (just covering the blades) and leave to soak for an hour.
2001 ABM8 rev.0
Page 19

Page
19
Home Bakery
•
HOW DID IT TURN OUT? 21
If you followed the steps on the previous pages you should have a loaf that looks and
tastes grea t. If not then the follo wing info rmatio n shou ld hel p you iden tify wha t went
wrong. If you have a failed loaf at any time in the future you can guarantee that the
reason is here in these next few paragraphs.
••••
Freque nt ly asked questions 22
PROBLEM CAUSE
The motor did not run
when I pressed START
The machine beeped part
way through the process.
I tried to make another loaf
straight after the first but
the process wouldn’t start.
What does the ‘keep warm’
sign mean when the loaf is
finished?
What if the power is
interrupted accidentally
during the process?
It’s not supposed to. All the programmes start with a pre-heat step that
ensures al l the ingr edien ts ar e at th e right temper atur e befo re th e proces s
starts.
This is the signal to add other ingredients like fruit or nuts. Some of the
recipes call for extr a ingredi ents. Refer to the appr opriate reci pe for more
information.
The machine must be allowed to cool thoroughly before another loaf can
be made. The machine will show the word
until it has cooled properly.
The Keep War m functi on pr events con den sati on fr o m for min g on the l oaf
after the bake cycle has finished. You can remove the loaf during the
Keep Warm period then press
The bread maker wi ll resume fr om where i t lef t off as lo ng as the p ower
is restor ed within 30 minutes. After this, i t is likely that the in gredients
will have spoiled anyway.
START/RESET
H:HH
button to reset the machine.
on the display panel
PROBLEMS? Sunken loaves. 22.1
••••
Typically, what happens is the dough will rise very well then sinks just as the baking
process starts. Most of the time, this is because the dough was not strong enough.
Whilst the yeast is still producing gas a weak dough will maintain a good shape but
once the yeast is killed by the baking process, the loaf can sink under it’s own
weight.
1.
The mixture is too wet causing weak dough.
a.
Too much water/not enough flour. This will make the dough sloppy. Check
the pictures on the previous page. The dough should be soft but firm.
b.
Use the recommended brands of flour and yeast at first. Other brands may
need some adjustment to the ingredients. Some types of flour absorb less
water than those recommended. In this case add an extra 50g of flour to
make the dough thicker.
c.
You’re not using ordinary plain flour are you?
2001 ABM8 rev.0
Page 20

SUNKEN LOAVES cont. 22.1
••••
Page
20
Home Bakery
2.
The gas bubbles produced by the yeast are escaping!
a.
Remember the protein called gluten? (sec. 4). Dough without gluten is like
water without soap; you cannot make bubbles in it. All the recommended
white flour brands have sufficient gluten to make good dough. Other brands
may not. If you are using whole meal, brown or bread flour from other
sources, you may obtain better results with the WHEAT setting as this
provides the extra kneading required to release the gluten.
3.
The yeast is dead or has go ne of f.
a.
If you use warm water the yeast may be exhausted before the rising process
is comp lete. Tap water i s usually fine. Be extra carefu l that the yeast d oes
not come into contact wi th the water b efore the mixing proce ss starts. Th is
is particularly important when using the timer.
b.
Check best before date on yeast sachet. If it is close to expiry it would be
best to buy some more.
c.
Avoid using yeast from sachets that are already opened. Use a new sachet
every time.
MY LOAF DID NOT RISE! 22.2
••••
Many of the reasons why bread doesn’t rise are outlined above. But first, let us
eliminate the obvious:
a.
Whole meal & brown loaves seldom rise as well as white.
b.
You did put the yeast in didn’t you? It’s easy to forget.
c.
A common error is mistaking teaspoons of salt for tablespoons. The yeast
will not work well if you put too much salt in.
d.
Both the flour and the yeast must be in good condition.
e.
The mixture may have been too dry. Add 1 tablespoon of water to the
mixture if necessary.
f.
If you feel that the yeast should be increased then only add an extra ½ tsp.
•
THE LOAF ROSE TOO HIGH AND STUCK TO THE LID! 22.3
Usual ly caused by to o much yeast, too much water or flour, or forgetting to a dd the
salt. Salt keeps the yeast in check – without it the yeast can cause the loaf to overrise.
Remember: Nothing the machine does will prevent good dough from rising
properly
2001 ABM8 rev.0
Page 21

•
CLEANING 23
Page
21
Home Bakery
Bread Pan & Kneading Blades
The most important thing when cleaning your Home Bakery is to keep the non-stick
coating of the bread pan and kneading blades in good order. Never use metal utensils
to remove loaves, cakes or jam from the bread pan, as this will damage the non-stick
coating.
Avoid using strong detergents and don’t put the pan or kneading blades in the
dishwasher. The strong detergent used in dishwasher tablets or liquids can damage
the non-stick coating in the long term. If you can get away with just using water to
clean the pan then just use water.
After making a loaf a simple wipe round the pan with a damp cloth should be
sufficient. If necessary, you can part fill the pan with water and leave it to soak for an
hour (but no longer) to release any stubborn dough/bread fragments.
After making a cake or jam it is very likely that the bread pan will need to be soaked.
However, avoid immer s in g th e whole pan in water as this may damage the seals
under the kneading blade shafts. The best method is to simply fill the pan with water,
leave to soak for an hour then wipe round with a cloth. Jam can be particularly
stubborn so use hot water and a tiny amount of washing up liquid if absolutely
necessary.
The oven
Since most of the ingredients are loaded into the bread pan away from the oven it
should not need to be cleaned too often. However, if you have an accidental spill or
overflow,
moistened with a mil d d etergent solu ti on then wipe dry.
The Machin e
A simple wipe with a cloth moistened in a mild detergent solution should be
sufficient.
wait for th e oven to cool comp l e tel y
IN ALL CASES ALWAYS E N SURE THA T THE MACHINE IS COLD AND
DISCONNECTED FROM THE MAINS SUPPLY BEFORE CLEANING
then wipe round with a damp cloth
2001 ABM8 rev.0
Page 22

•
RESOURCES 24
Page
22
Home Bakery
Barbar a ’s Kitchen
For further information about the Gluten Free recipes used in this book contact:
Barbar a ’s Kitchen.
here.
Wrights Bread Mixes
All of Wrights bread mixes give excellent results in the ABM6. Simply follow the
recipe on the back of the packet & select BREAD MIX mode.
For more informatio n about Wrights products call : 0800 0640100
Marriages
Marriages make an excellent range of flours, mostly available in health food shops. If
you exp erience any di ffi c ulty in obtai ning this flour contact them on: 01245 354455
Claybrooke Mill
If you want to buy gluten to use as a natural additive for low protein flours such as
whole me al, Claybrook e was the only place we could find. Their number i s: 01455
202443
One of the very best resources for additional recipes, hints & tips is the Internet of
course. There are sites with literally thousands of bread maker recipes that can easily
be ad apted for your machine.
Tel: 01443 229304. You can also obtain XANTHAN GUM from
Start at:
www.prima-international.com
2001 ABM8 rev.0
Page 23

Home Bakery
Home Bakery
Home BakeryHome Bakery
Recipes
Recipes
RecipesRecipes
Page
23
Home Bakery
ABM8
BASIC WHITE BREAD
(use half these measures for 1lb loaf)
2lb
Water 310ml
Strong white flour 560g
Salt 2 tsp
Dried Milk (optional) 2 tbsp
Sugar 2 tbsp
Butter/oil 3 tbsp
Dried s achet yeast 2 1/2tsp
Select BASIC (1) programme for best results. For 1.5lb option press LOAF SIZE
button. You can use QUICK (2) setting if you want the bread to be ready in a shorter
time. The loaf will be a little smaller because the QUICK programme uses shorter
steps.
A note about the LOAF SIZE button:
The loaf size option is only available where it has been deemed advantageous to
extend certain steps to accommodate larger quantities. With certain types of bread
(eg French) it makes no difference so the option to select a loaf size is not available.
Use the same programme regardless of loaf size.
1.5lb
Water 260ml
Strong white flour 460g
Salt 2 tsp
Dried Milk (optional) 2 tbsp
Sugar 2 tbsp
Butter/oil 3 tbsp
Dried s achet yeast 2 1/2tsp
2001 ABM8 rev.0
Page 24

Page
24
Home Bakery
White Flour Recipes
FRENCH BREAD
This recipe will produce bread that has the light, crusty texture characteristic of
French bread.
(use half these measures for 1lb loaf)
2lb
Water 310ml
Strong white flour 560g
Salt 2 tsp
Dried Milk (optional) 2 tbsp
Sugar 2 tbsp
Dried s achet yeast 2 1/2tsp
Select FRENCH (3) programme for best results. Remember LOAF SIZE option is not
available in this mode. The programme will work just as well with 2lb or 1.5lb loaf.
You can also use QUICK (2) setting if you want the bread to be ready in a shorter
time. The loaf will be a little smaller because the QUICK programme uses shorter
steps.
NOTE: there is no fat/oi l in the French l oa f
1.5lb
Water 260ml
Strong white flour 460g
Salt 2 tsp
Dried Milk (optional) 2 tbsp
Sugar 2 tbsp
Dried s achet yeast 2 1/2tsp
EGG BREAD
In this recipe 2 eggs are used in place of some of the water. We do not recommend
that you use the delay timer for this recipe as the ingredients may spoil before the
process starts
(use half these measures for 1lb loaf)
2lb
Eggs 3
(make up to 310ml with water )
Strong white flour 560g
Salt 2 tsp
Dried Milk (optional) 2 tbsp
Sugar 2 tbsp
Butter/Oil 4 tbsp
Dried s achet yeast 2 1/2tsp
Method:
water to 310ml or 260ml accord i ng to which loaf size you are making. U se BA SI C (1)
setting for best results. For 1.5lb option press LOAF SIZE button. You can also use
the QUICK (2) programme if you wish.
.
1.5lb
Eggs 2
(make up to 260 ml with water )
Strong white flour 460g
Salt 2 tsp
Dried Milk (optional) 2 tbsp
Sugar 2 tbsp
Butter/Oil 3 tbsp
Dried s achet yeast 2 1/2tsp
When adding the eggs, put them into a measuring jug then top up with
2001 ABM8 rev.0
Page 25

Page
25
Home Bakery
MILK LOAF
In this recipe milk is used in place of the water. We do not recommend that you use
the delay timer for this recipe as the ingredients may spoil before the process starts.
(use half these measures for 1lb loaf)
2lb
Milk 310ml
Strong white flour 560g
Salt 2 tsp
Dried Milk (optional) 2 tbsp
Butter/Oil 3 tbsp
Sugar 2 tbsp
Dried s achet yeast 2 1/2tsp
Use BASIC programme for best results. You can use the QUICK programme for this
recipe. The loaf will be ready in a shorter time but will be a little smaller because the
QUICK programme uses shorter steps.
1.5lb
Milk 260ml
Strong white flour 460g
Salt 2 tsp
Dried Milk (optional) 2 tbsp
Butter/Oil 2 tbsp
Sugar 2 tbsp
Dried s achet yeast 2 1/2tsp
HERB BREAD
Herb bread tastes and smells fantastic. The only limit here is your imagination! You
don’t have to use everything listed below. Feel free to add or omit herbs according to
your taste. Sometimes the herbs can have an effect on the action of the yeast so a
slightly smaller loaf is not unusual.
(use half these measures for 1lb loaf)
2lb
Water 330ml
Strong white flour 560g
Salt 1 tsp
Dried Milk (optional) 2 tbsp
Olive oil 3 tbsp
Sugar 2 tbsp
Tarragon 1 tsp
Basil 1 tsp
Oregano 1 tsp
Parsley 1 tsp
Dried s achet yeast 2 1/2tsp
All the herbs listed above are of the dried variety. If you want to use fresh herbs they
should be finely chopped and use double the quantities listed above. Use BASIC (1) or
WHOLE WHEAT (5) programme for best results. We don’t recommend the QUICK (2)
programme for this recipe
.
1.5lb
Water 270ml
Strong white flour 460g
Salt 1 tsp
Dried Milk (optional) 2 tbsp
Olive oil 2 tbsp
Sugar 2 tbsp
Tarragon 1 tsp
Basil 1 tsp
Oregano 1 tsp
Parsley 1 tsp
Dried s achet yeast 2 1/2tsp
2001 ABM8 rev.0
Page 26

Page
26
Home Bakery
ITALIAN STYLE BREAD
One of the most popular savoury bread recipes! This recipe requires ingredients to be
added
such as chopped nuts or dried fruit etc, it is best to add these part way through the
second kneading step. The reason for this is because we want these ingredients to
retain their shape and to distribute evenly throughout the loaf. If we added these
ingredients at the start, the powerful kneading action of the machine would chop
them into tiny pieces and force them to the bottom of the dough!
The Prima Home Bakery will beep to remind you to add these ingredients Refer to the
chart (p15) for the timings but expect the beep towards the end of the second
kneading step. On the BASIC (1) programme the beeps will sound when the clock
reads 2:57 for a 2lb loaf and 2:50 for 1.5lb loaf. If you are u s in g any other
programme add these ingredients about 5 minutes before the end of the second
kneading step (refer to chart).
2lb
Water 310ml
Strong white flour 560g
Salt 1 tsp
Dried Milk (optional) 2 tbsp
Olive oil 3 tbsp
Sugar 2 tbsp
Basil 2 tsp
Oregano 2 tsp
Tomato p aste 3 tbsp
Dried s achet yeast 2 1/2tsp
2-4 tbsp chopped olives – add these at
the beeps (refer to chart for timings)
Use the BASIC programme for best results. When you do add the chopped olives
simply lift the lid and sprinkle evenly over the dough then close the lid.
part way
(use half these measures for 1lb loaf)
through the programme. Whenever heavier ingredients are called for
1.5lb
Water 240ml
Strong white flour 460g
Salt 1 tsp
Dried Milk (optional) 2 tbsp
Olive oil 2 tbsp
Sugar 2 tbsp
Basil 2 tsp
Oregano 2 tsp
Tomato p aste 2½ tbsp
Dried s achet yeast 2 1/2tsp
2-4 tbsp chopped olives – add these at
the beeps (refer to chart for timings)
2001 ABM8 rev.0
Page 27

Page
27
Home Bakery
CINNAMON & RAISIN BREAD
This recipe also requires ingredients to be added part way through the programme.
See previous recipe for details.
(use half these measures for 1lb loaf)
2lb
Water 310ml
Strong white flour 560g
Salt 2 tsp
Dried Milk (optional) 2 tbsp
Butter/Oil 3 tbsp
Sugar 2 tbsp
Cinnamon 4 tsp
Dried s achet yeast 2 1/2tsp
Add 50g of raisins at the beeps. You can
also add ¼ cup of chopped apple if you
wish.
Use BASIC programme for best results.
1.5lb
Water 260ml
Strong white flour 460g
Salt 2 tsp
Dried Milk (optional) 2 tbsp
Butter/Oil 2 tbsp
Sugar 2 tbsp
Cinnamon 3 tsp
Dried s achet yeast 2 1/2tsp
Add 50g of raisins at the beeps. You can
also add ¼ cup of chopped apple if you
wish.
APRICOT BR EAD
(use half these measures for 1lb loaf)
2lb
Water 310ml
Strong white flour 560g
Salt 2 tsp
Dried Milk (optional) 2 tbsp
Butter/Oil 4 tbsp
Sugar 4 tbsp
Dried s achet yeast 2 1/2tsp
Method:
70g Dried apricots (chopped)
50g Pecans (chopped)
70g Old fashioned oatmeal
Use the BASIC programme. At the beeps add:
1.5lb
Water 260ml
Strong white flour 460g
Salt 2 tsp
Dried Milk (optional) 2 tbsp
Butter/Oil 3 tbsp
Sugar 3 tbsp
Dried s achet yeast 2 1/2tsp
2001 ABM8 rev.0
Page 28

Page
28
Home Bakery
SODA BREAD
A non-yeast bread perfect for the RAPID programme but you can use the CAKE
progr amme too if you wish.
Add the following the bread pan:
350g wh i te plain flour
350g p l ain wholemeal flour
2 tsp Bicarbonate of soda
1 tsp Salt
450ml buttermilk
Set mac hine to RAPID or CAKE programme.
BROWN & WHOLE MEAL/WHOLE WHEAT
RECIPES
For the purposes of these recipes you can consider whole meal and whole wheat flour
to be the same thing. It is of paramount importance to select the flour you use wisely.
People often buy plain brown or plain wholemeal flour in the belief that it will suffice
for bread making – sadly it won’t. Whichever brand you buy it
‘strong’ or ‘for bread making’ on the packet.
ABM8 can ma ke 2.5lb whole meal br ea d. FOR 2.5 LB LOAF SIZE USES THE 2LB
LOAF SIZE SETTING.
must
BASIC WHOLE MEAL LOAF
2.5 lb 2lb
Water 380ml
Strong whole meal flour 500g
Strong white flour 200g
Salt 2 tsp
Dried Milk (optional) 2 tbsp
Butter/Oil 3 tbsp
Sugar (brown is best) 3 tbsp
Dried sachet yeast 2 1/2tsp
Use the WHOLE WHEAT programme (5) for best results. You can substitute the white
flour for whole meal to mak e a 100% whole meal loa f but increase the water by 1
tbsp for 2lb/2.5lb l oaf or 2 tsp for th e 1.5lb recipe. W ith certain types of flour you
may find that the BREAD MIX (10) or FRENCH (3) works well.
(use half th ese measures for
1lb loaf)
Water 320ml
Strong whole meal flour 400g
Strong white flour 160g
Salt 2 tsp
Dried Milk (optional) 2 tbsp
Butter/Oil 3 tbsp
Sugar (brown is best) 3 tbsp
Dried sachet yeast 2 1/2tsp
1.5lb
Water 260ml
Strong whole meal flour 340g
Strong white flour 120g
Salt 2 tsp
Dried Milk (optional) 2 tbsp
Butter/Oil 2 tbsp
Sugar (brown is best) 2 tbsp
Dried sachet yeast 2 1/2tsp
have the w ords
2001 ABM8 rev.0
Page 29

Page
29
Home Bakery
BASIC BROWN LOAF
2.5 lb 2lb
Water 370ml
Strong brown flour 700g
Salt 2 tsp
Dried Milk (optional) 2 tbsp
Butter/Oil 3 tbsp
Sugar (brown is best) 3 tbsp
Dried sachet yeast 2 1/2tsp
For this recipe you can either use the BASIC (1) or WHOLE WHEAT (5) programmes.
(use half th ese measures for
1lb loaf)
Water 320ml
Strong brown flour 560g
Salt 2 tsp
Dried Milk (optional) 2 tbsp
Butter/Oil 3 tbsp
Sugar (brown is best) 3 tbsp
Dried sachet yeast 2 1/2tsp
1.5lb
Water 270ml
Strong whi te flour 460g
Salt 2 tsp
Dried Milk (optional) 2 tbsp
Butter/Oil 3 tbsp
Sugar (brown is best) 2 tbsp
Dried sachet yeast 2 1/2tsp
HONEY WHOLE MEAL
2.5 lb 2lb 1.5lb
Water 400ml
Strong whole meal flour 500g
Strong white flour 200g
Salt 2 tsp
Dried Milk (optional) 2 tbsp
Butter/Oil 3 tbsp
Honey 4 tbsp
Dried sachet yeast 2 1/2tsp
Use the WHOLE WHEAT programme for this recipe. Adding ¼ cup of chopped nuts at
the beeps enhances taste & texture.
Water 300ml
Strong whole meal flour 400g
Strong white flour 160g
Salt 2 tsp
Dried Milk (optional) 2 tbsp
Butter/Oil 3 tbsp
Honey 4 tbsp
Dried sachet yeast 2 1/2tsp
Water 240ml
Strong whole meal flour 340g
Strong whi te flour 120g
Salt 2 tsp
Dried Milk (optional) 2 tbsp
Butter/Oil 2 tbsp
Honey 3 tbsp
Dried sachet yeast 2 1/2tsp
2001 ABM8 rev.0
Page 30

Page
30
GRANARY LOAF
2lb 1.5lb
Water 310ml
Granary flour 560g
Salt 2 tsp
Dried Milk (optional) 2 tbsp
Butter/Oil 3 tbsp
Sugar 2 tbsp
Dried s achet yeast 2 1/2tsp
Use the BASIC (1) programme for this recipe.
Water 260ml
Granary flour 460g
Salt 2 tsp
Dried Milk (optional) 2 tbsp
Butter/Oil 2 tbsp
Sugar 2 tbsp
Dried s achet yeast 2 1/2tsp
Home Bakery
EUROPEAN BLACK BREAD
This loaf is well worth the effort bu t we don’t reco mmend that you try it as your first
loaf!
2lb only
Water 370ml
Cider vinegar 2 tsp
White fl our 400g
Rye flour 160g
Oat bran 100g
Butter 2 tbsp
Sugar 2 tbsp
Salt 1 tsp
Caraway seeds 4 tsp
Drie d m i nced onion 4 tsp
Cocoa powder(unsweetened) 4 tbsp
Dried s achet yeast 2 1/2tsp
Use the WHOLE WHEAT pr ogramme for this recipe.
2001 ABM8 rev.0
Page 31

Page
31
Home Bakery
CAKES
If you want to use smaller quantities than those shown here, you may need to stop
the bake step early. If usi ng a cake mix you should use a MINIMUM of 400g. Use the
CAKE programme for all the recipes on this page. Check the crust colour of the cake
after 50 minutes and press the START/STOP button for 3 seconds to stop the bake
process if necessary. The crust of Madeira cake is quite dark anyway due to the high
sugar content.
BASIC MADIERA CAKE
Butter 280g
Caster su gar 280g
Eggs (medium) 3
Self rai sing flour 460g
Vanilla essence 2 tsp
Lemon juice 2 tbsp
Baking soda 2 tsp
Use the CAKE programme for this recipe. We recommend that you chose the LIGHT
crus t se tti ng for your fi rst attempt. Ad d dried fruit i f you wish.
RICH CHOCOLATE CAKE
Castor sugar 300g
Butter 200g
Eggs 3 medium size
Vanilla essence 2 tsp
Cocoa 70g
Self rai sing flour 400g
Salt ½ tsp
Baking powde r 1 tsp
COCONUT CAKE
Soft brown sugar 300g
Butter 200g
Eggs 3(medium)
Self rai sing flour 400g
Baking powde r 3 tsp
Salt 1/2 tsp
Milk 50ml
Desiccated coconut 50g
2001 ABM8 rev.0
Page 32

Page
32
Home Bakery
BREAD DOUGH
The dough modes will perform the kneading some of the rising steps for you. When
the dough is ready you perform the final rising outside the machine and bake in a
conventio nal oven.
PIZZA BASE
Makes 2 x 12” bases
Water 240ml
Strong white flour 460g
Olive oil 2 tbsp
Strong wholemeal flour 3 tbsp
Sugar 1 tbsp
Salt 2 tsp
Yeast 2 tsp
Use the DOUGH programme. When the process is complete remove the dough from
the bread pan and cut into two equal pieces. On a floured surface, roll into Pizza
rounds and pinch around the edges to make a small rim. Place on a lightly greased
baking tray and cover with sauce, cheese and other toppings. Bake at 180°C (gas 5)
for 15-20 minutes. (Check progress after 15 minutes).
Tips:
1 tsp of basil or oregano and ¼ cup of Parmesan cheese for extra flavour. There are
quite a few pizza & taco seasonings available, which can be added (2 tbsp).
You can substitute some or all of the flour for wholemeal or brown. You can add
DINNER ROLLS
Makes 10-12 generously sized rolls
Use the basic white bread recipe as the basis for these dinner rolls.
Select DOUGH programme (7). Meanwhile beat 1 egg.
When the process has finished remove the dough and divide into 10-12 equally sized
balls. Place onto a lightly greased baking tray leaving as bigger gap as you can
between each roll. Cover and remove to a warm, draught-free place for 30-40
minutes or until rolls are double in size. Brush with the beaten egg glaze.
Bake in pre-heated oven at 180°C (gas 5) for 12-16 minutes.
2001 ABM8 rev.0
Page 33

Page
33
Home Bakery
BAGELS
Add ingredients to pan as per basic white bread recipe. You can substitute up to half
the white flour for wholemeal or brown if you wish. Select DOUGH (7). When the
process is complete proceed as follows:
Cut the do ugh into 15-20 eq ual pieces and ro ll into balls . Make a 1” (2.5cm) ho le in
the middle to form a ring shape. Cover and allow to rise in a warm place for 30-40
minutes.
Meanwhile bring 2 litres of water and 2 tbsp of sugar to a gentle boil. When the
bagels are ready, add to the water 2 at a time and boil uncovered for 2 minutes
turning once .
Place bagels on a lightly greased baking tray and bake in a pre-heated oven for 30
minutes at 180°C (gas 5) – or until golden brown.
CROISSANTS
Ingredient s Amount
Water 250ml
Strong white flour 460g
Sugar 2 tbsp
Butter 2 tbsp
Salt 1 tsp
Yeast 2 ½ tsp
You will also need 250g of butter or marga rin e , 1 egg, a little milk and so me cling
film.
Method:
Meanwhile, place the butter between two pieces of cling film. Using a rolling pin
gently roll the butter until it becomes a 1” thick rectangular slab. Remove to the
fridge to chill.
When the dough cycle is complete remove the dough from the machine. On lightly
floured surface roll the dough into a rectangle 10” x 12”. Remove the chilled butter
slab from the fridge, remove th e c ling film and lay the butter ac ross the dou gh in such
a way tha t the dough can be folded over to fo rm a sandwich with the butter in the
middle. Roll the dough again into a rectangular sheet 10” x 12”. Try to make sure the
butter between the dough spreads out evenly as you go.
Next, cut the dough sheet into 8 triangular pieces (see drawing). Starting at the base
of the triangle, roll each piece then turn each end in slightly to form the traditional
Place the ingredients into the bread pan, select DOUGH mode, press START.
2001 ABM8 rev.0
Page 34

croissant shape. Lay the 8 croissants on a baking tray giving each one as much room
as possible. Remove to a warm place for 40-60 minutes to rise.
Pre-heat oven to 200C ( gas 6). Brush th e top of each cro issant with a bea ten egg
mixed with 2 tbsp milk. Bake for 10-12 minutes or until golden brown.
Page
34
Home Bakery
BREAD MIXES
The ABM8 has a programme, which has been specially developed to get the best out
of the increasing number of bread mixes now available in supermarkets. The method
is simple:
Follow the instructions on the back of the packet and select the BREAD MIX (10)
programme. One th in g to consider i s that the drie d yeast is often mi xed in with the
flour so most bread mixes won ’t work well with the delay timer.
We used Wrights bread mixes for testing the machine, which all gave excellent
results.
2001 ABM8 rev.0
Page 35

Page
35
Home Bakery
JAM
The ABM8 makes excellent jam! However, please remember to be extra careful when
handling the hot jam.
Fresh s trawberries ( or just about any fr uit) 440g
Sugar (caster or granulated) 630g
Pectin (available in packets in supermarkets) 1 x 13g sachet.
Method:
to the bread pan and fold in the sugar with a wooden spoon or spatula. Sprinkle the
sachet of pectin over the mixture. Close the lid and select the JAM programme.
When the process is complete remove the bread pan.
A layer of foam often develops on top of the jam. Carefully remove this and discard.
Pour the r emaining mixtur e into jars/conta iners and leav e to cool be fore removing to
refrigerator.
Tip:
Caramelised sugar can be quite difficult to remove if left too long.
Either crush the fruit manually or use a food processor (preferable). Add fruit
!!carefully!!
It’s a good idea to clean the bread pan as soon as possible after making jam.
2001 ABM8 rev.0
Page 36

Page
36
Home Bakery
WHEAT/GLUTEN/DAIRY FREE BREAD
The Prima Home Bakery is not confined to wheat or yeast based bread. As
mentioned earlier wheat – oats – rye and barley all contain GLUTEN and many people
are intolerant to th ese flours.
We would like to thank BARBARA’S KITCHEN for supplying us with the following
recipes and information.
Barbara’s Kitchen will try to adjust all the recipes for your own particular intolerance
and can supply you with Xanathan gum, white rice/tapioca starch/potato starch flours
if necessary.
FOR FURTHE R I NFO RMA TI O N PLEASE CONTACT:-
BARBARA’S KITCHEN
TEL/F A X 01443 22 9304
E.MAIL:
WEBSITE: http://www.barbaraskitchen.co.uk
GLUTEN FREE FLOURS AVAILABLE
Sago Maize Millett
Quinoa Polenta Sorghum
Bean flour Nut flours Corn flour
Rice Bran Cornmeal Brown Rice
Sweet rice Potato fl our Soya flour
White rice flour
Potato s tarch
Tapioca starch flour
(Cassava)
Use the Prima measuring cup provided with the machine and Prima measuring spoon
for the following recipes.
Please measure very carefully.
enquiries@barbaraskitchen.co.uk
2001 ABM8 rev.0
Page 37

Page
37
Home Bakery
Makin g your own bulk supply of flour
This is how to make up a bulk supply of the flours that Barbara chose to use in her
recipes. Any combination of gluten free flours allowed for your own intolerance can
be used – but results will vary.
Please keep your flour in the freezer/refrigerator. The flour will not go hard, only cold:
EXAMPLE 1
2 CUPS WHITE RICE FLOUR
½ CUPS POTA TO STARCH FLOUR
½ CUP TAPIOCA STAR CH FLOUR
EXAMPLE 2
6 CUPS WHITE RICE FLOUR
2 CUP POTATO STARCH FLOUR
1 CUP TAPIOC A STARCH FLOUR
EXAMPLE 3
12 CUPS WHITE RICE FLOUR
3 CUPS POTATO STA R CH FLOUR
2 CUPS TAPIOC A STA R CH FLOUR
ADDITIONAL INFORMATION
Cider vinegar is gluten free and is used as a dough enhancer
Whole Egg Replacer can be substituted for large egg if you are allowed the
ingredie nt s.
Check your baking powder is Gluten Free or make your own:¼ ozs/7gm Potassium Bicarbonate (from chemist) 2 tsp
4¼-oz s /115gm Potato Sta rch Flour (Brand name Farina) ¾ CUP
2001 ABM8 rev.0
Page 38

Page
38
Home Bakery
2.5 lb WHITE/BR OW N L OAF RECIPE
Gently mix togeth er in a bowl first – ex c ept the yeast:
2 1/3 cups white rice flour
½ cup potato starch flour
½ cup tapioca starch flour
1
/3 cup extra potato starch or tapioca starch
½ tbsp xanthan gum
2 tbsp sugar
1½ tsp sal t
1 sachet dried yeast 2½ tsp (if you find the bread rises too high reduce by
¼ tsp)
Wet ingredients
2 large eggs at room temperature (beaten)
1 tsp cider vinegar (if allowed)
¼ cup sunflower/corn/olive oil
1/3 cup liquid milk (soya-rice-goat-ewe-cow’s)
Method
Mix all the wet ingredients together and place in the base of your bread machine.
Gently mix all the dry ingredients together (except the yeast) and place on top of the
wet ingredients. Sprinkle the yeast on top of the dry mixture. Use BASIC or RAPID
programme with your choice of crust setting. On completion of the baking time –
remove the loaf from the tin and place on a wire tray to become cold before slicing.
To make a brown loaf, add 1 tbsp molasses to wet ingredients, if allowed by your
intolerance.
2001 ABM8 rev.0
Page 39

Page
39
Home Bakery
3lb WHITE- B ROWN LOAF
Dry ingr edients
Gently mix togeth er in a bowl first – ex c ept the yeast
5 cups white rice flour
1 cup potato starch flour
1 cup tapioca starch flour (cassava)
1 cup extra potato starch or tapioca starch
2 tbsp xanthan gum
2 tsp salt or dried herbs
3 tbsp sugar
1 sachet dried yeast 2¼ tsp
Wet ingredients
2 large eggs at room temperature
½ cup organi c oli ve /s u nflower/co rn oi l
1 tsp cider vinegar (if allowed)
1 cup soya/rice/goat/ewe/cow’s or allowed milk
1½ cups hand hot warm water
Method
Mix all the wet ingredients together and place in the base of your bread machine.
Gently place all the dry ingredient together (except the yeast) on top of the wet
ingredients. Sprinkle the yeast on top of the dry mixture.
Use BASIC or RAPID programme with your choice of crust setting. Because this is a
large amount of mixture the finished loaves should weigh in at about 3lb 9ozs.
Use a plastic spatula to help turnover and mix the ingredients initially when the
machin e fir st sta r ts mixin g. On comple tio n of th e bak ing ti me – re move the loa f fro m
your machine and place on its side on a wire tray to cool. You can slice this loaf very
thinly – and it freezes well.
To make a brown loaf add (if allowed) 1tbs
Molasses/treacle with some lemon peel and crushed
Cardammon seeds – this will make a “mock rye” loaf.
2001 ABM8 rev.0
Page 40

Page
40
Home Bakery
Apricot and almond bread
Dry ingr edients
Mix tog ether in a bowl first except the ye ast
2 cups white rice flour
½ cup tapioca starch flour
½ cup potato starch flour
2 tsp xanthan gum
1½ tsp gluten-free mixed spice
½ cup powdered milk (if using fresh see additional info)
1 tsp salt
¼ cup sugar
½ cup dried apricots (finely chopped after soaking)
¼ cup crushed almonds – or – 1 tsp almond essence
Wet ingredients
3 large eggs at room temperature (beaten)
2 ozs melted butter or allowed margarine/oil
1 tsp cider vinegar (if allowed)
2/3 cup warm water – hand hot
1 cup apricot jam
1 tbs dried yeast (1 sachet which is 2 ¼ tsp)
Method
Mix all the wet ingredients together and place in the bread pan of your bread
machine. Gently mix all the dry ingredients together (except the yeast) and place on
top of the wet ingredients sprinkle the yeast on top of the dry ingredients use BASIC
or RAPID programme with your choice of crust setting.
On completion of the baking time – remove the loaf tin from your machine and leave
to cool slightly before removing the loaf. Place on a wire tray to become cold before
slicing. Freezes well.
2001 ABM8 rev.0
Page 41

Page
41
Home Bakery
Banana a nd nut bre a d
Dry ingr edients
2 cups white rice flour
½ cup tapioca starch flour
½ cup potato starch flour
2½ tsp xanthan gum
1 tsp salt
¼ cup powdered milk (if using fresh contact b-kitchen)
1/3 cup sugar
1/3 cup finely chopped nuts (if allowed)
Wet ingredients
1 large or 2 small mashed bananas
2 large eggs at room temperature (beaten)
3 ozs melted butter or allowed margarine
1 tsp cider vinegar if allowed
1 tbs molasses/treacle
1 1/3 cups of warm water – hand hot
1 packet of dried yeast (2 ¼ tsp)
Method
Mix all the wet ingredients together and place in the bread pan of the bread machine.
Gently mix all the dry ingredients together except the yeast) and place on top of the
wet ingredients. Use BASIC or RAPID programme with your choice of crust setting.
On completion of the baking time – remove the loaf tin from your machine and leave
to cool slightly on its side on a wire tray to become cold before slicing. Freezes well.
2001 ABM8 rev.0
Page 42

Page
42
Home Bakery
Carrot and pineapple bread
Dry ingr edients
2 cups white rice
½ cup tapioca starch flour
½ cup potato starch flour
2 ½ tsp xanthan gum
1 tsp salt
¼ cup powdered milk
¼ cup sugar
1 tsp gluten-free mixed spice
1 tsp gluten-free cinnamon
Wet ingredients
1 cup finely grated carrot
½ cup crushed unsweetened pineapple (tinned) plus juice
2 large eggs at room temperature (beaten)
3 ozs melted butter or allowed margarine/oil
1 tsp cider vinegar (if allowed)
1 1/3 cups warm water (hand hot)
1 packet of dried yeast (2 ¼ tsp)
Method
Mix all the wet ingredients together and place in the bread pan of your bread
machine. Gently mix all the dry ingredients together (except the yeast) and place on
top of the wet ingredients sprinkle the yeast on top of the dry ingredients use BASIC
or RAPID programme with your choice of crust setting.
On completion of the baking time – remove the loaf tin from your machine and leave
to cool slightly before removing the loaf. Place on a wire tray to become cold before
slicing. Freezes well.
2001 ABM8 rev.0
Page 43

Page
43
Home Bakery
Ploughman’s loaf
Dry ingr edients
Mix tog ether in a bowl first except the ye ast
2 cups white rice flour
½ tapioca starch flour
½ potato starch flour
2½ tsp xanthan gum
1 tsp salt
½ cup allowed powdered milk
2 tsp gluten-free prepared mustard
3 ozs fresh onion (minced) or onion powder to taste
1 cup strong grated cheese
2 ozs sugar
Wet ingredients
3 large eggs at room temperature (beaten
3 ozs melted butter or allowed margarine
1 tsp cider vinegar (if allowed)
1 2/3 cup warm wa ter hand hot
1 packet of dried yeast (2¼ tsp)
Method
Mix all the wet ingredients together and place in the bread pan of your bread
machine. Gently mix all the dry ingredients together (except the yeast) and place on
top of the wet ingredients sprinkle the yeast on top of the dry ingredients use BASIC
or RAPID programme with your choice of crust setting.
On completion of the baking time – remove the loaf tin from your machine and leave
to cool slightly before removing the loaf. Place on a wire tray to become cold before
slicing. Freezes well.
2001 ABM8 rev.0
Page 44

Page
44
Spiced apple loaf
Dry ingr edients
2 cups white rice flour
½ cup tapioca starch flour
½ cup potato starch flour
3 tsp xanthan fum
1 tsp salt
¼ tsp gluten-free cinnamon
¼ cup sugar or maple syrup
½ cup allowed powdered milk
1 tsp app le spice (if ab l e to obtain)
grated rind of half a lemon
Wet ingredients
1 large bramley apple-peeled and grated
2 large eggs at room temperature (beaten)
3 ozs melted butter or allowed margarine
4 tsp cider vinegar (if allowed)
1 ½ cups of warm water – hand hot
1 packet of dried yeast (2 1/4 tsp)
Home Bakery
Method
Mix all the wet ingredients together and place in the bread pan of your bread
machine. Gently mix all the dry ingredients together (except the yeast) and place on
top of the wet ingredients sprinkle the yeast on top of the dry ingredients use BASIC
or RAPID programme with your choice of crust setting.
On completion of the baking time – remove the loaf tin from your machine and leave
to cool slightly before removing the loaf. Place on a wire tray to become cold before
slicing. Freezes well.
2001 ABM8 rev.0
Page 45

Page
45
FITTING OF 3 PIN PLUG
WARNING: THIS APPLIANCE MU ST BE EARTHED
IMPORTANT:
following code:
UNITED KINGDOM: FITTING OF A 13A FUSED PLUG
As the colours of the wires in the mains
lead of this appliance may not correspond
with the coloured markings identifying the
terminals in your plug, proceed as follows:The wire which is coloured green & yellow
must be connected to the terminal in the
plug which is marked with the letter 'E' or
the earth symbol ‘ ‘ or coloured
green & yellow.
The wire, which is coloured
connected to the terminal which is marked
with the letter ‘N’ or coloured
The wire which is coloured
connected to the terminal which is marked
with the letter 'L' or colour ed
The wires in this mains lead are coloured in accordance with the
Green and Yellow:
Blue:
-
Earth
-
Neutral
Brown: - Live
E
EARTH FUSE
(GREEN & YELLOW
or GREEN)
N
NEUTRAL
(BLUE or BLACK)
green or
CORD GRIP
blue
must be
WIRING FOR A 13 AMP PLUG (BS 1363)
black
.
If a 13A (BS 1363) fused plug is used it
must be fitted with a 13A fuse. If in doubt -
brown
must be
consult a qualified electrician.
Please note: The Earth Terminal is marked
red
.
with the letter ‘E’ or
Home Bakery
Earth Symbo l
(BROWN or RED)
‘ ’.
L
LIVE
WARNING
This appliance must be earthed. If the supply cord is damaged, it must be replaced by the
manufacturer or its service agent or a similarly qualified person in order to avoid a hazard.
Disconnect the mains plug from the supply socket when not in use. Do not attempt to
dismantle any part of this appliance. There are no used serviceable parts. If this instruction
is ignored, responsibility for failure cannot be accepted. To prevent from fire or risk of
electric shock, do not immerse in water or any other liquid, or allow water to come into
contact with electrical connections or switches. Do not stand the bread maker in metal
trays, or on sloping surfaces or draining boards.
2001 ABM8 rev.0
Page 46

WARRANTY
~~~~~
This product is guaranteed for 12 months from the date of purchase when the
appliance is used solely for domestic purposes. For commercial use the product is
guaranteed for 90 days from the date of purchase.
The guarantee is valid against mechanical or electrical defects if the product is used in
accordance with the instructions and provided that it is not connected to an
unsuitable electricity supply or dismantled, interfered with or damaged in any way.
IMPORTANT, PL EASE RETAIN TH I S W A RRANTY
Please ask your retailer to either stamp this warranty or simply attach your store
receipt. Keep this warranty somewhere safe. DO NOT SEND TO PRIMA.
This guarantee in no way affects your rights under statutory law.
WARRANTY
WARRANTY WARRANTY
Page
46
Home Bakery
~~~~~
IF THE PRODUCT MALFUNCTIONS DURING IT’S WARRANTY PERIOD IT MUST BE
RETURNED TO TH E RETAILER FROM WHOM IT W A S PU RCHA SED FOR
REPLACEMENT. IF YOU BOUGHT THIS PRODUCT VIA MAIL ORDER, PLEASE KEEP
ALL THE DOCUMENTATION THAT CAME WHEN THE UNIT WAS DELIVERED.
NAME_______________________________________________________________
ADDRESS___________________________________________________________
_____________________________________________________________________
PURCHASED FROM__________________________________________________
DATE OF PURCHASE __________________MODEL_______________________
The Prima International Group Ltd. 4 Elland Road Ind. Park, Elland Way
LEEDS LS11 0EY. United Kingdom
© Copyright 2001 The Pr i m a International Group Ltd. All rights reserved.
2001 ABM8 rev.0
 Loading...