

Page 1

HEAT PUMP
REMOTE CONTROLLER ILLUSTRATION
PFCM123HX
PFCM183HX
PCM123HX
The design and specifications are subject to change without prior notice
for product improvement. Consult with the sales agency or manufacturer
for details.
202055091446
PCM183HX
Thank you very much for purchasing our heat pump.
Please read this owner's manual carefully before using
your heat pump.
Page 2
CONTENTS
Handling the remote controller ......................................................
Remote controller Specifications...................................................
Function buttons .................. .........................................................
Indicators on LCD ..........................................................................
How to use the buttons
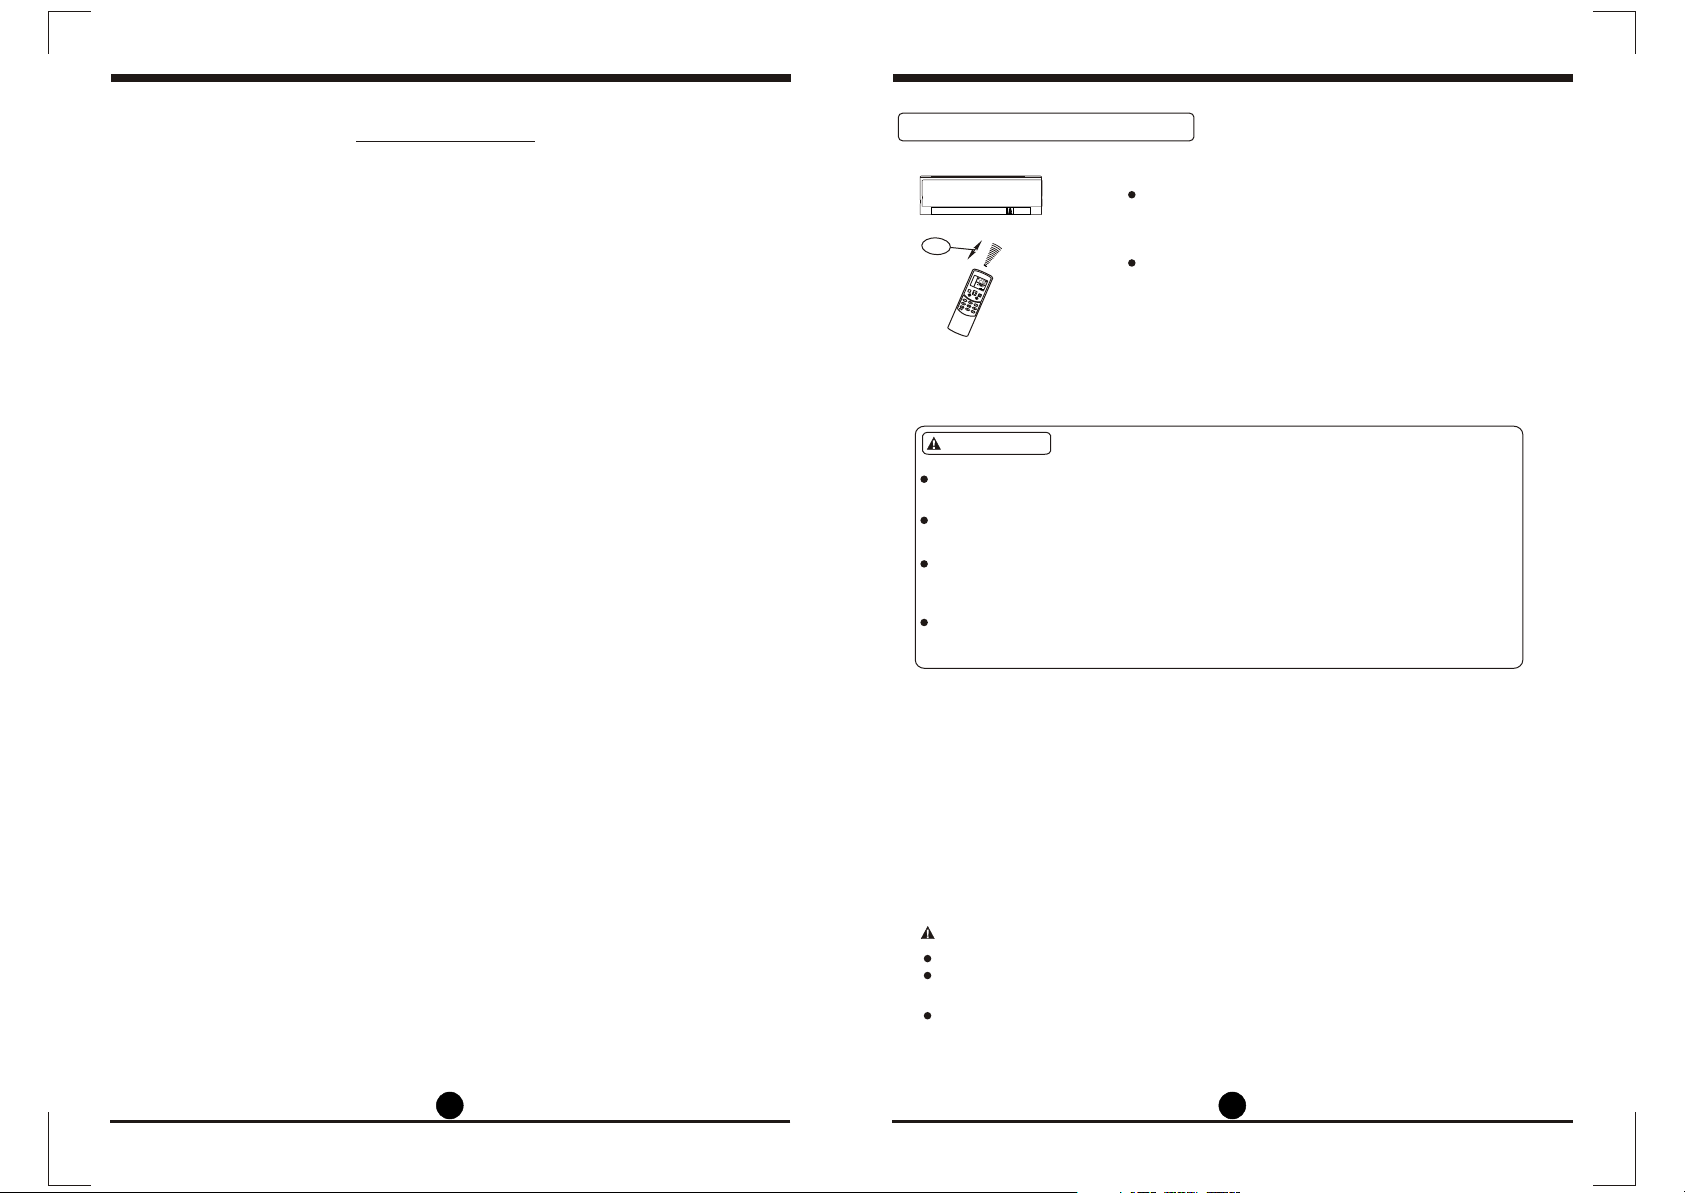
Handling the remote controller
Location of the remote controller.
2
3
4
8m
AUTO
COOL
TEMP.
DRY
SET
HEAT
CLOCK
TIMER
FAN
HOUR
ON
OFF
MODE
M
FAN S
PEED
SWING V
SLEEP
SWING H
TIMER ON
IONIZER
SELF CLEAN
RESET LOCK
TIMER OFF
CLOCK
Use the remote controller within a distance of 8
meters from the appliance, pointing it towards the
receiver. Reception is confirmed by a beep.
Keep the remote controller where its signals can
reach the receiver of the unit.
7
Initial setting the clock ...................................................................
Auto operation.................................................................................
Cooling/Heating/Fan operation......................................................
Dehumidifying operation ...............................................................
Adjusting air flow direction............................................................
Timer operation...............................................................................
Example of Timer setting ..............................................................
10
10
11
12
8
9
9
CAUTIONS
The heat pump will not operate if curtains, doors or other materials
block the signals from the remote controller to the indoor unit.
Prevent any liquid from falling into the remote controller. Do not expose
the remote controller to direct sunlight or heat.
If the infrared signal receiver on the indoor unit is exposed to direct
sunlight, the heat pump may not function properly. Use curtains to
prevent the sunlight from falling on the receiver.
If other electrical appliances react to the remote controller, either move
these appliances or consult your local dealer.
Replacing batteries
The remote controller is powed by two dry batteries(R03/LR03X2) housed in the
rear part and protected by a cover.
(1) Remove the cover by pressing and sliding off.
(2) Remove the old batteries and insert the new batteries,placing the(+) and (-)
ends correctly.
(3) Reattach the cover by sliding it back into position.
NOTE: When the batteries are removed, the remote controller erases all
programming. After inserting new batteries, the remote controller must be
reprogrammed.
CAUTIONS
Do not mix old and new batteries or batteries of different types.
Do not leave the batteries in the remote controller if they are not
going to be used for 2 or 3 months.
Do not dispose batteries as unsorted municipal waste. Collection
of such waste separately for special treatment is necessary.
11
22
Page 3
Remote Controller Specifications
Model
Rated Voltage
Lowest Voltage of
CPU Emitting Signal
Signal Receiving
Range
Environment
RG05F2/BGEU1
3.0V(Dry batteries R03/LR03 2)
2.4V
8m
OOOO
23 F~140 F(-5 C~60 C)
Performance Feature
1. Operating Mode: AUTO, COOL, DRY, HEAT(cooling & heating models only),
and FAN.
2. Timer Setting Function in 24 hours.
3. Indoor Setting Temperature Range : 6 2 F~86 F(17 C~30 C).
OOO O
4. Full function of LCD (Liquid Crystal Display).
AUTO
COOL
DRY
HEAT
FAN
MODE
FAN SPEED
M
Sliding door
(closed)
Function buttons
AUTO
COOL
DRY
HEAT
FAN
1
MODE
2
M
FAN SPEED
3
4
5
6
7
SWING V SLEEP
SWING H
I FEEL
SELF CLEAN
RESET LOCK
TURBO
LED
TIMER ON
TIMER OFF
8
Sliding door
(opened)
CLOCK
ON/OFF Button
1
Operation starts when this button is pressed
and stops when this button is pressed again.
MODE Button
2
Each time the button is pressed, the operation
mode is selected in a sequence of following:
AUTO
NOTE: Please do not select HEAT mode if the
COOL
DRY
machine you purchased is cooling only type. Heat
9
mode is not supported by the cooling only
appliance.
HEAT FAN
10
3
11
12
13
14
15
16
SLEEP Button
Active/Disable sleep function. It can maintain
the most comfortable temperature and save
energy. This function is available on COOL,
HEAT or AUTO mode only .
NOTE: While the unit is running under SLEEP
mode, it would be cancelled if MODE, FAN
SPEED or ON/OFF button is pressed.
4
SWING V Button
Used to stop or start horizontal louver movement and set the desired up/down air flow
direction. Push once, the louver changes 6
degree in angle. Keep pushing more than 2
seconds, the louver will swing up and down
automatically.
5
SWING H Button
Used to stop or start vertical louver movement
and set the desired left/right air flow direction.
The vertical louver changes 6 degree in angle
for each press.If keep pushing more than 2
seconds,the vertical louver swing feature is
activated.(Not applicable to all the units,please
refer to the OWNER S MANUAL for details).
I FEEL /SELF CLEAN Function
6
Press this button less than 2 seconds will
initiate I FEEL function. And if keep pressing
this button more than 2 seconds, the
SELF CLEAN function is initiated.
33 44
Page 4

Function buttons(continued)
AUTO
COOL
DRY
HEAT
FAN
1
MODE
2
M
FAN SPEED
9
10
3
4
5
6
7
8
SWING V SLEEP
TURBO
SWING H
I FEEL
LED
SELF CLEAN
RESET LOCK
TIMER ON
TIMER OFF
CLOCK
11
12
7
13
14
15
16
8
9
10
11
When the I FEEL function is activated, the
remote display is actual temperature at its
location. The remote control will send this
signal to the heat pump every 3 minutes
interval until press the I FEEL button again.
This indicator light remains on.
The I FEEL function is not available under
DRY and FAN mode.
Switch the operation mode or turn off the unit
will cancel the I FEEL function automatically.
Under SELF CLEAN mode, the heat pump
will automatically clean and dry the Evaporator
and keep it as fresh for the next operation.
RESET Button
Once the recessed RESET button is pressed,
all of the current settings will be cancelled
and the controller will return to the initial settings.
LOCK Button
Press this recessed button to lock all current
settings, and the remote controller will not
accept any operation except that of the LOCK.
Use the LOCK mode when you want to prevent
settings from being changed accidentally.
Press the LOCK button again to cancel the
LOCK function. A lock symbol will appear on
the remote controller display when the lock
function is activated.
FAN SPEED Button
Used to select the fan speed in four steps:
AUTO LOW MED HIGH
UP Button
Push this button to increase setting temperature
or to increase Hour during Clock time setting.
DOWN Button
Push this button to decrease setting temperature
or to decrease Hour during Clock time setting.
NOTE: Press and hold UP and DOWN buttons
together for 3 seconds will alternate the temperature display between the C & F scale.
OO
1
2
3
4
5
6
7
8
AUTO
COOL
DRY
HEAT
FAN
MODE
M
SWING V SLEEP
TURBO
SWING H
I FEEL
LED
SELF CLEAN
RESET LOCK
FAN SPEED
TIMER ON
TIMER OFF
CLOCK
12
TIMER ON Button
Press this button to activate the Auto-on time
setting. Each press will increase the time setting
in 30 minutes increments, up to 10 hours, then at
1 hour increments up to 24 hours. To cancel the
Auto-on time setting, just press the button until
the time setting is 0.0.
13
TIMER OFF Button
Press this button to activate the Auto-off time
9
10
11
12
13
14
15
16
setting. Each press will increase the time setting
in 30 minutes increments, up to 10 hours, then at
1 hour increments up to 24 hours. To cancel the
Auto-off time setting, just press the button until
the time setting is 0.0.
13
14
TURBO
Active/Disable Turbo function. Turbo function
enables the unit to reach the preset temperature
in the shortest time. When press this button
on heating mode(applicable to the unit adopts
PTC only), the PTC will be energized and bring
fast heating operation.
15
CLOCK Button
Used to set the remote clock.
LED Button
16
Disable/Active indoor screen Display.
NOTE:
Buttons design might be slightly different
from the actual one depending on individual
models.
All the functions described above are
accomplished by the indoor unit, if the
indoor unit has no this feature, there is no
corresponding operation happened when
press the relative button on the remote
controller.
Please do not select HEAT mode if the
machine you purchased is cooling only
type. Heat mode is not supported by the
coolingonly appliance.
55 66
Page 5

Indicators on LCD
How to use the buttons
AUTO
COOL
DRY
HEAT
FAN
TEMP.
SET
CLOCK
TIMER
HOUR
ON OFF
Mode display
Displays the current operation mode. Including
AUTO( ), COOL( ), DRY( ), HEAT( )
(Not applicable to cooling only models), FAN( )
and back to AUTO( ).
AUTO
Transmission Indicator
This transmission indicator lights when remote
controller transmits signals to the indoor unit.
ON/OFF display
AUTO
COOL
DRY
HEAT
FAN
MODE
M
TEMP.
SET
CLOCK
TIMER
HOUR
ON OFF
FAN SPEED
Displayed by pressing the ON/OFF button.
Press the ON/OFF button again to remove.
Temp. display
Displays the temperature setting(62F ~86F /17C ~
O
30C ). When you set the operating mode to FAN, no
OOO
temperature setting is displayed.
SWING V SLEEP
SWING H
I FEEL
SELF CLEAN
RESET LOCK
TURBO
LED
TIMER ON
TIMER OFF
CLOCK
Time display
Indicate Timer on/off time(0~24 hours) or clock
time. The clock time is indicated only when no AUTO-
FF
ON/OFF timer is set. When AUTO-TIMER feature is
operating, it displays the AUTO-ON/OFF time. To
check the current time, press the CLOCK button, and
the time will display.
Before you start operating the heat pump, set
the clock of the remote controller using the procedures given in this section. The clock panel on the
remote controller will display the time regardless of
whether the heat pump is in use or not.
Initial Setting the Clock
After batteries are inserted in the remote controller,
the clock panel will display "12:00" and begin to flash.
1. UP/DOWN button
.
Press these buttons to set time.
1
Forward.
Backward.
.
Each time you press the button, the time moves
forward or backward by one minute depending
2
on which side you press. The time alters as quickly
as you push the button.
.
Keep pressing the button without releasing, the
time moves forward or backward by 10 minutes
depending on which side you press.
2.
CLOCK button
When the right time is achieved, press the CLOCK
button or release the or and wait for 5
seconds, the clock time stops flashing and the
Fan speed display
Displays the selected fan speed, AUTO( ) and three
fan speed levels " " (LOW) " " (MED)
" " (HIGH) can be indicated. The fan speed
is auto controlled under AUTO or DRY mode.
Lock Display
Displayed when LOCK mode is activated.
clock starts operating.
3.Readjusting the Clock
Press the CLOCK button on the remote controller,
the time of the clock display will start to flash. To
set the new time, follow 1 and 2 of "Initial Setting
of the Clock".
Note: The time of the CLOCK must be set before
the AUTO-TIMER feature will operate.
Sleep Display
Displayed under sleeping operation.
Press the SLEEP button again to remove.
I FEEL Display
Displayed when I FEEL function is activated.
Note:
All displays on the remote controller are
shown for illustration purposes only.
* Clock accuracy is within 15 seconds per day.
!
CAUTION
Static electricity or other factors (Voltage transients) can
cause the remote controller clock to initialize. If your
remote controller is initialized (the time of "12:00"
flashing), readjust the clock before starting the unit.
77 88
Page 6

Auto operation
Ensure the unit is plugged in and power is
available. The OPERATION indicator on the
AUTO
TEMP.
COOL
SET
DRY
CLOCK
HEAT
HOUR
FAN
MODE
1
M
FAN SPEED
3
display panel of the indoor unit starts flashing.
1. Press the MODE button to select Auto.
2. Press the UP/DOWN button to set the
desired temperature. The temperature can
be set within a range of 62 F~86 F in 1 F
OOO
increments.
3. Press the ON/OFFbutton to start the
AUTO
TEMP.
COOL
SET
DRY
CLOCK
HEAT
HOUR
FAN
MODE
1
M
FAN SPEED
3
heat pump
2
NOTE
1. In the Auto mode, the heat pump can logically
choose the mode of Cooling, Fan, and Heating
2
Dehumidifying operation
Ensure the unit is plugged in and power is
available. The OPERATION indicator on the
display panel of the indoor unit starts flashing.
1. Press the MODE button to select DRY mode.
2. Press the UP/DOWN buttons to set the
desired temperature.
be set within a range of 62 F~86 F in 1 F
The temperature can
OOO
increments.
3. Press the ON/OFF button to start the
heat pump
NOTE
In the Dehumidifying mode, you can not switch the
fan speed. It has already been automatically controlled.
by sensing the difference between the actual
ambient room temperature and the setting
temperature on the remote controller.
2. In the Auto mode, you can not switch the fan speed.
It has already been automatically controlled.
3. If the Auto mode is not comfortable for you , the
desired mode can be selected manually.
Adjusting air flow direction
Cooling /Heating/Fan operation
AUTO
TEMP.
COOL
SET
DRY
CLOCK
HEAT
HOUR
FAN
MODE
1
M
FAN SPEED
4
Ensure the unit is plugged in and power is
available.
1. Press the MODE button to select COOL, HEAT,
(cooling & heating models only) or FAN mode.
2. Press the UP/DOWN buttons to set the
desired temperature. The temperature can
3
be set within a range of 62 F~86 F in 1 F
OOO
increments.
3. Press the FAN SPEEDbutton to select the
fan speed in four steps- Auto, Low, Med,or
2
High.
4. Press the ON/OFF button to start the
heat pump
NOTE
In the FAN mode, the setting temperature is not
displayed in the remote controller and you are not able
Use the SWING V button to adjust the desired
airflow direction.
When push the SWING V button, the horizontal
louver changes 6 degree in angle for each push.
Keep pushing more than 2 seconds, the louver
will swing automatically and give UP and
DOWN air flow.
NOTE: When the horizontal louver swing
or move to a position which would affect
the cooling or heating effect of the heat pump,
it would automatically change
the swing/moving direction.
to control the room temperature either. In this case,
only step 1, 3 and 4 may be performed.
99
1010
Page 7

AUTO
TEMP.
COOL
SET
DRY
CLOCK
TIMER
HEAT
FAN
MODE
M
SWING V SLEEP
TURBO
SWING H
I FEEL
LED
SELF CLEAN
RESET LOCK
HOUR
ON OFF
FAN SPEED
TIMER ON
TIMER OFF
CLOCK
Timer operation
press the TIMER ON button can set the auto-on
time of the unit. And press the TIMER OFF button
can set the auto-off time of the unit.
To set the Auto-on time.
1. Press the TIMER ON button. The remote
controller shows TIMER ON, the last Auto-on
setting time and the signal "HOUR" will be shown
on the LCD display area. Now it is ready to reset
the Auto-on time to START the operation.
2. Push the TIMER ON button again to set desired
Auto-on time. Each time you press the button,
the time increases in 30 minutes increments, up
1
to 10 hours, then at 1 hour increments up to 24
hours.
2
3. After setting the TIMER ON ,there will be a one half second delay before the remote controller
transmits the signal to the heat pump. Then,
after approximately another 2 seconds, the
signal "HOUR" will disappear and the set temper ature will re-appear on the LCD display window.
To set the Auto-off time.
1. Press the TIMER OFF button. The remote
controller shows TIMER OFF, the last Auto-off
setting time and the signal "HOUR" will be shown
on the LCD display area. Now it is ready to
reset the Auto-off time to START the operation.
2. Push the TIMER OFF button again to set desired
Auto-off time. Each time you press the button,
the time increases in 30 minutes increments, up
to 10 hours, then at 1 hour increments up to 24
hours.
3. After setting the TIMER OFF ,there will be a one half second delay before the remote controller
transmits the signal to the heat pump. Then,
after approximately another 2 seconds, the
signal "HOUR" will disappear and the set temper ature will re-appear on the LCD display window.
IMPORTANT
The effective operation time set by the remote controller for the timer
function is limited to the following settings: 0.5, 1.0, 1.5, 2.0, 2.5, 3.0,
3.5, 4.0, 4.5, 5.0, 5.5, 6.0, 6.5, 7.0, 7.5, 8.0, 8.5, 9.0, 9.5, 10, 11, 12, 13,
14, 15,16,17, 18, 19, 20, 21, 22, 23 and 24.
Example of Timer setting
TIMER ON
(Auto-on Operation)
TIMER
HOUR
ON
The TIMER ON feature is useful when you want
the unit to turn on automatically before say when
you return home. The heat pump will automatically start operating at the set time.
Start
Off
Example:
To start the heat pump in 6 hours.
1. Press the TIMER ON button, the last setting of
Set
6 hours later
starting operation time and the signal "HOUR" will
show on the display area.
2. Press the TIMER ON button to display "6.0" on
the TIMER ON display of the remote controller.
3. Wait for 3 seconds and the TIMER ON indicator
stops flashing and this function is activated. The
digital display area will show the tempera ture
again.
1111
1212
Page 8

TIMER
HOUR
Stop
On
Set 10 hours later
OFF
TIMER OFF
(Auto-off Operation)
The TIMER OFF feature is useful when you want
the unit to turn off automatically after you go to bed.
The heat pump will stop automatically at the set
time.
Example:
To stop the heat pump in 10 hours.
1. Press the TIMER OFF button, the last setting of
stopping operation time and the signal "HOUR" will
show on the display area.
2. Press the TIMER OFF button to display "10" on
the TIMER OFF display of the remote controller.
3. Wait for 3 seconds and the TIMER OFF indicator
stops flashing and this function is activated. The
digital display area will show the temperature
again.
COMBINED TIMER
(Setting both ON and OFF timers simultaneously)
TIMER
Off
Set
HOUR
2 hours later
after setting
ON OFF
Start
Stop
5 hours later
after setting
TIMER ON TIMER OFF
(Off Start Stop operation)
This feature is useful when you want to start
the heat pump before you wake up and
stop it after you leave the house.
Example:
To start the heat pump 2 hours after
setting, and stop it 5 hours after setting.
1. Press the TIMER ON button.
2. Press the TIMER ON button again to
display 2.0 HOUR on the TIMER ON display.
3. Press the TIMER OFF button.
4. Press the TIMER OFF button again to
display 5.0 HOUR on the TIMER OFF display .
5. Wait for the remote control to display
the setting temperature.
TIMER
On
Set
HOUR
2 hours later
after setting
Stop
ON OFF
Start
10 hours later
after setting
TIMER OFF TIMER ON
(On Stop Start operation)
This feature is useful when you want to stop the
heat pumpr after you go to bed, and start it again in
the morning when you wake up or when you return
home.
Example:
To stop the heat pump 2 hours after setting
and start it again 10 hours after setting.
1. Press the TIMER OFF button.
2. Press the TIMER OFF button again to
display 2.0 HOUR on the TIMER OFF display.
3. Press the TIMER ON button.
4. Press the TIMER ON button again to
display 10 HOUR on the TIMER ON display .
5. Wait for the remote control to display
the setting temperature.
1313
1414
 Loading...