

Page 1
Included in this document: Hand Control Reference Guide, Fabric
Care, Chair Assembly and Setup, Warranty, and Weight Capacity
Page 2
Hand Control referenCe Guide
NOTE: This quick reference guide offers basic hand control functions, general care instructions,
basic assembly information, warranty information, and weight capacity information for your
chair. Before operating the chair, thoroughly read the owner’s manual and all other supplemental
documents for information on safety, basic operation, and care and maintenance.
The illustrations reflect those hand controls with the highest level of functionality. The hand control you
receive may have fewer options, but basic functionality is the same.
The premier feature of the ViVaLiFT!® Power Recliner is that you have the ability to adjust your feet and back
independently to achieve your perfect position. For example, the seatback can recline until it is horizontal to
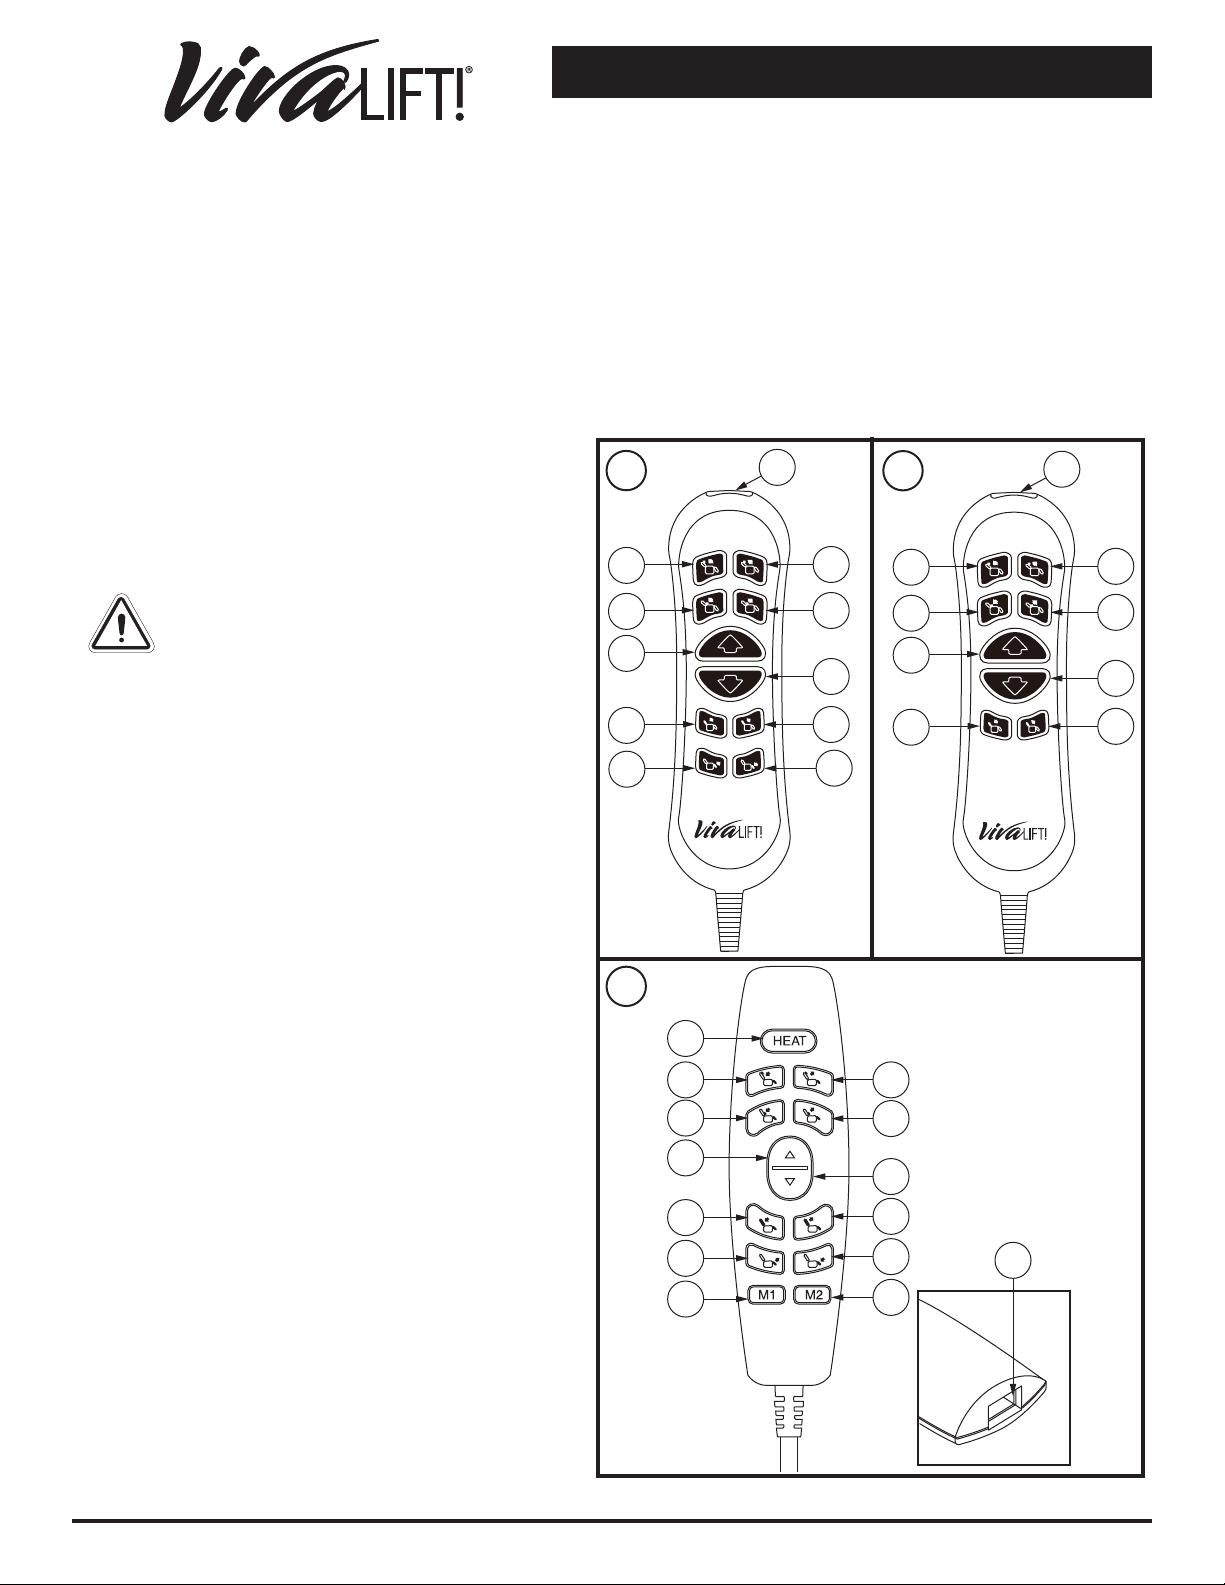
the floor. To achieve this, press and hold button “8” (as shown in figure 1) until it is fully reclined.
HAND CONTROL IDENTIFICATION KEY
1. USB PORT
Use to connect to/charge USB enabled devices.
WARNING! ONLY MFI-certified cables
MUST be used when charging iPhone
devices. Use of any non MFI-certified
cable may result in damage to the device
or charging system.
2. HEADREST IN BUTTON
Press and hold to move headrest in.
3. HEADREST OUT BUTTON
Press and hold to move headrest out.
4. LUMBAR SUPPORT IN BUTTON
Press and hold to move lumbar support in.
5. LUMBAR SUPPORT OUT BUTTON
Press and hold to move lumbar support out.
6. UP BUTTON
Press and hold to return all chair power options
to the neutral position, while lifting you into an
upright position.
A
10
C
1
Headrest
2
Lumbar
4
6
8
Back
Legrest
13
2
4
3
5
7
9
11
B
2
4
6
8
3
5
1
Headrest
3
Lumbar
5
7
9
Back
7. DOWN BUTTON
Press and hold to lower chair to seated or reclined
position.
8. SEATBACK RECLINE BUTTON
Press and hold to recline the seatback.
9. SEATBACK INCLINE BUTTON
Press and hold to raise the seatback.
10. LEG REST UP BUTTON
Press and hold to raise the leg rest.
2
6
8
10
12
Figure 1. Hand Controls
11
12
7
9
1
Page 3
Hand Control referenCe Guide
11. LEG REST DOWN BUTTON
Press and hold to lower the leg rest.
12. MEMORY BUTTONS (HAND CONTROL C ONLY)
Press and hold Memory Button 1 and Memory Button 2. The LEDs on the memory buttons will flash
to indicate that the hand control is in “set” mode. Press and hold the desired memory button to set the
memory position. The LEDs will stop flashing. To go to a preset memory position, press and hold the
desired memory button.
13. HEAT CONTROL BUTTON (HAND CONTROL C ONLY)
Press the heat button to activate the heat function. Press the HEAT button again to cycle intensity
through LOW, HIGH and OFF.
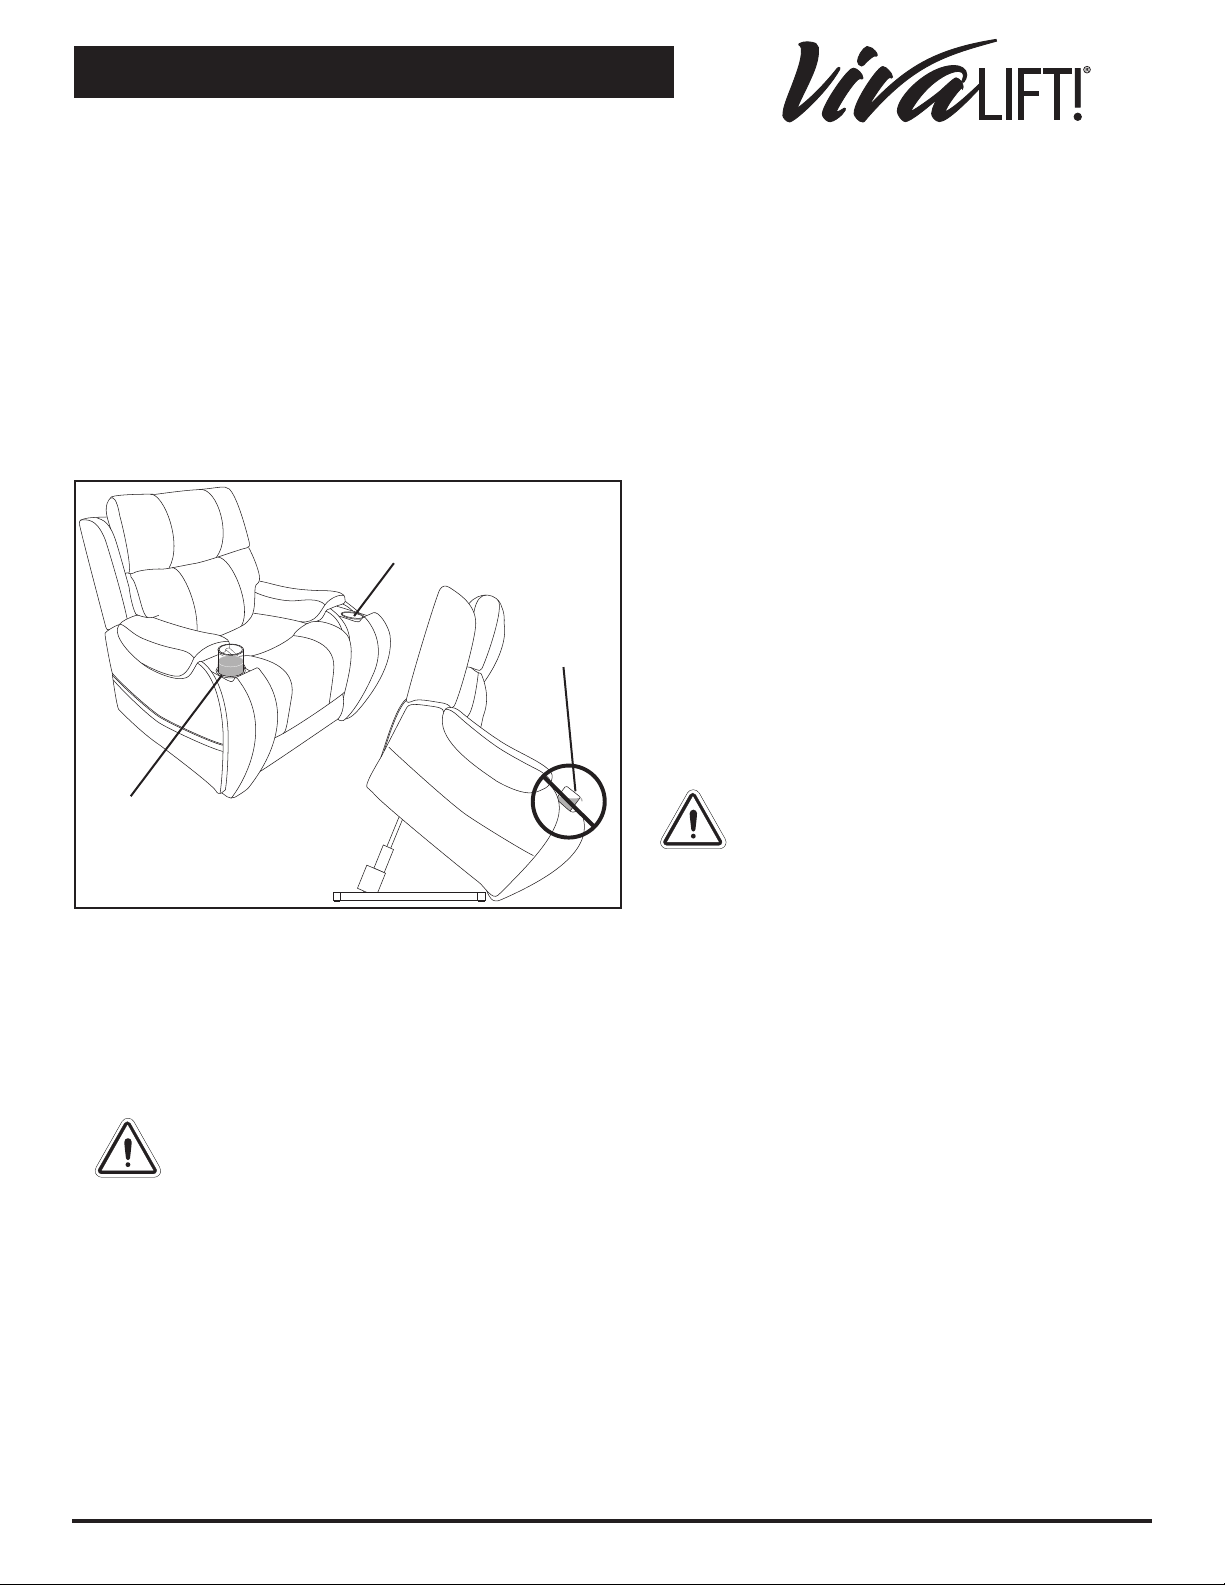
Follow these steps to properly stand up from
your chair:
CUP HOLDER
CUP HOLDER
1. Activate and hold the UP button (switch) to
raise your chair.
2. Release the button (switch) when the chair
reaches a height where you can stand up
comfortably.
WARNING! Do not attempt to stand
up until you can stand safely, are
steady on your feet, and can bear
weight. Pride recommends the
use of assistance aids and/or an
CUP HOLDER
Figure 2. Cup Holder
attendant for enhanced stability.
WARNING! Avoid putting all of
your weight on the chair armrests
when attempting to stand and do
not use the armrests for weight
bearing purposes.
If your chair is equipped with cup holders, ensure the cup holders are empty prior to elevating your chair
above a seated positon to a standing position. See figure 2.
WARNING! Any contents in the cup holder may shift or spill when the chair is raised.
Remove all contents prior to elevating your chair. Failure to remove all contents from
the cup holders prior to elevating your chair above a seated position may result in
personal injury or property damage.
WARNING! NEVER place lit tobacco products in the cup holders or attempt to use the
cup holders as an ashtray.
3
Page 4
Your ViValift!® Power reCliner
FABRIC CARE INSTRUCTIONS
The fabric covering this piece of furniture is very durable for everyday living. Clean with only waterbased shampoo or foam upholstery cleaner. Do not over wet. Do not use solvents to spot clean. Lightly
scrubbing will help with any tougher spots that may have developed. Always check a small spot of fabric
in an area that is unseen to be sure the cleaning agent being used will not discolor or fade the fabric’s
finishing. Let the chair air dry and vacuum for the best result.
CHAIR ASSEMBLY AND SETUP
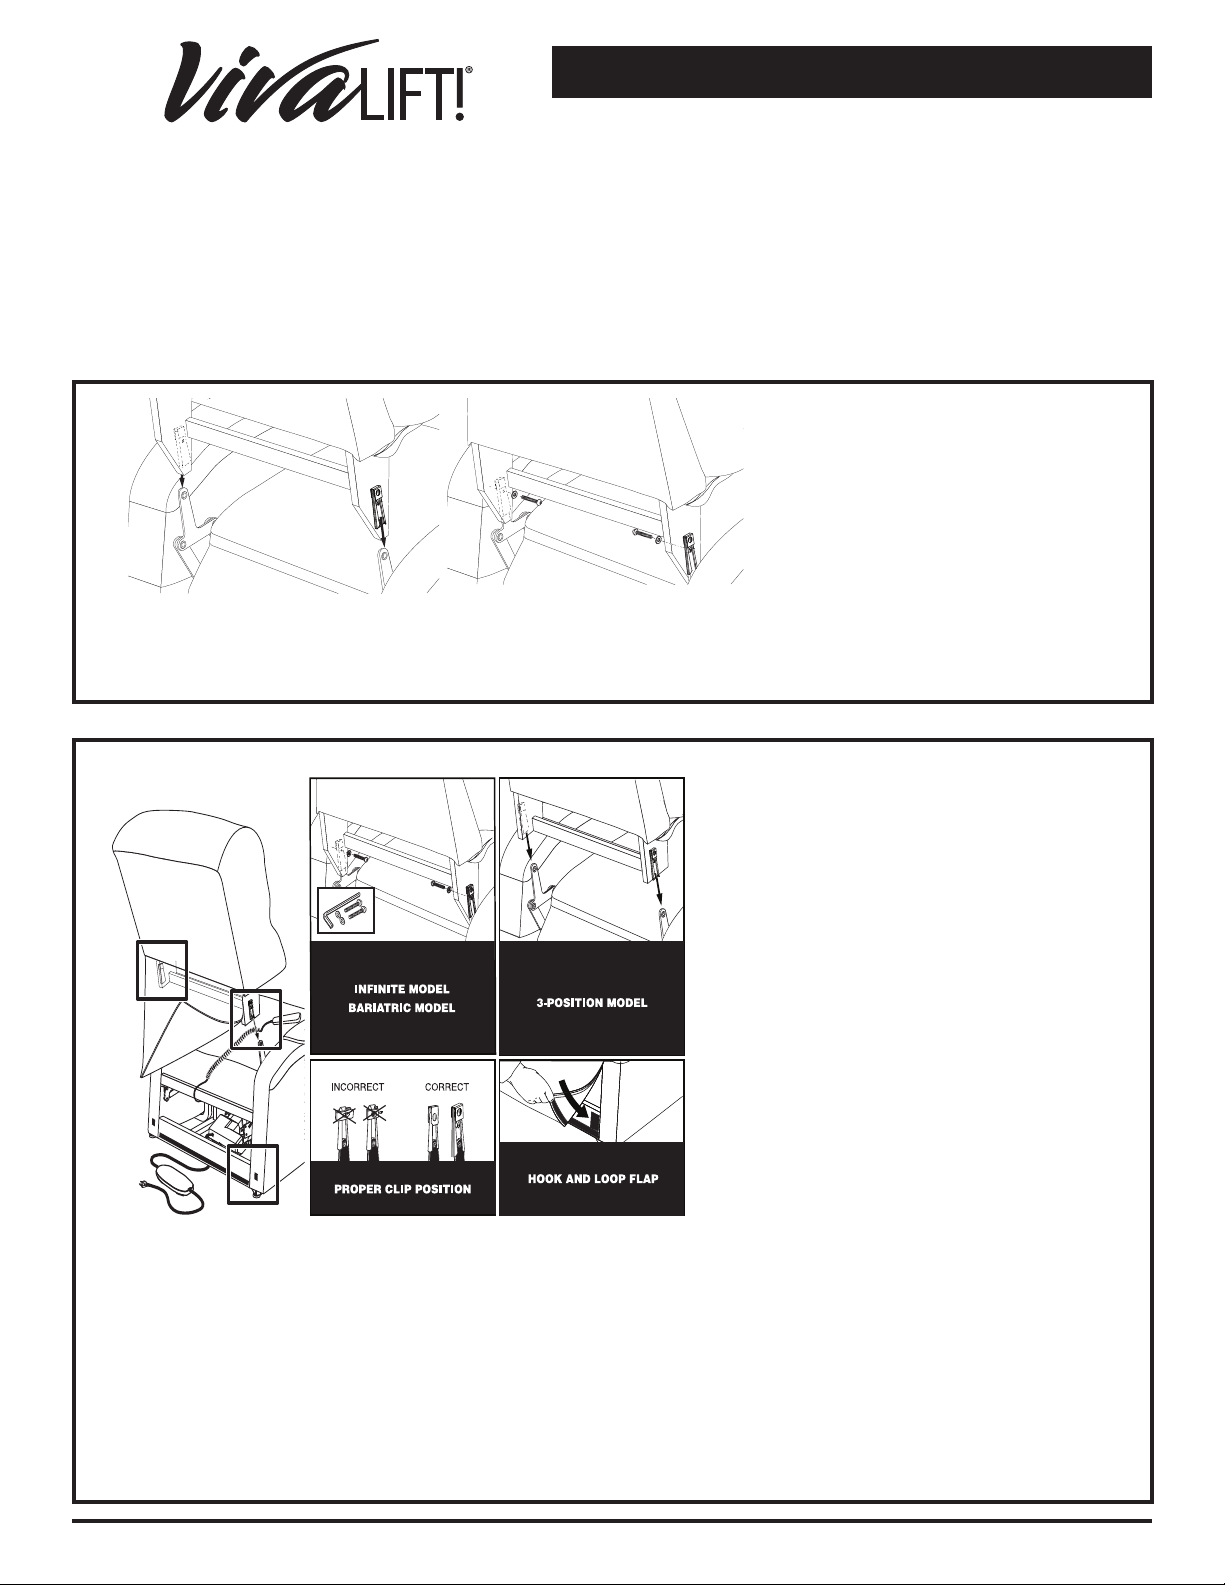
Unpack the chair. Place the hand
1
control on the chair base.
Lay the chair back, face down, on
the chair base and route all cables
through the wire access point as
shown.
NOTE: If your chair is an Infinite model,
2
3. Push firmly on the top of the back to lock into position. You must hear a click from each side of the chair
to ensure the back is locked in properly.
refer to the assembly instructions
provided with the chair. For the
2-position model, the KD sleeves are
located on the inside.
1. Check that the locking clip on the
back of the chair is in the vertical
position. Reposition if necessary.
2. Drape the hand control and cable
over the chair base, then slide the
back onto the base. Ensure the hand
control cable is routed through the
rear of the chair.
NOTE: Depending on chair width, you
may need to slide on one side of the
back at a time. If this is the case, level
the chair-back before pressing down to
lock into position.
NOTE: Pull up on the chair-back to ensure that it is locked in place.
4. Plug in the lumbar and headrest connectors. If your model is Headrest Only, you only need to
plug in the Headrest.
4
Page 5
Your ViValift!® Power reCliner
3
4
A-A
B-B
1. If your model has back wings, align the KD
sleeves, and slide the wing down into place.
Please note there is a label on the brackets.
Please assemble them as indicated (A-A and
B-B).
2. Connect the power transformer cable to the
corresponding plug coming from the back of
the chair.
3. Connect the power cord into the power
transformer.
4. Connect the power cord into an electrical outlet
near where the chair will be used.
With the chair upside down, locate the
junction box in the back corner. Carefully
pull the cables, taking up slack, and
plug in the three small cables first.
Ensure all of the cables are run along
the chair base frame and not through
the mechanism, and secure wires in
clips along the inside chair frame.
5
Identification Key
1. Control box
For chairs equipped
with a control box, plug
the cable marked “A”
B
A
1
into the control box’s
“A” port, and the cable
marked “B” into the
control box’s “B” port.
Plug the controller
cable into the center
wire connector.
5
Page 6
6
7
Your ViValift!® Power reCliner
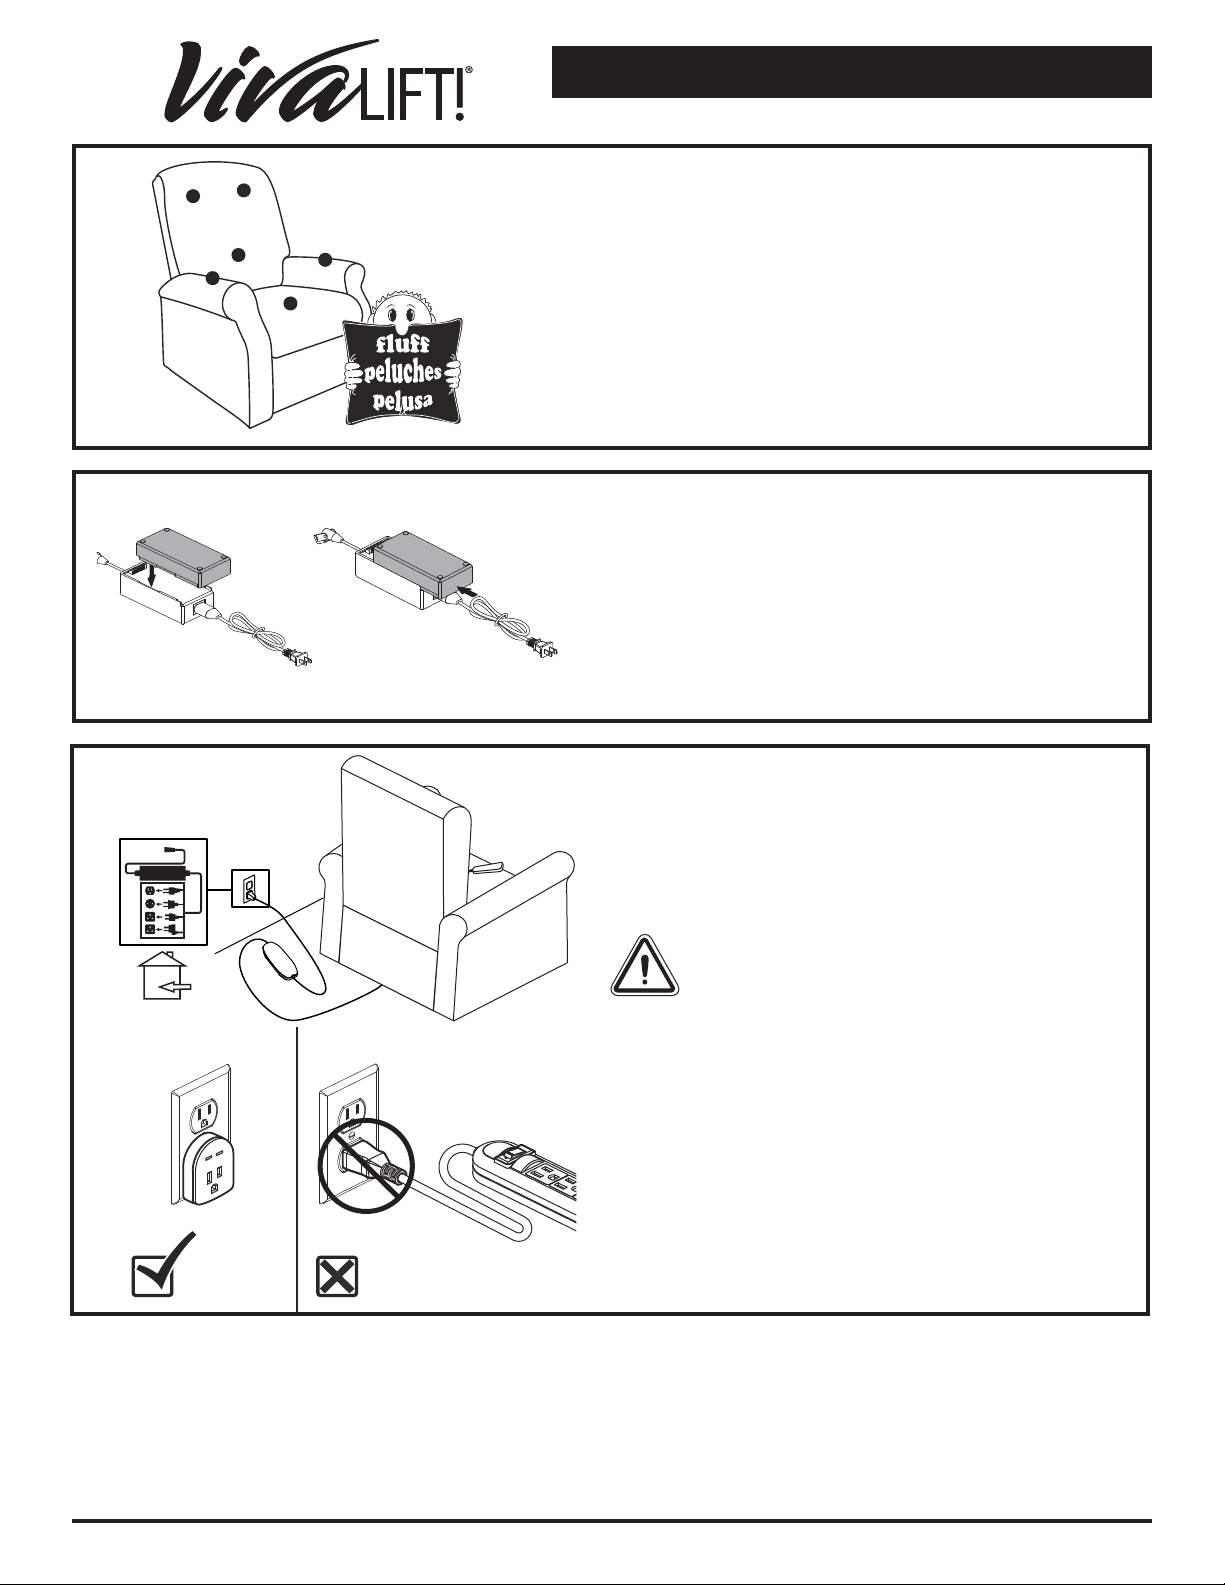
TIP: To ensure quality delivery of your new chair, we
have developed a customized packaging system to
guard against possible damage that may occur during
the transportation and handling of your product. As a
result, the packaging components used to protect the
product could cause the fibers in the cushioning to
appear misshaped upon unpacking. In the event that
you experience this, we recommend that you “fluff”
the chair cushions to allow air into the cushion fibers.
This process will return the cushions to their original
shape.
Your chair is equipped with a lithium-ion battery backup
system. Ensure that it is correctly installed onto the
external transformer.
LITHIUM-ION BATTERY PACK INSTALLATION
8
Plug the power cord leading from the external
transformer directly into a standard electrical outlet.
Route the power cord through the back of the chair.
Do not use an extension cord.
WARNING! Do not connect an extension cord
to the AC/DC converter or the battery charger.
A UL Listed or UL Recognized single outlet
plug-style surge protector with a minimum of
1000 joules of protection may be used. The
surge protector MUST be plugged directly
into an electrical outlet.
6
Page 7

ViValift!® Power reCliner warrantY
LIFETIME WARRANTY
Pride offers a lifetime warranty on the lift and recline mechanisms, and chair frame. Pride warrants that the lift and
recline mechanisms and chair frame on your lift chair will be free from defects under normal use and service for as
long as the chair is in use by the original owner. This lifetime warranty covers the lift and recline mechanisms against
metal fatigue, defective welds, and bushings.
NOTE: Pride reserves the right to replace only the part of the lift and recline mechanism, scissor(s) or
chair frame that may be defective from workmanship. Misuse and/or abuse are excluded from warranty.
SEVEN-YEAR PRO-RATED LIMITED WARRANTY
For the first four (4) years from the date of purchase, Pride will repair or replace at our option to the original
purchaser any of the following parts found upon examination by an authorized representative of Pride to be
defective in material and/or workmanship:
Motor
Power Headrest
For three (3) additional years, a pro-rated warranty will be made available for the following parts:
Motor
Power Headrest
Pride will warrant these components with the following pro-rated schedule:
Fifth year: 25% off suggested retail price
Sixth year: 15% off suggested retail price
Seventh year: 5% off suggested retail price
Hand Control
Power Lumbar
Hand Control
Power Lumbar
Transformer/Control Box
Transformer/Control Box
LITHIUM-ION BATTERY
The Lithium-Ion battery pack is covered by a twelve (12) month (1 year) warranty.
WARRANTY EXCLUSIONS
This warranty does not extend to fabric.
Pride is not responsible or obligated to pay for labor, service calls, shipping, and/or any other charges incurred for
repair of the product. All transportation costs and shipping damage incurred while submitting parts for repair or
replacement are the responsibility of the purchaser. Please contact your authorized Pride provider for information
on the current cost associated with a service visit.
Circumstances beyond the control of Pride
Labor, service calls, shipping, and other charges incurred for repair of the product, unless specifically
authorized, IN ADVANCE, by Pride
Repairs and/or modifications made to any part without specific consent from Pride
Exclusions also include components with damage caused by:
Contamination
Battery fluid spillage or leakage
Commercial use or use other than normal
Abuse, misuse, accident, or negligence
Improper operation, maintenance, or storage
IMPLIED WARRANTIES
Implied warranties, including those of merchantability and fitness for a particular purpose, are
limited to one (1) year from the date of purchase and to the extent permitted by law. Any and
all other implied warranties are excluded. This is the exclusive remedy. Liabilities for consequential
damages under any and all warranties are excluded.
Some states do not allow limitations on how long an implied warranty lasts or do not allow the exclusion or
limitation of incidental or consequential damages. The above limitation or exclusion may not apply to you.
This warranty gives you specific rights, and you may also have other rights which vary from state to state.
7
Page 8

weiGHt CaPaCitY
Your chair was developed for your convenience. Your chair has a weight capacity of 400 lbs. (181 kg).
Refer to the owner’s manual for any additional information concerning your chair.
MANDATORY! Stay within the specified weight capacity of your lift chair. Exceeding the weight capacity voids
your lift chair warranty.
8
Page 9

notes
9
Page 10

notes
10
Page 11

notes
11
Page 12

Rev G/August 2021
 Loading...