

Page 1
Specialty Seat Kit
ACN# 088 609 661
Page 2

PRODUCT SAFETY LABELS
The symbols below are used throughout this manual and on the product to
identify warnings, cautions, and notes. It is very important for you to read
and understand the information that follows these symbols completely.
WARNING! Indicates a potentially hazardous situation which, if not
avoided, could result in serious injury or equipment damage.
CAUTION! Indicates a potentially hazardous situation which, if not
avoided, could result in equipment damage.
NOTE: Indicates important things to remember when using this
product.
Using this product safely depends upon your diligence in following the
warnings, cautions, notes, and instructions in this owners manual. Safe
operation also depends upon your own good judgement and/or common sense,
as well as that of your provider, caregiver, and/or healthcare professional.
NOTE: Please read and follow all instructions in this manual before
attempting to operate your power chair for the first time. If there is
anything in this manual you do not understand, or if you require
additional assistance for setup, contact your authorized Pride
provider.
NOTE: Pride is not liable for damage to property or personal injury
arising out of unsafe use of this product. Pride is also not liable for
any property damage or personal injury arising out of the failure of
any person and/or user to follow the instructions and
recommendations set forth in this manual or any other instructions
or recommendations contained in other Pride related literature issued
by Pride or contained on the product itself.
NOTE: We have compiled this manual from the latest specifications
and product information available at the time of publication. We
reserve the right to make changes, as they become necessary. Any
changes to our products may cause slight variations between the
illustrations and explanations in this manual and the product you
have purchased.
Specialty Seat Kit www.quantumrehab.com Rev A 02-15-03
Page 3

TABLE OF CONTENTS
INTRODUCTION............................................................................ 4
SAFETY PRECAUTIONS .............................................................. 4
INSTALLING AND REMOVING THE SPECIALTY SEAT KIT....... 6
ADJUSTING THE SPECIALTY SEAT KIT .................................... 6
ARMREST ADJUSTMENTS.......................................................... 6
Two Post Flip-up....................................................................... 6
Cane Mount Flip-up .................................................................. 7
Heavy Duty Removable Height................................................. 7
Heavy Duty Removable Position .............................................. 8
Quick Height Adjustable Drop-in............................................... 9
CARE AND MAINTENANCE ....................................................... 12
WARRANTY................................................................................. 12
Copyright © 2003
Pride Mobility Products Corporation
Specialty Seat Kit www.quantumrehab.com Rev A 02-15-03
Page 4

4 Basic Operation Instructions
INTRODUCTION
Welcome to Quantum Rehab, a Division of Pride Mobility Products
Corporation. Quantum Rehab is dedicated to the customization of power
chairs for users with advanced rehabilitation and mobility issues. Quantum
Rehab also expands possibilities for enhanced healthcare attendant control
over power chair functions to provide a secondary level of support for our
customers where necessary.
This manual describes basic operation for the Specialty Seat Kit only and
must be read in conjunction with the owners manual supplied with your
power chair. Please read both manuals in their entirety before operating this
product or your power chair.
This manual is intended as a supplement to the in-service training provided
by your authorized provider. If you have any questions or problems regarding
the Specialty Seat Kit, please contact your authorized Pride provider.
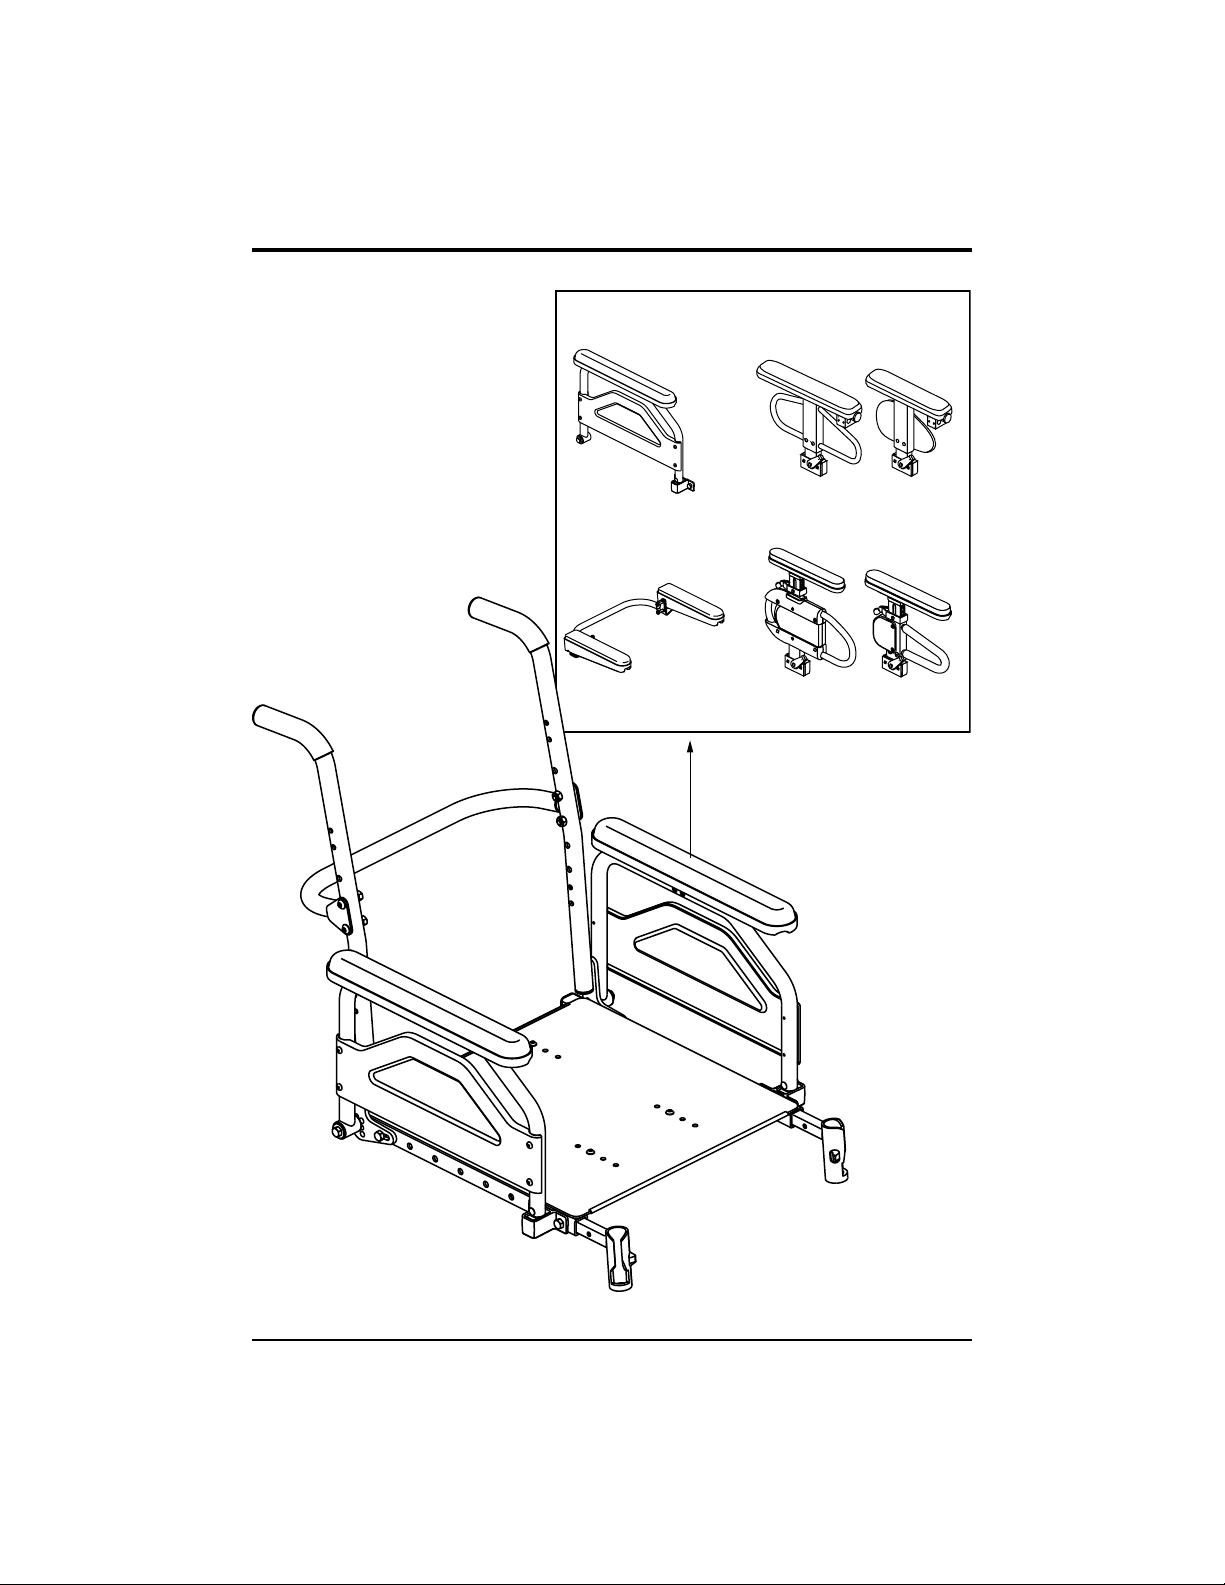
The Specialty Seat Kit
The Specialty Seat Kit is a basic seating system designed specifically for the
Jazzy Power Chair. It is adjustable to meet the individual needs of the user,
and is mounted to a Jazzy power base to provide maximum maneuverability.
Figure 1 provides information on the Specialty Seat Kit components and
connections. Use this diagram to familiarize yourself with the function and
location of each component before using the Specialty Seat Kit.
SAFETY PRECAUTIONS
Before operating the Specialty Seat Kit, please read and follow the safety
precautions listed below. These precautions are produced for your benefit
and will aid you in the safe operation of the Specialty Seat Kit.
n Turn off the power to your chair before you are seated in the Specialty Seat.
n Always have assistance when you are being seated in the Specialty Seat.
n Do not exceed the specifications stated in this manual.
Specialty Seat Kit www.quantumrehab.com Rev A 02-19-03
Page 5
Basic Operation Instructions 5
ARMRESTS
Available in four basic styles:
Two Post Flip-up
(standard)
Cane Mount Flip-up Quick Height Adjustable Drop-in
Heavy Duty Drop-in
(available in adult or pediatric sizes)
(available in adult or pediatric sizes)
Figure 1. The Specialty Seat Kit
Specialty Seat Kit www.quantumrehab.com Rev A 02-19-03
Page 6

6 Basic Operation Instructions
INSTALLING AND REMOVING THE SPECIALTY SEAT KIT
The Specialty Seat Kit is installed on and removed from the power base in
the same way as the standard seat. Refer to your power chair owners manual
for instructions.
ADJUSTING THE SPECIALTY SEAT KIT
The only parts of the Specialty Seat Kit that are user-adjustable are the
armrests. All other components are to be changed by your authorized provider
only.
WARNING! Y our authorized Pride provider configured your Specialty
Seat Kit to suit your specific requirements. Do not change the original
configuration without first contacting your authorized Pride
provider.There are four types of armrest styles available for the
Specialty Seat Kit: T wo Post Flip-up, Cane Mount Flip-up, Heavy Duty
Drop-in, and Quick Height Adjustable Drop-in. See figure 1.
ARMREST ADJUSTMENTS
There are four types of armrest styles available for the Specialty Seat Kit:
Two Post Flip-up, Cane Mount Flip-up, Heavy Duty Drop-in, and Quick
Height Adjustable Drop-in. See figure 1. The following sections will describe
these armrests and the comfort adjustments that can be made to them.
Two Post Flip-up Armrest Adjustment
No tools are required to flip up the armrest. Simply pull up on the front of
the armrest and tip it back. The armrest will stop when it has reached its
furthest point. See figure 2.
Figure 2. T wo Post Flip-up Armrest Adjustment
Specialty Seat Kit www.quantumrehab.com Rev A 02-19-03
Page 7

Basic Operation Instructions 7
Cane Mount Flip-up Armrest Adjustment
The Cane Mount Flip-up armrest is adjustable in the same way as the armrests
on the standard seat. Refer to your power chair owners manual for
instructions.
Heavy Duty Removable Armrest Height Adjustment
Required Tools:
n 5/32-in. hex key
1. Rotate the armrest lock lever rearward and remove the armrest from the
armrest lock. See figure 3.
2. Use a 5/32-in. hex key to remove the two (2) button head cap screws
from the side of the armrest. See figure 3.
3. Slide the armrest up or down the detent bar to the desired height.
4. Reinstall the button head cap screws to the side of the armrest. See
figure 3.
5. Reinstall the armrest and lock it into place.
6. If necessary, repeat for the other armrest.
Button Head
Cap Screws
Detent Bar
Armrest Lock
Armrest
Lock Lever
Figure 3. Heavy Duty Removable Armrest Height Adjustment
Specialty Seat Kit www.quantumrehab.com Rev A 02-19-03
Page 8

8 Basic Operation Instructions
Heavy Duty Removable Armrest Position Adjustment
Required Tools:
n 3/16-in hex key
n 1/2-in. open-end wrench
1. Rotate the armrest lock lever rearward and remove the armrest from the
armrest lock. See figure 4.
2. Use a 3/16-in. hex key to remove the flat head screws and nuts that fasten
the armrest lock to the seat base side rail. See figure 4.
3. Move the armrest lock forward or rearward along the seat base side rail.
4. Reinstall the armrest lock.
5. Reinstall the armrest and lock it into place.
6. Repeat for the other side if necessary.
Figure 4. Heavy Duty Removable Armrest Position Adjustment
Specialty Seat Kit www.quantumrehab.com Rev A 02-19-03
Page 9

Basic Operation Instructions 9
Quick Height Adjustable Drop-in Armrest Adjustments
The Quick Height Adjustable Drop-in armrests are removable like the Heavy
Duty Drop-in armrests. In addition, the armpad can be raised or lowered
using a release lever located just below the armpad. See figure 5.
The Quick Height Adjustable Drop-in armrests are available in both adult
and pediatric sizes.
NOTE: Both the adult and pediatric Quick Height Adjustable Drop-in
armrests use the same armrest lock as the Heavy Duty Drop-in
armrests. The procedures for removal and position adjustment are
the same. See figures 5 and 6.
Adult Size Armrest Height Adjustments
Height adjustments can be made on both the top and the bottom of the armrest.
The total height adjustment range is 6 inches (from 1117 inches). This range
is measured from the top of the seat rail to the top of the arm pad.
Top height adjustments do not require any tools. The top height adjustment
range is 3 inches in 1/2-inch increments. The bottom height adjustment range
is 3 inches in 1/2-inch increments.
To adjust the top height:
1. Twist the release lever
inward or outward. See
Release
Lever
figure 5.
2. Slide the armrest up or down.
3. Return the release lever to its
original position and the
armrest will lock into place.
Figure 5. Quick Height Adjustable
Drop-in Armrest Top Height
Adjustment
Specialty Seat Kit www.quantumrehab.com Rev A 02-19-03
Page 10

10 Basic Operation Instructions
Required Tools for Bottom Height Adjustment:
n Phillips head screwdriver
n 3/32-in. hex key
n 5/32-in. hex key
To adjust the bottom height:
1. Use the Phillips head screwdriver to remove the four (4) 3/8-in. pan head
screws. See figure 6.
2. Use the 3/32-in. hex key to remove the two (2) 5/16-in. flat head screws.
Remove the plastic clothing guard.
3. Use the 5/32-in. hex key to remove the two (2) 1/2-in. flat head screws
from the detent bar.
4. Slide the armrest up or down.
5. Line up the holes in the armrest.
6. Reinstall the two (2) 1/2-in. flat head screws.
7. Reinstall the plastic clothing guard.
Clothing Guard
3/8-in. Pan Head
Screws
5/16-in. Flat Head Screws
3/8-in. Pan Head Screws
1/2-in. Flat Head Screws
Armrest Lock Lever
Figure 6. Quick Height Adjustable Drop-in Armrest Bottom Height
Adjustment
Specialty Seat Kit www.quantumrehab.com Rev A 02-19-03
Detent Bar
Armest Lock
Page 11

Basic Operation Instructions 11
Pediatric Size Armrest Height Adjustments
Like the adult size Quick Height Adjustable Drop-in armrest, this pediatric
size drop-in armrest is designed to be adjusted and removed easily. The height
adjustment range is 3 inches in 1/2-inch increments. This range is measured
from the top of the seat rail to the top of the arm pad. The total height
adjustment range is 811 inches.
Unlike the adult size armrest, no bottom height adjustments can be made.
1. Twist the release lever inward or outward. See figure 7.
2. Slide the armrest up or down.
3. Return the release lever to its original position and the armrest will lock
into place.
Release
Lever
Armrest
Lock
Armrest Lock Lever
Figure 7. Pediatric Quick Height Adjustable Drop-in Armrest Height
Adjustment
Specialty Seat Kit www.quantumrehab.com Rev A 02-19-03
Page 12

12 Basic Operation Instructions
CARE AND MAINTENANCE
n Avoid knocking or bumping the controller.
n Keep the controller clean.
n Check all electrical connections to ensure that they are all tight, secured properly,
and not corroded.
n Visually inspect controller harnesses. Make sure that they are not frayed, cut,
or have any wires exposed.
n Make sure all hardware is secured properly, but do not overtighten any hardware
or electrical connection.
WARNING! If your Specialty Seat Kit was configured by an
authorized Pride provider or service center, please consult your
healthcare professional before changing seat position or making
any other adjustment. Some of these adjustments may degrade
the performance and safety of your Specialty Seat Kit and/or
power chair.
WARRANTY
Three-Year Limited Warranty
For three (3) years from the date of purchase, Pride will repair or replace at
our option to the original purchaser, free of charge, any of the following
parts found upon examination by an authorized representative of Pride to be
defective in material and/or workmanship:
n Structural frame components
Warranty service can be performed by an authorized provider or by Pride.
Do not return faulty parts to Pride without prior consent. All transportation
costs and shipping damage incurred while submitting parts for repair or
replacement are the responsibility of the original purchaser.
Warranty Exclusions:
n Upholstery and seating
n Repairs and/or modifications made to any part without specific consent from
Pride
n Circumstances beyond the control of Pride
n Labor, service calls, shipping, and other charges incurred for repair of the
product, unless specifically authorized by Pride
Specialty Seat Kit www.quantumrehab.com Rev A 02-19-03
Page 13

Basic Operation Instructions 13
n Damage caused by:
n Battery fluid spillage or leakage
n Abuse, misuse, accident, or negligence
n Improper operation, maintenance, or storage
n Commercial use or use other than normal
There is no other express warranty.
Implied warranties, including those of merchantability and fitness for a
particular purpose, are limited to one year from the date of purchase and to
the extent permitted by law. Any and all implied warranties are excluded.
This is the exclusive remedy. Liabilities for consequential damages under
any and all warranties are excluded.
Some states do not allow limitations on how long an implied warranty lasts
or do not allow the exclusion of limitation of incidental or consequential
damages, so the above limitation or exclusion may not apply to you.
This warranty gives you specific rights, and you may also have other rights
which vary from state to state.
Please fill out and return the product registration card to Pride Mobility
Products Corporation. This will aid Pride in providing the best possible
technical and customer service.
NOTE: If you ever lose or misplace your product registration card
or this manual, contact us and we will be glad to send you a new
one immediately.
Specialty Seat Kit www.quantumrehab.com Rev A 02-19-03
Page 14

14 Basic Operation Instructions
My Authorized Provider Is:
Name: ____________________________________________________________
Address: __________________________________________________________
Phone Number: _____________________________________________________
Quick Reference Information:
Serial Number: _____________________________________________________
Purchase Date: _____________________________________________________
Specialty Seat Kit www.quantumrehab.com Rev A 02-19-03
Page 15

Basic Operation Instructions 15
NOTES
Specialty Seat Kit www.quantumrehab.com Rev A 02-19-03
Page 16

Pride Mobility Products Corporation
182 Susquehanna Avenue
Exeter, PA 18643
USA
Pride Mobility Products Company
380 Vansickle Road, Unit 350
St. Catharines, Ontario L2R 6P7
Canada
Pride Mobility Products Ltd.
Unit 106, Heyford Park Camp Road
Upper Heyford, Oxfordshire OX25 5HA
Pride Mobility Products Australia Pty. Ltd.
21 Healey Road
Dandenong, 3175
Victoria, Australia
Pride Mobility Products Italia s.r.l.
Via della Tecnica, 14
Prato della Corte
00065 Fiano Romano
Roma - Italia
www.quantumrehab.com
www.pridemobility.com
Pride Mobility Products Europe B.V .
Tijnmuiden 28
1046 AL Amsterdam
The Netherlands
INFMANU2190/REV A
 Loading...