

Page 1

Page 2
Before You begin installation
Before you begin , you will need tools, supplies and adapters. It is best to make sure you have
everything you need before you start.
Amplifier Location
Allow air circulation around the amplifier.
When selecting a location, remember that amplifiers generate heat. Select a location where air can
circulate around the amplifier.
Do not cover the AMPLIFIER with carpets or enclose it behind interior trim panels.
Every installation will be a bit different based upon vehicle design, Check all locations and placements
carefully before making any cuts or connections.
Disconnect Battery
Before you begin, always disconnect the battery negative terminal.
Important :
If wiring connections are made incorrectly the unit will not operate properly and could be damaged.
Follow the installation instructions carefully or have the amplifier installed by an authorized dealer.
Things to remember when installing your amplifiers.
The design philosophy of the amplifiers and mode of regulation requires that proper installation and load
impedance instructions be adhered to at all times.
Minimum impedance recommended for UNO is 1ohm.
Minimum impedance for DUE and QUATTRO is 2ohm stereo or 4ohm mono.
Fuses are equipped with for UNO ( 40A ATC ), DUE ( 30A ATC ) and QUATTRO ( 30A x 2 ATC ).
These fuse ratings should be sufficient under normal working conditions. However, if the amplifiers are
overloaded ( see minimum impedance above ) fuses may blow.
Therefore, please try to avoid operating the amplifiers under these conditions.
1. Mount the amplifiers where air flow is the best.
2. Mount the amplifiers to a solid surface away from vibration, as these amplifiers are very heavy
and the vibration can damage the amplifiers.
3. Take extreme caution when mounting the amplifiers, so as not to damage the chassis with a drill or
screwdriver.
4. Run 4AWG or 8AWG wire from the battery, using fuses with 12” of the positive battery terminal.
The fuse is to protect the car and your car audio system from the fire that could be caused by a short circuit.
5. Run 4AWG or 8AWG ground wire as short as possible, to the closest chassis ground point.
Be sure to remove the paint around the chassis ground point to provide a more solid electrical connection.
6. Run a 16 AWG ( or larger ) wire to the remote turn-on lead of the headunit.
7. Connect the speakers as per wiring diagrams in the manual.
12AWG or larger speaker wire is recommended.
Page 3
8. Mount remote level control in the car where it can be easily reached from the driver’s seat, if desired.
9. Using rca interconnect cables, connect all line inputs per the wiring diagrams which follow.
If possible, keep rca cables away from the 12V power and ground wire.
10. Set the controls as described on following pages.
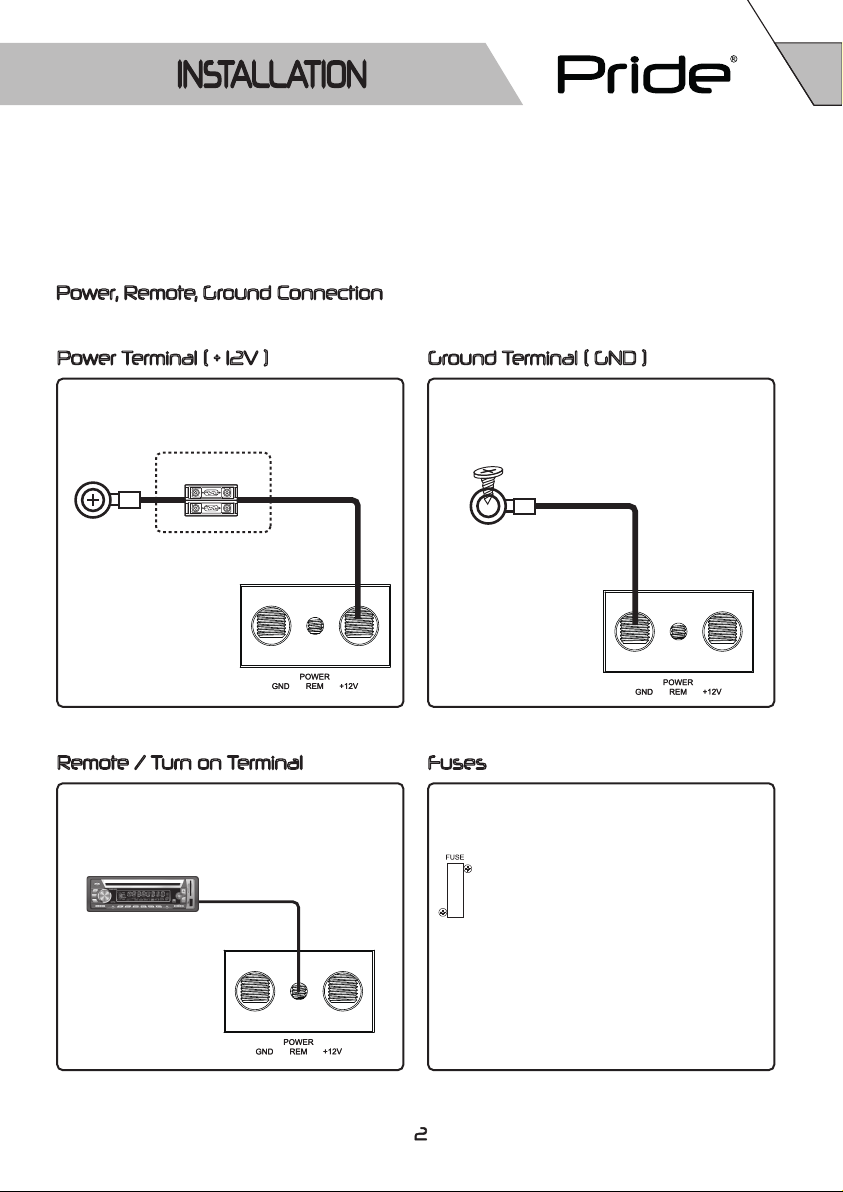
Power, Remote, Ground Connection
Power Terminal ( + 12V ) Ground Terminal ( GND )
Connect directly to the vehicle battery
+ terminal with 4 or 8 AWG wire
External or
Battery
Terminal
Adapter
Built in Fuses
Install as close as
to the battery as possible
4~8 AWG wire
Remote / Turn on Terminal
Connect the source unit’s remote turn on lead
from the source unit to the amplifier’s remote
terminal. This turns on the amplifier whenever
the source unit is turned on.
Connect to a good chassis ground. The ground
connection should be clean, unpainted metal
to provide a good electrical connection
Sheet Metal
screw
4~8 AWG wire
Drill 1/8” hole in
Chassis sheet metal
Fuses
UNO, DUE & QUATTRO include ATC
built in fues as below fuse rating.
UNO : 40A
DUE : 30A
QUATTRO : 30A x 2
Page 4
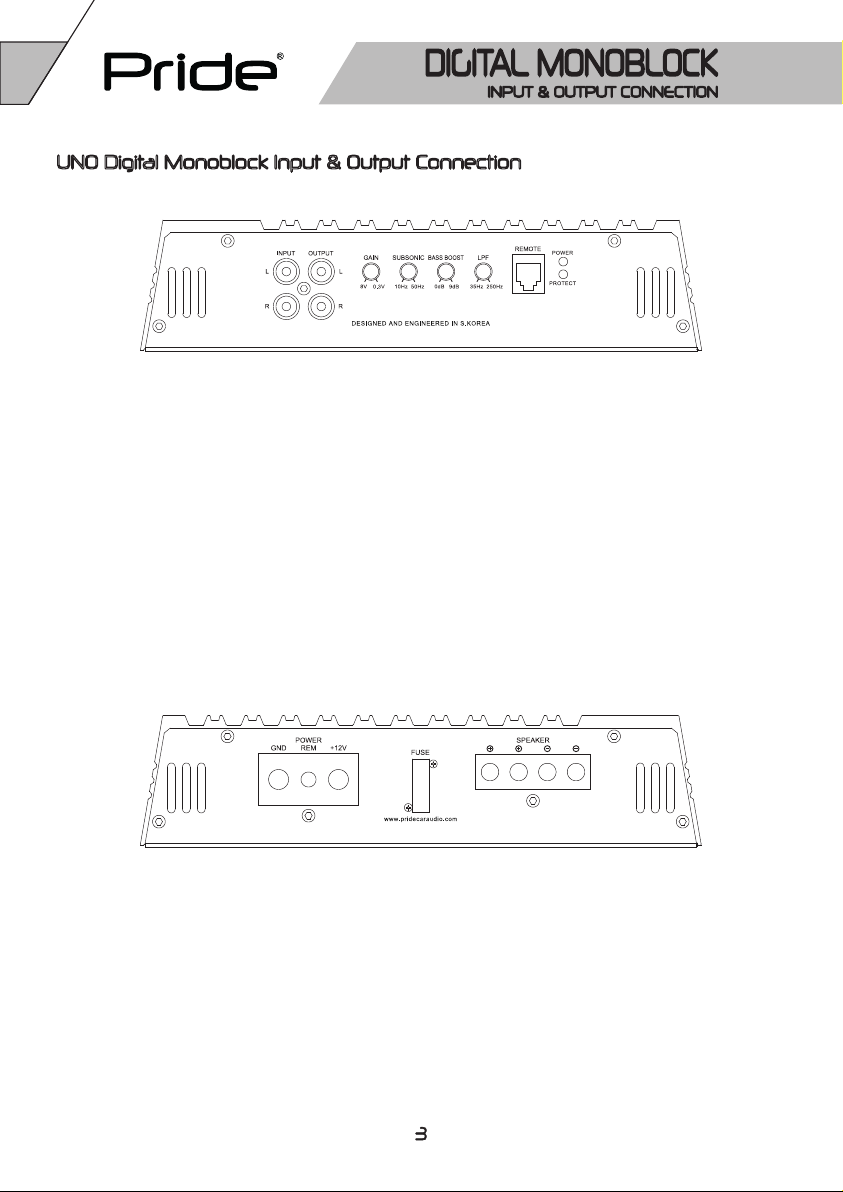
UNO Digital Monoblock Input & Output Connection
RCA INPUTS -
The RCA inputs ensure the highest quality contacts
and the lowest noise in your audio system.
RCA OUTPUTS -
The RCA outputs connect another amplifier for multi
car amplifiers system.
GAIN -
This adjusts the normal operating level of
the amplifier by matching the level from the headunit.
SUBSONIC FILTER -
This allows you to tune the response of the amplifier
at very low frequencies.
GROUND ( GND ) & POWER ( +12V ) -
The power and ground will accommodate 0 or 4 AWG
wire. Use high quality pure copper wire only.
REMOTE ( REM ) -
REM connector will accept wire sizes from12 to 18 AWG.
This terminal is used to remotely turn-on and turn-off
the amplifier when +12V DC is applied.
BASS BOOST -
This allows you to tune amplifier response with up
to 9dB of boost centered at 45Hz
LOW PASS CROSSOVER FREQUENCY CONTROL -
This allows you to tune the response of the amplifier
at higher bass frequencies to roll off for
a seamless integration into your midbass.
REMOTE CONTROL -
Use this to control level of the amplifier from
your driver’s seat.
Remote control includes clipping indicator.
POWER & PROTECT INDICATORS -
When the unit is powered on and operating
correctly the power LED illuminates.
When the unit is malfunction or faulty, the protect LED is on.
FUSE -
ATC fuse is built-in. If needed, use external fuses.
SPEAKER TERMINAL BLOCK -
Connect speaker cables from speaker terminal block to
subwoofers.
Subwoofers impedance should be checked carefully.
Page 5
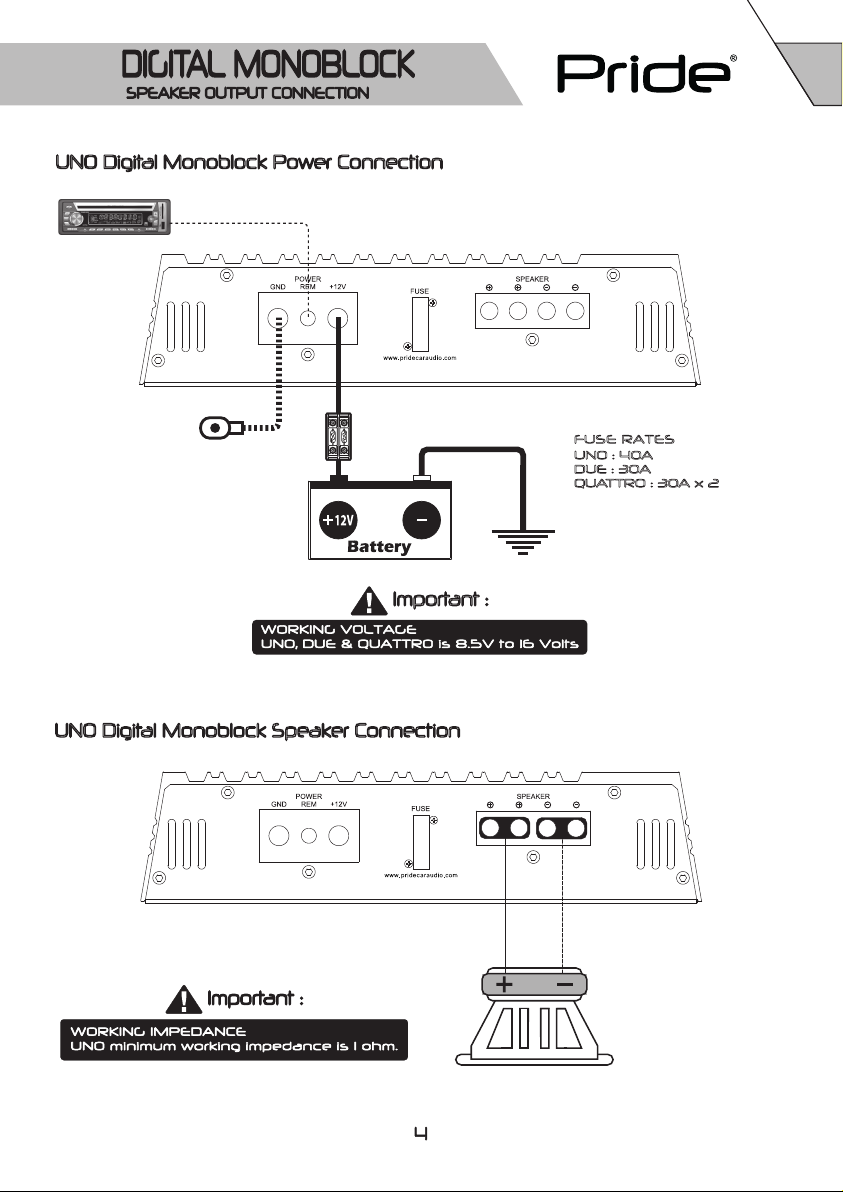
UNO Digital Monoblock Power Connection
Remote turn on
Ground
Fuses
Important :
UNO Digital Monoblock Speaker Connection
FUSE RATES
UNO : 40A
DUE : 30A
QUATTRO : 30A x 2
4 - 1 OHMS
Page 6
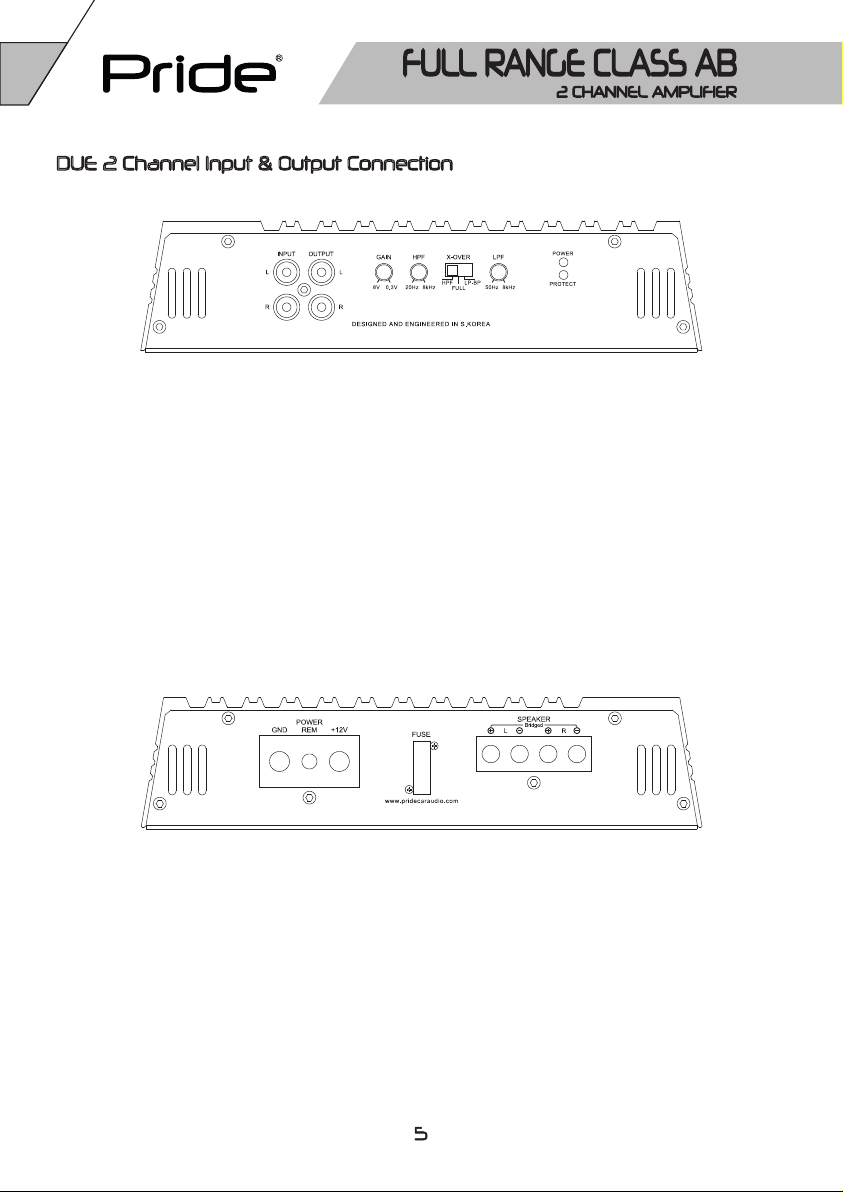
DUE 2 Channel Input & Output Connection
RCA INPUTS -
The RCA inputs ensure the highest quality contacts
and the lowest noise in your audio system.
RCA OUTPUTS -
The RCA outputs connect another amplifier for multi
car amplifiers system.
GAIN -
This adjusts the normal operating level of
the amplifier by matching the level from the headunit.
HPF -
Controls the high pass cutoff point for the speaker
outputs. HPF can be selected with X-over switch
located next to it.
GROUND ( GND ) & POWER ( +12V ) -
The power and ground will accommodate 0 or 4 AWG
wire. Use high quality pure copper wire only.
REMOTE ( REM ) -
REM connector will accept wire sizes from12 to 18 AWG.
This terminal is used to remotely turn-on and turn-off
the amplifier when +12V DC is applied.
X-OVER -
At HPF, high pass filter is activated
At FULL, it is bypass.
At LP-BP, Low pass and band pass filter are activated.
Pls set HPF frequency at minimum for band pass filter
activated.
LPF -
Controls the low pass cutoff point for the speaker
outputs. LPF can be selected with X-over switch
located next to it.
POWER & PROTECT INDICATORS -
When the unit is powered on and operating
correctly the power LED illuminates.
When the unit is malfunction or faulty, the protect LED is on.
FUSE -
ATC fuse is built-in. If needed, use external fuses.
SPEAKER TERMINAL BLOCK -
Connect speaker cables from speaker terminal block to
subwoofers.
Subwoofers impedance should be checked carefully.
Page 7
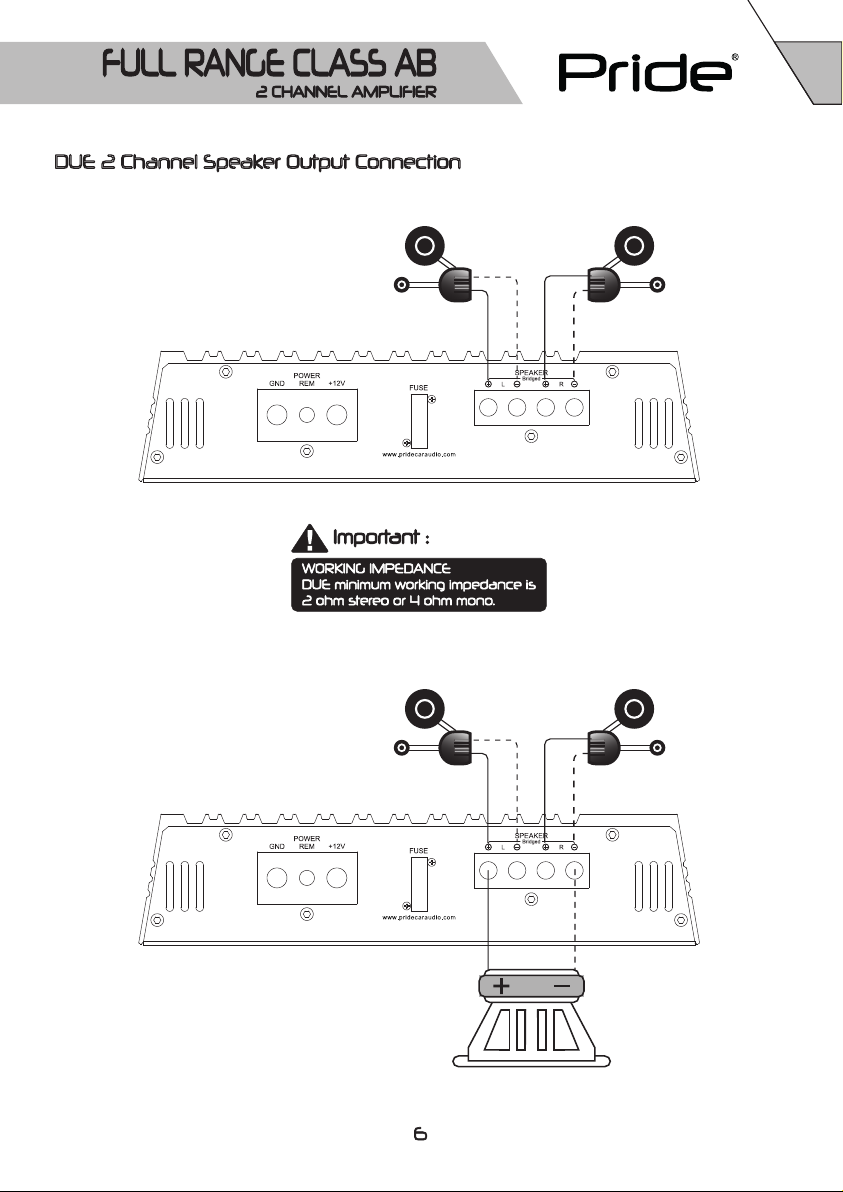
DUE 2 Channel Speaker Output Connection
DUE 2CHANNEL WIRING MODE
Mid Range
Tweeter
Passive
DUE 3CHANNEL WIRING MODE
Mid Range
Tweeter
Passive
8 - 4 OHMS
Page 8
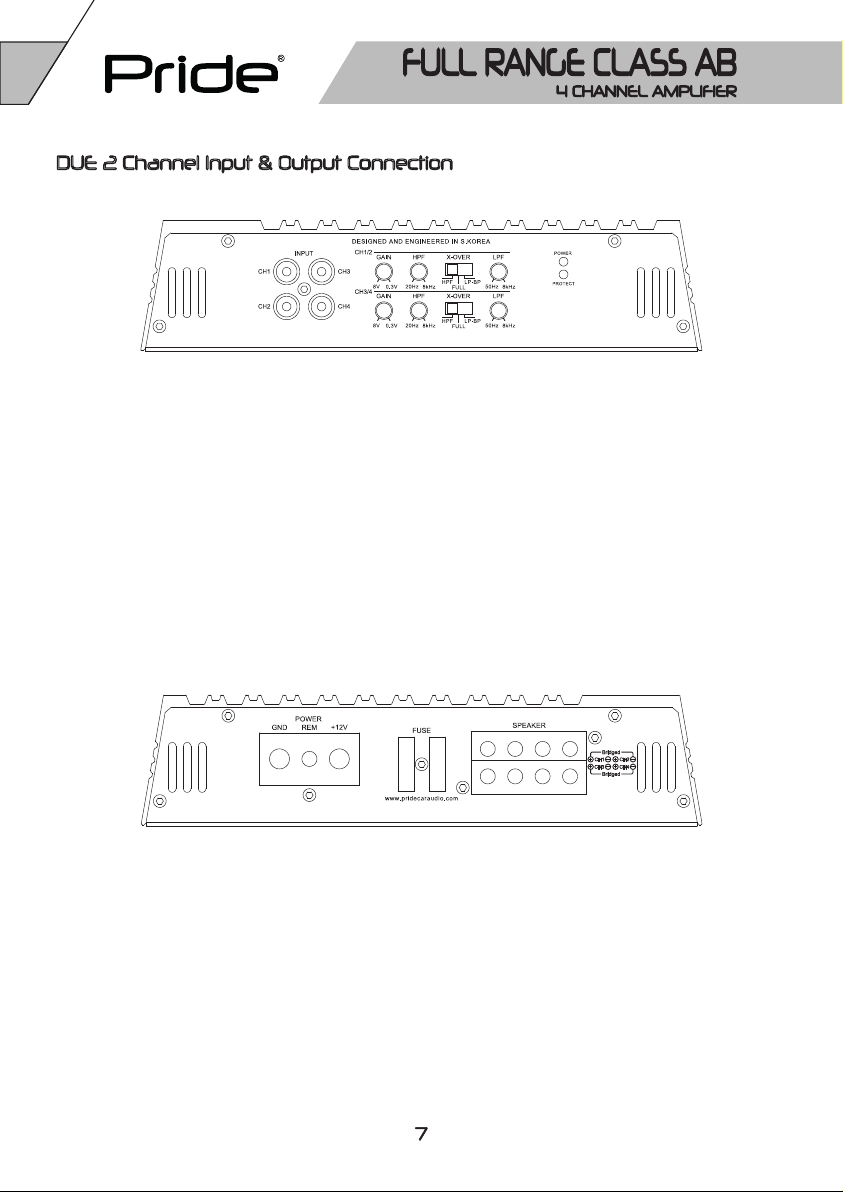
DUE 2 Channel Input & Output Connection
RCA INPUTS -
The RCA inputs ensure the highest quality contacts
and the lowest noise in your audio system.
RCA OUTPUTS -
The RCA outputs connect another amplifier for multi
car amplifiers system.
GAIN -
This adjusts the normal operating level of
the amplifier by matching the level from the headunit.
HPF -
Controls the high pass cutoff point for the speaker
outputs. HPF can be selected with X-over switch
located next to it.
GROUND ( GND ) & POWER ( +12V ) -
The power and ground will accommodate 0 or 4 AWG
wire. Use high quality pure copper wire only.
REMOTE ( REM ) -
REM connector will accept wire sizes from12 to 18 AWG.
This terminal is used to remotely turn-on and turn-off
the amplifier when +12V DC is applied.
X-OVER -
At HPF, high pass filter is activated
At FULL, it is bypass.
At LP-BP, Low pass and band pass filter are activated.
Pls set HPF frequency at minimum for band pass filter
activated.
LPF -
Controls the low pass cutoff point for the speaker
outputs. LPF can be selected with X-over switch
located next to it.
POWER & PROTECT INDICATORS -
When the unit is powered on and operating
correctly the power LED illuminates.
When the unit is malfunction or faulty, the protect LED is on.
FUSE -
ATC fuse is built-in. If needed, use external fuses.
SPEAKER TERMINAL BLOCK -
Connect speaker cables from speaker terminal block to
subwoofers.
Subwoofers impedance should be checked carefully.
Page 9
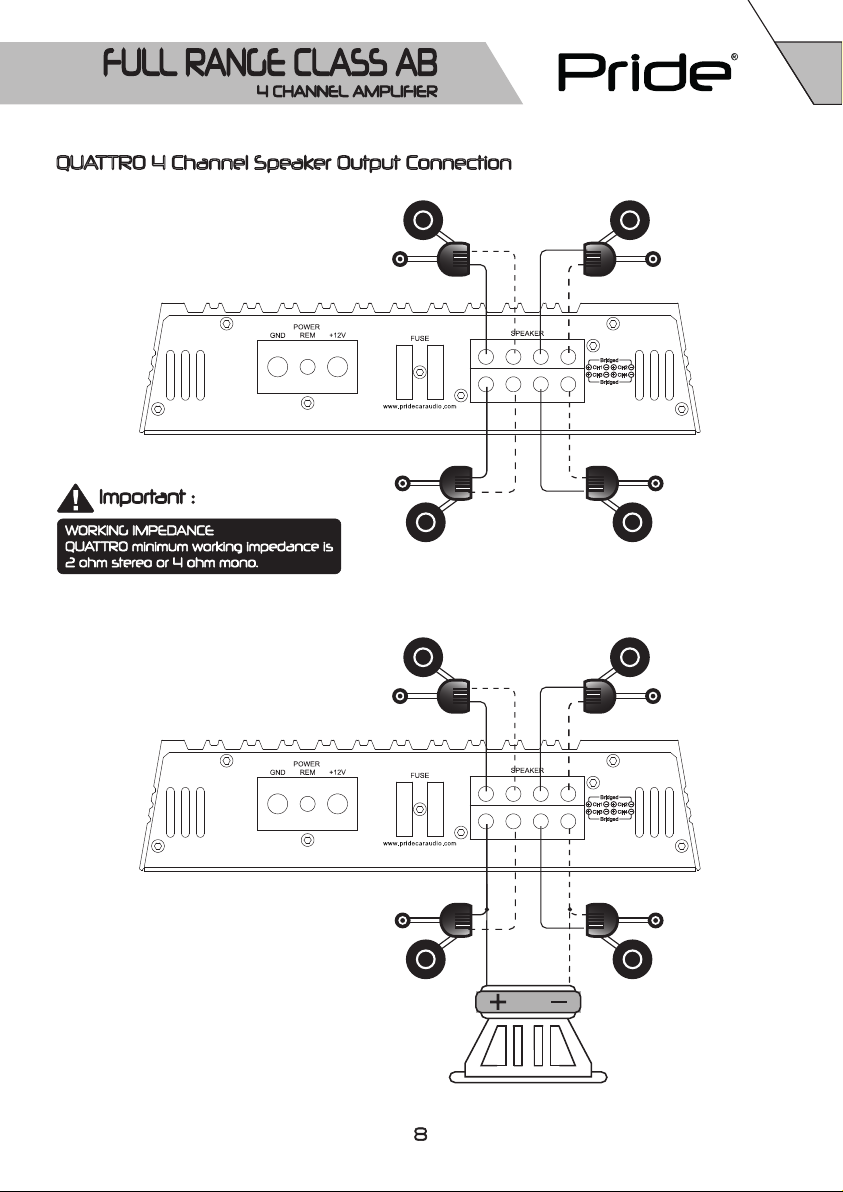
QUATTRO 4 Channel Speaker Output Connection
QUATTRO 4CHANNEL WIRING MODE
QUATTRO 5CHANNEL WIRING MODE
Tweeter
Tweeter
Mid Range
Passive
Mid Range
Passive
8 - 4 OHMS
Page 10

TROUBLE SHOOTING
NO POWER LED ON, NO OUTPUT
Check +12V and GND connection
Check remote signal +12V
Check the external fuses or built-in.
POWER LED ON, NO OUTPUT
Check source unit for output
Check input gain control
Check RCA cable
Check speaker and wiring for shorts
Check for damaged speakers
NO SOUND ON ONE CHANNEL
Swap left/right input to check source
... If sound swaps too, source or signal cable is bad
Swap left/right speaker to check speakers
... If sound does not swap, speaker or speaker wiring is bad
... In any case, consult authorized dealer
AMPLIFIER GOES IN PROTECTION MODE AT HIGHER GAIN
Check speaker impedance, UNO is 1ohm.
DUE and QUATTRO are 2ohm stereo or 4ohm mono.
Check working voltages ( 8.5V - 16Volts )
Check speaker wiring for short circuit
ENGINE OR ALTERNATOR WHINE NOISE
Check wiring. make sure RCA cables are not run parallel on same side of vehicle as power cable.
Check any preamps or black boxes in the signal path between source unit and amplifier
Make sure ground pin ( shield or outer barrel of rca cables ) have not lost connection and
that source unit has good reference ground.
Page 11
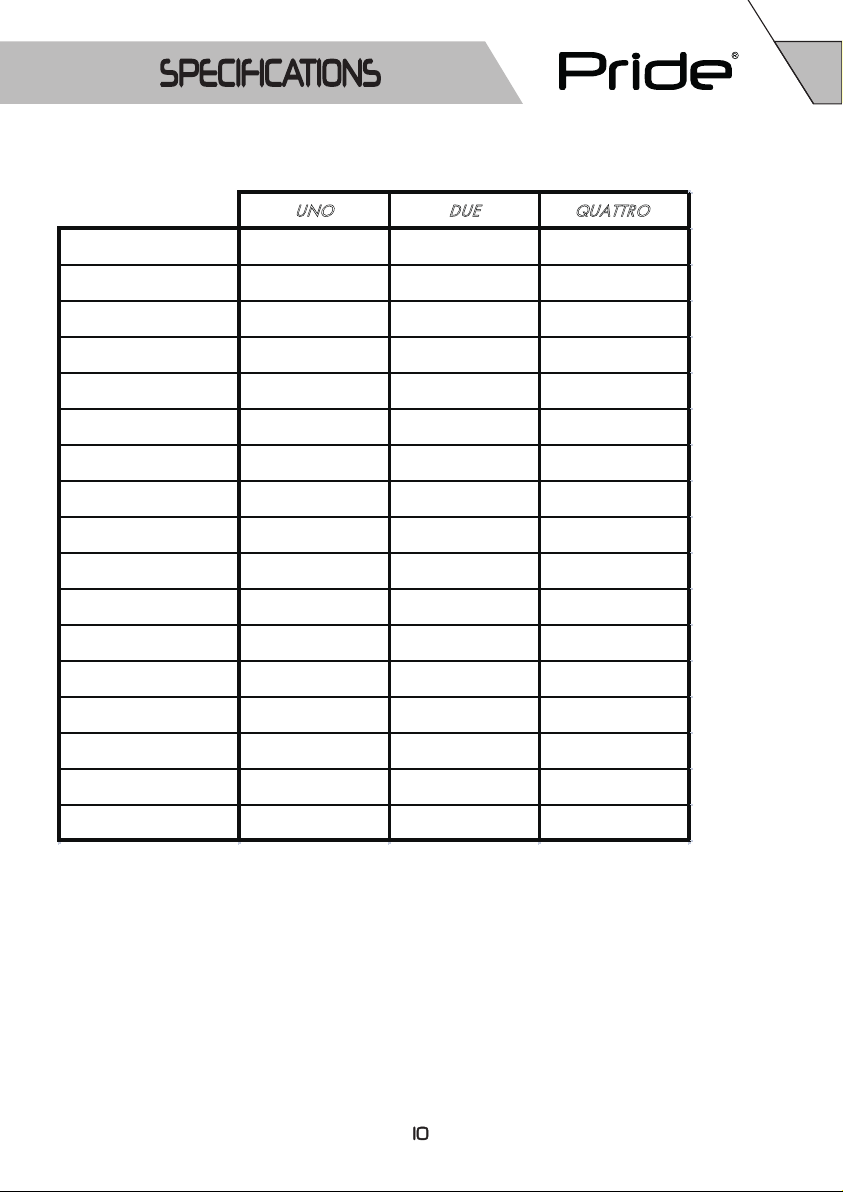
FEATURES
UNO DUE QUATTRO
4ohm Power 160W x 1 70W x 2 70W x 4
2ohm Power 280W x 1 100W x 2 100W x 4
1ohm Power 400W x 1 na na
4ohm mono na 200W x 1 200W x 2
Frequency Response 15Hz - 270Hz 15Hz - 30KHz 15Hz - 30KHz
Signal to Noise 85dB 100dB 100dB
Efficiency @ 4ohm Over 90% Over 65% over 65%
Damping Factor 150 < 150 < 150 <
Input Sensitivity 8V - 0.3V 8V - 0.3V 8V - 0.3V
Subsonic Filter 10Hz - 50Hz na na
High Pass Filter na 20Hz - 8kHz 20Hz - 8kHz
Low Pass Filter 35Hz - 250Hz 50Hz - 8kHz 50Hz - 8kHz
Bass Boost 0dB - 9dB na na
Remote Control Included na na
Fuse Rating ( ATC ) 40A 30A 30A x 2
Dimensions ( L mm ) 160 200 290
W x H mm 220 x 53 220 x 53 220 x 53
All features are subject to change in the continuing efforts to improve the products without notice.
Page 12

 Loading...