

Page 1
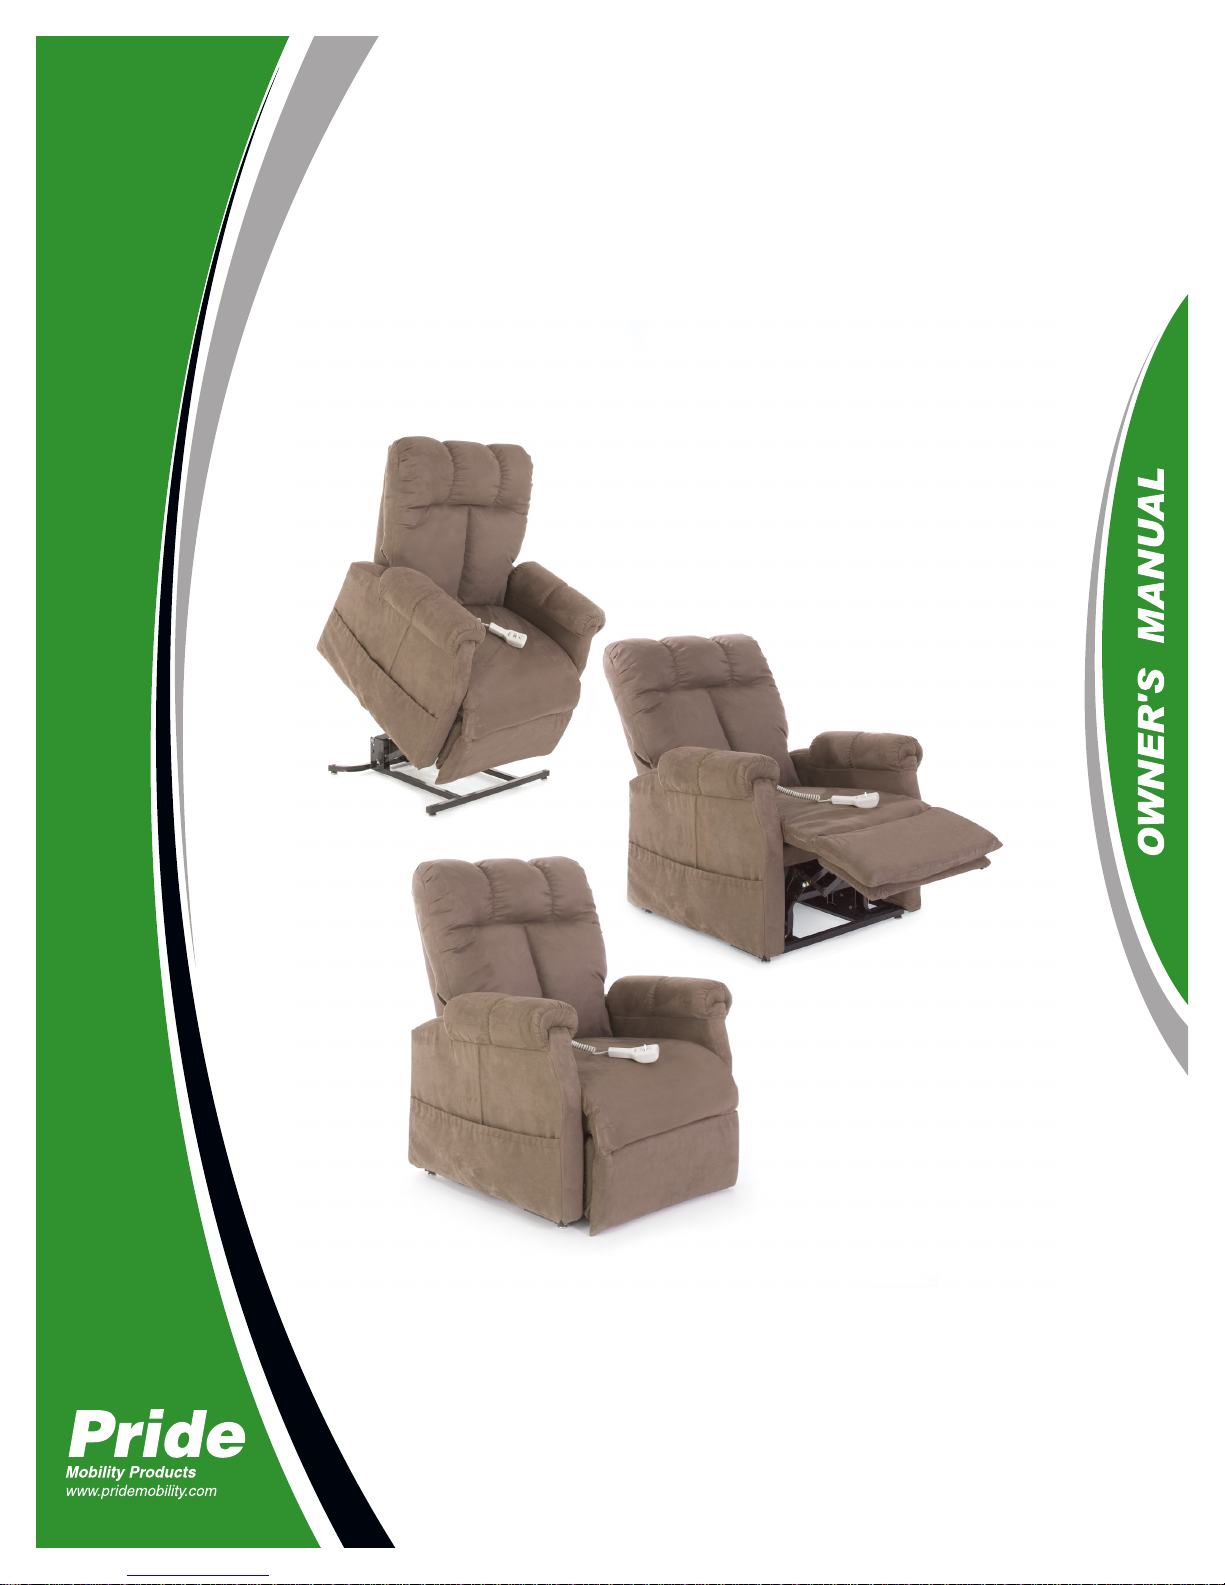
Including Models: C1, C5, C6, C11, C15, D30,
310, 560, 570, 660, 670, and 101
LIFT CHAIR
SERIES
Page 2
LIFT CHAIR SERIES
088 609 661
SAFETY GUIDELINES
The symbols below are used throughout this owner's manual and on the product to identify warnings and
important information. It is very important for you to read them and understand them completely.
WARNING! Indicates a potentially hazardous condition/situation. Failure to follow
designated procedures can cause either personal injury, component damage, or
malfunction. On the product, this icon is represented as a black symbol on a yellow
triangle with a black border.
MANDATORY! These actions should be performed as specified. Failure to perform
mandatory actions can cause personal injury and/or equipment damage. On the
product, this icon is represented as a white symbol on a blue dot with a white
border.
PROHIBITED! These actions are prohibited. These actions should not be performed
at any time or in any circumstances. Performing a prohibited action can cause
personal injury and/or equipment damage. On the product, this icon is represented
as a black symbol with a red circle and red slash.
Please fill out the following information for quick reference:
Pride Provider:_____________________________________________________________________
Address:__________________________________________________________________________
Phone Number:__________________________
Purchase Date:__________________________ Serial Number:_____________________________
NOTE: This owner’s manual is compiled from the latest specifications and product information available at the time of publication. We reserve the right to make changes as they become necessary. Any
changes to our products may cause slight variations between the illustrations and explanations in
this manual and the product you have purchased. The latest/current version of this manual is available on our website.
Copyright © 2009
Pride Mobility Products Corporation
INFMANU3686/Rev C/August 2009
Page 3
LABEL INFORMATION
LIFT CHAIR SERIES
PRODUCT SAFETY SYMBOLS
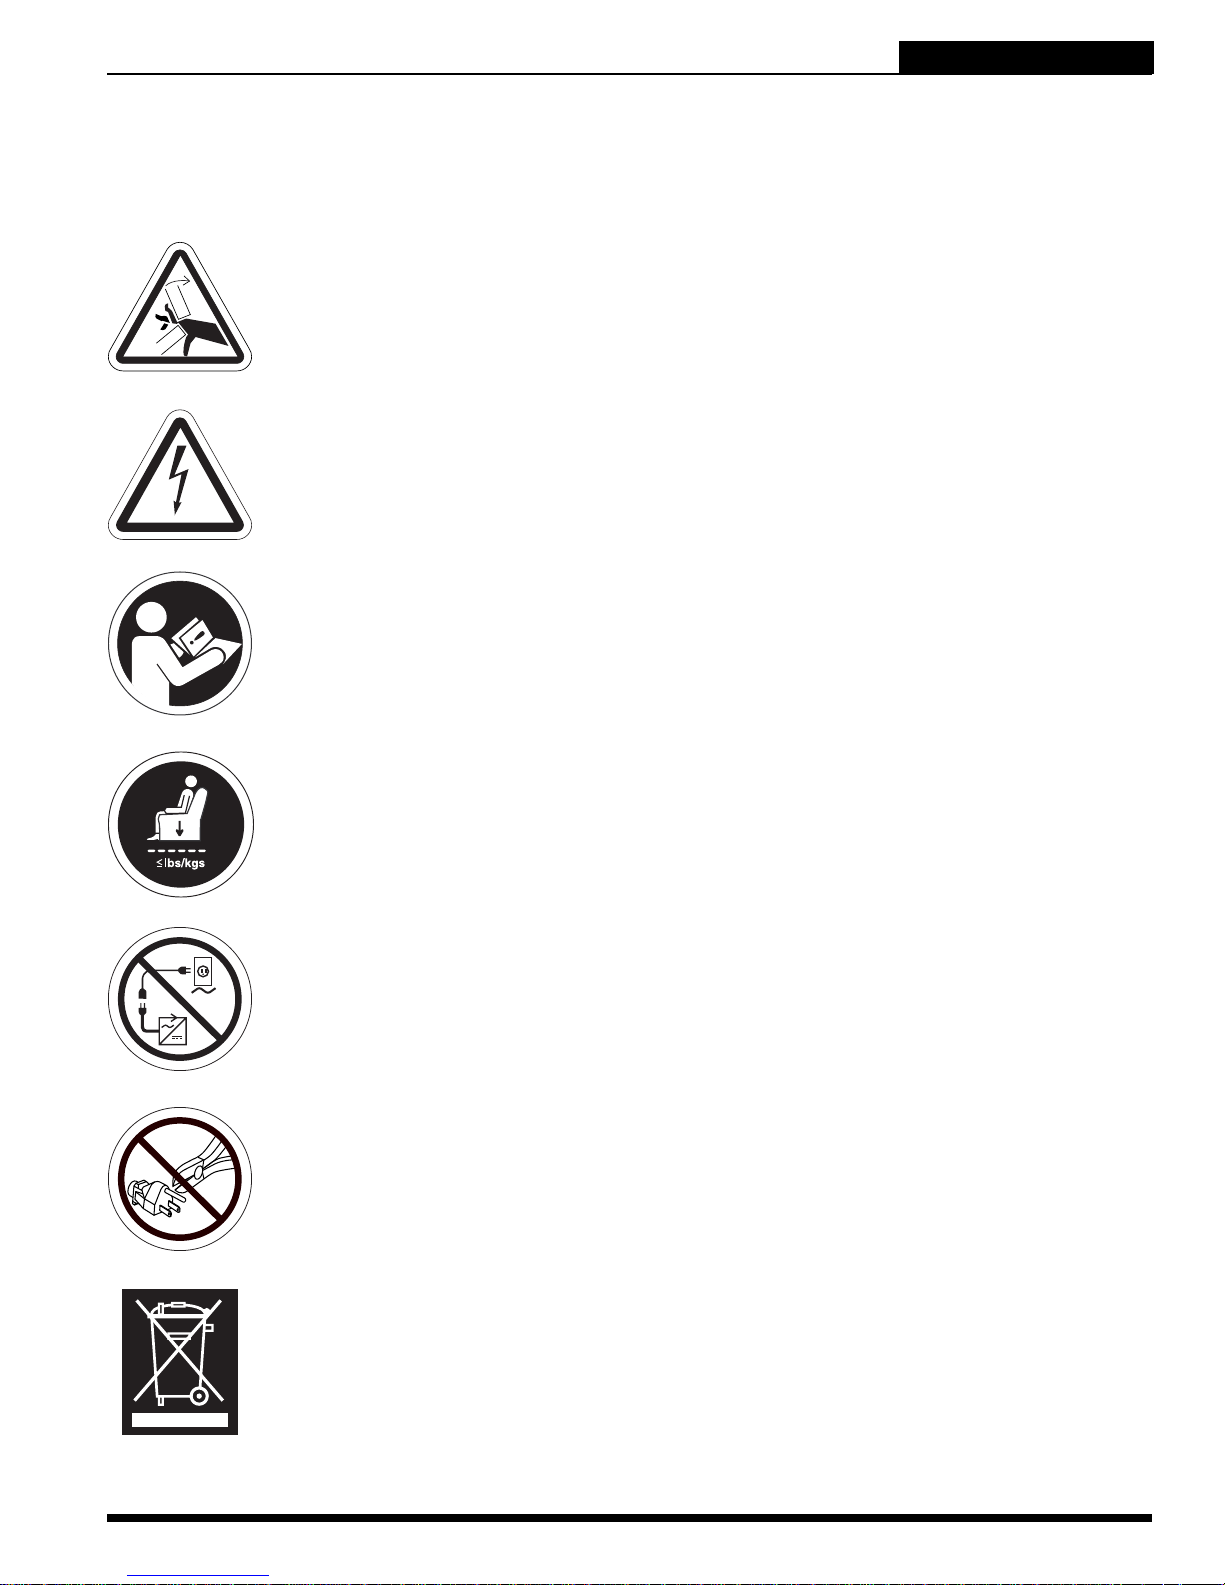
The symbols below represent labels used on the product to identify warnings, mandatory actions, and prohibited actions. It is very important for you to read and understand t hese symbols comple tely. Do not remove
these labels from your product. Please note that not all of the symbols may be used on your lift chair model.
Pinch/Crush Points Hazard! Do not place objects or appendages in the path
of moving parts.
Electrical Hazard
Read and follow the information in the owner’s manual.
Maximum weight capacity
Do not connect an extension lead to the AC/DC converter or the battery
charger.
Removal of grounding prong can create electrical hazard. If necessary,
properly install an approved 3-pronged adapter to an electrical outlet having
2-pronged plug access.
Properly dispose of all electronic components, including the external
transformer, hand control, batteries, actuator motors, and wiring. Contact
your authorized Pride Provider for more information.
Lift Chair Series www.pridemobility.com 3
Page 4
LIFT CHAIR SERIES
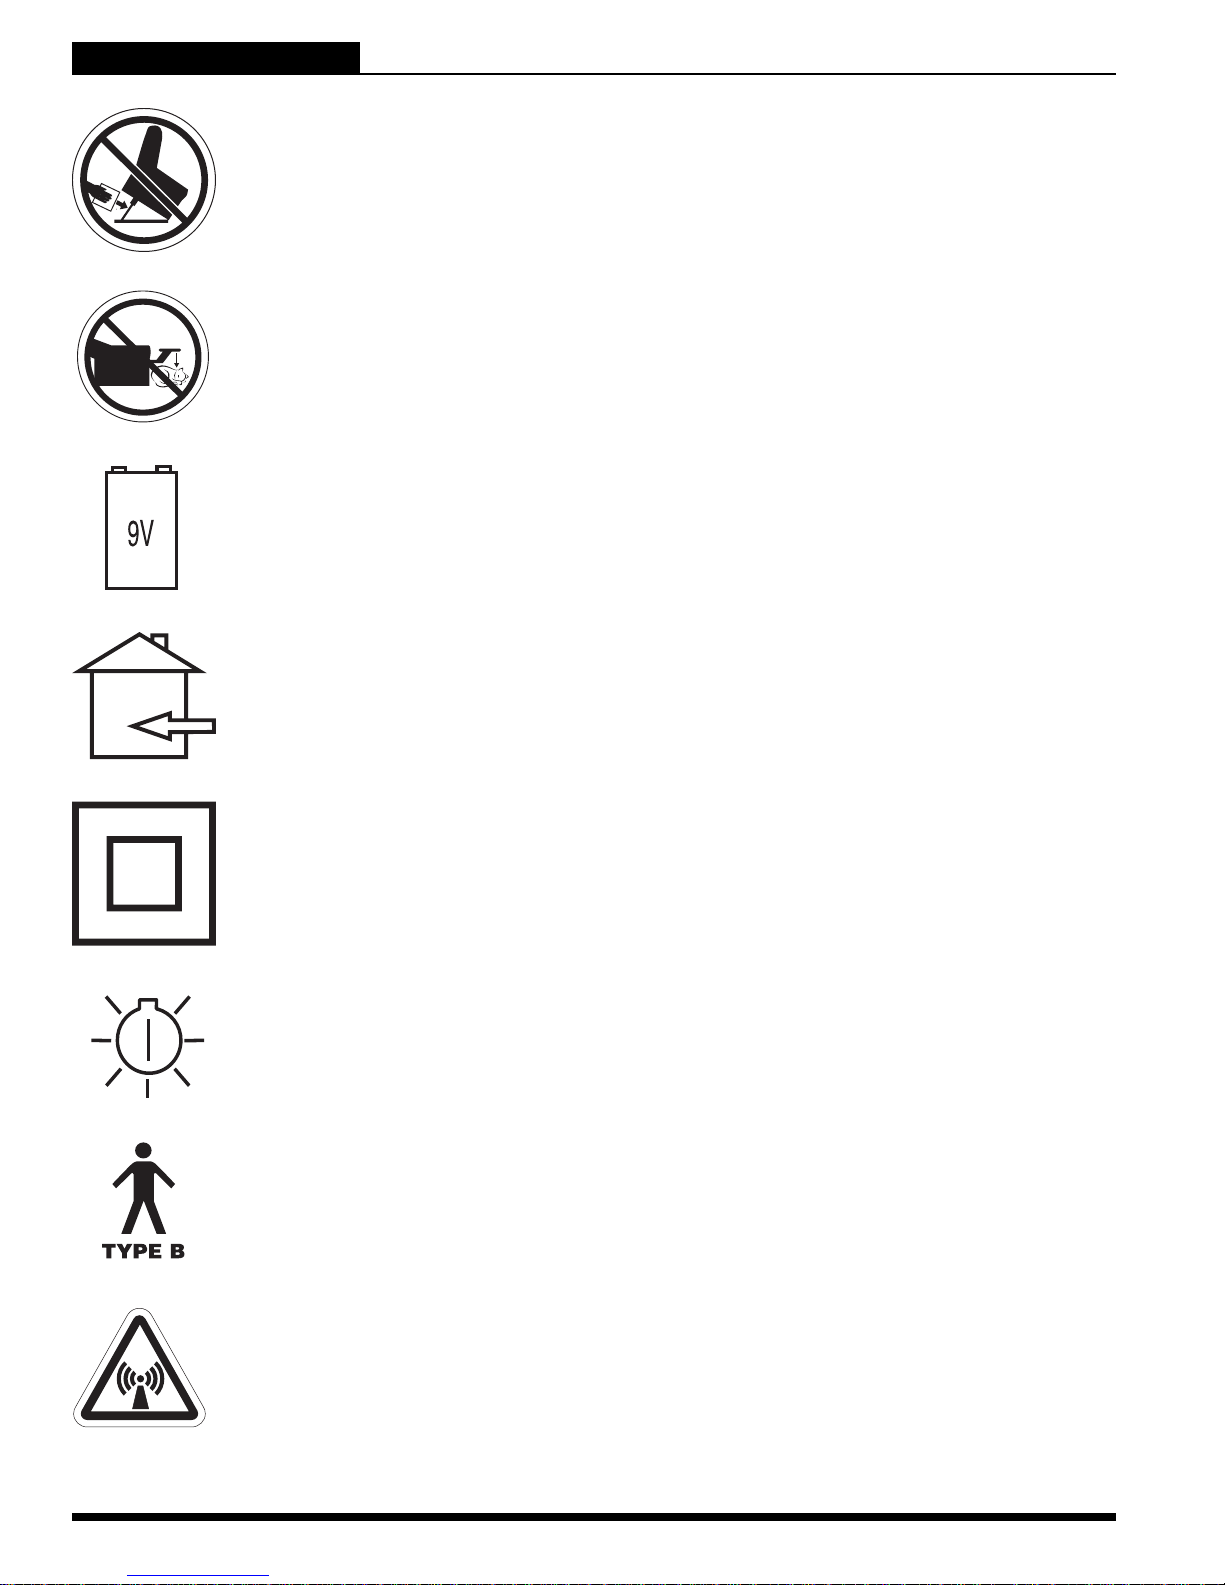
Do not place objects under the lift chair. Make sure the area is clear of
obstructions, including pets and small children during operation.
Do not place objects under the footrest when the lift chair is in the fully
reclined position. Make sure area is clear of obstructions, including pets and
small children during operation.
Battery Door Location
LABEL INFORMATION
Indoor Use Only. Avoid exposure to rain, snow, ice, salt, or standing water.
Maintain and store in a clean and dry environment.
Class II Equipment
Green LED indicates power to the unit is on. Not applicable to all models.
Degree of protection against electric shock.
This product has been tested and complies to IEC 60601-1-2.
4 www.pridemobility.com Lift Chair Series
Page 5

TABLE OF CONTENTS
LIFT CHAIR SERIES
SAFETY GUIDELINES .......................................................................................... 2
LABEL INFORMATION ......................................................................................... 3
I. INTRODUCTION................................................................................................ 6
SAFETY ....................................................................................................................................................................... 6
PURCHASER’S AGREEMENT.................................................................................................................................... 6
INFORMATION EXCHANGE....................................................................................................................................... 6
II. GENERAL GUIDELINES ................................................................................... 7
MODIFICATIONS......................................................................................................................................................... 7
WEIGHT LIMITATIONS ............................................................................................................................................... 7
PINCH/CRUSH HAZARDS .......................................................................................................................................... 7
DEGREE OF PROTECTION/MODE OF OPERATION ............................................................................................... 7
STORAGE AND OPERATION TEMPERATURES ...................................................................................................... 7
EMI/RFI ........................................................................................................................................................................ 8
SHIPPING AND DELIVERY......................................................................................................................................... 8
MOTOR VEHICLE TRANSPORT ................................................................................................................................ 8
III. YOUR LIFT CHAIR .......................................................................................... 9
BODY COMPONENTS ................................................................................................................................................ 9
ELECTRICAL COMPONENTS .................................................................................................................................. 10
IV. ASSEMBLY/DISASSEMBLY .......................................................................... 12
LIFT CHAIR SET UP.................................................................................................................................................. 12
LIFT CHAIR PLACEMENT......................................................................................................................................... 14
BATTERY INSTALLATION ........................................................................................................................................ 14
LIFT CHAIR DISASSEMBLY ..................................................................................................................................... 15
FABRIC REMOVAL/INSTALLATION......................................................................................................................... 16
V. OPERATION ................................................................................................... 19
OPERATION PRECAUTIONS ................................................................................................................................... 19
HAND CONTROL OPERATION ................................................................................................................................ 19
VI. TROUBLESHOOTING.................................................................................... 22
FREQUENTLY ASKED QUESTIONS........................................................................................................................ 22
VII. CARE AND MAINTENANCE ......................................................................... 24
FABRIC CARE ........................................................................................................................................................... 24
ELECTRONICS CARE............................................................................................................................................... 24
DISPOSAL AND RECYCLING................................................................................................................................... 24
VIII. WARRANTY ................................................................................................ 25
APPENDIX ........................................................................................................ 127
Lift Chair Series www.pridemobility.com 5
Page 6

LIFT CHAIR SERIES
I. INTRODUCTION
SAFETY
WELCOME to Pride Mobility Products Europe B.V. (Pride). The product you have purchased combines state-of-the-art components with safety, comfort, and styling in mind. We are confident the
design features will provide you with the conveniences you expect during your daily activities.
Understanding how to safely operate and care for this product should bring you years of trouble-
free operation and service.
Read and follow all instructions, warnings, and notes in this manual and all other accompanying literature
before attempting to operate this product for the first time. In addition , your safety depends upon you, as well
as your provider, caregiver, or healthcare professional in using good judgement.
If there is any information in this manual which you do not understand, or if you require additional assistance
for setup or operation, please contact your authorized Pride Provider. Failure to follow the instructions,
warnings, and notes in this manual and those located on your Pride product can result in personal
injury or product damage and will void Pride’s product warranty.
PURCHASER’S AGREEMENT
By accepting delivery of this product, you promise that you will not change, alter, or modify this product or
remove or render inoperable or unsafe any guards, shields, or other safety features of this product; fail, refuse
or neglect to install any retrofit kits from time to time provided by Pride to enhance or preserve the safe use
of this product.
INFORMATION EXCHANGE
We want to hear your questions, comments, and suggestions about this manual. We would also like to hear
about the safety and reliability of your new lift chair and about the service you received from your autho rize d
Pride Provider. Please notify us of any change of address, so we can keep you apprised of important information about safety, new products, and new options that can increase your ability to use and enjoy your lift
chair. Please feel free to contact us at the address below:
Pride Mobility Products Europe B.V.
Castricummer Werf 26
1901 RW Castricum
The Netherlands
NOTE: If you ever lose or misplace your product registration card or your copy of this manual, contact
us and we will be glad to send you a new one immediately.
6 www.pridemobility.com Lift Chair Series
Page 7
II. GENERAL GUIDELINES
LIFT CHAIR SERIES
Your lift chair is a state-of-the-art life-enhancement device designed to increase mobility. Pride
provides an extensive variety of products to best fit your individual needs. Please be a ware th at
the final selection and purchasing decision regarding the type of lift chair to be used is the
responsibility of you, the lift chair user, if capable of making such a decision, and/or your healthcare professional (i.e., medical doctor, physical therapist, etc.).
MANDATORY! Read and follow the information provided in this owner’s manual
before attempting to operate your lift chair for the first time.
There are certain situations, including some medical conditions, where you will need to practice operating the
lift chair in the presence of a trained attendant. A trained attendant can be defined as a family member or
healthcare professional specially trained in assisting you with performing various daily living activities while
safely operating a lift chair.
Below are some precautions, tips, and other safety considerations that will help you become accustomed to
operating the lift chair in a safe manner.
MODIFICATIONS
Pride has designed and engineered your lift chair to provide maximum comfort and utility. However, to prevent personal injury and/or damage to your lift chair, you should not modify, add, remove, or disable any
feature, part, or function of your lift chair. Unauthorized modifications may also void your product’s warranty.
NOTE: Use Pride parts only for all repairs and replacements.
WEIGHT LIMITATIONS
Your lift chair is rated for a maximum weight capacity. Refer to “Appendix A” for more information.
MANDATORY! Stay within the specified weight capacity of your lift chair. Pride will
not be held responsible for injuries and/or product damage resulting from failure to
observe weight limitations.
PINCH/CRUSH HAZARDS
The scissor and lift mechanisms are labeled as pinch/crush point hazards on your lift chair. Keep clear of
these areas and make sure the path of motion is unobstructed. See figure 3.1 for pinch/crush point locations.
WARNING! Do not place objects or appendages in the path of moving parts.
DEGREE OF PROTECTION/MODE OF OPERATION
Class II equipment/Type B protection against electric shock
Degree of protection against the ingress of solid/liquids—IPX1
Mode of operation—Maximum Duty Cycle: 2min ON/18min OFF
STORAGE AND OPERATION TEMPERATURES
Transportation or storage: -75°C/-104°F to 70°C/158°F
Operation: 10°C/50°F to 40°C/104°F
Lift Chair Series www.pridemobility.com 7
Page 8
LIFT CHAIR SERIES
II. GENERAL GUIDELINES
ELECTROMAGNETIC AND RADIO FREQUENCY INTERFERENCE (EMI/RFI)
WARNING! Laboratory tests have shown that electromagnetic and radio frequency
waves can have an adverse affect on the performance of electrically-powered
devices, such as lift chairs.
Electromagnetic and Radio Frequency Interference can come from sources such as cellular phones, mobile
two-way radios (such as walkie-talkies), radio stations, TV stations, amateur radio (HAM) transmitters, wireless computer links, microwave signals, paging transmitters, and medium-range mobile transceivers used by
emergency vehicles. In some cases, these waves can cause unintended movement or damage to the control
system of electrically-powered devices. The lift chair user can help prevent electromagnetic interference by
maintaining a minimum distance between portable and mobile RF communications equipment. It is recommended that at least 3 meters (9 feet) of distance be maintained between the lift chair and any handheld
equipment emitting 10 W or more of output power. Refer to the manufacturer’s literature for the handheld
device to determine the maximum output power of that device.
Every electrically-powered device has an immunity (or resistance) to EMI. The higher the immunity level, the
greater the protection against EMI. Per EMC standards, this product has passed immunity testing and is rated
as a Group 1, Class B product, meaning the lift chair uses RF energy only for its internal function. Therefore,
its RF emissions are very low and are not likely to cause any interference in nearby electronic equipment
making the lift chair suitable for use in all establishments, including domestic establishments and hospitals.
WARNING! Be aware that cell phones, two-way radios, laptops, and other types of
radio transmitters may cause unintended movement of your electrically-powered
device due to EMI. Exercise caution when using any of these items while operating
your lift chair.
WARNING! The addition of accessories or components to the lift chair can increase
the susceptibility of the chair to EMI. Do not modify your lift chair in any way not
authorized by Pride.
WARNING! Your lift chair itself can disturb the performance of other electrical
devices located nearby, such as alarm systems.
NOTE: If unintended motion occurs, discontinue use of the lift chair. Contact Pride to report the incident.
SHIPPING AND DELIVERY
Before using your lift chair, make sure your delivery is complete as some components may be packaged
individually. If you do not receive a complete delivery, please contact your authorized Pride Provider immediately. Where damage has occurred during transport, either to the packaging or content, plea se conta ct the
delivery company responsible.
MOTOR VEHICLE TRANSPORT
If you will be transporting your lift chair in a motor vehicle, individual components (external transformer, etc.)
should be secured against slipping. The lift chair itself must also be secured against slipping (a possible
hazard during vehicle braking).
8 www.pridemobility.com Lift Chair Series
Page 9
III. YOUR LIFT CHAIR
BODY COMPONENTS
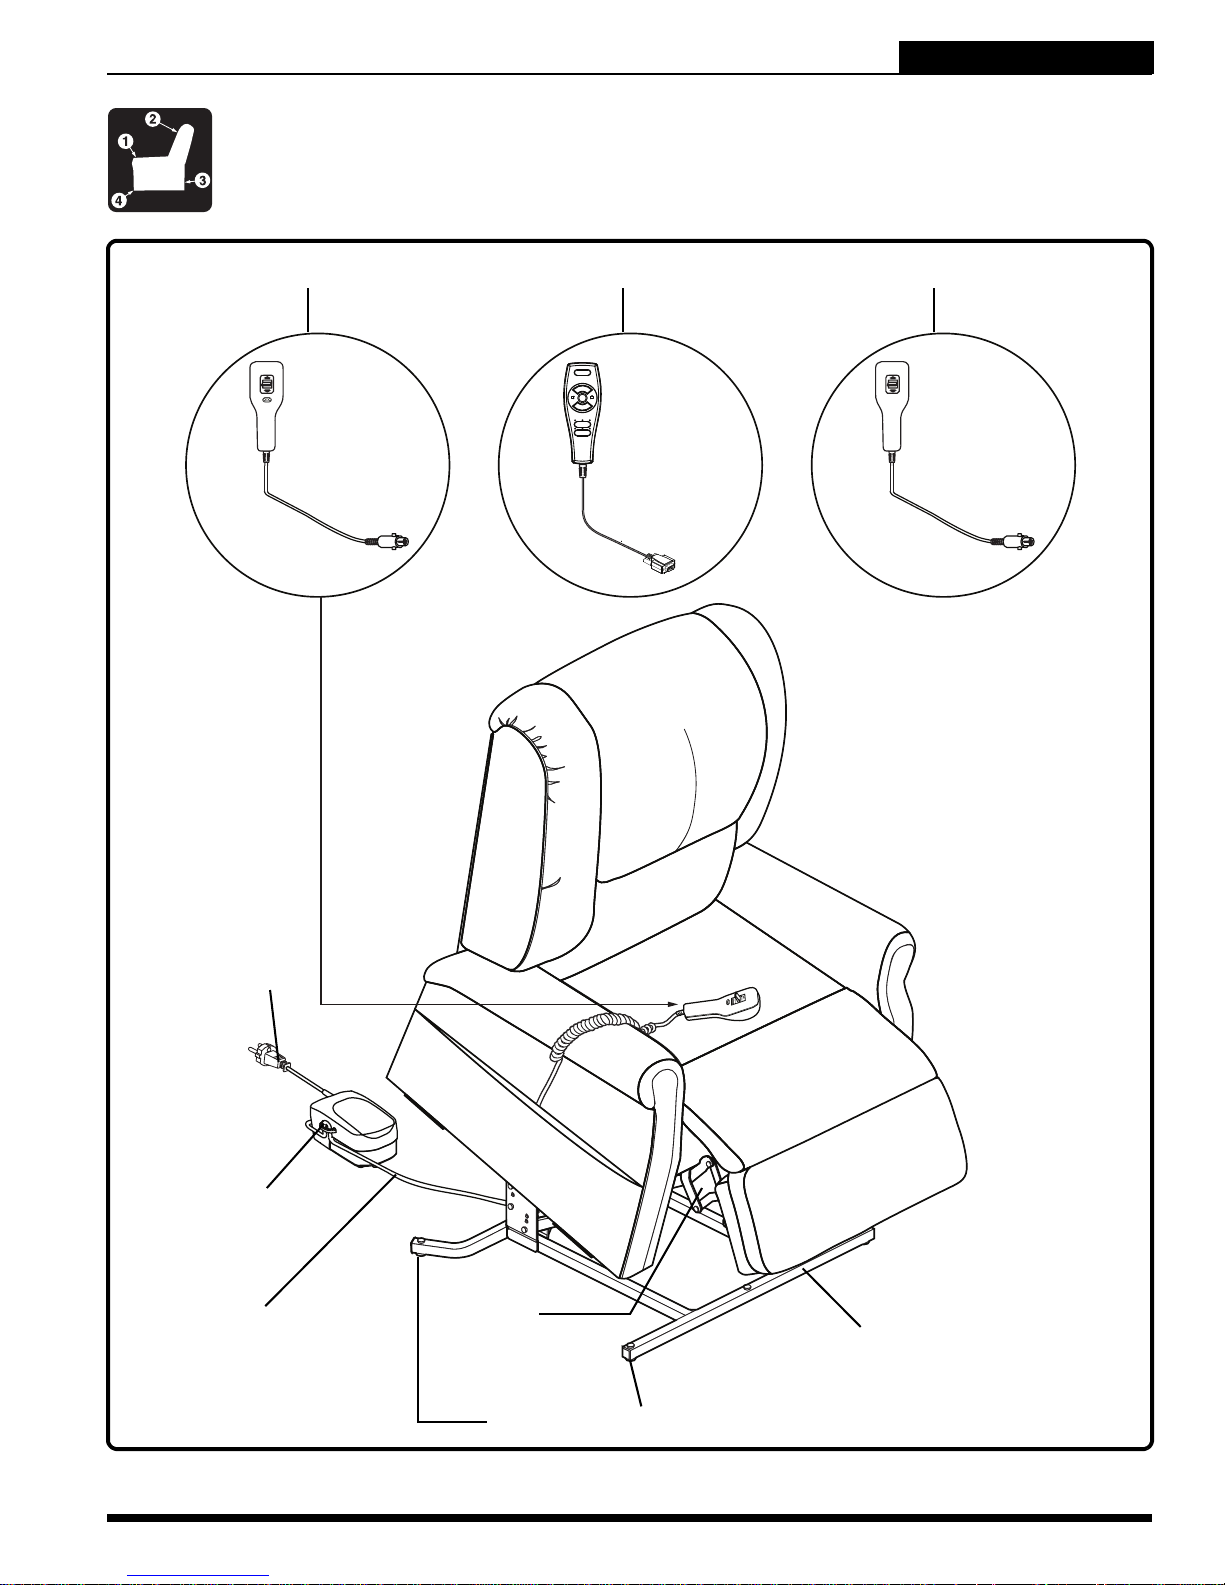
This section describes the features of your lift chair. Carefully review the function and location
of each item described, and note that the illustrations and option locations shown in this manual
may not reflect the type of lift chair that you own.
LIFT CHAIR SERIES
DUAL MOTOR HAND CONTROL
HEAT AND MASSAGE HAND CONTROL
STANDARD HAND CONTROL
POWER LEAD
EXTERNAL
TRANSFORMER
LOW VOLTAGE
CONNECTION CABLE
Figure 3.1 Pride Lift Chair Main Components
Lift Chair Series www.pridemobility.com 9
SCISSOR
MECHANISMS
(PINCH POINT)
LEG LEVELERS (FOUR TOTAL)
LIFT MECHANISM
(PINCH POINT)
Page 10
LIFT CHAIR SERIES
III. YOUR LIFT CHAIR
Lift Mechanism: Responds to the hand control commands to position the chair in the sit, recline, and stand
positions.
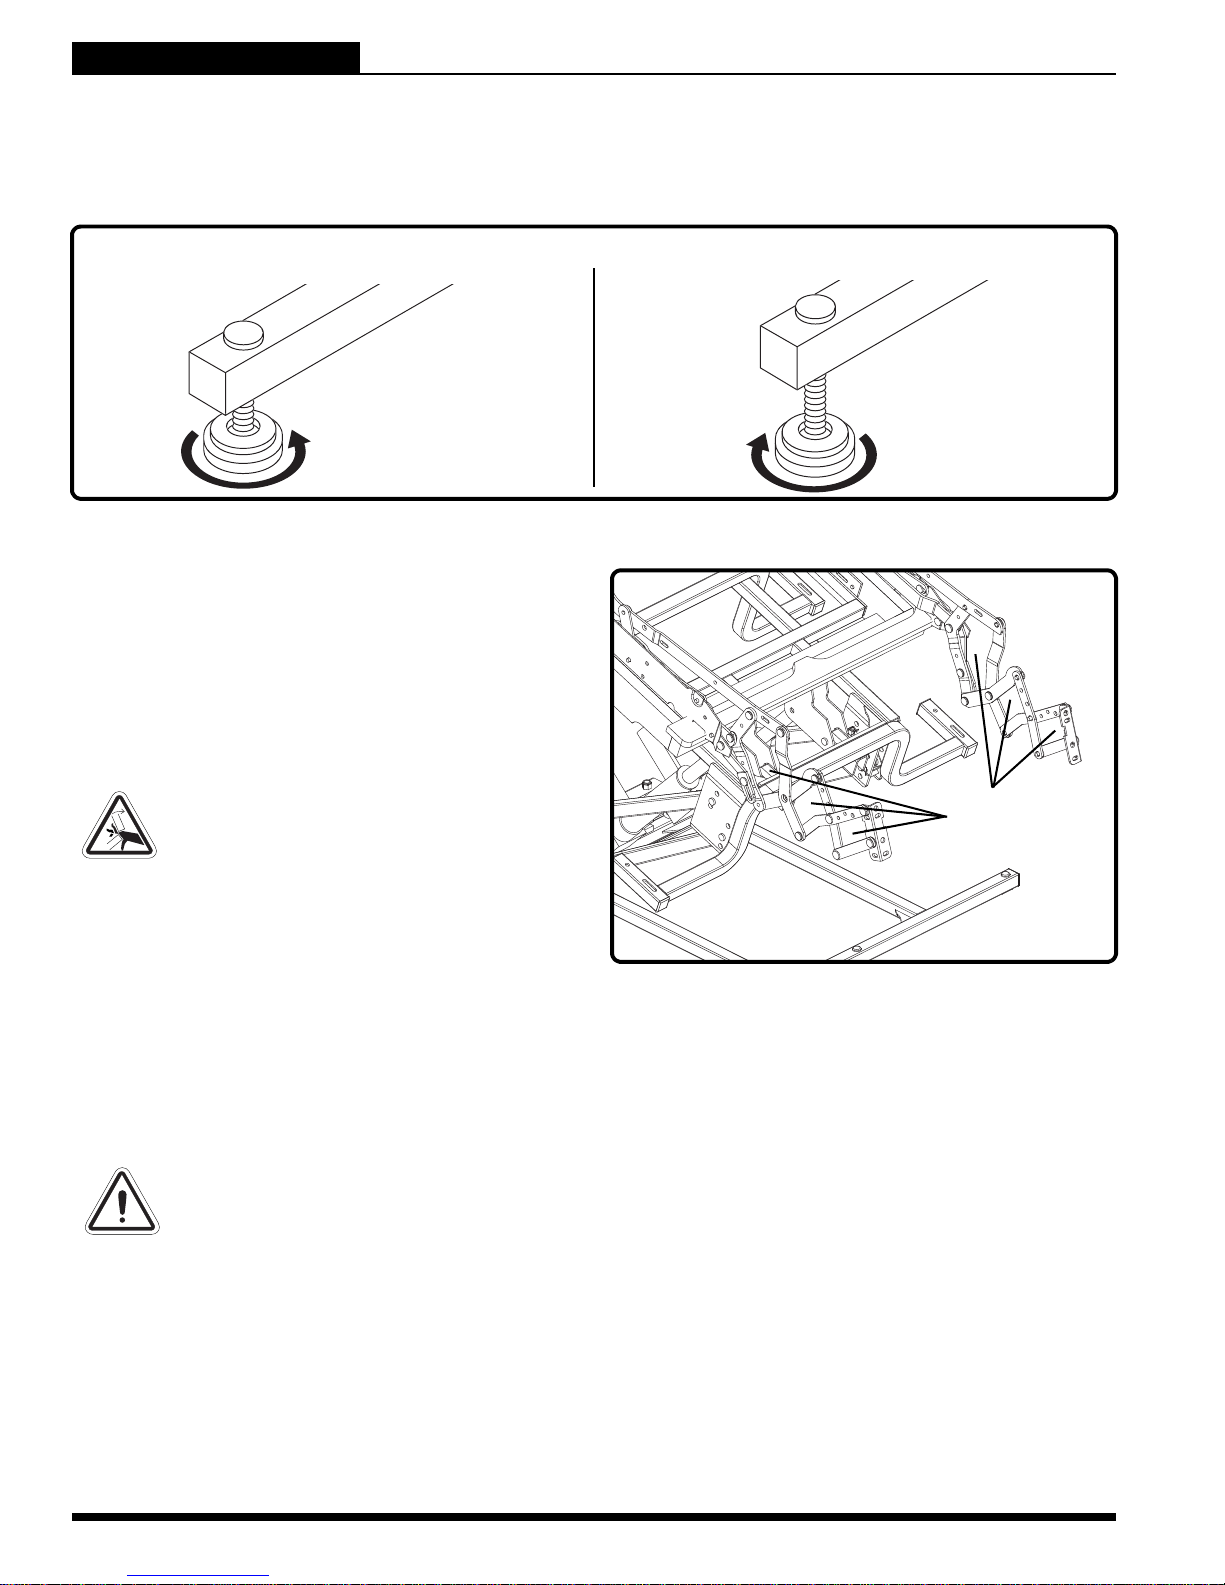
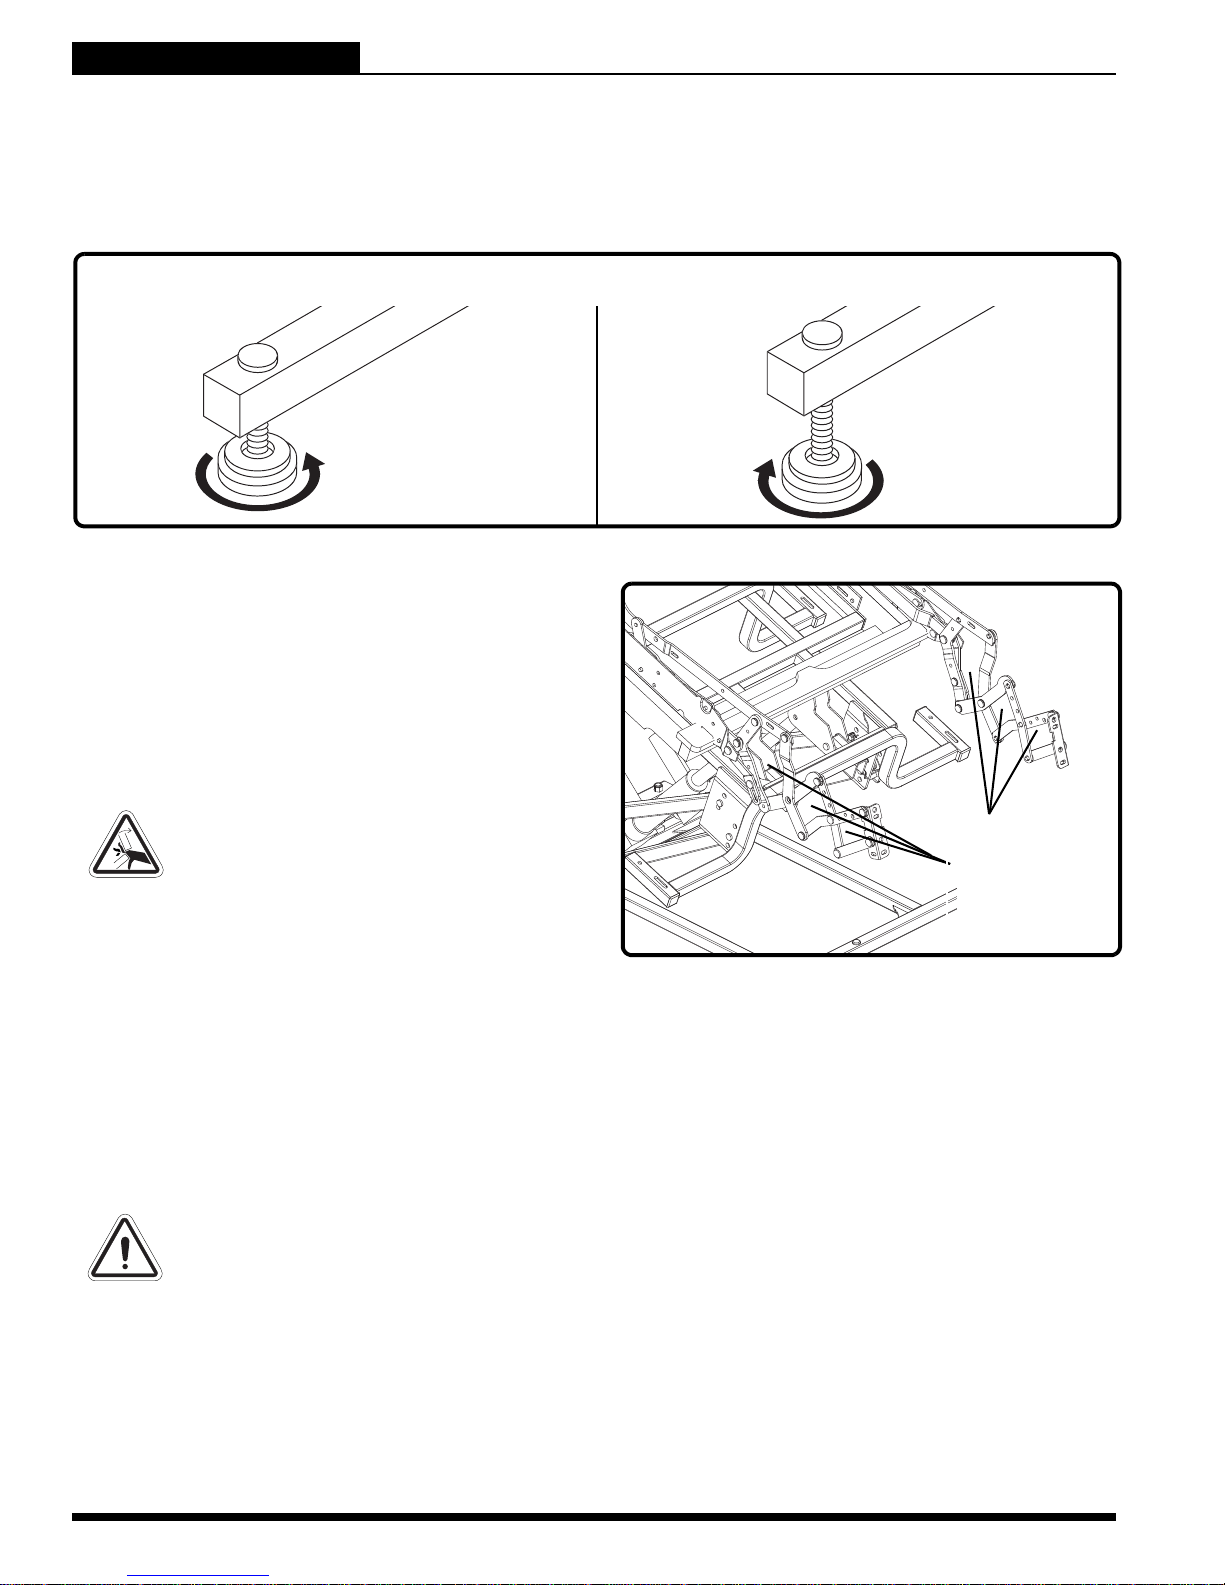
Leg Levelers: Manually rotate up or down in order to stabilize the chair before use (Fig. 3.2).
ROTATE THE LEG LEVELERS TO RAISE OR LOWER THE CHAIR.
Figure 3.2 Leg Levelers
Scissor Mechanisms: Extend or retract to take the
chair through the various stages of recline (Fig. 3.3).
WARNING! Pinch/Crush Points
Hazard! Be aware that the lift
mechanism and scissor
mechanisms are a pinch point on
the lift chair. Keep the following
items and similar objects clear of
these points when operating the
lift chair:
appendages
small children
SCISSOR
MECHANISM
(PINCH POINT)
pets
wires
oxygen tubes
loose items, including but not
limited to clothing and blankets
electrical power leads
Figure 3.3 Scissor Mechanism
ELECTRICAL COMPONENTS
Your Pride Lift Chair is equipped with a low voltage DC electrical system that reduces the standard household
alternating current of 90V AC - 264V AC to direct current (24/39V DC). The elect rical components include the
external transformer, batteries, and hand control. Keep these areas free from moisture at all times.
WARNING! Keep all electrical components free from moisture at all times to
prevent shock and/or electrical hazard.
External Transformer: Connects to a standard electrical outlet to provide power to the lift chair. The transformer may be equipped with an LED indicator, which shows green when power to the transformer is on.
The external transformer may also come equipped with mounting brackets that allow the transformer to be
mounted to the wall directly under the standard electrical outlet. The screws must be mounted to the wall stud
for security. Refer to “Appendix G” or “Appendix H” for a mounting diagram.
NOTE: Pride is not responsible for damage due to improper installation.
10 www.pridemobility.com Lift Chair Series
Page 11

III. YOUR LIFT CHAIR
LIFT CHAIR SERIES
Batteries: Provide the power needed to return the lift chair from the recline position to the sit and/or lift
position in the event of a power failure. For those models equipped with a battery backup system, the batteries
are located inside the external transformer.
Hand Control: Contains the controls needed to operate the various functions of the lift chair. Refer to V.
“Operation” for more information. The hand control may be equipped with a quick-release connector, which
enables the user to detach the hand control from the chair, disabling all functions of the hand control.
Lift Chair Series www.pridemobility.com 11
Page 12
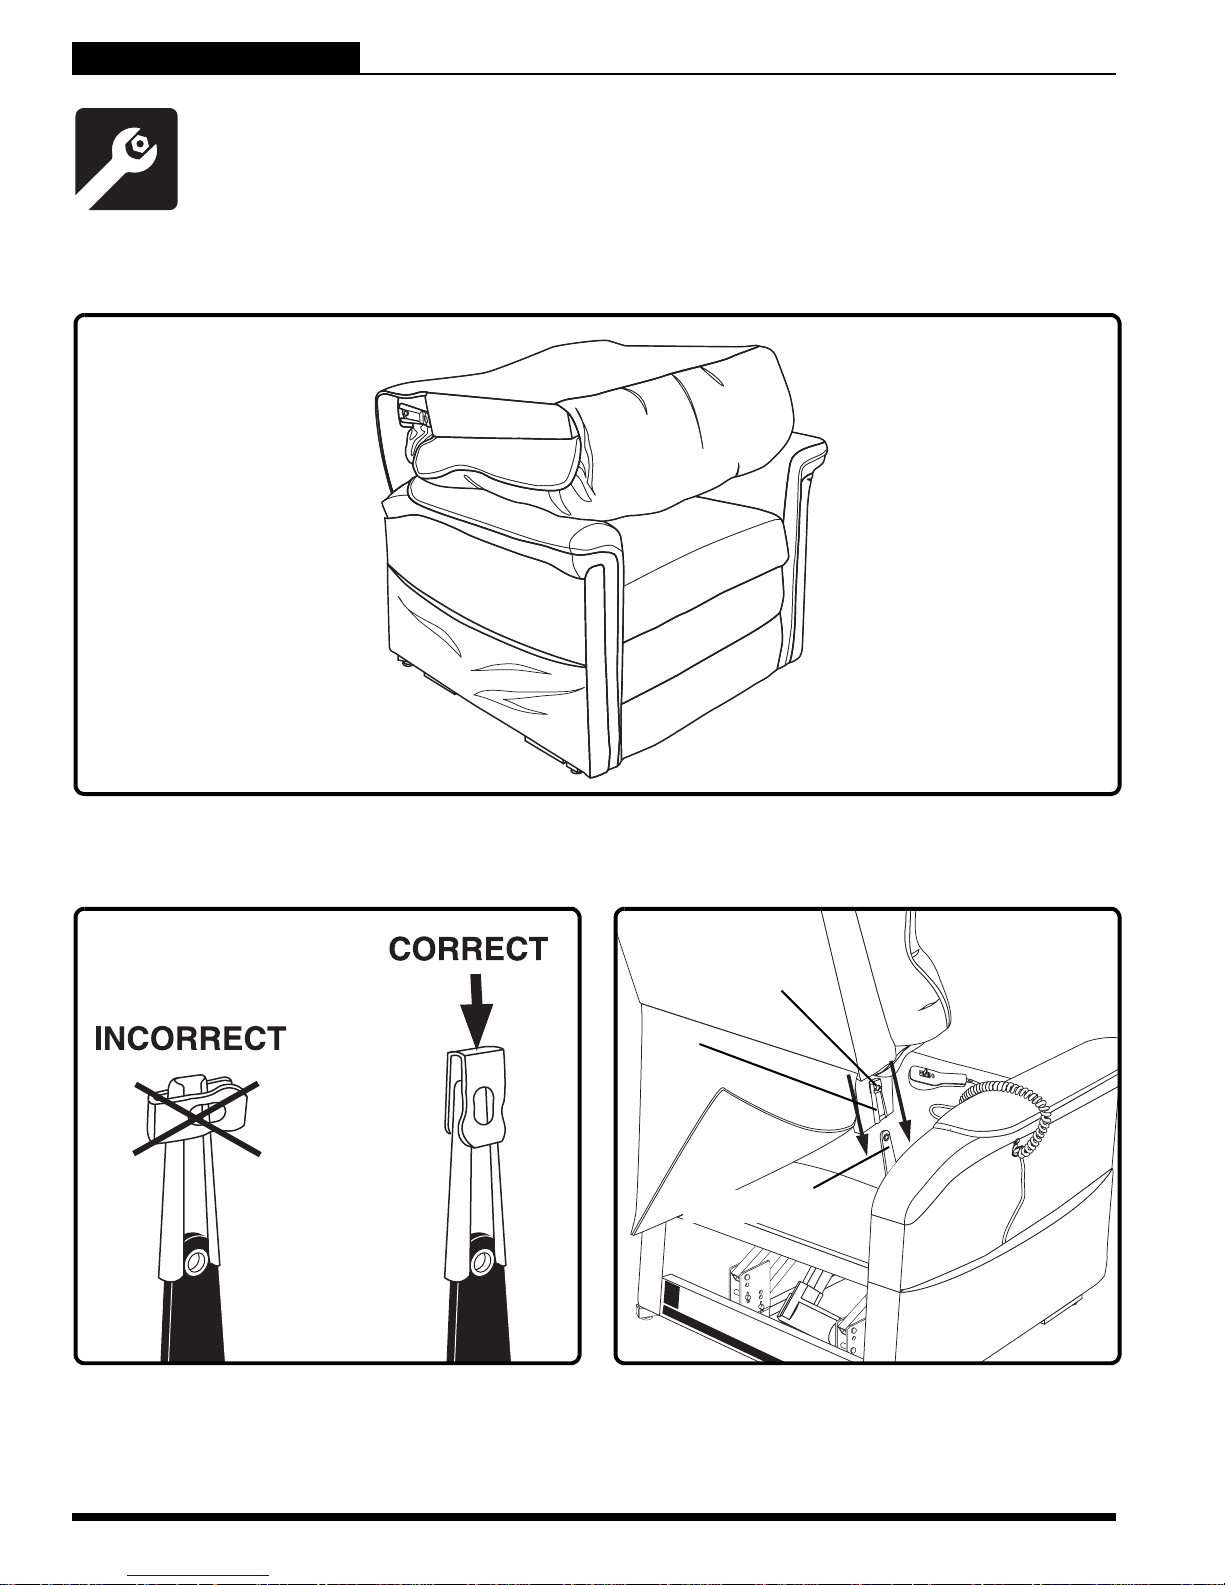
LIFT CHAIR SERIES
KD
SLEEVE
KD CONNECTION
Your lift chair may require some assembly before initial use. It may also require disassembly to
make servicing the chair more convenient. If your lift chair is a Knock-Down (KD) model, follow
the instructions in “Lift Chair Set Up.” If your lift chair is not a KD model, proceed to “Lift Chair
Placement.”
LIFT CHAIR SET UP
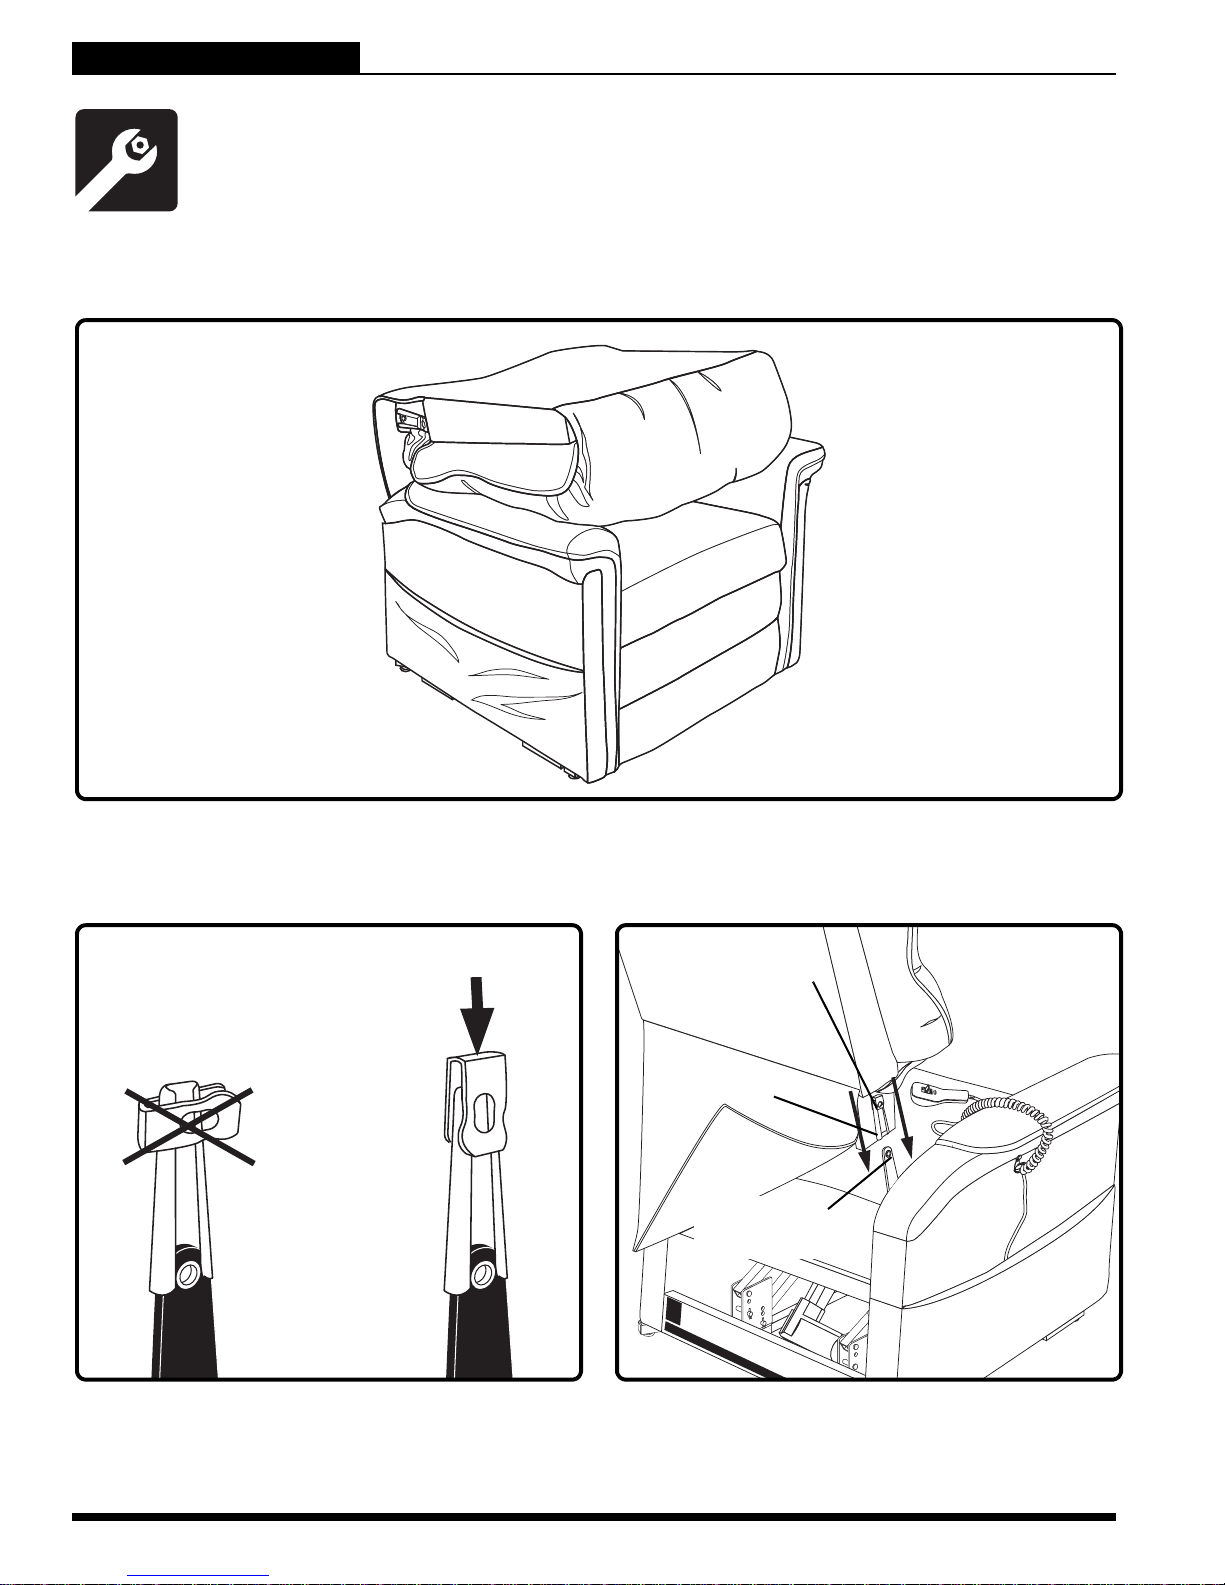
KD models will arrive in the knock-down position (Fig. 4.1).
IV. ASSEMBLY/DISASSEMBLY
Figure 4.1 Knock-down (KD) Position
Follow these steps to assemble the lift chair:
4.1.1 Remove the packaging from the back portion
of the chair and check that the locking clip is in
the vertical position. Reposition if necessary.
LOCKING CLIP
4.1.2 Slide the left and right KD sleeves of the
chair-back onto the KD connections on the
arms and seat of the chair.
12 www.pridemobility.com Lift Chair Series
Page 13
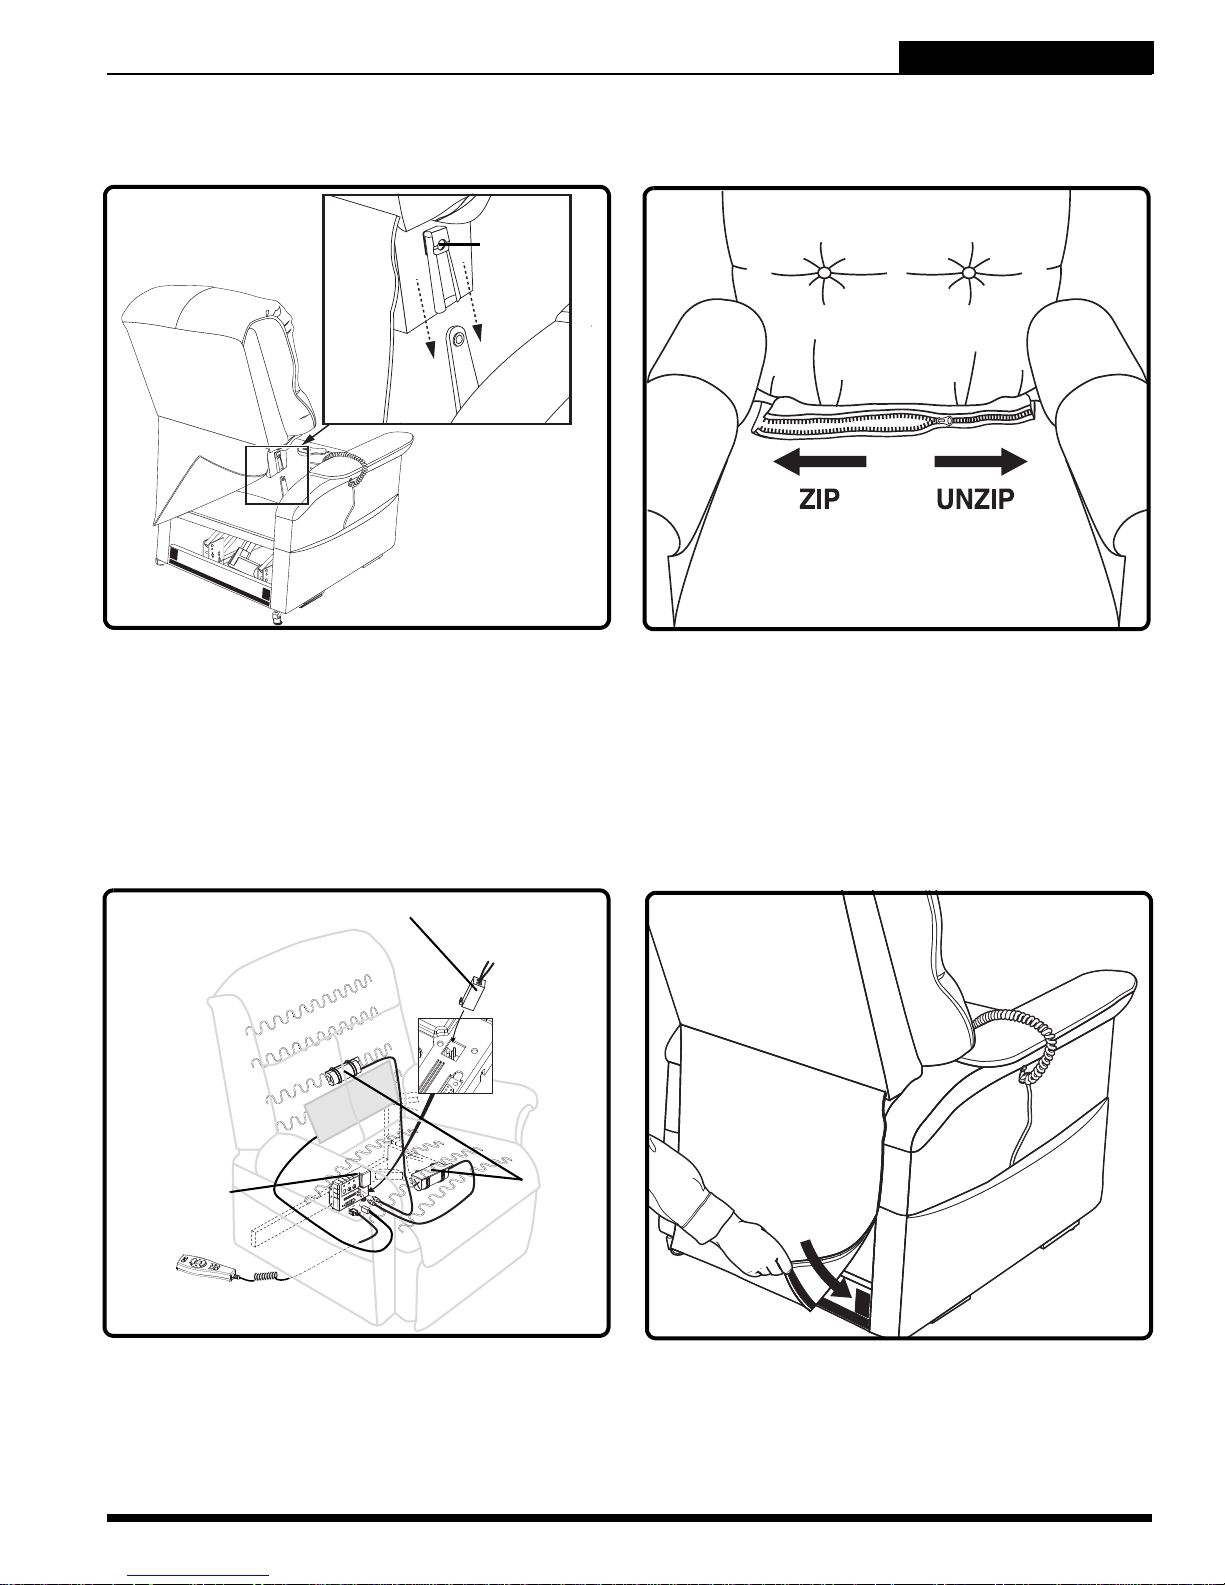
IV. ASSEMBLY/DISASSEMBLY
LIFT CHAIR SERIES
NOTE: Depending on chair width, you may need to slide on one side of the chair-back at a time. If this
is the case, level the chair-back before pressing down to lock into position.
“CLICK”
4.1.3 Push firmly on the top of the chair-back to
lock into position. Listen for a click on each
side to ensure the chair-back is locked in
properly.
NOTE: Pull up on the chair-back to ensure that it
is locked in place. If the back can be pulled off,
then repeat steps 4.1.1 through 4.1.3.
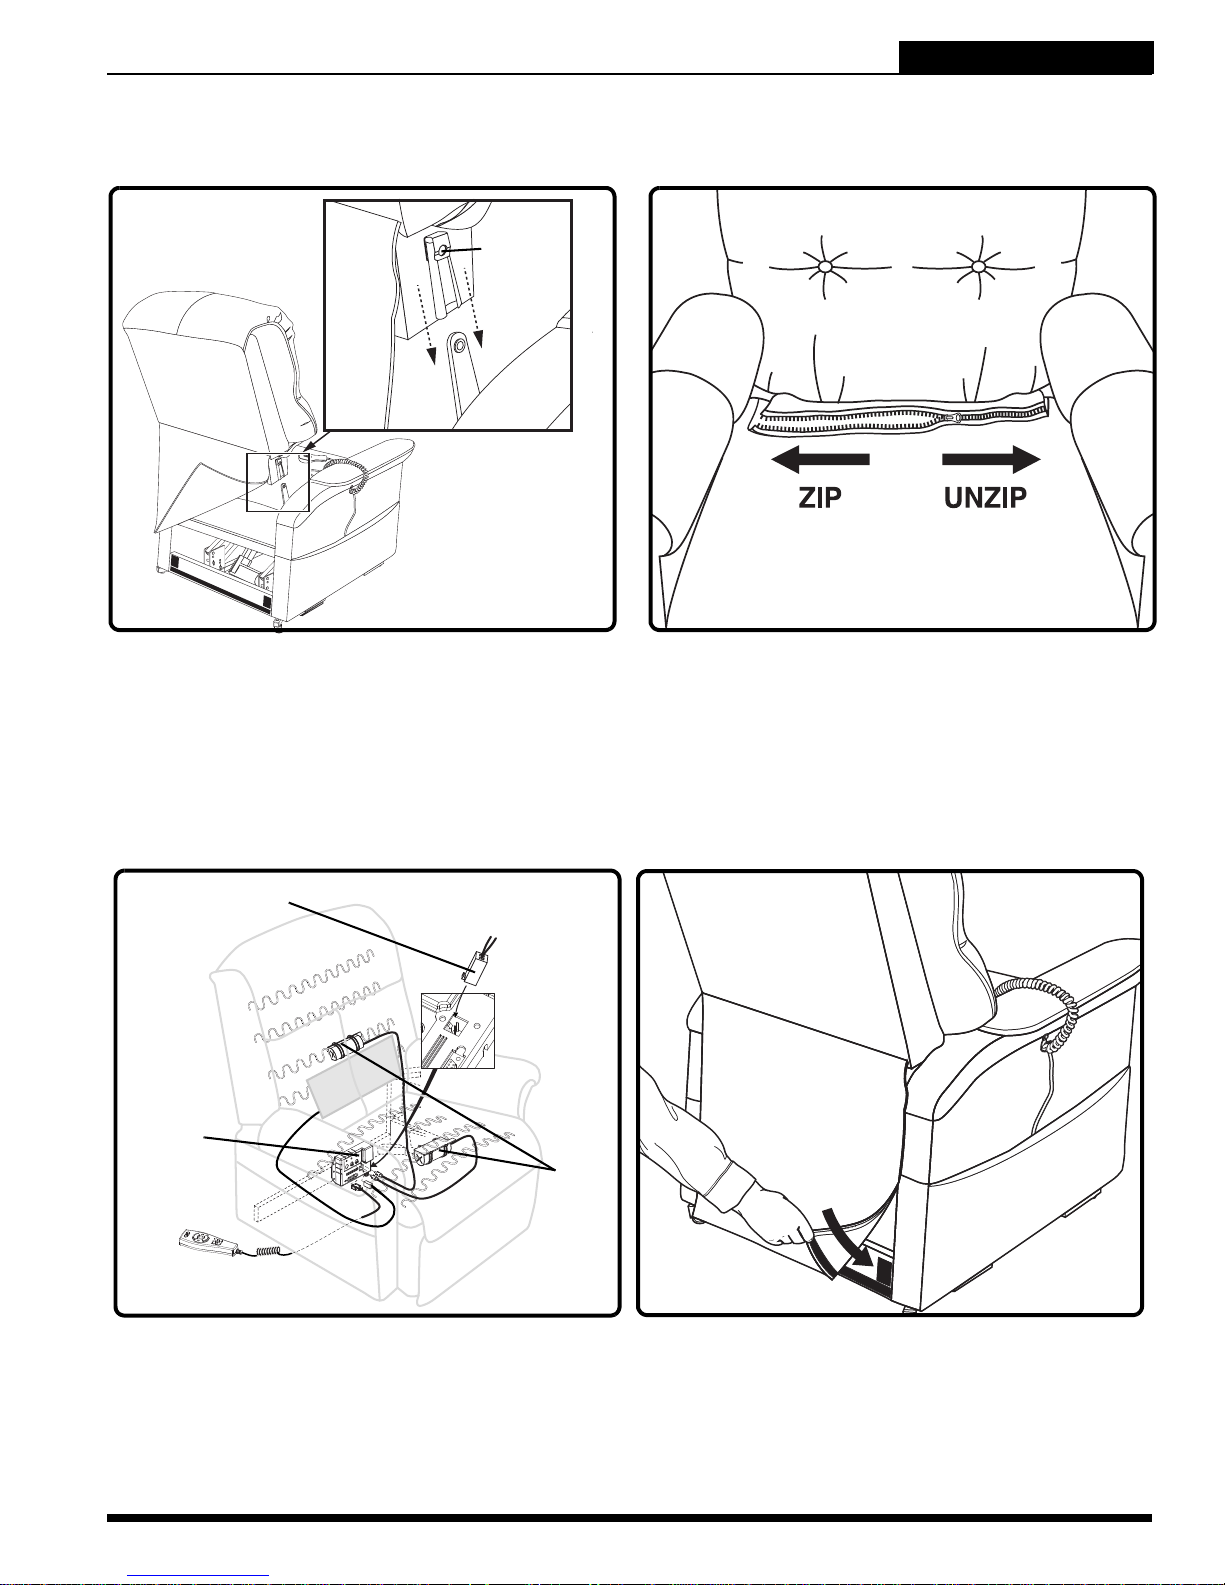
HEAT CONNECTION TO JUNCTION BOX
JUNCTION BOX
MASSAGE UNIT
4.1.4 For C6 Lift Chairs, tuck the fabric flaps on the
front of the chair-back and rear of the chair
base down into the frame and secure with the
reusable fastener on each flap. Then, zip the
two sections together.
4.1.5
Connect the heat and massage harnesses to
the junction box. The junction box is mounted
to the back of the lift chair. Refer to “Appendix
D” for proper harness connection s.
Lift Chair Series www.pridemobility.com 13
4.1.6 Attach the chair-back to the hook and loop
flaps on the bottom of the chair base.
Page 14
LIFT CHAIR SERIES
IV. ASSEMBLY/DISASSEMBLY
LIFT CHAIR PLACEMENT
Your lift chair should be placed near a standard electrical outlet on dry, level ground where there is ample
room to allow for proper operation. Pride recommends that you have the assistance of an attendant when
positioning the lift chair to avoid the possibility of injury when lifting.
Follow these steps to position the lift chair in a safe manner:
1. Place the back of the lift chair 76 cm (30 in.) from the nearest obstruction while the chair is in the seate d
position. This measurement may vary depending on model.
2. Adjust the leg levelers to stabilize the lift chair (Fig. 3.2).
3. Install the batteries into the external transformer if applicable. Refer to “Battery Installation” for more
information.
4. Position the external transformer on the floor in an open, well-ventilated area where it will not be an
obstruction, or if equipped, utilize the optional wall mount.
5. Position the low voltage connection cable where it will not be pinched between the frame and the lift
mechanism.
6. Connect the low voltage connection cable to the external transformer if it is not already connected.
7. Plug the power lead directly into the electrical outlet. Do not use an extension lead!
NOTE: If you discover a problem at any point during the set up and positioning of your lift chair, stop
and contact your authorized Pride Provider immediately. To avoid personal injury and/or product
damage, do not plug the unit into the electrical outlet until the problem is corrected and do not
attempt to fix electrical problems by yourself.
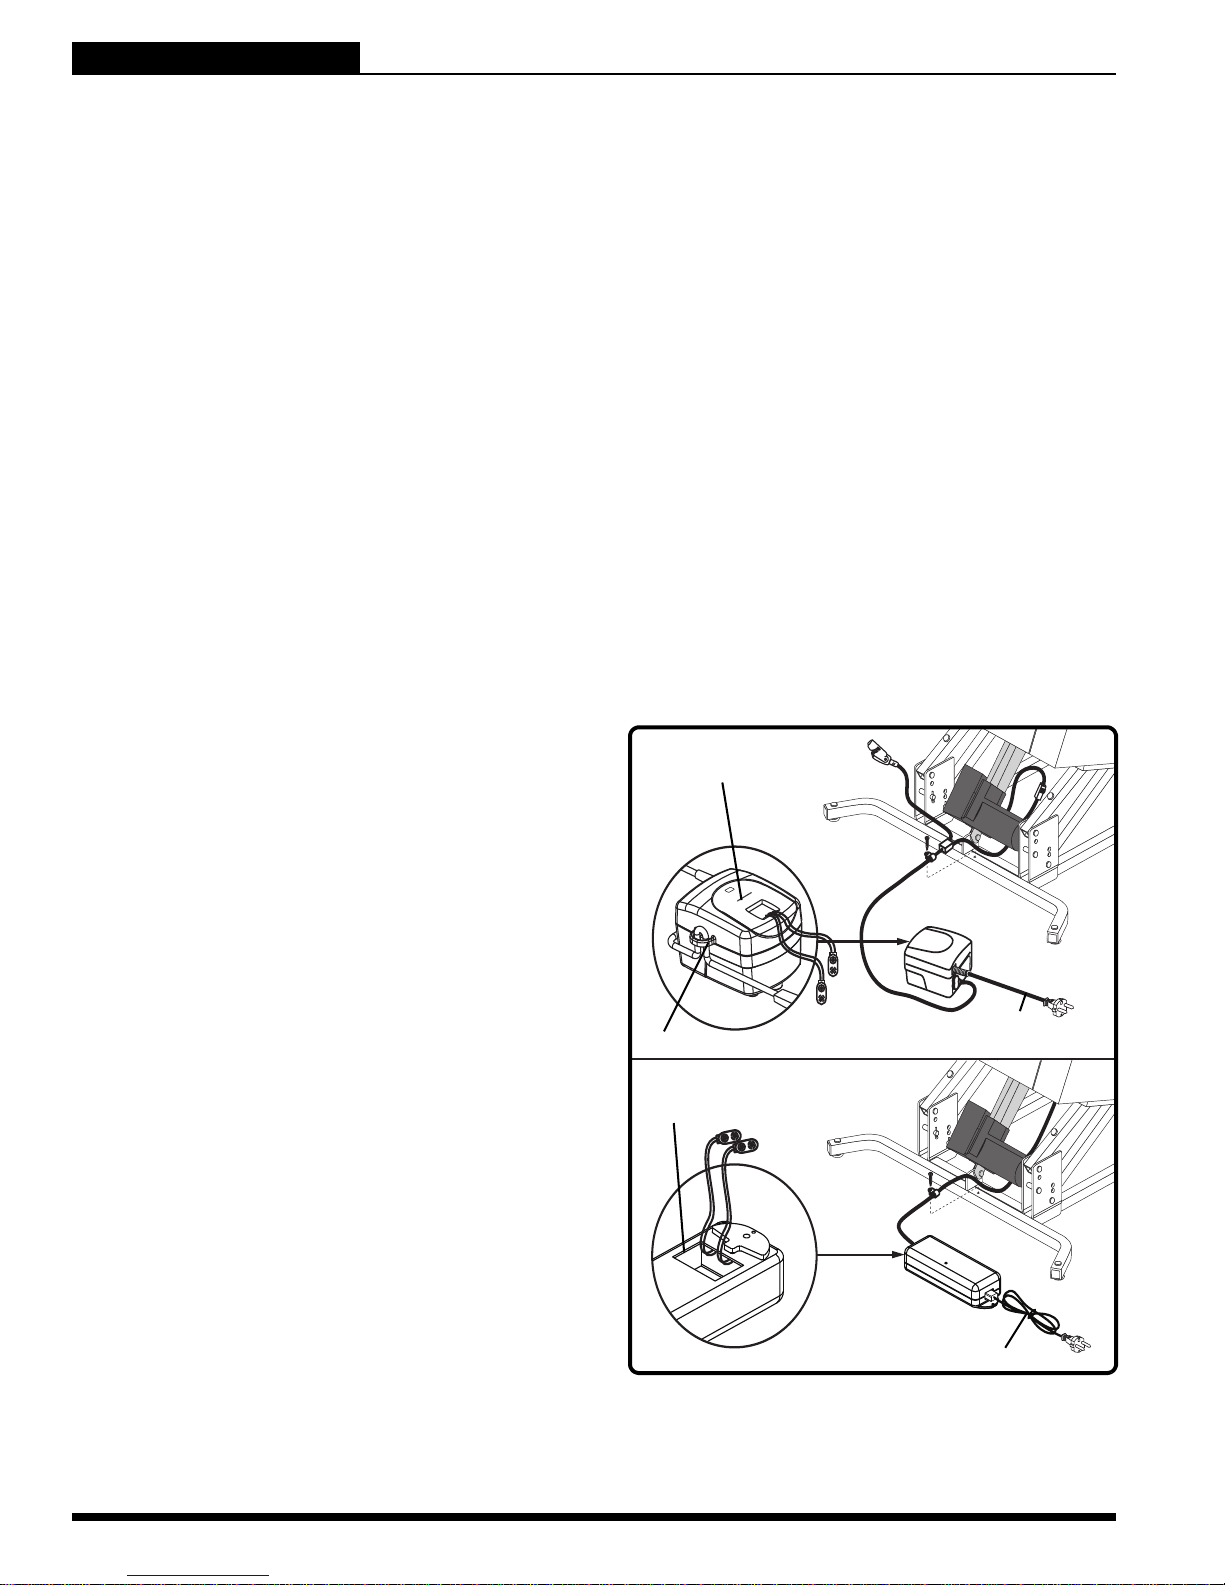
BATTERY INSTALLATION
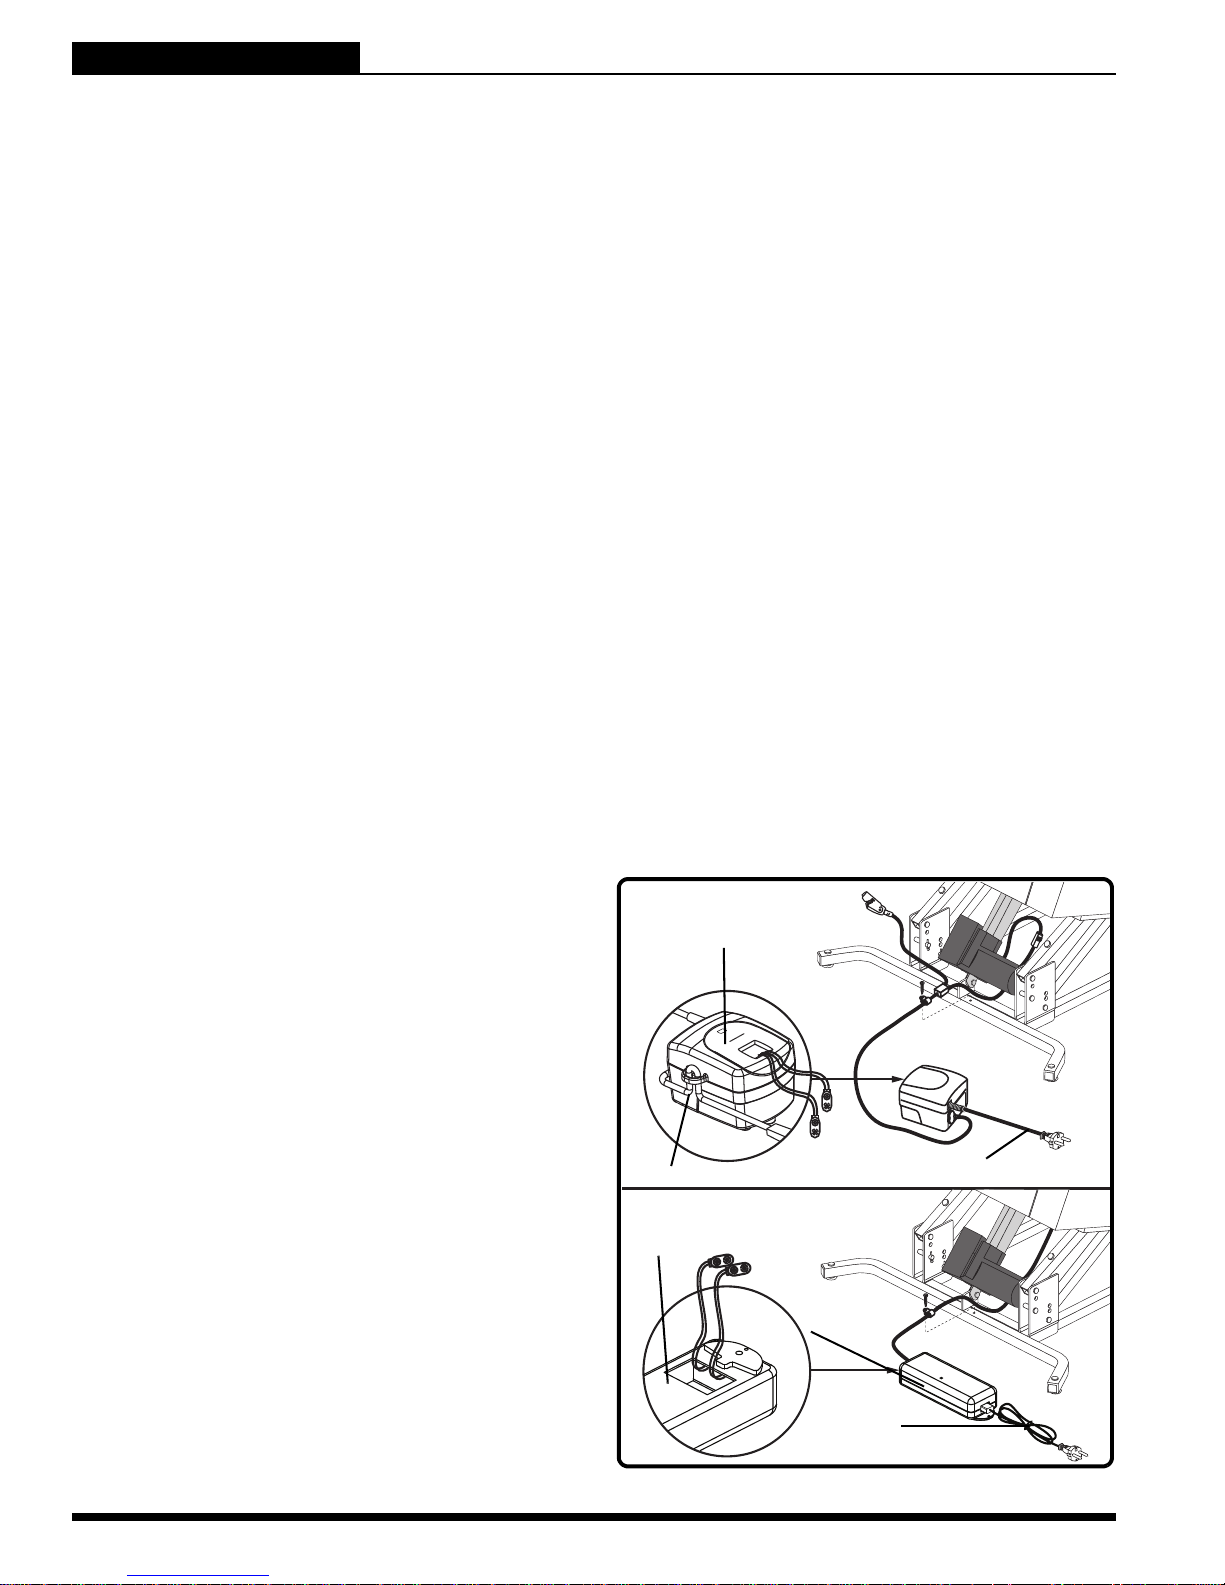
Your lift chair may be equipped with a battery backup
system that will activate during a power failure. The
backup system is powered by two 9V batteries (not
included) that need to be installed into the external
transformer.
Follow these steps to install the batteries:
1. Unplug the external transformer power lead from
the electrical outlet.
2. Open the marked battery door on the external
transformer.
3. Install two 9V batteries into the external transformer (Fig. 4.2).
4. Replace the battery door.
NOTE: Always make sure the external transformer
is equipped with two fresh 9V batteries, since the
battery backup system does not recharge itself.
Fresh batteries are defined as 9V alkaline batteries
that are replaced every time the battery backup
system is activated during a power failure, or once
a year if the battery backup system has not been
activated.
BATTERY DOOR
POWER LEAD
EXTERNAL TRANSFORMER
EXTERNAL TRANSFORMER
(BOTTOM VIEW)
POWER LEAD
NOTE: If you unplug your lift chair for an extended
period of time (more than one hour), remove the
batteries from the external transformer. The lift
chair will draw power from the batteries even
when it is not in use.
14 www.pridemobility.com Lift Chair Series
Figure 4.2 Lift Chair Battery Backup Location
Page 15
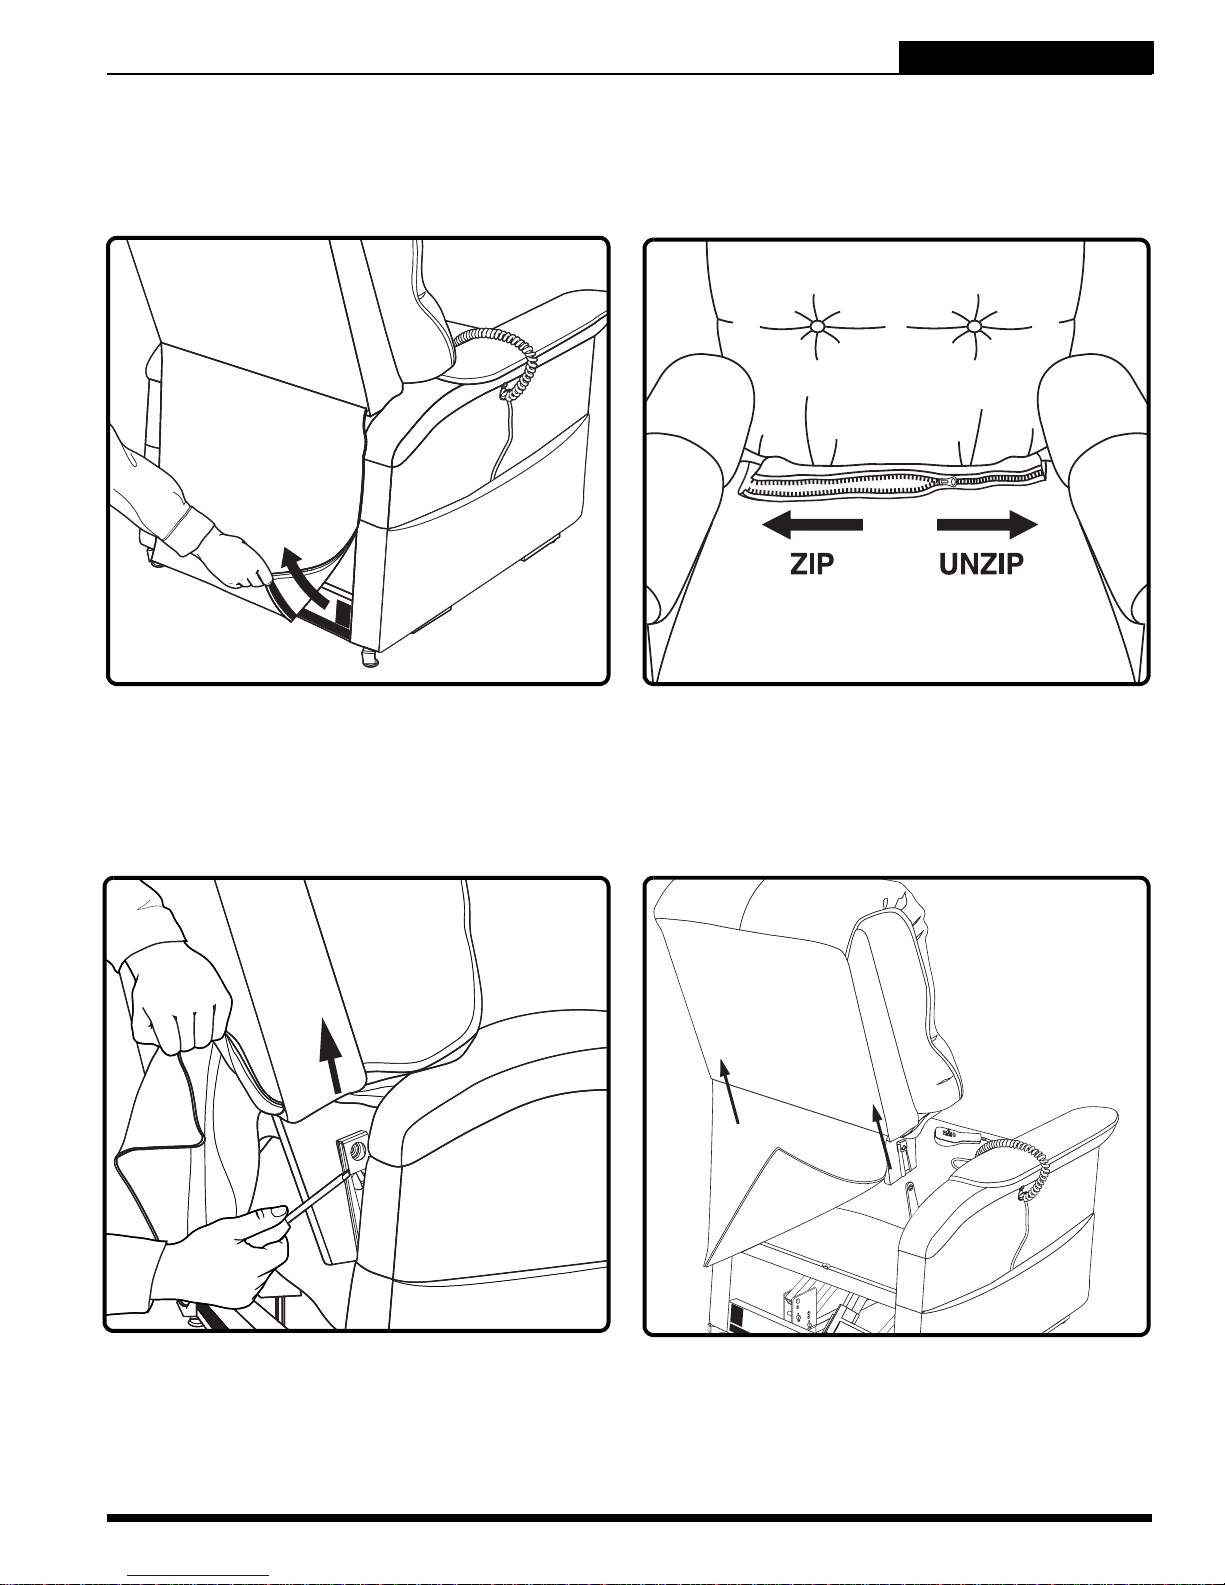
IV. ASSEMBLY/DISASSEMBLY
LIFT CHAIR SERIES
LIFT CHAIR DISASSEMBLY
The back portion of KD Lift Chairs can be removed to make service and transport of the chair more convenient.
Follow these steps to disassemble the lift chair:
4.3.1 Remove the bottom of the back fabric from
the hook and loop flaps on the chair base.
NOTE: If equipped with a heat and massage
option, be sure to disconnect the heat and/or
massage harnesses from the junction box.
4.3.2 For C6 Lift Chairs, unzip the chair-back from
the chair base, then disengage the reusable
fastener securing the chair-back fabric to the
frame.
4.3.3 Using a large flathead screwdriver, lift the left
and right locking clips on the chair-back one
side at a time to raise the back from the connections on the chair base. As you lift each
locking clip, pull up on the chair-back to lift
that side over the lock.
Lift Chair Series www.pridemobility.com 15
4.3.4 Lift the chair-back up and away from the
chair base.
Page 16
LIFT CHAIR SERIES
IV. ASSEMBLY/DISASSEMBLY
FABRIC REMOVAL/INSTALLATION
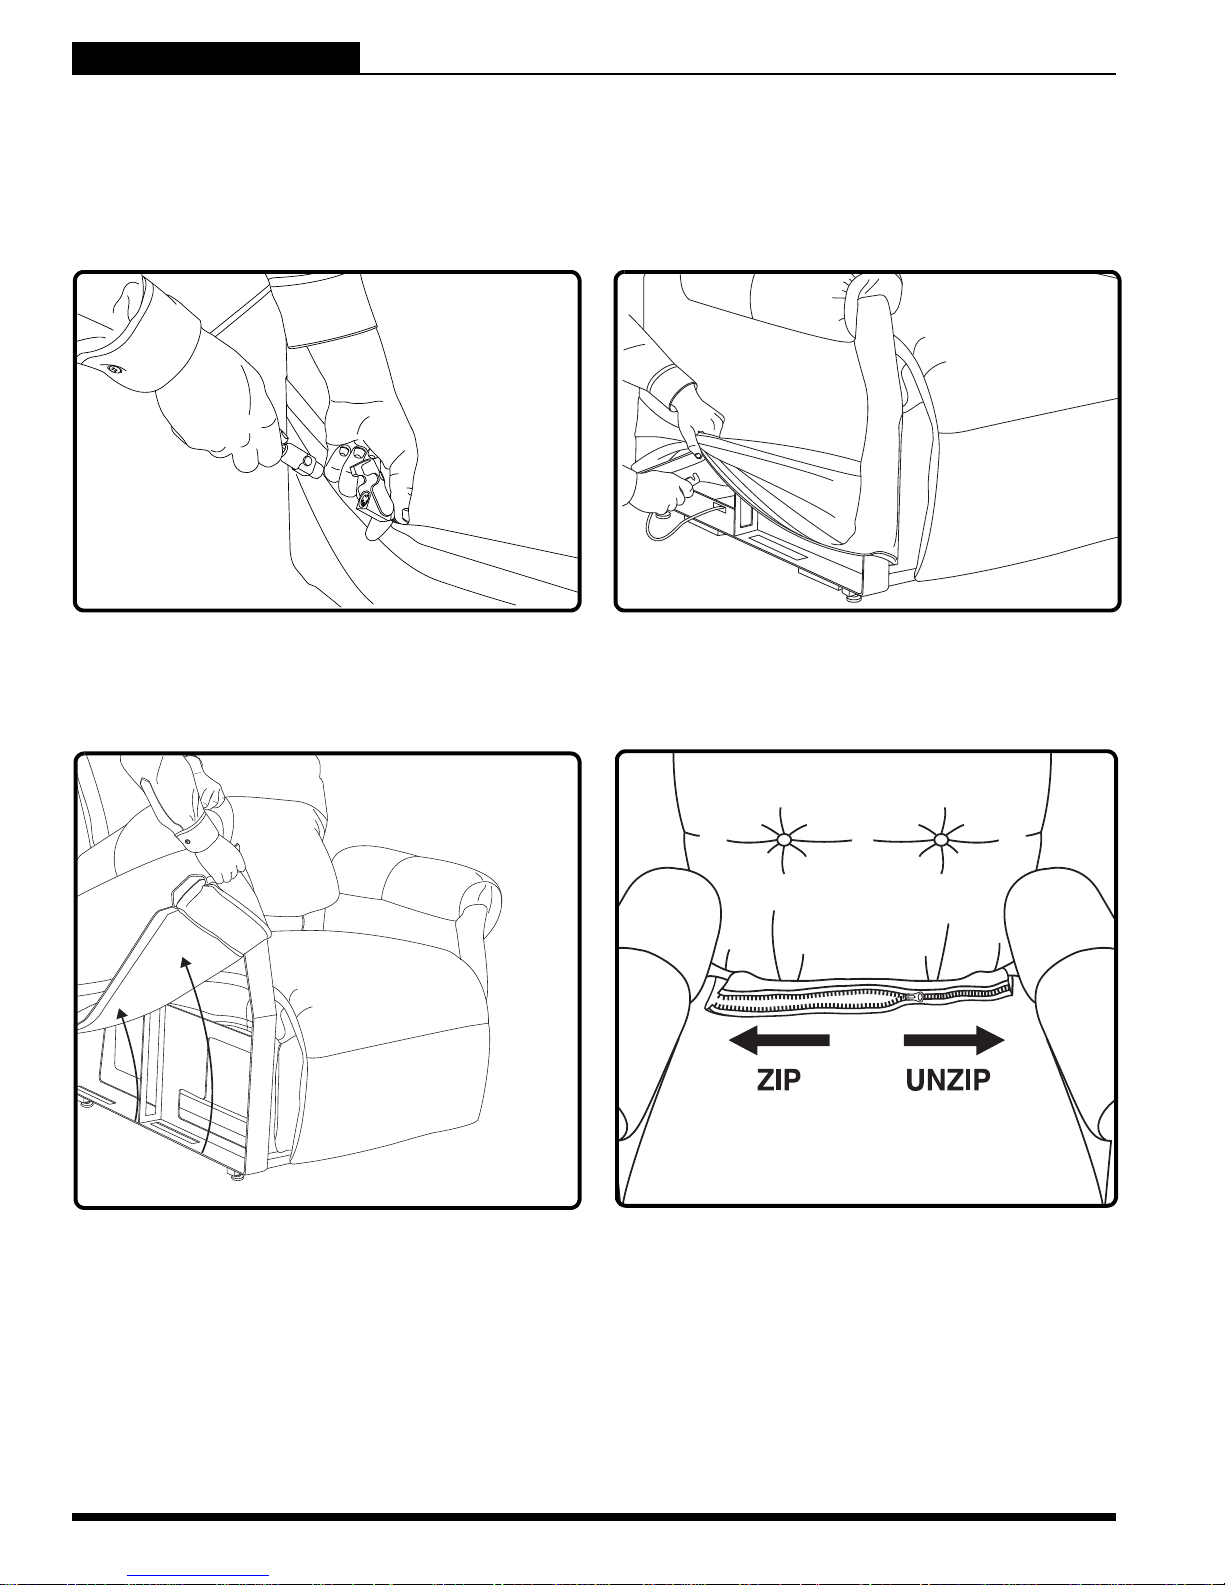
The fabric on some lift chairs can be removed to make cleaning and service of the chair more convenient. If
your chair is equipped with removable fabric, please see below.
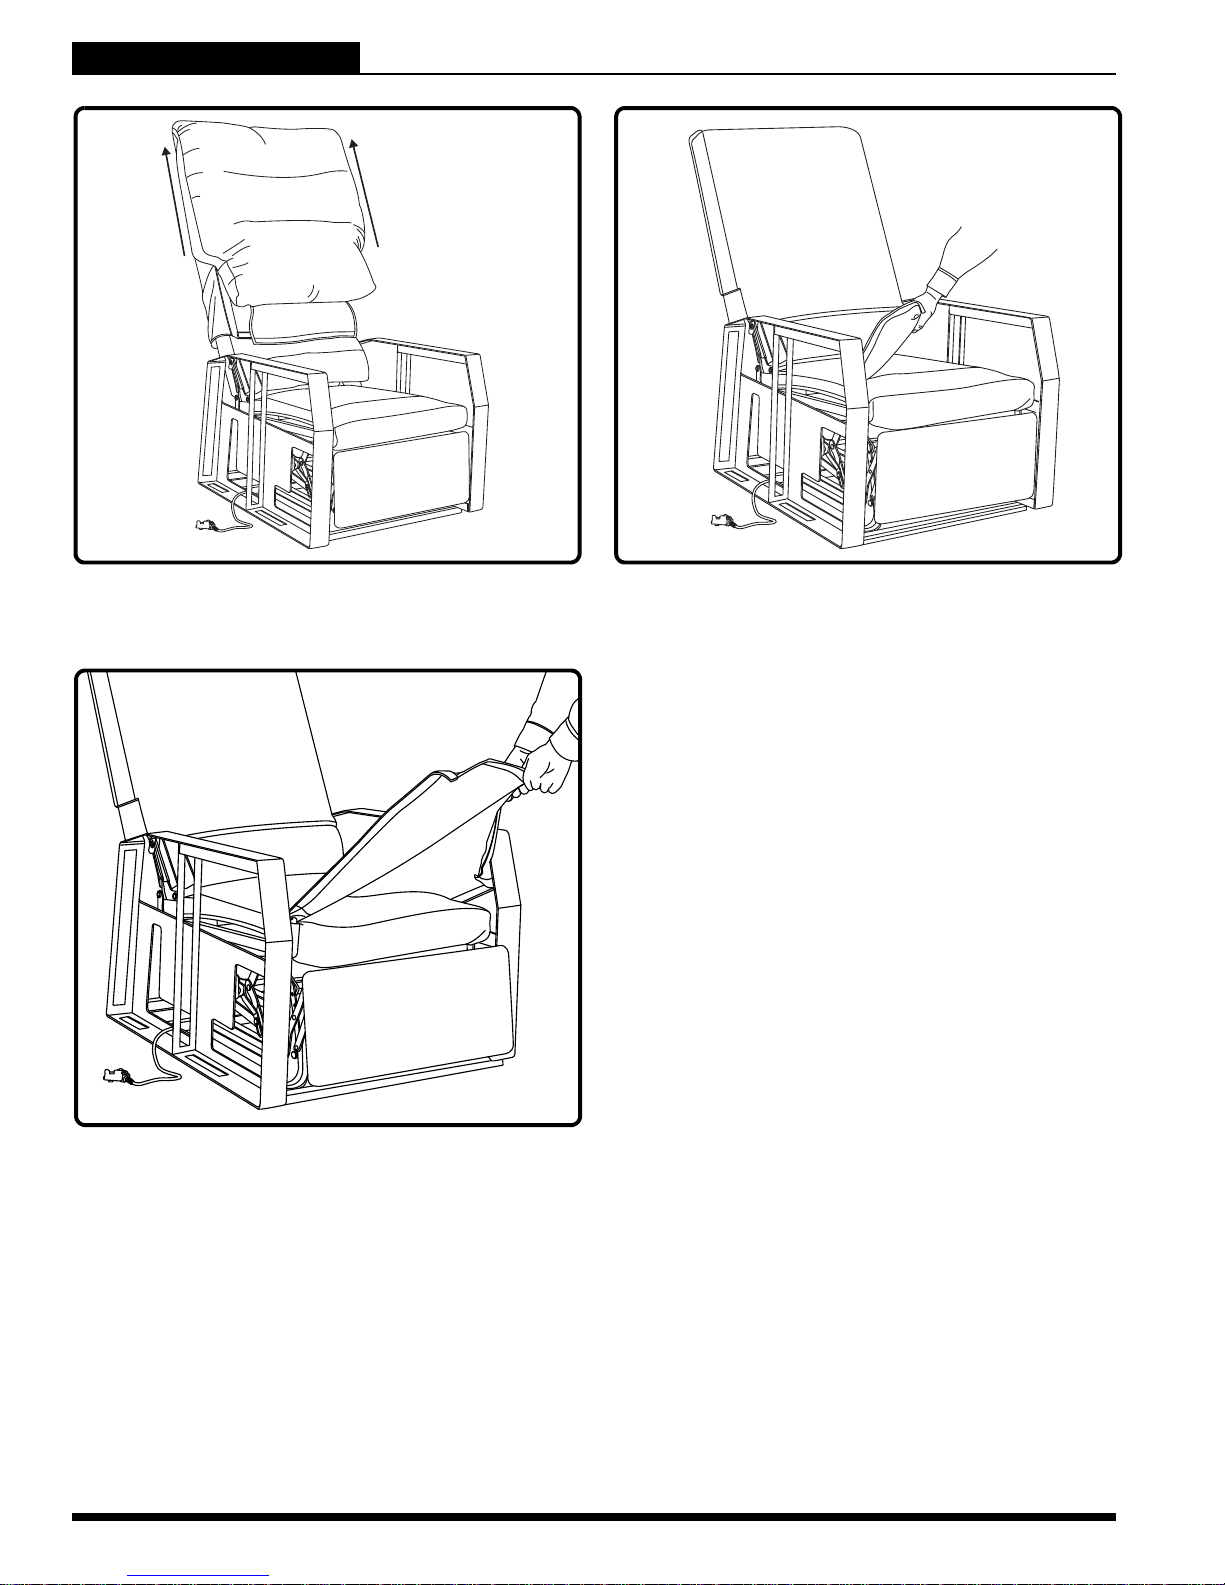
Follow these steps to remove and install the lift chair fabric:
4.4.1 Disconnect the hand control from the quick
release cable located in the lift chair side
pocket. Place the hand control in a safe location out of the way.
4.4.2 Push the quick release cable through the “V”
cut hole in the side pocket of the lift chair.
4.4.3 Slide the left and right side arm covers off of
the metal side arms.
16 www.pridemobility.com Lift Chair Series
4.4.4 For C6 Lift Chairs, unzip the chaise pad from
the chair-back cover.
Page 17
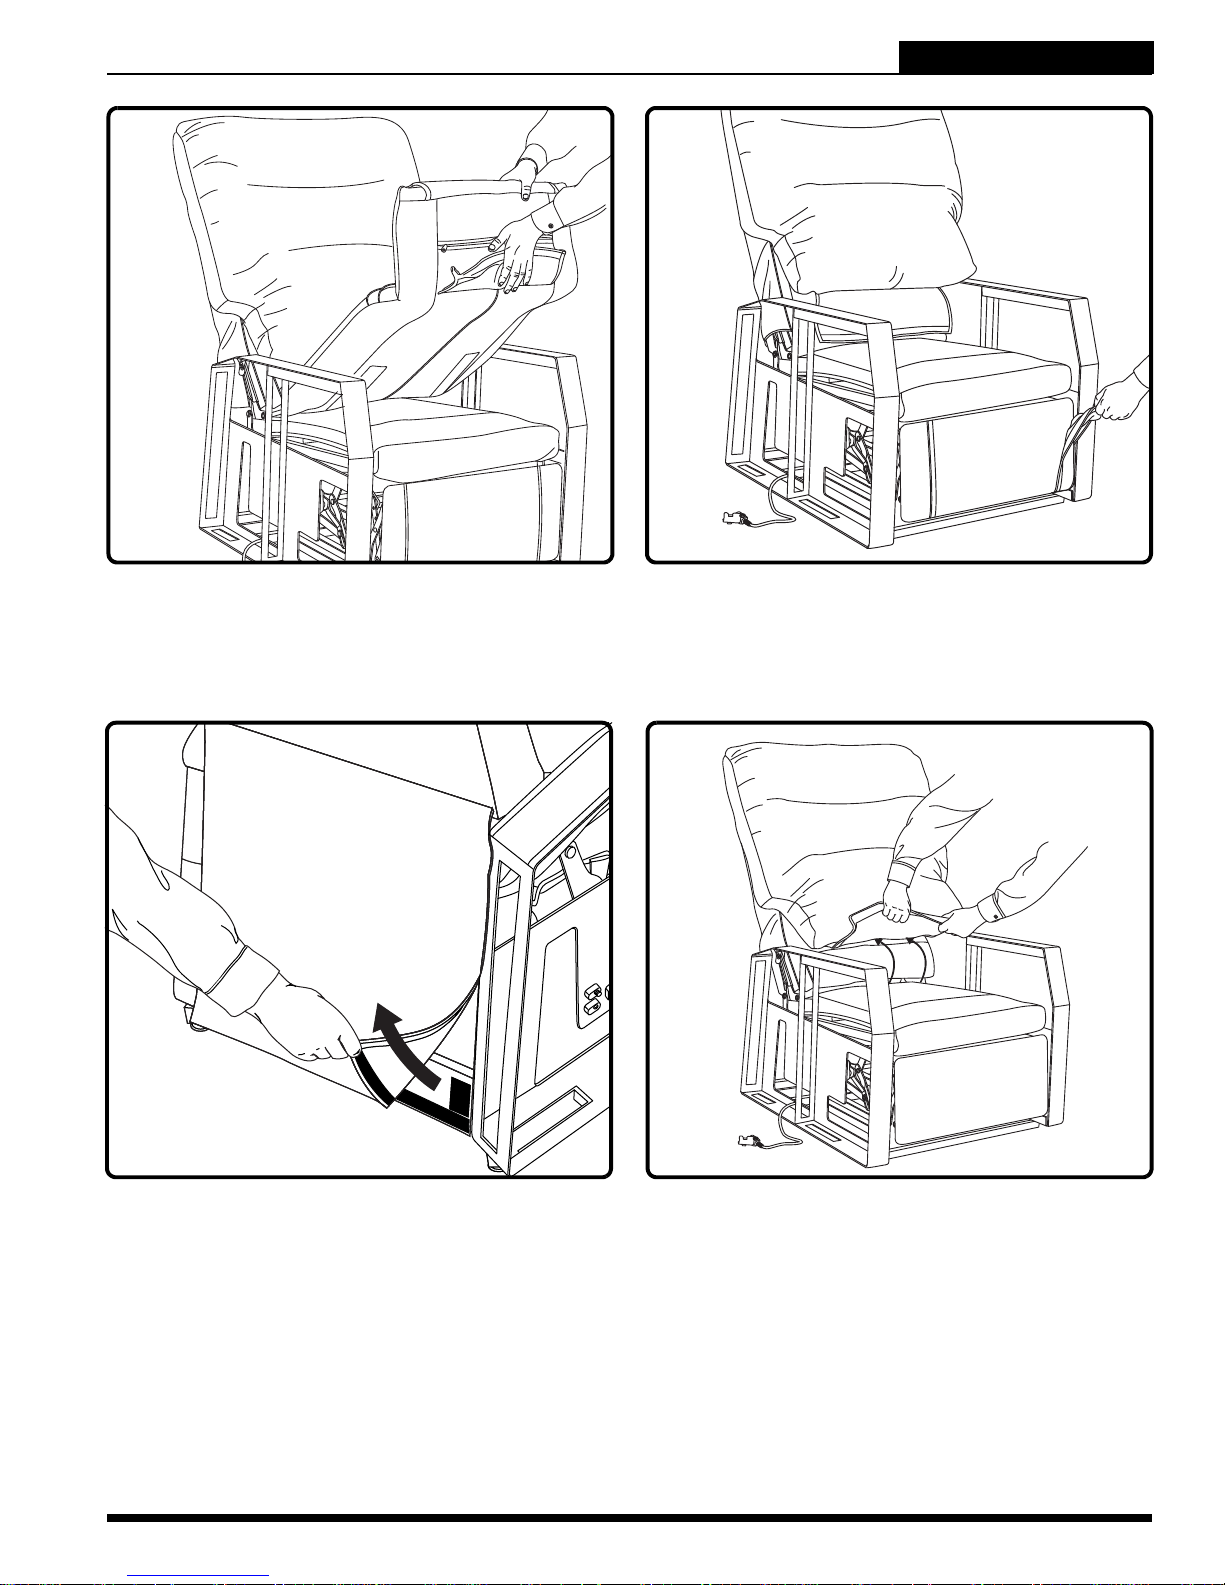
IV. ASSEMBLY/DISASSEMBLY
LIFT CHAIR SERIES
4.4.5 Loosen the front portion of the chaise pad
from the footrest and remove the chaise pad
from the lift chair.
4.4.6 Remove the footrest side covers.
NOTE: This feature does not apply to the C1 Lift
Chair.
4.4.7 Disengage the bottom flap of the chair-back
cover from the bottom seat rail.
Lift Chair Series www.pridemobility.com 17
4.4.8 Loosen the bottom chair-back cover flaps
from the bottom of the chair-back.
Page 18
LIFT CHAIR SERIES
IV. ASSEMBLY/DISASSEMBLY
4.4.9 Remove the chair-back cover.
4.4.11 Remove the seat box cover.
4.4.10 Loosen the seat box cover from the left and
right side of the seat box.
NOTE: Follow the fabric removal steps in the
reverse order to install the fabric components to
the lift chair.
18 www.pridemobility.com Lift Chair Series
Page 19
V. OPERATION
LIFT CHAIR SERIES
OPERATION PRECAUTIONS
There are certain precautions that should be taken during the operation of your lift chair. Read and
follow these precautions carefully in order to ensure safe lift chair operation and to prevent injury
and/or product damage.
Plug the power lead directly into the electrical outlet. Do not use an extension lead!
Do not place anything (for example, a drinking glass) on top of or near the external transformer.
If the external transformer box or hand control requires cleaning, unplug the power lead from the electrical
outlet and use a clean, dry cloth or lightly dampened cloth. Allow ample drying time before plugging the
power lead back into the electrical outlet.
Periodically check the hand control and all power leads for visible damage.
Keep the hand control away from all heated surfaces.
Ensure the hand control is out of the way before sitting in the chair.
Keep children and pets away from all moving parts while operating the lift chair.
Do not allow children to play on or operate the lift chair. Only the intended user should operate the lift
chair.
Utilize the quick-disconnect feature on the standard hand control when the lift chair is not in use to prevent
unintended operation of the chair.
Avoid pinch points, such as the lift and scissor mechanisms. Keep hands and feet clear of these areas.
Always leave the lift chair in an upright and closed position when not in use.
Do not sit or stand on the footrest.
Do not “drop” into the lift chair when sitting if it is in a partially raised position.
PROHIBITED! Do not place objects under the lift chair. Make sure area is clear of
obstructions, including pets and small children during operation.
WARNING! Prevent the risk of electrical shock, fire, falls, and/or being pinched.
Follow all instructions and precautions provided.
HAND CONTROL OPERATION
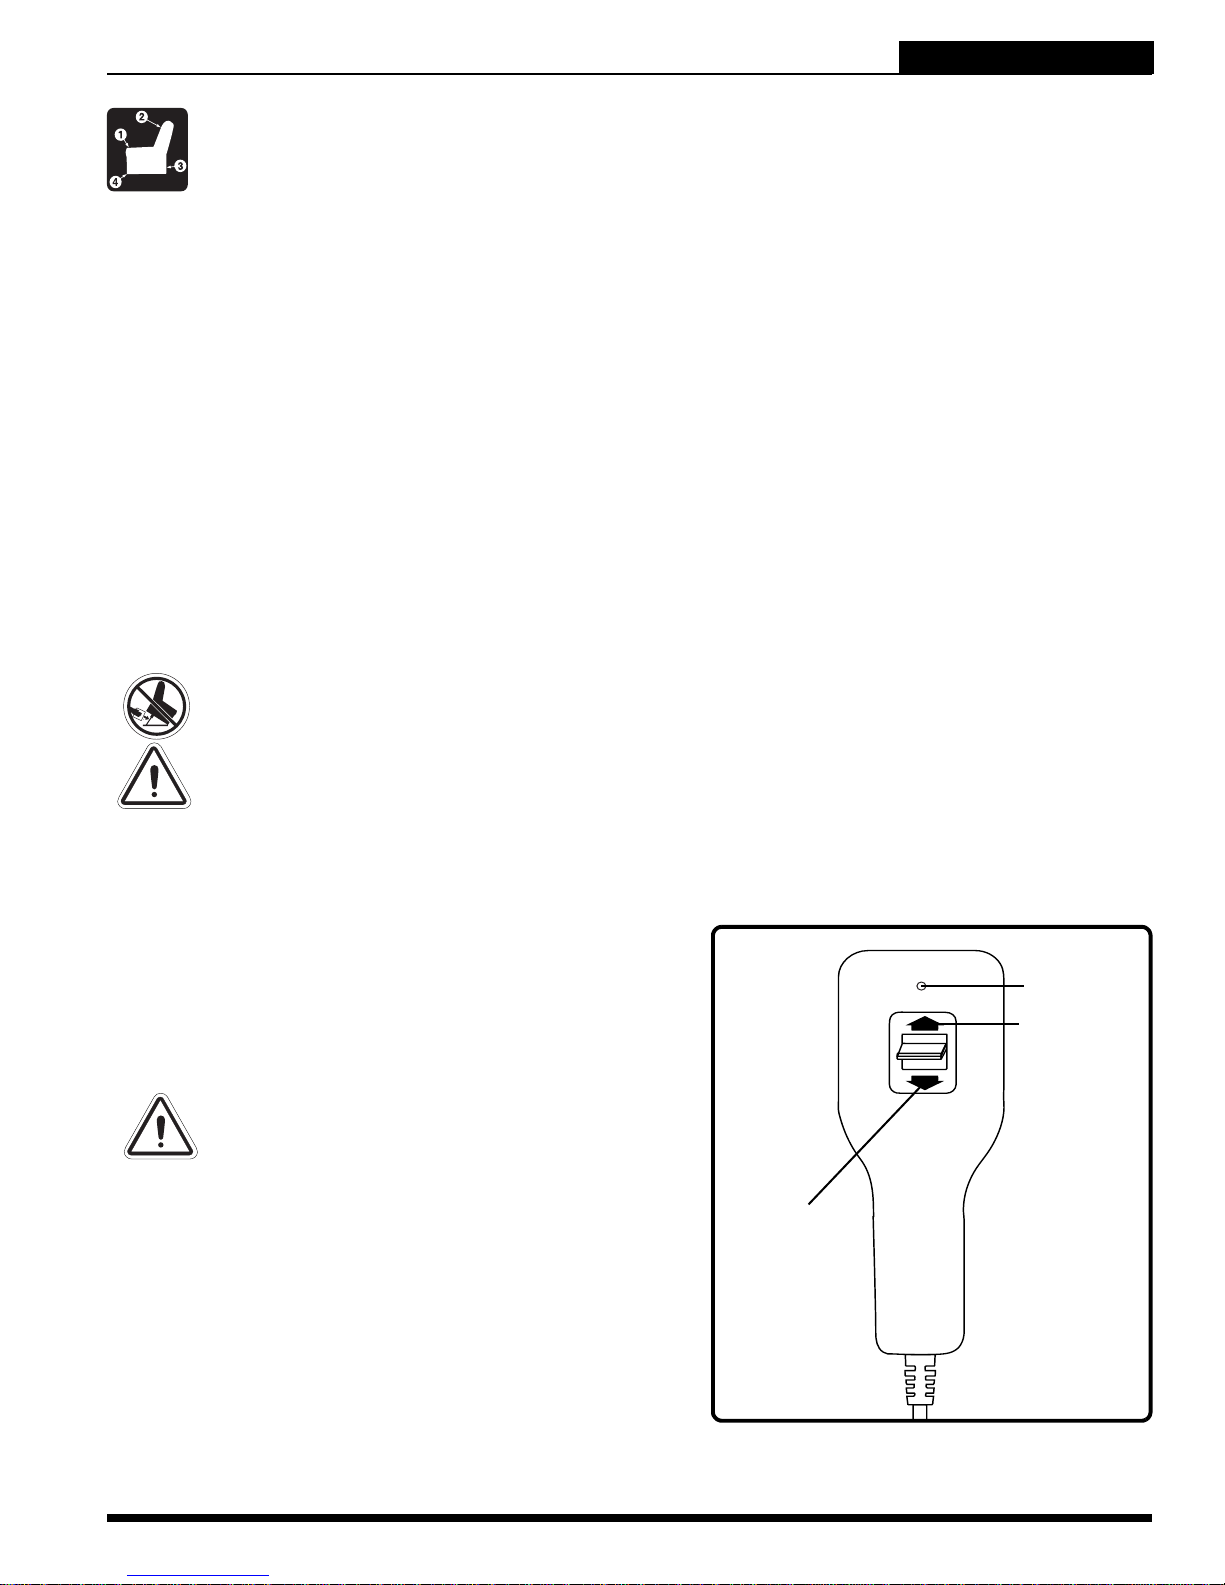
Depending on lift chair model, the hand control may be equipped with switches that control the movement of
the chair-back, chair base, and footrest (Fig. 5.1, 5.2, and 5.3).
WARNING! Do not lean on or apply
downward force to the chair-back when
the lift chair is in the fully reclined
position. Doing so could cause the lift
chair to tip, resulting in personal injury
and/or product damage.
WARNING! Do not use the footrest as a
seat, or for purposes outside its
intended use. Doing so could cause
instability in the lift chair and place
undue stress on lift chair components,
resulting in personal injury and/or
product damage.
DOWN
POSITION
LED
UP
POSITION
WARNING! Lock the hand control when not
in use.
NOTE: As an added safety measure, Pride recommends
that you utilize the quick disconnect to remove the hand
control from the lift chair and store the hand control out
of the reach of children when not in use.
Lift Chair Series www.pridemobility.com 19
Figure 5.1 Standard Hand Control
Page 20
LIFT CHAIR SERIES
V. OPERATION
Standard Hand Control Operation
Follow these steps to sit in your lift chair (Fig. 5.1):
1. Engage and hold the up/down switch in the UP position to raise your lift chair to the standing position.
2. Back into the lift chair and sit in the center of the seat, using the armrests for support if needed.
3. Engage and hold the up/down switch in the DOWN position to lower the lift chair to a comfortable seated
position.
Follow these steps to recline your lift chair from the seated position (Fig. 5.1):
1. Engage and hold the up/down switch in the DOWN position until comfortably reclined.
2. Engage and hold the up/down switch in the UP position to return to an upright, seated position. Release
the switch when the lift chair reaches a comfortable seated position.
Follow these steps to stand up from your lift chair (Fig. 5.1):
1. Engage and hold the up/down switch in the UP position to raise your lift chair.
2. Release the switch when the lift chair reaches a height where you can stand up comfortably.
NOTE: The hand control on your lift chair may be equipped with an LED that indicates power to the
hand control. If this LED is present and not lit when the hand control is in use, contact your authorized Pride Provider.
Heat and Massage Hand Control Operation
Follow these steps to sit in your lift chair (Fig. 5.2):
1. Press and hold the UP button to raise your lift chair t o the
standing position.
2. Back into the lift chair and sit in the center of the seat,
using the armrests for support if needed.
3. Press and hold the DOWN button to lower the lift chair
to a comfortable seated position.
Follow these steps to recline your lift chair from the
seated position (Fig. 5.2):
1. Press and hold the DOWN button until comfortably
reclined.
2. Press and hold the UP button to return to an upright,
seated position. Release the button when the lift chair
reaches a comfortable seated position.
Follow these steps to stand up from your lift chair (Fig. 5.2):
1. Press and hold the UP button to raise your lift chair.
2. Release the button when the lift chair reaches a height
where you can stand up comfortably.
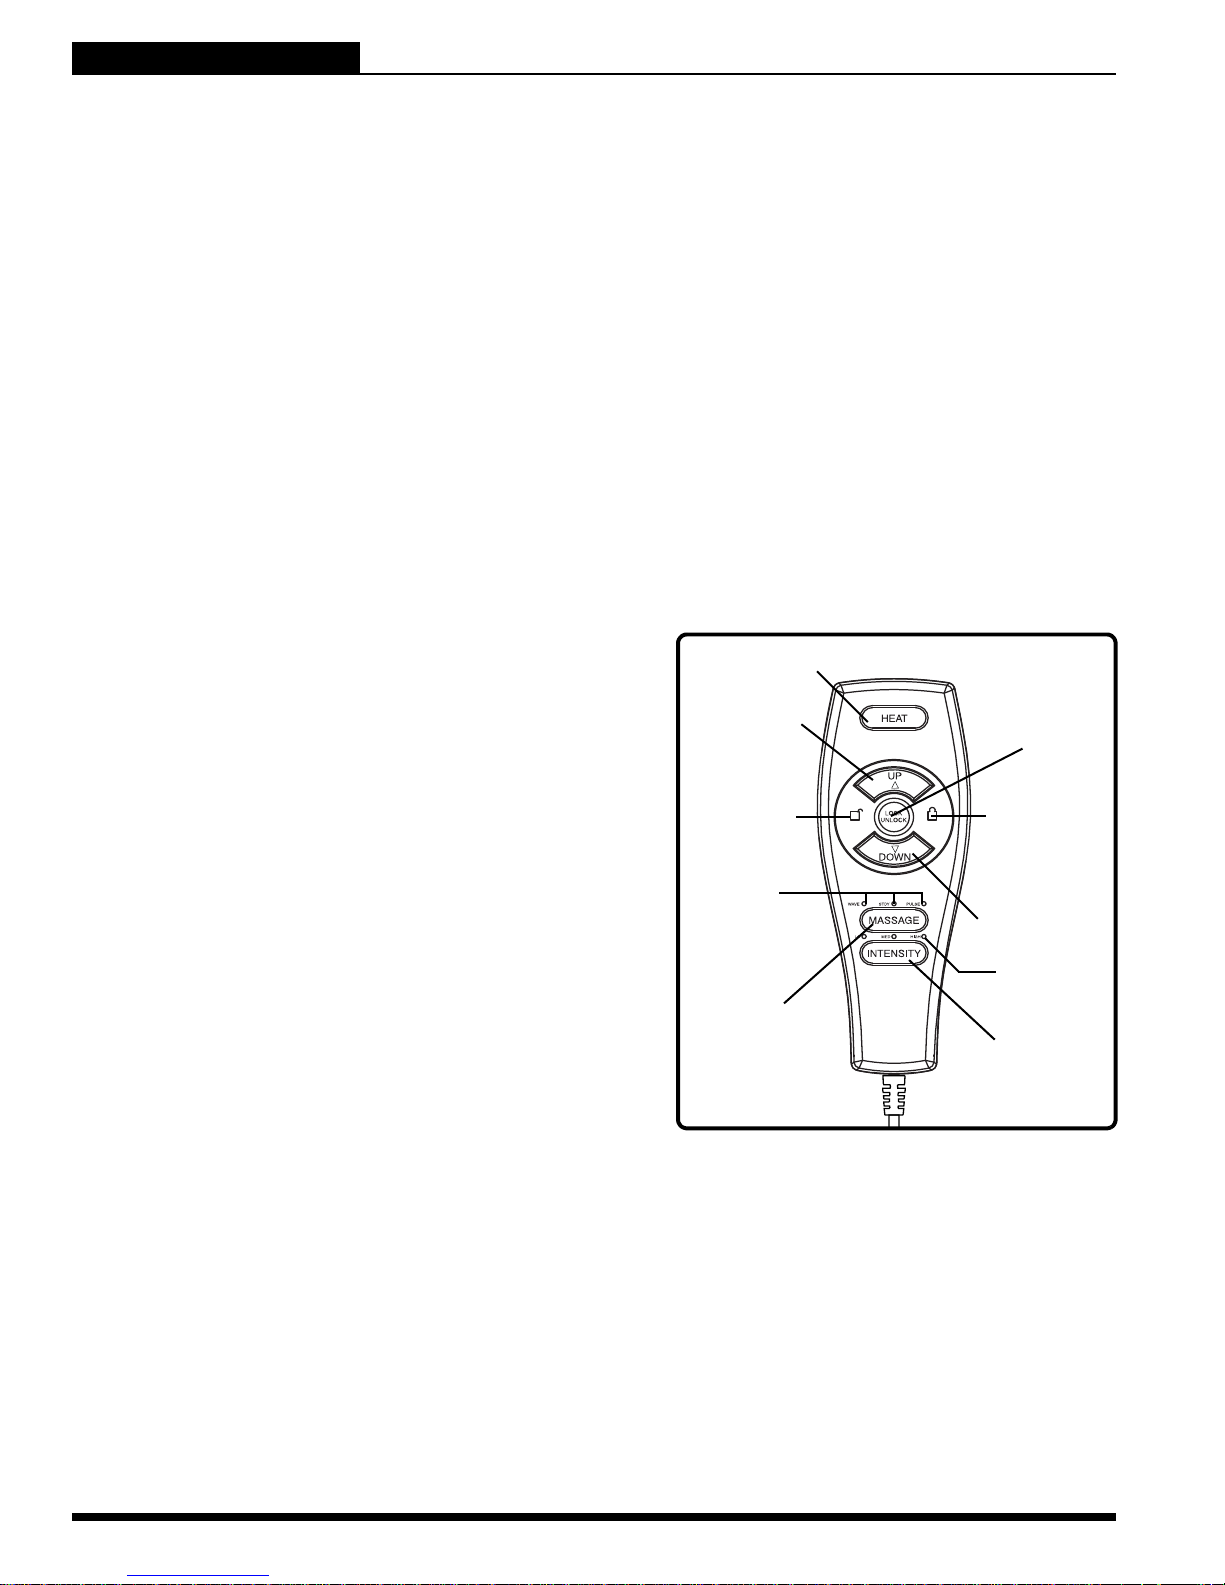
Follow these steps to activate/deactivate the lock feature (Fig. 5.2):
1. Press and hold the LOCK button for approximately 3 seconds to lock the hand control. The red LED to
the right of the button will light up to indicate the hand control has been locked.
2. Press and hold the LOCK button for approximately 6 seconds to unlock the hand control. The green LED
to the left of the button will light up to indicate the hand control has been unlocked.
HEAT BUTTON
UP BUTTON
UNLOCK LED
MASSAGE
SETTING
LEDS
MASSAGE
BUTTON
Figure 5.2 Heat and Massage Hand Control
LOCK/UNLOCK
BUTTON
LOCK LED
DOWN BUTTON
INTENSITY
SETTING LEDS
INTENSITY
BUTTON
Follow these steps to operate the heat function (Fig. 5.2):
1. Press the HEAT button once to activate the heat function. The heat function will shut off automatically
after 20 minutes of continuous use.
2. Press the HEAT button again to turn off the heat function.
20 www.pridemobility.com Lift Chair Series
Page 21
V. OPERATION
LIFT CHAIR SERIES
Follow these steps to operate the massage option (Fig. 5.2):
1. Press the MASSAGE button once to activate the massage function. This will automatically set the massage to the wave setting.
2. Press the MASSAGE button again to go to the next of three available massage settings: wave, steady, or
pulse. Each press of the button will take you to the next setting. Eac h setting is indicated by a colore d LED.
3. Press and hold the MASSAGE button for approximately 2 seconds to shut off the massage function,
otherwise this function will shut off automatically after 20 minutes of continuous use.
Follow these steps to adjust the intensity of the massage function (Fig. 5.2):
1. Press the INTENSITY button once to set the massage option to low.
2. Press the INTENSITY button again to set the massage option to the next of three available settings: low,
medium, or high. Each press of the button will take you to the next setting. Each setting is indicated by a
colored LED.
NOTE: Pride recommends that the heat and massage units not be used for more than 20 minutes at
a time. However, you should consult your physician about how often you should use the heat and
massage options on your lift chair.
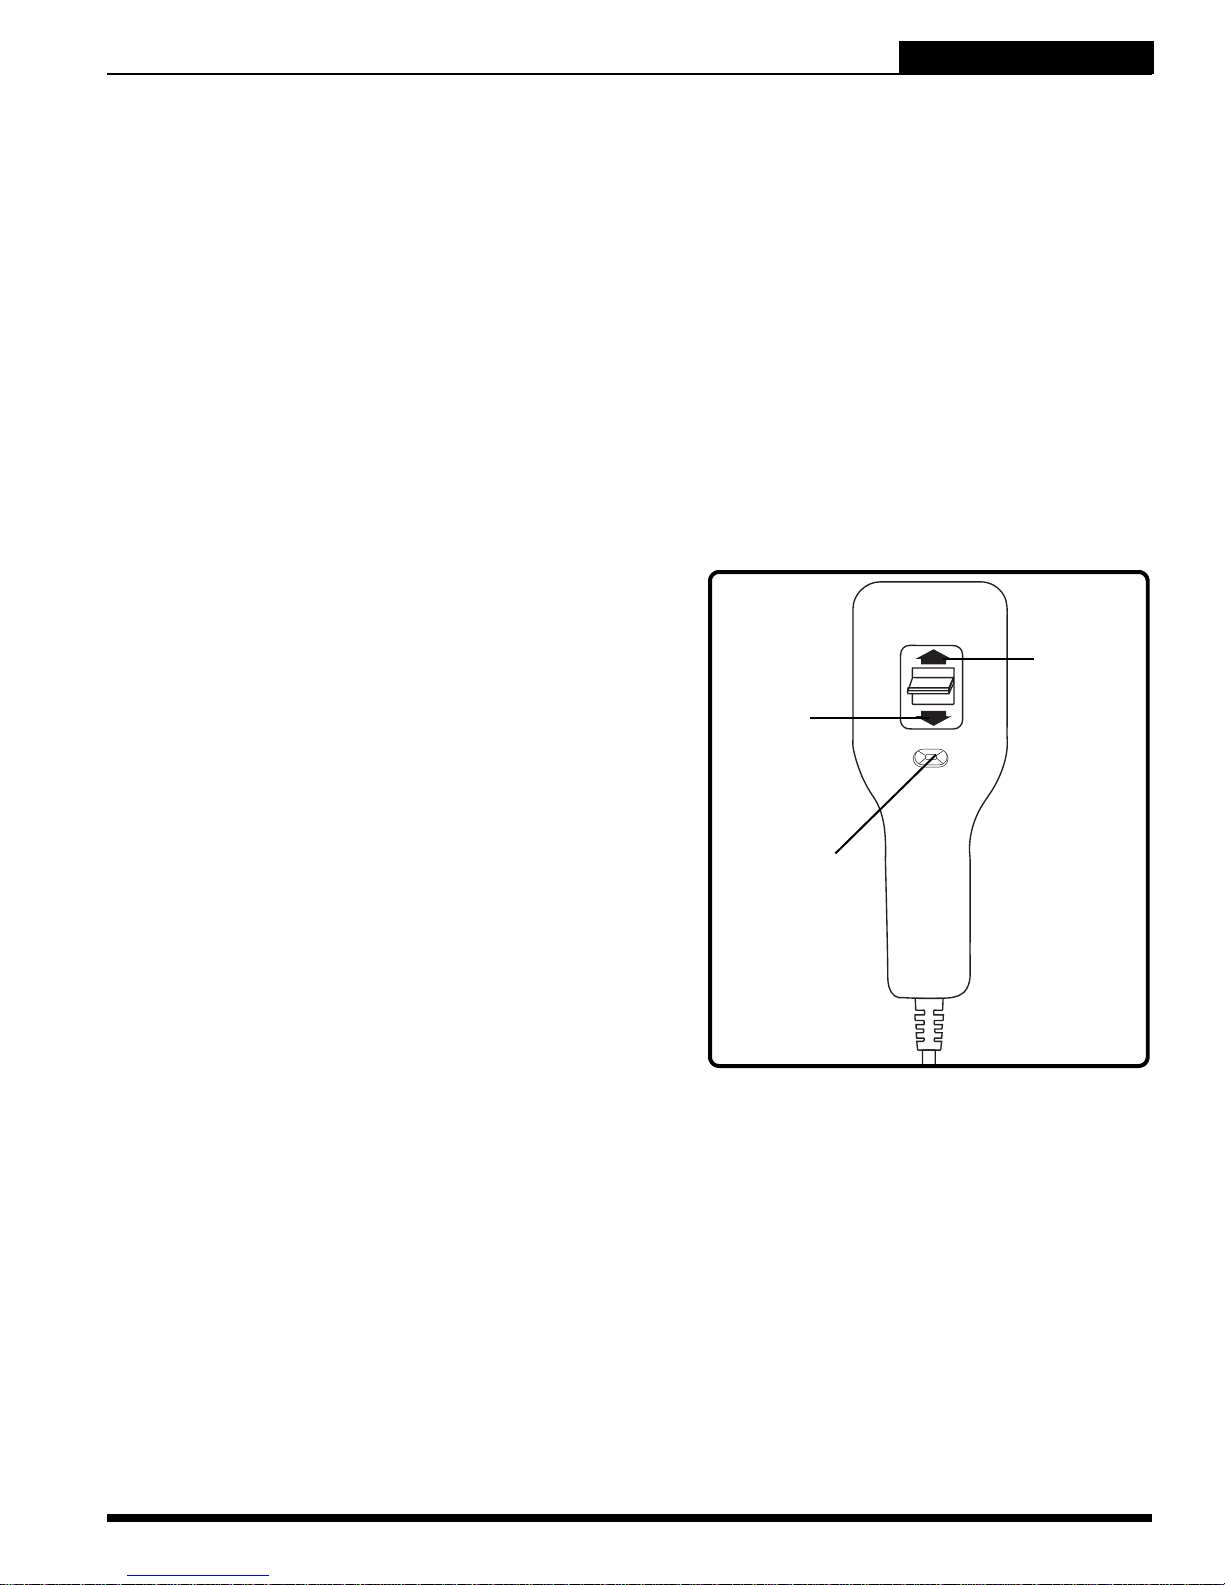
Dual Motor Hand Control Operation
Follow these steps to sit in your lift chair (Fig. 5.3):
1. Slide the inhibit switch to the right.
2. Engage and hold the up/down switch in the UP position
to raise your lift chair from the seated position to the
standing position.
3. Back into the lift chair and sit in the center of the seat,
using the armrests for support if needed.
4. Engage and hold the up/down switch in the DOWN position to lower the lift chair to a comfortable seated position.
DOWN
POSITION
UP
POSITION
Follow these steps to recline your lift chair from the
seated position (Fig. 5.3):
INHIBIT
SWITCH
1. Slide the inhibit switch to the left.
2. Engage and hold the up/down switch in the DOWN position until comfortably reclined.
3. Engage and hold the up/down switch in the UP position
to return to an upright, seated position. Release the
switch when the lift chair reaches a comfortable seated
position.
Figure 5.3 Dual Motor Hand Control
Follow these steps to raise or lower the footrest while in the seated or reclined position (Fig. 5.3):
1. Slide the inhibit switch to the right.
2. Engage and hold the up/down switch in the DOWN position until the footrest reaches a comfortable
height.
3. Engage and hold the up/down switch in the UP position to lower the footrest.
Follow these steps to stand up from your lift chair from the seated position (Fig. 5.3):
1. Slide the inhibit switch to the right.
2. Engage and hold the up/down switch in the UP position to raise your lift chair.
3. Release the switch when the lift chair reaches a height where you can stand up comfortably.
Lift Chair Series www.pridemobility.com 21
Page 22

LIFT CHAIR SERIES
Your Pride Lift Chair is a state-of-the-art product designed to enhance your mobility. Your lift cha ir
should bring you years of trouble-free service, however, it may require occasional troubleshooting. The following troubleshooting tips and FAQs should summarise what you need to know about
your lift chair. If at any time you do not feel comfortable performing the troubleshooting steps
listed in this manual, contact your authorized Pride Provider for service. Please have the model
number, serial number, and nature of the problem when calling.
VI. TROUBLESHOOTING
FREQUENTLY ASKED QUESTIONS
What if my lift chair does not operate at all?
Ensure the external transformer is plugged into a properly wired electrical outlet.
Check the circuit breaker box connected to the electrical outlet.
Ensure the low voltage connection cable is plugged into the external transformer.
Ensure the hand control and motor(s) are plugged in properly.
Ensure the low voltage connection cable is plugged into the motor(s).
What if my lift chair operates in one direction only?
Check the up/down switch on the hand control to make s ure there is a smooth movement from the UP position
to the DOWN position. If the switch is sticking in either position, the hand control may need to be replaced.
Check the UP and/or DOWN button(s) on the heat and massage hand control to make sure they do not
stick. If either button is sticking, the heat and massage hand control may need to be replaced.
Contact your authorized Pride Provider for further assistance.
What if my lift chair stops during a lifting cycle?
Your lift chair is equipped with an internal thermal shutoff switch located inside the external transformer
that prevents the motor control box from overheating. If the thermal shutoff activates, allow the lift chair
to remain in a stationary position for 10 minutes to allow the motor to cool, then resume n ormal operation.
If you notice the motors overheating frequently, contact your authorized Pride Provider.
There may have been a power failure and/or there are no batteries in the external transformer or the
batteries have no charge. Always make sure there are fresh 9V batteries in the external transformer if
equipped with battery backup.
Check the circuit breaker box connected to the electrical outlet.
What if my lift chair is rocking from corner to corner after I position the chair?
The floor may be uneven or the carpet may be affecting chair position. Adjust the leg levelers in the area
where the chair is rocking. See III. “Your Lift Chair” for instructions on leveling your chair.
What if the heat and massage options on my lift chair do not function?
Ensure the junction box is connected properly to the external transformer and that there is power to the
transformer. A green LED will light on the transformer to indicate power.
Ensure the heat and massage units are connected properly to the junction box and that the junction box
is connected properly to the actuator, both at the rear of the lift chair. Refer to “Appendix D” for proper
electrical connections.
Ensure the hand control is connected properly to the junction box. If connected properly, the LEDs on the
hand control will be lit.
If any of the LEDs do not light, contact your authorized Pride Provider for further assistance.
Where can I place the external transformer box?
On the floor away from heat sources in an open, well-ventilated area where it will not be an obstruction.
On the wall away from heat sources utilizing the optional external transformer wall mount.
22 www.pridemobility.com Lift Chair Series
Page 23

VI. TROUBLESHOOTING
LIFT CHAIR SERIES
Where do I find the serial number on my lift chair?
You can find the serial number in two locations—one is near the rear of the motor on the steel lift mechanism, the second is attached to the frame below the scissor mechanisms. The model number for your lift
chair is printed below the serial number bar code.
Who do I call for service?
Contact your authorized Pride Provider for service.
Lift Chair Series www.pridemobility.com 23
Page 24

LIFT CHAIR SERIES
VII. CARE AND MAINTENANCE
Your Pride Lift Chair will require routine maintenance checks. You can perform some of these
checks, but others may require assistance from an authorized Pride Provider. By following the
maintenance checks in this section as scheduled, you can help ensure your lift chair gives you
years of trouble-free operation. If you have any questions regarding your lift chair’s care, contact
your authorized Pride Provider.
FABRIC CARE
Inspect the fabric on a regular basis for any pulls, tears, or gaps.
Your lift chair fabric is made of 100% polyester and falls under cleaning code W. Frequent vacuuming and
light brushing to remove dust and grime is the recommended cleaning method for your lift chair. If spot
cleaning is required, you should use the foam from water-based cleaning agents such as mild detergent
or non-solvent upholstery shampoo. Apply the foam with a soft brush in a circular motion and vacuum
when dry. Pretest a small area of the fabric with the cleaning agent before using this method. If your lift
chair fabric is in an overall soiled condition, use a professional furniture cleaning service.
WARNING! Fabric should not be allowed to come in direct contact with any type of
heat source, e.g., a space heater or cigarette. Personal injury or fire damage may
occur.
WARNING! Pride strongly recommends that you do not smoke cigarettes while
seated in or using your lift chair, although the lift chair has passed the necessary
testing requirements for cigarette smoking. You must adhere to the following
safety guidelines if you decide to smoke cigarettes while seated in or using your
lift chair.
Do not leave lit cigarettes unattended.
Keep ashtrays a safe distance from the lift chair.
Always make sure cigarettes are completely extinguished before disposal.
NOTE: Do not use solvent-type cleaners to spot clean. Do not saturate the fabric. Prevent damage to
the fabric; do not expose the lift chair to direct sunlight.
ELECTRONICS CARE
Inspect all wiring harnesses to make sure they are not damaged or frayed.
If damage is present, unplug the lift chair and contact your authorized Pride Provider for service.
Keep all electronics free from moisture and temperature extremes. Pride Lift Chairs are intended for
indoor use only!
WARNING! Even though the lift chair has passed the necessary testing
requirements for ingress of liquids, you should keep electrical connections away
from sources of dampness, including direct exposure to water or bodily fluids and
incontinence. Check electrical components frequently for signs of corrosion and
replace as necessary.
DISPOSAL AND RECYCLING
Your lift chair must be disposed of according to applicable local and national statutory regulations. Contact
your local waste disposal agency or authorized Pride Provider for information on proper disposal of lift chair
packaging, metal frame components, fabric, electronic components, and batteries.
WARNING! Plastic bags are a suffocation hazard. Dispose of plastic bags properly
and do not allow children to play with them.
24 www.pridemobility.com Lift Chair Series
Page 25

VIII. WARRANTY
LIFT CHAIR SERIES
TWO-YEAR LIMITED WARRANTY
For two (2) years from the date of purchase, Pride will repair or replace at our option to the original
purchaser any of the following parts found upon examination by an authorized representative of
Pride to be defective in material and/or workmanship:
Steel Frame Motor Hand Control Scissor Mechanisms Steel Lift Mechanism
NOTE: Pride reserves the right to replace only the part of the steel lift mechanism that may be defective.
WARRANTY EXCLUSIONS
Fabric
Damage resulting from abuse, misuse, unauthorized repairs, negligence, accident(s), alteration, or mod-
ification of the product.
Damage caused by common carrier abuse or mishandling.
Any special, indirect, incidental, and/or consequential damages.
After the warranty period, Pride shall have no obligations under any warranties, expressed or implied (including implied warranties of merchantability and fitness for a particular purpose).
In the event that concealed damage is discovered after the freight is accepted, the consignee/individual who
signed for the merchandise must call the carrier within 48 hours and request an inspection. The consignee/
individual must retain the shipping carton. Please leave the merchandise in question in the area where it was
first received. All claims are negotiated between the consumer and freight company.
Lift Chair Series www.pridemobility.com 25
Page 26
LIFT CHAIR SERIES
CONSIGNES DE SECURITE
Les symboles suivants sont utilisés tout au long de ce manuel pour id entifier les mises en garde et moments
d’attention particulière. Il est important de les comprendre et de les suivre à la lettre.
MISE EN GARDE! Soulignent les conditions/situations dangereuses qui peuvent
entraîner des blessures et/ou des dommages (symbole noir sur triangle jaune et
bordure noire).
OBLIGATOIRE! Ces actions doivent être exécutées tel que spécifié sous peine de
vous blesser ou de provoquer des dommages matériels (symbole blanc sur point
bleu).
INTERDIT! Ces actions sont interdites; ne jamais tenter sous aucune considération
sous peine de vous blesser et/ou de provoquer des dommages matériels (symbole
noir sur cercle rouge et rayures rouges).
SVP veuillez compléter les informations ci dessous:
Détaillant Pride:
Adresse:
Téléphone:
Date d’achat: Numéro de série:
NOTE: Ce manuel a été préparé à partir des spécifications et informations les plus récentes
disponibles au moment de la publication. Nous nous réservons le droit d’apporter les changements
nécessaires de temps à autre. Ces changements au produit peuvent causer des variations entre les
illustrations et explications contenues dans ce manuel et le produit que vous avez acheté. La
dernière version de ce manuel sur notre site Internet.
088 609 661
Copyright © 2009
Pride Mobility Products Europe B.V.
INFMANU3686/Rev C/August 2009/French
26 www.pridemobility.com Lift Chair Series
Page 27
LABELS D’INFORMATION
LIFT CHAIR SERIES
SYMBOLES DE SECURITE
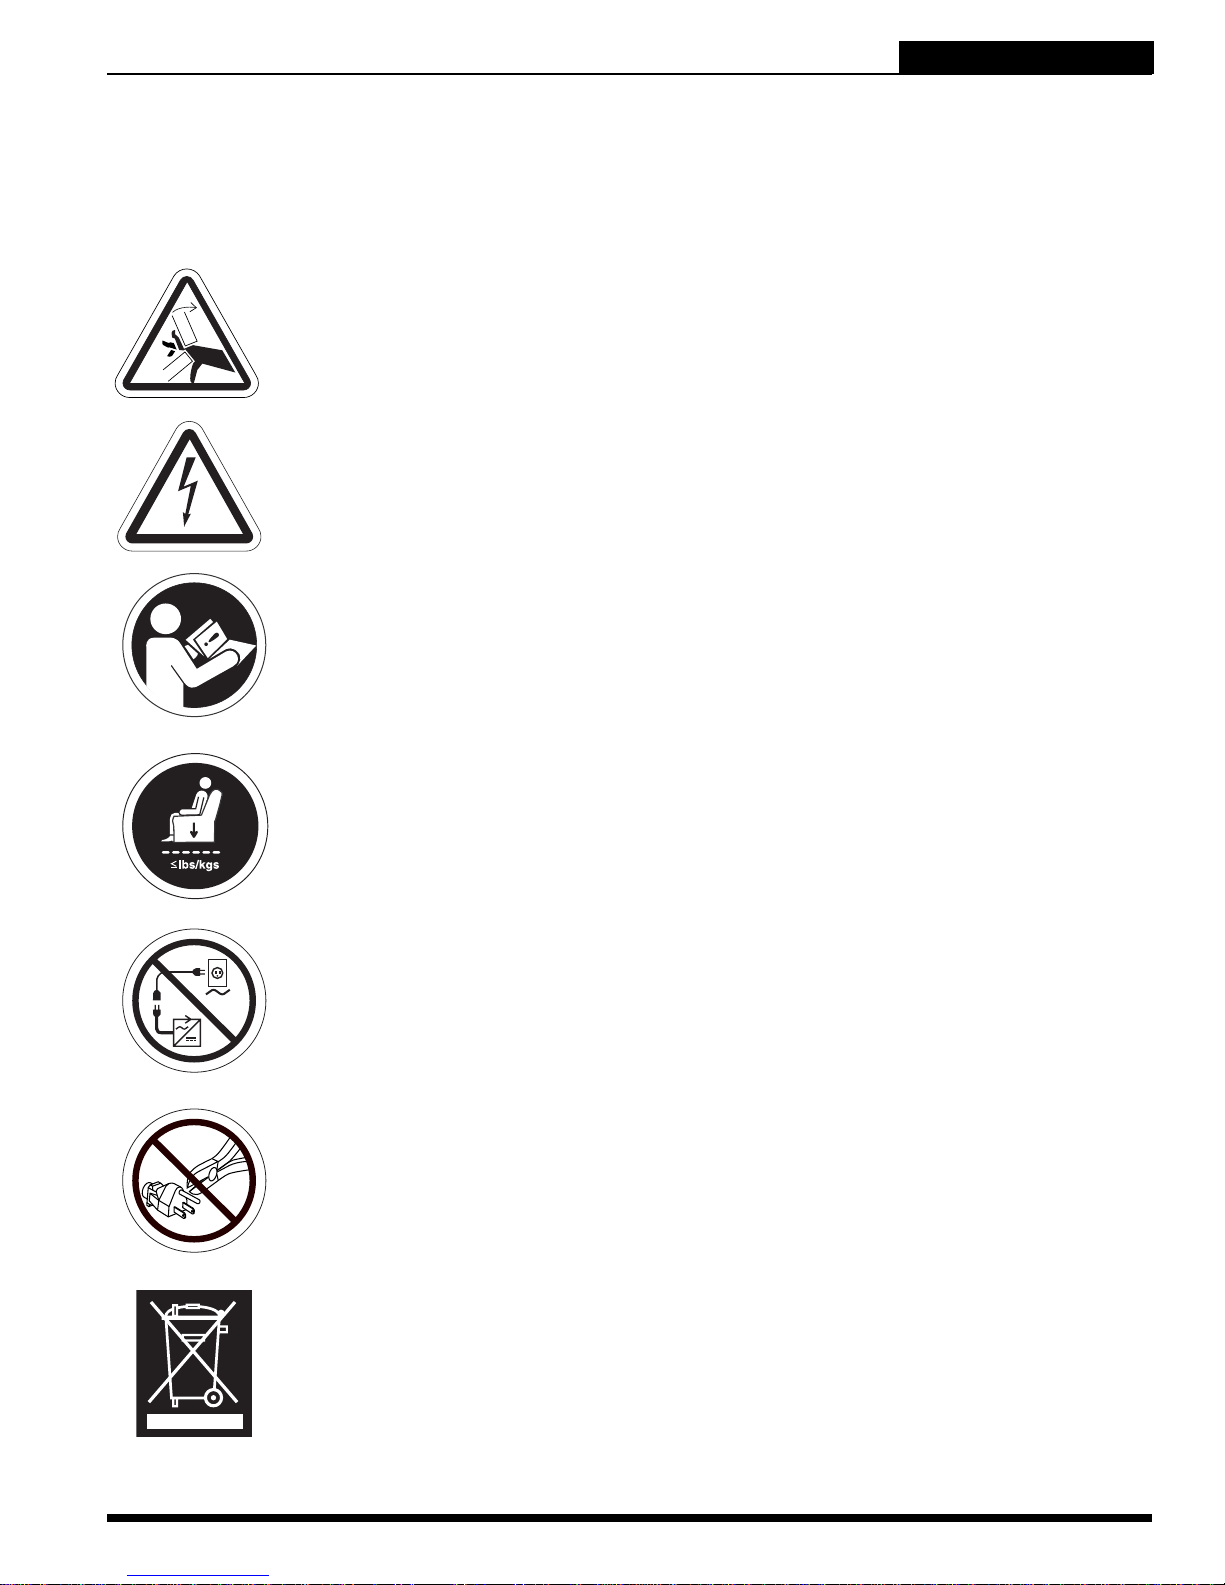
Les symboles ci dessous sont utilisés sur le produit pour souligner les mises en garde, les actions obligatoires et les actions interdites. Il est très important de lire les consignes et bien comprendre les symboles.
N’enlevez pas les labels de votre produit. Prenez-note que vous pouvez ne pas retrouver certains symboles
sur tous les modèles.
Endroit où vous pouvez pincer/écraser vos doigts. Ne placez pas d’objet ou
vos doigts près de pièces en mouvement.
Risque de chocs électriques
Lisez et respectez les consignes présentées dans ce manuel.
Poids maximum
N’utilisez pas de cordon de rallonge pour brancher le transformateur externe
ou le chargeur à batteries.
Ne retirez-pas la fiche de mise à la terre car vous risquez de vous
électrocuter. Au besoin, utilisez un adaptateur à 3 branches sur une prise à
deux fentes.
Disposez des composantes électroniques tels que la manette, les batteries,
les moteurs et transformateurs électriques correctement. Contactez votre
détaillant Pride pour de plus amples informations.
Lift Chair Series www.pridemobility.com 27
Page 28
LIFT CHAIR SERIES
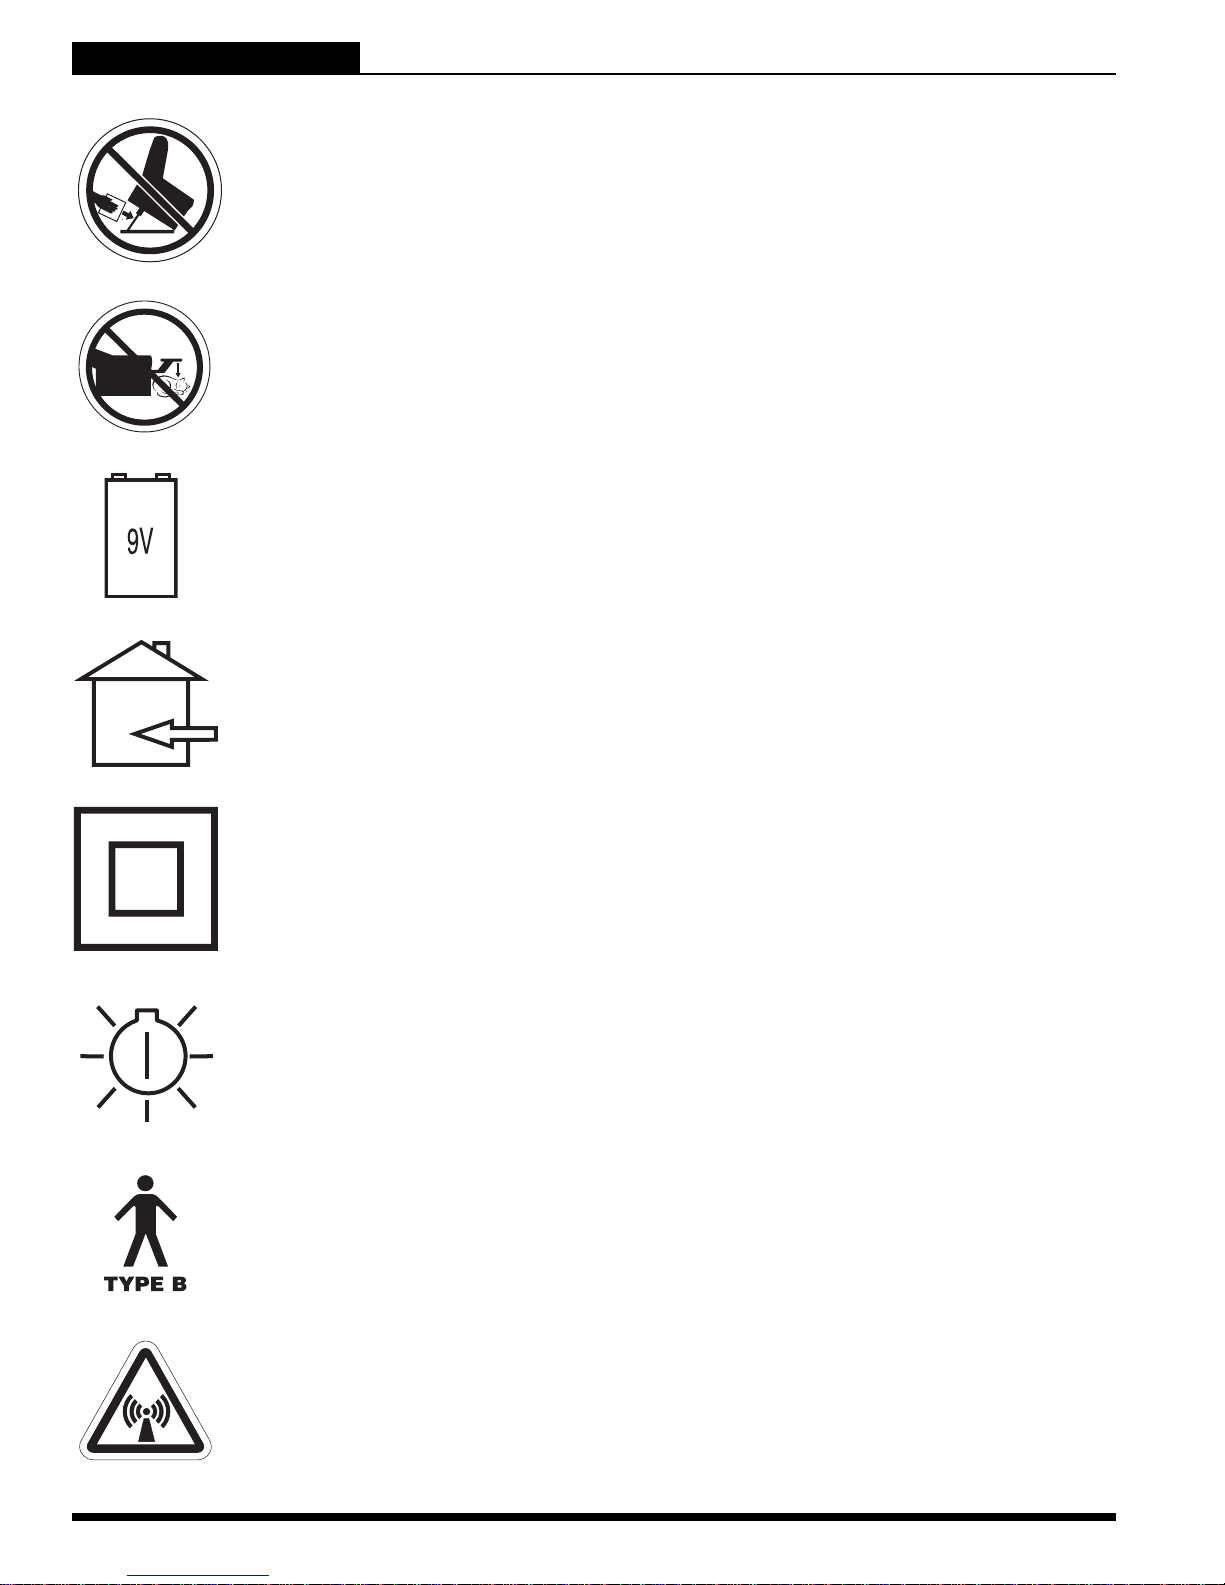
Ne placez pas d’objets sous le fauteuil. Assurez-vous qu’il n’y a pas
d’obstructions y compris votre animal de compagnie ou un enfant près du
fauteuil pendant le fonctionnement.
Ne placez pas d’objets sous le fauteuil. Assurez-vous qu'il n'y ait aucune
obstruction y compris un jeune enfant ou votre animal de compagnie.
Emplacement de la porte d’accès aux batteries.
LABELS D’INFORMATION
Pour usage à l’intérieur seulement. Ne pas exposer à la pluie, neige, glace,
sel, ou eau stagnante. Gardez dans un endroit propre et sec.
Équipem ent de clas se II
Voyant vert allumé indique que le bloc d’alimentation est sous tension. Ne
s’applique pas à tous les modèles.
Degré de protection contre les chocs électriques.
Ce produit a subi et réussi les tests de la norme IEC 60601-1-2.
28 www.pridemobility.com Lift Chair Series
Page 29

TABLE DES MATIERES
LIFT CHAIR SERIES
CONSIGNES DE SECURITE ................................................................................ 26
LABELS D’INFORMATION .................................................................................. 27
I. INTRODUCTION .............................................................................................. 30
SECURITE ................................................................................................................................................................. 30
ENTENTE A L’ACHAT ............................................................................................................................................... 30
ECHANGE D’INFORMATIONS.................................................................................................................................. 30
II. CONSIGNES GENERALES.............................................................................. 31
MODIFICATIONS....................................................................................................................................................... 31
LIMITE DE POIDS...................................................................................................................................................... 31
DANGER DE SE PINCER/ECRASER LES DOIGTS................................................................................................. 31
DEGRE DE PROTECTION/MODE DE FONCTIONNEMENT ................................................................................... 31
TEMPERATURES DE FONCTIONNEMENT/ENTREPOSAGE ................................................................................ 31
EMI/RFI ...................................................................................................................................................................... 32
TRANSPORT ET LIVRAISON ................................................................................................................................... 32
TRANSPORT DANS UN VEHICULE ......................................................................................................................... 32
III. VOTRE FAUTEUIL RELEVEUR ..................................................................... 33
COMPOSANTES DU FAUTEUIL .............................................................................................................................. 33
COMPOSANTES ELECTRIQUES............................................................................................................................. 34
IV. ASSEMBLAGE/DEMONTAGE......................................................................... 36
PREPARATION DU FAUTEUIL RELEVEUR............................................................................................................. 36
MISE EN PLACE DU FAUTEUIL RELEVEUR........................................................................................................... 38
INSTALLATION DES BATTERIES ............................................................................................................................ 38
DEMONTAGE DU FAUTEUIL RELEVEUR ............................................................................................................... 39
INSTALLATION/ENLEVEMENT DU RECOUVREMENT........................................................................................... 40
V. FONCTIONNEMENT ....................................................................................... 43
PRECAUTIONS A PRENDRE ................................................................................................................................... 43
FONCTIONNEMENT DE LA MANETTE DE COMMANDE ....................................................................................... 43
VI. PROBLEMES ET SOLUTIONS ....................................................................... 47
QUESTIONS FREQUEMMENT POSEES ................................................................................................................. 47
VII. SOINS ET ENTRETIEN................................................................................. 49
ENTRETIEN DU RECOUVREMENT ......................................................................................................................... 49
ENTRETIEN DES COMPOSANTES ELECTRONIQUES.......................................................................................... 49
MISE AU REBUT ET RECYCLAGE........................................................................................................................... 49
VIII. GARANTIE .................................................................................................. 50
EN ANNEXES.................................................................................................... 127
Lift Chair Series www.pridemobility.com 29
Page 30

LIFT CHAIR SERIES
I. INTRODUCTION
SECURITE
Pride Mobility Products Europe B.V. (Pride) vous souhaite la bienvenue. Le produit que vous
avez acheté a été conçu selon les toutes dernières technologies afin de maximiser la sécurité
et le confort. Nous sommes certains que ce fauteuil vous procurera plusieurs années d e confort
et de fiabilité pour votre usage quotidien. Apprenez les consignes de sécurité et le fonctionnement afin de vous assurer d’obtenir un fonctionnement fiable et sans problème.
Lisez et respectez toutes les instructions, mises en garde et notes de ce manuel ainsi que celles incluses
dans la documentation accompagnant le produit avant de tenter de l’utiliser pour une première fois. De plus,
soyez avisé que votre sécurité est tributaire de votre bon jugement ainsi que des conseils fournis par votre
professionnel de la santé, votre détaillant et/ou de votre personne aidante.
Si vous ne comprenez pas quelqu’information que ce soit dans ce manuel, ou si vous avez besoin d’aide
pour la préparation ou la mise en place de votre produit, s.v.p. contactez votre détaillant Pride autorisé.
Suivez les instructions, mise en garde et les notes incluses dans ce manuel ainsi que sur les labels
apposés sur le produit sous peine de vous blesser, d’endommager votre fauteuil et d’annuler la
garantie.
ENTENTE A L’ACHAT
En acceptant ce produit, vous vous engagez à ne pas modifier, altérer, enlever ou rendre inutilisables les
protecteurs et/ou gardes de sécurité, dispositifs de sécurité. Vous vous engagez à ne pas refuser ni négliger
de faire installer les trousses de mise à jour au besoin, fournies par Pride afin de maintenir ou améliorer
l’aspect sécuritaire de votre produit.
ECHANGE D’INFORMATIONS
Nous aimerions recevoir vos commentaires, questions et suggestions au sujet de ce manuel. Nous aimerions aussi recevoir vos commentaires concernant la fiabilité et la sécurité de votre nouvel appareil et sur les
services offerts par votre détaillant Pride. Nous aimerions être avisés si vous déménagez, car nous pourrons
ainsi vous tenir informé si des mesures venaient à être prises pour augmenter la sécurité de votre fauteuil,
ou encore sur les nouveaux produits, nouvelles fonctions qui augmenteraient le plaisir associé à l’utilisation
de votre fauteuil releveur. Vous pouvez nous écrire à l’adresse suivante:
Pride Mobility Products Europe B.V.
Castricummer Werf 26
1901 RW Castricum
The Netherlands
NOTE: Si vous perdez ou égarez votre carte de garantie ou votre manuel du propriétaire, téléphonez
ou écrivez-nous, nous vous ferons parvenir immédiatement des documents de remplacement.
30 www.pridemobility.com Lift Chair Series
Page 31
II. CONSIGNES GENERALES
LIFT CHAIR SERIES
Votre fauteuil releveur est un appareil dernier cri conçu pour améliorer votre autonomie. Pride
propose une grande variété de produits adaptés aux besoins de chacun, cependant prenez
note que le choix final d’achat et la décision concernant le type de fauteuil releveur vous
incombe si vous en êtes capable ou incombe à votre professionnel (i.e.,médecin,
ergohérapeute, etc.) le cas échéant.
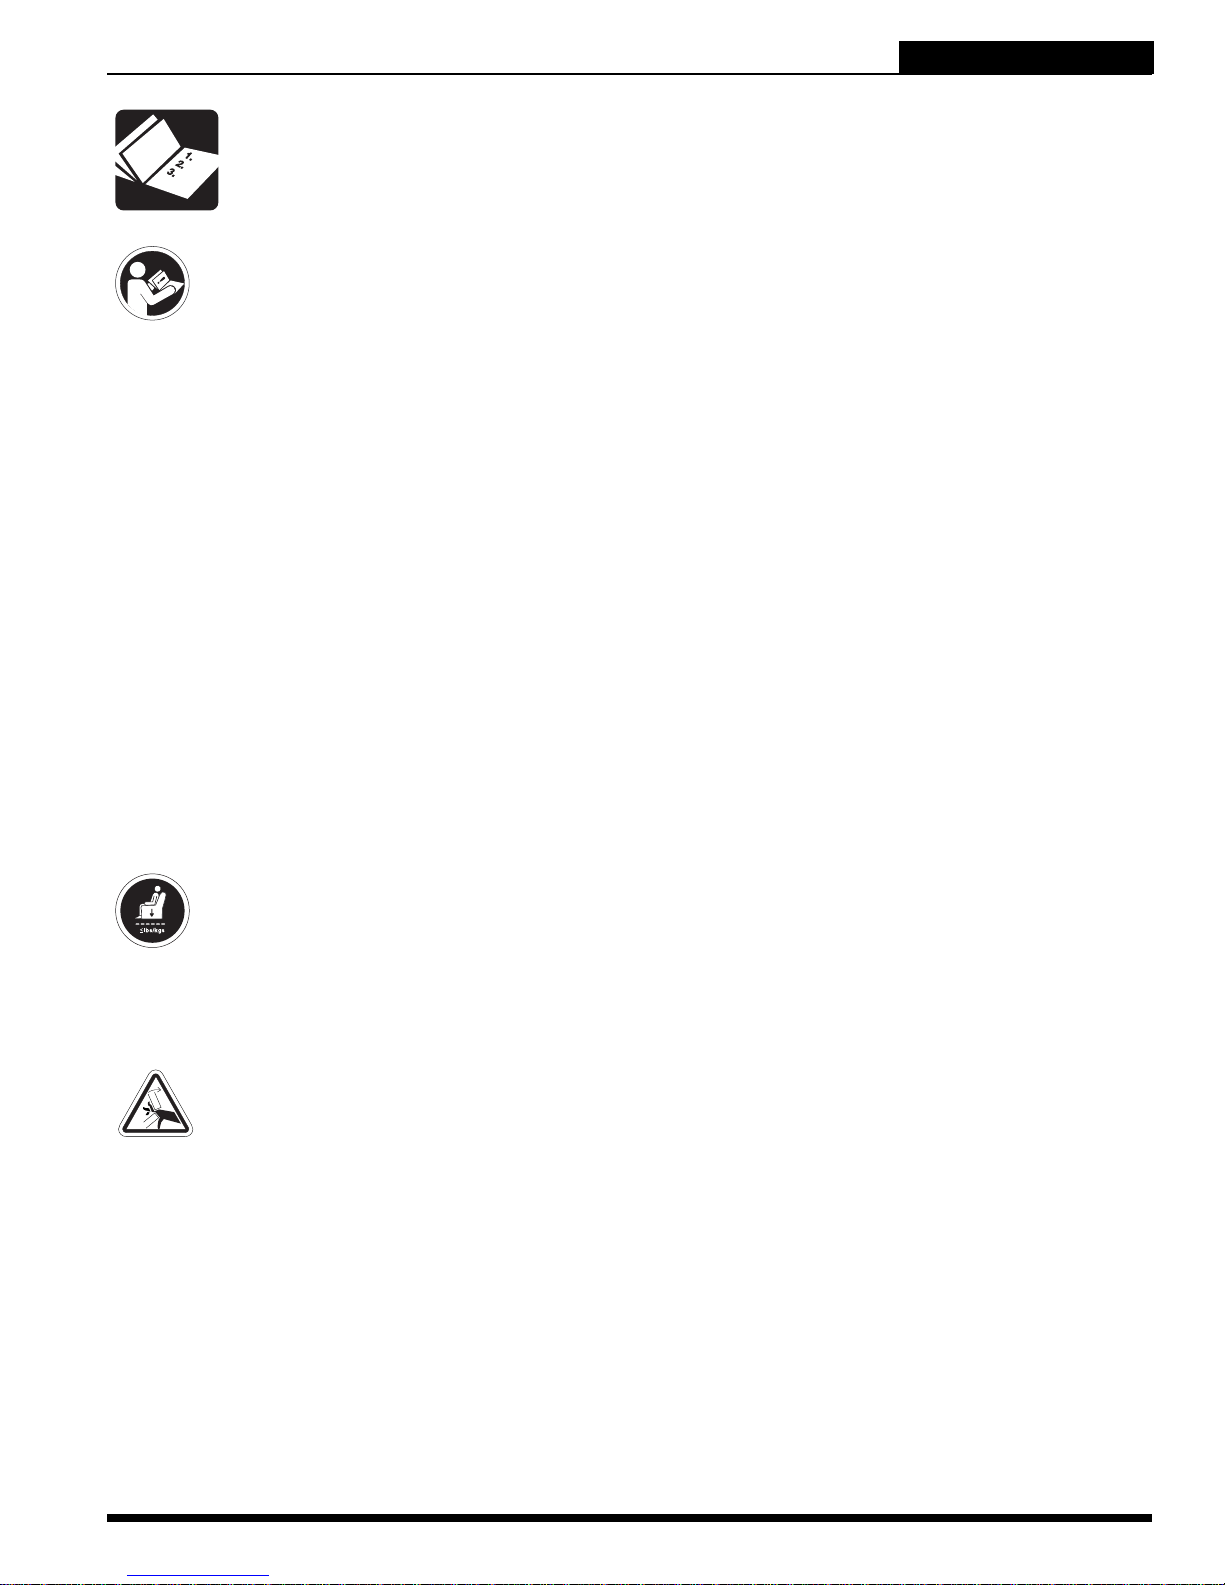
OBLIGATOIRE! Lisez et respectez les consignes et informations contenues dans ce
manuel avant de tenter d’utiliser votre fauteuil releveur pour la première fois.
Dans certaines situations, incluant des conditions médicales qui exigent une certaine habileté pour l’utilisation vous aurez besoin de la présence d’une personne aidante qualifiée afin de vous initier. Une personne
qualifiée peut être un membre de votre famille ou un professionnel de la sant é formé po ur vous assister lors
de l’exécution d’activités quotidiennes telle que l’utilisation sécuritaire de votre fauteuil releveur.
Vous trouverez ci-dessous des conseils, trucs et autres consignes qui vous seront utiles pour le fonctionnement sécuritaire de votre fauteuil releveur.
MODIFICATIONS
Pride a conçu votre fauteuil releveur pour que celui-ci vous procure confort et facili té d’utilisation. Cependant,
afin de prévenir blessures et dommages au produit, vous ne devez pas modifier, ajouter, retirer ou rendre
inutilisables quelques fonctions, pièces ou parties de votre fauteuil releveur. Des modifications non-autorisées peuvent annuler la garantie.
NOTE: Utilisez seulement des pièces de remplacement Pride d’origine pour les réparations.
LIMITE DE POIDS
Votre fauteuil releveur possède une limite de poids maximale. Référez-vous à l’ “Annexe A” pour de plus
amples informations.
OBLIGATOIRE! N’excédez pas la capacité de poids maximum de votre fauteuil
releveur. Pride ne pourra être tenu responsable des dommages et blessures
découlant du non-respect de la consigne du poids maximum.
DANGER DE SE PINCER/ECRASER LES DOIGTS
Le mécanisme à cissaux du fauteuil possède des étiquettes de mise en garde aux endroits où il y a danger
de se pincer/écraser les doigts. Gardez ces endroits libres et sans obstruction.
MISE EN GARDE! Ne placez pas d’ojets ou un membre dans la trajectoire du
mécanisme.
DEGRE DE PROTECTION/MODE DE FONCTIONNEMENT
Équipement de classe II /Protection de type B contre les chocs électriques
Degré de protection contre la pénétration des solides/liquides—IPX1
Mode de fonctionnement—Cycle d’utilisation: 2min en fonction «ON»/18min à l’arrêt «OFF»
TEMPERATURES DE FONCTIONNEMENT/ENTREPOSAGE
Transport ou entreposage: -75°C/-104°F à 70°C/158°F
Fonctionnement: 10°C/50°F à 40°C/104°F
Lift Chair Series www.pridemobility.com 31
Page 32
LIFT CHAIR SERIES
II. CONSIGNES GENERALES
INTERFERENCE ELECTROMAGNETIQUE ET RADIOMAGNETIQUE (EMI/RFI)
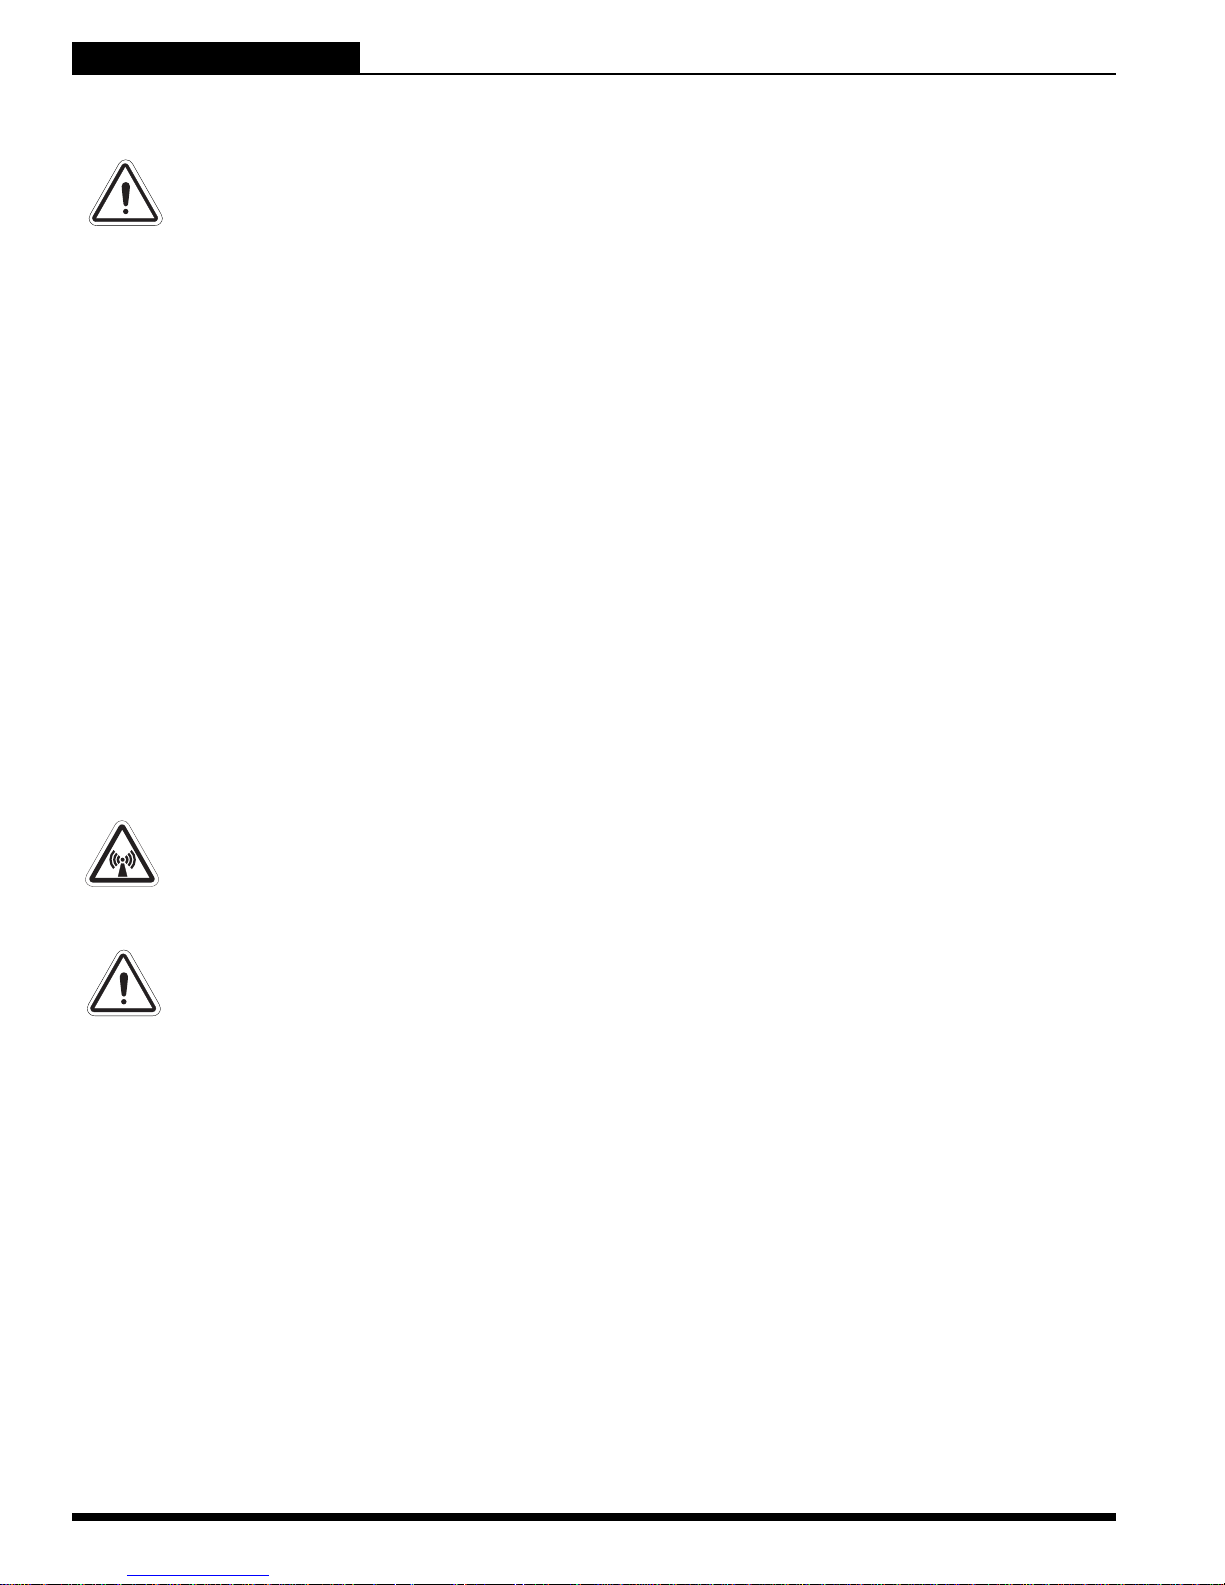
MISE EN GARDE! Des tests en laboratoire ont démontré que les ondes radio et les
interférences électromagnétiques peuvent affecter les appareils électriques tel
que votre fauteuil releveur.
Les ondes électromagnétiques et les interferences radio proviennent des sources tels que les téléphones
cellulaires, les radios mobiles (walkie-talkies), stations radio, stations de télévision, radio amateur (HAM)
liens informatiques, émetteurs micro-ondes, les téléavertisseurs et les radios émetteurs utilisés par les services d’urgence. Dans certains cas, ces ondes peuvent provoquer des mouvements involontaire s ou endommager les systèmes de commande des appareils électriques. L'utilisateur peut aider à réduire les interférences électromagnétiques en conservant une distance minimale de 3 mètres (9 pieds) entre le fauteuil et les
appareils portable et les équipements de communication de type "RF". Il est recommandé de maintenir au
moins 3 mètres (9 pieds) de distance entre le fauteuil releveur et tout équipement portatif émettant 10 W ou
plus de puissance radio. Référez-vous à la documentation accompagnant l'appareil émetteur pour connaître
la puissance maximale de cet appareil.
Tout appareil électrique possède un niveau d’immunité (ou résistance) au EMI/RFI. Plus le niveau est élevé
meilleure est la protrection contre les EMI/RFI. Sel on les standards EMC, ce produit a réussi un test d’immunité et est compatible à l’utilisation en établissement publique et à domicile. Selon les normes l'"EMC", ce
produit a réussi les tests d'immunité et est classé dans le groupe "1", Classe B, ce qui signifie que le fauteu il
élévateur n'utilise l'énergie "RF" que pour son fonctionnement interne. Conséquemment les émissions "RF"
sont très faibles et peuvent difficilement provoquer des interférences aux appareils électroniques avoisinant
le fauteuil. Le fauteuil est parfaitement sécuritaire et peut être utilisé dans tous les environnements incluant
les maisons privées et les hôpitaux.
MISE EN GARDE! Prenez garde aux téléphones cellulaires, radio émetteur,
ordinateur portable et autres radio émetteurs car leurs ondes radio peuvent
affecter le fonctionnement de votre fauteuil releveur. Soyez prudent si vous devez
utiliser un appareil semblable.
MISE EN GARDE! L’ajout d’accessoires ou de composantes à votre fauteuil releveur
peut accroitre la sensibilité de celui-ci au EMI. Ne modifiez pas votre fauteuil
releveur d’aucune façon sans l’autorisation de Pride.
MISE EN GARDE! Votre propre fauteuil releveur peut lui aussi affecter les appareils
électriques de son entourage tel que les systèmes d’alarme.
NOTE: Si un incident de mouvement involontaire de votre fauteuil survient, cessez l’utilisation de
votre fauteuil releveur et contactez Pride pour l’en informer.
TRANSPORT ET LIVRAISON
Avant d’utiliser votre fauteuil releveur, assurez-vous que vous avez bien reçu toutes les pièces car il se peut
que certaines composantes aient été emballées séparément. S’il vous manque des pièces, SVP contactez
votre détaillant Pride autorisé immédiatement. Si votre produit a été endommagé (emballage ou contenu)
pendant le transport, SVP contactez le transporteur responsable des dommages.
TRANSPORT DANS UN VEHICULE
Si vous transportez votre fauteuil releveur dans un véhicule routier, certaines composantes (transformateur
externe, etc.) doivent être ancrées afin qu’elles ne puissent glisser. De plus le fauteuil releveur doit lui-aussi
être ancré au véhicule car il glisserait lors d’un freinage d’urgence.
32 www.pridemobility.com Lift Chair Series
Page 33
III. VOTRE FAUTEUIL RELEVEUR
COMPOSANTES DU FAUTEUIL
Cette section décrit les caractéristiques de votre fauteuil releveur. Étudiez bien toutes les fonctions et emplacements de chacune d’elle en prenant note que les illustrations contenues dans
ce manuel et le produit que vous avez acheté peuvent différer.
LIFT CHAIR SERIES
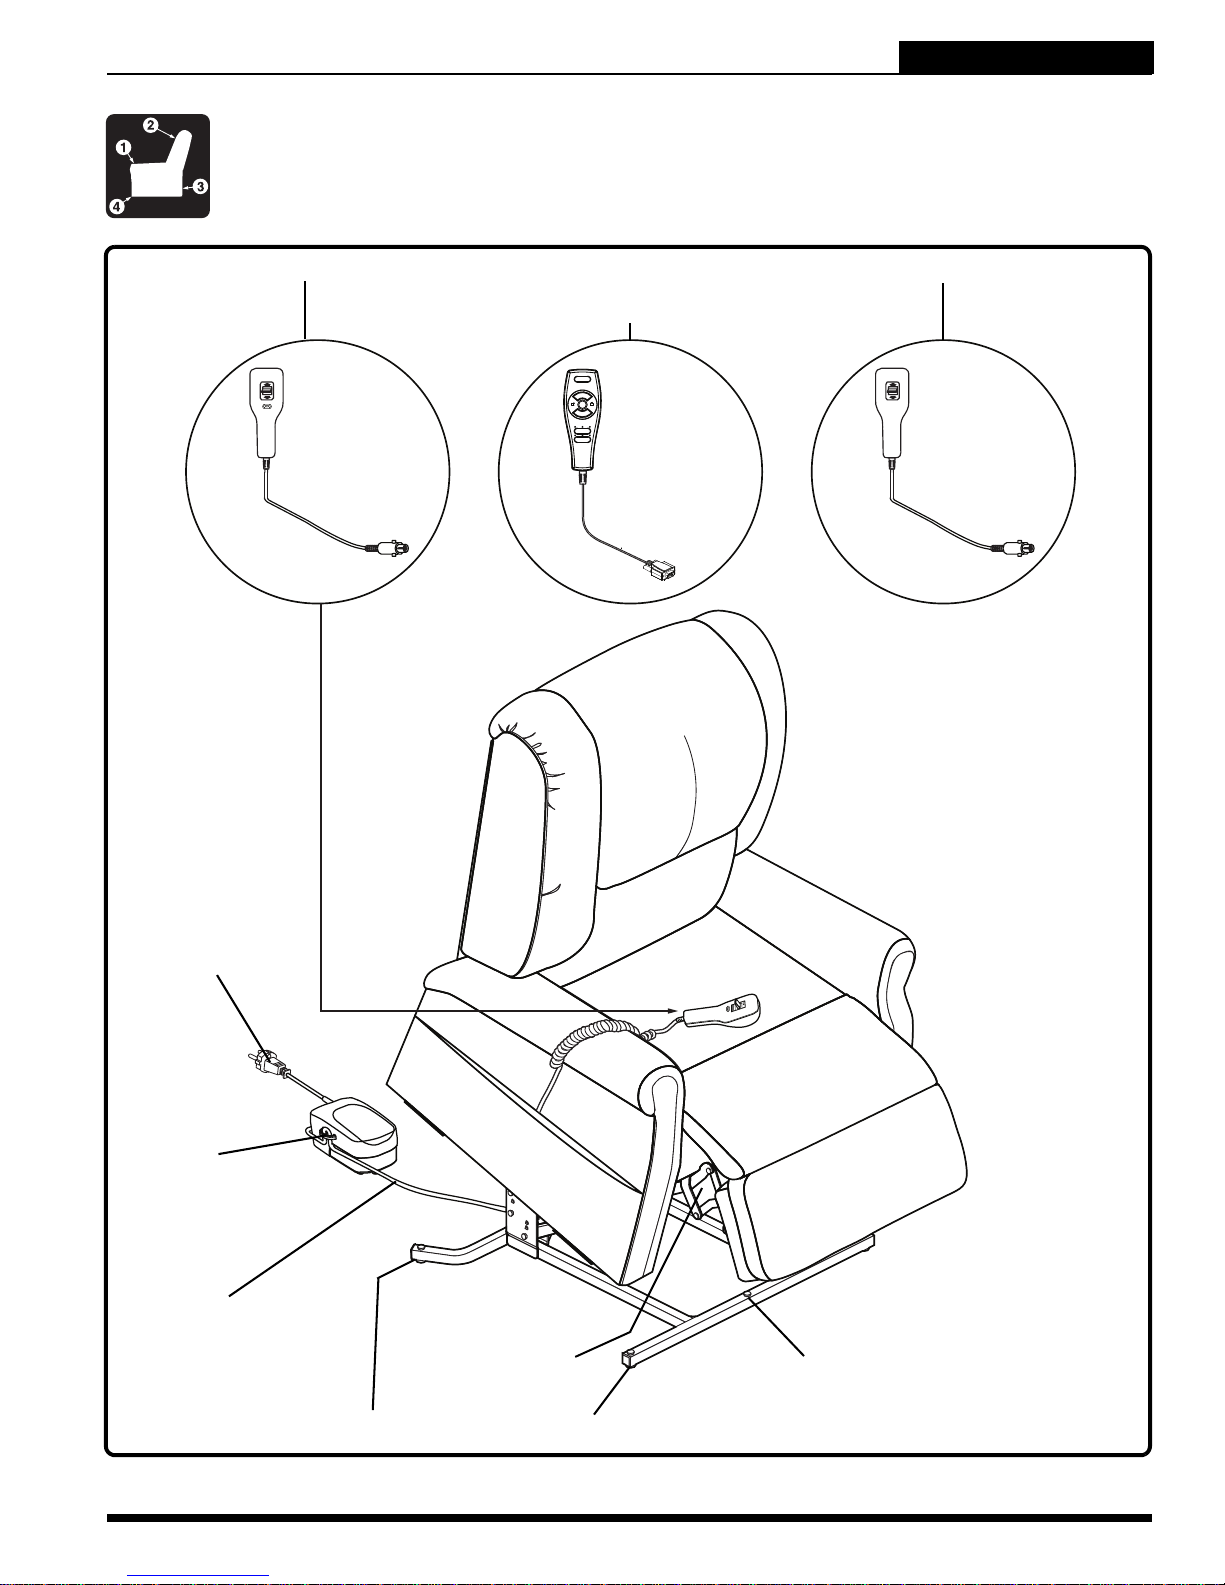
MANETTE DE COMMANDE DEUX MOTEURS
MANETTE CHALEUR ET MASSAGE
MANETTE DE COMMANDE STANDARD
CORDON ELECTRIQUE
TRANSFORMATEUR
EXTERNE
CONNEXION
CABLE BAS
VOLTAGE
MECANISME
A CISEAUX (POINT
DE PINCEMENT)
PATINS NIVELEURS (4 EN TOUT)
Figure 3.1 Composantes du fauteuil releveur
MECANISME SOULEVEUR
(POINT DE PINCEMENT)
Lift Chair Series www.pridemobility.com 33
Page 34
LIFT CHAIR SERIES
MECANISME
A CISEAUX
(POINT DE
PINCEMENT)
III. VOTRE FAUTEUIL RELEVEUR
Mécanisme releveur: Sur commande, place le fauteuil en position «assise», «inclinée» ou en position
debout.
Patins niveleurs: Tournez manuellement pour niveler vers le haut ou vers le bas afin de stabiliser le fauteuil
avant usage (Fig. 3.2).
TOURNEZ LES PATINS POUR MONTER OU DESCENDRE LE FAUTEUIL
Figure 3.2 Patins niveleurs
Ciseaux du mécanisme: S’allongent ou se rétract-
ent lors du changement de position (Fig. 3.3).
MISE EN GARDE! Danger! Prenez
garde de vous pincer ou de vous
écraser les doigts lorsque vous
faites fonctionner le mécanisme
élévateur du fauteuil inclinable.
Gardez les items suivants et
autres objets similaires loin des
endroits ou ils peuvent être pincés
ou écrasés par les articulations du
mécanisme du fauteuil:
membres
petits enfants
animaux de compagnie
fils ou câbles
tubes d’oxygène
articles pouvant se coincer tels
que les vêtements, couvertures
et autres articles semblables
Figure 3.3 Mécanisme à ciseaux
cordon d’alimentation électrique
COMPOSANTES ELECTRIQUES
Votre fauteuil releveur Pride est équipé d’un systéme électrique DC à bas voltage qui transforme le courant
standard 90V AC - 264V AC en courant direct (24/39V DC). Les com posantes électriques sont le transformateur
externe, les batteries et la manette de commande. Gardez les loin de l’humidité en tout temps.
MISE EN GARDE! Gardez les composantes électriques à l’abri de l’humidité en tout
temps afin de prévenir les chocs électriques.
Transformateur externe: Se branche dans une prise électrique stan dard pour alimenter le fau teuil releveur.
Le transformateur peut être équipé d’un voyant lumineux vert qui s’allume lorsque le transformateur est
alimenté.
Le transformateur externe peut être muni d’un boîtier moulé pour l’installation sur le mur directement sous la
prise électrique. Les vis doivent être dans une membrure du mur pour plus de solidité. Référez vous à l’
“Annexe G” ou “Annexe H” pour les instructions de montage.
NOTE: Pride ne pourra être tenu responsable des dommages causés par une installation inadéquate.
34 www.pridemobility.com Lift Chair Series
Page 35

III. VOTRE FAUTEUIL RELEVEUR
LIFT CHAIR SERIES
Batteries: Procure une alimentation afin de positionner le fauteuil en position assise depuis la position inclinée ou de la position «debout» en cas de panne de courant. Pour les modèles équipés d’un système d’alimentation d’urgence, les batteries sont situées à l’intérieur du transformateur externe.
Manette de commande: Contient les différents boutons pour le fonctionnement du fauteuil releveur. Référez-vous à la section V. “Fonctionnement” pour de plus amples informations. La manette peut être équipée
d’un connecteur rapide afin de la détacher du fauteuil et empêcher toute utilisation.
Lift Chair Series www.pridemobility.com 35
Page 36
LIFT CHAIR SERIES
SUPPORT DE
CONNEXION KD
CLIP DE BLOCAGE
Votre fauteuil releveur requiert un peu d’assemblage avant l’utilisation initiale. Le fauteuil peut
être partiellement démonté pour faciliter l’entretien. Si votre fauteuil releveur est un modèle rabattable (KD), suivez les instructions “Préparation du fauteuil releveur”. Si votre fauteuil releveur
n’est pas du type rabattable voir les instructions de “Mise en place du fauteuil releveur”.
IV. ASSEMBLAGE/DEMONTAGE
PREPARATION DU FAUTEUIL RELEVEUR
Les modèles rabattables (KD) arrivent avec le dossier en position rabatue. (Fig. 4.1).
Figure 4.1 Modèle KD dossier rabattu
Suivez ces étapes pour préparer votre fauteuil:
INCORRECTE
CORRECTE
4.1.1 Déballez le dossier pour vérifier que la clip de
blocage est bien à la verticale. Repositionnez-la au besoin.
MANCHON KD
4.1.2 Faites glisser les manchons de dossier KD
gauche et droit sur les supports KD de connexion sur les accoudoirs du fauteuil.
36 www.pridemobility.com Lift Chair Series
Page 37
IV. ASSEMBLAGE/DEMONTAGE
LIFT CHAIR SERIES
NOTE: En fonction de la largeur du fauteuil, vous devrez peut-être glisser un manchon à la fois. Dans
ce cas, mettez le dossier à niveau avant de l’enfoncer pour le bloquer en position.
“CLIC”
4.1.3 Pesez fermement sur le dessus du dossier
pour le bloquer en position. Vous devez
entendre le «clic» provenant de chaque coté
pour bien le bloquer en place.
NOTE: Tirez sur le dossier pour vous assurer qu’il
est bien bloqué en place. Si le dossier se détache,
recommencez alors les étapes 4.1.1 à 4.1.3.
CONNEXION CHALEUR VERS LA BOITE DE JONCTION
BOITE DE
JONCTION
MODULE MASSAGE
4.1.4 Pour le modèle C6, placez le rabat du devant
du dossier et du dos de la base sur la structure et attachez-les ensemble à l’aide des
bandes velcro, puis fermez la fermeture
éclair.
4.1.5 Branchez les fils de la fonction chaleur et
massage à la boîte de jonction. La boîte de
jonction est fixée à l’arrière du fauteuil
releveur. Référez-vous à I’ “Annexe D” pour le
diagramme des branchements électriques.
Lift Chair Series www.pridemobility.com 37
4.1.6 Fixez le recouvrement du dossier sur la
bande velcro à la base du fauteuil.
Page 38
LIFT CHAIR SERIES
IV. ASSEMBLAGE/DEMONTAGE
MISE EN PLACE DU FAUTEUIL RELEVEUR
Votre fauteuil releveur devrait être placé près d’une prise électrique standard, sur un plancher à niveau, au
sec et avec amplement d’espace pour le fonctionnement. Pride recommande de demander de l’aide pour la
mise en place du fauteuil afin d’éviter des vous blesser en le soulevant.
Suivez ces consignes pour la mise en place sécuritaire de votre fauteuil releveur:
1. Placez le dos du fauteuil releveur à environ 76 cm (30 po) du plus proche obstacle alors que le fauteuil
est en position droite. Cette distance peut varier selon le modèle.
2. Réglez les patins niveleurs pour stabiliser le fauteuil releveur (Fig. 3.2).
3. Installez les batteries dans le transformateur externe. Voir “Installation des batteries” au besoin.
4. Placez le transformateur externe sur le plancher dans un endroit à nive au, bien ventilé et ou il ne fe ra pas
obstacle. Installez-le au mur s’il est équipé de cette option.
5. Positionnez le câble d’alimentation bas voltage de manière à ce qu’il ne puisse pas être coincé entre le
câdre du fauteuil et le mécanisme.
6. Branchez le câble dans le transformateur externe si ce n’est pas déja fait.
7. Branchez le cordon d’alimentation directement dans la prise murale. N’utilisez pas de cordon de ral-
longe électrique!
NOTE: Si vous percevez un problème quelconque lors de la préparation ou de la mise en place de
votre fauteuil releveur, stoppez et contactez votre détaillant Pride autorisé immédiatement. Afin de
prévenir les blessures et/ou dommages au produit, ne branchez pas le fauteuil dans la prise électrique tant que le problème n’est pas résolu et ne tentez pas de corriger un problème électrique par
vous-même.
INSTALLATION DES BATTERIES
Votre fauteuil est possiblement équipé d’un système d’alimentation d’urgence en cas de panne de courant.
Le système est alimenté par deux batteries 9V (non incluses) qui doivent être installées dans le transformateur externe.
Suivez les étapes suivantes pour installer les
batteries:
1. Débranchez le transformateur externe de la
prise électrique.
2. Ouvrez la porte identifiée sur le transformateur
externe.
3. Installez deux batteries 9V dans le transformateur externe (Fig. 4.2).
4. Replacez la porte à batteries.
NOTE: Assurez-vous de toujours avoir deux batteries 9V installées dans votre système d’urgence
car le système ne recharge pas les batteries. Des
batteries sont des piles 9V de type alkaline qui
sont remplacées après chaque utilisation du système d’urgence ou au moins une fois l’an si le
système d’urgence n’a pas été sollicité.
PORTE A
BATTERIES
TRANSFORMATEUR
CORDON D’ALIMENTATION
TRANSFORMATEUR EXTERNE
(VUES DU DESSOUS)
NOTE: Si vous devez débrancher le fauteuil pour
une période prolongée (plus d’une heure), retirez
les batteries du transformateur car celui-ci drainera les batteries même si le fauteuil n’est pas en
fonction.
38 www.pridemobility.com Lift Chair Series
CORDON
D’ALIMENTATION
Figure 4.2 Emplacement des batteries
Page 39
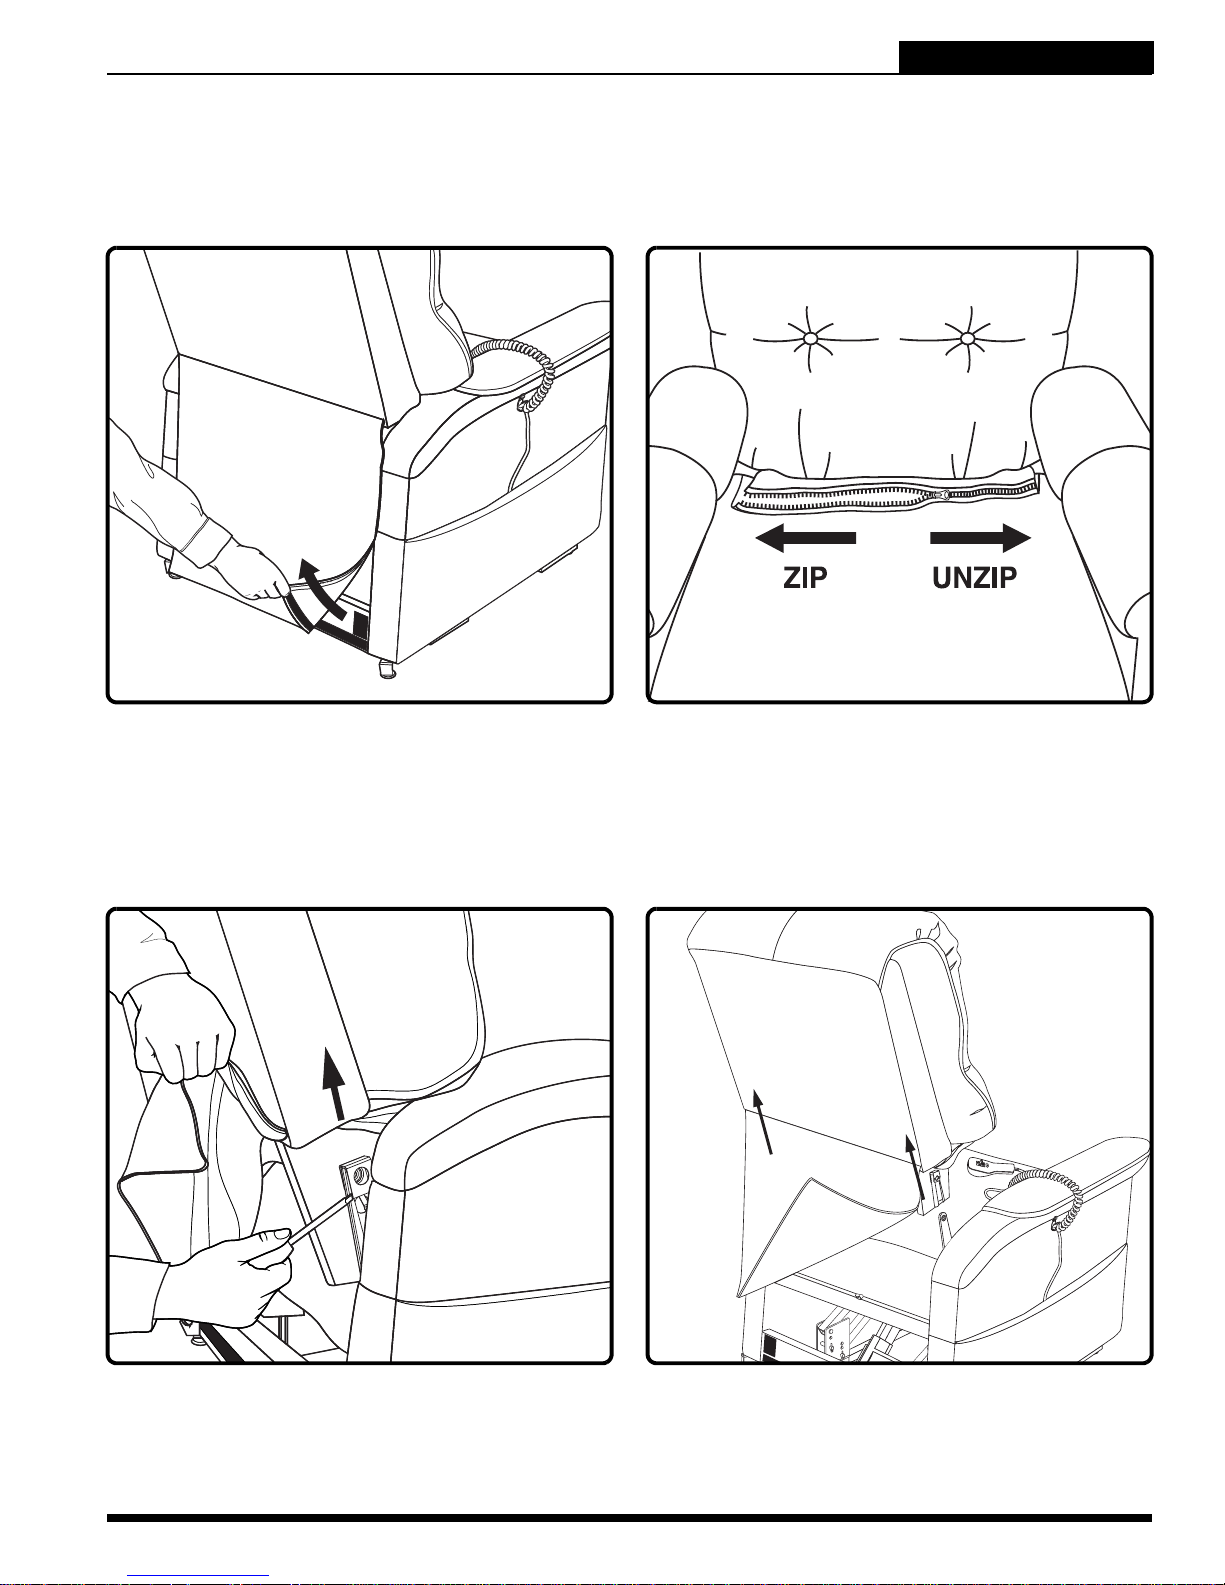
IV. ASSEMBLAGE/DEMONTAGE
DEMONTAGE DU FAUTEUIL RELEVEUR
Le dossier du fauteuil de type KD peut être retiré pour faciliter le transport ou l’entretien.
Suivez les étapes suivantes pour démonter le dossier du fauteuil releveur:
LIFT CHAIR SERIES
4.3.1 Détachez le tissu de la bande velcro à la
base du dossier.
NOTE: Si votre fauteuil est équipé de l’option
«chaleur et massage», assurez-vous de
débrancher les fils de la boîte de jonction.
4.3.2 Pour le modèle C6, ouvrez la fermeture éclair
entre le dossier et la base, puis détachez les
bandes velcro qui retiennent les rabats.
4.3.3 À l’aide d’un gros tournevis plat, soulevez la
clip de blocage droite et la clip gauche d’un
coté à la fois tout en soulevant le dossier
pour le dégager des manchons de support.
Lift Chair Series www.pridemobility.com 39
4.3.4 Soulevez le dossier du fauteuil et retirez-le
complètement de la base.
Page 40
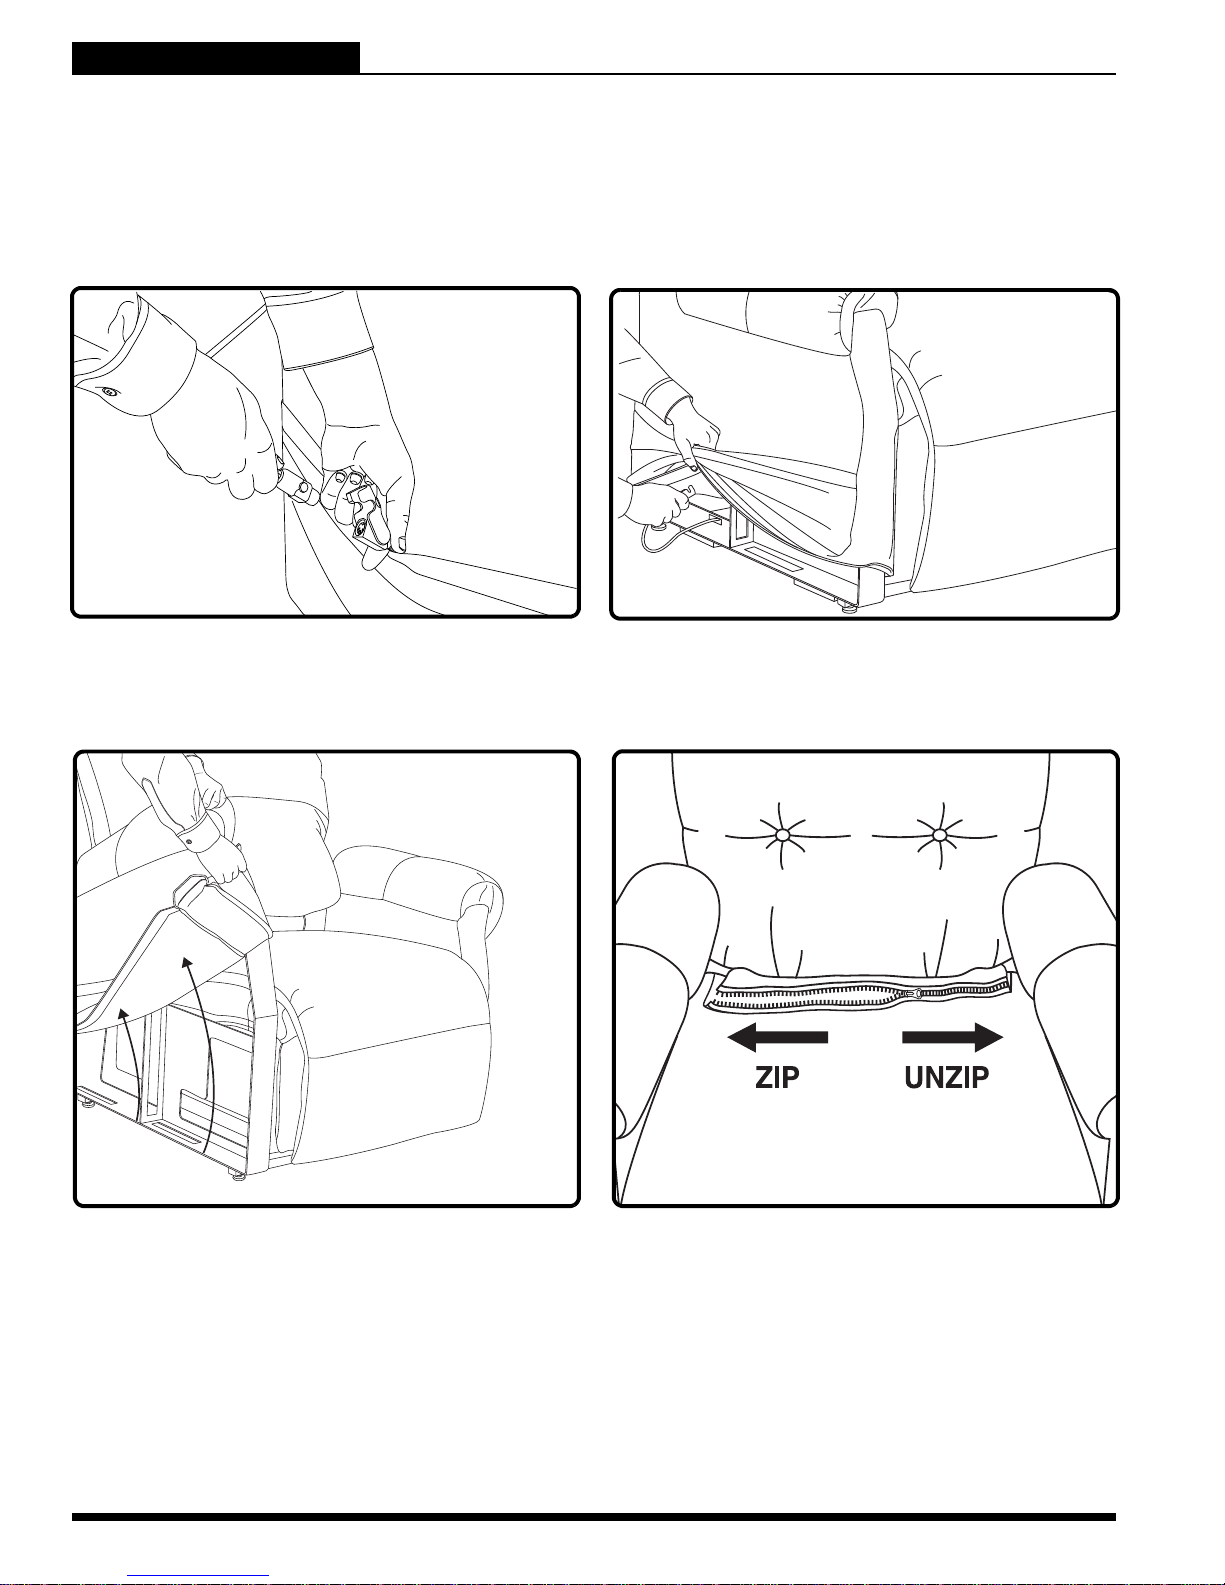
LIFT CHAIR SERIES
IV. ASSEMBLAGE/DEMONTAGE
INSTALLATION/ENLEVEMENT DU RECOUVREMENT
Le recouvrement de tissue de certains modèles de fauteuil élévateur peut être retire afin de faciliter le nettoyage ou la réperation. Si le recouvrement de votre fauteuil est enlevable, SVP voir ci-dessous.
Suivez ces instructions pour enlever ou installer le recouvrement:
4.4.1 Débranchez le connecteur rapide de la
manette de commande et déposez-la dans
un endroit sûr.
4.4.2 Poussez le câble et le connecteur dans la
fente en “V” sur le coté du fauteuil.
4.4.3 Glissez le recouvrement des accoudoirs hors
de la structure du bras gauche et du bras
droit.
40 www.pridemobility.com Lift Chair Series
4.4.4 Pour le modèle C6, détachez le fermoir éclair
entre le dossier et le coussin du siège.
Page 41
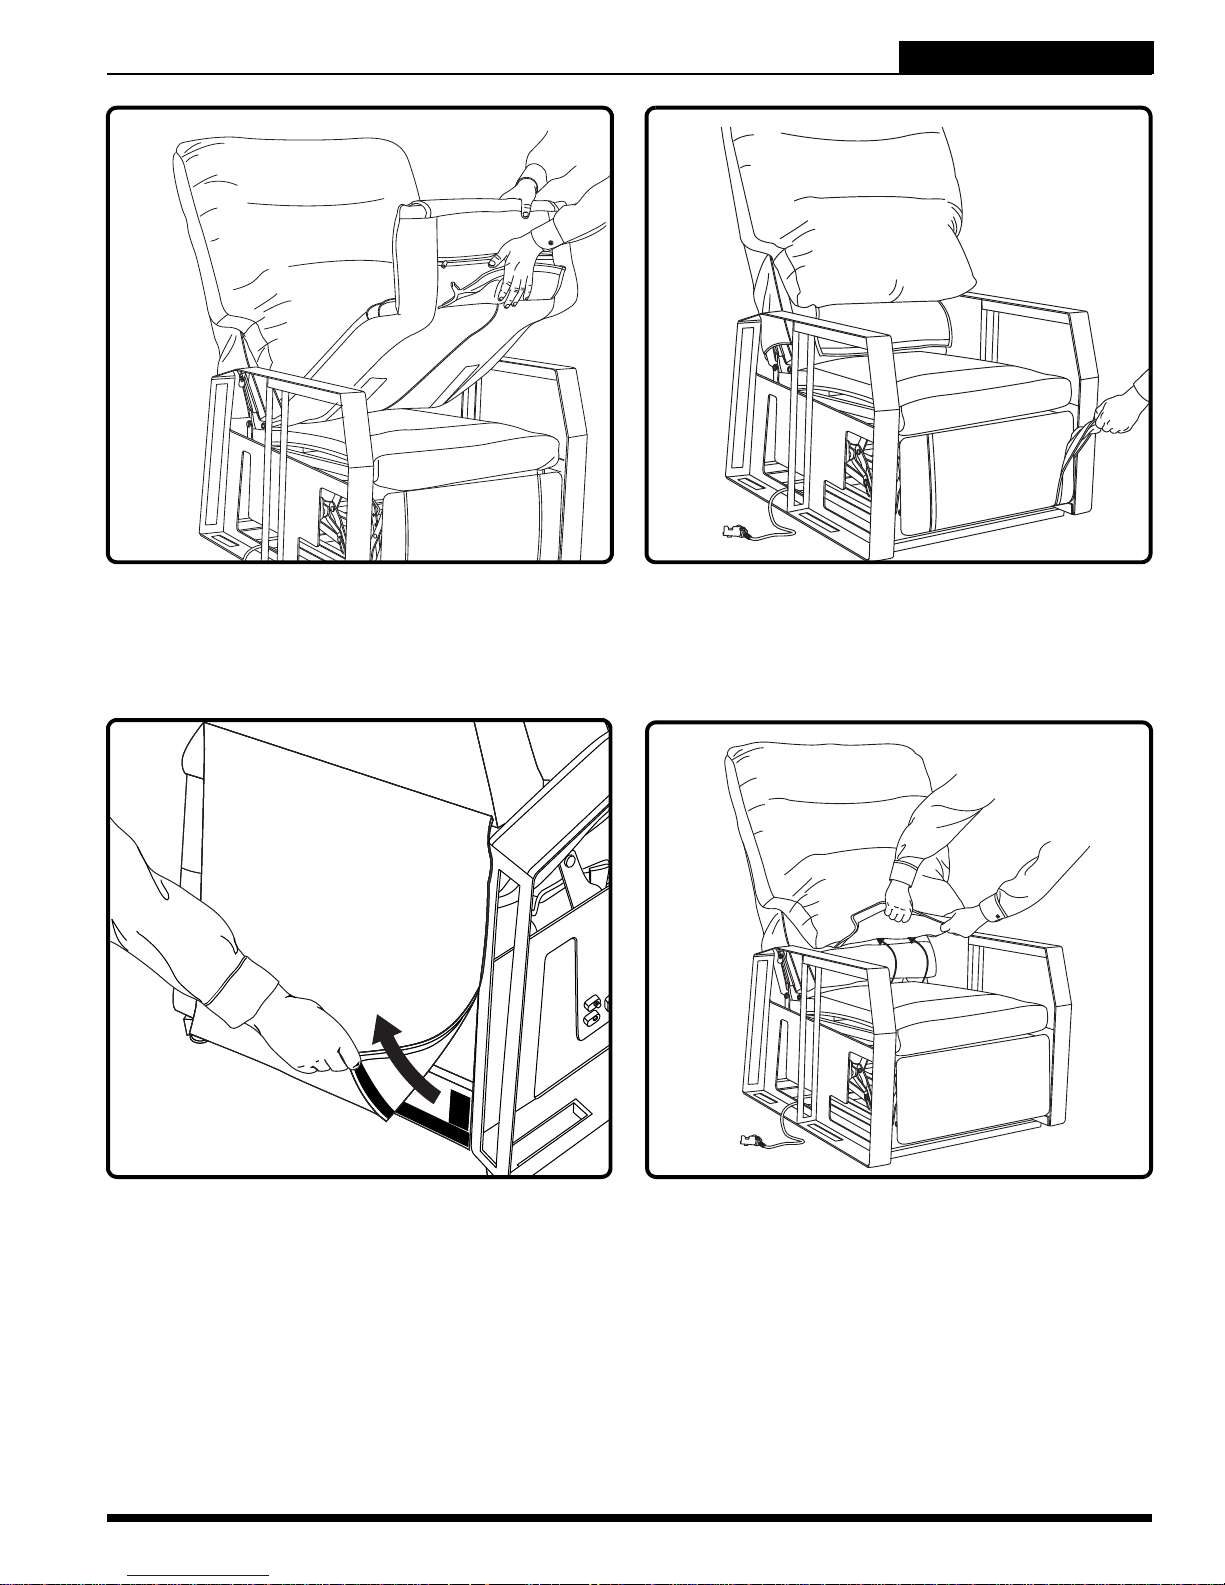
IV. ASSEMBLAGE/DEMONTAGE
LIFT CHAIR SERIES
4.4.5 Dégagez la partie avant du coussin de siège
du repose-pieds et retirez-le du fauteuil.
4.4.6 Retirez les caches de chaque coté du
repose-pieds.
NOTE: Cette étape ne s’applique pas au modè
le C1.
4.4.7 Détachez le rabat du dossier de la structure
à l’arrière du fauteuil.
Lift Chair Series www.pridemobility.com 41
4.4.8 Desserrez le rabat inférieur du recouvrement
du dossier.
Page 42
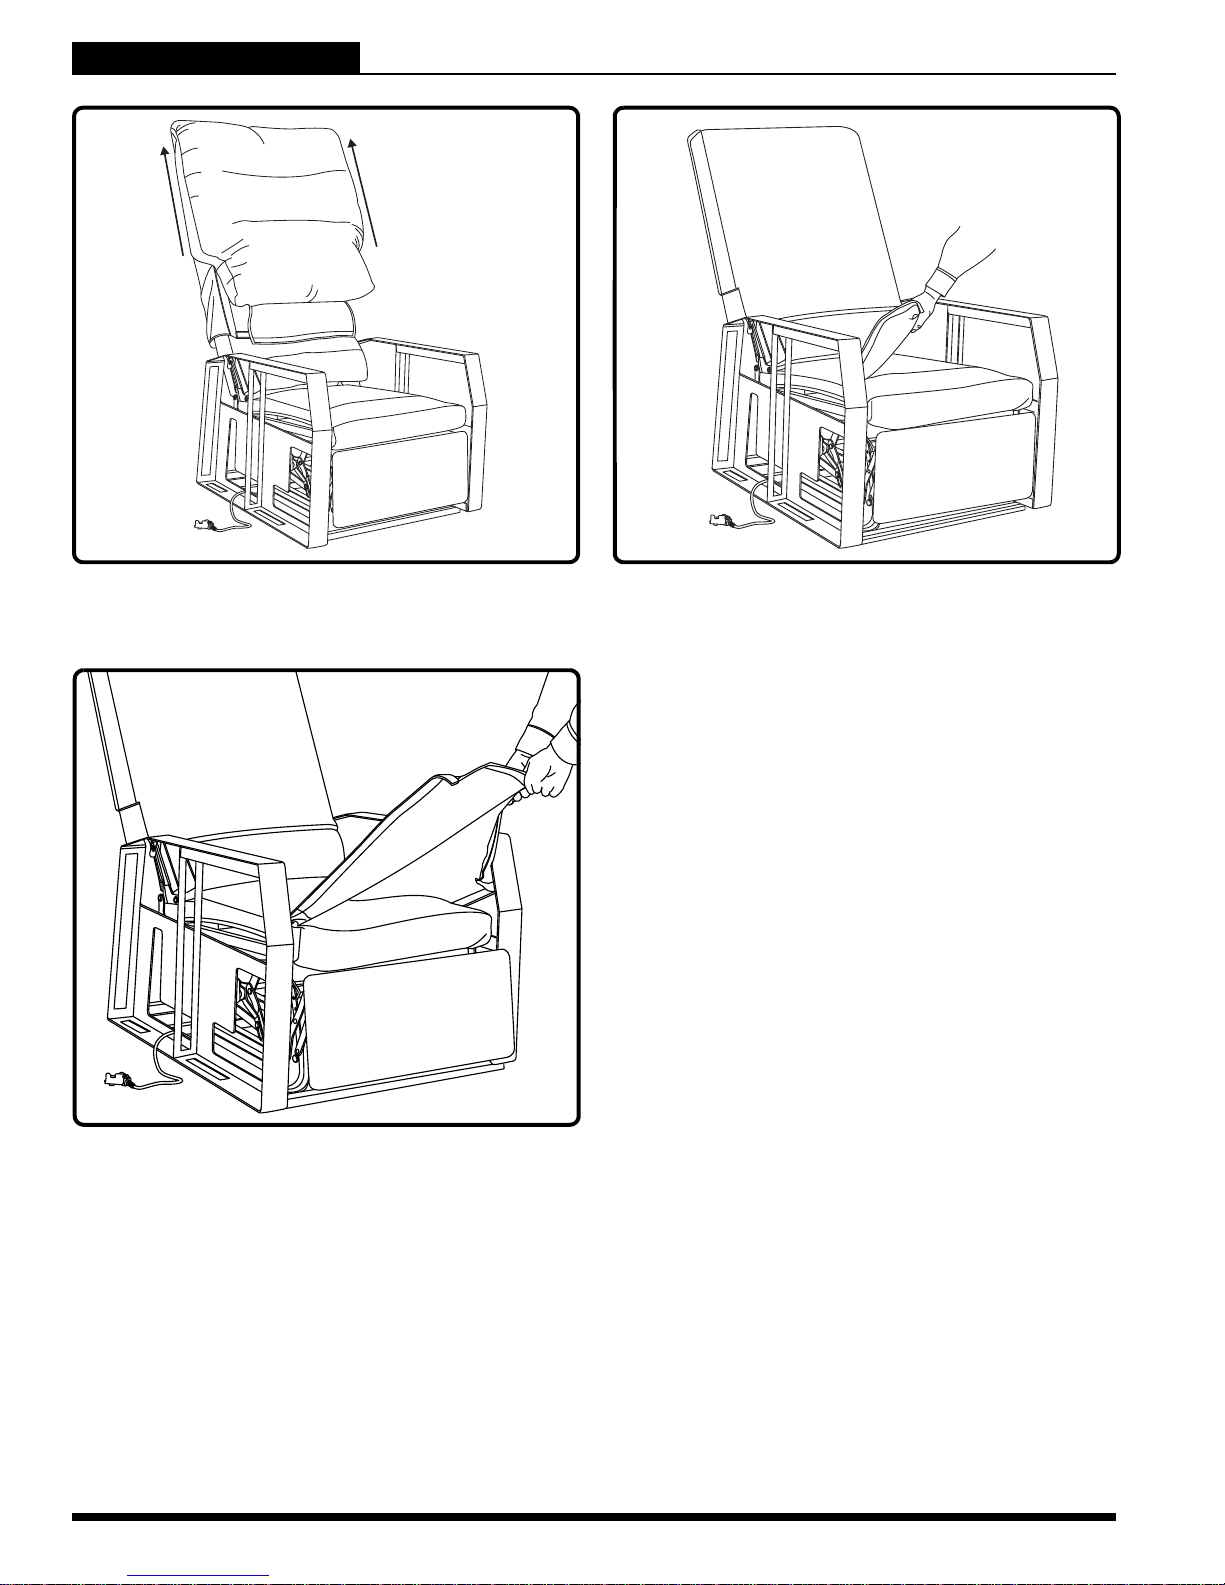
LIFT CHAIR SERIES
IV. ASSEMBLAGE/DEMONTAGE
4.4.9 Retirez le recouvrement du dossier.
4.4.11 Retirez le recouvrement du coussin de
siège.
4.4.10 Desserrez le recouvrement du coussin du
siège sur sa gauche et sur sa droite.
NOTE: Suivez ces instructions dans l’orde inverse
pour installer le recouvrement sur le fauteuil.
42 www.pridemobility.com Lift Chair Series
Page 43
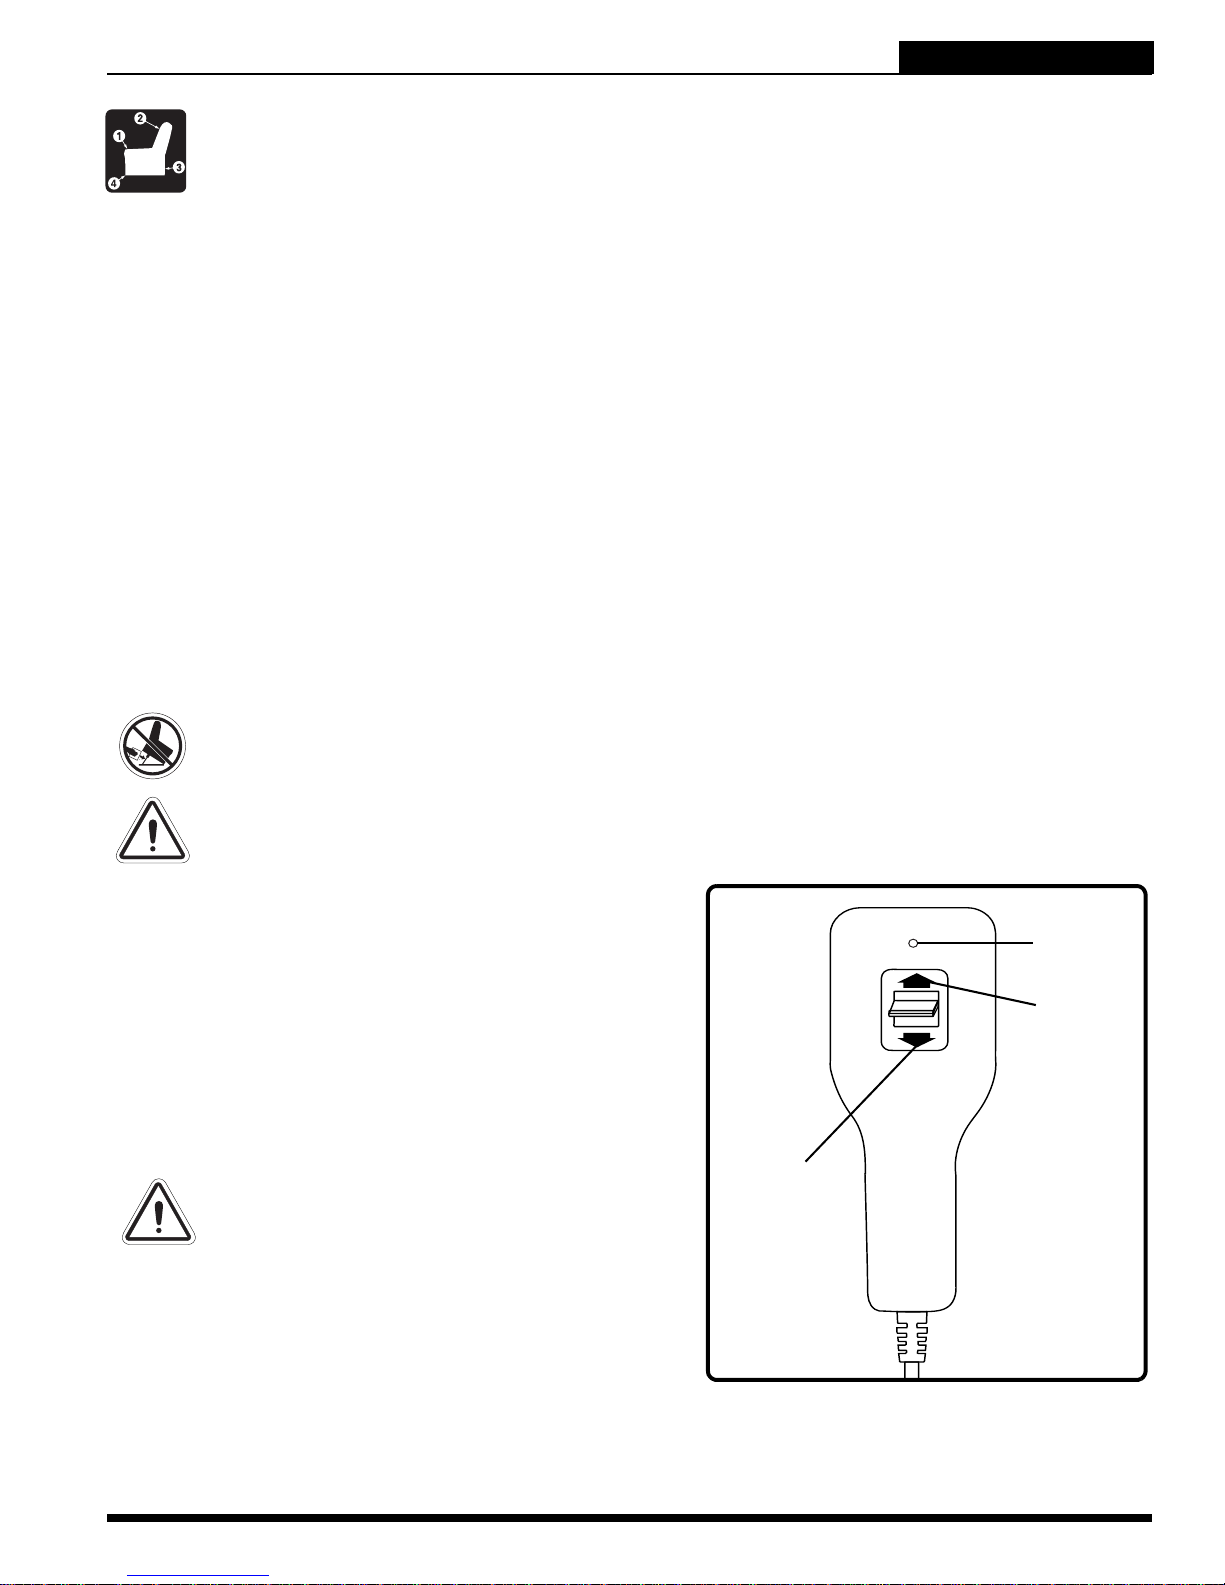
V. FONCTIONNEMENT
LIFT CHAIR SERIES
PRECAUTIONS A PRENDRE
Vous devez prendre certaines précautions lorsque vous utilisez votre fauteuil releveur. Lisez et
suivez les consignes afin de vous assurer un bon fonctionnement et éviter les blessures et/ou
dommages au produit.
Branchez le cordon d’alimentation directement dans une prise. N’utilisez pas de rallonge électrique!
Ne placez pas d’objets (par exemple un verre à boire) sur ou près du transformateur externe.
Si le transformateur externe ou la manette doivent être n ettoyés, débranchez le cordon de la prise électrique,
utilisez un chiffon légèrement humide et laissez les co mposantes s’assè cher avant de rebrancher le cordon.
Inspectez périodiquement la manette et les fils afin de détecter des dommages visibles.
Gardez toujours la manette loin des sources de chaleur.
Assurez-vous que la manette ne fasse pas obstacle lorsque vous vous assoyez.
Tenez les enfants et objets loin des pièces en mouvement lorsque vous faites fonctionner votre fauteuil
releveur.
Ne laissez-pas d’enfant jouer près du fauteuil lorsque vous le faites fonctionner. Seule la personne qui a
besoin du fauteuil devrait l’utiliser.
Vous pouvez détacher la manette du fauteuil lorsque vous voulez prévenir l’utilisation non autorisée du
fauteuil.
Évitez les endroits ou vous pouvez vous pincer/écraser les doigts dans les ciseaux du mécanisme. Gar-
dez vos mains et vos pieds loin de ces endroits.
Gardez le fauteuil en position droite et fermée lorsque celui-ci n’est pas utilisé.
Ne pas s’asseoir ou se tenir sur le repose-pieds ou son extension.
Ne vous laissez pas tomber dans le fauteuil releveur lorsque celui-ci est partiellement soulevé.
INTERDIT! Ne placez aucun objet sous le fauteuil releveur. Assurez-vous qu’il n’y ait
aucune obstruction incluant un petit enfant ou un animal de compagnie avant de le
faire fonctionner.
MISE EN GARDE! Évitez les risques de chute, de feux, de choc électrique ou de
pincement/écrasement de doigts. Respectez toutes les consignes et précautions.
FONCTIONNEMENT DE LA MANETTE DE
COMMANDE
En fonction du modèle, la manette de commande peut être équipée de boutons qui contrôlent le fonctionnement du dossier, de
la base du fauteuil et du repose-pieds (Fig. 5.1, 5.2, et 5.3).
MISE EN GARDE! Ne pas vous appuyez ni
mettre du poids sur le dossier lorsque
celui-ci est en position complètement
inclinée sous peine de faire basculer le
fauteuil et de provoquer des blessures
et/ou des dommages.
MISE EN GARDE! N'utilisez pas le
repose-pieds comme siège car celui-ci
n'a pas été conçu à cet effet. Il se peut
que le fauteuil se renverse, devienne
instable ou encore que les composantes
du fauteuil ne s'endommage entraînant
de blessures corporelles.
LED
VERS LE
HAUT «UP»
VERS LE
BAS «DOWN»
MISE EN GARDE! Verrouillez la manette
lorsque le fauteuil n’est pas utilisé.
NOTE: Comme mesure additionnelle, Pride recommande d’utiliser le connecteur rapide pour
débrancher et retirer la manette du fauteuil afin de la ranger hors d’atteinte des jeunes enfants lorsque le fauteuil n’est pas en usage.
Lift Chair Series www.pridemobility.com 43
Figure 5.1 Manette de commande standard
Page 44
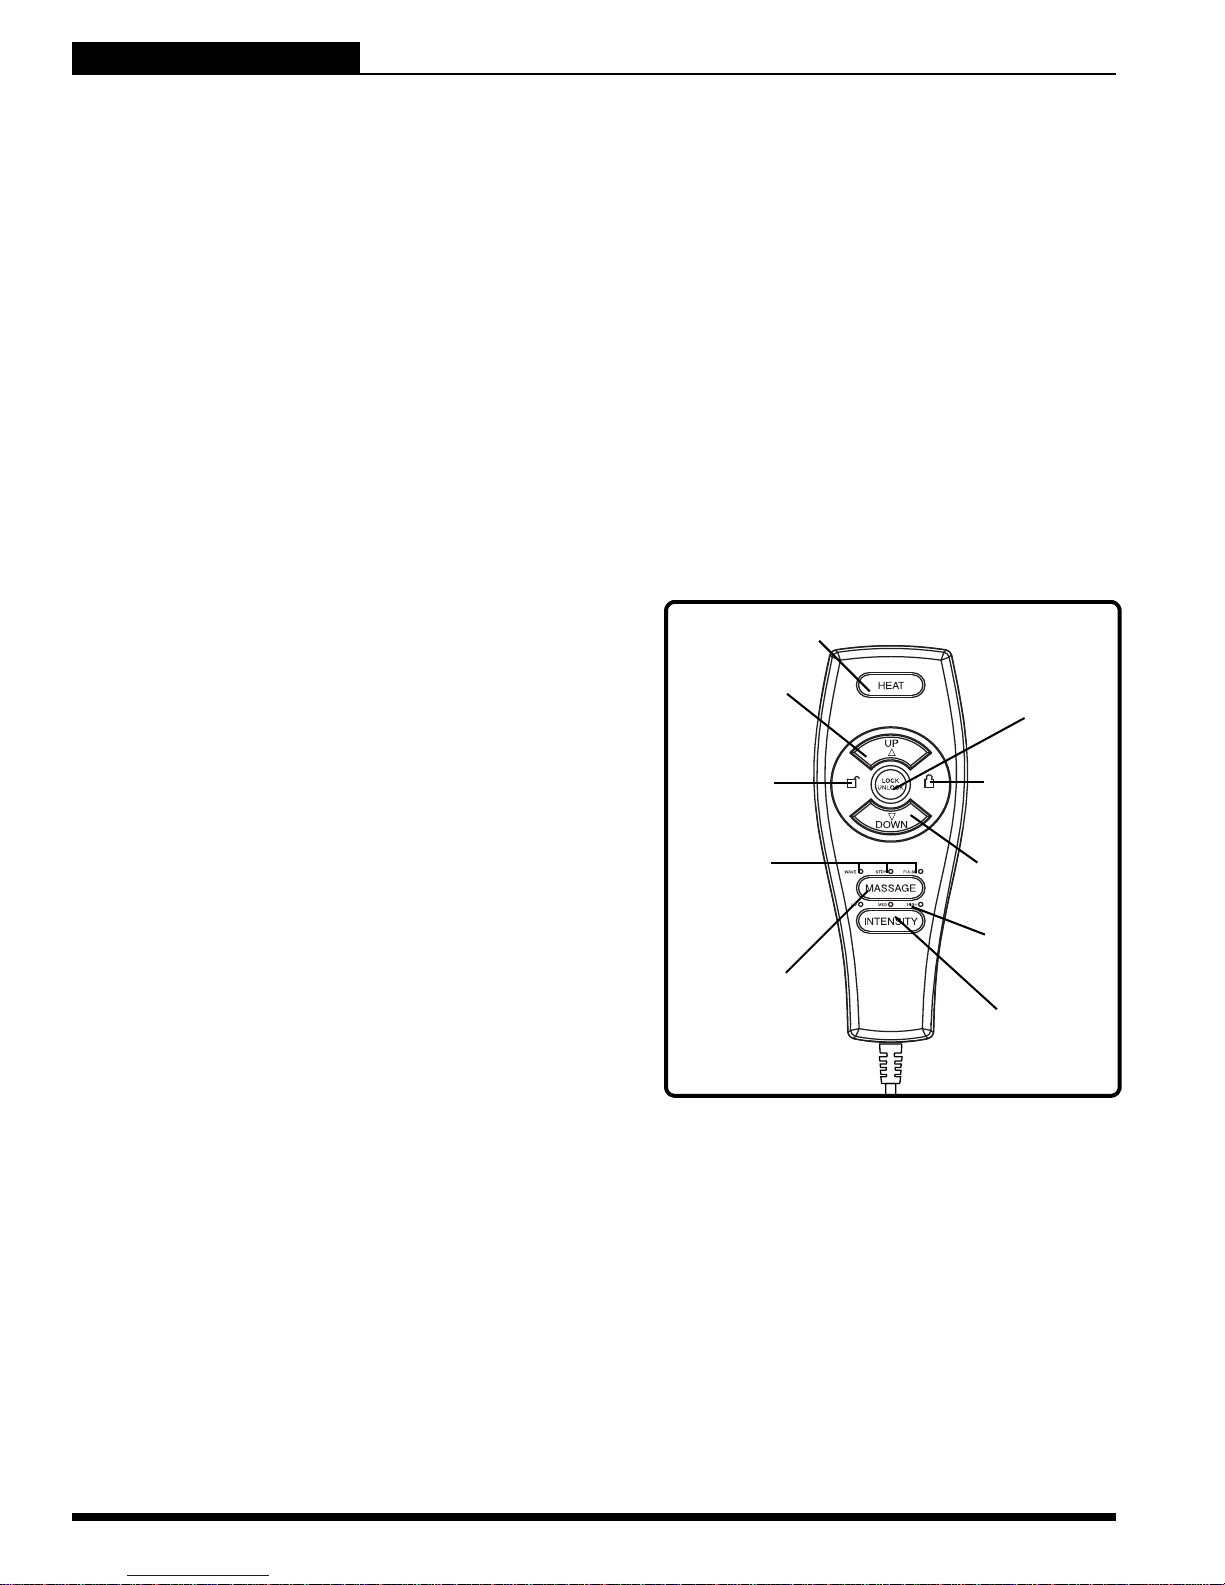
LIFT CHAIR SERIES
V. FONCTIONNEMENT
Fonctionnement de la Manette Standard
Voici comment s’asseoir dans votre fauteuil releveur (Fig. 5.1):
1. Pesez sur le bouton «UP» sur la manette de commande pour élever le fauteuil vers la position debout.
2. Approchez-vous et prenez place bien au centre du siège en vo us appuyant sur les accoudoirs au besoin.
3. Pesez sur le bouton «DOWN» pour abaisser le fauteuil vers la position assise confortablement.
Voici comment s’incliner dans votre fauteuil releveur à partir de la position assise (Fig. 5.1):
1. Pesez sur le bouton «DOWN» pour incliner le fauteuil vers une position confortable.
2. Pesez sur le bouton «UP» sur la manette de commande pour ramener le fauteuil en position relevée
droite pour être assis confortablement. Relâchez le bouton lorsque vous avez atteint la position désirée.
Voici comment se mettre debout à partir de votre fauteuil releveur (Fig. 5.1):
1. Pesez sur le bouton «UP» de la manette de commande pour élever le fauteuil vers la position debout.
2. Relâchez le bouton lorsque vous avez atteint la hauteur ou vous pouvez vous tenir debout confortablement.
NOTE: La manette de votre fauteuil est possiblement équipée d’un voyant lumineux qui s’allume
lorsque la manette est sous tension. Si celui-ci ne s’allume pas pendant le fonctionnement, contactez votre détaillant Pride autorisé.
Fonctionnement de la Manette de Commande
Voice comment vous asseoir dans votre fauteuil
releveur (Fig. 5.2):
1. Appuyez sur le bouton « VERS LE HAUT » (UP) pour
relever le fauteuil en position debout.
2. Approchez-vous du fauteuil et asseyez-vous au milieu
du siège en vous appuyant sur les accoudoirs, au
besoin.
3. Appuyez sur le bouton « VERS LE BAS » (DOWN)
pour baisser le fauteuil dans une position assise
confortable.
Voici comment incliner votre fauteuil releveur à partir
de la position assise (Fig. 5.2):
1. Appuyez sur le bouton « VERS LE BAS » (DOWN)
jusqu'à ce que vous arriviez à une position inclinée confortable.
2. Appuyez sur le bouton « VERS LE HAUT » (UP) pour
retourner à la position assise, dos droit. Relâchez le
bouton lorsque vous avez atteint la position désirée.
Voici comment vous relever de votre fauteuil releveur
(Fig. 5.2):
1. Appuyez sur le bouton « VERS LE HAUT » (UP) pour
relever le fauteuil releveur.
2. Relâchez le bouton dès que le fauteuil atteint une hau-
teur qui vous permet de vous mettre debout facilement.
BOUTON CHALEUR
BOUTON
VERS LE
HAUT (UP)
VOYANT DE
DEVERROUILLAGE
VOYANTS
DES
REGLAGES
DE MASSAGE
BOUTON
MASSAGE
BOUTON
VERROUILLER/
DEVERROUILLER
(LOCK/UNLOCK)
VOYANT DE
VERROUILLAGE
BOUTON VERS LE
BAS (DOWN)
VOYANTS DES
REGLAGES
D’INTENSITE
BOUTON
INTENSITE
(INTENSITY)
Figure 5.2 Manette chaleur et massage
44 www.pridemobility.com Lift Chair Series
Page 45
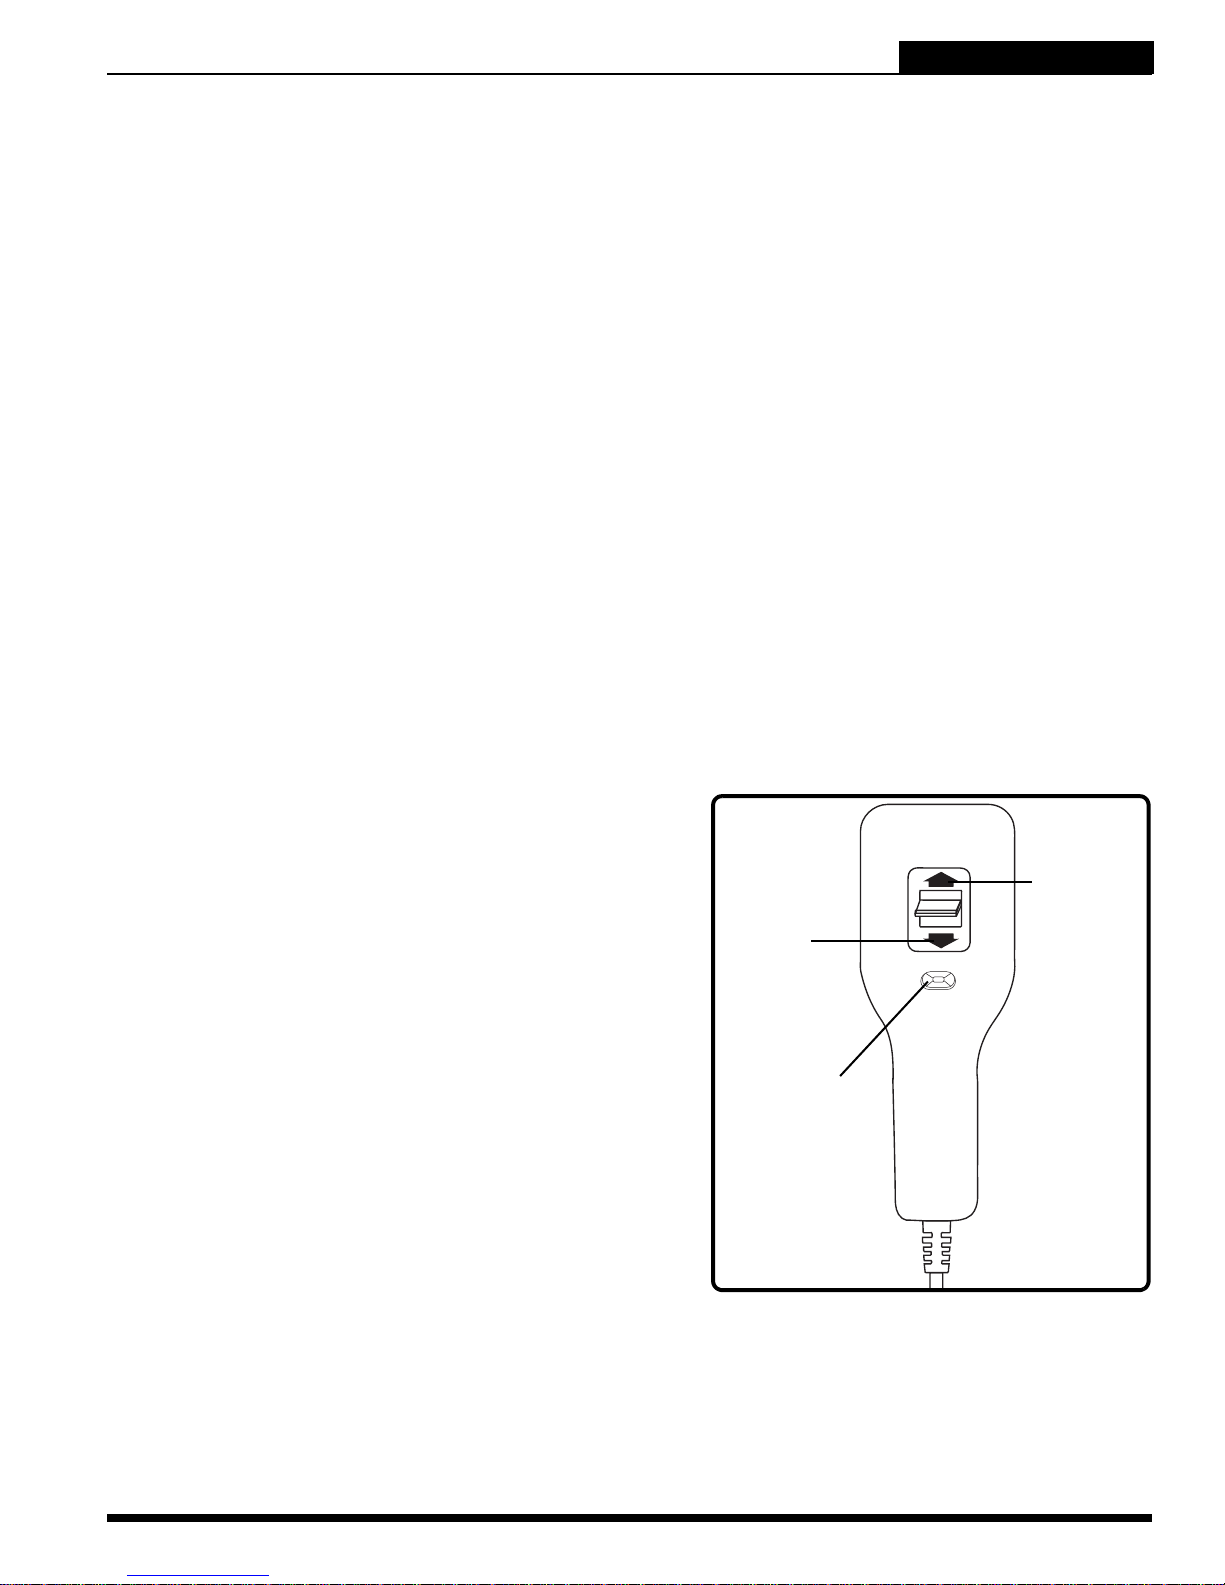
V. FONCTIONNEMENT
LIFT CHAIR SERIES
Voici comment activer/désactiver la fonction de verrouillage (Fig. 5.2):
1. Appuyez sur le bouton « VERROUILLER » (LOCK) pendant environ 3 secondes pour verrouiller la
manette. Le voyant rouge situé à la droite du bouton s'allumera pour indiquer que la manette est
verrouillée.
2. Appuyez sur le bouton « VERROUILLER » (LOCK) pendant environ 6 secondes pour déverrouiller la
manette. Le voyant vert situé à la gauche du bouton s'allumera pour indiquer que la manette est
déverrouillée.
Voici comment utiliser la fonction de chaleur (Fig. 5.2):
1. Appuyez sur le bouton « CHALEUR » (HEAT) une fois pour actionner la fonction de chaleur. La fon ctio n
de chaleur s'éteint automatiquement après 20 minutes d'utilisation continue.
2. Appuyez sur le bouton « CHALEUR » (HEAT) une deuxième fois pour éteindre la fonction de chaleur.
Voici comment utiliser l'option de massage (Fig. 5.2):
1. Appuyez sur le bouton « MASSAGE » une fois pour actionner la fonction de massage. Le réglage des
vagues est le réglage par défaut à la mise en marche.
2. Appuyez sur le bouton « MASSAGE » une deuxième fois pour choisir un des trois réglages suivants
vague, régulier ou pulsation. Chaque fois que vous appuyez sur le bouton, vous avancez d'un réglage.
Chaque réglage est indiqué par un voyant de couleur.
3. Appuyez sur le bouton « MASSAGE » pendant environ 2 secondes pour éteindre la fonction de massage.
Après 20 minutes d'utilisation continue, la fonction de massage s'éteint automatiquement.
Voici comment régler l'intensité de la fonction de massage (Fig. 5.2):
1. Appuyez une fois sur le bouton « INTENSITE » (INTENSITY) pour régler l'option d'intensité du massage.
2. Appuyez une deuxième fois sur le bouton « INTENSITE » (INTENSITY) pour régler l'option d'intensité du
massage à l'une des trois intensités suivantes : faible, moyenne ou élevée. Chaque fois que vous appuyez
sur le bouton, vous avancez d'un réglage. Chaque réglage est indiqué par un voyant de couleur.
Fonctionnement de la Manette du Deux
Moteurs
Voici comment s’asseoir dans votre fauteuil releveur
(Fig. 5.3):
1. Faites glisser le bouton de blocage vers la droite.
2. Pesez et tenez le bouton «up/down» en position «UP»
pour élever le siège de la position assise vers la position debout.
3. Approchez-vous et prenez place bien au centre du
siège en vous appuyant sur les accoudoirs au besoin.
4. Pesez sur le bouton «DOWN» pour abaisser le fauteuil
vers la position assise confortablement.
Voici comment s’incliner dans votre fauteuil releveur
à partir de la position assise (Fig. 5.3):
1. Faites glisser le bouton de blocage vers la gauche.
2. Pesez sur le bouton «DOWN» pour incliner le fauteuil
vers une position confortable.
3. Pesez sur le bouton «UP» sur la manette de
commande pour ramener le fauteuil en position relevée
pour être assis confortablement. Relâchez le bouton
lorsque vous avez atteint la position désirée.
VERS LE
BAS «DOWN»
BOUTON DE
BLOCAGE
Figure 5.3 Manette deux moteurs
VERS LE
HAUT «UP»
Lift Chair Series www.pridemobility.com 45
Page 46

LIFT CHAIR SERIES
V. FONCTIONNEMENT
Suivez ces étapes pour élever ou abaisser le repose-pieds lorsque vous êtes en position assise ou
inclinée (Fig. 5.3):
1. Faites glisser le bouton de blocage vers la droite.
2. Pesez et tenez le bouton «UP/DOWN» en position «DOWN» jusqu’à que le repose-pieds atteigne le
niveau désiré.
3. Pesez et tenez le bouton en position «UP» pour abaisser le repose-pieds.
Suivez ces étapes pour passer de la position assise à la position debout (Fig. 5.3):
1. Glissez le bouton de blocage vers la droite.
2. Pesez sur le bouton «up» de la manette de commande pour élever le fauteuil vers la position debout.
3. Relâchez le bouton lorsque vous avez atteint la hauteur où vous pouvez vous tenir debout confortablem ent.
46 www.pridemobility.com Lift Chair Series
Page 47

VI. PROBLEMES ET SOLUTIONS
Votre fauteuil releveur Pride est un produit à la fine pointe de la technologie conçu pour améliorer
la mobilité des personnes.Votre fauteuil releveur devrait vous procurer maintes années de service
sans problème, cependant, si un problème survenait vous trouverez ci-dessous des indications
afin d’y remédier sans complication. Si vous croyez ne pas pouvoir solutionner le problème en
suivant les étapes ci-dessous, contactez votre détaillant Pride autorisé pour du service. SVP ayez
en main le numéro de modèle, le numéro de série et la nature du problème avant de téléphoner.
LIFT CHAIR SERIES
QUESTIONS FREQUEMMENT POSEES
Pourquoi mon fauteuil releveur refuse-t-il de fonctionner?
Vérifiez que le transformateur externe est bien branché dans une prise électrique.
Vérifiez le disjoncteur (circuit) de la prise électrique.
Assurez-vous que le fil bas voltage est bien branché au transformateur externe.
Assurez-vous que la manette et le(s) moteur(s) sont branchés correctement.
Assurez-vous que le fil bas voltage est bien branché au(x) moteur(s).
Pourquoi mon fauteuil fonctionne seulement dans une direction?
Vérifiez le fonctionnement du bouton «up/down»sur la manette. Il doit glisser de la position «UP» vers la
position «DOWN» sans résistance. Si le bouton ne glisse pas sans adhérer, il faudra peut-être remplacer
la manette de commande.
Vérifiez les boutons «UP/DOWN» afin de vérifier que ceux-ci fonctionnent sans adhérer. Si un bouton a
tendance à coller, la manette devra possiblement être remplacée.
Contactez votre détaillant Pride autorisé pour obtenir de l’aide.
Que faire si mon fauteuil releveur stoppe pendant que je me soulève?
Votre fauteuil releveur est équipé d’une protection thermique interne située sur le transformateur externe
afin de protéger le module de contrôle contre la surchauffe. Si la protection thermique coupe le courant,
laissez le fauteuil releveur reposer pour environ 10 minutes afin que le moteur se refroidisse, puis
reprenez l’utilisation normale. Si vous constatez que les moteurs surchauffent fréquemment, contactez
votre détaillant Pride autorisé.
Il se peut qu’il y ait eu une panne de courant et/ou il n’y ait pas de batteries installées dans le transforma-
teur externe ou les batteries sont à plat. Assurez-vous de toujours avoir des batteries 9V fraîches dans le
transformateur externe.
Vérifiez le disjoncteur (circuit) de la prise électrique.
Que faire si mon fauteuil releveur oscille d’un coin à l’autre lorsqu’il est en place?
Le plancher est peut-être inégal ou un tapis affecte la position du fauteuil. Ajustez les patins niveleurs dans
les coins ou le fauteuil oscille, Voir la section III. “Votre Fauteuil releveur pour les instructions.
Que faire si les fonctions «Chaleur et Massage» de mon fauteuil ne fonctionnent pas?
Vérifez le branchement de la boîte de jonction avec le transformateur externe et l’alimentation du trans-
formateur. Un voyant lumineux vert indique que le transformateur est alimenté.
Assurez que les modules «chaleur/massage» sont correctement branchés à la boîte de jonction et que
la boîte de jonction est bien branchée aux moteurs tous situés à l’arrière du fauteuil releveur. Référez
vous à l’ “Annexe D” pour le diagramme des branchements électriques.
Vérifiez le branchement de la manette de commande sur la boîte de jonction. Si le branchement est
correct, les voyants lumineux de la manette s’allumeront.
Si un des voyants refuse de s’allumer, contactez votre détaillant Pride autorisé pour obtenir de l’aide.
Lift Chair Series www.pridemobility.com 47
Page 48

LIFT CHAIR SERIES
VI. PROBLEMES ET SOLUTIONS
Ou puis-je placer le transformateur externe?
Sur le plancher loin des sources de chaleur, dans un endroit bien ventilé et où il ne fera pas obstruction.
Sur le mur, loin des sources de chaleur, en le fixant à l’aide de la trousse de fixation pour transformateur
externe.
Ou se trouve le numéro de série de mon fauteuil releveur?
Le numéro se trouve en deux endroits: près de l’arrière du moteur sur le câdre en métal du mécanisme, le
second est attaché au câdre en dessous du mécanisme à ciseau. Le numéro de modèle de votre fauteuil
releveur est imprimé sous le code barre du numéro de série.
Qui dois-je appeler pour obtenir du service?
Contactez votre détaillant Pride autorisé pour obtenir du service.
48 www.pridemobility.com Lift Chair Series
Page 49

VII. SOINS ET ENTRETIEN
LIFT CHAIR SERIES
Votre fauteuil releveur Pride doit subir des vérifications de routine. Vous pouvez faire certaines
inspections vous-même tandis que d’autres inspections peuvent exiger que votre détaillant autorisé Pride les exécute. En respectant la cédule des vérifications, vous vous assurez que votre
fauteuil releveur vous procurera plusieurs années de service sans problèmes. Si vous avez des
questions concernant l’entretien votre fauteuil releveur, contactez votre détaillant Pride autorisé.
ENTRETIEN DU RECOUVREMENT
Inspectez le recouvrement pour voir s’il y a des fils tirés, des fentes ou des déchirures.
Le recouvrement de votre fauteuil est composé à 100% polyester et est coté «W» pour le nettoyage. Nous
recommendons de le nettoyer régulièrement avec un aspirateur et une brosse douce afin de retirer la
poussière. Pour enlever une tache, utilisez un nettoyeur moussant à base d’eau pour tissu ou un shampooing pour tissu. Appliquez la mousse avec une brosse dans un mouvement circulaire et passer l’aspirateur lorsque après que le tout ait sèché. Faites un test sur une petite surface avant de commencer le
nettoyage. si votre fauteuil est très sale, confiez le nettoyage à un professionnel.
MISE EN GARDE! Le recouvrement ne doit jamais être mis en contact direct avec
une source de chaleur telle qu’une chaufrette ou une cigarette sous peine de vous
blesser et/ou de provoquer un incendie.
MISE EN GARDE! Pride recommande fortement de ne pas fumer lorsque vous prenez
place ou que vous faites fonctionner votre fauteuil releveur, même si votre fauteuil
releveur a réussi les tests d’exposition à la cigarette. Si vous décidez de fumer dans
votre fauteuil releveur, vous devez respecter les consignes suivantes:
Ne laissez-pas de cigarette allumée sans surveillance.
Gardez les cendriers à distance du fauteuil releveur.
Assurez-vous de bien éteindre les mégots de cigarette avant d’en disposer.
NOTE: N’utilisez pas de nettoyeur à base de solvant pour enlever une tache. Ne saturez pas le tissu.
Ne placez pas le fauteuil en plein soleil afin de prévenir les dommages au recouvrement.
ENTRETIEN DES COMPOSANTES ELECTRONIQUES
Inspectez tous les fils pour déceler des dommages ou de l’usure.
Si vous décelez des dommages, débranchez le fauteuil et contactez votre détaillant Pride autorisé pour
le faire réparer.
Gardez les composantes électroniques bien au sec, loin de toute humidité et dans un endroit tempéré.
Les fauteuils releveurs Pride sont conçus pour l’utilisation à l’intérieur seulement.
MISE EN GARDE! Même si votre fauteuil a réussi les test d’exposition aux liquides,
gardez votre fauteuil à l’abri des sources d’humidité tel que l’exposition directe à
de l’eau, les liquides corporels et l’incontinence. Inspectez les composantes
électriques fréquemment et remplacez-les si vous décelez de la corrosion.
MISE AU REBUT ET RECYCLAGE
Votre fauteuil releveur doit être mis au rebut en respectant les lois et règlements de votre mu nicipalité. Contactez votre organisme local ou votre détaillant Pride autorisé pour obtenir les informations sur la mise au
rebut et le recyclage des pièces en métal, en bois, en plastique, batteries et l’emballage de votre fauteuil.
MISE EN GARDE! Les sacs en plastique sont dangereux pour les jeunes enfants.
Assurez-vous d’en disposer de façon sécuritaire.
Lift Chair Series www.pridemobility.com 49
Page 50

LIFT CHAIR SERIES
VIII. GARANTIE
GARANTIE LIMITEE DE DEUX ANS
Pendant les deux (2) années à partir de la date d’achat, Pride réparera ou remplacera selon son
choix, pour l’acheteur d’origine seulement, les pièces suivantes trouvées défectueuses après
examen par son représentant:
Structure métallique Moteur Manette de commande Ciseaux du mécanisme
Pièces métallique du mécanisme élévateur
NOTE: Pride se réserve le droit de remplacer seulement la pièce du mécanisme de métal qui s’avère
être défectueuse.
EXCLUSIONS DE LA GARANTIE
Recouvrement
Dommages résultant de l’abus, mauvais usage, réparations non-autorisées, négligence, accident(s),
altération, ou modification du produit.
Dommages causés par un transporteur ou pendant la manipulation.
Tous dommages extraordinaires, directs ou indirects.
Après la période de garantie, Pride n’aura aucune obligation de quelque type que ce soit (incluant la valeur
marchande ou la compatibilité avec un usage).
Dans l’évantualité ou des dommages seraient découverts après la réception de marchandise, le destinataire
doit aviser le transporteur dans les 48 heures suivant la réception et demander une inspection. Le destinataire doit conserver le carton d’emballage et laisser le produit dans l’endroit où il a été reçu. Toutes réclamations doivent être faites auprès du transporteur.
50 www.pridemobility.com Lift Chair Series
Page 51

NOTES
LIFT CHAIR SERIES
Lift Chair Series www.pridemobility.com 51
Page 52
LIFT CHAIR SERIES
088 609 661
DIRETTIVE PER LA SICUREZZA
I simboli sono utilizzati in tutto il manuale per l'utente e sul prodotto per comunicare importanti informazioni
su uso, cura e manutenzione corretti.
AVVERTENZA! Indica una condizione/situazione potenzialmente pericolosa. La
mancata osservanza delle procedure previste può provocare lesioni alle persone,
danni ai componenti o malfunzionamento. Sul prodotto, questa icona è
rappresentata da un simbolo nero in un triangolo giallo con bordo nero.
OBBLIGATORIO! Queste azioni devono essere eseguite come descritto. La
mancata esecuzione delle procedure obbligatorie può provocare lesioni alle
persone e/o danni alle apparecchiature. Sul prodotto, questa icona è rappresentata
da un simbolo bianco in un punto nero con bordo bianco.
PROIBITO! Queste azioni sono proibite. Non devono mai essere eseguite e per
nessun motivo. L’esecuzione di un'azione proibita può causare lesioni personali e/
o danni alle apparecchiature. Sul prodotto, questa icona è rappresentata da un
simbolo nero con un cerchio rosso e una riga rossa.
Compilare le seguenti informazioni per rapido riferimento:
Rivenditore autorizzato Pride:
Indirizzo:
Telefono:
Data di acquisto: Numero seriale:
NOTA: Il presente manuale per l’utente è redatto sulla base delle più recenti specifiche tecniche e
delle informazioni del prodotto, disponibili al momento della pubblicazione. Pride si riserva il diritto
di apportare modifiche qualora fossero necessarie. Qualsiasi modifica apportata ai nostri prodotti
può generare lievi differenze tra le illustrazioni e le spiegazioni contenute nel presente manuale e il
prodotto acquistato.
Copyright © 2009
Pride Mobility Products Italia S.r.l.
INFMANU3686/Rev C/August 2009/Italian
52 www.pridemobility.com Lift Chair Series
Page 53

ETICHETTE INFORMATIVE
LIFT CHAIR SERIES
SIMBOLI DI SICUREZZA DEL PRODOTTO
I simboli in basso sono utilizzati sul prodotto pe r identificare le avvertenze, gli interventi ob bligatori e le azioni
proibite. Non rimuovere queste etichette dal prodotto. Si osservi che non tutti i simboli sono utilizzati sul
modello di poltrona elevabile in oggetto.
Pericolo di punti di aggancio/schiacciamento! Non collocare oggetti o
accessori nel percorso delle parti mobili.
Pericolo elettrico
Leggere e seguire le informazioni contenute nel manuale per l’utente.
Portata massima
Non collegare una prolunga elettrica al convertitore CA/CC o al caricabatterie.
La rimozione dello spinotto di messa a terra può causare scossa elettrica.
Se necessario, installare correttamente un adattatore autorizzato a 3
spinotti in una presa elettrica con accesso per spina a 2 spinotti.
Smaltimento e riciclo - Contattare il fornitore Pride per le informazioni sulle
procedure di smaltimento e riciclo idonee del prodotto Pride e della relativa
confezione.
Lift Chair Series www.pridemobility.com 53
Page 54
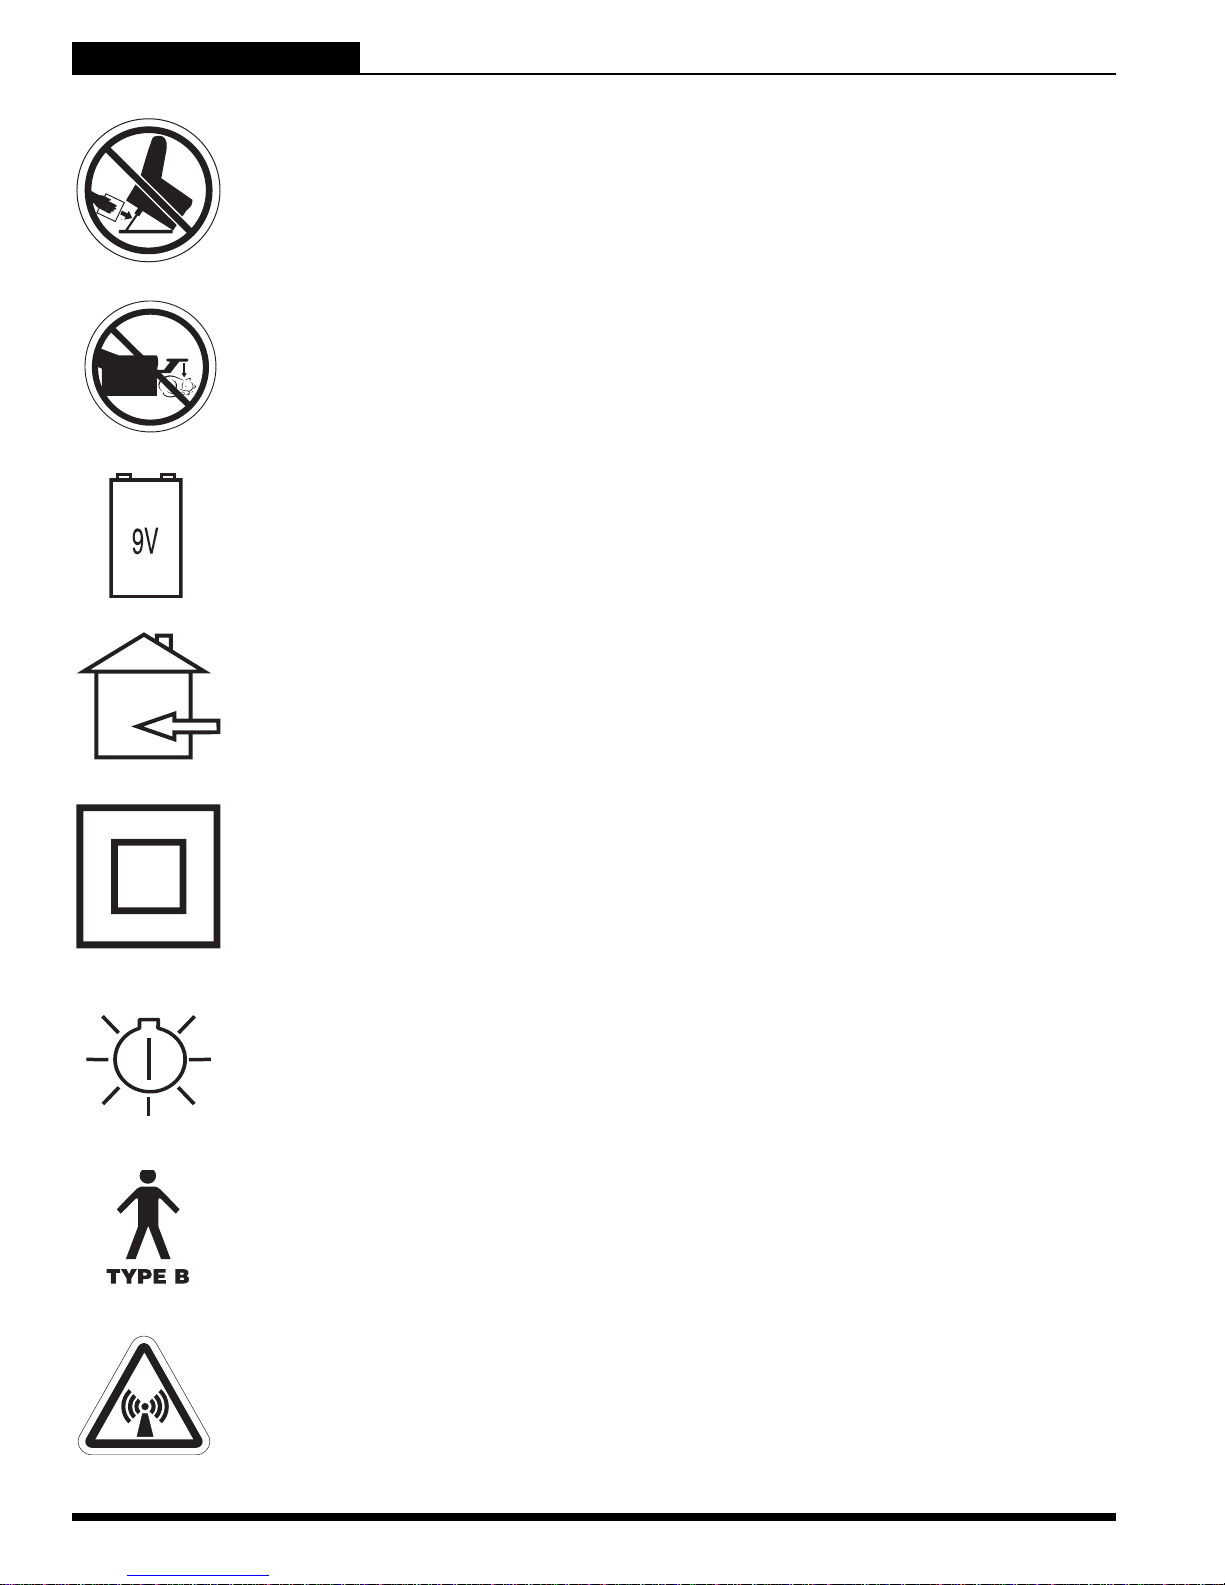
LIFT CHAIR SERIES
Non collocare oggetti sotto la poltrona elevabile. Durante il funzionamento,
verificare che l’area sia priva di ostacoli, compresi animali e bambini.
Non collocare oggetti sotto la poltrona elevabile. Assicurarsi che la zona sia
libera da ingombri o ostacoli, compresi animali domestici e bambini piccoli
durante il funzionamento.
Ubicazione sportello batteria
ETICHETTE INFORMATIVE
Solo per uso in locali interni. Evitare l’esposizione a pioggia, neve, ghiaccio,
sale o acqua stagnante. Mantenere e conservare in un luogo pulito ed
asciutto.
Apparecchiatura di Classe II
Il LED verde indica che l’alimentazione elettrica è accesa. Non applicabile a
tutti i modelli.
Grado di protezione da scossa elettrica.
Questo prodotto è stato collaudato e risulta conforme alla direttiva CEI 60601 1-2.
54 www.pridemobility.com Lift Chair Series
Page 55

INDICE
LIFT CHAIR SERIES
DIRETTIVE PER LA SICUREZZA........................................................................ 52
ETICHETTE INFORMATIVE ............................................................................... 53
I. INTRODUZIONE.............................................................................................. 56
SICUREZZA................................................................................................................................................................56
CONSENSO DELL ACQUIRENTE.............................................................................................................................56
COMUNICAZIONE DELLE INFORMAZIONI..............................................................................................................56
II. DIRETTIVE GENERALI .................................................................................. 57
MODIFICHE................................................................................................................................................................57
CAPACITÁ DI CARICO ..............................................................................................................................................57
PERICOLI DI AGGANCIO/SCHIACCIAMENTO.........................................................................................................57
GRADO DI PROTEZIONE/MODALITÀ OPERATIVA ...............................................................................................57
TEMPERATURE DI CONSERVAZIONE E FUNZIONAMENTO ................................................................................57
EMI/RFI.......................................................................................................................................................................58
SPEDIZIONE E CONSEGNA .....................................................................................................................................58
TRASPORTO SU VEICOLI A MOTORE ....................................................................................................................58
III. LA POLTRONA ELEVABILE .......................................................................... 59
COMPONENTI STRUTTURALI..................................................................................................................................59
COMPONENTI ELETTRICI .......................................................................................................................................60
IV. MONTAGGIO/SMONTAGGIO ........................................................................ 62
SET-UP DELLA POLTRONA ELEVABILE .................................................................................................................62
POSIZIONAMENTO DELLA POLTRONA ELEVABILE ..............................................................................................64
INSTALLAZIONE DELLE BATTERIE .........................................................................................................................64
SMONTAGGIO DELLA POLTRONA ELEVABILE......................................................................................................65
RIMOZIONE TESSUTO/INSTALLAZIONE.................................................................................................................66
V. FUNZIONAMENTO......................................................................................... 69
PRECAUZIONI D’USO .............................................................................................................................................69
USO DEL FILOCOMANDO .....................................................................................................................................69
VI. RISOLUZIONE DEI PROBLEMI ..................................................................... 73
DOMANDE FREQUENTI............................................................................................................................................73
VII. CURA E MANUTENZIONE ........................................................................... 75
CURA DEL TESSUTO................................................................................................................................................75
CURA DEL SISTEMA ELETTRONICO ......................................................................................................................75
SMALTIMENTO E RICICLO .......................................................................................................................................75
VIII. GARANZIA ................................................................................................. 76
APPENDICE...................................................................................................... 127
Lift Chair Series www.pridemobility.com 55
Page 56

LIFT CHAIR SERIES
I. INTRODUZIONE
SICUREZZA
BENVENUTI alla Pride Mobility Products Italia S.r.l. (Pride). Il prodotto acquistato unisce componenti allo stato dell'arte con sicurezza, comfort e stile. Siamo certi che queste caratteristiche del
design Vi forniranno tutte le comodità attese durante le attività quotidiane. La comprensione
dell'uso e della cura sicuri del prodotto Vi garantiranno anni di funzionamento e servizio senza
problemi.
Prima di utilizzare il prodotto leggere ed osservare tutte le istruzioni, le avvertenze e le note contenute nel
presente manuale. Inoltre, la Vostra sicurezza dipende dal buon senso dell'utente, del Rivenditore,
dell'assistente o del professionista sanitario.
Se il manuale contiene informazioni di difficile comprensione, oppure in caso sia necessaria assistenza per
l'installazione o l'uso, si prega di contattare il proprio rappresentante Pride. La mancata osservanza delle
istruzioni, avvertenze e note contenute nel presente manuale ed applicate sul prodotto Pride più comportare lesioni alle persone e/o danni al prodotto ed annullare la garanzia del prodotto Pride.
CONSENSO DELL'ACQUIRENTE PER GARANTIRE L'USO SICURO
Accettando la fornitura di questo prodotto, Vi impegnate a non cambiare, modificare o alterare il prodotto, nè
a rimuovere o rendere inattivi o insicuri dispositivi di protezione, schermi o altre funzioni di sicurezza del
prodotto; e a non evitare, rifiutare o dimenticare di installare i kit di adattamento forniti regolarmente dalla
Pride per migliorare o preservare l'uso sicuro del prodotto.
COMUNICAZIONE DELLE INFORMAZIONI
Siamo lieti di ricevere domande, commenti e suggerimenti in merito a questo manuale. Desideriamo anche
conoscere la Vostra opinione rispetto alla sicurezza e all'affidabilità della nuova poltrona elevabile e all'assistenza ricevuta dal rappresentante autorizzato Pride. Si prega di comunicare eventuali cambiamenti di indirizzo in modo da tenerVi al corrente delle informazioni importanti in merito alla sicurezza, ai nuovi prodotti e
alle nuove opzioni che possono incrementare la possibilità di utilizzo della Vostra poltrona elevabile. Potere
scrivere al seguente indirizzo:
Pride Mobility Products Italia S.r.l.
Via del Progresso - ang. Via del Lavoro
Loc. Prato della Corte
00065 - Fiano Romano (RM)
NOTA: In caso di smarrimento della scheda di registrazione del prodotto o del presente manuale per
l’utente, potete contattarci e saremo lieti di inviarvene immediatamente uno nuovo.
56 www.pridemobility.com Lift Chair Series
Page 57
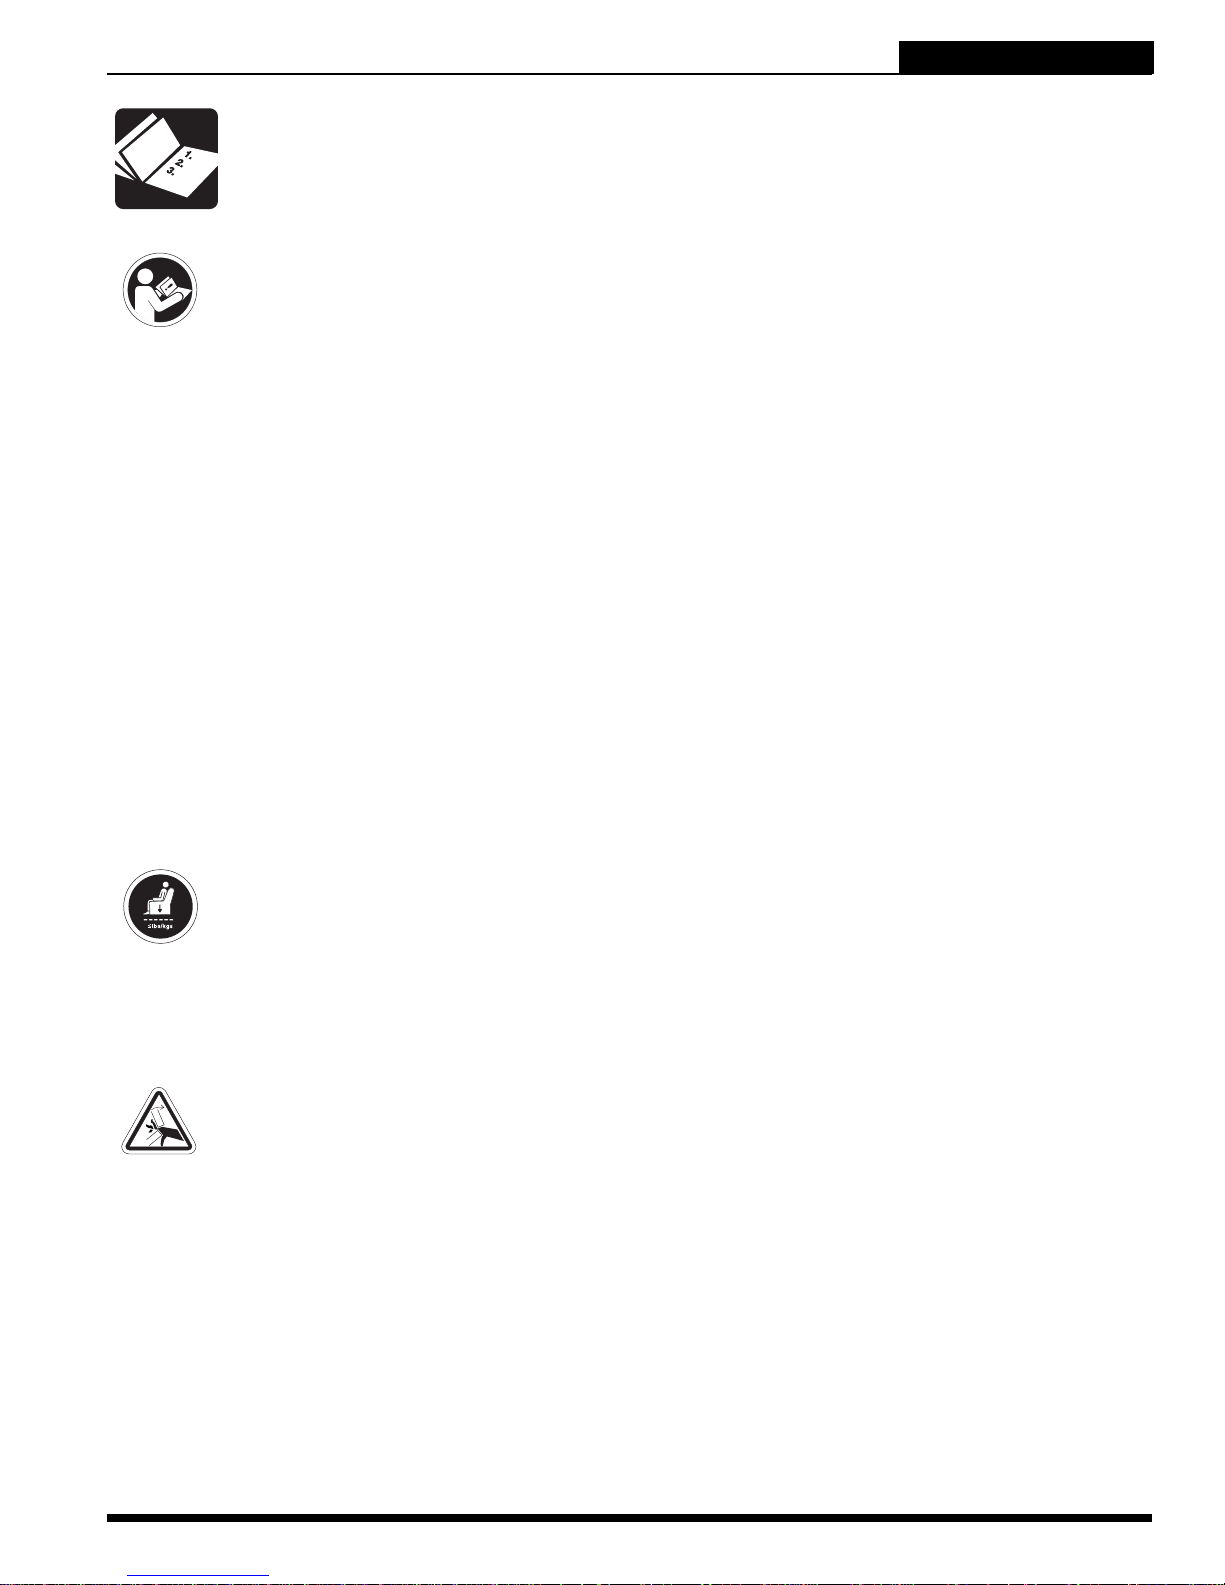
II. DIRETTIVE GENERALI
LIFT CHAIR SERIES
La Vostra poltrona elevabile Pride è un prodotto allo stato dell'arte progettato per migliorare la
mobilità. Pride fornisce un’ampia gamma di prodotti adatti alle esigenze individuali. È opportuno
comprendere che la selezione finale e la decisione di acquisto in merito alla tipologia di poltrona
elevabile da utilizzare costituisce responsabilità dell’utente della poltrona, se in grado di compiere tale decisione, e del suo assistente sanitario (medico curante, fisioterapista ecc.).
OBBLIGATORIO! Prima di utilizzare la poltrona elevabile per la prima volta,
assicurarsi di aver letto e compreso completamente il presente manuale.
In alcune situazioni, tra cui particolari stati di salute, è necessario che l’utente faccia pratica di utilizzo della
poltrona in presenza di un assistente qualificato. Per assistente qualificato si intende un familiare o un assistente professionista che sia preparato a coadiuvare un utente di poltrona elevabile nello svolgimento di varie
attività quotidiane.
Seguono precauzioni, consigli, e altre considerazioni in materia di sicurezza che aiuteranno l’utente ad acquisire la pratica dell’utilizzo in sicurezza della poltrona.
MODIFICHE
Pride ha progettato e realizzato la poltrona elevabile per fornire com fort e versatilità ottimali. Tuttavia , per
prevenire lesioni personali e/o danni alla poltrona elevabile, non modificare, aggiungere, rimuovere o disattivare caratteristiche, parti o funzioni della poltrona. Inoltre, le modifiche non autorizzate possono invalidare la
garanzia del prodotto.
NOTA: Per tutte le operazioni di riparazione e sostituzione, utilizzare solo componenti Pride.
CAPACITÀ DI CARICO
La poltrona ha una capacità di carico massima. Per maggiori informazioni consultare l’ ”Appendice A”.
OBBLIGATORIO! Rispettare i limiti di peso specificati della poltrona. Pride si
manleva ogni responsabilità per infortuni e/o danni agli oggetti generati dalla
mancata osservanza della capacità di carico.
PERICOLI DI AGGANCIO/SCHIACCIAMENTO
I meccanismi a forbice e di sollevamento sono etichettati sulla poltrona elevabile come pericoli di aggancio e
schiacciamento. Lasciare libere queste aree e verificare che il percorso del movimento sia privo di ostacoli.
Per i punti di aggancio/schiacciamento, consultare la figura 3.1.
AVVERTENZA! Non collocare oggetti o accessori nel percorso delle parti mobili.
GRADO DI PROTEZIONE/MODALITÀ OPERATIVA
Apparecchiatura di Classe II/Protezione Tipo II da scossa elettrica
Grado di protezione da ingresso di solidi/liquidi—IPX1
Modalità operativa—Ciclo di servizio massimo: 2min ON/18min OFF
TEMPERATURE DI CONSERVAZIONE E FUNZIONAMENTO
Trasporto o conservazione: da -75°C/-104°F a 70°C/158°F
Funzionamento: da 10°C/50°F a 40°C/104°F
Lift Chair Series www.pridemobility.com 57
Page 58

LIFT CHAIR SERIES
II. DIRETTIVE GENERALI
INTERFERENZA ELETTROMAGNETICA E DI RADIOFREQUENZA (EMI/RFI)
AVVERTENZA! Test di laboratorio hanno dimostrato che le onde elettromagnetiche
e radio possono influire negativamente sulle prestazioni delle apparecchiature
azionate elettricamente, come le poltrone elevabili.
L’interferenza elettromagnetica e radio può provenire da antenne di telefoni cellulari, radio mobili a due vie
(walkie-talkie e CB), emittenti radio-televisive, trasmettitori radio amatoriali (HAM), collegamenti di computer
senza fili, microonde e cercapersone e ricetrasmittenti portatili a medio raggio. In alcuni casi, queste onde
possono provocare spostamenti involontari o danni al sistema di controllo. L'utente della poltrona elevabile
può aiutare a prevenire interferenze elettromagnetiche mantenendo una distanza minima tra portatili e mobili
delle apparecchiature di comunicazione RF. Si raccomanda di mantenere una distanza di almeno 3 metri (9
piedi) tra la poltrona elevabile e qualsiasi tipo di attrezzature che emettano oltre 10 W di potenza di uscita.
Fare riferimento alla documentazione fornita dal produttore per determinare la massima potenza di uscita di
tale dispositivo.
Tutti i veicoli per la mobilità azionati elettricamente sono dotati di immunità (o resistenza) alle interferenze
elettromagnetiche. Per le norme EMC, questo prodotto ha superato le prove di immunità ed è valutato come
prodotto gruppo 1, classe B, vale a dire la poltrona elettrica utilizza energia in radiofrequenza solo per le
funzioni interne. Pertanto, le emissioni RF sono molto basse e non sono suscettibili di causare alcuna interferenza sugli apparecchi elettronici in vicinanza, cioè rende la poltrona elettronica adatta per l'utilizzo in tutti
gli ambienti, compresi gli quelli domestici e gli ospedali.
AVVERTENZA! Telefoni cellulari, radio mobili a due vie, computer portatili, e altri
tipi di emittenti radio-televisive possono provocare spostamenti involontari delle
apparecchiature elettriche a causa delle interferenze elettromagnetiche. E'
necessaria la massima cautela se si utilizzano questi prodotti, mentre la poltrona
è atonata.
AVVERTENZA! L’aggiunta di accessori o componenti al veicolo per la poltrona
elevabile può aumentare la vulnerabilità del veicolo alle interferenze
elettromagnetiche. Non modificare in alcun modo la poltrona elevabile senza
autorizzazione di Pride.
AVVERTENZA! La poltrona elevabile può interferire con le prestazioni di altri
dispositivi elettrici vicini, come per esempio sistemi di allarme.
NOTA: In caso di movimento accidentale, interrompere l’uso della poltrona elevabile. Contattare
Pride per riferire l’incidente.
SPEDIZIONE E CONSEGNA
Prima di utilizzare la poltrona, verificare che la consegna sia completa poichè alcuni componenti possono
essere imballati individualmente. In caso di consegna incompleta, contattare immediatamente il proprio fornitore/specialista autorizzato. In caso di danni durante il trasporto, relativi all'imballo o al contenuto, contattare
l'azienda di trasporto responsabile.
TRASPORTO SU VEICOLI A MOTORE
Per trasportare la poltrona elevabile in un veicolo a motore, è necessario fissare i singoli componenti (trasformatore esterno ecc.) per prevenirne lo scivolamento. È necessario fissare anche la poltrona elevabile per
prevenirne lo scivolamento (un rischio possibile in caso di frenata del veicolo).
58 www.pridemobility.com Lift Chair Series
Page 59
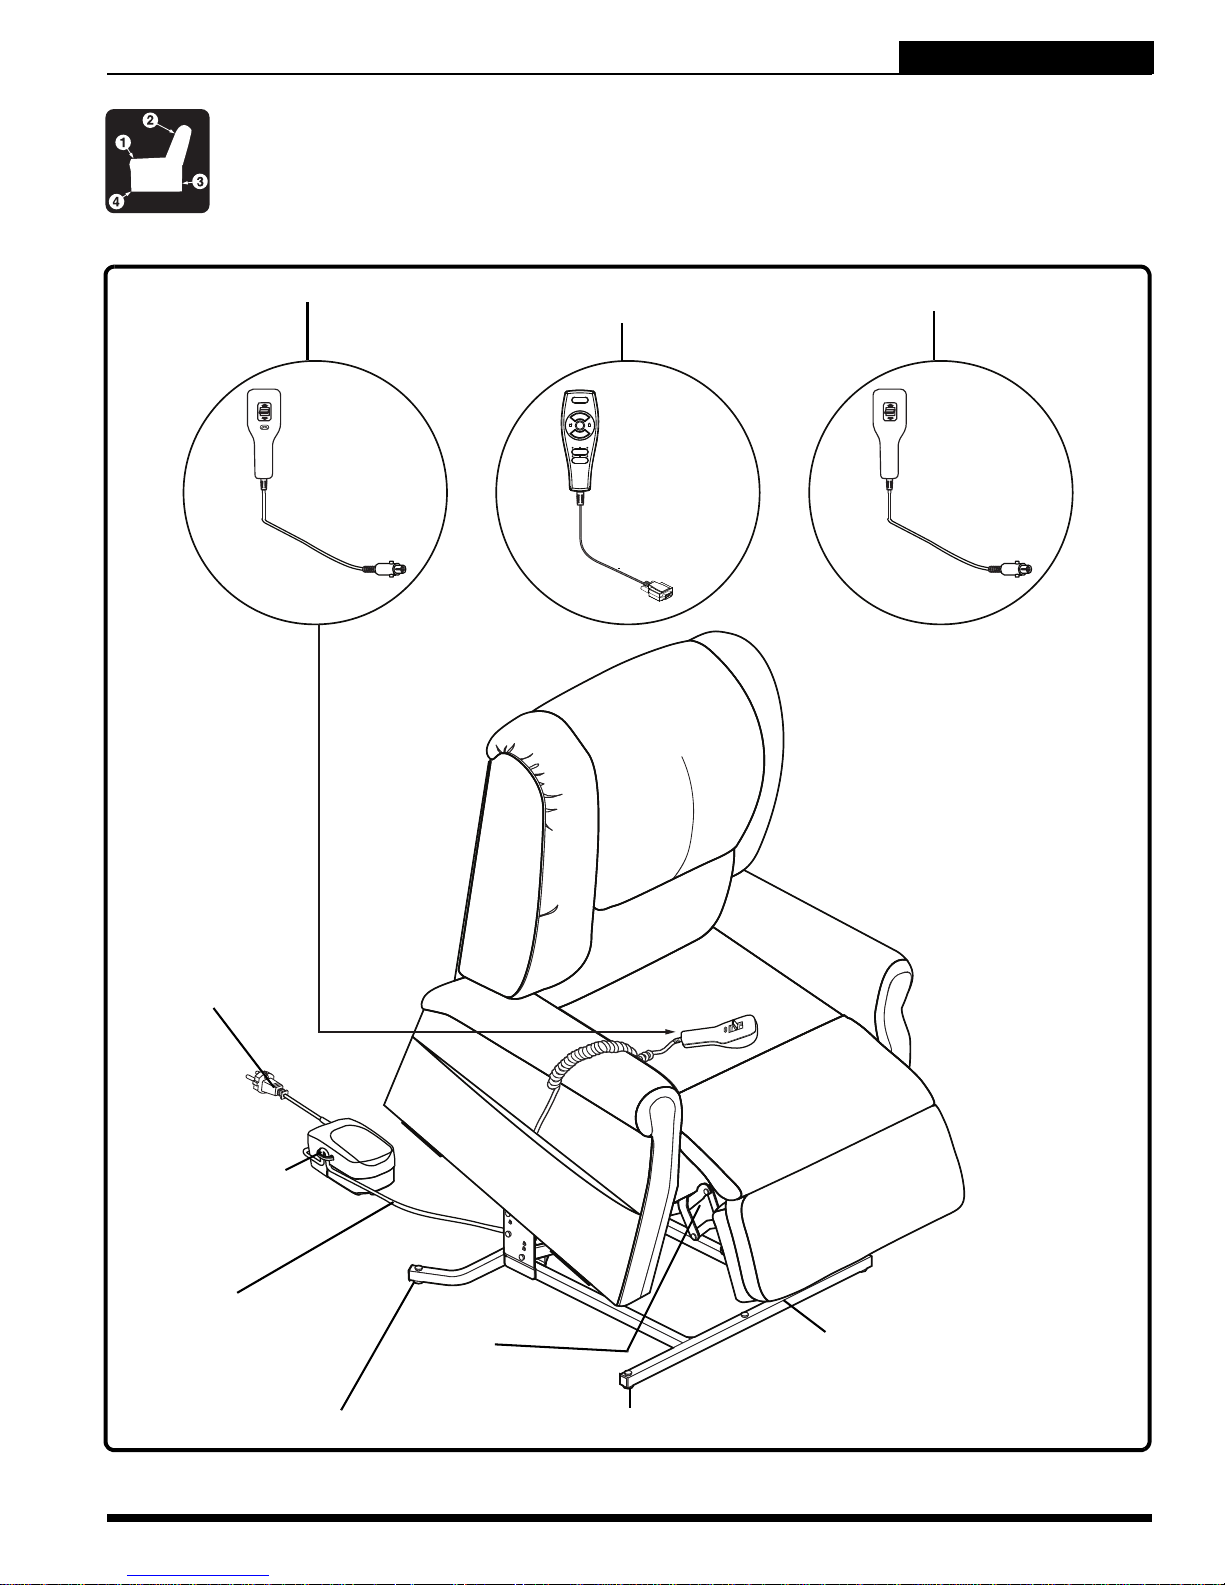
III. LA POLTRONA ELEVABILE
COMPONENTI STRUTTURALI
La presente sezione descrive le caratteristiche della polt rona elevabile. Esaminare rapidamente
la funzione e l’ubicazione di ciascun componente descritto; si osservi che le illustrazioni e la
posizione delle opzioni raffigurate nel presente manuale possono non rappresentare la propria
poltrona elevabile.
LIFT CHAIR SERIES
FILOCOMANDO POLTRONA DUE MOTORI
CONTROLLO MANUALE
RISCALDAMENTO E MASSAGGIO
FILOCOMANDO STANDAR
CAVO DI
ALIMENTAZIONE
TRASFORMATORE
ESTERNO
CAVO DI CONNESSIONE
A BASSA TENSIONE
MECCANISMI A
FORBICE
(PUNTI DI AGGANCIO)
PIEDINI POLTRONA (TOTALE QUATTRO)
Figura 3.1 Principali componenti poltrona elevabile Pride
Lift Chair Series www.pridemobility.com 59
MECCANISMO DI
ELEVAZIONE
(PUNTI DI AGGANCIO)
Page 60
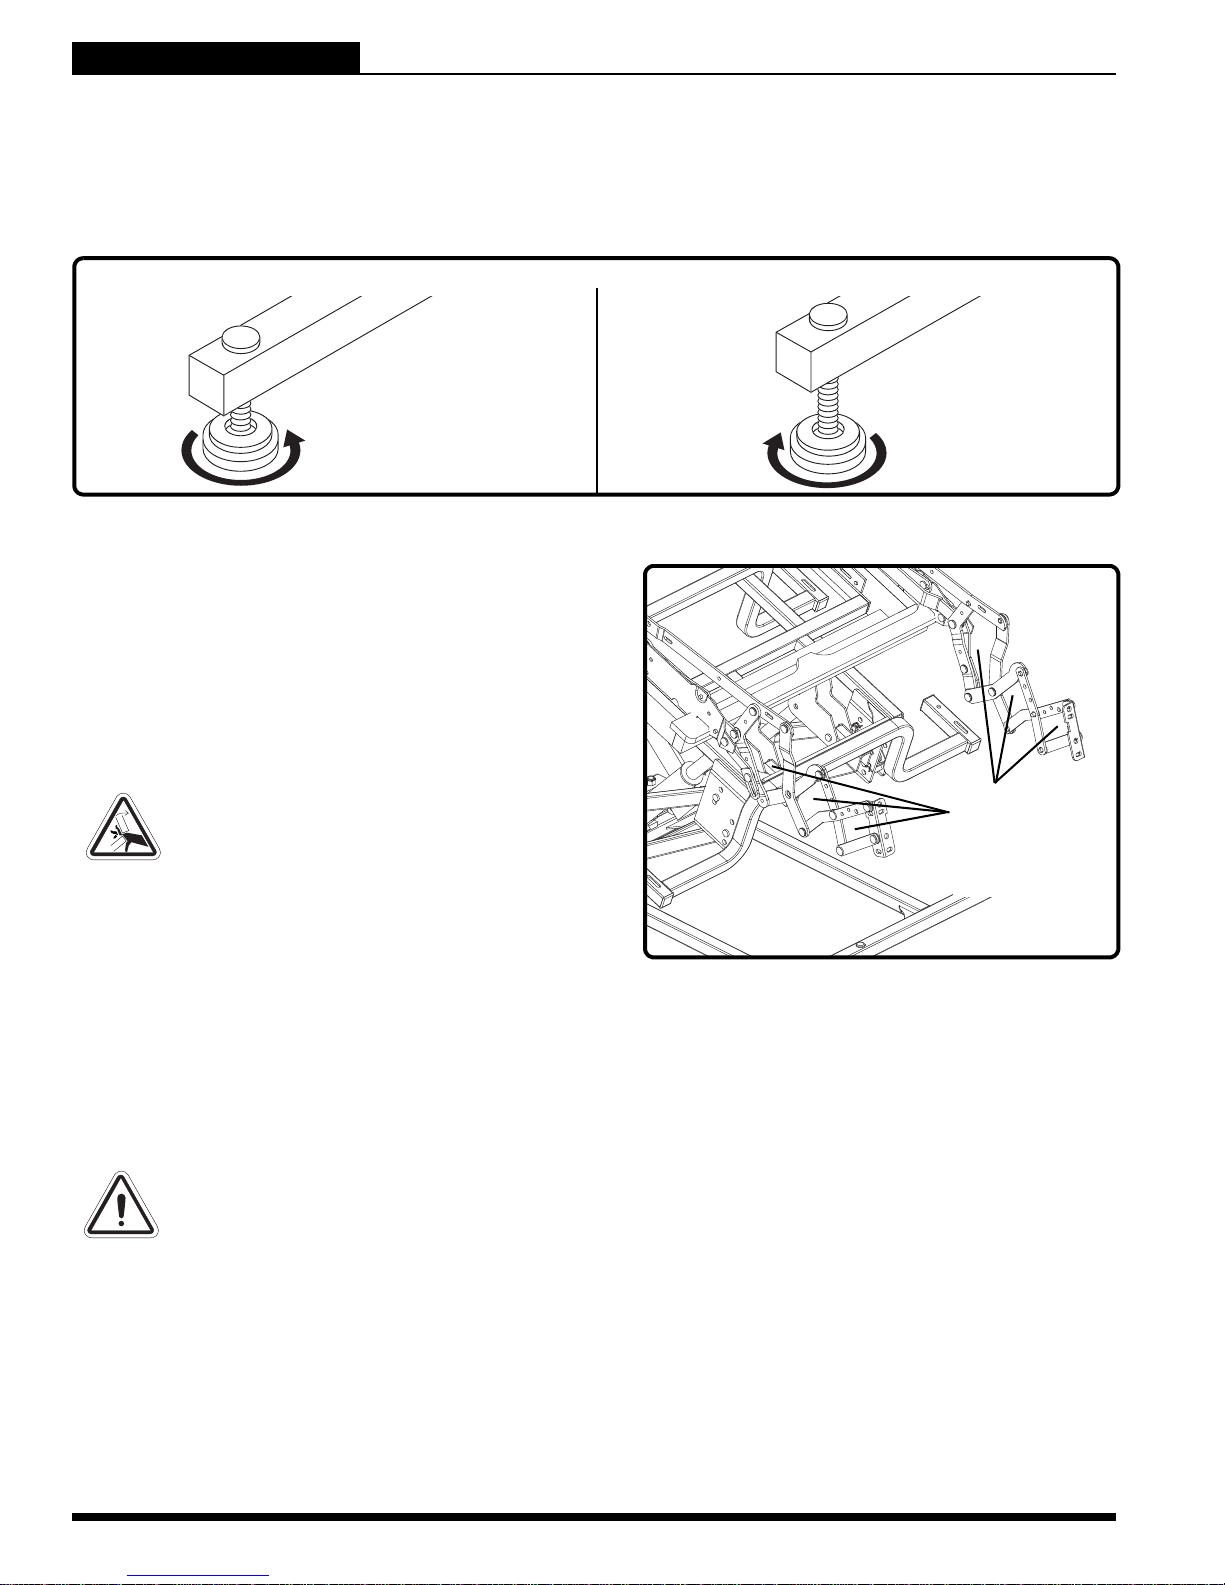
LIFT CHAIR SERIES
MECCANISMI
A FORBICE
(PUNTI DI
AGGANCIO)
III. LA POLTRONA ELEVABILE
Meccanismo di sollevamento: Risponde al filocomando per posizionare la poltrona nelle posizioni di
seduta, inclinazione e verticale.
Piedini regolabili: Ruotare manualmente verso l’alto o verso il basso per stabilizzare la poltrona prima
dell’uso (Fig. 3.2).
PIEDINI REGOLABILI PER BILANCIARE LA POLTRONA
Figura 3.2 Piedini regolabili
Meccanismo a forbice:
Estendere o ritrarre per posizion-
are la poltrona sui diversi livelli di inclinazione (Fig. 3.3).
AVVERTENZA! Pericolo di punti di
aggancio/schiacciamento! Ricordare
che i meccanismi di sollevamento
rappresentano un punto di aggancio
della poltrona elevabile. Allontanare
quanto segue e oggetti simili da
questi punti durante l'uso della
poltrona elevabile:
complementi di arredo
bambini in tenera età
animali domestici
fili elettrici
tubazioni per ossigeno
oggetti liberi, tra cui capi di abbiglia-
mento e coperto
Figura 3.3 Meccanismi a forbice
cavi di alimentazione elettrica
COMPONENTI ELETTRICI
La poltrona elevabile Pride dispone di un sistema elettrici DC a bassa tensione, che riduce la corrente domestica standard da 90V CA - 264V CA a corrente diretta (24/39V DC). I componenti elettrici comprendono il
trasformatore esterno e il filocomando. Mantenere sempre queste aree prive di umidità.
AVVERTENZA! Mantenere sempre tutti i componenti elettrici privi di umidità per
prevenire il rischio di shock e/o scossa elettrica.
Trasformatore esterno: Si collega ad una presa elettrica standard per fornire alimentazione alla poltrona
elevabile. Il trasformatore potrebbe essere dotato di un indicatore LED, che diventa verde quando l’alimentazione del trasformatore è in funzionamento.
Il trasformatore può essere inoltre dotato di supporti che ne consentono il montaggio a parete, direttamente
sotto la presa elettrica standard. Le viti vanno montate sulla trave della parete per sicurezza. Per il diagramma
di montaggio consultare l’ “Appendice G” o “Appendice H”.
NOTA: La Pride non è responsabile dei danni causati dall'installazione errata.
60 www.pridemobility.com Lift Chair Series
Page 61

III. LA POLTRONA ELEVABILE
LIFT CHAIR SERIES
Batterie: Forniscono l’alimentazione necessaria per riportare la p oltrona elevabile dalla posizione in clinata a
quella di seduta e/o sollevamento in caso di assenza di corrente elettrica. Per i modelli dotati di un sistema
di back-up a batteria, le batterie si trovano all'interno del trasformatore esterno.
Filocomando: Contiene i comandi necessari per controllare le diverse funzioni della poltrona elevabile. Per
maggiori informazioni consultare il paragrafo V. “Funzionamento”. Il filocomando può essere dotato di un
connettore a rilascio rapido che consente all’utente di staccare il filocomando dalla poltrona, disabilitandone
tutte le funzioni.
Lift Chair Series www.pridemobility.com 61
Page 62
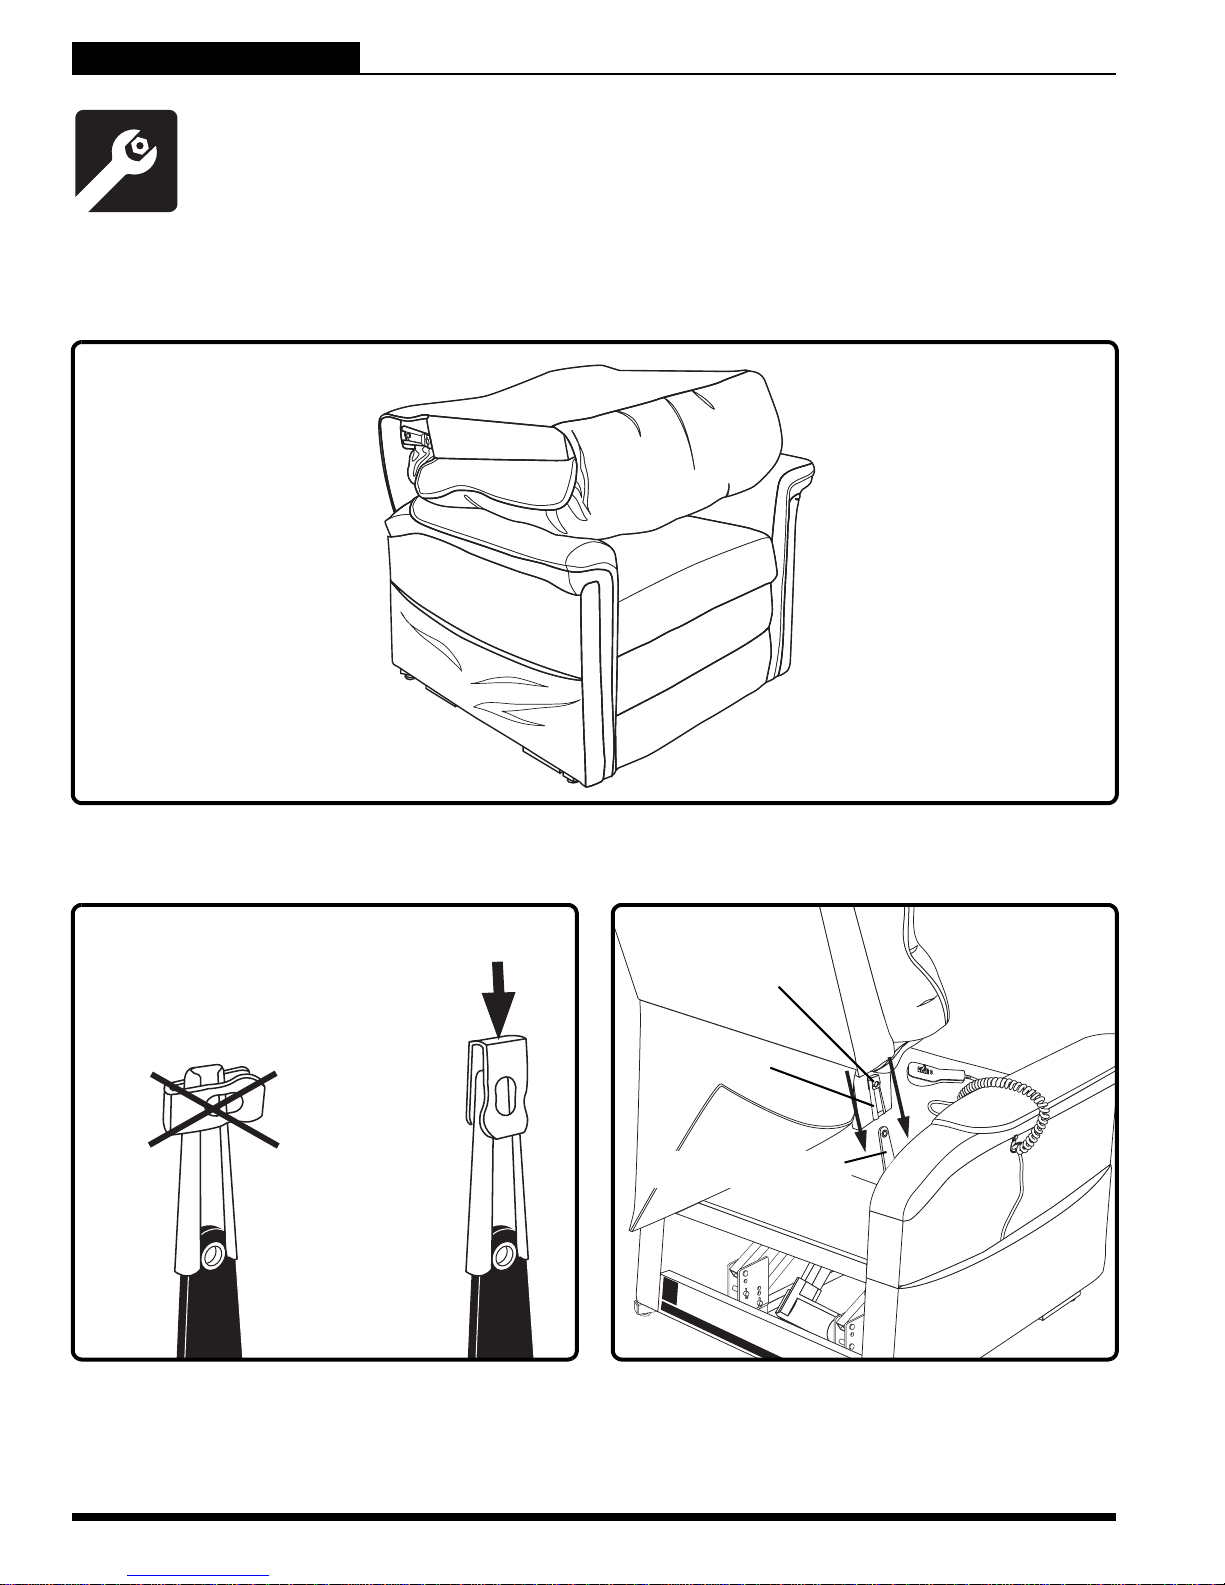
LIFT CHAIR SERIES
COLLEGAMENTO KD
La poltrona elevabile può richiedere alcune operazioni di montaggio prima dell’uso. Inoltre, per
favorire la manutenzione della poltrona, possono essere necessarie alcune operazioni di smontaggio. Se la poltrona elevabile è un modello richiudibile (KD), seguire le istruzioni contenute nel
paragrafo “Installazione della poltrona elevabile”. Se la poltro na no n è un modello KD, passare
al paragrafo “Posizionamento della poltrona elevabile”.
SET-UP DELLA POLTRONA ELEVABILE
I modelli KD sono consegnati in posizione chiusa (Fig. 4.1).
IV. MONTAGGIO/SMONTAGGIO
Figura 4.1 Posizione chiusa (KD)
Per montare la poltrona elevabile eseguire questi passaggi:
CORRETTO
SBAGLIATO
GUAINA KD
4.1.1 Eliminare l’imballaggio dalla parte posteriore
della poltrona e controllare che il morsetto di
blocco sia in posizione verticale. Riposizionare se necessario.
4.1.2 Inserire le guaine KD sinistra e destra dello
MORSETTO DI
BLOCCO
schienale della poltrona sulle connessioni
KD sui braccioli e sul sedile della poltrona.
62 www.pridemobility.com Lift Chair Series
Page 63
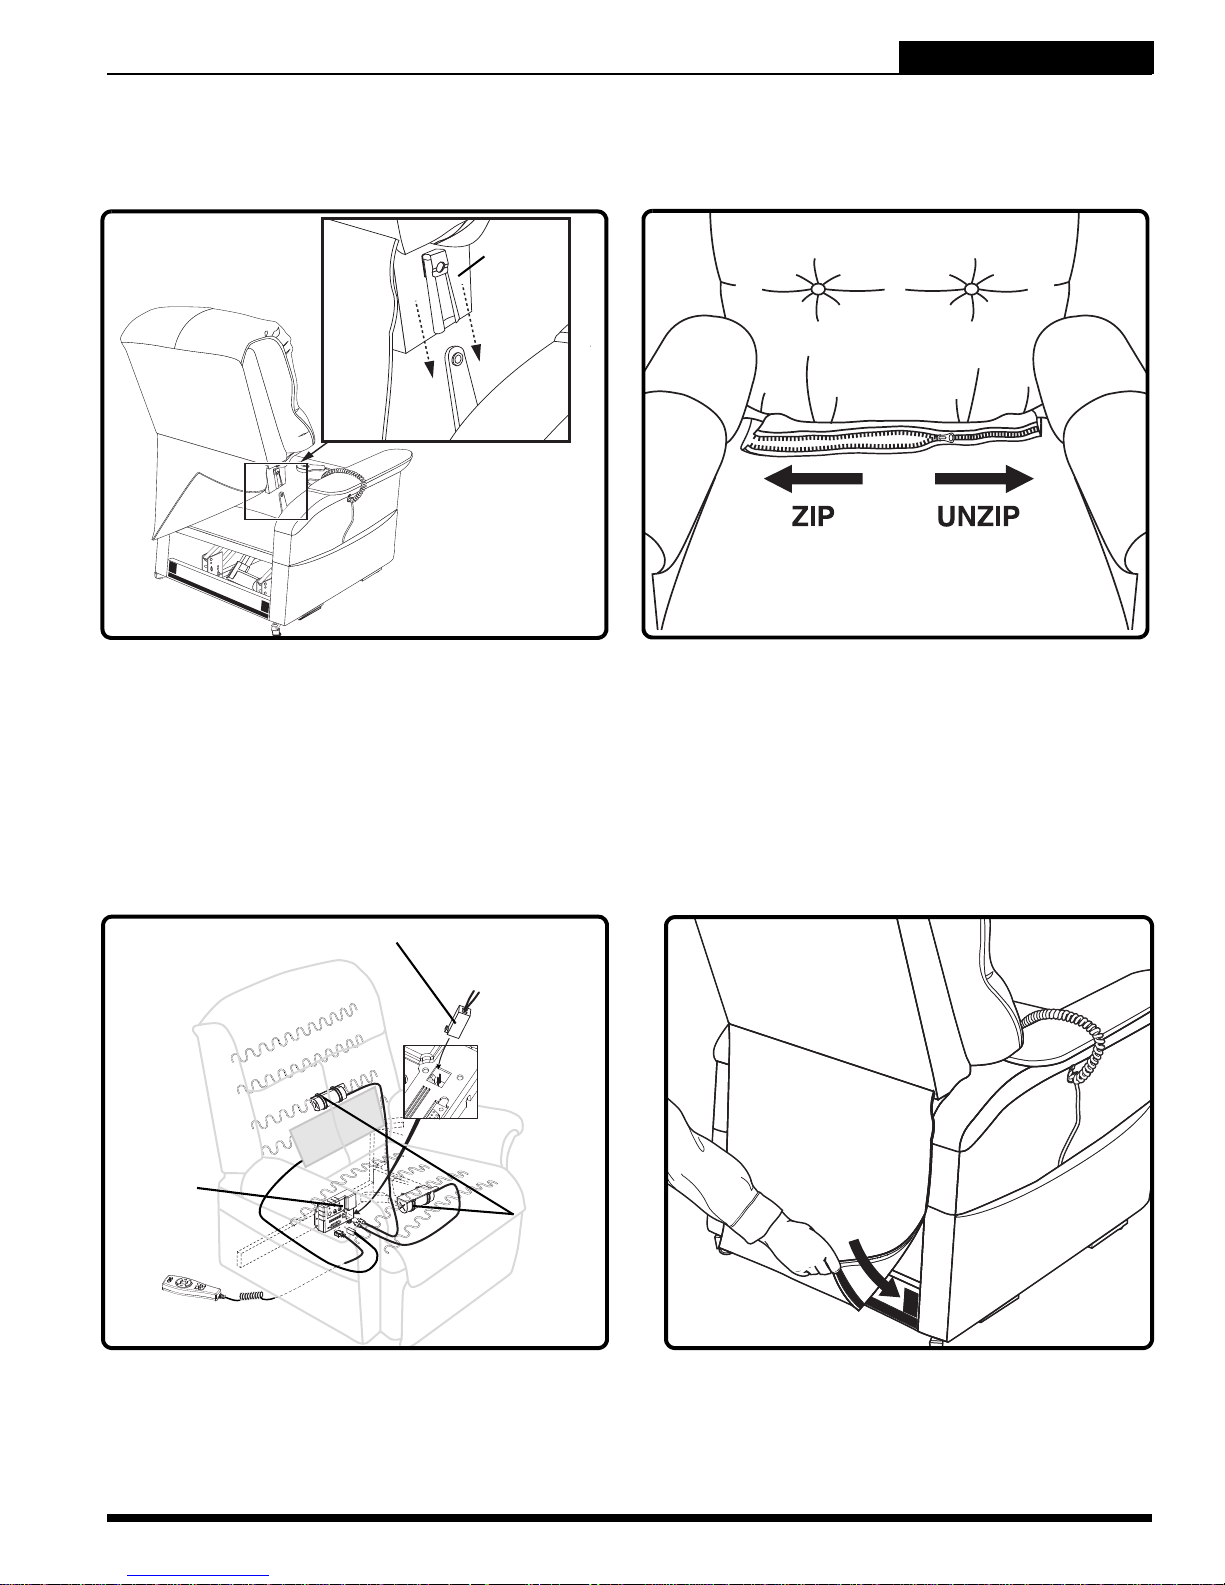
IV. MONTAGGIO/SMONTAGGIO
LIFT CHAIR SERIES
NOTA: In base alla larghezza della poltrona, può essere necessario inserire un lato dello schienale
alla volta. In questo caso, equilibrare lo schienale della poltrona prima di premere verso il basso in
posizione di blocco.
“CLICK”
4.1.3 Premere con forza sulla parte superiore dello
schienale della poltrona per bloccarla in
posizione. Attendere il clic su entrambi i lati
per garantire che lo schienale della poltrona
sia bloccato correttamente.
NOTA: Sollevare lo schienale della poltrona per
verificare che sia bloccata. Se lo schienale può
essere sollevato, ripetere i passaggi da 4.1.1 a 4.1.3.
SCATOLA DI GIUNZIONE COLLEGAMENTO TERMICO
SCATOLA DI
GIUNZIONE
UNITÀ MASSAGIO
4.1.4 Per le poltrone elevabili C6, inserire nel telaio
le alette di tessuto sulla parte anteriore dello
schienale e sulla parte posteriore della base
della poltrona e fissare con la fascetta riutilizzabile su ogni aletta. Quindi, unire le due sezioni con la cerniera.
4.1.5 Collegare i fili per il riscaldamento e il massaggio alla scatola di giunzione. La scatola di
giunzione è montata sulla parte posteriore
della poltrona elevabile. Per connessioni corrette dei fili, consultare l’ ”Appendice D”.
Lift Chair Series www.pridemobility.com 63
4.1.6 Unire lo schienale della poltrona al gancio e
chiudere le fascette in fondo alla base della
poltrona.
Page 64
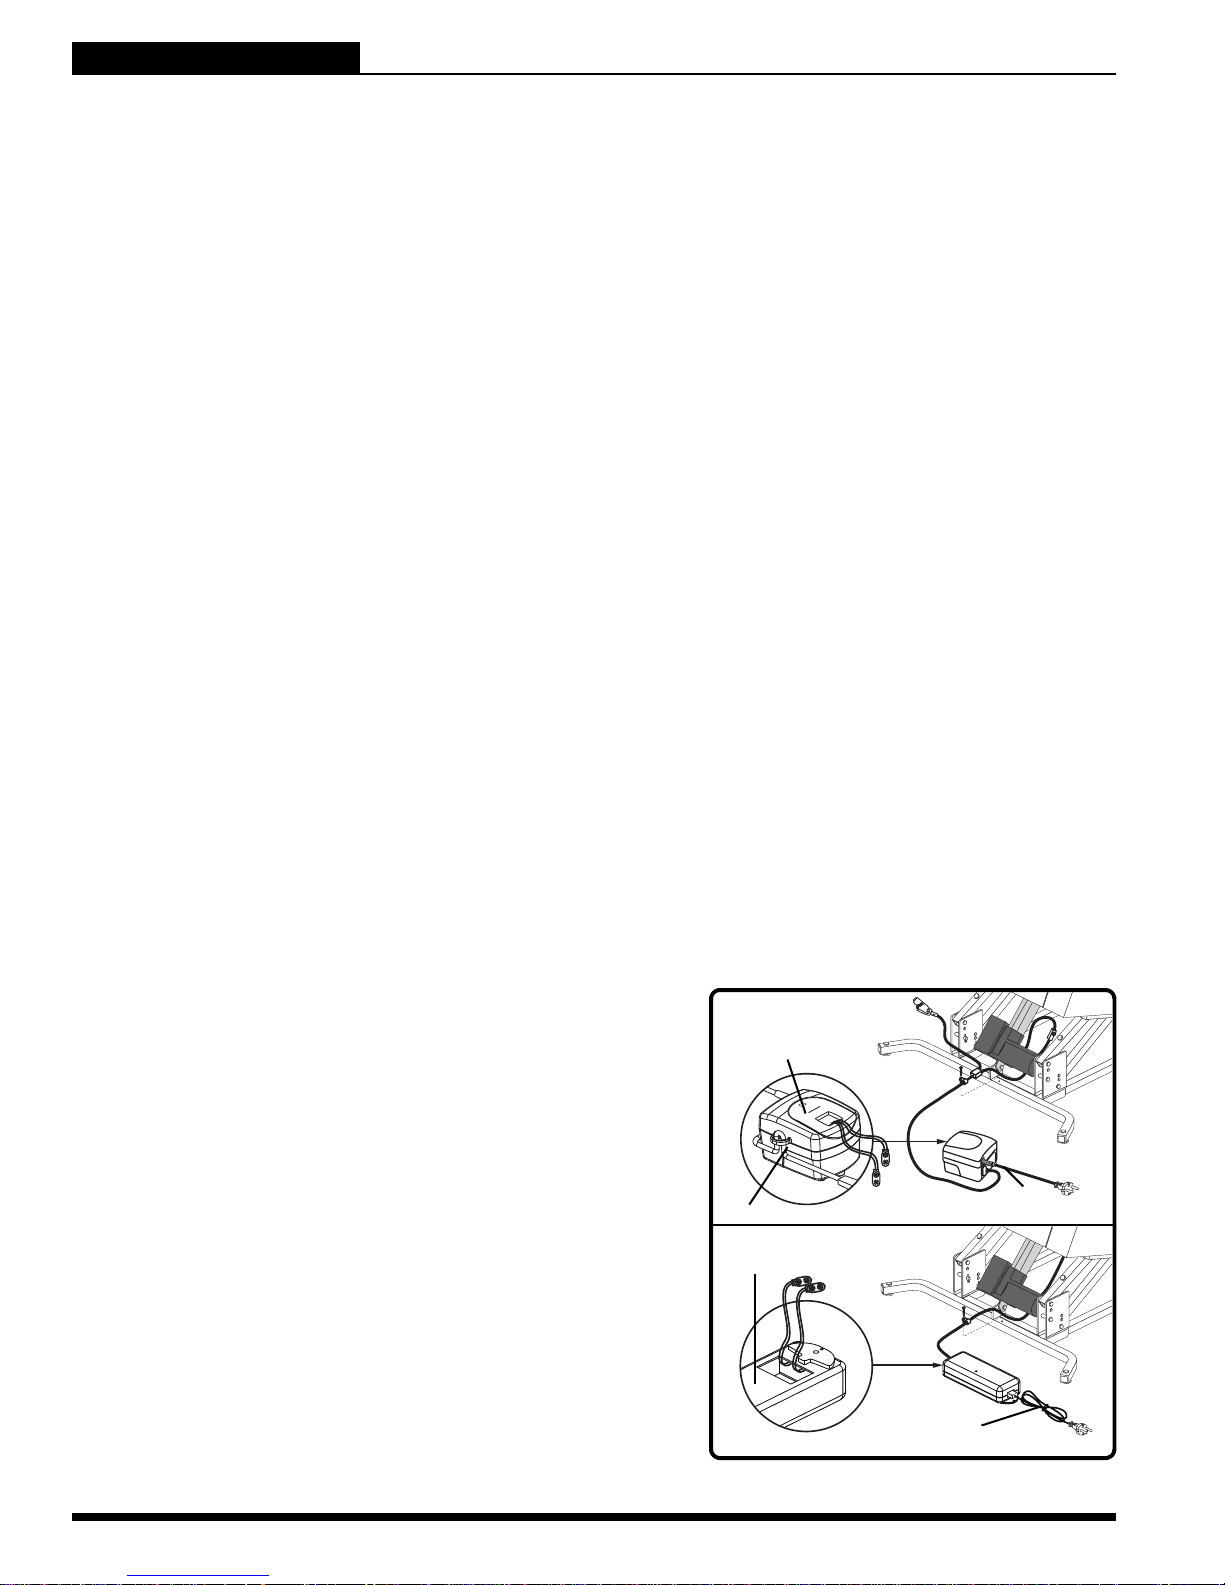
LIFT CHAIR SERIES
IV. MONTAGGIO/SMONTAGGIO
POSIZIONAMENTO DELLA POLTRONA ELEVABILE
La poltrona elevabile deve essere collocata vicino ad una presa elettrica standard, su un pavimento asciutto
ed uniforme, con ampio spazio che ne consenta un uso corretto. Pride consiglia di avvalersi di un assistente
durante il posizionamento della poltrona elevabile per evitare lesioni durante il sollevamento.
Per posizionare la poltrona elevabile in maniera sicura, eseguire questi passaggi:
1. Posizionare lo schienale della poltrona elevabile a 76 cm (30 in.) di distanza dall’ostacolo più vicino
mentre la poltrona è in posizione di seduta. Questa distanza può variare a seconda del modello.
2. Regolare i livellatori delle gambe per stabilizzare la poltrona elevabile (Fig. 3.2).
3. Installare le batterie nel trasformatore esterno se questa opzione è applicabile. Per maggiori informazioni,
consultare il paragrafo “Installazione delle batterie”.
4. Posizionare il trasformatore esterno sul pavimento, in una zona aperta e ben ventilata priva di ostacoli,
oppure, se in dotazione, utilizzare il montaggio a parete opzionale.
5. Posizionare il cavo di collegamento a bassa tensione dove non possa rimanere agganciato tra il telaio e
il meccanismo di elevazione.
6. Se non è già collegato, collegare il cavo di connessione a bassa tensione al trasformatore esterno.
7. Collegare il cavo elettrico direttamente nella presa. Non usare una prolunga!
NOTA: In caso di problemi in qualunque momento dell’installazione e del posizionamento della poltrona elevabile, interrompere le operazioni e contattare immediatamente il proprio rivenditore autorizzato Pride. Per evitare lesioni alle persone e/o danni al prodotto, non collegare l’apparecchio alla
presa elettrica fino alla risoluzione del problema e non cercare di risolvere autonomamente i problemi
di natura elettrica.
INSTALLAZIONE DELLE BATTERIE
La poltrona elevabile può essere dotata di un sistema di back-up a batteria che si attiva in caso di assenza
di alimentazione elettrica. Il sistema di back-up è alimentato da due batterie da 9V (non comprese) che
devono essere installate nel trasformatore esterno. Il sistema di back-up a batteria consente in caso di mancanza di corrente elettrica di riportare la poltrona, qualora essa si trovasse in posizione "sdraiata", nella
posizione base con schienale e pedana a 90°. L' energia delle batterie potrebbe non essere sufficiente per
fare alzare l' utente nella posizione elevata. Il ciclo qui descritto è reso possibile una sola volta per ogni coppia
di batterie utilizzate.
Per installare le batterie eseguire questi passaggi:
1. Scollegare il cavo di alimentazione dalla presa elettrica.
2. Aprire lo sportello del vano batterie sul trasformatore
esterno.
3. Installare due batterie da 9V nel trasformatore esterno (Fig. 4.2).
4. Riposizionare lo sportello del vano batterie.
NOTA: Accertarsi sempre che il trasformatore esterno della
poltrona elevabile sia dotato di due batterie alcaline cariche
da 9V, poiché il sistema non si ricarica da solo. Le batterie
cariche sono batterie alcaline da 9V che vengono sostituite
ogni volta che il sistema di backup a batteria viene attivato
durante l'assenza di corrente elettrica, oppure una volta
all'anno se il sistema non è stato attivato.
SPORTELLO DEL
VANO BATTERIE
TRASFORMATORE ESTERNO
TRASFORMATORE ESTERNO
(VISTA INFERIORE)
CAVO DI
ALIMENTAZION
NOTA: Se si scollega la poltrona elevabile per un periodo
prolungato (più di un’ora) rimuovere le batterie dal trasformatore esterno. La poltrona elevabile scarica l’alimentazione delle batterie anche quando non è in funzione.
64 www.pridemobility.com Lift Chair Series
CAVO DI ALIMENTAZIONE
Figura 4.2 Ubicazione delle batterie di
back-up della poltrona elevabile
Page 65
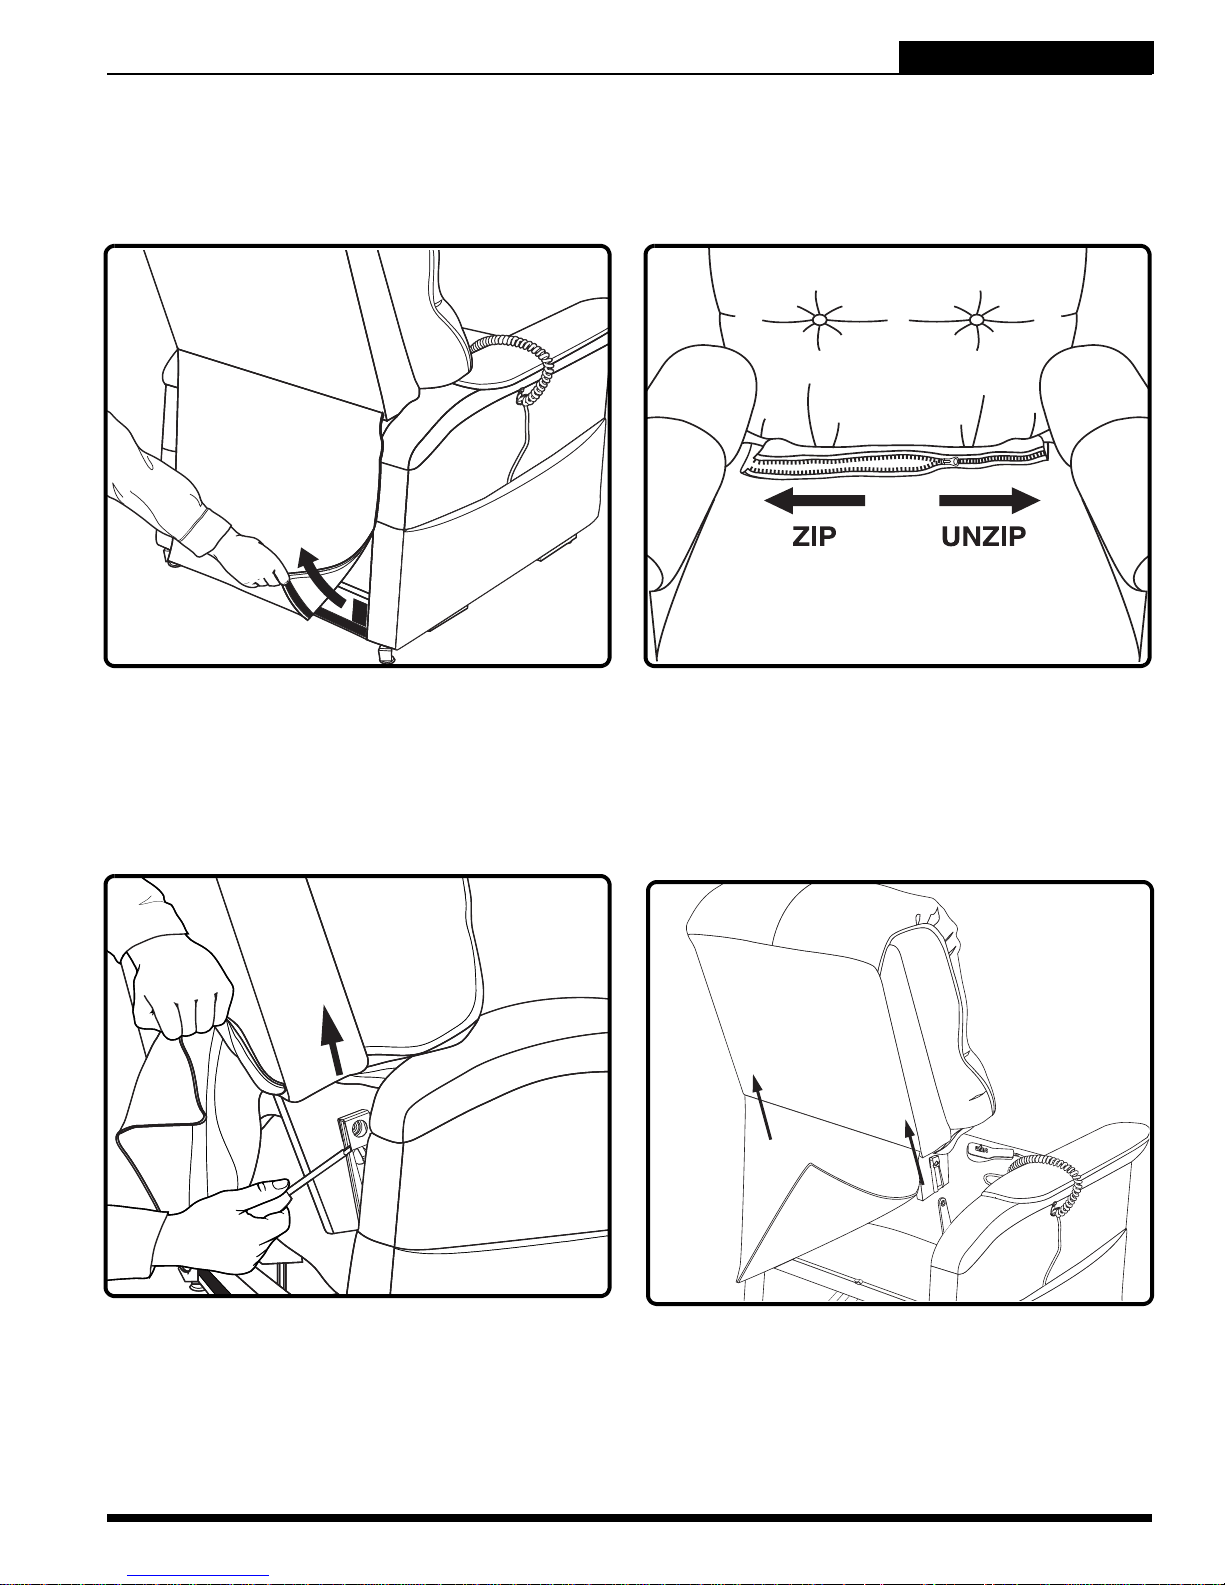
IV. MONTAGGIO/SMONTAGGIO
LIFT CHAIR SERIES
SMONTAGGIO DELLA POLTRONA ELEVABILE
È possibile rimuovere la parte posteriore della poltrona elevabile KD per facilitare le operazioni di manutenzione e trasporto della poltrona.
Per smontare la poltrona elevabile eseguire questi passaggi:
4.3.1 Rimuovere il fondo del tessuto dello schienale dal gancio e avvolgere le alette sulla base
della poltrona.
NOTA: In caso di opzione di riscaldamento e
massaggio, verificare di scollegare i fili corrispondenti dalla scatola di giunzione.
4.3.2 Per le poltrone elevabili C6, aprire la cerniera
dello schienale della poltrona dalla base,
quindi aprire il velcro riutilizzabile che fissa lo
schienale della poltrona al telaio.
4.3.3 Con un cacciavite piatto grande, sollevare i
morsetti di blocco sinistro e destro sullo schienale della poltrona, uno alla volta, per rialzare
lo schienale dai collegamenti sulla base della
poltrona. Insieme a ciascun morsetto di
blocco, tirare su lo schienale della poltrona
per sollevare il lato che si trova sopra il blocco.
Lift Chair Series www.pridemobility.com 65
4.3.4 Tirare su lo schienale della poltrona e
allontanarlo dalla base.
Page 66
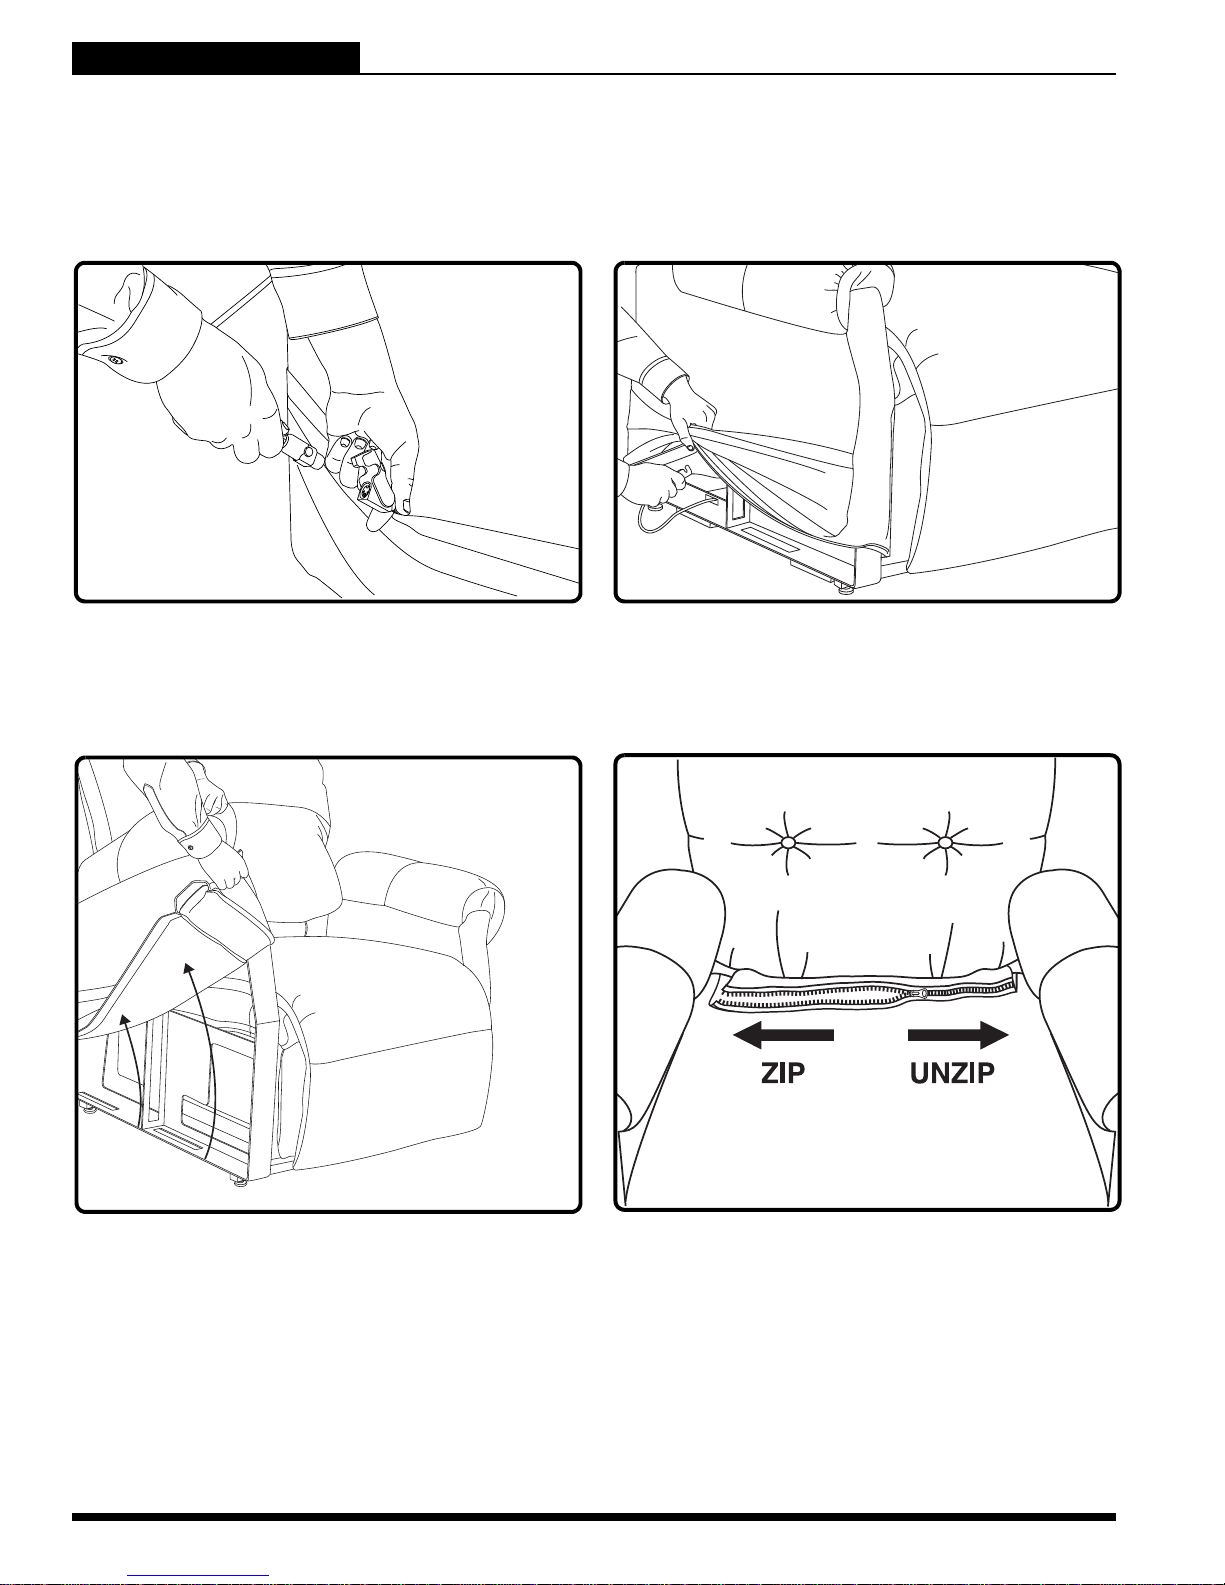
LIFT CHAIR SERIES
IV. MONTAGGIO/SMONTAGGIO
RIMOZIONE TESSUTO/INSTALLAZIONE
La stoffa su alcuni modelli di poltrone é interamente sfoderabile rendendo il lavaggio a secco più semplice.
Se la Vostra poltrona ésfonderabile, vedere sotto.
Per rimuovere e installare il tessuto della poltrona elevabile eseguire questi passaggi:
4.4.1 Scollegare il filocomando dal cavo a rilascio
rapido ubicato nella tasca laterale della poltrona elevabile. Posizionare il filocomando in
un luogo sicuro fuori portata.
4.4.2 Spingere il cavo a rilascio rapido attraverso il
foro a “V” nella tasca laterale della poltrona
elevabile.
4.4.3 Togliere le fodere dei braccioli laterali sinistro
e destro dai braccioli di metallo.
66 www.pridemobility.com Lift Chair Series
4.4.4 Per le poltrone elevabili C6, aprire la cerniera
del cuscino imbottito per staccarlo dalla
fodera dello schienale della poltrona.
Page 67
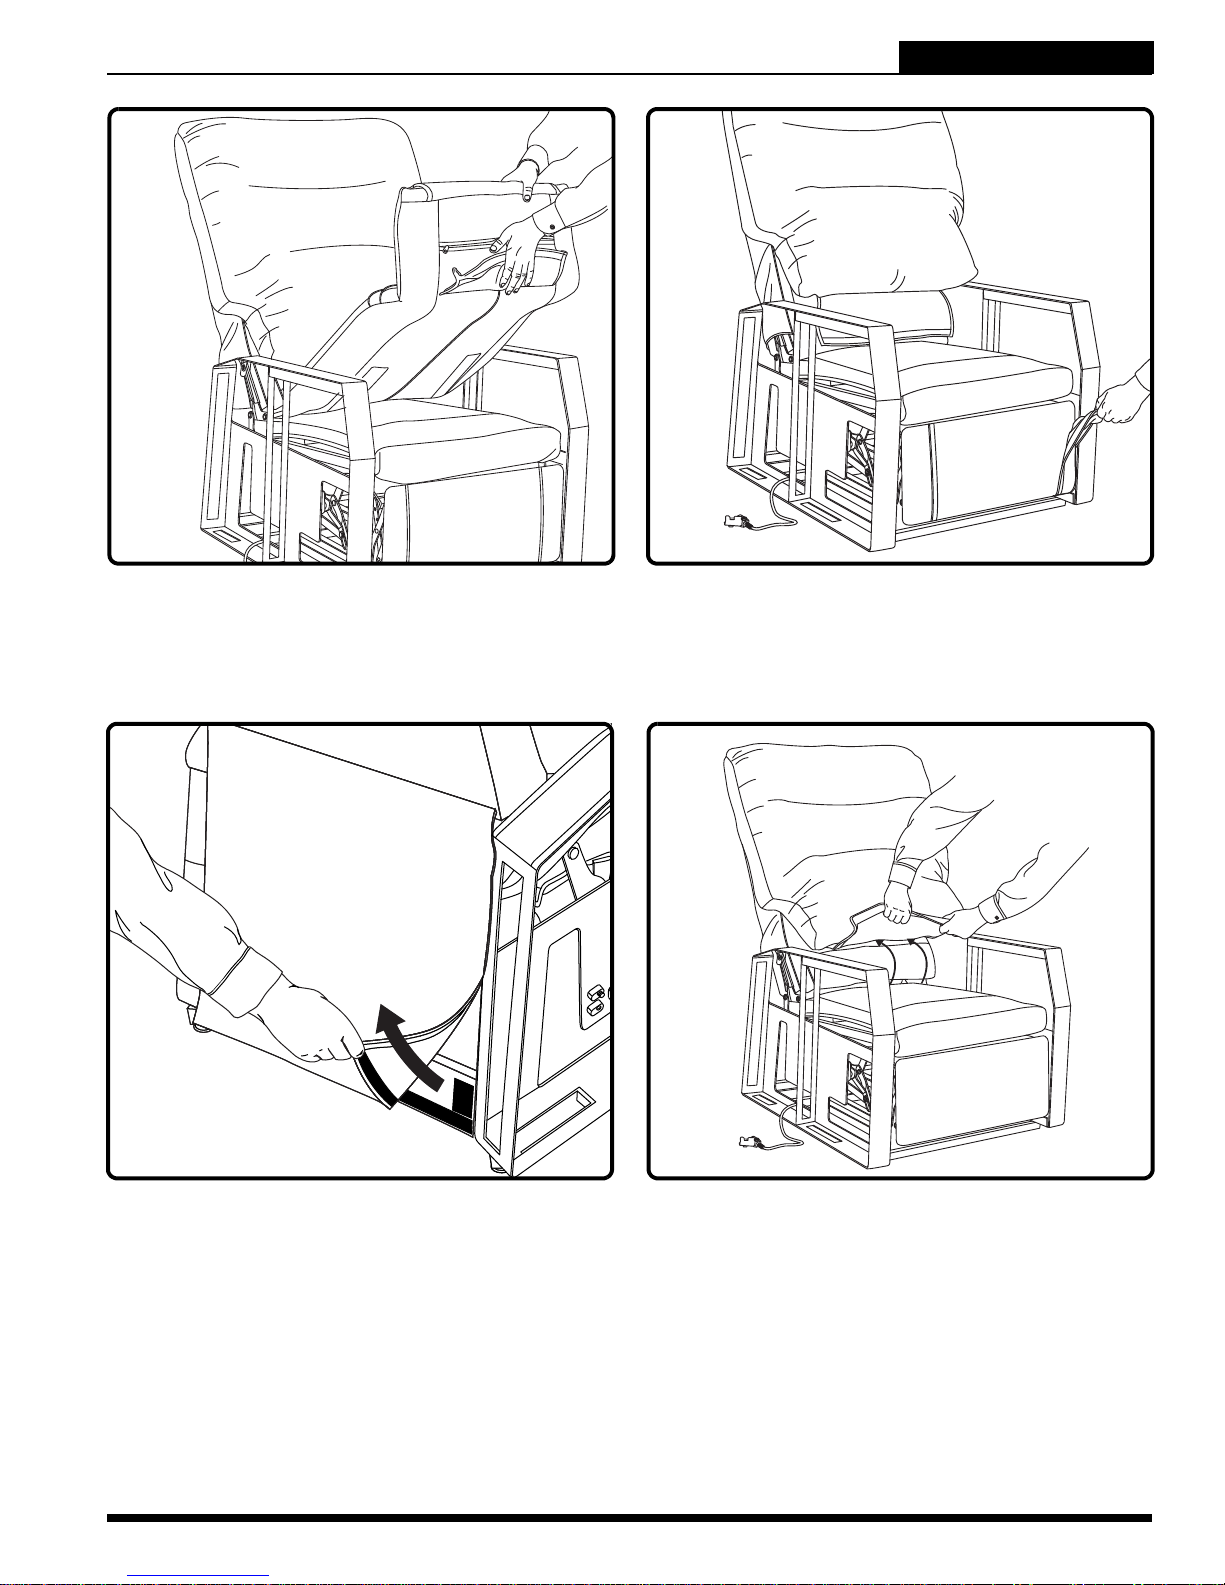
IV. MONTAGGIO/SMONTAGGIO
LIFT CHAIR SERIES
4.4.5 Liberare la parte anteriore del cuscino
imbottito dal poggiapiedi e rimuovere il cuscino imbottito dalla poltrona elevabile.
4.4.6 Rimuovere le fodere laterali del poggiapiedi.
NOTA: Questa caratteristica non è applicabile
alla poltrona elevabile C1.
4.4.7 Staccare l’aletta inferiore della fodera dello
schienale dalla guida inferiore del sedile.
Lift Chair Series www.pridemobility.com 67
4.4.8 Liberare le alette inferiori della fodera dello
schienale dal fondo del sedile.
Page 68
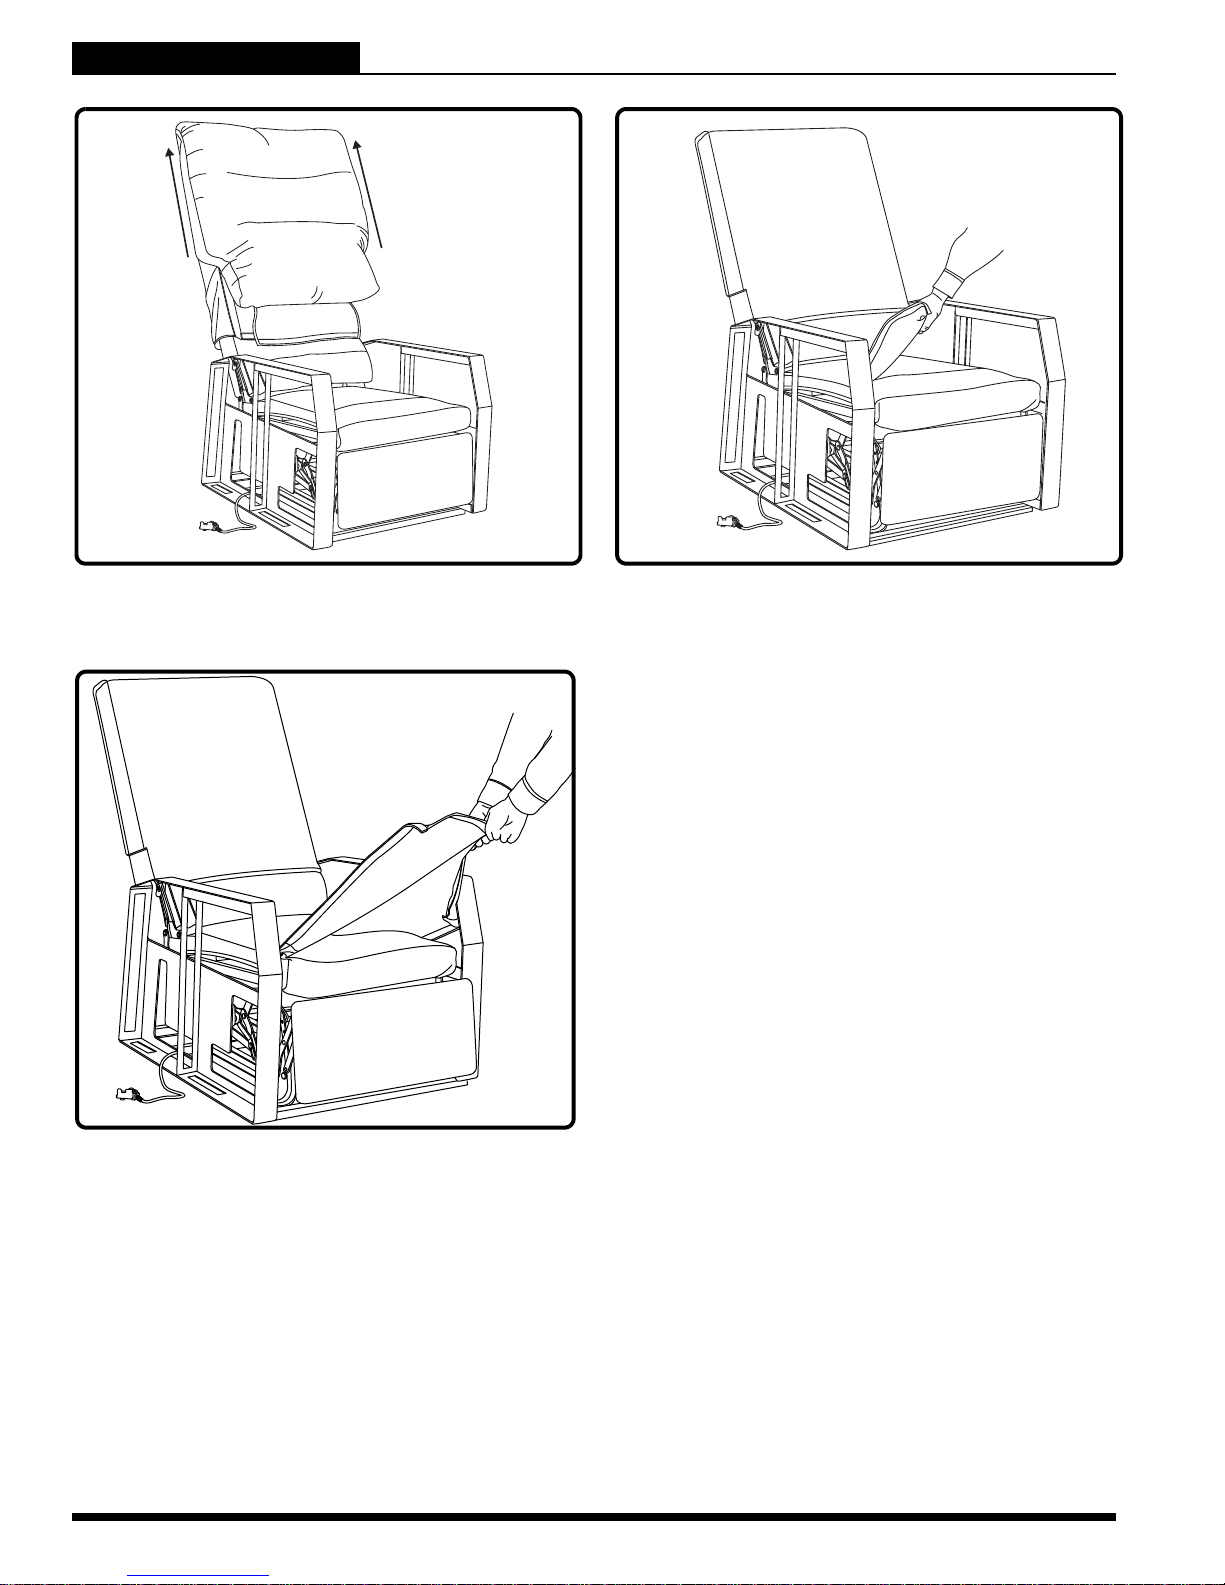
LIFT CHAIR SERIES
IV. MONTAGGIO/SMONTAGGIO
4.4.9 Rimuovere la fodera dello schienale.
4.4.11 Rimuovere la fodera del sedile.
4.4.10 Liberare la fodera del sedile dal lato sinistro
e destro.
NOTA: Per installare le parti in tessuto della poltrona elevabile, eseguire i passaggi di rimozione
del tessuto in ordine inverso.
68 www.pridemobility.com Lift Chair Series
Page 69
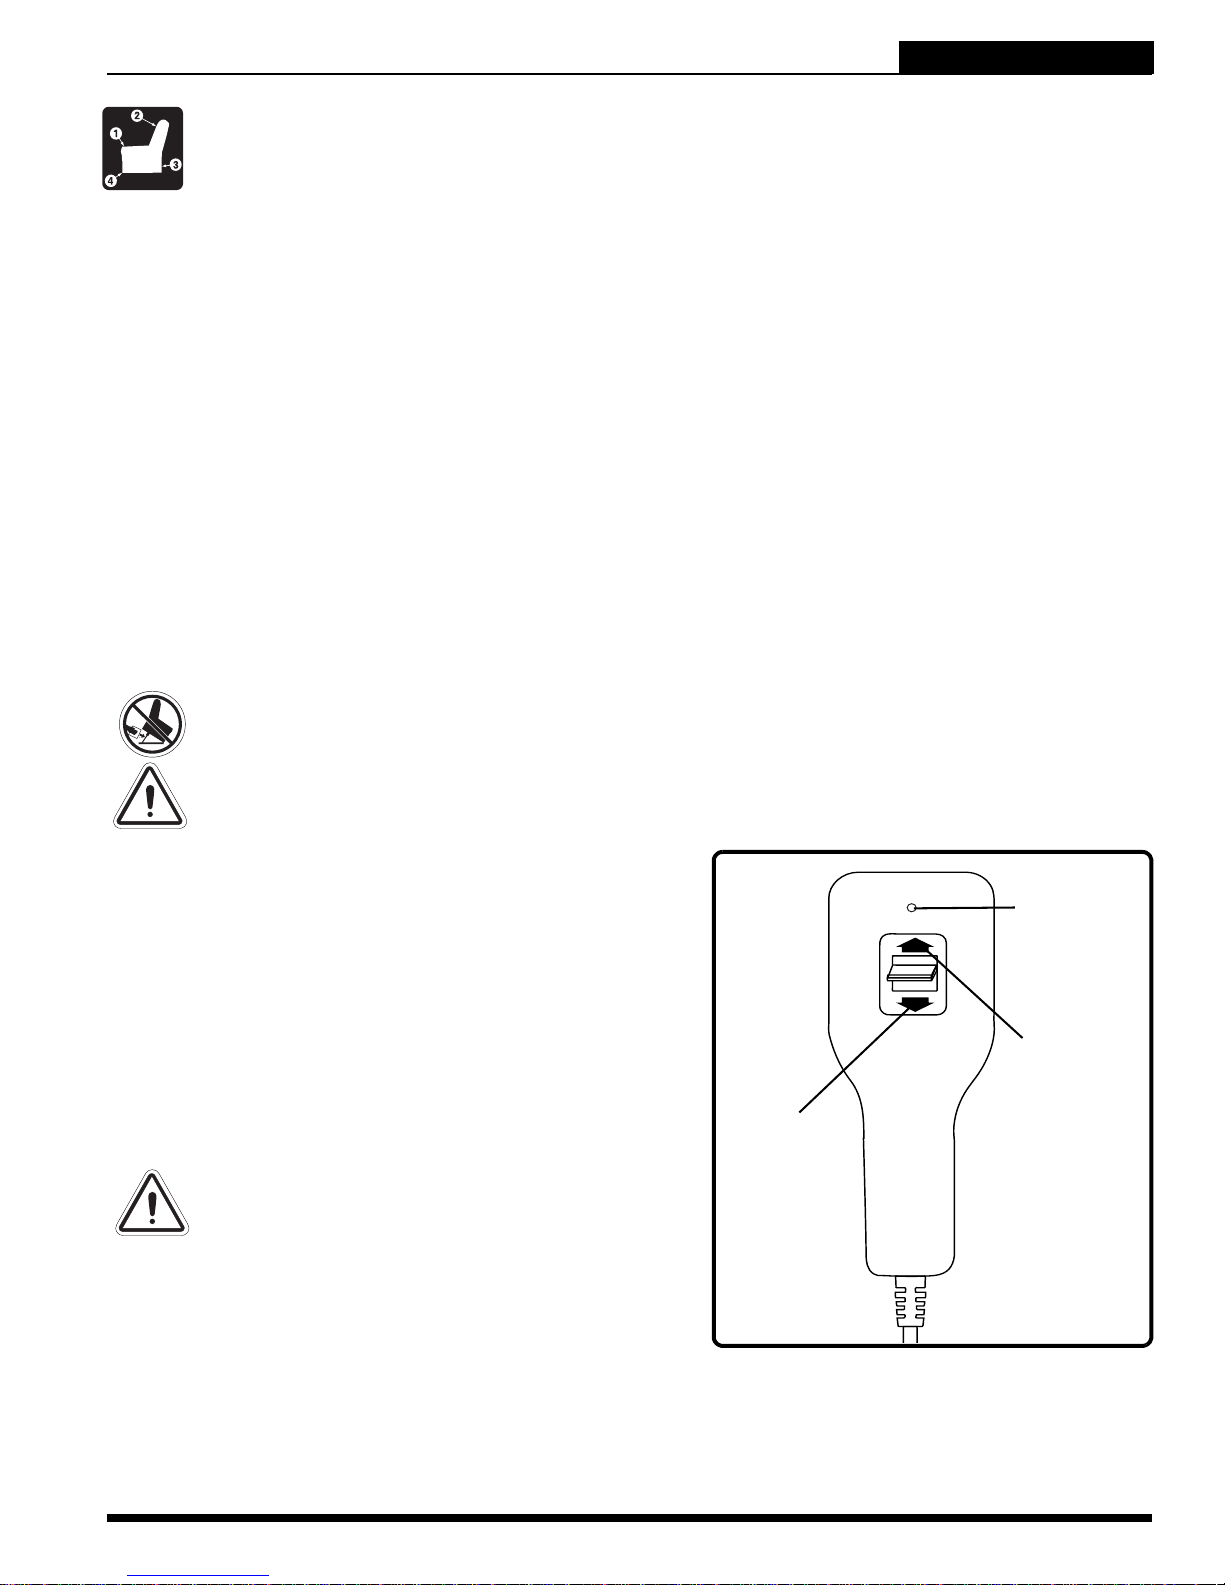
V. FUNZIONAMENTO
LIFT CHAIR SERIES
PRECAUZIONI D’USO
Durante l’uso della poltrona elevabile, è opportuno adottare alcune precauzioni. Leggere ed osservare attentamente queste precauzioni per garantire un uso sicuro della poltrona elevabile e per
prevenire lesioni e/o danni al prodotto.
Collegare il cavo elettrico direttamente alla presa. Non usare una prolunga!
Non posizionare alcun oggetto (per esempio un bicchiere) sopra o accanto al trasformatore esterno.
Per pulire la scatola del trasformatore esterno, scollegare dalla presa e usare un panno pulito e asciu tto,
o leggermente umido. In caso di utilizzo di un panno umido, lasciare asciugare completamente prima di
collegare nuovamente alla presa a parete.
Controllare periodicamente il comando manuale e tutti i cavi di alimentazione per assenza di danni visibili.
Tenere il filocomando lontano da tutte le superfici calde.
Prima di sedersi sulla poltrona, accertarsi che il filocomando non sia di ostacolo.
Allontanare i bambini e gli animali da tutte le parti mobili durante l’uso della poltrona elevabile.
Non lasciare che i bambini giochino o utilizzino la poltrona elevabile. La poltrona elevabile può essere
utilizzata solo dall’utente previsto.
Quando la poltrona elevabile non è in uso, utilizzare la funzione di scollegamento rapid o sul filocomando
standard per prevenire l’uso imprevisto della poltrona stessa.
Evitare i punti di aggancio, per esempio i meccanismi di sollevamento e a forbice. Allont anare mani e piedi
da queste aree.
Quando non è in funzione, lasciare sempre la poltrona in posizione diritta e chiusa.
Non stare seduti o in piedi sul poggiapiedi, e non alzarsi dalla poltrona quando la pedana è elevata.
Non lasciarsi “cadere” nella poltrona elevabile per sedersi se è in posizione parzialmente sollevata.
VIETATO! Non collocare oggetti sotto la poltrona elevabile. Durante il funzionamento,
verificare che l’area sia priva di ostacoli, compresi animali e bambini.
AVVERTENZA! Prevenire il rischio di scossa elettrica, incendio, cadute e/o
agganciamenti. Seguire le istruzioni fornite.
USO DEL FILOCOMANDO
A seconda del modello di poltrona elevabile, il filocomando
può essere dotato di interruttori che controllano il
movimento dello schienale, della base e del poggiapiedi
(Fig. 5.1, 5.2, è 5.3).
AVVERTENZA! Non appoggiarsi né
applicare forza verso il basso alla
spalliera quando la poltrona elevabile è
in posizione completamente inclinata.
Ciò potrebbe causare il ribaltamento
della poltrona elevabile e provocare
lesioni personali e/o danni al prodotto.
AVVERTENZA! Non utilizzare la pedana
come sedile o per scopi diversi da quelli
previsti. Ciò potrebbe provocare
instabilità della poltrona elevabile e
sollecitare inutilmente i componenti,
causando lesioni personali e/o danni al
prodotto.
AVVERTENZA! Quando non si utilizza il
controllo manuale, bloccarlo.
LED
POSIZIONE
VERSO L’ALTO
POSIZIONE
VERSO IL
BASSO
Figura 5.1 Filocomando standar
NOTA: Come misura di sicurezza supplementare, Pride consiglia di utilizzare lo scollegamento
rapido del comando manuale dalla poltrona elevabile e di conservarlo lontano dalla portata dei bambini quando non è in uso.
Lift Chair Series www.pridemobility.com 69
Page 70
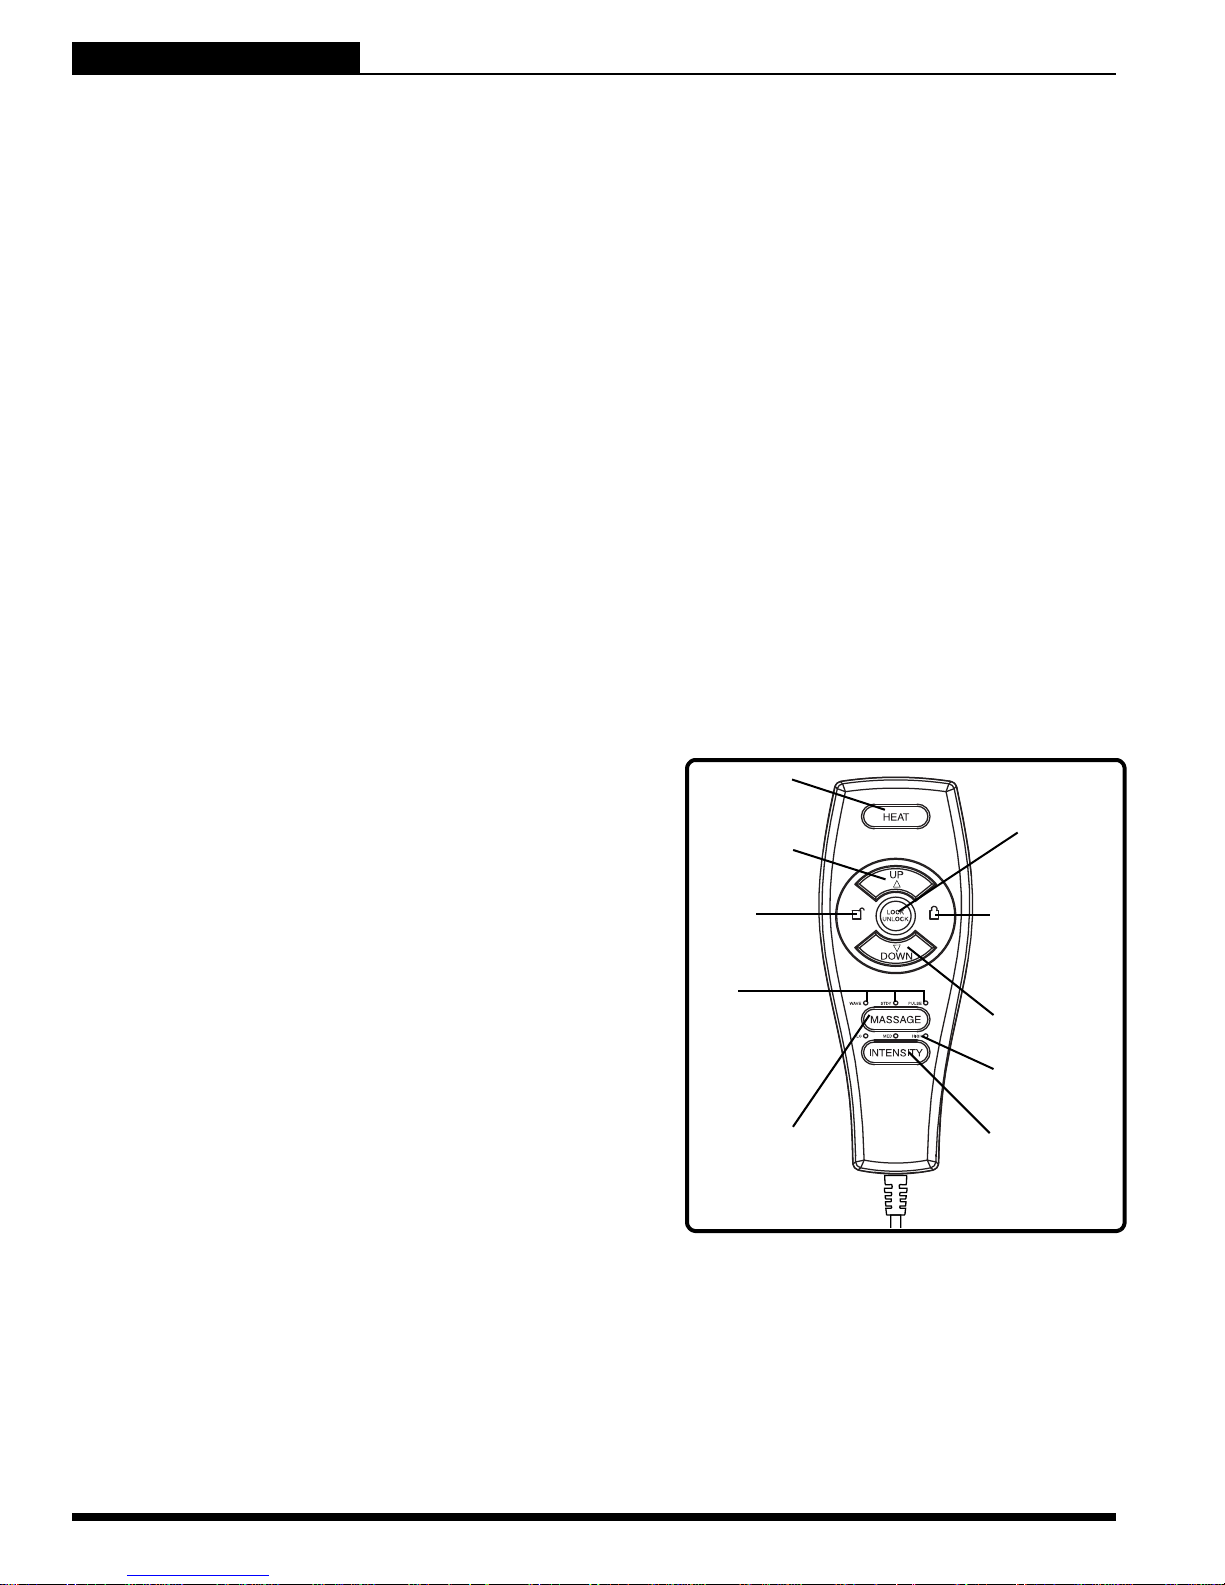
LIFT CHAIR SERIES
V. FUNZIONAMENTO
Uso del filocomando standar
Eseguire questi passaggi per sedersi nella poltrona elevabile (Fig. 5.1):
1. Tenere premuto l’interruttore di sollevamento/abbassamento sulla posizione verso l’alto per sollevare la
poltrona elevabile in posizione verticale.
2. Appoggiarsi alla poltrona e sedersi al centro del sedile, usando i braccioli come sostegno se necessario.
3. Tenere premuto l’interruttore di sollevamento/abbassamento sulla posizione verso il basso per abbassare
la poltrona elevabile in una posizione di seduta comoda.
Eseguire questi passaggi per inclinare la poltrona elevabile dalla posizione di seduta (Fig. 5.1):
1. Tenere premuto l’interruttore di sollevamento/abbassamento sulla posizione verso l’alto per sollevare la
poltrona elevabile in posizione verticale.
2. Appoggiarsi alla poltrona e sedersi al centro del sedile, usando i braccioli come sostegno se necessario.
3. Tenere premuto l’interruttore di sollevamento/abbassamento sulla posizione verso il basso per abbassare
la poltrona elevabile in una posizione di seduta comoda.
Eseguire questi passaggi per alzarsi dalla poltrona elevabile (Fig. 5.1):
1. Tenere premuto l’interruttore di sollevamento/abbassamento sulla posizione verso l’alto per sollevare la
poltrona elevabile.
2. Rilasciare l’interruttore quando la poltrona elevabile raggiunge un’altezza da cui è possibile alzarsi comodamente.
NOTA: Il filocomando della poltrona elevabile può essere dotato di un LED che indica la presenza
di alimentazione. Se questo LED è presente e non si accende quando il filocomando è in funzione,
contattare il rivenditore autorizzato Pride.
Funzionamento controllo manuale di
riscaldamento e massaggio
Eseguire questi passaggi per sedersi nella poltrona
elevabile (Fig. 5.2):
PULSANTE
RISCALDAMENTO
PULSANTE
SALITA
PULSANTE
BLOCCO/
SBLOCCO
1. Tenere premuto il pulsante di salita per sollevare la
poltrona elevabile in posizione eretta.
2. Appoggiarsi alla poltrona e sedersi al centro del sedile,
LED
SBLOCCO
LED BLOCCO
usando i braccioli come sostegno se necessario.
3. Tenere premuto il pulsante di discesa per abbassare la
poltrona elevabile in una posizione di seduta comoda.
Eseguire questi passaggi per inclinare la poltrona
elevabile dalla posizione di seduta (Fig. 5.2):
1. Tenere premuto il pulsante di discesa fino a raggiun-
gere un’inclinazione comoda.
2. Tenere premuto il pulsante di salita per tornare alla
LED
IMPOSTAZIONE
MASSAGGIO
PULSANTE
MASSAGGIO
PULSANTE
DISCESA
LED
IMPOSTAZIONE
INTENSITÀ
PULSANTE
INTENSITÀ
posizione di seduta eretta. Rilasciare il pulsante quando
la poltrona raggiunge una posizione di seduta comoda.
Eseguire questi passagi per alzarsi dalla poltrona
elevabile (Fig. 5.2):
1. Tenero premuto il pulsante di salita per sollevare la
poltrona elevabile.
2. Rilasciare il pulsante quando la poltrona elevabile
raggiunge un’altezza da cui è possibile alzarsi
comodamente.
70 www.pridemobility.com Lift Chair Series
Figura 5.2 Funzionamento controllo manuale
di riscaldamento e massaggio
Page 71
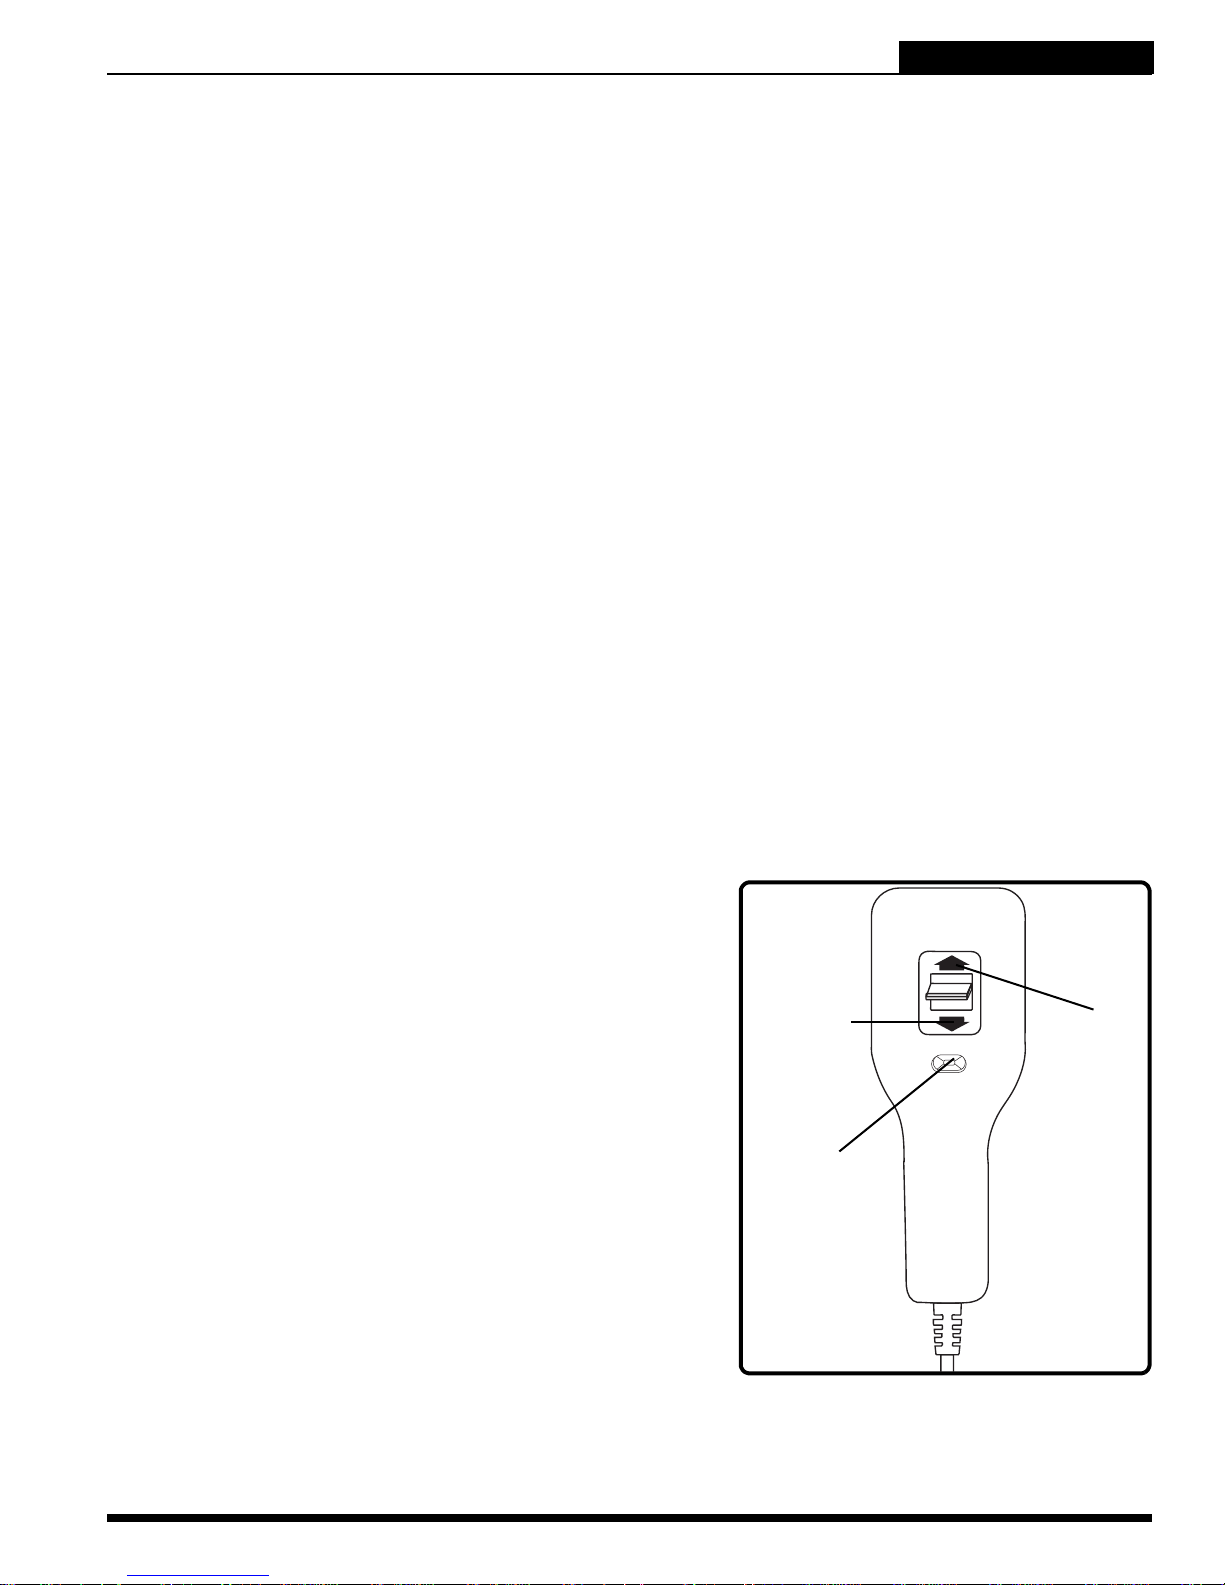
V. FUNZIONAMENTO
LIFT CHAIR SERIES
Eseguire passaggi per attivare/disattivare la funzione di blocco (Fig. 5.2):
1. Tenere premuto il pulsante di blocco per circa 3 secondi per bloccare il telecomando. II LED rosso a
destra del pulsante si accende per indicare che il comando manuale è bloccato.
2. Tenere premuto il pulsante di blocco per circa 6 secondi per sbloccare il telecomando. II LED verde a
sinistra del pulsante si accende per indicare che il comando manuale è sbloccato.
Eseguire questi passaggi per utilizzare la funzione di riscaldamento (Fig. 5.2):
1. Premere una volta il pulsante HEAT per attivare la funzione di riscaldamento. La funzione di riscalda-
mento si spegne automaticamente dopo 20 minuti di uso continuo.
2. Premere nuovamente il pulsante HEAT per spegnere la funzione di riscaldamento.
Eseguire questi passaggi per utilizzare la funzione di massaggio (Fig. 5.2):
1. Premere una volta il pulsante MASSAGE per attivare la funzione di massaggio. Ciò imposta automatica-
mente il massaggio sull’impostazione di oscillazione.
2. Premere nuovamente il pulsante MASSAGE per passare alle tre successive impostazioni di massaggio
disponiobili: oscillazione, stazionaria o a impulsi. Ogni volta che si preme il pulsante si passa
all’impostazione successiva. Ogni impostazione è indicata da un LED a colori.
3. Tenere premuto il pulsante MASSAGE per circa secondi per spegnere la funzione di massaggio; in caso
contrario questa funzione si spegne automaticamente dopo 20m minuti di uso continuo.
Eseguire questi passaggi per regolare l’intensità della funzione di massaggio (Fig. 5.2):
1. Premere una volta il pulsante INTENSITY per impostare l’opzione di massaggio su intensità bassa.
2. Premere nuovamente il pulsante INTENSITY per passare alle tre successive impostazioni disponibili:
bassa, media o alta. Ogni volta che si preme il pulsante si passa all’impostazione successiva. Ogni
impostazione è indicata da un LED a colori.
NOTA: Pride consiglia di non utilizzare le unità di riscaldamento e massaggio per più di 20 minuti
alla volta. Comunque consultare il proprio medico per sapere con quale frequenza usare le opzioni di riscaldamento e massaggio della poltrona elevabile.
Uso del Filocomando Due Motori
Eseguire questi passaggi per sedersi nella poltrona elevabile (Fig. 5.3):
1. Posizionare l’interruttore di blocco a destra.
2. Tenere premuto l’interruttore di sollevamento/abbassamento sulla posizione verso l’alto per sollevare la poltrona
elevabile dalla posizione di seduta a quella verticale.
3. Appoggiarsi alla poltrona e sedersi al centro del sedile,
usando i braccioli come sostegno se necessario.
4. Tenere premuto l’interruttore di sollevamento/abbassamento sulla posizione verso il basso per abbassare la poltrona elevabile in una posizione di seduta comoda.
Eseguire questi passaggi per inclinare la poltrona elevabile dalla posizione di seduta (Fig. 5.3):
1. Posizionare l’interruttore di blocco a sinistra.
2. Tenere premuto l’interruttore di sollevamento abbassamento sulla posizione verso il basso fino a raggiungere
l’inclinazione desiderata.
3. Tenere premuto l’interruttore di sollevamento abbassamento sulla posizione verso l’alto per sollevare la poltrona
elevabile in posizione di seduta verticale. Rilasciare l’interruttore quando la poltrona raggiunge una posizione di
seduta comoda.
POSIZIONE
VERSO IL
BASSO
POSIZIONE
VERSO
L’ALTO
INTERRUTTOR
E DI BLOCCO
Figura 5.3 Filocomando due motori
Lift Chair Series www.pridemobility.com 71
Page 72

LIFT CHAIR SERIES
V. FUNZIONAMENTO
Seguire questi passaggi per sollevare o abbassare il poggiapiedi quando la poltrona è in posizione
di seduta o inclinata (Fig. 5.3):
1. Posizionare l’interruttore di blocco a destra.
2. Tenere premuto l’interruttore di sollevamento/abbassamento sulla posizione verso il basso fino a quando
il poggiapiedi raggiunge l’altezza desiderata.
3. Tenere premuto l’interruttore di sollevamento/abbassamento sulla posizione verso l’alto per abbassare il
poggiapiedi.
Eseguire questi passaggi per alzarsi dalla poltrona elevabile dalla posizione di seduta (Fig. 5.3):
1. Posizionare l’interruttore di blocco a destra.
2. Tenere premuto l’interruttore di sollevamento/abbassamento sulla posizione verso l’alto per sollevare la
poltrona elevabile.
3. Rilasciare l’interruttore quando la poltrona elevabile raggiunge un’altezza d a cui è possibile alzarsi comodamente .
72 www.pridemobility.com Lift Chair Series
Page 73

VI. RISOLUZIONE DEI PROBLEMI
La poltrona elevabile Pride è un prodotto allo stato dell’arte progettato per migliorare la mobilità.
La poltrona elevabile deve durare per anni senza problemi; tuttavia, può richiedere interventi
occasionali. I seguenti consigli per la risoluzione delle anomalie e le domande frequenti dovrebbero riassumere tutte le informazioni sulla poltrona elevabile. Se in qualunque momento le operazioni di risoluzione delle anomalie elencate nel presente manuale risultassero problematiche,
contattare il rivenditore autorizzato Pride per assistenza. Per la chiamata, comunicare il numero
del modello, il numero seriale e la natura del problema.
LIFT CHAIR SERIES
DOMANDE FREQUENTI
La poltrona elevabile non funziona affatto?
Verificare che il trasformatore esterno sia collegato ad una presa correttamente cablata.
Controllare il pannello degli interruttori collegato alla presa elettrica.
Verificare che il cavo di collegamento della poltrona sia inserito nel trasformatore esterno.
Verificare che il filocomando e il motore siano collegati correttamente.
Verificare che il cavo di connessione a bassa tensione sia collegato al(i) motore(i).
La poltrona elevabile funziona solo in una direzione?
Controllare l’interruttore di sollevamento/abbassamento del filocomando per verificare che lo sposta-
mento dalla posizione verso l’alto a quella verso il basso avvenga senza problemi. Se l'interruttore si
blocca in una posizione, può essere necessario sostituire il filocomando.
Controllare i pulsanti di salita e discesa sul controllo manuale di riscaldamento e massaggio per verificar
che non si incastrino. Se uno dei pulsanti è incastrato, può essere necessaria la sostituzione del
comando manuale di riscaldamento e massaggio.
Per assistenza, contattare il rivenditore autorizzato Pride.
Che cosa accade se la mia poltrona elevabile si ferma durante il ciclo di sollevamento?
La poltrona elevabile è dotata di uno spegnimento termico interno ubicato nel trasformatore esterno, che
previene il surriscaldamento della centralina di controllo del motore. Se lo spegnimento termico si attiva,
lasciare che la poltrona elevabile resti in posizione stazionaria per 10 minuti per consentire il raffreddamento del motore, quindi riprendere il normale funzionamento. In caso di surriscaldamento frequente dei
motori, contattare il proprio rivenditore autorizzato Pride.
È possibile che si sia verificata un’interruzione dell’alimentazione elettrica e/o che non siano presenti
batterie nel trasformatore esterno, oppure che le batterie siano scariche. Verificare che siano sempre
presenti batterie nuove da 9V nel trasformatore esterno, se dispone di un back-up a batteria.
Controllare il pannello degli interruttori collegato alla presa elettrica.
La poltrona elevabile oscilla da un angolo all'altro dopo il posizionamento?
È possibile che il pavimento non sia uniforme o che il tappeto influisca sulla posizione della poltrona. Regolare i piedini della poltrona nella zona dove la poltrona oscilla. Consultare il paragrafo III. “La poltrona elevabile”, per istruzioni sull’equilibratura della poltrona.
Cosa posso fare se le opzioni di riscaldamento e massaggio della poltrona elevabile non
funzionano?
Verificare che la scatola di giunzione sia collegata correttame nte al trasformatore esterno e che il trasformatore
riceva corrente elettrica. Sul trasformatore si accende un LED verde che indica la presenza di alimentazione.
Verificare che la scatola di giunzione sia collegata correttamente alle unità di riscaldamento e massaggio
e che la scatola di giunzione sia collegata correttamente all’attuatore; entrambi si trovano nella parte
posteriore della poltrona elevabile. Per connessioni elettriche corrette, consultare l’ ”Appendice D”.
Verificare che il comando manuale sia collegato correttamente alla scatola di giunzione. Se il collega-
mento è corretto, i LED sul comando manuale si accendono.
Se uno dei LED non si accende, contattare il rappresentante autorizzato Pride per assistenza.
Lift Chair Series www.pridemobility.com 73
Page 74

LIFT CHAIR SERIES
VI. RISOLUZIONE DEI PROBLEMI
Dove posso posizionare la scatola del trasformatore esterno?
Sul pavimento, lontano da sorgenti di calore, in una zona aperta e ben ventilata priva di ostacoli.
Sulla parete, lontano da fonti di calore, utilizzando il supporto opzionale per il montaggio a parete del
trasformatore esterno.
Dove si trova il numero seriale della poltrona elevabile?
Il numero seriale si trova in due punti – uno è accanto alla parte posteriore del motore sul meccanismo di
sollevamento in acciaio, il secondo è applicato sul telaio sotto i meccanismi a forbice. Il numero del modello
della poltrona elevabile è stampato sotto il codice a barre del numero seriale.
Chi posso contattare per assistenza?
Per assistenza, contattare il rivenditore autorizzato Pride.
74 www.pridemobility.com Lift Chair Series
Page 75

VII. CURA E MANUTENZIONE
LIFT CHAIR SERIES
La poltrona elevabile Pride richiede controlli periodici di manutenzione. Alcuni controlli possono
essere eseguiti dall'utente, ma altri richiedono l'assistenza del rappresentante Pride. Seguendo
i controlli di manutenzione preventiva pianificata descritti nel presente paragrafo, è possibile
garantire anni di funzionamento senza problemi della poltrona elevabile. In caso di domande
sulla cura o il funzionamento della poltrona elevabile, contattare il proprio rappresentante autorizzato Pride.
CURA DEL TESSUTO
Verificare regolarmente il tessuto per l'assenza di graffi, strappi o buchi.
Il tessuto della poltrona elevabile è poliestere al 100%, con codice di pulitura W. Il metodo di pulitura
consigliato per la poltrona elevabile è l’uso frequente dell’aspirapolvere e una leggera spazzolatura per
eliminare polvere e residui. In caso di macchie, usare agenti schiumosi ad acqua, per esempio detergente
neutro o shampoo per tessuti non solvente. Applicare la schiuma con una spazzola morbida con movimento circolare ed aspirare quando è asciutta. Provare il detergente su una piccola area di tessuto prima
di adottare questo metodo. Se il tessuto della poltrona elevabile è molto sporco, utilizzare un servizio di
lavaggio professionale idoneo.
AVVERTENZA! Il tessuto non deve essere sottoposto a contatto diretto con fonti di
calore, per esempio radiatori. Ciò può causare lesioni o danni da incendio.
AVVERTENZA! Pride raccomanda vivamente di non fumare sigarette quando si sta
seduti nella poltrona elevabile, sebbene la poltrona elevabile abbia superato i
requisiti necessari dei test antifumo. In caso si decida di fumare sigarette quando
si è seduti nella poltrona elevabile, osservare le seguenti direttive di sicurezza.
Non abbandonare sigarette accese.
Tenere i posacenere a distanza di sicurezza dai cuscini del sedile.
Verificare sempre che le sigarette siano completamente spente prima dello
smaltimento.
NOTA: Non usare solventi per la pulizia di macchie. Non saturare il tessuto. Evitare di danneggiare il
tessuto. Non esporre la poltrona elevabile alla luce diretta del sole.
CURA DEL SISTEMA ELETTRONICO
Ispezionare tutti i gruppi di cablaggio per accertare che non siano danneggiati o tagliati.
In caso di danni, scollegare la poltrona elevabile e contattare il rivenditore autorizzato Pride per assistenza.
Mantenere tutti i componenti elettronici privi di umidità e non sottoporli a temperature estreme. Le pol-
trone elevabili Pride sono previste per solo uso in ambienti interni!
AVVERTENZA! Sebbene la poltrona elevabile abbia superato i requisiti dei test
necessari per l’ingresso di liquidi, è opportuno tenere lontani i collegamenti elettrici
dalle sorgenti di umidità, compresa la diretta esposizione ad acqua o liquidi
corporei o incontinenza. Controllare spesso i componenti elettrici per segni di
corrosione e sostituire se necessario.
SMALTIMENTO E RICICLO
La poltrona elevabile deve essere smaltita in conformità con le leggi e le normative locali e nazionali in vigore.
Contattare l’ente locale per lo smaltimento dei rifiuti oppure il rivenditore Pride autorizzato per le informa zioni
sul corretto smaltimento dei materiali di imballo, dei componenti metallici del telaio, del tessuto, delle parti
elettroniche e delle batterie.
AVVERTENZA! I sacchetti di plastica rappresentano pericolo di soffocamento.
Smaltire i sacchetti di plastica in modo adeguato e non lasciare che i bambini ci
giochino.
Lift Chair Series www.pridemobility.com 75
Page 76

LIFT CHAIR SERIES
VIII. GARANZIA
GARANZIA LIMITATA DI DUE ANNI
Per due (2) anni dalla data di acquisto, la Pride riparerà o sostituirà a propria discrezione,
all'acquirente originario, qualsiasi delle parti seguenti, riscontrata come difettosa nei materiali e/
o nella lavorazione, dopo esame da parte di un rappresentante autorizzato Pride:
Telaio di acciaio Motore Filocomando Meccanismi a forbice
Meccanismo di sollevamento di acciaio
NOTA: La Pride si riserva il diritto di sostituire solamente la parte difettosa del meccanismo di elevazione in acciaio.
ESCLUSIONI DALLA GARANZIA
Tessuto
Danni risultanti da abuso, uso improprio, riparazioni non autorizzate, negligenza, incidenti, modifiche, o
cambiamenti del prodotto.
Danni causati da abuso o trattamento inadeguato da parte di un corriere comune.
Qualsiasi danno particolare, indiretto, accidentale e/o conseguente.
Dopo il periodo di garanzia, la Pride non avrà alcun obbligo di garanzia, esplicita o implicita (comprese le
garanzie implicite di commercializzazione e di adattamento ad uno scopo particolare).
In caso di danno nascosto, scoperto dopo l'accettazione della consegna, il destinatario/soggetto che ha firmato per la merce deve chiamare il corriere entro 48 ore e richiedere un'ispezione. Il destinatario/soggetto
deve conservare il cartone di imballo del trasporto. Si prega di lasciare la merce in oggetto nella zona dove
è stata ricevuta. Tutte le rivendicazioni vengono negoziate tra il consumatore e l'azienda di trasporto.
76 www.pridemobility.com Lift Chair Series
Page 77

NOTAS
LIFT CHAIR SERIES
Lift Chair Series www.pridemobility.com 77
Page 78
LIFT CHAIR SERIES
088 609 661
SICHERHEITSRICHTLINIEN
Die folgenden Symbole werden in dieser Bedienungsanleitung und auf dem Produkt laufend verwendet und
dienen zur Kennzeichnung von Warnungen und wichtigen Informationen. Es ist äußerst wichtig, diese zu
lesen und vollständig zu verstehen.
WARNUNG! Die Nichtbeachtung angegebener Anweisungen kann zu Personenschaden bzw.
Schäden an dem Gerät oder Fehlfunktionen führen (schwarzes Symbol im gelben Dreieck mit
schwarzer Umrandung).
ANWEISUNG! Diese Maßnahmen sollten nur wie beschrieben durchgeführt werden. Die
Nichtbeachtung der vorgeschriebenen Maßnahmen kann zu Personenschaden bzw. Schäden
an dem Gerät führen (weißes Symbol auf blauem Kreis mit weißer Umrandung).
VERBOTEN! Diese Handlungen sollten unterlassen werden. Diese Handlungen dürfen Sie nie
und unter keinen Umständen vornehmen. Die Nichtbeachtung kann zu Personenschaden
bzw. Schäden an dem Gerät führen (schwarzes Symbol mit rotem Kreis und rotem
Schrägstrich).
Mein autorisierter Pride Fachhändler ist:
Name:
Adresse:
Telefon:
Kaufdatum: Fortlaufende Serienummer:
ANMERKUNG: Dieses Benutzerhandbuch wurde aus den neuesten, zum Zeitpunkt der Veröffentlichung verfügbaren Spezifikationen und Produktinformationen zusammengestellt. Wir behalten
uns vor, bei Bedarf Änderungen vorzunehmen. Alle Änderungen an unseren Produkten können
geringe Unterschiede zwischen den Abbildungen und Erläuterungen in diesem Handbuch und
dem von Ihnen erworbenen Produkt verursachen. Die letzte/neueste Version dieses Handbuchs
ist auf unserer Website verfügbar.
Copyright © 2009
Pride Mobility Products Europe B.V.
INFMANU3686/Rev C/August 2009/German
78 www.pridemobility.com Lift Chair Series
Page 79

INFORMATIONSHINWEISE
LIFT CHAIR SERIES
SYMBOLE DER PRODUKTSICHERHEIT
Die folgenden Symbole sind an Ihrem Elektromobil angebracht, um auf Warnungen, notwendige Maßnahmen und verbotene Handlungen hinzuweisen. Es ist sehr wichtig für Sie, diese komplett zu lesen und zu
verstehen.
Quetsch/ Stauchkanten, die während des Zusammenbauens entstanden
sind.
Gefahr eines elektrischen Schock.
Lesen und befolgen Sie die Angaben dieser Betriebsanleitung.
Maximales Sitzgewicht.
Verbinden Sie kein Verlängerungskabel an den Wechselstrom-/
Gleichstromwandler oder das Batterieladegerät.
Das Entfernen des Erdungsstiftes kann zu elektrischer Gefährdung
führen. Wenn notwendig, installieren Sie einen zugelassenen 3-poligen
Adapter an einem elektrischen Ausgang mit einer 2-poligen Steckdose.
Entsorgung und Recyling - Wenden Sie sich wegen informationen über die
ordnunsgemäße Entsorgung und Recycling Ihres Pride-Produkts und
seiner Verpackung an Ihren Pride-Vertragshändler.
Lift Chair Series www.pridemobility.com 79
Page 80
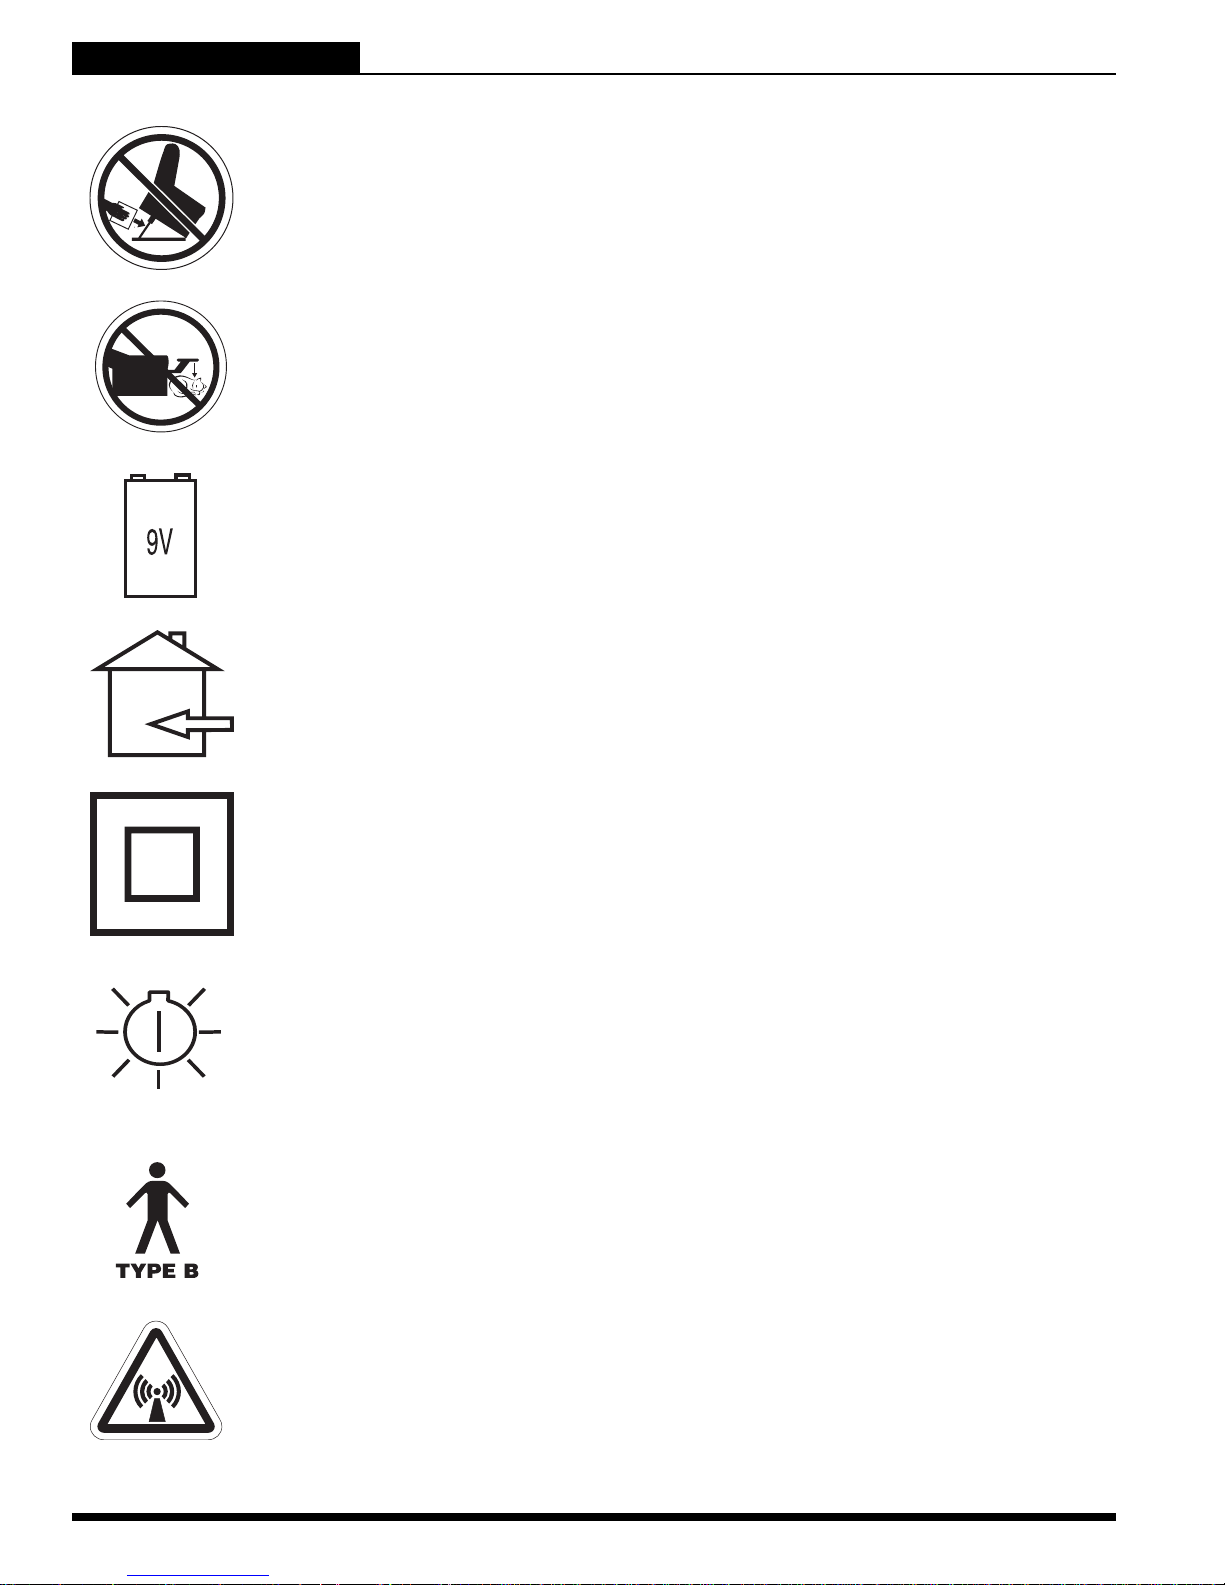
LIFT CHAIR SERIES
INFORMATIONSHINWEISE
Legen Sie keine Gegenstände unter den Aufrichtestuhl. Entfernen Sie
etwaige Hindernisse aus dem Verwendungsbereich und stellen Sie
sicher, dass sich keine Haustiere oder Kleinkinder dort aufhalten.
Legen Sie keine Gegenstände unter die Fußstütze, wenn der
Aufrichtestuhl vollständig in die Liege-Stellung gebracht wurde.
Entfernen Sie etwaige Hindernisse aus dem Verwendungsbereich und
stellen Sie sicher, dass sich keine Haustiere oder Kleinkinder dort
aufhalten.
Batteriefach
Für den Gebrauch in geschlossenen Raeumen. Vermeiden Sie Regen,
Schnee, Eis, Salz oder stehendes Wasser. Halten und Lagern in
trockenem und sauberem Zustard.
Schutzklasse-II-Ausrüstung
Wenn die grüne Diode leuchtet, ist die Energieversorgung eingeschaltet.
Gilt nicht für alle Modelle.
Schutzart gegen elektrischen Schlag.
EMI-RFI- Dieses Produkt wurde getestet und weist einen
Immunitätspegel von 20V/m auf.
80 www.pridemobility.com Lift Chair Series
Page 81

INHALT
LIFT CHAIR SERIES
SICHERHEITSRICHTLINIEN .............................................................................. 78
INFORMATIONSHINWEISE ................................................................................ 79
I. VORWORT ....................................................................................................... 82
SICHERHEIT.............................................................................................................................................................. 82
EINVERSTÄNDNISERKLÄRUNG DES KÄUFERS ................................................................................................... 82
INFORMATIONSAUSTAUSCH .................................................................................................................................. 82
II. ALLGEMEINE RICHTLINIEN .......................................................................... 83
ÄNDERUNGEN .......................................................................................................................................................... 83
GEWICHTSBESCHRÄNKUNGEN............................................................................................................................. 83
QUETSCHGEFAHR ................................................................................................................................................... 83
SCHUTZART/VERWENDUNGSART ......................................................................................................................... 83
LAGER- UND BETRIEBSTEMPERATUR.................................................................................................................. 83
EMI/RFI ...................................................................................................................................................................... 84
VERSAND .................................................................................................................................................................. 84
TRANSPORT IN KRAFTFAHRZEUGEN ................................................................................................................... 84
III. IHR LIFTSESSEL .......................................................................................... 85
BESCHREIBUNG....................................................................................................................................................... 85
ELEKTRISCHE BAUGRUPPEN ................................................................................................................................ 86
IV. ZERLEGEN UND ZUSAMMENBAUEN ........................................................... 88
AUFSTELLEN DES LIFTSESSEL.............................................................................................................................. 88
AUFSTELLEN DES AUFRICHTESTUHLS ................................................................................................................ 90
BATTERIE EINBAU.................................................................................................................................................... 90
ABBAU DES AUFRICHTESTUHLS ........................................................................................................................... 91
ENTFERNEN / ANBRINGEN DES ÜBERZUGS ........................................................................................................ 92
V. HANDHABUNG............................................................................................... 95
VORSICHTSMAßNAHMEN ....................................................................................................................................... 95
HANDSTEUERUNGSBEFEHLE ................................................................................................................................ 95
VI. FEHLERSUCHE ............................................................................................. 98
HAEUFIG GESTELLTE FRAGEN.............................................................................................................................. 98
VII. PFLEGE UND WARTUNG ........................................................................... 100
PFLEGE DES ÜBERZUGS ...................................................................................................................................... 100
PFLEGE DER ELEKTRONISCHEN BAUTEILE ..................................................................................................... 100
ENTSORGUNG UND RECYCLING ......................................................................................................................... 100
VIII. GARANTIE ................................................................................................ 101
APPENDIX I - TECHNISCHE ANGABEN ........................................................... 127
Lift Chair Series www.pridemobility.com 81
Page 82

LIFT CHAIR SERIES
I. VORWORT
SICHERHEIT
WILLKOMMEN bei Pride. Das von Ihnen gekaufte Produkt verbindet eine fortschrittliche, hochentwickelte Technologie unter Berücksichtigung der A spekte von Sicherheit, Komfort und Design. Wir
sind überzeugt, dass die Ausstattung die Annehmlichkeiten bieten wird, die Sie während Ihrer
täglichen Unternehmungen erwarten. Das Verstehen der sicheren Bedienung und Pflege dieses
Produktes sollte Ihnen viele Jahre lang einen störungsfreien Betrieb und Service bieten.
Lesen und befolgen Sie alle Anweisungen, Warnungen und Hinweise in dieser Bedienungsanleitung sowie
in etwaigen mitgelieferten Unterlagen, bevor Sie das erste Mal versuchen, dieses Produkt zu benutzen. Ihre
Sicherheit hängt von Ihnen selbst, ebenso von Ihrem Lieferanten, Fürsorger oder Pflegepersonal unter
Beachtung des gesunden Menschenverstandes ab.
Sollte diese Bedienungsanleitung Informationen beinhalten, die Sie nicht verstehen, oder sollten Sie Unterstützung bei der Inbetriebnahme oder dem Betrieb benötigen, wenden Sie sich bitte an Ihren autorisierten
Pride Fachhändler. Die Nichtbeachtung der Anweisungen, Warnungen und Hinweise in diesem Handbuch
und an Ihrem Pride Produkt kann zu Personenschaden bzw. Schäden an dem Gerät führen und die Pride
Produktgewährleistung gefährden.
EINVERSTÄNDNISERKLÄRUNG DES KÄUFERS
Mit der Annahme dieses Produkts versichern Sie, dass Sie dieses Produkt nicht verändern, umbauen oder
modifizieren; Schutzgitter, Schilder und andere Sicherheitseinrichtungen dieses Produkts nicht entfernen
oder inoperabel machen; den Einbau von Nachrüstsätzen von Pride, die von Pride von Zeit zu Zeit zur Verfügung gestellt werden, um die sichere Bedienung dieses Produktes zu erweitern oder gewährleisten, nicht
zu unterlassen, zu verweigern oder zu vernachlässigen.
INFORMATIONSAUSTAUSCH
Gerne würden wir Ihre Fragen, Kommentare und Vorschläge bezüglich dieser Bedienungsanleitung erfahren.
Ebenso würden wir gerne von der Sicherheit und Zuverlässigkeit Ihres Elektromobils, sowie über den von
Ihrem autorisierten Pride Fachhändler geleisteten Service erfahren. Sollte sich Ihre Adresse ändern, teilen
Sie uns dieses bitte mit, damit wir Sie über wichtige Informationen bezüglich der Sicherheit, neuer Produkte
und neuer Alternativen benachrichtigen können, die zu einer Steigerung der Bedienungsfähigkeit und der
Freude an Ihrem Elektromobil führen können. Bitte schreiben Sie uns unter der folgenden Adresse:
Pride Mobility Products Europe B.V.
Castricummer Werf 26
1901 RW Castricum
The Netherlands
HINWEIS: Sollten Sie Ihre Bedienungsanleitung verlieren oder verlegen, setzen Sie sich mit uns
in Verbindung; wir schicken Ihnen gerne gegen Gebühr unverzüglich eine neue zu.
82 www.pridemobility.com Lift Chair Series
Page 83
II. ALLGEMEINE RICHTLINIEN
LIFT CHAIR SERIES
Ihr Liftsessel ist ein hochentwickeltes Gerät, das entworfen wurde, um Ihren Lebensstandard
und Ihre Mobilität zu steigern. Um die individuellen Wünsche des Liftsessels zu befriedigen,
liefert Pride eine umfangreiche Auswahl an Produkten. Die endgültige Auswahl und Kaufentscheidung hinsichtlich welcher Liftsessel in Betrieb genommen wird, obliegt dem/der Liftsesselkaeufer/in, sowie dem für ihn/sie zuständigen Arzt oder Therapeuten.
ANWEISUNG! Vor der erstmaligen Inbetriebnahme Ihres Liftsessel sollten Sie diese
Betriebsanleitung sorgfältig lesen und verstehen.
Unter bestimmten Umständen, einschliesslich gewisser gesundheitlicher Beschwerden, muss der Benutzer
die Handhabung des Liftsessel unter Aufsicht einer Pflegeperson üben. Eine Pflegeperson kann ein Familienmitglied oder eine ausgebildete Pflegeperson sein, die über geeignete Kenntnisse über die alltägliche
Handhabung eines Liftsessels verfügt.
Im täglichen Umgang mit Ihrem Liftsessl kann es dazu kommen, dass sich einige Situationen ereignen, die
ein wenig Übung erfordern. Lassen sie sich aber Zeit und Sie werden bald in der Lage sein, Türen , Aufzüge,
Rampen und unregelmäßige Oberflächen gefahrlos und souverän zu meistern.
ÄNDERUNGEN
Ihr Liftsessel wurde entworfen und konstruiert, um das Maximum an Mobilität und Nutzen zu gewährleisten.
Um Liftsessel weiter individuell auf Ihre Bedürfnisse einzurichten, steht Ihnen eine umfangreiche Auswahl an
Extras bei Ihrem autorisierten Pride Fachhändler zur Verfügung. Sie sollten aber niemals Merkmale, Teile
oder Funktionen Ihres Liftsessels ändern, zufügen, abbauen oder unbrauchbar machen.
ANMERKUNG: Verwenden Sie für Reparaturen und Wartungsarbeiten ausschließlich Pride-Ersatzteile.
GEWICHTSBESCHRÄNKUNGEN
Der Aufrichtestuhl ist für eine maximale Traglast ausgelegt. Weitere Informationen dazu finden Sie im „Anhang A“.
WICHTIG! Bleiben Sie innerhalb der für Ihren Pride Liftsessel angegebenen
Gewichtskapazität. Ein Überschreiten der Gewichtskapazität macht Ihre Garantie
ungültig.
QUETSCHGEFAHR
Die Scheren- und Aufrichtemechanismen des Aufrichtestuhls sind als Gefahrenstellen (Achtung Quetschgefahr) ausgewiesen. Achten Sie besonders auf diese Gefahrenquellen und entfernen Sie etwaige Hin dernisse
aus dem Verwendungsbereich. Sämtliche Quetschgefahrenstellen finden Sie unter Abb. 3.1.
WARNUNG! Quetsch/ Stauchkanten, die während des Zusammenbauens
entstanden sind.
SCHUTZART/VERWENDUNGSART
Schutzklasse-II-Ausrüstung/Schutz gegen elektrischen Schlag (Typ B)
Schutz gegen Fremdkörper/Wasser—IPX1
Verwendungsart—Maximale Verwendungsdauer: 2min EIN/18min AUS
LAGER- UND BETRIEBSTEMPERATUR
Transport und Lagerung: -75°C bis +70°C
Betrieb: 10°C bis 40°C
Lift Chair Series www.pridemobility.com 83
Page 84
LIFT CHAIR SERIES
II. ALLGEMEINE RICHTLINIEN
ELEKTROMAGNETISCHE UND RADIOFREQUENTE INTERFERENZ (EMI/RFI)
WARNUNG! Labortests haben gezeigt, dass elektromagnetische und
radiofrequente Wellen einen negativen Einfluss auf die Leistung Ihres elektrisch
angetriebenen Liftsessel haben können.
Elektromagnetische und radiofrequenzbasierte Interferenzen können von verschiedensten Quellen verursacht
werden, darunter Mobiltelefone, Handfunkgeräte (Walkie-Talkies), Radio- oder Fernsehsender, Amateurfunkanlagen, Drahtlos-Netzwerke, Mikrowellensignale, Funkwellenempfänger oder mo bile Mittelstrecken-Funkanlagen, wie sie beispielsweise von Einsatzfahrzeugen verwendet werden. In manchen Fällen können diese
Wellen die Steuerung strombetriebener Geräte ungewollt beeinflussen oder beschädigen. Helfen Sie durch
das Einhalten eines Mindestabstands zu mobilen und drahtlosen Funkapparaten mit, elektromagnetische
Interferenzen zu verhindern. Zwischen dem Aufrichtestuhl und Funkapparaten, deren Ausgangsleistun g 10W
oder mehr beträgt, sollte unbedingt ein Mindestabstand von wenigstens 3 Metern eingehalten werden. Angaben zur maximalen Ausgangsleistung eines Funkapparats finden Sie in den jeweiligen Herstellerangaben.
Jedes strombetriebene Gerät verfügt über einen EMI-Widerstand. Je höher der Widerstandswert, desto
höher der Schutz vor elektromagnetischen Interferenzen. Dieser Aufrichtestuhl wurde gemäß Elektromagnetischen Verträglichkeitsstandards (EMV) getestet und als Produkt der Gruppe 1, Klasse B eingestuft, da
ausschließlich innere Arbeitsabläufe des Geräts funkbasiert sind. Aufgrund seiner geringen Funkemissione n
sind Interferenzen mit anderen elektronischen Geräten äußerst unwahrscheinlich, weshalb sich dieser
Aufrichtestuhl unter anderem auch zur Verwendung in privaten Haushalten und Krankenhäusern eignet.
WARNUNG! Beachten Sie, dass Handys, Wechselsprechanlagen, Laptopcomputer und
andere Typen von Radiosendern wegen EMB unbeabsichtigte Bewegungen Ihres Liftsessel
verursachen können. Seien Sie vorsichtig, wenn Sie einen dieser Gegenstände benutzen,
während Sie Ihr Liftsessel betreiben und vermeiden Sie in unmittelbare Nähe von Radio- und
Fernsehsendern zu kommen.
WARNUNG! Das Hinzufügen von Zubehör oder Anbaugeräten an das Liftsessel kann die
Anfälligkeit des Fahrzeugs gegenüber EMI verstärken. Verändern Sie Ihr Liftsessel nicht in
einer Weise, die nicht von Pride zugelassen ist.
WARNUNG! Der Liftsessel selbst kann die Leistung anderer elektrischer Geräte in
der Nähe, wie z.B. Alarmanlagen, stören.
ANMERKUNG: Sollte sich das Gerät bewegen, ohne dafür durch die Steuerung angewiesen worden zu
sein, den Aufrichtestuhl nicht weiter verwenden und den Vorfall unbedingt bei Pride melden.
VERSAND
Beim Versand ist die Orginalverpackung zu verwenden und Einzelkomponenten (Batterien u sw.) sind gegen
Verrutschen zu sichern. Beim Transport z.B in einem LKW, ist der Liftsessel gegen Verrutschen zu sichern
(Gefahr beim Bremsen). Kontrollieren Sie vor Inbetriebnahme Ihres Liftsessels den Lieferumfang auf Vollständigkeit. Bei Abweichungen wenden Sie sich bitte umgehend an Ihren autorisierten Pride Fachhändler.
Bei Transportschäden an der Verpackung oder des Inhaltes, setzen Sie sich bitte mit dem anliefernden
Fuhrunternehmen in Verbindung.
TRANSPORT IN KRAFTFAHRZEUGEN
Wenn Sie Ihren Aufrichtestuhl in einem Fahrzeug transportieren, sichern Sie Einzelteile (Außentransformator, etc.) vor dem Verrutschen. Auch der Aufrichtestuhl selbst sollte vor dem Verrutschen gesichert werden,
denn er kann im Falle von Bremsmanövern eine Gefahr darstellen.
84 www.pridemobility.com Lift Chair Series
Page 85
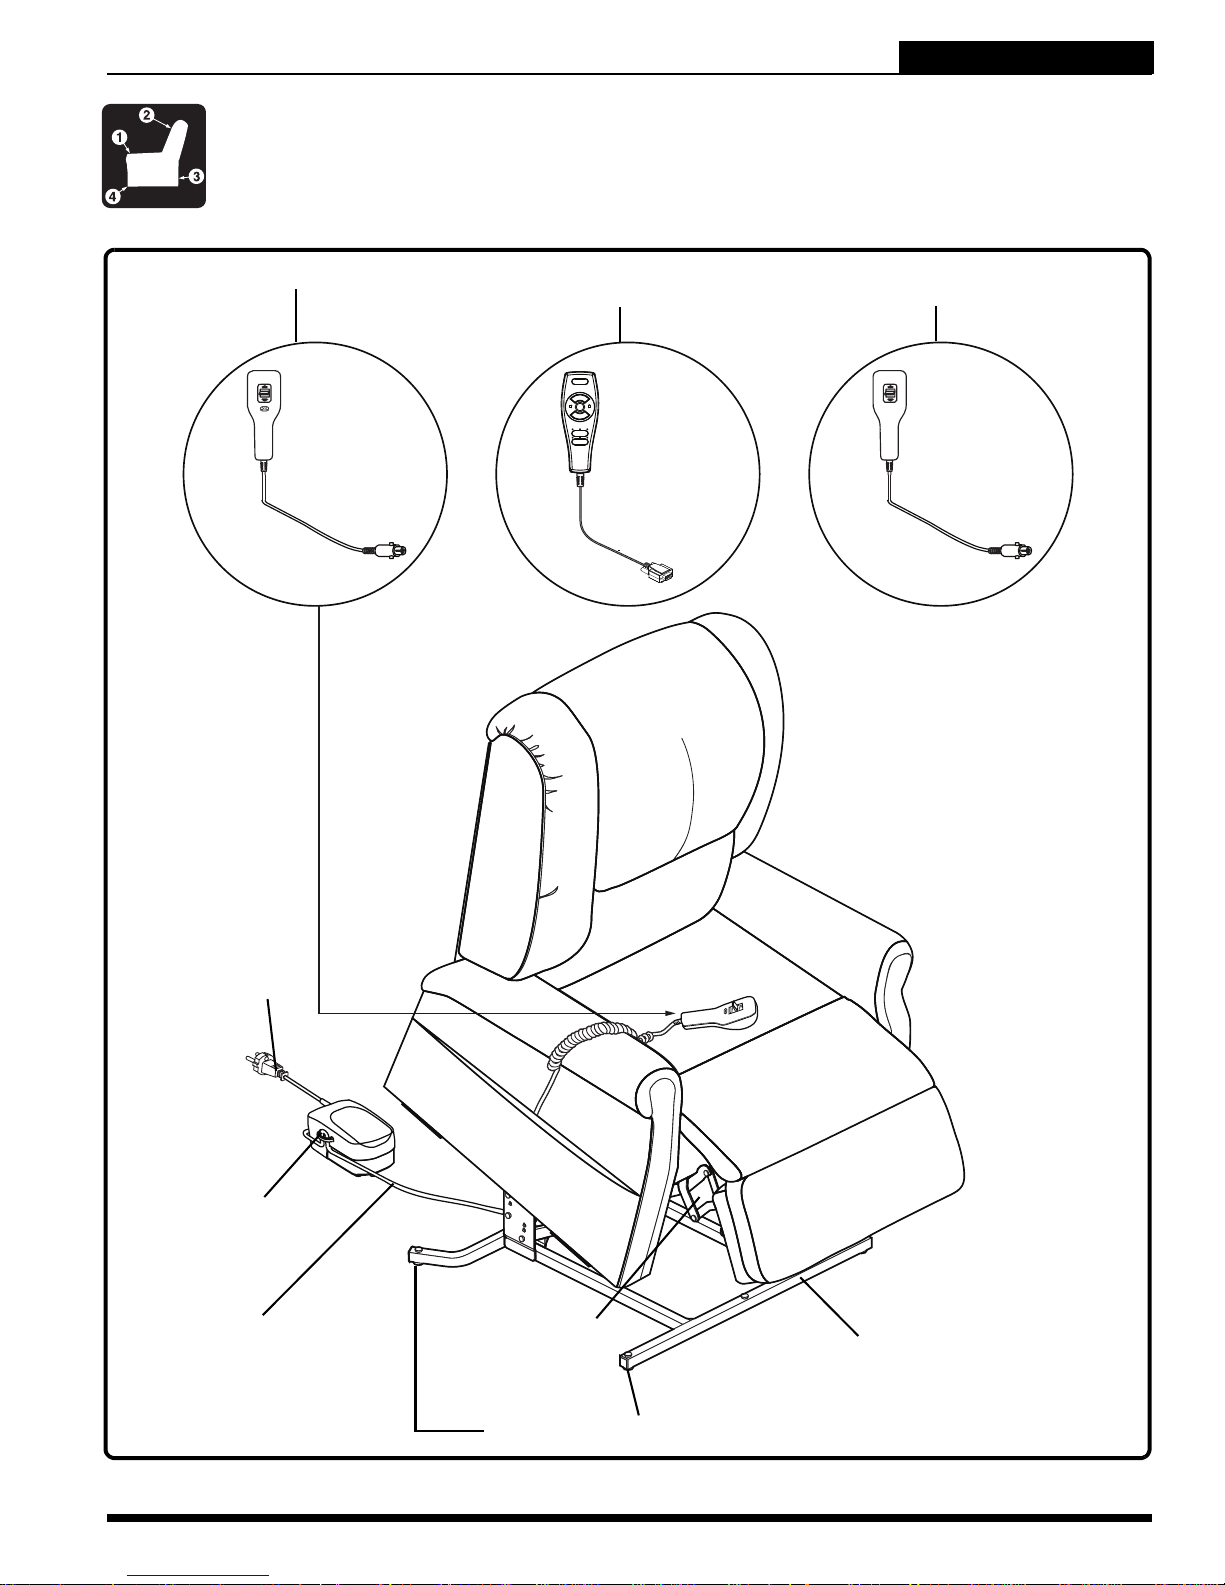
III. IHR LIFTSESSEL
BESCHREIBUNG
Beachten Sie bitte, dass die Abbildungen und Sonderausstattungen in diesem Handbuch nicht
Ihrem Modell des Liftsessels entsprechen könnten.
LIFT CHAIR SERIES
DOPPELMOTOREN-HANDSTEUERUNG
HANDSTEUERUNG MIT SITZHEIZUNGSUND MASSAGEFUNKTION
STANDARD HANDSTEUERUNG
STROMKABEL
EXTERNER
TRANSFORMATOR
NIEDERVOLT
VERBINDUNGSKABEL
Abbildung 3.1 Pride Liftsessel einzelteile
Lift Chair Series www.pridemobility.com 85
SCHERENMECHANISMS
(QUETSCHGEFAHR)
EINSTELLBARE STÜTZEN (4 STÜCK)
HEBEMECHANISMS
(QUETSCHGEFAHR)
Page 86
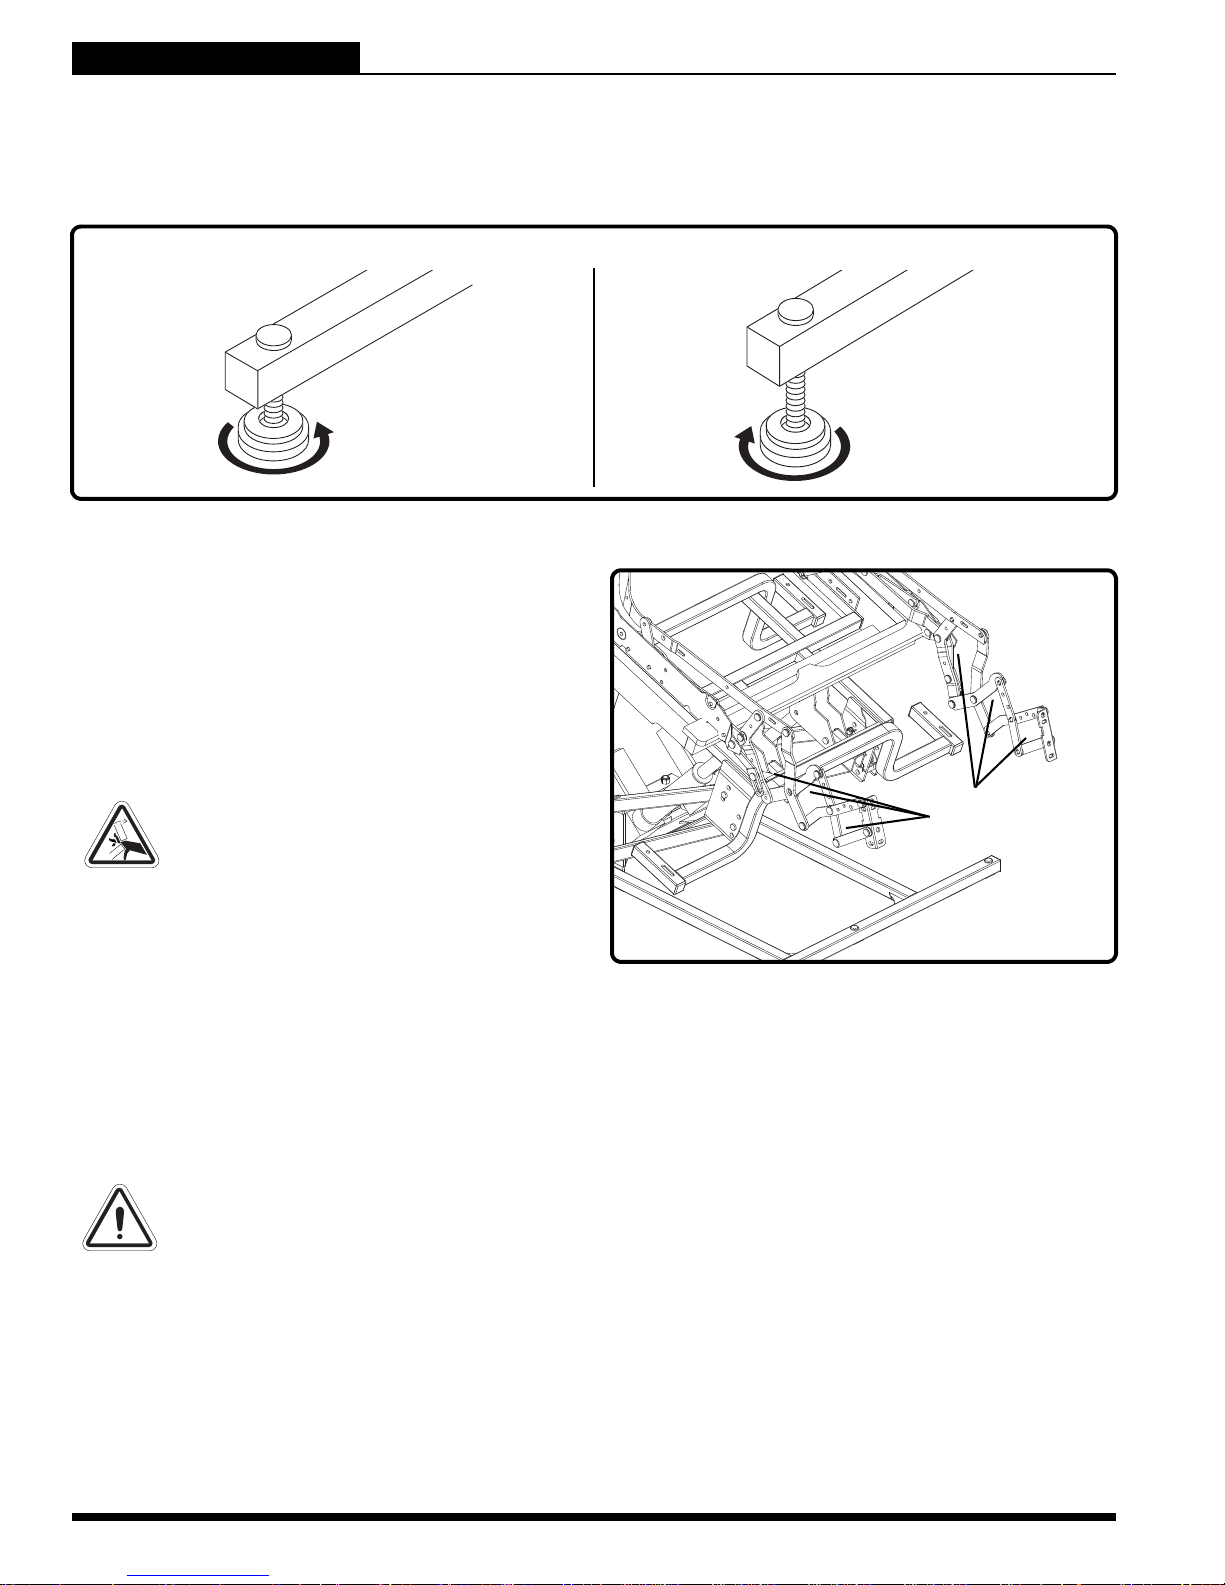
LIFT CHAIR SERIES
III. IHRES LIFTSESSEL
Aufrichtemechanismus: Bringt den Aufrichtestuhl mittels der Handsteuerung in die Sitz-, Liege- und
Aufrichte-Stellung.
Nivelliersockel:
Über die Nivelliersockel sorgen Sie für eine standfeste Bod enauflage des Aufrichtestuhls (Abb. 3.2).
STELLEN SIE DEN STUHL ÜBER DIE NIVELLIERSOCKEL HÖHER ODER NIEDRIGER
Abbildung 3.2 Nivelliersockel
Scherenmechanismus: Durch Aus- oder Einziehen
bringen Sie den Stuhl in die verschiedenen LiegeStellungen (Abb. 3.3).
WARNHINWEIS! Quetschgefahr!
Beachten Sie, dass am Scherenund Aufrichtemechanismus des
Aufrichtestuhls Quetschgefahr
besteht. Achten Sie bei der
Verwendung Ihres
Aufrichtestuhls ganz besonders
auf diese Gefahrenquellen und
schützen Sie besonders:
gliedmaßen
kleinkinder
haustiere
kabel
sauerstoffschläuche
bewegliche gegenstände, dar-
unter gewand oder decken
stromkabel
SCHERENMECHANISMUS
(QUETSCHGEFAHR)
Abbildung 3.3 Scherenmechanismus
ELEKTRISCHE BAUGRUPPEN
Ihr Pride-Aufrichtestuhl verwendet Niederspannungsgleichstrom und kann herkömmlichen Wechselstrom
(90V – 264V) in Gleichstrom (24/39V) umwandeln. Der Außentransformator, Batterien und die Handsteuerung werden mitgeliefert. Schützen Sie diese Bauteile unbedingt vor Feuchtigkeit.
WARNHINWEIS! Schützen Sie diese Bauteile unbedingt vor Feuchtigkeit, um
Stromschläge und/oder Unfälle zu vermeiden.
Externer Transformator: Verwenden Sie herkömmliche Steckdosen, um den Aufrichtestuhl anzuschließen.
Der Transformator kann mit einem Anzeigenlämpchen ausgestattet werden, welches grün leuchtet, wenn
Strom zum Transformator fließt.
Der Außentransformator kann auch mit einem Wandhalter geliefert und mit diesem unmittelbar neben der Steckdose an
der Wand befestigt werden. Aus Sicherheitsgründen ist bei der Anbringung des Transformators darauf zu achten, den
Apparat nur an angemessenen Stel len an der Wand zu fi xieren. Weiter e Informatione n dazu finden Si e im „Anhang G“
oder „Anhang H“.
HINWEIS: Pride ist nicht für Schäden verantwortlich, die aus unsachgemäßer Befestigung resultieren.
86 www.pridemobility.com Lift Chair Series
Page 87

III. IHRES LIFTSESSEL
LIFT CHAIR SERIES
Batterien: Vergewissern Sie sich stets, im Falle eines Stromausfalles über genug Restladung um Ihren
Aufrichtestuhl von der Liege- in die Sitz- und/oder Aufrichte-Stellung bringen zu können. Bei den Modellen
mit Notstromaggregat befinden sich die Batterien im Außentransformator.
Handsteurung: Enthält die Steuerung für die unterschiedlichen Funktionen des Aufrichtestuhls. Weitere
Informationen dazu finden Sie unter V. „Betrieb“. Die Handsteuerung kann mit einer Schnelltrenn ung ausgestattet werden, welche ihr Abtrennen vom Stuhl erlaubt, wodurch sämtliche Funktionen der Handsteuerung
gesperrt werden.
Lift Chair Series www.pridemobility.com 87
Page 88
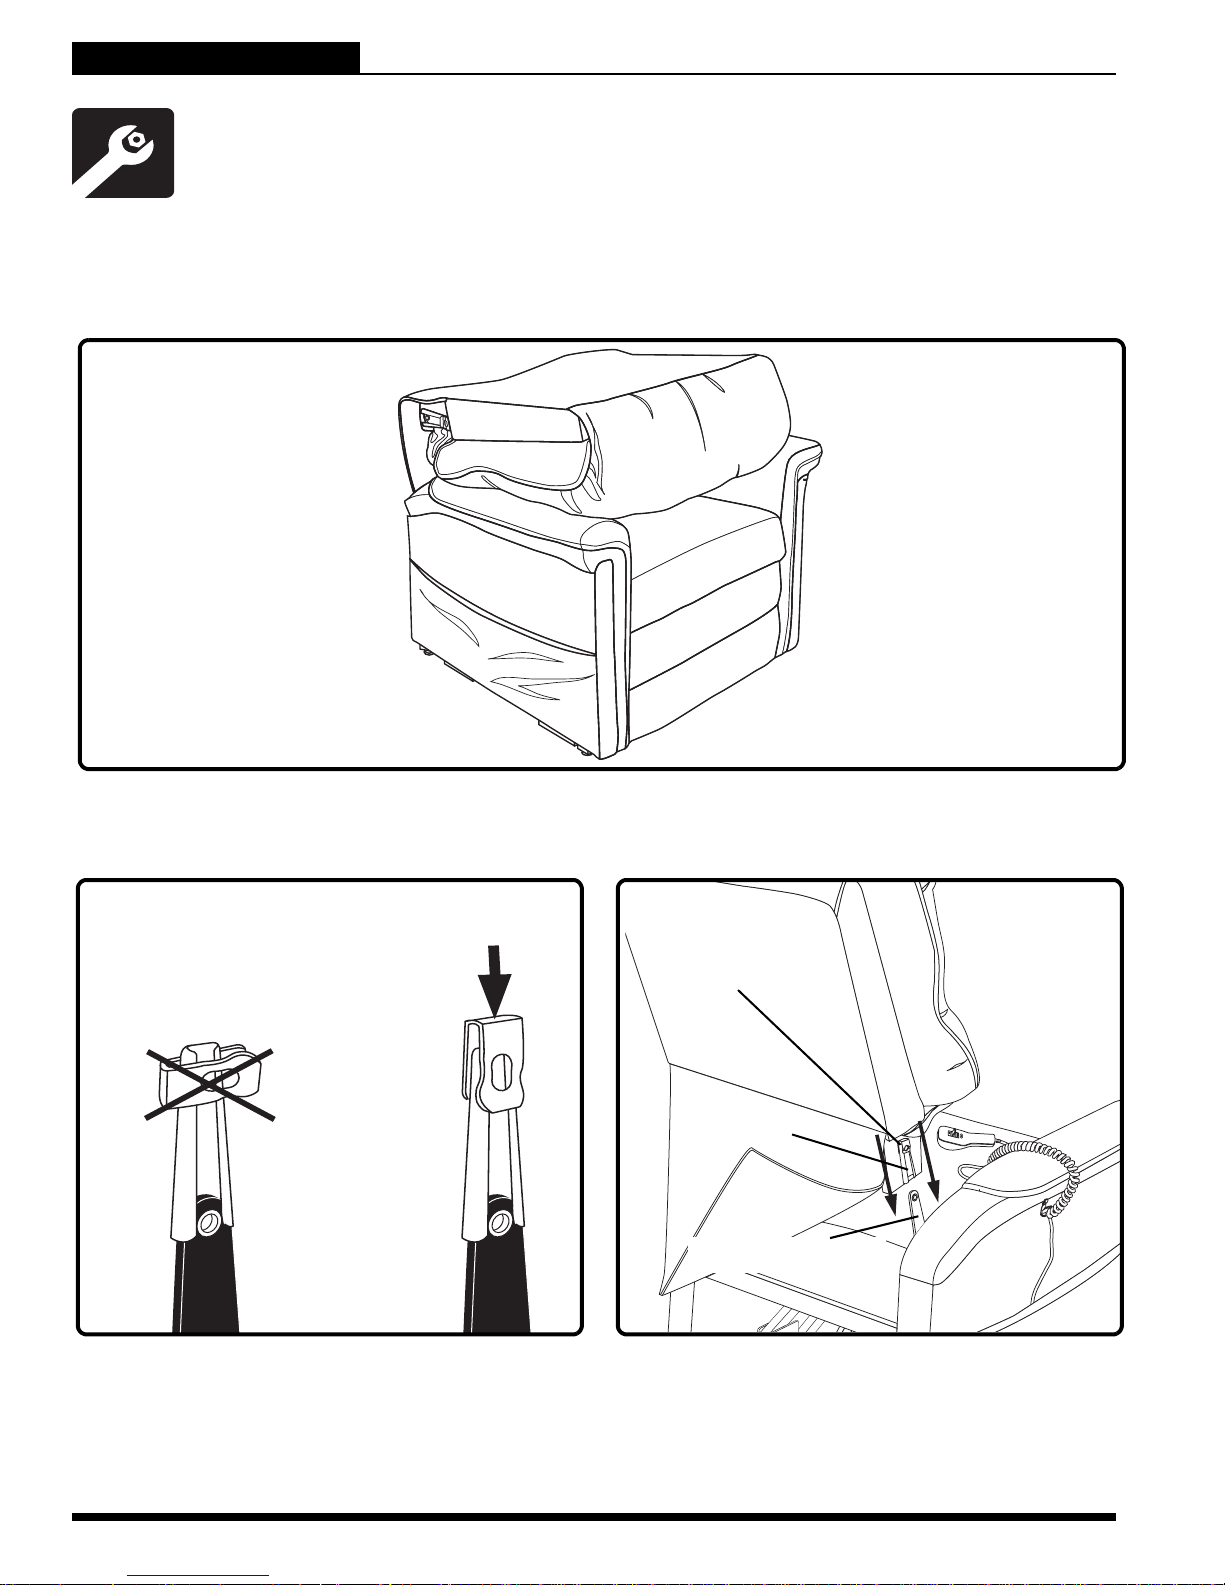
LIFT CHAIR SERIES
„KL“-HALTERUNG
Einige Aufrichtestuhl-Modelle müssen erst zusa mmengebaut werden, bevor sie verw endet werden
können. Darüber hinaus kann das Zerlegen des Stuhls die Instandhaltung erheblich erleichtern.
Handelt es sich bei Ihrem Aufrichtestuhl um ein Klapplehnen-Mo dell („KL“), dann beachten Sie bitte
die Angaben unter „Zusammenbau des Aufrichtestuhls“. Handelt es sich bei Ihrem Aufrichtestuhl
um kein „KL“-Modell, lesen Sie b itte direkt unter „Aufstellen des Aufrichtestuhls“ weiter.
AUFSTELLEN DES LIFTSESSEL
„KL“-Modelle werden eingeklappt geliefert (Abb. 4.1).
IV. ZERLEGEN UND ZUSAMMENBAUEN
Abbildung 4.1 Eingeklappte Steillung
Beachten Sie für den Selbstaufbau Ihres Aufrichtestuhls die folgenden Anweisungen:
RICHTIG
VERSCHLUSSKLEMME
FALSCH
„KL“-SCHIENE
4.1
.1 Entfernen Sie die Verpackung von der Rück-
enlehne des Stuhls und vergewissern Sie sich,
dass die Verschlussklemme senkrecht steht.
Falls nötig die Verschlussklemme entsprechend ausrichten.
88 www.pridemobility.com Lift Chair Series
4.1.2 Führen Sie die linke und rechte „KL“-Schiene
der Rückenlehne in die „KL“-Halterungen an
den Armlehnen und Sitzflächen ein.
Page 89
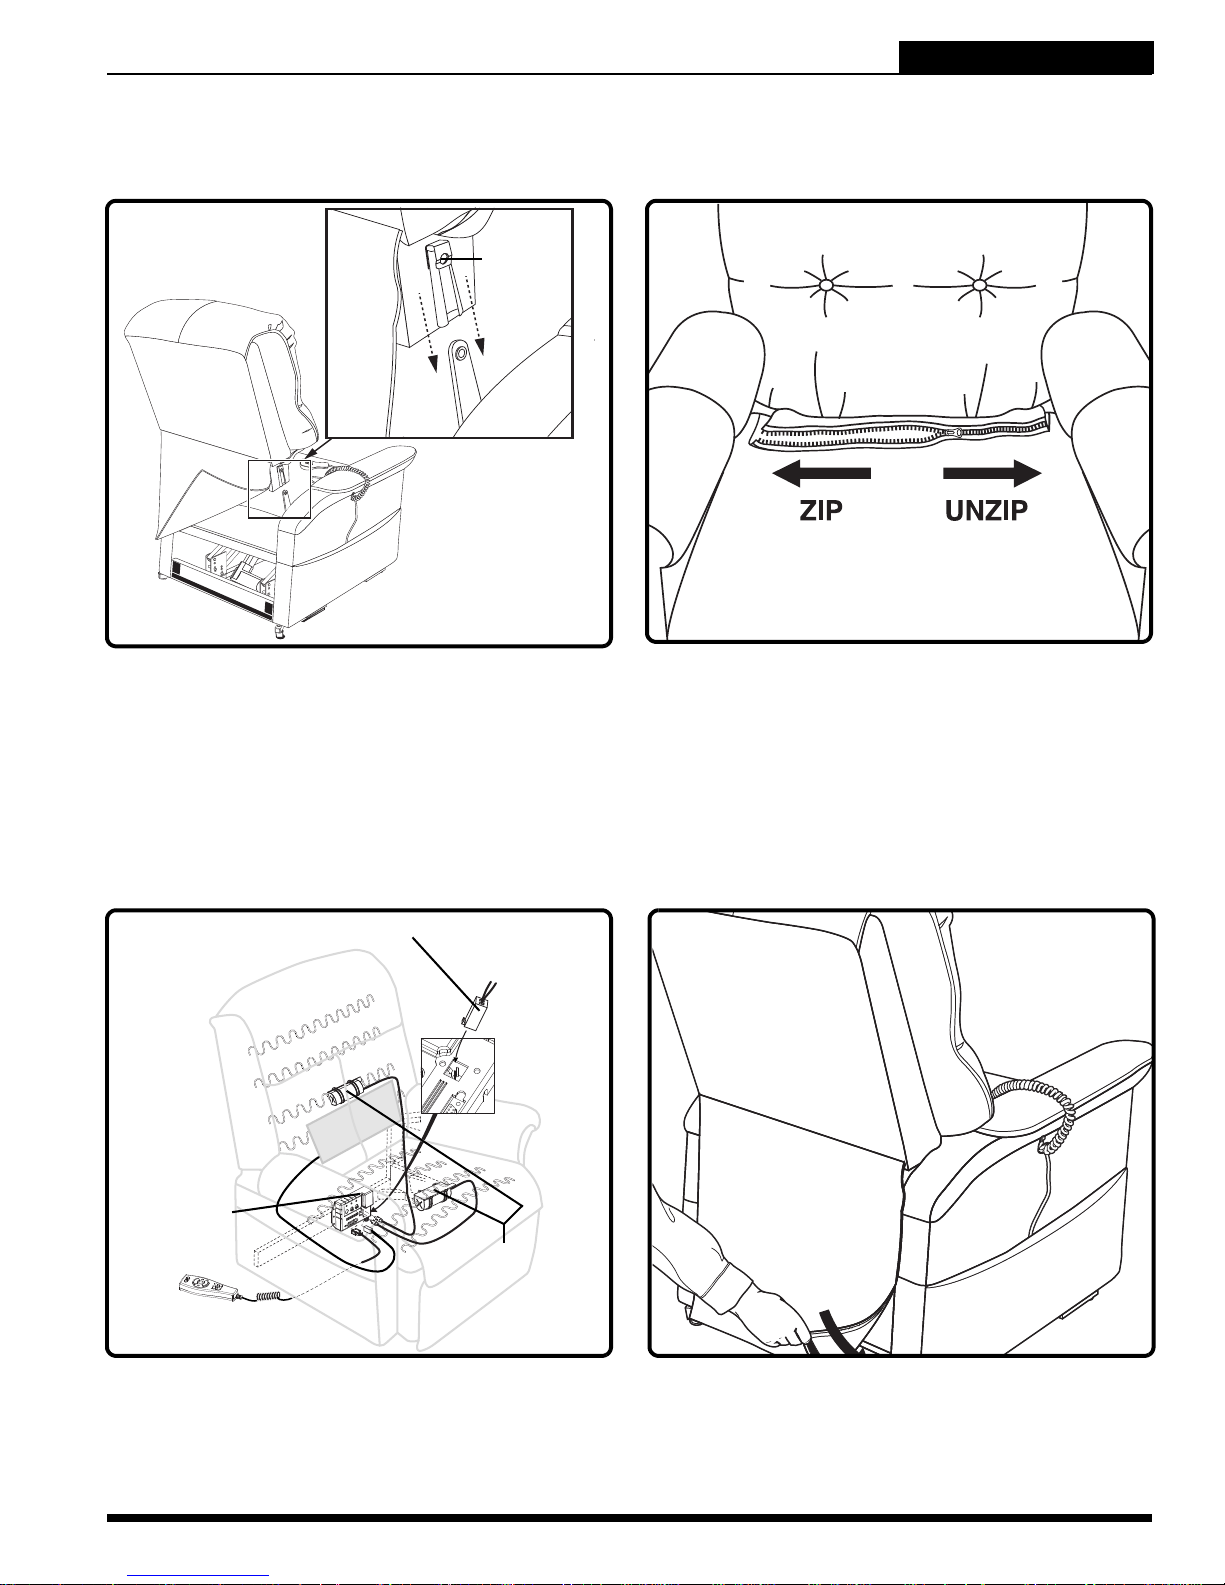
IV. ZERLEGEN UND ZUSAMMENBAUEN
LIFT CHAIR SERIES
ANMERKUNG: Bei breiteren Stuhlmodellen kann das seitenweise Befestigen der Rückenlehne notwendig werden. Richten Sie den Stuhl nach Einführen der beiden „KL“-Schienen auf, bevor Sie zum
Einrasten nach unten drücken.
“KLICKEN”
4.1.3 Drücken Sie kräftig auf das obere Ende der
Rückenlehne, um diese einzurasten. Ein
Klicken links und rechts verrät Ihnen das
Einrasten der jeweiligen Rückenlehnenseite.
ANMERKUNG: Ziehen Sie die Rückenlehne nach
oben, um das korrekte Einrasten zu überprüfen.
Lässt sich die Rückenlehne anheben, so wiederholen Sie die Schritte 4.1.1. bis 4.1.3.
ANSCHLUSS DES HEIZELEMENTS IM VERTEILER
VERTEILER
4.1.4 C6-Aufrichtestuhl-Modelle: Ziehen Sie die
Überzugslaschen an der Vorderseite der
Rückenlehne und jene an der Rückseite der
Sitzfläche durch den Rahmen und fixieren
Sie diese mit Hilfe der dafür vorgesehenen
Laschengurte. Verbinden Sie diese beiden
Abschnitte anschließend miteinander.
4.1.5 Schließen Sie das Heizungs- und das Massagekabel an den Verteiler an. Der Verteiler
befindet sich an der Rückseite des Aufrichtestuhls. Weitere Informationen zu den elektrischen Anschlüssen finden Sie im „Anhang D“.
Lift Chair Series www.pridemobility.com 89
MASSAGEEINHEIT
4.1.6 Befestigen Sie die Rückenlehne an den
Haken und Schlaufen am Stuhlsockel.
Page 90
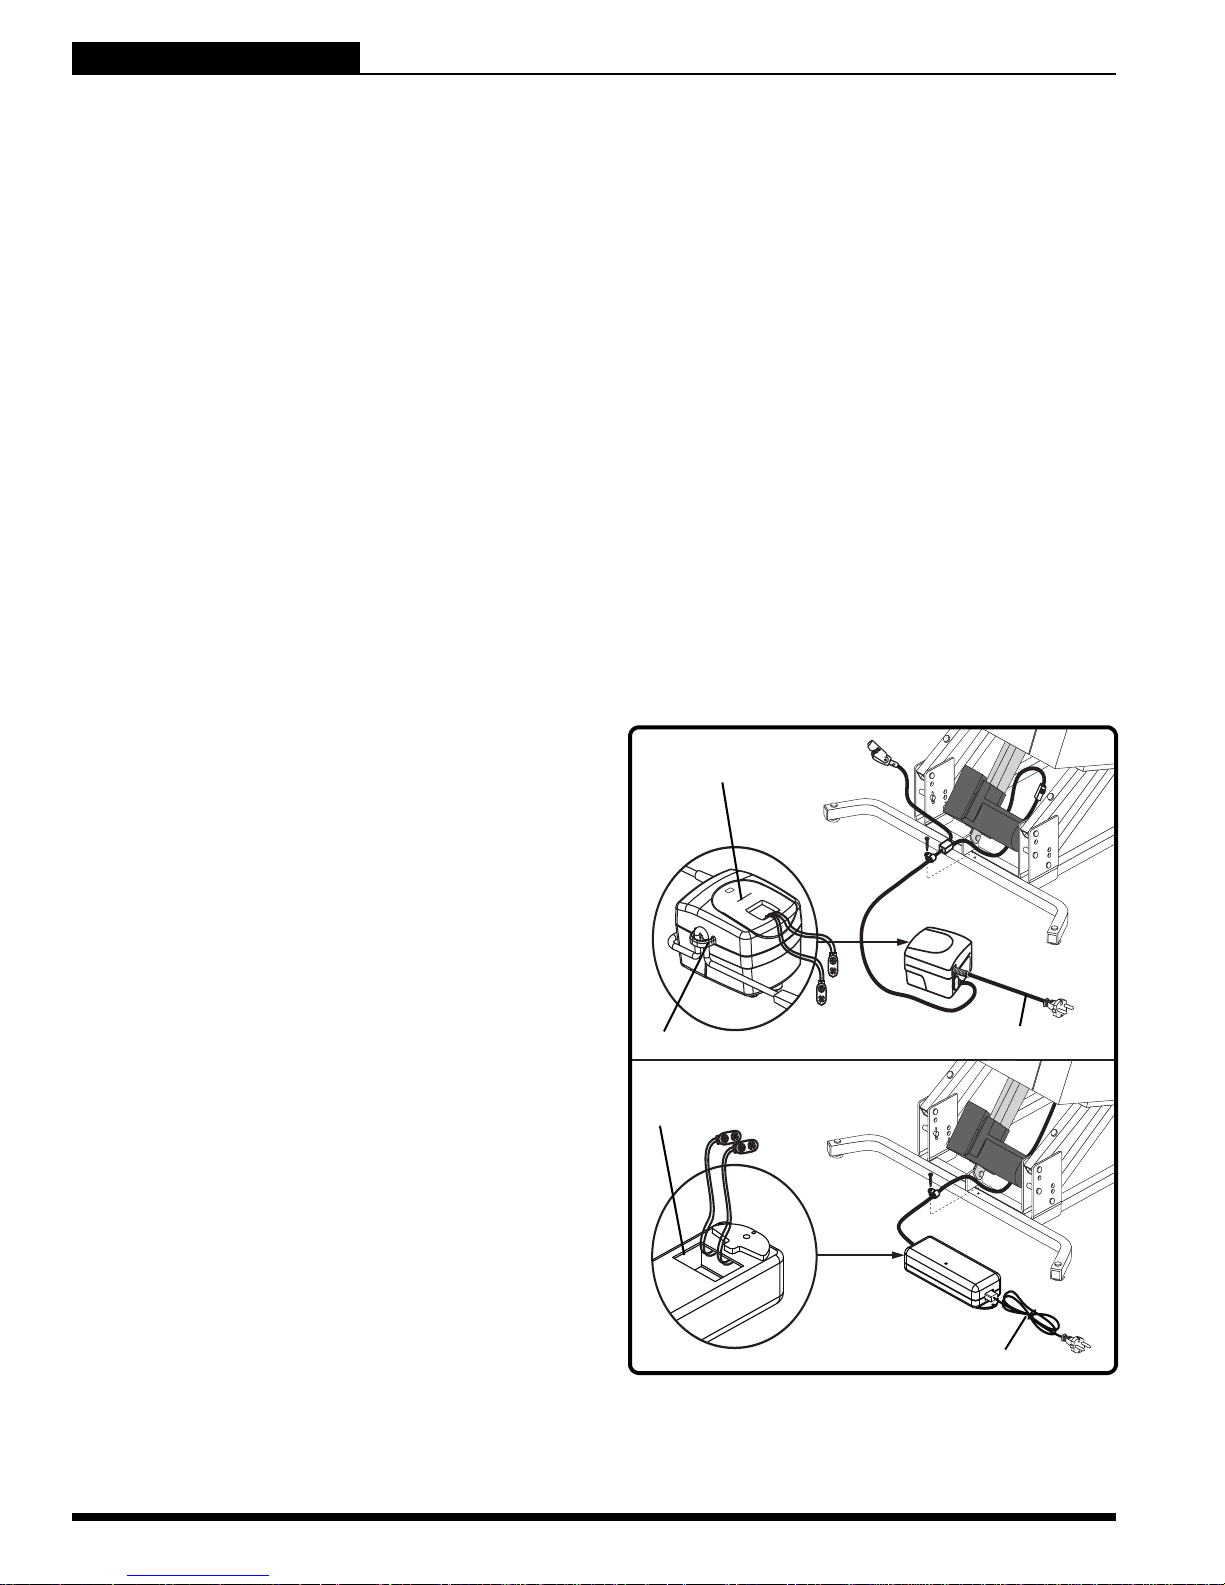
LIFT CHAIR SERIES
IV. ZERLEGEN UND ZUSAMMENBAUEN
AUFSTELLEN DES AUFRICHTESTUHLS
Stellen Sie Ihren Aufrichtestuhl in der Nähe einer herkömmlichen Steckdose auf und achten Sie auf trockenen, ebenen Untergrund und genügend Umraum. Um Verletzungen durch unsachgemäßes Heben zu vermeiden, empfiehlt Pride, den Aufrichtestuhl nicht ohne Hilfe einer zweiten Person aufzustellen.
Beachten Sie für das Aufstellen Ihres Aufrichtestuhls die folgenden Sicherheitsanweisungen:
1. Bringen Sie den Stuhl in die Sitz-Stellung und achten Sie darauf, dass die Rückenlehne über einen Mindestabstand von 76 cm zum nächsten Objekt verfügt. Diese Angaben können je nach Modell variieren.
2. Sorgen Sie mit Hilfe der Nivelliersockel für eine gute Standfestigkeit des Aufrichtestuhls (Abb. 3.2).
3. Setzen Sie die Batterien in den Außentransformator ein (gilt nur für entsprechend ausgerüstete Modelle).
Weitere Informationen dazu finden Sie unter „Einsetzen der Batterien“.
4. Stellen Sie den Außentransformator an einem offenen, gut belüfteten Ort auf, wo er kein Hindernis
darstellt, oder verwenden Sie je nach Modell den entsprechenden Wandhalter.
5. Legen Sie das Niederspannungskabel so aus, dass es nicht zwischen den Rahmen und den Hebemechanismus geraten kann.
6. Schließen Sie, wenn nötig, das Niederspannungskabel am Außentransformator an.
7. Stecken Sie den Netzteilstecker in eine Steckdose. Verwenden Sie kein Verlängerungskabel!
ANMERKUNG: Sollte während des Aufbaus oder Aufstellens Ihres Aufrichtestuhls ein Problem auftreten, unterbrechen Sie unverzüglich die Montage und wenden Sie sich an einen autorisierten PrideHändler. Um Personen- oder Produktschäden zu vermeiden, sollten Sie Ihren Aufrichtestuhl weder
anschließen bis das Problem behoben ist, noch versuchen, dieses selbst zu beheben.
BATTERIE EINBAU
Bei Aufrichtestühlen mit Notstromaggregaten aktiviert
sich dieses während Stromausfällen selbständig. Das
Notstromaggregat wird von zwei nicht mitgelieferten
9V-Batterien betrieben, die in den Außentransformator einzusetzen sind.
Beachten Sie für das Einsetzen der Batterien die
folgenden Anweisungen:
Ziehen Sie den Netzteilstecker aus der Steckdose.
1.
2. Öffnen Sie das gekennzeichnete Batteriefach am
Außentransformator.
3. Setzen Sie zwei 9V-Batterien in den Außentransformator ein (Abb. 4.2).
4. Schließen Sie das Batteriefach.
ANMERKUNG: Verwenden Sie stets nur frische 9VBatterien für den Außentransformator, da sich das
Notstromaggregat nicht selbständig wieder
auflädt. Unter frischen Batterien sind 9V-AlkaliBatterien zu verstehen, die nach jeder Verwendung des Notstromaggregates während eines Stromausfalls oder, bei dessen Nichtverwendung,
mindestens einmal pro Jahr ausgetauscht werden.
BATTERIEFACH
EXTERNER TRANSFORMATOR
EXTERNER TRANSFORMATOR
(UNTERANSICHT)
STROMKABEL
STROMKABEL
ANMERKUNG: Wenn Sie Ihren Aufrichtestuhl für längere Zeit ausstecken (länger als eine Stunde), entnehmen Sie die Batterien aus dem Außentransformator, denn der Aufrichtestuhl entzieht den Batterien
auch dann Strom, wenn er nicht verwendet wird.
90 www.pridemobility.com Lift Chair Series
Abbildung 4.2 Lage des Notstromaggregats am
Aufrichtestuhl
Page 91
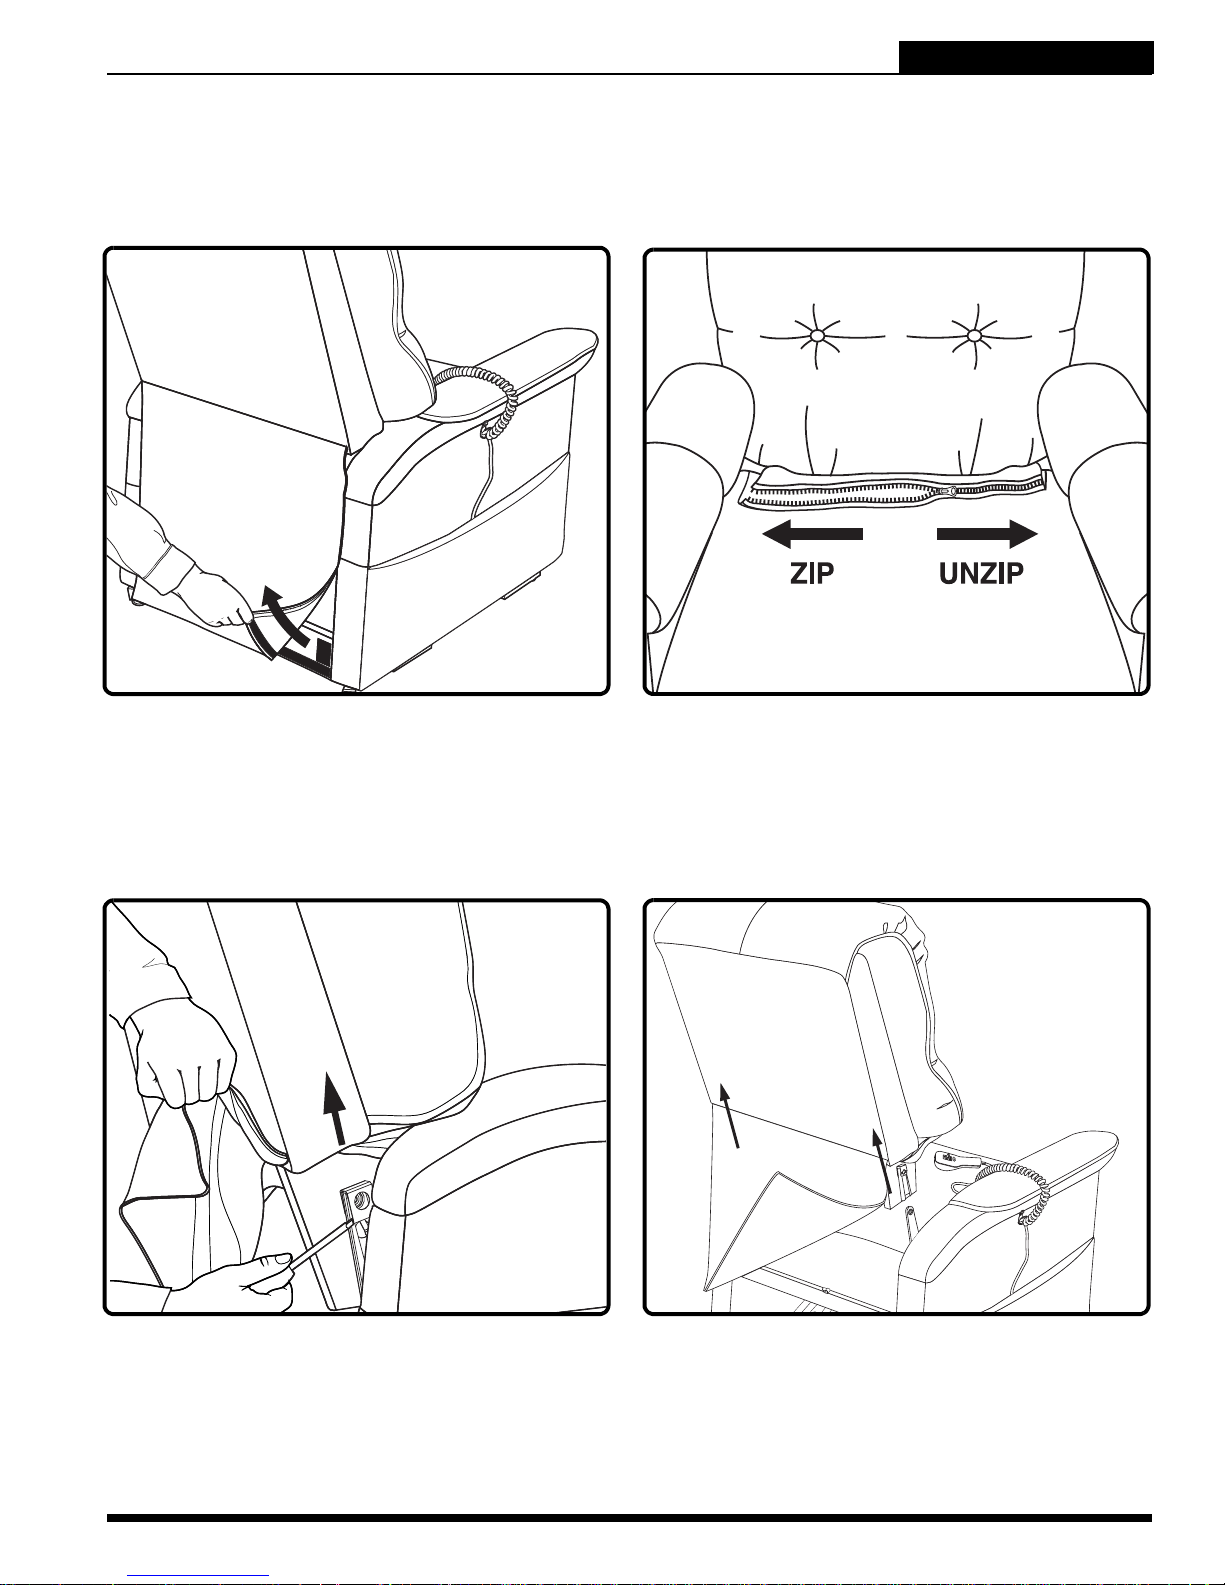
IV. ZERLEGEN UND ZUSAMMENBAUEN
LIFT CHAIR SERIES
ABBAU DES AUFRICHTESTUHLS
Die Rückenlehne Ihres „KL“-Aufrichtestuhls kann abgeno mmen werden, um Wartungsarbeite n und Transporte
zu erleichtern.
Beachten Sie für den Abbau Ihres Aufrichtestuhls die folgenden Anweisungen:
4.3.1 Lösen Sie das untere Ende des Rückenlehnenüberzugs aus den Haken und Schlaufen
am Stuhlsockel.
ANMERKUNG: Verfügt Ihr Stuhl über Heizungsbzw. Massageelemente, so sind deren Verteileranschlüsse zu lösen.
4.3.2 C6-Aufrichtestuhl-Modelle: Trennen Sie die
Rückenlehne vom Sockel und öffnen Sie die
Laschengurte, welche den Rückenlehnenüberzug am Rahmen fixieren.
4.3.3 Um die Rückenlehne aus den Halterungen des
Stuhlsockels zu entnehmen, lösen Sie die
beiden Verschlussklemmen an der Rückenlehne einzeln mit einem Schlitzschraubenzieher.
Heben Sie die Seiten der Rückenlehne nach
dem Lösen der jeweiligen Verschlussklemme
bis über das Schloss hinaus an.
Lift Chair Series www.pridemobility.com 91
4.3.4 Heben Sie die Rückenlehne nun ganz aus
dem Stuhlsockel heraus.
Page 92
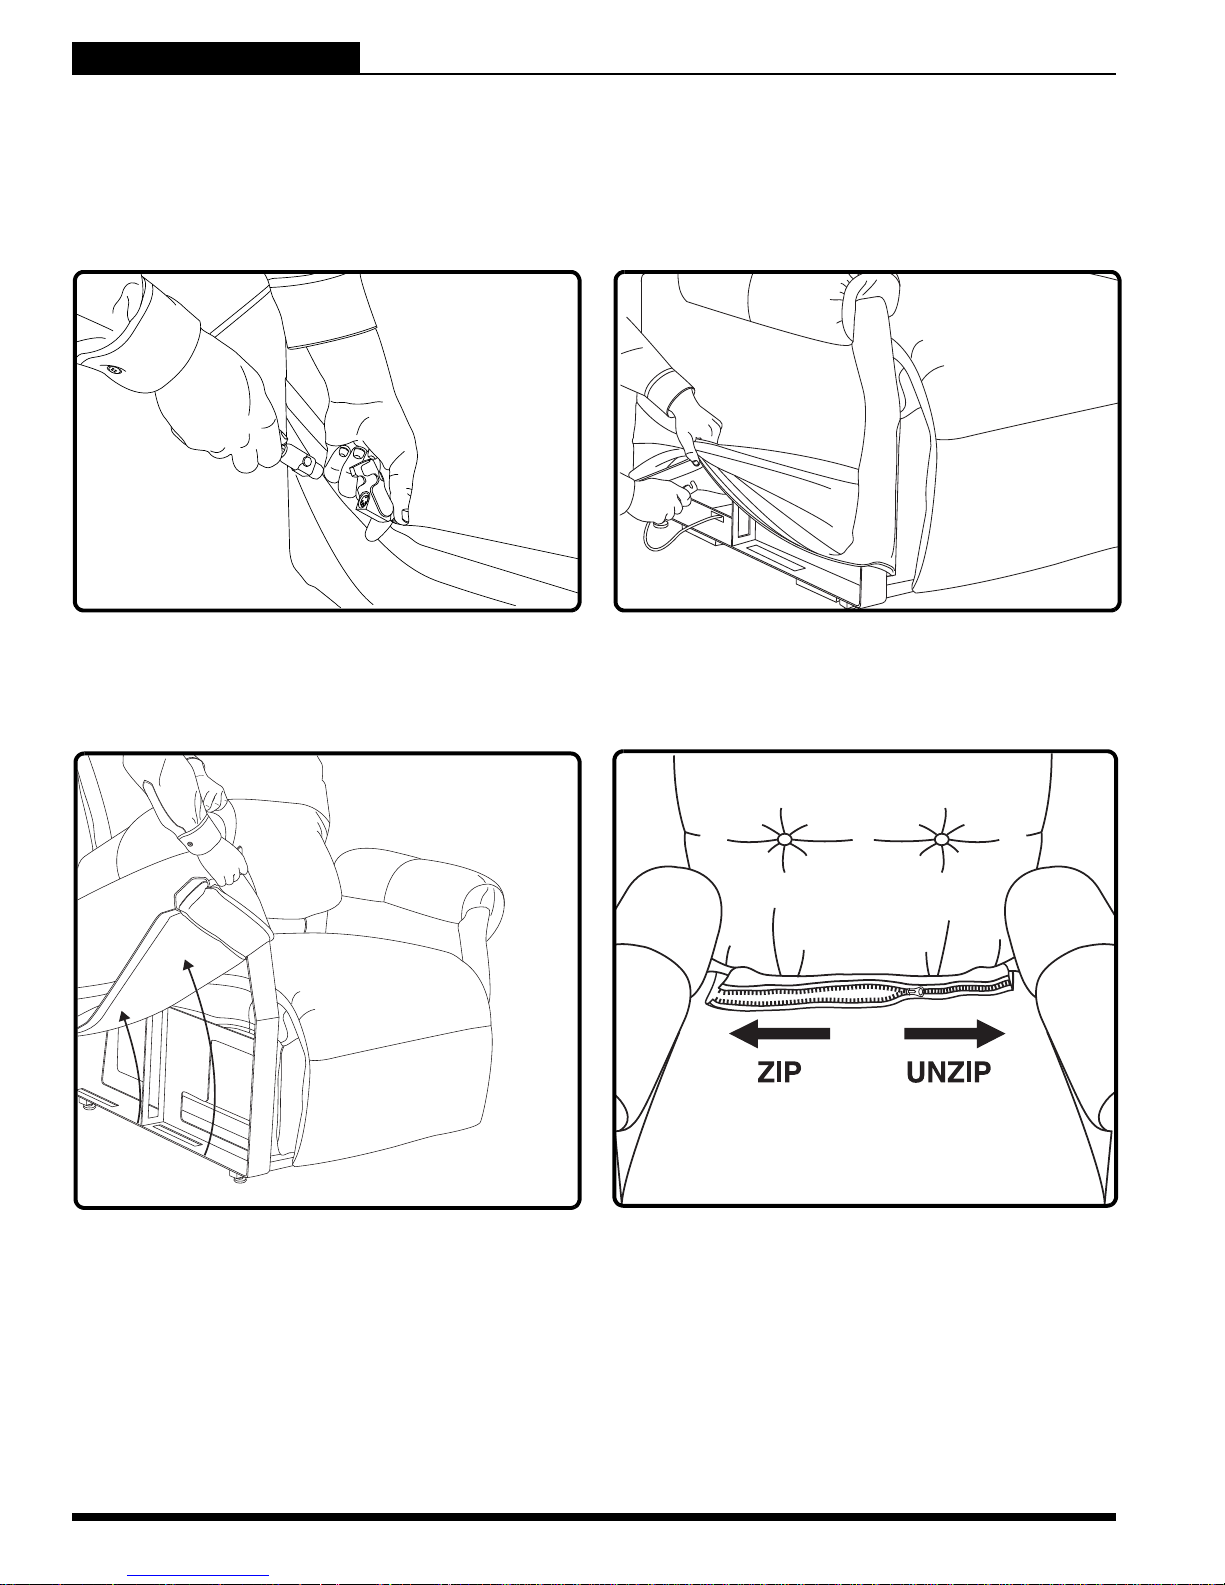
LIFT CHAIR SERIES
IV. ZERLEGEN UND ZUSAMMENBAUEN
ENTFERNEN / ANBRINGEN DES ÜBERZUGS
Der Überzug Ihres „KL“-Aufrichtestuhls kann abgenommen werden, um Wartungsarbeite n und Transporte zu
erleichtern. Für Informationen zu Aufrichtestuhl-Modellen mit abnehmbarem Überzug, siehe unten.
Beachten Sie für das Anbringen und Entfernen des Überzugs die folgenden Anweisungen:
4.4.1 Trennen Sie die Handsteuerung vom Schnelltrennungskabel, das sich in der Seitentasche des Aufrichtestuhls befindet. Bewahren Sie die Handsteuerung sicher auf.
4.4.2 Führen Sie das Schnelltrennungskabel
durch den V-förmigen Schlitz in der Seitentasche des Aufrichtestuhls.
4.4.3 Ziehen Sie die Überzüge der beiden Armlehnen ab.
92 www.pridemobility.com Lift Chair Series
4.4.4 C6-Aufrichtestuhl-Modelle: Trennen Sie den
Rückenlehnenüberzug vom Sitzbezug.
Page 93
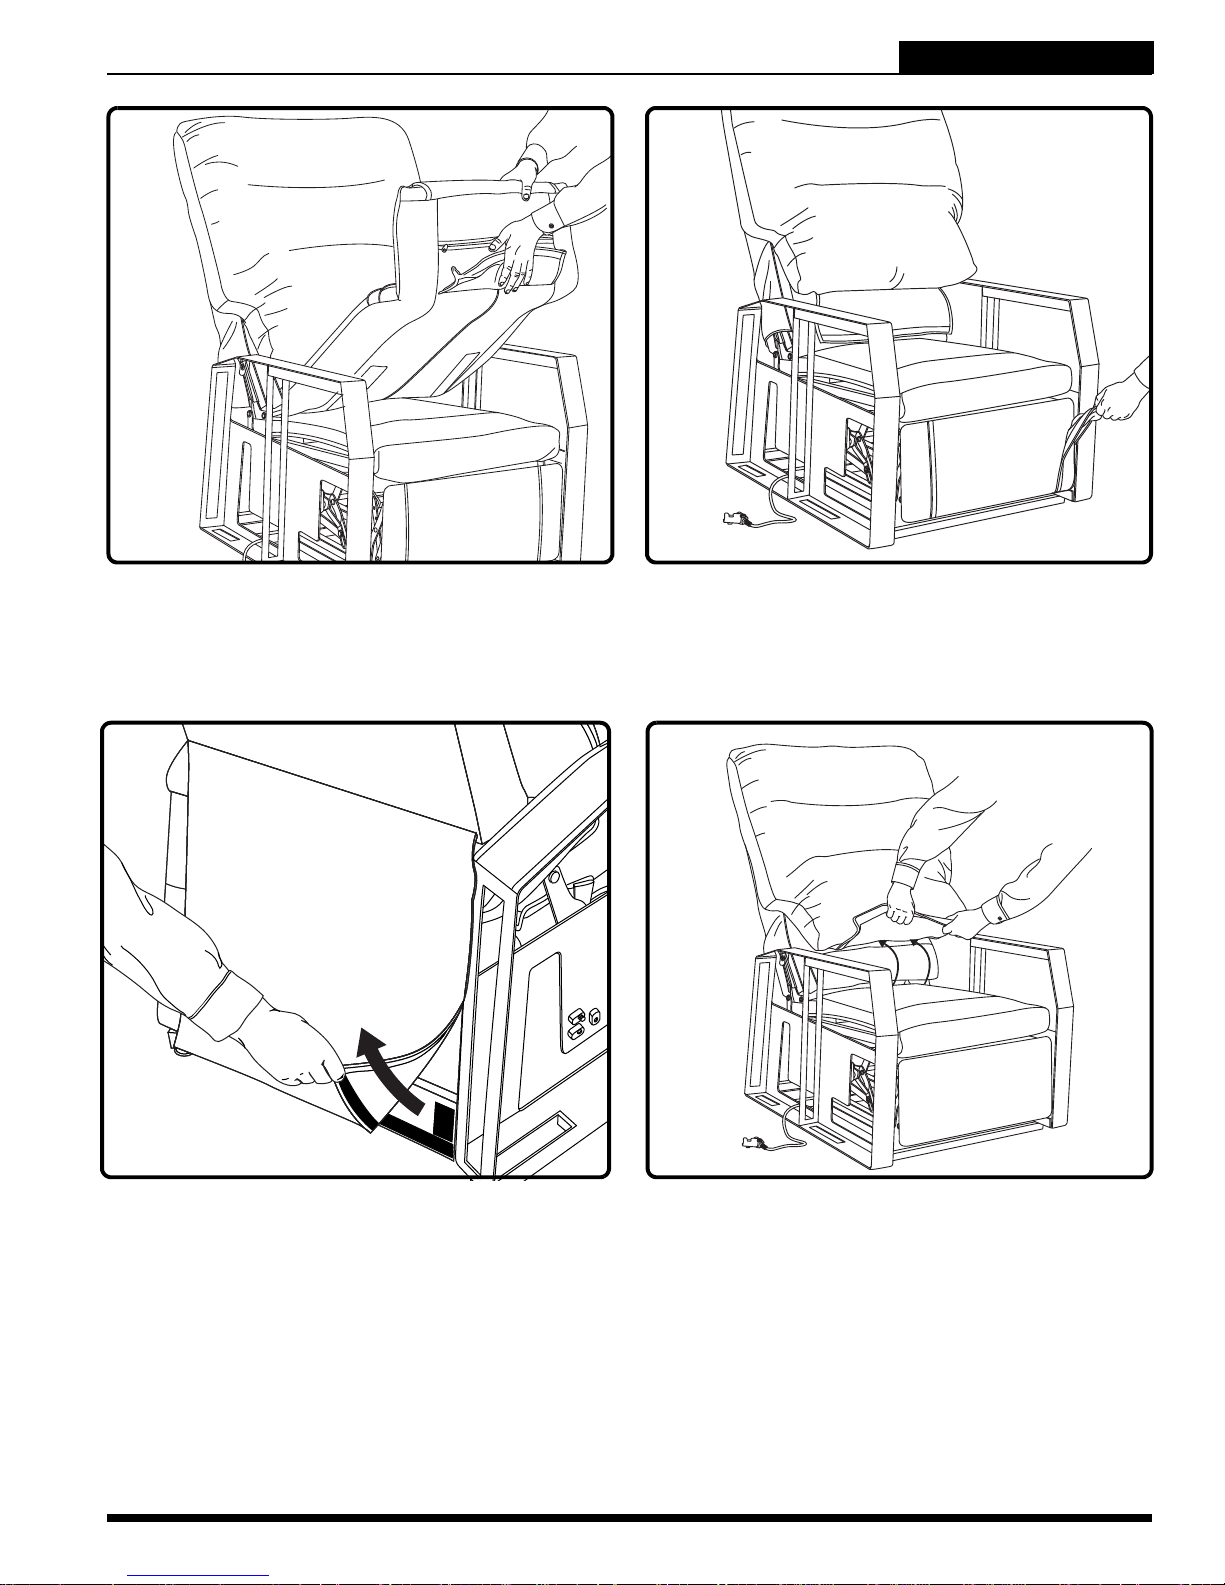
IV. ZERLEGEN UND ZUSAMMENBAUEN
LIFT CHAIR SERIES
4.4.5 Lösen Sie den Vorderteil des Sitzbezugs von
der Fußstütze und entfernen Sie den Sitzbezug vom Aufrichtestuhl.
4.4.6 Ziehen Sie die Ueberzuege von den Seiten
der Fussstuetze ab.
ANMERKUNG: C1-Aufrichtestühle verfügen
nicht über diese Ausstattung.
4.4.7 Lösen Sie die bodennahe Lasche des Rückenlehnenüberzugs von der unteren Sitzschiene.
Lift Chair Series www.pridemobility.com 93
4.4.8 Lösen Sie die untere Lasche des Rückenlehnenüberzugs vom unteren Ende der Rückenlehne.
Page 94
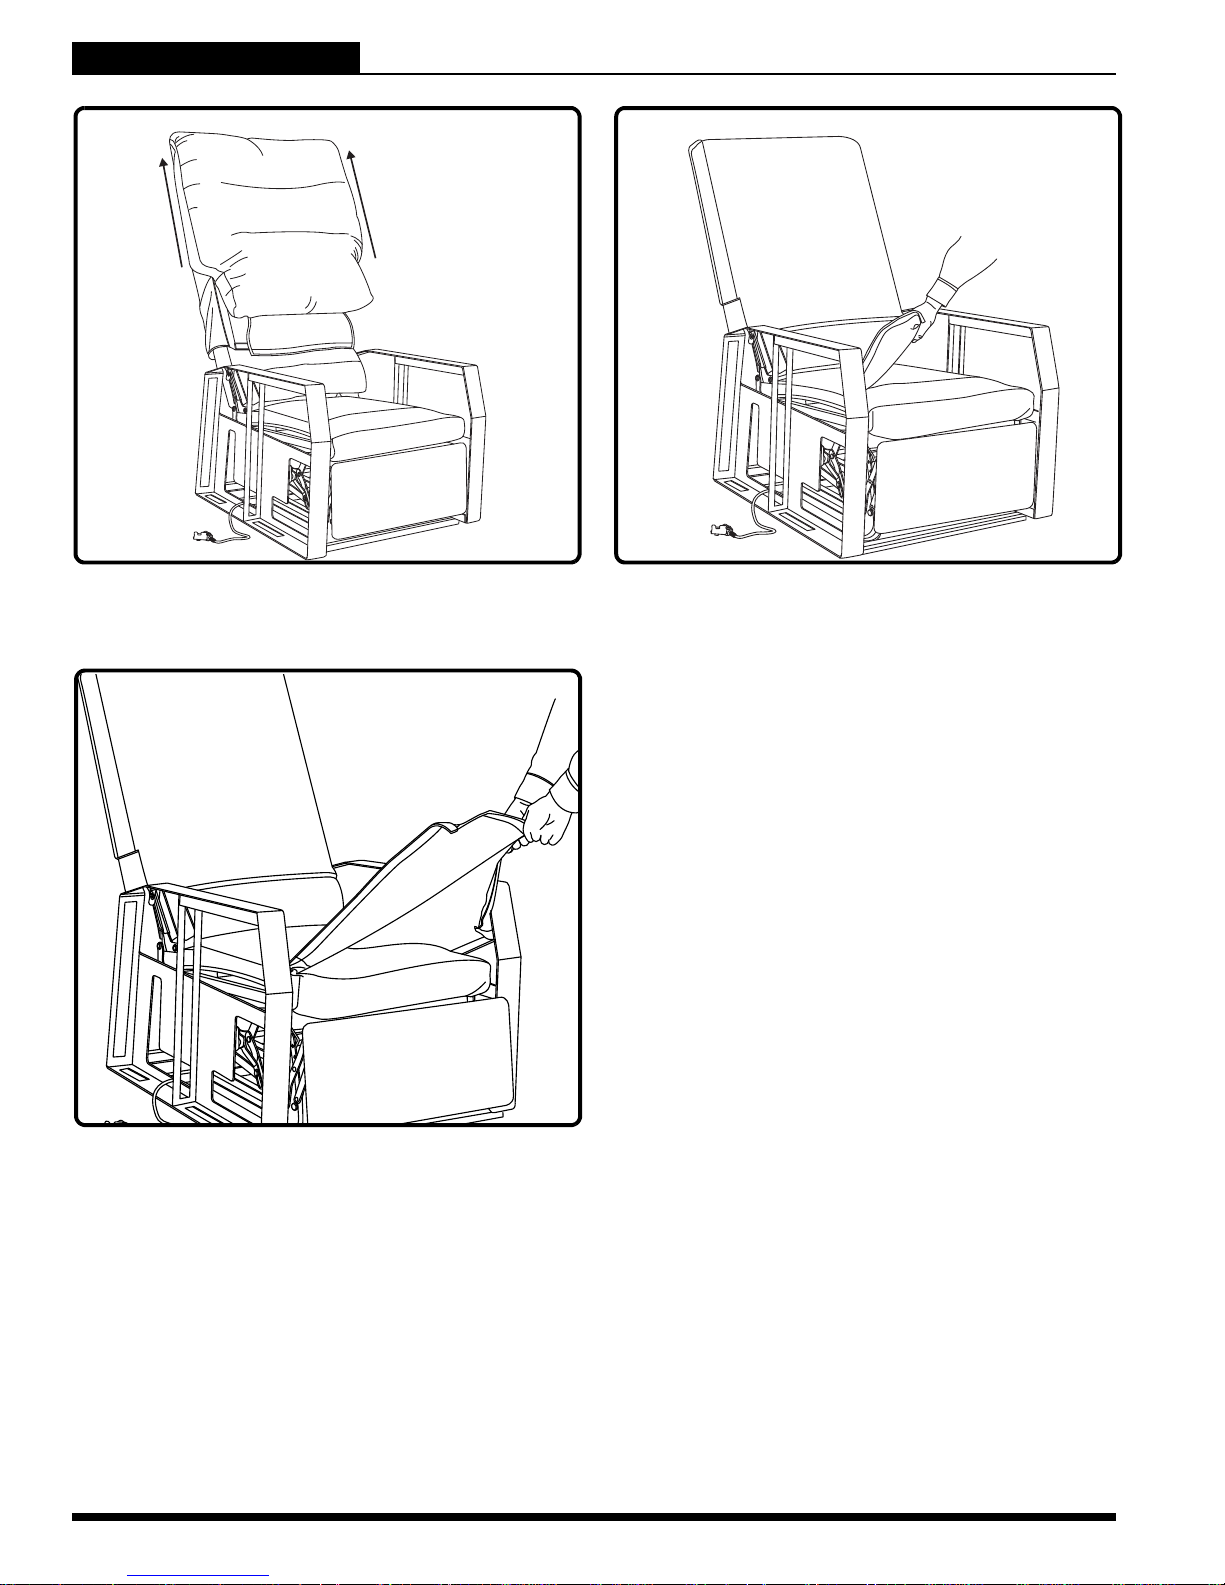
LIFT CHAIR SERIES
IV. ZERLEGEN UND ZUSAMMENBAUEN
4.4.9 Entfernen Sie den Rückenlehnenüberzug.
4.4.11 Entfernen Sie den Sitzbezug.
4.4.10 Lösen Sie den Sitzbezug links und rechts
des Sitzrahmens.
ANMERKUNG: Um den Aufrichtestuhl wieder zu
überziehen, befolgen Sie diese Anweisungen
einfach in umgekehrter Reihenfolge.
94 www.pridemobility.com Lift Chair Series
Page 95
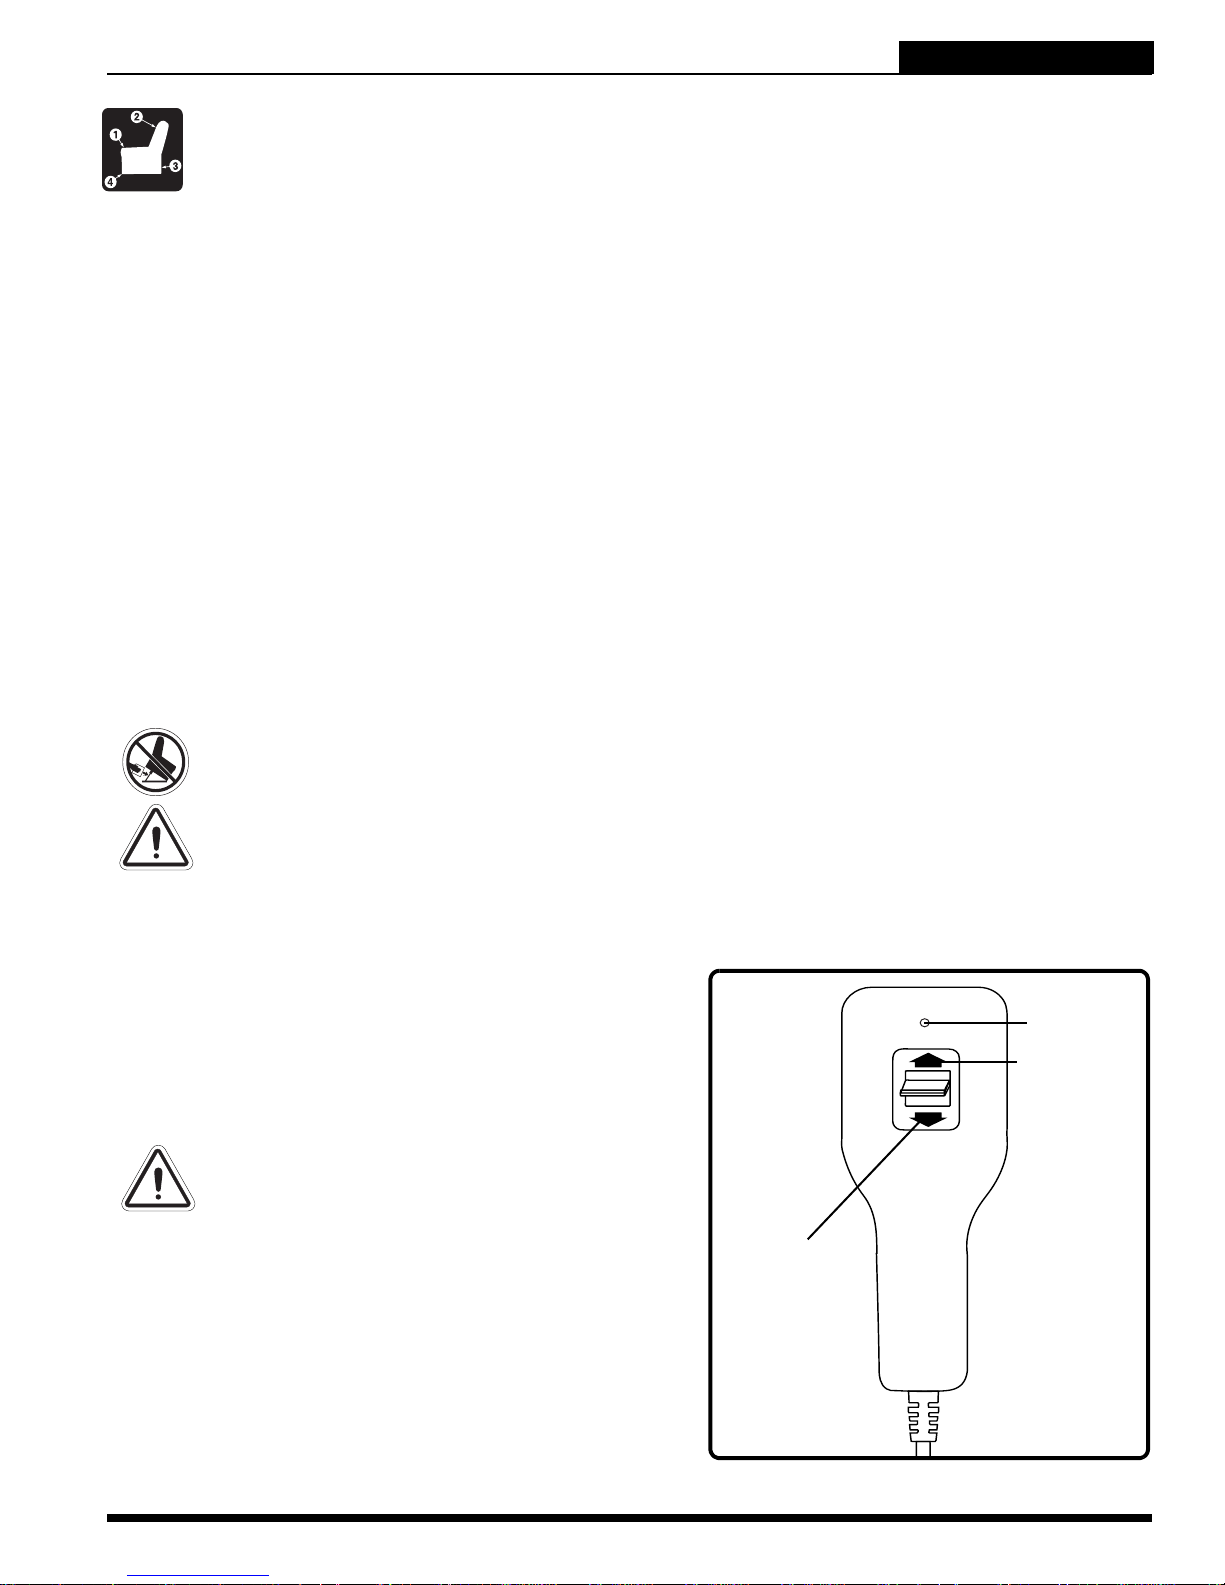
V. HANDHABUNG
LIFT CHAIR SERIES
VORSICHTSMAßNAHMEN
Beachten Sie bei der Benutzung Ihres Aufrichtestuhls bitte unbedingt die nachfolgenden Sicherheitshinweise. Befolgen Sie stets diese Sicherheitshinweise, um eine sichere Aufrichtestuhl-Benutzung zu gewährleisten und Unfälle mit Personen- und/oder Geräteschaden zu verhindern.
Verwenden Sie keine Aufsätze für den Netzteilste cker Ihres Aufrichtestuhls.
Stellen Sie keinerlei Gegenstände (z.B. Trinkgläser) auf oder in der Nähe Ihres Außentransformators ab.
Stecken Sie Ihren Aufrichtestuhl stets aus, bevor Sie die Hülle des Außentransformators oder die Handsteuerung reinigen und verwenden Sie dafür nur saubere und trockene bis leicht feuchte Tücher. Lassen Sie
gereinigte Bauteile ausreichend trocknen, bevor Sie Ihren Aufrichtestuhl wieder an das Stromn etz anschließen.
Überprüfen Sie die Handsteuerung sowie sämtliche Stromkabel regelmäßig auf Beschädigungsspuren.
Bringen Sie die Handsteuerung nicht mit heißen Oberflächen in Berührung.
Stellen Sie sicher, dass Sie sich niemals auf die Handsteuerung setzen.
Halten Sie Kinder und Haustiere während der Benützung Ihres Aufrichtestuhls von sämtlichen bewegli-
chen Teilen desselben fern.
Lassen Sie Kinder nicht auf dem Aufrichtestuhl spielen oder diesen bedienen. Nur verantwortungsvolle
Personen sollten den Aufrichtestuhl bedienen.
Wenn Sie Ihren Aufrichtestuhl nicht benutzten, verhindern Sie ungewollte Inbetriebnahmen desselben
mittels des Schnelltrennungsmechanismus der Handsteuerung.
Achten Sie auf Quetschgefahrenstellen, wie z.B. den Scheren- oder Aufrichtemechanismus. Achten Sie
besonders auf Ihre Hände und Füße.
Bringen Sie Ihren Aufrichtestuhl stets in eine aufrechte un d geschlossene Stellung, wenn Sie ihn nicht ben ützen.
Stellen oder setzen Sie sich nicht auf die Fußstütze.
Lassen Sie sich beim Hinsetzen niemals in einen nur teilweise geneigten Aufrichtestuhl „fallen“.
Verwenden Sie kein Verlängerungskabel!
UNTER ALLEN UMSTÄNDEN BEACHTEN! Legen Sie keine Gegenstände unter den
Hebestuhl. Entfernen Sie vor Inbetriebnahme UNBEDINGT etwaige Hindernisse,
sowie Haustiere und Kleinkinder aus dem Verwendungsbereich.
WARNUNG! Vermeiden Sie die Gefahr von elektrischen Schlägen, Feuer, Umkippen
und/ oder Quetschungen. Befolgen Sie die zur Verfügung gestellten Anweisungen.
HANDSTEUERUNGSBEFEHLE
Je nach Aufrichtestuhlmodell können mittels Handsteuerung die Rückenlehne, der Stuhlsockel und die
Fußstütze gesteuert werden (Abb. 5.1, 5.2 und 5.3).
WARNHINWEIS! Drücken Sie die
Rückenlehne nicht mit Gewalt nach
unten, wenn sich der Aufrichtestuhl
vollständig in der Liege-Stellung
befindet. Es könnte dazu führen, dass
der Aufrichtestuhl umkippt und
Personen- und/oder Produktschäden
könnten die Folge sein.
WARNHINWEIS! Benützen Sie die
Fußstütze nicht als Sitz oder für andere,
zweckwidrige Verwendungen. Dadurch
könnte sich der Aufrichtestuhl verziehen
und einzelne Bauteile schneller
ermüden, was Personen- und/oder
Produktschäden zur Folge haben könnte.
ABSENKEN
LED
ANHEBEN
WARNHINWEIS! Sperren Sie stets die
Handsteuerung, wenn Sie sie nicht
verwenden.
ANMERKUNG: Pride empfiehlt als zusätzliche Sicherheitsmaßnahme, die Handsteuerung über die Schnelltrennung
vom Aufrichtestuhl zu lösen und sie, wenn Sie sie nicht
verwenden, für Kinder unerreichbar aufzubewahren.
Lift Chair Series www.pridemobility.com 95
Abbildung 5.1 Standard handsteuerung
Page 96
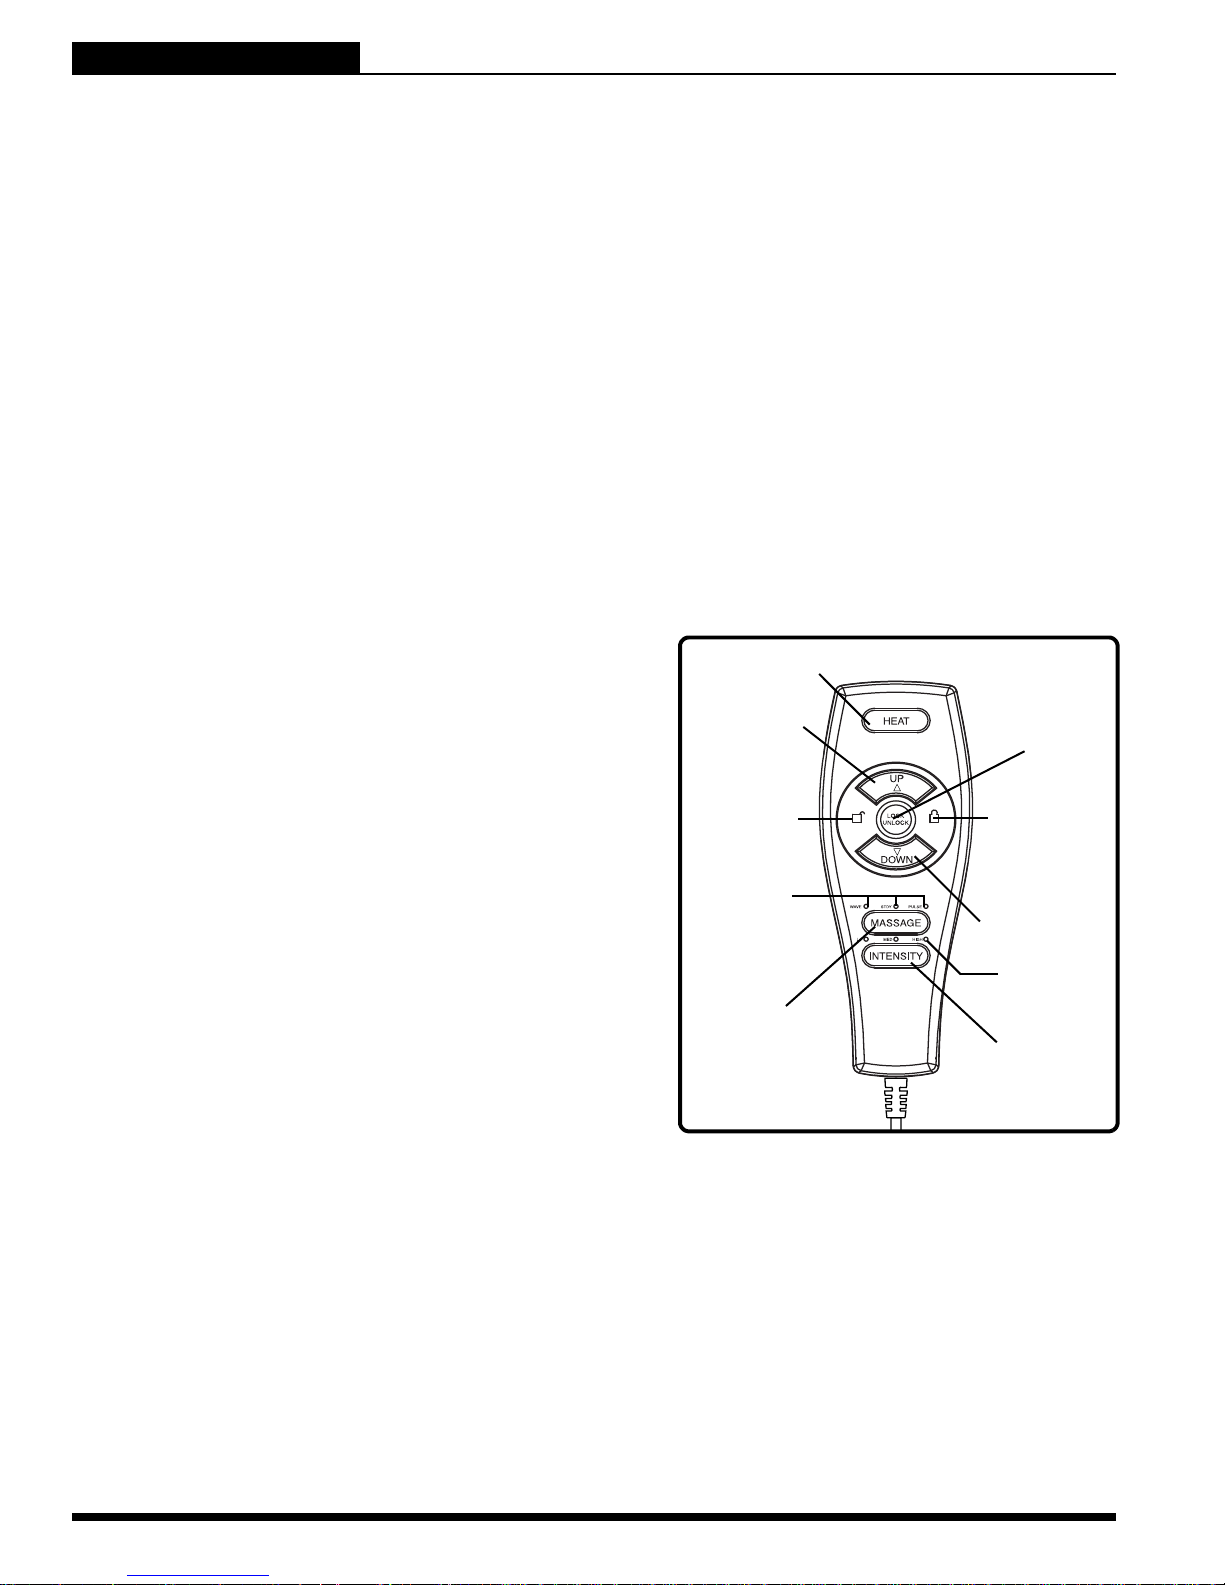
LIFT CHAIR SERIES
V. HANDHABUNG
Standard-Handsteuerung
So gelangen Sie in die Sitz-Stellung (Abb. 5.1):
1. Halten Sie den Anheben/Absenken-Hebel in der Anheben-Stellung gedrückt, um Ihren Stuhl aufzurichten.
2. Setzen Sie sich aufrecht in die Mitte des Stuhls. Falls nötig, geben Ihnen die Armlehnen zusätzlichen Halt.
3. Halten Sie den Anheben/Absenken-Hebel in der Absenken-Stellung gedrückt, um Ihren Aufrichtestuhl in
eine bequeme Sitz-Stellung abzusenken.
So gelangen Sie aus der Sitz-Stellung in die Liege-Stellung (Abb. 5.1):
1. Halten Sie den Anheben/Absenken-Hebel in der Absenken-Stellung gedrückt, bis Sie eine bequeme
Liege-Stellung erreicht haben.
2.
Halten Sie den Anheben/Absenken-Hebel in der Anheben-Stellung gedrückt, um in eine aufrechte SitzStellung zurückzukehren. Lassen Sie den Hebel los, sobald Sie eine bequeme Sitz-Stellung erreicht haben.
So stehen Sie aus Ihrem Aufrichte-Stuhl auf (Abb. 5.1):
Halten Sie den Anheben/Absenken-Hebel in der A nheben-Stellung gedrückt, um Ihren Stuhl aufzurichten.
1.
2. Lassen Sie den Hebel los, sobald Sie aus der Aufrichte-Stellung bequem aufstehen können.
ANMERKUNG: Ist Ihre Handsteuerung mit einem Anzeigelämpchen ausgestattet, bedeutet grünes
Licht, dass die Handsteuerung Strom hat. Sollte dieses Anzeigelämpchen während der Verwendung
der Handsteuerung nicht leuchten, wenden Sie sich bitte an einen autorisierten Pride-Händler.
Handsteuerung mit Sitzheizungs- und Massagefunktion
So gelangen Sie in die Sitz-Stellung (Abb. 5.2):
1. Halten Sie den Anheben/Absenken-Hebel in der UP-
Stellung gedrückt, um Ihren Stuhl aufzurichten.
2. Setzen Sie sich aufrecht in die Mitte des Stuhls. Falls
nötig, geben Ihnen die Armlehnen zusätzlichen Halt.
3. Halten Sie den Anheben/Absenken-Hebel in der
DOWN-Stellung gedrückt, bis Sie eine bequeme SitzStellung erreichen.
So gelangen Sie aus der Sitz-Stellung in die Liege-Stellung (Abb. 5.2):
1. Halten Sie den Anheben/Abs enken-Hebel in der DOWN-Stel-
lung, bis Sie eine bequeme Liege-Stellung erreicht haben.
2. Halten Sie den Anheben/Absenken-Hebel in der UP-
Stellung gedrückt, um Ihren Stuhl wieder in eine SitzStellung zu bringen. Lassen Sie den Hebel los, sobald
Sie eine bequeme Sitz-Stellung erreicht haben.
So stehen Sie aus Ihrem Aufrichte-Stuhl auf (Abb. 5.2):
1. Halten Sie den Anheben/Absenken-Hebel in der UP-
Stellung gedrückt, um Ihren Stuhl aufzurichten.
2. Lassen Sie den Hebel los, sobald Sie aus dem Aufrichte-Stuhl bequem aufstehen können.
HEAT-KNOPF
UP-KNOPF
ENTSPERRLÄMPCHEN
MASSAGEAUSWAHLANZEIGE
MASSAGEKNOPF
Abbildung 5.2 Handsteuerung mit
Sitzheizungs- und Massagefunktion
LOCK/UNLOCKKNOPF
SPERRLÄMPCHEN
DOWN-KNOPF
INTENSITÄTSANZEIGE
INTENSITÄTSKNOPF
So verwenden Sie die Tastensperre (Abb. 5.2):
1. Halten Sie den LOCK-Knopf etwa 3 Sekunden lang gedrückt, um die Handsteue rung zu sperren . Das Anzeigenlämpchen rechts vom LOCK-Knopf zeigt durch ro tes Leu chten an, dass die Handsteuerung gesperrt ist.
2. Halten Sie den LOCK-Knopf etwa 6 Sekunden lang gedrückt, um die Handsteuerung zu entsperren. Das
Anzeigenlämpchen links vom LO CK-Knopf zeigt durch grünes Leuchten an, dass die Handsteuerung entsperrt ist.
So verwenden Sie die Sitzheizung (Abb. 5.2):
1. Drücken Sie ein Mal auf den HEAT-Knopf, um die Heizfunktion einzuschalten. Nach 20-minütigem Dauerbetrieb schaltet sich die Sitzheizung automatisch ab.
2. Drücken Sie den HEAT-Knopf erneut, um die Heizfunktion auszuschalten.
96 www.pridemobility.com Lift Chair Series
Page 97
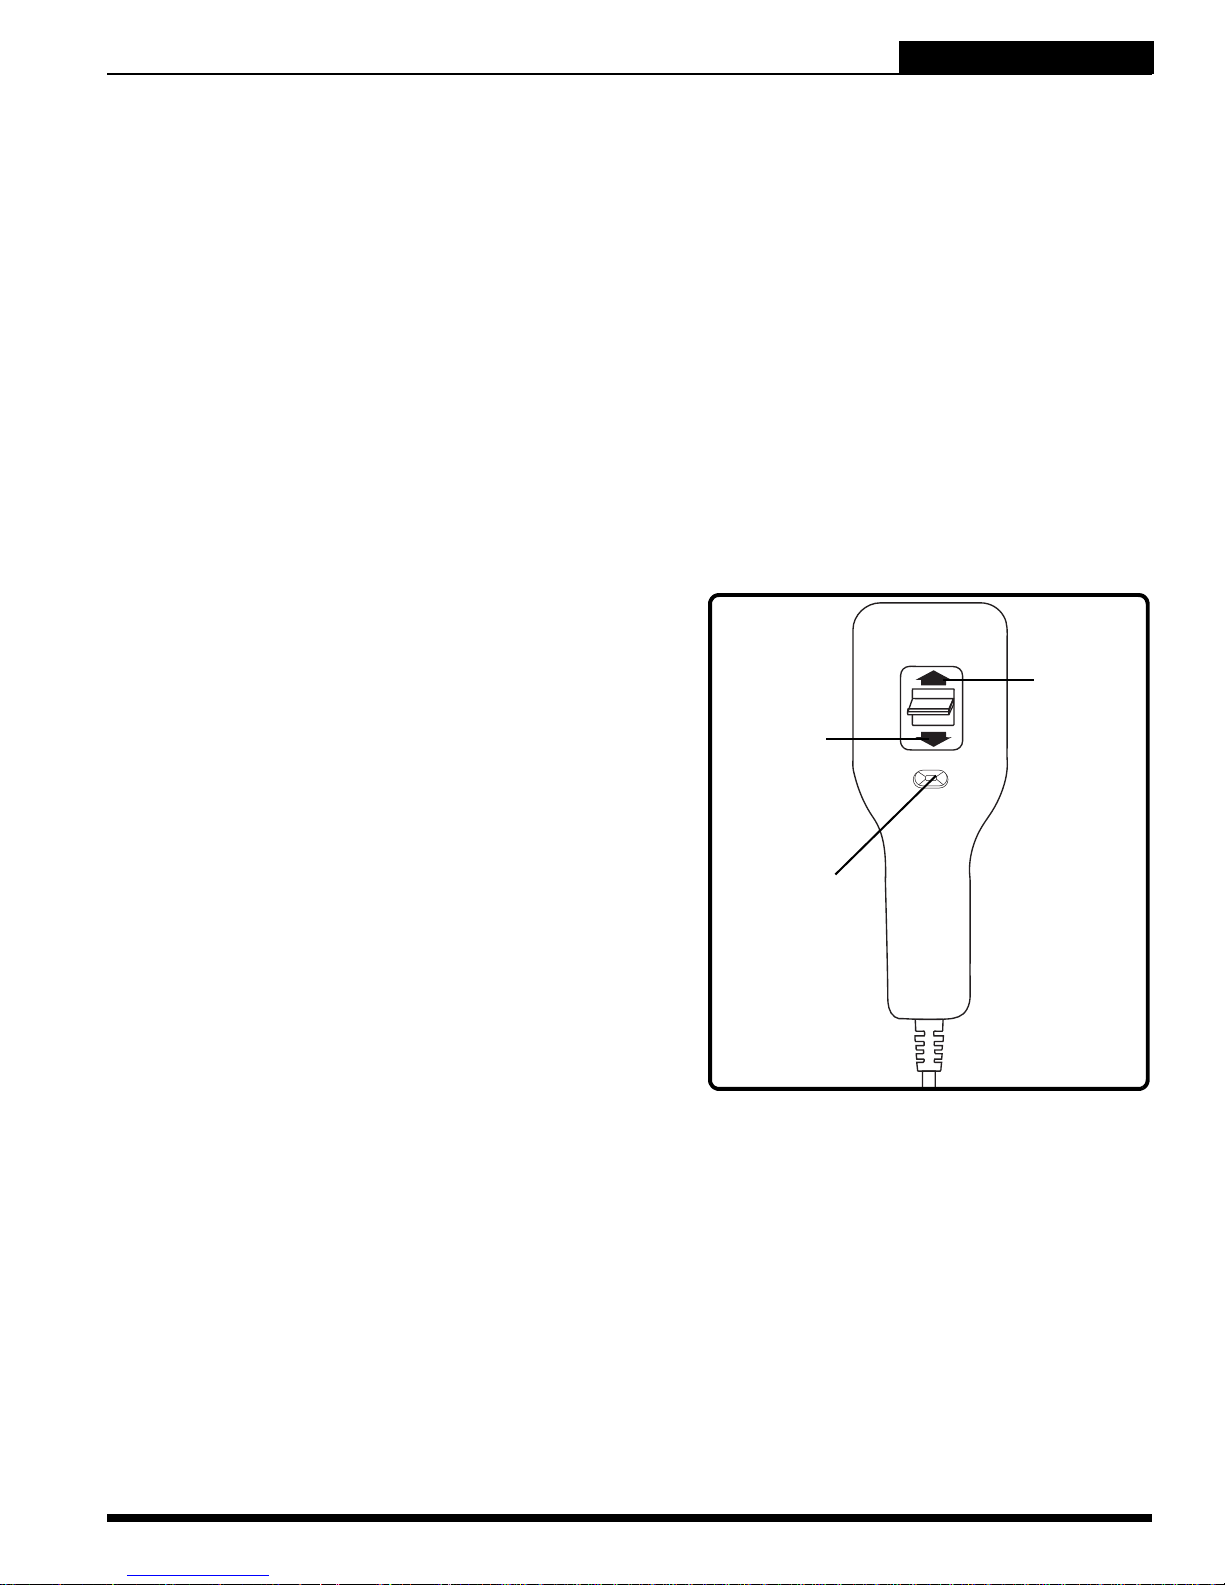
V. HANDHABUNG
LIFT CHAIR SERIES
So verwenden Sie die Massagefunktion (Abb. 5.2):
1. Drücken Sie ein Mal auf den MASSAGE-Knopf, um die Massagefunktion einzuschalten. Die Massagefunktion startet automatisch im sanften wave-Modus.
2. Durch erneutes Drücken des MASSAGE-Knopfes kann die jeweils nächste von drei Intensitätsstufen gewählt werden:
Sanfter wave-, mittelstarker steady- oder intensiver pulse-Modus. Durch einmaliges Drücken des MASSAGE-Knopfes
verändern Sie so schrittweise die Intensität Ihrer Massage. Jeder Modus verfügt über ein eigenes Anzeigenlämpchen.
3. Halten Sie den MASSAGE-Knopf etwa 2 Sekunden lang gedrückt, um die Massagefunktion
abzuschalten. Nach 20-minütigem Dauerbetrieb schaltet sich die Massagefunktion automatisch ab.
So regeln Sie die Intensität der Massagefunktion (Abb. 5.2):
1. Drücken Sie ein Mal auf den INTENSITY-Knopf, um die Massagefunktion auf die niedrigste Stufe einzustellen.
2. Durch erneutes Drücken des INTENSITY-Knopfes kann die jeweils nächste von drei Intensitätsstufen
gewählt werden: Sanft, mittelstark oder intensiv. Durch einmaliges Drücken des Knopfes verändern Sie
so schrittweise die Intensität Ihrer Massage. Jeder Modus verfügt über ein eigenes Anzeigenlämpchen.
ANMERKUNG: Pride empfiehlt, weder die Sitzheizungs- noch die Massagefunktion länger als 20
Minuten im Dauerbetrieb zu verwenden. Informieren Sie sich bezüglich der Anzahl und Stärke der
Sitzheizungs- und Massageanwendungen unbedingt bei Ihrem Arzt.
Doppelmotoren-Handsteuerung
So gelangen Sie in die Sitz-Stellung (Abb. 5.3):
1. Schieben Sie den Sperrhebel nach rechts.
2. Halten Sie den Anheben/Absenken-Hebel in der Anheben-Stel-
lung gedrückt, um Ihren Stuhl in die Aufrichte-Stellung zu bringen.
3. Setzen Sie sich aufrecht in die Mitte des Stuhls. Falls
nötig, geben Ihnen die Armlehnen zusätzlichen Halt.
4. Halten Sie den Anheben/Absenken-Hebel in der Absen-
ken-Stellung gedrückt, um Ihren Aufrichtestuhl in eine
bequeme Sitz-Stellung abzusenken.
ABSENKEN
ANHEBEN
So gelangen Sie aus der Sitz-Stellung in die Liege-Stellung (Abb. 5.3):
SPERRHEBEL
1. Schieben Sie den Sperrhebel nach links.
2. Halten Sie den Anheben/Absenken-Hebel in der Absen-
ken-Stellung gedrückt, bis Sie eine bequeme Liege-Stellung erreicht haben.
3. Halten Sie den Anheben/Absenken-Hebel in der Anhe-
ben-Stellung gedrückt, um in eine aufrechte Sitz-Stellung zurückzukehren. Lassen Sie den Hebel los, sobald
Sie eine bequeme Sitz-Stellung erreicht haben.
Abbildung 5.3 Doppelmotoren Handsteuerung
So verwenden Sie die Fußstütze in der Liege- oder Sitz-Stellung (Abb. 5.3):
1. Schieben Sie den Sperrhebel nach rechts.
2. Halten Sie den Anheben/Absenken-Hebel in der Absenken-Stellung gedrückt, bis die Fußstütze die
gewünschte Stellung erreicht.
3. Halten Sie den Anheben/Absenken-Hebel in der Anheben-Stellu ng gedrückt, um die Fußstütze abzusen-
ken.
So richten Sie Ihren Aufrichtestuhl aus der Sitz-Stellung auf (Abb. 5.3):
1. Schieben Sie den Sperrhebel nach rechts.
2. Halten Sie den Anheben/Absenken1-Hebel in der Anheben-Stellung gedrückt, um Ihren Aufrichtestuhl
anzuheben.
3. Lassen Sie den Hebel los, sobald Sie aus der Aufrichte-Stellung bequem aufstehen können.
Lift Chair Series www.pridemobility.com 97
Page 98

LIFT CHAIR SERIES
Ihr Pride-Aufrichtestuhl ist ein hochwertiges Erzeugnis zur Steigerung Ihrer Mobilität. Er wurde
für einen langjährigen und wartungsfreien Betrieb gebaut. Gelegentlich kann es jedoch trotzdem zu Funktionsstörungen kommen. Die folgenden Problemlösungshinweise und oft gestellten Fragen (FAQ) umfassen viele nützliche Informationen zu Ihrem Aufrichtestuhl. Sollte
trotz all dieser Hinweise die Entstörung Ihres Aufrichtestuhls nicht funktionieren, wenden Sie
sich bitte an einen autorisierten Pride-Händler. Geben Sie in diesen Fällen bitte die Modell- und
Seriennummer sowie die Art des Problems an.
VI. FEHLERSUCHE
HAEUFIG GESTELLTE FRAGEN
Mein Aufrichtestuhl reagiert nicht?
Vergewissern Sie sich, dass der Außentransformato r an eine funktionierende Steckdose angeschlossen ist.
Überprüfen Sie den Schutzunterbrecher der Steckdose.
Vergewissern Sie sich, dass das Niederspannungskabel an den Außentransformator angeschlossen ist.
Überprüfen Sie den korrekten Anschluss der Handsteuerung und des Motors/der Motoren.
Vergewissern Sie sich, dass das Niederspannungskabel an den Motor/die Motoren angeschlossen ist.
Was ist, wenn mein Liftsessel sich nur in eine Richtung bewegt?
Überprüfen Sie den Auf/Ab Schalter an der Handsteuerung auf einen sanften Übergang aus der “Auf” in
die “Ab ” Position. Wenn der Schalter in einer der beiden Positionen hängen bleiben sollte, muß die
Handsteuerung ausgewechselt werden.
Bewegen Sie den Auf/Ab Schalter der Handsteuerung in die “Auf” und “Ab” Positionen und achten Sie
auf Klickgeräusche von dem externen Transformator. Ertönt kein Klickgeräusch, dann erhält der Antriebsmotor kein Signal von der Handsteuerung und die Handsteuerung müßte ausgetauscht werden.
Wenden Sie sich an Ihren autorisierten Pride Fachhändler für weitere Unterstützung.
Mein Aufrichtestuhl bleibt während des Aufrichtens stecken?
Ihr Aufrichtestuhl ist mit einem Überhitzungsschutzschalter ausgestattet, der sich im Außentransformator
befindet und die Motorsteuerung vor zu hohen Temperaturen schützt. Schaltet sich der Überhitzungsschutz ein, benützen Sie den Aufrichtestuhl 10 Minuten lang nicht, um den Motor auskühlen zu lassen.
Sollte der Motor Ihres Aufrichtestuhls regelmäßig überhitzen, wenden Sie sich bitte an einen autorisierten
Pride-Händler.
Möglicherweise handelt es sich um einen Stromausfall und/oder es sind keine Batterien im Außentrans-
formator oder aber die Batterien sind leer. Vergewissern Sie sich, dass bei vorhandenem Notstromaggregat ausschließlich frische 9V-Batterien für den Außentransformator verwendet werden.
Überprüfen Sie den Schutzunterbrecher der Steckdose.
Was ist, wenn mein Liftsessel von einer Ecke zur anderer Ecke schaukelt, nachdem ich den
Sessel aufgestellt habe?
Der Fußboden kann uneben sein, oder ein Teppich kann die Standstabilität des Sessels beeinflusst haben.
Stellen Sie die Stütze an der Seite ein, wo der Sessel schaukelt. Beachten Sie in dem Kapitel "Liftsessel
Einstellungen" die Anleitung für das Ausrichten Ihres Sessels.
Die Sitzheizungs- und Massageanwendung funktioniert nicht?
Vergewissern Sie sich, dass der Verteiler korrekt an den Außentransformator angeschlossen ist und
dieser Strom hat. Ein grünes Anzeigelämpchen leuchtet auf, wenn der Transformator Strom hat.
Vergewissern Sie sich, dass die Sitzheizungs- und Massageeinheit korrekt an den Verteiler, und dieser
korrekt an den Antrieb angeschlossen ist. Beide befinden sich an der Rückseite des Aufrichtestuhls.
Weitere Informationen zu den elektrischen Anschlüssen finden Sie im „Anhang D“.
Überprüfen Sie den korrekten Anschluss der Handsteuerung an den Verte iler. Wenn das Anzeigenlämp-
chen leuchtet, ist sie korrekt angeschlossen.
Leuchtet eines der Lämpchen nicht, wenden Sie sich bitte an einen autorisierten Pride-Händler.
98 www.pridemobility.com Lift Chair Series
Page 99

VI. FEHLERSUCHE
LIFT CHAIR SERIES
Wo kann ich den externen Transformator hinstellen?
Am Boden: fern jeglicher Wärmequelle an einem offenen, gut belüfteten Ort, wo er kein Hindernis
darstellt.
An der Wand: fern jeglicher Wärmequelle und je nach Modell unter Verwendung der entsprechenden
Wandhalterung.
Wo finde ich die Fertigungsnummer an meinem Liftsessel?
Sie finden die Fertigungsnummer an zwei Stellen - eine ist nahe an der Vorderseite des Antriebsmotors auf
dem Stahl-Hebemechanismus, die zweite ist an dem Holzrahmen unterhalb des Scherenmechanismus
angebracht.
An wen kann ich mich bei Fragen wenden?
Wenden Sie sich für Beratung an Ihren autorisierten Pride Fachhändler.
Lift Chair Series www.pridemobility.com 99
Page 100

LIFT CHAIR SERIES
VII. PFLEGE UND WARTUNG
Lassen Sie Ihren Pride-Aufrichtestuhl regelmäßig überprüfen. Manche Kontrollen können Sie
selbst durchführen, andere erfordern den Service eines autorisierten Pride-Händlers. Beachten
Sie stets sämtliche Sicherheits- und Problemlösungshinweise, und Ihr Aufrichtestuhl wird es
Ihnen mit jahrelangem störungsfreiem Betrieb danken. Bei Fragen zur Pflege Ihres Aufrichtestuhls wenden Sie sich bitte an einen autorisierten Pride-Händler.
PFLEGE DES ÜBERZUGS
Überprüfen Sie den Überzug regelmäßig auf Risse oder Löcher.
Der Überzug Ihres Aufrichtestuhls besteht zu 100% aus Polyester. Reinigen Sie ihn ausschließlich mit
Polstermöbelreinigern auf Wasserbasis. Regelmäßiges Saugen und sanftes Bürsten eignet sich ebenfalls, um Schmutz und Staub vom Überzug zu entfernen. Zur Fleckentfernung eignen sich Schaumreiniger auf Wasserbasis, wie beispielsweise sanfte Schaumwaschmittel oder lösungsmittelfreie Polstermöbelreiniger. Schäumen Sie den Überzug mit einer weichen Bürste ein. Sobald alles getrocknet ist, saugen
Sie den Überzug ab. Probieren Sie das Reinigungsmittel zunächst auf einer kleinen Stelle aus, bevor Sie
es flächendeckend auftragen. Ist der gesamte Aufrichtestuhl-Überzug stark verunreinigt, wenden Sie sich
an eine professionelle Möbelreinigung.
WARNHINWEIS! Halten Sie den Überzug von Wärmequellen wie zum Beispiel
Zigaretten oder Raumheizgeräten fern. Personen- oder Produktschäden sowie
Feuergefahr könnten die Folge sein.
WARNUNG! Pride empfiehlt dringend, dass Sie keine Zigaretten rauchen, wenn Sie
in Ihrem Liftsessel sitzen, obwohl der Liftsessel die erforderlichen
Testanforderungen für das Zigarettenrauchen bestanden hat. Sie müssen die
folgenden Sicherheitsrichtlinien befolgen, wenn Sie sich entschließen, Zigaretten
zu rauchen, während Sie in Ihrem Liftsessel sitzen.
Zigaretten nicht unbeaufsichtigt lassen.
Aschenbecher in sicherer Entfernung von den Sitzkissen halten.
Immer vergewissern, dass Zigaretten vollkommen gelöscht sind, bevor Sie sie
beseitigen.
ANMERKUNG: Verwenden Sie zur Fleckentfernung keine lösungsmittelbasierten Reinigungsmittel.
Imprägnieren Sie den Überzug Ihres Aufrichtestuhls nicht. Um Schäden am Überzug zu verhindern,
setzten Sie Ihren Aufrichtestuhl keinem direkten Sonnenlicht aus.
PFLEGE DER ELEKTRONISCHEN BAUTEILE
Überprüfen Sie sämtliche Kabel und Anschlüsse auf schadhafte Stellen.
Treten schadhafte Stellen auf, stecken Sie den Aufrichtestuhl aus und wenden Sie sich an einen autorisi-
erten Pride-Händler.
Schützen Sie sämtliche elektronischen Bauteile vor Feuchtigkeit und hohen Temperaturen. Pride-
Aufrichtestühle eignen sich ausschließlich zur Verwendung in Innenräumen.
WARNHINWEIS! Obwohl Ihr Aufrichtestuhl sämtliche Schutzanforderungen gegen
Flüssigkeitseintritt erfüllt, sollten Sie Anschlüsse vor Feuchtigkeit und jedem
direkten Kontakt mit Wasser oder Körperflüssigkeiten (z. B. im Falle von
Inkontinez) schützen. Kontrollieren Sie die elektornischen Komponenten
regelmäßig auf Korrosionsschäden und ersetzen Sie schadhafte Teile.
ENTSORGUNG UND RECYCLING
Entsorgen Sie Ihren Aufrichtestuhl gemäß geltender gesetzlicher Vorschriften. Zur entsprechenden Entsorgung
einzelner Aufrichtestuhl-Komponenten wie Verpackunge n, Metallrahmenelemente, Überzüge, ele ktronische Bauteile oder Batterien wenden Sie sich an ihre Abfallentsorgung vor Ort oder an eine n auto risierte n Pride -Händler.
WARNHINWEIS! Bei Plastikverpackungen besteht Erstickungsgefahr. Entsorgen Sie
Plastikverpackungen vorschriftsmäßig und lassen Sie Kinder nicht damit spielen.
100 www.pridemobility.com Lift Chair Series
 Loading...