

Price RDV Series, RDVQ Series, RDVQ 5000 Installation, Operation And Maintenance Manual
MANUAL – INSTALLATION, OPERATION, AND MAINTENANCE
Air Volume Control Valve
RDV / RDVQ Series
v004 – Issue Date: 07/14/16
© 2016 Price Industries Limited. All rights reserved.

AIR VOLUME CONTROL VALVE
TABLE OF CONTENTS
Product Overview
General ......................................................................... 1
Receiving Inspection ..................................................... 1
Wiring ........................................................................... 1
Installation Instructions
Installing the RDV/RDVQ 5000 Terminal Unit ................. 2
Air Volume Ranges ........................................................ 2
SP300 Cal. Curves - RDV ............................................. 3
SP300 Cal. Curves - RDVQ w/Absorptive Silencer ........ 4
SP300 Cal. Curves - RDVQ w/Packless Silencer ........... 5
OPTIONAL
NEMA1
CONTROLS
ENCLOSURE
(SEE NOTE)
OPTIONAL
NEMA1
CONTROLS
ENCLOSURE
(SEE NOTE)
20”
(508)
MULTI-POINT SENSOR
C/W GAUGE TAPS
PACKLESS
SILENCER
20”
(508)
4
3
/4” (121)
9
1
/2” (241)
9
1
/2” (241)
MULTI-POINT SENSOR
C/W GAUGE TAPS
ABSORPTIVE
SILENCER
DIA = A + 8”
4
3
/4” (121)
DIA = A - 1/8” (3)
DIA = A -
1
/8” (3)
181/2” (470)
INLET SILENCER
SECTION
DIA = A - 1/8” (3)
AIR
FLOW
2”
(51)
B
2” (51)
36” (914)
CONNECTION COLLAR
UP
AIR VOLUME CONTROL VALVE
PRODUCT OVERVIEW
General
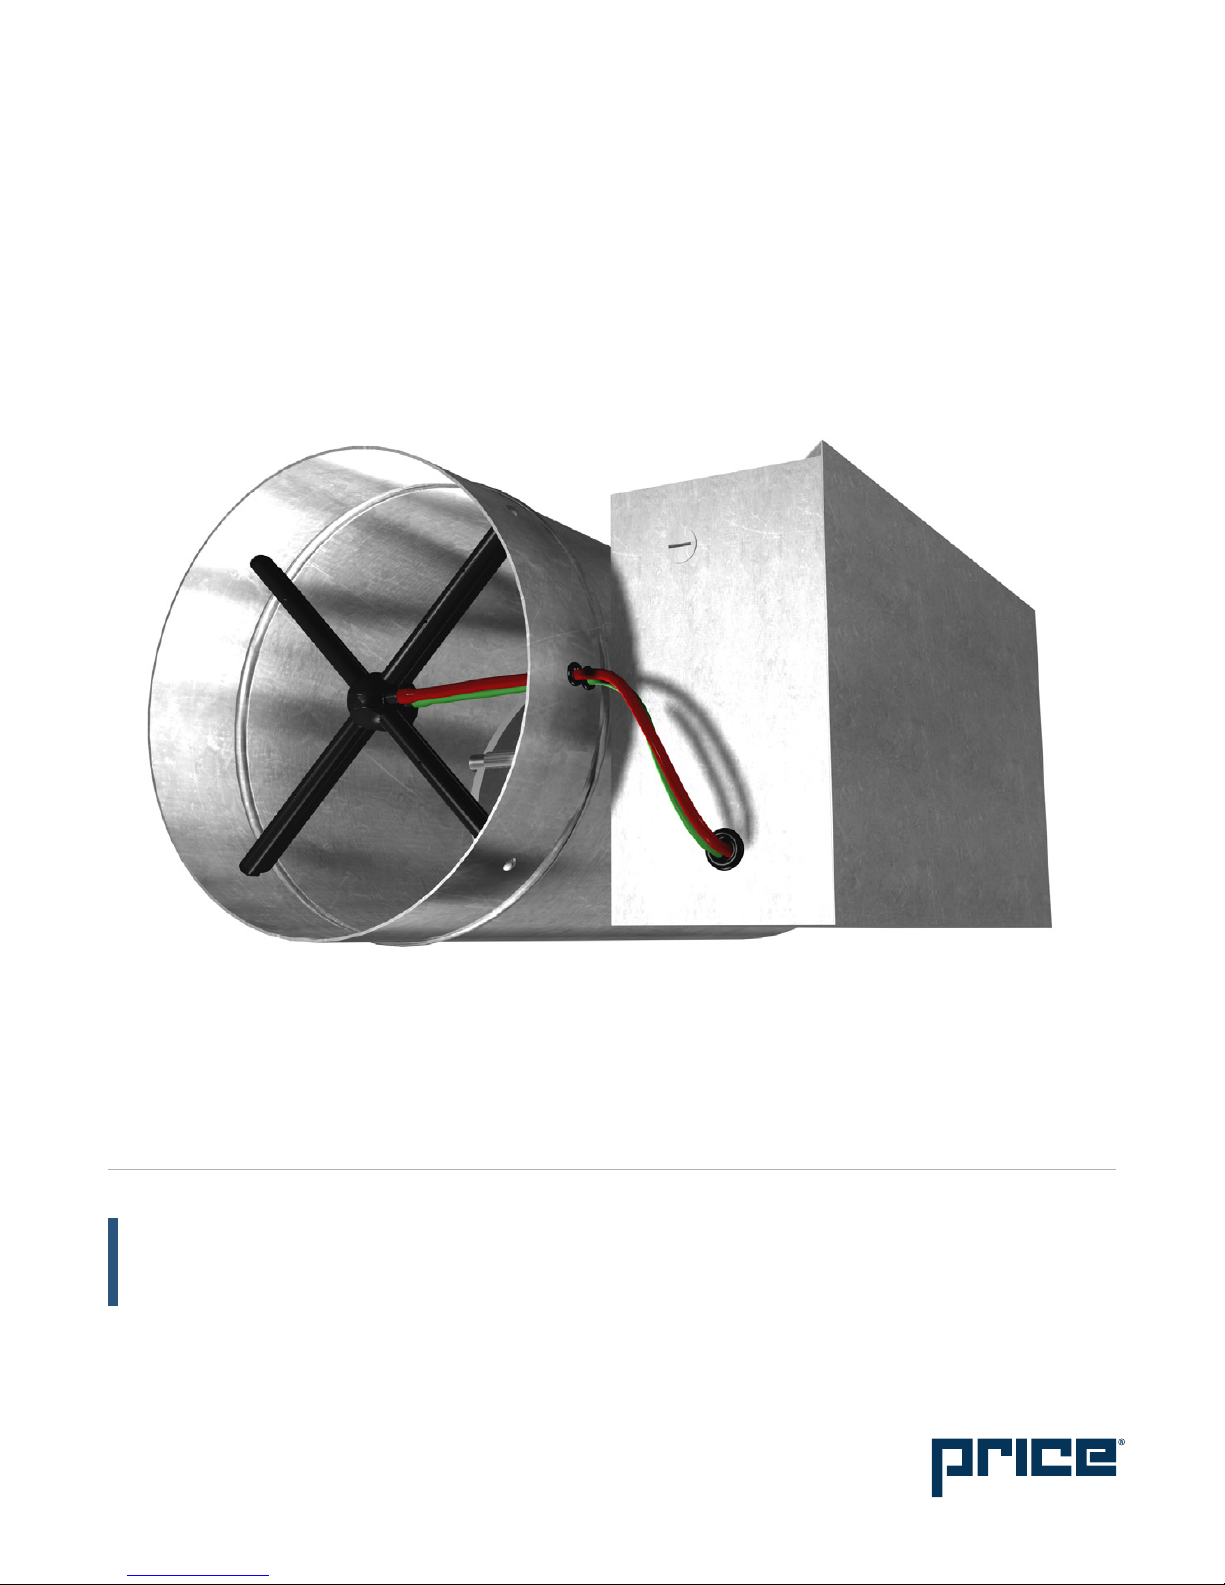
The RDV/RDVQ is supplied with the duct, damper, and airflow
sensor. The RDV/RDVQ assembly is designed to accept Direct
Digital Controls (DDC) for VAV pressure independent operation.
The terminal unit controls are supplied by the controls
contractor and either factory or field mounted and wired. For
information concerning controls, components, sequence of
operation, etc., please refer to the documentation provided by
the controls contractor.
Receiving Inspection
After unpacking the assembly, check it for shipping damage.
If any shipping damage is found, report it immediately to the
delivering carrier. During unpacking and installation do not
handle by the inlet velocity sensor, damper shaft, or tubing.
Damage may result.
Wiring
If controls have been factory mounted, a wiring diagram
will be included with the unit indicating the factory mounted
components. For field wiring of room sensors and other
accessories, refer to the controls contractor's documentation.
If the controls have been field mounted, refer to the controls
contractor's documentation for all wiring information.
Damper rotation is always clockwise to the open position.
An identification mark on the end of the shaft indicates the
damper position.
The factory supplied sensing lines are color coded. Red
indicates the total pressure or ”HI“ line which should be
located on the upstream side. Green indicates the static
pressure or ”LO“ line which should be located on the
downstream side.
An optional protective enclosure may be provided to house
the terminal unit control components. The enclosure cover is
removable with two sheet metal screws.
RDV
AIR
DIA = A - 1/8” (3)
FLOW
RDVQ
PACKLESS
SILENCER
20”
(508)
MULTI-POINT SENSOR
C/W GAUGE TAPS
DIA = A - 1/8” (3)
4 1/2” (114)
DAMPER SHAFT
MULTI-POINT SENSOR
C/W GAUGE TAPS
FOR PNEUMATIC CONTROLS
NEMA1 OPTIONAL
CONTROLS ENCLOSURE
20”
(508)
AIR
FLOW
2”
(51)
3
/4” (121)
4
1
9
/2” (241)
OPTIONAL
NEMA1
CONTROLS
ENCLOSURE
(SEE NOTE)
36” (914)
INLET SILENCER
SECTION
ABSORPTIVE
SILENCER
DIA = A + 8”
MULTI-POINT SENSOR
C/W GAUGE TAPS
2” (51)
DIA = A - 1/8” (3)
18 1/2” (470)
UP
CONNECTION COLLAR
DIA = A -
1 1/2” (38)
4
1
/2” (241)
9
OPTIONAL
NEMA1
CONTROLS
ENCLOSURE
(SEE NOTE)
181/2” (470)
UP
1
/8” (3)
3
/4” (121)
B
priceindustries.com | AIR VOLUME CONTROL VALVE - Manual
1
 Loading...