

Prevue Hendryx 3154 Assembly Instructions Manual
steps
cage assembly instructions
Select Cage
Model: # 3154
Hammertone Models
exterior: 35⅜"L × 23½"W × 67"H (floor to playtop perch)
w/seed guards: 43¾"L × 32"W
interior: 34½"L × 22¾"W × 36½"H
wire: [gauge] 9 & 9 [spacing] ¾"
getting started!
READ THESE NOTES FIRST:
• Enlist A Friend: While this large cage may be assembled
by one person, the assembly would be made easier with two
people.
• Count Hardware: Extra screws may be included. If the
screw count is short, please contact Prevue Customer Service.
• Review All Parts: If wires are bent during shipping,
they may be straightened with needle nose pliers. For seriously
damaged pieces, please contact Prevue Customer Service.
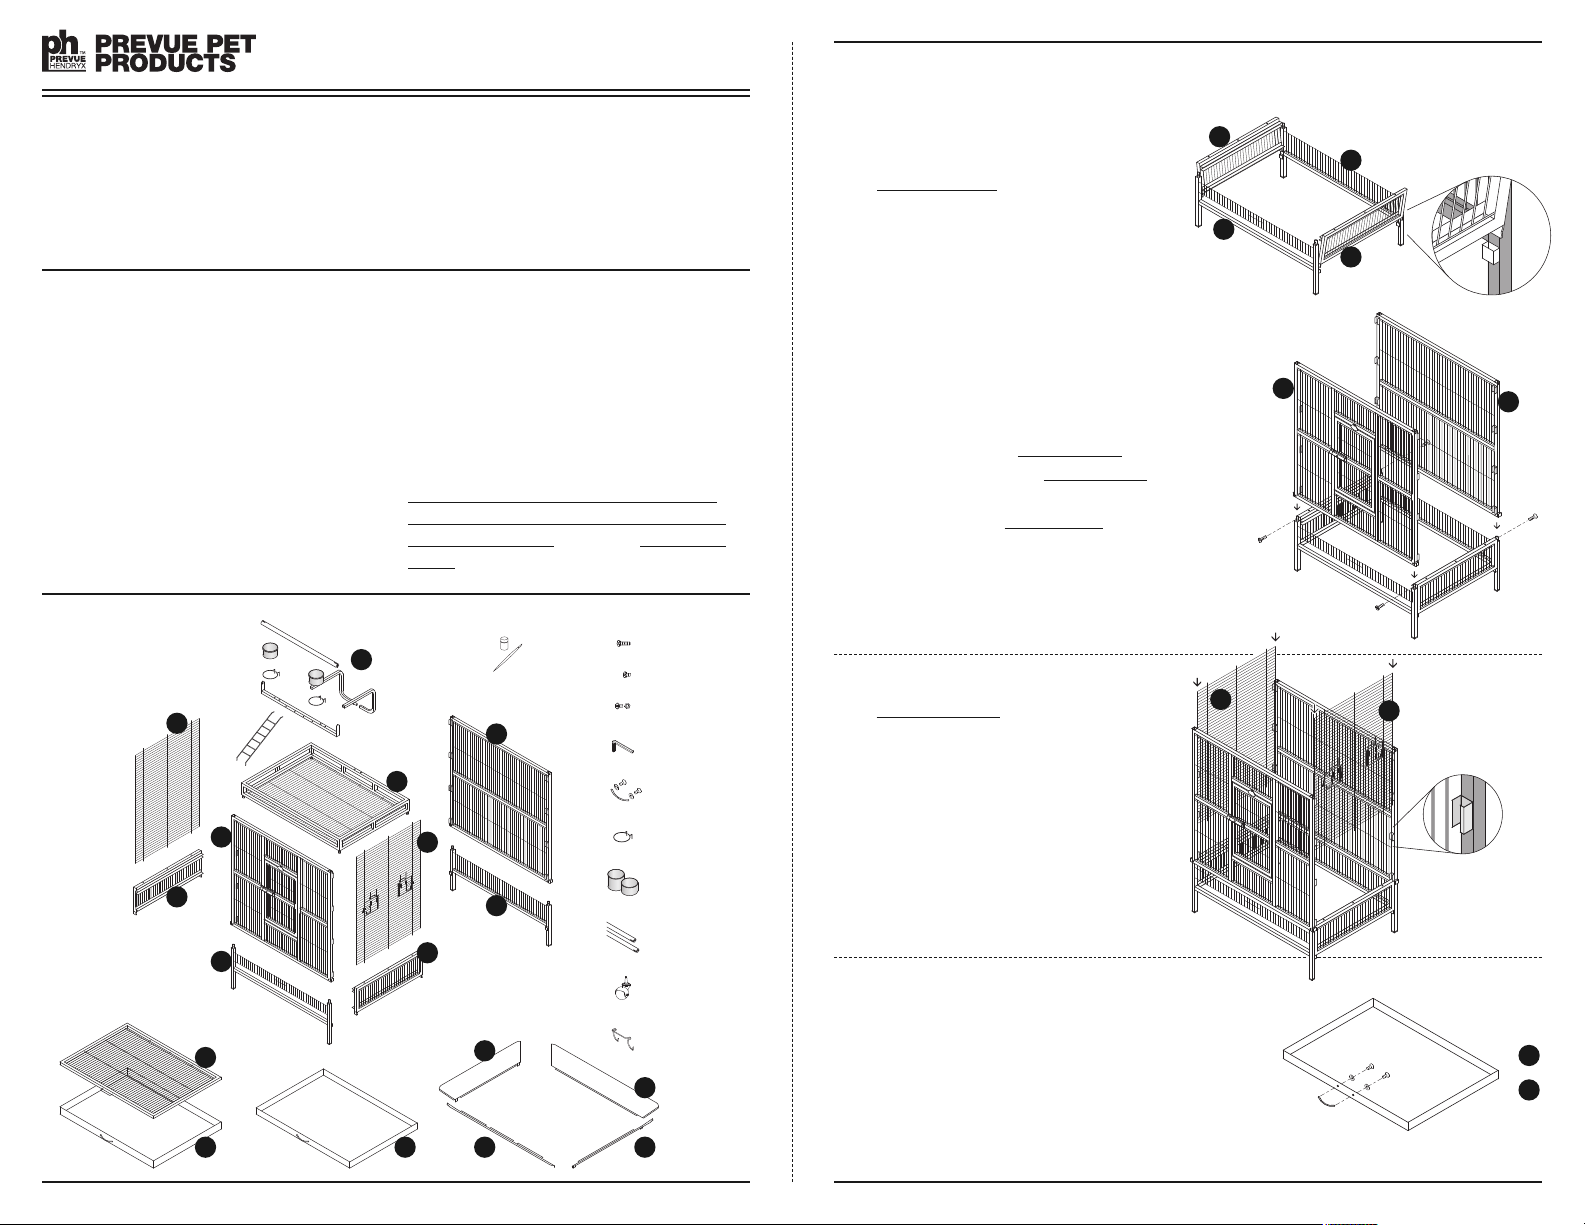
parts
L2
KEY:
PT = Playtop
L = Left panels
F = Frontpanel
R = Right panels
B = Back panel
G = Grille
T = Tray
SG = Seed Guards
F2
L1
F1
G
T1 T2
• Tools: An allenwrenchis included.Youwill need a small-head
slotorphillipsscrewdriver.Youmayneedneedlenosepliersto remove
slugs or straightenwires.Youmay useyour ownhand tools,but we
DO NOT recommend power tools! Parts can be over-tightened
and damaged. Prevue is not responsiblefor this type of damage.
Review these instructions thoroughly before attempting to
assemble the cage. If you require assistance, please contact
PrevueCustomer Service at 800.243.3624 or through links
online at prevuepet.com
touch-up
PT
PT1
R2
R1
paint & brush
B2
B1
SG3
SG1
{ 8 } long hex screws
{ 4 } short hex screws
{ 8 } short hex screw &
nut pairs for seed guard
{ 1 } allen wrench
{ 2 } setsofhardware for
trayhandles
{ 4 } cup holders
{ 4 } stainless steel cups
(short cups for Playtop)
{ 2 } wood dowel perches
(long dowel for cage;
short dowel for Playtop)
{ 4 } rolling casters
{ 1 } grille safe-clip
SG2
SG4
a
1
Assemble the base: Insert the tabs on side
lower (L1 & R1) panels into the sleeves on the
legs of front lower (F1) & back lower (B1) frame
panels (see detail). The tray/grille channels on
the side panels should face the inside of the cage.
b
1
Insert the front upper (F2) panel over the corner
posts of the front lower frame.
Secure the front panel with a long hex screw
in each lower corner. The hex screw will pass
through the hole in the front upper panel frame
leg, through the hole in the front lower panel
corner post, and to the threaded receiving hole
in the opening of the side lower panel.
Follow the same procedure for the back. Insert
the back upper (B2) panel over the corner posts
of the back lower frame, align the side frames
and secure the corners with the long hex screws.
2 Assemble the sides: Slide the right side upper
(R2) panel down through the channel guides along
the inner front & back panel frame legs. The third
channel guide down is hooked foran extra level of
stability(see detail).
Three heavy vertical wires on the side panel
extend below lowest horizontal wire. Align the
extended wires with the corresponding holes
along top surface of the side lower panel.
Repeat for the left side upper (L2) panel.
a
3
If you have someone helping you, have them
assemble the playtop tray (T2) and bottom
tray (T1) handles.
Put a washer on the small slothead screw, poke
the washer/screwcombo throughthe hole from tray
inside, alignit with the handle,and tightensnuggly.
L1
B1
F1
R1
F2
NOTE: Side upper panels may
L2
be switched R to L— just
R2
make surecup doors and
heavy vertical wires oneither
side panel swing/face out.
B2
T1
T2
b
3
With the playtop tray (T2) removed,insert the
playtoprack (PT1) frame onto the cage,aligning
the corner posts of the playtop with the open ends
of the front & back panel frames. The extended
vertical wires at the top of both side panels will
align with corresponding holes on the underside
of the playtop rack.
Once all wires have been aligned and playtop has
been nestled into place, secure the playtop with
short hex screws in each corner.
PT1
b
5
To keep the grille securely in place,
a safe-clip is included. Locate the short
horizontal bar on the front panel under
the grille, and centered directly under the
grille handle.
Hook the open-ends of the safe-clip onto
the short horizontal bar. Hook the upper
part of the safe-clip over the handle on
the grille (see detail).
4 If you have help, lower the cage to the floor and
insert the rolling casters.
→ If youdo not have assistance, and are lowering the
cage by yourself, be very careful, as it is aheavy cage.
Cushion the floor with heavy couch pillows to addan
extra level of protection.
After inserting casters, return cage to upright position.
a
5
Insert the playtop tray (T2)
into place at the top.
Insert cup holders into the cup
doors, and insert the deep coop cups
into the holders (see detail).
Insertthe long perch into
the inside of the cage.
Insert the grille (G) and bottom
tray (T1) into place at the base.
6 Assemble the Playtop unit:
1 U-bar ships as two pieces. Pre-assemble
U-bar before attaching to back edge of playtop
frame with two long hex screws.
2 Attach cup/perch bar to U-bar with two long
hex screws.
3 Insert cup holders and short coop cups
into holders on cup/perch bar.
4 Slide shortest perch onto cup/perch bar.
5 Install ladder. Fit the ladder’s top posts into
holes on face of cup/perch bar; the bottom posts
into holes on front top edge of playtop frame.
7 Assemble the seed guards: Left & right side
seed guards (SG3 & SG4) are interchangeable &
have tabs at the corners which fit into sleeves on
the frame legs of the front/back (F1 & B1) panels.
T2
G
To make assembly easier, pre-assemble (upsidedown) the SG4/SG2 pair and the SG1/SG3 pair
on the floor.
SG2
SG4
SG1
SG3
SG3
SG1
4
3
2
1
5
Slip the side/back (SG4/SG2) seed guard pair into
place (see detail). Slip the front/side (SG1/SG3)
pair into place.
Align the holes at the front (SG1 + SG4) corner
and secure guards together with screw & nut
pairs. Finish with the back (SG3 + SG2) corner.
SG2
SG4
T1
Your cage is now fully assembled!
✩
Made in China for Prevue Pet Products, Inc., Chicago IL USA prevuepet.com 800 243-3624 customerservice@prevuepet.com3154 — 07/13 — US
 Loading...