

Page 1
QUICK REFERENCE GUIDE
SOUND SELECTOR, VR300 RADIO & GPS NAVIGATION SYSTEM
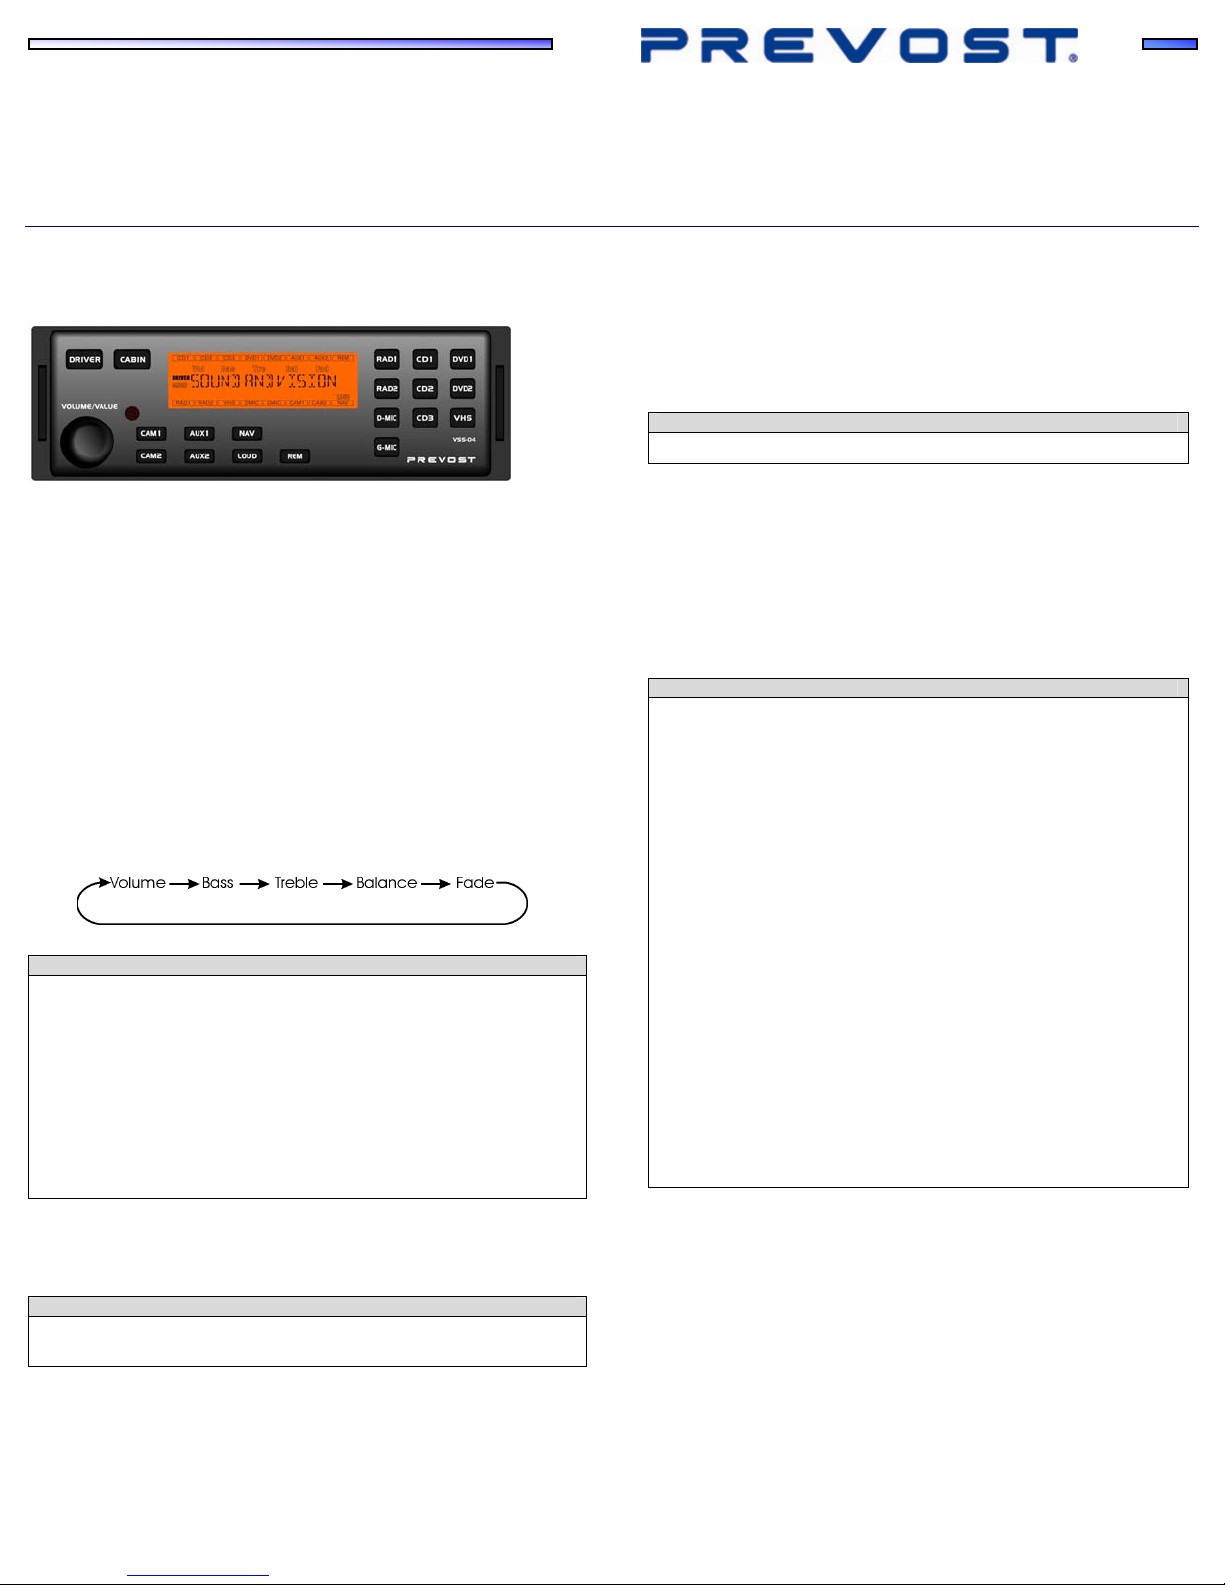
VSS-04 SOUND SELECTOR
Power switch: there is no power button. The unit turns on automatically
when the ignition switch is set to ACC or ON position and turns off when the
ignition switch is set to OFF position. Start image shows “SOUND AND
VISION”.
DRIVER: press to adjust sound settings and select audio/video source for
the driver’s area. Driver’s and passenger’s systems are independent
systems. RAD1 is default source.
CABIN: press to adjust sound settings and select audio/video source for the
passenger’s area.
VOLUME/VALUE: turn to adjust volume level or sound settings value for the
selected audio/video source (RAD1 is default source). Each source has
independent settings of volume, bass, treble, etc.
Press repeatedly to select sound settings. Settings will change as follow:
NOTE
Some components like the standard radio, the satellite radio and the DVD
Player have their own audio controls (volume, bass, treble, balance, fade,
etc.). These audio controls should be adjusted once at the beginning and
should not be changed after.
If volume level or sound quality adjustments are required, they should be
made using the VSS-04 Sound Selector only.
Presets of the audio controls:
• Adjust each radio and DVD Player own volume level between 50% and
75% of their output range (DVD Player volume on remote control).
• Adjust radio’s own bass, treble, balance and fade settings value to 0.
NAV: press to select the navigation system display as current video source
for the passenger’s area. Press a second time to cancel.
LOUD: press to increase the low frequencies level of the selected
audio/video source. Press a second time to cancel.
REM: press to enable use of the remote control to operate selection of
sources, settings of volume, bass, treble, etc. Press a second time to cancel
use of the remote control.
NOTE
Point the remote control in direction of the Sound Selector.
RAD1: press to select the dashboard radio as current audio source for the
chosen area.
RAD2: press to select an optional radio (satellite radio for example) as
current audio source for the chosen area.
D-MIC: press to turn on driver microphone. A gong can be heard and the
current audio source volume in the passenger's area is reduced. Press a
second time to turn off. When the microphone is activated, turn
VOLUME/VALUE button to adjust volume value between 18 and 20. Also,
you can turn on the microphone simply by pressing its on/off switch.
NOTE
Adjustment for background music
When microphone is activated, the current audio source volume will
reduce to a certain level which as been set at the factory. To adjust it,
proceed as follows:
1- Press AUX1 and VOLUME/VALUE at the same time.
2- Turn VOLUME/VALUE knob to adjust the background music
volume.
3- Press AUX1 and VOLUME/VALUE once again to save the
setting.
Adjustment for gong sound
If desired, a gong will sound upon activating of the microphone. This
gong will also sound when a passenger activates the service bell. Gong
sound level can be adjusted as follows:
1- Press AUX2 and VOLUME/VALUE at the same time.
2- Turn VOLUME/VALUE knob to adjust gong volume.
3- Press AUX2 and VOLUME/VALUE once again to save the
setting.
The gong sound heard upon activating of the microphone can be
disabled. To do so, press simultaneously VOLUME/VALUE and D-MIC
repeatedly to enable/disable the gong sound. The controller will then
display MGONG N (gong disabled) or MGONG Y (gong enabled).
CAM1: press to turn on the optional panoramic view camera. The video
monitors turn on automatically. Press a second time to turn off. This function
can be selected simultaneously with an audio function like the radio, the
driver or guide microphone or a CD player.
NOTE
The back-up camera turns on automatically when the transmission selector
is set to reverse “R”.
CAM2: press to select an optional second panoramic view camera if
equipped as current video source. Press a second time to cancel. This
function can be selected simultaneously with an audio function like the radio,
the driver or guide microphone or a CD.
AUX1, AUX2: press to select an auxiliary audio/video source like a second
VHS.
G-MIC: press to turn on the guide microphone. Press a second time to turn
off. When the microphone is activated, turn VOLUME/VALUE button to adjust
volume value between 18 and 20. Also, you can turn on the microphone
simply by pressing its on/off switch.
CD1, CD2, CD3: press to select up to 3 different remote CD players as
current source.
DVD1: press to select DVD Player #1 as current source.
DVD2: press to select DVD Player #2 as current source.
VHS: press to select VHS as current source.
Page 2
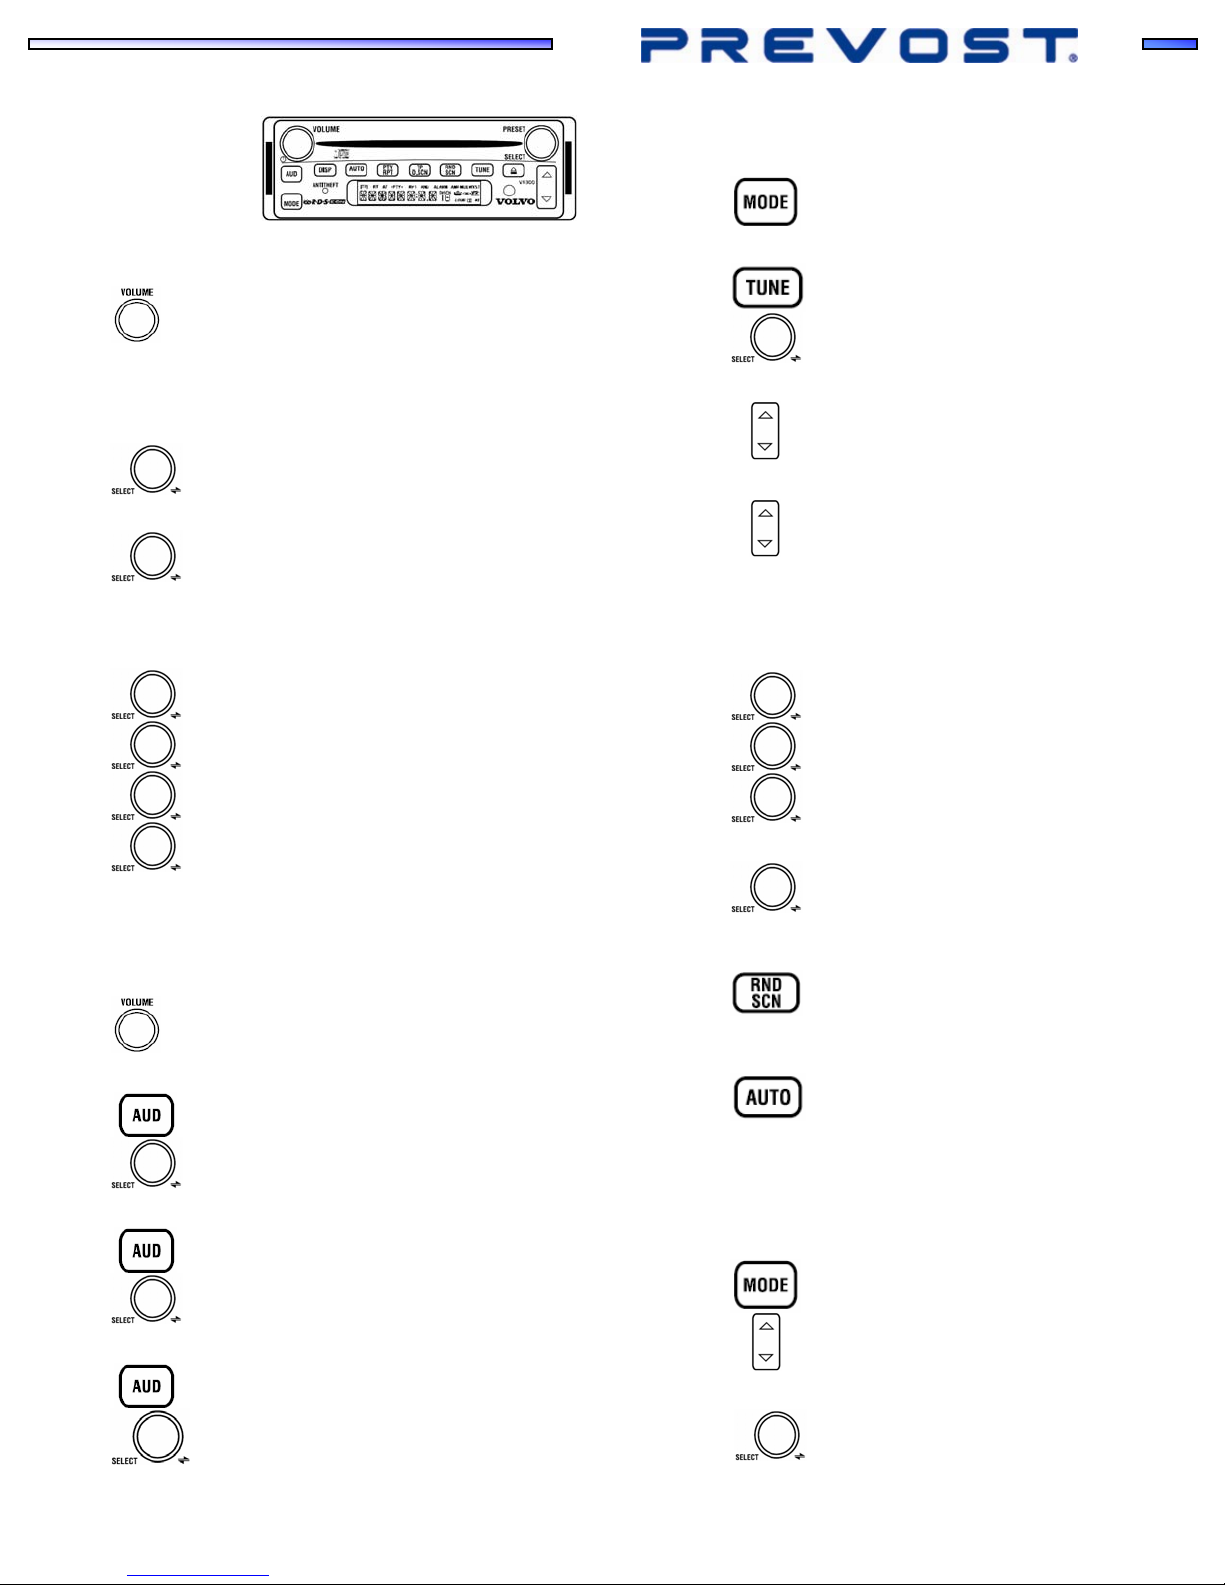
VR300 RADIO
POWER ON/OFF
TUNING THE RADIO
Band select
Press
Tune
Press
repeatedly to display desired band (AM, FM, WX
(weather), CD… )
Press
to turn ON/OFF
CLOCK
Select a 12-hour or 24-hour style time display
Press
The number shown beside 12/24 indicates which format is selected (12hour or 24-hour). To change this number…
Press
Selection will be saved after 5 seconds
Setting time of day
Press
Turn
Press
Press
Selection will be saved after 5 seconds
and hold for 3 seconds until 12/24 is displayed
and hold for 3 seconds
to display TIMESET
and turn to correct hour
until minutes flash and turn to correct minutes
Turn
to tune manually
Seek
Press
up or down to seek next higher or lower station
Scan
Press
and hold momentarily to scan for stations. To
stop scan, press UP/DOWN rocker button.
PRESETS (18 FM, 12 AM & 6 WX preset channels)
Storing preset stations
Tune to the desired station
Push
Turn
Push
Accessing the preset stations
Turn to choose preset station
and release. STORE and a flashing preset
number display
to change preset number
to store station at that preset number
AUDIO CONTROLS
Volume
Turn
to adjust volume between 38 and 40. Afterwards,
use Sound Selector to adjust volume
Balance control
Press
Turn
repeatedly to display BAL
to adjust balance to 0. Afterwards, use Sound
Selector to adjust balance
Fade control
Press
Turn
repeatedly to display FADE
to adjust fade to 0. Afterwards, use Sound
Selector to adjust fade
Treble, Bass control
Press
Turn to adjust treble
repeatedly to display TREB or BASS
use Sound Selector to adjust treble or bass
or bass to 0 (flat). Afterwards,
Preset Scan
To scan through your presets
Press
to display PSCN and begin scanning presets. To
stop the scan, press SCN button again.
Auto-Store preset
To automatically store 18 stations
Press
Press AUTO button to cancel the Auto-Store function.
to scan for strongest signals and store as
presets
COMPACT DISC (CD) PLAYER
CD select
Insert a CD in the radio’s CD slot and it will automatically begin to play.
If the radio is in another mode and a CD is already in the player…
Press
Press
Next/previous track
Turn
until CD is displayed
up/down rocker button
clockwise to skip forward or counterclockwise
to skip backward to next track.
Page 3
GPS NAVIGATION SYSTEM
QUICK START
Below you will find a quick reference guide which describes the process for entering a bus line company home base address and start guidance to bring
the coach home after taking delivery at Prevost facility, in simple, brief steps.
As soon as the navigation system is operational, an instruction about using the system appears in the display. Read this instruction and confirm it by
pressing the OK button on the remote control.
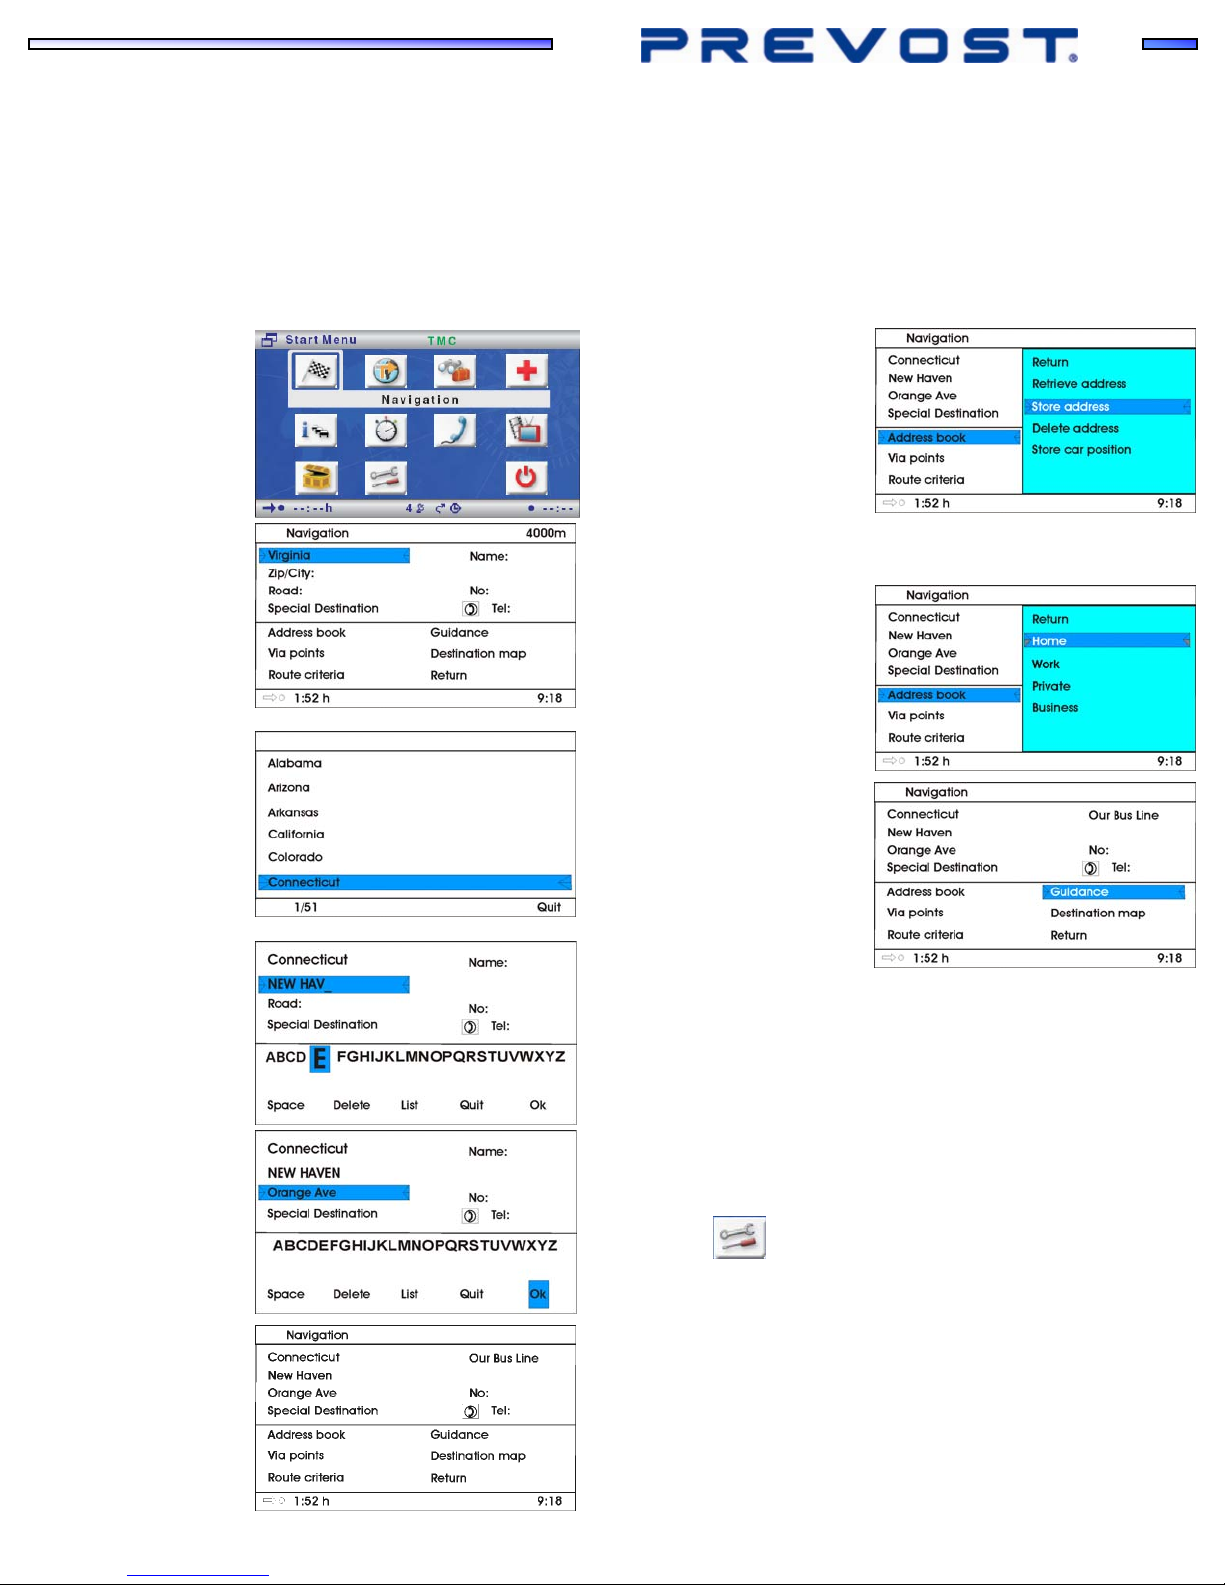
The start menu appears
after you have confirmed
the user instruction.
• Use the cursor buttons
◄, ►, ▲, ▼ on the
remote control to
select “Navigation”
menu (checkered flag)
in the “Start menu”.
The “Navigation” menu
appears.
If your destination is in a
state other than the
displayed state, first select
the destination state from
the list of available states.
• Use the cursor buttons
◄, ►, ▲, ▼ to move
the cursor (colored
marking) to the state
item.
• Press OK button.
• Use the cursor buttons
▲, ▼ to select the
destination state from
the list.
• Press OK button to
confirm the selection.
In the same manner, enter
the destination address
under “Zip/City” and
“Road”. To do so,
highlight the relevant
characters and then
confirm with the OK
button.
• Use the cursor buttons
◄, ►, ▲, ▼ to move
the cursor (colored
marking).
• Press OK button to
confirm the selection.
Under “Name”, you can
give a free-text name to
the address.
Because this is our home
base address, we will
store it in the address
book under Home
category.
• Use the cursor buttons
to select “Address
book” and press OK
button.
• Select “Store address”
and confirm with the
OK button.
• Select the desired
address-book category
(home, work, private or
business) and confirm
with the OK button.
The displayed address is
stored as Home address.
Select “Guidance” and
press OK button to start
guidance.
You will be given the first
guidance message after
just a short time.
Press the Navigation button to switch between the various guidance
screen types (symbol display, map display, split-screen display).
Language
To change the screen display and voice guidance language:
English Ù French, Spanish Ù English
• In the Start menu, select the “Config. du système/Settings” menu
icon
• The “Config. du système/System settings ” menu appears.
• Select “Réglages généraux/General settings” and press OK button.
• Select “Langue/Language” and press OK button.
• Select desired language and store with “Return”.
and press OK button.
Page 4
FURTHER DETAILS
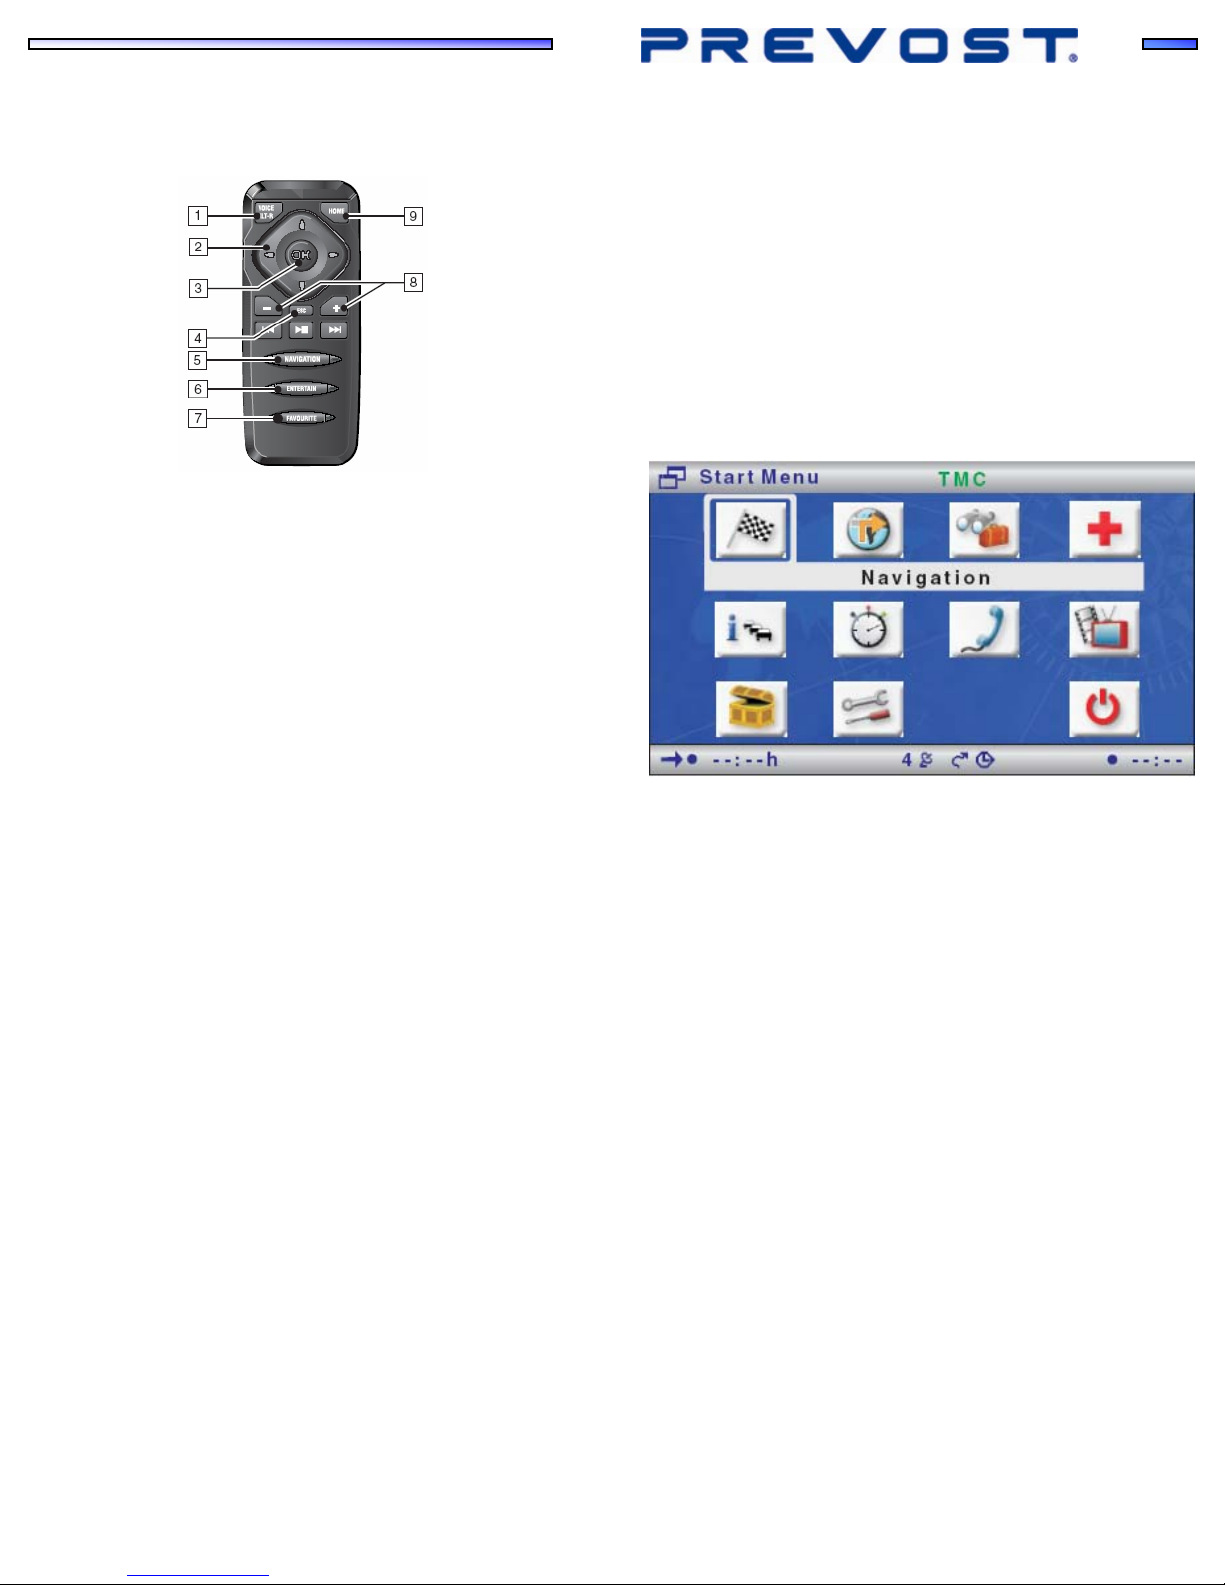
Remote control
VOICE/ALT-R Press briefly: Calls up the current audible guidance
c
◄, ►, ▲, ▼ Cursor buttons. Move the cursor in the menus.
d
OK Confirms a selection.
e
ESC Press briefly: Jumps back to the previous menu.
f
NAVIGATION Press briefly: Switches the display type of the
g
ENTERTAIN Press briefly: calls up the previous used
h
FAVORITE Button freely programmable to provide direct
i
-, +
j
HOME Press briefly: Adopts the address stored under
k
message.
Press and hold: Switches to “Alternative Route”
menu.
Press and hold: jumps directly to the Start menu.
guidance screen.
Press and hold: Moves directly to the Start menu.
entertainment source.
access to selected functions.
Volume setting. Press the + or - button once or
several times to increase or decrease the volume
of the audible messages.
“Home” in the directional guidance.
Press and hold: Adopts the address stored under
“Work” in the directional guidance.
Menu operation
The central elements for operating the menu are the cursor buttons ◄,
►, ▲, ▼ and the OK button.
• Press the cursor buttons to move the cursor (colored marking) to
the desired menu item.
• Press the OK button to confirm the selection and activate the
function.
• Press the OK button to adopt the settings.
• Press the ESC button to quit the menu without adopting the set
value or to move back a menu level.
Switching on/off
The navigation computer is switched on and off together with the
ignition.
As soon as the navigation system is operational, an instruction about
using the system appears in the display. Read this instruction and
confirm it by pressing the OK button on the remote control. The Start
menu appears.
Start menu
The Start menu appears after you have confirmed the user instruction.
In the Start menu, the following menu options are available.
Navigation Calls up the main navigation menu (e.g. for
Map Calls up the previous selected guidance screen.
Travel info Calls up the menu with the available C-IQ travel
Emergency Display the Emergency menu with the current vehicle
Info Calls up the Info menu with TMC traffic information.
Trip computer Calls up the trip computer display with the trip data
Telephone Calls up the Telephone menu (this entry appears only
Bluetooth
TV/Video Switches to the connected TV/video source (e.g. TV
C-IQ Calls up the C-IQ menu. Here, you can activate C-IQ
Settings For the individual adjustment of the navigation
Stand-by Switches the system into stand-by mode. Press the
destination input, guidance, address book, etc.).
information products (e.g. travel guide, restaurant
and hotel guide).
location and the national emergency telephone
number. In addition, you can program a telephone
number for a breakdown service.
Other information relating to the current route is
available.
and the current GPS position.
if a relevant system upgrade is connected).
Calls up the Paring menu (this entry appears only if a
relevant system upgrade is connected).
tuner) (this entry appears only if a relevant system
upgrade is connected).
products and manage your C-IQ products.
system.
OK button to reactivate the system.
Quick reference guide sound system eng rev3 August 15, 2008
 Loading...