

Page 1
Confidential
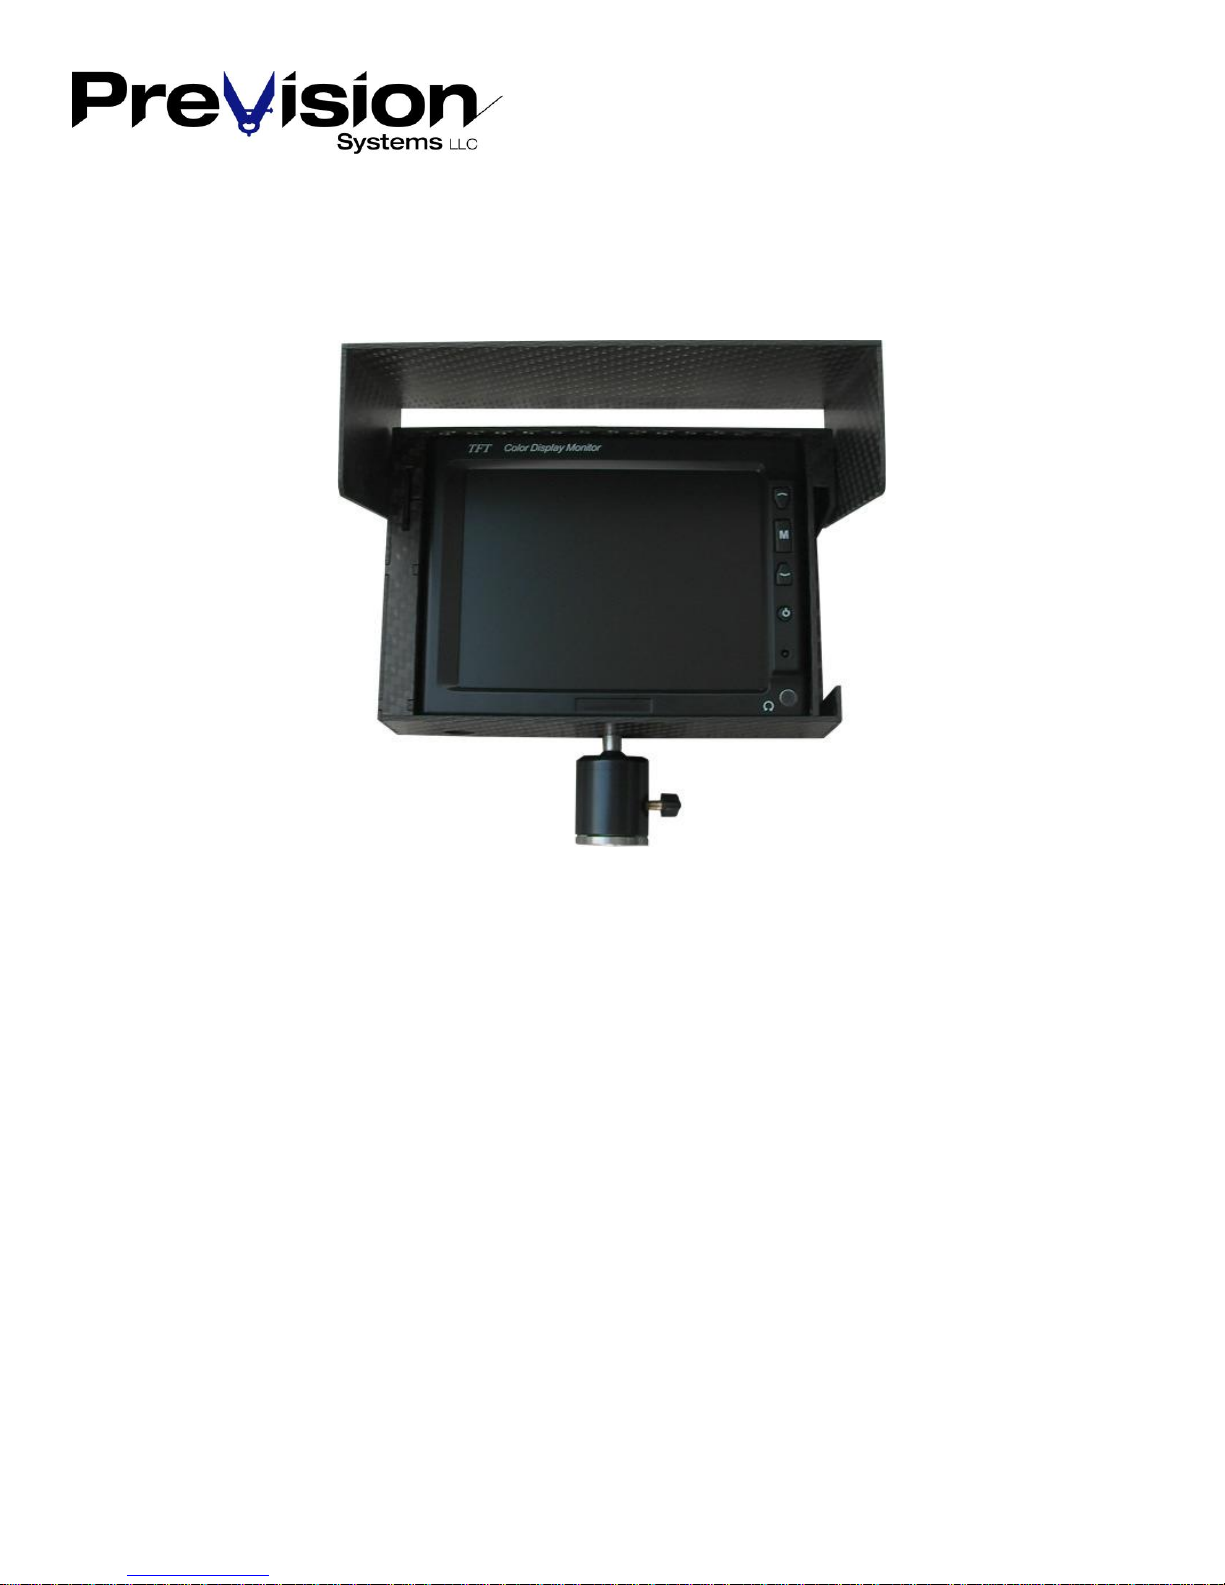
Digital Storage Monitor
PN 145168
o 5.6”TFT LCD Monitor DVR in a carbon-fiber
housing, attached to the reel with a lockable
swivel
o Store videos and images on a SD card (max.
16GB)
o Video: MPEG4 WMP file , *.AVI
o Image: Loss-less Bitmap, *.BMP.
354 US Highway 46 W, Suite 1C, New Jersey 07840-5335
Page 2

Contents
Quick Start Guide............................................................................................................................. 3
Setup ............................................................................................................................................ 3
Recording a video ........................................................................................................................ 5
Saving a Snapshot ........................................................................................................................ 5
Saving a Snapshot while video is recording ................................................................................ 5
How to store a video ....................................................................................................................... 6
How to store a Snapshot ................................................................................................................. 7
Remote Control Unit ....................................................................................................................... 8
File system of the stored images and videos .................................................................................. 9
Filename of image or video ......................................................................................................... 9
File extensions ............................................................................................................................. 9
File folder ..................................................................................................................................... 9
Preview of videos / images .......................................................................................................... 9
File Navigation ........................................................................................................................... 10
Selecting a Video file ................................................................................................................. 10
Selecting a Picture file ............................................................................................................... 10
System Menu ................................................................................................................................. 11
Microphone Gain ....................................................................................................................... 11
Storage ...................................................................................................................................... 12
System Settings ......................................................................................................................... 13
Specifications ................................................................................................................................. 15
Recording time of memory capacity ......................................................................................... 15
145196B Page 2 of 15
Page 3
Quick Start Guide
Precautions
o Protect the DVR/Monitor unit from dirt and moisture.
o For optimal storage performance, format the SD-card device regularly.
o Should you need service, please contact Prevision Systems or an authorized dealer.
Setup
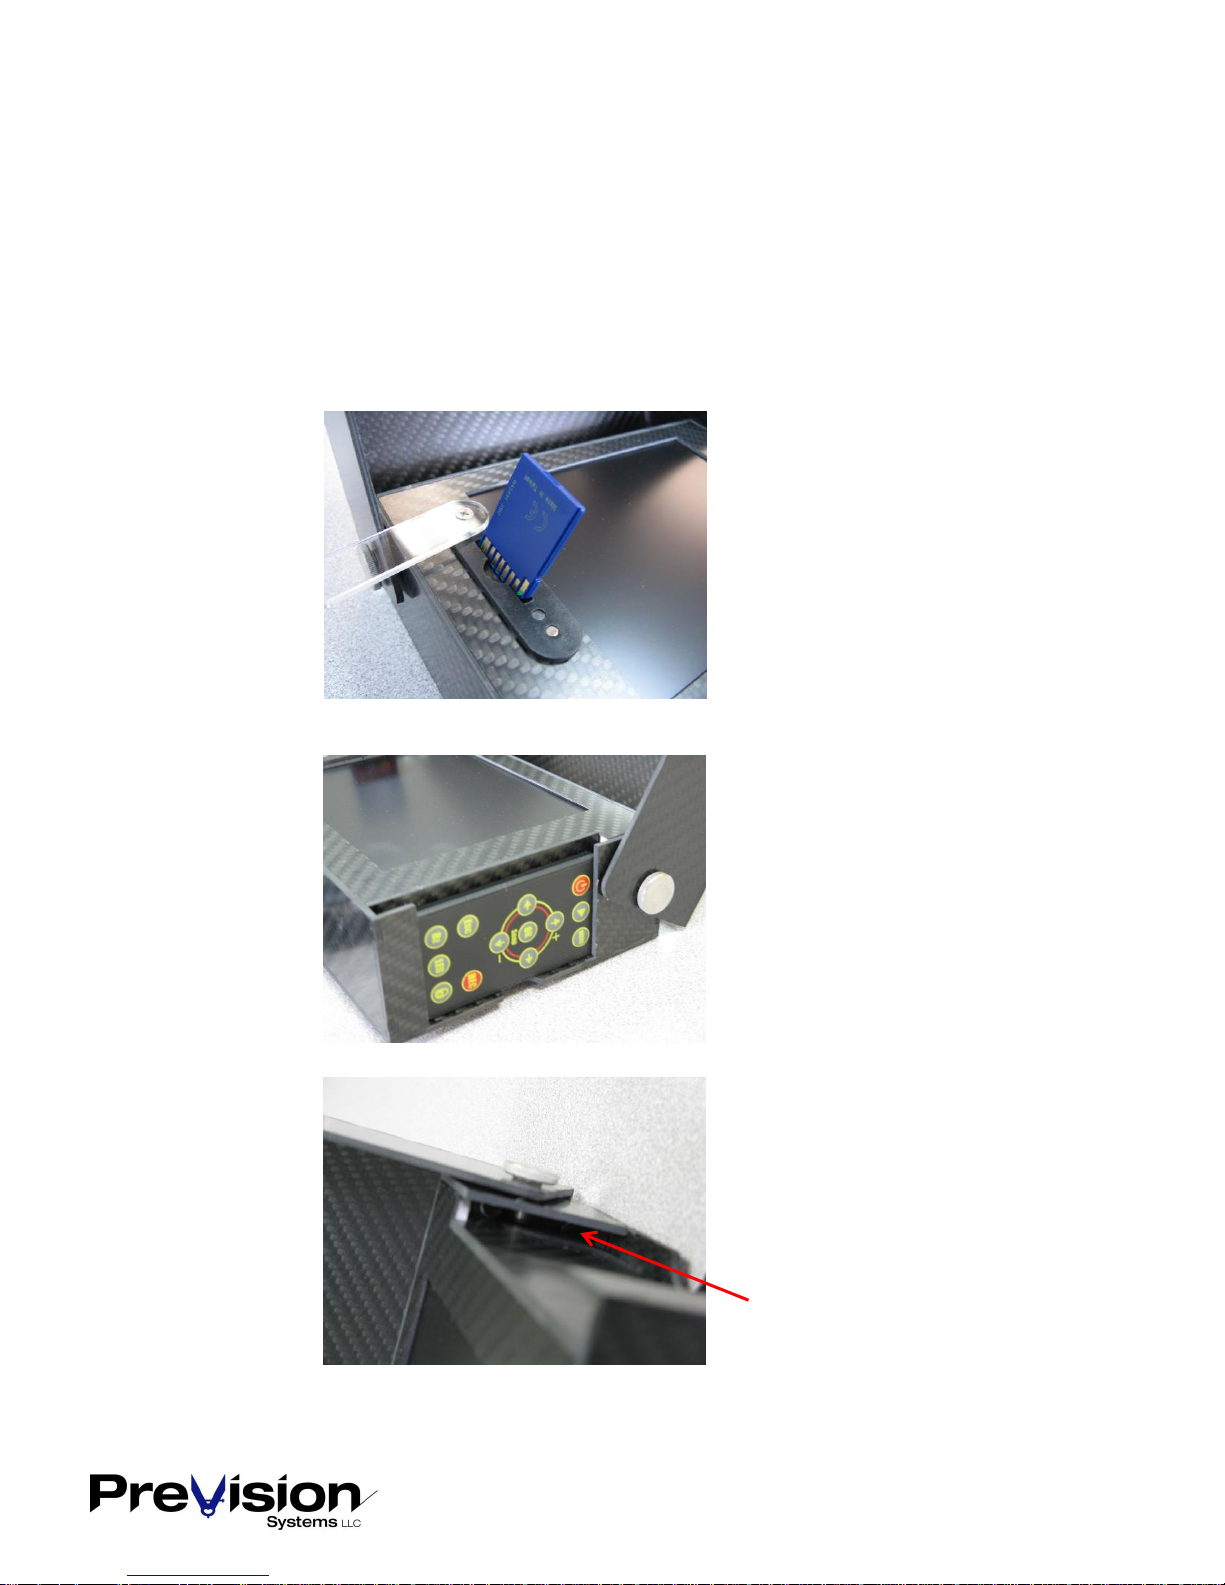
Be sure that the SD-card is inserted fully in the correct way.
The remote control is positioned on the right side of the monitor housing.
Note:
The remote control unit can stay in the
docking space. It does not have to be
taken out to work with it.
Note:
The remote control unit has an IR
sender which communicates to an IR
receiver.
The IR receiver is located in the
monitor housing indicated by the red
line.
145196B Page 3 of 15
Page 4
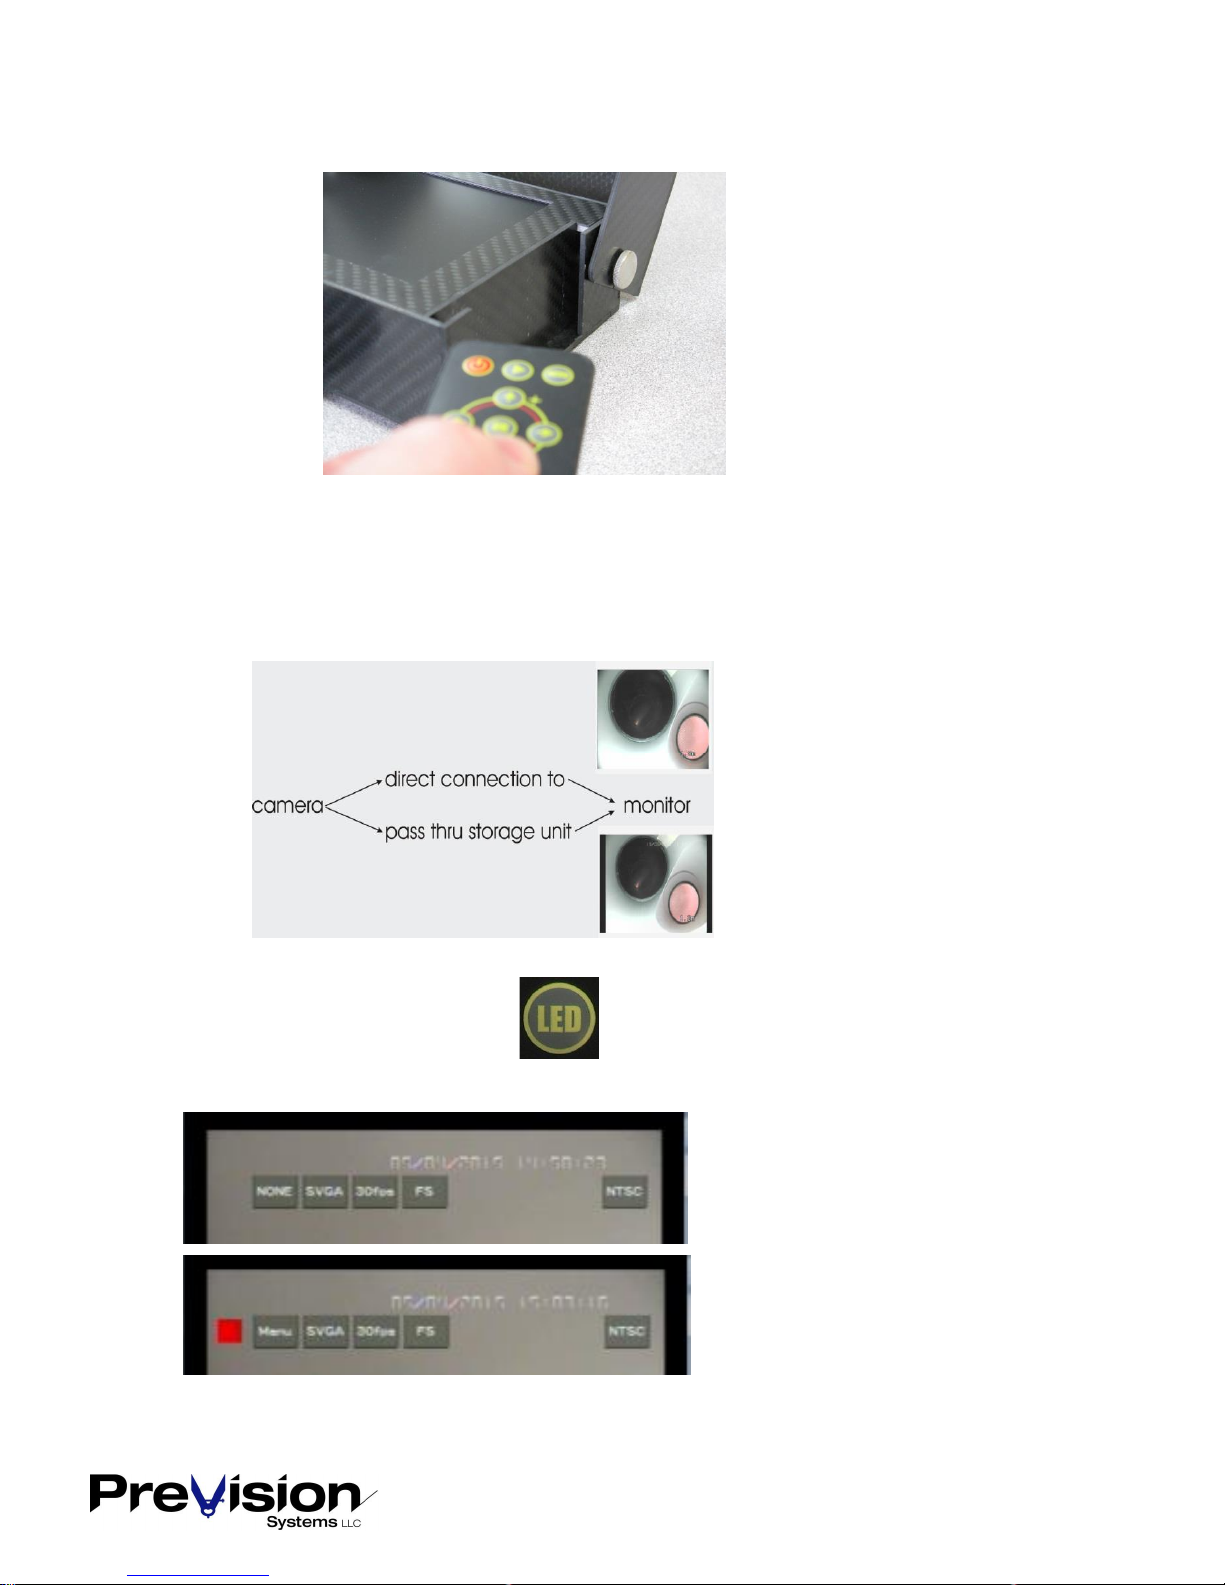
To operate the remote control, press the remote Button for a short time, you will hear a beep,
wait 2 seconds till the unit reacts.
Select one of two modes of video monitor
Press the LED Button on the
remote control unit to switch
between modes.
Note:
Point the remote control unit at the
IR receiver for best performance.
.
Live Mode
Video signal directly passed to the
monitor, results in best image & no
text overlay on top of the screen.
DVR Mode
Black bars on the left and right side of
the monitor, text overlay on top of
the screen.
Note:
Before starting to record, it is best to
be in DVR Mode where the overlay
145196B Page 4 of 15
can be seen and the recording
indicator can be confirmed.
Page 5
Recording a video
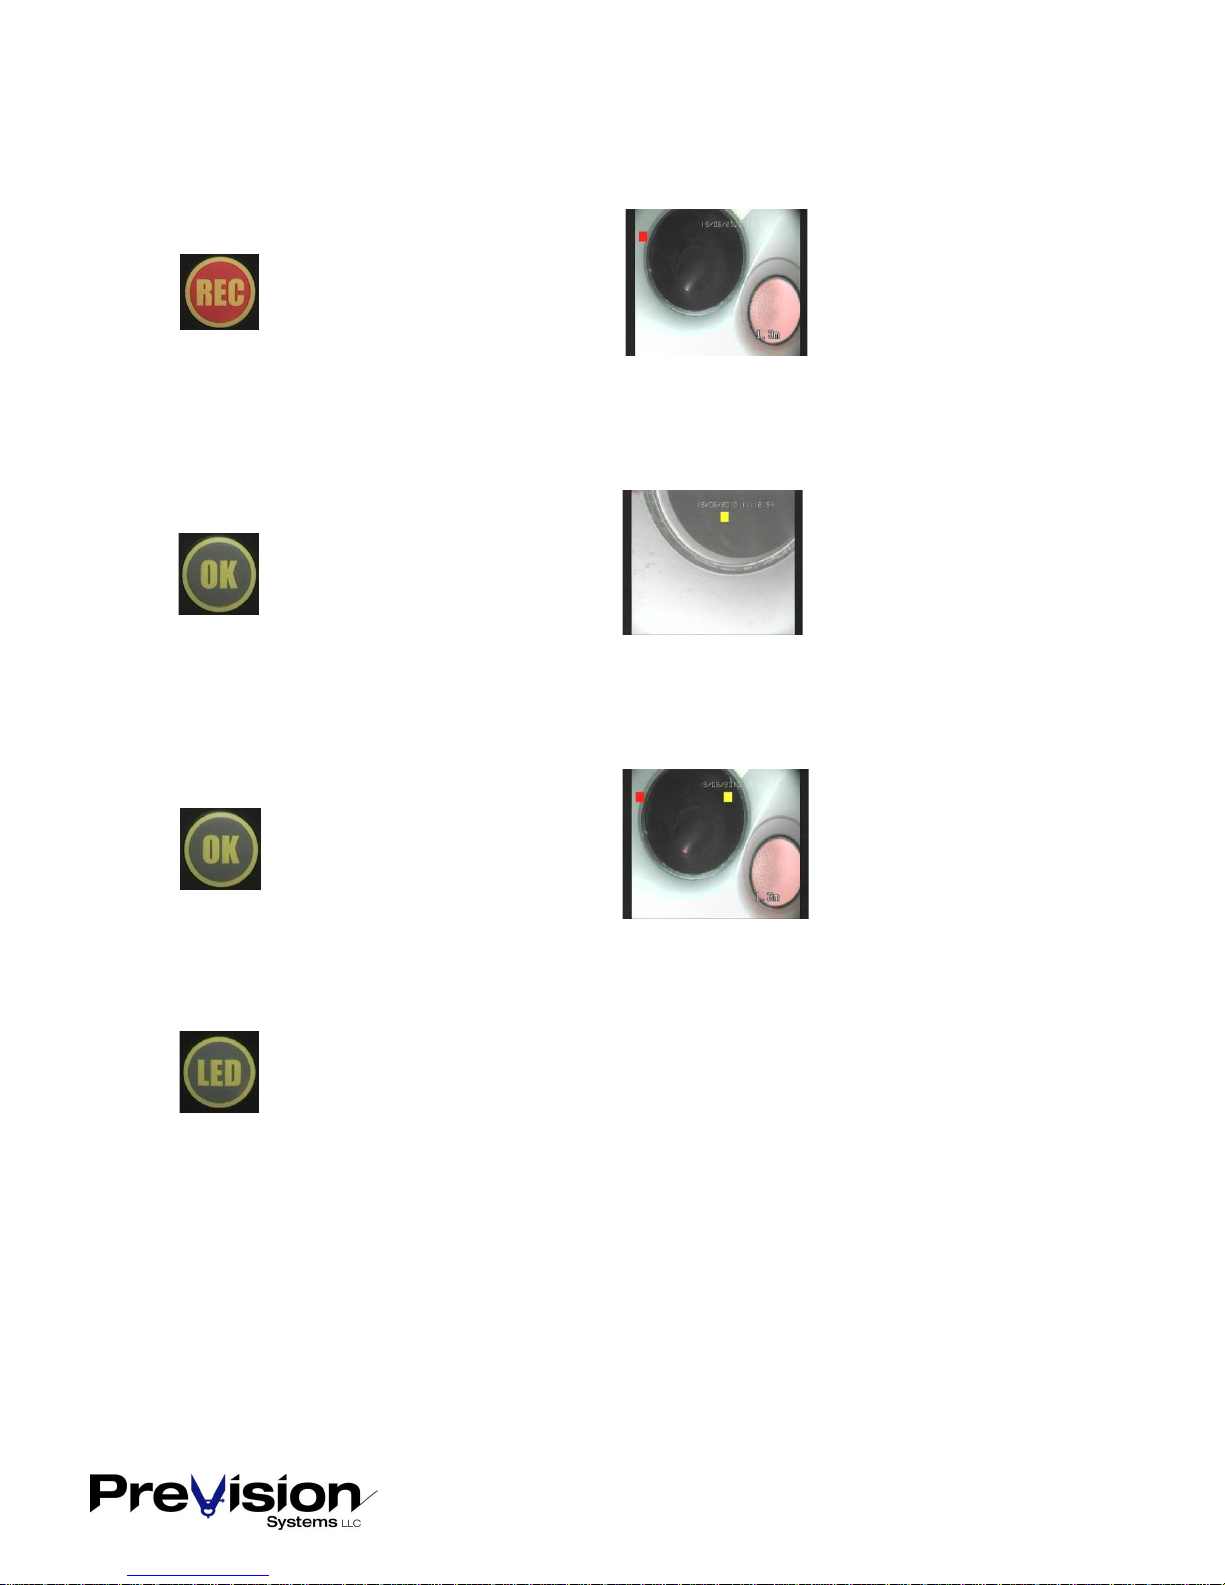
Press REC to start recording.
The red square indicates
that video is recording.
Press OK to save a Snapshot.
The yellow square
indicates that the Snapshot
is stored.
Press OK to save a Snapshot.
Shows both the red and
yellow square indicators.
Saving a Snapshot
Saving a Snapshot while video is recording
Note:
When you are sure you are recording properly, you may press the LED Button in order to get
the optimal image quality with a 4:3 ratio and no video overlays, to have an unfettered view
for inspection.
145196B Page 5 of 15
Page 6
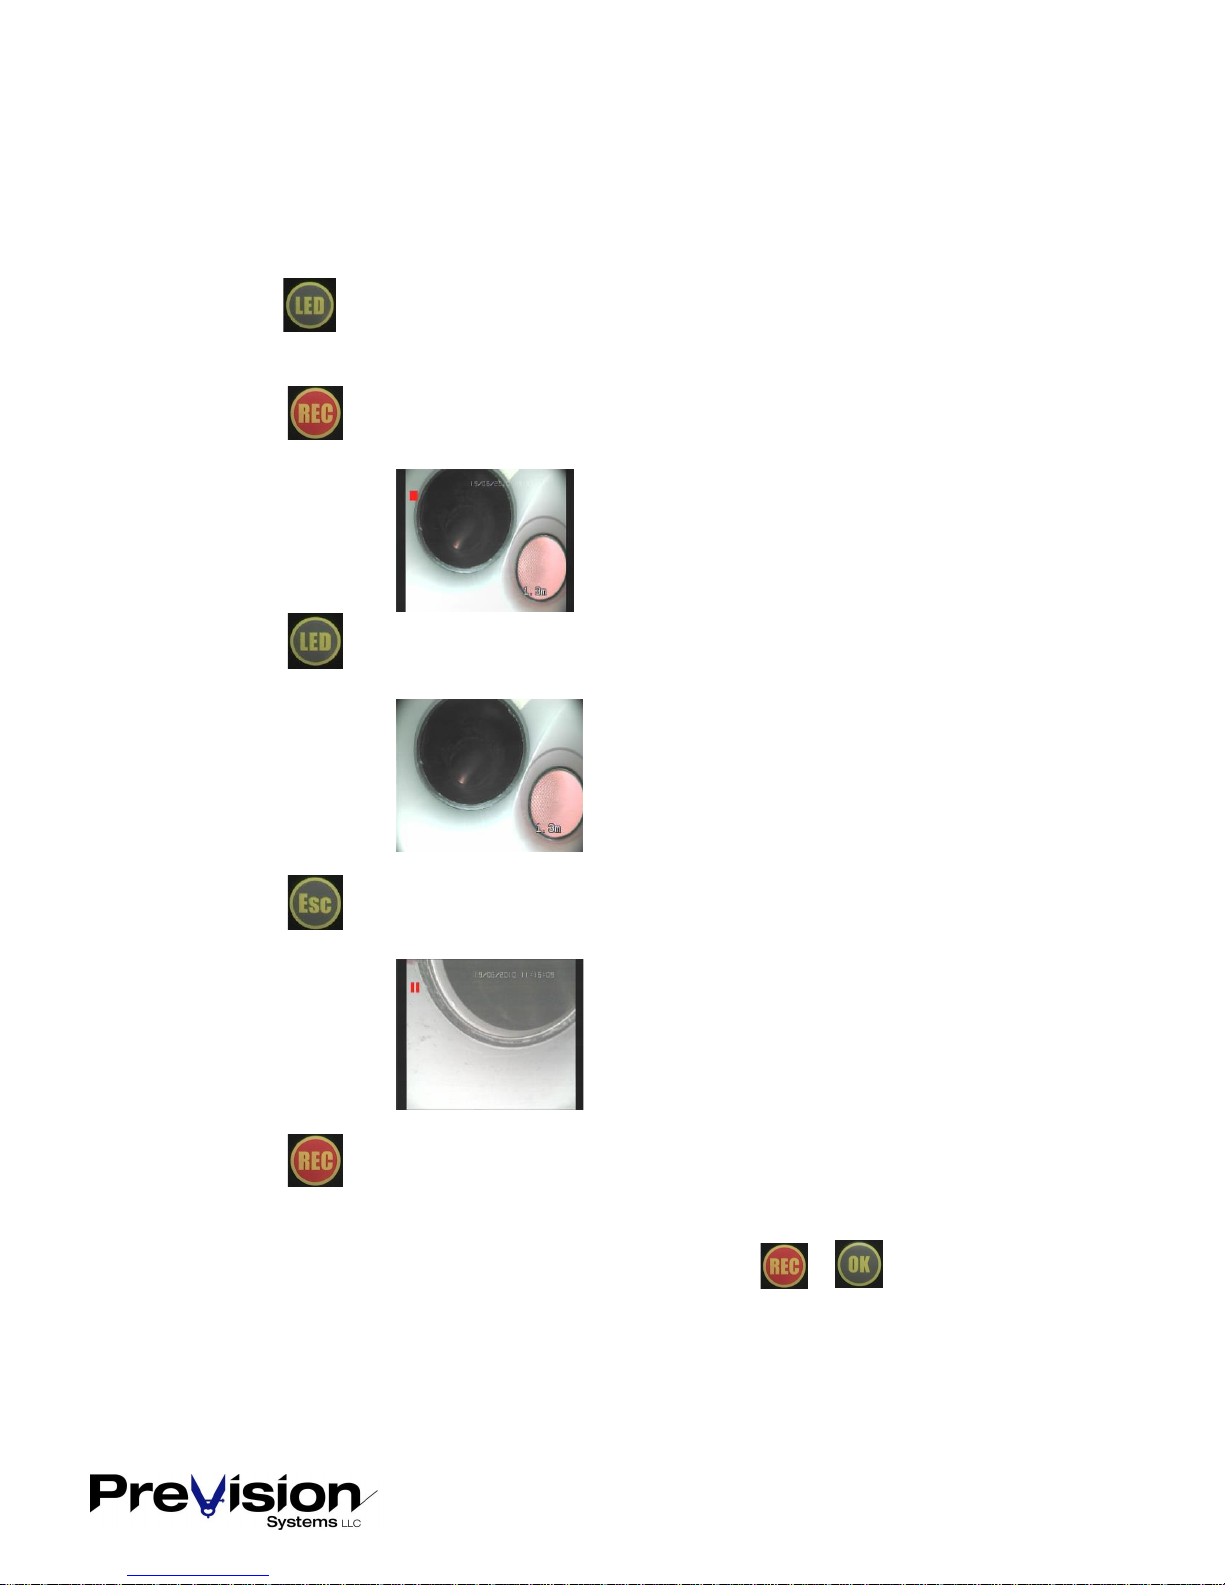
How to store a video
Press Button to toggle to DVR mode, you will see the image with the black bars on the left and right
side.
Press Button to start recording. As soon as recording starts, the red square will appear near the
upper left edge.
Press Button in order to achieve a better (4:3) image, toggles to the direct camera connection.
Although the red square is now not visible, the DVR is still recording.
Press Button to pause the video recording, two red bars will appear where the square was.
Storage of the video is paused until Esc is pressed again.
Press Button to stop video recording and complete the file on the SD card.
NOTE: Whether the image is in Live Mode or DVR Mode;
The video displayed is passed through to the DVR unit. Once you press or , the video
recording or Snapshot saving will be started.
145196B Page 6 of 15
Page 7
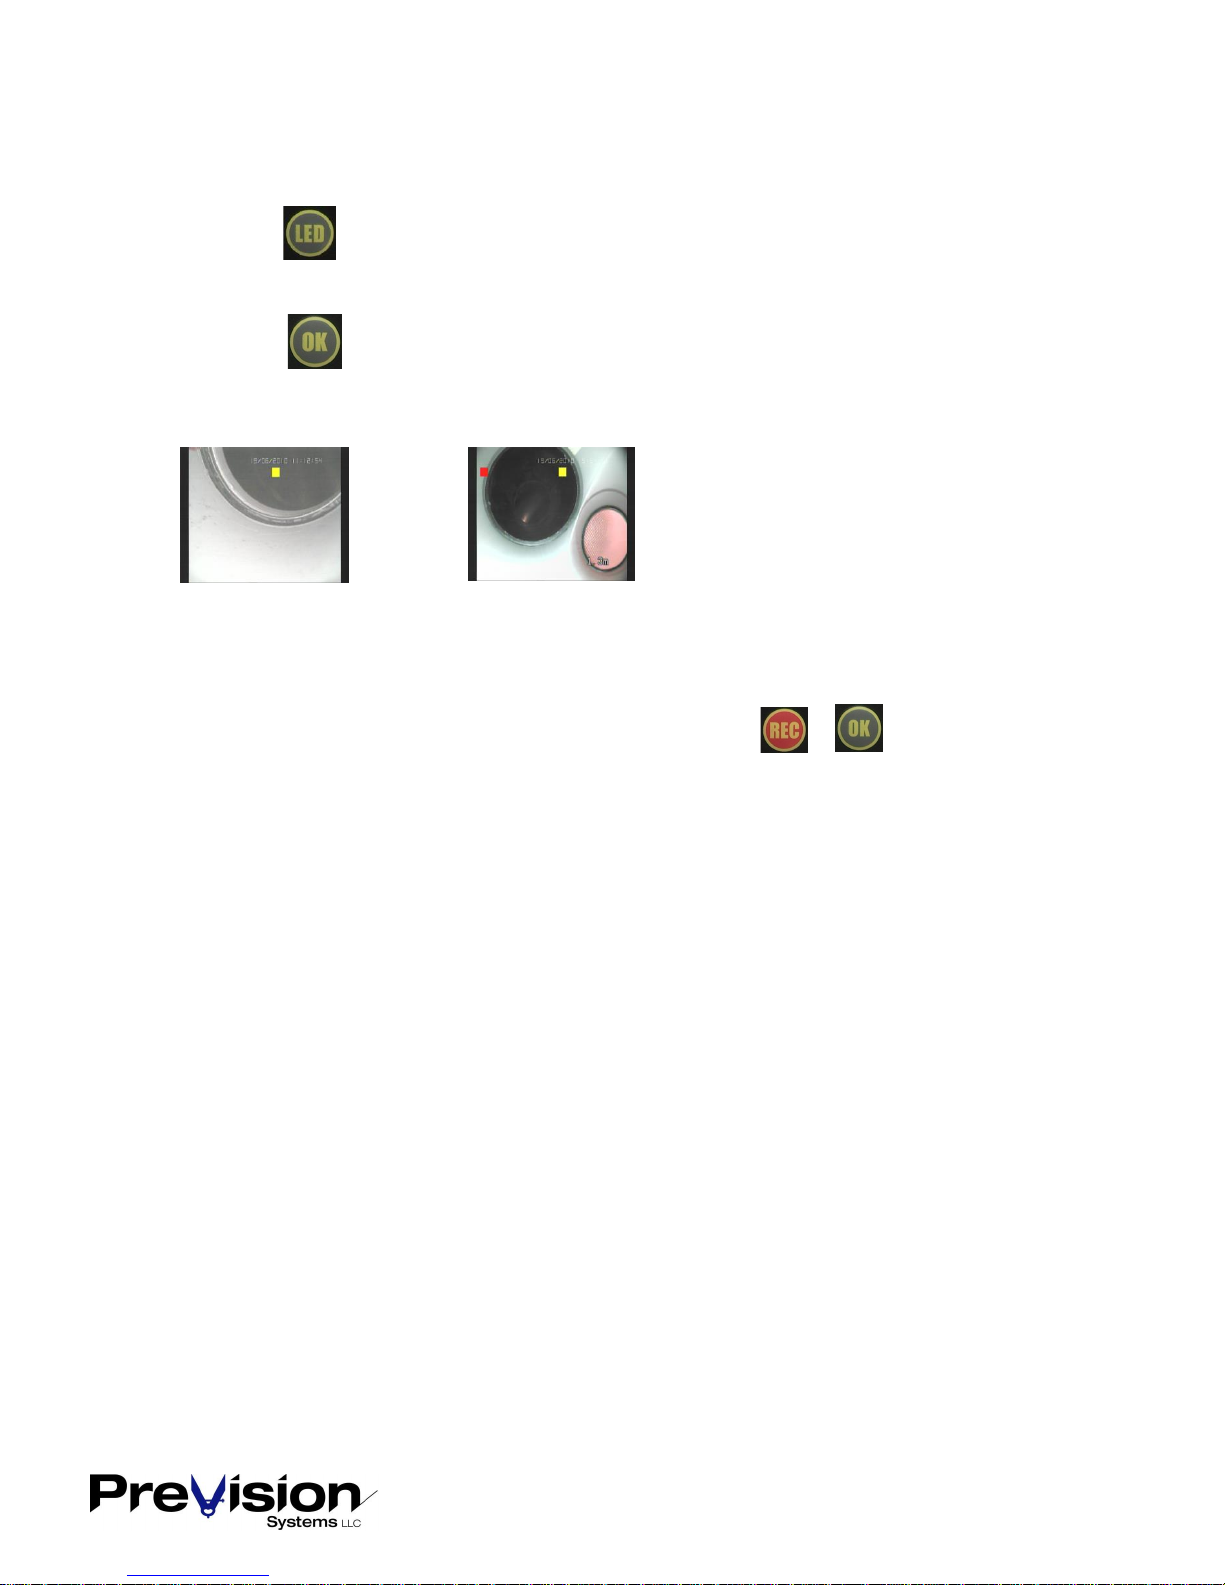
How to store a Snapshot
Press Button to toggle to DVR mode, you will see the image with the black bars on the left and right
side.
Press Button press to save a Snapshot.
When the Snapshot is stored a yellow square is displayed in the middle of the screen.
Storing Snapshot Storing Snapshot while video is recording.
Note: Storing a Snapshot while a video is recording will pause the video recording for about 2 seconds.
Note: Whether the video is in Live Mode or DVR Mode;
The video displayed is passed through to the DVR unit. Once you press or , the video
recording or Snapshot saving will be started.
145196B Page 7 of 15
Page 8
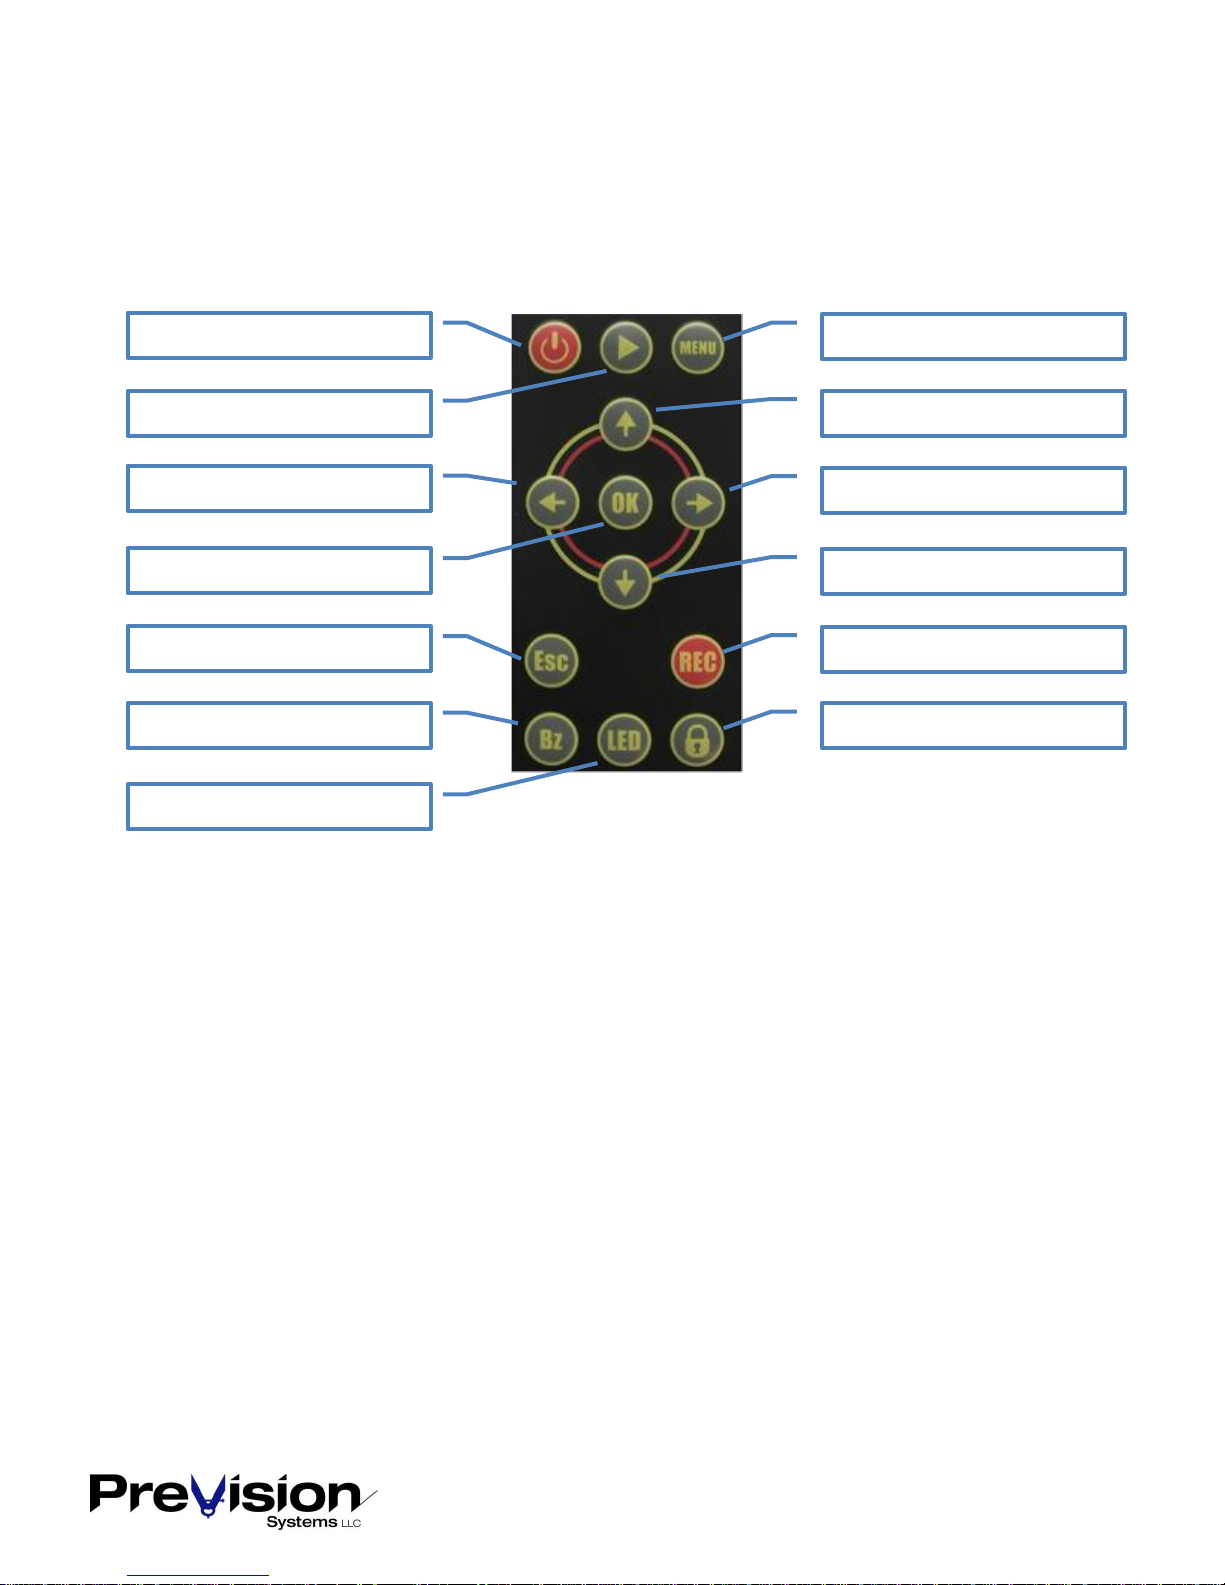
Remote Control Unit
System Settings
Up
Right
Start/Stop Recording
Not Used
Down
Not Used
Playback
Left
Snapshot / Enter
Back / Pause Rec
Toggles Button Beep
Toggle Live / DVR Mode
145196B Page 8 of 15
Page 9
File system of the stored images and videos
Filename of image or video
Images and videos will be stored with the filename “TYYYYMMDDhhmmss“
YYYY year
MM month
DD day
hh hour
mm minute
ss second
File extensions
Images have the extension *.BMP
Videos have the extension *.AVI
File folder
Images are stored sequentially in the folder “PICTURES“
Videos are stored in the folder “HVR“
Sub-folder “MMDD“ (MM=month, DD=day)
Sub-folder “hh“ (hh=hour, in which the storage was started)
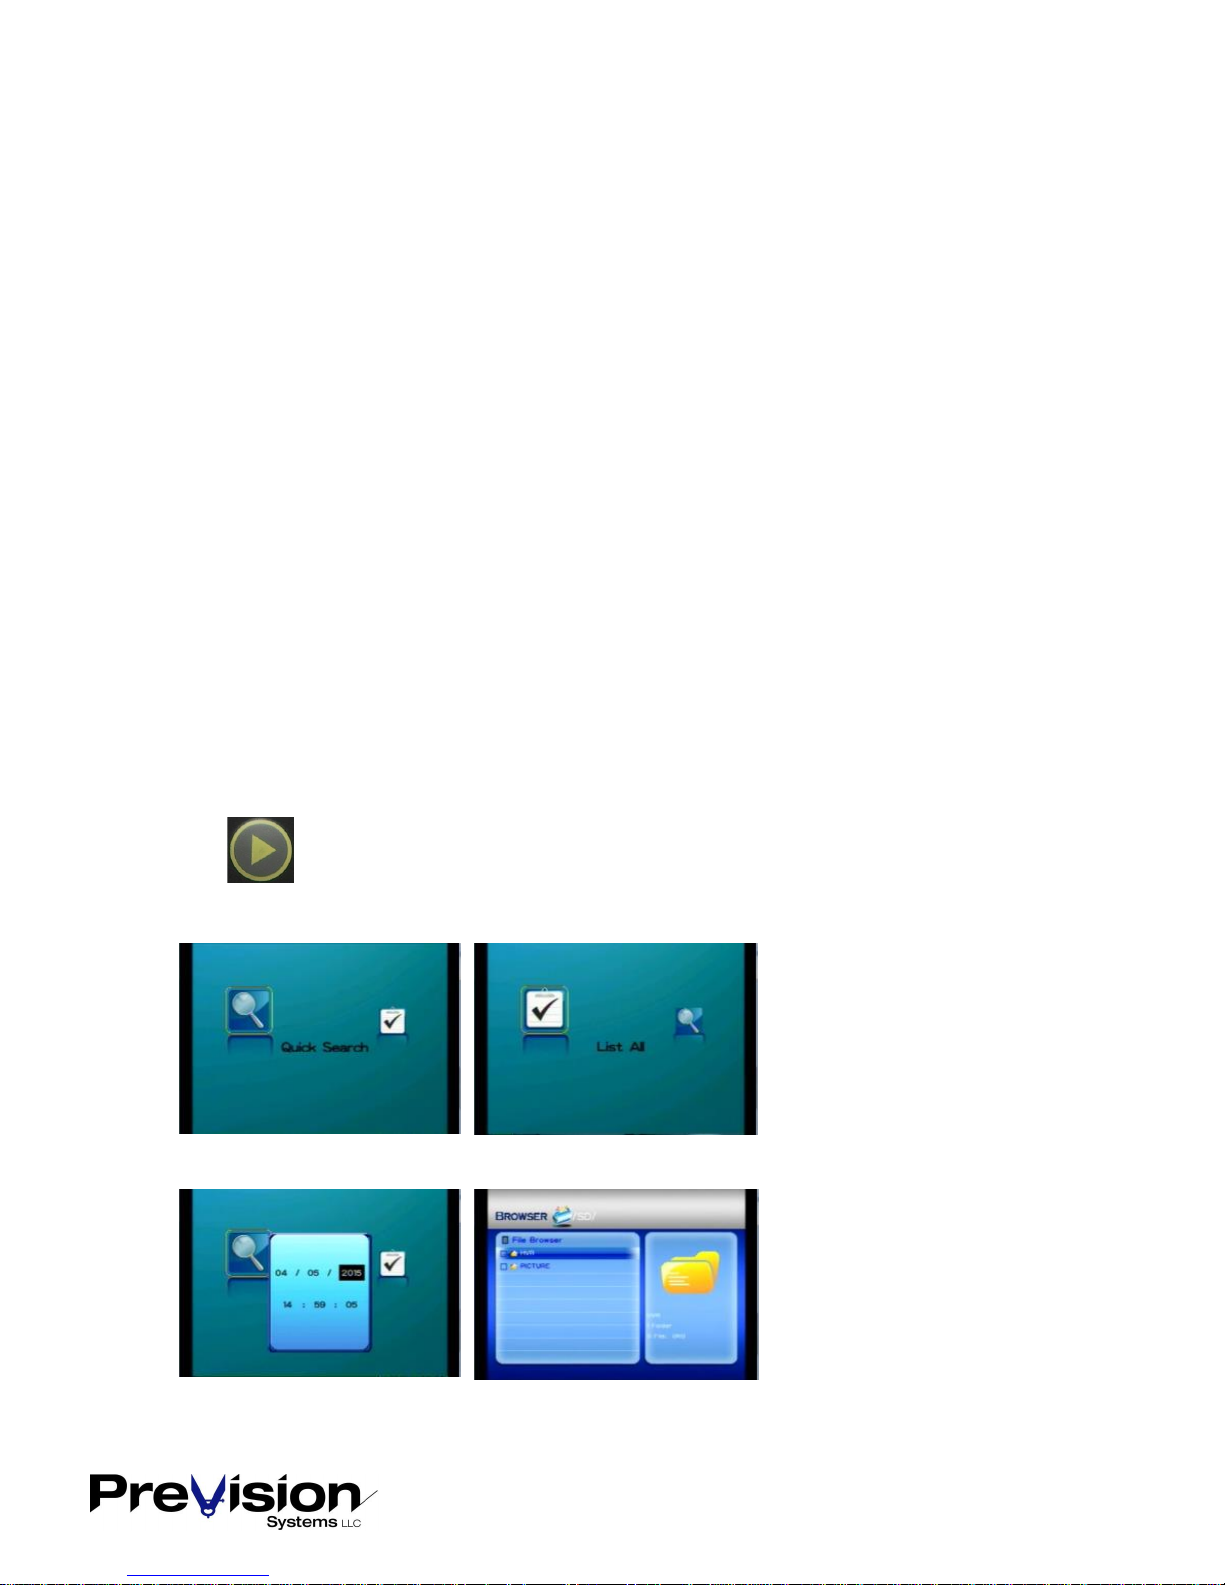
Preview of videos / images
Press to enter the preview menu
Search according to storage date or List All.
According to date, time. List All Browser
145196B Page 9 of 15
Page 10
File Navigation
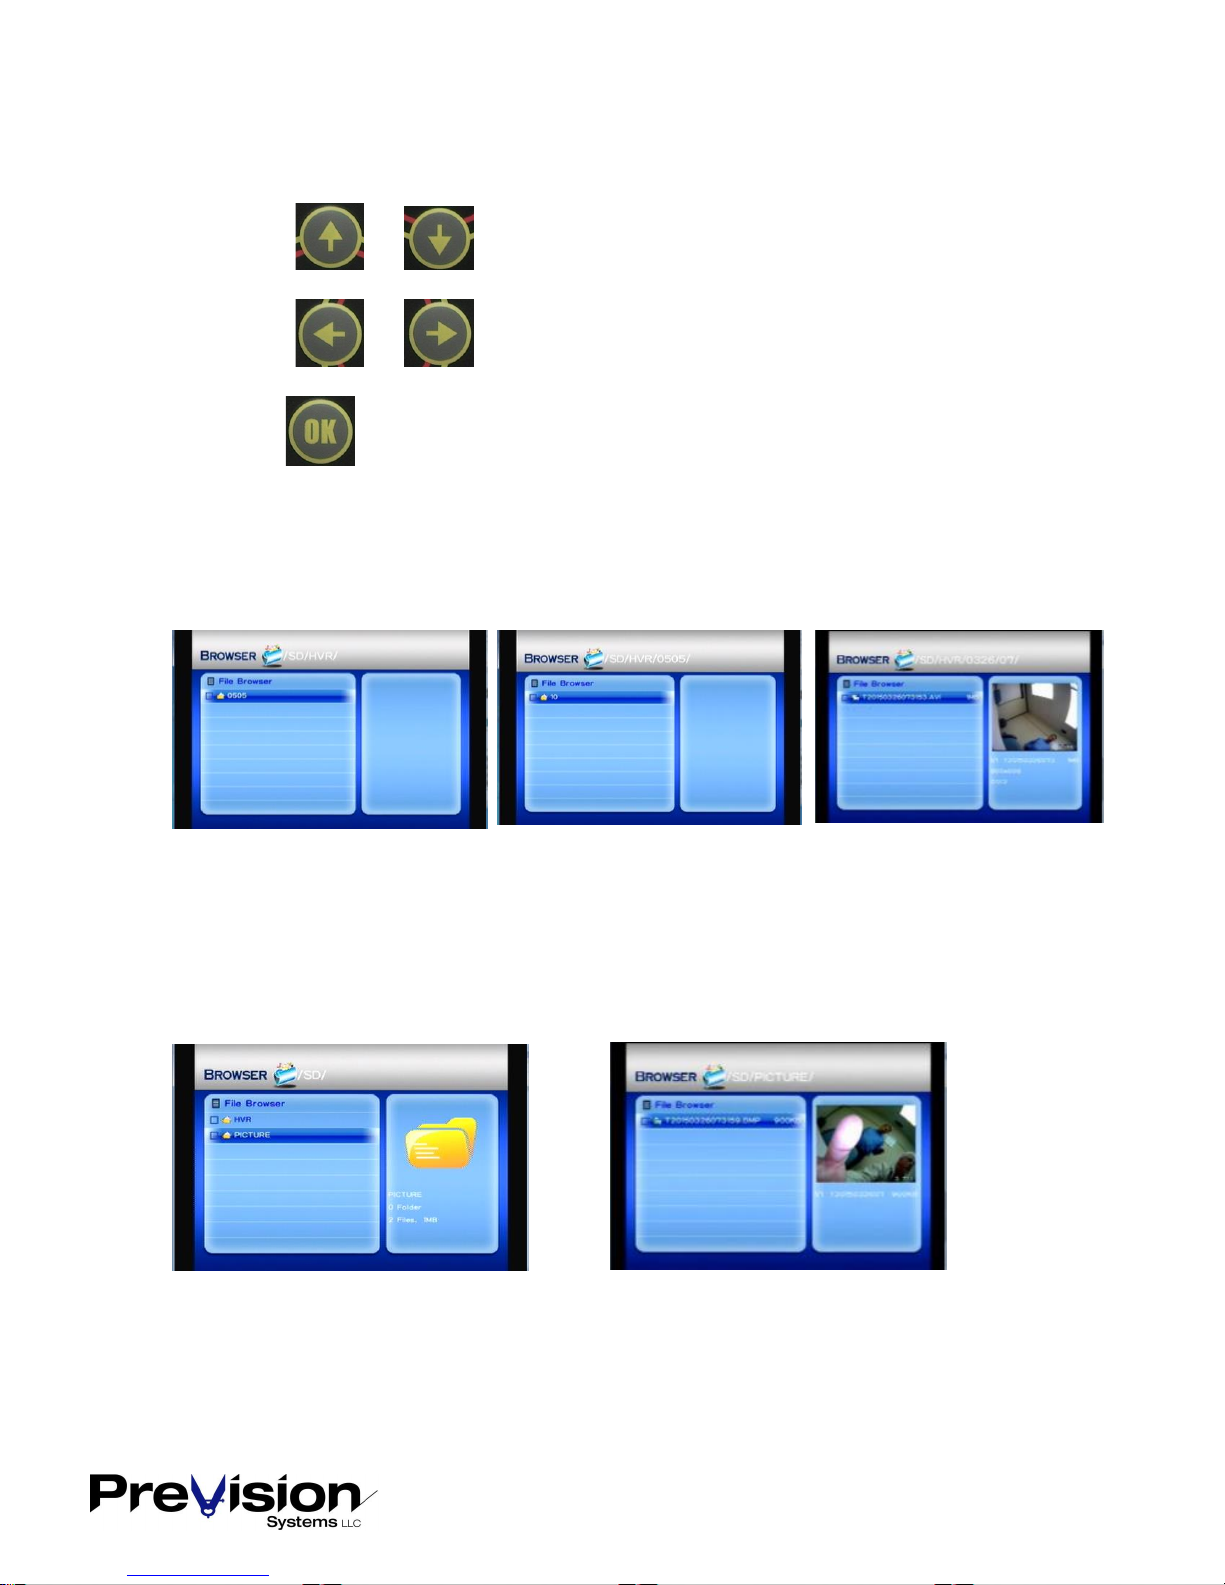
Press Buttons and to go to prior or next image.
Press Buttons and to go to top or bottom of list.
Confirm with .
Selecting a Video file
To navigate to the videos, you have to select the HVR folder, then 2 levels of sub folders first.
Folder date, then folder time, then the video file.
Selecting a Picture file
To navigate to the pictures, you have to select the PICTURE folder, then the file.
145196B Page 10 of 15
Page 11
System Menu
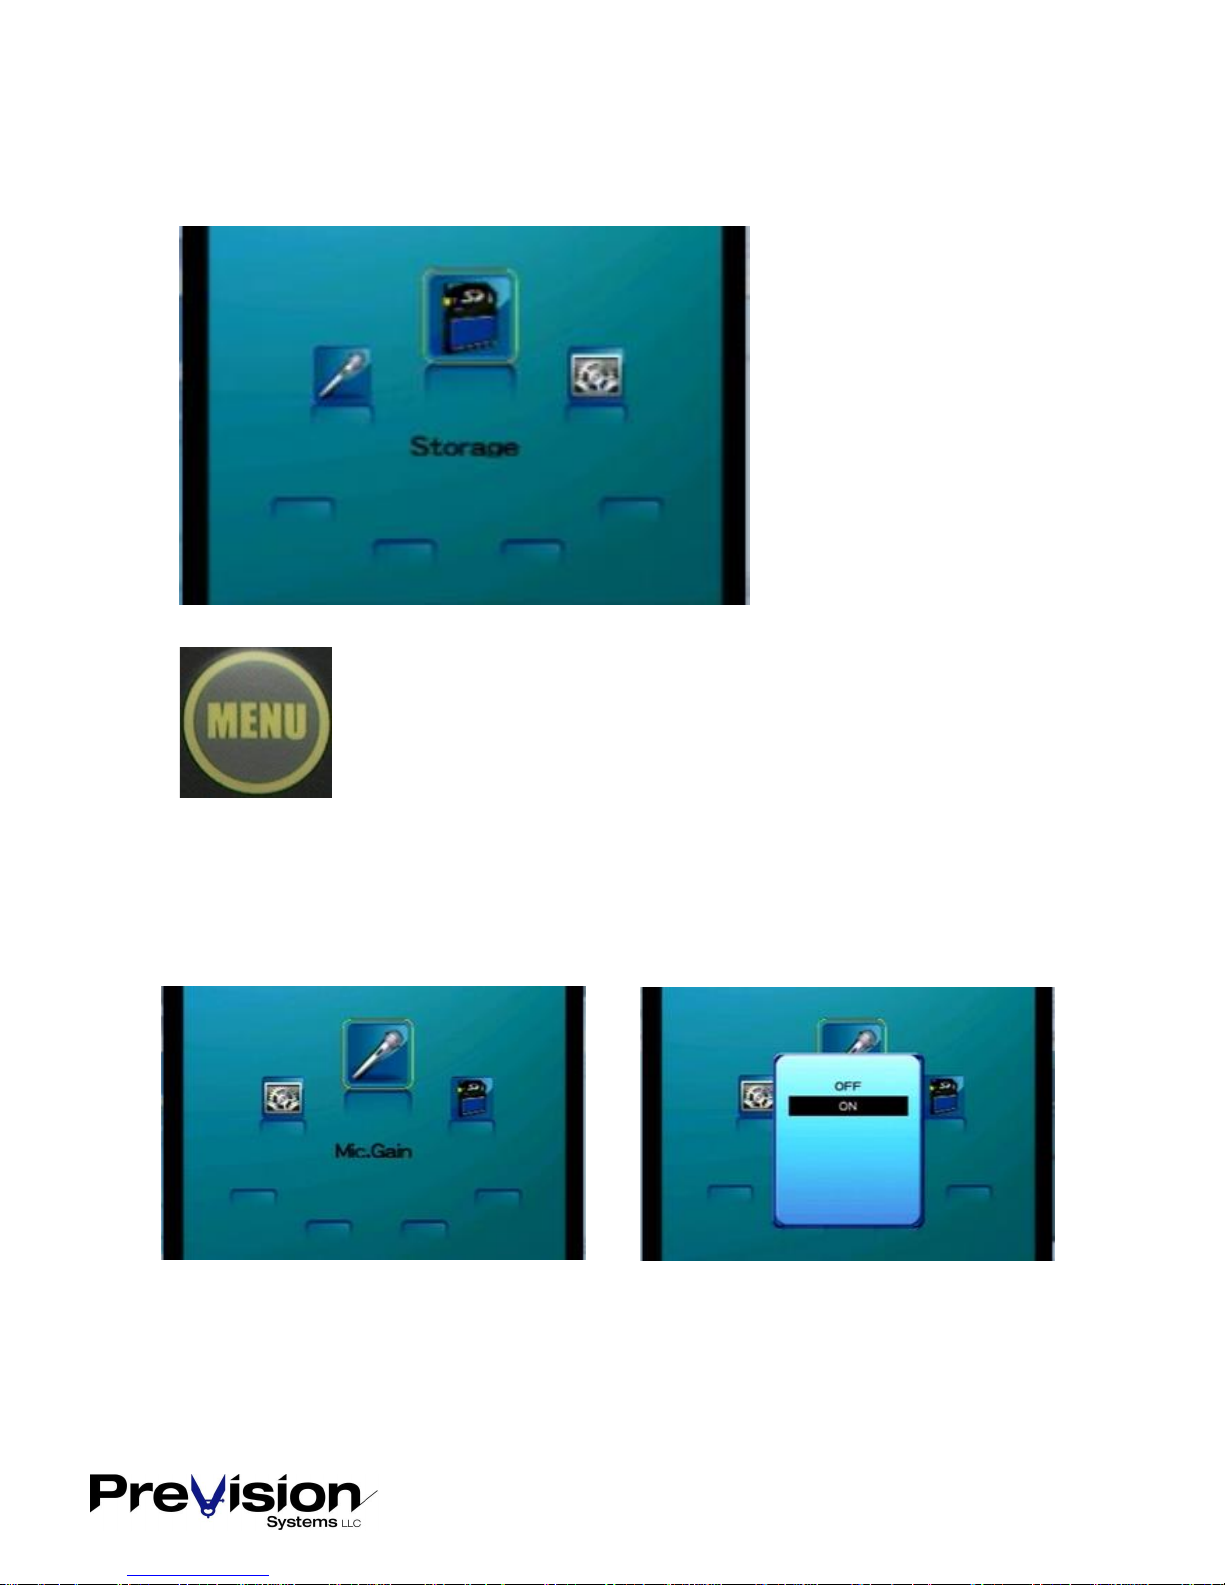
Press the MENU Button to access the 3 submenu items;
Mic.Gain
Storage
System Settings
Microphone Gain
This selection turns the audio microphone on and off.
145196B Page 11 of 15
Page 12
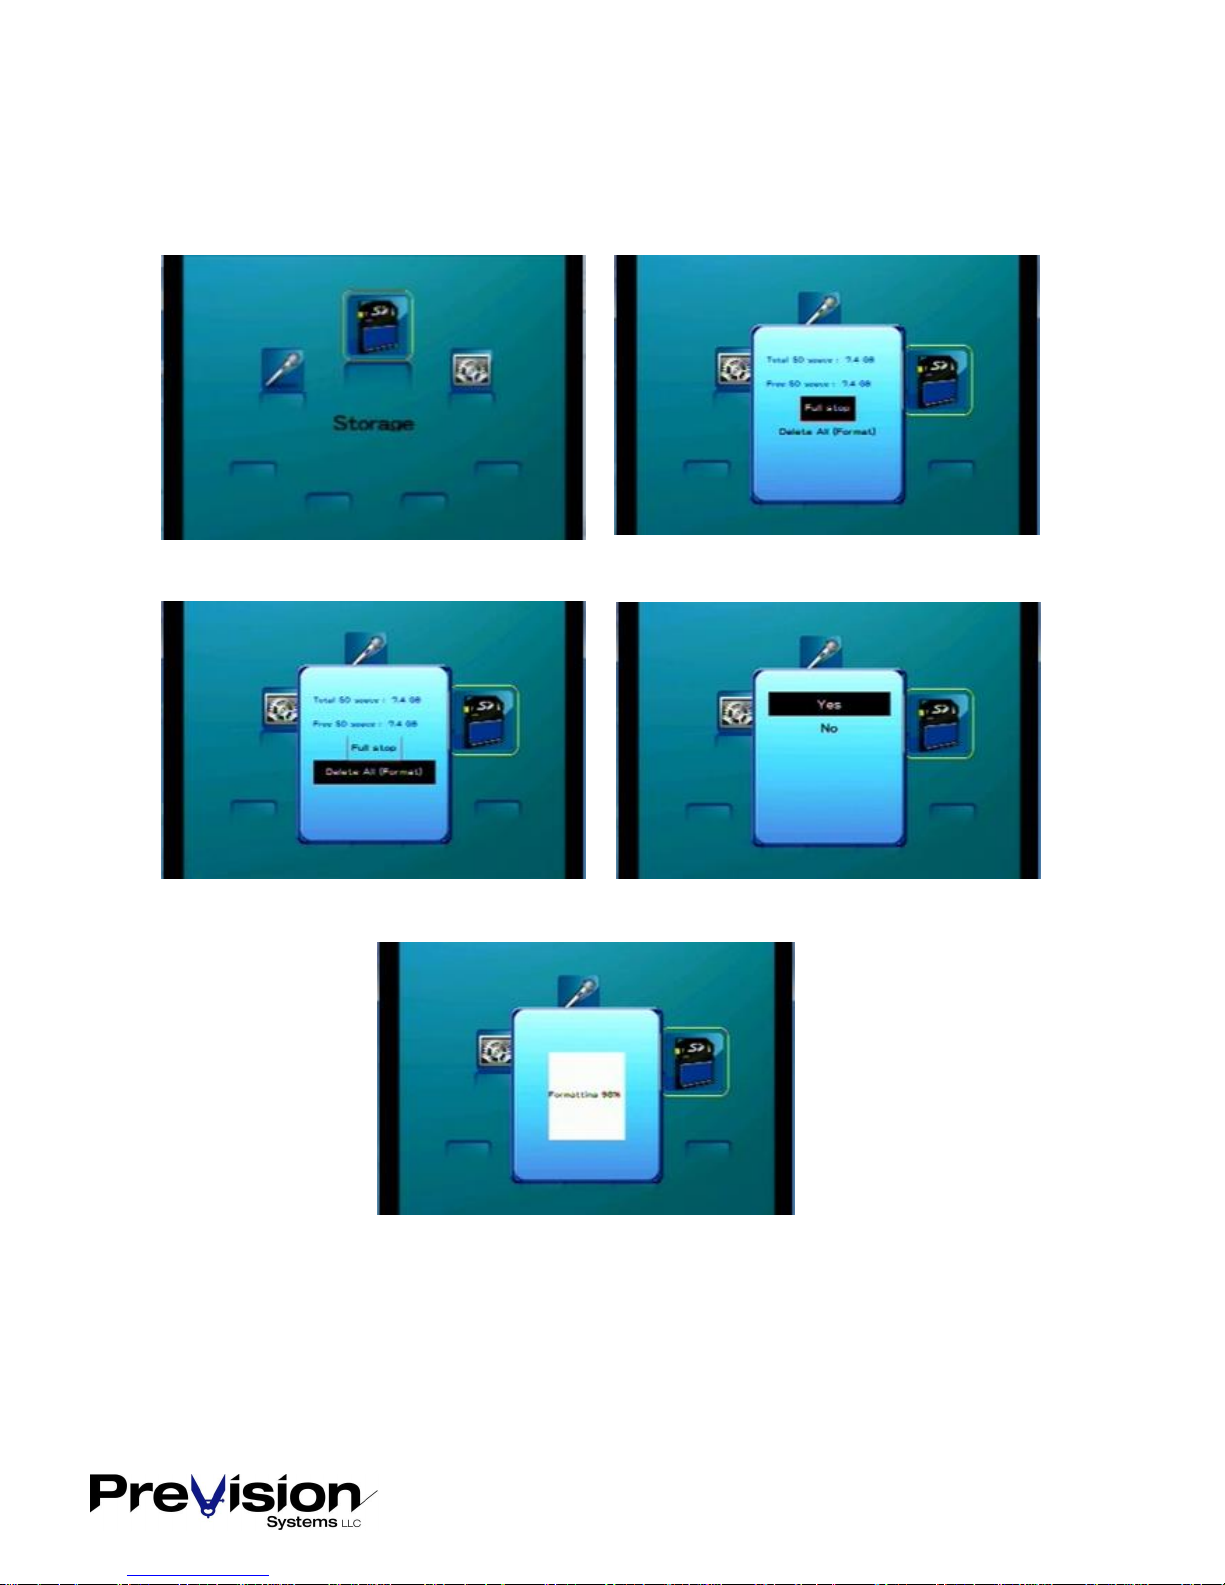
Storage
This selection allows SD Card stopping for Eject and SD Card formatting.
145196B Page 12 of 15
Page 13
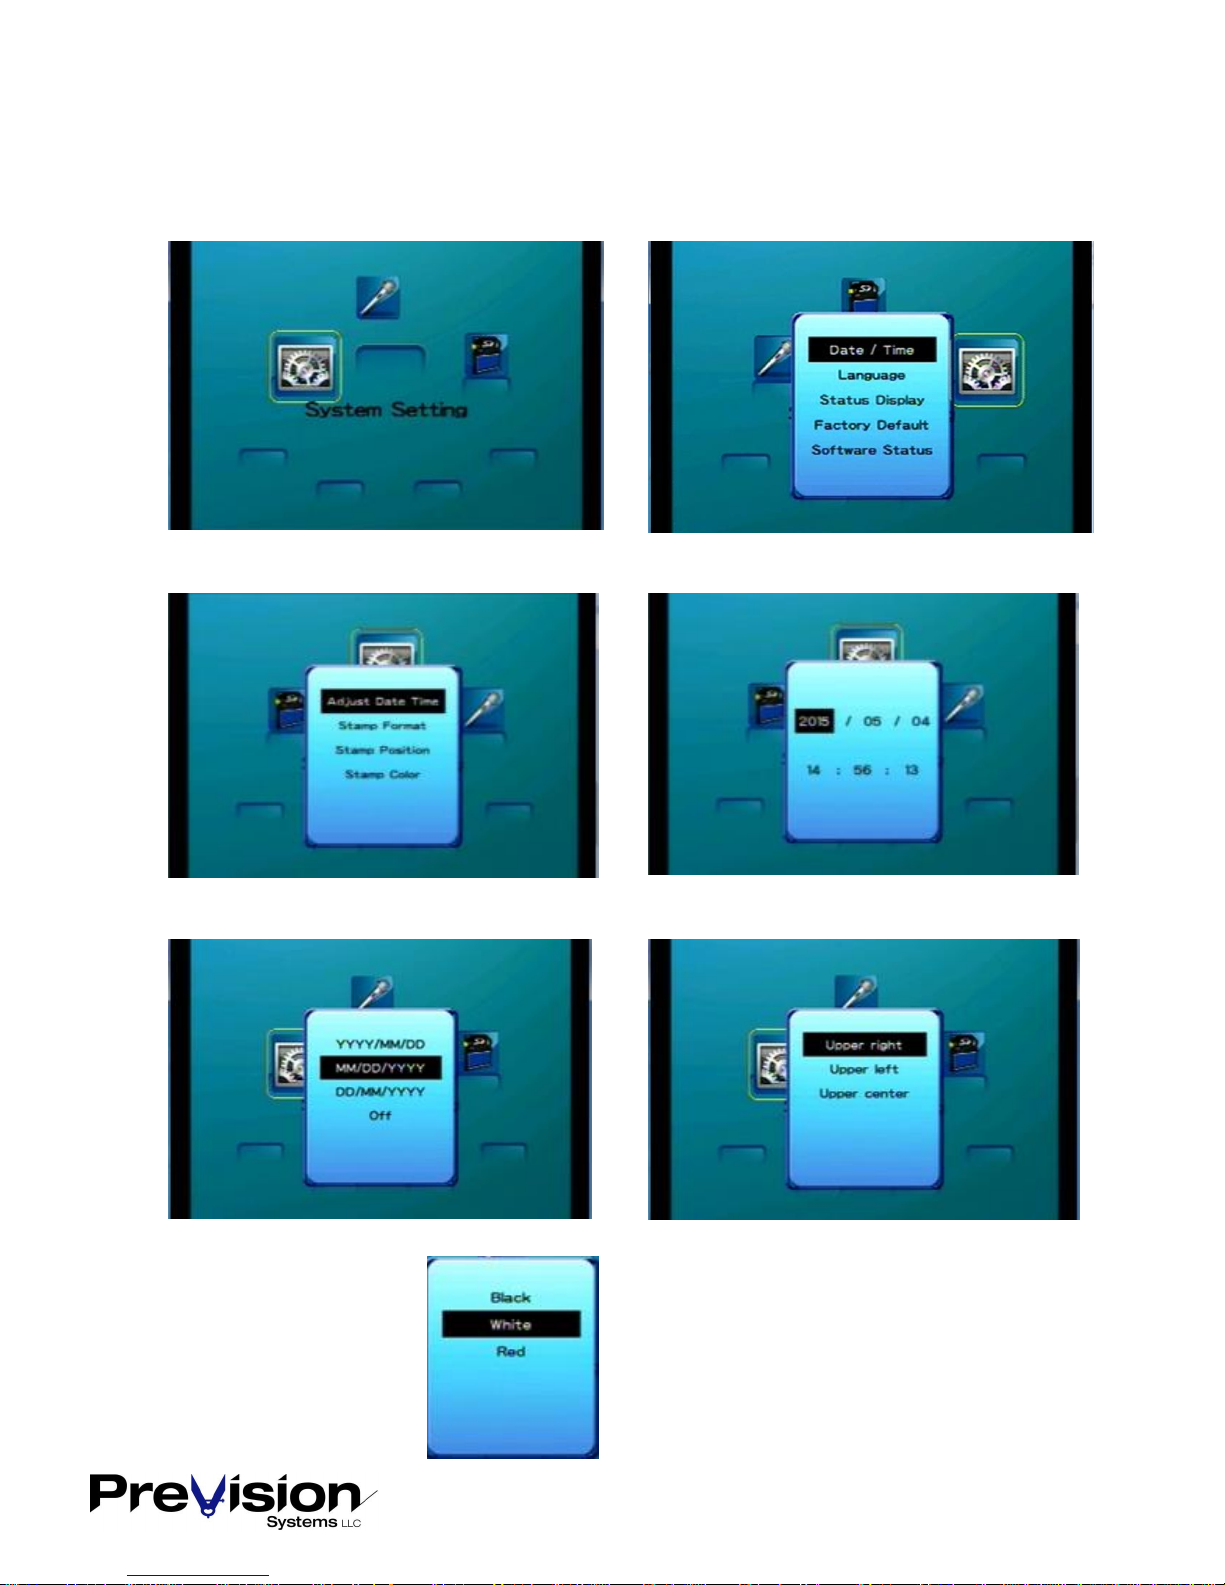
System Settings
Control of Date, Time, Language, Display, Factory Reset, Firmware Update
Setting the date and time clock.
Setting the Date format. Setting the Date/Time Position.
Setting the Date Color.
145196B Page 13 of 15
Page 14
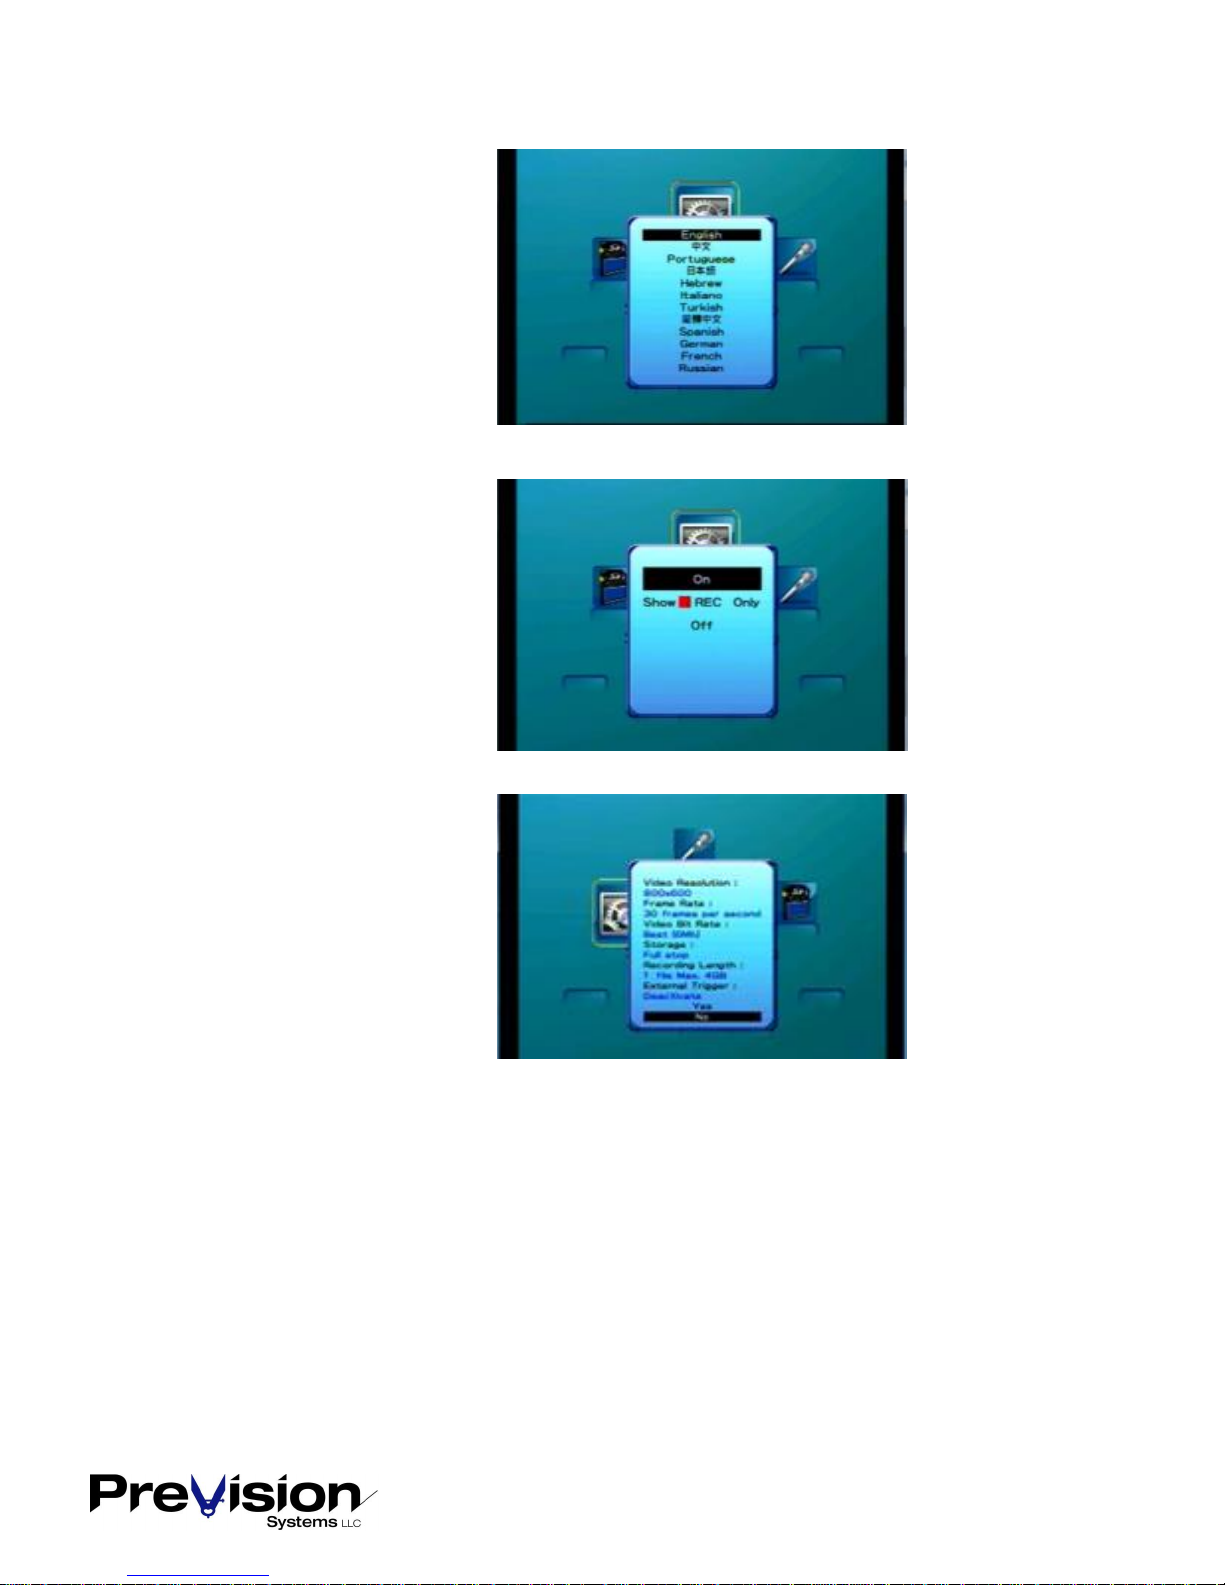
Language Selection
Display of Status
On, Off or only when recording
Factory Default
Resets to original settings
145196B Page 14 of 15
Page 15
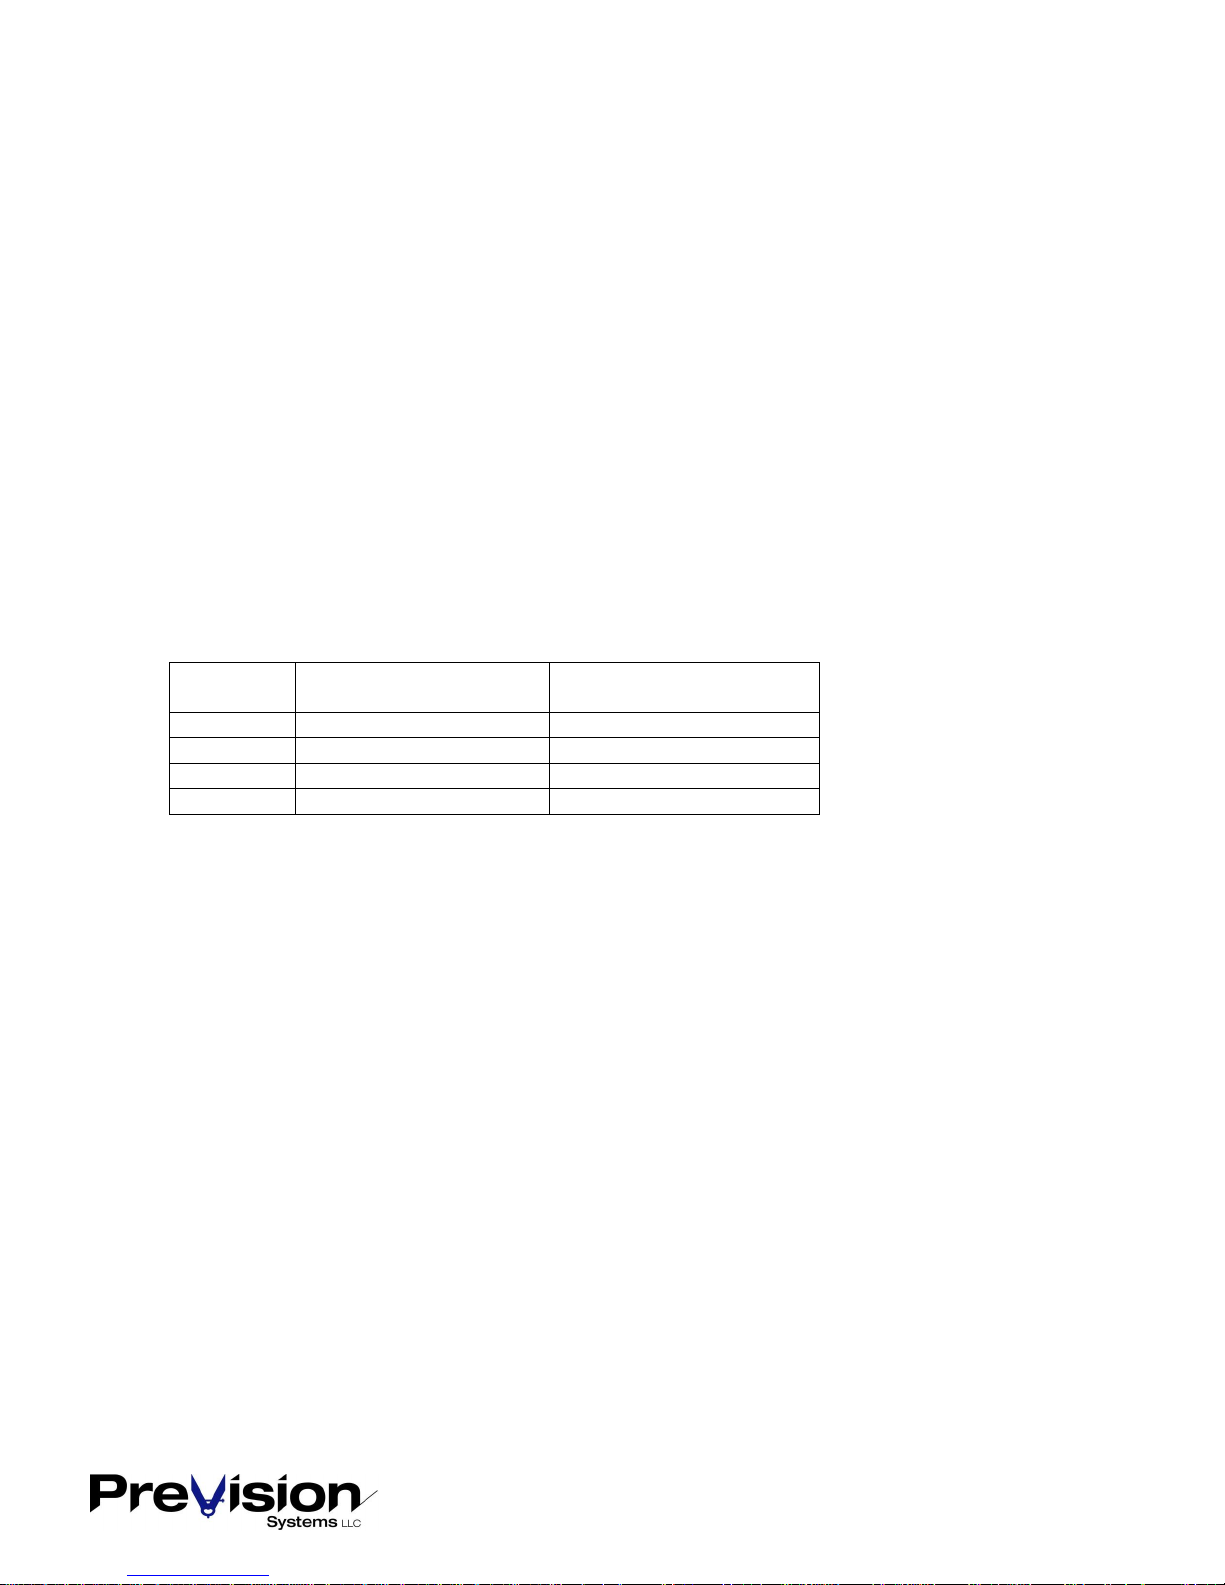
SD card
capacity
720 x 480 @ 30 fps
720 x 480 @ 25 fps
(NTSC)
(PAL)
1 GB
2 hrs.
2.4 hrs.
8 GB
16 hrs.
19.2 hrs.
16 GB
32 hrs.
38.4 hrs.
Specifications
Video Compression MPEG4, WMP compliant
Video System NTSC/PAL
Video Resolution 800x600 / 720x480
Frame Rate 1, 2, 3, 5, 13/15, 25/30fps
Video Quality Best / Better / Fair
Snapshot Image 640 x 480 pixel x 24 bit BMP file
Clock Battery Lasts for 3 months w/o power supply
Power Supply 12V DC
Storage Media SD / SDHC up to 16GB
IR remote control battery 3V lithium
Operating Temperature 0~+50°C
Recording time of memory capacity
145196B Page 15 of 15
 Loading...