

Page 1

electric Stirring Popper
• Big 6-quart capacity makes enough for the entire
family. Pops smaller batches too.
• Built-in melter distributes butter over corn as it pops.
• Cover flips over after popping for use as a serving bowl.
Estas instrucciones también están disponibles en español.
Para obtener una copia impresa:
• Descargue en formato PDF en www.GoPresto.com/espanol.
• Envíe un mensaje de correo electrónico a contact@GoPresto.com.
• Llame al 1-800-877-0441, oprima 2 y deje un mensaje.
Visit us on the web at www.GoPresto.com
INSTRUCTIONS
2015 National Presto Industries, Inc.
This is a Listed appliance. The following important safeguards are recommended by most portable appliance manufacturers.
IMPORTANT SAFEGUARDS
To reduce the risk of personal injury or property damage, when using electrical appliances, basic safety precautions should always be
followed, including the following:
1. Read all instructions before using the popcorn popper.
2. A popper that is plugged into an outlet should not be left unattended.
3. Do not touch hot surfaces. Use handles or knobs.
4. To protect against the risk of electrical shock, never put the cord, plug, or popper base in water or other liquids.
5. Close supervision is necessary when any appliance is used by or near children.
6. Unplug from outlet when not in use and before cleaning. Allow to cool before putting on or taking off parts and before cleaning
the appliance.
7. Extreme caution must be used when unloading popcorn. Always turn the unit over a countertop so that residual hot oil or water
running out will not cause burns.
8. Do not operate any appliance with a damaged cord or plug or in the event the appliance malfunctions or has been damaged in
any manner. Return the appliance to the Presto Factory Service Department for examination, repair, or electrical or mechanical
adjustment.
9. The use of accessory attachments not recommended or sold by the appliance manufacturer may cause injuries.
10. Do not let cord hang over edge of table or counter or touch hot surfaces.
11. Do not use outdoors.
12. Do not place on or near a hot gas or electric burner or in a heated oven.
13. Extreme caution must be used when moving an appliance containing hot oil.
14. Do not use appliance for other than intended use.
SAVE THESE INSTRUCTIONS
THIS PRODUCT IS FOR HOUSEHOLD USE ONLY.
1
Page 2
WARNING! FOR CALIFORNIA RESIDENTS
State of California Proposition 65 requires that we include the following warning:
This product contains a chemical known to the State of California to cause cancer and birth defects or other reproductive harm.
Important Cord Information
This appliance has a polarized plug (one blade is wider than the other). To reduce the risk of electric shock, this plug is intended to fit
into a polarized outlet only one way. If the plug does not fit fully into the outlet, reverse the plug. If it still does not fit, contact a qualified
electrician. Do not attempt to modify the plug in any way.
A short power supply cord (or cord set) is provided to reduce the risk resulting from becoming entangled in or tripping over a longer
cord. Extension cords may be used if care is properly exercised in their use. If an extension cord is used, the marked electrical rating of
the extension cord should be at least as that of the appliance. The extension cord should be arranged so that it will not drape over the
countertop or tabletop where it can be pulled on by children or tripped over.
Connect the power supply cord to a 120VAC electrical outlet only.
Before First Use
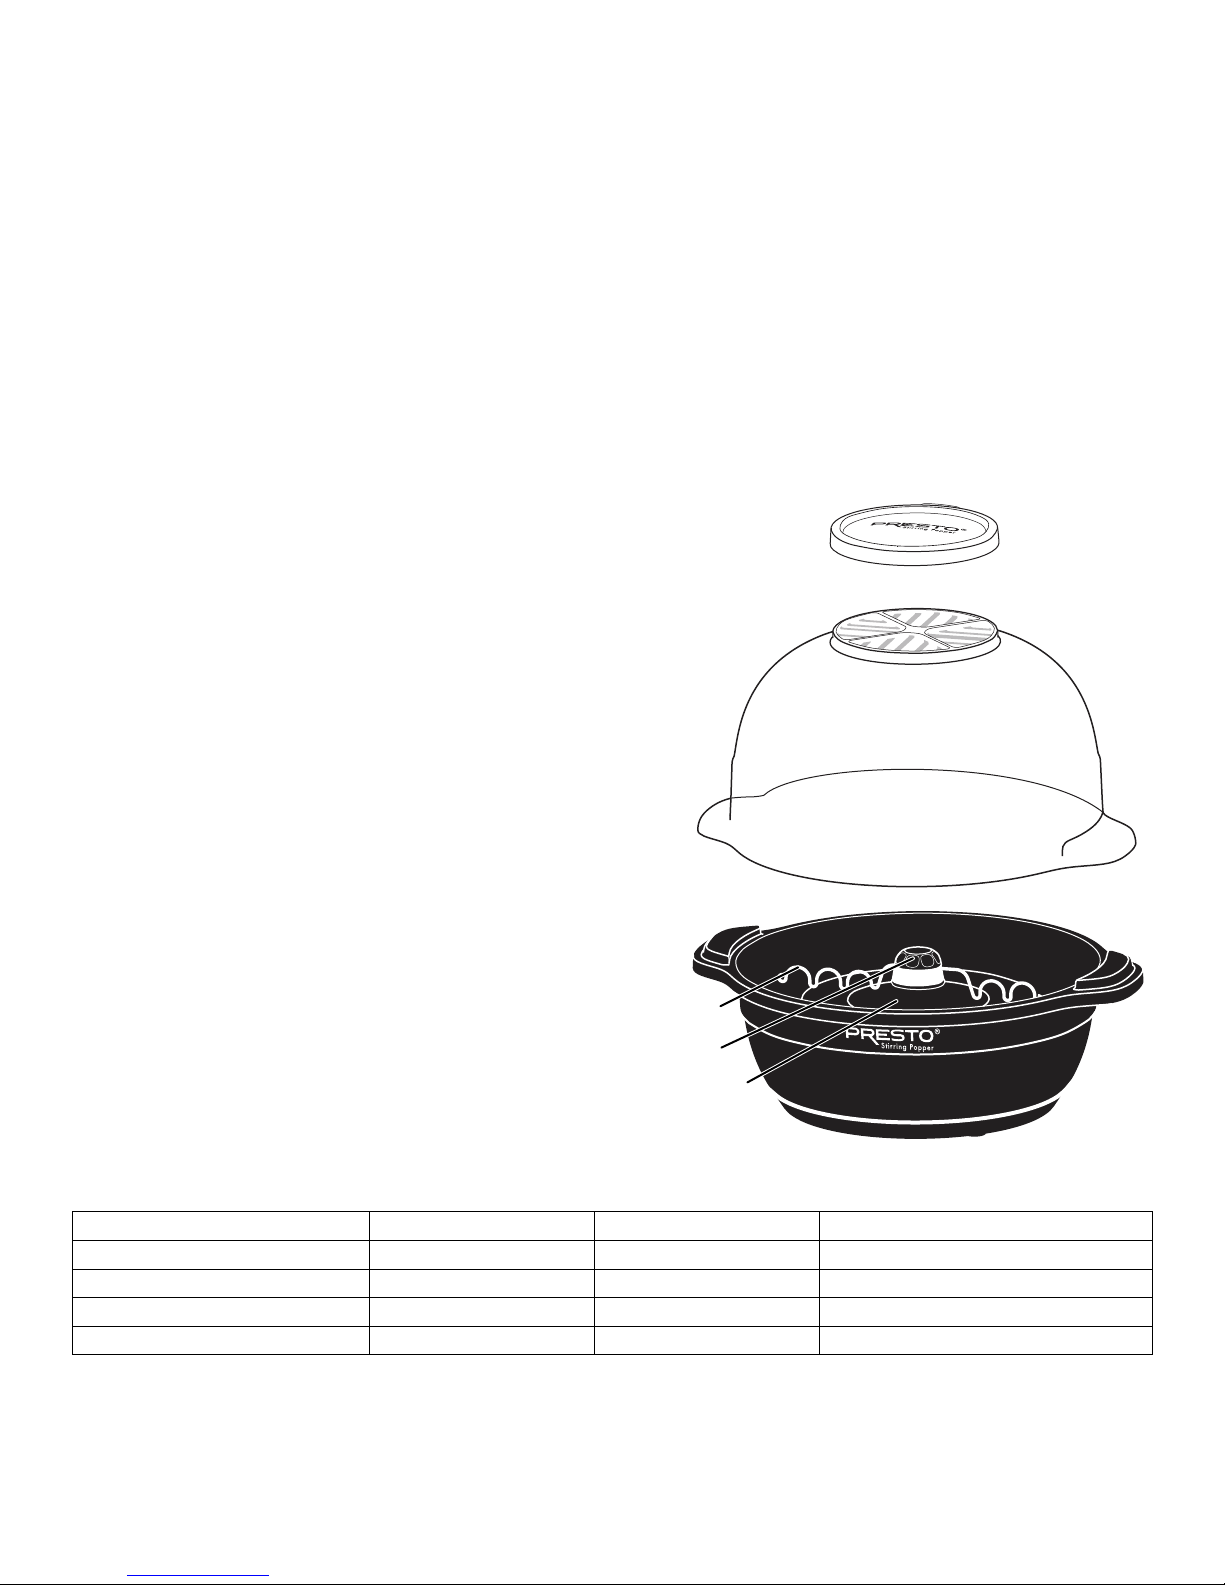
1. Become familiar with the various parts of the popper
(Fig. A). Read and follow the instructions carefully.
2. Prior to making your first batch of popcorn, clean
the components as follows:
Popper cover/serving bowl: Wash in warm, sudsy
water. Rinse and dry thoroughly. Do not wash in an
automatic dishwasher.
Popper base: Wipe the nonstick popping surface and
stirring arm and knob with a damp cloth.
WARNING! As with any motorized appliance, to
prevent water from damaging the motor or heating
element, the base of your popper should never be
filled with water, immersed in water or other liquid,
or washed in a dishwasher.
How to Use
Various quantities of popcorn can be made in the Presto
stirring popcorn popper. Refer to the chart below and
determine what size batch of popcorn you want. Use
the suggested amounts of popping corn, oil, and butter
for that amount.
CAUTION! Do not use more than the maximum recommended amounts of corn and oil. Failure to comply with
the manufacturer’s recommendations could damage the
popper and/or lead to unsafe operation.
Be sure unit is clean and dry before each use.
Fig. A
Popper cover/ serving bowl
Cover handles
Popper base handles
Scalloped stirring arm
Stirring arm knob
Nonstick popping surface
Butter melter cover
Butter melter
Popper base
Volume of Popped Corn* Popping Corn Oil for Popping Butter for Butter Melter (optional)
2 to 2½ quarts (8 to 10 cups) ⅓ cup 1 to 1½ tablespoons 1 tablespoon
3½ to 4 quarts (14 to 16 cups) ½ cup 1½ to 2 tablespoons 1½ tablespoons
5 to 5½ quarts (20 to 22 cups) ⅔ cup 2 to 2½ tablespoons 2 tablespoons
5½ to 6 quarts (22 to 24 cups) ¾ cup 2½ to 3 tablespoons 2½ tablespoons
* Volume of popped corn will vary depending on the type, quality, and freshness of the corn. In the chart above, there is a volume range for popped corn. The higher side
of the range is the volume produced when using fresh, gourmet, yellow popcorn, like Orville Redenbacher’s Gourmet Yellow Popping Corn. The smaller quantity is
the volume produced when using other types of corn. Yellow popcorn generally pops larger than white popcorn.
Orville Redenbacher’s and Gourmet are registered trademarks of ConAgra Foods RDM, Inc., used under license. Presto is not affiliated with ConAgra Foods RDM, Inc.
2
Page 3

1. Preheating the popper is not necessary. Following the chart at the bottom of page 2, pour the desired
amount of popping corn into the popper base, distributing it evenly around the loading area of the
nonstick popping surface (Fig. B). Then drizzle popping oil over the corn.
2. Place the popper cover/serving bowl over the popper base, fitting the cover handles onto the popper
base handles.
CAUTION! If the cover handles and the popper base handles are not aligned, hot kernels and oil
may be ejected from the popper during popping causing possible injury. In addition, cover damage
may occur.
3. Remove the butter melter cover (Fig. A, page 2) before popping corn. Failure to do so will result in soggy popcorn.
4. If buttered corn is desired, place softened butter onto the butter melter. Refer to the chart at the bottom of page 2 for suggested
amounts. For best results, cut butter into thin slices and distribute the slices evenly on the butter melter vents.
5. Plug popper into a 120VAC electrical outlet. When using the popper for the first time, a slight odor may be noticeable as manufac-
turing residue evaporates. This is normal during initial use.
Popping will begin in 2 to 3 minutes. Popping will be completed in 3 to 5 minutes depending on the amount of corn used.
CAUTION! Never leave popper unattended while in use. Keep hands and face away from vents in butter melter during popping.
NOTE: Occasionally a popcorn kernel may become trapped between the stirring arm and the popper base resulting in a rubbing type
sound. This is normal.
6. When popping slows to approximately 2 to 3 seconds between pops, popping is done. Immediately unplug unit.
7. Place butter melter cover onto butter melter and snap in place.
8. Hold the cover and popper base handles together. Carefully flip the unit over away from your body to avoid escaping steam.
9. Lift the popper base off the popper cover/serving bowl and set aside.
10. Add salt or seasoning to the popcorn, as desired. Serve popcorn in serving bowl or pour into another bowl if you would like to make
additional batches of popcorn.
11. Before making additional batches, carefully remove any unpopped kernels or popped corn that may have gotten trapped under the
scalloped stirring arm during popping. Also, wipe away excess oil from popper cover and popping surface. Then repeat steps 1–10.
Fig. B
Loading area
Helpful Hints
• This popper is designed to pop all kinds of popcorn—yellow, white, baby rice, and premium brands. Try different brands to find the
one you like best. Yellow popcorn generally pops into larger kernels than white.
• Always use fresh popcorn. Fresh popcorn pops into larger kernels and with more consistency than older, dried out corn. To maintain
moisture content and preserve freshness, store popcorn in an air-tight container.
• If your popcorn does not pop well, it may be too dry. Try adding a little bit of water to the popping corn. Add 1 tablespoon per quart
of popcorn. Then place the corn in an airtight container and shake at frequent intervals until the popcorn has absorbed the water. Wait
for 3 or 4 days and then try popping the corn.
• Always remove the butter melter cover before popping corn. Failure to do so will result in soggy popcorn.
• If buttered corn is desired, place softened butter onto the butter melter. For best results, cut butter into thin slices and distribute the
slices evenly on the butter melter vents.
• Because of its fine texture, popcorn salt works best. It is available at most grocery stores.
• You may use most any kind of vegetable oil for popping (corn, soybean, peanut, canola, light olive oil). Butter, margarine, shortening,
lard, and extra-virgin olive oil should not be used, as they burn easily.
Care and Cleaning
1. The popper should be cleaned before initial use and after each use.
2. Allow the popper to cool completely before cleaning.
3. Wash the popper cover/serving bowl and butter melter cover in warm, sudsy water. Rinse and dry thoroughly. Do not wash in an
automatic dishwasher or scour surfaces with steel wool or abrasive cleaners.
For easy cleanup, especially after preparing kettle corn, attach the butter melter cover to the popper cover/serving bowl and fill the
popper cover with warm, sudsy water. Allow the popper cover to soak for a few minutes and then wash the popper cover clean.
NOTE: Water will slowly drain out of the bottom of the popper cover as the butter melter cover does not provide an airtight seal.
3
Page 4

4. Remove the scalloped stirring arm (Fig. C) from the popper base. Simply unscrew the black
stirring arm knob by turning it counterclockwise and remove the stirring arm. Wash the knob
and stirring arm in warm, sudsy water. Rinse and dry thoroughly. Do not wash these parts in
Fig. C
Scalloped stirring
arm facing up
Stirring arm
knob
an automatic dishwasher.
Wipe the popper base with a damp cloth to clean.
WARNING! As with any motorized appliance, to prevent water from damaging the motor or
heating element, the base of your popper should never be filled with water, immersed in water
or other liquid, or washed in a dishwasher.
Helpful Hint: After preparing kettle corn, clean the popper base with a moistened cloth or a
non-metal cleaning pad, such as a Scotch-Brite* Multi-Purpose Scrub Sponge or a ScotchBrite* Dobie* Cleaning Pad. Firm pressure can be applied, if necessary. Do not use steel wool or abrasive kitchen cleaners.
5. After cleaning and drying, place the stirring arm back on the popper base, with the rounded portion facing up as shown in Fig. C,
and reattach the stirring arm knob. Turn the knob clockwise until it is finger-tight.
6. The popper base nests inside the popper cover for convenient storage.
Recipes
Old-Fashioned Kettle Corn
½ cup popcorn
3 tablespoons vegetable oil
Pour popcorn into the popper base, distributing it evenly around the loading area. Drizzle vegetable oil over the corn; sprinkle sugar
over the oil and popcorn. Place popper cover/serving bowl over the popper base and pop corn according to instructions in the How to
Use section.
Preparation tips: Sugar can easily burn, so the following tips will help minimize scorched kernels of kettle corn: Use only fresh popcorn.
Use no more than ½ cup popcorn. Flip the popcorn popper immediately when popping begins to slow.
3 tablespoons sugar
Classic Caramel Corn
6 quarts popped popcorn
1 cup butter
2 cups firmly packed brown sugar
Preheat oven at 250°F. Spray a large mixing bowl and two rimmed 17 x 12-inch baking pans lightly with no-stick cooking spray. Place
popped popcorn inside mixing bowl; set aside. In a medium pan combine butter, brown sugar, corn syrup, and salt. Bring to a boil over
medium heat, stirring constantly. Lower heat; boil 5 minutes without stirring. Remove from heat and stir in baking soda. Gradually pour
over reserved popped corn, mixing well to coat. Spread coated popcorn evenly into prepared baking pans. Bake for 1 hour, stirring every
15 minutes. Remove from oven and cool completely. Store in an air-tight container.
Makes 5 quarts.
½ cup light corn syrup
1 teaspoon salt
½ teaspoon baking soda
Popcorn Italiano
2 quarts popped popcorn
2 tablespoons butter, melted
1 teaspoon Italian seasoning
Preheat oven at 250°F. Combine melted butter and Italian seasoning; pour over popcorn. Toss. Sprinkle cheese and salt over popcorn;
mix well. Spread popcorn evenly into a rimmed 17 x 12-inch baking pan. Bake for 10 minutes. Remove from oven and cool completely.
Preparation tip: It is not necessary to bake popcorn, but it produces crispier popcorn.
3 tablespoons grated Parmesan cheese
⅛ teaspoon salt, or as desired
Sassy South of the Border Popcorn
1 teaspoon garlic powder
½ teaspoon chili powder
¼ teaspoon cumin
¼ teaspoon popcorn salt
Mix garlic powder, chili powder, cumin, salt, and red pepper in a small bowl; set aside. Pour popcorn into the popper base, distributing
it evenly around the loading area. Drizzle vegetable oil over the corn. Place the popper cover/serving bowl over the popper base. Place
butter in butter melter and pop corn according to instructions in the How to Use section. After ipping popper, remove base. Shake bowl
to distribute butter. Sprinkle seasoning evenly over popcorn; shake to distribute.
⅛ teaspoon ground red pepper
⅓ cup popcorn
1½ tablespoons vegetable oil
1 tablespoon butter, thinly sliced
* Scotch-Brite and Dobie are registered trademarks of 3M Company. Presto is not affiliated with 3M Company.
4
Page 5

Fruit and Nut Popcorn Bars
8 cups popped popcorn
½ cup raisins
4 cups miniature marshmallows
Grease a 9 x 9-inch baking pan. Combine popcorn and raisins in a large bowl; set aside. Melt butter and marshmallows in a medium
saucepan over medium heat, stirring frequently. Stir in peanut butter until evenly mixed with melted marshmallows. Pour marshmallow
mixture over reserved popcorn and raisins. Using two large mixing spoons, mix until popcorn and raisins are evenly coated. Press popcorn mixture into prepared pan. Cool before cutting.
Preparation tip: Mixture can also be shaped into small balls instead of pressing into baking pan.
2 tablespoons butter
¼ cup creamy peanut butter
Consumer Service Information
If you have any questions regarding the operation of your PRESTO appliance or need parts for your appliance, contact us by any of
these methods:
• Call 1-800-877-0441 weekdays 8:00 AM to 4:00 PM (Central Time)
• Email us through our website at www.GoPresto.com/contact
• Write: National Presto Industries, Inc.
Consumer Service Department
3925 North Hastings Way
Eau Claire, WI 54703-3703
When contacting the Consumer Service Department, please indicate the model and series numbers for the popper. These numbers can
be found on the bottom of the popper base. Please record this information:
Model ________________________ Series ________________________ Date Purchased _______________
Inquiries will be answered promptly by telephone, email, or letter. When emailing or writing, please include a phone number and a time
when you can be reached during weekdays if possible.
The Presto Factory Service Department is equipped to service PRESTO appliances and supply genuine PRESTO replacement
parts. Genuine PRESTO replacement parts are manufactured to the same exacting quality standards as PRESTO appliances and are
engineered specifically to function properly with its appliances. Presto can only guarantee the quality and performance of genuine
PRESTO replacement parts. “Look-alikes” might not be of the same quality or function in the same manner. To ensure that you are
buying genuine PRESTO replacement parts, look for the PRESTO trademark.
Canton Sales and Storage Company
Presto Factory Service Department
555 Matthews Drive
Canton, MS 39046-3251
This quality PRESTO
original owner that should there be any defects in material or workmanship during the first year after purchase, we will repair or replace it at our option. Our
pledge does not apply to damage caused by shipping. Outside the United States, this limited warranty does not apply.
To obtain service under the warranty, please call our Consumer Service Department at 1-800-877-0441. If unable to resolve the problem, you will be instructed
to send your PRESTO appliance to the Presto Factory Service Department for a quality inspection; shipping costs will be your responsibility. When returning
an appliance, please include your name, address, phone number, and the date you purchased the appliance as well as a description of the problem you are
encountering with the appliance.
We want you to obtain maximum enjoyment from using this PRESTO appliance and ask that you read and follow the instructions enclosed. Failure to follow
instructions, damage caused by improper replacement parts, abuse, misuse, disassembly, alterations, or neglect will void this pledge. This warranty gives you
specific legal rights, and you may also have other rights which vary from state to state. This is Presto’s personal pledge to you and is being made in place of
all other express warranties.
2015 National Presto Industries, Inc. Form 76-264B
appliance is designed and built to provide many years of satisfactory performance under normal household use. Presto pledges to the
PRESTO Limited Warranty
(Applies Only in the United States)
NATIONAL PRESTO INDUSTRIES, INC.
EAU CLAIRE, WI 54703-3703
5
 Loading...