

Page 1
electric
Hot Air Popper
INSTRUCTIONS
Estas instrucciones también están disponibles en español. Para obtener una copia impresa:
• Descargue en formato PDF en www.GoPresto.com/espanol.
• Envíe un correo electrónico a contact@GoPresto.com.
• Llame al 1-800-877-0441, oprima 2 y deje un mensaje.
Visit us on the web at www.GoPresto.com
Form 3004-397A
This is a Listed appliance. The following important safeguards are recommended by most portable appliance manufacturers.
2016 National Presto Industries, Inc.
IMPORTANT SAFEGUARDS
To reduce the risk of personal injury or property damage, when using electrical appliances basic safety precautions should always be
followed, including the following:
1. Read all instructions. Do not leave unit unattended while in use.
2. Cover and measuring scoop must be in place before plugging unit in.
3. This unit pops with hot air. Do not place oil, shortening, butter, or margarine in the popping chamber. Use of these substances will
cause hazards and will damage the unit.
4. Do not touch hot surfaces. Cover and detachable measuring scoop become hot during popping.
5. To protect against electrical hazards, do not immerse cord, plug, or popper in water or other liquids.
6. Close supervision is necessary when any appliance is used by or near children.
7. Unplug from outlet when not in use and before cleaning. Allow to cool before putting on or taking off parts and before cleaning
the appliance.
8. Do not operate any appliance with a damaged cord or plug or in the event the appliance malfunctions, or is dropped or damaged
in any manner. Before returning this appliance to the Presto Factory Service Department for examination, repair, or electrical or
mechanical adjustment, see IMPORTANT INFORMATION section, page 3.
9. The use of attachments not recommended or sold by the appliance manufacturer may cause fire, electric shock, or injury. Use only
genuine Presto replacement parts.
10. Do not use outdoors.
11. Do not let cord hang over edge of table or counter or touch hot surfaces.
12. Do not place on or near a hot gas or electric burner or in a heated oven.
13. Do not use appliance for other than intended use.
SAVE THESE INSTRUCTIONS
THIS PRODUCT IS FOR HOUSEHOLD USE ONLY.
1
Page 2
WARNING! FOR CALIFORNIA RESIDENTS
State of California Proposition 65 requires that we include the following warning:
This product contains a chemical known to the State of California to cause cancer and birth defects or other reproductive harm.
Important Cord Information
This appliance has a polarized plug (one blade is wider than the other). To reduce the risk of electric shock, this plug is intended to fit
into a polarized outlet only one way. If the plug does not fit fully into the outlet, reverse the plug. If it still does not fit, contact a qualified
electrician. Do not attempt to modify the plug in any way.
A short power supply cord (or cord set) is provided to reduce the risk resulting from becoming entangled in or tripping over a longer
cord. Extension cords may be used if care is properly exercised in their use. If an extension cord is used, the marked electrical rating of
the extension cord should be at least as great as the electrical rating of the appliance. The extension cord should be arranged so that it
will not drape over the countertop or tabletop where it can be pulled on by children or tripped over unintentionally.
Connect the power supply cord to a 120VAC electrical outlet only.
How to Use
Important: To assure proper operation, read and follow instructions carefully. Before initial use, wash the popper cover and measuring
scoop in warm, soapy water; rinse and dry thoroughly. Wipe the popper base with a damp cloth. NEVER IMMERSE BASE IN WATER
OR OTHER LIQUID.
1. Remove the cover and measuring scoop from the popper base (Fig. A).
2. Fill the measuring scoop provided with popcorn until it is LEVEL. Do not pack
popcorn into scoop or overfill. Pour popcorn into the popping chamber.*
Important: Never fill the popping chamber past the fill line (Fig. B) as this could
result in overheating, smoking, scorched corn, and may cause the unit to shut off.
See IMPORTANT INFORMATION at the bottom of page 3.
3. Place the cover in the cover groove (Fig. B). For easiest alignment, begin by
positioning the back of the cover in the groove and then lower the cover until
the sides are seated in the groove.
4. Position the measuring scoop on the cover with the tab towards the back of the
popper (Fig. A). Never pop corn without the measuring scoop in position on the
cover. The measuring scoop doubles as a butter melter. If you prefer buttered
popcorn, put 1 tablespoon of SOFT butter or margarine in the measuring scoop.
Refrigerated butter will not melt during the short popping period. Whether you
melt butter or not, the measuring scoop must always be in position on the cover
when popping corn.
WARNING! Do not place salt, butter, margarine, shortening, or microwave popcorn in the
popping chamber as this could damage the popper and cause a fire hazard.
5. Place a 4-quart or larger heat-proof bowl under the popping chute to collect popped corn. One
batch will yield up to 3 quarts of popped popcorn.
6. Plug unit into a 120VAC electrical outlet. Once popping starts, it will be completed within 2
to 3 minutes. Important: Do not leave unit unattended while popping.
CAUTION! Occasionally a hot unpopped kernel may be thrown from the popping chute. To
avoid contact with hot kernels, keep well away from the popper during popping.
7. Unplug the unit when popping is complete. Some popped corn may remain in the chamber†
after popping has stopped. To prevent scorching, unplug the popper without waiting for this
corn to clear the unit. Because a few kernels may continue to pop even after the unit is unplugged, make sure all popping has stopped
before removing the cover and measuring scoop. Using hot pads, carefully remove the cover, pour the remaining popcorn into the
bowl, and immediately place the cover back on the unit.
Note: The cover is made of a costly material which absorbs heat without melting. When heated, it does soften and may change shape
temporarily if left on the counter to cool, which may make it difficult to place back on the popper base. To avoid this situation, always
return the cover to the base immediately after pouring out the popped corn.
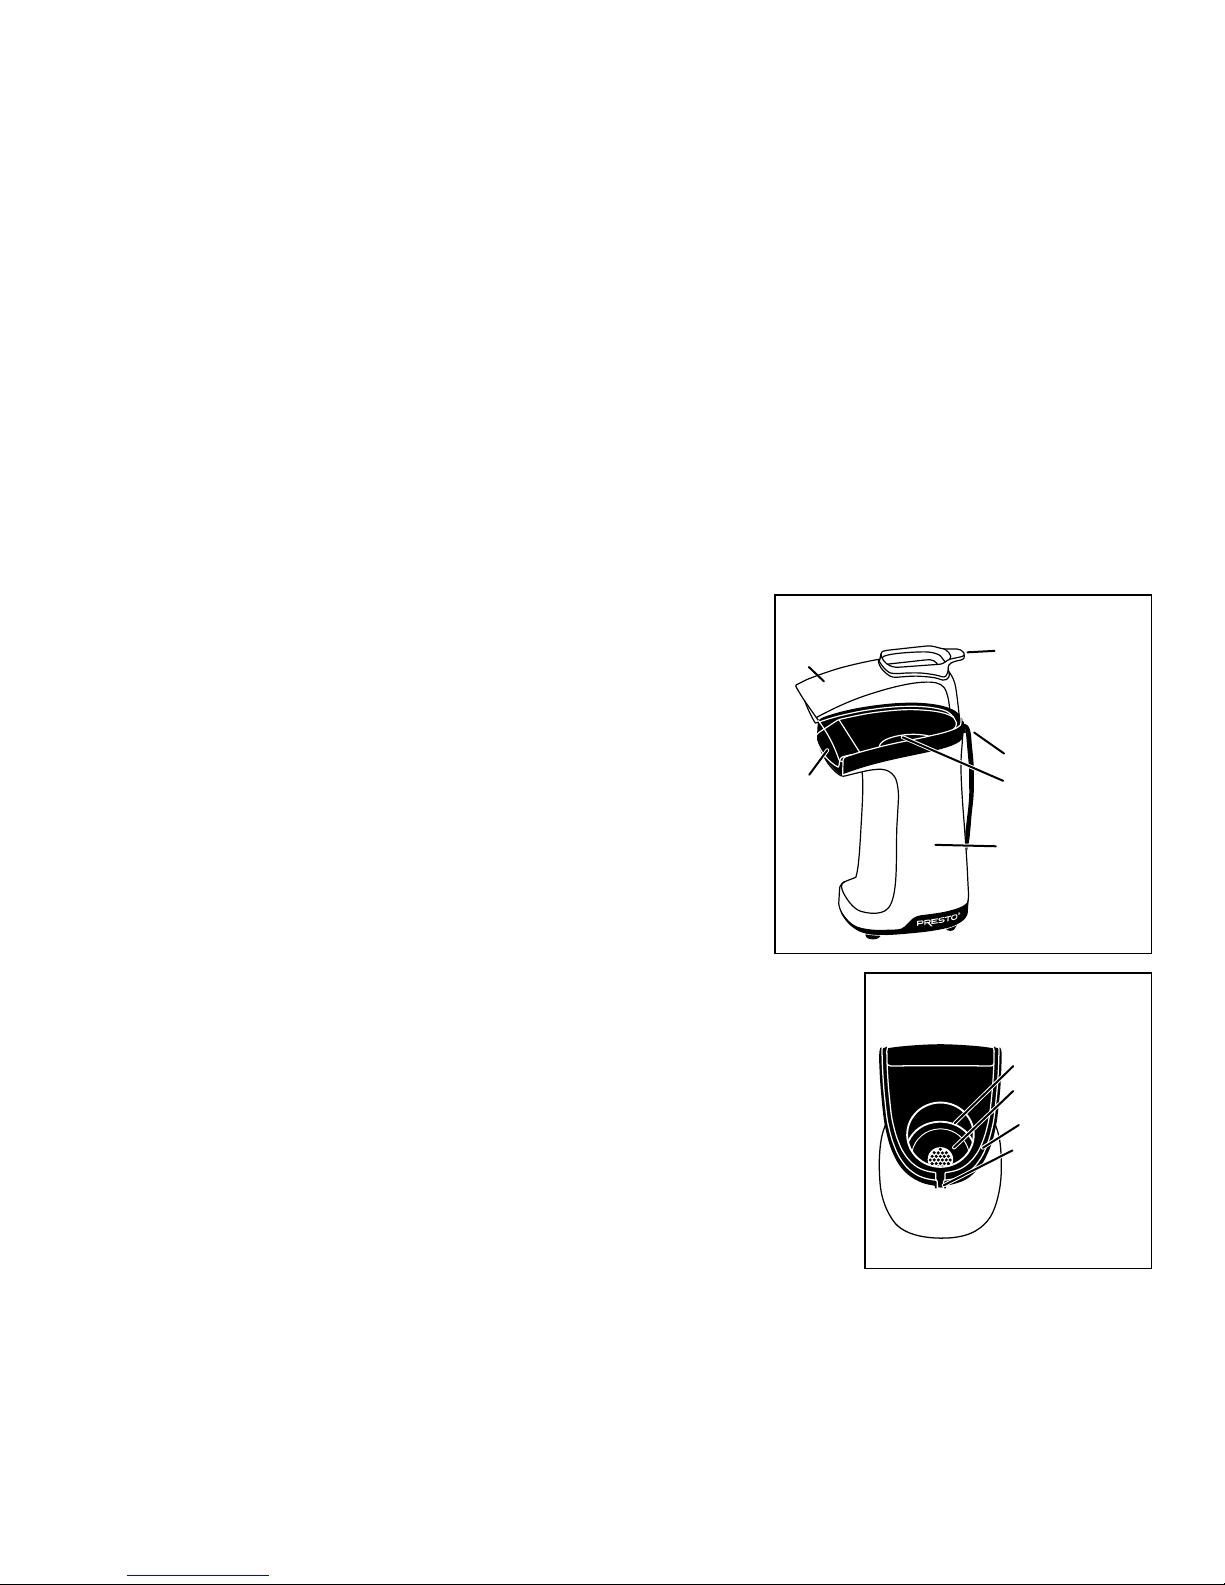
Fig. A
Cover
Chute Popping chamber
Measuring Scoop/
Butter Melter
Note: The measuring
scoop is located in
the top filler of the
carton.
Cord storage slot
Popper base
Fig. B
Front of popper
Fill line
Popping chamber
Cover groove
Cord storage slot
Back of popper
*If you prefer to use a standard dry measuring cup, 1 measuring scoop = ⅓ cup.
† When popcorn remains in the chamber after popping and has not discharged, it is caused by variances in popcorn type, freshness, moisture content, or household current.
2
Page 3

8. If butter was melted during popping, carefully grasp the measuring scoop by the tab and pour the butter over the popped corn. Sprinkle
the popcorn with salt if desired.
9. Before popping additional batches, make sure the popping chamber is empty. Using hot pads, remove the cover and turn the unit
upside down to remove popcorn or unpopped kernels. Wash and dry the measuring scoop if it was used to melt butter. Then repeat
steps 2 through 9.
Important Information:
This popper is thermostatically controlled. It will shut off to prevent overheating if the popping chamber is overfilled or if the popper is
used continuously for extended periods without being unplugged and allowed to cool. Should this happen, unplug the popper from the
wall outlet, remove cover, empty any popped or unpopped corn from the popping chamber, and return cover to the base immediately.
Allow the popper to cool for about 15 minutes before using again.
How to Clean
1. Allow unit to cool before cleaning.
2. Wash the cover and measuring scoop in warm, soapy water. Do not wash in dishwasher. Rinse and dry thoroughly.
Wipe the corn popper base, including the popping chamber, clean and dry with a soft, dry cloth. Never immerse the corn popper
base in water or other liquid. Do not scour surfaces with steel wool or abrasive cleaners.
3. Insert the cord in the cord storage slot (Fig. B, page 2) and tuck the excess cord and plug in the popping chamber. Place the cover on
the unit for convenient storage.
Helpful Hints
• This popper is designed to pop regular and premium brands of popcorn. Try different brands to find the one you like best. Yellow
popcorn generally pops larger than white.
• This popper can also pop premium brands of popcorn; however, like other poppers designed to pop standard corn, the popper may not
perform as well with premium brands, and you may get more unpopped kernels than with regular corn.
• Some varieties of small and lighter weight kernel popcorn are not recommended for use with hot air poppers. Refer to any additional
instructions by popcorn manufacturer.
• Always use fresh popcorn for the best popping performance. Store popcorn in a tightly sealed container. Do not store popcorn in a
refrigerator or freezer as this can dry out the kernels quickly.
• Carefully select the bowl you will be using to collect popped corn. A metal bowl may become very hot to the touch due to the flow
of hot air from the chute and must be handled carefully. It will, however, tend to keep the popcorn warm. If a plastic bowl is used, be
certain it can withstand the heat caused by the warm air flow without melting.
• Never fill the popping chamber past the fill line (Fig. B, page 2). Overloading the chamber will cause overheating, smoking, scorched
corn, and may cause the unit to shut off. Should this happen, unplug the popper from the wall outlet, remove cover, empty any popped
or unpopped corn from the popping chamber, and return cover to the base immediately. Allow the popper to cool for about 15 minutes
before using again.
• The measuring scoop capacity is equal to ⅓ cup. Using less than one level measuring scoop full of popcorn (⅓ cup) may increase the
number of unpopped kernels.
• Tipping the popper toward the bowl slightly when popping stops will help clear popped corn from the chamber.
Toss popped corn with up to 1 tablespoon of vegetable oil or, for even less calories and fat, spray the popcorn with no-stick cooking
spray. Add salt, if desired. For a unique avor, add seasonings, such as Cajun, Italian, garlic or onion powder, seasoned salt, powdered
popcorn seasonings and much more. For more delicious popcorn recipes, visit: www.GoPresto.com/recipes/popcorn/.
Reduced Oil Popcorn Recipe
3
Page 4

Consumer Service Information
If you have any questions regarding the operation of your Presto appliance or need parts for your appliance, contact us by any of these
methods:
• Call 1-800-877-0441 weekdays 8:00 AM to 4:00 PM (Central Time)
• Email us through our website at www.GoPresto.com/contact
• Write: National Presto Industries, Inc.
Consumer Service Department
3925 North Hastings Way
Eau Claire, WI 54703-3703
Inquiries will be answered promptly by telephone, email, or letter. When emailing or writing, please include a phone number and a time
when you can be reached during weekdays if possible. When contacting the Consumer Service Department, please indicate the model
and series numbers for the popper. These numbers can be found on the bottom of the popper. Please record this information:
Model ____________________ Series ____________________ Date Purchased ____________
The Presto Factory Service Department is equipped to service PRESTO
PRESTO replacement parts are manufactured to the same exacting quality standards as PRESTO appliances and are engineered
specifically to function properly with its appliances. Presto can only guarantee the quality and performance of genuine PRESTO
parts. “Look-alikes” might not be of the same quality or function in the same manner. To ensure that you are buying genuine PRESTO
replacement parts, look for the PRESTO trademark.
Canton Sales and Storage Company
Presto Factory Service Department
555 Matthews Drive, Canton, MS 39046-3251
appliances and supply genuine PRESTO parts. Genuine
This quality PRESTO
original owner that should there be any defects in material or workmanship during the first year after purchase, we will repair or replace it at our option. Our
pledge does not apply to damage caused by shipping. Outside the United States, this limited warranty does not apply.
To obtain service under the warranty, please call our Consumer Service Department at 1-800-877-0441. If unable to resolve the problem, you will be instructed
to send your PRESTO
an appliance, please include your name, address, phone number, and the date you purchased the appliance as well as a description of the problem you are
encountering with the appliance.
We want you to obtain maximum enjoyment from using this PRESTO
instructions, damage caused by improper replacement parts, abuse, misuse, disassembly, alterations, or neglect will void this pledge. This warranty gives you
specific legal rights, and you may also have other rights which vary from state to state. This is Presto’s personal pledge to you and is being made in place of
all other express warranties.
2016 National Presto Industries, Inc. Form 3004-397A
appliance is designed and built to provide many years of satisfactory performance under normal household use. Presto pledges to the
appliance to the Presto Factory Service Department for a quality inspection; shipping costs will be your responsibility. When returning
PRESTO Limited Warranty
(Applies Only in the United States)
appliance and ask that you read and follow the instructions enclosed. Failure to follow
NATIONAL PRESTO INDUSTRIES, INC.
EAU CLA IRE, WI 54703-3703
4
 Loading...