

Page 1
One handy bowl cooks ramen noodles, mac and cheese,
bacon, and soup. Pops corn too!
collapsible silicone
Microwave Multi-cooker
Visit us on the web at www.GoPresto.com
INSTRUCTIONS
©2017 National Presto Industries, Inc.
Estas instrucciones también están disponibles en español.
Para obtener una copia impresa:
• Descargue en formato PDF en www.GoPresto.com/espanol.
• Envíe un correo electrónico a contact@GoPresto.com.
• Llame al 1-800-877-0441, oprima 2 y deje un mensaje.
Page 2

2
The following important safeguards are recommended by most portable appliance
manufacturers.
IMPORTANT SAFEGUARDS
To reduce the risk of personal injury or property damage when using this appliance, basic
safety precautions should always be followed, including the following:
1. Read all instructions. Do not leave unit unattended while in use.
2. Use caution when touching hot surfaces and when moving multi-cooker containing
hot liquids or hot bacon drippings. Always use bowl handles when moving and handling unit. Unit becomes hot during use.
3. Close supervision is necessary when any appliance is used by or near children.
4. Do not operate in the event the multi-cooker malfunctions or is damaged in any manner. Return the unit to the Presto Factory Service Department for examination, repair,
or adjustment. See page 7 for contact information.
5. The use of accessories not recommended by the appliance manufacturer may damage
the unit or cause injuries. Use only genuine Presto™ accessories or replacement parts.
6. Do not place on or near a hot gas or electric burner or in a heated oven.
7. Do not use multi-cooker for other than intended use.
SAVE THESE INSTRUCTIONS
THIS PRODUCT IS FOR HOUSEHOLD USE ONLY.
Getting Acquainted
Before using your silicone microwave multi-cooker, please read the following:
IMPORTANT: If your microwave has a removable tray or turntable, be sure the tray or
turntable is in place whenever you use your microwave multi-cooker, and be sure the unit
can rotate freely. This multi-cooker is designed to work in microwave ovens with a cavity
size at least 8 inches tall by 12 inches wide by 12 inches deep.
CAUTION! Do not collapse the bowl partially to t it in the microwave oven. This may
result in steam burns when removing a bowl containing hot liquids.
Your multi-cooker has been tested in a wide variety of microwave ovens and found to
work very well. However, the function and condition of microwave ovens may vary
greatly.
When using this multi-cooker, we ask that you do the following:
a. Check that the microwave oven is clean and free of food/grease residue according to
manufacturer’s instructions.
b. Remain near the microwave oven during the cooking period.
c. Look through the window of the microwave oven periodically during the cooking
period.
d. If you notice anything unusual (e.g., a peculiar odor, sparking, etc.), immediately turn
off and unplug your microwave oven. Leave the microwave oven door closed. If you
encounter any issues with the use of your microwave multi-cooker, please call the
Presto Consumer Service Department at 1-800-877-0441.
Before initial use and after each subsequent use, wash the multi-cooker bowl, bacon rack,
chopsticks, and cover in warm, sudsy water, rinse, and dry thoroughly, or wash in the
dishwasher, top rack only.
Page 3
3
CAUTION! To prevent burns:
• Always use handles when removing the bowl from the microwave and when handling when unit is hot.
• Avoid contact with bottom and sides of bowl, as they will be extremely hot.
• To keep bowl from collapsing during use, do not ll above the MAX ll line (Fig. C)
or exert downward pressure on the bowl.
How To:
Make Ramen Noodles
1. Remove bacon rack, chopsticks, and cover from microwave bowl and fully expand
bowl (Fig. B).
2. Add water up to the FILL LINE* marked inside the
bowl (Fig. C).
3. Place ramen noodles in bottom of bowl. Noodles
can be broken apart, if desired.
4. Position bowl in center of microwave oven. Cook at
full power (HIGH) for 4 minutes, stirring halfway
through.
5. Once cooking time has expired, using handles,
carefully remove bowl from microwave. Stir in
contents of seasoning packet.
Helpful Hints:
• If you prefer ramen noodles without broth, the cover doubles as a strainer. Place the
cover on the bowl and drain off excess liquid through the vents.
• Enjoy ramen right in the multi-cooker bowl. Carefully collapse the bowl by pushing
down on the handles (Fig. A). Use chopsticks, if desired.
NOTICE: Do not use knives or other sharp utensils, as these may damage the silicone bowl.
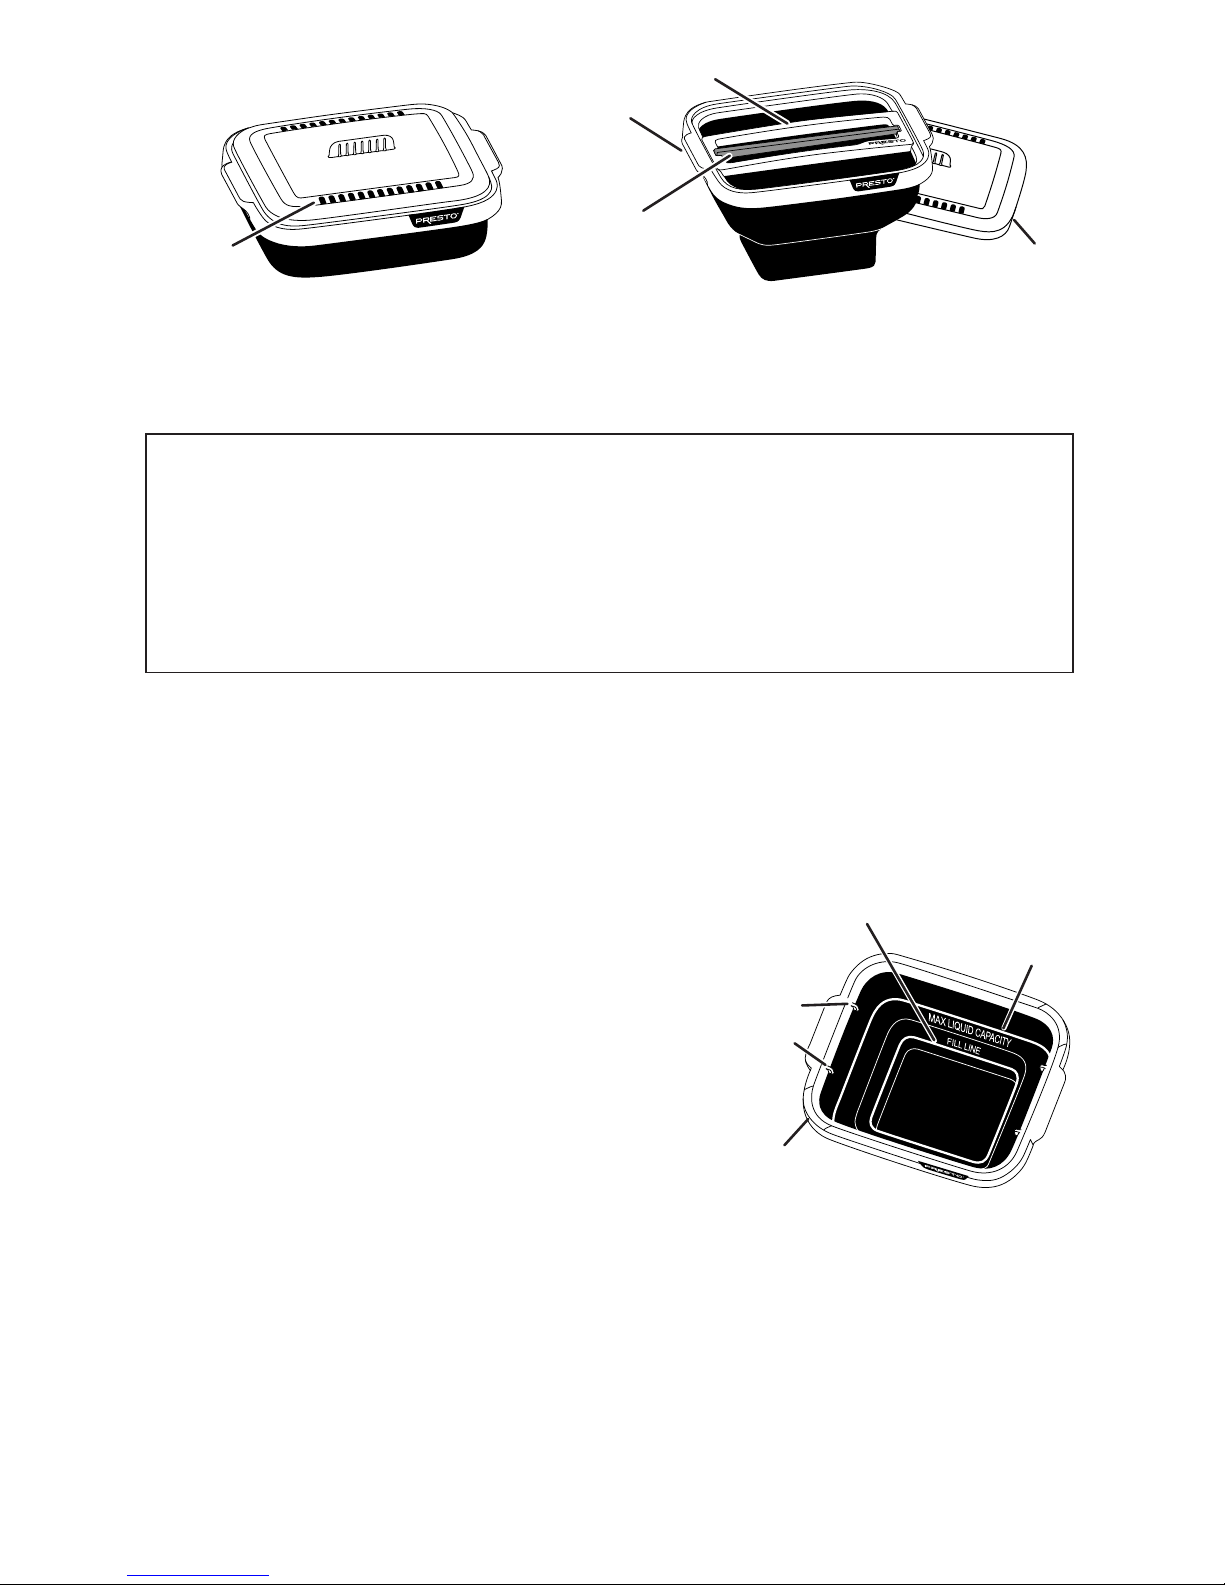
Collapsed microwave bowl
Fig. A
See-through
cover
Expanded microwave bowl
Handles
Fig. B
Bacon rack
Chopsticks
Fig. C
Fill line
Max. liquid
capacity
Rack
guides
Pour spout
Vents/
strainer
*If you prefer to use a liquid measuring cup, this amount is equal to approximately 1¾ cups.
Page 4

4
• Tasty ramen variations:
Add veggies, such as shredded carrots and zucchini, sliced green onions, grated fresh
ginger, minced garlic, or fresh herbs.
Add cooked shredded meat or poultry or cooked shrimp.
Add sauces such as sriracha, soy, or tamari.
Make Bacon
1. Fully expand the microwave bowl (Fig. B, page 3). Position the bacon rack between
the handles so the Presto logo is facing up and the rack is within the rack guides on the
bowl rim (Fig. C, page 3).
2. Drape the desired number of bacon slices over the rack,
allowing excess to hang in the bowl. Up to 5 slices of
bacon will t on each side of the rack, depending on the
width of the bacon slices. For best cooking results, do not
overlap the bacon slices (Fig. D).
NOTE: As you place the bacon on the rack, it will touch
the bottom and sides of the bowl. This is okay, since the
bacon will shrink as it cooks.
3. Place cover on bowl and position bowl in center of microwave oven. Cook at full
power (HIGH), allowing 40 to 60 seconds per slice of bacon. Begin with the minimum
recommended cooking time. For example, if cooking 6 slices of bacon, set cook time
for 4 minutes (240 seconds). Cooking time will depend on the microwave and the type,
thickness, and fat content of the bacon.
4. After the minimum recommended cooking time, check to see if bacon is done. If more
cooking time is desired, place covered unit back in microwave and cook in 30 second
intervals until bacon is done.
CAUTION! To prevent burns, carefully handle the microwave bowl when it contains
hot bacon drippings.
5. Line a plate with paper towels. Then, using tongs, carefully grasp one side of the bacon
rack and lift the rack onto the plate.
6. Remove bacon from rack immediately after cooking and atten out on plate.
7. Allow bacon drippings to cool. Then pour drippings from one of the corner spouts on
the multi-cooker bowl.
Helpful Hints:
• Allow bacon to warm up just long enough so slices separate easily. This will make the
bacon easier to drape over the bacon rack without stretching.
• For more evenly cooked bacon, choose bacon that is uniform in width.
Fig. D
Page 5

5
Make Macaroni and Cheese
NOTE: Instructions are for preparing a package of macaroni and cheese.
1. Remove bacon rack and chopsticks from microwave bowl and fully expand bowl
(Fig. B, page 3).
2. Add hot tap water up to the FILL LINE* marked inside the bowl. Do not ll above the
MAX. LIQUID CAPACITY line marked inside the bowl (Fig. C, page 3).
3. Pour macaroni from a box of macaroni and cheese dinner into bottom of bowl.
4. Place bowl in center of microwave oven. Cook uncovered at full power (HIGH) for 8
to 10 minutes, stirring every 3 minutes until water is absorbed.
5. If necessary, to remove any remaining liquid, place the cover on the bowl and drain off
excess liquid through the vents.
6. Follow remaining instructions on package to complete macaroni and cheese.
Make Pasta
1. Remove bacon rack and chopsticks from microwave bowl and fully expand bowl
(Fig. B).
2. Add hot tap water up to the FILL LINE* marked inside the bowl. Do not ll above the
MAX. LIQUID CAPACITY line marked inside the bowl (Fig. C).
3. Pour 4 to 6 ounces of pasta into bottom of the bowl. Pastas that are thicker, such as
rotelle, mostaccioli, penne, etc., or pastas that are made with whole wheat, may require
more than 10 minutes of cooking.
4. Place bowl in center of microwave oven. Cook uncovered at full power (HIGH) for 8
to 10 minutes, stirring every 3 minutes until water is absorbed.
5. If necessary, to remove any remaining liquid, place the cover on the bowl and drain off
excess liquid through the vents.
Heat Soup
1. Remove bacon rack and chopsticks from microwave bowl and fully expand bowl
(Fig. B).
2. Pour soup into bowl. Follow the manufacturer's instructions to see if additional liquid
is to be added. Do not ll above the MAX. LIQUID CAPACITY line marked inside the
bowl (Fig. C).
3. Place cover on bowl and position bowl in center of microwave oven. Refer to the soup
can label or package for recommended heating time and further instructions.
*If you prefer to use a liquid measuring cup, this amount is equal to approximately 1¾ cups.
Page 6

6
Make Popcorn
Before using the unit to pop popcorn, be sure you check your microwave oven’s operating manual to see if popping popcorn is permitted.
1. Fully expand the microwave bowl before using (Fig. B, page 3).
2. Pour ⅓ cup popping corn into microwave bowl. Do not use more than ⅓ cup.
For oil-popped corn, add up to 1 tablespoon of oil or butter-avored oil. Sprinkle with
salt, if desired.
3. Place cover on bowl and position bowl in center of microwave oven.
4. For the rst use, set the microwave timer for 4 minutes and begin popping at full
power (HIGH). Listen carefully. When popping slows to approximately 2 to 3
seconds between pops, stop microwave. All microwave ovens do not perform alike
and popping time will vary with each microwave, but popping will usually be done in
2 to 4 minutes.
Do not use “Popcorn Setting” if your microwave has this feature. This setting has an
automatic timing function, which is designed for bagged microwave popcorn.
NOTE: Popcorn can easily scorch so never leave microwave oven unattended during
popping.
5. Use the microwave bowl handles to carefully remove popper from microwave oven.
6. Carefully lift the cover toward you to keep any steam away from you.
CAUTION! Bowl will be very hot after popping. Allow bowl to cool before placing on
lap.
7. Before popping additional batches, wipe the inside of the popping bowl with a damp
cloth to remove remaining salt and oil. Because microwave function varies, some
microwave ovens perform better when allowed to cool 10 to 15 minutes before
popping additional batches of corn.
Helpful Hints:
• Always use fresh popcorn for the best popping performance. Fresh popcorn pops into
larger kernels and with more consistency than older, dried out corn.
• If you want oil-avored popcorn, but don’t want the added fat or calories that oil gives
you, either before or after popping, spray popcorn with a no-stick cooking spray. This
will give you a hint of oil avor and will also allow salt and other seasonings to stick to
the popcorn better. For a hint of butter-avored popcorn, use the butter-avored sprays.
• You can use any kind of cooking oil (corn, vegetable, peanut, olive, canola, coconut,
etc.). Use up to 1 tablespoon for each batch of popcorn. Butter may also be used.
When cooked at high temperatures, like those in the microwave popper, butter tends to
brown, imparting a different, but delicious avor.
• If making multiple batches of popcorn, allow the microwave to cool between batches.
• If you are getting a lot of unpopped kernels and/or scorched corn, try positioning the
multi-cooker off center inside the microwave oven. Your microwave oven may have
areas where microwave energy is not evenly distributed.
Page 7

7
Care, Cleaning, and Storage
The microwave bowl and cover are dishwasher safe (top rack only), or they can be
washed in warm, sudsy water and rinsed and dried thoroughly.
If popping corn with oil and salt, wipe the microwave bowl with a damp cloth after each
use to remove oil and salt residue.
For convenient storage, collapse the bowl by pushing down on the bowl handles.
Consumer Service Information
If you have any questions regarding the operation of your PRESTO® appliance or need
parts for your appliance, contact us by any of these methods:
• Call 1-800-877-0441 weekdays 8:00 AM to 4:00 PM (Central Time)
• Email us through our website at www.GoPresto.com/contact
• Write: National Presto Industries, Inc.
Consumer Service Department
3925 North Hastings Way, Eau Claire, WI 54703-3703
When contacting the Consumer Service Department, please indicate the model and series
numbers for the popper. These numbers can be found on the bottom of the popping bowl.
Please record this information:
Model ______________ Series ____________ Date Purchased __________
Inquiries will be answered promptly by telephone, email, or letter. When emailing or
writing, please include a phone number and a time when you can be reached during
weekdays if possible.
The Presto Factory Service Department is equipped to service PRESTO® appliances and
supply genuine PRESTO™ parts. Genuine PRESTO™ replacement parts are manufactured
to the same exacting quality standards as PRESTO® appliances and are engineered
specically to function properly with its appliances. Presto can only guarantee the quality
and performance of genuine PRESTO™ parts. “Look-alikes” might not be of the same
quality or function in the same manner. To ensure that you are buying genuine PRESTO™
replacement parts, look for the PRESTO trademark.
Canton Sales and Storage Company
Presto Factory Service Department
555 Matthews Dr., Canton, MS 39046-3251
Page 8

(Applies Only in the United States)
This quality PRESTO® appliance is designed and built to provide many years of
satisfactory performance under normal household use. Presto pledges to the original
owner that should there be any defects in material or workmanship during the rst
year after purchase, we will repair or replace it at our option. Our pledge does not
apply to damage caused by shipping. Outside the United States, this limited warranty
does not apply.
To obtain service under the warranty, please call our Consumer Service Department at
1-800-877-0441. If unable to resolve the problem, you will be instructed to send your
PRESTO® appliance to the Presto Factory Service Department for a quality inspection;
shipping costs will be your responsibility. When returning an appliance, please include
your name, address, phone number, and the date you purchased the appliance as well
as a description of the problem you are encountering with the appliance.
We want you to obtain maximum enjoyment from using this PRESTO® appliance and
ask that you read and follow the instructions enclosed. Failure to follow instructions,
damage caused by improper replacement parts, abuse, misuse, disassembly, alterations,
or neglect will void this pledge. This warranty gives you specic legal rights, and you
may also have other rights which vary from state to state. This is Presto’s personal
pledge to you and is being made in place of all other express warranties.
NATIONAL PRESTO INDUSTRIES, INC.
EAU CLAIRE, WI 54703-3703
PRESTO® Limited Warranty
Printed in China Form 4001-013A
 Loading...