

Page 1
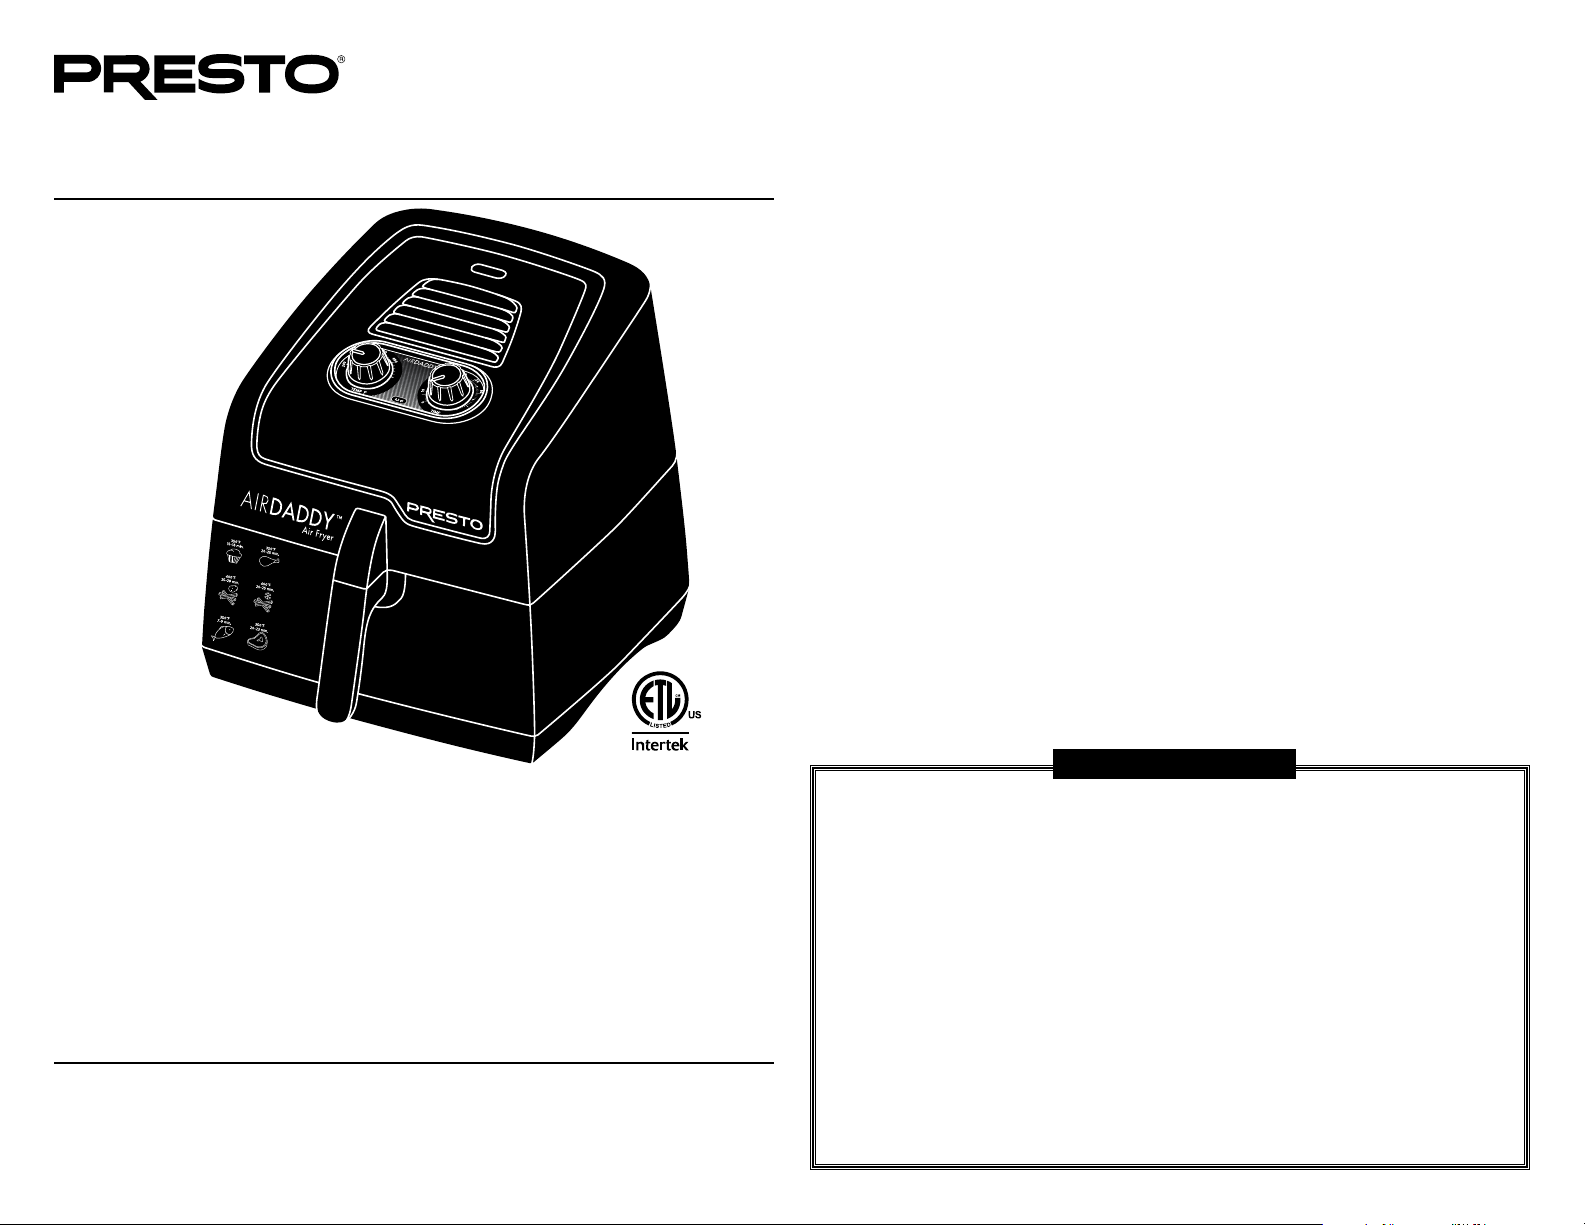
AirDaddy
Visit us on the web at www.GoPresto.com
4.2-quart electric air fryer
Consumer Service Information
If you have any questions regarding the operation of your Presto appliance or need parts
for your appliance, contact us by any of these methods:
♦ Call 1-800-877-0441 weekdays 8:00 a.m. to 4:00 p.m. (Central Time)
♦ Email us through our website at www.GoPresto.com/contact
♦ Write: National Presto Industries, Inc.
Consumer Service Department
3925 North Hastings Way, Eau Claire, WI 54703-3703
Inquiries will be answered promptly by telephone, email, or letter. When emailing or writing,
please include a phone number and a time when you can be reached weekdays, if possible.
When contacting the Consumer Service Department, please indicate the model and series
numbers for the air fryer. These numbers can be found on the bottom of the air fryer.
Please record this information:
Model _______________ Series _______________ Date Purchased _________
The Presto Factory Service Department is equipped to service Presto appliances and supply
genuine Presto replacement parts. Genuine Presto replacement parts are manufactured to
the same exacting quality standards as Presto appliances and are engineered specifically to
function properly with its appliances. Presto can only guarantee the quality and performance
of genuine Presto replacement parts. “Look-alikes” might not be of the same quality or
function in the same manner. To ensure that you are buying genuine Presto replacement
parts, look for the Presto trademark.
Canton Sales and Storage Company
Presto Factory Service Department
555 Matthews Drive, Canton, MS 39046-3251
• Convection cooking system circulates hot air in every direction for
foods that are crispy outside and tender inside.
• Fries with little to no added oil for delicious fried food without the
added fat. Roasts, grills, and bakes too.
• Large 4.2-quart basket is ideal for family-size batches.
Estas instrucciones también están disponibles en español. Para obtener una copia impresa:
• Descargue en formato PDF en www.GoPresto.com/espanol.
• Envíe un correo electrónico a contact@GoPresto.com.
• Llame al 1-800-877-0441, oprima 2 y deje un mensaje.
INSTRUCTIONS
2017 National Presto Industries, Inc. Form 4007-057A
Presto Limited Warranty
(Applies only in the United States)
This quality Presto appliance is designed and built to provide many years of satisfactory performance under
normal household use. Presto pledges to the original owner that should there be any defects in material or
workmanship during the first year after purchase, we will repair or replace it at our option. Our pledge does
not apply to damage caused by shipping. Outside the United States, this limited warranty does not apply.
To obtain service under the warranty, call our Consumer Service Department at 1-800-877-0441. If unable to resolve the problem, you will be instructed to send your Presto
Service Department for a quality inspection; shipping costs will be your responsibility. When returning an
appliance, please include your name, address, phone number, and the date you purchased the appliance,
as well as a description of the problem you are encountering with the appliance.
We want you to obtain maximum enjoyment from using this Presto
follow the instructions enclosed. Failure to follow instructions, damage caused by improper replacement
parts, abuse, misuse, disassembly, alterations, or neglect will void this pledge. This warranty gives you
specific legal rights, and you may also have other rights which vary from state to state. This is Presto’s
personal pledge to you and is being made in place of all other express warranties.
NATIONAL PRESTO INDUSTRIES, INC.
EAU CLAIRE, WI 54703-3703
appliance to the Presto Factory
appliance and ask that you read and
Page 2

This is an Listed appliance. The following important safeguards are recommended by
most portable appliance manufacturers.
IMPORTANT SAFEGUARDS
To reduce the risk of personal injury or property damage, when using electrical appliances,
basic safety precautions should always be followed, including the following:
1. Read all instructions. Do not leave the appliance unattended while in use.
2. To protect against electrical shock or burns, do not immerse the air fryer, cord, or plug
in water or other liquid. Do not let children handle or put electrical cords or plugs in
their mouths.
3. Do not touch hot surfaces. Use handles or knobs. Any accessible surface may become
hot during use. Always use oven mitts when handling hot materials.
4. Extreme caution must be used when moving any appliance containing hot oil or other
hot liquids. This appliance is not intended for deep frying.
5. Close supervision is necessary when any appliance is used by or near children.
6. This appliance is not intended for use by a person (including children) with reduced
physical sensory or mental capabilities, or lack of experience and knowledge, unless
they have been given adequate supervision or adequate instruction concerning use of
the appliance by a person responsible for their safety.
7. Do not operate any appliance with a damaged cord or plug or in the event the appliance
malfunctions or has been damaged in any manner. Return the appliance to the nearest
authorized service facility for examination, repair, or adjustment.
8. Always attach the plug to the appliance first, then plug the cord into the wall outlet. To
disconnect, turn the control to OFF, then remove the plug from the wall outlet.
9. Unplug from the wall outlet when not in use and before cleaning. Allow to cool before
putting on or taking off parts, and before cleaning the appliance.
10. The use of accessory attachments not recommended by the appliance manufacturer may
cause injuries. Use only genuine Presto accessory attachments and replacement parts.
11. Do not let cord hang over edge of table or counter or touch hot surfaces.
12. Do not place on or near a hot gas or electric burner or in a heated oven.
13. Do not use outdoors.
14. This appliance is not intended to be operated by means of an external timer or a separate
remote-control system.
15. Do not use the appliance for other than intended use.
SAVE THESE INSTRUCTIONS
THIS PRODUCT IS FOR HOUSEHOLD USE ONLY.
Important Cord Information
This appliance has a polarized plug (one blade is wider than the other). To reduce the risk
of electric shock, this plug is intended to fit into a polarized outlet only one way.
If the plug does not fit fully into the outlet, reverse the plug. If it still does not fit, contact a
qualified electrician. Do not attempt to modify the plug in any way.
A short power supply cord is provided to reduce the risk resulting from becoming entangled
in or tripping over a longer cord. Do not use this appliance with an extension cord.
Connect the power supply cord to a 120VAC electrical outlet only.
Important Safety Information
WARNING! Electrical Hazards
To avoid the risk of electrocution or severe disfiguring electrical burns:
♦ Do not let the air fryer base, cord, or plug come in contact with water or other liquid.
♦ Do not let children handle or put electrical cords or plugs in their mouths.
♦ Never use the air fryer without the basket assembly in place.
CAUTION! Burn Hazards
♦ Always allow air fryer to cool completely before removing parts and before cleaning.
♦ This air fryer generates heat during use. Proper precautions must be taken to prevent
the risk of burns, fire, or other injury to persons or damage to property. Always use
oven mitts when handling hot materials.
♦ It is normal for steam to escape from the air vents and the sides of the fryer during
cooking. To prevent steam burns, keep well away from the vents.
♦ The element will continue to heat when the basket assembly is removed. Do not place
hands or other items in the basket assembly cavity.
♦ Hot oil or grease from food cooked may collect in the pan of the basket assembly. To
avoid the risk of burns, personal injury, or hot oil or grease drips, always separate the
basket from the basket assembly before emptying food.
CAUTION! Fire Hazards
♦ Do not place the air fryer on or near combustible materials such as a tablecloth or curtain,
nor place anything on top of the air fryer while it is operating or hot.
♦ Do not store any materials, other than the manufacturer's recommended accessories, in
this air fryer when not in use.
♦ Do not overfill the basket. Food should not come in contact with the heating element
on the upper surface of the chamber.
♦ Do not fill the basket assembly with oil or other liquid.
♦ Do not cook excessively greasy foods, such as sausage or bacon, as this could cause
extreme smoking.
2 3
Page 3
Important Fryer Guidelines
♦ Close supervision is necessary when any appliance is used by or near children.
♦ To ensure proper cooking and air circulation, do not ll the basket more than ¾ full.
Overfilling could prevent the basket assembly from sliding into the air fryer or result in
food being sheared off.
♦ This air fryer is not suitable for preparing food with a high-liquid content, such as soups
and sauces, and should not be used to boil water.
♦ The timer will continue to count down, the motor will continue to run, and the element
will continue to heat when the basket assembly is removed.
Before First Use
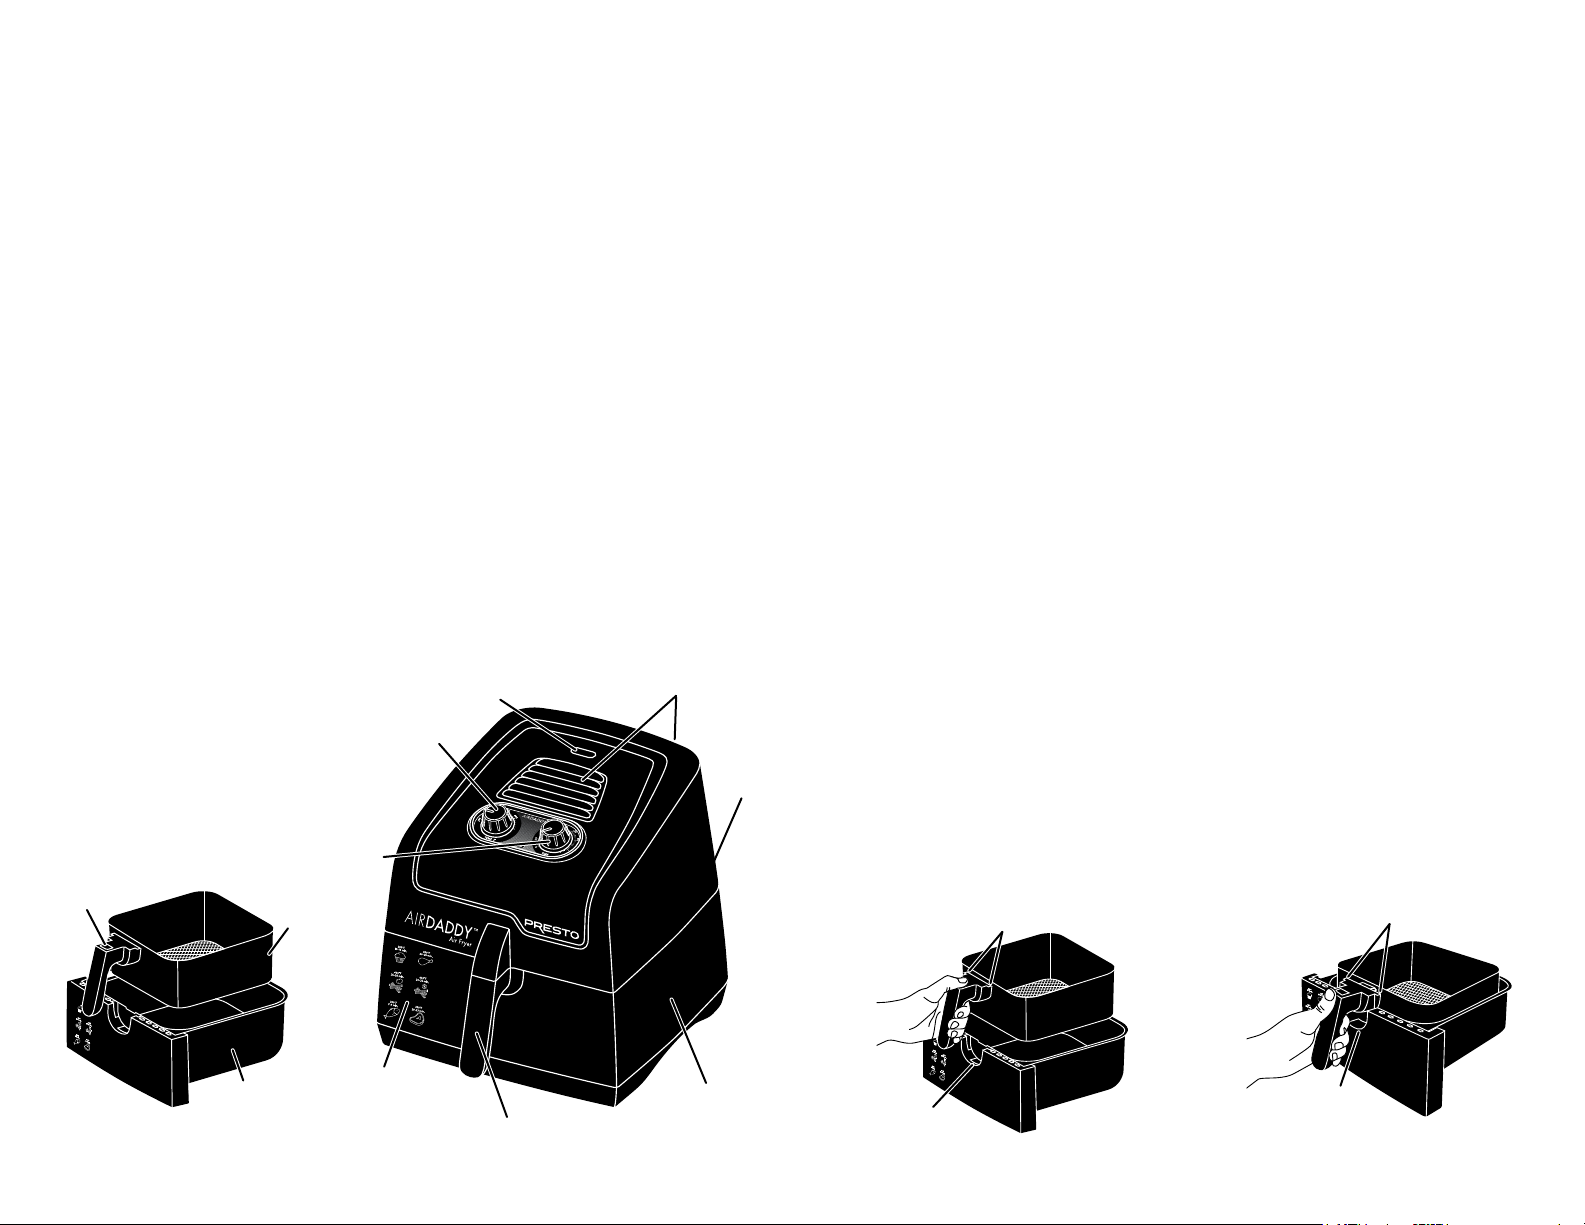
Before using the Presto AirDaddy electric air fryer for the first time, become familiar
with the various parts of the air fryer (Fig. A) and read the instructions carefully. Remove
all packaging from the air fryer. Wash the air fryer according to the “Care and Cleaning”
instructions on page 7. Never immerse the air fryer or plug in water or other liquid.
To remove the basket assembly from the air fryer, grasp the handle and pull the assembly
towards you. Be sure not to press the release button on the top of the handle. To separate
the basket from the pan, grasp the handle, press the basket release button, and lift the basket
straight up and out of the pan (Fig. B).
To reinsert the basket, grasp the handle. Line up the tabs on the sides of the semi-circular
portion of the handle with the grooves in the semi-circular cut-out on the front of the pan.
Lower the basket until it clicks in place (Fig. C).
Air vents
Cord
wrap
Basket
release
button
Fig. A
Signal light
Temperature
control knob
Timer
control knob
Basket
How to Use
Check the rubber pads on the bottom of the air fryer base before each use to be sure they
are free of oil or other debris. If needed, wipe with a warm, soapy cloth and dry thoroughly.
1. Position the air fryer on a clean, dry, level, and stable surface in the center of the countertop, away from combustible materials. Always make sure air fryer and cord are
out of reach of children.
2. Do not cover the air inlet or outlet vents or put anything on top of the air fryer. This
disrupts the airflow, affects the final cooking results, and may cause fryer to overheat.
3. Remove the basket assembly from the air fryer by firmly grasping the basket handle,
pulling it toward you, and then sliding the assembly out of the unit. Place it on the
countertop. Do not fill the pan with oil or any other liquid. Never use the basket
assembly without the basket in it.
4. Fill the basket up to ¾ full with food. Do not overfill.
5. Slide the basket assembly back into the air fryer. Plug cord into a 120VAC electrical
wall outlet only.
6. Turn the temperature control knob to the desired temperature in the selected recipe or
the Cooking Guide on pages 8–9.
7. Turn the timer control knob to the time recommended in the recipe or the Cooking
Guide on pages 8–9. The heating element will energize and the red signal light will
illuminate. It is normal for steam to escape from the sides of the fryer during cooking.
NOTE: When using the air fryer for the first time, a slight odor or light smoking may
occur as manufacturing residue evaporates. This is normal.
8. When the set time has expired, the timer will ding once and the air fryer will stop heating. Allow prepared food to rest 5 to 10 seconds before removing the basket assembly.
9. Grasping the handle, carefully slide the basket assembly out of the air fryer to make sure
food is golden brown. Do not touch the basket or pan as they get hot during use.
If additional cooking time is needed, slide the basket assembly back into the air fryer
and reset the timer to the desired time. To cook 4 minutes or less, rotate the timer
control knob past “5” and then back to the desired time. This will activate the heating
element and timer.
Fig. B
Tabs
Fig. C
Tabs
Basket
Pan
Basket assembly (removed and separated)
Menu
guide
Handle
4 5
Basket assembly
(pan and basket)
Semi-circular
cut-out
Pan
Basket
Pan
Semi-circular
cut-out
Page 4

10. Once the food is done, slide the basket assembly out of the air fryer and place it on
a heat-resistant surface, such as a cooling rack. Press the basket release button and
separate the basket from the assembly. Empty prepared food on to a serving plate and
season to taste.
11. If preparing additional food, repeat steps 4 through 9. When cooking is complete, turn
the timer control knob to “0” (OFF) and remove the plug from the wall outlet. Allow
the air fryer to cool completely before cleaning.
Helpful Hints
♦ In most instances, it is not necessary to preheat your air fryer. However, preheating for
4 to 5 minutes will result in a better quality product for foods that are baked, such as
muffins, cakes, and cupcakes.
♦ For the best results and most even browning, cut food into pieces of equal size and
thickness and place in a single layer in the basket.
♦ The air fryer can be used for baking many wonderful foods. The use of accessory pans
or tins will be necessary for baking.
▪ Use individual muffin tins, oven safe glass custard cups, or ceramic ramekins for
baking muffins, cupcakes, or egg dishes.
▪ Use disposable or permanent loaf-type pans measuring no more than 8 x 3⅞ inches
when baking cakes or quick breads.
▪ Use a 6-inch pie pan or tart pan for pies, tarts, and quiches.
After filling the accessory pans or tins, position them in the basket.
♦ Frozen fries do not require oil because they have been partially fried before freezing.
♦ For the best results when making fries from scratch, follow these suggestions:
▪ Begin with the right potato. Baking-type potatoes, such as russet, will yield a fluffier,
drier fry. Do not refrigerate potatoes as that will make the fries soggier.
▪ Soak the cut potatoes for at least 30 minutes before cooking. After soaking, drain
potatoes and pat dry with paper towels.
▪ Spray cut potatoes with cooking oil spray or coat with ½–1 tablespoon of vegetable
oil before cooking.
▪ Fill the basket with no more than 1 pound of fries.
▪ Shake basket twice during cooking.
♦ When cooking naturally high-fat foods, such as chicken wings, the basket assembly
may become hotter than usual. This does not affect cooking results. To avoid excess
smoke, empty any oil or grease that has collected in the pan between batches and clean
the entire basket assembly after each use.
♦ Do not overfill the basket. Foods will be crispier and cook more evenly when there is
plenty of room in which the air can circulate. Most foods cook better when a single
layer of food is placed in the basket.
♦ Always pat food dry. This will allow for better browning and a crispier exterior.
♦ If desired, foods can be coated with breading. Be sure to firmly press the breading onto
the food. To aid in getting the breading to adhere to the food, first dip the food into
a mixture of 1 beaten egg and ½ cup milk. Coat with panko bread crumbs. You may
also mix 1 tablespoon of oil into the bread crumbs before pressing them onto the food.
♦ Many foods require shaking or flipping halfway through cooking to ensure more even
cooking and browning. To shake or flip food, remove the basket assembly from the air
fryer, shake or flip food, and then slide the assembly back into place. Do not press the
basket release button during shaking.
♦ If the basket assembly is too heavy for shaking food, you may release the basket from
the pan by pressing the basket release button and lifting the basket out of the pan. Shake
the basket and then return it to the pan. Slide the basket assembly back into place.
♦ The timer may be set as a reminder to shake food. However, once food has been shaken,
reset the timer for the remaining cooking time.
♦ Use pre-made dough to prepare filled snacks quickly and easily. Pre-made dough has
a shorter cooking time than homemade dough.
♦ Snacks that can be prepared in the oven can also be prepared in the air fryer. As a general
rule, lower the cooking temperature by 25ºF and reduce the cooking time 3–5 minutes.
♦ Your favorite recipe may be adapted to the AirDaddy air fryer by using the cooking
times provided in the Cooking Guide on pages 8–9 or using one of the recipes on pages
10–15 as a guide for determining the appropriate time and temperature.
♦ The air fryer can be turned off at any time by turning the timer control knob to “0.”
Care and Cleaning
1. After the air fryer has cooled completely, carefully slide the basket assembly out of
the air fryer. Separate the basket from the assembly following the instructions in the
“Before First Use” section on page 4.
2. Wash the entire basket assembly (the pan and basket) in warm, soapy water. For any
stuck on food residue, it will be helpful to soak the basket in hot, soapy water before
cleaning. Rinse and dry thoroughly. A brush may be needed to thoroughly clean residue
from the basket. Do not use steel wool scouring pads or abrasive kitchen cleaners.
It is not recommended that any part of the air fryer be washed in the dishwasher.
3. The outside surface of the air fryer can be wiped clean with a moist cloth. Do not use
steel wool scouring pads or abrasive kitchen cleaners. Never immerse the air fryer
or plug in water or other liquid.
4. Once the air fryer has been cleaned, the cord can be wrapped and secured on the tab
located on the back of the unit for convenient storage.
5. Any maintenance required for this product, other than normal household care and cleaning, should be performed by an authorized service representative.
6 7
Page 5

Cooking Guide
This guide lists the suggested food amount, temperature, cooking time, and any action required to
obtain the best results. The quantity, thickness, and density of food prepared may aect cooking time,
as will personal preference. Fill the basket no more than ¾ full for most foods. When indicated in the
cooking tips, food should be flipped halfway through cooking.
Type of Food Amount Temp. Time (min.) Cooking Tips
Fresh Meat, Fish, and Poultry
Chicken, breaded or unbreaded
Breasts, boneless, skinless 3–4 350° 20–25 Flip.
Drumsticks 5–6 350° 20–25 Flip.
Strips
Thighs 3–4 350° 22–27 Flip.
Whole
Wings 6–8 350° 19–23 Flip.
Fish fillets, breaded 3–4 350° 7–9 Flip.
Hamburger 4 patties 350° 17–20 Flip.
Pork chop, ½–¾ inch thick 3–4 350° 20–23 Flip.
Salmon fillets 4–5 350° 14–15
Shrimp
Steak, ½–¾ inch thick 2–4 350° 20–23 Flip.
Frozen Convenience Foods
Cheese sticks, breaded
Chicken nuggets
Egg rolls 5–6 350° 19–22
Fish fillets, breaded 6–8 400° 15–18 Flip.
French toast 4 400° 10–12
Onion rings, breaded 1 pound 400° 16–18 Shake.
Pizza rolls
Stuffed peppers
10–12
ounces
Up to 3½
pounds
12–14
ounces
12–14
ounces
12–14
ounces
12–14
ounces
14–16
ounces
350° 11–13
350° 60
350° 8–10
400° 6–9
400° 10–12
400° 7–8
400° 10–12
Start breast side
down. Flip.
Line bottom of
basket with foil.
Type of Food Amount Temp. Time (min.) Cooking Tips
Potatoes
Baked, sweet, medium
(7–8 ounces)
Baked, white, medium
(5–6 ounces)
Frozen hash brown patties 4–5 400° 10–12
Frozen thick cut fries
Frozen shoestring fries
Homemade fries
Homemade wedges
Baked Products (Preheat at 350° for 3–5 minutes.)
Cake 1 350° 32–34
Cupcakes 4 350° 15
Muffins 4 350° 15
Refrigerator Dough
Biscuits, crescents 6 350° 6–8
Cinnamon rolls 8 350° 8–10
Other Foods
Grilled sandwiches 2 400° 8 Flip.
Toasted almonds
Toasted pecans
Toasted walnuts
4–5 350° 40–45
4–5 350° 40–45
1–1½
pounds
1–1½
pounds
1–1½
pounds
1–1½
pounds
4–6
ounces
4–6
ounces
4–6
ounces
400° 20–25
400° 16–20
400° 25–28
350° 18–20
350° 6
350° 3
350° 5
Shake every 8
minutes.
Shake every 8
minutes.
Shake every 8
minutes.
Line bottom of
basket with foil.
Line bottom of
basket with foil.
8 9
Page 6

Recipes
Spicy Chicken Strips
1 cup buttermilk
1½ tablespoons hot pepper sauce
1 teaspoon salt
½ teaspoon black pepper, divided
1 pound boneless, skinless chicken
breasts, cut into ¾-inch strips
¾ cup panko bread crumbs
½ teaspoon salt
¼ teaspoon cayenne pepper, or to taste
1 tablespoon olive oil
Combine buttermilk, hot sauce, salt, and
¼ teaspoon black pepper in a shallow bowl.
Add chicken strips and refrigerate for at
least 2 hours. Combine bread crumbs, salt,
remaining black pepper, and cayenne pepper in another shallow bowl; stir in oil.
Remove chicken strips from marinade and
discard marinade. Drop strips, a few at a
time, into crumb mixture. Press crumbs
onto strips for even and secure coating.
Place a single layer of chicken strips,
about half, in basket. Cook at 350° for 12
minutes. Cook remaining strips when rst
batch is complete.
8 servings (serving size = 2–3 strips)
Pepper Crusted Salmon
¼ cup tamari or soy sauce
½ tablespoon orange juice
2 garlic cloves, minced
2 teaspoons honey
4 4-ounce salmon fillets
1 tablespoon olive oil
½ to 1½ tablespoons coarsely ground
mixed peppercorns
Mix tamari, orange juice, garlic, and honey
in a shallow glass baking dish. Add salmon,
turning to coat. Cover and refrigerate for
30 minutes, turning occasionally. Remove
salmon from marinade; discard marinade.
Pat salmon dry.
Rub both sides of each llet with oil. Coat
the esh side of each llet with pepper.
Line basket bottom with aluminum foil and
place llets, skin side down, on the foil.
Cook at 350° until salmon akes, about 15
minutes.
4 servings
Herb Roasted Chicken
½ to 1 tablespoon olive oil
1 teaspoon dried rosemary, crushed
1 teaspoon dried parsley
1 garlic clove, minced
¼ teaspoon salt
⅛ teaspoon black pepper
1 3 to 3½-pound chicken
Parmesan Coated Chicken Breasts
¼ cup panko bread crumbs
¼ cup grated Parmesan cheese
¼ teaspoon dried basil
1 tablespoon olive oil
1 tablespoon Dijon mustard
1 teaspoon Worcestershire sauce
2 boneless, skinless chicken breasts
Combine oil, rosemary, parsley, garlic, salt,
and pepper in a small bowl. Rub oil mixture over the entire chicken. Place chicken
in the basket, breast side down. Cook at
350° for 1 hour, ipping halfway through
cooking. Allow chicken to rest in basket for
10 minutes before removing to carve.
4 servings (serving size = 4 ounces)
Combine bread crumbs, cheese, and basil
in a small, shallow bowl. Add oil and stir
until thoroughly combined. Combine mustard and Worcestershire sauce in a small
bowl. Spread mustard mixture over both
sides of each chicken breast. Place chicken
in bowl with crumb mixture and press coating onto each side of each breast for even
and secure coating. Place chicken in basket.
Cook at 350° for 21–25 minutes, ipping
halfway through cooking.
2 servings
Horseradish Crusted Pork Chop
1½ tablespoons prepared horseradish
1 tablespoon ground coriander
½ teaspoon salt
¼ teaspoon black pepper
2 teaspoons olive oil
4 boneless pork chops, ½ to ¾ inch
thick
Sesame Ginger Beef
½ cup tamari or soy sauce
3 tablespoons olive oil
2 tablespoons dark-roasted sesame oil
1 tablespoon brown sugar
1 tablespoon grated fresh ginger
3 cloves garlic, minced
1 to 1½ pounds beef flank, boneless sirloin,
or top round steak
Combine horseradish, coriander, salt,
pepper, and oil in a small bowl. Rub
mixture over both sides of the pork chops.
Place pork chops in basket. Cook at 350°
for 20–23 minutes, ipping halfway
through cooking.
4 servings
Whisk together tamari, oils, brown sugar,
ginger, and garlic in a small bowl. Add beef
to a gallon-size resealable plastic bag; pour
marinade in bag. Press as much air out of
the bag as possible and seal. Refrigerate
for 1–1½ hours, turning halfway. Remove
beef from marinade and discard marinade.
Pat steak dry and place in basket. Cook at
350° for 20–23 minutes, ipping halfway
through cooking.
4–6 servings (serving size = 4 ounces)
10 11
Page 7

Santa Fe Pizza
1 teaspoon vegetable oil
½ teaspoon ground cumin
2 tortillas, 7–8 inches in diameter
¼ cup prepared spicy black bean dip
4 ounces cooked chicken, cut in strips
or shredded
1 tablespoon taco seasoning
2 tablespoons prepared chipotle salsa,
or preferred type
¼ cup plus 2 tablespoons fresh or
frozen (thawed) corn kernels
1 tablespoon sliced scallions
1 teaspoon chopped cilantro
⅔ cup shredded pepper jack cheese
Triple Cheese Grill
2 tablespoons mayonnaise
⅛ teaspoon dried basil
⅛ teaspoon dried oregano
4 slices whole wheat bread
2 ½- to 1-ounce slices cheddar cheese
2 ½- to 1-ounce slices brick or
Monterey Jack cheese
2 thin slices tomato
2 ½- to 1-ounce slices provolone cheese
Softened butter
Sweet Potatoes with Nut Butter
1½ pounds (about 2 medium) sweet
potatoes, peeled and cut into
½-inch dice
½ tablespoon olive oil
1 tablespoon butter, melted
1 tablespoon finely chopped walnuts
½ teaspoon grated orange peel
⅛ teaspoon ground nutmeg
⅛ teaspoon grated cinnamon
Combine oil and cumin in a small bowl;
spread on both tortillas. Then spread bean
dip evenly on both tortillas. Place chicken
pieces and taco seasoning in a medium
bowl and stir until chicken is evenly
coated. Add salsa and mix with the coated
chicken.
Remove half of the chicken and place
evenly over bean dip on one of the tortillas.
Sprinkle tortilla with half of corn, scallions, and cilantro, then top with half of the
cheese. Place pizza in basket. Bake at 400°
for 10 minutes. Prepare remaining tortilla
and cook after removing the rst pizza.
2 pizzas
Mix mayonnaise, basil, and oregano in
small bowl; spread mixture on one side
of each bread slice. Top each bread slice
with 1 slice each of cheddar cheese,
brick cheese, tomato, provolone cheese,
and bread. Lightly butter outside of each
sandwich. Add sandwiches to basket. Cook
at 400° for 8 minutes, ipping halfway
through cooking.
2 servings
Place sweet potatoes in a small bowl and
drizzle with oil. Stir until potatoes are
coated and then pour into basket, spreading
sweet potatoes into a single layer. Cook at
350° for 20–25 minutes, shaking/stirring
halfway through cooking. Remove sweet
potatoes to a serving bowl. Combine butter,
walnuts, orange peel, nutmeg, and cinnamon in a small bowl and pour over sweet
potatoes.
5 servings (serving size = ¾ cup)
Hot and Spicy Fries
1 pound (about 4 medium) russet baking
potatoes, cut into ½-inch wide strips
2 teaspoons olive oil
1 tablespoon cornstarch
1 teaspoon Hot and Spicy Seasoning
Hot and Spicy Seasoning
1 tablespoon chili powder
1 teaspoon salt
½ teaspoon cumin
¼ teaspoon cayenne pepper
Apple Pear Crisp
¼ cup plus 2 tablespoons quick-cooking
oats
3 tablespoons all-purpose flour
2 tablespoons packed brown sugar
½ teaspoon ground pumpkin pie spice,
divided
1½ tablespoons butter, cut in small pieces
1 medium (about 8 ounces) Golden
Delicious apple, peeled, cored, and
diced
1 medium (about 8 ounces) pear, cored
and diced
1 teaspoon lemon juice
4 ounces mascarpone cheese
½ tablespoon sugar
½ teaspoon vanilla extract
Place the potatoes in a large bowl. Cover
with water and soak for at least 30 minutes.
Drain, pat potatoes dry, and return to bowl.
Combine oil, cornstarch, and seasoning in a
small bowl. Pour oil mixture over potatoes
and stir until well coated. Place potatoes in
the basket. Bake at 400° for 26–30
minutes, shaking/stirring potatoes twice
during cooking.
5 servings (serving size = ¾ cup)
Combine chili powder, salt, cumin, and
pepper in a small bowl. Store in an airtight
container for several weeks.
Makes enough for 6 batches of fries.
Preheat air fryer at 350°. Combine oats,
our, brown sugar, and ¼ teaspoon of
pumpkin pie spice in a medium bowl. Add
butter and, using a pastry cutter or your
ngers, work mixture together until
crumbly; set aside.
Mix apple and pear pieces and sprinkle
with lemon juice and remaining pumpkin
pie spice. Pour apple-pear mixture into a
1-quart bowl or casserole dish that will
comfortably t into the basket. Sprinkle
reserved oat mixture evenly over top. Bake
30 minutes or until apples and pears are
tender. Remove bowl from air fryer and
allow to cool slightly.
While crisp is cooling, blend together mascarpone, sugar, and vanilla in a small bowl.
Top each serving of crisp with sweetened
mascarpone.
4 servings (serving size = ½ cup)
12 13
Page 8

Glazed Zucchini Walnut Cake
1 9-ounce package yellow cake mix
1 egg
⅓ cup water
½ cup shredded zucchini
¼ cup chopped walnuts
¾ teaspoon cinnamon
¼ teaspoon ground nutmeg
¼ teaspoon ground ginger
Maple Glaze
Maple Glaze
¼ cup sifted powdered sugar
1 tablespoon maple syrup
½ to 1½ teaspoons milk
Preheat air fryer at 350°.
Prepare an 8- x 3⅞-inch loaf pan and make
cake according to package directions. Use
⅓ cup water instead of ½ cup. Stir in
zucchini, walnuts, cinnamon, nutmeg, and
ginger.
Pour batter into prepared pan and place
pan in basket. Bake until a toothpick
inserted near the center of cake comes out
clean, about 32–34 minutes. Remove cake
from air fryer. Cool on a wire rack for 10
minutes. Remove cake to a serving plate.
Allow to cool just until warm. Drizzle with
maple glaze.
Combine powdered sugar and maple syrup
in small bowl. Stir in milk, ½ teaspoon at a
time, until smooth and desired consistency.
Drizzle over cake.
10 servings (serving size = ¾-inch slice)
Sunrise Surprise Muffins
½ cup whole wheat flour
¼ cup sugar
½ teaspoon baking soda
¼ teaspoon cinnamon
⅛ teaspoon nutmeg
½ cup shredded carrots
2 tablespoons chopped walnuts
2 tablespoons flaked coconut
2 tablespoons golden raisins
1 egg
1 tablespoon milk
½ teaspoon vanilla extract
¼ cup applesauce
Preheat air fryer at 350°. Grease the bottom
of 4 mun tins or custard cups, or line with
baking papers. Combine our, sugar, soda,
cinnamon, and nutmeg in a medium bowl.
Stir carrots, walnuts, coconut, and raisins
into our mixture.
Beat egg, milk, and vanilla in a small bowl;
stir in applesauce. Add to our mixture and
stir only until all ingredients are moistened.
Fill prepared mun tins or custard cups
with equal amount of batter (about ⅓ cup).
Place mun tins in basket. Bake for 15
minutes. Cool in mun tins for 5 minutes
before removing.
4 servings
Tip: If lining mun tins with baking paper,
remove muns from tins immediately.
14 15
 Loading...