

Prestigio PMB000L650, PMB514L550, PMB514L650, PMB514L700, PMB000L700 Quick Start Manual
...Page 1
Red Color - Pantone 1945C
MULTIBOARD
2017
2016/12/01
Quick Start Guide
Page 2
Contents
1. Safety precautions ................................................................................................... 1
2.
Preparation ............................................................................................................... 4
Use the wall mount kit ��������������������������.......�������������������������������������������������������������������� 4
Use the stand �������������������������������������������������������������������������������������...���������������������������� 4
3. Unboxing .................................................................................................................. 5
Open your package ��������������������������������������������������������������������������������������������������� 5
Your MultiBoard at a glance ������������������������������������������������������������������������������������������� 6
Remote control ������������������������������������������������������������������������������������������������...������������.�� 8
4. Getting started ........................................................................................................ 12
Use internal PC ���������������������������������������������������������������������������������������������������������� 12
Connected with an external computer ������������������������������������������������������������������������ 13
Connected with other devices ��������������������������������������������������������������������������..�������.���� 14
5.
Network connection ............................................................................................... 16
Connecting to the Network ������������������������������������������������������������������������������������� 16
Wired installation ��������������������������������������������������������������������������������������������������������� 16
Wireless installation �������������������������������������������������������������������������������������...���������������� 17
6. General settings ...................................................................................................... 18
Set up your MultiBoard ������������������������������������������������������������������������������������������������ 18
Input settings ��������������������������������������������������������������������������������������������������������������� 18
Brightness settings ������������������������������������������������������������������������������������������������������� 19
Volume settings ����������������������������������������������������������������������������������������������������������� 19
VGA Channel settings ��������������������������������������������������������������������������������������������������� 20
Screen settings ����������������������������������������������������������������������������������������...������������.��������� 21
7. Daily care and maitenance ..................................................................................... 22
8. Technical specifications .......................................................................................... 23
9.
Troubleshooting ...................................................................................................... 25
2016/12/01
Page 3
EN - 1
1. Safety precautions
Please observe all safety precautions before using your MultiBoard�
Please follow all procedures outlined in this quick start guide to
correctly operate it�
CAUTION
TO REDUCE THE RISK OF ELECTRIC SHOCK, do not attempt to open the shell or attempt
to repair, if the device or any parts are defective, please go to a Prestigio maintenance
centre for repair�
Installation and relocation
•
Have the unit installed, removed and disposed of only by qualified service personnel�
•
Do not place the unit where it cannot be securely positioned and would easily tilt�
• Do not lean against the screen or on the cover (lower), even if the electronic
board is mounted on the wall�
• To avoid the risk of electrical shock, do not connect or disconnect the product
with wet hands�
• Do not put drinks, other liquids or heavy items on the tray or screen�
• Do not put heavy objects on top of the unit�
• Do not use the electronic board in an excessively humid or dusty location�
• Do not place the device near a heat source or directly expose it to flame or heat�
• Do not put the unit near appliances that create magnetic fields�
• Please use the device under natural temperature, do not work under the
temperature which human body cannot adapt to�
• If the electronic board is not going to be used for an extended period of time (e�g�,
during extended holidays), turn off the power and remove the plug from the wall
outlet�
•
When the unit will no longer be used, in order to prevent it from falling, do not
leave the unit installed, but remove it� If the unit falls, it can cause injury
Power cord and power supply
• Please ensure that the power voltage specified on the product conforms to that of the main
power supply�
• Prior to a lightning or thunderstorm, switch the power off and disconnect the power cord�
• The included power cord is for this unit only� Do not use it with any other devices�
• Do not place the power cord near heat sources�
• Do not unplug the power cord when the device is in use�
1
2016/12/01
EN
Page 4
EN - 2
• Please keep the power cord from physical or mechanical damage� Do not bend or
pull the power cord with force� Do not place any heavy object on the power cord�
• Please ensure that the AC power is grounded�
• Disconnect the power cord from the power socket if you will not use the unit for an
extended period of time�
Screen
•
Do not use any hard or sharp object on the screen�
• Unplug the power cord before cleaning�
• Clean the screen with a soft, dustless, and dry cloth�
• Do not use water or directly spray any type of detergent on the screen�
• For a thorough cleaning, contact an authorized service centre�
• Do not display a still image with high brightness on the screen for an extended period of
time�
Viewing distance
• The optimal viewing distance is 5-7 times the diagonal length of the screen�
• The optimal viewing angle is within 178 degrees from the screen�
Temperature
• Do not place the product near any electric radiator or heating unit�
• When moving the product from a low temperature area to a high temperature area, let it
sit for a period of time to allow the condensation inside to defuse before powering it on�
• The unit's optimal operating temperature is 0 ~ 40°C, and the advised temperature for
storage is - 20 ~ 60°C�
Humidity
• Do not expose the product to the rain, or place it near the water�
• Please ensure the unit is placed in a dry and cool environment� The suitable operating
humidity level is 10 ~ 90%, while for storage it is 10 ~ 90%�
Ventilation
The vents and other openings in the cabinet are designed for ventilation�
• Do not cover or block these vents and openings, since insufficient ventilation can cause
overheating and/or shorten the life of the unit�
• Ensure that there is enough space around the unit for ventilation: the left, right and back
>10cm, the top> 20cm�
• This product is not designed for built-in installation; do not place the product in an
enclosed place such as a bookcase or rack, unless proper ventilation is provided or the
2016/12/01
EN
Page 5
EN - 3
Quick Start Guide
Prestigio MultiBoard
EN
manufacturer’s instructions are followed�
Battery
If batteries are not used properly, they may leak, and cause corrosion inside the remote
control, or even burst� To prevent this, always follow the precautions below:
• Dispose of the batteries in accordance with the laws and regulations in your area�
• Do not allow children to handle the batteries without adult supervision� Do not throw
batteries into fire, or place them in water�
• Always remove batteries from the remote control if they are not to be used for an
extended period of time�
• Use the same type of batteries� Do not mix different types�
• Do not mix old and new batteries�
• When inserting the batteries, always ensure the polarity is a match to that indicated on the
remote control�
• If the remote control ceases to work because of drained batteries, remove them
immediately and dispose them according to safety regulations�
• Leaving drained batteries in the remote control may result in leakage�
• Alkaline batteries cannot be recharged� Never attempt to recharge alkaline batteries�
Earphone
To prevent possible hearing damage, do not listen at high volume levels for long
periods�
As the Prestigio products are constantly updated and improved, your device’s
software and hardware may have a slightly different appearance or modified
functionality than presented in this User manual�
Prestigio hereby states that this MultiBoard complies to basic requirements and another
relevant regulations given by the EU directive 2004/108/EC� Full version of the declaration of
conformity is available on: www.prestigio.com/certificates
2016/12/01
Page 6
EN - 4
EN
Quick Start Guide
Prestigio MultiBoard
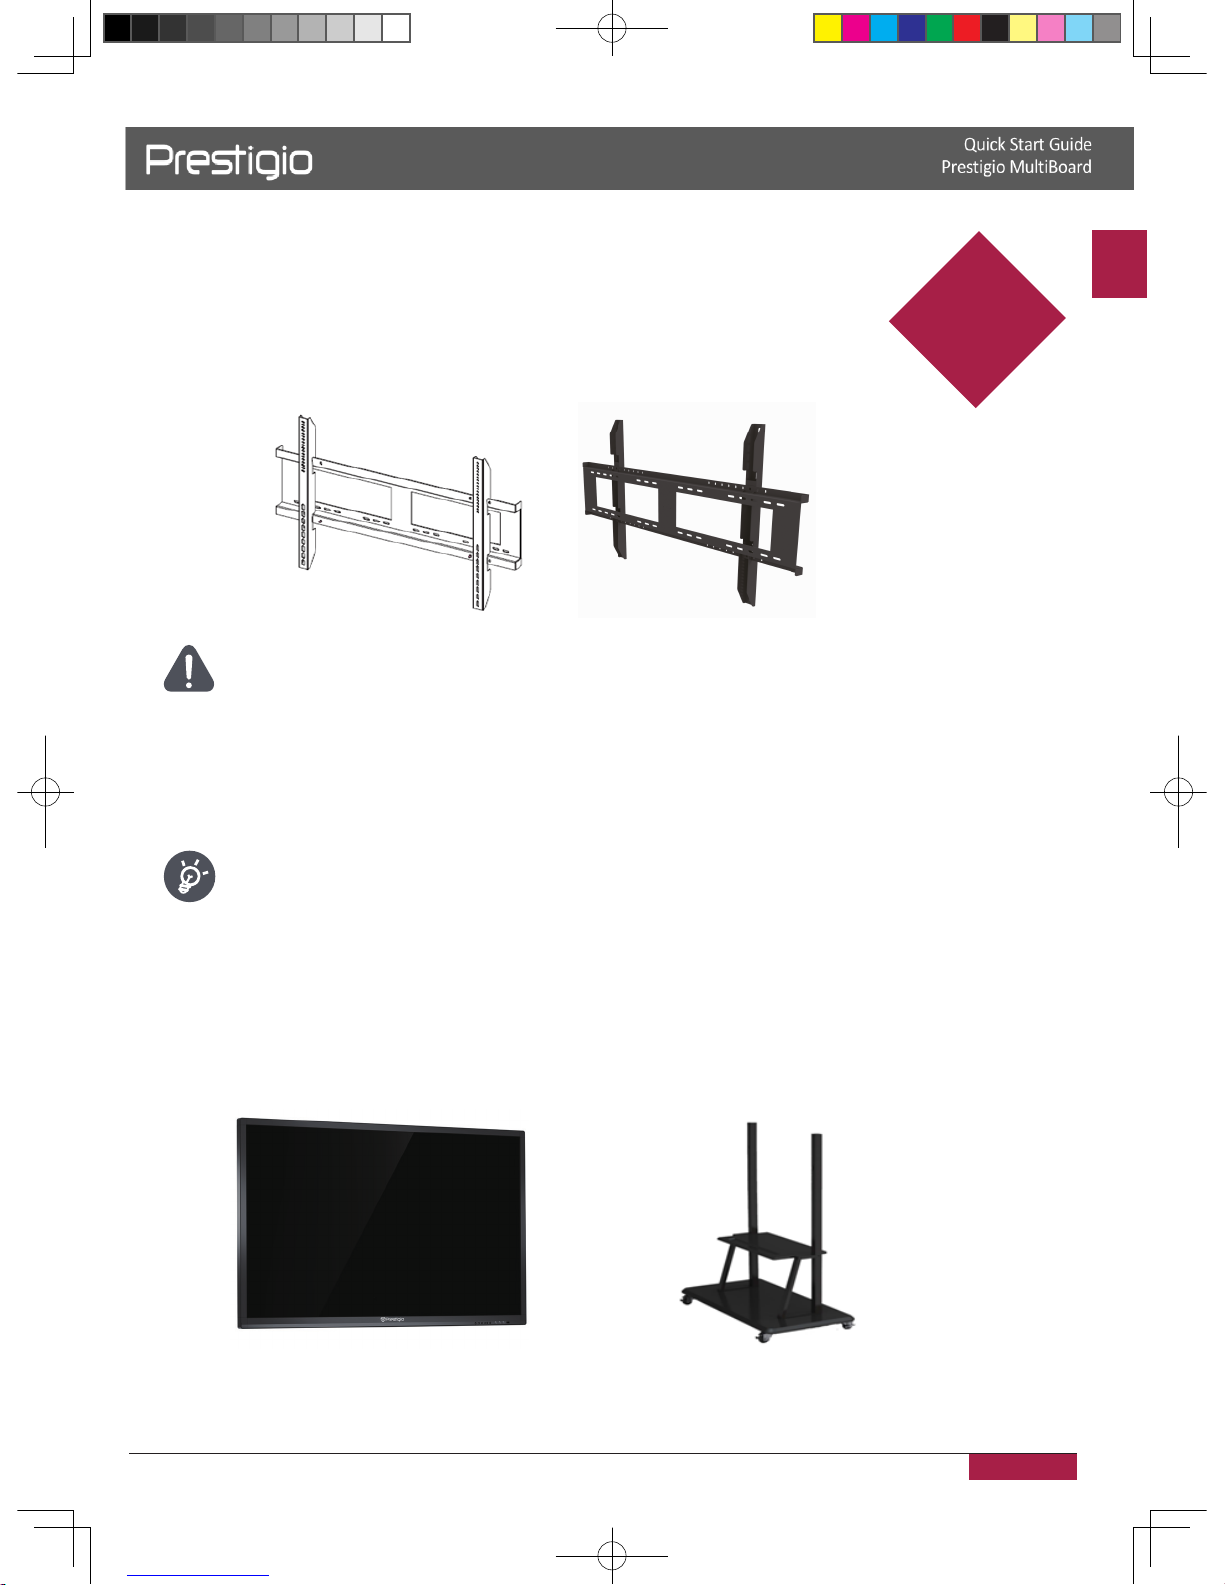
2. Preparation
Use the wall mount kit
You can mount the MultiBoard on the wall by using the wall mount kit�
• This MultiBoard should be mounted on a wall only with a wall mount kit
recommended by Prestigio� The use of other wall mount kits may result in an
unstable installation and may cause serious injuries�
• Installing the MultiBoard requires special skills that should only be performed
by qualified service personnel� Customers should not attempt to do the work
themselves� Prestigio bears no responsibility for improper mounting or mounting
that results in accident or injury�
You can ask a qualified service professional about using a Prestigio recommended
kit to mount the MultiBoard to the wall�
Use the stand
You can put your MultiBoard on a stand�
2
2016/12/01
*The stand can be used for 98”, but
please be careful and support the device
when you place it on a slop angle over 7°
to avoid dropping.
Page 7
EN - 5
Quick Start Guide
Prestigio MultiBoard
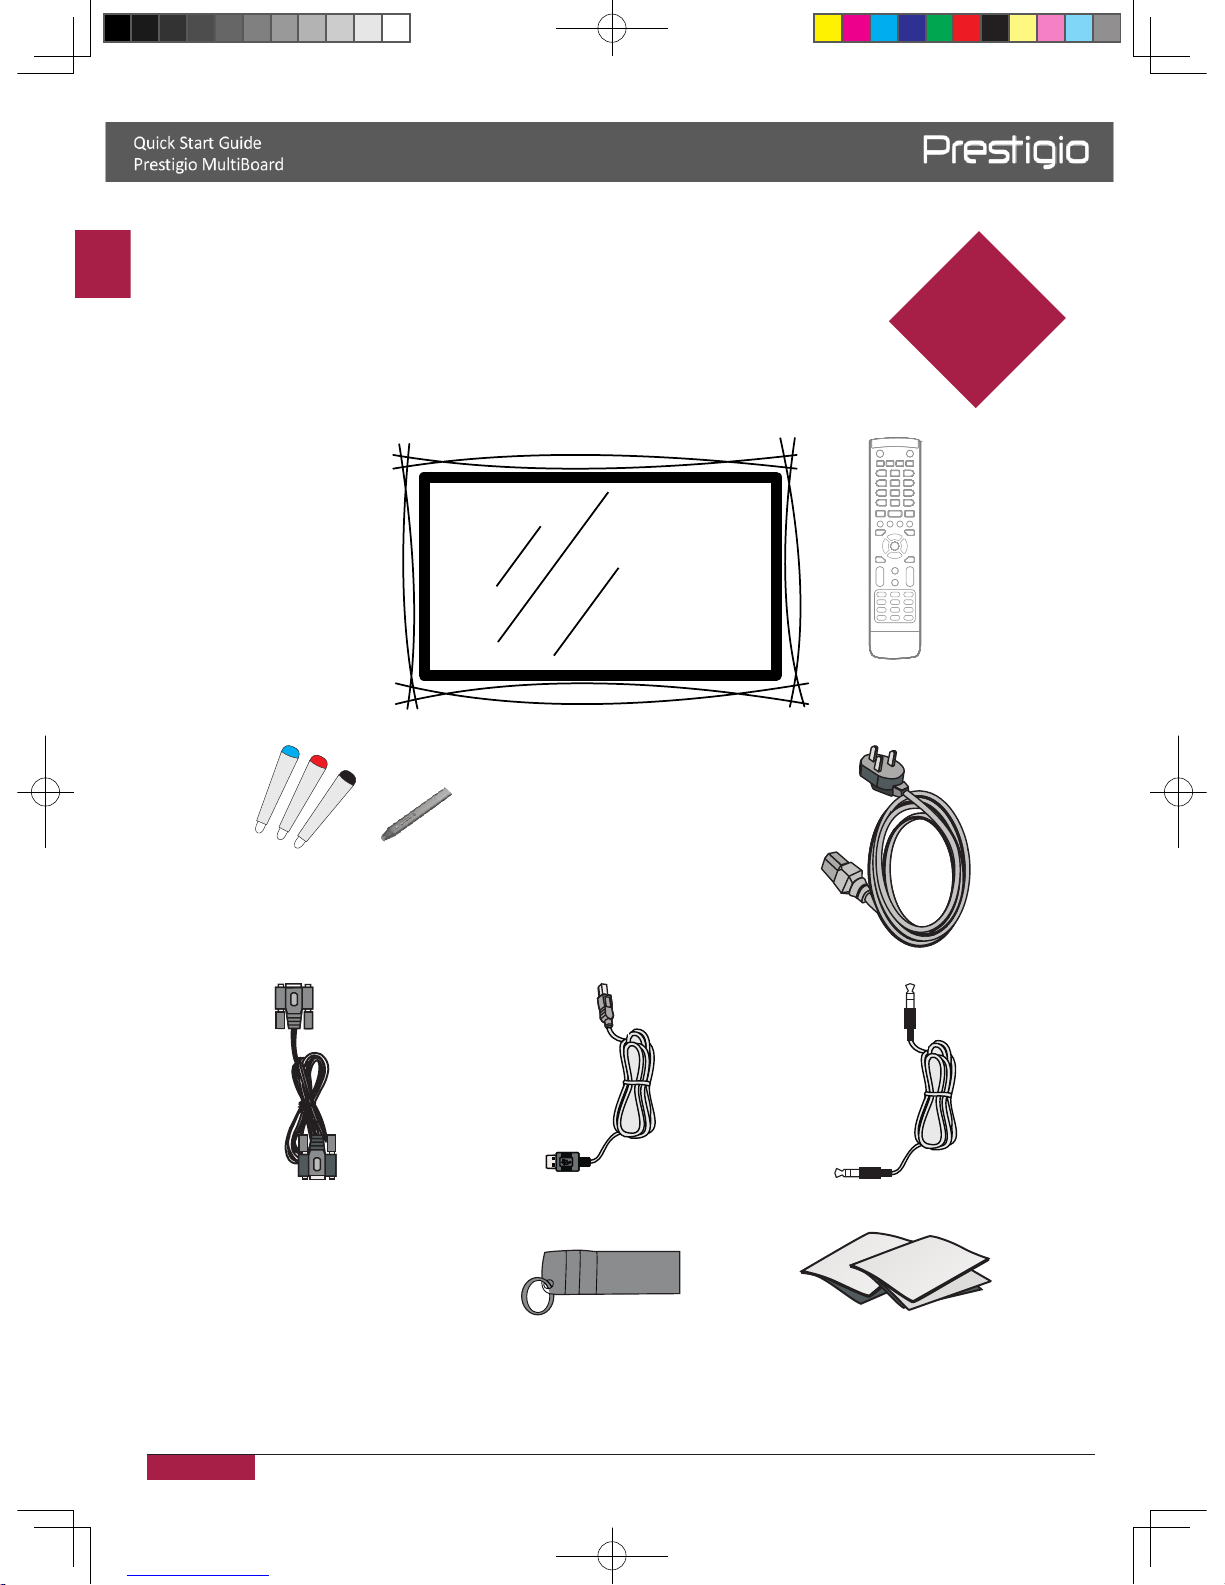
3. Unboxing
Open your package
• Prestigio MultiBoard • Remote control
•
• AC Power cable
•
VGA cable
• USB cable • PC Audio cable
• USB key • Quick start guide
3
2016/12/01
6 handwriting pens +1 interactive
NOTE! Here the Prestigio MultiBoard L-series interface is used for illustrations.
Real appearance may vary. Please visit product support section on www.prestigio.com.
EN
Page 8
.
.
.
.
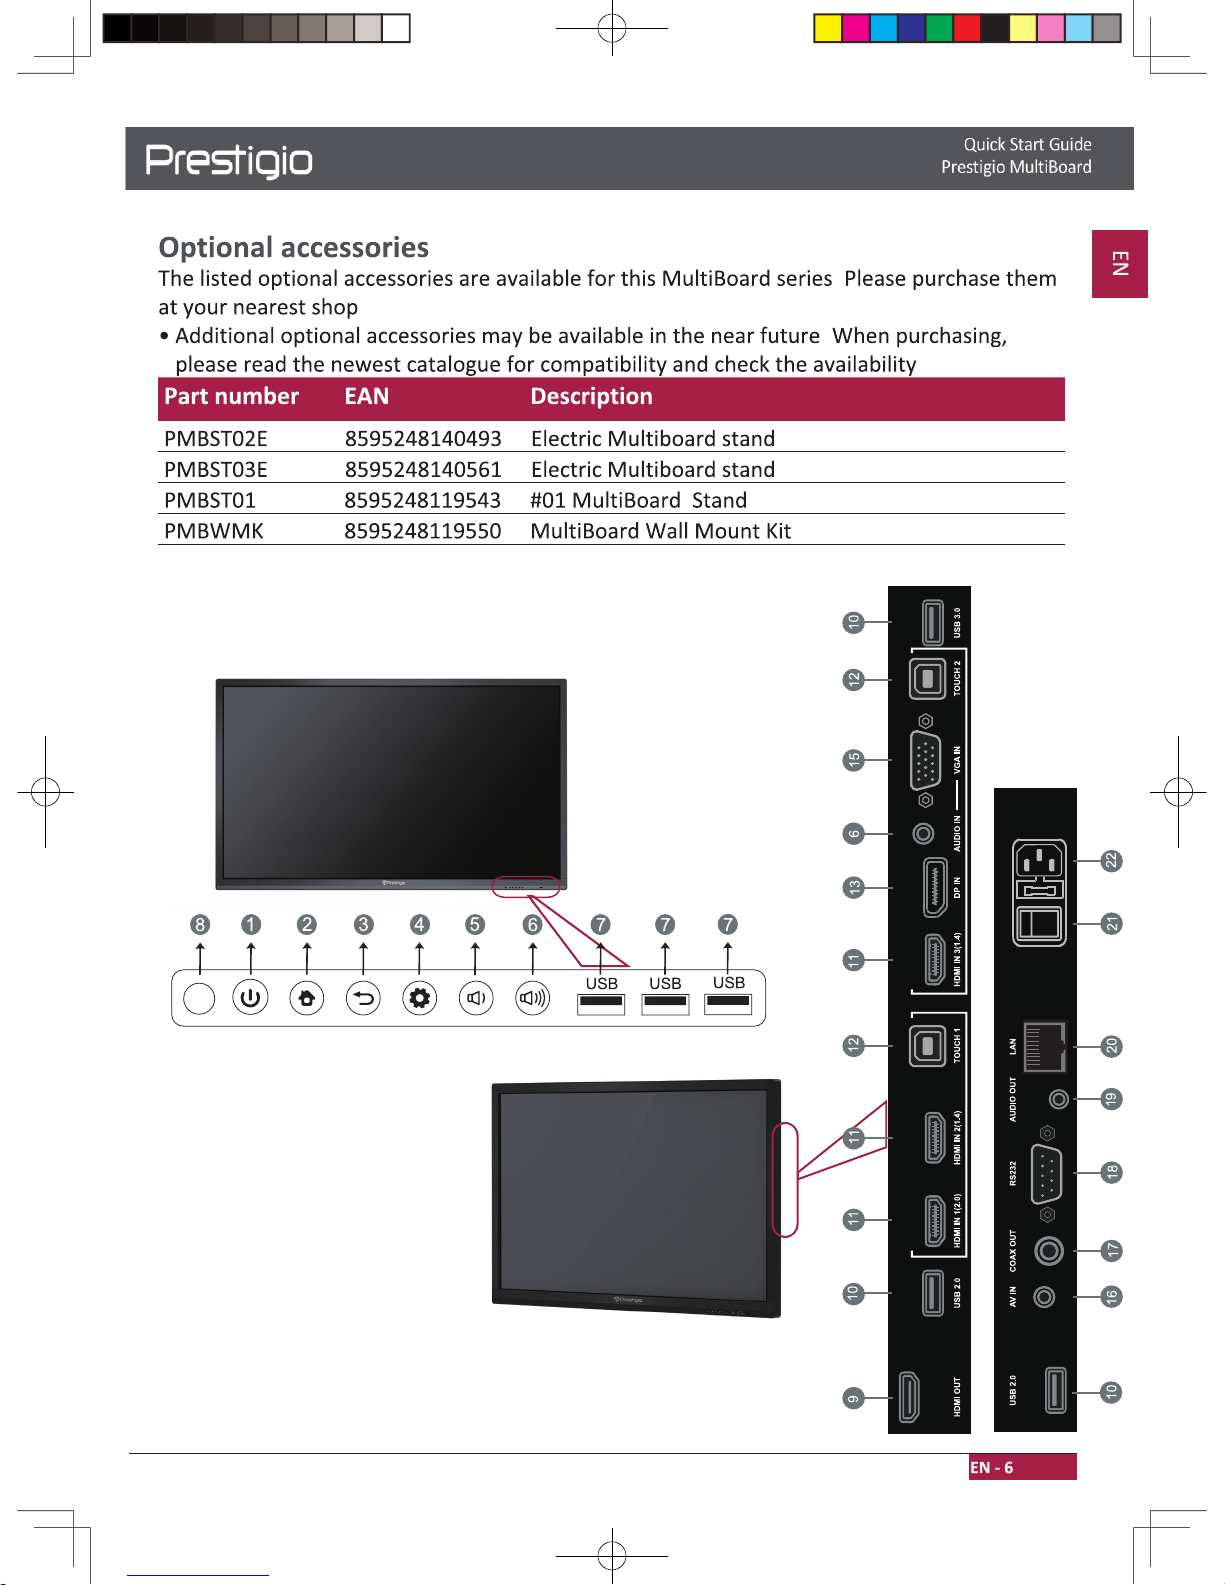
Your MultiBoard at a glance
2016/12/01
LAN
Page 9
EN - 7
Quick Start Guide
Prestigio MultiBoard
EN
Number Specification Number Specification
1
Energy saving/stand-by mode
15
2
Home button
16
3
Return button
17
4
Menu button
18
5
Volume down
19
6
Volume up
20
HDMI OUT
7
USB port of Android & PC system
21
8
22
9
Remote control signal receiver
10
11
12
13
14
2016/12/01
USB
HDMI IN
LAN
AUDIO IN
VGA IN
TOUCH
AV IN
COAX OUT
RS232
AC IN
DP
AUDIO OUT
AC SWITCH
NOTE! Here the Prestigio MultiBoard L-series interface is used for illustrations.
Real appearance may vary. Please visit product support section on www.prestigio.com.
Page 10

EN - 8
EN
Quick Start Guide
Prestigio MultiBoard
Remote control
Number Item Specification
1
Power/standby Power on/off, or enter standby mode
2
Mute Turn off the sound
3
Windows key
4
ALT+F4 Close the window of the internal PC programs
5
Space Space key
6
ALT+Tab Window switch button of Internal PC programs
7
Number keys Enter the numbers
2016/12/01
Start
Page 11

EN - 9
Quick Start Guide
Prestigio MultiBoard
EN
8
Display Display input source information
9
Return button
10
Home Home screen of Android system
11
Input Source selected button
12
Menu OSD menu button
13
Green Function button
14
Yellow Function button
15
Red Function button
16
Blue Function button
17
One key for blank screen
18
Backspace key
19
Navigation button, press to up
20
Enter Enter button, press to select the selection
21
Navigation button, press to left
22
Navigation button, press to right
23
Start-up the writing software
24
Navigation button, press to down
25
Back Return key
26
PgUp Previous page
27
PgDn Next page
28
CH�+/CH�- Switch key
29
VOL+/VOL- Turn up or lower the volume
30
Function button F1 - F12 function keys
2016/12/01
Page 12

EN - 10
EN
Quick Start Guide
Prestigio MultiBoard
Insert the batteries
1� Remove the cover on the rear of the remote control�
2� Insert two “ AAA” batteries and care to respect the polarities:
- + on the battery against +,- on the battery against - � Please do not mix the batteries�
3� Replace the cover by aligning the new batteries in the base of the remote control and
pressing it back into place�
2016/12/01
Page 13

EN - 11
Quick Start Guide
Prestigio MultiBoard
EN
Remote control area
The range of remote control receiver as shown�
2016/12/01
Page 14

EN - 12
EN
Quick Start Guide
Prestigio MultiBoard
4. Getting started
Use internal PC
1� Use the power cord to connect the MultiBoard to a power socket�
2� Switch on the POWER button on the back of the MultiBoard�
3� Turn the MultiBoard on by using the remote control or the power
button on the touch panel on the front of the MultiBoard�
4� Use the INPUT button on the remote control to display the input source list�
5� Press
/ to select the PC/Android as the input source�
6� Press ENTER to confirm your selection�
4
2016/12/01
NOTE! Here the Prestigio MultiBoard L-series interface is used for illustrations.
Real appearance may vary. Please visit product support section on www.prestigio.com
Page 15

Quick Start Guide
Prestigio MultiBoard
EN
Connected with an external computer
Audio Cable
VGA Cable
USB Cable
Computer
1� Connect a VGA cable (15pin) between the VGA and external PC� Connect an audio cable
between the PC and audio at the same time�
2� Connect a USB cable between the external PC and USB terminal�
3� Plug the POWER cord and switch on the power�
4� Start-up the external computer (Setup the touch driver)�
5� Press to turn the power on�
6� Press INPUT switch to PC/Android source�
• The best resolution of external computer input is 1920*1080�
• The unit can connect with the external PC via HDMI�
2016/12/01
EN - 11
Page 16

EN - 14
EN
Quick Start Guide
Prestigio MultiBoard
Connected with other devices
A/V connection
• AV IN
Video Game
Set-top
Satellite TV receiver
Video recorder
Camera
DVD
AV cable
1� Connect an AV-IN cable with the external devices with AV-OUT (Yellow is Video, Red is
Audio-R, White is Audio-L)�
2� Plug the POWER cord and switch on the power�
3� Press to turn the power on�
4� Press INPUT switch to PC/Android source�
• HDMI1/HDMI2
HDMI cable
DVD Disc Player
1� Use a HDMI cable to connect the device by HDMI jack�
2� Plug the POWER cord and switch on the power�
3� Press to turn the power on�
4� Press INPUT switch to HDMI source�
2016/12/01
Page 17

EN - 15
Quick Start Guide
Prestigio MultiBoard
EN
Coaxial connection
Power amplifier/stereo equipment
Coaxial cable
1� Use a coaxial cable to connect the device by Coaxial jack�
2� Plug the POWER cord and switch on the power�
3� Press
to turn the power on�
Video-OUT connection
• VGA-OUT
Projector
VGA cable
Audio cable
1� Use a VGA cable to connect the device by VGA OUT jack� Connect an earphone cable with
the Audio-OUT�
2� Plug the POWER cord and switch on the power�
3� Press to turn the power on�
VGA-OUT can output the image in the internal computer only�
2016/12/01
Page 18

EN - 16
EN
Quick Start Guide
Prestigio MultiBoard
5. Network connection
Connecting to the Network
To enjoy internet services, you need to connect the MultiBoard to a router
with a high speed connection to the internet� You can also connect the
MultiBoard to your Home network server through a router or access point� The MultiBoard
connection to the router can either be wired or wireless�
• If you choose a wired connection to the router, you need a LAN cable
(commercially available)�
• If you do not have a broadband internet connection, consult the store where you
purchased your MultiBoard or ask your internet service provider or telephone
company�
• A wired and wireless connection cannot be used at the same time� Use only one
of the connection types�
Wired installation
1� Switch on the router� Refer to the router’s operation manual for switching on�
2� Connect the LAN terminal on the MultiBoard to the router with a LAN cable (commercially
available)�
LAN
The network signal output
like router etc�
5
2016/12/01
Page 19

EN - 17
Quick Start Guide
Prestigio MultiBoard
EN
Wireless installation
1� Switch on your router before starting the network installation�
2� Plug the POWER cord and switch on the power�
3� Press to turn the power on�
4� Press INPUT switch to PC/Android source�
5� Detected Wi-Fi networks will be listed in the Wi-Fi networks section on the right-hand
corner of the status bar�
6� Tap the desired Wi-Fi network you want to connect�
- If you selected a secured network, you’ll be asked to enter the network key or password�
• A wireless LAN connection and performance cannot be guaranteed for all
residential environments� In the following cases, the wireless LAN signal may be
poor or drop, or the connection speed may become slow�
- When used in buildings made with concrete, reinforced steel, or metal�
- When placed near objects that obstruct the signal�
- When used with other wireless devices that emit the same frequency�
- When used in the vicinity of microwave ovens and other devices that emit a
magnetic field, electrostatic charge, or electromagnetic interference�
• Make sure the firewall in your network allows access to the MultiBoard wireless
connection�
• Operations cannot be guaranteed when used with access points that do not have
Wi-Fi® certification�
• A wireless LAN access point is required to connect the MultiBoard to the Internet
using a wireless LAN� See the operation manual of your access point for setup�
• A stable connection speed is required to play back streaming content� Use a wired
connection if the wireless LAN speed is unstable�
2016/12/01
Page 20

EN - 18
EN
Quick Start Guide
Prestigio MultiBoard
6. General settings
Set up your MultiBoard
Follow the steps to finish settings:
1� Plug the POWER cord and switch on the power�
2� Press INPUT on the remote control to enter settings�
3� Press
or to select the settings item�
4� Press ENTER if you want to set the desired item�
5� Select the parameter by pressing
or �
6� Press ENTER to confirm your selection�
7� Press INPUT again to go back to preview mode�
Input settings
1� Press INPUT button on the remote control enter input settings menu�
2� Press / / / button on the remote control to select the input source you need�
3� Press the Enter button on the remote control to confirm selected input source�
4� Press the return key on the remote control to exit�
6
2016/12/01
NOTE! Here the Prestigio MultiBoard L-series interface is used for illustrations.
Real appearance may vary. Please visit product support section on www.prestigio.com
Page 21

EN - 19
Quick Start Guide
Prestigio MultiBoard
EN
Brightness settings
1� Press INPUT button on the remote control enter input settings menu�
2� Press button on the remote control to enter the brightness setting menu�
3� Press the Vol / Vol- button on the remote control to adjust the
brightness� 4� Press the return key on the remote control to exit�
Volume settings
1� Press INPUT button on the remote control enter input settings menu�
2.
Press
button on the remote control to enter the volume setting menu
�
Press the Vol / Vol- button on the remote control to adjust the volume�
4. Press the return key on the remote control to exit�
2016/12/01
3.
Page 22

EN - 20
EN
Quick Start Guide
Prestigio MultiBoard
VGA Channel settings
1� In VGA mode, press INPUT button on the remote control enter settings menu�
2� Press button on the remote control to enter the advanced settings menu� 3�
Press the Vol / Vol- button on the remote control to adjust the parameter� 4�
Press the return key on the remote control to exit�
H position
Press the Vol / Vol- button on the remote control to adjust the horizontal position of
image�
V position
Press the Vol / Vol- button on the remote control to adjust the vertical position of
image�
Phase
Press the Vol / Vol- button on the remote control to adjust the phase position of
image�
Clock
Press the Vol / Vol- button on the remote control to adjust the phase clock of
image�
Aspect ratio
Press the Vol / Vol- button on the remote control to adjust the aspect ratio�
Auto fit
Press Enter button on the remote control to automatically adjust horizontal, vertical
position/phase and clock of image�
2016/12/01
Page 23

EN - 21
Quick Start Guide
Prestigio MultiBoard
EN
Screen settings
1� In Android mode, press INPUT button on the remote control enter settings menu�
2� Press button on the remote control to enter the advanced settings menu�
3. Press the Vol / Vol- button on the remote control to adjust the parameter.
4. Press the return key on the remote control to adjust the brightness of image
�
Brightness
Press the Vol / Vol- button on the remote control to adjust the brightness of image�
Contrast
Press the Vol/Vol- button on the remote control to adjust the contrast of image�
Color temp
Press the Vol/Vol- button on the remote control to adjust the color temperature of image
(Cool color/warm color/auto matic)�
2016/12/01
Page 24

EN - 22
EN
Quick Start Guide
Prestigio MultiBoard
7. Daily care and maitenance
CAUTION
Always turn off the power switch and unplug the power cord before
cleaning the unit�
Cleaning
Cleaning the screen and the unit
• Gently wipe the screen and unit with a waterdampened cloth that has been thoroughly
wrung�
• Do not use thinner, benzine or any cleaner containing abrasives as this may result
in discoloration�
• Do not wipe the screen with a dry cloth as this may generate a static charge�
• Do not apply a cleaning agent that contains alcohol, solvent, or surfactant to the
screen�
• Do not spray water or detergent directly on the product�
Storage of the product when not in use
If the unit will not be used for a while, please cut off the power supply� To prevent system
failures and power supply surges, please use a power surge protector�
7
2016/12/01
Page 25

Quick Start Guide
Prestigio MultiBoard
8.
Technical specifications
8
ARTICLE
DISPLAY SIZE
DISPLAY
RESOLUTION
RESPONSE
TIME
VIEWING
ANGLE
BRIGHTNESS
/
CONTRAST
REFRESHING
FREQUENCY
OVERALL/
STANDBY
POWER
CONSUPMTION
DISPLAY
INTERFACES
WINDOWS PC
GRAPHIC
CARD
WIFI
PMB514L550/
PMB000L550*
PMB254L650/
PMB000L650*
PMB514L650/
PMB000L650*
PMB514L700/
PMB000L700*
PMB728L750/
PMB000L750*
PMB728L860/
PMB000L860*
PMB721G980/
PMB000G980*
DISPLAY
TYPE /TOUCH
SYSTEM
65" (FHD)
65" (UHD/4K)
70" (UHD/4K)
75" (UHD/4K)
86" (UHD/4K)
98" (UHD/4K)
55" (UHD/4K)
3840*2160
1920*1080
3840*2160
3840*2160
3840*2160
3840*2160 3840*2160
9ms
8ms
8ms 8ms 8ms 8ms
8ms
178/178
LED/ IR 20 point
touch, 10 point
writing
LED/ IR 10 point
touch, 5 point
writing
LED/ IR 20
point touch, 10
point writing
LED/ IR 20
point touch, 10
point writing
LED/ IR 20
point touch, 10
point writing
LED/ IR 20
point touch, 10
point writing
LED/ IR 10
point, touch, 5
point writing
350 cd/m2 /
1200:1
350 cd/m2 /
4000:1
350 cd/m2 /
1200:1
330 cd/m2 /
4000:1
330 cd/m2 /
1200:1
330 cd/m2 /
1200:1
440 cd/m2 /
1300:1
60Hz
60Hz 60Hz
60Hz
60Hz
60Hz
120Hz
250W / ≤0.5W
250W / ≤0.5W 250W / ≤0.5W 300W / ≤0.5W 400W / ≤0.5W 500W / ≤0.5W 650W / ≤0.5W
HDMI Out x1;
USB 2.0x2
(+2 in front);
USB 3.0x1
(+1 in front);
TP out x 2;
HDMI In x 3;
VGA-in x 1;
Audio-In x 1;
AV-In x 1;
RS232 x 1;
Audio Out x 1;
LAN x 1;
COAX Out x 1;
Line IN x 1;
USB 2.0x2
(+2 in front);
TP out x 1;
MINI YPbPr x 1;
HDMI In x 2;
VGA-out x 1;
VGA-in x 1;
Audio-In x 1;
AV-In x 1;
RS232 x 1;
Earphone out x 1;
LAN x 1;
COAX Out x 1;
HDMI Out x1;
USB 2.0x2
(+2 in front);
USB 3.0x1
(+1in front);
TP out x 2;
HDMI In x 3;
VGA-in x 1;
Audio-In x 1;
AV-In x 1;
RS232 x 1;
Audio Out x 1;
LAN x 1;
COAX Out x 1
HDMI Out x1;
USB 2.0x2
(+2 in front);
USB 3.0x1
(+1in front);
TP out x 2;
HDMI In x 3;
VGA-in x 1;
Audio-In x 1;
AV-In x 1;
RS232 x 1;
Audio Out x 1;
LAN x 1;
COAX Out x 1;
HDMI Out x1;
USB 2.0 x 2
(+2 in front);
USB 3.0 x 1
(+1in front);
TP out x2;
HDMI In x 3;
VGA-in x 1;
Audio-In x 1;
AV-In x 1;
RS232 x 1;
Audio Out x 1;
LAN x 1;
COAX Out x 1;
USB 2.0x2
(+2 in front);
USB 3.0 x 1;
(+1 in front);
TP out x 2;
HDMI In x 3;
VGA-in x 1;
Audio-In x 1;
AV-In x 1;
RS232 x 1;
Audio Out x 1;
LAN x 1;
COAX Out x 1;
CVBS x1;
VGA-In x 3;
HDMI-In x 3;
HDMI4K x 1;
PC-Audio x 3;
VGA-Out x 1;
Earphone x 1;
COAX x 1;
USB 2.0 x 1
(+3 in front);
USB 3.0 x 1;
RJ45 x 1;
RS232 x 1;
Intel® Core™ i5
(6th gen) /4GB
DDR4 / 128GB
SSD
Intel Celeron
G3900 / 4GB
DDR4 / 500GB
HDD
Intel® Core™ i5
(6th gen) /4GB
DDR4 / 128GB
SSD
Intel® Core™ i7
(6th gen) /8GB
DDR4 / 256GB
SSD
Intel® Core™ i7
(6th gen) /8GB
DDR4 / 256GB
SSD
Intel® Core™ i7
(4th gen) /16GB
DDR4 / 256GB
SSD
Integrated Intel® HDGraphics, Intel H110 Express chipset
Independent
Graphics
NVIDIA GeForce
GT730M
802.11ac (2.4GHz/5GHz)
802.11ac
(2.4GHz/5GHz)
Intel® Core™ i5
(6th gen) /4GB
DDR4 / 128GB
SSD
EN - 23
Page 26

Quick Start Guide
Prestigio MultiBoard
ARTICLE
PC INTERFACES
AUDIO
DIMENSIONS
L*H*W MM
DIMENSIONS
PACAGE
L*H*W MM
NET WEIGHT
G
SHIPPING
WEIGHT G
PMB514L550/
PMB000L550*
PMB254L650/
PMB000L650*
PMB514L650/
PMB000L650*
PMB514L700/
PMB000L700*
PMB728L750/
PMB000L750*
PMB728L860/
PMB000L860*
PMB721G980/
PMB000G980*
USB 3.0 x 6;
BT 4.2;
LAN x 1;
VGA Out x 1;
Earphone Out x 1;
Microphone In x 1;
Display port x 1;
HDMI Out x 1
USB 3.0 x 6;
BT 4.2;
LAN x 1;
VGA Out x 1;
Earphone Out x 1;
Microphone In x 1;
Display port x 1;
HDMI Out x 1
USB 3.0 x 6;
BT 4.2;
LAN x 1;
VGA Out x 1
Earphone Out x1
Microphone x 1;
Display Port x 1
HDMI Out x 1
USB 3.0 x 6;
BT 4.2;
LAN x 1;
VGA Out x 1;
Earphone Out x 1;
Microphone In x1;
Display Port x 1
HDMI Out x 1
USB 3.0 x 6;
BT 4.2;
LAN x 1;
VGA Out x 1;
Earphone Out x 1;
Microphone In x1;
Display Port x 1;
HDMI Out x 1
USB 3.0 x 6;
BT 4.2;
LAN x 1;
VGA Out x 1;
Earphone Out x 1;
Microphone In x1;
Display Port x 1;
HDMI Out x 1
USB 2.0 x 4;
USB 3.0 x 2;
RJ45 x 1;
VGA Out x 1;
Earphone Out x 1;
Microphone-In x 1;
Mini Display x 1;
HDMI-Out x 1;
12W x 2 Stereo
speakers
10W x 2 Stereo
speakers
10W x 2 Stereo
speakers
12W x 2 Stereo
speakers
12W x 2 Stereo
speakers
12W x 2 Stereo
speakers
12W x 2 Stereo
speakers
1302*791*98
mm
1501*907*100 mm1521*915*98 mm1638*982*98
mm
1762*1034*100
mm
1988*1178*99.6
mm
2257*1335*118
mm
1458*932*220
mm
1697*1071*220 mm1697*1071*220
mm
1803*1160*243 mm1913*1225*280
mm
2211*1370*280
mm
2450*1555*385
mm
32
41
44 56 60 78 150
40
52
55 68 78 105 200
* - Models without PC
EN - 24
Page 27

EN - 25
Quick Start Guide
Prestigio MultiBoard
EN
9. Troubleshooting
Treat problems according to the information given in the table below� If
problems still persist, call your dealer for service�
The problems described below are not always caused by malfunctions�
Check the MultiBoard again before having the MultiBoard serviced�
Problem Possible solution
Remote control
out of order
• Check whether there is an object between remote control and
MultiBoard receiver�
• Check whether the batteries polarities in remote control are right�
• Check whether the batteries are drained�
The unit
shuts down
automatically
• Sleeping mode setting�
• Check whether there is a sudden power failure�
• Check for signal to system and control�
PC mode
Out of signal
• Check display setting�
• Check the resolution�
• Adjust the Hs & Vs (synchronization) in the menu�
Background
streaking
• Choose auto adjustment�
• Adjust clock and phase�
False color
• Check the VGA�
• Setup the chroma, brightness and contrast�
Unsupport
format
• Choose auto adjustment�
• Setup the clock and phase�
Touch Function
Touch function
void
• Check driver is installed correctly�
• Reinstall the driver�
Not allow to
touch
• Check the settings and set it again�
• Reinstall the driver�
• Check whether the touch pen is working properly�
Video not working properly
No picture/No
sound
• Check POWER status�
• Check the signal cable�
• Check the internal PC�
Picture trembles
• Check the signal cable�
• Check if there are other electronics interrupting the signal�
9
22016/1 1/0
Page 28

EN - 26
EN
Quick Start Guide
Prestigio MultiBoard
Poor picture
• Adjust chroma, brightness and contrast in the menu�
• Check the signal cable�
Audio not working properly
No sound
• Check the mute key�
• Adjust the volume�
• Check the audio cable�
One speaker
• Adjust the sound balance in the menu�
• Check the setting in sound control panel of the computer�
• Check the audio cable�
VGA-OUT
silence
• Check if the earphone is properly connected�
2016/12/01
Page 29

 Loading...