

Page 1

PAP4000 Service Manual
_________________________________________________________________________________________________________ _______________
2012-5-8 1/42
Contents
1. Summary ................................................................................................................................................ 2
1.1. Product summary ............................................................................................................................. 2
1.2. Appearance and corresponding functionalities ................................................................................ 2
1.3. Abbreviations .................................................................................................................................. 3
2. Specifications and features.................................................................................................................... 3
2.1. Technological specifications............................................................................................................ 4
2.2. Hardware features ............................................................................................................................ 4
3. Upgrade guides ...................................................................................................................................... 6
3.1. Upgrade of main program ............................................................................................................... 6
4. Guides of disassembling and assembling ............................................................................................. 9
4.1. Tools of disassembling and assembling ........................................................................................... 9
4.2. Steps of disassembling and assembling ........................................................................................... 9
5. Maintenance technologies ................................................................................................................... 16
5.1. Solutions to frequent failures ......................................................................................................... 16
5.1.1. The name and location of main board ................................................................................... 16
5.1.2. Hardware system framework ................................................................................................. 18
5.1.3. Basic principles and analyses and maintenance of frequent failures ..................................... 18
(A)Functional failures .............................................................................................................. 19
A. The failure of powering on ................................................................................................... 19
B. Failures of receiving voice and ringtones ....................................................................... 20
C.The failures of displaying ....................................................................................................... 21
D.The failures of identifying SIM/UIM card and T card ............................................................ 23
E.The failures of Bluetooth ......................................................................................................... 24
F.The failures of shooting photos and recording videos ............................................................. 25
G. The failures of keys ................................................................................................................... 25
H. The failures of motor ................................................................................................................ 26
I. The failures of charging ...................................................................................................... 26
J. The failures of WIFI ................................................................................................................ 27
(B). RF section ......................................................................................................................... 29
A. RF section of WCDMA ............................................................................................................ 29
B、GSM The working principle of RF circuit for GSM ............................................................... 34
6. Quality inspection ................................................................................................................................ 35
6.1. Inspection tools .............................................................................................................................. 35
6.2. Inspection objects .......................................................................................................................... 35
6.3. Inspection items ............................................................................................................................. 35
7. Technological support ......................................................................................................................... 38
7.1. FTP Server (ftp://119.147.25.41/) .................................................................................................. 38
8. FAQ ....................................................................................................................................................... 38
9. Appendix .............................................................................................................................................. 42
Page 2
PAP4000 Service Manual
_________________________________________________________________________________________________________ _______________
2012-5-8 2/42
1. Summary
1.1. Product summary
1)WCDMA:850/2100MHz,GSM 900/1800/1900MHz;
2)WVGA HD capacitance screen with 4.0 inch;
3) Handwriting input under capacitance touchscreen;
4)Qualcomm 7227-A(1GHz)CPU;
5)Supporting syncing with PC, connecting to PC with USB port conveniently;
6) Supporting GPS navigation;
7) Supporting BT/WIFI
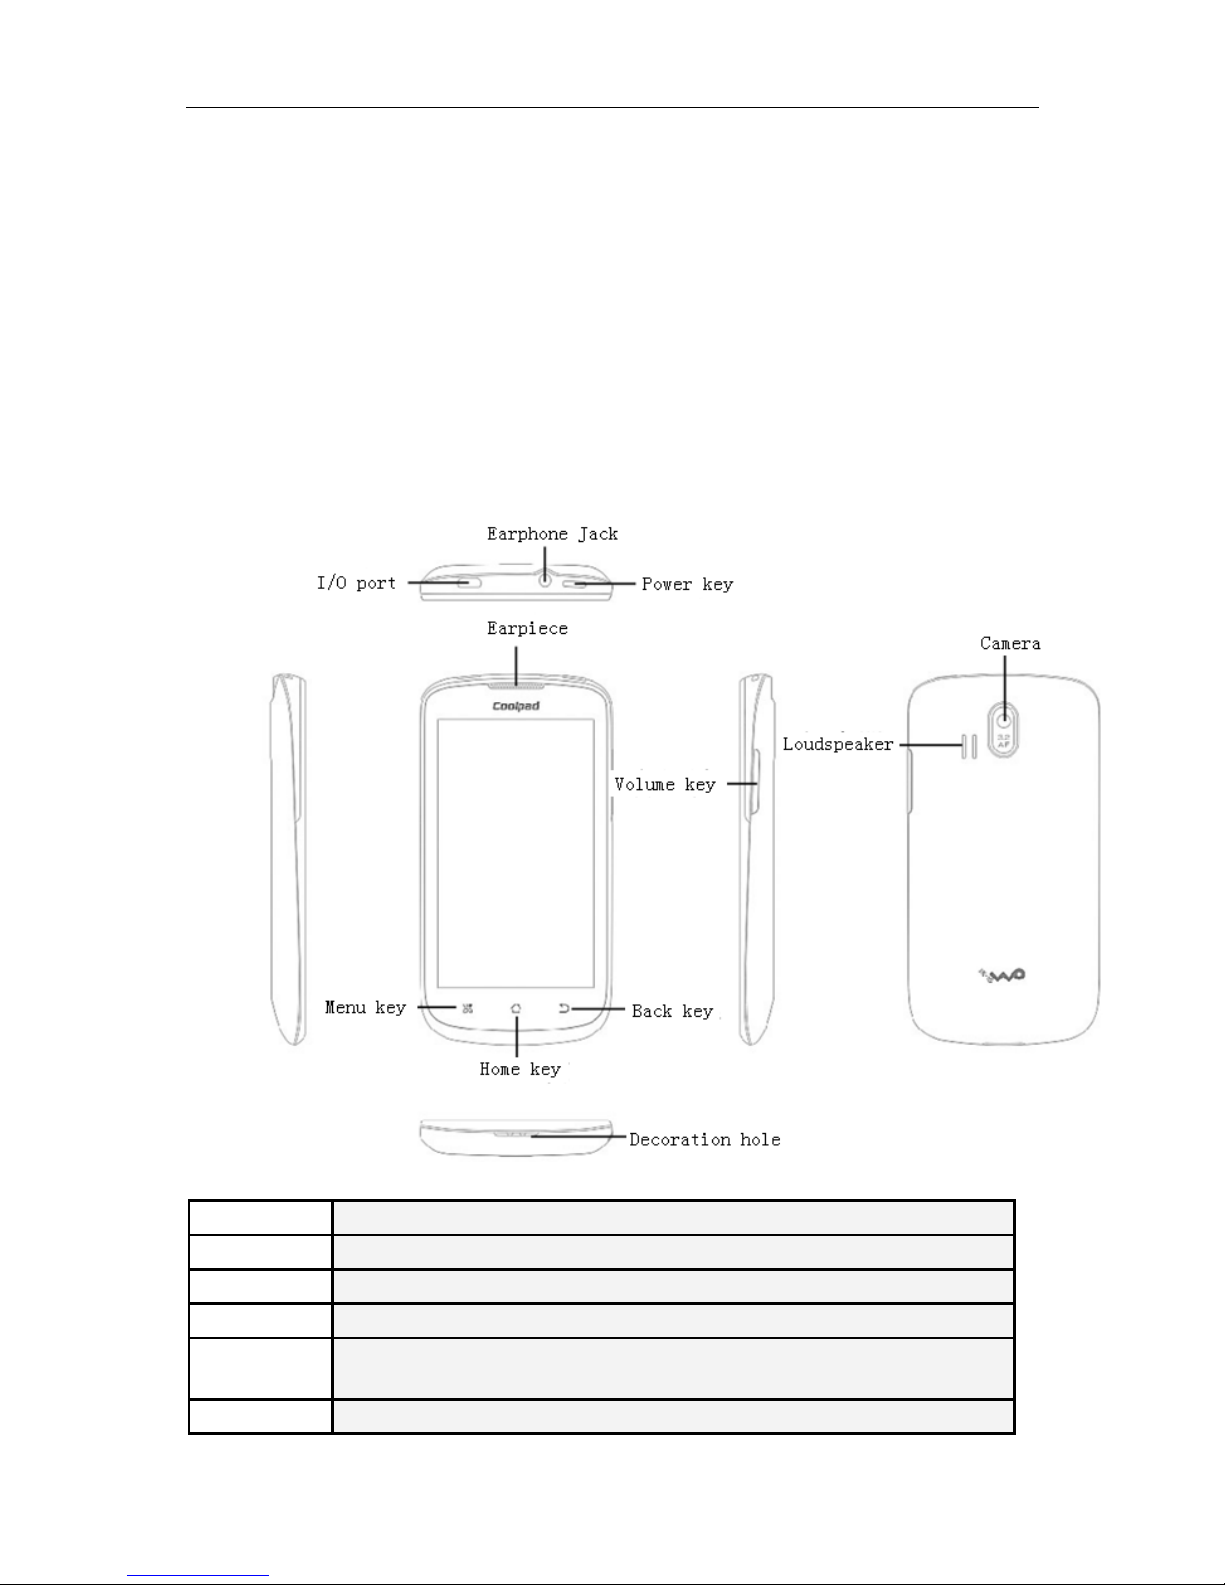
1.2. Appearance and corresponding functionalities
Keys Functionalities
Menu key Tap to pop up the menu at the functionality interface
Back key Tap to go back to the previous interface
Volume key Adjust call, ringtone, music and video volumes
Power key When the backlight is on, press the button shortly to turn off the backlight, while
the device is asleep, press the button shortly to wake it up.
Home key Tap to go back to the functionality interface from the application interface
Page 3

PAP4000 Service Manual
_________________________________________________________________________________________________________ _______________
2012-5-8 3/42
1.3. Abbreviations
For your convenience, this handbook adopts the following abbreviations:
AP Application processor
BB Basic band
TD TD-SCDMA, full name is: Time Division Duplex-Synchronization
Code Division Multiple Access.
HSDPA Full name is: High Speed Downlink Packet Access
GSM Global system of mobile communication
GPRS General packet radio service
TW Touch Window
dBm Decibel (referenced to milliwatts)
BL (Boot Loader)Hardware to initialize functionalities and build
mapping for internal space (full name: Boot Loader)
DSP Processing digital signals ( full name: Digital Signal
Processor)
RF Radio frequency
ESD Electrostatic discharge
FPC Flexible printed circuit
LCD Liquid crystal display
LDO Low dropout regulator
LED Light emitting diode
PCB Printed circuit board
PCM Pulse Code Modulation
PGA Programmable gain amplifier
PLL Phase locked loop
PMU Power Management Unit
RAM Random Access Memory
ROM Read Only Memory
RTC Real-Time Clock
SAW Surface acoustic wave
SIM Subscriber identity module
SLR Send loudness rating
SOC System On Chip
SRAM Static random access memory
STMR Side tone masking rating
TA Travel adapter
TDD Time division duplex
UART Universal asynchronous receiver transmitter
VCO Voltage controlled oscillator
VCTCXO Voltage controlled temperature compensated crystal oscillator
2. Specifications and features
Page 4

PAP4000 Service Manual
_________________________________________________________________________________________________________ _______________
2012-5-8 4/42
2.1. Technological specifications
Basic specifications
Size 123×65.8×11.8mm
Type Bar
Antenna Built-in
Phone card Mini-inserted card
Network mode WCDMA:850/2100MHz,GSM 900/1800/1900MHz
Operation system Android2.3
Processor
Qualcomm 7227-A (1GHz)
Memory
ROM:512MB+RAM:512 MB
SD card Support T-FLSHA card with 32GB at most
Camera camera with 3.2 megapixels (AF)
Port MINI-USB
Screen parameters
Type WVGA
Size 4.0 inch
Resolution 800*480
Main supported functionalities (take actual device for real)
Input method
Language Simplified Chinese
Input method Handwriting
Contacts Max Contact number 5000 pieces
Call log Max number 2000 pieces
Picture (picture
viewer)
Supported format jpg、jpeg、bmp、png、wbmp、gif
Messages Max storage 3000 pieces
Accessories
Battery
Battery name Lithium-ion chargeable battery
Specific capacity 1400mAh
Normal voltage 3.7V
2.2. Hardware features
1. Hardware configurations:
Name Specifications
CPU Qualcomm 7227-A
Power manager Qualcomm PM8029
Audio Qualcomm 7227-A
BT BROADCOM BCM4330FKUBG
Memory ROM 512MB+RAM 512MB
Primary camera Auto-focused camera with 3.2 megapixels
Page 5
PAP4000 Service Manual
_________________________________________________________________________________________________________ _______________
2012-5-8 5/42
Secondary
camera
Null
2. Feature parameters
Series
No.
Items Specifications
2 Battery capacity
Number of battery Voltage
0 3.500V~3.660V
1 3.660V~3.730V
2 3.730V~3.800V
3 3.800~3.930V
4 >3.930V
24 Low voltage alarm
Incoming calls: if the voltage floats over
100mV, the current may come from module, so it
needs to lower the limit of low voltage
threshold, namely, primary card 3400 millivolt,
secondary card 3450 millivolt.
Standby: when the phone is at standby, and if
the voltage is lower than 3600 millivolt, it
needs to shut the communication functionality
down on secondary card, and if the voltage is
lower than 3550 millivolt, it needs to shut the
communication functionality down on primary
card.
25
The voltage of forcing
to power off
3.40±0.03V
26 Battery
The voltage of full battery:4.2V
Capacity:1080mAh
27 Travel charger
AC input:100~240V,50/60Hz
DC input:5V,1000mA
3. Current parameters
Item names Test data
Power on ≤300mA
Calls CDMA ≤300mA
Standby Base current(Not connected to BT)≤2mA
Current of powering off ≤0.1mA
Charging loop -400~-580mA
Page 6
PAP4000 Service Manual
_________________________________________________________________________________________________________ _______________
2012-5-8 6/42
3. Upgrade guides
3.1. Upgrade of main program
Preparations for upgrade:
Series
No.
Name Specifications Quantity Notes
1 Computer No requirement 1
2 Data cable
Standardized data cable (slotted 5PIN data
cable)
1
3 Phone 1
4 Battery 1
adequate
battery
5 Software
Version software, upgrade tools, phone
driver and others.
Instructions:
1) Upgrade will lose the data stored in phone, so please note to save and backup the user data first
before performing upgrade for the occurrence of data losing.
2) The upgrade platform is installation-free version and supports multiport download, if it is needed,
it is advised to apply active USB-HUB to improve its stability.
Brief steps to upgrade:
1) It needs to install port driver of the device for the first time to connect to
computer.
2) To run the upgrade platform with installation-free version “Assemble customer
service Downloader.exe”.
3) When the phone is powered off, press its Volume + key and plug USB cable to computer
at the same time, and release when the screen displays “Communicating„Boot status
and version No.”. Click Start to download upgrade when the upgrade platform has
detected Online device.
Driver installation:
1) When the driver is installed, the phone is needed to be powered on.
2) Enable USB debug mode: Setting menu Select Application Select
Development Click and confirm Allow USB debug.
1) Connect phone to computer (Click No need to open USB memory device at USB large
memory dialogue). When the computer finds uninstalled new hardware, click Select from list or
designated location to install (Advanced), and select directory file of driver path (generally, it
locates in PC Driver directory) in Search includes this location, and then finish the installation
based on the instructions on computer. It needs to perform five-time installation for hardware
update wizard, as the following figure shows (installed device driver in device manager):
2)
Page 7

PAP4000 Service Manual
_________________________________________________________________________________________________________ _______________
2012-5-8 7/42
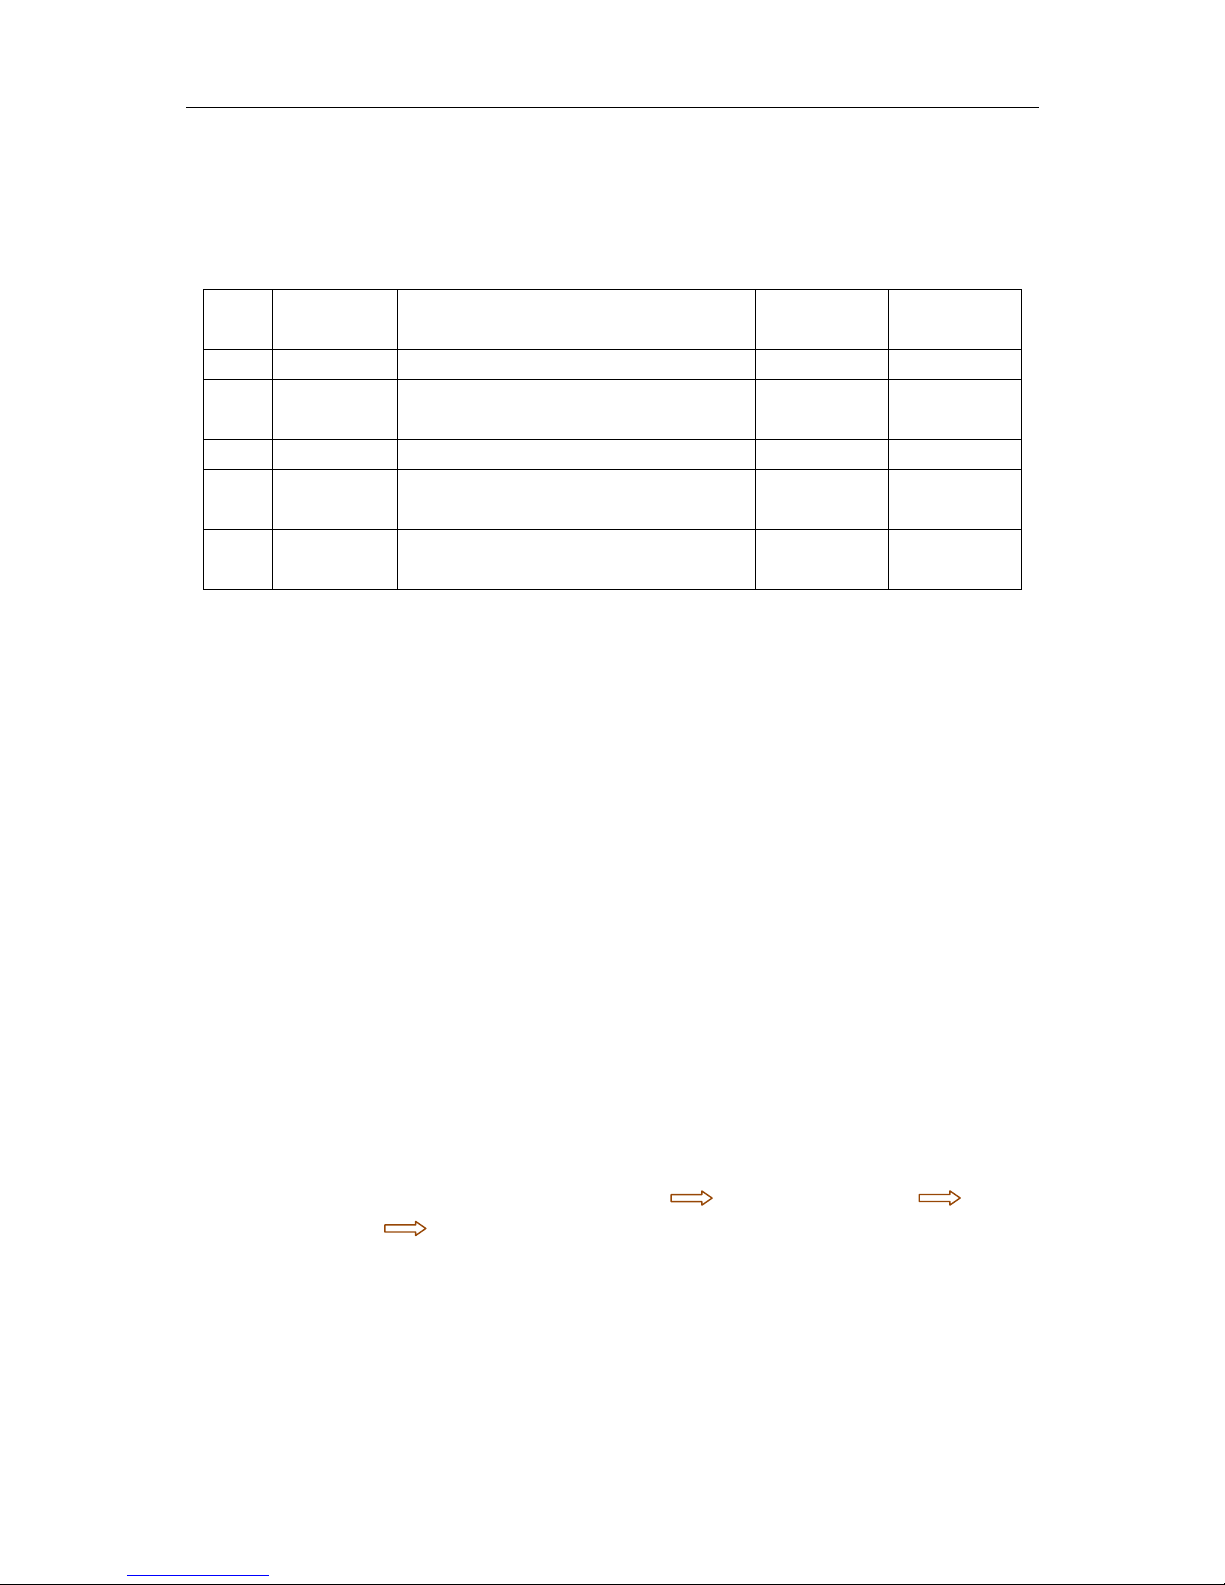
Detailed steps of upgrade
1) To run installation-free platform tool ;
2) When the phone is powered off, press its Volume + key and plug USB cable to computer
at the same time, and release when the screen displays “Communicating„Boot status
and version No.”. It indicates is working under upgrade module and communication
can be downloaded, when the upgrade platform has detected Online device.
Note: if the device cannot be Online with the platform in the course of upgrading,
the solution is to turn off the platform and turn it on again and get COM port set
well.
3) When the platform has detected being Online with device, click Start to enable
download upgrade.
Download the driver that APP
needs. If it prompts Apps failed to
search device at tool status bar, please
check if adb driver is normal and USB
debug is enabled.
Get port set
Page 8
PAP4000 Service Manual
_________________________________________________________________________________________________________ _______________
2012-5-8 8/42
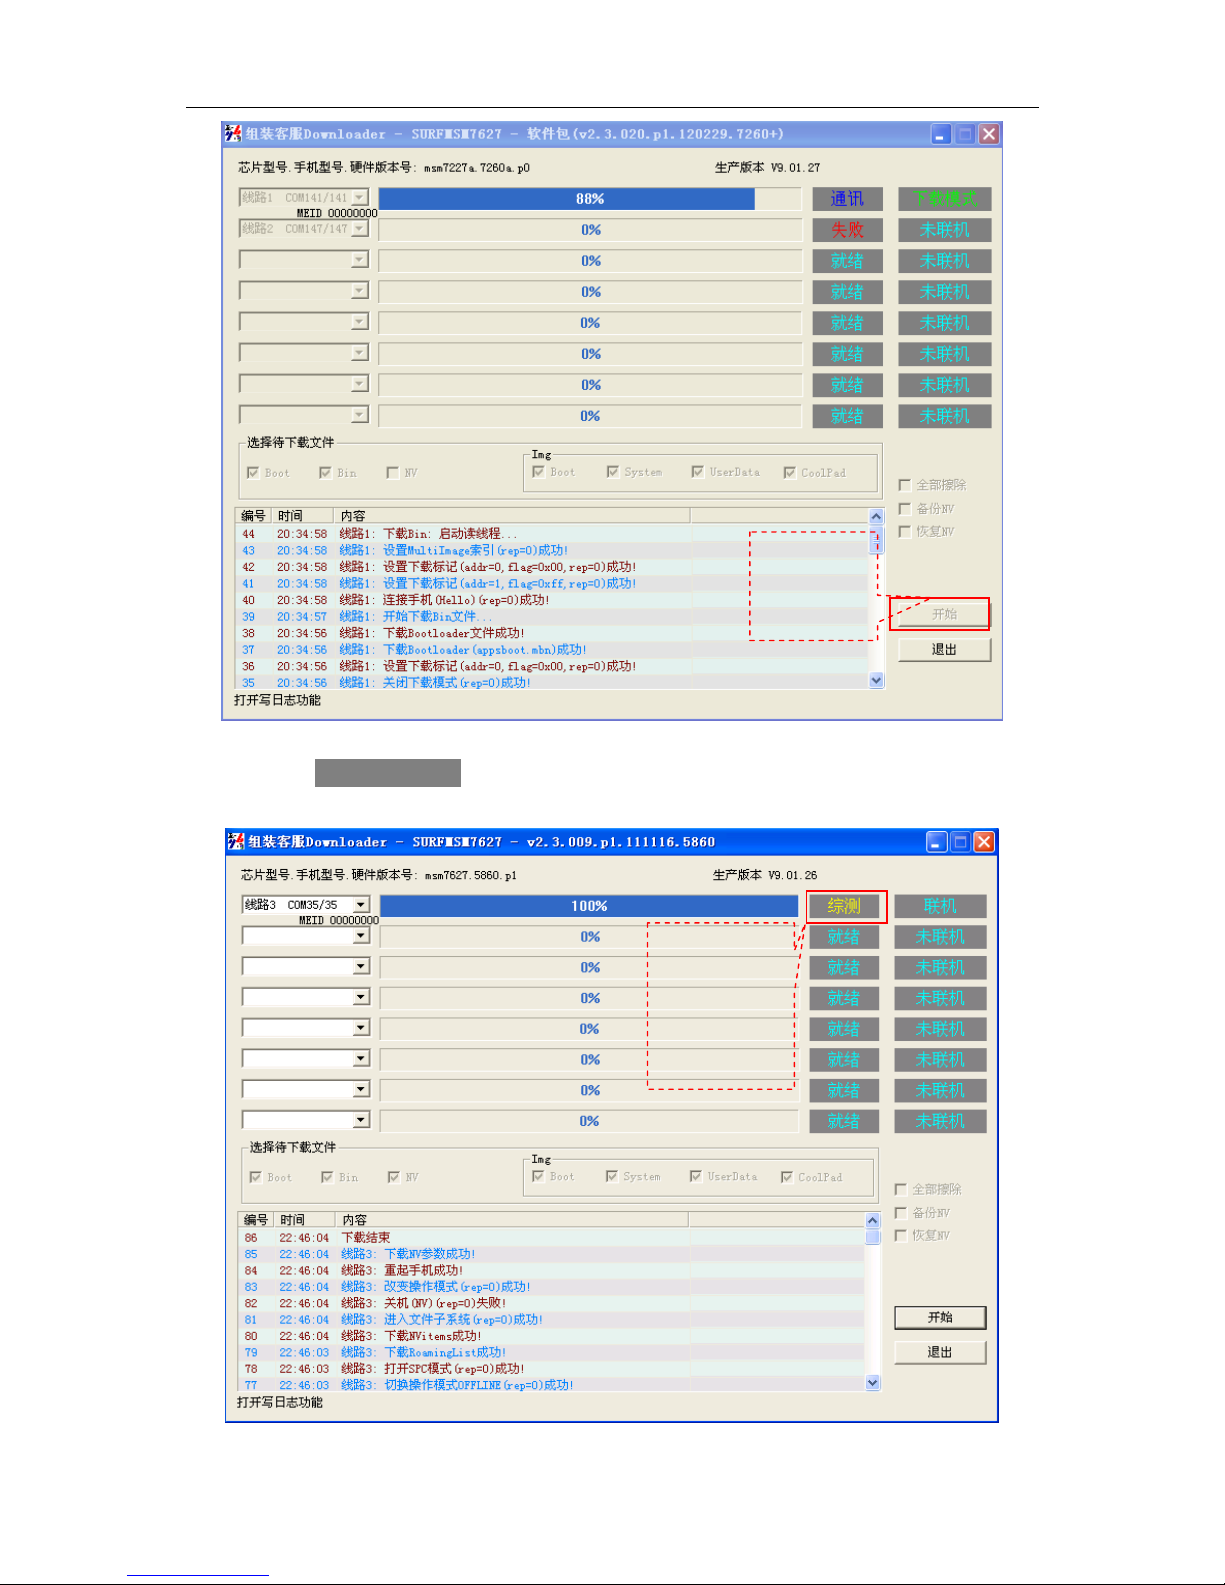
4) When Integrated test is displayed in the tool status bar, it indicates the upgrade
of PAP4000 is done, please plug off its data cable for the next device.
Click Start to
enable
upgrade
Integrated test
is displayed,
which means its
upgrade is
done.
Page 9

PAP4000 Service Manual
_________________________________________________________________________________________________________ _______________
2012-5-8 9/42
5) Copy GPS map package/pre-installed resource package/install pack:
7260+ GPS map package is external; please copy it to memory card to use.
Copy COOLMAP package (decompressed) to memory card directory.
5.1. 7260+ pre-installed resource package, presetapp-7260+.zip, (do not need to
be decompressed), copy it to COOLPAD directory located in memory card.
Note: the pre-installed resource package, presetapp-7260+.zip, included in
the new released software version may be different from that of the form one,
please re-copy the pre-installed resource package to its corresponding
directory in the memory card after the upgrade is done.
Precautions
1) If the device cannot be Online with the platform in the course of upgrading, the
solution is to turn off the platform and turn it on again (but the premise are the
following two points, a. the driver of USB port is installed well; b. the phone
is switched to upgrade mode successfully);
2) The default configuration of upgrade platform is not to perform Delete all, and
using QPST to backup NV parameters before performing upgrade is advised.
4. Guides of disassembling and assembling
4.1. Tools of disassembling and assembling
Device, instruments, jigs and tools
NO Name of product Specification Quantity
1 tweezers 1
2 screwdriver Cross shape 1
3
anti-electrostatic wrist
strap/anti-electrostatic glove
1
4 Disassemble plate 1
5 Knife 1
4.2. Steps of disassembling and assembling
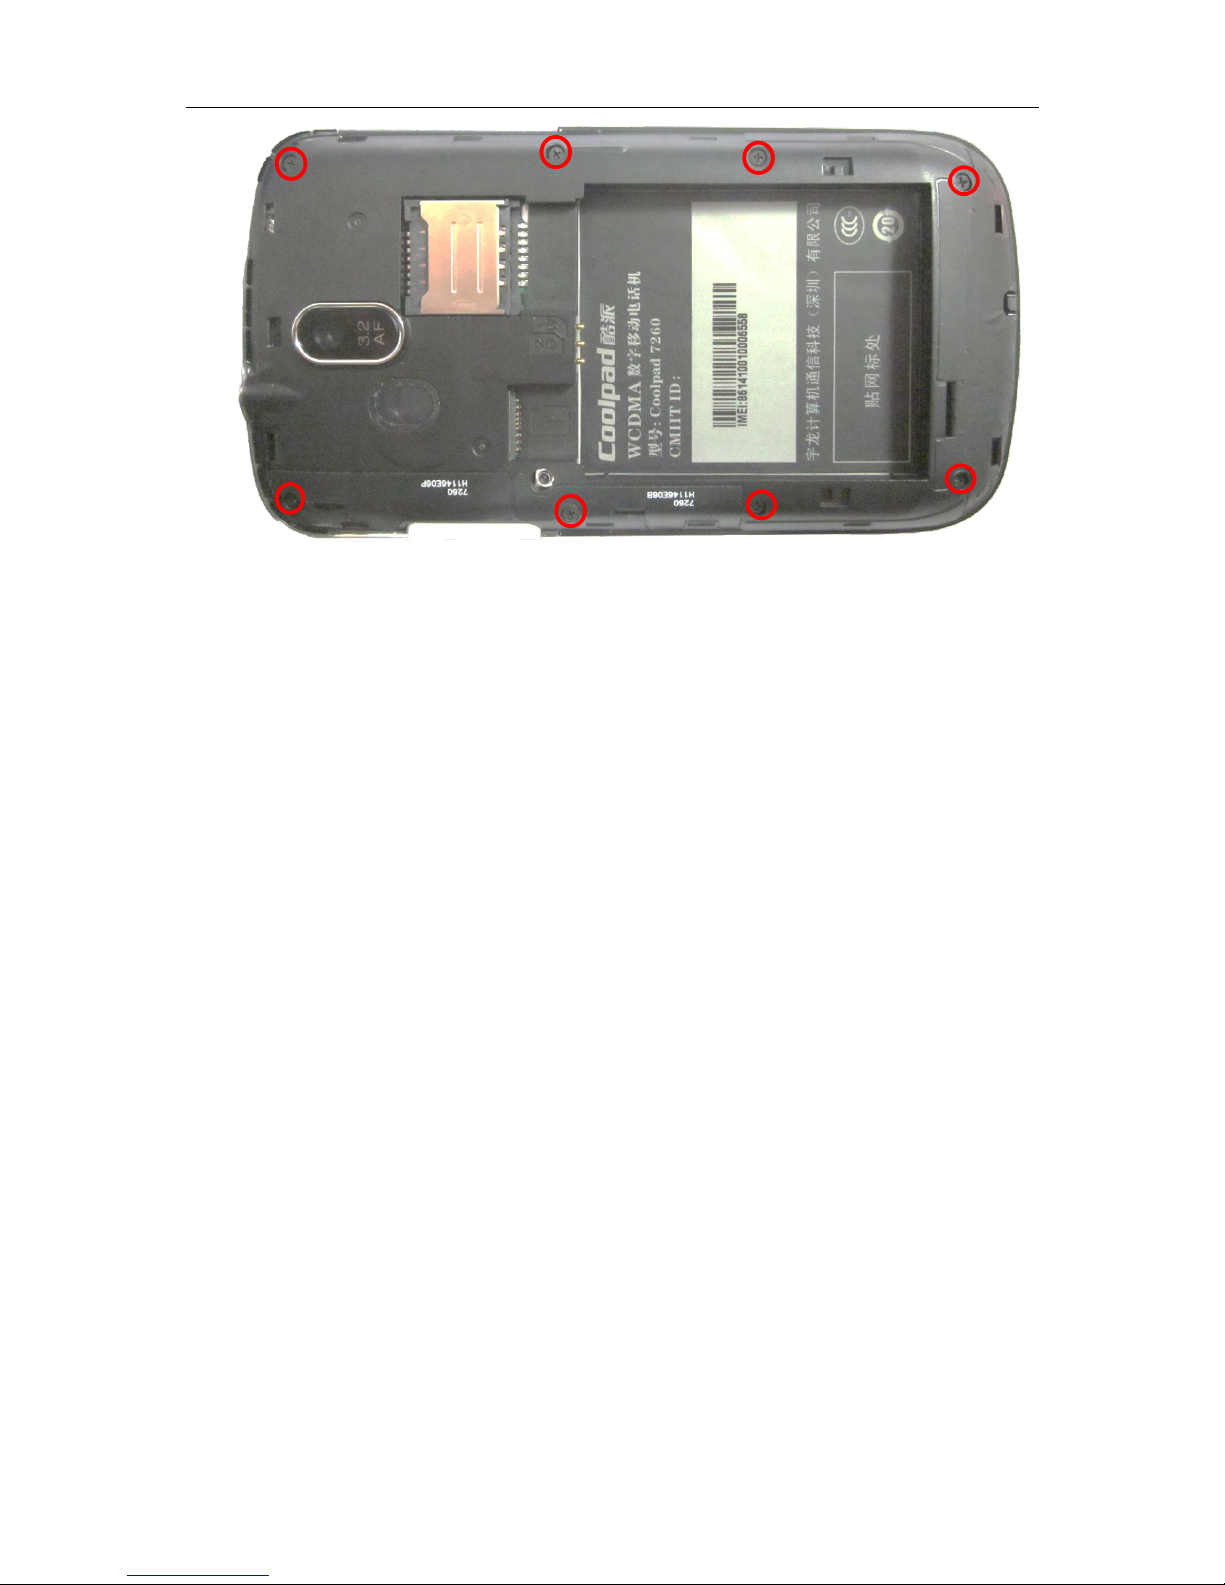
4.2.1. Disassembling screws of the back shell
There are eight screws (cross shape) in 7260+ back shell, shown as the following figure:
Page 10
PAP4000 Service Manual
_________________________________________________________________________________________________________ _______________
2012-5-8 10/42
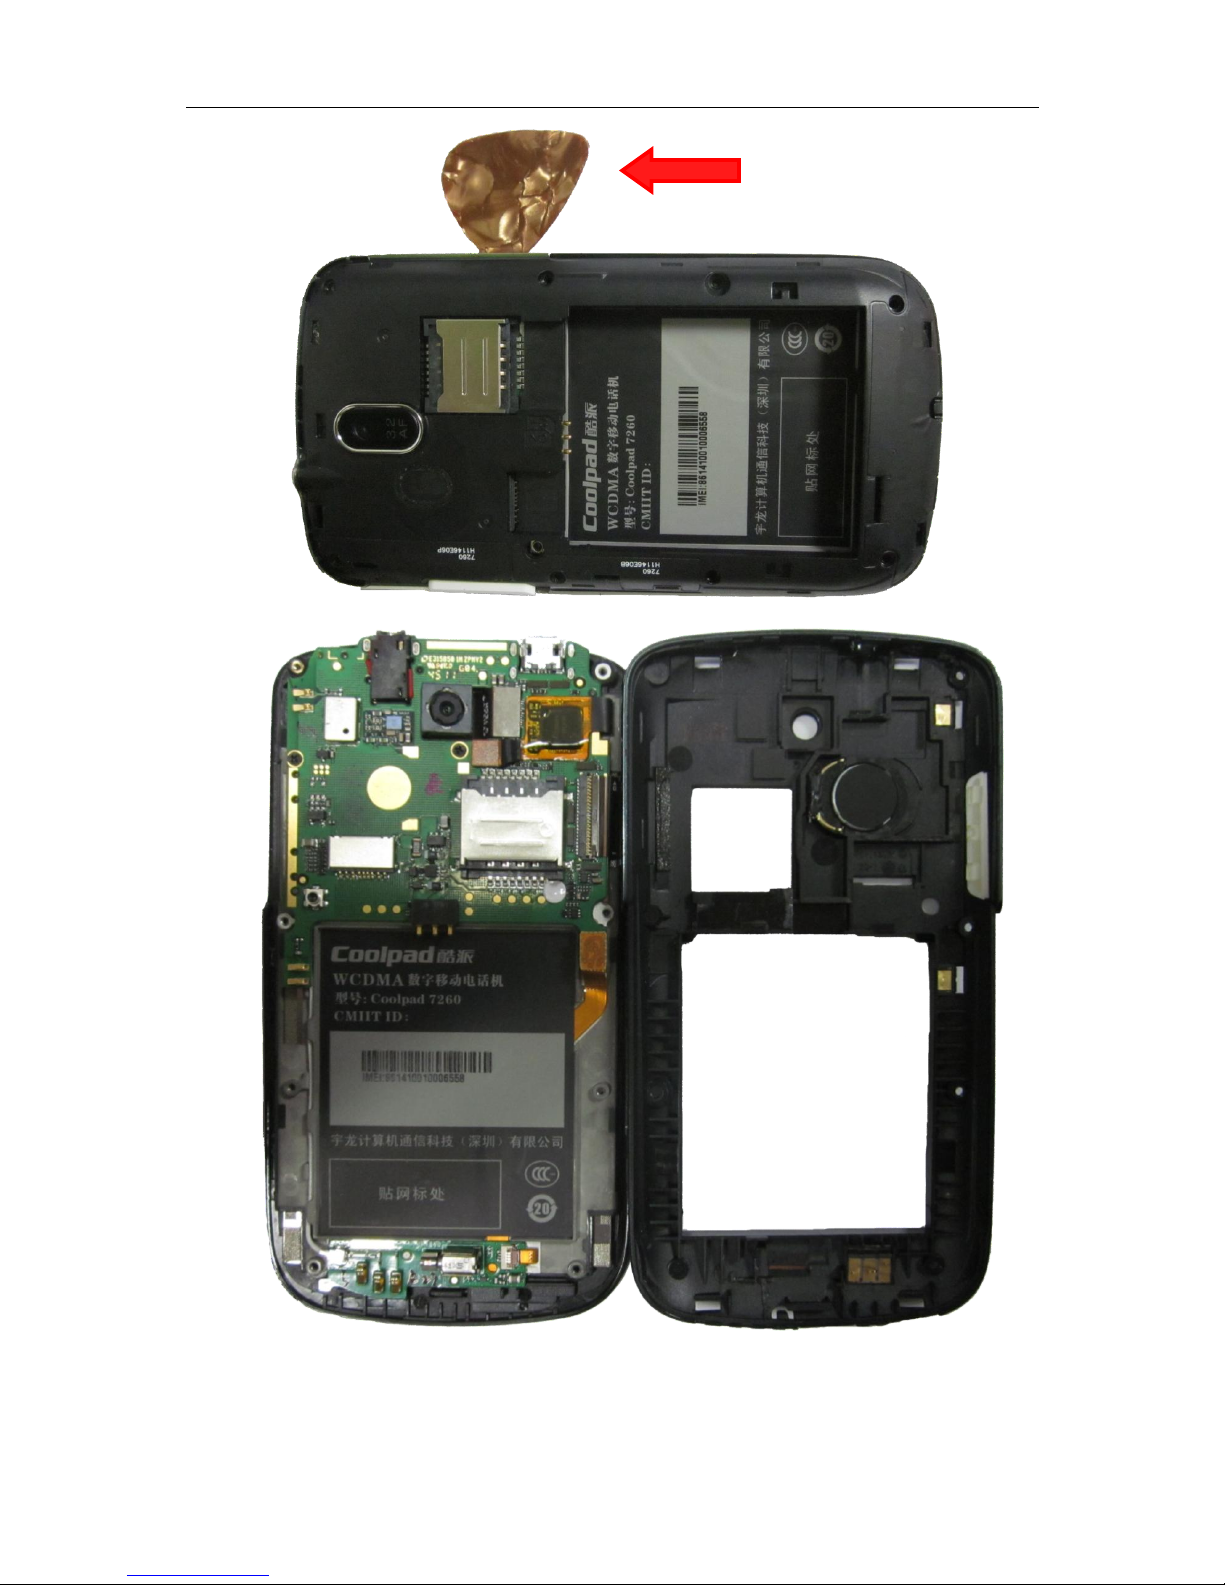
4.2.2. Separate the back shell
Use Disassemble plate to separate alongside with the seam.
Page 11
PAP4000 Service Manual
_________________________________________________________________________________________________________ _______________
2012-5-8 11/42
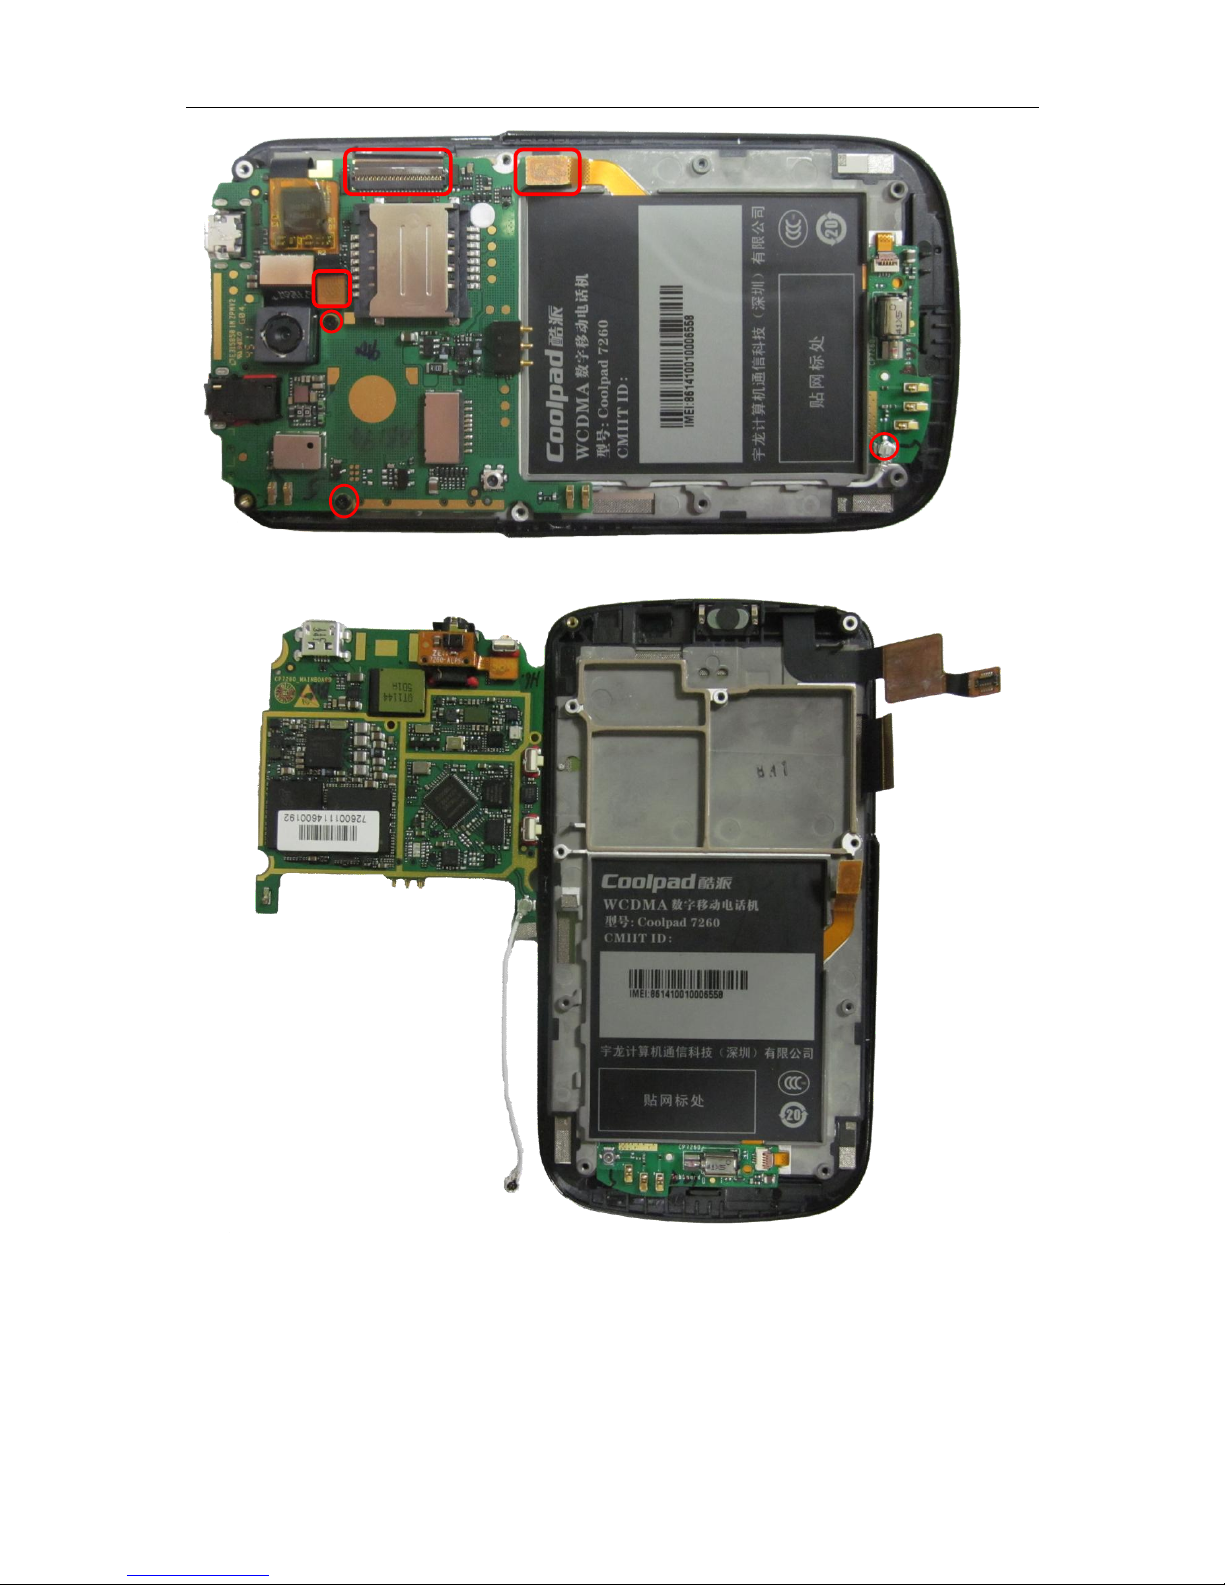
4.2.3. Separate the front shell
a. Disassembling tow screws and taking off the RF connection line;
b. Open TW/LCD/small board connector;
Page 12
PAP4000 Service Manual
_________________________________________________________________________________________________________ _______________
2012-5-8 12/42
4.2.4. Disassembling main board set
Page 13
PAP4000 Service Manual
_________________________________________________________________________________________________________ _______________
2012-5-8 13/42
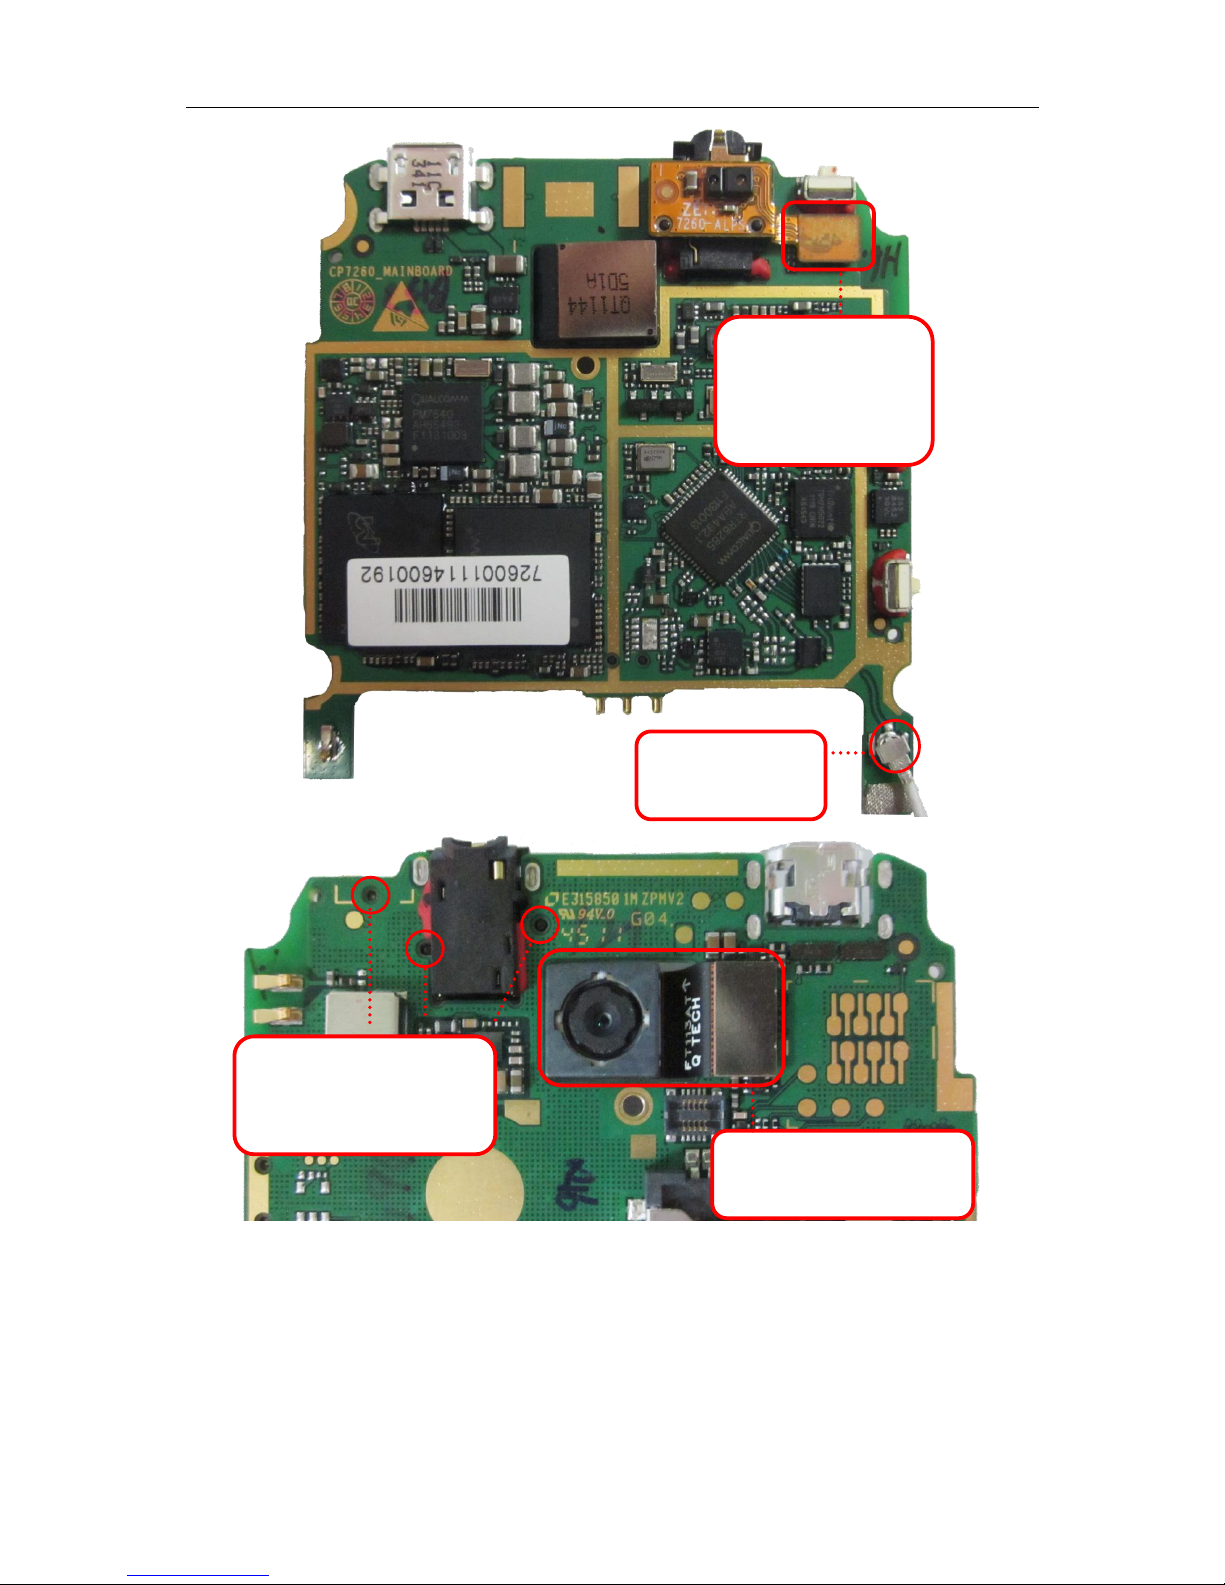
4.2.5. Disassembling the set of the side shell
Disassemble FPCBA set
Open the connector
and turn over to the
back of the main
board.
Take off the RF
coaxial line
Open the connector and
take out the camera
use the tweezers or other
sharp objects to take off
positioning pillars.
Page 14

PAP4000 Service Manual
_________________________________________________________________________________________________________ _______________
2012-5-8 14/42
Before disassembling FPCBA set, it needs to
tear off the label on the bottom
Open the connector, take
out FPC and take out the
small board
Page 15

PAP4000 Service Manual
_________________________________________________________________________________________________________ _______________
2012-5-8 15/42
Note: the front shell of 7260+ adopts the new adhesive art, so they cannot be disassembled
respectively, and the solution is to exchange them as an entirety.
Disassemble alongside with
the seam with the tweezers or
other tools and take out
FPCBA set
Page 16

PAP4000 Service Manual
_________________________________________________________________________________________________________ _______________
2012-5-8 16/42
5. Maintenance technologies
5.1. Solutions to frequent failures
5.1.1. The name and location of main board
Page 17

PAP4000 Service Manual
_________________________________________________________________________________________________________ _______________
2012-5-8 17/42
Page 18

PAP4000 Service Manual
_________________________________________________________________________________________________________ _______________
2012-5-8 18/42
5.1.2. Hardware system framework
Antenna
switch
GSM900/18
00/1900M
PA
Attenuator
RTR6285A
GSM900
GSM1800
GSM1900
MN
MN
MN
GSM PA control
MSM7227A
SAW LNA SAW
GPS
antenna
SSBI_2
VPH
VPH
PM8029
From 8029
Antenna switch controlling signal
Battery
EBI2
EBI1
DDR
NAND
IO
VCHG
Periphery
control
circuit of
charging
Charging control
SDIO1
SD
card
SIM1
I2C
VBAT
VPH
USB_D+
USB_D-
TO and from
MSM7227A
Motor
VPH
CAMERA BUS
BCM4330
HPH_L
EAR10_M
EAR10_P
Receiver
SBI
Keyboard
backlight
VPH
VREG_S3
WCDMA
850M PA
WCDMA PA control
WCDMA
2100M PA
VPH
WCDMA PA control
Duplexer
Duplexer
WCDMA850
Attenuator
Attenuator
WCDMA2100
Key
TW
LCD
MIC1
EAR_MIC
Brightness and
proximity sensor
Earphone
Loudspeaker
320W
CAMERA
SIM2
VREG_L12
RF switch
SDIO
RF
RF
+1V8_VREG_S3
VPH
UART
PCM
VREG_L13
I2C
Accelerometer
From
PM8029
EAR10_M
EAR10_M
EAR10_M
EAR10_M
HPH_R
LINE_O_RM
LINE_O_LP
5.1.3. Basic principles and analyses and maintenance of frequent failures
Page 19

PAP4000 Service Manual
_________________________________________________________________________________________________________ _______________
2012-5-8 19/42
(A)Functional failures
A. The failure of powering on
There are lots of reasons to cause the device cannot power on or suffers from
powering-on failures such as insufficient battery, battery connector being disconnected or
welded poorly, broken component on system main board and malfunctioned structure.
When the battery is low or the battery is broken, its voltage should be measured first.
If it voltage is lower than 3.6V, the battery needs to be charged by a charger; if the battery
cannot be charged, then it needs to be exchanged for a new one.
When J2001, the battery connector, is broken or bad welded, it is another reason to
cause the device cannot be powered on. If this failure still exists after installing a new
battery, J2001 is needed to be verified if it is broken or bad welded, if it is or has worse
case, it needs to be re-welded.
If the reason is none of the above cases, the polarity voltages (namely, pin 3 and pin 1)
of J2001, the connector, should be measured by using a multi-meter directly, verifying if
they are shot circuited, if it is shot circuited, it means there is broken component and then
it needs to locate the broken component and replace it; if it is not short circuited, it needs
to verify if there is current response on pressing the Power key, if there is current
response, and the current is lower than 40mA, it needs low format upgrade again; if the
current is over 90mA, it needs to perform exchanging tests for the LCD module, if the
device can be powered on, it represents the LCD module is broken and it must be
exchanged; if it is not current response, then it needs to check the powering-on circuit, the
powering-on key is SW2000, therefore it needs to verify if SW2000, the keyboard
connector, is broken or welded poorly.
Page 20

PAP4000 Service Manual
_________________________________________________________________________________________________________ _______________
2012-5-8 20/42
B. Failures of receiving voice and ringtones
The audio system framework of 7260+ is as follows:
MSM7227A
BCM4330
PM8029
BT Antenna
SPEAKER
UART1
T card
EAR1_O/P
LINE_ON/OP
PCM
RECEIVER
SDC1
EBI2
NAND
RTR6285A(
WCDMA/GSM
)
RF
multi-
channel
switch
BT
earph
one
MAIN
MIC
EAR
MIC
Earphone
The audio system of 7260+ takes MSM7227A as its center with other functionalities such as PM8029
(built-in loudspeaker, earphone PA and echo canceling), power management chip, BCM4330, BT chip
which realizes WG communication hand-hold, hand-free, BT and earphone calls. Additionally, 7260+
supports the handhold mode to constrain the noise of calls in order to constrain the surrounding noise and
improve user’s call quality under the noise surroundings.
As for problems of audio, the problems of MIC, RECEIVER and SPEAKER can be confirmed by the
relevant test programs in the Net monitor. If it verifies there are failures, it needs to verify if there are poor
welded or connected components. For instance, it needs to verify if MIC is welded badly, RECEIVER or
SPEAKER is assembled correctly. If all the components are verified to be fine, then it needs to exchange
them all to perform exchanging tests to verify if they are not malfunctioned. If the exchanging tests are
proved to be OK, then the corresponding broken component needs to be exchanged, however, if the
problems still exist after perform exchanging tests, it needs to verify if the relevant circuits are normal.
As for the failure that MIC fails to deliver sounds, it needs to verify if its working circuit is normal.
For instance, if the level of MIC_BIAS, MIC bias power supply, is at 1.8V, the normal voltage, and if MIC
outputs signal when speaks to it.
Page 21

PAP4000 Service Manual
_________________________________________________________________________________________________________ _______________
2012-5-8 21/42
As for the problems of delivering and receiving sounds of earphone, it needs to verify if the earphone
is well functioned, and the solution is to exchange the earphone for a new one to make confirmation. If the
failure still lasts after having a new earphone, then it needs to verify if the connection of J1301, the
earphone connector, is reliable, poor weld or broken.
If the weld of earphone connector is normal, then it needs to confirm if the inserting detective circuit
of earphone is normal. After the earphone is inserted, the voltage of HS_DETECT_N, the signal network,
changes from high to low, then it detects the earphone is inserted.
When the earphone key is pressed, if the voltage of PIN3 of Q1700 changes from low to high,
it means the phone has detected the earphone key is pressed.
As for the problem that the loudspeaker is soundless, it needs to exchange for a new one to perform
test. If the failure still exists after the new loudspeaker is exchanged, it needs to verify if the circuit of
SPEAKER is normal.
If there is any problem on the channel of earpiece receiver, the first step to figure it out is to exchange
it for a new earpiece and perform exchanging test, if the failure is tackled, it means the failure lies in the
earpiece, and the solution is to exchange it.
C.The failures of displaying
7260+ LCD adopts RGB port and LCD connects to the main board via J1800, the connector.
Page 22

PAP4000 Service Manual
_________________________________________________________________________________________________________ _______________
2012-5-8 22/42
LCD connector
The failures of displaying include white screen, backlight fails to work, blurred screen and abnormal
colors. If the failure is white screen, blurred screen or abnormal colors, it needs to verify if J1800, the LCD
connector, has solid connection to main board or is reliable; if it is well connected and reliable, then a new
LCD needs to be used to replace the old one to do verification; if the verification result is OK, the solution
is to exchange LCD.
If the LCD backlight fails, it needs to verify if U1801, the circuit of LCD backlight, is normal.
Page 23

PAP4000 Service Manual
_________________________________________________________________________________________________________ _______________
2012-5-8 23/42
D.The failures of identifying SIM/UIM card and T card
The failure of identifying SIM/UIM card
7260+ SIM/UIM card is inserted to J2002, the UIM connector, directly, the bottom slot of the slot set
is WCDMA card by default and the other one is GSM card:
When UIM/SIM card cannot be identified, the first step to check this failure is to verify if UIM/SIM
card is malfunctioned. If it is well functioned, it needs to verify if J2002, the UIM connector, is well
connected to main board or welded poorly.
When SIM card cannot be identified, it needs to verify if the connector of SIM card and J2002, the
connector of main board, are connected to main board well. If J2002 is connected to the main board well,
it needs to check if PM8029 works normally.
The failure of identifying T card:
TFlash card circuit consists of LDO L13, the power supply of route, ESD pipe, ESD/EMI protective
component, and J1302, the card connector.
TFlash slot
As for failures that fail to identify cards, it can exchange for a new TFlash card to verify if the former
one is broken; if the TFlash card functions well, it needs to verify if J1302, the connector of TFlash card, is
Page 24

PAP4000 Service Manual
_________________________________________________________________________________________________________ _______________
2012-5-8 24/42
broken or welded poorly, if it is, the solution is to exchange it for a new one. However, if the connection
between J1302 and the main board is normal, then it needs to analyze the circuit of TFlash card and verify
if there is shot circuit between all pins of J1302 and the main board, if there is, it needs to exchange J1302.
E.The failures of Bluetooth
If Bluetooth fails to be turned on, it needs to verify if U2301, the Bluetooth IC, is posted well and
welded well.
If the transmission distance of Bluetooth is less than 5 meters, it needs to verify if ANT2203, the
Bluetooth antenna, is posted well or welded well; if the antenna is welded poorly, it needs to be re-welded;
while if the antenna is welded well, it needs to verify if ANT2203, the WIFI chip, is welded well.
Page 25

PAP4000 Service Manual
_________________________________________________________________________________________________________ _______________
2012-5-8 25/42
F.The failures of shooting photos and recording videos
Cannot enter shoot mode: Generally, the causes are software, camera or assemble is malfunctioned,
and/or J1900, U1902 or U1900 is malfunctioned.
Black screen on entering shoot mode: It needs to obviate malfunctioned camera first, and the
causes may lie in that U1902n U1900 and J1900 are welded poorly, additionally, the malfunctioned
software may also cause this case.
Blurred screen on shooting: Generally, the cause lies in camera or assembles; the causes for this
case is similar to those of Black screen on entering shoot mode.
Cannot shoot:The system cannot enter Shoot mode via the Shoot key, which means the Shoot key is
malfunctioned. And it needs to obviate the cause coming from malfunctioned camera, additionally, if the
software is malfunctioned, it will also raise this failure.
Black screen/ black spots/ colorful spots etc on shooting:It needs to obviate malfunctioned camera
and LCD first.
Malfunctioned software: The failures raised by it are slow response, death on shooting, unavailable
Shoot key, failure of storing and failure of entering Shoot mode.
The circuit of 3.0 megapixel camera:
G. The failures of keys
If keys fail, please open the back shell to check if they are OK, and if they are broken, they need to be
exchanged.
Page 26

PAP4000 Service Manual
_________________________________________________________________________________________________________ _______________
2012-5-8 26/42
H. The failures of motor
The failure of vibrator: first, it needs to verify if MOTOR, the vibrator, is welded well, if it is not, it
needs to be re-welded; while if it is, it needs to measure the voltages against the ground of vibrator, and if
the circuit is short-circuited to ground, it needs to verify if PM8029, the driver of vibrator, is broken. If all
these cases are normal, it needs to power the digital power supply up to 2.8V and connect it to the two
controlling points of the vibrator to verify if it vibrates, if it does not vibrate, it represents the vibrator is
broken, and the solution is to exchange it for a new one; while if it vibrates, it means the signal of power
supply of vibrator is not transmitted and it needs to perform check based on the circuit with the reverse
direction. And it can also exchange FPC for a new one to verify if it is FPC problems.
I. The failures of charging
The detective circuits of charger and USB: to verify if J2000, the tail plug, is welded well and if
U2000 is wielded well.
Page 27

PAP4000 Service Manual
_________________________________________________________________________________________________________ _______________
2012-5-8 27/42
The battery cannot be charged full: generally, the battery is broken, and
some cases are the problems coming from the detective circuit.
Failure of charging: first, it needs to verify if J2000, the tail plug, is
welded well and then verify if U2000is welded well. Malfunctioned or poor welded
Q700 can cause the failure of charging. What is more, the malfunctioned detective
circuit of battery temperature may cause the device cannot detect the failure
that the battery cannot be charged.
The current of charging loop is small: it needs to check the detective
circuit first, and the malfunctioned software may cause this failure.
J. The failures of WIFI
First, it needs to verify U2301, WIFI chip, is welded well, if it is welded poorly, it needs to be
re-welded; while if it is welded well, it needs to verify if the power supply and the clock of WIFI circuit
are normal.
Page 28

PAP4000 Service Manual
_________________________________________________________________________________________________________ _______________
2012-5-8 28/42
Page 29

PAP4000 Service Manual
_________________________________________________________________________________________________________ _______________
2012-5-8 29/42
(B). RF section
A. RF section of WCDMA
Electronic switch(U1400)
This phone is dual mode single standby, the RF transmitting and receiving channels change via the
electronic switch (U1400)which likes one single-blade and multi-turn switch. 20th PIN and 21st PIN are
WCDMA signal channels. The principle figure of electronic switch module is as follows:
If R1403~R1406 is pasted or welded poorly, it may cause the logic controlling signal of switch
mixing, but the switch changes based on the usual logic, which causes the signals of WCDMA and GSM
cannot be transmitted and received normally.
If C1404, C1405 and L1402 are pasted or welded poorly, it may cause the chip of electronic switch
cannot supply power normally and the electronic switch cannot work, and then the RF signal cannot pass
successfully.
Please check if the electronic switch is placed with correctness, if it is pasted on the wrong direction,
the electronic switch cannot work. If it is forced to do the integrated test, its chip may be hot and has no
Page 30

PAP4000 Service Manual
_________________________________________________________________________________________________________ _______________
2012-5-8 30/42
power frequency or even burned.
RF test port(J1400)
This item only includes one RF test port. RF test port is exclusively saved for the sake of the
convenience of R&D and production to calibrate and test the machine. If the test port is not inserted with
the radio frequency line, pin 1 and pin 2 are connected directly, namely, the circuit is using the antenna;
while if it is inserted with the radio frequency line, the pin 1 is connected directly to the signal line of radio
frequency line, and pin 1 and pin 2 will be disconnected, namely, the antenna is disconnected.
Generally, the reasons of test port failure include being welded poorly, being blocked by foreign
objects or having spoiled materials.
The results coming from such reasons may lead to lower the power of conduction test, lower the
sensitivity and fail to pass the calibration integrated test.
Duplexer(U1101、 U1103)
Because the WCDMA receivers share the same antenna, thus if no certain separation measurement is
performed, it will cause serious interference on receiving and transmitting to impact the effect of signal
receiving. The purposes of the duplexers are to avoid the big signal entering the front end of the Receiver
to cause saturation or even burnout of the receiving channel, and to avoid the signal coming from the
transmitter affecting the receiving sensitivity at the same time, namely, to separate the receiving and
transmitting signals effectively.
Generally, the problems coming from receiving and transmitting duplexer lead to fail to pass
calibration integrated test and have no transmitting or receiving signals. The solution is to verify if the
duplexer is poor welded or not in the correct position.
As for the RF part of W850, the 6th PIN is the antenna port, namely, the public port, and the 3rd
PIN is the port of inputting signal for duplexer, and the 1st PIN and the 8th PIN are the PINs to output
signals, as the following figure.
When WCDMA transmits signals, they are amplified at PA, enter the coupler and reach the antenna
through antenna port.
When WCDMA receive signals, the antenna receives some weak wireless signal coming from the
space first, transmits them to the antenna port of the duplexer, and then the signals are sent to LNA to be
processed by the receiving port.
As for the RF part of W2100, the 6th PIN is the antenna port, namely, the public port, and the 3rd PIN
is the port of inputting signal for duplexer, and the 1st PIN is the PIN to output signals, as the following
figure.
When WCDMA transmits signals, they are amplified at PA, enter the coupler and reach the antenna
through antenna port.
Page 31

PAP4000 Service Manual
_________________________________________________________________________________________________________ _______________
2012-5-8 31/42
When WCDMA receive signals, the antenna receives some weak wireless signal coming from the
space first, transmits them to the antenna port of the duplexer, and then the signals are sent to LNA to be
processed by the receiving port.
Low Noise Amplifier(LNA)
Low Noise Amplifier (LNA) is the main unit circuit of the front end of Receiver and the first level
amplified circuit of the Receiver. Its major function in the circuit is to amplify the weak RF signal which is
received by the antenna to meet the need of the mixer for the extent of input signal.
As for the RF section of W2100, the weak RF which is output from the receiving end of duplexer
receives signals and performs matches, and then reaches to LNA to amplify signals. Finally, RTR6285A,
the chip, integrates LNA internally.
C1117,C1118 and L1107 receive matched circuits. If they are welded poorly, they may make the
receiving sensitivity value lower than the normal one.
If the LNA works abnormally, it will cause the Receiver to have receiving errors such as weak signal,
bad receiving sensitivity, and coming calls failed and the integrated test for receiving part failed. Then it
needs to verify if LNA is welded poorly or located in the wrong place.
As for the RF section of W850, he weak RF which is output from the receiving end of duplexer
receives signals and performs matches, and then reaches to LNA to amplify signals. Finally, RTR6285A,
the chip, integrates LNA internally. C1106,C1109, L1102 and L1103 receive matched circuits. If they are
welded poorly, they may make the receiving sensitivity value lower than the normal one.
If the LNA works abnormally, it will cause the Receiver to have receiving errors such as weak signal,
bad receiving sensitivity, and coming calls failed and the integrated test for receiving part failed. Then it
Page 32

PAP4000 Service Manual
_________________________________________________________________________________________________________ _______________
2012-5-8 32/42
needs to verify if LNA is welded poorly or located in the wrong place.
Receiving filter(FL1000)
Being amplified by LNA, the signal received by W2100 needs to be sent to FL1000, the filter, to
filter further. After the transformation between the balance and unbalance, it becomes differential signal
and then is sent to RTR6285A to perform demodulation.
C1014, L1006 and C1019 output from FL1000 are all impedance components; they should not be
welded poorly or have spoiled materials.
The function of receiving filter is to only allow those useful signals which are in the scope of
receiving frequency band, but to stop other useless signal.
The Receiving filter of 2100M can let those signals which are from 2110M to 2170M to pass through
at least cost and other signals will be stopped by it.
The most common reasons to the failure of the Receiving filter are easy to have welded poorly and to
make the welded point be at the wrong position.
They may lead to:
a. Fail to pass the receiving calibration for corresponding frequency
b. Fail to pass the integrated receiving test for corresponding frequency and lower the sensitivity
c. No signal and cannot receive calls
WCDMA Power Amplifier(PA)(U1102、U1100)
The transmitter PA is used to the last stage of the transmitter, and its main usage is to amplify the
power of the signal transmitted by RF to acquire the needed power value and to transmit it to the antenna
for transmitting. And then the antenna turns the high frequency signal into the high frequency
Page 33

PAP4000 Service Manual
_________________________________________________________________________________________________________ _______________
2012-5-8 33/42
electromagnetic wave and to radiate it out.
The general failures caused by the problems of PA and its periphery circuit are:
a. The calibration for the receiving part is normal, but that of transmission part fails
b. The transmission power is abnormal on testing and the output power is lower or the power keeps
vibrating on a large scope on testing;
c. Display signal is weak, but it cannot connect to the all-purpose tester or cannot make a call;
d. If PA is broken, it would also cause the calling current obviously higher than the normal value or
some part of PA is special hot on working; or even cause PA to be penetrated; its surface will be black and
bulk.
e. Turn the multi-meter to resistance and then measure the resistance of VPH to ground to verify if it
is penetrated and short circuited; if it is short circuited, the device cannot be powered on.
When the above symptoms appear, we suggest checking the corresponding frequency bands of PA
and its periphery resistance, capacitance and inductance, verifying if they have poor welded. And then
move to check PA to verify if it is broken.
Page 34

PAP4000 Service Manual
_________________________________________________________________________________________________________ _______________
2012-5-8 34/42
VPH connects VCC1 power supply net of PA, RFPA_VC supplies power to VCC2 pins of PA. D1102
is the protection diode of ESD, using to protect PA from static electricity. Additionally, VPH network
connects to RFPA_VCC via the resistance with 0 ohm. D1101 is zener diode, using to protect PA from
sudden high voltages.
WCDMA sending filter(FL1100,FL1101)
The purpose of sending filter is to only allow the useful signal within the transmission frequency
band to pass through and constrain other useless signals.
FL1100 is the sending filter with 850M frequency bands, it can let those sending signals which are
from 824M to 849M to pass through at least cost, but any other signal will be stopped by it.
FL1100 is the sending filter with 2100M frequency bands, it can let those sending signals which are
from 1920M to 1980MHz to pass through at least cost, but any other signal will be stopped by it.
The common problems for sending filter are also easy to have poor welded and to make the welded
point be at the wrong position. The possible failures:
a. Fail to pass the transmitting calibration for corresponding frequency
b. Fail to pass the integrated transmitting test for corresponding frequency band and lower the
power;
c. The phone cannot connect to the network or it is very difficult to make calls.
B、GSM The working principle of RF circuit for GSM
PA(U1402):
The power amplifier of GSM is similar to that of WCDMA, VBAT supplies power for it,
which consists of some filter capacitances such as zener diode, ESD diode and others.
Low and high frequency RF signals are output from RTR6285A respectively,
transmitted to the 8th PIN (GSM RF input) and the 1st PIN (DCS/PCS RF input) of PA
(TQM7M5022) to be amplified after they go through the decoupling capacitor (C1009
and C1010)and the matching networks. The matching network used in this phase is the PI
decreasing network, consisting of one resistance, which can protect PA effectively.
The match of PA match is showed as the following figure:
Page 35

PAP4000 Service Manual
_________________________________________________________________________________________________________ _______________
2012-5-8 35/42
The signal received in GSM is differentiated output in the electronic switch, differentiated matched
and then transmitted to RTR6285A for internal follow-up processions.
If one of capacitors is pasted or spoiled in differentiated matching circuit, it may cause failing to pass
calibration test and lowering receiving sensitivity.
6. Quality inspection
6.1. Inspection tools
Supply meter, anti-static wrist strap, glove, red label and inspection
record sheet etc.
6.2. Inspection objects
All the post-fixed main devices of Coolpad phone
6.3. Inspection items
Items Operations
Inspections
on
appearance
Shell
Verify if the shell is installed well, its appearance is dirty. The device
appearances are different based on different devices, and the appearance
cannot be broken in the course of fixing (If the appearance is scratches
and other faults in the front desk, it needs to explain to the client and
specify on the note).
Main board
Inspection on the appearance of main board. Verify if the fixed main
board is dirty (after welding, it needs to clean up the welding point).
Page 36

PAP4000 Service Manual
_________________________________________________________________________________________________________ _______________
2012-5-8 36/42
Inspections
on functions
The course of
powering on
Take the device and install battery, wait for the system boots fully and
verify if there is booting ringtone, if the ringtone is smooth, if the signal
and time displays are normal, if the screen has stripes and if there are
other abnormal atmosphere.
Memory card
Verify if it is smooth to plug out and insert memory card, if it can read
the card and if it can read its contents such as playing MP3 and
displaying photos.
Software
versions
Based on the latest Version Contrast List, verify if the version you are
using is upgraded to the latest one, if it is not, it needs to inform the user
of upgrading his/her phone. The system and functionalities will be more
stable after upgrading, but all data must be backuped before performing
upgrading.
Touch-screen
calibration
As for the device with handwriting method, tap Screen calibration and
then tap + to perform calibration, when it is done, tap to exit.
Key test
Verify if all keys function well, if the flexibilities of all keys are normal
and if their responses are normal on being pressed.
Handwriting
functions
Tap Message - Compose new message, click display screen with the
handwriting stylus and perform writings in handwriting area to verify if
the writing is normal.
Name card
identification
If the device supports the functionality of identifying name card, tap
Business assistant and move the video stick to Micro distance mode, and
then tap Name card identification and hole horizontally to verify if it can
perform identification (note: light should be enough).
Test on taking
photos
Verify if the camera has both Far and Near modes, if the size can be set
and if the display of taking photos is normal.
Test on taking
videos
Take a video for 10 seconds and stop, then play the took video to verify
if there is blurred screen, blue screen, flashing screen and etc.
Record
Verify if digital gallery is normal and recording is normal. Choose one
game to verify if the game runs normally.
Ringtones and
vibrating
Turn on Vibrate in Profile, turn its volume to the top, tap the default
ringtone loudspeaker to verify if it has noise, hoarse, TDD noise and
other faults, tap the default ringtone loudspeaker for message to verify if
it has noise and if the vibrating is normal.
Time display Inspection on time, tap the time icon to verify if it changes.
Delete records
When the test is done, all the photos used to serve the test will be deleted
and it turns back to Home page.
Page 37

PAP4000 Service Manual
_________________________________________________________________________________________________________ _______________
2012-5-8 37/42
GPS inspection
As for the device which supports GPS, it needs to test if GPS can search
Satellite and position precisely. Note, the test must be performed in the
outdoor spacious place. Input *#9527# in Dialpad to enter Monitor test.
Read phone
card
Identify phone card. Insert phone card and boot the phone to verify if its
booting process is normal and if identifying card and searching Network
service are normal.
Call
inspection
Phone calls
Place a call via the phone, listen to SPK voice and verify if the voice is
distorted, listen to MIC delivering voice and verify if the voice is
distorted.
Earpiece calls
Answer or end a call via earpiece, listen to SPK voice and verify if the
voice is distorted, listen to MIC delivering voice and verify if the voice is
distorted, and verify if the connection of earpiece jack is good.
Bluetooth calls
Verify if Bluetooth connection is normal, if it cannot have connection
after it is tried to be connected for two straight times and re-booted once,
it can confirm the cause is Bluetooth is malfunctioned. When the
connection is established, it needs to verify if the call has noise, TDD
noise and other noise, and transfer Bluetooth call to phone call to verify
if the calling voice is clear, noise-free and TDD noise-free.
Current test
Current
parameters
Test all current parameters such as powering-on current, powering-off
current, standby current and C/G calling current to verify if they all meet
the specified demands. Standby current is the current under the phone is
asleep (boot and search network, and sleep the screen for five minutes
and re-test).
Signal
observation
and
inspection
Signal strength
Based on the authorized center environment, record the signal strength of
CDMA and GSM, compare the signal strength among tested devices. If
the client brings the device to the authorized center for fixing, the
authorized center cannot find out obvious difference with this method,
and if the client believe firmly that fault is the weakened signal of the
device, then he/she can send the device back to factory for fixing.
Note:
1. As for the accident problems raised by the client, such problems
include there is weakened signal sometimes, sometimes it cannot
answer calls and sometimes it hangs up by itself, it needs to learn
about the problem clearly, including its surroundings and using
methods, and then it needs to test for 5 to 8 times.
2. As for the problem of poor welding, after it is fixed, it needs to be tested
for several times to make sure it has been fixed totally in order to lower
the second back repair rate. For instance, sometimes the internal memory
card cannot be read because of poor welded slot, sometimes the device
cannot power on because of poor welded CPU, as for such matters which are
not visible, it needs to tap with hand for some times on testing the device
to verify if such a matter will re-occur.(As for the former, if the playing
music which is stored in SD card stops on tapping with hand, it means the
problem still exists; as for the latter, if the connection of the battery
is solid and when it is tapped for several times, the phone auto powers
Page 38

PAP4000 Service Manual
_________________________________________________________________________________________________________ _______________
2012-5-8 38/42
off or re-boots, it means the problem still exists.)
7. Technological support
The supporting path for daily technological service:
7.1. FTP Server (ftp://119.147.25.41/
)
Series
No.
Items Saved path
1 Software with
specific
version
/ Technology Department/01 Software with
specific version
2 Upgrade tools / Technology Department/02 Upgrade tools
3 Technology
announcement
/ Technology Department/05 Technology
announcement(Technology announcement of earlier
stage)
4 Materials on
fixing training
/ Technology Department/08 Materials on fixing
training
5 Record sheet of
FQA
/ Technology Department/04 Record sheet of FQA
8. FAQ
Questions Answers
The method to enter Recovery
for 7260+
Step 1: Enter Recovery mode:
1. Press Volume up, Volume down and Power key to boot, it
displays Recovery mode.
2. Wait for several seconds, the phone displays Please press
Home key to view details (the yellow exclamation and the green
Android robot can be seen).
3. Press Home key and four items are displayed.
Step 2: Restore factory settings:
Page 39

PAP4000 Service Manual
_________________________________________________________________________________________________________ _______________
2012-5-8 39/42
1. To select Wipe cache partition via Volume key and to perform
erasing by pressing Power key, when these are done, it returns to
the original status.
2. To select Wipe data/factory reset via Volume key and to enter
the next interface by pressing Power key.
3. To select Yes – delete all user data via Volume key to confirm
performing restoring the action of erasing data.
The explanations for the for items are as follows:
Reboot system now-------- Reboot the phone
Apply sdcard:updata.zip-------- Upgrade T card (update.zip file is
not provided now, so this functionality is not available.)
Wipe data/factory reset--------- Erase data, which is equivalent to
restore factory settings
Wipe cache partition------------ Erase cache area
Fail to boot up
1. The memory is broken or welded poorly, upgrading 34 and
updating new software to solve this failure.
2. PMU, PA and CPU are malfunctioned, if this failure cannot be
solved by upgrading, then it can verify that the components are
broken, and the solution is to exchange the broken components
or the board.
3. Failed to perform OTA or download computer software, if the
reason belongs to failing to download software, please download
it for several times.
Auto power off/re-boot
1. pogo pin battery connector is bad connected internally,
operating based on the previous instructions and pressing pogo
pin for 20 times.
2. Some battery has non-standardized sizes. Measure the battery
size using vernier calliper and if it is obviously small, then the
battery needs to be exchanged.
3. The local Network compatibility causes to re-boot in some
areas and the solution is to upgrade the latest version.
No sound on earpiece/ no sound
can be delivered
1. The phone displays Earpiece mode and it needs to verify if the
phone cannot deliver sound under this mode, if it cannot, then it
needs to exchange the earpiece jack.
2. If the reason does not lie in the above case, it needs to verify
the earpiece is well-functioned (measuring the impedance value),
if it is malfunctioned, it needs to be exchanged.
UIM card cannot be identified/
PIN needles located in slot are
broken
First, it needs to verify if the six pin needles of the slot are
normal, if they are broken, they can be fixed normally and the
user needs to be warmed to use it carefully, and the card should
be placed horizontally and inserted.
If the slot is not broken, it needs to be re-verified if the failure
still exists by upgrading the latest software.
Slow response/fake death /death
on operating
Because the hardware configuration is limited, so when the
system runs several programs or big games, then internal
Page 40

PAP4000 Service Manual
_________________________________________________________________________________________________________ _______________
2012-5-8 40/42
memory (RAM)is relatively small and leads to slow response:
Do not run several programs at the same time, long press Home
key to end task. When the system runs big programs, it may
cause the screen is blocked. This phone already has high cost
performance, but its internal memory is a little small.
2. Some clients can upgrade to the brief version made by net
friends to have some software experience.
The delivered sound is low
(mainly for hand-free situation)
The reason is the limitation of first-production of structural
cavity design. If the hand-free volume is turned up, the noise
may be produced, so the volume of hand-free situation is
relatively small.
1. The volume of hand-free situation of 32 version has been
turned up properly, but it may be still a little small.
2. Our company will release a new version that turns up the
volume of hand-free situation, which may have some noise. As
for the client who is great desire for it, he/she can upgrade to that
version.
3. Some have small volume under the non- hand-free situation,
which cause may be there is foreign object in MIC hole or MIC
is broken.
The edge of the touch-screen
raises
Bad production and normal fix, if it happens within the
exchangeable period, the user can exchange it for a new one,
while if it happens out of the period, it needs to be exchanged the
shell set for solution.
Displays highlight spots or black
spots
To verify if the number of highlight spot (no more than 2
highlight spots) and the distance (longer than 15mm) comply
with the company standards, if they are outside the standard, they
can get the fix; while if they are within the standard, they cannot
get any fix.
The incoming ringtone is
distorted/small
The loudspeaker is broken.
Dark screen/the backlight fails
1. If the screen is dark on calling, it is related to the proximity
sensor and it needs to verify if the cause lies in the
configuration of anti-light foam, or if the proximity sensor is
broken. As for the matter if the proximity sensor is
malfunctioned can be verified in *#9527*#--App and test.
2. Dark screen on booting, this cause may lie in the
malfunctioned backlight cell or broken circuit, which
solution is to exchange backlight or the main board.
How to download software from
computer without SD card?
It is suggested to download 豌豆夹 or 91 手机助手 to your
computer, and to download software to your phone via 豌豆夹
or 91 手机助手 by connecting USB cable between your phone
and computer. There are lots of available software offered by 豌
豆夹 or 91 手机助手.
Unstable WIFI Network service If the user suffers from unstable WIFI, but the Network can be
Page 41

PAP4000 Service Manual
_________________________________________________________________________________________________________ _______________
2012-5-8 41/42
connected normal, the signal is positive, and the Network cannot
be accessed (sometimes it can be), which cause may be that the
router is set as b/n/g mixing mode and the solution is to reset the
router as single g mode.
If the user suffers from WIFI disconnecting by itself, which
needs to verify if the cause lies in wrong settings in that the
setting of WIFI for 7260+ is to auto sleep when the screen is
asleep. The solution is to perform settings as Settings – Wireless
and Network – WLAN settings – Press the left key on keyboard
– Advanced – WKAN sleep strategies.
when 7260+ is connected to the
computer for development, its
screen does not auto turn dark.
To verify if Settings – App – Development – Stay awake is
selected, if it is, the screen cannot turn dark.
What cautions should be noticed
using Bluetooth to receive files?
The receiving notification locates in the status bar, it needs to be
dragged down and to be choose to receive manually (it needs to
warm the user to insert SD card for receiving).
Where is the file received via
Bluetooth located without SD
card? And how to view it?
when it finishes receiving, it displays the hint
Uudisk/Bluetooth/name, but the user cannot find it in File
manager. The cause is that the file received via Bluetooth cannot
be viewed without SD card, such a file can only be viewed by
developers with the help of some delicate tools, and such a file
cannot be stored and disappears every time the phone reboots.
(This matter has been submitted to the company)
Does 7260+ support GPSONE?
It does not support GPSONE in that its hardware chip does not
support GPSONE communication.
Is the vibration response of
sliding to unlock canceled?
It cannot be canceled.
Why the key lights are turned off
sometimes?
After the backlight brightness is adjusted, it needs to re-wake the
phone to turn on key lights.
The phone cannot create a new
Hotmail account and it warns it
cannot connect to the server.
There is compatibility problem between Android e-mail protocol
and hotmail, it has been verified in the Android development
website, so hotmail is not supported. However, the user can
download the third party software to do some trial, most of them
are available.
The third party app (Mobile TV
and QQ etc) installed in 7260+
has no sound or has low-level
sound.
Open one built-in video file first and turn up its volume and then
enter media apps such as Tudou.com, QQ and Mobile TV.
Update driver path manually
for Surfing broadband in
7260+/E239/D539
G:\MODEMCLIENT\2058_MODEM_DRIVER\ANDROID\XP
(G disk is a mobile disk with a small bee icon, but different
computer may have different name for it, some is H disk, some is
I disk and the user can check My computer and choose its
corresponding disk.)
When the user opens Coolmart
and tap its download source to
This occurs under the case that the user performed downloads in
Coolmart before, some apps those are disconnected before they
Page 42

PAP4000 Service Manual
_________________________________________________________________________________________________________ _______________
2012-5-8 42/42
download, but there is no hints
for the user (the phone has been
connected to the Network, and
the user can enjoy surfing the
Network), then what is the
solution?
are downloaded are stored in the system space of Coolmart,
which causes the system cannot update more online sources. If
the problem lies in 7260+, the solution is to enter
Settings-Applications-Manage applications; select all the
applications and drag down to find Coolmart, then tap to enter
Coolmart, and then the user can tap Clear cache and Clear data.
Generally, this problem can always be solved. If such a case
happens in 7260+, D539, E239 or W711, the operations are the
same, but there is one thing different, namely, when the user
opens Manage applications, it only displays the applications
downloaded and installed by the user. Tap Menu to pop up Filter,
tap Filter to select All, and the it displays all the applications on
your phone, then drag down to find Coolmart to perform the
previous options.
The store path of navigation
applications
The source downloaded from CPTone website is a compressed
resource. When it is decompressed, it is 7260+ GPS folder. Copy
COOLMAP located in the folder to SD directory, or the phone
cannot identify it.
How to adjust word size for
COOLBOOK?
The word size can be adjusted via the Volume keys, Up key to
zoom in and Down key to zoom out.
When there is an incoming call,
how to stop vibrating and
ringtone for 7260+?
This can be done by taping the Ring icon on the screen or turning
to the Volume keys (Up key or Down key).
How to set incoming ringtone
for 7260+?
Two methods, first, Settings-Profiles-Standard mode - Incoming
call ringtones-Music-Select one song-OK-Menu-Set as Current
mode; second, File manager-SD directory-Find the folder
included Music files-move the cursor to your target song-tap Act
located in the right-bottom corner-Set as incoming call ringtone.
How to set the usage fixed in 2G
Network?
Settings-Wireless and Network-CDMA Network- CDMA
Network preference settings-Select Only CDMA-OK
How to set time and timing
power on or off?
Settings-Date and time – if it needs to take the time of CDMA
Network as the default time, tap hook for Auto to turn blue,
while if the user wants to auto set the time, he/she needs to tap
hook for Auto to turn gray-turn the hook for Use 24-hour format
blue. In the last item of Date and time settings, the user can see
Timing power on or off.
9. Appendix
Appendix 1: Location map of PAP4000 main board(TOP and BOTTOM)
Appendix 2: Exploded views of PAP4000 structure
 Loading...