

Page 1

English
Before using this product, please read the security instructions first
and bear them in mind when using the product.
OWNERS
INSTRUCTIONS
TFT LCD TV -
Built in DVD/DivX(Option) Player
/
19”20”/22
”
Page 2

Eng - 2
Warning
TO PREVENT FIRE OR SHOCK HAZARD. DO NOT
EXPOSE THIS APPLIANCE TO RAIN OR MOISTURE.
THIS SYMBOL IS INTENDED TO ALERT
THE USER TO THE PRESENCE OF
UNINSULATED. DANGEROUS
VOLTAGE. WITHIN THE PRODUCTS
ENCLOSURE THAT MAY BE OF
SUFFICIENT MAGNITUDE TO
CONSTITUTE A RISK OF ELECTRIC
SHOCK TO PERSONS.
THIS SYMBOL IS INTENDED TO ALERT
THE USER TO THE PRESENCE OF
IMPORTANT OPERATING AND
MAINTENANCE (SERVICING)
INSTRUCTIONS IN THE LITERATURE
ACCOMPANYING THE APPLIANCE.
This equipment has been designed and
manufactured to meet international safety
standards but, like any electrical equipment,
care must be taken if you are to obtain the best
results and safety is to be assured. So, please
read the points below for your own safety.
They are of a general nature, intended to help
you with all your electronic consumer products
and some points may not apply to the goods
you have just purchased.
• Read these instructions.
• Keep these instructions.
• Heed all warnings.
• Follow all instructions.
• Do not use this apparatus near water.
• Clean only with a dry cloth.
• Do not block any ventilation openings.
Install in accordance with the manufacturer’s
instructions.
•Do not install near any heat sources such as
radiators, heat registers, stoves, or other
apparatus (including amplifiers) that produce
heat.
• This TV is not completely disconnected from a
power supply line, as minute current is
consumed even when the POWER switch is
turned off.
• Do not place hot objects or naked flame
sources, such as lighted candles or nighlights
on, or close to the TV. High temperatures can
melt plastic and lead to fires.
• Do not set on top of the TV any object or
container that might spill liquids or small
objects into the TV.
• Protect the power cord from being walked on
or pinched, particularly at plugs, convenience
receptacles, and the point where it exits the
apparatus.
• Only use attachments/accessories specified by
the manufacturer.
• Use only with the cart, stand, tripod, bracket,
or table specified by the manufacturer, or sold
with the apparatus. When a cart is used, use
caution when moving the cart/apparatus
combination to avoid injury from tip-over.
• Unplug this apparatus during lightning storms
or when unused for long periods of time.
• Refer all servicing to qualified service
personnel. Servicing is required when the
apparatus has been damaged in any way, such
as power supply cord or plug is damaged,
liquid has been spilled or objects have fallen
into the apparatus, the apparatus has been
exposed to rain or moisture, does not operate
normally, or has been dropped.
• The apparatus shall not be exposed to dripping
or splashing and no objects filled with liquids,
such as vases, shall be placed on the apparatus.
CAUTION: Danger of explosion if battery is incorrectly
replaced. Replace only with the same or equivalent
type.
Important Safety Instructions
Safety Instruction
CAUTION
CAUTION: TO REDUCE THE RISK OF ELECTRIC SHOCK,
DO NOT REMOVE COVER (OR BACK).
NO USER-SERVICEABLE PARTS INSIDE.
REFER SERVICING TO QUALIFIED SERVICE PERSONNEL.
RISK OF ELECTRIC SHOCK
DO NOT OPEN
NO USER-SERVICEABLE
PARTS INSIDE
Page 3
3 - Eng
English
Disposal of Old Electrical & Electronic Equipment (Applicable in the European
Union and other European countries with separate collection systems)
This symbol on the product or on its packaging indicates that this product shall not be
treated as household waste.
Instead it shall be handed over to the applicable collection point for the recycling of
electrical and electronic equipment.
By ensuring this product is disposed of correctly, you will help prevent potential negative
consequences for the environment and human health, which could otherwise be caused
by inappropriate waste handling of this product. The recycling of materials will help
to conserve natural resources. For more detailed information about recycling of this
product, please contact your local city office, your household waste disposal service or
the shop where you purchased the product.
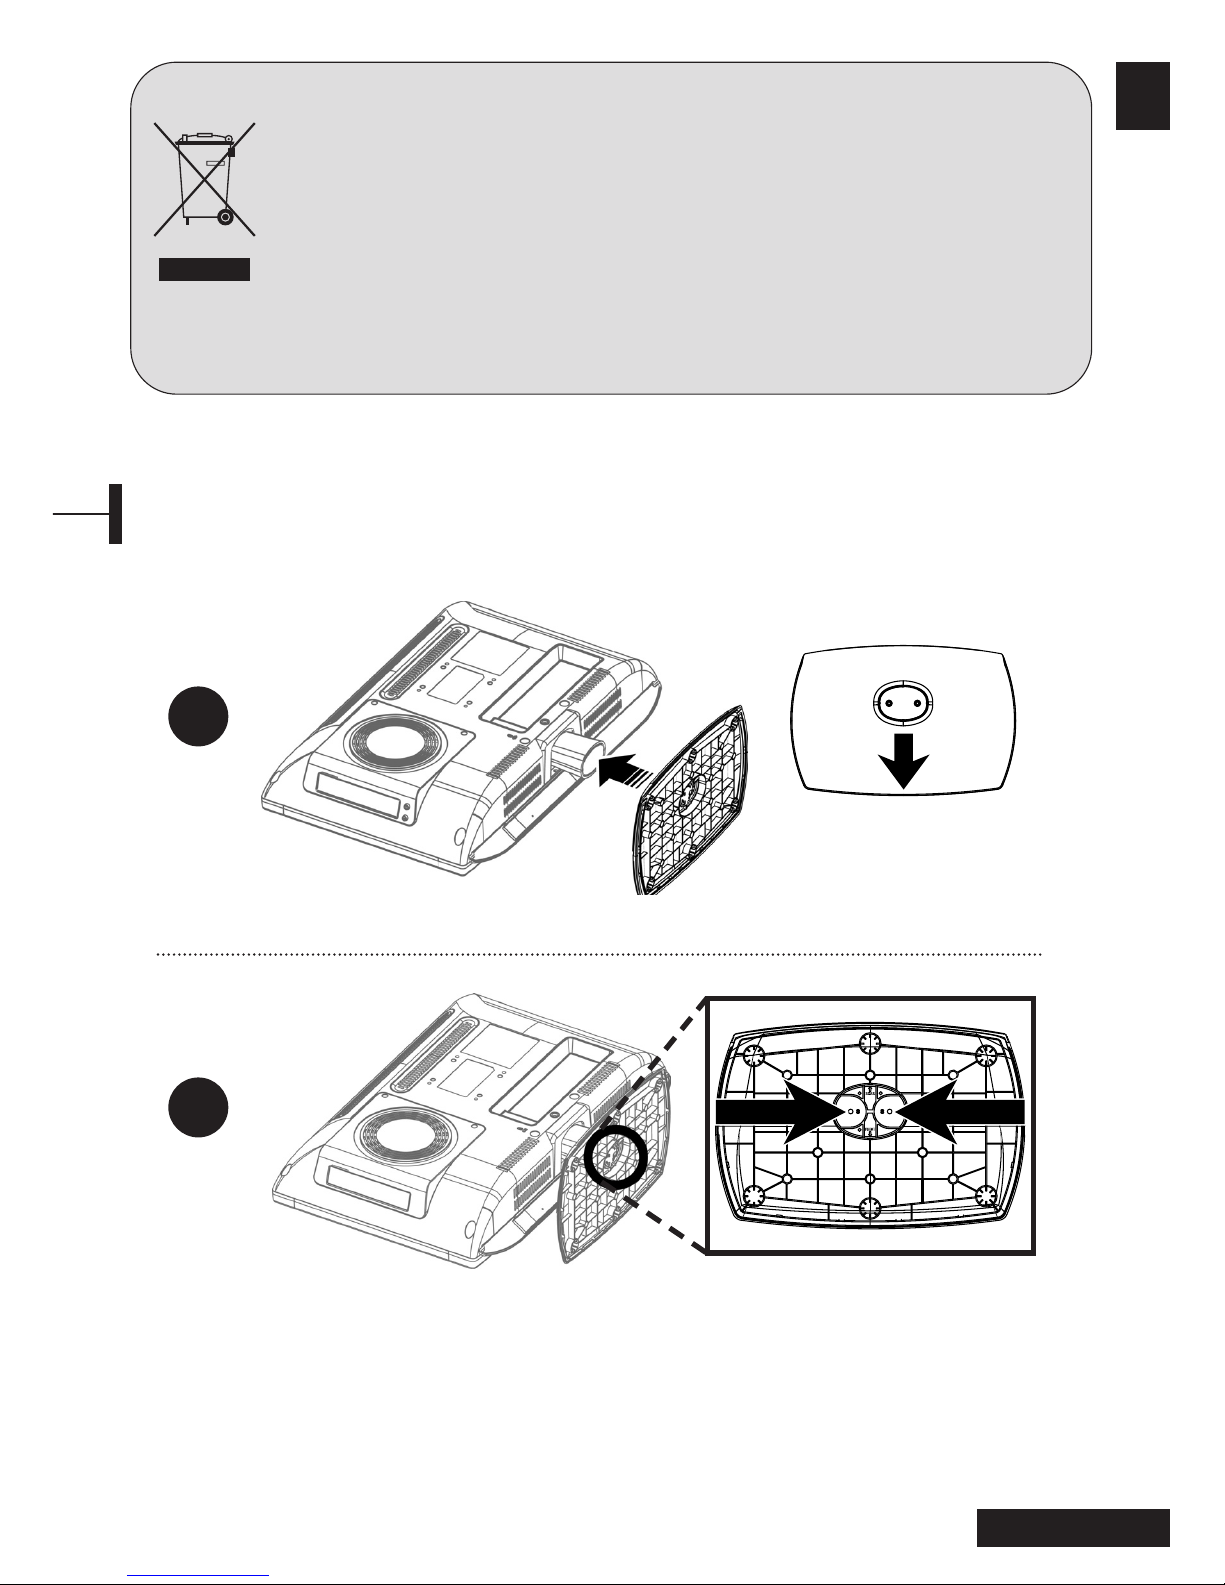
1
2
Front
Back
Installing the Stand
• Place the TV face down on a soft cloth or cushion on a table.
- Put the stand together with TV-Neck like this illustration.
- Fix the stand by using the enclosed screw.
Page 4

Eng - 4
You can use any wall mount arms manufactured
by an office furniture manufacturer. You should
take into account the following conditions.
• They have to comply with VESA Mount
Interface 75mm standard.
•They have to able to sustain the weight of the
LCD TV.
• They have to be fixed to a position adjustable
by hand.
• They have to be adjustable.
• The distance between the screw holes for fixing
the arms has to be 75mm. Additionally, refer to
the installation manual supplied with the arms
for installation.
• Arm installation procedures Install the arms
following the procedures given below.
1.Remove all cables connected to the LCD TV.
2.Lay the LCD TV face down on a flat surface
with a cushion or some type of soft material
to protect the screen.
3.Using a screwdriver, remove the screws fixing
the stand.
4.Install the steel frame of the arms, insert the
attached screws into the screw holes of the
LCD TV, and then fasten the screws using a
screwdriver.
•Attach the arm to the fixed board first.
• Do not use the handle screws for fixing the
stand and the handle screws to fix the arms.
Use only the screws attached for the arms (M4 x
10 screws with a diameter of 4 mm, and a
length of 10 mm). If you use the stand screws to
fix the arms, the LCD TV may be fall and get
damaged, because the arms are not fixed
completely. To reattach the removed stand, use
the stand screws.
• Attach the arms completely.
If the LCD TV becomes detached from the arms,
it may cause injury or damage the product.
If the LCD TV is somehow detached
accidentally, unplug the power cable from the
wall outlet, and contact your service center.
Damage may cause fire or electric shock.
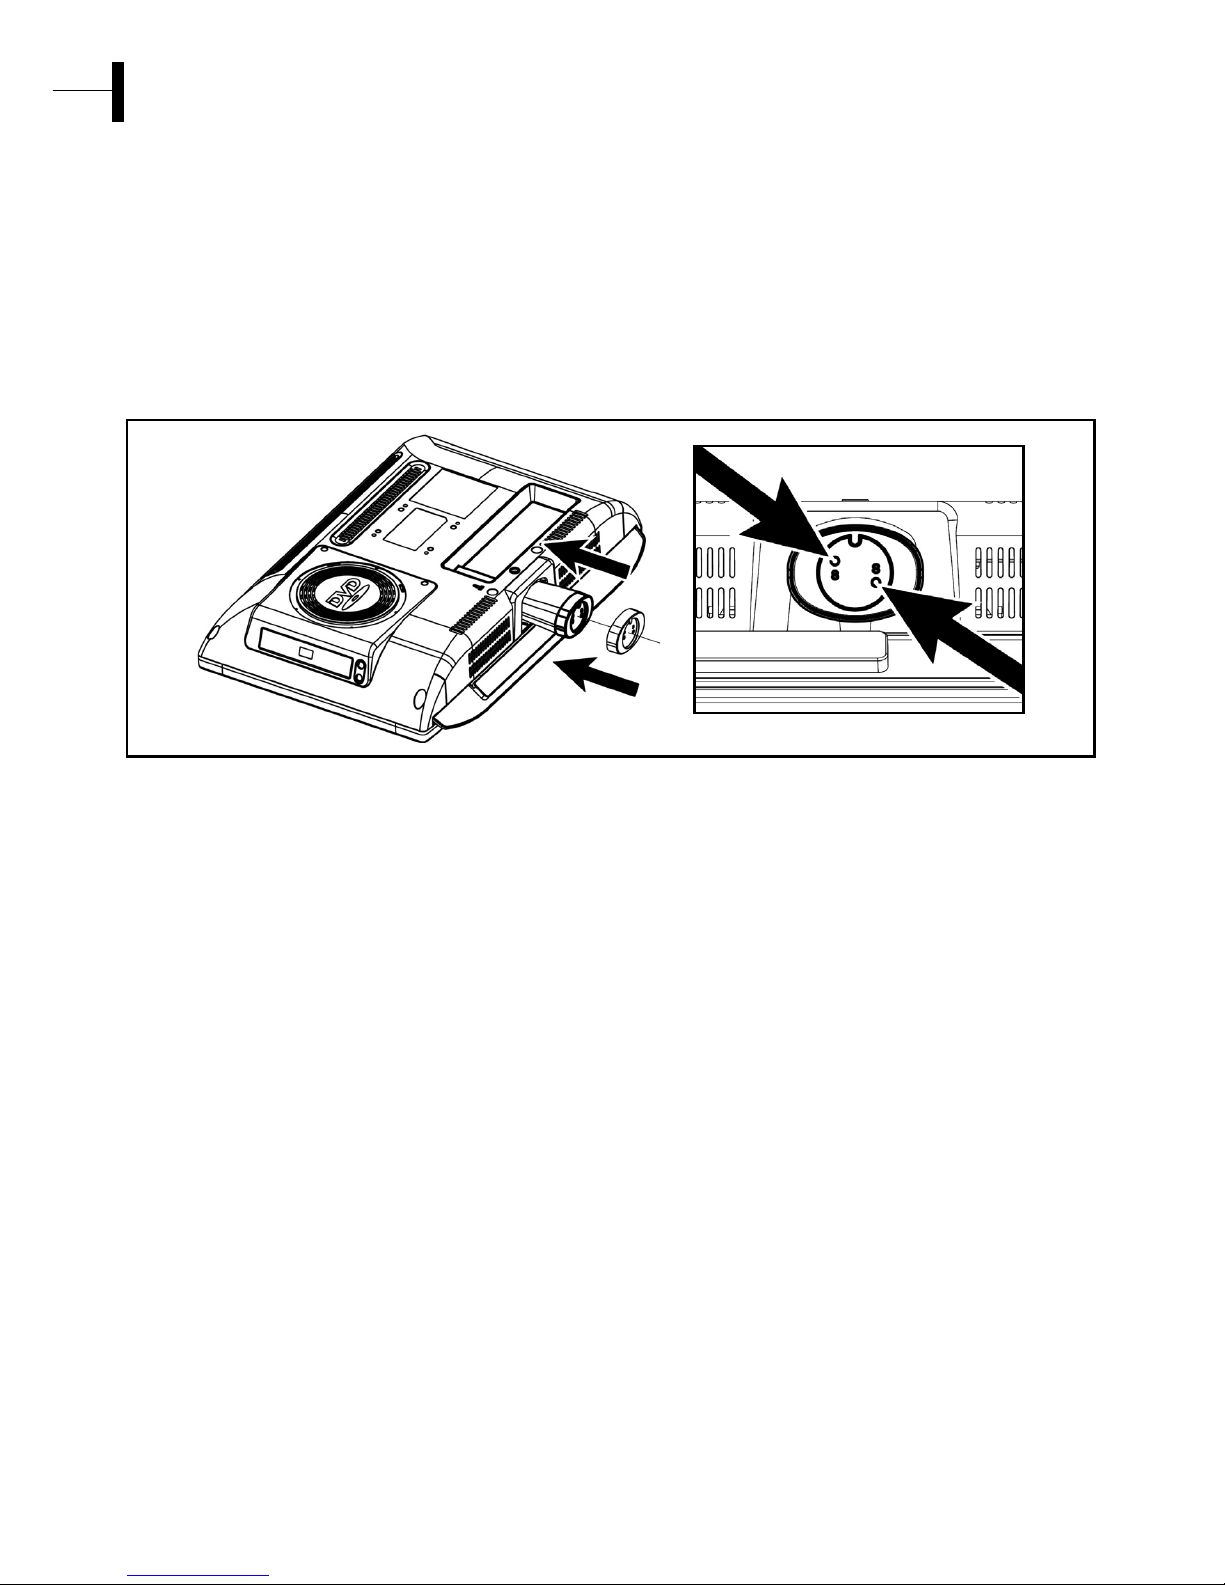
Using ARM on the Outer Wall
NOTE - Before installing TV wall mount, detach the stand from the TV.
• Place the TV face down on a soft cloth or cushion on a table.
• Install the stand neck cover following the picture below.
• By loosening the screw, take the stand apart.
• Then, separate it from the TV by pulling the
Stand-Neck.
• Following
this picture, install the enclosed Neck-
Cover.
Installing the Stand neck-Cover
1 2
Page 5

English
1
2
3
Front
Back
Installing the Stand
• Place the TV face down on a soft cloth or cushion on a table.
• Tilt the stand by about 45 degrees to the right, and then put it together with the TV like the
picture below.
• When the stand is engaged with the TV set, spin it counterclockwise to fix it on the TV.
• Following the Picture 3, turn the screw in the bottom of the stand to hold it in place.
Page 6
Using ARM on the Outer Wall
NOTE.
• Before installing TV wall mount, detach the stand from the TV.
• With the stand detached, install the stand cover in the same way like the stand.
• Place the TV face down on a soft cloth or cushion on a table.
• Install the stand neck cover following the picture below.
• With the cover fixed, turn the screw in bottom of the cover to hold it in place.
Installing the Stand neck-Cover
You can use any wall mount arms manufactured
by an office furniture manufacturer. You should
take into account the following conditions.
• They have to comply with VESA Mount
Interface 75mm standard.
•They have to able to sustain the weight of the
LCD TV.
• They have to be fixed to a position adjustable
by hand.
• They have to be adjustable.
• The distance between the screw holes for fixing
the arms has to be 75mm. Additionally, refer to
the installation manual supplied with the arms
for installation.
• Arm installation procedures Install the arms
following the procedures given below.
1.Remove all cables connected to the LCD TV.
2.Lay the LCD TV face down on a flat surface
with a cushion or some type of soft material
to protect the screen.
3.Using a screwdriver, remove the screws fixing
the stand.
4.Install the steel frame of the arms, insert the
attached screws into the screw holes of the
LCD TV, and then fasten the screws using a
screwdriver.
•Attach the arm to the fixed board first.
• Do not use the handle screws for fixing the
stand and the handle screws to fix the arms.
Use only the screws attached for the arms (M4 x
10 screws with a diameter of 4 mm, and a
length of 10 mm). If you use the stand screws to
fix the arms, the LCD TV may be fall and get
damaged, because the arms are not fixed
completely. To reattach the removed stand, use
the stand screws.
• Attach the arms completely.
If the LCD TV becomes detached from the arms,
it may cause injury or damage the product.
If the LCD TV is somehow detached
accidentally, unplug the power cable from the
wall outlet, and contact your service center.
Damage may cause fire or electric shock.
Page 7

5 - Eng
English
Contents
• To clean your flat panel display screen, lightly dampen a soft, clean cloth with water
or mild detergent.
If possible, use a special screen cleaning tissue or solution suitable for the antistatic coating.
• To clean the LCD TV cabinet, use a cloth lightly dampened with a mild detergent.
• Never use flammable cleaning material to clean your LCD TV or any other electrical apparatus.
Unplug the LCD TV from the power outlet before cleaning
• Safety Instruction………………………………2
• Installing the Stand ……………………………3
• Using ARM on the Outer Wall ………………4
•Unplug the LCD TV from the power outlet
before cleaning …………………………………5
• Overview …………………………………………6
• Remote Control…………………………………8
• Connecting Your TV……………………………9
• Check Before Using ……………………………11
• TV Function
Watching TV ………………………………………12
Storing Channels Automatically ………………12
Manual Storing of Channels ……………………13
Channel Name ……………………………………13
Program Edit ………………………………………14
Changing Channel ………………………………14
When the Picture Quality is Poor or Unstable 15
Selecting the Picture Status ……………………15
Adjusting the Picture Settings …………………16
Selecting the Sound Mode………………………16
Adjusting the BALANCE …………………………17
Adjusting the Bass/Treble ………………………17
Choosing a Soundtrack …………………………17
Selecting the AVC mode…………………………18
Changing the Screen Size ………………………18
Setting the Clock …………………………………18
Setting the On/Off Timer ………………………19
Selecting the ON Timer Channel ………………19
Setting the Sleep Timer …………………………19
• TTX Function
Teletext ……………………………………………20
Displaying the Teletext Information …………20
Selecting a Page by Number ……………………20
Using FLOF to Select a Page ……………………21
• PC Function
Connecting to a PC ………………………………21
Adjusting the PC …………………………………22
• DVD Function (Depend on the model)
Playing DVD’s ……………………………………23
Displaying the Playback Status …………………23
Searching for a Specific Screen/Song …………23
Repeating a Title, Chapter(DVD), Track(CD) …24
Changing the Audio Language/
Changing the Subtilte Language ………………24
Changing the Size and Angle of the Screen …25
Additional Function………………………………25
Setting a Specific DVD Title or Chapter ………26
Playing MP3 Discs …………………………………27
Playing DIVX Discs (Option) ……………………27
Playing Kodak Picture CD and JPEG File ………28
Using the Setup Menu …………………………30
• DivX Function (Depend on the model)
DivX feature Table ………………………………32
DivX® VOD Playback ……………………………33
• DVB-T Function (Depend on the model)
First time installation ……………………………34
Main menu ………………………………………34
Channel list ………………………………………35
Favourites …………………………………………38
Guides
- Now/Next EPG …………………………………39
- List Schedule EPG /
Timeline Schedule EPG ………………………39
Setting
- Configuration …………………………………41
- Language ………………………………………42
- Installation ……………………………………43
Common Interface ………………………………45
Technical Specification …………………………46
• Troubleshooting ………………………………47
• Specifications……………………………………49
• Appendix …………………………………………50
Page 8
Eng - 6
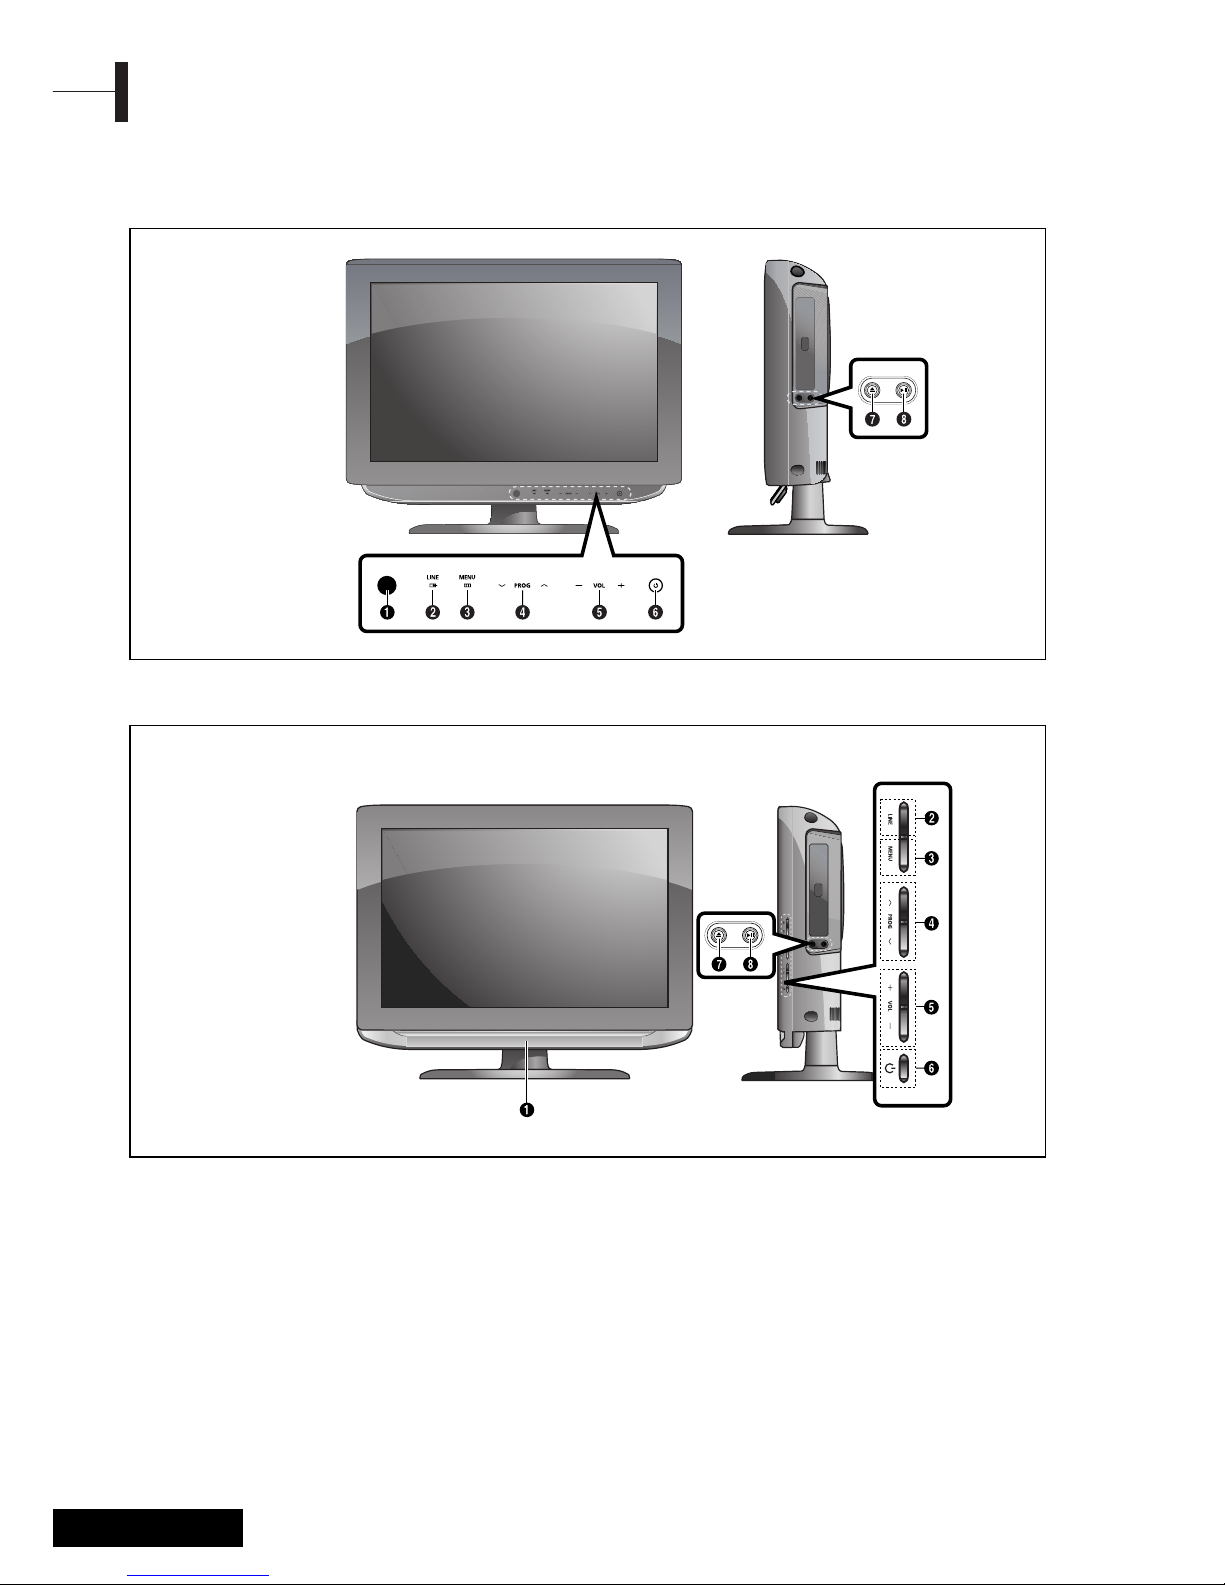
Front View
Overview
•LW
•LV
ΠRemote Control Sensor
´ LINE(AV) : External input selection.
ˇ MENU: To access or close menus,
simultaneously.
¨ PROG: Changes channels or “MOVE” to items
on the on-screen menu.
ˆ VOL: Increases or decreases the volume.
This is also used to select the MOVE/ PREV
item on the on-screen menu.
Ø POWER: Turns the TV on and off.
<DVD> Depend on the model
∏ OPEN/CLOSE: OPEN/CLOSE the DVD.
” PLAY/PAUSE: Play the DVD or temporarily
stop playback.
Page 9
7 - Eng
English
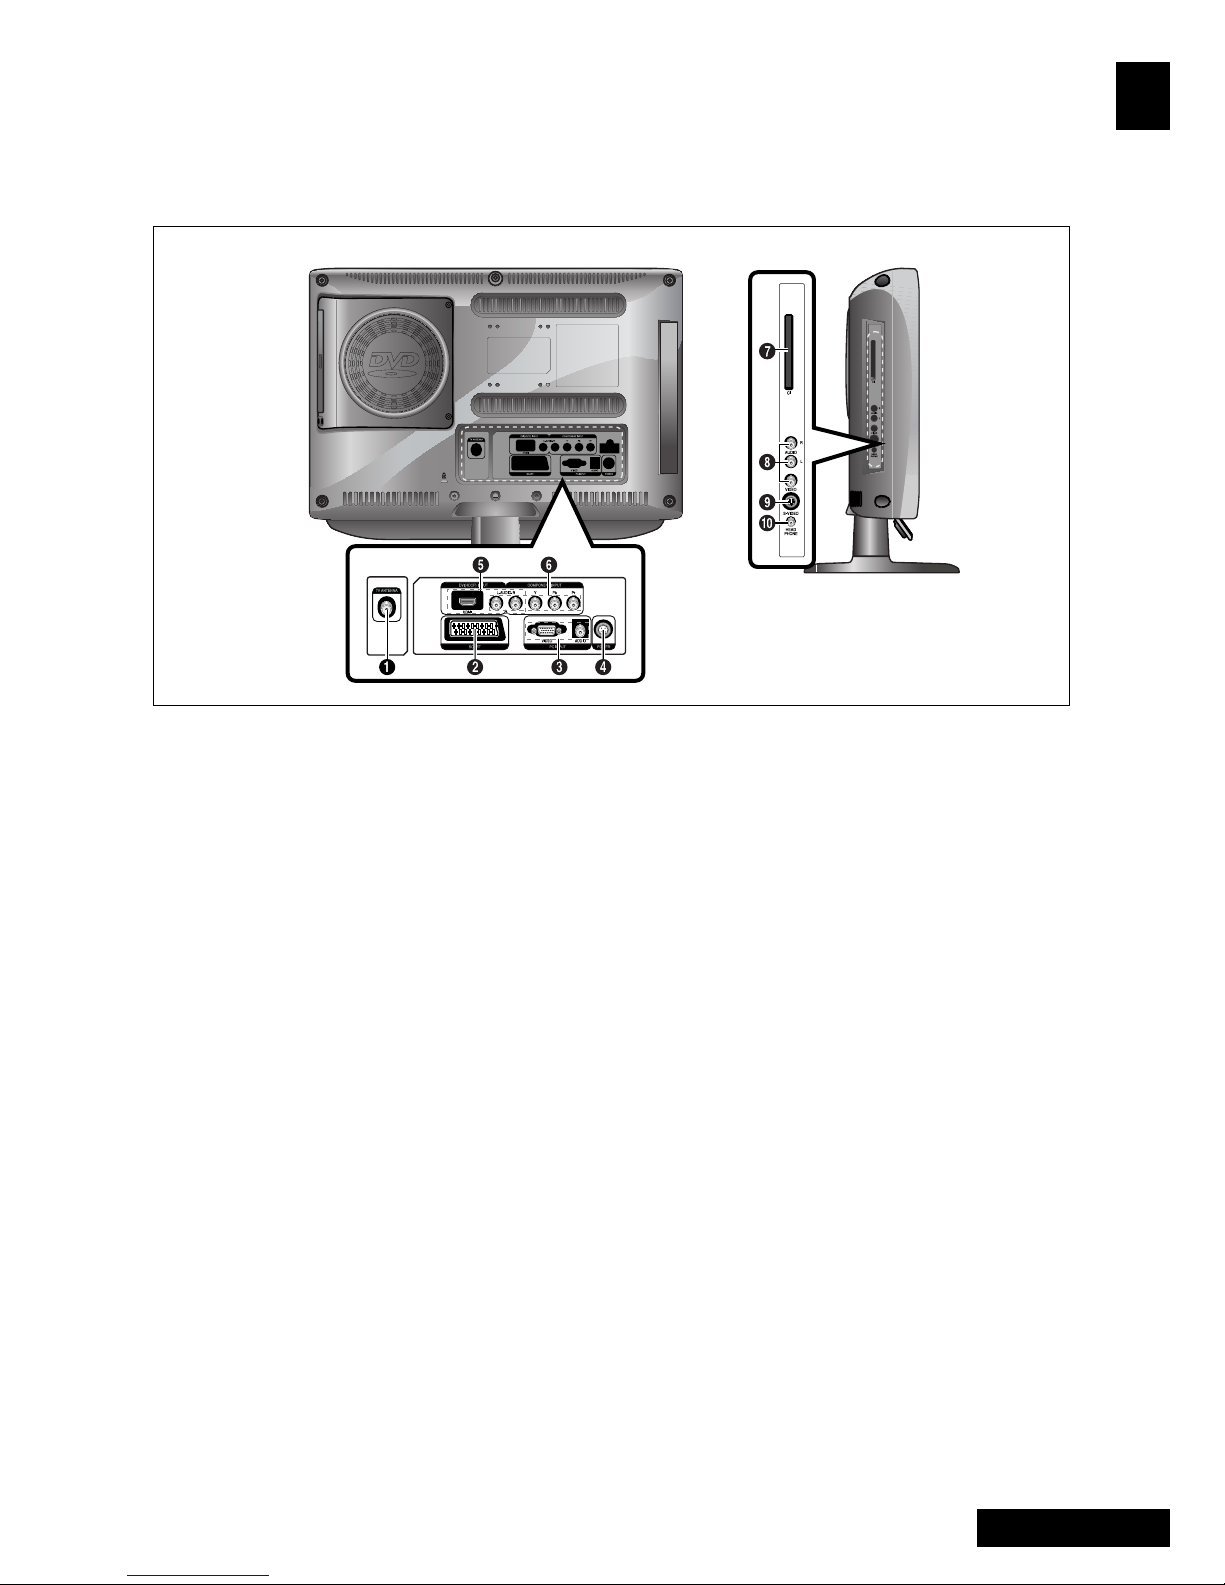
Rear Panel Jacks
ΠTV ANTENNA INPUT JACK
´ SCART JACK
ˇ PC VIDEO(D-SUB) INPUT JACK
PC AUDIO INPUT JACK
¨ POWER INPUT CONNECTOR
ˆ
HDMI INPUT, DVI INPUT(VIDEO/AUDIO:L/R) JACK
Ø
COMPONENT JACKS (VIDEO : Y, Pb, Pr/AUDIO : L/R)
∏ CI INPUT JACK
” VIDEO(VIDEO/AUDIO) INPUT JACKS
’ S-VIDEO INPUT JACK
˝ HEADPHONE JACK
: Used for headphones that can be purchased
additionally.
For more details on connections see page 9~11.
Page 10
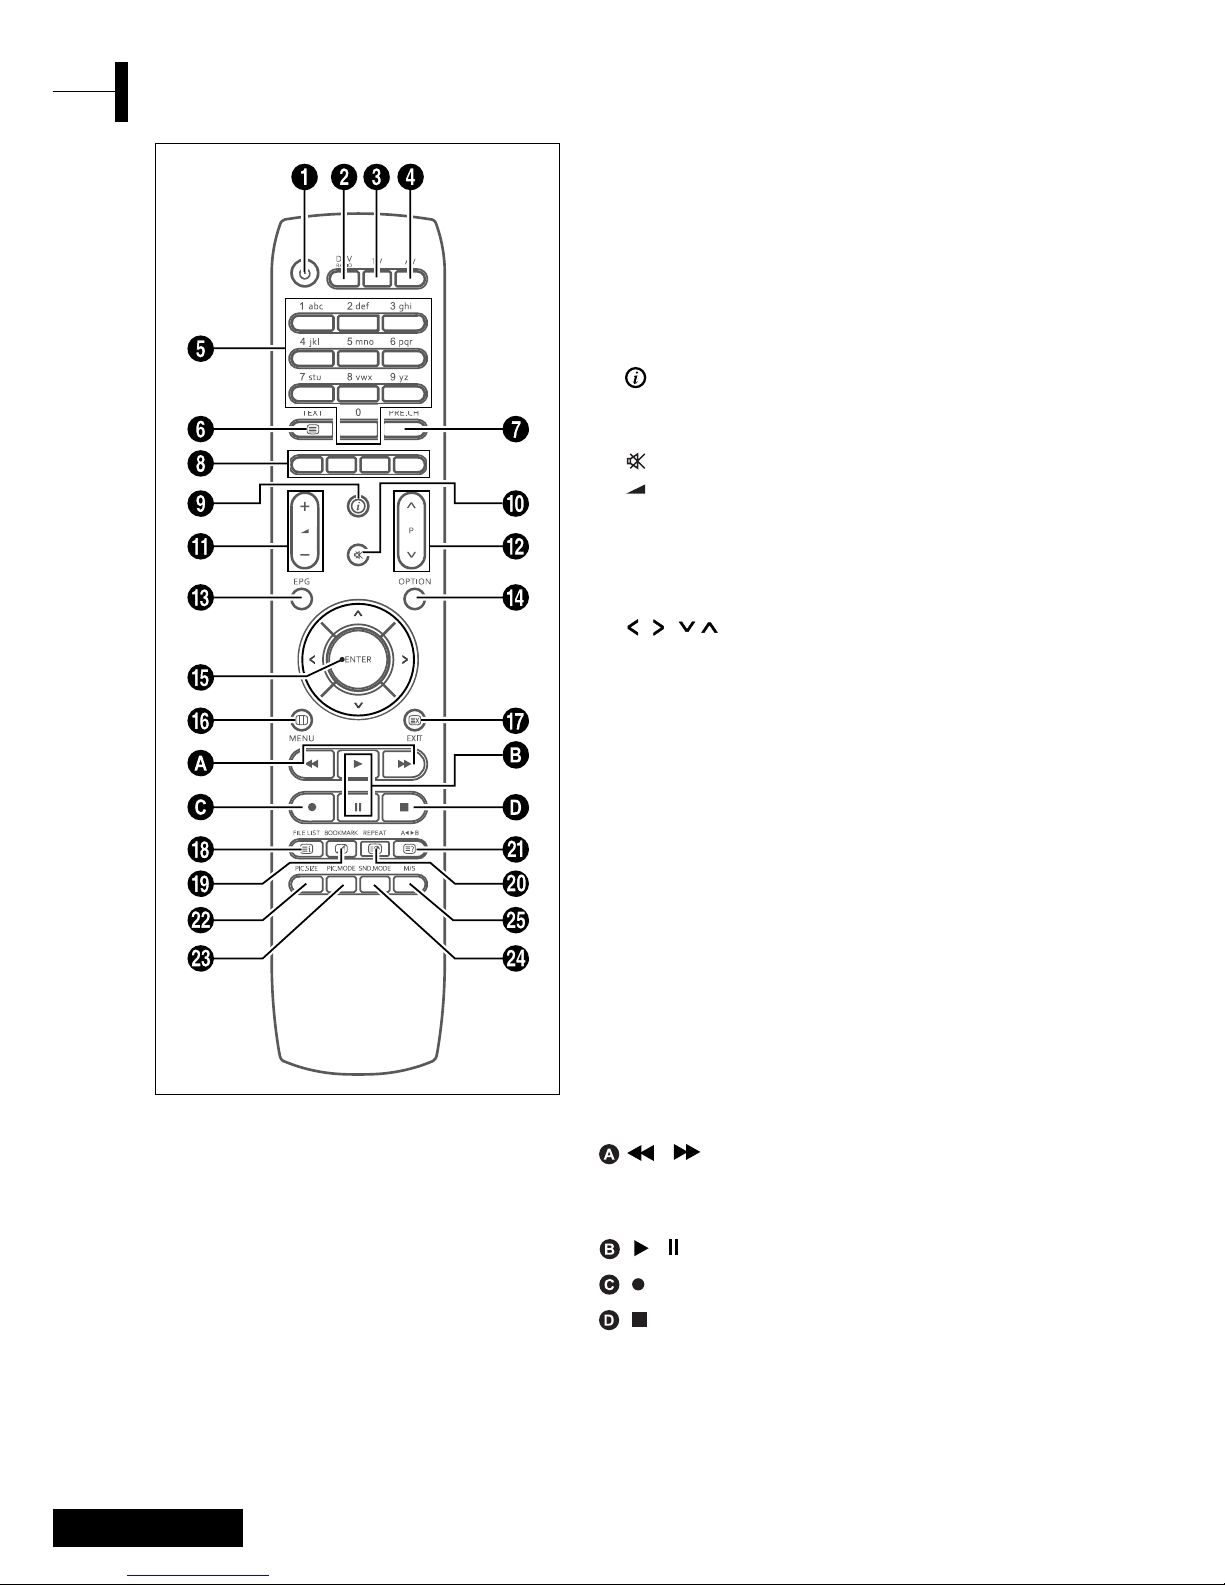
Eng - 8
ΠPOWER: Turns the TV on and off.
´ DTV/RADIO: Switches to DVB-T mode.
ˇ TV: Switches to TV mode.
¨ AV: External input selection.
ˆ
NUMBER BUTTONS: Selects channels directly on the TV.
Ø TEXT: Switches to Teletext mode.
∏ PRE.CH: Moves to the previous channel.
” COLOUR BUTTONS
’ : TV - Displays the current channel and the
audio-video settings.
DTV - Display the current channel information.
˝ (MUTE): Temporarily mute the sound.
Ô (VOLUME): Increases or decreases the volume.
P (CHANNEL): Changes channels.
Ò EPG: Electronic program guide.
Ú OPTION: Displays the Configuration Menu in DVD
or DTV mode.
Æ ////ENTER:
Select an item of menu / Change confirmation.
ı MENU: Displays the OSD menu.
˜ EXIT: Exit the current configuration /
To exit from the teletext display.
¯ INDEX/FILE LIST: Programme selection by name /
File list.
˘ MIX/BOOKMARK: Video & TTX MIX /
To SAVE a specific frame for later viewing.
¿ SUB PAGE/REPEAT: Teletext SUB-PAGE /
For specifying and repeating playback of a segment.
¸ REVEAL/A
œ√
B: Teletext reveal /
For repeated playback of disc titles, chapters or sound.
˛ PIC.SIZE: Change the screen size.
◊ PIC.MODE: Change the picture status.
± SND.MODE: Change the sound mode.
≠ M/S: Sound mode selection.
<DVD> - Depend on the model
/: Skip forward - Reverse /
For fast and slow playback (press and hold the
button over 2seconds).
/: Play the DVD / Temporarily stop playback.
: Record (PVR ONLY)
: Stop the DVD playback.
Remote Control
Page 11
9 - Eng
English
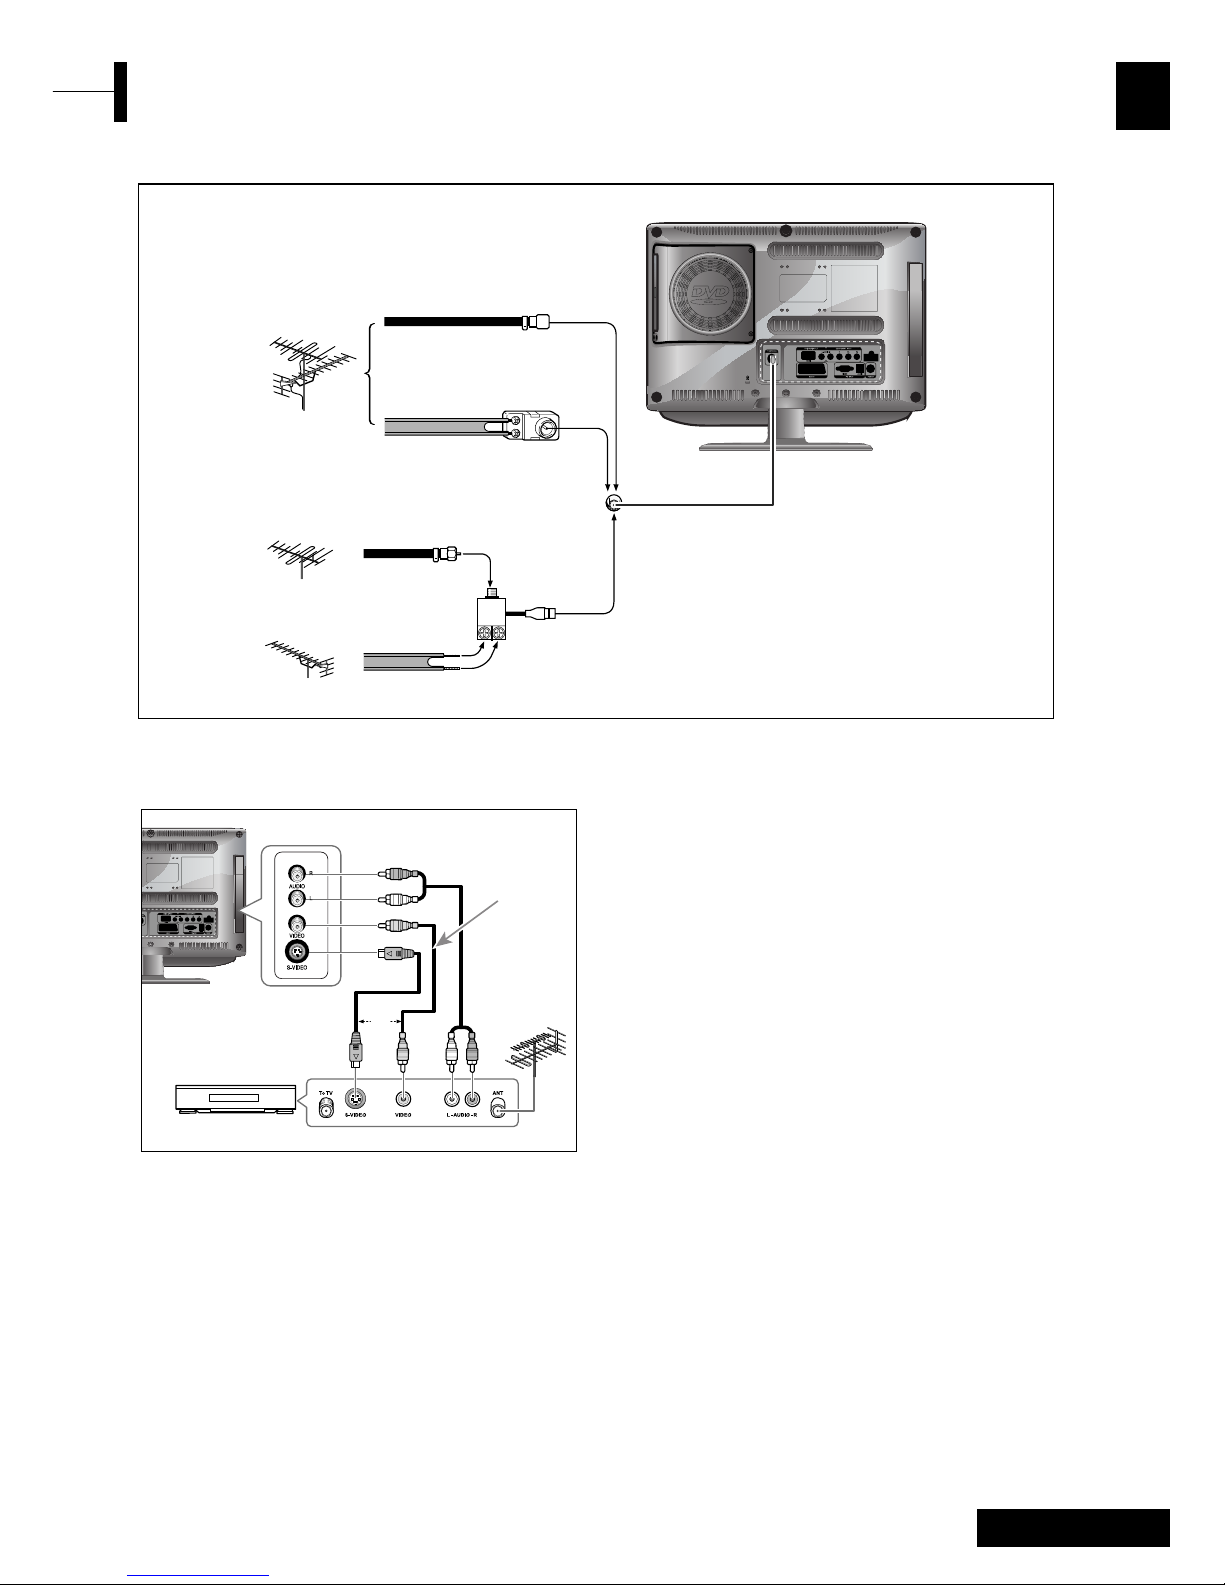
Connecting Your TV
Connection Procedures
ΠConnect the antenna cable to the ANTENNA IN
terminal on the back of your VCR.
´ Connect the VIDEO/AUDIO INPUT jacks of the TV
and the video/audio output jacks of your VCR with
the video/audio cables. (Connect the cable to the
terminal of the same color)
- You can use the S-Video cable to connect a VCR
or a DVD player for better video quality.
- If your VCR does not support stereo sound,
connect the mono audio out jack to the AUDIO
INPUT (left) jack.
Procedures for watching a video over a VCR
Turn the TV on, and select ‘VIDEO’ using the AV button
on the remote control.
- If you have connected a S-Video cable, select ‘S-Video’.
Connecting the Video or S-Video/Audio Jacks
Connecting an Antenna or Cable without a Decoder box
VHF, UHF
or Cable
75-ohm coaxial cable
OR
OR
300-ohm twin lead cable
Antenna adapter
(Not supplied)
U/V mixer
(Not supplied)
VHF
UHF
VCR/DVD Player/STB
Video Cable
Audio Cable
OR
S-Video Cable
Page 12
Eng - 10
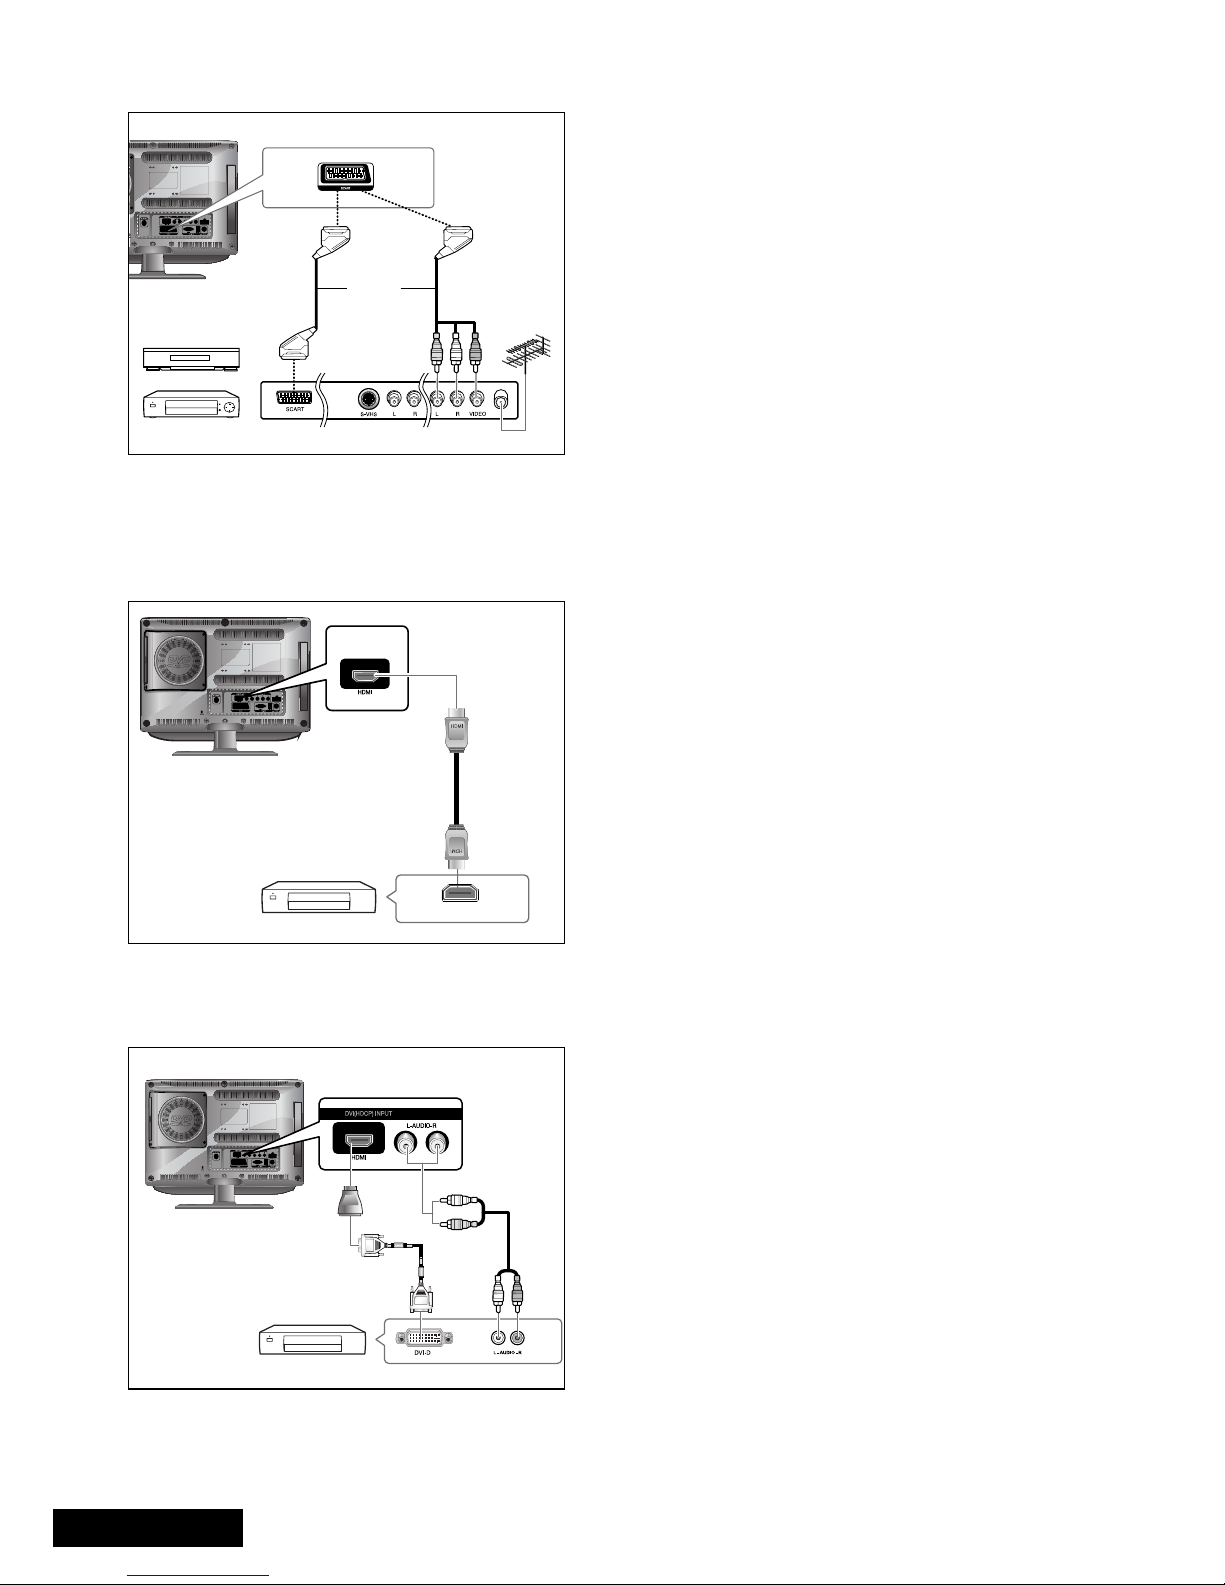
HDMI
Connection Procedures
ΠConnect the HDMI input jack of the TV and the
HDMI output jack of your DTV Receiver (480p/60Hz,
576p/50Hz, 720p/50Hz, 720p/60Hz, 1080i/50Hz,
1080i/60Hz).
HDMI Cable
DTV Receiver
Connecting the HDMI JACK
•Warning : Do not Connect DVI audio cable.
Connecting the HDMI JACK (USE DVI JACK)
Connection Procedures
ΠConnect the HDMI input jack of the TV and the DVI
output jack of your DTV Receiver (Using the adapter
or HDMI cable).
´ Connect the DVI audio input jacks of the TV and the
DVI audio output jacks of your DTV Receiver with
the audio cable (480p/60Hz, 576p/50Hz, 720p/50Hz,
720p/60Hz, 1080i/50Hz,1080i/60Hz).
ˇ VESA Standard Mode (Resolution/Vertical
Fraequency), refer to page 50.
Audio Cable
DVI Cable
DVI to HDMI
adapter
DTV Receiver
Connection Procedures
ΠAV output is used for the equipment with an RGB
output, such as video game devices or video disc
players.
This end can be fitted with:
-A SCART connector
- Three RCA connectors(VIDEO+AUDIO_L+AUDIO_R)
Procedures for watching a Video over a VCR
Œ Turn the TV on, and select ‘SCART’ using the AV
button on the remote control.
NOTE: When the RGB cloors look abnormal on screen,
check the SCART cable if it’s properly connected.
Connecting the Scart Jack
VCR
SAT
OR
Page 13
11 - Eng
English
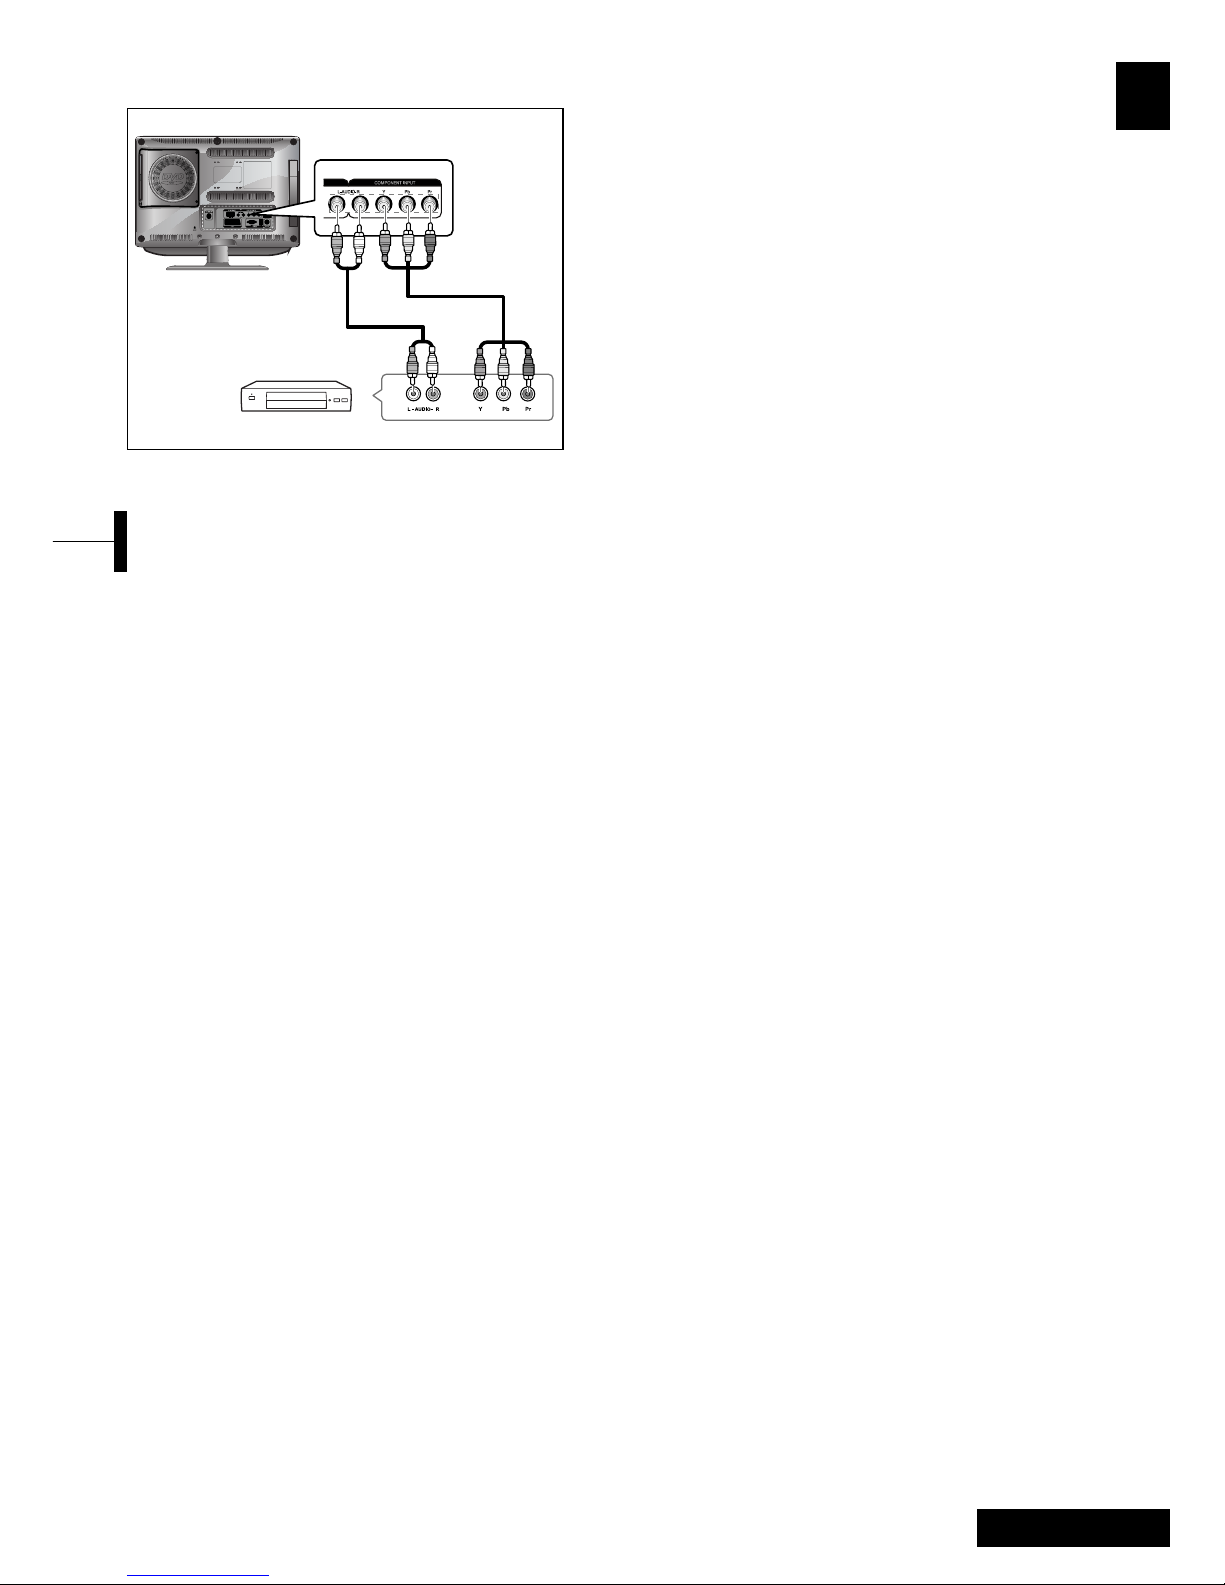
Connecting the DTV Receiver
Connection Procedures
ΠThe COMPONENT VIDEO IN and COMPONENT
AUDIO IN connectors are used for equipment
with a DVD or DTV receiver out. (480i/60Hz,
480p/60Hz, 576i/50Hz, 576p/50Hz, 720p/50Hz,
720p/60Hz, 1080i/50Hz,1080i/60Hz)
To watch the DTV
Œ Turn the TV on, and select ‘COMPONENT’ using
the AV button on the remote control.
´ Turn the DTV Receiver on.
Component Cable
Audio Cable
DTV Receiver
Please check the following check list before using
the TV.
ΠIs the antenna cable connected properly?
´ Is the AC adapter connected properly?
- When you connect the adapter to the unit,
turn the power switch on the front panel to
“off”, and then connect the adapter cable.
- When not using the adapter for a long time
period, separate the AC adapter from both
the main body and the power outlet on the
wall.
ˇ Are the remote control batteries installed
properly?
-Install two AAA size batteries according to
the correct polarity.
- The remote control works up to about
7~10m from the TV, 3m to the left or right
of the TV, and to within 30 degrees from
the remote control sensor of the TV.
¨ Have the receive channels been configured?
ˆ Are the cables connected to any external
devices connected properly?
Check Before Using
Page 14
Eng - 12
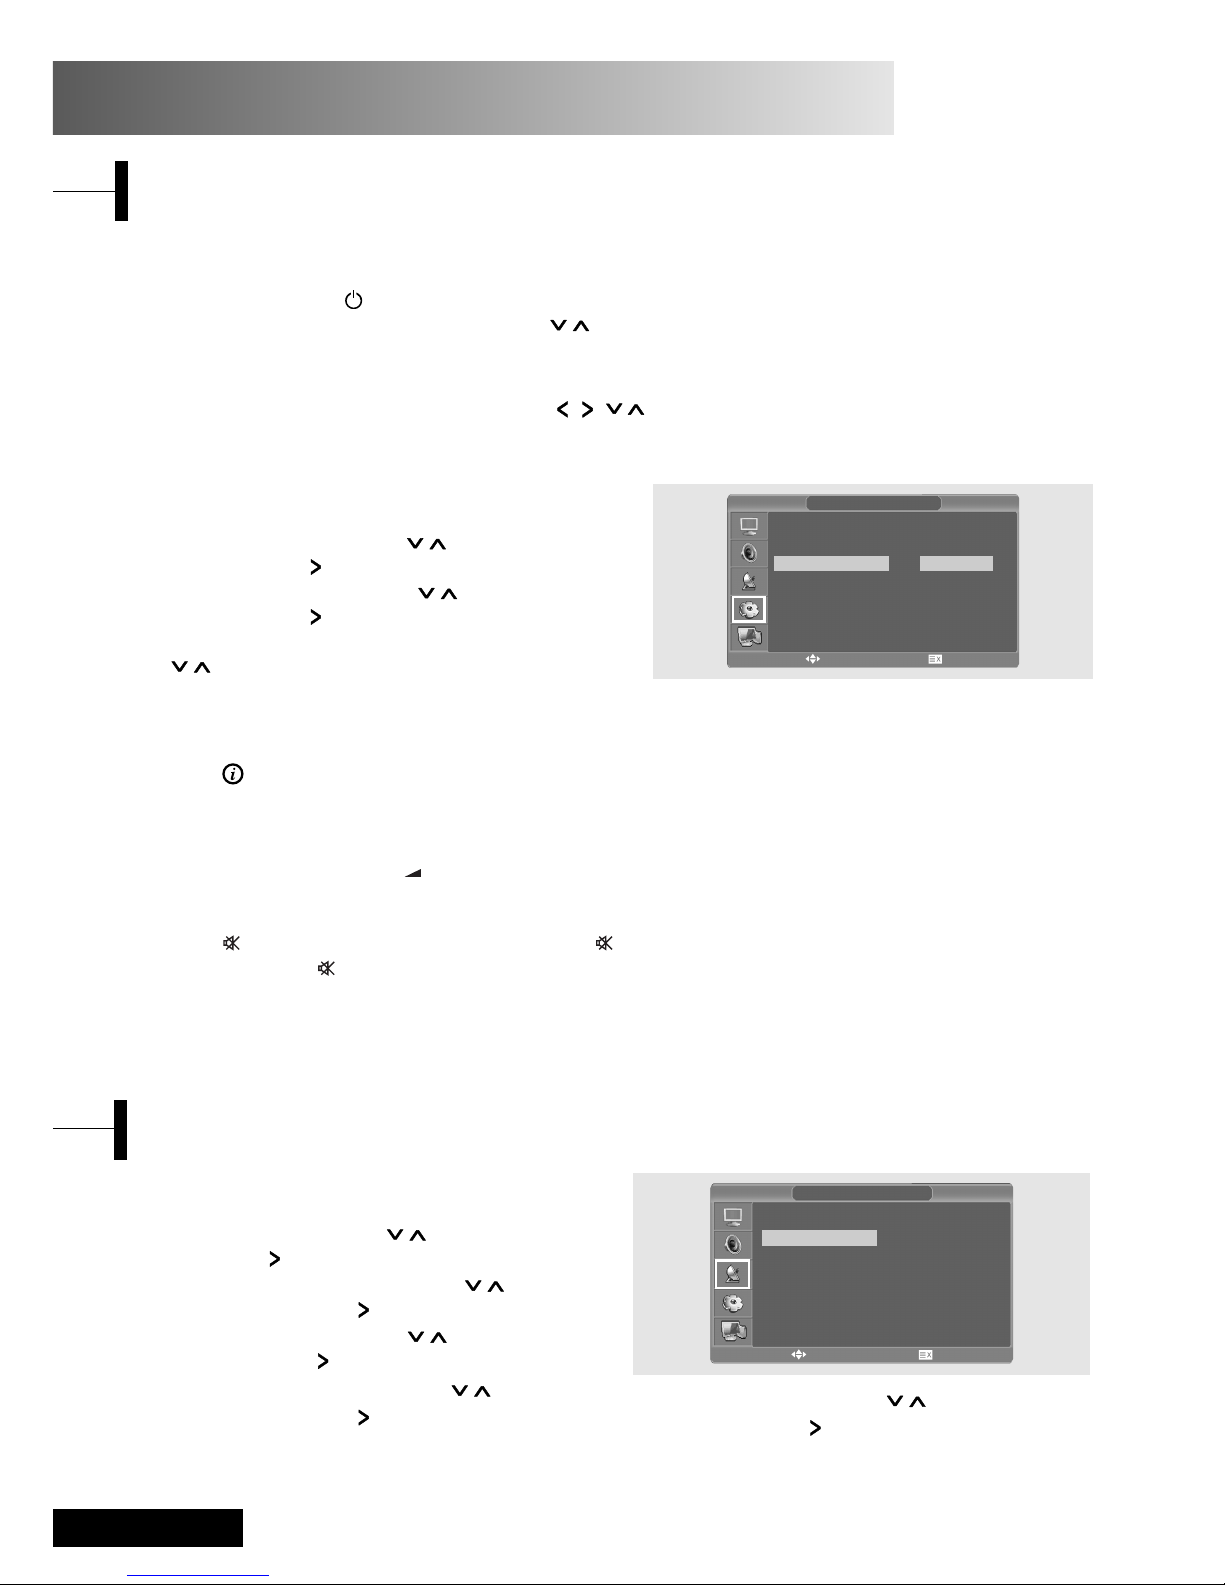
ΠPress the MENU button. The OSD MENU will
be displayed.
´ Select Setup using the / button and then
press the button.
ˇ Select Auto Program using the / button
and then press the button.
¨ Select Country using the / button and
then press the button.
ˆ Select your country using the / button
and then press the button.
Ø Select Search using the / button and
then press the button.
Storing Channels Automatically
AUTO PROGRAM
Country
Search
UK
œ
√
√
MOVE&ADJUST EXIT
Press the button on the remote control. The TV will display the input source, the picture mode, the
sound mode, the stereo mode, sleep time and the current time.
Viewing the Status Information
Adjust the volume using the +/-button.
Adjusting the Volume
Press the button. You can conveniently use the button when a telephone or a door bell rings.
To cancel, press the button again.
Muting the Sound
Press the AV button. For connection and setup procedures, refer to page 9-11.
Viewing a Video or DVD
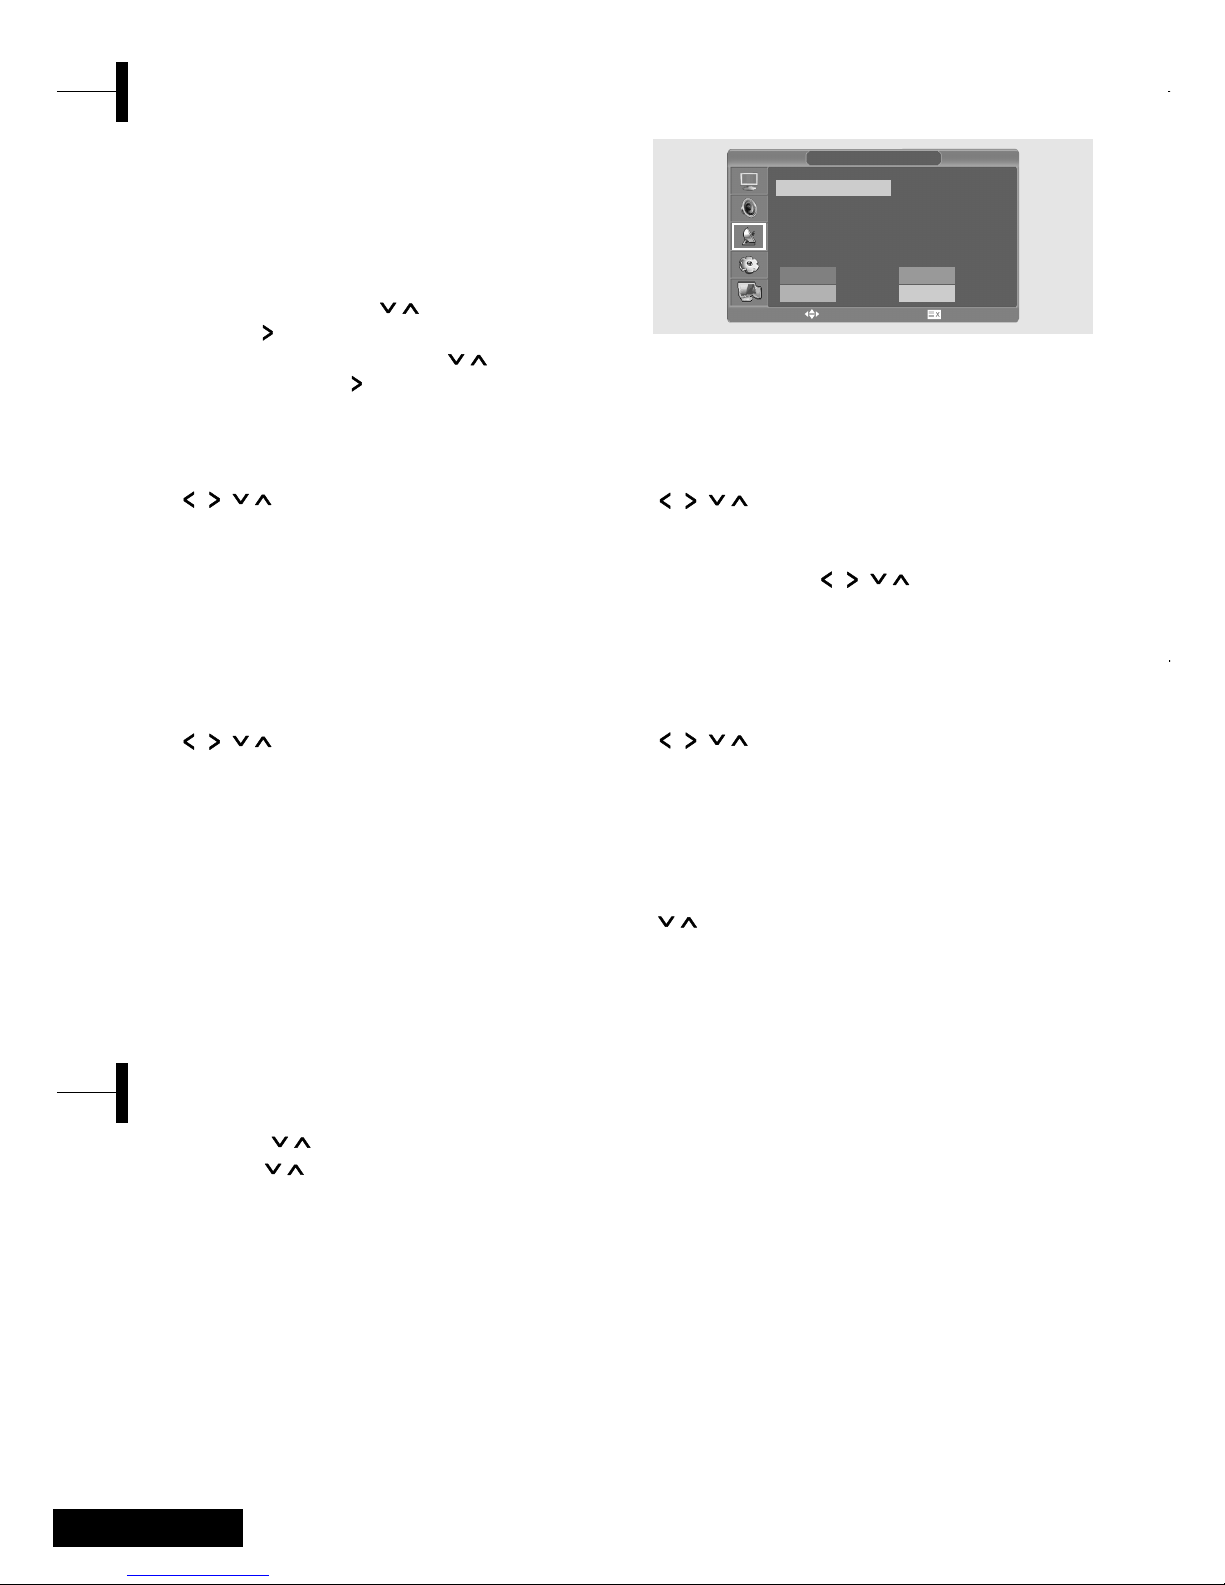
ΠPress the MENU button. The OSD MENU will
be displayed.
´ Select Function using the / button and
then press the button.
ˇ Select Language using the / button and
then press the button.
¨ Select the desired menu language using the
/ button.
ˆ Press the EXIT button to exit the menu.
FUNCTION
Selecting the Menu Language
Size
Time
Language
Sleep
DVD Setup
DTV Setup
Wide
English
Off
œ
√
œ
œ
√
√
√
√
√
MOVE&ADJUST EXIT
Watching TV
TV Function
Turning the TV On and OFF
ΠPlug the mains lead into an appropriate socket.
´ Press the POWER( ) button on the remote control (or on the front panel of the unit.)
You can also switch on by pressing the P /buttons.
• when you power on this product in the first time, the product will ask you language selection,
country selection and automatic search on the screen menu.
Thus, you should select desired status by / / / and ENTER button.
Page 15

13 - Eng
English
When storing channels manually, you can choose:
- Whether or not to store each of the channels
found.
- The programme number by which you wish to
identify each stored channel.
ΠPress the MENU button. The OSD MENU will
be displayed.
´ Select Setup using the / button and then
press the button.
ˇ Select Manual program using the /
button and then press the button.
¨ Select System using the / button and
then press the button. And press the /
button to select the system.
Whenever you press this button, system
changes to Auto ➞ BG ➞ DK ➞ I ➞ L ➞ Auto
mode in this order.
ˆ Select Program no. using the / button
and then press the button.
And press the / button to select the
required channel number.
Ø Select Search using the / button and
then press the button.
The tune scans the frequency range until the
first channel on the channel that you selected
is received on your screen.
∏ Select Store using the / button and then
press the button.
And press the / button to select the OK.
” Repeat Step 5 to 7 for each channel to be
stored.
Manual Storing of Channels
ΠPress the MENU button. The OSD MENU will
be displayed.
´ Select Setup using the / button and then
press the button.
ˇ Select Manual program using the /
button and then press the button.
¨ Select Name using the / button and then
press the button. And press the / / /
buttons to edit the name.
/: Select the characters (A~ Z, 0~9, -, + ).
/: move on the previous or next letter.
ˆ Select Store using the / button and then
press the button.
And press the / button to select the OK.
Ø Press the EXIT button to exit the menu.
Channel Name
MANUAL PROGRAM
System
Fine Tune
Program No.
Pr. Name
Store
Search
AUTO
0
52
S-33-
- -
œ
œ
œ
œ
œ
√
√
√
√
√
√
MANUAL PROGRAM
System
Fine Tune
Program No.
Pr. Name
Store
Search
AUTO
0
52
- - - -
- -
œ
œ
œ
œ
œ
√
√
√
√
√
√
MOVE&ADJUST EXIT
MOVE&ADJUST EXIT
Page 16
Eng - 14
ΠUsing the P / buttons.
Press the P / buttons to change channels.
You will see all the channels that the TV has
memorized. (The TV must have memorized at
least three channels.)
´ Using the Previous Channel
Press the PRE.CH button on the remote control.
The TV changed to the last channels to the
last channel you were watching.
Changing Channel
This function enables you to delete, copy, move
or skip the stored programs.
ΠSelect the channel to tune using the numeric
or channel buttons.
´ Press the MENU button. The OSD MENU will
be displayed.
ˇ Select Setup using the / button and then
press the button.
¨ Select Program edit using the / button
and then press the button.
Program Edit
ΠSelect a program to the deleted with the
/// buttons.
´ Press the RED button.
The selected program is deleted.
All the following programs are shifted up
one position.
Delete a Program
ΠSelect a program to the copied with the
/// buttons.
´ Press the BLUE button.
All the following programs are shifted down
one position.
Copy a Program
ΠSelect a program to the moved with the
/// buttons.
´ Press the GREEN button.
ˇ Move the program to the desired program
number with the / / / buttons.
¨ Press the GREEN button again to release this
function.
Moving a Program
ΠSelect a program to the skipped with the
/// buttons.
´ Press the YELLOW button.
The skipped program turns to Gray.
ˇ Press the YELLOW button again to release this
function.
When a program number is skipped it means
that you will be unable to select it using the
/ button during normal TV viewing.
If you want to select the skipped program,
directly enter program number with the
number buttons or select it in the program
edit or table menu.
Skipping a Program Number
PROGRAM EDIT
00 - - - - -
01 E-0302 E-0403 - - - - 04 - - - - -
Delete
Copy
Move
Skip
05 - - - - 06 S-0307 S-0408 S-0509 S-06-
MOVE&ADJUST EXIT
Page 17

15 - Eng
English
You can select a video mode from among User,
Standard, Dynamic or Mild mode according to
your personal preference.
ΠPress the MENU button. The OSD MENU will
be displayed.
´ Select Picture using the / button and then
press the button.
ˇ Select Status using the / button and then
press the button.
¨ Select the desired Picture Status using the
/ button. Whenever you press this button,
Picture Status changes to Standard ➞ Dynamic
➞ Mild ➞ User mode in this order.
ˆ When you have finished, press the EXIT button
to exit the menu.
Picture Status
•Standard: Select this mode when the
surrounding illumination is bright.
•Dynamic: Select this mode to increase picture
clarity and sharpness.
•Mild: Select this mode when viewing the TV
when the light is low.
•User: Select this mode if you want to adjust the
settings according to your personal preferences.
Use fine tune to adjust a particular channel for
better picture quality when noise interferes, color
quality is poor, or the screen is unstable.
ΠSelect the channel to tune using the numeric
or P /.
´ Press the MENU button. The OSD MENU will
be displayed.
ˇ Select Setup using the / button and the
press the button.
¨ Select Manual program using the /
button and then press the button.
ˆ Select Fine tune using the / button and
then press the button.
Ø Press the / button and then press
the button.
If you are unable to fine-tune a channel,
check that the System settings are correct.
∏ Select Store using the / button and then
press the button.
And press the / button to select OK.
” Press the EXIT button to exit the menu.
When the Picture Quality is Poor or Unstable
Selecting the Picture Status
MANUAL PROGRAM
System
Fine Tune
Program No.
Pr. Name
Store
Search
AUTO
0
1
E-03-
- -
œ
œ
œ
œ
œ
√
√
√
√
√
√
MOVE&ADJUST EXIT
PICTURE
Status
Contrast
Brightness
Sharpness
Color
Tint
Color Temperature
Standard
Normal
œ
œ
√
√
MOVE&ADJUST EXIT
Page 18

Eng - 16
ΠPress the MENU button. The OSD MENU will
be displayed.
´ Select Picture using the / button and then
press the button.
ˇ Select the desired item to adjust using the /
button and then press the button.
¨ Select the desired status using the / button.
During the adjustment, an additional adjustment
window will be displayed.
In addition, Picture Status is automatically
changed to User mode.
ˆ Press the EXIT button to exit the menu.
Picture
•Contrast: Determines the difference in brightness
between an object and the background.
•Brightness: Determines the brightness of the
screen.
•Sharpness: Determines the sharpness of an object
image.
•Color: Determines the color density.
•Tint: Determines the tint of the screen
(NTSC ONLY).
• Color Temperature: Determines the temperature
of colour tone. Status changes to Normal ➞
Warm ➞ Cool ➞ Normal mode in this order.
Adjusting the Picture Settings
PICTURE
Status
Contrast
Brightness
Sharpness
Color
Tint
Color Temperature
Standard
Normal
œ
œ
√
√
Selecting the Sound Mode
MOVE&ADJUST EXIT
You can select a sound mode from among
STANDARD, MUSIC, SPEECH or USER mode
according to your personal preference.
ΠPress the MENU button. The OSD MENU will
be displayed.
´ Select Sound using the / button and then
press the button.
ˇ Select Sound Mode using the / button
and then press the button.
¨ Select Sound Mode using the / button.
Whenever you press this button, Sound Mode
changes to STANDARD ➞ MUSIC ➞ SPEECH ➞
USER mode, in this order.
ˆ When you have finished, press the EXIT button
to exit the menu.
Sound Mode
•STANDARD: Select this to listen to sound normally.
•MUSIC: Select this to listen to the original sound.
•SPEECH: Select this to listen to clear voice sound.
•USER: Select this if you want to adjust the
settings according to your personal preferences.
SOUND
Sound Mode
Bass
Treble
Balance
Stereo
Dual
AVC
Standard
MONO
MAIN
On
œ
œ
œ
œ
√
√
√
√
MOVE&ADJUST EXIT
Page 19

17 - Eng
English
ΠPress the MENU button. The OSD MENU will
be displayed.
´ Select Sound using the / button and then
press the button.
ˇ Move to the item using the / button and
then press the button.
¨ Select the desired status using the /
button. During the adjustment, an additional
adjustment window will be displayed. Also,
the Sound Status is automatically changed to
User mode.
ˆ Press the EXIT button to exit the menu.
Adjusting the Bass/Treble
SOUND
Sound Mode
Bass
Treble
Balance
Stereo
Dual
AVC
Standard
MONO
MAIN
On
œ
œ
œ
œ
√
√
√
√
MOVE&ADJUST EXIT
Determines the volume ratio between the left and
right speakers.
ΠPress the MENU button. The OSD MENU will
be displayed.
´ Select Sound using the / button and then
press the button.
ˇ Select Balance using the / button and
then press the button.
¨ Select the desired status using the / button.
During the adjustment, an additional adjustment
window will be displayed.
Also, the Sound Status is automatically changed
to User mode.
ˆ Press the EXIT button to exit the menu.
SOUND
Sound Mode
Bass
Treble
Balance
Stereo
Dual
AVC
Standard
MONO
MAIN
On
œ
œ
œ
œ
√
√
√
√
Adjusting the BALANCE
MOVE&ADJUST EXIT
Type of broadcast
Standard broadcast
Regular+NICAM MONO
NICAM STEREO
NICAM DUAL
Standard broadcast
Bilingual or DUAL
STEREO
Quick! Pressing the M/S button.
Whenever you press this button, the mode
changes to Stereo/Mono mode, in this order.
- If the receiving conditions deteriorate, listening
will be easier if the mode is set to the Mono
position using the M/S button.
-If the stereo signal is weak( or if intermittent
Stereo-Mono) and automatic switching occurs,
then switch to the Mono mode.
- When receiving mono sound in the AV mode,
connect to the ‘L’ input jack on the panels.
- If the mono sound comes out only from the left
speaker, then press the M/S button.
CAUTION: If stereo mode is set to mono, the
output is mono even though the broadcast is in
stereo.
Choosing a Soundtrack
NICAM
STEREO
A2
STEREO
On-Screen
MONO
MONO
NICAM STEREO ↔ MONO
NICAM MAIN → NICAM SUB
MONO
MAIN ↔ SUB
STEREO ↔ MONO
Page 20

Eng - 18
If you switch AVC to on, the set automatically
keeps on an equal volume level.
ΠPress the MENU button. The OSD MENU will
be displayed.
´ Select SOUND using the / button and
then press the button.
ˇ Select AVC using the / button and then
press the button.
¨ Select the desired status using the / button.
ˆ Press the EXIT button to exit the menu.
Selecting the AVC Mode
SOUND
Sound Mode
Bass
Treble
Balance
Stereo
Dual
AVC
Standard
MONO
MAIN
On
œ
œ
œ
œ
√
√
√
√
MOVE&ADJUST EXIT
Changing the Screen Size
You can select a desired screen size for each video.
Press the PIC.SIZE button.
Whenever you press the PIC.SIZE button, the
screen size changes to WIDE ➞ 4:3 ➞ ZOOM1 ➞
ZOOM2, in this order.
Screen Size Menu
•WIDE : Set the picture to 16:9 wide mode (default).
•4:3 : Sets the picture to 4:3 normal mode.
This is a standard TV screen size.
•ZOOM1: Magnifies the size of the picture on
the screen.
•ZOOM2: Magnifies the size of the picture on
the screen leaving the subtitles visible.
Note
•You can select only WIDE, 4:3 screen size in the
PC / HDMI Mode.
1
2
ΠPress the MENU button. The OSD MENU will
be displayed.
´ Select Function using the / button and
then press the button.
ˇ Select Time using the / button and then
press the button.
¨ Select Clock using the / button and then
press the button.
ˆ Move to the Hour using the button and
then set the Hour to the correct time using
the / button.
Ø Move to the Minute using the button and
then set the Minutes to the correct time using
the / button.
∏ Press the EXIT button to exit the menu.
Setting the Clock
TIME
Clock
Timer
On Time
Off Time
Program No.
PM 03:07
Off
AM 11:30
AM 10:30
ATV 0001
œ
œ
œ
œ
œ
√
√
√
√
√
MOVE&ADJUST EXIT
Page 21

19 - Eng
English
You can shut off the TV after a desired period of
time.
ΠPress the MENU button. The OSD MENU will
be displayed.
´ Select Function using the / button and
then press the button.
ˇ Select Sleep using the / button and then
press the button.
¨ Select the desired sleep time using the /
button. Whenever you press this button, Sleep
Mode changes to Off ➞ 10 ➞ 30 ➞ 60 ➞ 90 ➞
120 ➞ 150 ➞ 180 ➞ Off mode, in this order.
ˆ Press the EXIT button to exit the menu.
You can set the On/Off Timer to automatically
turn the TV on and off at a desired time.
The current time has to be configured first to set
the On/Off Timer.
Œ~ˇ STEP1~STEP3 is the same as that of Setting
the clock.
¨ Select Timer using the / button and then
press the button.
Select On using the / button.
- The On/off timer works only when the timer
is configured to On.
Example : Turning On At 6:10 AM
ˆ Move to On time using the / button.
Ø Move to the Hours using the button and
then set the Hour to AM 6 using the /
button.
∏ Move to the Minute using the button and
then set the Minutes to 10 using the /
button.
” Press the button to finish the On time
configuration.
’ Press the EXIT button to exit the menu.
For Off timer setting, select Off time instead of
On time.
Œ~ˇ STEP1~STEP3 is the same as that of Setting
the clock.
¨ Select Program No. using the / button
and then press the button.
ˆ Select the desired source to watch when the
TV is turned on using the / button and
then press the button.
Ø Select the desired channel to watch when the
TV is turned on using the / button.
∏ Press the EXIT button to exit the menu.
Setting the On/Off Timer
Selecting the ON Timer Channel
TIME
Clock
Timer
On Time
Off Time
Program No.
PM 03:07
Off
AM 11:30
AM 10:30
ATV 0001
œ
œ
œ
œ
œ
√
√
√
√
√
TIME
Clock
Timer
On Time
Off Time
Program No.
PM 03:07
Off
AM 11:30
AM 10:30
ATV 0001
œ
œ
œ
œ
œ
√
√
√
√
√
Setting the Sleep Timer
MOVE&ADJUST EXIT
MOVE&ADJUST EXIT
FUNCTION
Size
Time
Language
Sleep
DVD Setup
DTV Setup
Wide
English
10
œ
√
œ
œ
√
√
√
√
√
MOVE&ADJUST EXIT
Page 22

Eng - 20
Most television channels provide written
information services via teletext. Information
provided includes:
- Television program times
- News bulletins and weather forecasts
- Sports results
- Travel information.
This information is divided into numbered pages
(see diagram).
Part Contents
A Selected page number.
B Broadcasting channel identity.
C Current page number or
search indications.
D Date and time.
E Text.
FStatus information.
Teletext
TTX Function
You can display Teletext information at any time
on your television.
For Teletext information to be displayed correctly,
channel reception must be stable; otherwise:
- Information may be missing
- Some pages may not be displayed
ΠSelect the channel providing the Teletext
service using the P or P button.
´ Press the TEXT ( ) button to activate the
teletext mode.
Result: The contents page is displayed. It can be
redisplayed at any time by pressing the INDEX ( )
button.
ˇ If you wish to display the actual broadcast at
the same time as the teletext page, press the
MIX ( ) button again.
¨ Press the TEXT ( ) button to exit from the
teletext display.
Displaying the Teletext Information
You can enter the page number directly by pressing
the numeric buttons on the remote control.
ΠEnter the three-digit page number given in
the content by pressing the corresponding
numeric buttons.
Result: The current page counter is incremented
and the page is then displayed.
Using the various display options:
To display... Press the...
Hidden text (answers to quiz REVEAL ( )
games, for example)
The normal screen REVEAL ( ) again
A secondary page, by SUBPAGE ( )
entering its 4-digit number
The next page P
The previous page P
Selecting a Page by Number
Page 23

21 - Eng
English
Connecting to a PC
Connection Procedures
ΠConnect the PC D-SUB INPUT jack of the TV
and the monitor output jack of the PC using
the D-Sub cable.
´ Connect the PC AUDIO jack of the TV and the
audio output jack of the PC with the audio cable.
(This can only be applied when the PC actually
has an audio output jack.)
Procedures for viewing the PC screen
through the TV
ΠTurn the PC on and check that the PC settings
are correct.
•If the PC settings are incorrect, the screen may
display a duplicated or distorted picture.
•For PC configuration procedures, refer to
page 50.
´ Press the AV button and select PC INPUT mode.
ˇ Adjust the PC screen.
(For adjustment procedures, refer to page 22.)
PC Function
The various topics included in the teletext pages
are colorcoded, and can be selected by pressing
the colored buttons on the remote control.
ΠDisplay the teletext contents page by pressing
the MIX ( ) button.
´ Press the coloured button corresponding to
the topic that you wish to select; the available
topics are given on the status line.
Result: The page is displayed with other
coloured information that can be selected in
the same way.
ˇ To display the previous or next page, press the
corresponding coloured button.
¨ To display the subpage, see the following steps.
• Press the SUBPAGE ( ) button.
Result: The available subpages appear.
• Select the required sub-page.
Sub-pages can be scrolled by using the
P or P button.
Using FLOF to Select a Page
Page 24

Eng - 22
VESA Standard Mode
Resolution /
Vertical Frequency
IBM
MAC
VESA
VESA
640x350 / 70.0Hz
640x480 / 59.9Hz
720x400 / 70.0Hz
1024x768 / 60.0Hz
1024x768 / 70.0Hz
1024x768 / 75.0Hz
1280X768 / 60.0Hz
1360x768 / 60.0Hz
1152x864 / 75.0Hz (19”/22” ONLY)
1280x960 / 60.0Hz (19”/22” ONLY)
1280x1024
/ 60.0Hz (19”/22” ONLY)
1280x1024
/ 75.0Hz (19”/22” ONLY)
1440x900 / 59.8Hz (19” ONLY)
1440x900 / 74.9Hz (19” ONLY)
1680x1050
/ 59.9Hz (22” ONLY)
640x480 / 66.6Hz
832x624 / 74.5Hz
1152x870 / 75.0Hz
640x480 / 75.0Hz
640x480 / 72.8Hz
800x600 / 56.2Hz
800x600 / 60.3Hz
800x600 / 75.0Hz
800x600 / 72.1Hz
ΠPress the MENU button. The OSD MENU will
be displayed.
´ Select PC using the / button and then
press the button.
ˇ PC Adjust using the / button and then
press the button.
Adjusting the Horizontal Position
¨ Select H POSITION using the / button and
adjust the horizontal position using
the button.
Adjusting the Vertical Position
¨ Select V POSITION using the / button and
adjust the vertical position using the button.
Initializing Settings (RESET)
¨ Select RESET using the / buttons and then
select using the button.
This returns you to the factory default screen.
ˆ Press the EXIT button to exit the menu.
Auto Adjust
You can adjust the frequency and the phase of
the PC screen automatically.
¨ Select AUTO ADJUST using the / button
and then select using the button.
The PC screen is adjusted automatically.
Frequency
If vertical lines appear on the PC screen, adjust
the clock.
¨ Select FREQUENCY using the / button
and then select using the button.
Phase
The phase controls the image fine on the screen.
¨ Select PHASE using the / button and then
select using the button.
Adjusting the PC
PC
Frequency
Phase
H-Position
V-Position
Auto Adjust √
Reset √
MOVE&ADJUST EXIT
Page 25

23 - Eng
English
You can use one of the functions listed below to
jump to a specific chapter or track during playback.
Fast Forward/Reverse
Use this function to play the DISC contents in
fastforward or fast reverse. During searching
audio will be muted (except CD or MP3).
Œ Press and hold the œœ or √√ button for over
2seconds.
•For DVD playback, pressing the button
executes the function in the following order:
X2 ➞ X4 ➞ X8 ➞ X16 ➞ X32 ➞ X64 ➞ normal.
•For VCD playback, X2 ➞ X4 ➞ X8 ➞ X16 ➞
X32 ➞ normal
•For CD/MP3 playback, X2 ➞ X4 ➞ X8 ➞ normal.
Skip Forward/Reverse
Use this function to move to the next or previous
chapter for DVD, track for CD and MP3.
Œ Press the œœ or √√ button.
•When the œœ button is pressed, playback
skips to the next chapter or track during DVD
or CD playback.
•When the √√ button is pressed, playback
skips to the beginning of the current chapter
during DVD playback and to the previous
chapter when it is pressed again.
Slow Forward/Reverse
ΠPress the button to resume normal playback.
´ Press and hold the œœ or √√ button for over
2seconds.
•For disc playback, pressing the button
executes the function in the following order:
X1/2 ➞ X1/4 ➞ X1/8 ➞ X1/16 ➞ X1/32 ➞
X1/64 ➞ NORMAL
ˇ Press the button to resume normal playback.
Searching for a Specific Screen/Song
DVD Function
(Depend on the model)
Turn on the power of the TV and external audio
system. Ensure that the local code of the TV set is
matched to that of the disc. (If not matched, your
disc cannot be played.)
ΠPress the AV button.
´ Insert the DVD.
Ensure that the labeled surface is at the front
when placing it.
ˇ DVD Playback.
Your DVD will be automatically played
depending on the current program mode.
- To STOP PLAYBACK, press the button.
- To temporarily STOP PLAYBACK, press the
button.
- To resume PLAYBACK, press the button.
Playing DVD’s
ΠPress the button
For DVD Playback
•The ROOT MENU, TITLE REMAIN, CHAPTER
ELAPSED, CHAPTER REMAIN is shown.
•Pressing the button again shows the TITLE
REMAIN for the chapter.
•Pressing the button again shows the CHAPTER
ELAPSED for the chapter.
•Pressing the button again shows the CHAPTER
REMAIN for the chapter.
•Pressing the button again exits the status display.
For CD Playback
•The SINGLE ELAPSED for the track is shown.
•Pressing the button again shows the SINGLE
REMAIN for the track.
•Pressing the button again shows the TOTAL
ELAPSED for the track.
•Pressing the button again shows the TOTAL
REMAIN for the track.
•Pressing the button again exits the status
display.
Displaying the Playback Status
Page 26

Eng - 24
Repeat Playback
This function repeats the playback of a chapter,
title or track.
ΠPress the REPEAT button.
•Each press of the button changes the repeat
mode in the following order:
For DVD playback, Chapter ➞ Title ➞ Repeat Off.
For CD playback, Track ➞ Disc ➞ Repeat Off.
´ To resume normal playback, press the REPEAT
button repeatedly until the repeat mode
indicator disappears on screen.
Repeating a Specific Section
ΠDuring playback, press the A
œ√
B button at the
beginning of the desired section.
´ Press the A
œ√
B button again at the end of the
section. "AB" will be displayed on the screen
then the A-B section is continually repeated.
ˇ To resume normal playback, press the Aœ√B
button repeatedly until the repeat mode
indicator disappears on screen.
•Chapter repeat: Repeats playback of a single
chapter.
•Title repeat: Repeats playback of a single title.
•Repeat disc: Repeats playback of the whole disc.
•Repeat track: Repeats playback of a single track.
•Repeat off: Exits repeat mode.
Repeating a Title, Chapter(DVD), Track(CD)
Changing the Audio Language
It is possible to change the audio soundtrack
language to a different language from the one
selected at the initial settings.
This operation works only with discs on which
multiple audio soundtrack languages are
recorded. If the loaded disc supports multiple
languages, you can select the audio language.
ΠPress the OPTION button.
The DVD MENU will be displayed.
´ Select AUDIO using the / button and then
press the ENTER button.
• For DVD playback, Each time you press the
ENTER, the language is changed.
• For CD playback, Mono Left ➞ Mono Right
➞ Mix-Mono ➞ Stereo.
Changing the Subtitle Language
It is possible to change the subtitle language to a
different language from the one selected at the
initial settings. This operation works only with
discs on which multiple subtitle languages are
recorded.
ΠPress the OPTION button.
The DVD MENU will be displayed.
´ Select SUBTITLE using the / button and
then press the ENTER button.
ˇ Press the ENTER button repeatedly until the
desired subtitle language is displayed.
¨ To turn the subtitles off, Select the SUBTITLE
and then press the ENTER button until
Subtitle off is displayed.
Changing the Audio Language/Changing the Subtitle Language
Select the language on discs that contain more than one language by following the instructions below.
Page 27

25 - Eng
English
Muting the sound
ΠPress the button.
•Pressing the button toggles the mute function
on and off. If no sound is heard with mute
turned on, turn it off to hear sound.
Basic Disc Menu Controls
Some DVD's contain menus. Sometimes these are
displayed automatically when you start playback;
ΠPress the OPTION button.
The DVD MENU will be displayed.
´ Select MENU using the / button and then
press the ENTER button.
•The menu contained on the disc will appear
on the screen. The menu appears differently
with different disc.
´ Select TITLE using the / button and then
press the ENTER button.
•The title contained on the disc will appear on
the screen. The title menu appers differently
with different disc.
Additional Function
Changing the Size of the Screen
ΠPress the OPTION button.
The DVD MENU will be displayed.
´ Select ZOOM using the / button and then
press the ENTER button.
ˇ Each press of the ENTER button changes the
zoom mode in the following order:
X1.5 ➞ X2 ➞ X3 ➞ OFF
•If you press the
/
/
/
button during the
zoom mode, the zoom point will shift.
•To resume normal playback, select the ZOOM
and then press the ENTER button repeatedly
until the repeat mode indicator disappears
on screen.
•This function is activated for only DVD playback.
Viewing from another Angle
Some DVDs contain scenes that have been shot
simultaneously from multiple angles.
ΠPress the OPTION button.
The DVD MENU will be displayed.
´ Select ANGLE using the / button and then
press the ENTER button.
•Pressing the button successively changes the
viewing angle which is displayed on the screen.
•The ( )icon appears. If no additional camera
angle are recorded, the ( )icon will be displayed.
•If multiple camera angles are recorded, the
( )icon displays the current angle, number
and the number of angles available.
•This function is activated only for discs having
scenes recorded at different angles.
Changing the Size and Angle of the Screen
Page 28

Eng - 26
DIRECT Search (GO TO) for CD
ΠPress the OPTION button.
The DVD MENU will be displayed.
´ Select GOTO using the / button and
then press the ENTER button.
•Each press of the ENTER button changes the
repeat mode in the following order:
Disc Go To - - : - - ➞ Disc go to XX:XX.
ˇ Enter the number using the numeric button.
•Disc Go To: Press the number of the desired
time in disc using the numeric button.
•Track Go to: Press the number of the desired
time in track using the numeric button.
•Select Track: press the track number using
the numeric button.
C : - - / T : - -
GO TO : - -: - -
00:00:00
This function is used to go to the Chapter, Track
or Song of the disc you want.
Program play DIRECT Search (GO TO) for DVD
ΠPress the OPTION button.
The DVD MENU will be displayed.
´ Select GOTO using the / button and
then press the ENTER button.
ˇ Select the item using the / button and
press the ENTER button.
•Chapter: Press the chapter number using the
numeric button.
•Title: Press the Track number using the
numeric button.
•TT:Press the number of the desired time in
title using the numeric button.
¨ Press the ENTER button to confirm.
Setting a Specific DVD Title or Chapter
T : _ _ / _ _ C : _ _ / _ _
Page 29

27 - Eng
English
Playback of a CD/CD-RW disc that contain a MP3 files.
To Play a MP3 File
ΠInsert the MP3 disc.
Make sure that the disc's label is facing up.
´ Using the / button to find the desired
folder.
ˇ Using the / button to select the desired a
mp3 files.
¨ Press the ENTER button to start playback a file.
Repeat Playback
Playback of a CD/CD-RW disc that contain a MP3 files.
ΠPress the REPEAT button.
•Each press of the REPEAT button changes
the repeat mode in the following order:
Repeat track ➞ Folder repeat ➞ Repeat OFF.
Note
•The file name is only displayed in English.
•This player is compatible with the "MPEG-1
Audio Layer 3" standard. It is not compatible
with other standards, such as "MPEG-2 Audio
Layer 3", "MPEG-2.5 Audio Layer 3", MP1, MP2,
etc.
•Do not play CD-R/RW discs containing any files
other than music CD files, MP3 and JPEG files.
•Programmed playback is not possible with MP3
discs.
•When writing MP3 files on CD-R/RW discs, select
"ISO9660 level 1" as the writing software
format.
Playing MP3 Discs
Playback of a CD/CD-RW disc that contain a DIVX
files.
CAUTION: This subtitle is selectable only when it' s
name is same with the title' s .
To Play a DIVX File
ΠInsert the DIVX disc.
Make sure that the disc's label is facing up.
´ Using the / button to find the desired folder.
ˇ Using the / button to select the desired a
divx files.
¨ Press the ENTER button to start playback a file.
ˆ To delete the subtitle while playback.
• Press the OPTION button.
The DVD MENU will be displayed.
• Select SUBTITLE using the / button and
then press the ENTER button.
Note
•AVI file used to contain the audio and video
data : these must be stored on CD in the ISO
9660 format .
• Press STOP button when file do not appear on
the screen .
• When playing the DivX disk , you can play the
file with extension of AVI only .
• DTS Audio is not supported .
• WMA is not supported .
• When burning a subtitle file to a CD-ROM in
your PC , be sure to burn it as an SMI file .
• Reverse of slow playback does not work DivX .
• Supported format : VIDEO - Divx3. 11 , 4. x , 5. x
AUDIO - AC3 , MP3(80kbps ~ 320kbps)
Playing DIVX Discs(option)
Page 30

Eng - 28
To play Kodak Picture CD and JPEG File
When a Kodak Picture CD is inserted, an
automated slide show is launched. When a JPEG
file is loaded the table of contents is displayed on
TV screen.
ΠInsert the Kodak Picture CD or JPEG file disc.
•An automated slide show is launched.
•If you press the ■ button, File menu screen
will be appeared.
´ Select the picture.
•Select the picture, you want to see, by
pressing the / button.
ˇ Press the ENTER button.
•The selected item is displayed as a full size
picture.
Changing the Size of the Screen
ΠPress the OPTION button.
The DVD MENU will be displayed.
´ Select ZOOM using the / button and then
press the ENTER button.
•Each press of the ENTER button changes the
zoom mode in the following order:
25% ➞ 50% ➞ 100%(default) ➞ 150% ➞ 200%.
Image Rotation
ΠPress the / / / button. There are 4
modes to rotate a picture:
• button : invert
• button : mirror
• button : Turn left
• button : Turn right
Playing Kodak Picture CD and JPEG File
Rotating
Page 31

29 - Eng
English
Changing JPEG Slideshow Transition Mode
ΠPress the OPTION button.
The DVD MENU will be displayed.
´ Select ANGLE using the / button and then
press the ENTER button.
• 13 slideshow transition modes are provided.
• Each press of the ENTER button is pressed
during JPEG image playback, the display mode
on screen shows 13 variations as follows:
- mode 1 : It displays from top to buttom in turn.
- mode 2 : It displays from buttom to top in turn.
- mode 3 : It displays from top to buttom to
center in turn
- mode 4 : It displays from center to top and
buttom in turn.
- mode 5 : It displays from vertical blind.
- mode 6 : It displays from from left to right in
turn.
- mode 7 : It displays from right to left in turn.
- mode 8 : It displays from left and right to center
in turn.
- mode 9 : It displays from center to left and right
in turn.
- mode 10 : It displays from outside to inside in
turn.
- mode 11 : It displays from horizontal blind.
- mode RAND : It displays at random.
- NONE
Starting MUSIC slide show
ΠPress the OPTION button.
The DVD MENU will be displayed.
´ Select SUBTITLE using the / button and
then press the ENTER button at STOP mode,
SLIDE SHOW MODE1 ➞ SLIDE SHOW MODE2 ➞
SLIDE SHOW MODE3 ➞ SLIDE SHOW OFF
will be selected repeatedly.
ˇ Starting slide show mode 1
• After selecting SLIDE SHOW MODE 1,
press ENTER button.
MP3 FILE No.1 Track will be played with JPEG
Picture
changing automatically.
¨ Starting slide show mode 2
• Select SLIDE SHOW MODE 2 and press the arrow
button to select the MP3 File tracks.
• Press Aœ√B button on the remote control and
Press ENTER.
• The seltcted MP3 FILE will be played with JPEG
Picture changing automatically.
ˆ Starting slide show mode 3
• Select SLIDE SHOW MODE 3 and press ENTER button.
While MP3 FILE No.1 Track is playing, JPEG picture
will not be changed.
• When the MP3 FILE track moves to the next
one, the JPEG picture will be moved to the next
one too.
Ø Stoping slide show mode
• Press ■ button to stop MP3 FILE and SLIDE SHOW.
Page 32

Eng - 30
Language Setup
¨ Press the / button to move to Language
Setup.
ˆ Press the / button to move to desired item.
And press the ENTER button.
Ø Press the / button to select desired language.
•AUDIO: Use the audio language menu to select
the subtitle language that you prefer. If the disc
you are playing has that language available, it
will display subtitles in that language.
•SUBTITLE: Use the subtitle language menu to
select the subtitle language that you prefer.
If the disc you are playing has that language
available, it will display subtitles in that.
•DISC MENU: Use the Disc Menu option to select
the language you want a DVD's disc menu to be
displayed in(not the same as the player menu).
Using the Setup Menu
LANGUAGE SETUP
DISC MENU ENGLISH
SUBTITLE ENGLISH
AUDIO ENGLISH
LANGUAGE SETUP
ΠPress the MENU button. The OSD MENU will
be displayed.
´ Select Function using the / button and
then press the button.
ˇ Select DVD Setup using the / button and
then press the button.
The DVD OSD MENU will be displayed.
QUICK!
a. Press OPTION button to display the DVD MENU.
b. Press the /
button to select SETUP and then press the ENTER button.
FUNCTION
Size
Time
Language
Sleep
DVD Setup
DTV Setup
Wide
English
Off
œ
√
œ
œ
√
√
√
√
√
MOVE&ADJUST EXIT
Video Setup
For selecting TV screen ratio.
¨ Press the / button to move to Video Setup.
ˆ Press the / button to move to desired item.
And press the ENTER button.
Ø Press the / button to select desired item.
TV DISPLAY
• 4:3 / PS: Choose this setting if you want the
movie to fill the entire screen of your TV.
This might mean that the left and right edges
won't be seen.
• 4:3 / LB: Choose this setting if you want to see
movies in their original aspect ratio.
The movie might appear with black bars at top
and bottom of the screen.
• 16:9 / WIDE: Choose this setting if you want the
movie to be seen in widescreen.
PIC MODE
•AUTO : The picture mode will be selected
automatically according to the disc information.
•FILM : The optimal display at still mode will be
selected.
• VIDEO: The optimal display at movie mode will
be selected.
• SMART: The optimal display will be displayed by
the combination of Film and Video.
SCREEN SAVER
-You can select the screen protection function
'On' and 'Off'.
VIDEO SETUP
TV DISPLAY 4:3 PS
PIC MODE 4:3 LB
SCREEN SAVER 16:9 WIDE
SET TV DISPLAY MODE
√
Page 33

31 - Eng
English
Audio Setup
¨ Press the / button to move to Audio Setup.
ˆ Press the / button to move to desired item.
And press the ENTER button.
Ø Press the / button to select desired item.
DUAL MONO
- STEREO : For stereo sound output.
- LEFT MONO : For stereo the output of the
left channel of the audio track.
- RIGHT MONO : For selecting the output of
the right channel of the audio track.
- MIXED MONO : For selecting the output of
both the left and right channels of the audio
track.
Custom Setup
¨ Press the / button to move to Custom Setup.
ˆ Press the / button to move to desired item.
And press the ENTER button.
Ø Press the / button to select desired item.
• Logo
- MPG Logo : To use the original initial screeen.
- JPG Logo : To use the initial screen downloaded
from CD.
If you use DivX(option), the JPG logo is applied.
If you use DVD(option), the JPG logo is not
applied.
• Parental
- Set a password and select rating level for DVD’s
unsuitable for children.
Dynamic
- For increasing the output of the audio only.
(4/4, 3/4, 2/4, 1/4, OFF)
- Selecting OFF returns to the default value.
Speaker Setup
¨ Press the / button to move to Speaker Setup.
ˆ Press the / button to move to desired item.
And press the ENTER button.
Ø Press the / button to select desired item.
• Downmix
- LT/RT: Choose this setting if you want to
select the surround sound for the front
speaker.
- Stereo: Choose this setting if you want to
select the stereo output through the
front speaker.
AUDIO SETUP
DUAL MONO STEREO
DYNAMIC LEFT MONO
RIGHT MONO
MIXED MONO
DUAL MONO (1+1) SETUP
CUSTOM SETUP
Logo 2
PARENTAL 3 PG
PASSWORD 4 PG 13
DIVX(R) VOD 5
DEFAULTS 6 PG-R
7 NC-17
8 ADULT
SET PARENTAL CONTROL
CUSTOM SETUP
Logo MPG LOGO
PARENTAL JPG LOGO
PASSWORD
DIVX(R) VOD
DEFAULTS
SET PARENTAL CONTROL
√
√
SPEAKER SETUP
DOWNMIX LT/RT
STEREO
SET DOWNMIX MODE
√
√
Page 34

Eng - 32
DivX Feature Table
• AVI files are used to contain the audio and video data;
these must be stored on CD in the ISO 9660 format.
• When playing the DivX disc, you can play the file with extension of AVI only.
• WMV is not supported.
• When burning a subtitle file to a CD-ROM in your PC, be sure to burn it as an SMI file.
• Reverse of slow playback does not work with DivX.
VIDEO
• DivX 3.11 content
• DivX 4 content (Based on MPEG-4 simple profile)
• DivX 5 content (MPEG-4 simple profile, bi-directional frames, Qpel and GMC are not supported.
AUDIO
DivX certified devices can play back any interleaved MP3 audio at any bitrate, both CBR and VBR.
The audio must be sampled at standard frequencies, such as 32khz, 44.1khz, and must conform to the
AVI file specification.
Note.
Our solution support a maximum constant 6Mbps bitrate.
Support all resolution up 720 X 480 @ 30fps
to maximum of 720 X 576 @ 25fps
Macroblocks per second 40500
Maximum average bitrate 4000 kbps
Maximum peak bitrate 10000kbps
during any 3 seconds of video
Minimum VBV buffer size (kbytes) 384k bytes
DivX (option)
DivX Function(Depend on the model)
• Password Change
ˆ Press the / button to move to PASSWORD.
And press the ENTER button.
Ø Press the ENTER button again.
∏ Enter your old password, and new password in
4 digits.
” Re-enter new password for confirmation then
press the ENTER button.
• Default
- If user selects reset from the setup menu, all the
value of setup menu will be initialized by
factory setting value.
(Exception: Parental level and Password values
will not be changed.)
• The password is preset to 0000.
PASSWORD CHNAGE
OLD PASSWORD:
NEW PASSWORD:
CONFIRM PWD:
Page 35

33 - Eng
English
DivX® VOD Playback
This chapter explains how to playback DivX VOD.
ΠPress the MENU button.
The OSD MENU will be displayed.
´ Select FUNCTION using the / button and
then press the button.
ˇ Select DVD Setup using the / button and
then press the button.
The DVD OSD MENU will be displayed.
¨ Use / to move to “Custom” mode.
ˆ Use / to move to “DivX® VOD”, then
press ENTER.
Ø Then, below message will pop up.
YOUR REGISTRATION
CODE IS : XXXXXXXX
TO LEARN MORE
GO TO WWW.DIVX.COM/VOD
∏ Registration code is : XXXXXXXX please fill out
8 characters registration code.
” When you down load files through internet.
Please make sure to insert registration code
before the down loading.
’ Burn the down loaded file to CD-R or CD-RW.
˝ Playback CD-R or CD-RW disc to the set.
Ô You will see below message.
This rental video has X view left. A view ends
when you stop playback, play a different video,
or trun off your player.
Do you want to use one of your X views now?
If you select “YES” button, it will playback,
otherwise it will show you list of files.
Note.
• If you tried to play back anything over X view.
If will show you following message “This rental
is expied” and will not play back.
If you tried to play back expired rental disc,
it will show you following message
“ This rental is expired”.
• If you want play back new rental disc, please
follow the procedure from No.1
• In case of Bad Registration code are inserted.
It turns out to be invalid registration code, the
file will not be play back.
“This video player is not authorized to play this
video.” showing following message.
FUNCTION
Size
Time
Language
Sleep
DVD Setup
DTV Setup
Wide
English
Off
œ
√
œ
œ
√
√
√
√
√
MOVE&ADJUST EXIT
DONE
YES NO
CUSTOM SETUP
Logo
PARENTAL
PASSWORD
DIVX(R) VOD
DEFAULTS
DIVX (R) REGISTRATION SETUP
DIVX(R) VIDEO ON DEMAND
YOUR REGISTRATION
CODE IS : XXXXXXXX
TO LEARN MORE
GO TO WWW.DIVX.COM/VOD
DONE
DIVX (R) REGISTRATION SETUP
Page 36

Eng - 34
First time installation
Main menu
DVB-T Function (Depend on the model)
This product is designed for the access of digital terrestrial free to view only.
When the system is first switched on, the Application attempts to configure itself for the first time.
This is called “First Time Installation”. You can choose your country.
The user is then asked if they wish to perform an automatic tune for services. Automatic tuning
functionality is described later in this document. When the automatic tune finishes and services have
been found, the lowest number service is selected and a banner describing that service is shown.
A user may have chosen not to perform an automatic tune or no services may have been found by an
automatic scan. In this instance the user may use the”Main Menu” to automatically scan again or
perform a manual scan.
First Time Installation
Welcome!
Choose your Country:
Continue installation:
Belgium
A “Main Menu” is provided to enable the user to configure elements of the DVB-T.
ΠPress the MENU button. The OSD MENU will
be displayed.
´ Select Function using the / button and
then press the button.
ˇ Select DTV Setup using the / button and
then press the button.
The DTV OSD MENU will be displayed.
FUNCTION
Size
Time
Language
Sleep
DVD Setup
DTV Setup
Wide
English
Off
œ
√
œ
œ
√
√
√
√
√
MOVE&ADJUST EXIT
Configurable elements of the Reference Application are described elsewhere in this document.
• Channel List, Installation, Automatic Search, Manual Search, Favourites,
Configuration, Language , Guides.
QUICK!
a. Press OPTION button to display the DTV MENU.
b. Press the /
button to select SETUP and then press the ENTER button.
Page 37

35 - Eng
English
Channel List
To Watch a channel
To Display the Channel List
• Use / buttons to step along the options until you reach Select.
• Use / to navigate through the channel list until you reach the channel you want to watch.
• Press “ENTER” to watch the selected channel in the picture window located at the top right corner.
• To watch the channel on full screen press EXIT.
Channel List
1024 Eurosport
1024. Eurosport
1025. Hamburg 1
1026. NEUN LIVE Televidion
1027. TERRA NOVA
Select Delete Edit Name Lock Move
Funciton Select Channel Watch More
• Press the OPTION button. The DTV MENU will be displayed.
• Select LIST using the / button and then press the ENTER button
to display the CHANNEL LIST,
see below for an example. This shows a TV channel selected. When a radio channel is selected the
picture frame will be blank.
The Channel List presents a list of all channels found during the channel search described earlier.
The list comprises radio and TV channels.
They have been allocated a channel(reference) number and are listed in this numerical order.
The Channel List can be use to watch and listen to the selected channels. delee them from the list, edit
the name of the channel, set a password to access the channel, and to add the channel to your list of
favourite channels.
A password to access the channel, and to add the channel to your list of favourite channels.
Page 38

Eng - 36
To Edit a channel name
• Use / to navigate through the channel list until you reach the channel you want to edit.
• Use / to step along the options until you reach Edit Name.
• Press “ENTER” to select the edit name function.
• The selected channel name appears in a text box that opens below the picture window.
The first character of the name is enclosed in square brackets.
• Use / to step along the characters of the name and modify each as required.
The new name can be shorter or longer than the existing name. Maximum length is 16 characters.
Remote button
Press once
press twice
Press three thimes
Press four times
Press five times
Press six times
Press seven times
1
A
B
C
1
a
b
c
2
D
E
F
2
d
e
f
3
G
H
I
3
g
h
i
4
J
K
L
4
j
k
l
5
M
N
O
5
m
n
o
6
P
Q
R
6
p
q
r
7
S
T
U
7
s
t
u
8
V
W
X
8
v
w
x
9
Y
Z
9
y
z
&
•
0
SP
0
+
-
*
/
!
• Use the number buttons (0~9) to modify this character using the table below.
Channel List
1024 Eurosport
ABCD Sport
1024. Eurosport
1025. Hamburg 1
1026. NEUN LIVE Televidion
1027. TERRA NOVA
Select Delete Edit Name Lock Move
Cancel Enter Name Update More
To Delete a Channel
• Use / to step along the options until you reach Delete.
• Use / to navigate through the channel list until you reach the channel you want to delete.
• Press “ENTER” to delete the selected channel in the picture window, top right corner.
•A confirmation box opens up. Answer Yes or No as required. If you answer Yes, the channel will be
removed from the list and will no longer be available to watch/listen to.
The Selected Service will be permanently deleted, and
favourite list will be turned off. Are you sure?
Yes No
Page 39

37 - Eng
English
Enter Lock Key
To Lock a channel
This function allows you to set a password to gain access to selected channels.
• Use / to navigate through the channel list until you reach the channel you want to lock.
• Use / to step along the options until you reach Lock.
• Press “ENTER” to set Lock.
• The lock( ) symbol appears alongside the selected channel in the list.
• Press “ENTER” again to remove the lock.
The next time you select to watch this channel you will be asked for a password - the Enter Lock Key
window will be displayed for this.
You will only be able to watch this channel if you enter a valid number.
If you enter a wrong number, the Wrong Lock Key box will be displayed briefly.
When a valid number is entered the channel will be played.
(Initial password is 0000)
XX X X
To Move a channel
•/key on function button and reach to “Move” button.
• Press “ENTER” key, enter moving .
• Use / key to change the position of the selected channel.
• When / key to choose destination position of the moved channel,
User Press / , give warning information to tell if user want to cancel moving.
If choose yes, restore to Previous List, If choose “No”, go on moving channel.
•”ENTER” to Save the result of moving.
Warning information for timer canceling because program index changed.
• If choose “Yes”, store the result and exit moving.
• If choose “No”, just restore to Previous List state.
Channel List
1024 Eurosport
ABCD Sport
1024. Eurosport
1025. Hamburg 1
1026. NEUN LIVE Televidion
1027. TERRA NOVA
Select Delete Edit Name Lock Move
Cancel Enter Name Update More
Page 40

Eng - 38
Favourites
Favourite Service Lists
A favourites list enables the user to select a subset of services they consider favourite.
The Application allows the user to have up to five different favourites lists.
Favourites lists are defined in the favourites dialog that can be accessed by selecting the favourites
button on the Channel List dialog and via the Main Menu.
The favourites dialog contains a scrolling list of all services and a set of buttons to enable the user to
toggle a service’s inclusion in a favourites list. Icons indicate the services that are members of a
favourites list.
The currently selected service is displayed in the background of the favourites dialog.
The favourites mode can be enabled from the Configuration dialog in the “Main Menu”.
The user cannot select a favourites list that contains no services. When a user selects a favourites list,
all EPG’s will show only those services in that favourite list.
When the favourites mode is enabled, the program up and down buttons on the remote control will
only select those services selected as favourites, and all EPGs will only show the services in the current
favourite list. It is still possible to select a service using the service’s number even if it is not a member
of the currently selected favourites list.
The Favourites dialog cannot be accessed if there are no services available.
Changing Channel
You can change channels by using any of the following methods.
Channel browse buttons
• Use the P / buttons to browse up and down the available channels.
Edit Favourite Lists
1024 Eurosport
1024. Eurosport
1025. Hamburg 1
1026. NEUN LIVE Tel...
Œ
1027. TERRA NOVA
List 1 List 2 List 3 List 4 List 5
Select List
Select Channel
Add/Remove More
Number buttons (0~9)
• The complete channel number must be entered within 3 seconds of the first digit entry.
• For example, to watch channel 43, press button 4 and then button 3.
• The enterd channel number will be displayed in top left of TV screen and the TV will show
the entered channel.
Channel list
• Display the Channel list to view the list of available channels in the Channel List.
ΠPress the OPTION button. The DTV MENU will be displayed.
´ Select LIST using the / button and then press the ENTER button.
• Select the required channel using the / buttons.
• Press “ENTER” to view/listen to the channel.
Page 41

39 - Eng
English
Guides
Now / Next Electronic Program Guide
An EPG dialog is provided that allows the user to view the current and next programme playing on
each service.
In this dialog a list of channels and the corresponding current and next programmes is displayed. The
user can navigate up and down the list of channels and highlight either the now or next programme.
Information for the highlighted programme can be displayed by pressing “Info”. This information
includes the start/end time of the programme, the programme genre in brackets, and a synopsis of
the programme content.
A user may select a service by highlighting a program in the “now” list and pressing the “ENTER” key.
The Now/Next Electronic Program Guide cannot be accessed if there are no services available.
Now/Next EPG Wed 26/1 19:24
Navigate
Schedule
Watch Event
Channels Current Event Next Event
1024. Eurosport Elskunstlauf Eurosport Spezial
1025. Hamburg 1 No Inormation No Informaiton
1026. NEUN LIV... No Inormation No Informaiton
1027. TERRA NO... GREAT FESTIVALS Aller simple pou...
List Schedule EPG
List Schedule EPG Wed 26/1
Eurosport
Navigate
Change Time
Advance Day Event
1024. Eurosport
1025. Hamburg 1
1026. NEUN LIV...
1027. TERRA NO...
Wed 26/1, 19:00-21:00
18:00 Eiskunstlauf
20:45 Eurosport Spezial
Page 42

Eng - 40
Timeline Schedule EPG
Timeline Schedule EPG Wed 26/1 19:24
Navigate
Zoom
Advance Day Event
1024. Eurosport
1025. Hamburg 1
1026. NEUN LIV...
1027. TERRA NO...
Wed 26/1 18:2017:5016:00
Eiskunstlauf
Eurosport Spezial
List Schedule EPG information is presented using a list format, either on a banner for the current
service, or as a full screen dialog showing multiple services.
A banner with schedule list displays the similar information to that displayed by the current service
banner.
On this banner, instead of next programme name, a scrolling list is presented containing programme
schedule information for four hours. Users may change the time of the schedule information displayed
and highlight a programme within the schedule information.
Whilst this banner is displayed a user may change the current service using the Program Up and
Program Down remote control keys.
In the case when there is no schedule information available, the list shown on the banner displays the
label “No Information Available”.
The user may view more detail for the programme playing now or the programme highlighted in the
schedule list using the yellow and blue keys respectively.
The A full screen dialog with schedule list presents the user with two lists and an information panel.
The leftmost list displays all available services, the current selected service is displayed in the title bar
of this list. The rightmost list displays two hours of schedule information for the currently selected
service, its title shows the time span covered by the list. The user navigates between the two lists to
change the selected service or the highlighted programme using the Arrow keys on the remote control.
Programme information for the highlighted programme, or first programme item on the schedule list
can be displayed by pressing the “ (information)” key.
The user may change the time span of the schedule information displayed for a channel by either two
hours or an entire day.
In the case when there is no schedule information available, the list shown on the banner displays the
label “No Information Available”.
programme detail shown includes start/end time and a description of the programme.
The Extended Schedule Electronic Program Guide cannot be accessed if there are no services available.
Page 43

41 - Eng
English
Setting
Configuration
The Configuration window allows you to customise various settings.
You can select from the available options for each of the items in the Configuration window.
See below for a tpical display.
The text along the lower banner changes according to the item selected.
• Use the / buttons to display the options in turn.
• Use / to navigate through the configuration list until you reach the item you want to reconfigure.
•Press EXIT to close down the configuration window and return to the previously displayed channel.
• The configuration settings are now as they were set at the time you pressed the EXIT button.
Configuration
1024 Eurosport
Time Zone
DST
Subtitle
Banner
Favourite Mode
Channel List
Parental Settings
HW5376.257_SW2.0.208
GMT
2 sec.
Off
Off
Off
Show all
Subtitle On/Off More
To Display the Configuration
• Press the OPTION button. The DTV MENU will be displayed.
• Select OPT using the / button and then press the ENTER button.
Parental Settings
The Parental Setting feature allows you to password pretect groups of menus or allow access to all menus.
• Use / to highlight Parental Settings.
• Press “ENTER”.
• Initial password is 0000.
• The window below left is displayed:
(Initial password is 0000)
Maturity Lock
Menu Lock
Set Lock Key
Lock Key
Confirm
Off
Disabled
Page 44

Eng - 42
Language
System, Audio and Subtitle language selection
A languages dialog is provided in the “Main Menu”, here the user can set the preferred and the
current language of both the audio and subtitles.
The preferred language options available are predefined and depend on the customer requirements.
By setting the current language the user can choose from the languages available for a particular
selected service. Here, only the languages available for the current service will be offered as an option.
It is not possible to determine exactly which audio language is currently selected as an audio source
may indicate that provides support for more than one language.
The languages dialog also displays the current system language.
The system language refers to the language used for all UI text throughout the Application.
The current language can also be set from the Current Service Banner. When multiple language
options are available for either subtitles or audio on the current event the icon ”I/II” will be displayed
on the Current Service Banner. The user can then press the “Left” key to display a dialog and set the
current audio or subtitle language for that service.
The dialog will not be displayed if there are no current language options available.
Language Settings
1024 Eurosport
System
Preferred
-Audio
-Subtitle
Current
English
French
French
Change
Change Default System Language. More
• Use / to step through and display the available options: All menus, Installation Menus or None
(Disabled).
• Use / to highlight Set Lock Key.
• Press “ENTER”.
•A second sub-window is displayed, above right.
• Enter the Lock Key code in the code entry box using the number buttons (0~9).
• Input now switches to the Confirm code entry box.
• Enter the same Lock Key code in this window using the number buttons(0~9).
• The second sub-window displays Key Lock Changed and then closes.
• Press EXIT to Apply Setting and return to the Configuration menu.
Page 45

43 - Eng
English
Installation
• Automatic Search
Automatic tuning can be triggered on “First Time Installation” and using an option in the
“Main Menu” -> Settings -> Installation.
Whilst performing an automatic tune no service will be selected. A dialog is displayed during
automatic tuning that shows the progress of the scan through the channels.
Automatic tuning may be cancelled by the user, in such cases the previous list of services is used, if
already stored. When an automatic tune is complete the application will attempt to select the service
with the lowest number from the service list and return to “normal viewing” operation.
Note that after automatic tuning has been completed successfully, all user preferences that are related
to services are reset, e.g. favourite lists.
Automatic Search
Cancel search
Searching VHF Channel: 11
Please wait, This will take a few minutes.
0% 100%
Page 46

Eng - 44
• Manual Search
Manual tuning allows the user to scan an individual channel (frequency) for services.
The user can perform a manual tune by selecting an option on the “Main Menu”.
Whilst performing a manual tune no service will be selected. The user enters the channel number to
be scanned, only those channels supported by the tuner may be entered.
The Manual tuning dialog displays a bar indicating the quality and strength of the signal of the
currently selected channel. The user can then choose to scan the selected channel for services, a
separate dialog is displayed showing the services found whilst scanning is taking place.
Newly discovered services are merged with the current list of services.
Manual tuning may be cancelled by the user, in such cases any newly discovered services are
disregarded.
When a manual tune is complete the application will attempt to select the previously selected service
and return to “normal viewing” operation. In cases were there was not a previously selected service
the application will attempt to select the service with the lowest number.
Manual Search
21
0
...
9
Select channel Search Exit More
Single Quality: Very Good
Single Level:
Channel Number:
Page 47

45 - Eng
English
Common Interface
To Display the Common Interface Menu
• Press the ENTER button to display the CI Main
menu, see below for an example.
• Select the desired option using the / button
and then press the ENTER button.
• Press the EXIT button to exit the menu.
Viewing Common Interface
• Insert the CAM with the CI CARD installed into
the common interface slot.
If you installed CAM/CI CARD, the CI Message
will be displayed below for an example.
• Check if you can see a picture on a scrambled
signal channel.
Main menu
Common Interface
OK Cancel
Press OK to select, or Exit to quit
Module information
Smart card information
Language
Software Download
Top Up Tv
CI Message
Common Interface module
inserted.
• Press the OPTION button. The DTV MENU will
be displayed.
• Select SETUP using the / button and then
press the ENTER button.
The DTV OSD MENU will be displayed.
• Select Common Interface using the /
button and then press the ENTER button to
display the Common Interface, see below for an
example.
Connecting CI
ΠInsert the CI CARD into the CAM in the
direction of the arrow until it fits.
´ Insert the CAM with the CI CARD installed into
the common interface slot.
(Insert the CAM in the direction of the arrow,
right up to the end so that it is parallel with
the slot.)
CI CAM
• The Application Info inserting is about the CI CARD.
• You can install the CAM anytime whether the TV
is ON or OFF.
Page 48

Eng - 46
Basics
• DVB Terrestrial Free-To-Air receiver compliant
to EN 300 744
• VHF/UHF frequency range
• Video and Audio out via internal connector
• S/PDIF out via internal connector
• Fast channel search
• Read-Solomon decoding support (EN 300 744)
• Automatic FEC selection (1/2, 2/3, 3/4, 5/6, 7/8)
• MPEG2 Transport Stream support: ISO/IEC 13818-1
• DVB-Video/-Audio support : ISO/IEC 13818-2, -3
• MHEG and LCN support (UK only)
RF specification
• QPSK/QAM16/64 demodulation compliant to
DVB terrestrial standard EN 300 744
• COFDM 2K and 8K
• VHF/UHF support (47...862 MHz) : EU area
• UHF Support(474...862 MHz) : UK area
• 7/8 MHz channel brandwidth
• Guard Interval Modes : 1/32, 1/16, 1/8, 1/4 active
symbol duration
• Fast PLL tuning speed : step size 62.5 KHz /
166.67 KHz
Input / Output specification
• TV out : CVBS, YUV
• Audio analogue out
• Digital Audio out via S/PDIF
• RF input
- Connector IEC60169-2 female
- Termination 75 Ω
- Return Loss : min. 6dB (75 Ω)
• Loop-Through of RF signals
• Internal connection for 1KX modem protocol
for software update service
Mode functionality
• DVB Terrestrial TV and Radio reception
• Easy-to-use graphical user interface
• Multi language support
• Automatic and manual channel scan
• Electronic Program Guide (EPG)
• Aspect ratio : 4:3, 16;9, 2.21:1(PAL only)
• Wide Screen Signalling (WSS)
• Context referred help function
• Excellent quality monitoring to avoid video and
audio artefacts if to weak signal
• Excellent help to adjust indoor aerial for
maximum input RF signal level
Standard and Regulation Compliance
• DVB terrestrial standard EN 300 744
• MPEG2 Transport Stream support to ISO/IEC 13818-1
• DVB-Video/-Audio support to ISO/IEC 13818-2, -3
• Safety and EMC regulations : EN 55013, EN 55020
and EN 60065
Technical Specification
Page 49

47 - Eng
English
A picture is displayed on
the screen, but there is
no audio.
Remote control
malfunctions.
Noise is heard on the
radio.
No color in a color
picture.
The volume is adjusted to 0.
Mute is active.
The audio cable is disconnected.
The polarity of the batteries
installed in the remote control
is wrong.
The batteries installed in the
remote control have not been
discharged completely.
This may happen when you
use a radio near the TV.
The Color density is adjusted
to 0 or almost 0.
Turn up the Volume button.
Press the Mute button again.
Check the audio cable connectivity.
Reinstall the batteries properly.
Replace the batteries with new ones.
Noise may occur when you use a radio
near the TV.
Keep some distance between any radios
and the LCD TV.
Adjust the Color density to 100 or less.
Symptom
No picture on the screen,
and the power LED does
not turn on.
The TV is turned on, but
there is no picture on the
screen.
An afterimage is generated
when continuously
watching a still image.
No picture on the screen.
No audio.
Possible Problem
Power connection problem.
The brightness is adjusted too
low.
The fluorescent tube is out of
order.
Discordance between the
external device jack and the
input switch button location.
This is caused by an inherent property of LCD panels.
Depending on the number of valid pixels, there may be black or bright pixels.
These will be less than 0.005% of the sum of all pixels.
This is not a problem.
Possible Solution
Check the power cable connectivity to the
power connector.
Press the power switch again.
Adjust the brightness and the contrast so
that a picture is displayed brightly.
The fluorescent tube of a LCD TV has a
lifetime of about 50,000 hours .
To replace the fluorescent tube, contact a
service center.
Adjust the input switch location.
If the TV seems to have a problem, first try the following list of possible problems and solutions before
contacting a service center. If none of these troubleshooting tips apply, do not attempt to repair the
product yourself. Call your nearest service center.
• Symptoms that may appear to be a problem
The following symptoms may happen even if the TV has no problem. First try the following list of
possible problems and solutions before contacting a service center. First try the following list of possible
problems and solutions. If the symptom continues, turn the TV off, and call your nearest service center.
Troubleshooting
Page 50

Eng - 48
The remote control does not work properly!
• Are the polarities of the installed batteries correct?
• Has the battery discharged completely?
• Is the power cord plugged in properly or is there a power failure?
• Is fluorescent lighting or a neonsign near the unit?
Warning
If a problem has been detected, unplug the power cable from the wall outlet first.
Using the product when it has a fault may cause electric shocks or fire.
Do not place objects near the wall outlet so that you can unplug the power cable if necessary.
Duplicated pictures on
the screen.
Blurred or snowy picture.
This may be caused by reflected
broadcasting signals when
there is are mountains,
buildings, or trees near your
house.
The direction of the antenna
is not optimal.
The antenna cable is
disconnected.
Check if there are any tall objects such as
skys crapers near your house.
Check that the direction of the antenna is
adjusted correctly.
Check that the direction of the antenna is
correct.
Check that the antenna cable is
connected to the ANTENNA jack on the
back of the LCD TV.
Page 51

49 - Eng
English
Specifications
The exterior design and the product specifications are subject to be changed without prior notice due
to improvements in performance. This product is manufactured for domestic use.
This product may not be used in countries whose television system type or power voltage is different.
The TFT LCD panel uses a panel consisting of sub pixels which require sophisticated technology to
produce. However, there may be few bright or dark pixels on the screen. These pixels will have no
impact on the performance of the product.
• This device has been registered in regards to EMI for residential use. It may be used in all areas.
HDMI/DVI-D
2W x 2
Less than 3W
Remote control, Battery (AAA), Owner’s Instructions,
Power Cord, AC adapter, Stand Screw, Cleaning Cloth,
Neck Cover (for WALL MOUNT)
479 X 392.6 X 200
479 X 323 X 89.8
5 Kg
532.9 X 398.5 X 200
532.9 X 332.5 X 99.5
6 Kg
548.5 X 428 X 200
548.5 X 381 X 85.5
6.3 Kg
LCD Panel
DVD loader
(option)
TV/VIDEO
PC
Synchronization
Dimension
(mm)
HDMI
Audio Out
Power Supply
Power Consumption
Power Consumption When Power Saving Mode
Color Quality
Maximum Resolution
Separation Signal
Display Color
Interface
Receiver / Channels
Antenna Interface
Video Signal
Video Type
Applicable disc
(Do not insert 8Cm/3inch disc)
MPEG4 ASP Video (option)
Aspect Ration
Language
Others
Screen Size
Type
Display Color
Horizontal F
Vertical F
Weight
Accessories
With Stand (W x H x D)
Monitor (W x H x D)
TFT LCD
DVD-Video / DVD-R /+R / Super VCD / VCD / CD / CD-R / RW
MP3 / WMA / JPEG files / Picture CD Disc Compatible
Support Divx 3.11 / 4.x / 5.x
16:9, 4:3Letter Box, PAN&SCAN
Audio(9), Subtitle(9) (+others)
Built-in screen saver,Repeat mode (chapter/title),
Continuous repeat A-B, Resume play/Last Memory
19 Inch WIDE 20 Inch WIDE 22 Inch WIDE
VHF: E2 ~ E12
UHF: E21 ~ E69
CATV: S1 ~ S41
Television Broadcasting System: PAL, SECAM: B/G, D/K, I, L
VHF, UHF: 75 ohm
PAL, SECAM, NTSC(3.58/4.43)
CVBS, S - VHS, RGB, YUV, HDMI
30 ~ 60KHz
56 ~ 75Hz
TTL, Anode or Cathode
D-sub
50/60Hz, DC12V/5A
Maximum 60W
16.7M 16.2M
16.7M
16.7M
16.2M 16.7M
8-bit, 16.7M 6-bit, 16.2M 8-bit, 16.7M
50/60Hz, DC12V/6A
Maximum 72W
50/60Hz, DC12V/5A
Maximum 72W
1440 x 900
1360 x 768 1680 x 1050
Page 52

Eng - 50
19” ONLY
22” ONLY
Appendix
Standard Signal Mode Table
A TFT LCD TV is configured to support the following 24 signal modes. A user can register up to 24 modes.
Configure the PC display mode referring to the following table.
For configuration procedures, refer to the Appendix of the PC manual.
Resolution
IBM, 640 X 350
IBM, 640 X 480
IBM, 720 X 400
MAC, 640 X 480
MAC, 832 X 624
MAC, 1152 X 870
VESA, 640 X 480
VESA, 640 X 480
VESA, 800 X 600
VESA, 800 X 600
VESA, 800 X 600
VESA, 800 X 600
VESA, 1024 X 768
VESA, 1024 X 768
VESA, 1024 X 768
VESA, 1280 X 768
VESA, 1360 X 768
Horizontal Frequency
(KHz)
31.469
31.469
31.469
35.000
49.726
68.681
37.500
37.861
35.156
37.879
46.875
48.077
48.363
56.476
60.023
47.693
47.712
Vertical Frequency
(Hz)
70.086
59.940
70.087
66.667
74.551
75.062
75.000
72.809
56.250
60.317
75.000
72.188
60.004
70.069
75.029
59.992
60.015
Clock Frequency
(MHz)
25.175
25.175
28.322
30.240
57.284
100.000
31.500
31.500
36.000
40.000
49.500
50.000
65.000
75.000
78.750
80.125
85.800
Polarity
(H/V)
+/-
-/-
-/+
-/-
-/-
-/-
-/-
-/-
-/+/+
+/+
+/+
-/-
-/+/+
-/+
+/+
Resolution
VESA, 1152 X 864
VESA, 1280 X 960
VESA, 1280 X 1024
VESA, 1280 X 1024
VESA, 1440 X 900
VESA, 1440 X 900
Horizontal Frequency
(KHz)
67.500
60.000
63.891
79.976
55.935
70.635
Vertical Frequency
(Hz)
75.000
60.000
60.020
75.025
59.887
75.984
Clock Frequency
(MHz)
108.000
108.000
108.000
135.00
106.500
136.750
Polarity
(H/V)
+/+
+/+
+/+
+/+
-/+
-/+
Resolution
VESA, 1152 X 864
VESA, 1280 X 960
VESA, 1280 X 1024
VESA, 1280 X 1024
VESA, 1680 X 1050
Horizontal Frequency
(KHz)
67.500
60.000
63.891
79.976
65.290
Vertical Frequency
(Hz)
75.000
60.000
60.020
75.025
59.954
Clock Frequency
(MHz)
108.000
108.000
108.000
135.00
146.250
Polarity
(H/V)
+/+
+/+
+/+
+/+
-/+
Page 53

51 - Eng
English
Note
 Loading...