

Page 1

Prestigio P370 DVD-X
User’s Manual
ENG
Before using this product, please read the security instructions first and bear them in mind when using the product.
1PRESTIGIO P370DVD-X
Page 2
Safety Instruction
Warning
TO PREVENT FIRE OR SHOCK HAZARD.
ENG
DO NOT EXPOSE THIS APPLIANCE TO RAIN OR MOISTURE.
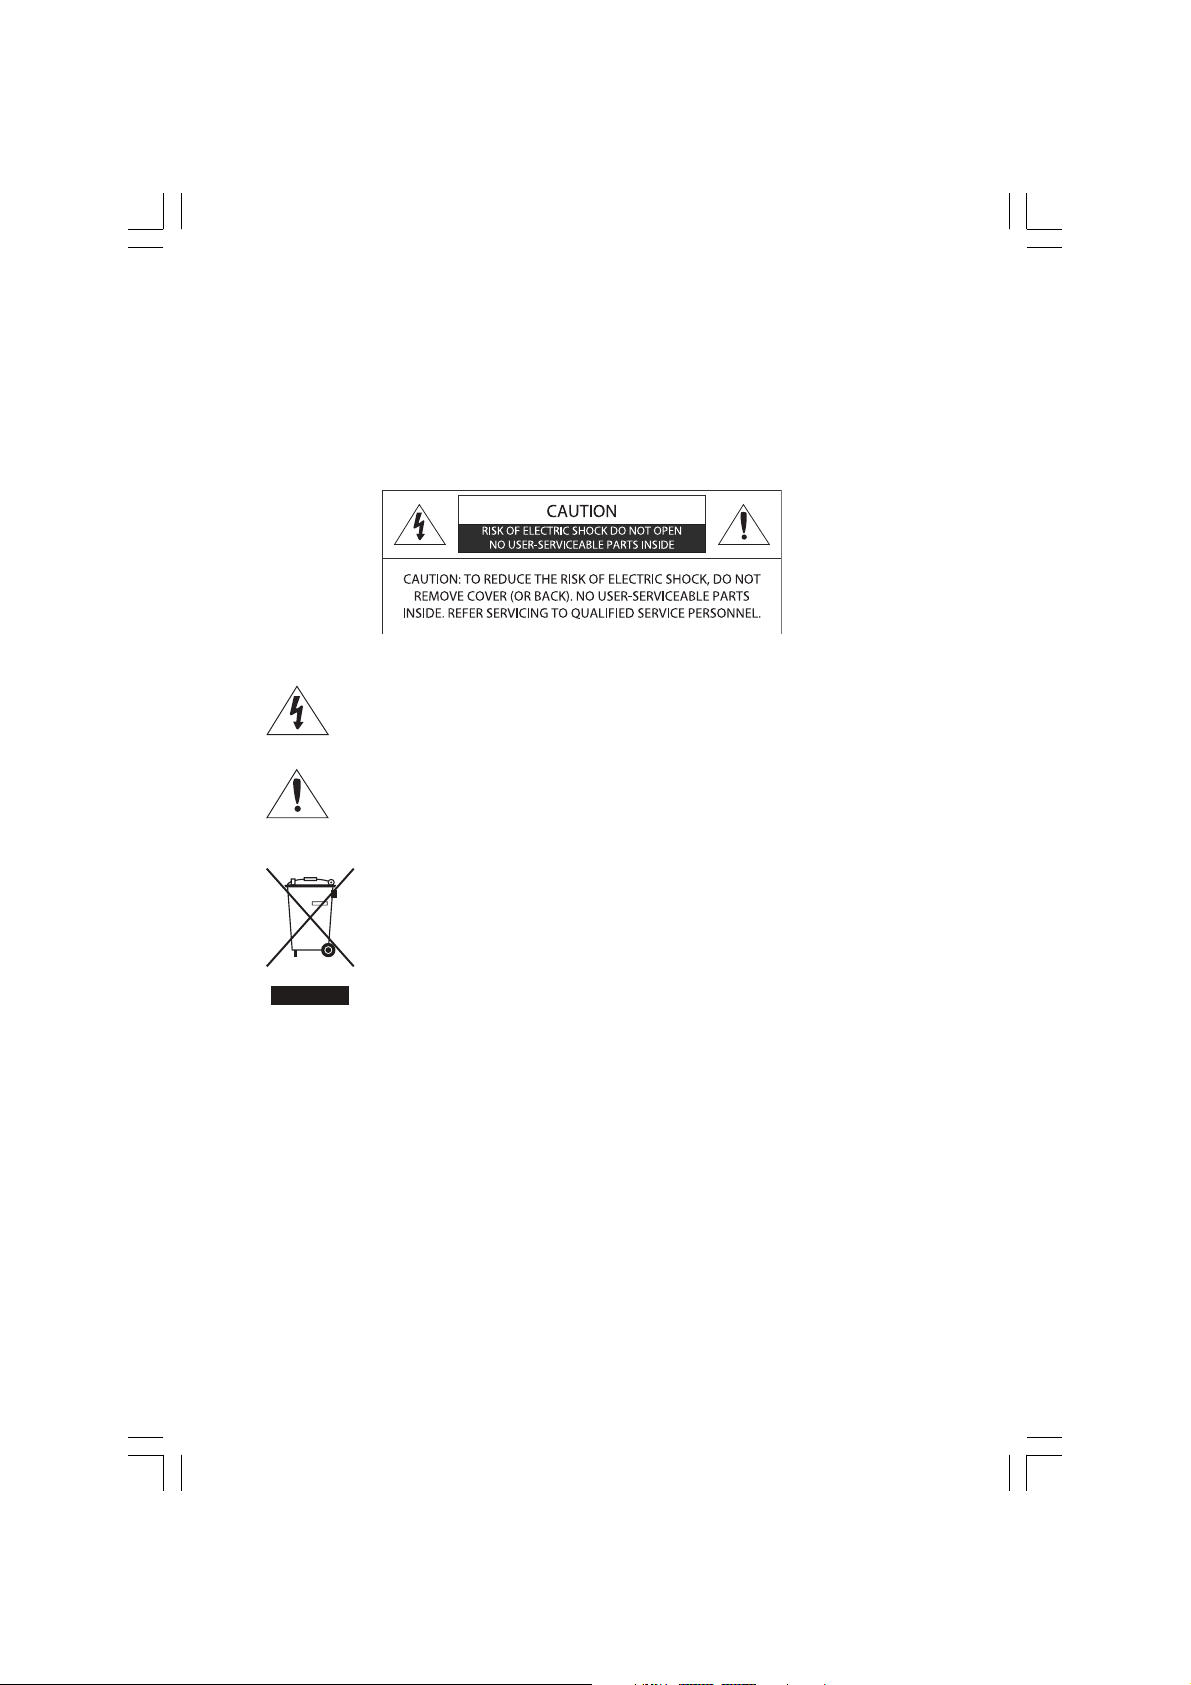
THIS SYMBOL IS INTENDED TO ALERT THE USER TO THE PRESENCE OF UNINSULATED. DANGEROUS VOLTAGE.
WITHIN THE PRODUCTS ENCLOSURE THAT MAY BE OF SUFFICIENT MAGNITUDE TO CONSTITUTE A RISK OF
ELECTRIC SHOCK TO PERSONS.
THIS SYMBOL IS INTENDED TO ALERT THE USER TO THE PRESENCE OF IMPORTANT OPERATING AND MAINTENANCE (SERVICING) INSTRUCTIONS IN THE LITERATURE ACCOMPANYING THE APPLIANCE.
Disposal of Old Electrical & Electronic Equipment
(Applicable in the European Union and other European
countries with separate collection systems)
This symbol on the product or on its packaging indicates that this product shall not be treated as
household waste. Instead it shall be handed over to the applicable collection point for the recycling
of electrical and electronic equipment. By ensuring this product is disposed of correctly, you will help prevent potential
negative consequences for the environment and human health, which could otherwise be caused by inappropriate
waste handling of this product. The recycling of materials will help to conserve natural resources. For more detailed
information about recycling of this product, please contact your local city office, your household waste disposal service
or the shop where you purchased the product.
2 PRESTIGIO P370DVD-X
Page 3

Important Safety Instructions
This equipment has been designed and manufactured to meet international safety standards but, like any electrical
equipment, care must be taken if you are to obtain the best results and safety is to be assured. So, please read the points
below for your own safety. They are of a general nature, intended to help you with all your electronic consumer products
and some points may not apply to the goods you have just purchased.
• Read these instructions.
• Keep these instructions.
• Heed all warnings.
• Follow all instructions.
• Do not use this apparatus near
• Clean only with a dry cloth.
• Do not block any ventilation openings. Install in accordance with the manufacturer’s instructions.
• Do not install near any heat sources such as radiators, heat registers, stoves, or other apparatus (including
amplifiers) that produce heat.
• This TV is not completely disconnected from a power supply line, as minute current is consumed even when
the POWER switch is turned off.
• Do not place hot objects or naked flame sources, such as lighted candles or highlights on, or close to the TV.
High temperatures can melt plastic and lead to fires.
• Do not set on top of the TV any object or container that might spill liquids or small objects into the TV.
• Protect the power cord from being walked on or pinched, particularly at plugs, convenience receptacles, and
the point where it exits the apparatus.
• Only use attachments/accessories specified by the manufacturer.
• Use only with the cart, stand, tripod, bracket, or table specified by the manufacturer, or sold with the apparatus.
When a cart is used, use caution when moving the cart/apparatus combination to avoid injury from tip-over.
• Unplug this apparatus during lightning storms or when unused for long periods of time.
• Refer all servicing to qualified service personnel. Servicing is required when the apparatus has been damaged
in any way, such as power supply cord or plug is damaged, liquid has been spilled or objects have fallen into
the apparatus, the apparatus has been exposed to rain or moisture, does not operate normally, or has been
dropped.
• The apparatus shall not be exposed to dripping or splashing and no objects filled with liquids, such as vases,
shall be placed on the apparatus.
ENG
CAUTION: Danger of explosion if battery is incorrectly replaced. Replace only with the same or
equivalent type.
3PRESTIGIO P370DVD-X
Page 4

Contents
Safety Instruction ................................................ 2
Warning ................................................................ 2
Important Safety Instructions ............................... 3
ENG
Overview .............................................................5
Front View ............................................................. 5
Rear Panel Jacks ..................................................... 5
Remote Control .................................................... 6
Connecting Your TV .............................................. 7
Connecting an Antenna or Cable without
a Decoder box ........................................................ 7
Connecting the Scart Jack ...................................... 7
Connecting a Digital Audio System
(Depend on the model) .......................................... 7
Connecting the Video or S-Video/Audio Jacks ........ 8
Connecting a External TV ....................................... 8
Connecting the DTV Receiver ................................. 8
Connecting the DVI JACK (DVI-D Only) .................... 9
Check Before Using ..............................................9
TV Function ........................................................ 10
Watching TV ...................................................... 1 0
Turning the TV On and OFF ................................... 1 0
Selecting the Menu Language .............................. 1 0
Viewing the Status Information ........................... 1 0
Adjusting the Volume .......................................... 1 0
Muting the Sound ............................................... 10
Viewing a Video, DVD or COMPONENT .................. 1 0
Storing Channels Automatically .......................... 11
Manual Storing of Channels ................................ 1 1
Channel Name ...................................................11
Activating the Child Lock ..................................... 12
Program Edit ..................................................... 12
Delete a Program ................................................. 1 2
Copy a Program ................................................... 1 2
Moving a Program ............................................... 1 3
Skipping a Program Number ............................... 1 3
Changing Channel .............................................. 13
When the Picture Quality is Poor or Unstable ....... 13
Selecting the Picture Status ................................ 14
Adjusting the Picture Settings ............................. 14
Selecting the Sound Mode .................................. 15
Adjusting the BALANCE ....................................... 15
Adjusting the Headphone Volume ....................... 15
Adjusting the EQUALIZER .................................... 16
Choosing a Soundtrack ...................................... 16
Changing the Screen Size ................................... 17
Freezing the Picture ........................................... 17
Viewing Picture-in-Picture ................................... 18
Changing the Source of the PIP Window ............. 18
Changing the PIP Window Channel ..................... 19
Changing the POSITION of the PIP Window ......... 19
Selecting the Speaker Output in the PIP Screen
Mode ....................................................... 19
Swapping the Main and the PIP Window ............. 20
Selecting the Headphone Output in the PIP Screen
Mode ....................................................... 20
Setting the Clock ................................................ 20
Setting the On/Off Timer .................................... 20
Selecting the ON Timer Channel/Adjusting the ON
Timer Volume ........................................... 21
Setting the Sleep Timer ...................................... 21
MELODY Function ............................................... 22
Change Password .............................................. 22
TTX Function ...................................................... 23
Teletext ............................................................. 23
Displaying the Teletext Information .................... 23
Selecting a Page by Number ............................... 24
Using the various display options: ........................ 2 4
Using FLOF to Select a Page ................................ 24
Storing Teletext Pages........................................ 24
PC Function ........................................................ 25
Connecting to a PC ............................................. 25
Connection Procedures ........................................ 25
Adjusting the PC ................................................. 25
Adjusting the Horizontal Position ........................ 2 5
Adjusting the Vertical Position ............................. 26
Initializing Settings (RESET) .................................. 2 6
Auto Adjust .......................................................... 2 6
DVD Function(Depend on the model) .................. 27
Playing DVD’s ..................................................... 27
Displaying the Playback Status ........................... 27
For DVD Playback ................................................. 27
For CD Playback .................................................... 2 7
Searching for a Specific Screen/Song .................. 27
4 PRESTIGIO P370DVD-X
Page 5

Fast Forward/Reverse ........................................... 2 7
Skip Forward/Reverse ........................................... 2 8
Slow Forward/Reverse ......................................... 28
STEP(Frame-by-Frame) Playback .......................... 2 8
Repeating a Title, Chapter(DVD), Track(CD) ......... 28
Repeat Playback ................................................... 2 8
Repeating a Specific Section ................................ 2 8
Changing the Audio Language/Changing the Subtitle
Language ................................................. 29
Changing the Audio Language ............................ 2 9
Changing the Subtitle Language .......................... 29
Changing the Size and Angle of the Screen .......... 29
Changing the Size of the Screen ........................... 2 9
Viewing from another Angle ............................... 2 9
Additional Function ............................................. 30
Muting the sound ................................................ 30
Basic Disc Menu Controls ...................................... 30
Programming in a Specific Order ......................... 30
Program play ....................................................... 3 0
Setting a Specific DVD Title or Chapter ................ 30
Program play DIRECT Search (GO TO) for DVD ....... 30
DIRECT Search (GO TO) for CD ................................ 31
Playing MP3 Discs .............................................. 31
To Play a MP3 File ................................................. 3 1
Repeat Playback ................................................... 3 1
Playing DIVX Discs (option) ................................. 32
To Play a DIVX File ................................................. 3 2
Playing Kodak Picture CD and JPEG File ................ 32
To play Kodak Picture CD and JPEG File ................. 32
Changing the Size of the Screen ........................... 3 3
Image Rotation .................................................... 33
Changing JPEG Slideshow Transition Mode .......... 33
Starting music slide show ..................................... 3 3
Starting slide show mode 1 .................................. 33
Starting slide show mode 2 .................................. 33
Starting slide show mode 3 .................................. 34
Stoping slide show mode ..................................... 3 4
Using the Setup Menu ........................................ 34
Language Setup ................................................... 3 4
Video Setup ......................................................... 3 4
Speaker Setup ...................................................... 3 5
Audio Setup ......................................................... 3 5
Custom Setup ....................................................... 3 5
DivX Function(Depend on the model) .................. 37
DivX (option) ...................................................... 37
DivX Feature Table ................................................ 37
DivX® VOD Playback ............................................. 3 8
Using ARM on the Outer Wall .............................. 38
Troubleshooting ................................................ 39
Specifications .................................................... 41
Appendix ........................................................... 43
ENG
5PRESTIGIO P370DVD-X
Page 6
Overview
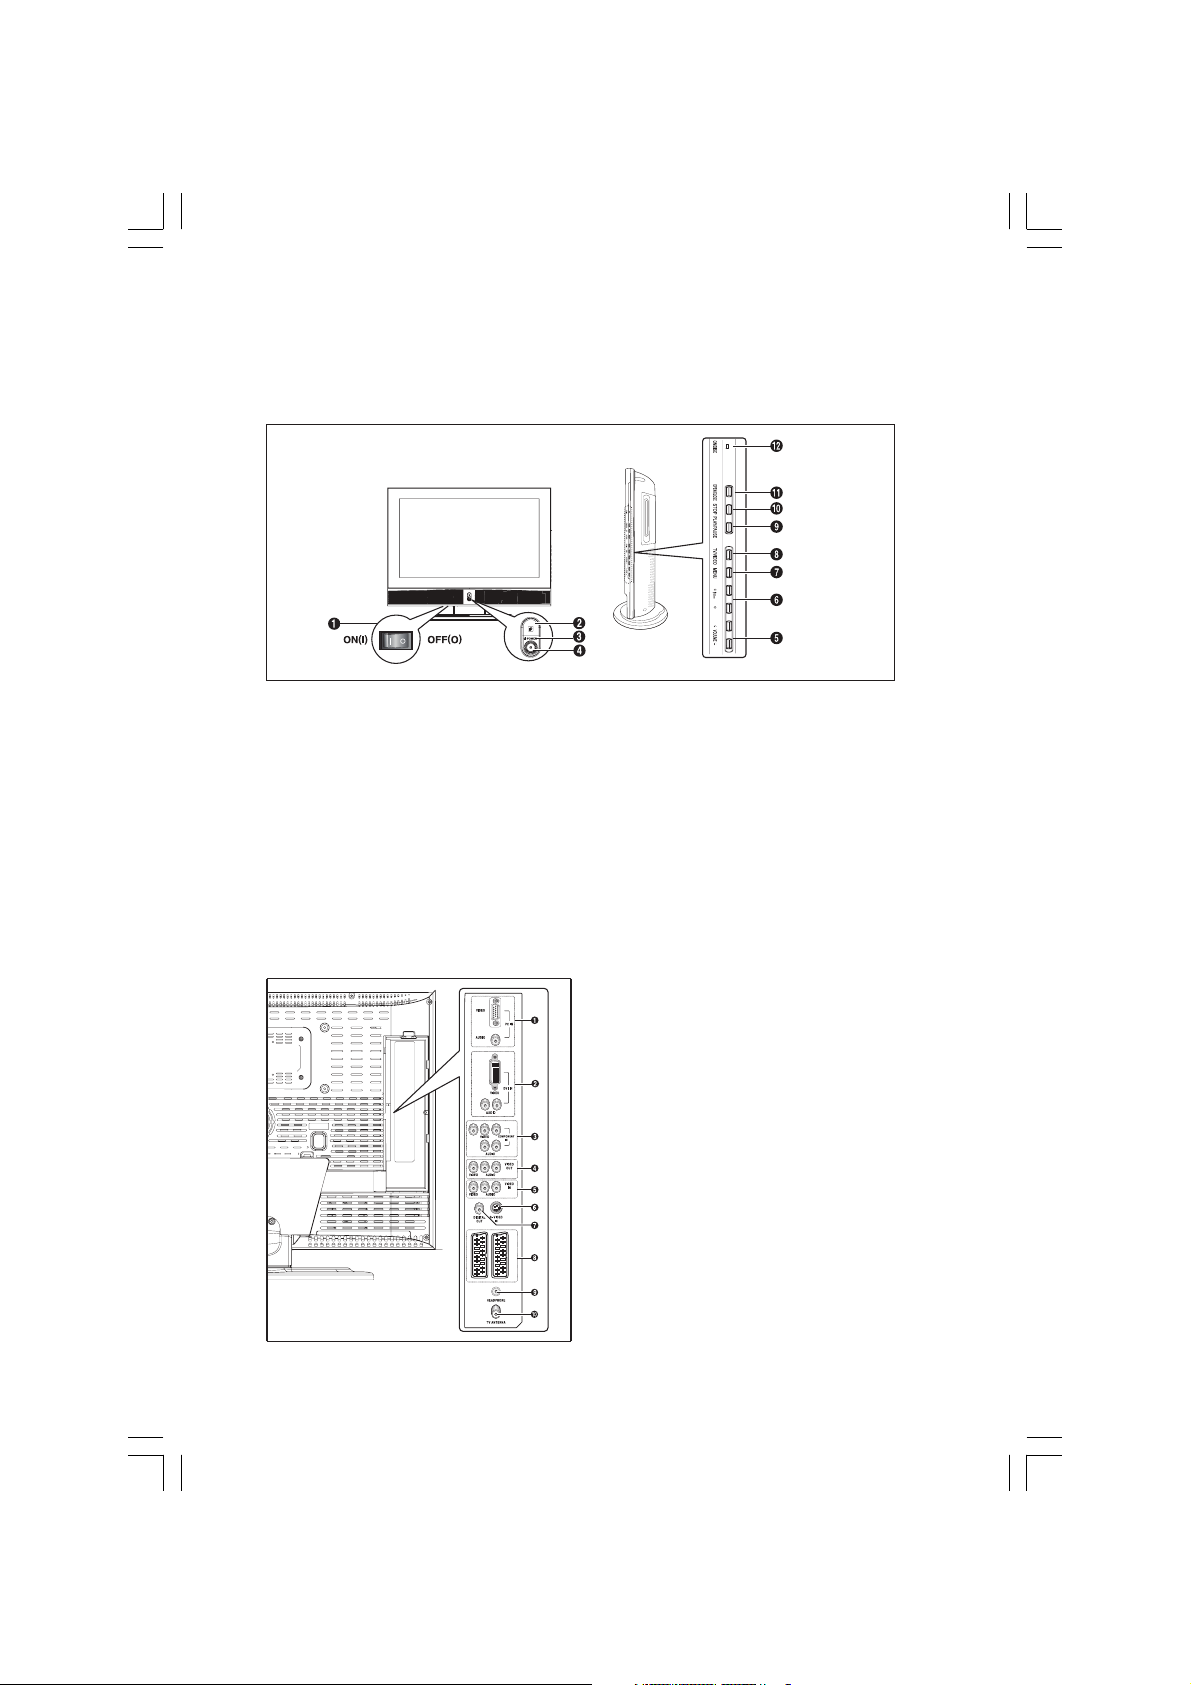
Front View
ENG
1. MASTER SWITCH
2. Remote Control Sensor
3. POWER: Turns the TV on and off.
4. LED Lights
5. VOLUME: Increases or decreases the volume. This is also
used to select the “MOVE&ADJUST” item on the on-screen
menu.
6. PROGRAM: Changes channels or “MOVE&ADJUST” to items
on the on-screen menu.
Rear Panel Jacks
7. MENU: To access or close menus, simultaneously.
8. TV/VIDEO: Selects an external device connected to the TV.
<DVD> - Depend on the model
9. PLAY/PAUSE: Play the DVD or temporarily stop playback.
10. STOP: Stop the DVD playback.
11. OPEN/CLOSE: OPEN/CLOSE the DVD.
12. ON/DISC LED
1. PC INPUT (VIDEO/AUDIO) JACKS
2. DVI INPUT (VIDEO/AUDIO : L/R) JACKS : DVI-D Only
3. COMPONENT JACKS (VIDEO : Y, Pb, Pr/AUDIO : L/R)
4. LINE (VIDEO/AUDIO) OUTPUT JACKS
5. VIDEO3 (VIDEO/AUDIO) INPUT JACKS
6. S-VIDEO INPUT JACK
7. DIGITAL AUDIO OUTPUT JACK (Depend on the model)
8. SCART JACKS (BOTTOM : SCART1, TOP : SCART2)
9. HEADPHONE JACK: Used for headphones that can be purchased additionally.
10. TV ANTENNA INPUT JACK
For more details on connections see page 6~7.
6 PRESTIGIO P370DVD-X
Page 7
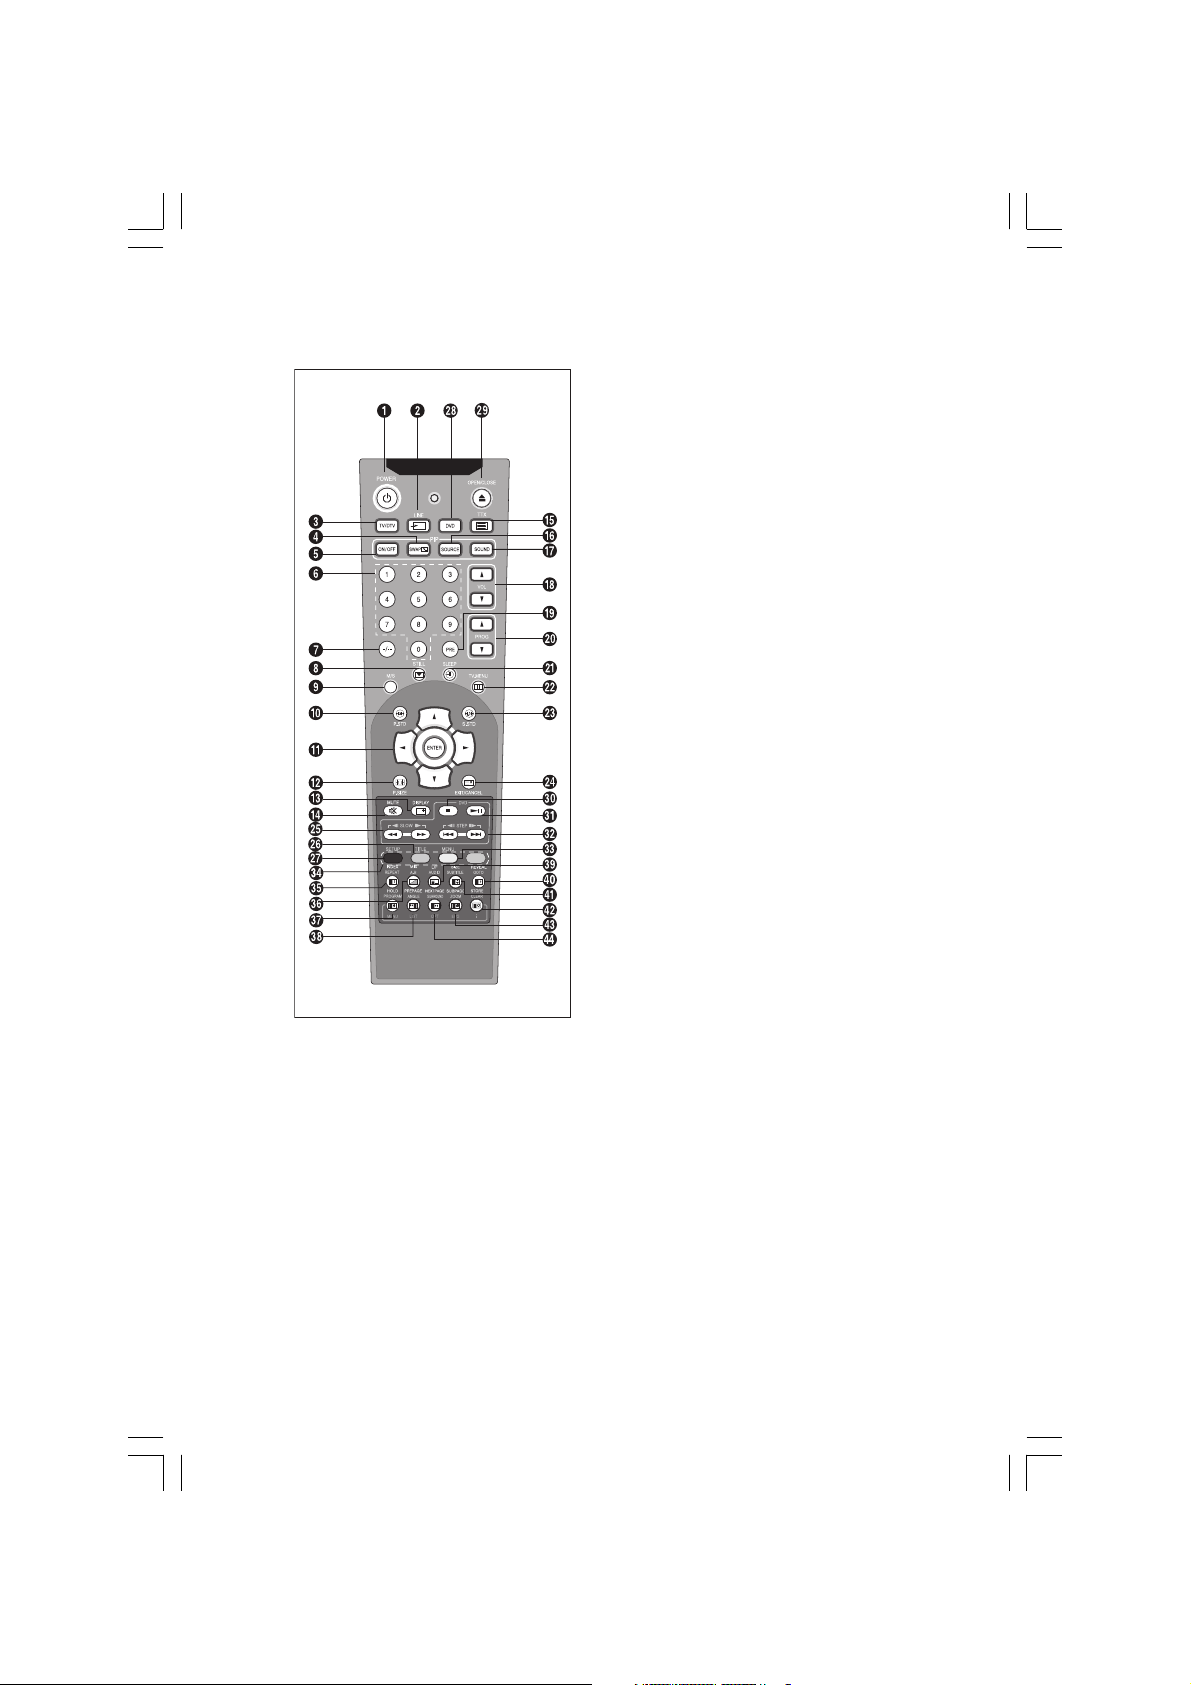
Remote Control
1. POWER: Turns the TV on and off.
2. LINE: External input selection. (TV -> RGB -> Video1 -> Video2 > Video3 -> S-Video -> COMPONENT -> DVI -> PC)
3. TV: Switches to TV mode.
4. SWAP: Exchanges the video signal source of the main screen and the
PIP window.
5. ON/OFF: Turns PIP on or off.
6. NUMBER BUTTONS: Selects channels directly on the TV.
7. -/—: Selects channels over 10. For example, to select channel 21,
press “-/—” then press “2”, “1”.
8. STILL: Freezes a moving picture on the screen.
9. M/S: Sound mode selection.
10. P.STD: Configures various video settings.
11. ARROW/ENTER: Select an item of menu/Change confirmation.
12. P.SIZE: Changes the screen size.
13. DISPLAY: Displays the current channel and the audiovideo settings.
14. MUTE: Temporarily mute the sound.
15. TTX: Switches to Teletext mode.
16. SOURCE: Selects the signal source for the PIP window.
17. SOUND: Changes the audio signal source between the main screen
and the PIP window.
18. VOL: Increases or decreases the volume.
19. PRE: Moves to the previous channel.
20. PROG: Changes channels.
21. SLEEP: Selects a preset time interval for automatic shutoff.
22. TV.MENU: Displays the OSD menu.
23. S.STD: Configures various audio settings.
24. EXIT/CANCEL: Exit the current configuration or the teletext display.
ENG
<DVD> - Depend on the model
25. SCAN/SLOW: For fast and slow playback.
26. TITLE: For selecting a title on the disc.
27. SETUP: For initial DVD player settings.
28. DVD: Displays the DVD.
29. OPEN/CLOSE: OPEN/CLOSE the DVD tray.
30. STOP: Stop the DVD playback.
31. PLAY/PAUSE: Play the DVD or temporarily stop playback.
32. SKIP/STEP: For skipping to the next chapter/For playing one frame at a time.
33. MENU: For displaying the menu contained in the disc.
<DVD & TTX> - Depend on the model
34. COLOR KEY: Fasttext topic selection.
35. INDEX/REPEAT: Programme selection by name/ For specifying and repeating playback of a segment.
36. MIX/A-B: Video & TTX MIX/For repeated playback of disc titles, chapters or sound.
37. HOLD/PROGRAM: Teletext page/For playback in a specified order.
38. PRE PAGE/ANGLE: Teletext previous page/For viewing scenes from different.
39. L/F/AUDIO: Switching the LIST or FLOF mode./ For selecting the audio language.
40. REVEAL/GOTO: Teletext reveal/For jumping to a specified location.
41. SIZE/SUBTITLE: Teletext size selection/For selecting the SUBTITLE language.
42. STORE/CLEAR: To store the teletext in the LIST mode/To erase a program content.
43. SUB PAGE/ZOOM: Teletext SUB-PAGE/For magnifying the screen.
44. NEXT PAGE/SURROUND: Teletext NEXTPAGE/For stereophonic sound effect.
7PRESTIGIO P370DVD-X
Page 8
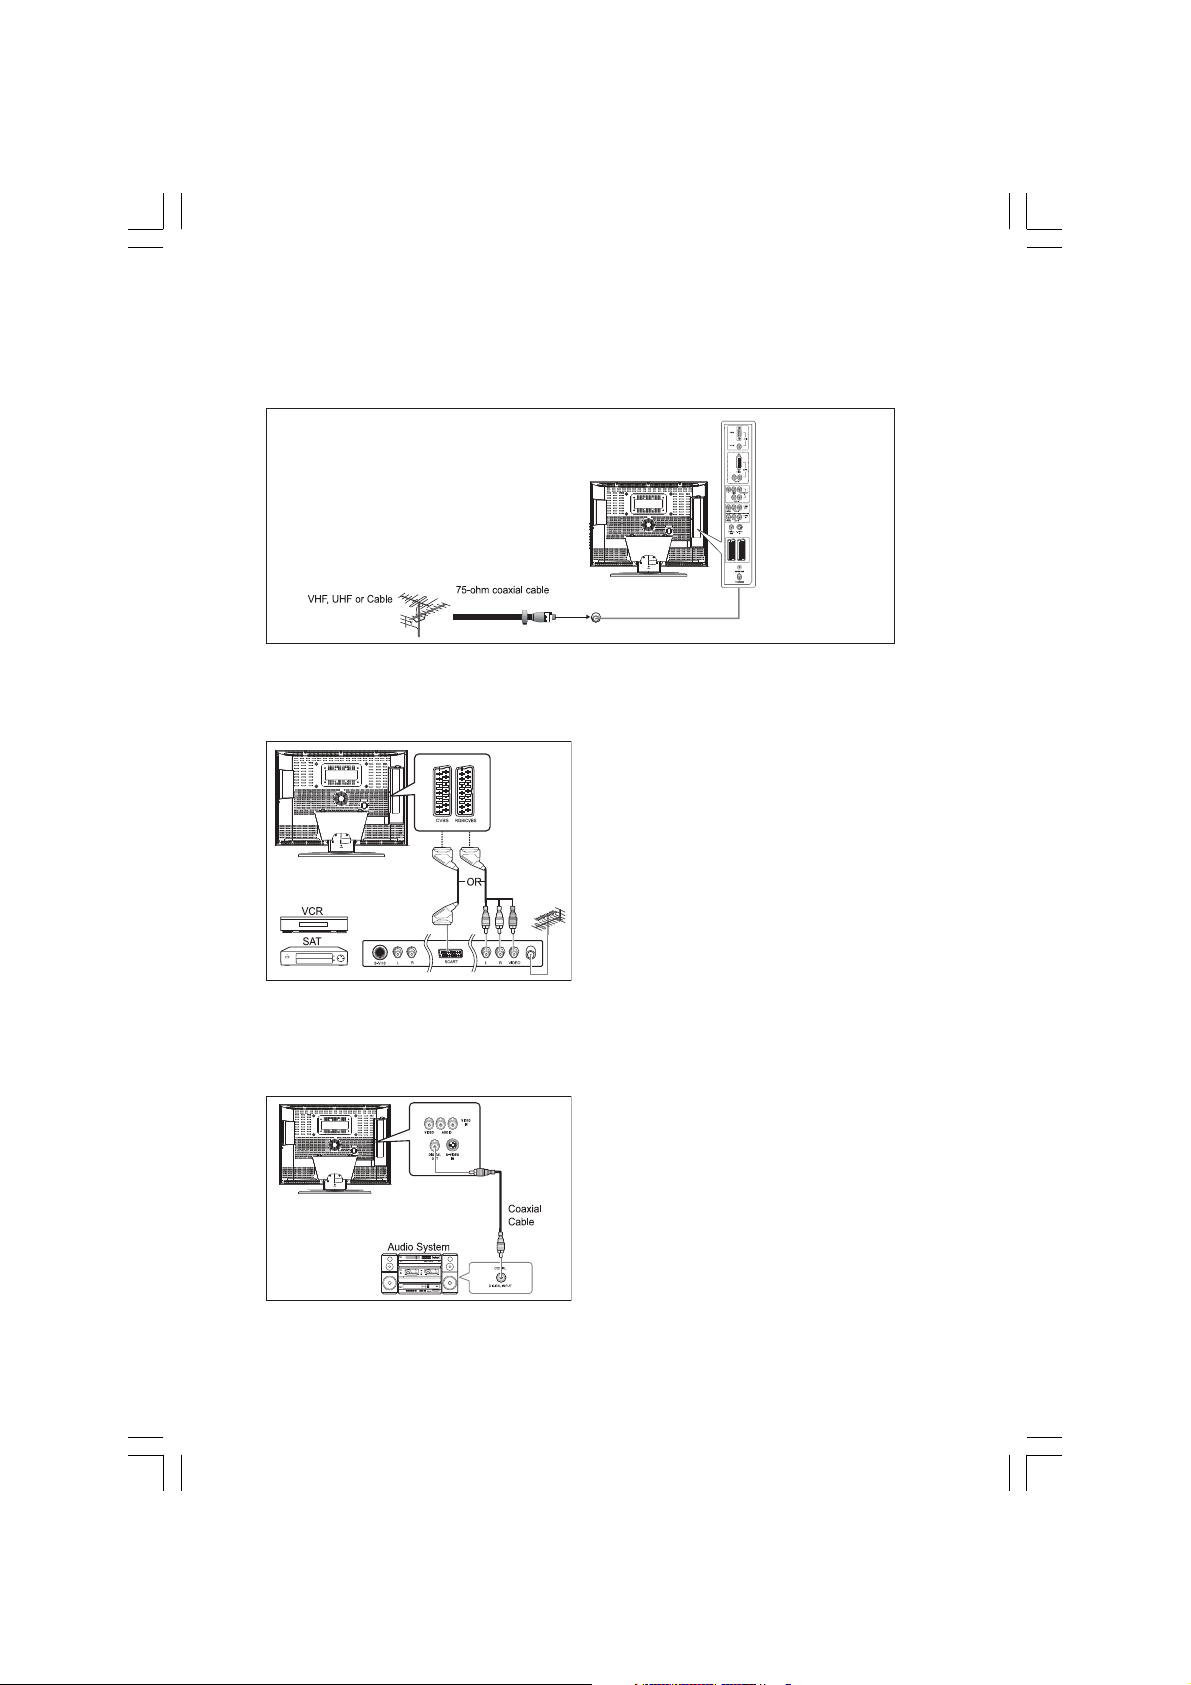
Connecting Your TV
Connecting an Antenna or Cable without a Decoder box
ENG
Connecting the Scart Jack
Connection Procedures
SCART1 is used for the equipment with an RGB output,
such as video game devices or video disc players. This end
can be fitted with:
- A SCART connector
- Three RCA connectors(VIDEO+AUDIO_L+AUDIO_R)
Procedures for watching a Video over a VCR
Turn the TV on, and select ‘VIDEO1’ using the LINE button
on the remote control.
If you have a second VCR and wish to copy cassette tape,
connect the source VCR to SCART1 and the target VCR to
SCART2 so that you can redirect the signal from SCART1 to SCART2.
Connecting a Digital Audio System (Depend on the model)
Connection Procedures
Connect the DIGITAL OUT (black) jack on the back of your
TV to the DIGITAL IN jack of the Decoder or AV amplifier.
To use the digital out
Turn the TV on, and select ‘DVD’ using the DVD button on
the remote control.
Turn the digital amp on and select the external input mode.
8 PRESTIGIO P370DVD-X
Page 9
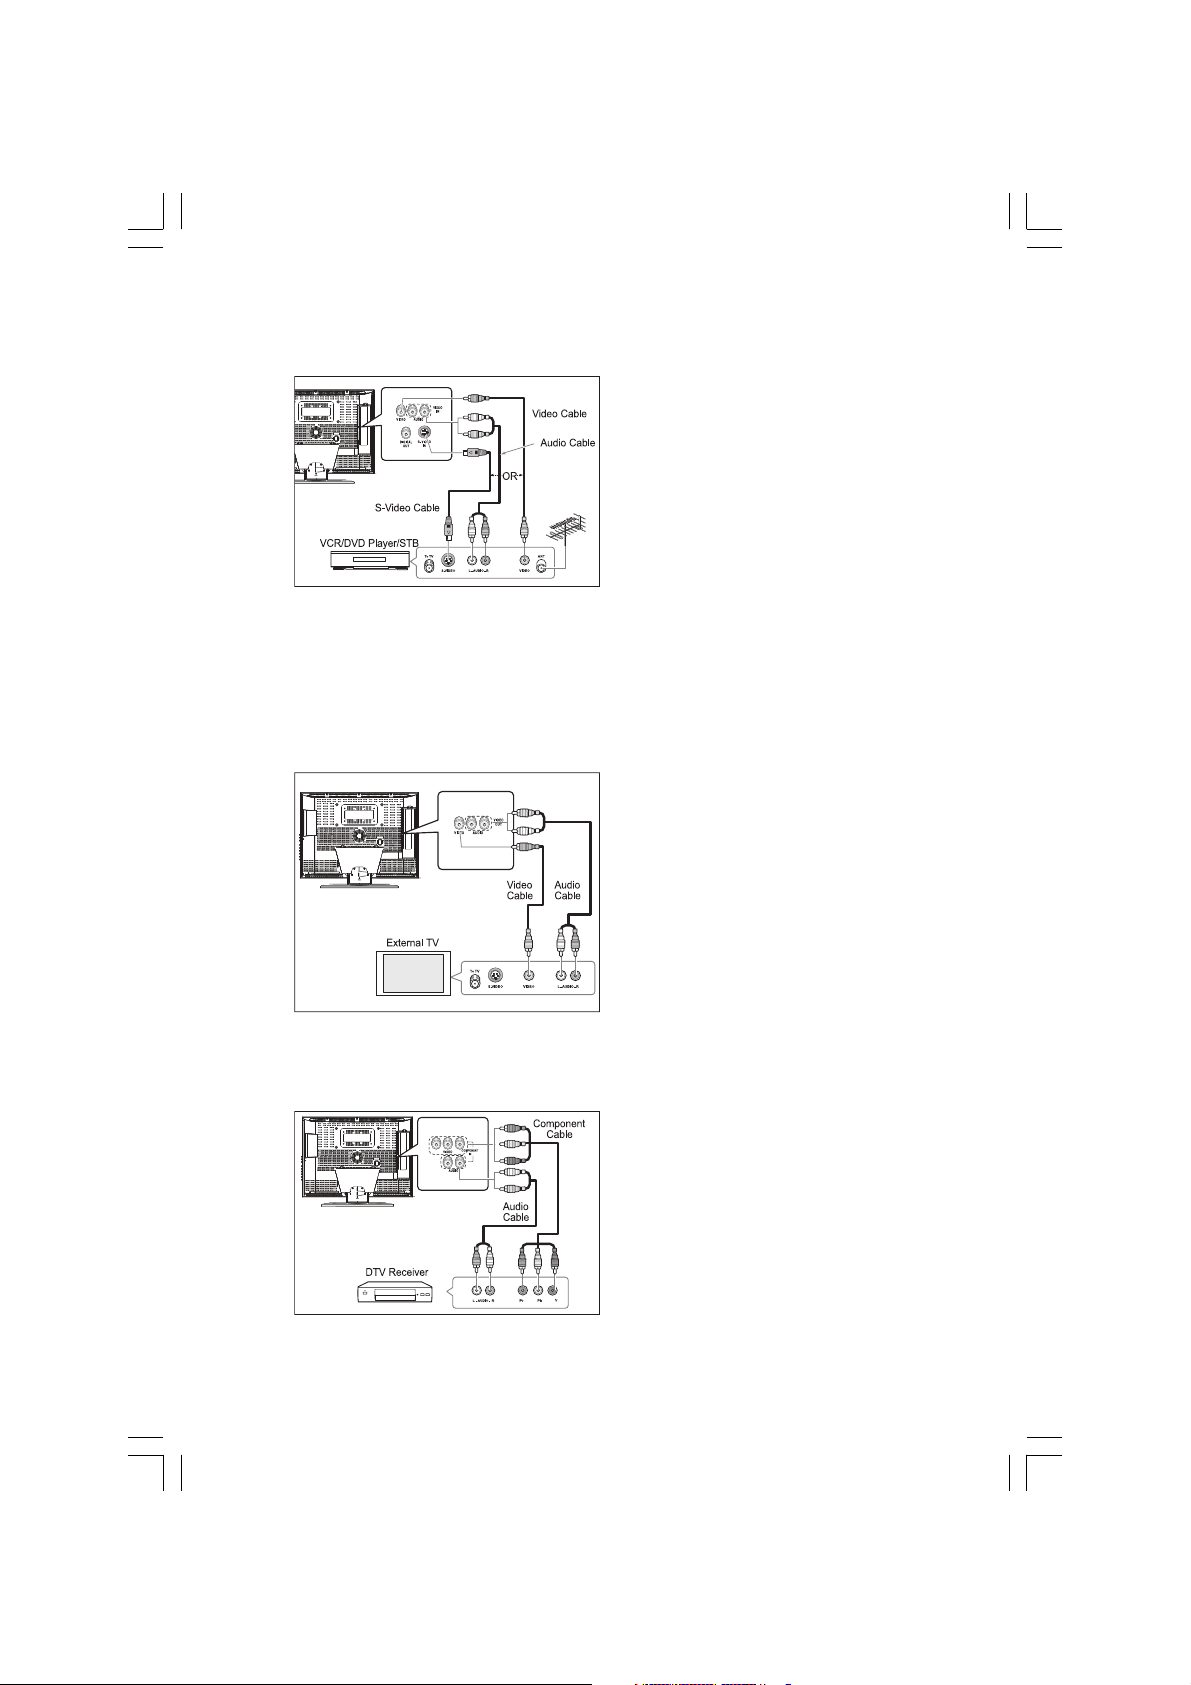
Connecting the Video or S-Video/Audio Jacks
Connection Procedures
Connect the antenna cable to the ANTENNA IN terminal on
the back of your VCR.
Connect the VIDEO/AUDIO INPUT jacks of the TV and the
video/audio output jacks of your VCR with the video/audio cables. (Connect the cable to the terminal of the same
color)
- You can use the S-Video cable to connect a VCR or a DVD
player for better video quality.
- If your VCR does not support stereo sound, connect the
mono audio out jack to the AUDIO INPUT (left) jack.
Procedures for watching a video over a VCR
Turn the TV on, and select ‘VIDEO 3’ using the LINE button on the remote control.
- If you have connected a S-Video cable, select ‘S-VIDEO’.
Connecting a External TV
Connection Procedures
Connect the AUDIO CABLES between the AUDIO OUT L and
R jacks on the back of your TV and the corresponding
AUDIO INPUT jacks on external TV.
Connect the VIDEO CABLE between the VIDEO OUT jack on
the back of your TV and the corresponding VIDEO INPUT
jack on external TV.
ENG
Connecting the DTV Receiver
To watch the external TV
Turn the external TV on and select ‘VIDEO’ using the external
input button.
Turn the your TV on.
Connection Procedures
The COMPONENT VIDEO IN and COMPONENT AUDIO IN connectors are used for equipment with a DVD or DTV receiver
out. (480i/60Hz, 480p/60Hz, 576i/50Hz, 576p/50Hz,
720p/50Hz, 720p/60Hz, 1080i/50Hz,1080i/60Hz)
To watch the DTV
Turn the TV on, and select ‘COMPONENT’ using the LINE
button on the remote control.
Turn the DTV Receiver on.
9PRESTIGIO P370DVD-X
Page 10

Connecting the DVI JACK (DVI-D Only)
ENG
Check Before Using
Please check the following check list before using the TV.
Is the antenna cable connected properly?
Are the remote control batteries installed properly?
- Install two AAA size batteries according to the correct polarity.
- The remote control works up to about 7~10m from the TV, 3m to the left or right of the TV,
and to within 30 degrees from the remote control sensor of the TV.
Have the receive channels been configured?
Are the cables connected to any external devices connected properly?
Connection Procedures
Connect the DVI input jack of the TV and the DVI output
jack of your DTV Receiver.
Connect the DVI audio input jacks of the TV and the DVI
audio output jacks of your DTV Receiver with the audio
cable.
10 PRESTIGIO P370DVD-X
Page 11
TV Function
Watching TV
Turning the TV On and OFF
Plug the mains lead into an appropriate socket.
Press the POWER switch on the bottom of the television toward “ON”(I).
Press the POWER button on the remote control (or on the front panel of the unit.)
You can also switch on by pressing the PROG /\ / \/ buttons.
• When you turn the power ON, the screen appears and the POWER/STANDBY light is turned off.
• When you turn the power OFF, the screen goes blank, and the POWER/STANDBY light turns red.
• Do not leave your television in Standby mode for long periods of time (when you are away on holiday, for example).
Turn your television off by pressing the POWER switch toward “OFF”(O). It is best to unplug the set from the mains and
aerial.
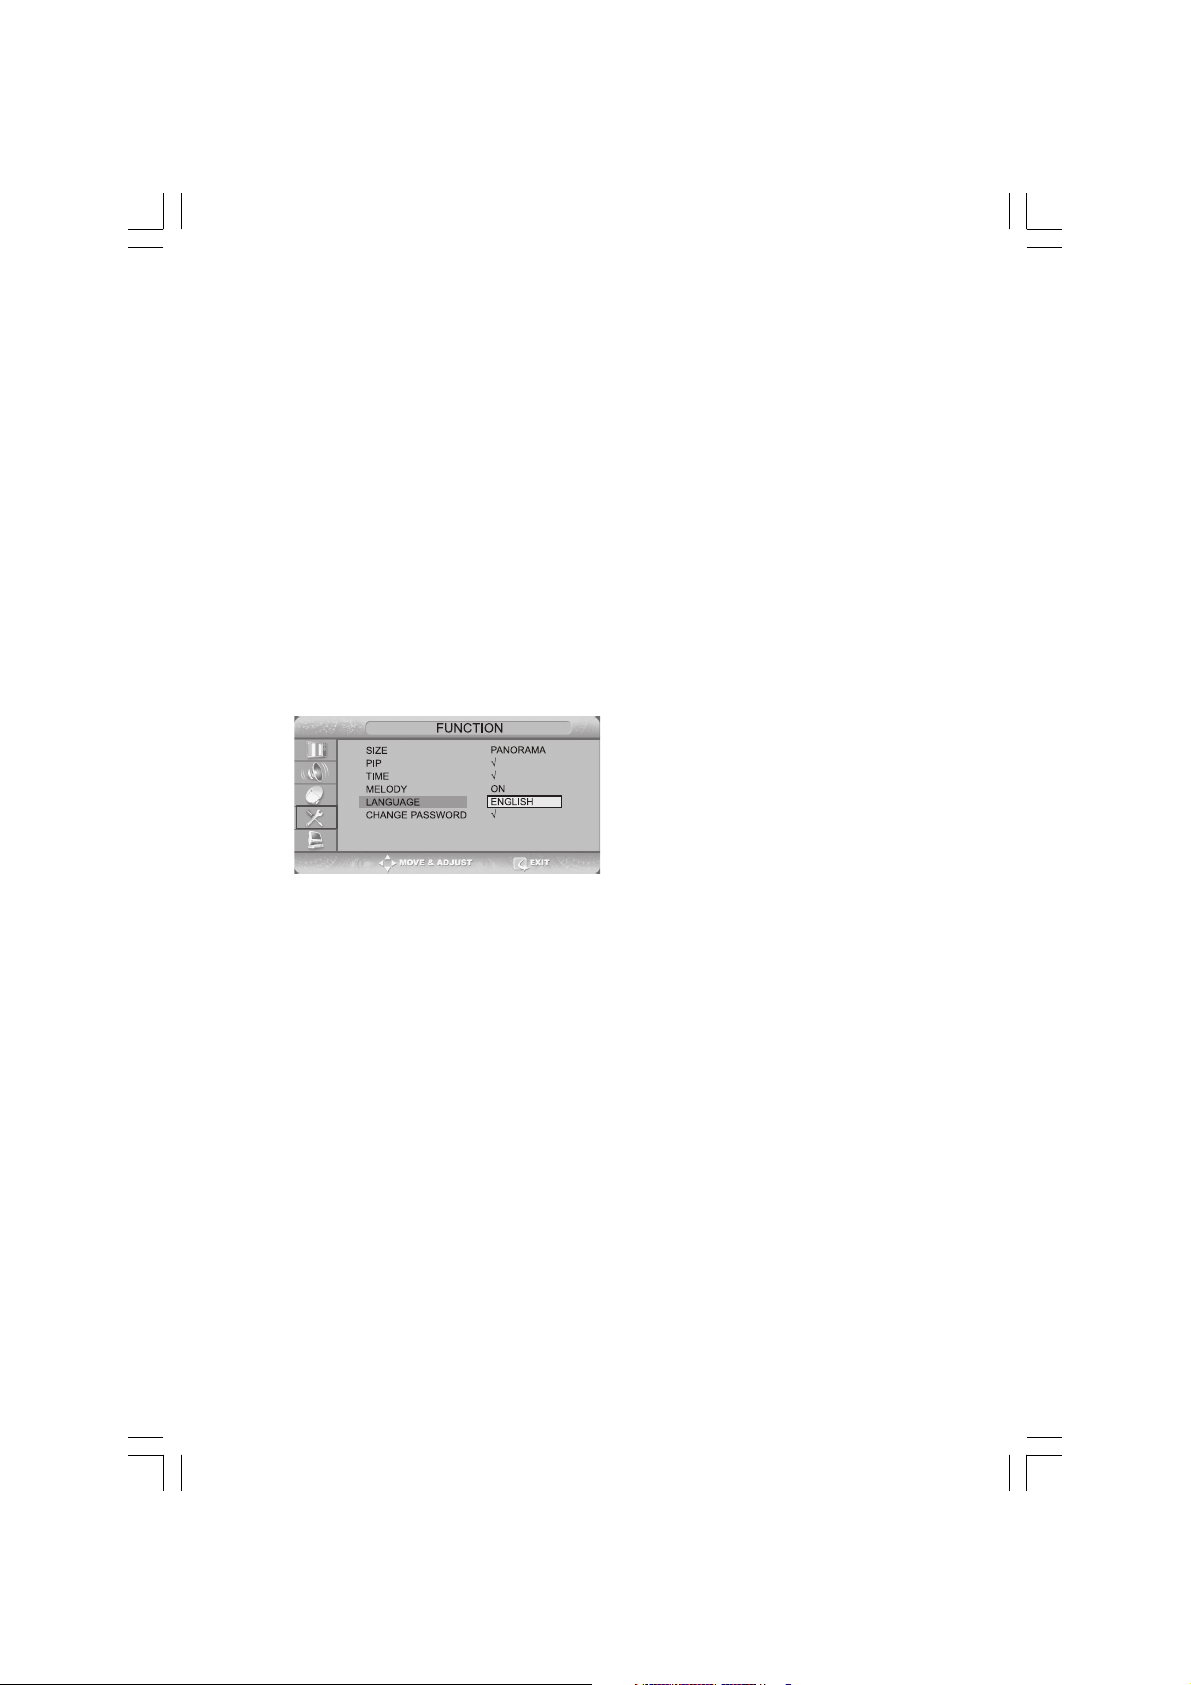
Selecting the Menu Language
Press the TV.MENU button. The OSD MENU will be displayed.
Select FUNCTION using the /\ / \/ button and then press the
> button.
LANGUAGE using the /\ / \/ button and then press the >
button.
Select the desired menu language using the /\ / \/ button.
Press the EXIT/CANCEL button to exit the menu.
Viewing the Status Information
Press the DISPLAY button on the remote control. The TV will display the input source, the picture mode, the sound mode,
the STEREO mode, the sleep time, the current time, and the pip mode.
ENG
Adjusting the Volume
Adjust the volume using the VOL /\ / \/ button.
Muting the Sound
Press the MUTE button. You can conveniently use the MUTE button when a telephone or a door bell rings. To cancel, press
the MUTE button again.
Viewing a Video, DVD or COMPONENT
Press the LINE button. For connection and setup procedures, refer to page 6.
11PRESTIGIO P370DVD-X
Page 12
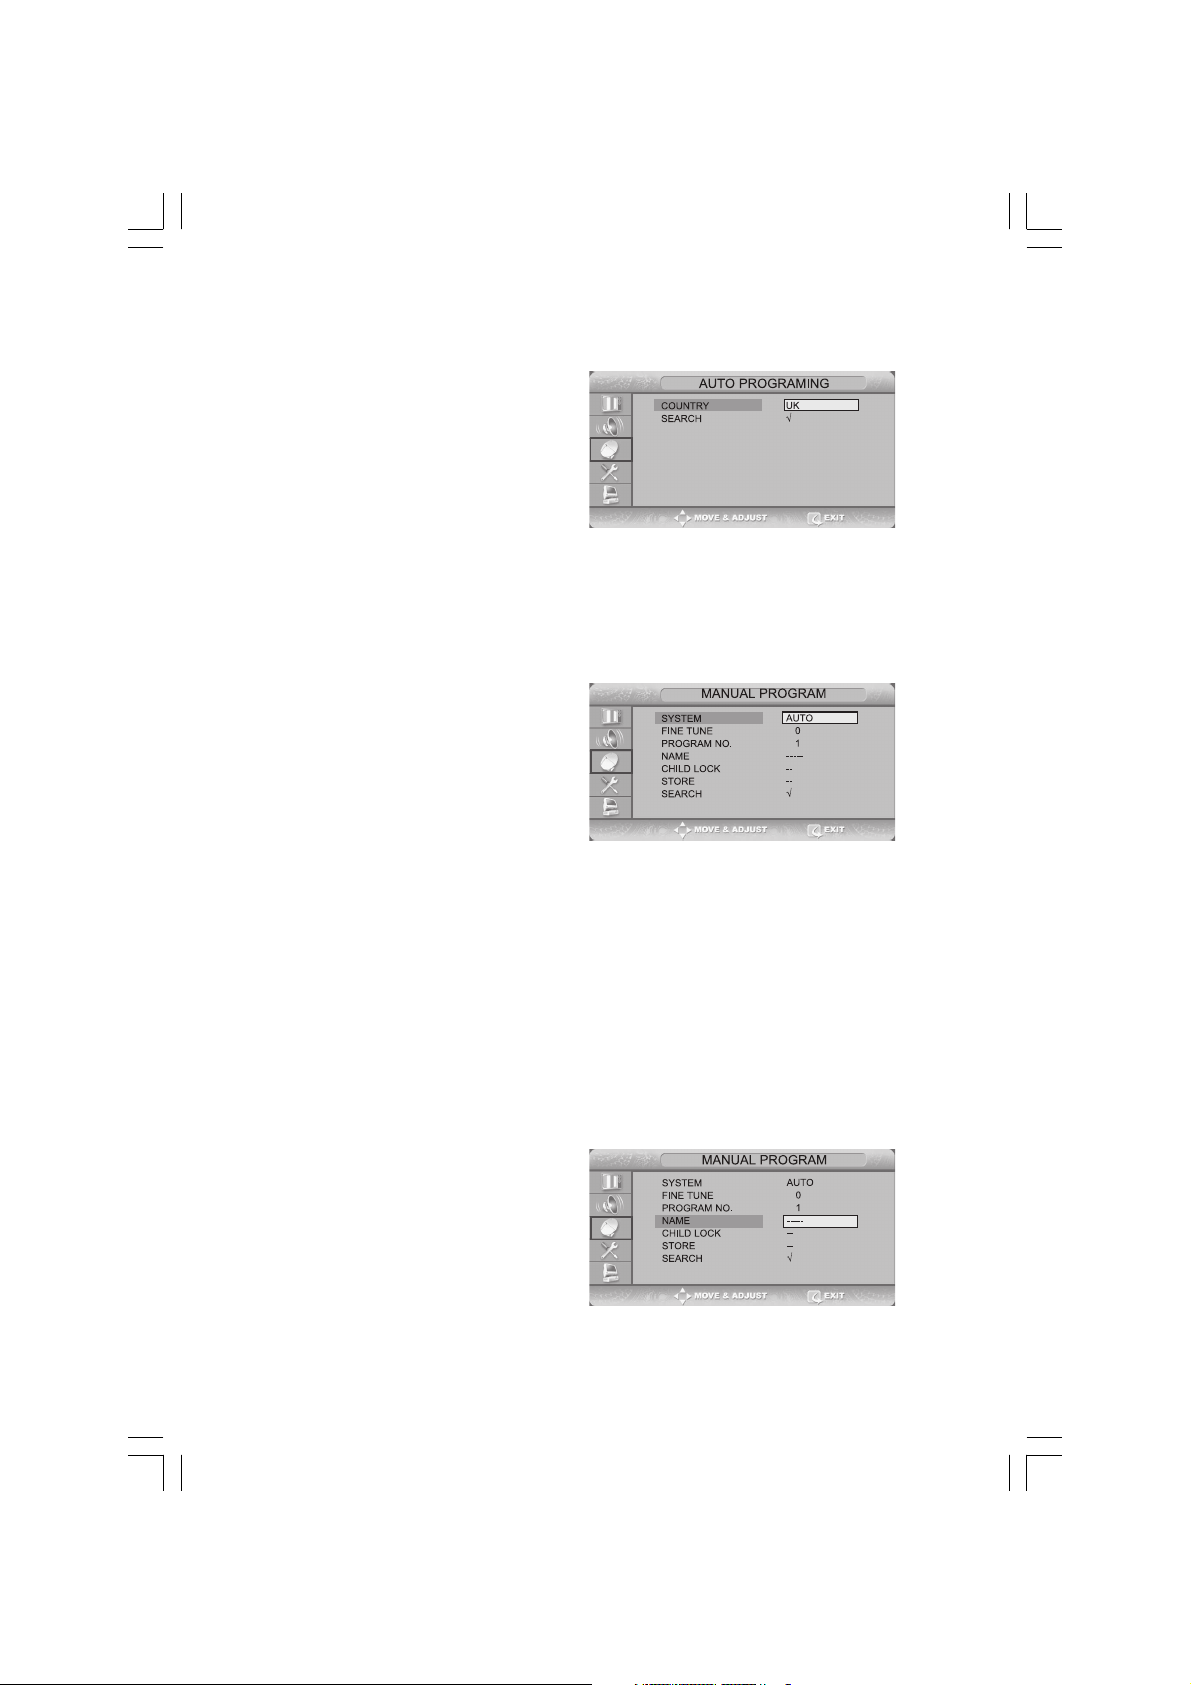
Storing Channels Automatically
Press the TV.MENU button. The OSD MENU will be displayed.
Select SETUP using the /\ / \/ button and then press the >
button.
ENG
Select AUTO PROGRAMMING using the /\ / \/ button and
then press the > button.
Select COUNTRY using the /\ / \/ button and then press the
> button.
Select your COUNTRY using the /\ / \/ button and then
press the > button. The countries are displayed in the following order.
Select SEARCH using the /\ / \/ button and then press the > button.
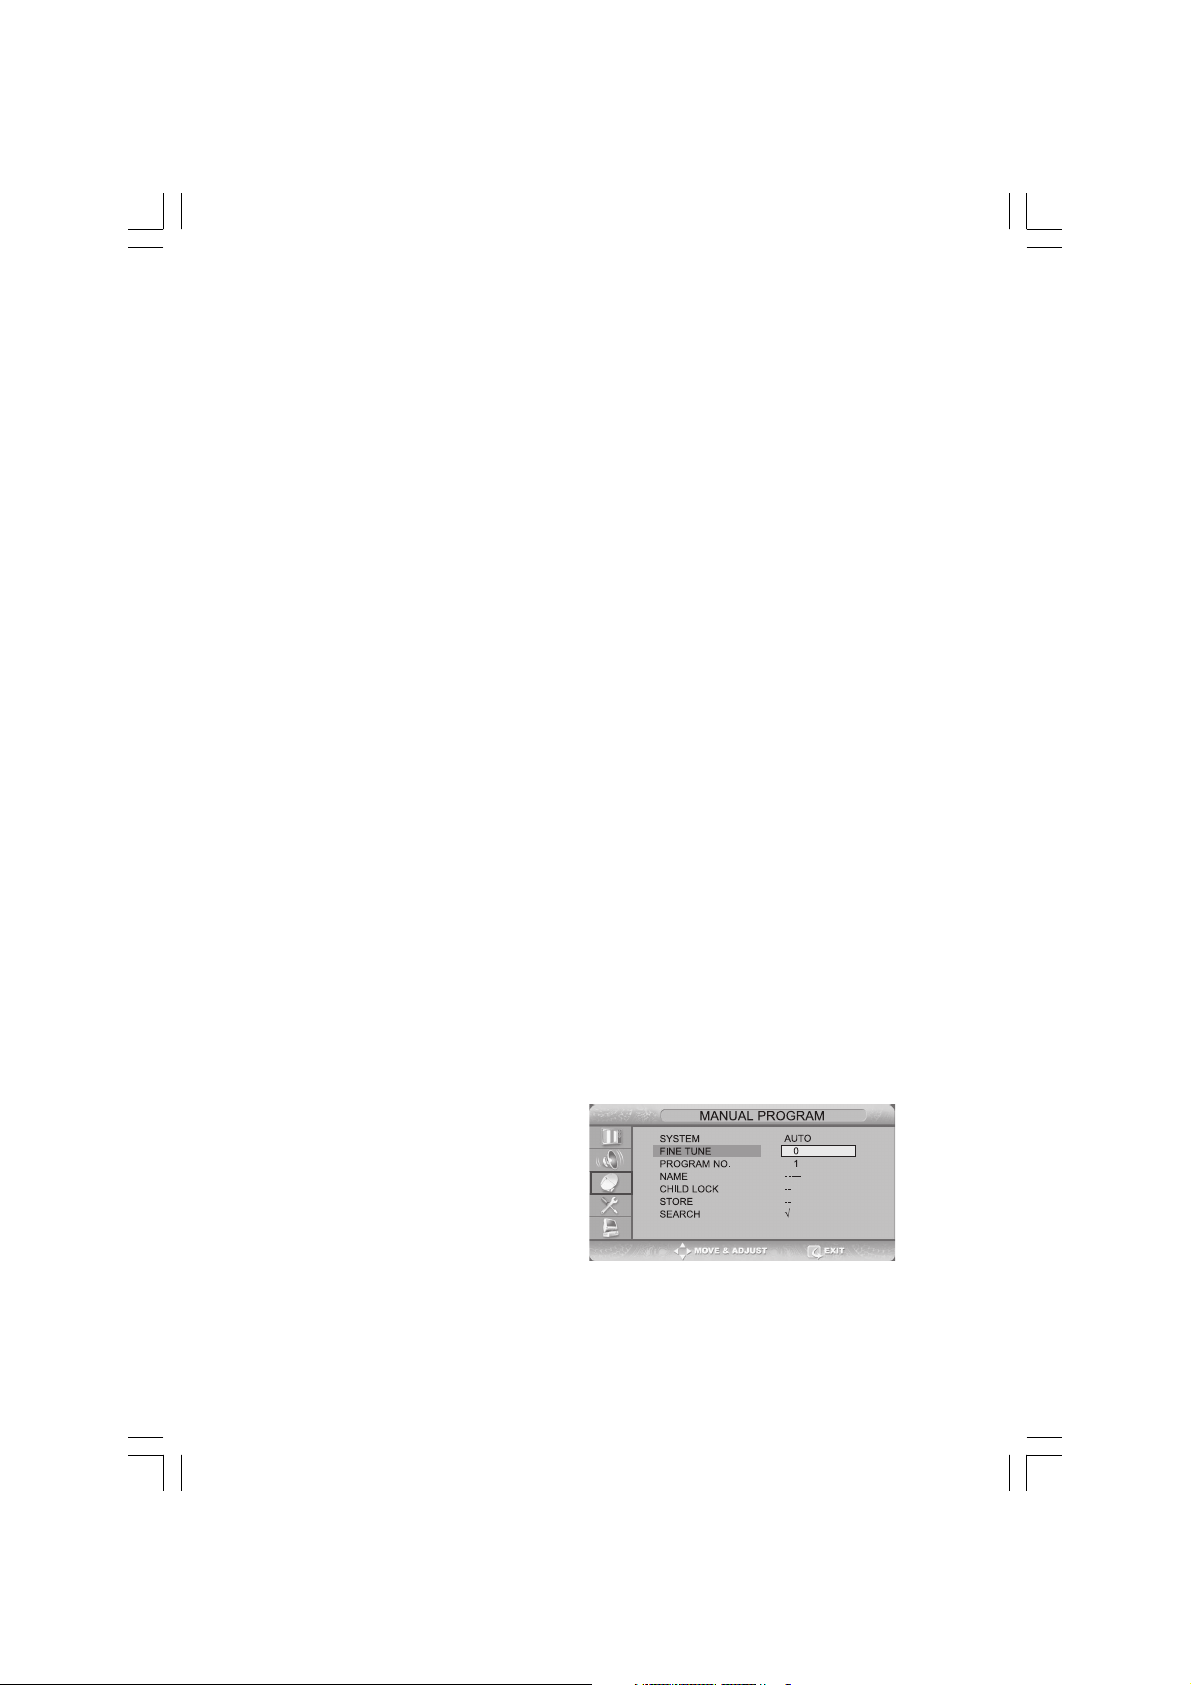
Manual Storing of Channels
When storing channels manually, you can choose:
- Whether or not to store each of the channels found.
- the programme number by which You wish to identify
each stored channel.
Press the TV.MENU button. The OSD MENU will be displayed.
Select SETUP using the /\ / \/ button and then press the >
button.
Select MANUAL PROGRAM using the /\ / \/ button and then
press the > button.
Select SYSTEM using the /\ / \/ button and then press the > button.
AUTO -> BG -> DK -> I -> L -> LP -> AUTO
Select PROGRAM NO. using the /\ / \/ button and then press the > button. And press the /\ / \/ button to select the
required channel number.
Select SEARCH using the /\ / \/ button and then press the > button.
The tune scans the frequency range until the first channel on the channel that you selected is received on your screen.
Select STORE using the /\ / \/ button and then press the > button. And press the /\ / \/ button to select the OK.
Repeat Step 5 to 7 for each channel to be stored.
Channel Name
Press the TV.MENU button. The OSD MENU will be displayed.
Select SETUP using the /\ / \/ button and then press the >
button.
Select NAME using the /\ / \/ button and then press the >
button. And press the /\ / \/ /</> buttons to edit the name.
/\ / \/: Select the characters (A~ Z, 0~9, -, +).
</>: move on the previous or next letter.
Select STORE using the /\ / \/ button and then press the >
12 PRESTIGIO P370DVD-X
Page 13
button. And press the /\ / \/ button to select the OK.
Press the EXIT/CANCEL button to exit the menu.
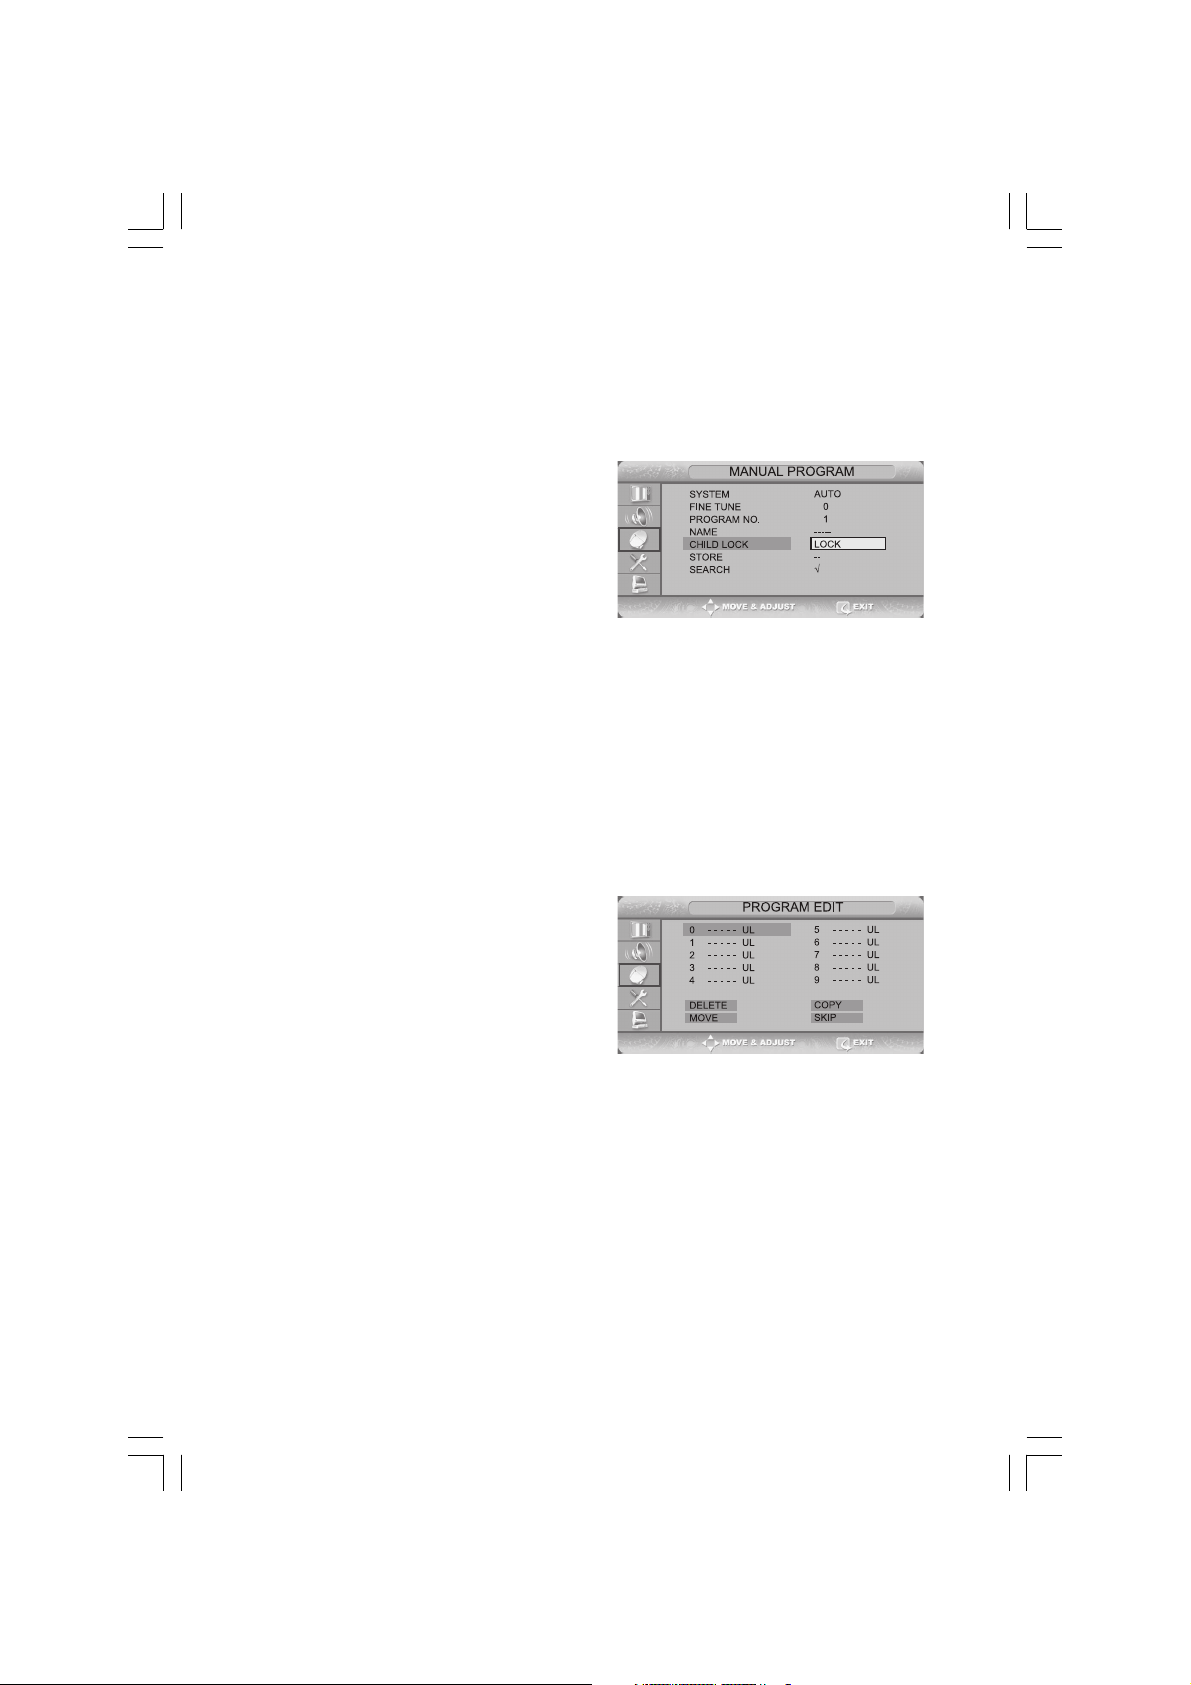
Activating the Child Lock
This feature allows you to prevent unauthorized users, such
as children, from watching unsuitable programmers by
muting out video and audio. Child Lock cannot be released
using front panel buttons. Only remote control can release
the Child Lock setting, so keep the remote control away
from children.
Press the TV.MENU button. The OSD MENU will be displayed.
Select SETUP using the /\ / \/ button and then press the >
button.
Select MANUAL PROGRAM using the /\ / \/ button and then press the > button.
Select CHILD LOCK using the /\ / \/ button and then press the > button.
To lock the channel, select LOCK by pressing the /\ / \/ button.
Note
• When child lock is activated, only entering the correct password will proceed to the operation
before you can do auto or manual searches. Everything previously locked will be unlocked.
Program Edit
This function enables you to delete, copy, move or skip the
stored programs.
Select the channel to tune using the numeric or channel
buttons.
Press the TV.MENU button. The OSD MENU will be displayed.
Select SETUP using the /\ / \/ button and then press the >
button.
Select PROGRAM EDIT using the /\ / \/ button and then
press the > button.
ENG
Delete a Program
Select a program to the deleted with the /\ / \/ /</> buttons.
Press the RED button. The selected program is deleted. All the following programs are shifted up one position.”
Copy a Program
Select a program to the copied with the /\ / \/ /</> buttons.
Press the YELLOW button.
All the following programs are shifted down one position.
13PRESTIGIO P370DVD-X
Page 14
Moving a Program
Select a program to the moved with the /\ / \/ /</> buttons.
Press the GREEN button.
Move the program to the desired program number with the /\ / \/ /</> buttons.
Press the GREEN button again to release this function.
ENG
Skipping a Program Number
Select a program to the skipped with the /\ / \/ /</> buttons.
Press the BLUE button. The skipped program turns to Magenta.
Press the BLUE button again to release this function.
When a program number is skipped it means that you will be unable to select it using the /\ / \/ button during normal
TV viewing. If you want to select the skipped program, directly enter program number with the number buttons or select
it in the program edit or table menu.
Changing Channel
Using the CHANNEL buttons
Press the PROG /\ / \/ buttons to change channels.
You will see all the channels that the TV has memorized.(The TV must have memorized at least three channels.)
Using the NUMBER buttons
- To change to single-digit channels(0~9) faster, press “0” before the single digit.
Example: For channel 4, press “0”, then “4”.
- To select a channel over 10, press the -/— button first.
Example: For channel 42, press “-/—”, then “4”, then “2”.
Using the Previous Channel
Press the PRE button on the remote control.
The TV changed to the last channels to the last channel you were watching.
When the Picture Quality is Poor or Unstable
Use fine tuning to adjust a particular channel for better
picture quality when noise interferes, color quality is poor,
or the screen is unstable.
Select the channel to tune using the numeric or channel
buttons.
Press the TV.MENU button. The OSD MENU will be displayed.
Select SETUP using the /\ / \/ button and then press the >
button.
Select MANUAL PROGRAM using the /\ / \/ button and then press the > button.
Select FINE TUNE using the /\ / \/ button and then press the > button.
Press the /\ / \/ button to fine tune and then press the > button.
14 PRESTIGIO P370DVD-X
Page 15
If you are unable to fine-tune a channel, check that the SYSTEM settings are correct.
Select STORE using the /\ / \/ button and then press the > button. And press the /\ / \/ button to select OK.
Press the EXIT/CANCEL button to exit the menu.
Selecting the Picture Status
You can select a video mode from among USER, STANDARD, DYNAMIC, or MILD mode according to your personal preference.
QUICK! Press the P.STD button.
Whenever you press this button, PICTURE STATUS changes
to USER -> STANDARD -> DYNAMIC -> MILD mode, in this
order.
Press the TV.MENU button. The OSD MENU will be displayed.
Select PICTURE using the /\ / \/ button and then press the
> button.
Select the desired PICTURE STATUS using the /\ / \/ button. Whenever you press this button, PICTURE STATUS changes to
USER -> STANDARD -> DYNAMIC -> MILD mode, in this order.
Press the EXIT/CANCEL button to exit the menu.
ENG
Picture Status
• STANDARD: Select this mode when the surrounding illumination is bright.
• DYNAMIC: Select this mode to increase picture clarity and sharpness.
• MILD: Select this mode when viewing the TV when the light is low.
• USER: Select this mode if you want to adjust the settings according to your personal
preferences.
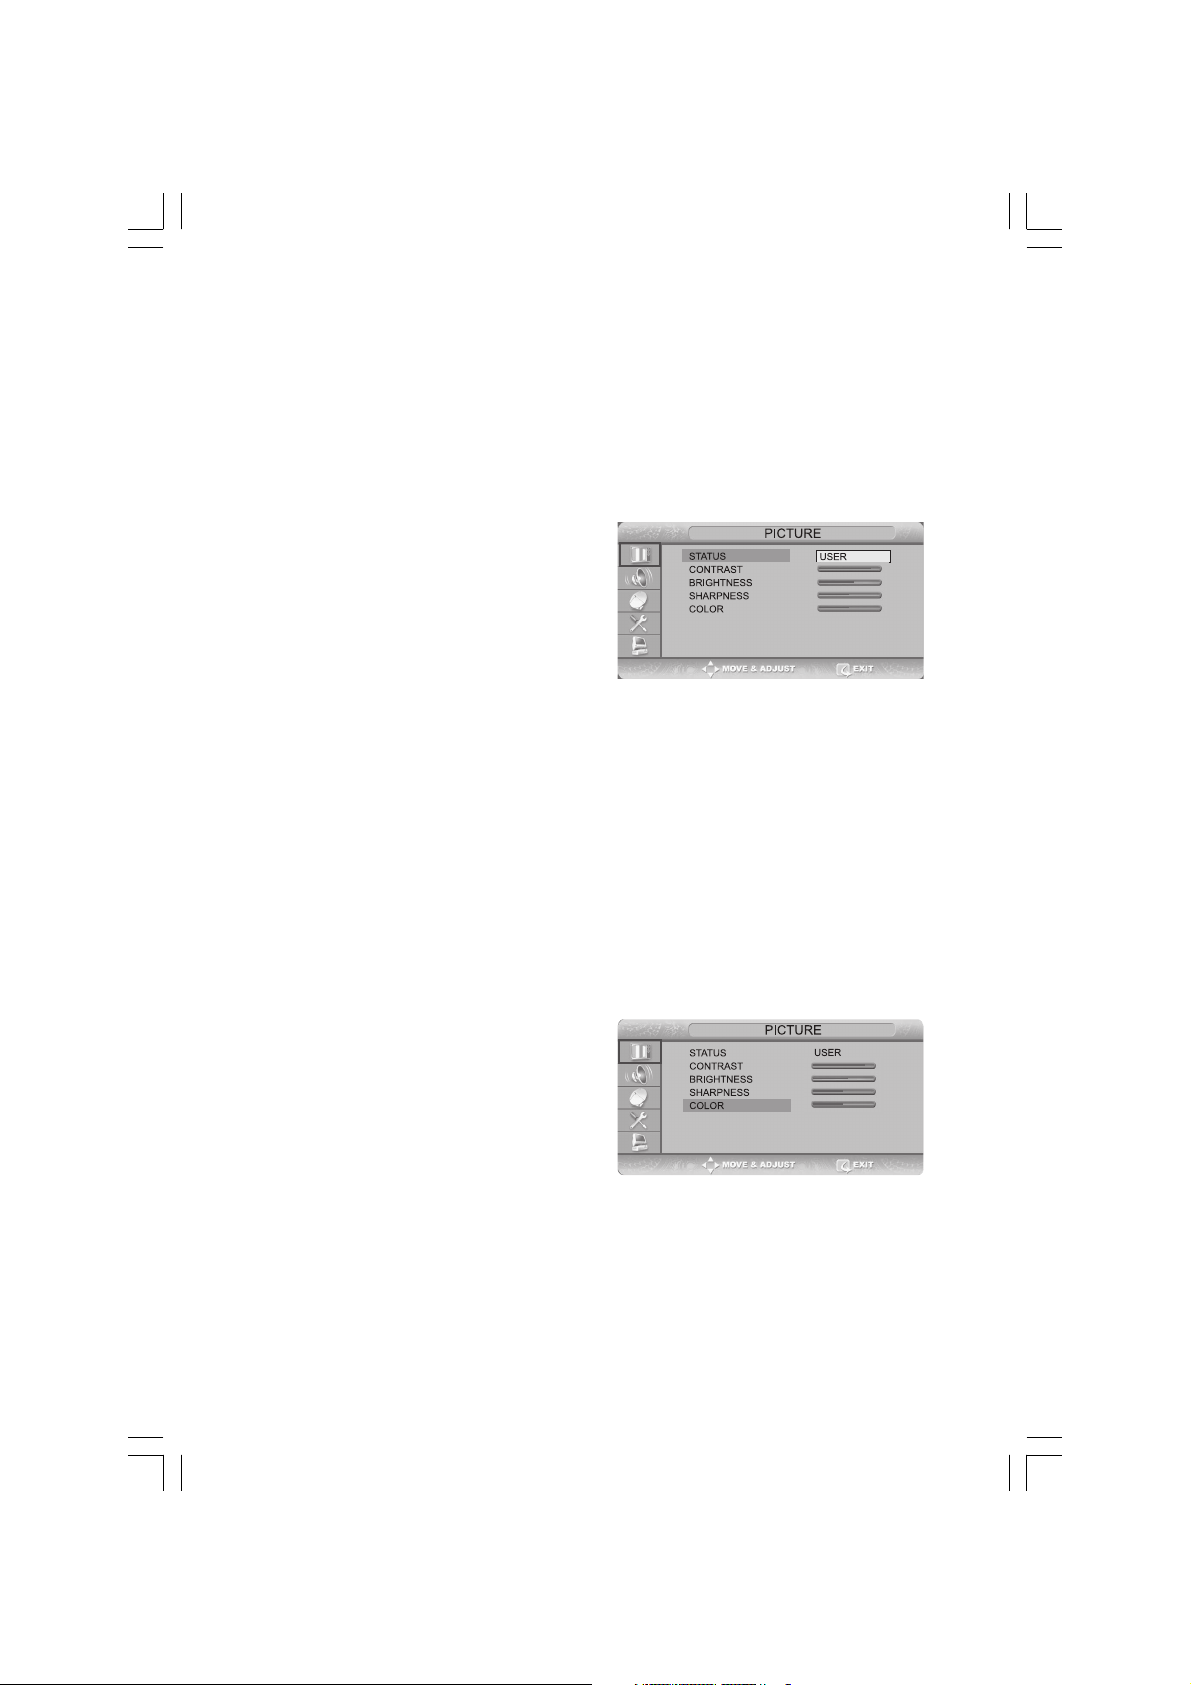
Adjusting the Picture Settings
Press the TV.MENU button. The OSD MENU will be displayed.
Select PICTURE using the /\ / \/ button and then press the
> button.
Select the desired item to adjust using the /\ / \/ button and
then press the > button.
Select the desired status using the </> button. During the
adjustment, an additional adjustment window will be displayed. In addition, PICTURE STATUS is automatically changed
to USER mode.
Press the EXIT/CANCEL button to exit the menu.
Picture
• CONTRAST: Determines the difference in brightness between an object and the background.
• BRIGHTNESS: Determines the brightness of the screen.
• SHARPNESS: Determines the sharpness of an object image.
• COLOR: Determines the color density.
15PRESTIGIO P370DVD-X
Page 16
Selecting the Sound Mode
You can select a sound mode from among USER, STANDARD, MUSIC, or SPEECH mode according to your personal preference.
ENG
Whenever you press this button, SOUND STATUS changes to
USER -> STANDARD -> MUSIC -> SPEECH mode, in this order.
Press the TV.MENU button. The OSD MENU will be displayed.
Select SOUND using the /\ / \/ button and then press the >
button.
Select the desired SOUND STATUS using the /\ / \/ button. Whenever you press this button, SOUND STATUS changes to USER
-> STANDARD -> MUSIC -> SPEECH mode, in this order.
Press the EXIT/CANCEL button to exit the menu.
Sound Status
QUICK! Press the S.STD button.
• STANDARD: Select this to listen to sound normally.
• MUSIC: Select this to listen to the original sound.
• SPEECH: Select this to listen to clear voice sound.
• USER: Select this if you want to adjust the settings according to your personal preferences.
Adjusting the BALANCE
Determines the volume ratio between the left and right
speakers.
Press the TV.MENU button. The OSD MENU will be displayed.
Select SOUND using the /\ / \/ button and then press the >
button.
Select BALANCE using the /\ / \/ button and then press the
> button.
Select the desired status using the </> button. During the
adjustment, an additional adjustment window will be displayed. Also, the Sound Status
is automatically changed to USER mode.
Press the EXIT/CANCEL button to exit the menu.
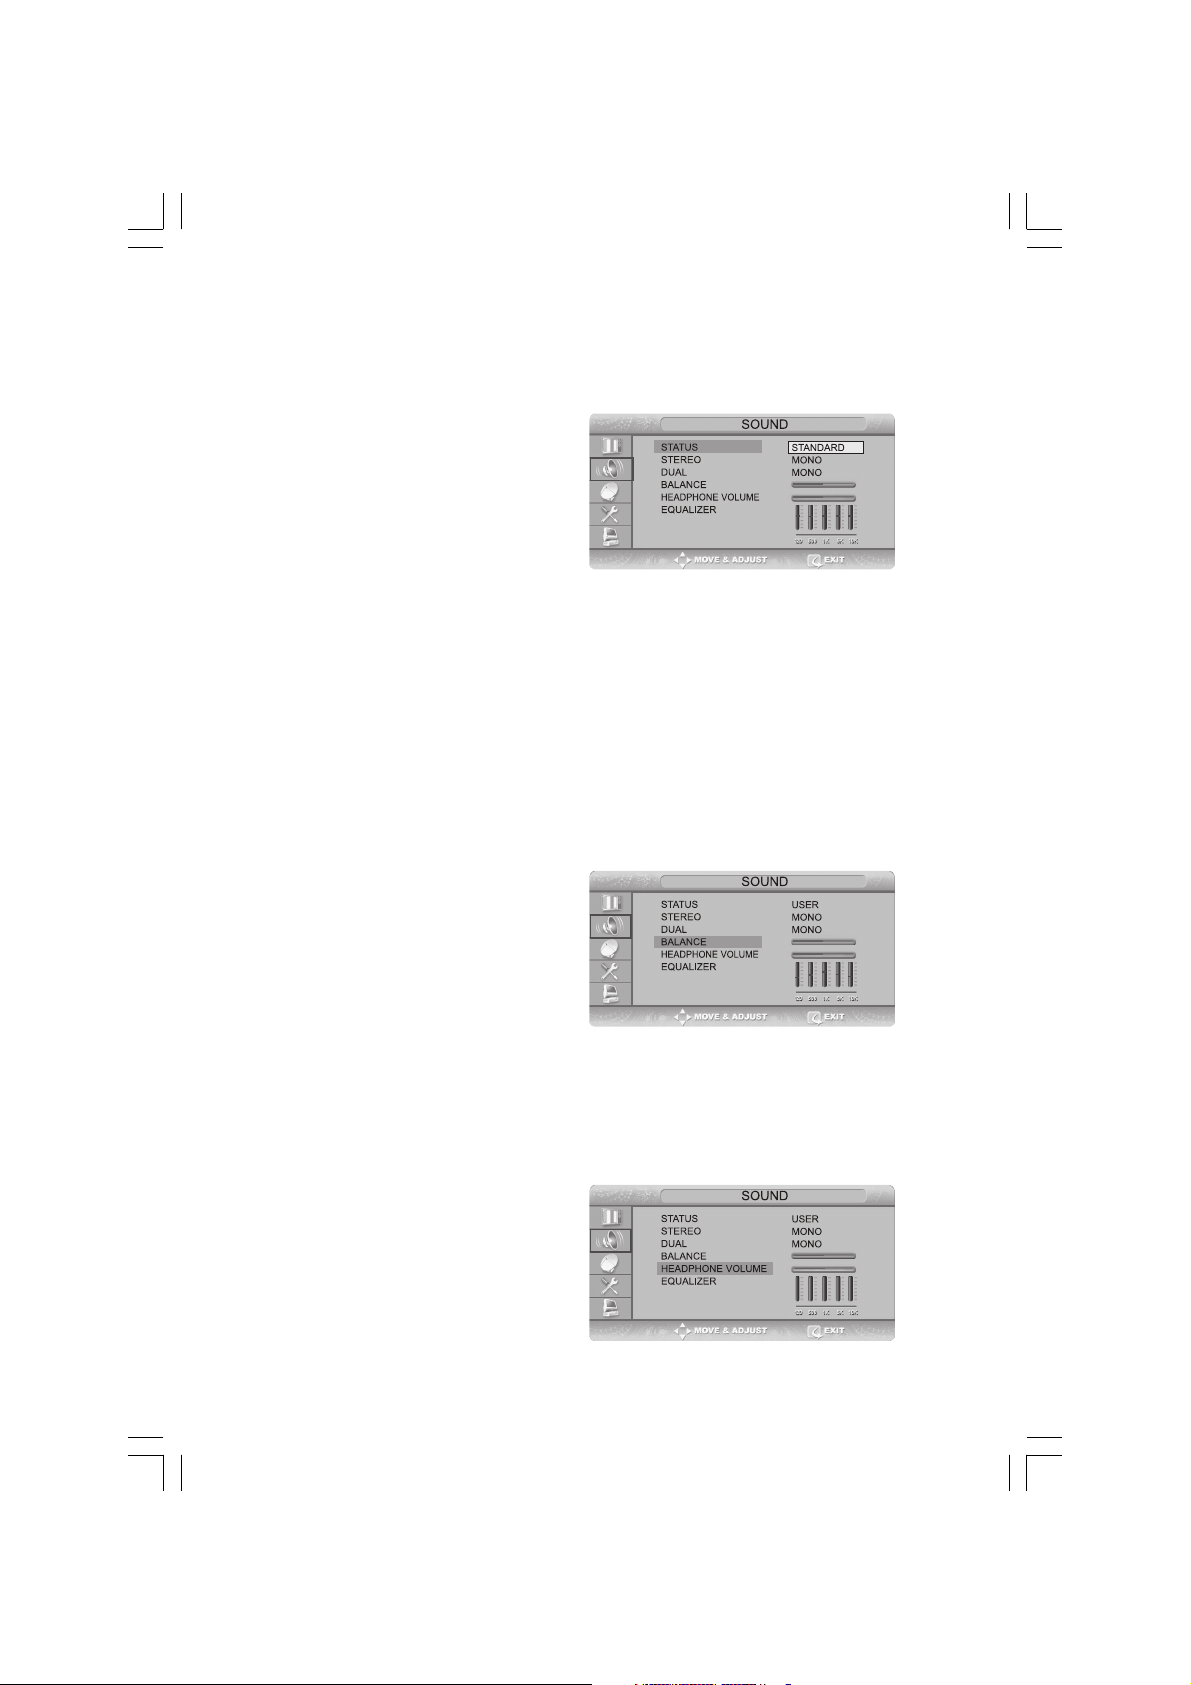
Adjusting the Headphone Volume
You can listen to the sound of the main or sub PIP using
the headphones. You can also adjust the volume of the
headphones.
Press the TV.MENU button. The OSD MENU will be displayed.
Select SOUND using the /\ / \/ button and then press the >
button.
16 PRESTIGIO P370DVD-X
Page 17
Select HEADPHONE VOLUME using the /\ / \/ button and then press the > button.
Select the desired volume level using the /\ / \/ button.
Prolonged use of headphones at a high volume may damage your hearing.
Adjusting the EQUALIZER
Determines the volume of the frequency range (low to
high tones).
Press the TV.MENU button. The OSD MENU will be displayed.
Select SOUND using the /\ / \/ button and then press the >
button.
Move to the EQUALIZER item using the /\ / \/ button.
Move to the desired frequency using the > button.
120(Low Tone) -> 1K(Mid Tone) -> 10K(High Tone).
Select the desired status using the /\ / \/ button.
When you have adjusted the EQUALIZER, the SOUND STATUS is automatically changed to USER MODE.
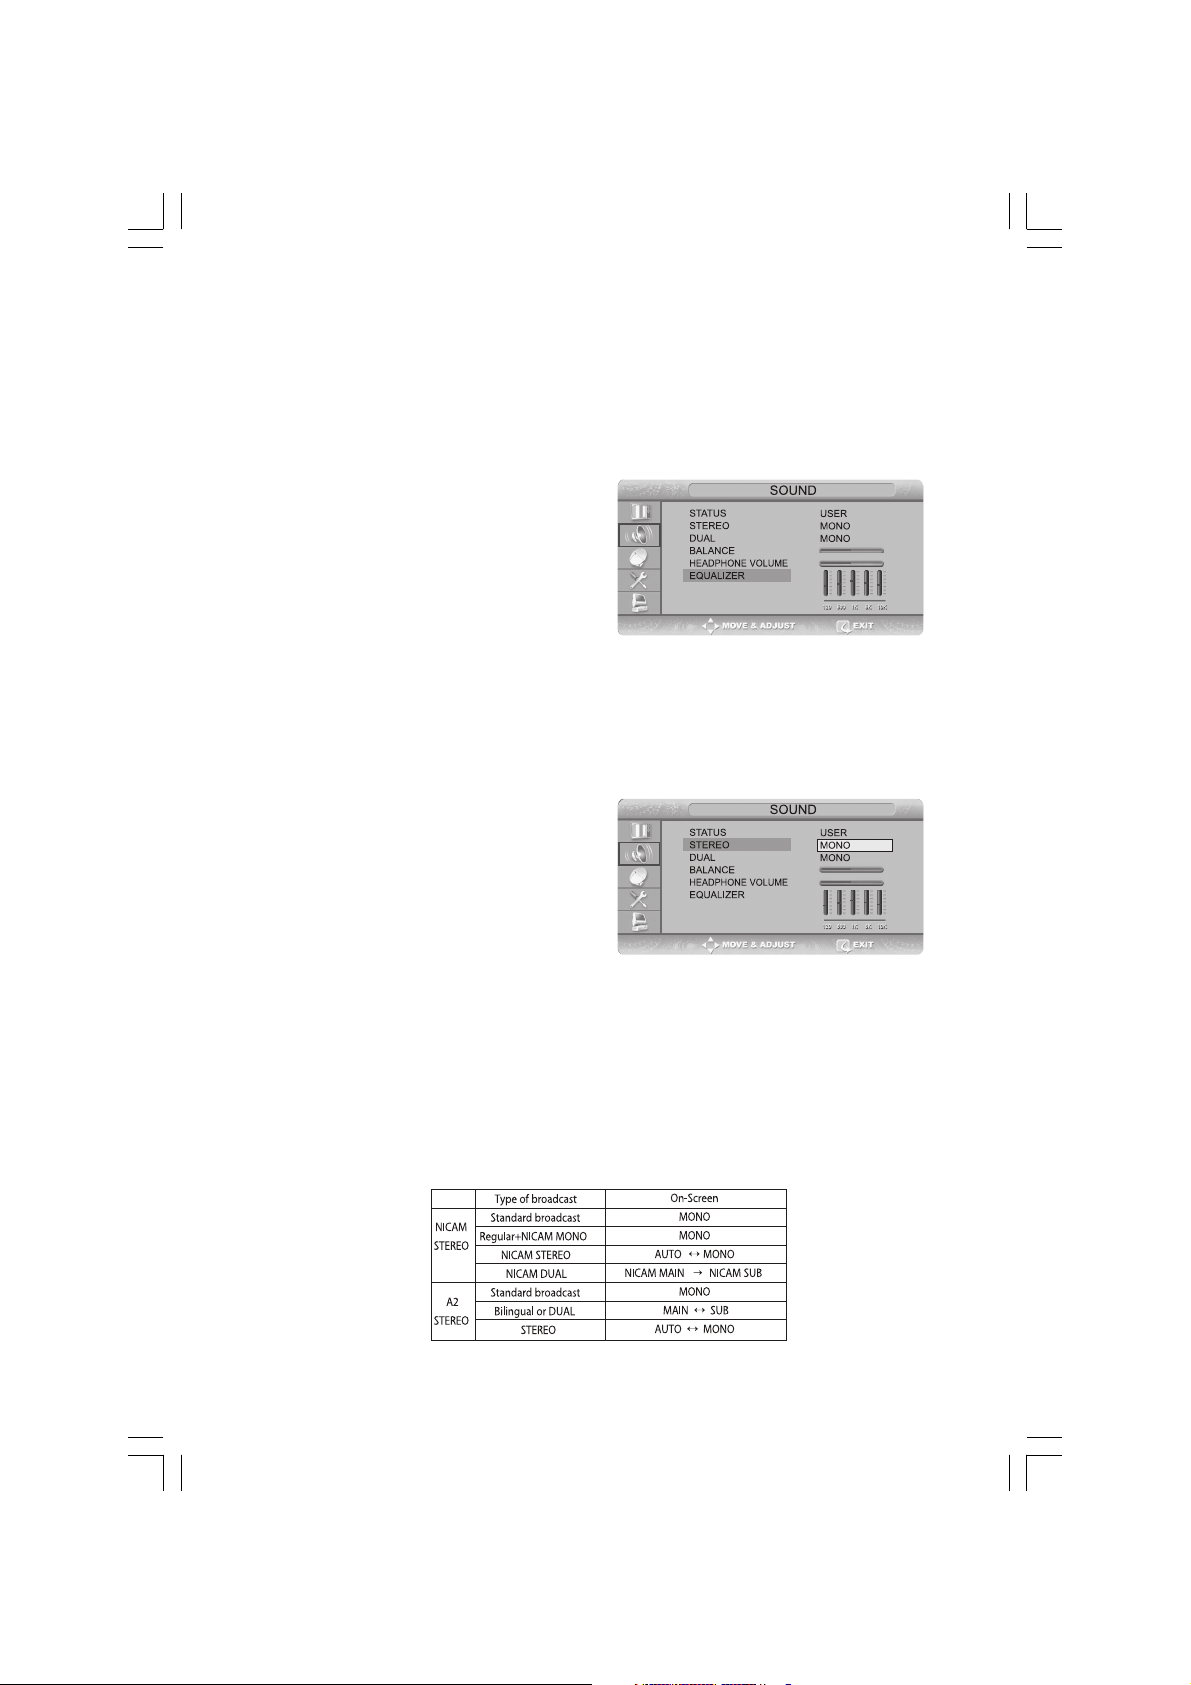
Choosing a Soundtrack
The M/S button displays/controls the processing and output of the audio signal. When power is switched ON, the
mode is automatically preset to either DUAL or STEREO,
depending on the current transmission.
Quick! Pressing the M/S button.
Whenever you press this button, the mode changes to
STEREO/MONO mode, in this order.
Press the TV.MENU button. The OSD MENU will be displayed.
Select SOUND using the /\ / \/ button and then press the > button.
Select STEREO or DUAL using the /\ / \/ button and then press the > button.
Select the desired status using the /\ / \/ button.
Press the EXIT/CANCEL button to exit the menu.
- If the receiving conditions deteriorate, listening will be easier if the mode is set to the MONO position using the M/S
button.
- If the stereo signal is weak( or if intermittent Stereo-Mono) and automatic switching occurs, then switch to the MONO
mode.
- When receiving mono sound in the AV mode, connect to the ‘L’ input jack on the panels.
- If the mono sound comes out only from the left speaker, then press the M/S button.
ENG
17PRESTIGIO P370DVD-X
Page 18
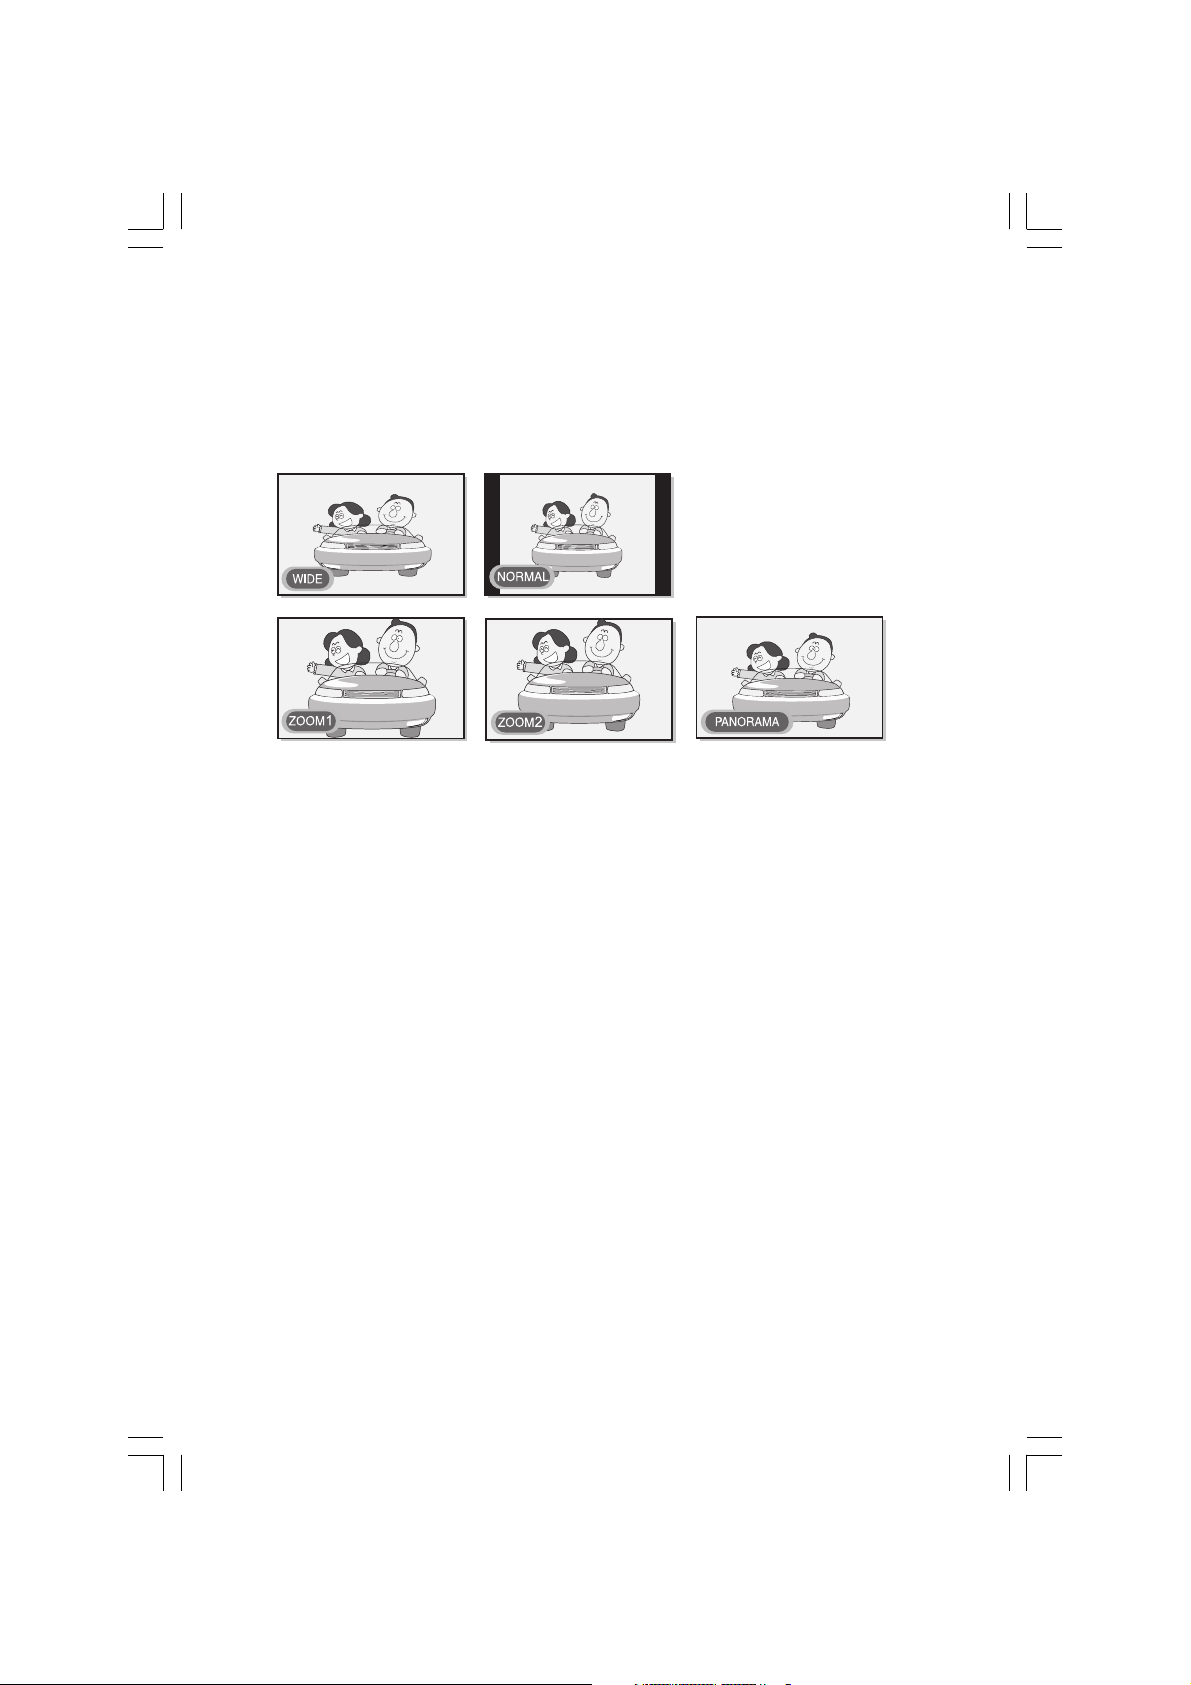
Changing the Screen Size
You can select a desired screen size for each video.
Press the P.SIZE button.
Whenever you press the P.SIZE button, the screen size changes to WIDE -> NORMAL -> ZOOM1 -> ZOOM2 -> PANORAMA,
ENG
in this order. (Note that you can select either WIDE or NORMAL mode in PC input mode.)
Screen Size Menu
• WIDE: Set the picture to 16:9 wide mode.
• NORMAL: Sets the picture to 4:3 normal mode. This is a standard TV screen size.
• ZOOM1: Magnifies the size of the picture on the screen.
• ZOOM2: Magnifies the size of the picture on the screen leaving the subtitles visible.
• PANORAMA: Use this mode for the wide aspect ratio of a panoramic picture.
Note
• You can select only WIDE, NORMAL(4:3) screen size in the PC Mode.
Freezing the Picture
You can freeze a moving picture on the screen.
Quick! Press the STILL button.
Whenever you press this button, the freezing function is turned on or off.
Note
• Even if the picture has been frozen, the audio sound continues normally.
• The freezing function will not work for the PIP window in PIP mode.
18 PRESTIGIO P370DVD-X
Page 19
Viewing Picture-in-Picture
You can watch two videos on the screen simultaneously.
Quick! Pressing the ON/OFF button.
Pressing the button turns the PIP screen on or off.
Press the TV.MENU button. The OSD MENU will be displayed.
Select FUNCTION using the /\ / \/ button and then press the
> button.
Select PIP using the /\ / \/ button and then press the > button.
Press the > button again. Select PIP using the /\ / \/ button and press the > button.
The PIP menu will be displayed.
Whenever you press the \/ button, PIP mode is turned PIP, DW or OFF. Selecting OFF turns off PIP mode.
You can switch between DW1 and DW2 by pressing the Picture button on the remote control when you are in DW
mode. When entering DW mode by pressing the PIP button, the last mode will be memorized to display DW1 or DW2
as previously selected.
Press the EXIT/CANCEL button to exit the menu.
Note
• Since this product has a single tuner, you cannot watch two TV channels simultaneously in PIP
mode.
• You can only listen to one sound output from either the main screen or the PIP window.
• Refer to the PIP configuration table (Page 34).
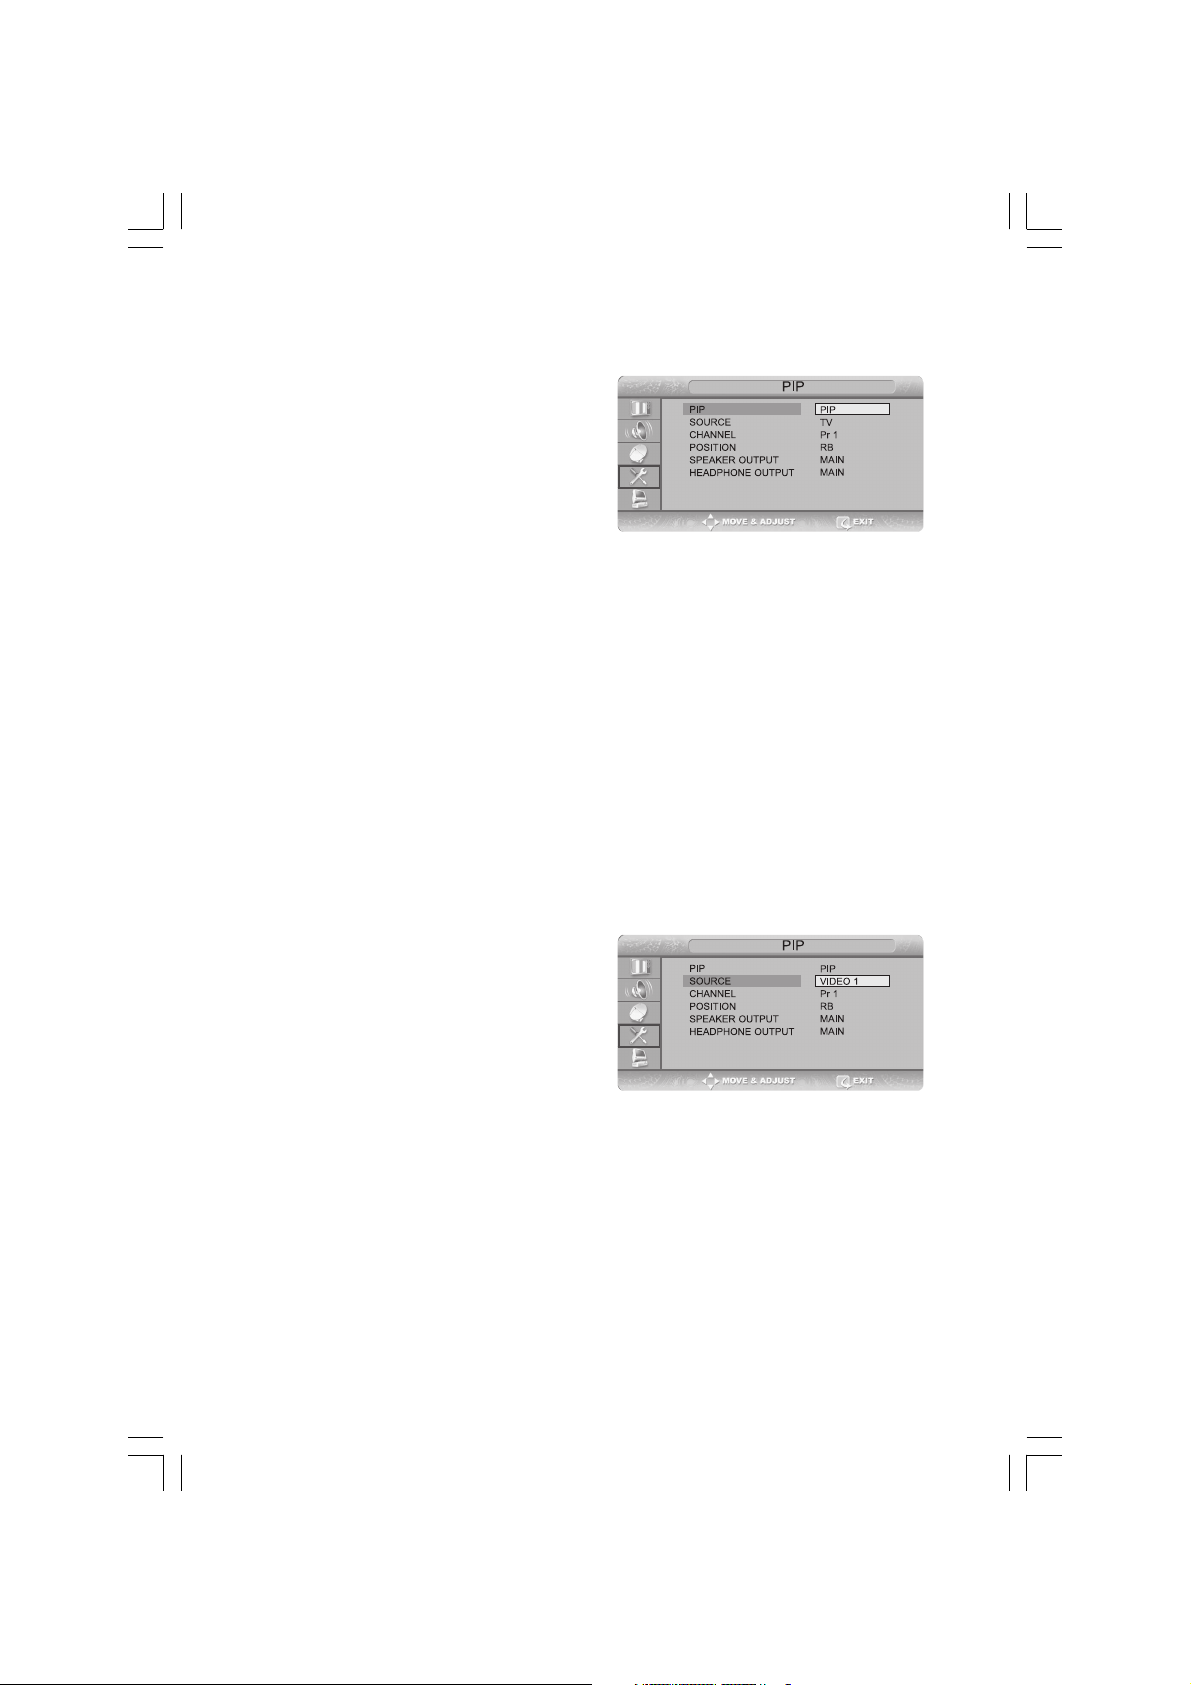
Changing the Source of the PIP Window
ENG
You can change the video source of the PIP window from
any externally connected devices.
Quick! Pressing the SOURCE button.
Whenever you press this button, the source of the PIP
window is changed to the next video signal of an externally connected device, in that order.
STEP1~STEP4 is the same as that of Viewing Picture-in-Picture.
Select SOURCE using the /\ / \/ button and then press the > button. Select the desired external input signal using the /
\ / \/ button and then press the > button. Since this product has a single tuner, you cannot watch two TV channels
simultaneously when in PIP mode.
Press the EXIT/CANCEL button to exit the menu.
19PRESTIGIO P370DVD-X
Page 20
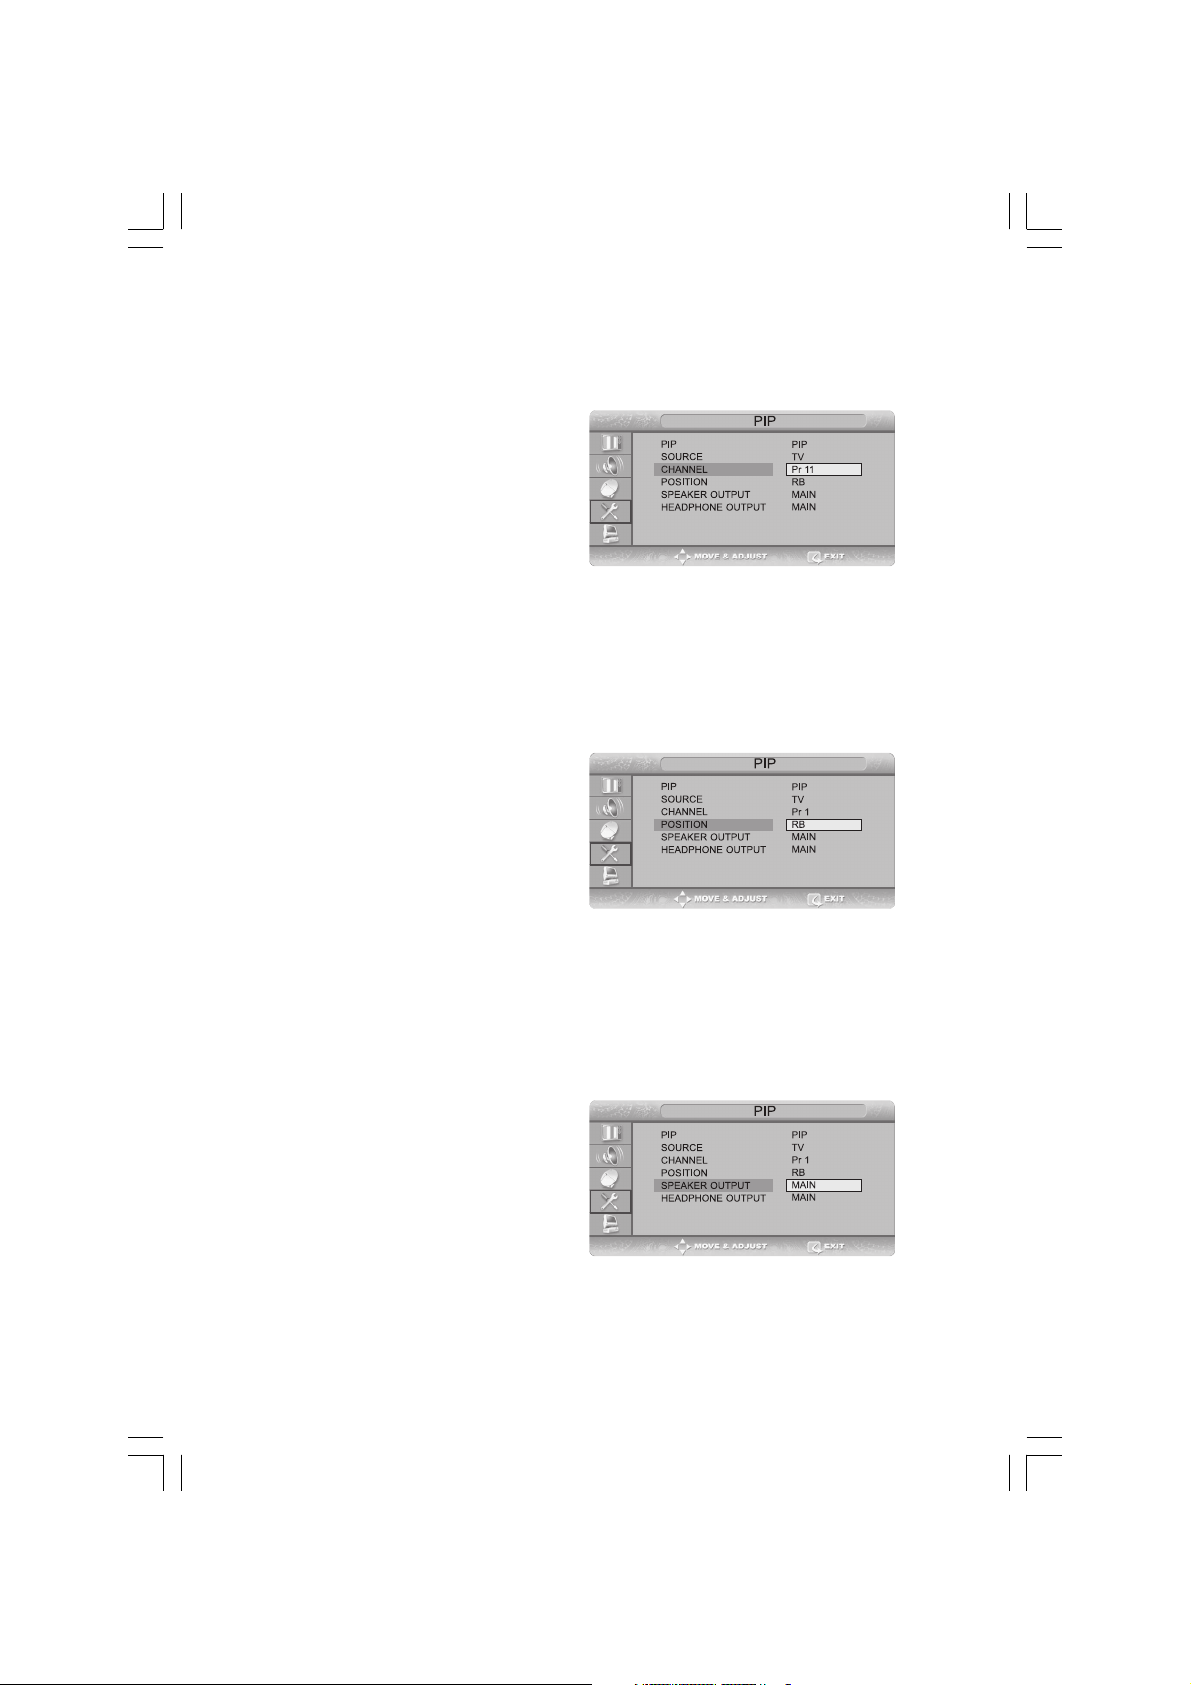
Changing the PIP Window Channel
When the PIP window shows normal broadcasting (TV and CATV) channels, you can change the PIP window channel.
ENG
Quick! Press the PROG /\ / \/ button.
Whenever you press this button, the channel is changed.
STEP1~STEP4 is the same as that of Viewing Picture-inPicture.
Select CHANNEL using the /\ / \/ button and then press the
> button.
Select the desired channel using the /\ / \/ button and then
press the > button. Since this product has a single tuner, you cannot watch two TV channels simultaneously when in
PIP mode.
Press the EXIT/CANCEL button to exit the menu.
Changing the POSITION of the PIP Window
You can select the location of the PIP window from among
the corners of the TV screen.
STEP1~STEP4 is the same as that of Viewing Picture-inPicture.
Select POSITION using the /\ / \/ button and then press the
> button.
Select the desired position using the /\ / \/ button. Whenever you press this button, the PIP window moves from
one corner to the next of the TV screen.
Press the EXIT/CANCEL button to exit the menu.
Selecting the Speaker Output in the PIP Screen Mode
You can select the desired audio source from either the main screen or the PIP window.
Quick! Pressing the SOUND button.
Whenever you press this button, the mode is changed to
MAIN -> SUB/PIP.
When MAIN is selected: Audio of the main screen is heard.
When SUB is selected: Audio of the DW screen is heard.
When PIP is selected: Audio of the PIP screen is heard.
STEP1~STEP4 is the same as that of Viewing Picture-inPicture.
Select SPEAKER OUTPUT using the /\ / \/ button and then press the > button.
Select a desired status (MAIN or SUB/PIP) by pressing the /\ / \/ button.
20 PRESTIGIO P370DVD-X
Page 21
Swapping the Main and the PIP Window
You can swap the video source of the main screen and the PIP window.
Quick! Pressing the SWAP button.
Whenever you press this button, the video source of the main screen and PIP window are swapped.
Selecting the Headphone Output in the PIP Screen Mode
You can simultaneously listen to the sound of the main
picture using the internal speaker as well as listen to the
sound of the sub-picture using the headphones, by setting up the headphone output configuration or vice versa.
STEP1~STEP4 is the same as that of Viewing Picture-inPicture.
Select HEADPHONE OUTPUT using the /\ / \/ button and
then press the > button.
Select a desired status (MAIN or SUB/PIP) by pressing the /\ / \/ button.
Setting the Clock
Press the TV.MENU button. The OSD MENU will be displayed.
Select FUNCTION using the /\ / \/ button and then press the
> button.
Select TIME using the /\ / \/ button and then press the >
button.
Move to the Hour using the > button and then set the
Hour to the correct time using the /\ / \/ button.
Move to the Minute using the > button and then set the
Minutes to the correct time using the /\ / \/ button.
Press the EXIT/CANCEL button to exit the menu.
ENG
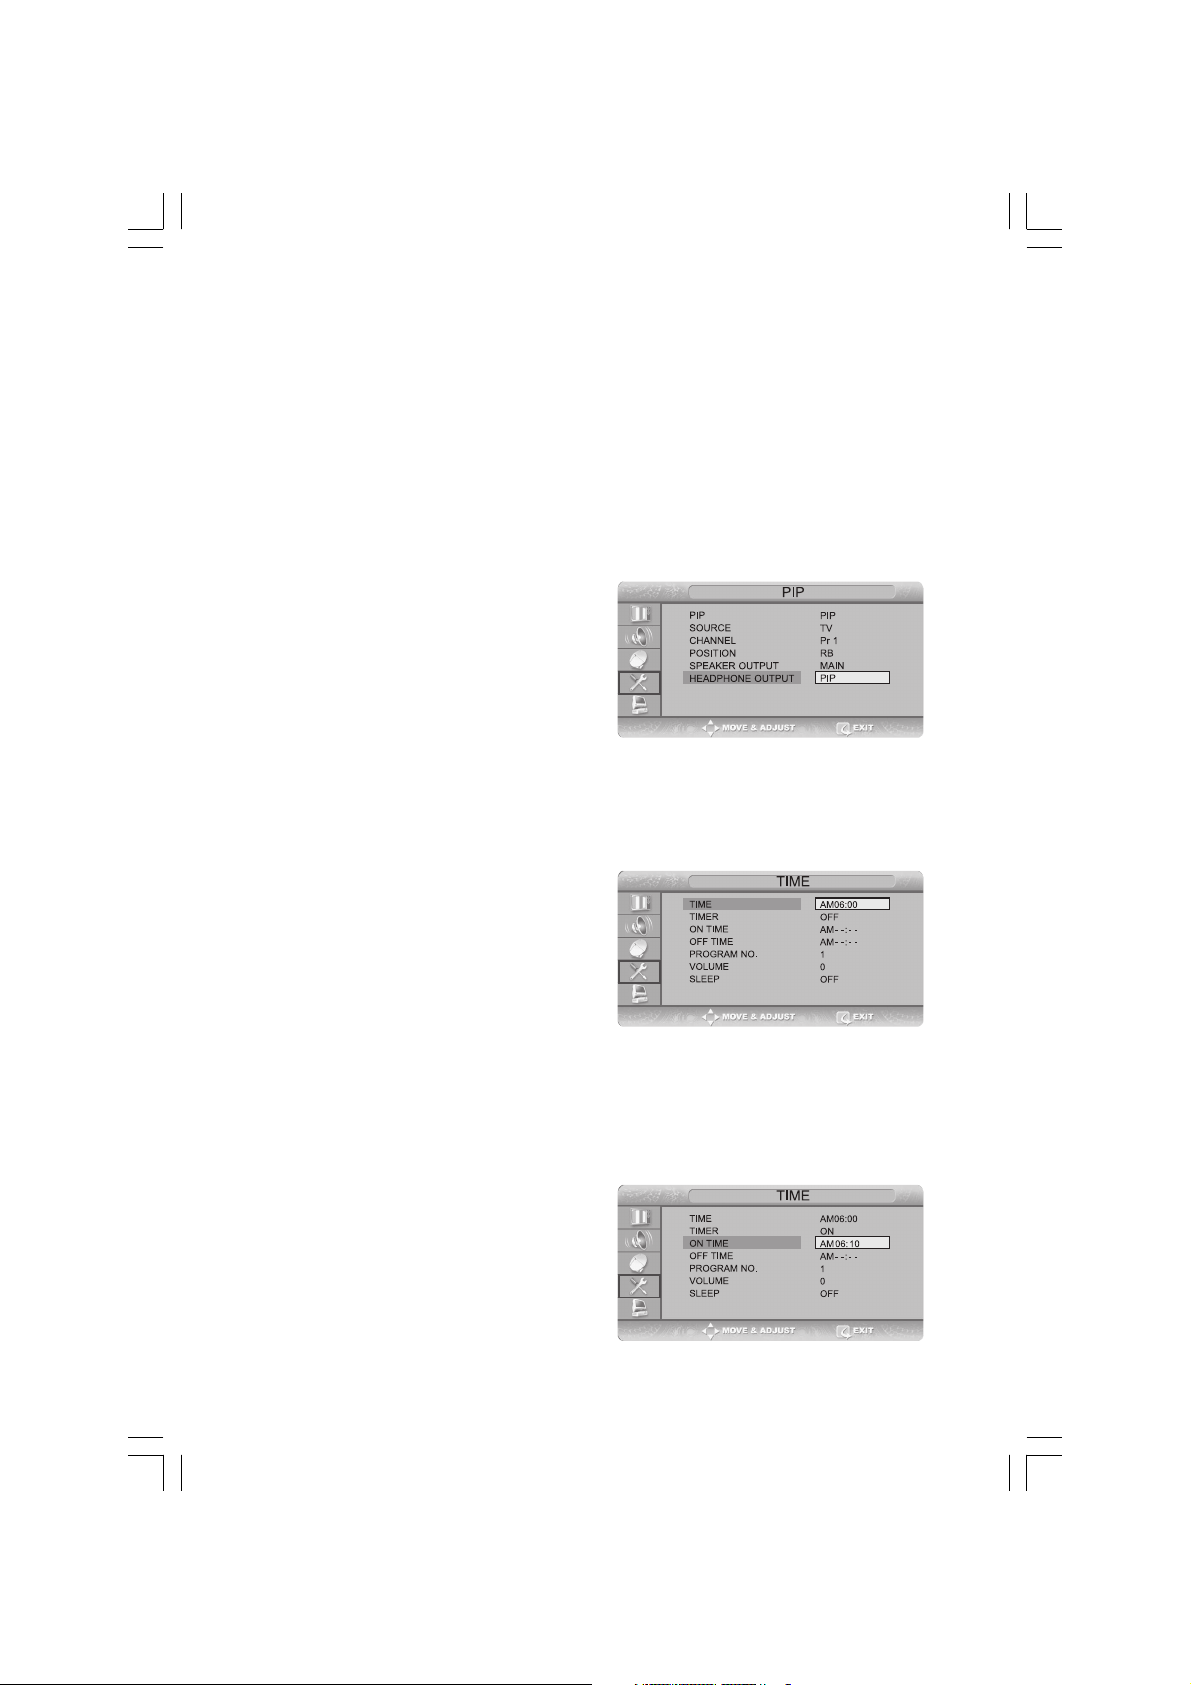
Setting the On/Off Timer
You can set the On/Off Timer to automatically turn the TV
on and off at a desired time. The current time has to be
configured first to set the On/Off Timer.
STEP1~STEP3 is the same as that of Setting the clock.
Select TIMER using the /\ / \/ button and then press the >
button. Select ON using the /\ / \/ button.
21PRESTIGIO P370DVD-X
Page 22
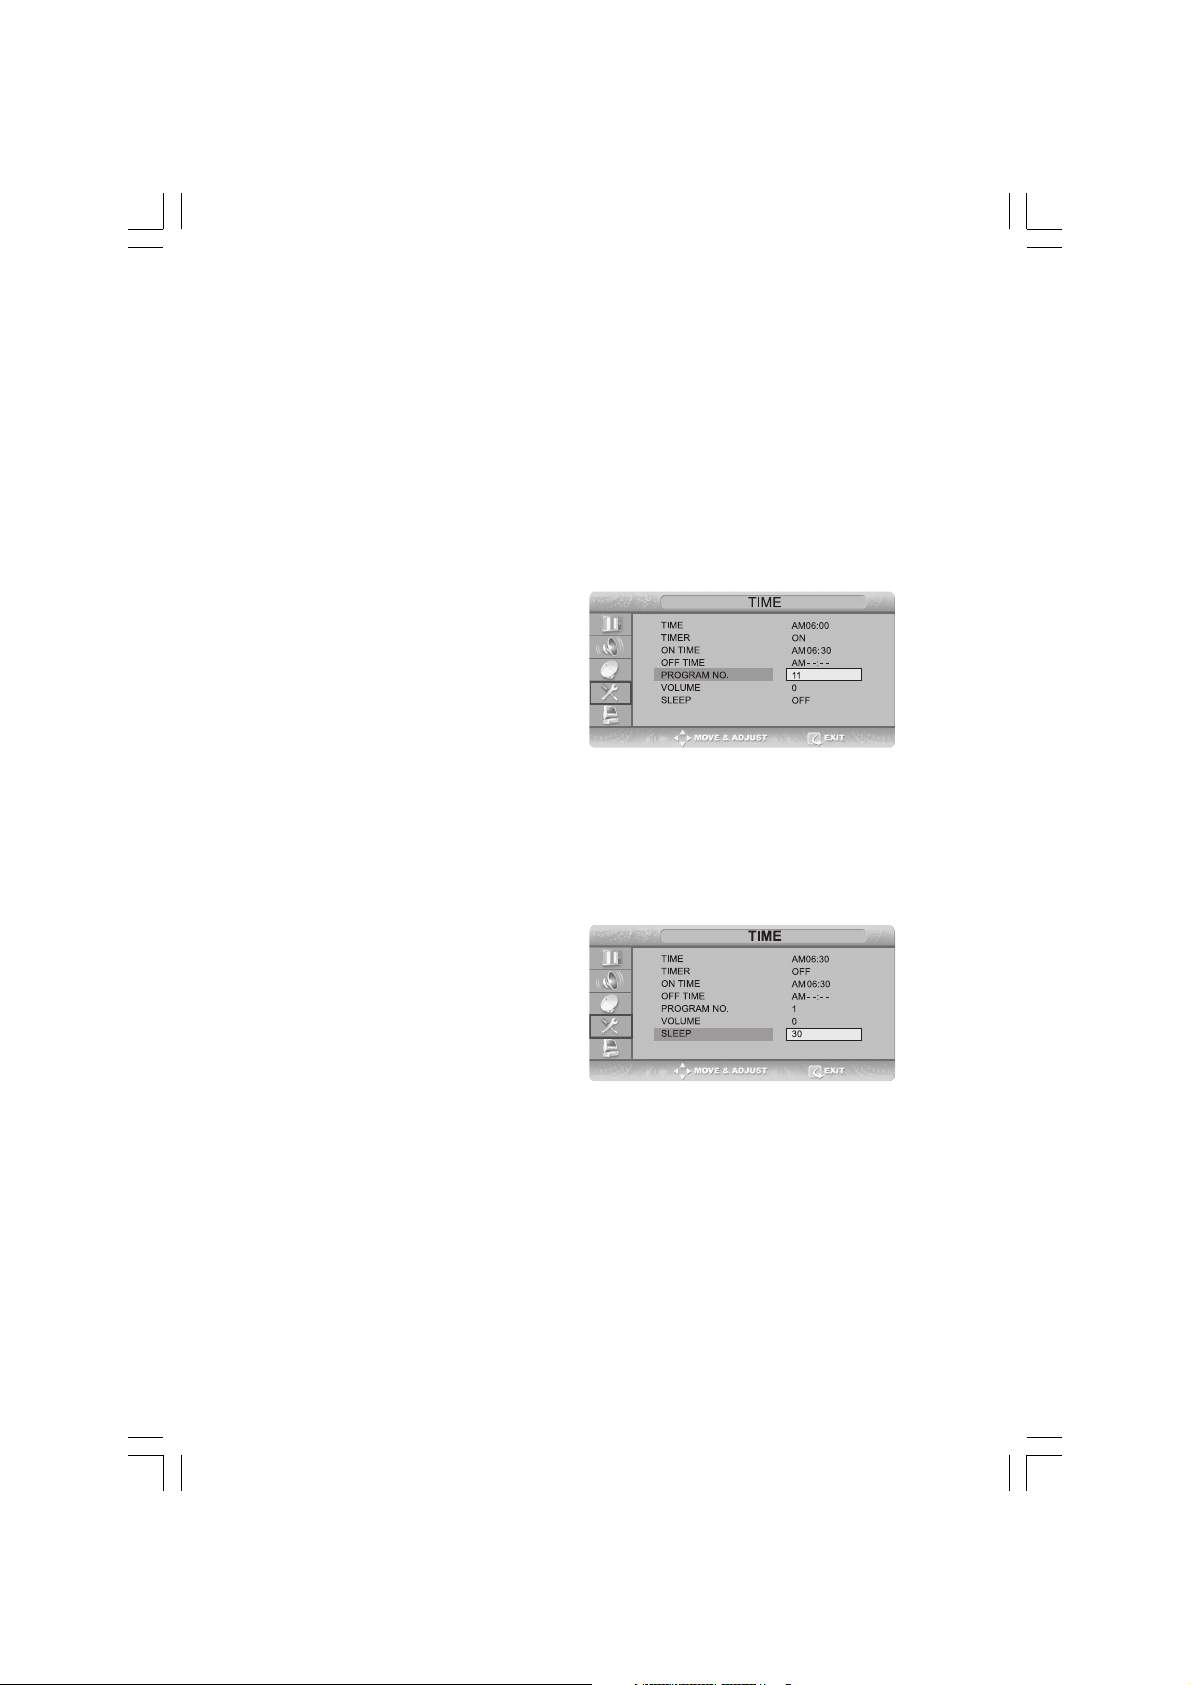
- the ON/OFF TIMER works only when the TIMER is configured to ON.
Example : Turning On At 6:10 AM
Move to ON TIME using the /\ / \/ button.
Move to the Hours using the > button and then set the Hour to AM 6 using the /\ / \/ button.
Move to the Minute using the > button and then set the Minutes to 10 using the /\ / \/ button.
Press the > button to finish the ON TIME configuration.
ENG
Press the EXIT/CANCEL button to exit the menu.
For Off timer setting, select OFF TIME instead of ON TIME.
Selecting the ON Timer Channel/Adjusting the ON Timer Volume
You can configure the channel and volume to play when
the TV is turned on by the Timer.
STEP1~STEP3 is the same as that of Setting the clock.
Select PROGRAM NO. using the /\ / \/ button and then press
the > button.
Select the desired channel to watch when the TV is turned
on using the /\ / \/ button.
Press the > button to finish the configuration.
Select VOLUME using the /\ / \/ button and then press the > button.
Select the volume level for when the TV turns on using the /\ / \/ button.
Press the EXIT/CANCEL button to exit the menu.
Setting the Sleep Timer
You can shut off the TV after a desired period of time.
Quick! Press the SLEEP button.
Whenever you press this button, the mode is changed to
SLEEP OFF -> SLEEP 10 -> SLEEP 30 -> SLEEP 60 -> SLEEP
90,... -> SLEEP 180 -> SLEEP OFF, in this order.
STEP1~STEP3 is the same as that of Setting the clock.
Select SLEEP using the /\ / \/ button and then press the > button.
Configure the SLEEP time using the /\ / \/ button.
Press the > button to finish the configuration.
Press the EXIT/CANCEL button to exit the menu.
22 PRESTIGIO P370DVD-X
Page 23
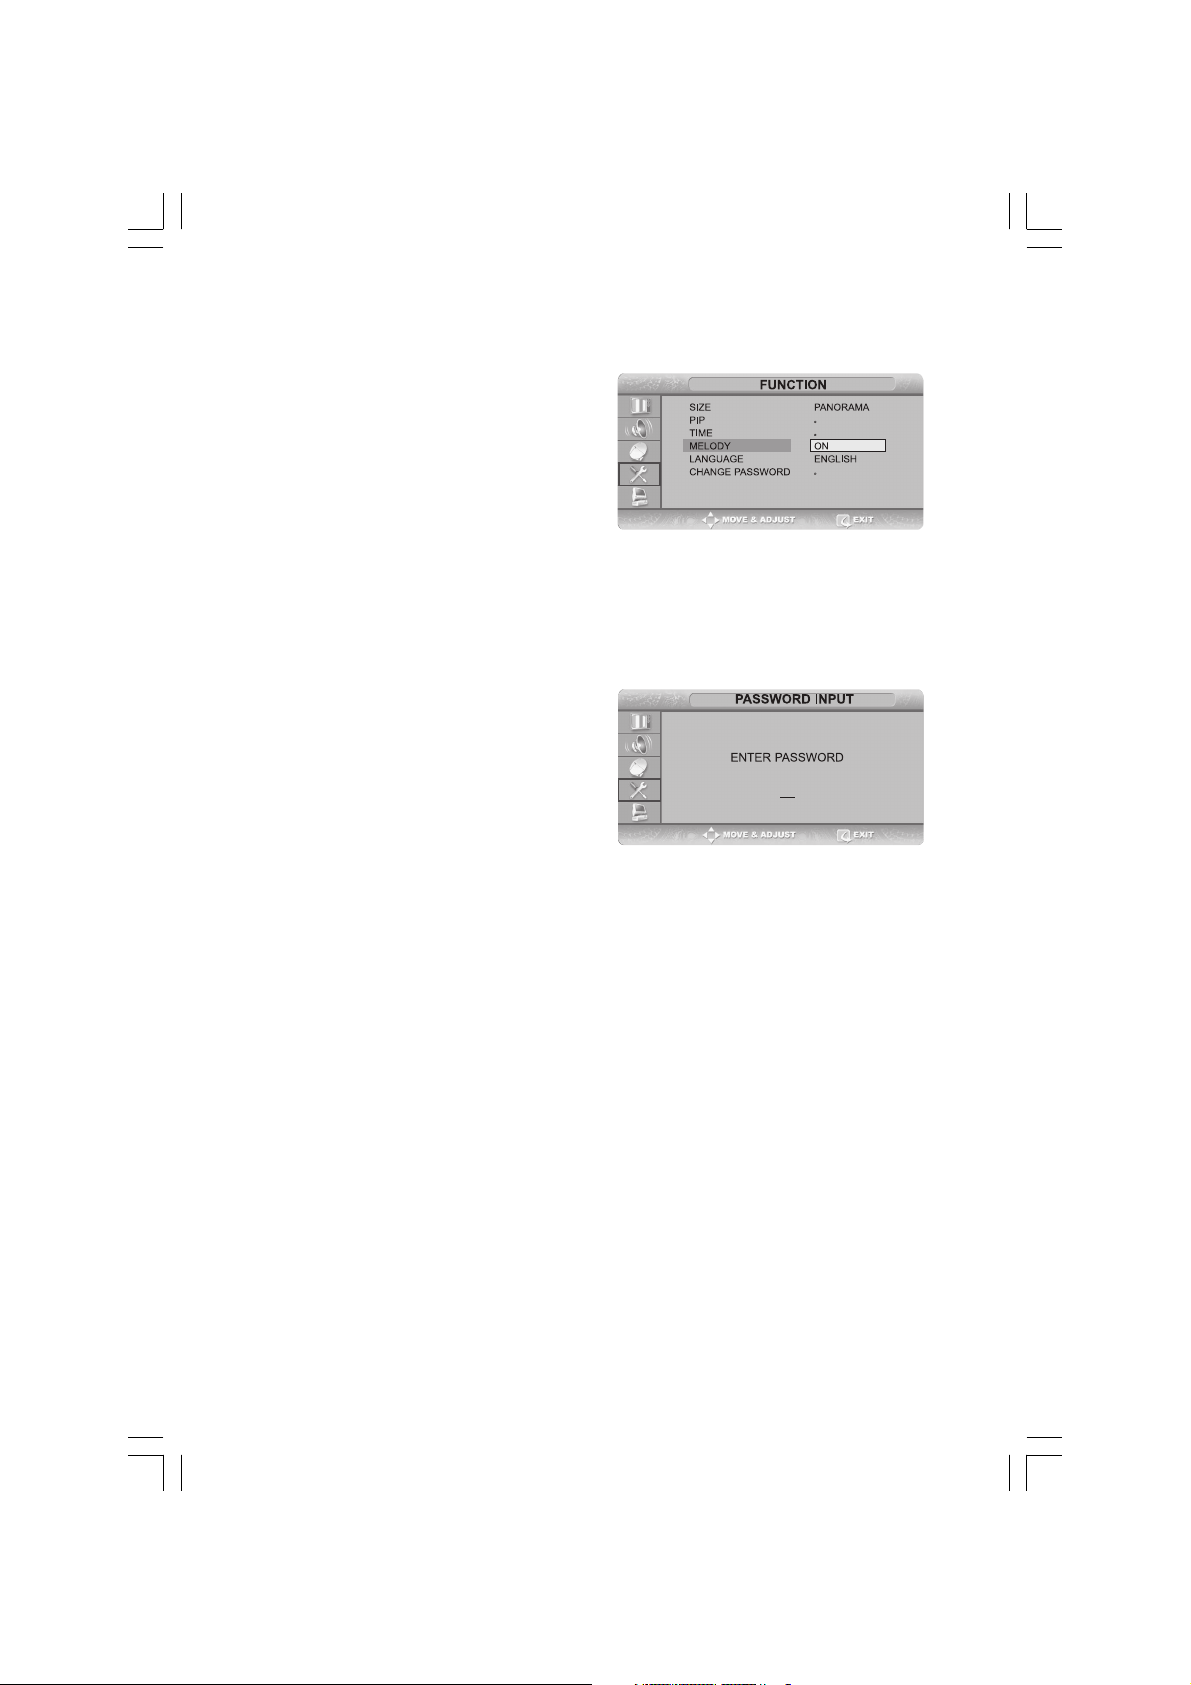
MELODY Function
If the MELODY function is turned on, a melody plays whenever the TV is turned on or off.
Press the TV.MENU button. The OSD MENU will be displayed.
Select FUNCTION using the /\ / \/ button and then press the
> button.
Select MELODY using the /\ / \/ button and then press the
> button.
Select ON using the /\ / \/ button. Whenever you press this
button, the Melody function is either on or off.
Press the EXIT/CANCEL button to exit the menu.
Change Password
To play or unlock a locked channel in CHILD LOCK channel
mode requires password.
Press the TV.MENU button. The OSD MENU will be displayed.
Select FUNCTION using the /\ / \/ button and then press the
> button.
Select CHANGE PASSWORD using the /\ / \/ button and
then press the > button.
Enter the password using the numeric button. Initial password is 0000.
Enter the change password using the numeric button.
To confirm, enter the confirm new password using the numeric button. Please remember the password should be a 4
digit numeric value.
ENG
Note
• For security you may wish to cut this note from your.
• If you forget your password, the universal code is 2-4-8-6.
23PRESTIGIO P370DVD-X
Page 24
TTX Function
Teletext
Most television channels provide written information services via teletext. Information provided includes:
ENG
- Television programme times
- News bulletins and weather forecasts
- Sports results
- Travel information initialized with the factory defaults.
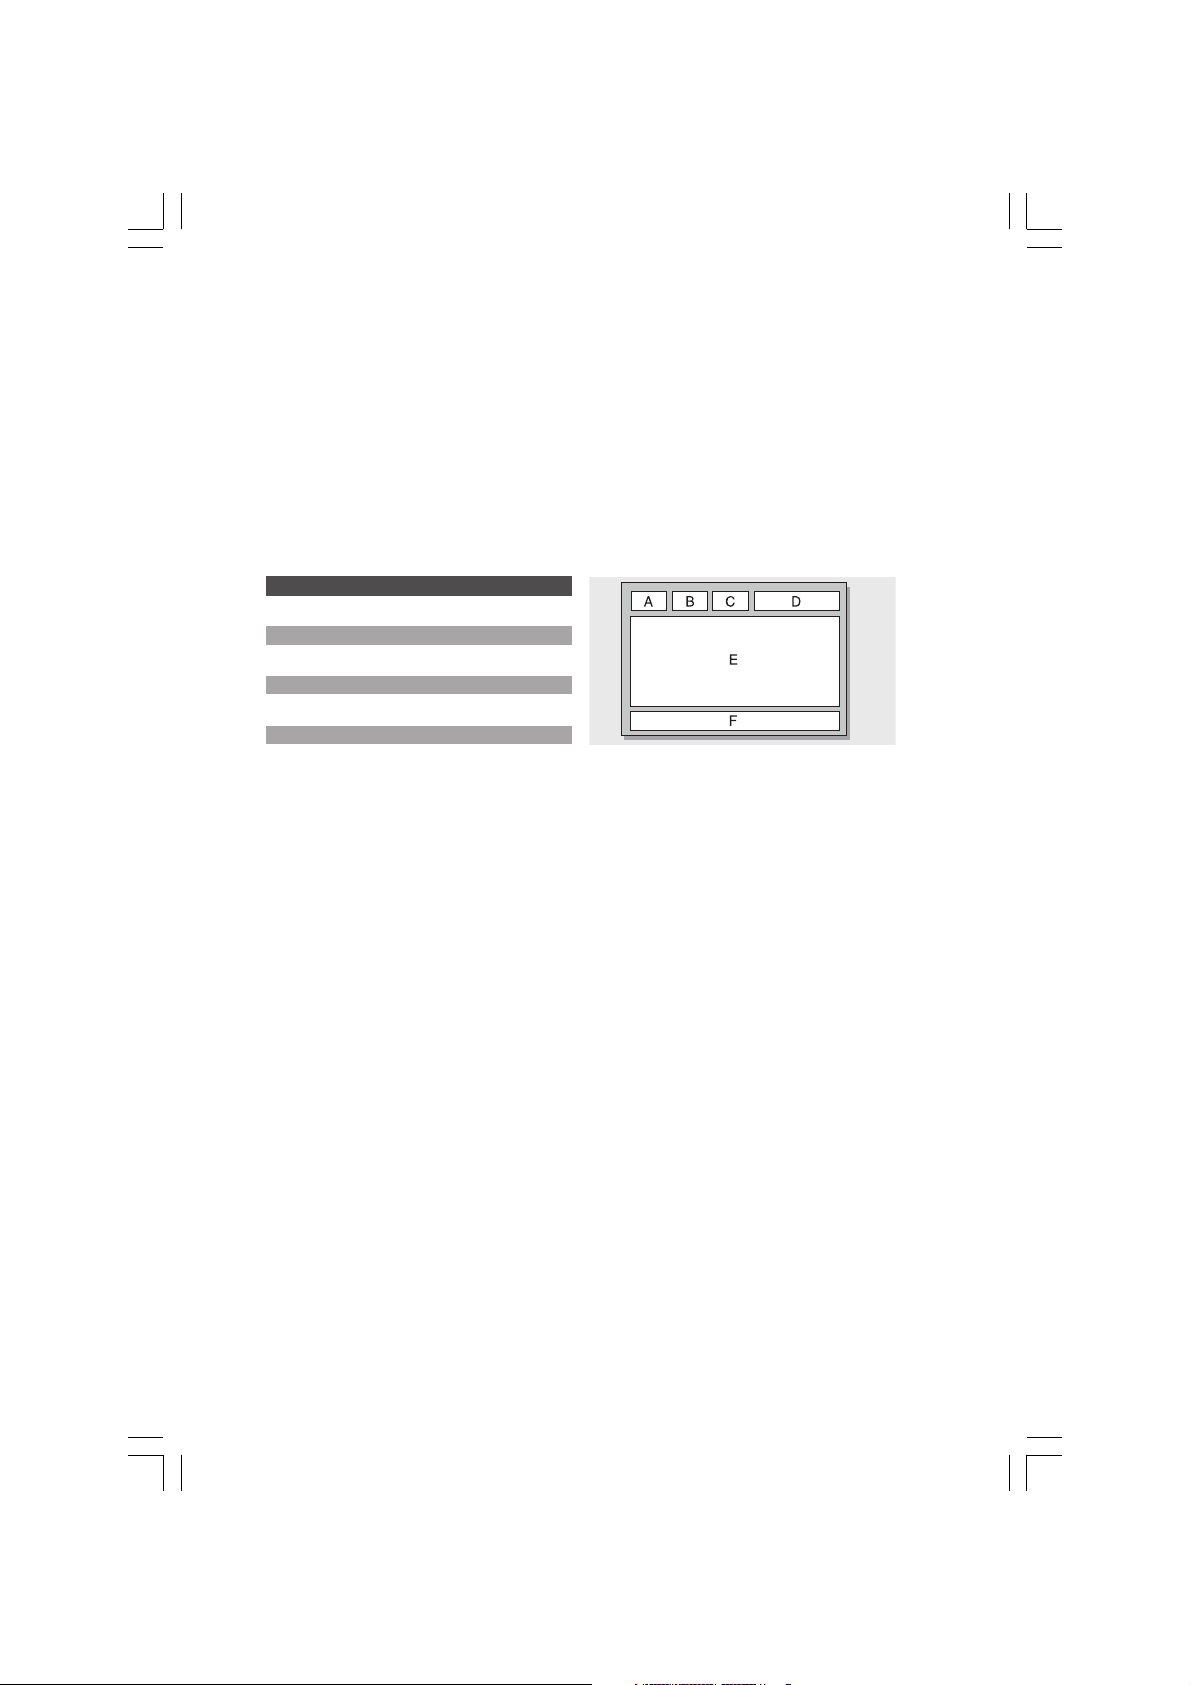
This information is divided into numbered pages (see diagram).
Part Contents
A Selected page number.
B Broadcasting channel identity.
C Current page number or search indications.
D Date and time.
EText.
F Status information.
Displaying the Teletext Information
You can display Teletext information at any time on your television.
For Teletext information to be displayed correctly, channel reception must be stable; otherwise:
- Information may be missing
- Some pages may not be displayed
Select the channel providing the Teletext ser vice using the PREPAGE ( ) or NEXTPAGE ( ) button.”
Press the TTX ( ) button to activate the teletext mode.
Result: The contents page is displayed. It can be redisplayed at any time by pressing the INDEX ( ) button.
If you wish to display the actual broadcast at the same time as the teletext page, press the MIX ( )button again.
Press the CANCEL ( ) button to exit from the teletext display.
24 PRESTIGIO P370DVD-X
Page 25

Selecting a Page by Number
You can enter the page number directly by pressing the numeric buttons on the remote control.
Enter the three-digit page number given in the content by pressing the corresponding numeric buttons. Result: The
current page counter is incremented and the page is then displayed.
If the selected page is linked with several secondary pages, the secondary pages are displayed in sequence. To freeze the
display on a given page, press the HOLD ( ). Press the HOLD ( ) again to resume.
Using the various display options:
To display... Press the...
Both teletext information and the normal broadcast twice TTX/MIX ( / )
Hidden text (answers to quiz games, for example) REVEAL ( )
The normal screen REVEAL ( ) again
A secondary page, by entering its 4-digit number SUBPAGE ( )
The next page NEXTPAGE ( )
The previous page PREPAGE ( )
Double-size letters in the: SIZE
• Upper half of the screen • Once
• Lower half of the screen • Twice
Normal screen • Three times
Using FLOF to Select a Page
ENG
The various topics included in the teletext pages are color-coded, and can be selected by pressing the colored buttons
on the remote control.
Display the teletext contents page by pressing the MIX ( ) button.
Press the coloured button corresponding to the topic that you wish to select; the available topics are given on the status
line. Result: The page is displayed with other coloured information that can be selected in the same way.
To display the previous or next page, press the corresponding coloured button.
To display the subpage, see the following steps.
• Press the SUBPAGE( ) button. Result: The available subpages appear.
• Select the required sub-page. Sub-pages can be scrolled by using the PREPAGE ( ) or NEXTPAGE ( ) button.
Storing Teletext Pages
You can store up to 1000 teletext pages to display them later at leisure.
Select the LIST mode using the L/F ( ) button. Result: Four 3-digit numbers are displayed in different colours. The button
is used to switch between the LIST and FLOF modes.
Press the coloured button corresponding to the page that will be replaced.
Enter the new page number using the numeric buttons.
Repeat steps 2 and 3 for each page to be stored, using a different coloured button each time.
Press the STORE ( ) button until the corresponding blocks blink.
25PRESTIGIO P370DVD-X
Page 26
PC Function
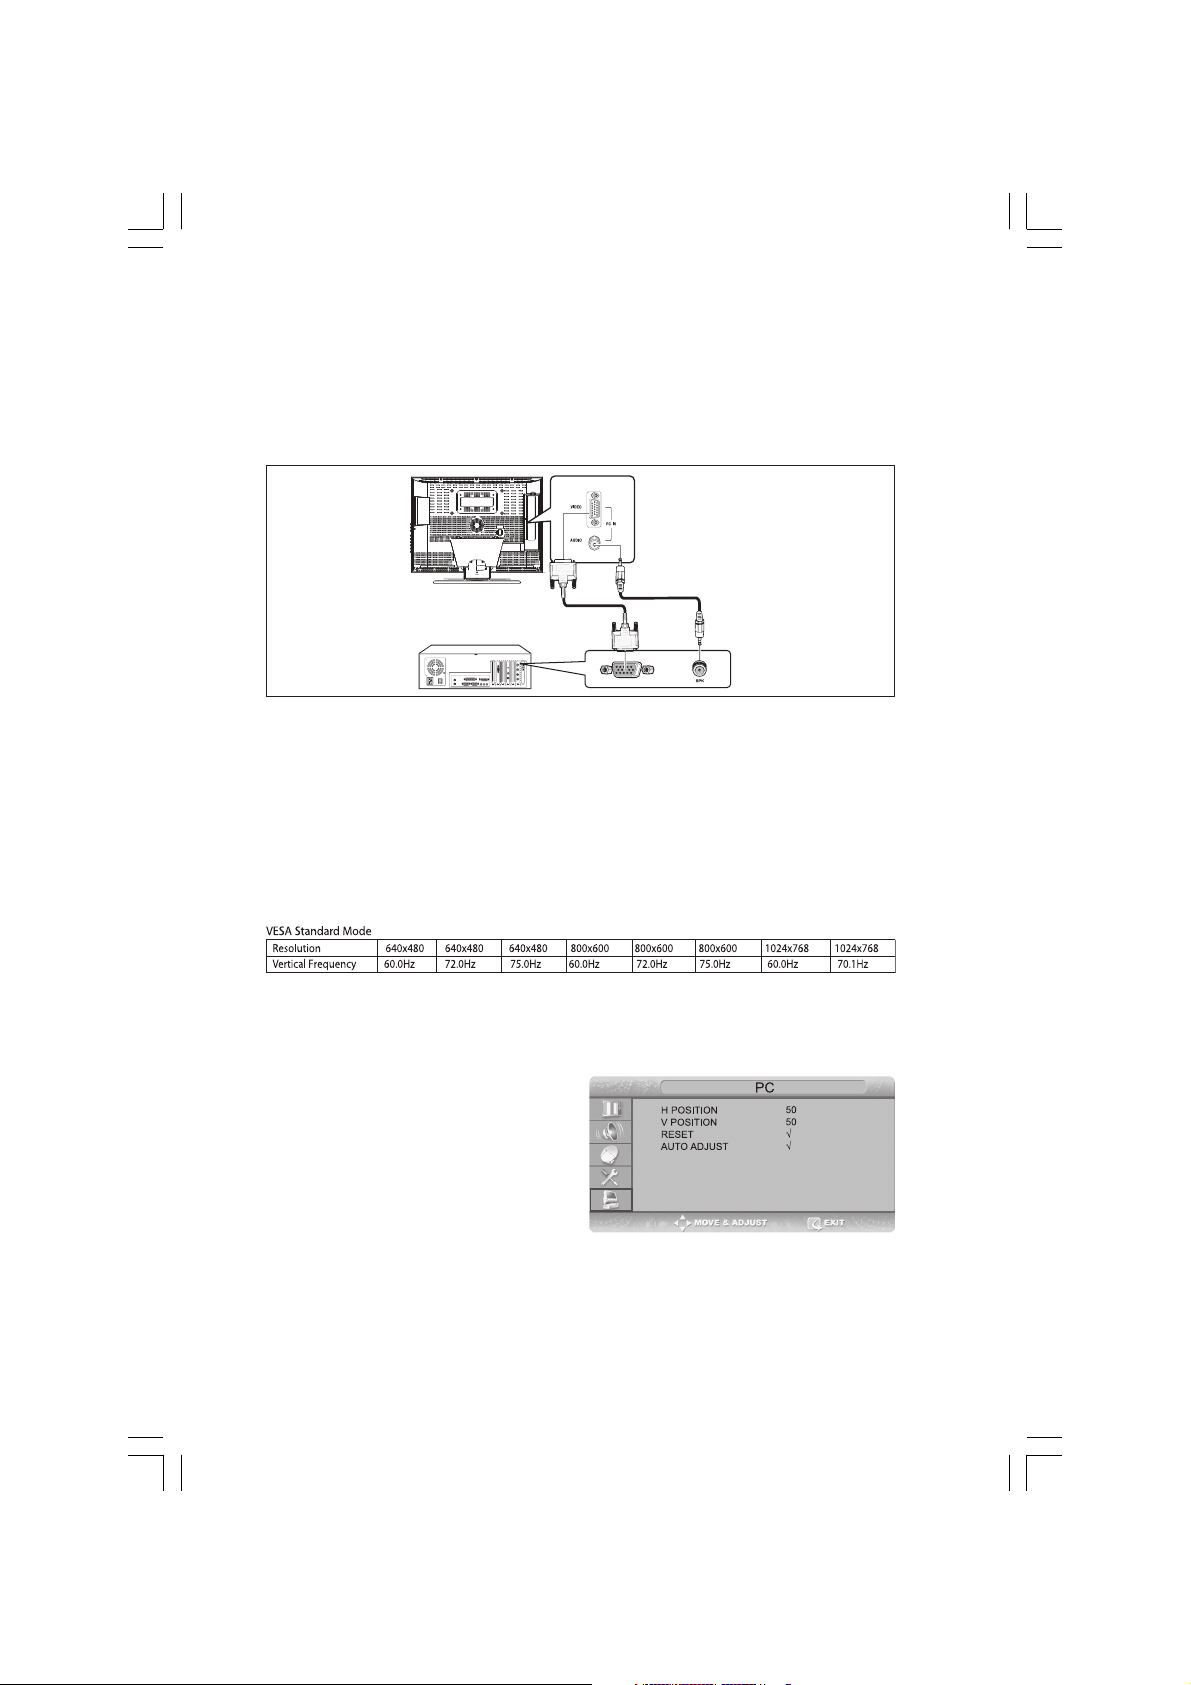
Connecting to a PC
ENG
Connection Procedures
Connect the PC D-SUB INPUT jack of the TV and the monitor output jack of the PC using the D-Sub cable.
Connect the PC AUDIO jack of the TV and the audio output jack of the PC with the audio cable. (This can only be applied
when the PC actually has an audio output jack.)
Procedures for viewing the PC screen through the TV
Turn the PC on and check that the PC settings are correct.
• If the PC settings are incorrect, the screen may display a duplicated or distorted picture.
• For PC configuration procedures, refer to page 34.
Press the LINE button and select PC INPUT mode.
Adjust the PC screen. (For adjustment procedures, refer to page 21.)
Adjusting the PC
Press the TV.MENU button. The OSD MENU will be displayed.
Select PC using the /\ / \/ button and then press the >
button.
Adjusting the Horizontal Position
Select H POSITION using the /\ / \/ button and adjust the horizontal position using the > button.
26 PRESTIGIO P370DVD-X
Page 27

Adjusting the Vertical Position
Select V POSITION using the /\ / \/ button and adjust the vertical position using the > button.
Initializing Settings (RESET)
Select RESET using the /\ / \/ buttons and then select using the > button. This returns you to the factory default screen.
Press the EXIT/CANCEL button to exit the menu.
Auto Adjust
You can adjust the frequency and the phase of the PC screen automatically.
Select AUTO ADJUST using the /\ / \/ button and then select using the > button. The PC screen is adjusted automatically.
ENG
27PRESTIGIO P370DVD-X
Page 28

DVD Function(Depend on the model)
Playing DVD’s
Turn on the power of the TV and external audio system. Ensure that the local code of the TV set is matched to that of
ENG
the disc. (If not matched, your disc cannot be played.)
Press the LINE(LINE) button.
Insert the DVD.
Ensure that the labeled surface is at the front when placing it.
DVD Playback
Your DVD will be automatically played depending on the current program mode.
- To STOP PLAYBACK, press the STOP button.
- To temporarily STOP PLAYBACK, press the PLAY/PAUSE button.
- To resume PLAYBACK, press the PLAY/PAUSE button once again.
Displaying the Playback Status
Select the language on discs that contain more than one language by following the instructions below.
Press the DISPLAY button
For DVD Playback
• The ROOT MENU, TITLE REMAIN, CHAPTER ELAPSED, CHAPTER REMAIN is shown.
• Pressing the button again shows the TITLE REMAIN for the chapter.
• Pressing the button again shows the CHAPTER ELAPSED for the chapter.
• Pressing the button again shows the CHAPTER REMAIN for the chapter.
• Pressing the button again exits the status display.
For CD Playback
• The SINGLE ELAPSED for the track is shown.
• Pressing the button again shows the SINGLE REMAIN for the track.
• Pressing the button again shows the TOTAL ELAPSED for the track.
• Pressing the button again shows the TOTAL REMAIN for the track.
• Pressing the button again exits the status display.
Searching for a Specific Screen/Song
You can use one of the functions listed below to jump to a specific chapter or track during playback.
Fast Forward/Reverse
Use this function to play the DISC contents in fast forward or fast reverse. During searching audio will be muted (except
CD or MP3).
28 PRESTIGIO P370DVD-X
Page 29

Press the << or >> button.
• For DVD playback, pressing the button executes the function in the following order: X2 -> X4 -> X8 -> X16 -> X32
-> X64 -> normal.
• For VCD playback, X2 -> X4 -> X8 -> X16 -> X32 -> normal
• For CD/MP3 playback, X2 -> X4 -> X8 -> normal.
Skip Forward/Reverse
Use this function to move to the next or previous chapter for DVD, track for CD and MP3.
Press the |<< or >>| button.
• When the |<< button is pressed, playback skips to the next chapter or track during DVD or CD playback.
• When the >>| button is pressed, playback skips to the beginning of the current chapter during DVD playback and to
the previous chapter when it is pressed again.
Slow Forward/Reverse
Press the PLAY/PAUSE button to resume normal playback.
Press the << or >> button.
• For disc playback, pressing the button executes the function in the following order: X1/2 -> X1/4 -> X1/8 -> X1/16
-> X1/32 -> X1/64 -> NORMAL
Press the PLAY/PAUSE button to resume normal playback.
STEP(Frame-by-Frame) Playback
Press the PLAY/PAUSE button.
Press the |<< or >>| button.
• Each time you press the >>| button, one frame forward is displayed at a time.
• Each time you press the |<< button, one frame backward is displayed at a time.
Press the PLAY/PAUSE button to resume normal playback.
ENG
Note :
Reverse step and reverse slow are not supported on VCD.
Repeating a Title, Chapter(DVD), Track(CD)
Repeat Playback
This function repeats the playback of a chapter, title or track.
Press the REPEAT button.
• Each press of the button changes the repeat mode in the following order:
For DVD playback, Chapter -> Title -> Repeat Off. For CD playback, Track -> Disc -> Repeat Off.
To resume normal playback, press the REPEAT button repeatedly until the repeat mode indicator disappears on screen.
Repeating a Specific Section
During playback, press the A-B button at the beginning of the desired section.
Press the A-B button again at the end of the section. “AB” will be displayed on the screen then the A-B section is
continually repeated.
29PRESTIGIO P370DVD-X
Page 30

To resume normal playback, press the A-B button repeatedly until the repeat mode indicator disappears on screen.
• Chapter repeat: Repeats playback of a single chapter.
• Title repeat: Repeats playback of a single title.
• Repeat disc: Repeats playback of the whole disc.
ENG
• Repeat track: Repeats playback of a single track.
• Repeat off: Exits repeat mode.
Changing the Audio Language/Changing the Subtitle Language
Select the language on discs that contain more than one language by following the instructions below.
Changing the Audio Language
It is possible to change the audio soundtrack language to a different language from the one selected at the initial
settings. This operation works only with discs on which multiple audio soundtrack languages are recorded. If the loaded
disc supports multiple languages, you can select the audio language.
Press the AUDIO button
• For DVD playback, Each time you press the AUDIO button, the language is changed.
• For CD playback, Mono Left -> Mono Right -> Mix-Mono -> Stereo.
Changing the Subtitle Language
It is possible to change the subtitle language to a different language from the one selected at the initial settings. This
operation works only with discs on which multiple subtitle languages are recorded.
Press the SUBTITLE button
Press the SUBTITLE button repeatedly until the desired subtitle language is displayed.
To turn the subtitles off, press the SUBTITLE button until Subtitle off is displayed.
Changing the Size and Angle of the Screen
Changing the Size of the Screen
Press the ZOOM button
• Each press of the button changes the zoom mode in the following order: X1.5 -> X2 -> X3 -> OFF
• If you press the direction button during the zoom mode, the zoom point will shift.
• To resume normal playback, press zoom button repeatedly until the repeat mode indicator disappears on screen.
• This function is activated for only DVD playback.
Viewing from another Angle
Some DVDs contain scenes that have been shot simultaneously from multiple angles.
Press the ANGLE button.
• Pressing the button successively changes the viewing angle which is displayed on the screen.
• The (CAMERA) icon appears. If no additional camera angle are recorded, the (NO) icon will be displayed.
• If multiple camera angles are recorded, the (CAMERA) icon displays the current angle, number and the number of angles
30 PRESTIGIO P370DVD-X
Page 31

available.
• This function is activated only for discs having scenes recorded at different angles.
Additional Function
Muting the sound
Press the MUTE button.
• Pressing the button toggles the mute function on and off. If no sound is heard with mute turned on, turn it off to hear
sound.
Basic Disc Menu Controls
Some DVD’s contain menus. Sometimes these are displayed automatically when you start playback; others only appear
when you press MENU or TITLE remote control.
Press the MENU button.
• The menu contained on the disc will appear on the screen. The menu appears differently with different disc.
Press the TITLE button.
• The title contained on the disc will appear on the screen. The title menu appers differently with different disc.
Programming in a Specific Order
Program play
This function is used to play the Title, Chapter and Tracks on
the disc in the order you program.
Press the PROGRAM button.
• Program menu is displayed on screen.
Select the Track NO.(CD) is displayed on the TV screen.
Select other NO. to program. You can add desired racks up
to 99 programs. Repeat step 2 until the programming is
finished.
Using the PLAY button to select “Start”, play now begins in the programmed sequence.
Stop all the programmed title, chapter and tracks. Using the EXIT button to select “Exit”.
ENG
Setting a Specific DVD Title or Chapter
This function is used to go to the Chapter, Track or Song of
the disc you want.
Program play DIRECT Search (GO
TO) for DVD
Press the GOTO button.
31PRESTIGIO P370DVD-X
Page 32

Select the item using the </> button and press the ENTER button.
• Chapter: Press the chapter number using the numeric button.
• Title: Press the Track number using the numeric button.
• TT: Press the number of the desired time in title using the numeric button.
Press the ENTER button to confirm.
ENG
DIRECT Search (GO TO) for CD
Press the GOTO button and select the desired item.
• Each press of the GOTO button changes the repeat mode
in the following order: Disc Go To - - : - - -> Disc go to XX:XX
Enter the number using the numeric button.
• Disc Go To: Press the number of the desired time in disc
using the numeric button.
• Track Go to: Press the number of the desired time in track
using the numeric button.
• Select Track: press the track number using the numeric button.
Playing MP3 Discs
Playback of a CD/CD-RW disc that contain a MP3 files.
To Play a MP3 File
Insert the MP3 disc. Make sure that the disc’s label is facing
up.
Using the /\ / \/ button to find the desired folder.
Using the /\ / \/ button to select the desired a mp3 files.
Press the ENTER button to start playback a file.
Repeat Playback
Playback of a CD/CD-RW disc that contain a MP3 files.
Press the REPEAT button.
• Each press of the REPEAT button changes the repeat mode in the following order: Repeat track -> Folder repeat ->
Repeat OFF.
Note
• The file name is only displayed in English.
• This player is compatible with the “MPEG-1 Audio Layer 3” standard. It is not compatible with
other standards, such as “MPEG-2 Audio Layer 3”, “MPEG-2.5 Audio Layer 3”, MP1, MP2, etc.
• Do not play CD-R/RW discs containing any files other than music CD files, MP3 and JPEG files.
• Programmed playback is not possible with MP3 discs.
• When writing MP3 files on CD-R/RW discs, select “ISO9660 level 1” as the writing software
format.
32 PRESTIGIO P370DVD-X
Page 33

Playing DIVX Discs (option)
Playback of a CD/CD-RW disc that contain a DIVX files.
CAUTION: This subtitle is selectable only when it’ s name is same with the title’ s .
To Play a DIVX File
Insert the DIVX disc. Make sure that the disc’s label is facing
up.
Using the /\ / \/ button to find the desired folder.
Using the /\ / \/ button to select the desired a divx files.
Press the ENTER button to start playback a file. Press the
SUBTITLE button to delete the subtitle display while playback.
Note
• AVI file used to contain the audio and video data : these must be stored on CD in the ISO 9660
format .
• Press STOP button when file do not appear on the screen .
• When playing the DivX disk , you can play the file with extension of AVI only.
• DTS Audio is not supported .
• WMA is not supported .
• When burning a subtitle file to a CD-ROM in your PC , be sure to burn it as an SMI file .
• Reverse of slow playback does not work DivX .
• Supported format : VIDEO - Divx3. 11 , 4. x , 5. x AUDIO - AC3 , MP3(80kbps ~ 320kbps)
ENG
Playing Kodak Picture CD and JPEG File
To play Kodak Picture CD and JPEG File
When a Kodak Picture CD is inserted, an automated slide
show is launched. When a JPEG file is loaded the table of
contents is displayed on TV screen.
Insert the Kodak Picture CD or JPEC file disc.
• An automated slide show is launched.
• If you press the (square) button, File menu screen will be
appeared.
Select the picture.
• Select the picture, you want to see, by pressing the /\ / \/ button.
Press the ENTER button.
• The selected item is displayed as a full size picture.
33PRESTIGIO P370DVD-X
Page 34

Changing the Size of the Screen
Press the ZOOM button.
• Each press of the ZOOM button changes the zoom mode in the following order: (<<) 25% -> 50% -> 100%(default)
-> 150% -> 200%(>>).
ENG
Image Rotation
Press the /\ \/<> button. There are 4 modes to rotate a
picture:
• /\ button : invert
• \/ button : mirror
• < button : Turn left
• > button : Turn right
Changing JPEG Slideshow Transition Mode
Press the ANGLE button.
• 13 slideshow transition modes are provided.
• Each press of the ANGLE button is pressed during JPEG image playback, the display mode on screen shows 13 variations
as follows:
- mode 1 : It displays from top to buttom in turn.
- mode 2 : It displays from buttom to top in turn.
- mode 3 : It displays from top to buttom to center in turn
- mode 4 : It displays from center to top and buttom in turn.
- mode 5 : It displays from vertical blind.
- mode 6 : It displays from from left to right in turn.
- mode 7 : It displays from right to left in turn.
- mode 8 : It displays from left and right to center in turn.
- mode 9 : It displays from center to left and right in turn.
- mode 10 : It displays from outside to inside in turn.
- mode 11 : It displays from horizontal blind.
- mode RAND : It displays at random.
- NONE
Starting music slide show
Whenever SUBTITLE button pressed at STOP mode, SLIDE SHOW MODE1 -> SLIDE SHOW MODE2 -> SLIDE SHOW MODE3
-> SLIDE SHOW OFF will be selected reeatedly.
Starting slide show mode 1
• After selecting SLIDE SHOW MODE 1, press ENTER button. MP3 FILE No.1 Track will be played with JPEG Picture changing
automatically.
Starting slide show mode 2
• Select SLIDE SHOW MODE 2 and press the arrow button to select the MP3 File tracks.
• Press A-B on the remote and Press ENTER.
34 PRESTIGIO P370DVD-X
Page 35

• The seltcted MP3 FILE will be played with JPEG Picture changing automatically.
Starting slide show mode 3
• Select SLIDE SHOW MODE 3 and press ENTER button. While MP3 FILE No.1 Track is playing, JPEG picture will not be
changed.
• When the MP3 FILE track moves to the next one, the JPEG picture will be moved to the next one too.
Stoping slide show mode
• Press STOP button to stop MO3 FILE and SLIDE SHOW.
Using the Setup Menu
Once the initial settings have been completed, the player can always be operated under the same conditions whenever
the power is switched on. These settings are called SETUP data, and are easily modified and stored using the SETUP menu.
The SETUP menu includes the information for GENERAL, LANGUAGE, VIDEO, SPEAKER, AUDIO and CUSTOM SETUP.
Language Setup
Press the SETUP button during stop mode and Press the </
> button to move to Language Setup.
Press the /\ / \/ button to move to desired item. And press
the ENTER button.
Press the /\ / \/ button to select desired language.
• AUDIO:Use the audio language
menu to select the subtitle
language that you prefer. If the disc
you are playing has that language available, it will display subtitles in that language.
• SUBTITLE: Use the subtitle language menu to select the subtitle language that you prefer. If the
disc you are playing has that language available, it will display subtitles in that.
• DISC MENU: Use the Disc Menu option to select the language you want a DVD’s disc menu to be
displayed in(not the same as the player menu).
ENG
Video Setup
For selecting TV screen ratio.
Press the SETUP button during stop mode and Press the </
> button to move to Video Setup.
Press the /\ / \/ button and press the ENTER button.
Press the /\ / \/ button to select desired item.
TV DISPLAY
• 4:3 / PS: Choose this setting if you
want the movie to fill the entire
screen of your TV. This might mean that the left and right edges won’t be seen.
• 4:3 / LB: Choose this setting if you want to see movies in their original aspect ratio. The movie
might appear with black bars at top and bottom of the screen.
35PRESTIGIO P370DVD-X
Page 36

• 16:9 / WIDE: Choose this setting if you want the movie to be seen in widescreen.
PIC MODE
• AUTO : The picture mode will be selected automatically according to the disc information.
• FILM : The optimal display at still mode will be selected.
• VIDEO : The optimal display at movie mode will be selected.
ENG
• SMART : The optimal display will be displayed by the combination of Film and Video.
SCREEN SAVER
- You can select the screen protection function ‘On’ and ‘Off’.
Speaker Setup
Press the SETUP button during stop mode and Press the </
> button to move to Speaker Setup.
Press the /\ / \/ button to move to desired item. And press
the ENTER button.
Press the /\ / \/ button to select desired item.
• Downmix
- LT/RT: Choose this setting if You
want to select the surround sound for the front speaker.
- Stereo: Choose this setting if you want to select the stereo output through the front speaker.
Audio Setup
Press the SETUP button during stop mode and Press the </
> button to move to Audio Setup.
Press the /\ / \/ button to move to desired item. And press
the ENTER button.
Press the /\ / \/ button to select desired item.
DIGITAL
- ON : Set to disconnect the digital
output sound.
- OFF : Set to output digital sound.
DUAL MONO
- STEREO : For stereo sound output.
- LEFT MONO : For stereo the output of the left channel of the audio track.
- RIGHT MONO : For selecting the output of the right channel of the audio track.
- MIXED MONO : For selecting the output of both the left and right channels of the audio track.
Dynamic
- For increasing the output of the audio only. (4/4, 3/4, 2/4, 1/4, OFF)
- Selecting OFF returns to the default value.
Custom Setup
Press the SETUP button during stop mode and Press the </> button to move to Custom Setup.
Press the /\ / \/ button to move to desired item. And press the ENTER button.
36 PRESTIGIO P370DVD-X
Page 37

Press the /\ / \/ button to select desired item.
• Logo
- MPG Logo : to use the original
initial screeen.
- JPG Logo : To use the initial screen
downloaded from CD.
If you use DivX(option), the JPG
logo is applied. If you use
DVD(option), the JPG logo is not
applied.
• Parental
- Set a password and select rating
level for DVD’s unsuitable for
children.
• Password Change
1 Press the SETUP button during
stop mode and Press the </>
button to move to Password
Setup.
2 Press the /\ / \/ button and press
the ENTER button.
3 Press the ENTER button again.
4 Enter your old password, and
new password in 4 digits.
5 Re-enter new password for
confirmation then press the ENTER
button.
• The Password is preset to 0000.
ENG
• Default
- If user selects reset from the setup menu, all the value of setup menu will be initialized by
factory setting value. (Exception: Parental level and Password values will not be changed.)
37PRESTIGIO P370DVD-X
Page 38

DivX Function(Depend on the model)
DivX (option)
ENG
DivX Feature Table
• AVI files are used to contain the audio and video data; these must be stored on CD in the ISO 9660 format.
• When playing the DivX disc, you can play the file with extension of AVI only.
• WMV is not supported.
• When burning a subtitle file to a CD-ROM in your PC, be sure to burn it as an SMI file.
• Reverse of slow playback does not work with DivX.
VIDEO
• DivX 3.11 content
• DivX 4 content (Based on MPEG-4 simple profile)
• DivX 5 content (MPEG-4 simple profile, bi-directional frames, Qpel and GMC are not supported.
Support all resolution up to maximum of 720 X 480 @ 30fps
Macroblocks per second 40500
Maximum average bitrate 4000 kbps
Maximum peak bitrate during any 3 seconds of video 10000kbps
Minimum VBV buffer size (kbytes) 384k bytes
Note.
Our solution support a maximum constant 6Mbps bitrate.
720 X 576 @ 25fps
AUDIO
DivX certified devices can play back any interleaved MP3 audio at any bitrate, both CBR and VBR.
The audio must be sampled at standard frequencies, such as 32khz, 44.1khz, and must conform to the AVI file specification.
38 PRESTIGIO P370DVD-X
Page 39

DivX® VOD Playback
This chapter explains how to playback DivX VOD.
1 Press SETUP at disc stop mode.
2 Use </> to move to “Custom” mode.
3 Use /\ / \/ to move to “DivX® VOD”, then press ENTER.
4 Then, below message will pop up.
YOUR REGISTRATION
CODE IS : XXXXXXXX
TO LEARN MORE
GO TO WWW.DIVX.COM/VOD
5 Registration code is : XXXXXXXX please fill out 8 characters registration code.
6 When you down load files through internet. Please make sure to insert registration code before the down loading.
7 Burn the down loaded file to CD-R or CD-RW.
8 Playback CD-R or CD-RW disc to the set.
9 You will see below message. This rental video has X view left. A view ends when you stop playback, play a different video,
or trun off your player. Do you want to use one of your X views now?
10 If you select “YES” button, it will playback, otherwise it will show you list of files.
Note.
• If you tried to play back anything over X view. If will show you following message “This rental
is expied” and will not play back. If you tried to play back expired rental disc, it will show you
following message “ This rental is expired”.
• If you want play back new rental disc, please follow the procedure from No.1
• In case of Bad Registration code are inserted.
It turns out to be invalid registration code, the file will not be play back.
“This video player is not authorized to play this video.” showing following message.
ENG
Using ARM on the Outer Wall
This LCD TV is available for installing Wall Mount Rack. When you install Wall mount rack to this product, please make
sure to use the same manufacturer’s Wall mount rack as LCD TV. Regarding purchasing Wall mount Rack, please contact
the shop you purchased LCD TV. D etailed installing procedure of Wall mount rack, please referring to “Wall Mount Rack
Installing Guide”.
39PRESTIGIO P370DVD-X
Page 40

Troubleshooting
If the TV seems to have a problem, first try the following list of possible problems and solutions before contacting a
service center. If none of these troubleshooting tips apply, do not attempt to repair the product yourself. Call your nearest
service center.
ENG
• Symptoms that may appear to be a problem
The following symptoms may happen even if the TV has no problem. First try the following list of possible problems and
solutions before contacting a service center. First try the following list of possible problems and solutions. If the symptom
continues, turn the TV off, and call your nearest service center.
Symptom Possible Problem Possible Solution
No picture on the screen, and the Power connection problem. Check the power cable connectivity to the
power LED does not turn on. power connector. Press the power switch again.
The TV is turned on, but there is The brightness is adjusted too low. Adjust the brightness and the contrast so that
no picture on the screen. The fluorescent tube is out of order. a picture is displayed brightly. The flores cent
An afterimage is generated when This is caused by an inherent property of LCD panels. Depending on the number of
continuously watching a still image. valid pixels, there may be black or bright pixels. These will be less than 0.005% of the
sum of all pixels. This is not a problem.
No picture on the screen. No audio. Discordance between the external Adjust the input switch location.
device jack and the input switch
button location.
A picture is displayed on the screen, The volume is adjusted to 0. Turn up the Volume button.
but there is no audio. Mute is active. Press the Mute button again.
The audio cable is disconnected. Check the audio cable connectivity.
Remote control malfunctions. The polarity of the batteries installed Reinstall the batteries properly.
in the remote control is wrong. Replace the batteries with new ones.
The batteries installed in the remote
control have not been discharged
completely.
Noise is heard on the radio. This may happen when you use a Noise may occur when you use a radio near
radio near the TV. the TV. Keep some distance between any
radios and the LCD TV.
No color in a color picture. The Color density is adjusted Adjust the Color density to 100 or less.
to 0 or almost 0.
Duplicated pictures on the screen. This may be caused by reflected Check if there are any tall objects such as skys
broadcasting signals when there is crapers near your house. Check that the
are mountains, buildings, or direction of the antenna is adjusted correctly.
trees near your house.
Blurred or snowy picture. The direction of the antenna is not Check that the direction of the antenna is
optimal. The antenna cable correct. Check that the antenna cable is
is disconnected. connected to the ANTENNA jack on the back of
tube of a LCD TV has a lifetime of about
50,000 hours. To replace the fluorescent tube,
contact a service center.
the LCD TV.
40 PRESTIGIO P370DVD-X
Page 41

Symptom Possible Problem Possible Solution
A “No input signal” message appears. The Signal connection is incorrect. Check that the computer is turned on. Check
the display cable connectivity. Check the
supported input signal specifications.
The input signal is not supported by Check the supported input signal specifications.
the LCD TV. Check the display cable specifications.
The entire screen flickers. This product has been optimally set to watch TV channels in the factory.
There may be flickering when you watch still images from a PC.
This is not a problem of the product.
The remote control does not work properly!
• Are the polarities of the installed batteries correct?
• Has the battery discharged completely?
• Is the power cord plugged in properly or is there a power failure?
• Is fluorescent lighting or a neon sign near the unit?
Warning
If a problem has been detected, unplug the power cable from the wall outlet first. Using the
product when it has a fault may cause electric shocks or fire. Do not place objects near the wall
outlet so that you can unplug the power cable if necessary.
ENG
41PRESTIGIO P370DVD-X
Page 42

Specifications
The exterior design and the product specifications are subject to be changed without prior notice due to improvements
in performance. This product is manufactured for domestic use. This product may not be used in countries whose
television system type or power voltage is different.
ENG
The TFT LCD panel uses a panel consisting of sub pixels which require sophisticated technology to produce. However,
there may be few bright or dark pixels on the screen. These pixels will have no impact on the performance of the product.
LCD Panel
Screen Size
37inch WIDE
Type
Color Active Matrix TFT LCD
Display Color
8-bit, 16.7M
DVD loader (Option)
Applicable disc (Do not insert 8Cm/3inch disc.)
DVD-Video / DVD-R /+R / Super VCD / VCD / CD / CD-R / RW
MP3 / WMA / JPEG files / Picture CD Disc Compatible
Aspect Ration
16:9, 4:3Letter Box, PAN&SCAN
Language
Audio(9), Subtitle(9) (+others)
Audio Outputs
Digital Coaxial out: Dolby digital, DTS digital Output Analog
Audio out : Down Mix 2 CH Stereo, Lt/Rt
TV/VIDEO
Receiver/Channels
VHF: Channel E2 ~ Channel E12
UHF: Channel E21 ~ Channel E69
CATV: Channel S1 ~ Channel S41
Television Broadcasting System: PAL, SECAM: B/G, D/K, I, L, L’
Antenna Interface
VHF, UHF: 75ohm
Video Signal
PAL, SECAM, NTSC(3.58/4.43)
Vertical F
56 ~ 75Hz
Color Quality
16,772,216 colors
Maximum Resolution
1024 X 768
Separation Signal
TTL, Anode or Cathode
Display Color
8-bit, 16.7M
Interface
D-sub
DVI
DVI-D Only
Audio Output
10W x 2
Power Consumption
Maximum 200 W
Power Consumption When Power
Saving
Less than 3.5 W
Input Voltage
AC 100-240V~, 50/60Hz
PC
Synchronization
Horizontal F
30 ~ 60KHz
42 PRESTIGIO P370DVD-X
Dimension
Monitor+Stand
958(W) X 730.5(H) X 323.4(D)
Monitor Alone
958(W) X 660.5(H) X 138.5(D)
Page 43

Weight
31 Kg
• This device has been registered in regards to EMI for residential use. It may be used in all areas.
Accessories
Remote control, Battery (AAA), User’s Guide, Power Cord,
SCART Cable.
ENG
43PRESTIGIO P370DVD-X
Page 44

Appendix
Standard Signal Mode Table
A TFT LCD TV is configured to support the following 10 signal modes. A user can register up to 10 modes.
Configure the PC display mode referring to the following table.
ENG
For configuration procedures, refer to the Appendix of the PC manual.
PIP Screen Configuration Table
44 PRESTIGIO P370DVD-X
Page 45

Prestigio P370 DVD-X
CZ
1PRESTIGIO P370DVD-X
Page 46

Bezpečnostní instrukce
Varování
PRO PŘEDEJITÍ ÚRAZU ELEKTRICKÝM PROUDEM
CZ
NIKDY NEVYSTAVUJTE TENTO VÝROBEK DEŠTI NEBO VLHKOSTI.
TENTO SYMBOL UPOZORŇUJE UŽIVATELE NA PŘÍTOMNOST NEIZOLOVANÝCH SOUČÁSTÍ VÝROBKU, NA KTERÝCH SE
NACHÁZÍ NEBEZPEČNÉ NAPĚTÍ. PO OTEVŘENÍ PŘÍSTROJE MŮŽE DOTEKEM NA TAKTO OZNAČENÝCH MÍSTECH DOJÍT K
ÚRAZU ELEKTRICKÝM PROUDEM.
TENTO SYMBOL UPOZORŇUJE UŽIVATELE NA PŘÍTOMNOST DŮLEŽITÝCH INSTRUKCÍ K POUŽÍVÁNÍ A ÚDRŽBĚ TOHOTO
VÝROBKU, KTERÉ JSOU OBSAŽENY V TOMTO NÁVODU K OBSLUZE.
Nakládání s elektrickým a elektronickým šrotem
(aplikovatelné v zemích EU a v ostatních zemích, kde je uplatňován
systém tříděného odpadu)
Tento symbol na výrobku nebo na jeho obalu označuje, že tento výrobek nesmí být považován za směsný
odpad. Jeho likvidaci je nutno provádět odevzdáním ve sběrném dvoře, který shromažďuje a recykluje elektrický
a elektronický odpad. Správnou likvidací vysloužilého a nepotřebného výrobku zabraňujete potenciálnímu
negativnímu vlivu na životní prostředí a na lidské zdraví, které může být nesprávnou likvidací tohoto výrobku
ohroženo. Recyklace výrobku také napomáhá uchovávat přírodní zdroje. Pro získání více informací o správné
likvidaci tohoto výrobku a sběrných místech tohoto typu odpadu kontaktujte místní obecní úřad, společnost, která ve vašem místě
likviduje odpad, nebo prodejce tohoto výrobku.
2 PRESTIGIO P370DVD-X
Page 47

Tento výrobek byl navržen a vyroben tak, aby odpovídal mezinárodním bezpečnostním standardům, ale jako při používání jakéhokoliv
jiného elektrického výrobku musí být i při používání tohoto výrobku dodržován určitý způsob používání a údržby, aby výrobek
přinášel maximální užitek a aby byla zajištěna bezpečnost při jeho používání. Přečtěte si tedy, pro vaši vlastní bezpečnost, níže
uvedené instrukce. Tyto instrukce jsou všeobecné a řízení se jimi je společné pro všechna elektronická zařízení, i když některé z
instrukcí nemusí přímo odpovídat vašemu právě zakoupenému výrobku.
• Přečtěte si tyto instrukce.
• Uložte si tyto instrukce.
• Věnujte pozornost všem varováním.
• Řiďte se těmito instrukcemi.
• Nepoužívejte toto zařízení vblízkosti vody.
• Čistěte je pouze suchou utěrkou.
• Nezakrývejte žádný zventilačních otvorů na výrobku. Výrobek instalujte vsouladu sinstrukcemi výrobce.
• Neinstalujte výrobek blízko zdrojů tepla, jako jsou například radiátory, vyústění výdechů tepla, sporáků a kamen nebo jiných
zařízení /zesilovače/, která produkují teplo.
• I když je zařízení vypnuto tlačítkem napájení /POWER/, není úplně odpojeno od elektrické sítě a i vtomto stavu spotřebovává malé
množství elektrické energie.
• Do blízkosti zařízení neumísťujte žádné zdroje tepla nebo výrobky, které produkují otevřený plamen, jako jsou např. svíčky či
různé lampičky apod. Vysoká teplota vokolí těchto zařízení může deformovat plastové části výrobku.
• Na horní hranu televizoru nepokládejte žádné předměty, které by do něj mohly zapadnout, a také žádné předměty obsahující
jakoukoliv tekutinu /vázy/, která by případně mohla do výrobku natéci.
• Přívodní síťový kabel a další kabely umístěte tak, aby po nich nepřecházely osoby a aby o ně nikdo nemohl zakopnout. Chraňte
také konektory na výrobku před poškozením a dbejte, aby kabely knim připojené měly správnou délku.
• Svýrobkem používejte pouze doplňková zařízení, která jsou schválena jeho výrobcem.
• Jestliže chcete umístit výrobek na stolek, podstavec či vozík, použijte pouze takový, který je doporučen výrobcem nebo který je
možno zakoupit spolu s výrobkem. Pokud používáte pro umístění výrobku vozík, buďte při jeho případné změně polohy opatrní, neboť
při jeho případném naklonění může dojít kpoškození zařízení nebo i ke zranění.
• Odpojte toto zařízení při bouřce nebo pokud jej delší čas nehodláte používat.
• Všechny případné nutné servisní úkony přenechte kvalifikované osobě. Oprava je nezbytná vpřípadě, pokud zařízení jeví známky
jakéhokoliv poškození, i vpřípadě poškození přívodního kabelu nebo jeho zástrčky, vpřípadě, že do přístroje vnikla jakákoliv
tekutina, zapadl do něj jakýkoliv předmět, přístroj byl vystaven dešti nebo vlhkosti, nepracuje normálním způsobem nebo pokud
zařízení spadlo na zem.
• Přístroj by neměl být vystavován kuchyňským výparům nebo možným rozstřikům jakýchkoliv tekutin a zejména by na jeho horní
stranu neměly být stavěny žádné předměty obsahující tekutiny /vázy atd./.
CZ
VÝSTRAHA: Vpřípadě nesprávného vložení baterií do zařízení vzniká nebezpečí exploze. Vybité
baterie nahrazujte vždy stejným typem nebo jeho ekvivalentem.
3PRESTIGIO P370DVD-X
Page 48

Obsah
Bezpečnostní instrukce ...................................................... 2
Varování .......................................................................... 2
CZ
Celkový přehled ............................................................... 6
Pohled zepředu ................................................................ 6
Pohled na zadní panel skonektory ................................... 6
Dálkové ovládání ............................................................. 7
Připojení TV přijímače ....................................................... 8
Připojení antény nebo kabelové sítě bez dekodéru ............ 8
Připojení pomocí konektoru SCART ...................................8
Připojení digitálního audio systému /v závislosti na
modelu/ ......................................................................... 8
Připojení videa nebo zařízení S-VIDEO a konektorů
pro vstup zvukového signálu ............................................. 9
Připojení externího TV přijímače ........................................ 9
Připojení DTV přijímače ..................................................... 9
Připojení konektorem DVI (pouze DVI-D) .......................... 10
Kontrola před použitím TV přijímače ................................. 10
Funkce televizního přijímače ........................................... 11
Sledování televizních programů ...................................... 11
Zapnutí a vypnutí TV přijímače ........................................ 11
Výběr jazyka menu ........................................................ 11
Informace o stavu systému .............................................. 11
Nastavení hlasitosti ........................................................ 11
Vypnutí zvuku ................................................................ 11
Sledování videa nebo DVD zařízení
zkomponentního vstupu ................................................ 11
Automatické ukládání kanálů ........................................... 12
Manuální ukládání kanálů ............................................... 12
Názvy kanálů ................................................................ 12
Aktivace dětského zámku ................................................ 13
Editace programů ........................................................... 13
Vymazání programu ....................................................... 13
Kopírování programu ...................................................... 13
Přesunutí programu ........................................................ 14
Přeskočení programového čísla ....................................... 14
Změna kanálů ................................................................ 14
Problémy sobrazem – nestabilita, špatná kvalita .............. 14
Výběr obrazových schémat .............................................. 15
Nastavení vlastností obrazu ............................................. 15
Nastavení režimu zvuku ................................................. 16
Nastavení vyrovnání hlasitosti zvukových
kanálů /BALANCE/ .............................................. 16
Nastavení hlasitosti reprodukce ve sluchátkách .................. 16
Nastavení equalizéru ..................................................... 17
Výběr režimu reprodukce zvukového záznamu ................ 17
Změna rozměru obrazovky ............................................. 18
Zastavení (zmrazení) obrazu .......................................... 18
Zobrazení obrazu vobraze (funkce PIP –
Picture in Picture) ................................................ 19
Změna zdrojového signálu pro zobrazení v okně PIP ......... 19
Změna kanálu okna PIP ..................................................20
Změna umístění okna PIP ................................................ 20
Výběr zvukového výstupu vrežimu PIP ............................20
Přepínání mezi hlavní obrazovkou a oknem PIP ................21
Výběr zvukového výstupu pro sluchátka vrežimu PIP ........ 21
Nastavení hodin ............................................................. 21
Nastavení časovače zapnutí/vypnutí ................................ 21
Nastavení časovače pro určitý kanál/nastavení
hlasitosti při zapnutí ............................................. 22
Nastavení časovače pro usnutí ......................................... 22
Funkce MELODY .............................................................2 3
Změna hesla .................................................................. 23
Funkce teletext .............................................................. 24
Teletext ......................................................................... 24
Zobrazení informací zteletextu ....................................... 24
Výběr stránky podle čísla ................................................ 25
Použití různých možností zobrazování: ............................. 25
Použití funkce FLOF pro výběr stránky ............................. 25
Uložení teletextových stránek ..........................................25
Funkce ve spojení s PC ....................................................2 6
Připojení kPC ................................................................ 26
Postup připojení kPC ..................................................... 26
Nastavení pro spojení s PC ..............................................2 6
Nastavení horizontální pozice ......................................... 26
Nastavení vertikální pozice ............................................. 27
Inicializační nastavení (RESET) ....................................... 27
Automatické nastavení ................................................... 27
Funkce DVD přehrávače (v závislosti na modelu) .............. 2 8
Přehrávání DVD disků .....................................................28
Zobrazení informací o přehrávání ................................... 28
Při přehrávání DVD disků ................................................. 28
Při přehrávání CD disků ................................................... 28
Hledání specifické scény/skladby .................................... 28
4 PRESTIGIO P370DVD-X
Page 49

Rychle vpřed/zpět .........................................................28
Přeskok vpřed/vzad ....................................................... 29
Pomalu vpřed/zpět ........................................................ 29
Přehrávání krok za krokem po jednotlivých obrazech ........ 29
Opakování přehrávaného titulu, kapitoly (DVD)
nebo skladby (CD) ............................................... 29
Opakování přehrávání .................................................... 29
Opakování přehrávání určitého úseku .............................. 30
Změna jazyka/jazyka titulků ..........................................30
Změna jazyka audio doprovodu ...................................... 30
Změna jazyka titulků ...................................................... 30
Změna velikosti a úhlu zobrazení .................................... 30
Změna velikosti obrazovky .............................................. 30
Sledování scén zrůzných úhlů ........................................ 30
Další funkce .................................................................. 31
Vypnutí zvuku ................................................................ 31
Základní menu disku ......................................................31
Programování vurčeném pořadí ...................................... 31
Přehrávání podle programu ............................................. 31
Nastavení specifického titulu DVD nebo kapitoly ................31
Programové přehrávání přímého výběru pro DVD disky ...... 32
Přímé hledání pro CD disky ............................................. 32
Přehrávání MP3 disků .................................................... 32
Přehrávání souboru MP3 ................................................. 32
Opakování přehrávání .................................................... 32
Přehrávání disků DIVX (volitelné) .................................... 33
Přehrávání DIVX souborů ................................................. 33
Přehrávání CD Kodak Picture nebo souborů JPG ................33
Přehrávání CD Kodak Picture a JPG souborů ...................... 33
Změna velikosti obrazovky .............................................. 34
Rotace obrazu ............................................................... 34
Změna způsobu přeměny jednotlivých obrázků při
sekvenčním prohlížení (slideshow). .................................34
Spuštění hudebního slideshow........................................ 34
Spuštění hudebního slideshow režimu 1 .......................... 34
Spuštění hudebního slideshow režimu 2 .......................... 34
Spuštění hudebního slideshow režimu 3 .......................... 35
Zastavení režimu slideshow ............................................. 35
Použití nastavovacího menu (SETUP MENU) ...................... 35
Nastavení jazyka (LANGUAGE SETUP) .............................. 35
Nastavení video ............................................................. 35
Nastavení reproduktorů .................................................. 36
Nastavení audio ............................................................. 36
Uživatelské nastavení ..................................................... 36
Funkce DivX (závisí na konkrétním modelu) .... ................. 3 8
DivX (volitelné) ............................................................. 38
Přehled funkcí DivX ........................................................ 38
VIDEO ............................................................................ 38
AUDIO ........................................................................... 38
DivX® VOD Playback .....................................................39
Použití ramena pro montáž na zeď .................................. 39
Možné problémy a jejich řešení ....................................... 40
Technické údaje .............................................................42
Appendix .......................................................................44
CZ
5PRESTIGIO P370DVD-X
Page 50

Celkový přehled
Pohled zepředu
CZ
1 Hlavní vypínač
2 Senzor dálkového ovládání
3 POWER: tlačítko napájení - zapíná a vypíná TV přijímač
4 Kontrolky LED
5 VOLUME: nastavení hlasitosti. Toto tlačítko má také další funkci
pohyb/nastavení pro výběr položek vOSD menu na obrazovce.
6 PROGRAM: změna kanálů nebo má význam pohyb/nastavení
pro výběr položek v menu na obrazovce.
7 MENU: otevírá a zavírá menu pro nastavení TV přijímače
Pohled na zadní panel skonektory
8 TV/VIDEO: volba externího zařízení, připojeného kTV přijímači.
<DVD> - závisí na modelu
9 PLAY/PAUSE: přehrávání DVD disku nebo vložení pauzy
vpřehrávání.
10 STOP: zastavení přehrávání DVD
11 OPEN/CLOSE: otevírání/zavírání šacht y pro DVD disk
12 LED kontrolka ON/DISC
1 KONEKTORY PC VSTUP (VIDEO/AUDIO)
2 KONEKTORY DVI VSTUP (VIDEO/AUDIO:L/R): pouze DVI-D
3 KOMPONENTNÍ KONEKTORY (VIDEO : Y, Pb, Pr/AUDIO : L/R)
4 VÝSTUPNÍ KONEKTORY LINE (VIDEO/AUDIO)
5 VSTUPNÍ KONEKTORY VIDEO3 (VIDEO/AUDIO)
6 VSTUPNÍ KONEKTOR S-VIDEO
7 VÝSTUPNÍ KONEKTOR DIGITAL AUDIO (v závislosti na modelu)
8 KONEKTORY SCART (spodní SC ART 1, horní SCAR T 2)
9 SLUCHÁTKOVÝ KONEKTOR: Pro připojení sluchátek, která je možno
samostatně dokoupit.
10 VSTUPNÍ KONEKTOR PRO ANTÉNU
6 PRESTIGIO P370DVD-X
Page 51

Dálkové ovládání
1 POWER: Zapne nebo vypne TV přijímač.
2 LINE: Výběr externího vstupu. (TV -> RGB -> Video1 -> Video2 ->
Video3 -> S-Video -> COMPONENT -> DVI -> PC)
3 TV: Přepne do režimu TV.
4 SWAP: Mění zdroj video signálu hlavní obrazovky a okna PIP.
5 ON/OFF: Vypíná a zapíná funkci okna PIP.
6 ČÍSELNÁ TLAČÍTKA: Slouží pro přímý výběr kanálů při sledování TV.
7 -/—: Výběr kanálů svyšším číslem než 10. Například pro výběr kanálu
č. 21 stiskněte tlačítko -/— a pak tlačítko 2 a tlačítko 1
8 STILL: Zmrazí pohybující se obraz na obrazovce.
9 M/S: Výběr režimu zvuku.
10 P.STD: Konfigurace různých video funkcí.
11 ŠIPKA/ENTER: Výběr položky zmenu/změna konfigurace.
12 P.SIZE: Změna velikosti obrazovky.
13 DISPLAY: Zobrazí současný kanál a nastavení audio a video.
14 MUTE: Dočasné vypnutí zvuku.
15 TTX: Přepne do režimu teletextu.
16 SOURCE: Vybere zdroj signálu pro PIP okno.
17 SOUND: Mění zdroj audio signálu mezi zvukovým doprovodem
programu na hlavní obrazovce nebo v okně PIP.
18 VOL: Zvyšuje nebo snižuje hlasitost.
19 PRE: Přeskok na předcházející kanál.
20 PROG: Změna kanálů.
21 SLEEP: Vybere přednastavený časový interval pro automatické vypnutí
TV přijímače.
22 TV MENU: Zobrazí OSD menu na obrazovce.
23 S.STD: Konfigurace různých nastavení audio.
24 EXIT/CANCEL: Odchod ze současné konfigurace nebo ze zobrazení
teletextu.
CZ
<DVD> - závisí na modelu
25 SCAN/SLOW: Pro rychlé a pomalé přehrávání.
26 TITLE: Výběr titulu na DVD disku.
27 SETUP: Počáteční nastavení DVD přehrávače.
28 DVD: Zobrazí DVD.
29 OPEN/CLOSE: Otevírá a zavírá šachtu pro DVD disk.
30 STOP: Zastaví přehrávání DVD disku.
31 PŘEHRÁVÁNÍ/PAUZA: Přehrávání DVD disku nebo vložení pauzy.
32 SKIP/STEP: Pro přechod na další kapitolu. Pro zpomalené krokové přehrávání po zobrazování jednotlivých obrazů.
33 MENU: Pro zobrazení menu, které je obsaženo na disku.
<DVD & TTX> - závisí na modelu
34 COLOR KEY: Výběr fasttextové položky.
35 INDEX/REPEAT: Programování názvu výběru. Pro specifikaci a opakování přehrávání určitého segmentu.
36 MIX/A-B: Mix videa a teletextu. Druhá funkce – opakování přehrávání titulů disku, kapitol nebo zvuku.
37 HOLD/PROGRAM: Stránka teletextu nebo přehrávání vespecifikovaném pořadí.
38 PRE PAGE/ANGLE: Předešlá stránka teletextu nebo sledování scény zrůzných úhlů.
39 LF/AUDIO: Přepíná režim LIST a FLOF. Výběr jazyka zvukového doprovodu.
40 REVEAL/GOTO: Obnovení teletextu a pro přechod na specifikované místo.
41 SIZE/SUBTITLE: Výběr velikosti teletextu a pro výběr jazyka titulků.
42 STORE/CLEAR: Pro uložení teletextu vrežimu LIST a pro vymazání obsahu programu.
43 SUB PAGE/ZOOM: Podstránka teletextu a zvětšení obrazu /zoomování/ na obrazovce.
44 NEXTPAGE/SURROUND: Další stránka teletextu a zapnutí stereofonního zvukového efektu.
7PRESTIGIO P370DVD-X
Page 52

Připojení TV přijímače
Připojení antény nebo kabelové sítě bez dekodéru
CZ
Připojení pomocí konektoru SCART
Postup připojení
Vstup SCART1 je vyhrazen pro zařízení sRGB výstupem, jako jsou
zařízení pro video hry nebo přehrávače video disků. Tento konec
kabelu může být spojen s:
- konektorem SCART
- třemi konektory RCA /video + audioL +audioR/
Postup pro sledování programu zVCR přehrávače
Zapněte TV přijímač a vyberte spoužitím tlačítka LINE na dálkovém
ovládání položku VIDEO 1.
Pokud vlastníte druhý videopřehrávač /VCR/ a přejete si kopírovat
video kazety, připojte VCR se zdrojovou kazetou do konektoru SCART1
a cílový VCR s nahrávanou kazetou do konektoru SCART2, neboť je možné přesměrovávat signál zkonektoru SCART1 na konektor SCART2.
Připojení digitálního audio systému /v závislosti na modelu/
Postup připojení
Spojte černý konektor DIGITAL OUT na zadní straně vašeho TV
přijímače skonektorem DIGITAL IN na vašem dekodéru nebo na
zesilovači.
Použití digitálního výstupu
Zapněte TV přijímač a spoužitím tlačítka DVD na dálkovém ovládání
vyberte položku DVD.
Zapněte digitální zesilovač a vyberte režim externího vstupního
signálu.
8 PRESTIGIO P370DVD-X
Page 53

Připojení videa nebo zařízení S-VIDEO a konektorů pro vstup zvukového signálu
Postup připojení
Připojte anténní kabel do vstupu ANTENNA IN na zadní straně
vašeho VCR přehrávače.
Spojte konektory VIDEO/AUDIO INPUT na TV přijímači
sodpovídajícími konektory VIDEO/AUDIO OUTPUT na vašem VCR
přehrávači pomocí odpovídajících kabelů /spojte kabely
konektory se stejnou barvou/.
- Pro lepší kvalitu obrazu můžete použít pro připojení VCR nebo
DVD přehrávače kabel S-VIDEO.
- Pokud váš VCR přehrávač nepodporuje zvuk ve stereofonní
kvalitě, připojte monofonní výstupní audio jack do konektoru AUDIO INPUT L.
Postup pro sledování programu zVCR přehrávače
Zapněte TV přijímač a vyberte spoužitím tlačítka LINE na dálkovém ovládání položku VIDEO 3. Pokud je připojení VCR přehrávače realizováno pomocí kabelu S-VIDEO, vyberte položku S-VIDEO.
Připojení externího TV přijímače
Postup připojení
Propojte audio kabelem konektory AUDIO OUT L a R na zadní
straně TV přijímače sodpovídajícími vstupními kabely na externím
TV přijímači.
Propojte video kabelem konektor VIDEO OUT na zadní straně TV
přijímače sodpovídajícím vstupním konektorem VIDEO INPUT na
externím TV přijímači.
CZ
Připojení DTV přijímače
Sledování programu externího TV přijímače
Zapněte externí TV přijímač a zvolte tlačítkem pro volbu externího
vstupu vstup VIDEO.
Zapněte váš LCD TFT TV přijímač.
Postup připojení
Pro připojení DVD přehrávače nebo DTV přijímače jsou určeny
konektory COMPONENT VIDEO IN a COMPONENT AUDIO IN. (480i/
60Hz, 480p/60Hz, 576i/50Hz, 576p/50Hz, 720p/50Hz,
720p/60Hz, 1080i/50Hz, 1080i/60Hz)
Sledování DTV
Zapněte TV přijímač a pomocí tlačítka LINE na dálkovém ovládání
vyberte COMPONENT.
Zapněte DTV přijímač.
9PRESTIGIO P370DVD-X
Page 54

Připojení konektorem DVI (pouze DVI-D)
CZ
Kontrola před použitím TV přijímače
Nežli TV přijímač začnete používat, zkontrolujte následující.
Je správně připojen anténní kabel?
Jsou baterie vdálkovém ovládání vloženy správně a správnou polaritou ?
- Vložte 2 baterie typu AAA a ujistěte se o správné polaritě baterií.
- Pracovní dosah dálkového ovládání je cca 7-10 m od TV přijímače, 3 m z každé strany a okolo 30°od
senzoru dálkového ovládání na přijímači.
Nastavili jste přijímané kanály?
Jsou všechny kabely kexterním zařízením správně zapojeny?
Postup připojení
Spojte DVI kabelem vstupní DVI konektor vašeho TV přijímače
svýstupním DVI konektorem DVI přijímače.
Spojte audio kabelem vstupní konektor audio DVI na vašem TV
přijímači svýstupním konektorem audio DVI na DTV přijímači.
10 PRESTIGIO P370DVD-X
Page 55

Funkce televizního přijímače
Sledování televizních programů
Zapnutí a vypnutí TV přijímače
Připojte síťový kabel do el. zásuvky.
Stiskněte hlavní vypínač napájení POWER, který je umístěn na spodní straně TV přijímače, směrem ke značce „ON“ (I).
Stiskněte tlačítko napájení /POWER/ na dálkovém ovládání nebo na předním panelu TV přijímače. Přijímač lze také zapnout stisknutím
tlačítek PROG /\ / \/ na dálkovém ovládání.
• Když zapnete napájení, rozsvítí se obrazovka a kontrolka POWER/STANDBY zhasne.
• Když napájení vypnete, obrazovka zhasne a kontrolka POWER/STANDBY se rozsvítí červeně.
• Neponechávejte TV přijímač dlouhý čas v režimu Standby /například když odjíždíte na dovolenou/. V tomto případě vypněte
přijímač hlavním vypínačem napájení do polohy OFF (O)a doporučuje se i odpojit jej od el. zásuvky a také odpojit anténu od jejího
konektoru na zadní straně přijímače.
Výběr jazyka menu
Stiskněte tlačítko TV.MENU. Na obrazovce se objeví OSD /On
Screen Display/ menu.
Vyberte požadovanou funkci FUNCTION stisknutím tlačítek /\ /
\/ a pak stiskněte tlačítko >.
Vyberte požadovaný jazyk LANGUAGE pomocí tlačítka /\ / \/
a pak stiskněte tlačítko >.
Vyberte požadovaný jazyk menu použitím tlačítek /\ / \/.
Stiskem tlačítka EXIT/CANCEL menu opustíte.
CZ
Informace o stavu systému
Stiskněte tlačítko DISPLAY na dálkovém ovládání. Na obrazovce TV přijímače se objeví zdroj vstupního signálu, informace o režimu
obrazu, režimu zvuku, režimu STEREO, nastavení časovače pro usnutí, současný čas a režim PIP.
Nastavení hlasitosti
Hlasitost můžete nastavit tlačítkem VOL /\ / \/.
Vypnutí zvuku
Stiskem tlačítka MUTE můžete dočasně vypnout zvuk, například při telefonním hovoru. Opětovným stiskem tlačítka MUTE se zvuk
obnoví vpůvodní hlasitosti.
Sledování videa nebo DVD zařízení zkomponentního vstupu
Stiskem tlačítka LINE můžete začít sledovat program ztěchto zařízení. Informace pro jejich připojení a postup nastavení naleznete
na straně 6.
11PRESTIGIO P370DVD-X
Page 56

Automatické ukládání kanálů
Stiskněte tlačítko TV.MENU a na obrazovce se objeví OSD menu
Pomocí tlačítek /\ / \/ vyberte položku SETUP a pak stiskněte
tlačítko >.
CZ
Vyberte pomocí tlačítek /\ / \/ volbu AUTO PROGRAMMING a
pak stiskněte tlačítko >.
Vyberte pomocí tlačítek /\ / \/ volbu COUNTRY a pak stiskněte
tlačítko >.
Vyberte zemi, ve které se nacházíte, pomocí tlačítek /\ / \/ a
pak stiskněte tlačítko >. Jednotlivé země jsou uvedeny v následujícím pořadí.
Vyberte pomocí tlačítek /\ / \/ volbu SEARCH a pak stiskněte tlačítko >.
Manuální ukládání kanálů
Pokud hodláte ukládat kanály manuálně, můžete vybrat následující:
- Jestli nalezený kanál uložit nebo ne
- Programové číslo, pod kterým chcete mít nalezený kanál uložen.
Stiskněte tlačítko TV.MENU a na obrazovce se objeví OSD menu.
Pomocí tlačítek /\ / \/ vyberte položku SETUP a pak stiskněte
tlačítko >.
Pomocí tlačítek /\ / \/ vyberte položku MANUAL PROGRAM a
pak stiskněte tlačítko >.
Pomocí tlačítek /\ / \/ vyberte položku SYSTEM a pak stiskněte tlačítko >.
AUTO -> BG -> DK -> I -> L -> LP -> AUTO
Pomocí tlačítek /\ / \/ vyberte položku PROGRAM NO. a potvrďte tlačítkem > . Stiskem tlačítka /\ / \/ vyberte žádané číslo kanálu,
pod kterým jej chcete mít uložen.
Pomocí tlačítek /\ / \/ vyberte položku SEARCH a pak stiskněte tlačítko >. Tuner TV přijímače začne přelaďovat frekvenční rozsah
do té doby, nežli je nalezen první kanál, který je pak zobrazen na obrazovce.
Pomocí tlačítek /\ / \/ vyberte položku STORE a potvrďte tlačítkem > . Stiskem tlačítka /\ / \/ vyberte OK.
Pro každý další kanál, který chcete uložit, opakujte kroky 5 až 7.
Názvy kanálů
Stiskněte tlačítko TV.MENU a na obrazovce se objeví OSD menu.
Pomocí tlačítek /\ / \/ vyberte položku SETUP a pak stiskněte
tlačítko >.
Pomocí tlačítek /\ / \/ vyberte položku NAME a potvrďte
tlačítkem > . Stiskem tlačítek /\ / \/ /</> editujte název
kanálu.
/\ / \/: Vybere znaky (A~ Z, 0~9, -, +).
</>: Posune na předchozí nebo následující znak.
Pomocí tlačítek /\ / \/ vyberte položku STORE a potvrďte tlačítkem > . Stiskem tlačítka /\ / \/ vyberte OK.
Pro opuštění menu stiskněte tlačítko EXIT/CANCEL.
12 PRESTIGIO P370DVD-X
Page 57

Aktivace dětského zámku
Tato funkce vám dovoluje zabránit sledování nevhodných TV
programů neautorizovaným uživatelům, například vašim dětem.
Funkce vypne zvuk a obraz a tento zámek nelze obejít ovládáním
TV přijímače tlačítky, která jsou umístěna na předním panelu. Dětský
zámek lze uvolnit a získat tak opětovný přístup ke sledování TV
přijímače jen spomocí dálkového ovládání. Proto držte dálkové
ovládání zdosahu dětí.
Stiskněte tlačítko TV.MENU. Na obrazovce se objeví OSD menu.
Pomocí tlačítek /\ / \/ vyberte položku SETUP a pak stiskněte tlačítko >.
Pomocí tlačítek /\ / \/ vyberte položku MANUAL PROGRAM a pak stiskněte tlačítko >.
Pomocí tlačítek /\ / \/ vyberte položku CHILD LOCK a pak stiskněte tlačítko >.
Pro uzamknutí kanálu vyberte stisknutím tlačítka /\ / \/ položku LOCK.
Poznámka:
• Pokud je dětský zámek aktivován, pouze vložení správného hesla umožní automatické nebo
manuální vyhledávání kanálů a všechny předešlé uzamčené položky se zpřístupní.
Editace programů
Editace programů vám dovoluje vymazávat, kopírovat, přesouvat nebo přeskakovat uložené programy.
Vyberte požadovaný kanál pomocí numerických tlačítek nebo
pomocí tlačítka pro volbu kanálů.
Stiskněte tlačítko TV.MENU a na obrazovce se objeví OSD menu.
Pomocí tlačítek /\ / \/ vyberte položku SETUP a pak stiskněte
tlačítko >.
Pomocí tlačítek /\ / \/ vyberte položku PROGRAM EDIT a pak
stiskněte tlačítko >.
CZ
Vymazání programu
Pomocí tlačítek /\ / \/ /</> vyberte program k vymazání.
Stisknutím červeného tlačítka tento vybraný program vymažete. Všechny zbývající programy jsou číselně posunuty o jedno číslo
nahoru.
Kopírování programu
Pomocí tlačítek /\ / \/ /</> vyberte program, který chcete kopírovat.
Stisknutím žlutého tlačítka tento vybraný program zkopírujete. Všechny zbývající programy jsou číselně posunuty o jedno číslo dolů.
13PRESTIGIO P370DVD-X
Page 58

Přesunutí programu
Pomocí tlačítek /\ / \/ /</> vyberte program, který chcete přesunout.
Stiskněte zelené tlačítko
Pomocí tlačítek /\ / \/ /</> přesuňte program na požadované programové číslo.
Opětovným stisknutím zeleného tlačítka můžete tuto funkci vyřadit.
CZ
Přeskočení programového čísla
Pomocí tlačítek /\ / \/ /</> vyberte program, který chcete přeskočit.
Stiskněte modré tlačítko a přeskočený program se zbarví do modra.
Opětovným stisknutím modrého tlačítka můžete tuto funkci vyřadit. Pokud
je určitý program přeskočen, znamená to, že jej nebudete moci vybrat při obvyklém sledování TV programu pomocí tlačítka /\ / \/
. Pokud si budete přát takto přeskočený program sledovat, vložte jeho programové číslo přímo pomocí číselných tlačítek nebo jej
vyberte vmenu editace programů nebo zmenu.
Změna kanálů
Pomocí tlačítka CHANNEL
Pro změnu kanálů stiskněte tlačítko PROG /\ / \/.
Zobrazí se všechny uložené kanály /TV přijímač musí mít uloženy alespoň 3 kanály, aby se zobrazily/.
Pomocí číselných tlačítek
- Pro rychlejší změnu jednočíselného kanálu /0-9/ stiskněte „0“ před stiskem čísla kanálu. Například pro kanál č. 4 stiskněte “0”
a pak “4”.
- Pro výběr kanálů s číslem vyšším než 10 stiskněte nejprve tlačítko -/—. Například pro kanál č. 42 stiskněte -/— a pak “4” a pak “2”.
Použití funkce vyvolání předchozího kanálu
Stiskněte tlačítko PRE, které je umístěno na dálkovém ovládání. TV přijímač přepne na poslední sledovaný kanál.
Problémy sobrazem – nestabilita, špatná kvalita
Pokud je obraz určitého kanálu rušený, kvalita barev je snížená
či je obraz nestabilní, použijte pro lepší kvalitu obrazu pro tento
kanál funkci jemného doladění.
Vyberte požadovaný kanál pomocí numerických tlačítek nebo
pomocí tlačítka pro volbu kanálů.
Stiskněte tlačítko TV.MENU a na obrazovce se objeví OSD menu.
Pomocí tlačítek /\ / \/ vyberte položku SETUP a pak stiskněte
tlačítko >.
Pomocí tlačítek /\ / \/ vyberte položku MANUAL PROGRAM a pak stiskněte tlačítko >.
Pomocí tlačítek /\ / \/ vyberte položku FINE TUNE a pak stiskněte tlačítko >.
Pomocí tlačítek /\ / \/ se snažte obraz vyladit a pak stiskněte tlačítko > . Pokud není doladění kanálu možné, zkontrolujte, jestli
je nastavení v SYSTEM správné.
Pomocí tlačítek /\ / \/ vyberte položku STORE a potvrďte tlačítkem > . Stiskem tlačítka /\ / \/ vyberte OK.
Stiskem tlačítka EXIT/CANCEL menu opustíte.
14 PRESTIGIO P370DVD-X
Page 59

Výběr obrazových schémat
Režim zobrazení je možno vybírat mezi kategoriemi USER, STANDARD, DYNAMIC a MILD podle vašich osobních preferencí.
Okamžitá změna: Stiskněte tlačítko
P.STD.
Kdykoliv stisknete toto tlačítko, změní se režim zobrazení obrazu
zUSER na STANDARD – DYNAMIC – MILD vtomto pořadí.
Stiskněte tlačítko TV.MENU a na obrazovce se objeví OSD menu.
Pomocí tlačítek /\ / \/ vyberte položku PICTURE a pak stiskněte
tlačítko >.
Pomocí tlačítek /\ / \/ vyberte požadovaný režim zobrazení. Následným tisknutím se mění režim zobrazení obrazu zUSER na
STANDARD – DYNAMIC – MILD vtomto pořadí.
Po ukončení nastavování odejdete zmenu stiskem tlačítka EXIT/CANCEL.
CZ
Využití jednotlivých režimů zobrazení
• STANDARD: Režim Standard je vhodný kpoužití, pokud je při sledování TV přijímače místnost
osvětlena.
• DYNAMIC: Režim Dynamic podporuje zvýšení jasu a ostrosti obrazu.
• MILD: Režim Mild je vhodný při sledování TV za slabého osvětlení.
• USER: Režim User je uživatelský režim, kde hodnoty zobrazení můžete nastavit podle svých
osobních preferencí.
Nastavení vlastností obrazu
Stiskněte tlačítko TV.MENU a na obrazovce se objeví OSD menu.
Pomocí tlačítek /\ / \/ vyberte položku PICTURE a pak stiskněte
tlačítko >.
Pomocí tlačítek /\ / \/ vyberte položku, kterou si přejete nastavit
a pak stiskněte tlačítko >.
Tlačítky </> vyberte požadovaný režim obrazu. Během
nastavování se zobrazí pomocné nastavovací okno. Statut obrazu
je automaticky změněn na režim USER.
Po ukončení nastavování odejdete zmenu stiskem tlačítka EXIT/CANCEL.
Vlastnosti obrazu:
• CONTRAST: Kontrast je dán rozdíly vjasu mezi objekty a pozadím.
• BRIGHTNESS: Jas je dán světlostí zobrazení.
• SHARPNESS: Ostrost udává zaostření obrazu.
• COLOR: Barevnost udává nasycení obrazu barvami.
15PRESTIGIO P370DVD-X
Page 60

Nastavení režimu zvuku
Nastavení režimu zvuku je možno vybírat mezi kategoriemi USER, STANDARD, MUSIC a SPEECH podle vašich osobních preferencí.
CZ
Kterýmkoliv stiskem tohoto tlačítka se mění režim zvuku zUSER
na STANDARD – MUSIC – SPEECH vtomto pořadí.
Stiskněte tlačítko TV.MENU a na obrazovce se objeví OSD menu
Pomocí tlačítek /\ / \/ vyberte položku SOUND a pak stiskněte
tlačítko >.
Pomocí tlačítek /\ / \/ vyberte požadovaný zvukový režim. Kterýmkoliv stiskem tohoto tlačítka se mění režim zvuku zUSER na
STANDARD – MUSIC – SPEECH vtomto pořadí.
Po ukončení nastavování odejdete zmenu stiskem tlačítka EXIT/CANCEL.
Režimy zvuku:
Okamžitá změna: Stiskněte tlačítko
S.STD.
• STANDARD: Režim Standard je vhodný pro obvyklý poslech při sledování TV programů.
• MUSIC: Režim Music je vhodný pro poslech hudby.
• SPEECH: Režim Speech využijete při poslechu mluveného slova.
• USER: Režim User je uživatelský režim, kde hodnoty nastavení zvuku můžete nastavit podle svých
osobních preferencí.
Nastavení vyrovnání hlasitosti zvukových kanálů /BALANCE/
Funkce Balance ovlivňuje poměr hlasitosti mezi levým a pravým
reproduktorem.
Stiskněte tlačítko TV.MENU a na obrazovce se objeví OSD menu.
Pomocí tlačítek /\ / \/ vyberte položku SOUND a pak stiskněte
tlačítko >.
Pomocí tlačítek /\ / \/ vyberte položku BALANCE a pak stiskněte
tlačítko >.
Tlačítky </> vyberte požadovaný zvukový režim. Během
nastavování se zobrazí pomocné nastavovací okno. Režim zvuku je automaticky změněn na režim USER.
Po ukončení nastavování odejdete zmenu stiskem tlačítka EXIT/CANCEL.
Nastavení hlasitosti reprodukce ve sluchátkách
Váš TV přijímač umožňuje poslouchat zvukový doprovod programu
zhlavní obrazovky nebo zokna PIP ve sluchátkách. Hlasitost
reprodukce ve sluchátkách lze nastavovat podle vašeho přání.
Stiskněte tlačítko TV.MENU a na obrazovce se objeví OSD menu.
Pomocí tlačítek /\ / \/ vyberte položku SOUND a pak stiskněte
tlačítko >.
16 PRESTIGIO P370DVD-X
Page 61

Pomocí tlačítek /\ / \/ vyberte položku HEADPHONE VOLUME a pak stiskněte tlačítko >.
Pomocí tlačítek /\ / \/ nastavte požadovanou úroveň hlasitosti reprodukce.
Dlouhodobá hlasitá reprodukce pomocí sluchátek může poškodit váš sluch.
Nastavení equalizéru
Nastavením equalizéru můžete ovlivňovat hlasitost jednotlivých
zvukových frekvencí (od nízkých kvysokým).
Stiskněte tlačítko TV.MENU a na obrazovce se objeví OSD menu.
Pomocí tlačítek /\ / \/ vyberte položku SOUND a pak stiskněte
tlačítko >.
Pomocí tlačítek /\ / \/ můžete pohybovat položkou EQUALIZER.
Tlačítkem se přesouvejte přes jednotlivé frekvence od 120 (nízké
frekvence), přes 1K (střední frekvence) až kvysokým frekvencí (10K).
Pomocí tlačítka /\ / \/ zvolte jednotlivé úrovně těchto frekvencí. Pokud jste provedli nastavení equalizéru, je režim zvuku
automaticky změněn na USER.
Výběr režimu reprodukce zvukového záznamu
Tlačítko M/S zobrazuje a ovládá zpracování a výstup audio
signálu. Po stisknutí tlačítka napájení je režim zvuku automaticky
nastaven na DUAL nebo na STEREO, vzávislosti na momentálním
stavu signálu programu.
Okamžitá změna: Stiskem tlačítka M/S se mění výstupní signál na
STEREO nebo MONO vtomto pořadí.
Stiskněte tlačítko TV.MENU a na obrazovce se objeví OSD menu.
Pomocí tlačítek /\ / \/ vyberte položku SOUND a pak stiskněte
tlačítko >.
Pomocí tlačítek /\ / \/ vyberte položku STEREO nebo DUAL a pak stiskněte tlačítko >.
Pomocí tlačítek /\ / \/ vyberte požadovaný režim.
Po ukončení nastavování odejdete zmenu stiskem tlačítka EXIT/CANCEL.
- Při zhoršených příjmových podmínkách bude zvuk kvalitnější, pokud přepnete jeho režim tlačítkem M/S na MONO.
- Pokud je stereo signál slabý (nebo nesouvislý mezi mono a stereo) a dochází kautomatickému přepínání mezi režimy mono a stereo,
je lépe přepnout zvuk na MONO manuálně.
- Pokud přijímáte v režimu AV zvuk mono, připojte na zadním panelu vstupní jack do konektoru L.
- Pokud je slyšet monofonní signál pouze z levého reproduktoru, stiskněte tlačítko M/S.
CZ
17PRESTIGIO P370DVD-X
Page 62

Změna rozměru obrazovky
Pro každý video program můžete změnit velikost obrazovky podle vašeho přání.
Stiskněte tlačítko P.SIZE.
Každým stisknutím tohoto tlačítka se rozměr obrazovky změní od normálního rozměru po zvětšený /WIDE - NORMAL – ZOOM1 –
CZ
ZOOM2 - PANORAMA/ vtomto pořadí. Vrežimu vstupního signálu zPC můžete použít volby WIDE nebo NORMAL.
Menu rozměru obrazovky
• WIDE: Nastaví širokoúhlý formát obrazovky 16:9.
• NORMAL: Nastaví obraz na normální standardní velikost obvyklé TV obrazovky ve formátu 4:3.
• ZOOM1: Zvětšení obrazu na obrazovce.
• ZOOM2: Zvětšení obrazu na obrazovce při zanechání viditelnosti titulků.
• PANORAMA: Tento režim je vhodný pro sledování panoramatických obrázků.
Poznámka
Vrežimu připojení k PC je možno volit pouze režimy Wide a Normal 4:3.
Zastavení (zmrazení) obrazu
Pohybující se obraz na obrazovce můžete zastavit (zmrazit).
Rychlá volba: Stiskněte tlačítko STILL.
Kdykoliv stisknete toto tlačítko, tuto funkce tím zapnete nebo vypnete.
Poznámka
• V případě, že je obraz zastaven, zvukový doprovod obrazu pokračuje dál.
• Tato funkce není dostupná pro okno PIP vrežimu PIP.
18 PRESTIGIO P370DVD-X
Page 63

Zobrazení obrazu vobraze (funkce PIP – Picture in Picture)
Na vašem TV přijímači můžete současně sledovat dva video
programy současně.
Rychlá volba: Stiskněte tlačítko ON/OFF na dálkovém ovládání.
Stiskem tohoto tlačítka funkci PIP zapnete nebo vypnete.
Stiskněte tlačítko TV.MENU a na obrazovce se objeví OSD menu.
Pomocí tlačítek /\ / \/ vyberte položku FUNCTION a pak stiskněte
tlačítko >.
Pomocí tlačítek /\ / \/ vyberte položku PIP a pak stiskněte
tlačítko >.
Opět stiskněte tlačítko >. Pomocí tlačítek /\ / \/ vyberte položku PIP a pak stiskněte tlačítko >.
Zobrazí se PIP menu.
Kdykoliv stisknete tlačítko \/ , režim zobrazení se změní na PIP, DW nebo na OFF (vypnut). Výběr položky OFF režim PIP vypne.
Pokud jste vrežimu DW, můžete přepínat spoužitím tlačítka Picture na dálkovém ovládání mezi DW1 a DW2. Pokud vstupujete do
režimu DW pomocí tlačítka PIP, bude poslední zvolený režim zapamatován pro zobrazení DW1 nebo DW2, podle toho, který režim
byl naposledy vybrán.
Po ukončení nastavování odejdete zmenu stiskem tlačítka EXIT/CANCEL.
CZ
Poznámka
• Vzhledem ke skutečnosti, že tento TV přijímač je vybaven pouze jedním tunerem, nemůžete
sledovat současně 2 TV kanály současně vPIP režimu.
• Přijímač umožňuje poslech pouze jednoho zvukového doprovodu, a to buď podle scény na hlavní
obrazovce, nebo doprovod ke scéně vPIP okně.
• Nahlédněte do informací pro konfiguraci funkce PIP (strana 34).
Změna zdrojového signálu pro zobrazení v okně PIP
Zdroj video signálu obrazu okna PIP můžete měnit vzávislosti na
jakémkoliv dalším, externě připojeném zařízení.
Rychlá volba: Stiskněte tlačítko
SOURCE.
Každým stisknutím tohoto tlačítka se mění zdrojový videosignál
PIP okna na signál zdalšího připojeného externího zařízení.
Kroky 1 až 4 jsou stejné jako vpředchozím odstavci pro zobrazení PIP.
Pomocí tlačítek /\ / \/ vyberte položku SOURCE a pak stiskněte tlačítko >.
Pomocí tlačítek /\ / \/ vyberte požadovaný externí vstupní signál a pak stiskněte tlačítko >. Vzhledem ke skutečnosti, že tento TV
přijímač je vybaven pouze jedním tunerem, nemůžete sledovat současně 2 TV kanály současně v PIP režimu.
Po ukončení nastavování odejdete zmenu stiskem tlačítka EXIT/CANCEL.
19PRESTIGIO P370DVD-X
Page 64

Změna kanálu okna PIP
Vpřípadě, že okno PIP zobrazuje normální TV vysílání /i
kabelové/, můžete kanál, zobrazovaný vokně PIP, měnit.
CZ
Kdykoliv stisknete toto tlačítko, bude kanál v PIP okně změněn.
Kroky 1 až 4 jsou stejné jako vpředchozím odstavci pro zobrazení
PIP.
Pomocí tlačítek /\ / \/ vyberte položku CHANNEL a pak stiskněte tlačítko >.
Pomocí tlačítek /\ / \/ vyberte požadovaný kanál a pak stiskněte tlačítko >. Vzhledem ke skutečnosti, že tento TV přijímač je vybaven
pouze jedním tunerem, nemůžete sledovat současně 2 TV kanály současně v PIP režimu.
Po ukončení nastavování odejdete zmenu stiskem tlačítka EXIT/CANCEL.
Rychlá volba: Stiskněte tlačítko
PROG /\ / \/.
Změna umístění okna PIP
Tímto postupem můžete zvolit umístění PIP okna na TV obrazovce.
Kroky 1 až 4 jsou stejné jako vpředchozím odstavci pro zobrazení
PIP.
Pomocí tlačítek /\ / \/ vyberte položku POSITION a pak stiskněte
tlačítko >.
Pomocí tlačítek /\ / \/ vyberte požadovanou polohu okna PIP
na obrazovce. Postupným tisknutím tohoto tlačítka se bude okno
PIP přemísťovat z jednoho rohu TV obrazovky do druhého.
Po ukončení nastavování odejdete zmenu stiskem tlačítka EXIT/CANCEL.
Výběr zvukového výstupu vrežimu PIP
Vrežimu PIP si můžete vybrat, který zvukový doprovod (program na hlavní obrazovce nebo v okně PIP) chcete slyšet
vreproduktorech.
Rychlá volba: Stiskněte tlačítko SOUND.
Kdykoliv stisknete toto tlačítko, bude režim zvukového doprovodu
změněn na zvukový doprovod programu na hlavní obrazovce
nebo v okně PIP (MAIN -> SUB/PIP).
Když je vybrán režim MAIN: Bude reprodukován zvukový doprovod programu, který je zobrazován na hlavní obrazovce.
Když je vybrán režim SUB: Bude reprodukován zvukový doprovod programu, který je zobrazován na DW obrazovce.
Když je vybrán režim PIP: Bude reprodukován zvukový doprovod programu, který je zobrazován v okně PIP.
Kroky 1 až 4 jsou stejné jako vpředchozím odstavci pro zobrazení PIP.
Pomocí tlačítek /\ / \/ vyberte položku SPEAKER OUTPUT a pak stiskněte tlačítko >.
Stisknutím tlačítka /\ / \/ vyberte požadovaný režim (MAIN nebo SUB/PIP).
20 PRESTIGIO P370DVD-X
Page 65

Přepínání mezi hlavní obrazovkou a oknem PIP
Zdroj video signálu může být přepínán (zobrazován) mezi hlavní obrazovkou a oknem PIP.
Rychlá volba: Stiskněte tlačítko SWAP na dálkovém ovládání.
Kdykoliv stisknete toto tlačítko, dojde kpřepnutí video signálu mezi hlavní obrazovkou a oknem PIP.
Výběr zvukového výstupu pro sluchátka vrežimu PIP
Tento TV přijímač umožňuje současný poslech zvukového
doprovodu scény na hlavní obrazovce spoužitím vestavěných
reproduktorů s poslechem zvukového doprovodu scény vokně
PIP do sluchátek.
Kroky 1 až 4 jsou stejné jako vpředchozím odstavci pro zobrazení
PIP.
Pomocí tlačítek /\ / \/ vyberte položku HEADPHONE OUTPUT a
pak stiskněte tlačítko >.
Stisknutím tlačítka /\ / \/ vyberte požadovaný režim (MAIN nebo SUB/PIP).
Nastavení hodin
Stiskněte tlačítko TV.MENU a na obrazovce se objeví OSD menu.
Pomocí tlačítek /\ / \/ vyberte položku FUNCTION a pak stiskněte
tlačítko >.
Pomocí tlačítek /\ / \/ vyberte položku TIME a pak stiskněte
tlačítko >.
Tlačítkem > se přesuňte na hodiny /Hour/ a nastavte tlačítky /
\ / \/ správný čas v hodinách.
Tlačítkem > se přesuňte na minuty /Minute/ a nastavte tlačítky
/\ / \/ správný čas v minutách.
Po ukončení nastavování odejdete zmenu stiskem tlačítka EXIT/CANCEL.
CZ
Nastavení časovače zapnutí/vypnutí
Tento TV přijímač je vybaven časovačem pro jeho zapnutí/vypnutí,
který umožňuje nastavit čas zapnutí a vypnutí přístroje podle
vašeho přání. Před nastavením tohoto časovače je nutno nejprve
nastavit současný správný čas.
Kroky 1 – 3 jsou stejné jako vpředchozím odstavci, kde je popsáno
nastavení hodin.
Pomocí tlačítek /\ / \/ vyberte položku TIMER a pak stiskněte
21PRESTIGIO P370DVD-X
Page 66

tlačítko >. Pomocí tlačítek /\ / \/ vyberte ON (zapnuto).
- Tento časovač zapnutí/vypnutí funguje pouze vpřípadě, že je zapnut, tedy že je položka ON vybrána.
Příklad: Nastavení zapnutí TV přijímače v6:10 ráno
Pomocí tlačítek /\ / \/ se přesuňte na položku ON TIME.
Tlačítkem > se přesuňte na položku Hours a pak tlačítky /\ / \/ nastavte hodiny na AM 6.
CZ
Tlačítkem > se přesuňte na položku Minute a pak tlačítky /\ / \/ nastavte minuty na 10.
Stisknutím tlačítka > dokončíte konfiguraci funkce TIME ON.
Po ukončení nastavování odejdete zmenu stiskem tlačítka EXIT/CANCEL.
Pro nastavení času vypnutí vybírejte vpřípadech, kde jste vpředchozím postupu používali položku ON TIME, místo toho položku OFF
TIME.
Nastavení časovače pro určitý kanál/nastavení hlasitosti při zapnutí
Na vašem TV přijímači lze také nastavit kanál a požadovanou
úroveň hlasitosti pro případ jeho zapnutí pomocí časovače.
Kroky 1 – 3 jsou stejné jako vpředchozím odstavci, kde je popsáno
nastavení hodin.
Vyberte pomocí tlačítek /\ / \/ volbu PROGRAM NO. a pak
stiskněte tlačítko >.
Pomocí tlačítka /\ / \/ zvolte požadovaný kanál, který chcete
při zapnutí TV přijímače pomocí časovače sledovat.
Stisknutím tlačítka > dokončíte konfiguraci.
Pomocí tlačítka /\ / \/ zvolte položku VOLUME a pak stiskněte tlačítko >.
Pomocí tlačítka /\ / \/ zvolte požadovanou hlasitost reprodukce, kterou chcete mít při zapnutí TV přijímače pomocí časovače
nastavenu.
Po ukončení nastavování odejdete zmenu stiskem tlačítka EXIT/CANCEL.
Nastavení časovače pro usnutí
Pomocí této funkce můžete nastavit vypnutí vašeho TV přijímače
po určité, vámi vybrané době.
Rychlé nastavení: Stiskněte tlačítko
SLEEP na dálkovém ovládání.
Kdykoliv stisknete toto tlačítko, režim je měněn od vypnutého
stavu časovače (SLEEP OFF) přes časy vypnutí vminutách (SLEEP
10) - (SLEEP 30) - (SLEEP 60) - (SLEEP 90)…..SLEEP 180 - (SLEEP OFF).
Kroky 1 – 3 jsou stejné jako vpředchozím odstavci, kde je popsáno nastavení hodin.
Pomocí tlačítka /\ / \/ zvolte položku SLEEP a pak stiskněte tlačítko >.
Pomocí tlačítek /\ / \/ nastavte požadovaný čas vypnutí.
Stisknutím tlačítka > dokončíte konfiguraci.
Po ukončení nastavování odejdete zmenu stiskem tlačítka EXIT/CANCEL.
22 PRESTIGIO P370DVD-X
Page 67

Funkce MELODY
Pokud je tato funkce aktivována, TV přijímač vždy po zapnutí či
vypnutí přehraje melodii.
Stiskněte tlačítko TV.MENU a na obrazovce se objeví OSD menu.
Pomocí tlačítek /\ / \/ vyberte položku FUNCTION a pak stiskněte
tlačítko >.
Pomocí tlačítek /\ / \/ vyberte položku MELODY a pak stiskněte
tlačítko >.
Pomocí tlačítek /\ / \/ vyberte položku ON (zapnuto). Každým
stisknutím tohoto tlačítka je funkce Melody buď zapnuta, nebo vypnuta.
Po ukončení nastavování odejdete zmenu stiskem tlačítka EXIT/CANCEL.
Změna hesla
Pro možnost sledování nebo naopak pro možnost uzamčení kanálu
vrežimu dětského zámku CHILD LOCK potřebujete nastavit heslo.
Stiskněte tlačítko TV.MENU a na obrazovce se objeví OSD menu.
Pomocí tlačítek /\ / \/ vyberte položku FUNCTION a pak stiskněte
tlačítko >.
Pomocí tlačítek /\ / \/ vyberte položku CHANGE PASSWORD a
pak stiskněte tlačítko >.
Vložte pomocí číselných tlačítek dálkového ovládání heslo. Výchozí
heslo je nastaveno zvýroby na 0000.
Vložte pomocí číselných tlačítek své změněné heslo.
Pro potvrzení hesla vložte nové heslo pomocí číselných tlačítek ještě jednou. Toto 4 místné číslo si zapamatujte.
CZ
Poznámka
• Pro zabezpečení vašeho TV přijímače byste měli následující informaci vtomto návodu začernit.
• Pokud heslo zapomenete, univerzální heslo je: 2-4-8-6.
23PRESTIGIO P370DVD-X
Page 68

Funkce teletext
Teletext
CZ
Většina televizních kanálů poskytuje textové informační služby pomocí teletextu. Mezi tyto informace většinou patří:
- televizní program
- zprávy a předpověď počasí
- sportovní zpravodajství
- cestovní informace
Tyto informace jsou rozděleny do očíslovaných stránek podle tohoto schématu:
Oddíl Obsah
A Číslo vybrané stránky
B Identita vysílaného kanálu
C Číslo aktuální stránky nebo vyhledávací indikátor
D Datum a čas
E Vlastní teletext
F Stavové informace
Zobrazení informací zteletextu
Teletextové informace můžete kdykoliv zobrazit na vašem TV přijímači.
Pro správné zobrazení teletextu je důležitý stabilní a silný příjem vybraného kanálu steletextem, neboť jinak:
- mohou některé informace chybět
- některé stránky nemusí být zobrazeny vůbec
Pomocí tlačítek PREPAGE nebo NEXTPAGE vyberte kanál, který poskytuje teletextové informace.
Stiskněte tlačítko TTX pro aktivaci režimu teletextu.
Výsledek: Dojde kzobrazení obsahové stránky sinformacemi teletextu. Každým stiskem tlačítka INDEX dojde kznovuzobrazení této
stránky.
Pokud si přejete zobrazit aktuální vysílání kanálu spolu steletextem, stiskněte tlačítko MIX.
Pro odchod zteletextové obrazovky stiskněte tlačítko CANCEL.
24 PRESTIGIO P370DVD-X
Page 69

Výběr stránky podle čísla
Číslo stránky můžete vložit přímo pomocí číselných tlačítek na dálkovém ovládání.
Stiskem odpovídajících číselných tlačítek vložte 3-místné číslo stránky tak, jak je uvedeno na úvodní obsahové stránce teletextu. TV
přijímač začne vyhledávat zadanou stránku a po jejím načtení ji zobrazí na obrazovce.
Pokud je vybraná stránka spojena sněkolika jinými druhotnými stránkami, jsou tyto druhotné stránky také postupně zobrazovány.
Pokud chcete zastavit zobrazení na určité stránce a ponechat si tuto stránku na obrazovce déle např. pro její důkladné přečtení,
stiskněte tlačítko HOLD. Po jeho opětovném stisknutí se systém zobrazování navrátí do původního stavu.
Použití různých možností zobrazování:
Pro zobrazení: Stiskněte:
Teletextu a normálního vysílání stiskněte 2 x TTX/MIX ( / )
Skrytého textu /např. odpovědi na kvizy/ REVEAL ( )
Normální obrazovky REVEAL opět
Druhotné stránky vložením jejího 4-místného čísla SUBPAGE ( )
Další stránky NEXTPAGE ( )
Předchozí stránky PREPAGE ( )
Písmen dvojnásobné velikosti v: SIZE
• horní polovině obrazovky • jedenkrát
• dolní polovině obrazovky • dvakrát
Normální obrazovky • třikrát
Použití funkce FLOF pro výběr stránky
CZ
Různá témata, která jsou zahrnuta vteletextových stránkách, jsou barevně kódována a mohou být vybrána stisknutím barevných
tlačítek na dálkovém ovládání.
Zobrazte teletextovou stránku stisknutím tlačítka MIX.
Stiskněte barevné tlačítko sbarvou, která odpovídá tématu, jež chcete vybrat. Dostupná témata jsou uvedena ve stavové lince stránky.
Výsledkem je zobrazení stránky sdalšími, barevně odlišenými informacemi, které mohou být vybrány stejným způsobem.
Pro zobrazení předešlé nebo následující stránky stiskněte odpovídající barevné tlačítko.
Pro zobrazení podstránky se řiďte následujícími kroky:
• Stiskněte tlačítko SUBPAGE pro podstránku. Výsledkem je zobrazení dostupných podstránek.
• Vyberte požadovanou podstránku. Vpodstránkách lze listovat pomocí tlačítek PREPAGE a NEXTPAGE.
Uložení teletextových stránek
Tento TV přijímač vám dává možnost uložit až 1000 teletextových stránek pro možnost jejich pozdějšího prohlížení.
Vyberte režim LIST pomocí tlačítka L/F. Výsledkem je zobrazení 4 třímístných čísel vrůzných barvách. Tlačítko slouží kpřepínání mezi
režimy LIST a FLOF.
Stiskněte barevná tlačítka vbarvách odpovídajících stránkám, které budou nahrazeny.
Vložte nová čísla stránek pomocí číselných tlačítek.
Opakujte kroky 2 a 3 pro každou stránku, kterou chcete uložit, pokaždé spoužitím tlačítek odlišných barev.
Tiskněte tlačítko STORE tak dlouho, dokud odpovídající bloky blikají.
25PRESTIGIO P370DVD-X
Page 70

Funkce ve spojení s PC
Připojení kPC
CZ
Postup připojení kPC
Spojte pomocí D-SUB kabelu vstupní konektor PC D-SUB INPUT na vašem TV přijímači svýstupním konektorem pro připojení monitoru
na vašem počítači.
Propojte audio kabelem konektor PC AUDIO na TV přijímači svýstupním audio konektorem vašeho počítače. Toto propojení může být
realizováno pouze vpřípadě, že váš PC skutečně disponuje výstupním audio konektorem.
Postup pro sledování obrazového výstupu zpočítače na obrazovce TV přijímače
Zapněte počítač a zkontrolujte, zdali jsou jeho nastavení správná.
• Pokud je PC nesprávně konfigurován, obraz na obrazovce může být zdvojený nebo zkreslený.
• Pro nastavení počítače nahlédněte na stranu 34.
Stiskněte tlačítko LINE a vyberte režim PC INPUT.
Nastavení pro spojení s PC
Stiskněte tlačítko TV.MENU a na obrazovce se objeví OSD menu.
Pomocí tlačítek /\ / \/ vyberte položku PC a pak stiskněte tlačítko
>.
Nastavení horizontální pozice
Pomocí tlačítek /\ / \/ vyberte položku H POSITION a pak stiskněte tlačítko >.
26 PRESTIGIO P370DVD-X
Page 71

Nastavení vertikální pozice
Pomocí tlačítek /\ / \/ vyberte položku V POSITION a pak stiskněte tlačítko >.
Inicializační nastavení (RESET)
Pomocí tlačítek /\ / \/ vyberte položku RESET a pak stiskněte tlačítko >. Tato funkce obnoví nastavení vašeho TV přijímače na původní
hodnoty, na které byl nastaven ve výrobě.
Po ukončení nastavování odejdete zmenu stiskem tlačítka EXIT/CANCEL.
Automatické nastavení
Fázi a frekvenci zobrazení při připojení k PC můžete také nastavit automaticky.
Pomocí tlačítek /\ / \/ vyberte položku AUTO ADJUST a pak stiskněte tlačítko >. Nastavení TV přijímače jako PC monitoru je pak
provedeno automaticky.
CZ
27PRESTIGIO P370DVD-X
Page 72

Funkce DVD přehrávače (v závislosti na modelu)
Přehrávání DVD disků
CZ
Zapněte TV přijímač a externí audio systém. Ujistěte se, že regionální kód pro DVD disky, který je nastaven na vašem TV přijímači,
odpovídá kódu DVD disku. Pokud tomu tak není, disk nebude možno přehrát.
Stiskněte tlačítko LINE.
Vložte do přístroje DVD disk. Ujistěte se, že je vložen potištěnou stranou směrem vzhůru. Přehrávání DVD.
Vložený disk bude automaticky přehrán, v závislosti na právě zvoleném programovém režimu.
- Pokud si přejete přehrávání zastavit, stiskněte tlačítko STOP.
- Pokud si přejete dočasně zastavit přehrávání disku, stiskněte tlačítko PLAY/PAUSE.
Pokud si v režimu pauzy přejete opět obnovit přehrávání, stiskněte tlačítko PLAY/PAUSE ještě jednou.
Zobrazení informací o přehrávání
Pomocí níže uvedených instrukcí vyberte žádaný jazyk disku, pokud je tento disk nahrán vněkolika jazycích.
Stiskněte tlačítko DISPLAY
Při přehrávání DVD disků
• Zobrazuje se hlavní menu, zbývající tituly, přehrané kapitoly a zbývající kapitoly.
• Opětovným stiskem tlačítka se objeví zbývající tituly pro kapitolu.
• Dalším stiskem se zobrazí informace o odehraných kapitolách.
• Dalším stiskem informace o zbývajících kapitolách.
• Dalším stisknutím se zobrazování informací ukončí.
Při přehrávání CD disků
• Zobrazí se odehraný čas.
• Opětovným stiskem se zobrazí zbývající čas do konce skladby.
• Dalším stiskem se zobrazí celkový přehraný čas.
• Dalším stiskem se zobrazí celkový zbývající čas.
• Opětovným stiskem se navrátíte knormálnímu stavu zobrazení.
Hledání specifické scény/skladby
Svyužitím níže popsaných funkcí můžete přeskočit během přehrávání na specifickou kapitolu nebo skladbu.
Rychle vpřed/zpět
Tuto funkci můžete využít pro rychlé přehrání obsahu disku vpřed nebo zpět. Během hledání je hlasitost vypnuta (neplatí pro CD a
MP3 disky).
28 PRESTIGIO P370DVD-X
Page 73

Stiskněte tlačítko << nebo >>.
• Při přehrávání DVD disků vyvolá stisknutí tlačítka funkci zrychlení vnásledujícím pořadí: x2 – x4 – x8 – x16 – x32 – x64 –
normální rychlost.
• Při přehrávání disků VCD jsou rychlosti následující: x2 – x4 – x8 – x16 – x32 – normální rychlost.
• Pro přehrávání CD a MP3 disků platí: x2 – x4 – x8 – normální rychlost
Přeskok vpřed/vzad
Tuto funkci můžete využít kpřeskoku na další nebo předešlou kapitolu u disků DVD nebo kpřeskoku na následující či předešlou
skladbu u disků CD a MP3.
Stiskněte tlačítko |<< nebo >>|.
• Pokud je stisknuto tlačítko |<<, dojde k přeskoku přehrávání na následující kapitolu nebo skladbu podle přehrávaného disku (DVD
nebo CD).
• Pokud je stisknuto tlačítko >>|, přehrávání přeskočí na začátek právě přehrávané kapitoly (během přehrávání DVD) a na kapitolu
předcházející, pokud je toto tlačítko stisknuto podruhé.
Pomalu vpřed/zpět
Pro obnovení normálního režimu přehrávání stiskněte tlačítko PLAY/PAUSE.
Stiskněte tlačítko << nebo >>.
• Při přehrávání disku se každým stisknutím tohoto tlačítka začne rychlost přehrávání postupně snižovat vnásledujícím pořadí: x1/
2 – x1/4 – x1/8 – x1/16 – normální rychlost.
Pro obnovení normálního režimu přehrávání stiskněte tlačítko PLAY/PAUSE.
Přehrávání krok za krokem po jednotlivých obrazech
Stiskněte tlačítko PLAY/PAUSE.
Stiskněte tlačítko |<< nebo >>|.
• Každým stisknutím tlačítka >>| se posunete o jeden obrazový krok dopředu.
• Každým stiskem tlačítka |<< se posunete o jeden obrazový krok dozadu.
Pro obnovení normálního režimu přehrávání stiskněte tlačítko PLAY/PAUSE.
CZ
Poznámka:
Funkce po krocích zpět a pomalu zpět není podporována u disků VCD.
Opakování přehrávaného titulu, kapitoly (DVD) nebo skladby (CD)
Opakování přehrávání
Tato funkce umožňuje opakovat přehrávání kapitoly, titulu nebo skladby.
Stiskněte tlačítko REPEAT.
• Každé stisknutí tohoto tlačítka změní opakovací režim následovně:
Pro disky DVD – kapitola – titul – opakování vypnuto.
Pro disky CD: skladba – celý disk – opakování vypnuto.
Pro návrat do normálního režimu přehrávání tiskněte tlačítko REPEAT tak dlouho, dokud zobrazovky nezmizí hlášení o opakování.
29PRESTIGIO P370DVD-X
Page 74

Opakování přehrávání určitého úseku
Během přehrávání stiskněte tlačítko A-B vokamžiku, který chcete zvolit jako začátek části kopakování.
Vokamžiku, kdy je přehráváno místo, které chcete zvolit jako konec části kopakování, stiskněte tlačítko A-B opět. Na obrazovce se
objeví A-B a tato část začne být neustále opakována.
Pro návrat knormálnímu režimu tiskněte tlačítko A-B tak dlouho, dokud nezmizí indikátor A-B zobrazovky.
CZ
• Opakování kapitoly (Chapter Repeat): opakuje přehrávání jednotlivé kapitoly.
• Opakování titulu (Title Repeat): opakuje přehrávání jednotlivého titulu.
• Opakování disku (Repeat Disc): opakuje přehrávání celého disku.
• Opakování skladby (Repeat Track): opakuje přehrávání dané skladby.
• Opakování vypnuto (Repeat Off): opuštění režimu opakování.
Změna jazyka/jazyka titulků
Výběr jazyka na disku, který obsahuje více než jeden jazykový doprovod, provedete podle následujících instrukcí.
Změna jazyka audio doprovodu
Vinicializačním nastavení je možno provést změnu jazyka zvukové stopy, pokud disk tuto funkci podporuje a je nahrán vícejazyčně.
Pokud váš disk tuto funkci podporuje, provedete změnu následujícím způsobem:
Stiskněte tlačítko AUDIO
• Při přehrávání DVD disku je pak každým dalším stiskem tohoto tlačítka změněn jazyk zvukového doprovodu.
• Při přehrávání CD disku se mění výstup signálu následujícím způsobem: mono vlevo – mono vpravo – mix mono – stereo.
Změna jazyka titulků
Pokud disk tuto funkci podporuje a obsahuje vícejazyčně nahrané titulky, můžete jejich jazyk měnit podle vašeho přání.
Stiskněte tlačítko SUBTITLE
Tiskněte toto tlačítko SUBTITLE opakovaně tak dlouho, dokud se neobjeví titulky ve vámi požadovaném jazyce.
Pokud chcete titulky vypnout, tiskněte toto tlačítko tak dlouho, dokud není zobrazeno hlášení SUBTITLE OFF.
Změna velikosti a úhlu zobrazení
Změna velikosti obrazovky
Stiskněte tlačítko ZOOM
• Každým stisknutím tohoto tlačítka dojde ke změně velikosti obrazovky následovně: x 1,5 - x 2 - x 3 - OFF (vypnuto).
• Pokud během zoomovacího režimu stisknete tlačítko pro směr, zoomovací bod se posune tímto směrem.
• Pro návrat k normální velikosti obrazovky tiskněte tlačítko ZOOM tak dlouho, dokud z obrazovky nezmizí indikátor zoomovací
funkce.
• Tato funkce je aktivní pouze pro přehrávání disků DVD.
Sledování scén zrůzných úhlů
Některé DVD disky obsahují scény, které byly snímány více kamerami zrůzných úhlů. Pokud disk tuto funkci podporuje, můžete měnit
úhel pohledu na scénu.
30 PRESTIGIO P370DVD-X
Page 75

Stiskněte tlačítko ANGLE
• Stiskem tlačítka se mění úhel pohledu na scénu a ten je pak zobrazen na obrazovce.
• Pokud je scéna snímána z více úhlů, objeví se na obrazovce také ikona kamery (CAMERA). Pokud nejsou jiné úhly záběru scény
k dispozici, objeví se ikona (NO).
• Pokud jsou na disku nahrány záběry kamery z různých úhlů, zobrazí ikona (CAMERA) také momentální úhel kamery, jeho číslo
a také čísla dalších dostupných úhlů záběru kamery.
• Tato funkce je dostupná pouze pro DVD disky, které obsahují scény snímané z různých úhlů.
Další funkce
Vypnutí zvuku
Zvuk můžete dočasně vypnout stisknutím tlačítka MUTE.
• Toto tlačítko jednorázově vypne zvuk. Pokud je zvuk vypnutý, dalším stiskem tohoto tlačítka jej obnovíte.
Základní menu disku
Některé DVD disky obsahují své vlastní menu. Někdy je toto menu zobrazeno automaticky po založení disku, někdy se objeví jen
vpřípadě, pokud stisknete tlačítko MENU nebo TITLE na dálkovém ovládání.
Stiskněte tlačítko MENU
• Menu, které je obsažené na disku, se objeví na obrazovce. U každého disku má menu jiný vzhled.
Stiskněte tlačítko TITLE
• Titul, který je obsažen na disku, se objeví na obrazovce. U každého disku má menu titulů jiný vzhled.
Programování vurčeném pořadí
CZ
Přehrávání podle programu
Tato funkce může být použita pro přehrávání titulů, kapitol či
skladeb na disku podle vašeho programu.
Stiskněte tlačítko PROGRAM
Na obrazovce se objeví programové menu.
Vyberte číslo skladby (Track NO u CD disku), které jsou zobrazeny
na obrazovce.
Můžete vybrat další číslo skladby do programu až do počtu 99
položek. Opakujte krok 2 až do poslední žádané položky, kterou
chcete do programu vložit.
Stisknutím tlačítka PLAY vyberte “Start” – přehrávání pak začne vpředem naprogramované sekvenci.
Pro zastavení přehrávání všech naprogramovaných titulů, kapitol či skladeb použijte tlačítko EXIT, kterým vyberete položku “Exit”.
Nastavení specifického titulu DVD
nebo kapitoly
Pomocí této funkce můžete vstoupit přímo na kapitolu nebo skladbu,
kterou si přejete.
31PRESTIGIO P370DVD-X
Page 76

Programové přehrávání přímého výběru pro DVD disky
Stiskněte tlačítko GOTO
Použitím tlačítka </> vyberte požadovanou položku a stiskněte tlačítko ENTER.
• Kapitola: zadejte číslo kapitoly pomocí číselných tlačítek.
• Titul: zadejte číslo stopy pomocí číselných tlačítek.
CZ
• TT Čas titulu: zadejte pomocí číselných tlačítek požadovaný čas titulu.
Pro potvrzení stiskněte tlačítko ENTER.
Přímé hledání pro CD disky
Stiskněte tlačítko GOTO a vyberte požadovanou položku.
• Každé stisknutí tlačítka GOTO mění režim opakování v
následujícím pořadí: Jít na disk - - : - - -> Jít na disk XX:XX
Vložte číselný údaj pomocí numerických tlačítek.
• Přejít na disk: Stiskněte číslo (numerická tlačítka) žádaného
času na disku.
• Přejít na skladbu: Stiskněte číslo (numerická tlačítka) žádané
skladby.
• Výběr skladby: Zadejte číslo skladby použitím numerických tlačítek.
Přehrávání MP3 disků
Přehrávání CD/CD-RW disků se zvukovými soubory formátu MP3.
Přehrávání souboru MP3
Vložte disk sMP3 soubory do mechaniky. Ujistěte se, že disk je
vložen potištěnou stranou nahoru.
Použitím tlačítka /\ / \/ nalezněte požadovaný adresář.
Pomocí tlačítka /\ / \/ vyberte požadované soubory MP3.
Stisknutím tlačítka ENTER začne přehrávání souboru.
Opakování přehrávání
Opakované přehrávání CD/CD-RW disků se soubory MP3.
Stiskněte tlačítko REPEAT
• Každým stisknutím tlačítka REPEAT se zobrazí jiný režim opakování vtomto pořadí: Opakovat skladbu - Opakovat adresář Opakování vypnuto (OFF).
Poznámka
• Název souboru je zobrazen pouze vangličtině.
• Přehrávač je kompatibilní s MPEG-1 Audio Layer 3. Není kompatibilní s těmito standardy: MPEG-2
Audio Layer 3, MPEG-2,5 Audio Layer 3, MP1, MP2 atd.
• Nepřehrávejte CD-R/RW disky obsahující jiné než hudební CD soubory, soubory MP3 a JPEG.
• Programování přehrávání není možné sdisky MP3.
• Při zápisu souborů MP3 na CD-R/RW disk zvolte zapisovací softwarový formát ISO 9660 level 1.
32 PRESTIGIO P370DVD-X
Page 77

Přehrávání disků DIVX (volitelné)
Opakované přehrávání CD/CD-RW disků se soubory DIVX.
UPOZORNĚNÍ: Tento titulek lze vybrat pouze v případě, jestliže se jeho název shoduje s názvem
titulu.
Přehrávání DIVX souborů
Vložte disk se soubory DIVX do mechaniky.
Ujistěte se, že disk je vložen potištěnou stranou nahoru.
Pomocí tlačítek /\ / \/ vyhledejte žádaný adresář.
Pomocí tlačítek /\ / \/ vyberte žádané DIVX soubory k
přehrávání.
Stisknutím tlačítka ENTER začne přehrávání souboru.
Stisknutím tlačítka SUBTITLE vymažete při přehrávání
zobrazované titulky.
Poznámka
• Soubory AVI obvykle obsahují audio a video data - tato data musí být na CD uložena ve formátu ISO
9660.
• Pokud se soubor nezobrazuje na obrazovce, stiskněte tlačítko STOP.
• Při přehrávání DIVX disků je možno přehrávat pouze soubory s koncovkou .avi.
• DTS Audio není podporováno.
• WMA formát není podporován.
• Při vypalování souboru titulků na CD-ROM na vašem PC se ujistěte, že soubor je vypalován jako
soubor SMI.
• Zpětné a zpomalené přehrávání není v případě DIVX disků podporováno.
• Podporované formáty: VIDEO - Divx3. 11 , 4. x , 5. x AUDIO - AC3 , MP3(80kbps ~ 320kbps)
CZ
Přehrávání CD Kodak Picture nebo souborů JPG
Přehrávání CD Kodak Picture a JPG souborů
Při vložení CD disku Kodak Picture je automaticky zahájeno
sekvenční prohlížení obrázků (slideshow). Pokud je vložen disk
se soubory JPEG, objeví se obsah disku na obrazovce.
Vložte Kodak Picture CD nebo disk se soubory JPEG.
• Po vložení je zahájeno automatické přehrávání disku.
• Pokud stisknete tlačítko Přehrávání/pauza, objeví se na
obrazovce menu souboru.
Výběr požadovaného obrázku.
• Pomocí tlačítka /\ / \/ vyberte obrázek, který si chcete prohlédnout.
Stiskněte tlačítko ENTER
• Zobrazovaná položka je zobrazena v plné velikosti.
33PRESTIGIO P370DVD-X
Page 78

Změna velikosti obrazovky
Stiskněte tlačítko ZOOM
• Každým stisknutím tlačítka ZOOM dojde k následující změně velikosti (<<) 25% -> 50% -> 100% (výchozí) -> 150% ->
200%(>>).
CZ
Rotace obrazu
Rotaci obrazu provedete stisknutím tlačítek /\ \/<> . Kdispozici
jsou celkem 4 režimy rotace.
• Tlačítko /\ obraz invertuje
• Tlačítko \/ obraz zrcadlově převrátí
• Tlačítko < obraz otočí doleva
• Tlačítko > obraz otočí doprava
Změna způsobu přeměny jednotlivých
obrázků při sekvenčním prohlížení (slideshow).
Stiskněte tlačítko ANGLE
• K dispozici je celkem 13 efektů přeměny obrázků.
• Každé stisknutí tlačítka ANGLE během přehrávání JPEG obrázků zobrazí jiný režim (efekt) přeměny, jak je popsáno níže:
- režim 1 : Zobrazování shora dolů v otočce.
- režim 2 : Zobrazování zdola nahoru v otočce.
- režim 3 : Zobrazování shora dolů s otočkou ve středu.
- režim 4 : Zobrazování zdola nahoru s otočkou ve středu.
- režim 5 : Vertikální roztažení.
- režim 6 : Zobrazení zleva doprava v otočce.
- režim 7 : Zobrazení zprava do leva v otočce.
- režim 8 : Zobrazení zleva doprava s otočkou ve středu.
- režim 9 : Zobrazení od středu doleva a doprava s otočkou.
- režim 10 : Zobrazení z vnějšku dovnitř s otočkou.
- režim 11 : Horizontální roztažení.
- režim RAND : Náhodné zobrazení.
- bez efektu
Spuštění hudebního slideshow
Kdykoliv je tlačítko SUBTITLE stisknuto v režimu STOP, SLIDE SHOW MODE1 -> SLIDE SHOW MODE2 -> SLIDE SHOW MODE3 -> SLIDE
SHOW OFF bude opakovaně vybráno.
Spuštění hudebního slideshow režimu 1
• Po výběru SLIDE SHOW MODE 1, stiskněte tlačítko ENTER. Skladba MP3 FILE No.1 pak bude automaticky při sekvenčním prohlížení
JPG obrázků přehrávána.
Spuštění hudebního slideshow režimu 2
• Vyberte SLIDE SHOW MODE 2 a stiskněte pro výběr MP3 souboru tlačítko se šipkou.
• Stiskněte tlačítko A-B na dálkovém ovládání a pak stiskněte tlačítko ENTER.
• Vybraný soubor MP3 bude automaticky přehráván spolu s JPEG slideshow.
34 PRESTIGIO P370DVD-X
Page 79

Spuštění hudebního slideshow režimu 3
• Vyberte SLIDE SHOW MODE 3 a stiskněte tlačítko ENTER. Zatímco je skladba MP3 FILE č.1 přehrávána, JPEG obrázky se nemění.
• Poté, co přístroj započne s přehráváním další skladby MP3, je JPEG obrázek nahrazen dalším.
Zastavení režimu slideshow
• Stisknutím tlačítka STOP dojde k zastavení jak přehrávání MP3 souboru, tak i obrázkového slideshow.
Použití nastavovacího menu (SETUP MENU)
Jakmile jednou provedete počáteční nastavení přístroje, přehrávač bude, kdykoliv jej zapnete, vždy pracovat stímto nastavením. Toto
nastavení se nazývá SETUP Data /datové nastavení/ a je možno jej snadno modifikovat a také uložit pomocí nastavovacího menu
/SETUP MENU/. Toto menu zahrnuje všeobecné instrukce pro chování přístroje a poskytuje možnost nastavení a ovládání vpoložkách
GENERAL, LANGUAGE, VIDEO, SPEAKER, AUDIO a CUSTOM SETUP.
Nastavení jazyka (LANGUAGE SETUP)
Stiskněte tlačítko SETUP vokamžiku, kdy je přehrávač zastaven.
Pomocí tlačítka </> se přesuňte na “Language Setup”.
Pomocí tlačítka /\ / \/ se přesuňte na požadovanou položku a
pak stiskněte tlačítko ENTER.
Stisknutím tlačítka /\ / \/ vyberte požadovaný jazyk.
• AUDIO: Menu “audio language”
použijte k výběru preferovaného
jazyka titulků. Pokud disk tuto funkci
podporuje, dojde při přehrávání disku kvolbě vámi zvoleného jazyka titulků.
SUBTITLE: Menu “subtitle language menu” použijte pro výběr preferovaného jazyka titulků. Pokud
disk podporuje funkci vícejazyčných titulků, budou při přehrávání zobrazeny ve vámi přednastaveném
jazyce.
DISC MENU: Volby menu disku můžete využít při volbě jazyka menu disku. Funkce je dostupná
vpřípadě, že disk obsahuje své vlastní menu. Toto menu není totožné smenu přehrávače.
CZ
Nastavení video
Tato funkce slouží pro výběr poměru stran zobrazení na televizní
obrazovce.
Při zastaveném přehrávači stiskněte tlačítko SETUP. Stisknutím
tlačítka </> se přesuňte do nastavení videa (video setup).
Stiskněte tlačítko /\ / \/ a pak stiskněte tlačítko ENTER.
Stiskem tlačítka /\ / \/ vyberte požadovanou položku.
ZOBRAZENÍ NA TV OBRAZOVCE
• 4:3/PS: vyberte tuto volbu, pokud si přejete, aby sledovaný film vyplnil celou plochu obrazovky.
Může to ale znamenat, že levý a pravý okraj filmu nebude viditelný.
• 4:3/LB: Vyberte tuto volbu, pokud si přejete sledovat filmy v jejich původním originálním
zobrazení poměru stran. Film ale může mít černé pruhy na spodním i horním okraji obrazovky.
• 16:9/WIDE: tuto volbu vyberte, pokud si přejete sledovat film na širokoúhlé obrazovce.
35PRESTIGIO P370DVD-X
Page 80

REŽIM OBRAZU - PIC MODE
• AUTO: Režim zobrazení obrazu bude vybrán automaticky podle dostupných informací z disku.
• FILM: Výběr optimálního zobrazení pro pomalejší scény.
• VIDEO: Výběr optimálního zobrazení pro filmy.
• SMART: Dosažení optimálního zobrazení pomocí kombinace “Film” a “Video”.
CZ
SPOŘIČ OBRAZOVKY - SCREEN SAVER
- Pomocí výběru “On” a “Off” můžete zapnout nebo vypnout funkci ochrany obrazovky.
Nastavení reproduktorů
Při zastaveném přehrávači stiskněte tlačítko SETUP. Stisknutím
tlačítka </> se přesuňte do nastavení reproduktorů (speaker
setup).
Stiskněte tlačítko /\ / \/, kterým se přesunete na požadovanou
položku, a pak stiskněte tlačítko ENTER.
Stiskem tlačítka /\ / \/ vyberte požadovanou položku.
• Downmix
- LT/RT: Vyberte toto nastavení,
pokud si přejete, aby přední reproduktory produkovaly prostorový zvuk.
- STEREO: Při tomto nastavení budou přední reproduktory produkovat zvuk ve stereofonní kvalitě.
Nastavení audio
Při zastaveném přehrávači stiskněte tlačítko SETUP. Stisknutím
tlačítka </> se přesuňte do nastavení audio (audio setup).
Stiskněte tlačítko /\ / \/, kterým se přesunete na požadovanou
položku, a pak stiskněte tlačítko ENTER.
Stiskem tlačítka /\ / \/ vyberte požadovanou položku.
DIGITAL
- ON : Nastavte pro odpojení výstupu
digitálního zvuku.
- OFF : Nastavte pro připojení výstupu digitálního zvuku.
DUAL MONO
- STEREO : Zvukový výstup ve kvalitě stereo.
- LEFT MONO : Pro stereo výstup pouze levého připojeného kanálu audio doprovodu.
- RIGHT MONO : Pro výběr výstupu pravého kanálu audio doprovodu.
- MIXED MONO : Pro výběr výstupu levého i pravého kanálu audio doprovodu.
Dynamic
- Pro vylepšení kvality zvukového výstupu (4/4, 3/4, 2/4, 1/4, OFF).
- Výběr položky “OFF” znamená návrat k výchozím hodnotám.
Uživatelské nastavení
Při zastaveném přehrávači stiskněte tlačítko SETUP. Stisknutím tlačítka </> se přesuňte do uživatelského nastavení (custom setup).
Stiskněte tlačítko /\ / \/, kterým se přesunete na požadovanou položku, a pak stiskněte tlačítko ENTER.
Stiskem tlačítka /\ / \/ vyberte požadovanou položku.
36 PRESTIGIO P370DVD-X
Page 81

• Logo
- MPG Logo : Použití původního loga při inicializaci obrazovky.
- JPG Logo : Použití inicializační
obrazovky, stažené z CD.
“Pokud používáte DivX (volitelné),
pak je JPG logo podporováno.
Pokud používáte DVD (volitelné), pak
JPG logo podporováno není.”
• Rodičovský zámek
- Nastavte heslo a vyberte úroveň
hodnocení obsahu DVD disků nevhodných pro děti.
• Změna hesla
1 Při zastaveném přehrávači stiskněte
tlačítko SETUP. Stisknutím tlačítka </
> se přesuňte do nastavení hesla
(password setup).
2 Stiskněte tlačítko /\ / \/ a pak
stiskněte tlačítko ENTER.
3 Stiskem tlačítka /\ / \/ vyberte
požadovanou položku.
4 Vložte vaše původní heslo a pak
heslo nové o délce 4 čísel.
5 Pro potvrzení vložte znovu nové
heslo a stiskněte tlačítko ENTER.
• Výchozí heslo z výroby je
nastaveno na 0000.
• Výchozí (default) hodnoty
- Pokud uživatel vybere funkci
resetování z nastavovacího menu, budou všechny hodnoty provedených nastavení nastaveny zpět na
původní hodnoty z výroby. (Kromě rodičovského zámku a nastavení hesla - tyto hodnoty nebudou
změněny).
CZ
37PRESTIGIO P370DVD-X
Page 82

Funkce DivX (závisí na konkrétním modelu)
DivX (volitelné)
CZ
Přehled funkcí DivX
• Soubory AVI obvykle obsahují audio a video data - tato data musí být na CD uložena ve formátu ISO 9660.
• Při přehrávání DIVX disků je možno přehrávat pouze soubory s koncovkou .avi.
• WMA formát není podporován.
• Při vypalování souboru titulků na CD-ROM na vašem PC se ujistěte, že soubor je vypalován jako soubor SMI.
• Zpětné a zpomalené přehrávání není v případě DIVX disků podporováno.
VIDEO
• Obsah DivX 3.11
• Obsah DivX 4 (Založen na jednoduchém profilu MPEG-4)
• Obsah DivX 5 (Jednoduchý profil MPEG-4, dvousměrné obrazové rámce, Qpel a GMC nejsou podporovány).
Podpora všech hodnot rozlišení až do maxima 720 X 480 @ 30fps
Makrobloky za sekundu 40500
Maximální průměrný bitový tok 4000 kbps
Maximální špičkový bitový tok každé 3 sekundy videa 10000 kbps
Minimální hodnota VBV bufferu (kbytes) 384 kbytes\
Poznámka
Naše řešení podporuje maximální konstantní bitový tok 6 Mbps.
720 X 576 @ 25fps
AUDIO
DivX certifikovaná zařízení jsou schopna přehrávat jakýkoliv prokládaný audio soubor MP3 s jakýmkoliv bitovým tokem, a to jak CBR,
tak i VBR.
Audio musí být vzorkováno na standardních frekvencích jako je 32 kHz či 44,1 kHz a musí odpovídat specifikaci pro AVI soubory.
38 PRESTIGIO P370DVD-X
Page 83

DivX® VOD Playback
Tato kapitola obsahuje informace, jak přehrávat DivX VOD.
1 V režimu zastavení disku stiskněte tlačítko SETUP.
2 Pomocí tlačítka </> se přesuňte do režimu “Custom”
3 Pomocí tlačítek /\ / \/ se přesuňte na položku “DivX® VOD” a pak stiskněte tlačítko ENTER.
4 Objeví se následující hlášení:
YOUR REGISTRATION
CODE IS : XXXXXXXX
TO LEARN MORE
GO TO WWW.DIVX.COM/VOD
5 Registrační kód je: XXXXXXXX prosíme vyplnit 8 místný registrační kód.
6 V případě, že stahujete soubory z internetu, ujistěte se prosím, že byl registrační kód vložen ještě před stahováním.
7 Vypalte stažený soubor na CD-R nebo CD-RW disk.
8 Přehrajte CD-R nebo CD-RW disk.
9 Ve spodní části se objeví hlášení. Toto zapůjčené video může být ještě x-krát přehráno. Přehrání končí zastavením přehrávání,
přehráním jiného videa nebo vypnutím přehrávače. Chcete nyní využít další možnost z vašich x možností přehrání nyní ?
10 Pokud vyberete “YES”, soubor bude přehrán, jinak se objeví seznam souborů.
Poznámka
• Pokud budete zkoušet přehrávat jakýkoliv soubor přes povolený x-počet zhlédnutí, objeví se následující hlášení: “This rental
expired” (Toto zapůjčení vypršelo) a přehrání nebude možné. Pokud se budete pokoušet přehrát zapůjčený disk, jehož zápůjční
podmínky jsou již prošlé, zobrazí se následující hlášení: “This rental expired” (Toto zapůjčení vypršelo).
• Pokud si budete přát přehrávat další zapůjčený disk, postupujte podle výše uvedeného postupu od bodu 1.
• V případě, že je vložen chybný registrační kód.
Bude zobrazeno hlášení o neplatném registračním kódu a soubor nebude možné přehrát.
“This video player is not authorized to play this video” (Tento videopřehrávač není oprávněn k přehrání tohoto videa).
CZ
Použití ramena pro montáž na zeď
Váš TV přijímač je vhodný i pro montáž na zeď pomocí speciálního ramene. Pro montáž vašeho TV přijímače na zeď použijte ramena,
které poskytuje výrobce TV přijímače. Pro nákup tohoto ramene kontaktujte prodejce, u kterého jste televizní přijímač zakoupili.
Detailní informace pro montáž na zeď naleznete vnávodu, který je přiložen kramenu.
39PRESTIGIO P370DVD-X
Page 84

Možné problémy a jejich řešení
Pokud se při používání tohoto TV přijímače objeví nějaké problémy, zkuste před tím, než budete kontaktovat odborný servis, vyřešit
problém svépomocí podle následujících rad. Pokud váš problém níže uvedené rady nevyřeší, kontaktujte odborný servis. Nikdy
nezkoušejte váš TV přijímač opravovat sami.
CZ
• Příznaky, které mohou znamenat problém
Tyto příznaky se mohou objevit i vpřípadě, že váš TV přijímač nevykazuje žádnou závadu. Postupujte nejprve podle níže popsaných
instrukcí a pokud pomocí nich problém nevyřešíte a ten přetrvává, přijímač vypněte a kontaktujte odborný servis .
Příznak Možný problém Možné řešení
Na obrazovce se neobjevuje Problém s připojením napájení. Zkontrolujte připojení napájecího kabelu do
žádný obraz a svítivá dioda LED jeho odpovídajícího konektoru. Stiskněte
nesvítí. tlačítko napájení ještě jednou.
TV přijímač je zapnut, ale na Jas je nastaven na příliš nízkou úroveň. Nastavte jas a kontrast tak, aby obraz byl jasně
obrazovce se neobjeví žádný obraz. Fluorescenční výbojka, která zajišťuje viditelný. Fluorescenční výbojka obrazovky má
Při trvalém sledování neměnného Tento jev je zapříčiněn vlastnostmi LCD obrazovky. V závislosti na počtu platných pixelů se
obrazu je generován obraz i po mohou vyskytovat i pixely černé nebo světlé. Tento počet je menší než 0,005% z
jeho zmizení. celkového počtu všech pixelů a tento jev není považován za závadu.
Na obrazovce se neobjevuje Neshoda mezi externím zařízením Nastavte odpovídající vstup.
žádný obraz, chybí zvuk. a zvoleným vstupem.
Obraz je zobrazen, ale chybí zvuk. Hlasitost je nastavena na minimum. Zkuste zvýšit hlasitost. Stiskněte tlačítko MUTE
Dálkové ovládání nefunguje. Baterie byly vloženy do dálkového Baterie vyjměte a vložte je do dálkového
Z TV přijímače je slyšitelný zvuk Tento jev může nastat, pokud používáte Přemístěte rádio do větší vzdálenosti od
radia. rádio v bezprostřední blízkosti TV TV přijímače.
Barevným zobrazením chybí barva. Nasycení barev je nastaveno na 0 Nastavte nasycení barev na hodnotu 100 nebo
Na obrazovce se objevuje Tento jev může mít příčinu v odrazech Zkontrolujte, zdali se ve vašem okolí
zdvojený obraz (duchy). přijímaného signálu TV vysílání v horách, nenacházejí překážky, které mohou způsobovat
Obraz je rozmazaný nebo se v něm Anténa není nastavena do optimálního Zkontrolujte správnost směru nastavení antény.
objevuje “sněžení”. směru pro příjem. Anténní kabel je Zkontrolujte, jestli je konektor anténního
zpětné podsvětlení obrazovky, není životnost cca 50.000 hodin. S výměnou
v pořádku. fluorescenční výbojky se obraťte na odborný
servis.
Funkce MUTE je aktivní. ještě jednou. Zkontrolujte kabelová propojení.
Audio kabel je odpojený.
ovládání s nesprávnou polaritou. ovládání znovu se správnou polaritou.
Baterie jsou vybité. Vyměňte vybité baterie za nové.
přijímače.
nebo na hodnotu blízkou 0. méně.
v budovách, mohou jej způsobovat i odraz signálu. Může také pomoci přesměrování
vzrostlé stromy v blízkosti TV přijímače. přijímací antény.
odpojen. kabelu správně připojen do vašeho TV
přijímače.
40 PRESTIGIO P370DVD-X
Page 85

Příznak Možný problém Možné řešení
Objevuje se hlášení Zdroj signálu je nesprávně připojen. Ujistěte se, že je počítač zapnut. Ujistěte se, že
„No input signal“. všechny kabely jsou správně a důkladně
připojeny. Ujistěte se, že je vstupní signál vaším
TV přijímačem podporován.
Vstupní signál není tímto TV Ujistěte se o vhodnosti vstupního signálu. Ujistěte
přijímačem podporován. se o správnosti použitého kabelu, který
používáte pro video signál.
Obraz celkově bliká. Tento výrobek byl ve výrobě optimálně nastaven pro sledování TV kanálů.
Pokud pozorujete statický obraz, např. obrázky zPC, blikání se může objevovat a není
vadou výrobku.
Pokud dálkové ovládání nefunguje správně, zkontrolujte:
• polaritu vložených baterií
• zdali nejsou baterie vybité
• připojení napájecího kabelu
• zdali není v blízkosti TV přijímače umístěno fluorescenční nebo neonové osvětlení
Varování
Pokud přijímač vykazuje poruchu, odpojte jej nejprve od přívodu el. energie. Používání výrobku, který
vykazuje nesprávné fungování, může zapříčinit požár nebo úraz el. proudem. Před el. zásuvku, do
které hodláte připojovat TV přijímač, nestavte žádné předměty, aby byla zachována možnost rychlého
odpojení TV přijímače vpřípadě jeho poruchy od této el. zásuvky.
CZ
41PRESTIGIO P370DVD-X
Page 86

Technické údaje
Vnější vzhled a technická data výrobku jsou vzhledem kneustálému vývoji a inovacím předmětem změn bez jakéhokoliv dalšího
upozornění. Tento výrobek je určen pro používání vdomácnostech. Neměl by být používán vzemích, kde je používán odlišný televizní
systém nebo odlišné napětí vel. síti.
CZ
TFT LCD panel používá panel, který je složený z jednotlivých pixelů a který při výrobě vyžaduje použití velice sofistikovaných
technologií. Je ale možné, že panel může i přesto obsahovat několik tmavých nebo světlých pixelů. Tyto pixely nemají vliv na výkon
výrobku.
LCD panel
Velikost obrazovky
37" WIDE
Typ
Barevný aktivní maticový TFT LCD
Zobrazení barev
8-bit, 16.7M
DVD přehrávač (volitelné)
Použitelné disky (nepoužívejte disky o průměru 8
cm/3")
DVD-Video / DVD-R /+R / Super VCD / VCD / CD / CD-R / RW
MP3 / WMA / JPEG soubory / Kompatibilní s Picture CD Disc
Poměr stran zobrazení
16:9, 4:3 Letter Box, PAN&SCAN
Jazyk
Audio (9), Titulky (9) (+ostatní)
Výstupy audio
Digitální koaxiální výstup: Dolby digital, DTS digital Output, Analog Audio out : Down Mix 2 CH Stereo, Lt/Rt
TV/VIDEO
Tuner/kanály
VHF: Kanál E2 ~ Kanál E12
UHF: Kanál E21 ~ Kanál E69
CATV: Kanál S1 ~ Kanál S41
Systém televizního vysílání : PAL, SECAM: B/G, D/K, I, L, L’
Anténní připojení
VHF, UHF: 75ohm
Video signál
PAL, SECAM, NTSC(3.58/4.43)
PC
Synchronizace
Horizontální F
30 ~ 60KHz
Vertikální F
56 ~ 75Hz
Kvalita barev
16,772,216 barev
Maximální rozlišení
1024 X 768
Oddělení signálu
TTL, anoda nebo katoda
Zobrazení barev
8-bit, 16.7M
Rozhraní
D-sub
DVI
DVI-D Only
Výstupní výkon audio
10 W x 2
Příkon
Maximálně 200 W
Příkon Stand by
Méně než 3,5 W
Vstupní napětí
AC 100-240V~, 50/60Hz
42 PRESTIGIO P370DVD-X
Page 87

Rozměry
S podstavcem
958 (Š) X 730.5 (V) X 323.4 (H)
Bez podstavce
958 (Š) X 660.5 (V) X 138.5 (H)
Hmotnost
31 kg
Tento výrobek byl registrován vzhledem ke standardům EMI pro domácí použití. Může být používán ve všech oblastech.
Příslušenství
Dálkové ovládání, baterie typu AAA, návod k obsluze, napájecí
síťový kabel, kabel SCART.
CZ
43PRESTIGIO P370DVD-X
Page 88

Appendix
Standard Signal Mode Table
A TFT LCD TV is configured to support the following 10 signal modes. A user can register up to 10 modes.
CZ
Configure the PC display mode referring to the following table.
For configuration procedures, refer to the Appendix of the PC manual.
PIP Screen Configuration Table
44 PRESTIGIO P370DVD-X
Page 89

Prestigio P370 DVD-X
SK
1PRESTIGIO P370DVD-X
Page 90

Bezpečnostné inštrukcie
Výstraha
ABY STE PREDIŠLI VZNIKU POŽIARU ALEBO ÚRAZU ELEKTRICKÝM PRÚDOM,
SK
NEVYSTAVUJTE TOTO ZARIADENIE DAŽĎU ALEBO VLHKOSTI.
TENTO SYMBOL SLÚŽI NA UPOZORNENIE POUŽÍVATEĽA NA PRÍTOMNOSŤ NEBEZPEČNÉHO NEIZOLOVANÉHO NAPÄTIA,
KTORÉ SA NACHÁDZA POD KRYTOM JEDNOTKY, A KTORÉ JE DOSTATOČNE VYSOKÉ NA TO, ABY SPÔSOBILO ÚRAZ
ELEKTRICKÝM PRÚDOM.
INFORMÁCIE O STAROSTLIVOSTI (A SERVISE) NÁJDETE V PRILOŽENEJ LITERATÚRE.
Zneškodnenie starých elektrických a elektronických zariadení
(platné v Európskej únii a v ostatných európskych krajinách so
systémami separovaného zberu odpadu)
Tento symbol na produkte alebo jeho balení indikuje, že produkt nepatrí do bežného domového odpadu. Musí
byť odovzdaný na príslušné zberné miesto určené na recykláciu elektrických a elektronických zariadení. V
prípade nevhodnej likvidácie môže mať produkt nepriaznivý dosah na ľudské zdravie alebo na životné prostredie.
Pri správnej likvidácii predídete potenciálnym negatívnym dopadom na ľudské zdravie alebo na životné prostredie,
ku ktorým by mohlo prísť pri nesprávnej likvidácii tohto produktu. Recyklácia materiálov pomôže zachovať
prírodné zdroje. Viac informácií o recyklácii tohto produktu získate na príslušnom mestskom úrade, u spoločnosti
na likvidáciu odpadkov, alebo na mieste zakúpenia tohto produktu.
2 PRESTIGIO P370DVD-X
Page 91

Dôležité bezpečnostné inštrukcie
Toto zariadenie bolo navrhnuté a vyrobené tak, aby spĺňalo medzinárodné bezpečnostné štandardy, ale podobne, ako pri každom
elektrickom zariadení, ak chcete dosiahnuť najlepšie výsledky a bezpečné ovládanie, musíte mu venovať dostatočnú starostlivosť.
Preštudujte si preto nasledujúce pokyny. Sú to všeobecné pravidlá, ktoré platia pri používaní všetkých elektronických produktov.
• Preštudujte si užívateľský manuál.
• Manuál uchovajte pre prípadné použitie v budúcnosti.
• Dodržujte všetky výstrahy.
• Postupujte podľa užívateľského manuálu.
• Toto zariadenie nepoužívajte v blízkosti vody.
• Zariadenie čistite iba suchou tkaninou.
• Vetracie otvory ničím neprikrývajte. Zariadenie nainštalujte podľa pokynov výrobcu.
• Zariadenie neinštalujte v blízkosti zdrojov tepla, ako sú radiátory, kachle alebo v blízkosti iných zariadení (vrátane zosilňovačov),
ktoré produkujú teplo.
• Aj keď je TV uvedený vypínačom POWER do vypnutého stavu, nie je úplne oddelený od napájania a spotrebúva malé množstvo
energie.
• Na TV prijímač alebo do jeho blízkosti nepokladajte horúce predmety alebo otvorené zdroje ohňa, ako sú sviečky, a pod. Vysoké
teploty môžu roztaviť plasty a viesť k požiaru.
• Na TV prijímač nepokladajte žiadne predmety, z ktorých môže vytiecť kvapalina alebo malé predmety, ktoré môžu vniknúť do
TV prijímača.
• Dbajte na to, aby sa po napájacom kábli nechodilo a nebol nikde zalomený.
• Používajte iba príslušenstvo odporúčané výrobcom.
• Používajte iba stojany, vozíky, montážne držiaky alebo stojany špecifikované výrobcom alebo predávané so zariadením. Pri
premiestňovaní zariadenia pomocou vozíka buďte mimoriadne opatrní, ľahko môže prísť k jeho prevrhnutiu.
• Počas búrok, alebo ak nebudete zariadenie dlhšiu dobu používať, ho vytiahnite z elektrickej zásuvky.
• Všetky opravy prenechajte kvalifikovaným osobám. Ak bolo zariadenie akýmkoľvek spôsobom poškodené, vrátane poškodenia
napájacej šnúry, vniknutia tekutín alebo objektov, bolo prevrhnuté, vystavené dažďu alebo zvýšenej vlhkosti, prípadne ak
nepracuje normálne, je vyžadovaná jeho oprava.
• Zariadenie nesmie byť vystavené kvapkajúcej alebo striekajúcej vode a nesmú byť naň pokladané žiadne objekty naplnené
vodou, ako sú napr. vázy.
SK
VÝSTRAHA: Ak je batéria vložená nesprávne, hrozí riziko jej výbuchu. Vybitú batériu nahraďte iba
takým istým typom.
3PRESTIGIO P370DVD-X
Page 92

Obsah
Bezpeènostné inštrukcie ...................................... 2
Výstraha ................................................................. 2
Dôle•ité bezpeènostné inštrukcie ......................... 3
SK
Preh¾ad ............................................................. 6
Poh¾ad spredu ..................................................... 6
Konektory na zadnom paneli ................................. 6
Dia¾kový ovládaè ............................................... 7
Pripojenie TV prijímaèa ........................................ 8
Pripojenie antény alebo kábla bez dekodéra .......... 8
Pripojenie konektora SCART ................................... 8
Pripojenie digitálneho zvukového signálu (Závisí od
modelu) ................................................................. 8
Pripojenie Video alebo S-Video/audio konektorov . 9
Pripojenie externého TV prijímaèa .......................... 9
Spôsob pripojenia DTV prijímaèa ............................ 9
Pripojenie DVI konektora (iba DVI-D) .................... 1 0
Skontrolujte pred pou•itím .................................. 1 0
Funkcie TV prijímaèa .......................................... 11
Sledovanie TV prijímaèa ..................................... 11
Zapnutie a vypnutie TV prijímaèa ......................... 1 1
Výber jazyka menu ............................................... 1 1
Zobrazenie stavových informácií .......................... 11
Nastavenie hlasitosti ............................................. 11
Umlèanie zvuku .................................................... 1 1
Sledovanie signálov na vstupe Video, DVD alebo
COMPONENT ........................................................ 1 1
Automatické ulo•enie kanálov ............................ 12
Manuálne ulo•enie kanálov ................................ 12
Pomenovanie kanála ......................................... 12
Aktivácia detského zámku ................................. 13
Editácia programu ............................................. 13
Vymazanie programu ........................................... 1 3
Kopírovanie programu ........................................ 13
Presun programu ................................................. 1 4
Preskoèenie èísla programu. ................................. 14
Prepínanie kanálov ............................................ 14
Ak je kvalita obrazu nízka alebo nestabilná. ........ 14
Výber predvo¾by obrazu .................................... 15
Zmena nastavení obrazu .................................... 15
Výber zvukového re•imu .................................... 16
Nastavenie rovnováhy kanálov ........................... 16
Nastavenie hlasitosti zvuku v slúchadlách ........... 16
Nastavenie ekvalizéra. ....................................... 17
Výber zvukovej stopy .......................................... 17
Zmena formátu obrazu ...................................... 18
Zastavenie obrazu .............................................. 18
Sledovanie obrazu v obraze ................................ 19
Zmena zdrojového signálu pre PIP okno .............. 19
Zmena kanála v PIP okne. .................................. 20
Zmena pozície PIP okna ..................................... 20
Výber výstupu z reproduktorov v re•ime PIP ........ 20
Prepnutie hlavného a PIP okna ........................... 21
Výber slúchadlového výstupu v re•ime PIP ........... 21
Nastavenie hodín ............................................... 21
Nastavenie èasovaèa ......................................... 21
Výber kanála èasovaèa a nastavenie hlasitosti
èasovaèa ................................................. 22
Nastavenie automatického vypnutia ................... 22
Funkcia MELODY ................................................ 23
Zmena hesla ...................................................... 23
Funkcia TTX .......................................................24
Teletext ............................................................. 24
Zobrazenie teletextu .......................................... 24
Výber èísla stránky. ............................................ 25
Rôzne mo•nosti zobrazovania: ............................ 2 5
Pou•itie FLOF na výber stránky ............................ 25
Ulo•enie teletextových stránok ........................... 25
Funkcia PC ......................................................... 26
Pripojenie k PC ................................................... 26
Spôsob pripojenia ................................................ 26
Nastavenie PC ................................................... 26
Nastavenie horizontálnej pozície ......................... 26
Nastavenie vertikálnej pozície. .............................. 27
Poèiatoèné nastavenia (RESET) ............................. 2 7
Automatické nastavenie ....................................... 2 7
Funkcia DVD (závisí od modelu) .......................... 28
Prehrávanie DVD ................................................ 28
Zobrazenie informácií o prehrávaní ..................... 28
Prehrávanie DVD .................................................. 2 8
Prehrávanie CD ..................................................... 2 8
Vyh¾adanie špecifikovanej obrazovky/skladby ... 28
4 PRESTIGIO P370DVD-X
Page 93

Rýchle pretáèanie dopredu/dozadu ..................... 2 8
Preskoèenie dopredu/dozadu .............................. 2 9
Spomalené prehrávanie dopredu/dozadu ............ 2 9
Prehrávanie po jednotlivých snímkoch ................ 2 9
Opakovanie titulu, kapitoly (DVD), stopy (CD) ...... 29
Opakované prehrávanie ........................................ 2 9
Opakovanie špecifikovanej èasti ............................ 2 9
Zmena jazyka dialógov/zmena jazyka titulkov ..... 30
Zmena jazyka dialógov ......................................... 3 0
Zmena jazyka titulkov ........................................... 3 0
Zmena ve¾kosti obrazu a uhla poh¾adu ........... 30
Zmena ve¾kosti obrazu ....................................... 3 0
Sledovanie z iného uhla poh¾adu ....................... 3 0
Ïalšie funkcie ..................................................... 31
Vypnutie zvuku .................................................... 31
Základné prvky urèené na ovládanie menu ........... 31
Programovanie špecifikovaného poradia ............ 31
Programované prehrávanie .................................. 3 1
Výber špecifikovaného titulu alebo kapitoly na DVD
31
Programované prehrávanie, priame vyh¾adávanie
(GO TO) pre DVD ................................................... 3 1
Priame vyh¾adávanie (GO TO) pre CD ................... 3 2
Prehrávanie MP3 diskov ..................................... 32
Prehrávanie MP3 súboru ..................................... 3 2
Opakované prehrávanie ........................................ 3 2
Prehrávanie DivX diskov (volite¾ne) ................... 33
Prehrávanie DivX súboru. ..................................... 33
Prehrávanie Kodak Picture CD a JPEG súborov ..... 3 3
Prehrávanie Kodak Picture CD a JPEG súborov ...... 3 3
Zmena ve¾kosti obrazu ....................................... 3 4
Otoèenie obrazu .................................................. 34
Zmena spôsobu prelínania obrázkov pri ich
automatickom prezeraní ...................................... 3 4
Automatické prehrávanie hudby .......................... 3 4
Spustenie re•imu automatického prehrávania 1 ... 3 4
Spustenie re•imu automatického prehrávania 2 ... 3 4
Spustenie re•imu automatického prehrávania 3 ... 3 5
Ukonèenie re•imu automatického prezerania. ...... 35
Pou•itie menu Setup .......................................... 35
Nastavenie jazyka ................................................. 35
Nastavenie obrazu ............................................... 35
Speaker Setup (Nastavenie reproduktorov) .......... 3 6
Nastavenie zvuku ................................................. 3 6
U•ívate¾ské nastavenie ........................................ 3 6
Funkcia DivX (závisí od modelu) .......................... 38
DivX (volite¾ne) ................................................ 38
Tabu¾ka funkcií DivX ........................................... 3 8
VIDEO ................................................................... 3 8
AUDIO ................................................................... 38
Prehrávanie DivX® VOD ...................................... 39
Pou•itie ramena na stenu ................................... 39
Odstraòovanie porúch ........................................ 40
Špecifikácia ....................................................... 42
Appendix ........................................................... 44
SK
5PRESTIGIO P370DVD-X
Page 94

Prehľad
Pohľad spredu
SK
1. HLAVNÝ VYPÍNAČ
2. Snímač diaľkového ovládania
3. POWER: Zapnutie a vypnutie TV prijímača.
4. LED indikátory
5. VOLUME: Zvýšenie alebo zníženie hlasitosti. Takisto sa používa
na výber a nastavenie položiek v OSD menu.
6. PROGRAM: Zmena kanálov alebo výber a nastavenie položiek
v OSD menu.
7. MENU: Sprístupnenie alebo zatvorenie menu.
Konektory na zadnom paneli
8. TV/VIDEO: Výber externého zariadenia pripojeného k TV
prijímaču.
<DVD> - Závisí od modelu
9. PLAY/PAUSE: Spustenie prehrávania DVD alebo dočasné
pozastavenie.
10. STOP: Zastavenie prehrávania DVD.
11. OPEN/CLOSE: Zatvorenie/otvorenie DVD.
12. ON/DISC LED
1. KONEKTORY PC INPUT (VIDEO/AUDIO)
2. KONEKTORY DVI INPUT (VIDEO/AUDIO : L/R): iba DVI-D
3. KONEKTORY COMPONENT (VIDEO : Y, Pb, Pr/AUDIO : L/R)
4. VÝSTUPNÉ KONEKTORY LINE (VIDEO/AUDIO)
5. VSTUPNÉ KONEKTORY VIDEO3 (VIDEO/AUDIO)
6. VSTUPNÝ KONEKTOR S-VIDEO
7. VÝSTUPNÝ KONEKTOR DIGITAL AUDIO (závisí od modelu)
8. KONEKTORY SCART (DOLE: SC ART1, HORE: SCART2)
9. Konektor HEADPHONE: Slúži na pripojenie slúchadiel, ktoré sa
predávajú samostatne.
10. VSTUPNÝ KONEKTOR TV ANTENNA
Viac informácií o prepojeniach nájdete na stranách 6 - 7.
6 PRESTIGIO P370DVD-X
Page 95

Diaľkový ovládač
1. POWER: Zapnutie a vypnutie TV prijímača.
2. LINE: Výber externého vstupu. (TV > RGB > Video1 > Video2 > Video3
> S-Video > Component > DVI > PC)
3. TV: Prepnutie do TV režimu.
4. SWAP: Výmena video signálu medzi hlavným oknom a PIP obrazom.
5. ON/OFF: Zapnutie alebo vypnutie PIP.
6. ČÍSELNÉ TLAČIDLÁ: Priamy výber kanálov TV prijímača.
7. -/—: Výber vyššieho čísla kanála, ako 10. Napr. na výber kanála 21
stlačte “-/—”, potom stlačte “2”, “1”.
8. STILL: Zastavenie obrazu.
9. M/S: Výber zvukového režimu.
10. P.STD: Konfigurácia rôznych nastavení obrazu.
11. ŠÍPKA/ENTER: Výber položky v menu/potvrdenie.
12. P.SIZE: Zmena veľkosti obrazu.
13. DISPLAY: Zobrazenie aktuálneho kanála a nastavení obrazu/zvuku.
14. MUTE: Dočasné umlčanie zvuku.
15. TTX: Prepnutie do režimu teletextu.
16. SOURCE: Výber zdroja signálu pre PIP okno.
17. SOUND: Zmena zdroja audio signálu medzi hlavnou obrazovkou a PIP
oknom.
18. VOL: Zvýšenie alebo zníženie hlasitosti.
19. PRE: Výber predchádzajúceho kanála.
20. PROG: Zmena kanálov.
21. SLEEP: Nastavenie času, po ktorom sa jednotka automaticky vypne.
22. TV.MENU: Zobrazenie OSD menu.
23. S.STD: Konfigurácia rôznych zvukových nastavení.
24. EXIT/CANCEL: Opustenie aktuálnych nastavení alebo obrazovky s
teletextom.
<DVD> - Závisí od modelu
25. SCAN/SLOW: Rýchle a pomalé prehrávanie.
26. TITLE: Výber titulu na disku.
27. SETUP: Počiatočné nastavenie DVD prehrávača.
28. DVD: Zobrazenie DVD.
29. OPEN/CLOSE: Zatvorenie/otvorenie DVD.
30. STOP: Zastavenie prehrávania DVD.
31. PLAY/PAUSE: Spustenie prehrávania DVD alebo dočasné pozastavenie.
32. SKIP/STEP: Preskočenie na nasledujúcu kapitolu/prehrávanie po snímkoch.
33. MENU: Zobrazenie menu, ktoré sa nachádza na disku.
SK
<DVD & TTX> - Závisí od modelu
34. FAREBNÉ TLAČIDLO: Výber témy pri Fasttexte.
35. INDEX/REPEAT: Výber programu podľa názvu/Špecifikácia a opakovanie prehrávania segmentu.
36. MIX/A-B: Video & TTX MIX/Opakované prehrávanie titulov na disku, kapitol alebo zvuku.
37. HOLD/PROGRAM: Teletextová stránka/Prehrávanie v špecifikovanom poradí.
38. PRE PAGE/ANGLE: Predchádzajúca teletextová stránka/Prezeranie iných scén.
39. L/F/AUDIO: Prepnutie režimu LIST alebo FLOF./ Výber jazyka dialógov.
40. REVEAL/GOTO: Odokrytie skrytých častí teletextu/Skok na požadovanú pozíciu.
41. SIZE/SUBTITLE: Výber veľkosti teletextu/Výber jazyka titulkov.
42. STORE/CLEAR: Uloženie teletextu v režime LIST/Vymazanie programového obsahu.
43. SUB PAGE/ZOOM: Teletextová podstránka/Zväčšenie obrazu.
44. NEXT PAGE/SURROUND: Nasledujúca stránka teletextu/Stereofónny zvukový efekt.
7PRESTIGIO P370DVD-X
Page 96

Pripojenie TV prijímača
Pripojenie antény alebo kábla bez dekodéra
SK
Pripojenie konektora SCART
zo SCART1 do SCART2.
Spôsob pripojenia
“SCART1 sa používa pre zariadenia s RGB výstupom, ako sú napr.
herné konzoly alebo videoprehrávače. Tento koniec môže byť
doplnený o:- SCART konektor- Tri RCA konektory
(VIDEO+AUDIO_L+AUDIO_R)”
Spôsob sledovania videa prostredníctvom VCR
Zapnite TV prijímač a tlačidlom LINE na diaľkovom ovládači vyberte
‘VIDEO1’.
Ak máte druhý videorekordér a chcete kopírovať kazetu, pripojte
zdrojový prehrávač ku konektoru SCART1 a cieľový rekordér ku
konektoru SCART2, vďaka čomu budete môcť presmerovať signál
Pripojenie digitálneho zvukového signálu (Závisí od modelu)
Spôsob pripojenia
Konektor DIGITAL OUT (čierny) na zadnej strane Vášho TV prijímača
pripojte ku konektoru DIGITAL IN na dekodéri alebo AV zosilňovači.
Použitie digitálneho výstupu
Zapnite TV prijímač a tlačidlom DVD na diaľkovom ovládači vyberte
‘DVD’.
Zapnite digitálny zosilňovač a vyberte režim externého vstupu.
8 PRESTIGIO P370DVD-X
Page 97

Pripojenie Video alebo S-Video/audio konektorov
Spôsob pripojenia
Anténny kábel pripojte ku konektoru ANTENNA IN na zadnej strane
Vášho videorekordéra.
“Konektory VIDEO/AUDIO INPUT na TV prijímači prepojte s video/
audio vstupmi na videorekordéri prostredníctvom video/audio
káblov. (Káble pripojte ku koncovkám s rovnakými farbami).- Na
pripojenie VCR alebo DVD prehrávača a zaistenie lepšej kvality
obrazu použite S-Video kábel.- Ak Váš videorekordér nepodporuje
stereo zvuk, pripojte mono výstup k ľavému konektoru AUDIO
INPUT.”
Spôsob sledovania videa prostredníctvom videorekordéra
“Zapnite TV a pomocou tlačidla LINE na diaľkovom ovládači vyberte ‘VIDEO 3’.- Ak ste urobili prepojenie prostredníctvom S-Video
kábla, vyberte ‘S-VIDEO’.”
Pripojenie externého TV prijímača
Spôsob pripojenia
Pomocou audio káblov prepojte konektory AUDIO OUT L a R na
zadnej strane Vášho TV prijímača k zodpovedajúcim konektorom
AUDIO INPUT na externom TV prijímači.
Pomocou video kábla prepojte konektor VIDEO OUT na zadnej
strane Vášho TV prijímača k zodpovedajúcemu konektoru VIDEO
INPUT na externom TV prijímači.
SK
Spôsob pripojenia DTV prijímača
Sledovanie externého TV prijímača
Zapnite externý TV prijímač a pomocou tlačidla na výber externého
vstupu vyberte ‘VIDEO’.
Zapnite Váš TV prijímač.
Spôsob pripojenia
Konektory COMPONENT VIDEO IN a COMPONENT AUDIO IN sa
používajú na pripojenie komponentov s DVD alebo DTV výstupom.
(480i/60Hz, 480p/60Hz, 576i/50Hz, 576p/50Hz, 720p/
50Hz, 720p/60Hz, 1080i/50Hz,1080i/60Hz)
Sledovanie DTV
Zapnite TV prijímač a pomocou tlačidla LINE na diaľkovom ovládači
vyberte ‘COMPONENT’.
Zapnite DTV prijímač.
9PRESTIGIO P370DVD-X
Page 98

Pripojenie DVI konektora (iba DVI-D)
SK
Skontrolujte pred použitím
Pred použitím TV prijímača prosím skontrolujte nasledujúce body.
Je kábel k anténe pripojený správne?
“Sú batérie v diaľkovom ovládači vložené správne?- Nainštalujte dve batérie typu AAA so správnou
polaritou.- Diaľkový ovládač pracuje v rozsahu približne 7~10 m od TV prijímača, 3 m naľavo alebo
napravo od TV prijímača, v rozsahu 30 stupňov od snímača diaľkového ovládania na TV prijímači.”
Boli nakonfigurované prijímané kanály?
Sú káble, pripojené k externým zariadeniam, zapojené správne?
Spôsob pripojenia
Vstupný konektor DVI na TV prijímači prepojte s výstupným
konektorom DVI na Vašom DTV prijímači.
Vstupný audio konektor DVI na TV prijímači prepojte pomocou
audio kábla s výstupným DVI konektorom na DTV prijímači.
10 PRESTIGIO P370DVD-X
Page 99

Funkcie TV prijímača
Sledovanie TV prijímača
Zapnutie a vypnutie TV prijímača
Napájací kábel pripojte do elektrickej zásuvky.
Vypínač POWER na spodnej strane TV prijímača prepnite do polohy “ON” (I).
“Stlačte tlačidlo POWER na diaľkovom ovládači (alebo na prednom paneli jednotky.)TV prijímač je možné zapnúť aj tlačidlami PROG
\/ /\.• Po zapnutí TV prijímača sa zobrazí obraz a vypne sa indikátor POWER/STANDBY.• Po vypnutí TV prijímača obrazovka
zhasne a indikátor POWER/STANDBY sa rozsvieti načerveno.• TV prijímač nenechávajte dlhodobo v pohotovostnom režime, napríklad
počas dovolenky. TV prijímač v takomto prípade vypnite prepnutím tlačidla POWER do polohy “OFF”(O). Najlepšie je TV prijímač odpojiť
aj od elektrickej siete a vytiahnuť z neho anténu.”
Výber jazyka menu
Stlačte tlačidlo TV.MENU. Zobrazí sa OSD MENU.
Tlačidlami /\ \/ vyberte FUNCTION a následne stlačte tlačidlo >.
Tlačidlami /\ \/ vyberte LANGUAGE s následne stlačte tlačidlo
>.
Tlačidlami /\ \/ vyberte požadovanú položku v menu.
Na opustenie menu stlačte tlačidlo EXIT/CANCEL.
Zobrazenie stavových informácií
Stlačte tlačidlo DISPLAY na diaľkovom ovládači. Na TV prijímači sa zobrazí zdroj vstupného signálu, obrazový režim, zvukový režim,
STEREO režim, čas do automatického vypnutia, aktuálny čas a režim PIP.
SK
Nastavenie hlasitosti
Na nastavenie hlasitosti použite tlačidlo VOL /\ \/.
Umlčanie zvuku
Stlačte tlačidlo MUTE. Na obnovenie pôvodnej hlasitosti stlačte tlačidlo MUTE ešte raz.
Sledovanie signálov na vstupe Video, DVD alebo COMPONENT
Stlačte tlačidlo LINE. Informácie o prepojení a nastavení nájdete na strane 6.
11PRESTIGIO P370DVD-X
Page 100

Automatické uloženie kanálov
Stlačte tlačidlo TV.MENU. Zobrazí sa OSD MENU.
Tlačidlami /\ \/ vyberte SETUP a následne stlačte tlačidlo >.
Tlačidlami /\ \/ vyberte AUTO PROGRAMMING a potom stlačte
SK
tlačidlo >.
Tlačidlami /\ \/ vyberte COUNTRY a následne stlačte tlačidlo >.
Tlačidlami /\ \/ vyberte COUNTRY a potom stlačte tlačidlo >.
Zobrazia sa jednotlivé krajiny, v nasledujúcom poradí.
Tlačidlami /\ \/ vyberte SEARCH a následne stlačte tlačidlo >.
Manuálne uloženie kanálov
Pri manuálnom ukladaní kanálov si môžete vybrať:
“- Či nájdený kanál uložiť alebo nie.- Číslo programu, do ktorého
chcete uložiť daný kanál.”
Stlačte tlačidlo TV.MENU. Zobrazí sa OSD MENU.
Tlačidlami /\ \/ vyberte SETUP a následne stlačte tlačidlo >.
Tlačidlami /\ \/ vyberte MANUAL PROGRAM a následne stlačte
tlačidlo >.
Tlačidlami /\ \/ vyberte SYSTEM a následne stlačte tlačidlo >.
AUTO -> BG -> DK -> I -> L -> LP -> AUTO
Tlačidlami \/ /\ vyberte PROGRAM NO. a následne stlačte tlačidlo
>. Na výber požadovaného čísla kanála použite tlačidlá \/ /\ . “Tlačidlami \/ /\ vyberte SEARCH a následne stlačte tlačidlo >.Tuner
spustí prehľadávanie frekvenčného rozsahu, zastaví, ak nájde nejakú stanicu. “
Tlačidlami /\ \/ vyberte STORE a následne stlačte tlačidlo >. Na výber OK použite tlačidlá /\ \/.
Pre každý kanál, ktorý chcete uložiť, zopakujte kroky 5 až 7.
Pomenovanie kanála
Stlačte tlačidlo TV.MENU. Zobrazí sa OSD MENU.
Tlačidlami /\ \/ vyberte SETUP a následne stlačte tlačidlo >.
“Tlačidlami /\ \/ vyberte NAME a následne stlačte tlačidlo >. Na
editáciu názvu použite tlačidlá /\ \/ < >./\ \/: Výber znakov
(A~ Z, 0~9, -, +). < > : výber predchádzajúceho alebo
nasledujúceho písmena.”
Tlačidlami /\ \/ vyberte STORE a následne stlačte tlačidlo >. Na
výber OK použite tlačidlá /\ \/.
Na opustenie menu stlačte tlačidlo EXIT/CANCEL.
12 PRESTIGIO P370DVD-X
 Loading...