

Page 1

1
PRESTIGIO P323MW / P373MW
ENG
Prestigio P323MW / P373MW
User’s Manual
Trademarks
All brand and product names are trademarks or registered trademarks of their respective companies.
Note
The information in this manual is subject to change without notice.
Page 2
2
PRESTIGIO P323MW / P373MW
ENG
Important Safety Information
The Power Supply should be connected to a MAIN Socket outlet with a protective earthing connection.
WARNING:
TO REDUCE THE RISK OF FIRE OR ELECTRIC SHOCK, DO NOT EXPOSE THIS PRODUCT TO WATER OR MOISTURE.
CAUTION
RISK OF ELECTRIC SHOCK
DO NOT OPEN
CAUTION:
TO REDUCE THE RISK OF ELECTRIC SHOCK, DO NOT REMOVE COVER (OR BACK). NO USER-SERVICEABLE PARTS INSIDE. REFER
SERVICING TO QUALIFIED SERVICE PERSONNEL.
Warning
Do not leave any stationary images, patterns, PIP windows, or letterbox images on the screen for an extended period of
time as this may result in permanent damage to the LCD panel. This type of damage is not covered under warranty. The
following are examples of, but not limited to, potentially hazardous display output: side bar images, video game patterns,
closed captioning, channel logos, and letterbox black bars. To prevent this type of damage, display constant moving
images that fill the screen as often as possible.
According to industrial standards for LCD display technology, there are a certain number of allowable defective pixels.
Although we produce panels with more than 99.9 percent active cells, there still may be some cells that do not produce
light or remain constantly lit. For further information, please contact your supplier.
Safety Precautions
Read and follow all instructions carefully.
1. Water and moisture: Do not use the product near water or areas of high moisture.
2. Cleaning: Unplug the power cord from the AC outlet before cleaning the product. Use a damp cloth to clean the product. Do not
use liquid cleaners or aerosol cleaners.
3. Ventilation: The vents and other openings in the cabinet are designed for ventilation. Do not cover or block these vents and
openings as insufficient ventilation can cause overheating and/or shorten the life of the product. Do not place the product on a bed,
sofa, rug or other similar surface, since they can block ventilation openings. This product was not designed to operate in an enclosed
environment. Do not place the product in an enclosed space such as a bookcase or rack, unless proper ventilation is provided or the
manufacturer’s instructions are followed.
4. Heat sources: Keep the product away from heat sources such as radiators, heaters, stoves and other heat-generating products
(including amplifiers).
5. Stand: Do not place the product on an unstable cart, stand, tripod or table. Placing the product on an unstable base can cause the
product to fall, resulting in serious personal injuries as well as damage to the product. Only use a cart, stand, tripod, and bracket or
table recommended by the manufacturer or sold with the product. Only use mounting hardware recommended by the dealer.
6. For added protection during a lightning storm or for extended periods of non-use, unplug the power cord from the wall outlet
and disconnect the antenna (if used). This will prevent damage to the product due to power line surges.
7. During the LCD panel lifespan it is normal for a few pixels to become defective. Non-active pixels may appear on the screen as
fixed points of red, blue or green. Refer pixel policy questions to your dealer for further clarification on acceptable loss.
Page 3

3
PRESTIGIO P323MW / P373MW
ENG
Table of Contents
Preface ..................................................................................................................................................................... 4
CHAPTER 1 Quick Setup ............................................................................................................................................. 5
1.1 Unpacking .......................................................................................................................................................... 5
1.2 Preparation ........................................................................................................................................................ 5
Inserting the Batteries ......................................................................................................................................................... 5
Mounting the LCD TV on the Wall (Optional) ....................................................................................................................... 6
1.3 Basic Connections ................................................................................................................................................ 7
Connecting Cable TV or an Antenna (Analogue) ................................................................................................................... 7
Connecting Power ................................................................................................................................................................. 8
1.4 Powering the TV On and Off ............................................................................................................................... 8
Main Power Switch ............................................................................................................................................................... 8
Power Button ....................................................................................................................................................................... 9
CHAPTER 2 Introducing Your LCD TV ....................................................................................................................... 10
2.1 Features ............................................................................................................................................................ 10
2.2 Front Panel Indicators ....................................................................................................................................... 10
2.3 Rear Panel Inputs/Outputs ................................................................................................................................ 11
2.4 Rear Right-Side Inputs/Outputs ........................................................................................................................ 12
2.5 Right-Side Panel Inputs/Outputs ....................................................................................................................... 13
2.6 Left-Side Panel Controls .................................................................................................................................... 13
2.7 Remote Control ................................................................................................................................................ 14
CHAPTER 3 Watching TV ......................................................................................................................................... 16
3.1 Before You Can Watch TV ................................................................................................................................... 16
Selecting Country ................................................................................................................................................................ 16
Scanning TV Channels (UHF Antenna Only) ........................................................................................................................ 17
3.2 Basic TV Controls ............................................................................................................................................... 17
Selecting TV Channels ......................................................................................................................................................... 17
Adjusting Volume ............................................................................................................................................................... 17
Selecting Mono/Stereo Mode ............................................................................................................................................. 18
3.3 Basic TV Controls ............................................................................................................................................... 18
Removing/Rearranging Channels ........................................................................................................................................ 18
Removing Channels ............................................................................................................................................................. 18
Rearranging Channels ......................................................................................................................................................... 18
CHAPTER 4 Connecting External Devices .................................................................................................................. 19
4.1 Understanding Video Connections .................................................................................................................... 19
4.2 Connecting a DVD Player ................................................................................................................................... 20
Using the Component Connection ....................................................................................................................................... 20
Using the Composite Connection ........................................................................................................................................ 20
Using the SCART Connection ............................................................................................................................................... 21
4.3 Connecting a VCR, Camcorder, or Game Console .................................................................................................. 22
Using the Composite Connections ....................................................................................................................................... 22
Using the SCART Connection ............................................................................................................................................... 23
4.4 Connecting to Another Device’s Video/Audio Input Connector .......................................................................... 24
CHAPTER 5 More Features ....................................................................................................................................... 25
5.1 Changing the Aspect Ratio ................................................................................................................................ 25
Using the Remote Control ................................................................................................................................................... 25
Using the OSD ..................................................................................................................................................................... 25
Page 4

4
PRESTIGIO P323MW / P373MW
ENG
Preface
This manual contains information that will help you operate your system.
* Chapter 1, Quick Setup, takes you through the process of setting up the LCD TV for use.
* Chapter 2, Introducing Your LCD TV, briefly introduces the connectors, buttons, and controls on your LCD TV and the
buttons on your remote control.
* Chapter 3, Watching TV, tells you how to use the basic operations for watching TV.
* Chapter 4, Connecting External Devices, tells you how to connect different devices to your LCD TV.
* Chapter 5, More Features, provides detailed information on features such as aspect ratio, hold, twin-picture mode,
parental controls, sleep timer, and teletext.
* Chapter 6, Adjusting LCD TV Settings, describes how to adjust the settings using the On Screen Display (OSD).
* Chapter 7, Troubleshooting, gives solutions to common problems.
* Appendix A, Specifications, provides brief specifications and regulatory information for the LCD TV.
5.2 Using Hold ........................................................................................................................................................ 26
5.3 Using Twin Picture ............................................................................................................................................ 26
Part 1. Activating PIP Mode ................................................................................................................................................ 26
Part 2. Selecting the Input Source ....................................................................................................................................... 27
Adjusting PIP Display and Sound Output ............................................................................................................................. 28
5.4 Using Parental Control ...................................................................................................................................... 28
Setting up Parental Control ................................................................................................................................................ 28
Viewing Blocked Program .................................................................................................................................................. 29
5.5 Setting the Sleep/Wake-up Timer ...................................................................................................................... 29
Using the Remote Control (Sleep Timer only) .................................................................................................................... 29
Using the OSD (Sleep/Wake-up Timer) .............................................................................................................................. 29
5.6 Using Teletext .................................................................................................................................................... 30
CHAPTER 6 Adjusting LCD TV Settings ..................................................................................................................... 31
6.1 Using the OSD ................................................................................................................................................... 31
Opening the OSD Menu ...................................................................................................................................................... 31
Moving Around and Making Selections .............................................................................................................................. 31
Changing the OSD Language ............................................................................................................................................... 31
6.2 Picture Menu .................................................................................................................................................... 32
6.3 Sound Menu ..................................................................................................................................................... 33
6.4 Tuning Menu .................................................................................................................................................... 34
6.5 System Menu .................................................................................................................................................... 35
6.6 Favourite Menu ................................................................................................................................................ 36
6.7 Calibration Menu .............................................................................................................................................. 37
CHAPTER 7 Troubleshooting ................................................................................................................................... 38
APPENDIX A Specifications ...................................................................................................................................... 39
Page 5
5
PRESTIGIO P323MW / P373MW
ENG
1 Quick Setup
1.1 Unpacking
NOTE: Depending on the model you purchased, the appearance of your LCD TV and its
accessories may not be exactly the same as those shown in this manual.
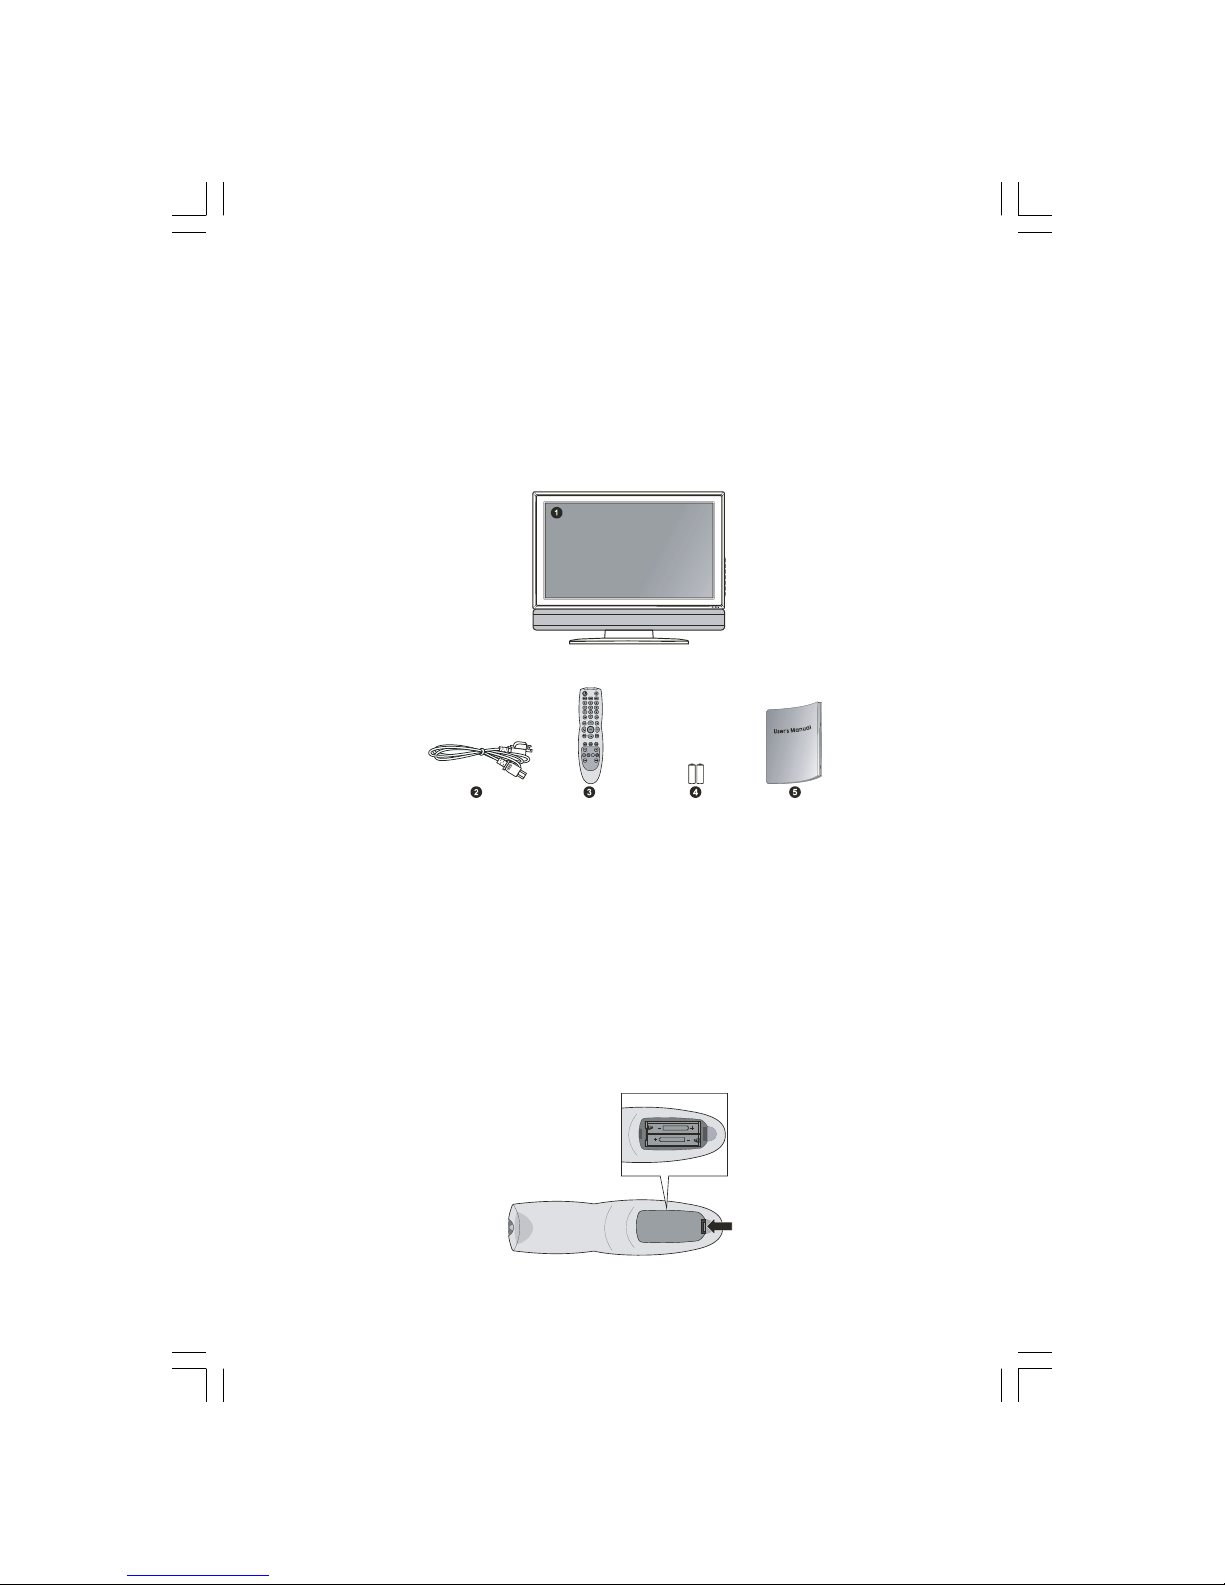
After unpacking, you should find these standard items:
1. TV Set
2. Power Cord
3. Remote Control
4. AAA Battery (x2)
5. User Manual
1.2 Preparation
Inserting the Batteries
1. Prepare two AAA batteries. It is recommended that the batteries are of the same type and manufacturer. (Two batteries
are supplied with your LCD TV.)
2. Remove the battery door by pressing inwards on the battery latch and lifting it up and away from the remote control.
Page 6
6
PRESTIGIO P323MW / P373MW
ENG
3. Install the two AAA batteries into the battery compartment as depicted by the diagram in the interior of the battery
compartment showing the positive (+) and negative (–) ends of the batteries.
4. Place the battery door back into place and make sure it clicks into position.
CAUTION:
* Place the batteries with their terminals corresponding to the (+) and (–) indicators.
* When replacing the batteries, use two batteries of the same type and manufacturer. Replace
both batteries at the same time. Do not mix old and new batteries together.
* Check the regulations of your local government for proper battery disposal.
Mounting the LCD TV on the Wall (Optional)
CAUTION: Mounting an LCD TV requires the skills of a qualified technician. Do not attempt to
mount the TV by yourself. The manufacturer bears no responsibility for improper installation
resulting in accident or injury.
The LCD TV can be mounted onto a variety of mounting fixtures (purchased separately) that are compliant with VESA
(Video Electronics Standards Association) standards (200 mm x 100 mm).
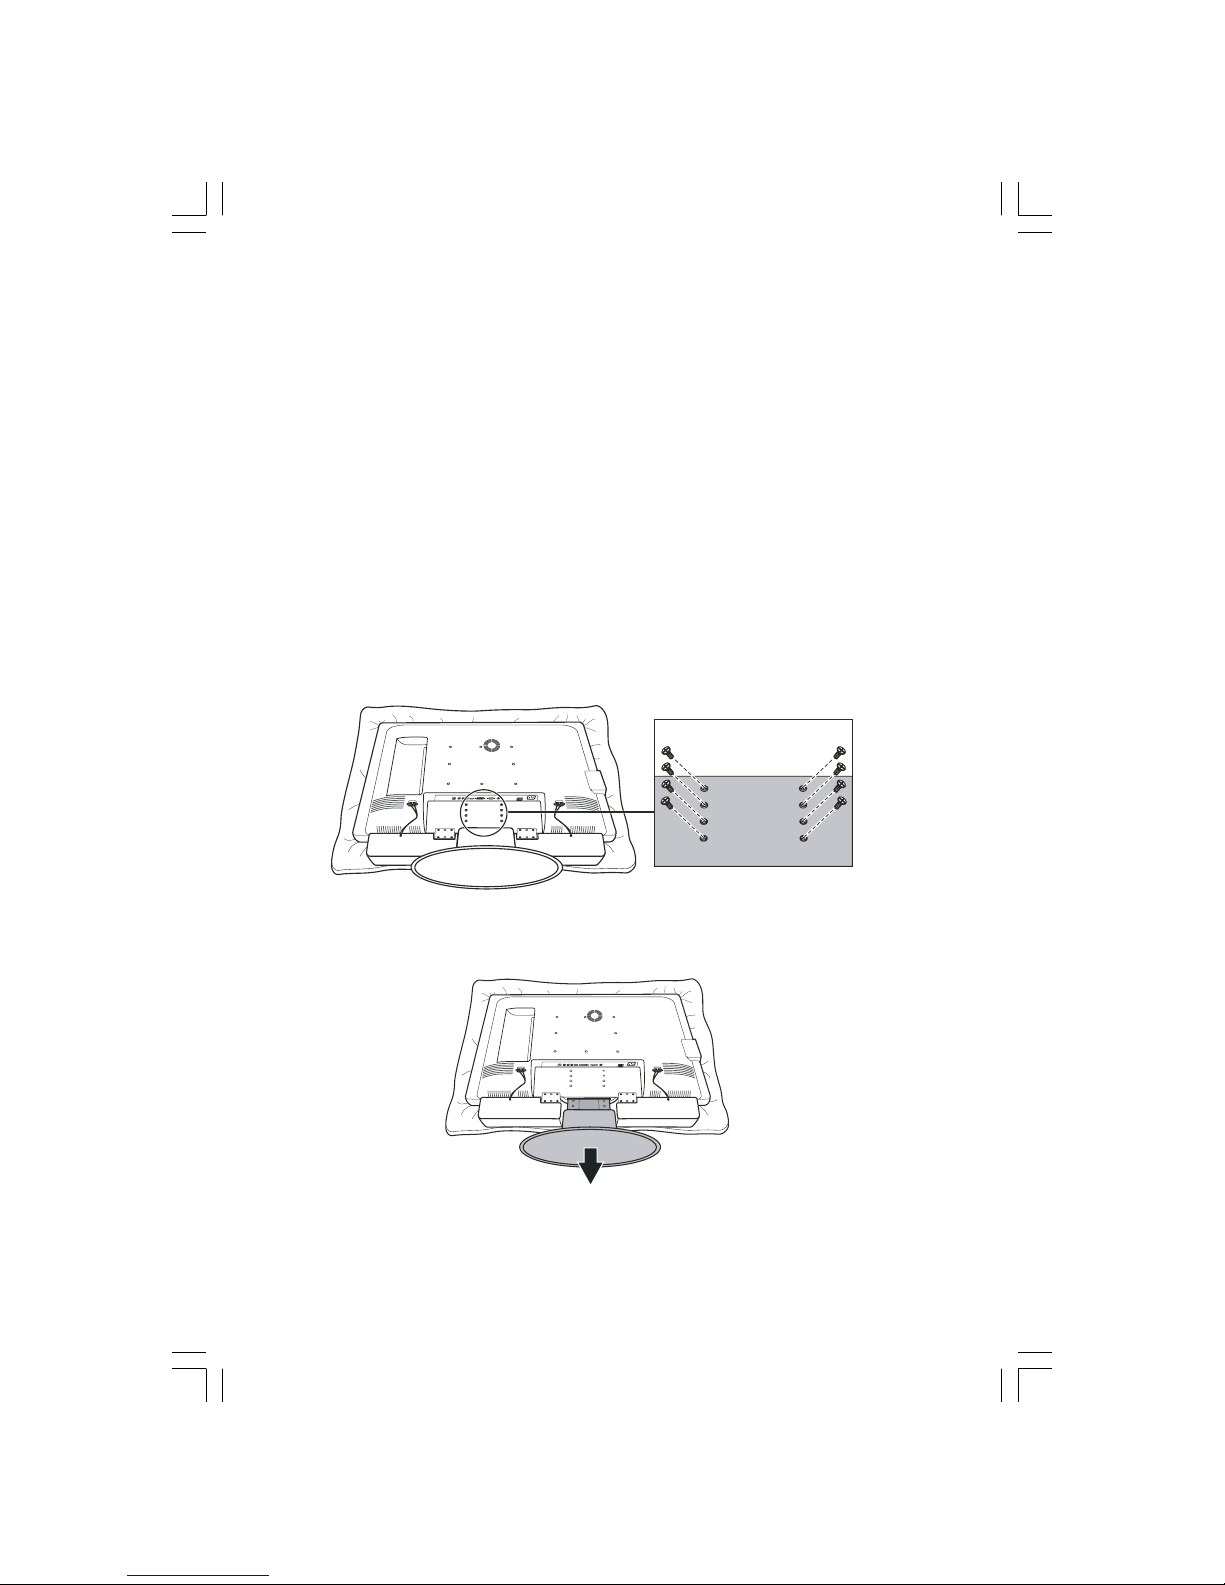
Before mounting the display to the wall, the stand must be removed from the LCD TV.
1. Carefully lay the LCD TV with its front facing down on a flat and steady surface.
CAUTION: To protect the LCD panel, use a soft cloth, such as a towel, to lay the display (front of
the LCD TV) on.
2. Remove the screws connecting the stand to the LCD TV.
NOTE: The speaker does not have to be removed to remove the stand.
3. Pull outwards on the base to detach the stand from the LCD TV frame.
Page 7
7
PRESTIGIO P323MW / P373MW
ENG
4. After the stand has been removed, the LCD TV is ready to be mounted on the wall. It is recommended to seek the help
of a qualified technician to perform the installation or refer to your wall mounting kit manual for instructions.
1.3 Basic Connections
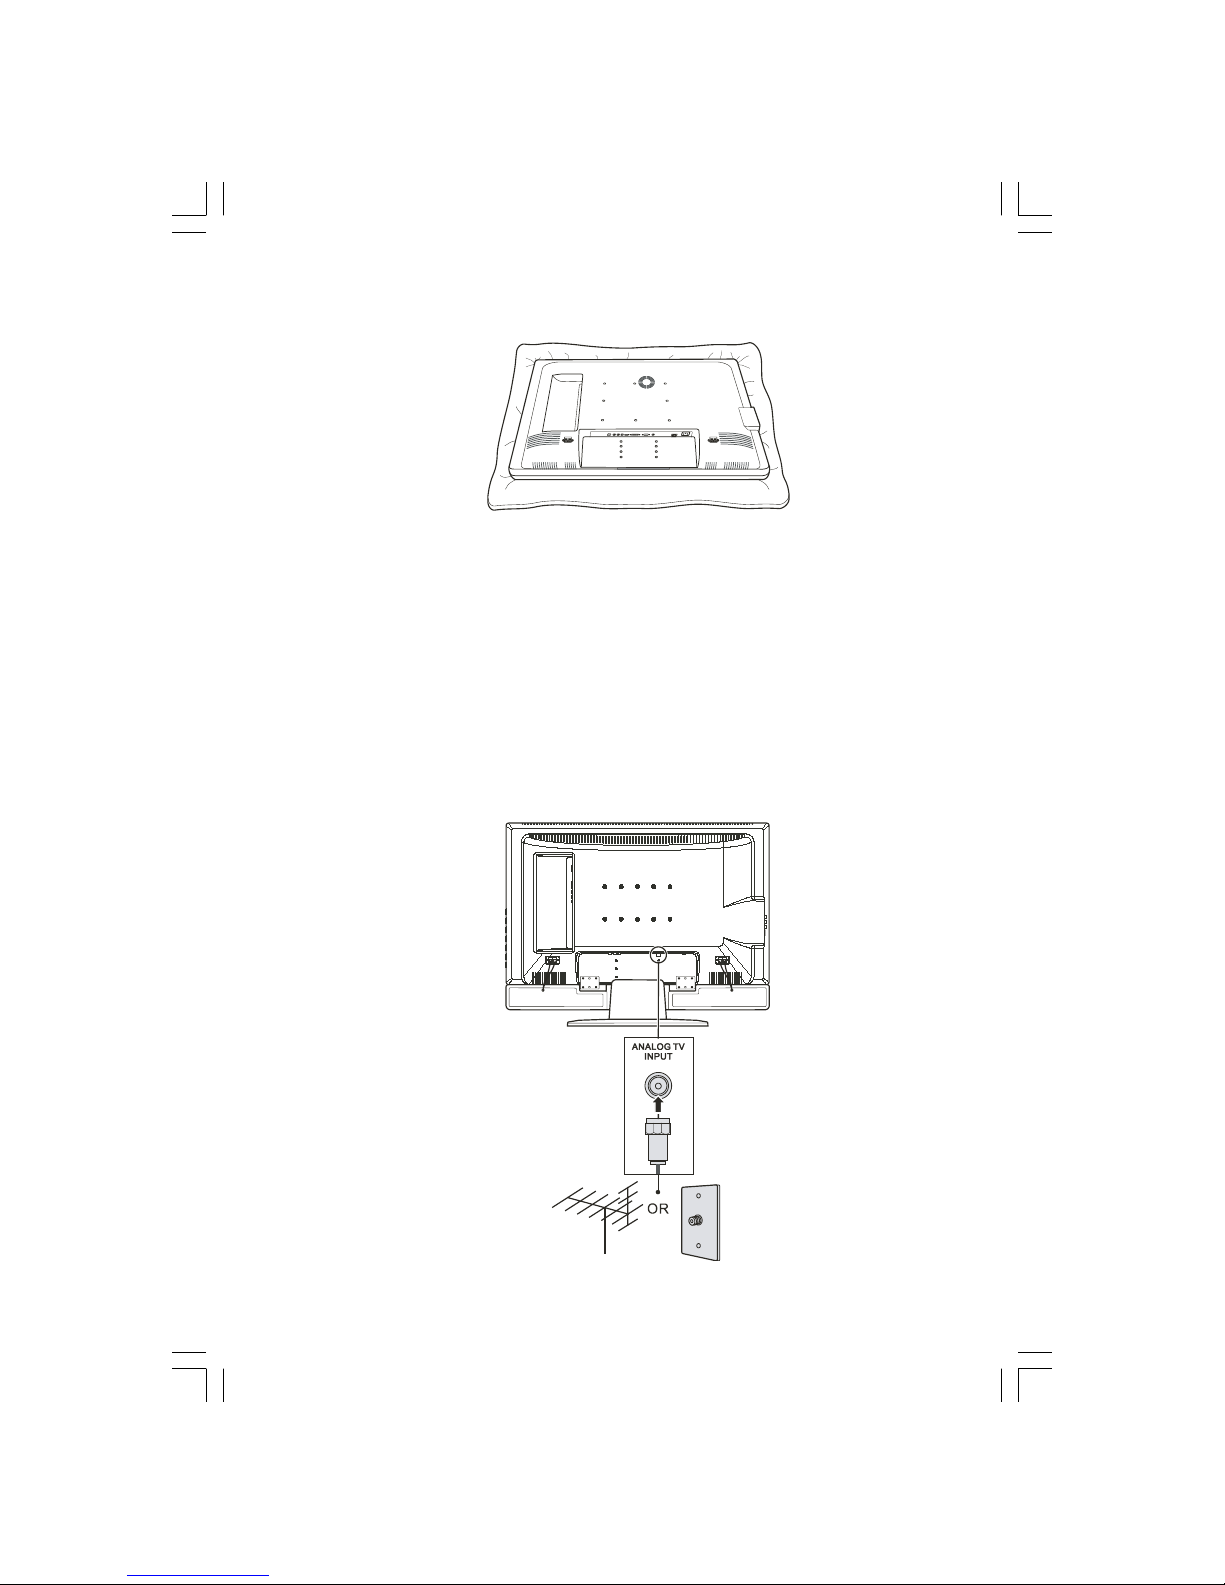
Connecting Cable TV or an Antenna (Analogue)
NOTE:
* To receive an optimal signal, it is recommended that you use a 75 ohm F-type coaxial cable.
* For proper reception of UHF channels, an external antenna is required.
* For reception of cable channels, you have to subscribe to a cable TV company and use the
cable supplied by your local cable company.
1. Prepare an F-type coaxial cable.
2. Connect one end of the corresponding coaxial cable to the TV1 input connector. Connect the other end to an antenna
or cable TV connector on the wall.
Page 8
8
PRESTIGIO P323MW / P373MW
ENG
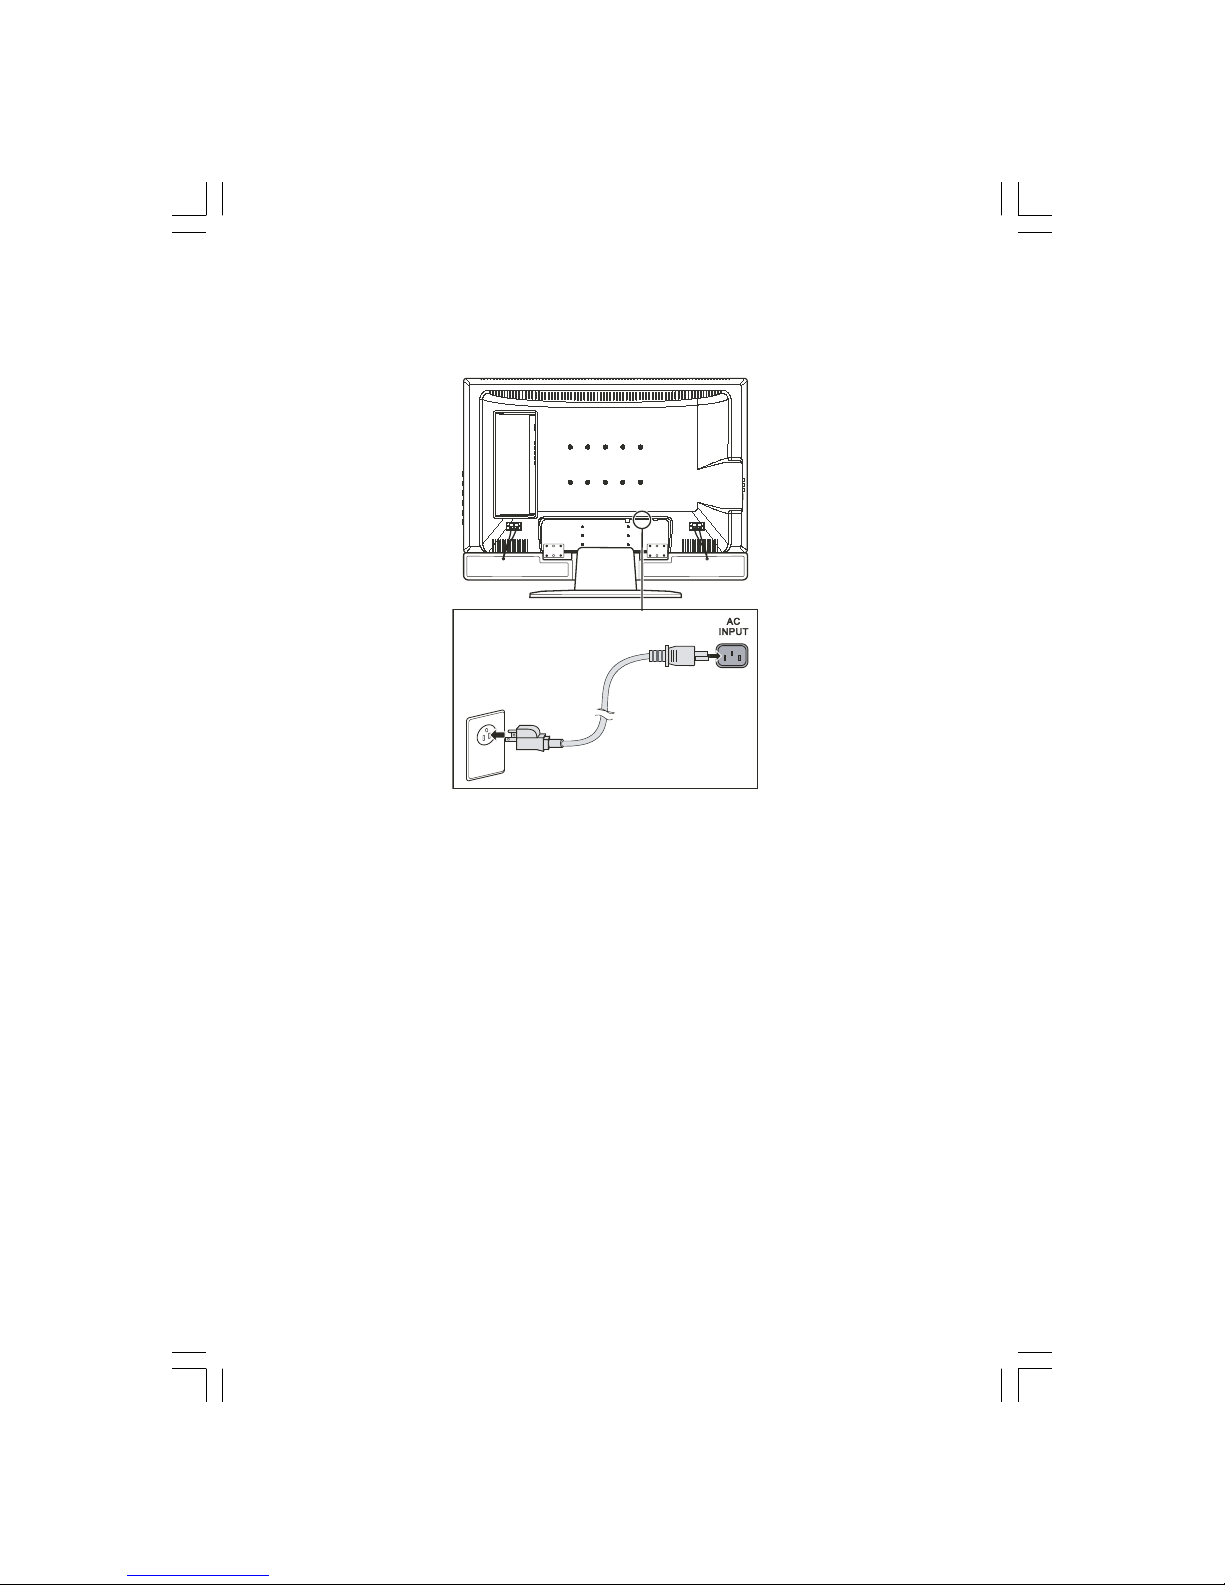
Connecting Power
Plug the female end of the power cord to the power connector on the rear of the LCD TV and plug the male end to an
electrical outlet.
CAUTION:
* When unplugging the power cord, disconnect from the electrical outlet first, then from the
system.
* When unplugging the connector, always hold the plug head. Never pull on the cord.
1.4 Powering the TV On and Off
NOTE: Before using the LCD TV for the first time, remember to remove the plastic film that
protects the panel during transport.
Main Power Switch
When using the LCD TV for the first time, make sure that the main power switch located on the rear of the LCD TV is set
to the on ( I ) position. The power indicator on front of the LCD TV will illuminate orange, indicating that the TV has power
and is currently in standby mode.
Page 9
9
PRESTIGIO P323MW / P373MW
ENG
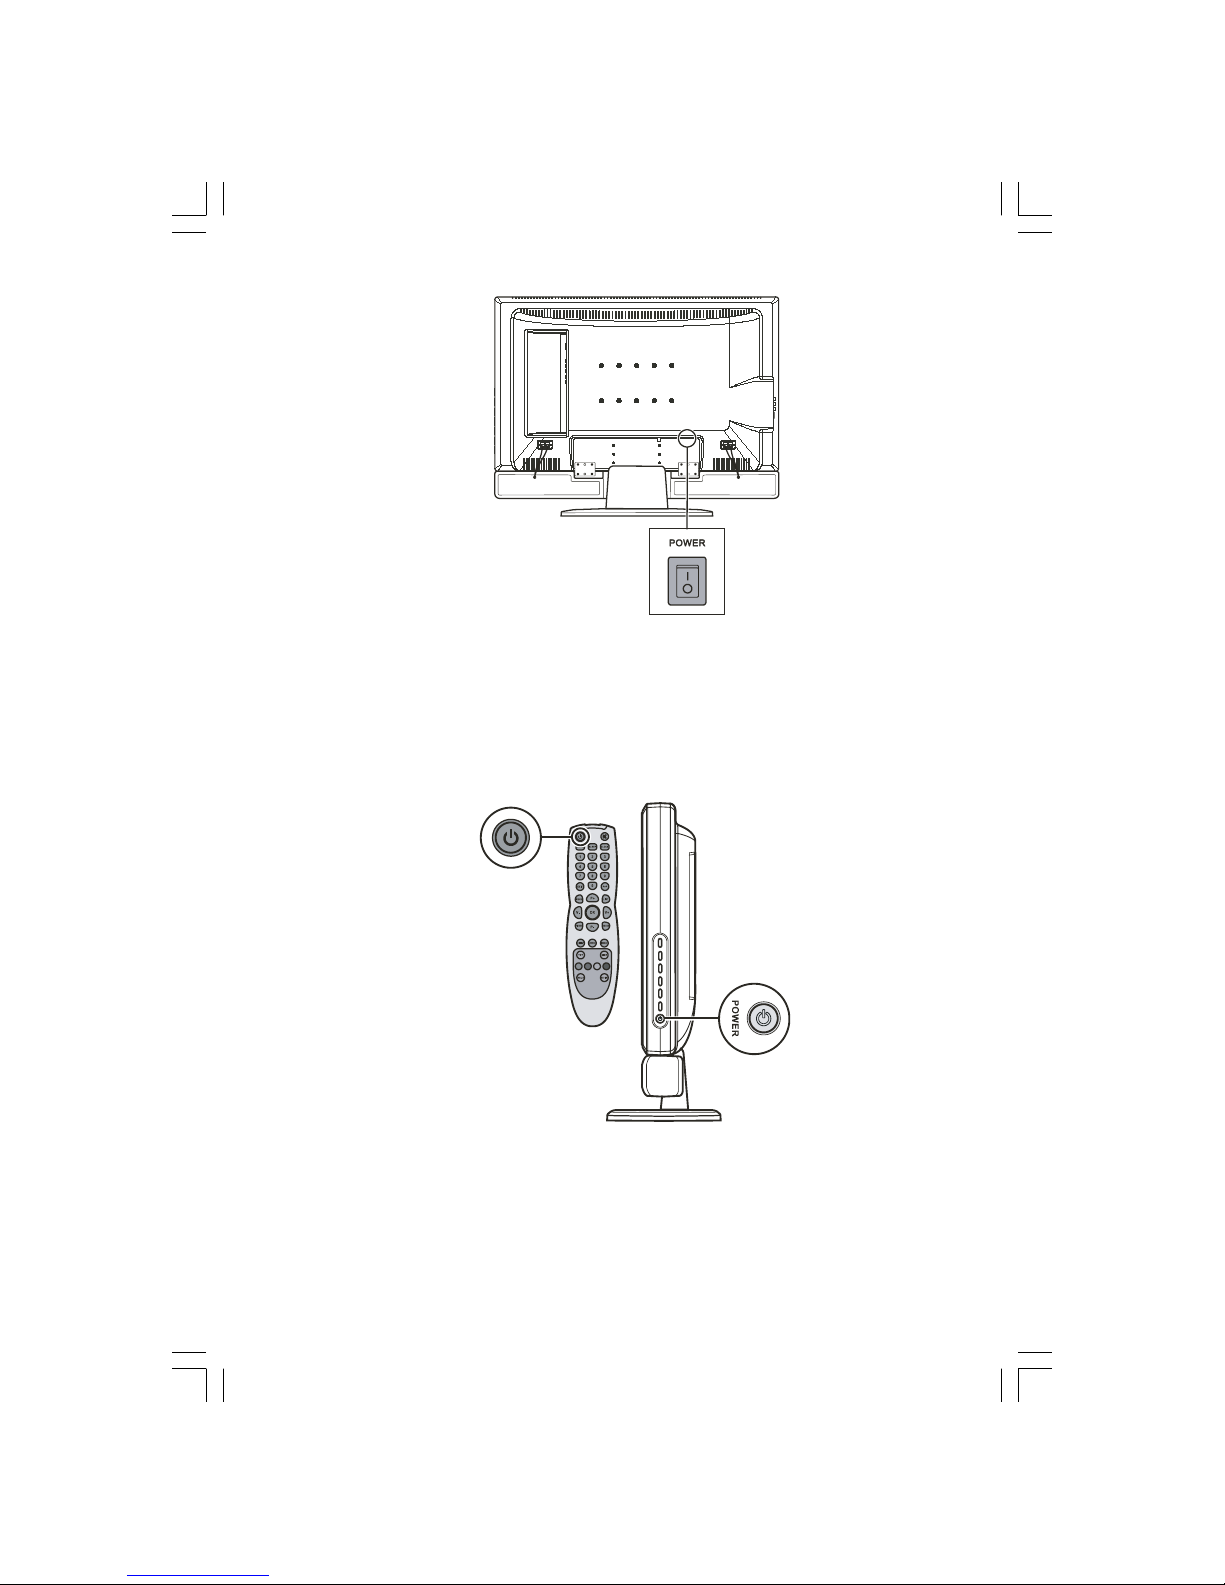
Once the master power switch has been engaged, TV power can be turned on and off using the power buttons located
on the right side panel of the TV or the remote control.
Power Button
To turn the TV on, press the POWER button located on the right side panel of the TV or the power button on the remote
control. The power indicator on front of the LCD TV lights green to indicate that the TV is on.
To turn the TV off, press the POWER button located on the right side panel of the TV or the power button on the remote
control. The power indicator on front of the LCD TV lights orange to indicate that the TV is in off (standby) mode.
Page 10

10
PRESTIGIO P323MW / P373MW
ENG
2 Introducing Your LCD TV
2.1 Features
Your LCD TV features:
* Widescreen colour active matrix thin film transistor (TFT ) liquid crystal display (LCD)
* 1366 x 768 resolution (32” model) / 1920 x 1080 (37” model)
* Analog TV tuner
* Antiglare with AR coating and Hard-Coating (3H)
* TV system compatibility: PAL/SECAM
* SAP system: MTS
* OSD (On Screen Display) adjustment
* PIP (Picture-In-Picture) function
* Teletext support
* VGA / TV / AV / SCART x 2 / Composite / Component input support
* AV output support
2.2 Front Panel Indicators
Ref. Component Description See Also
1 Remote Sensor Receives signal input from the remote control.
2 Power Indicator Green: On Section 1.4
Orange: Standby
Off: Main power off (see Rear Panel Inputs/Outputs)
Page 11
11
PRESTIGIO P323MW / P373MW
ENG
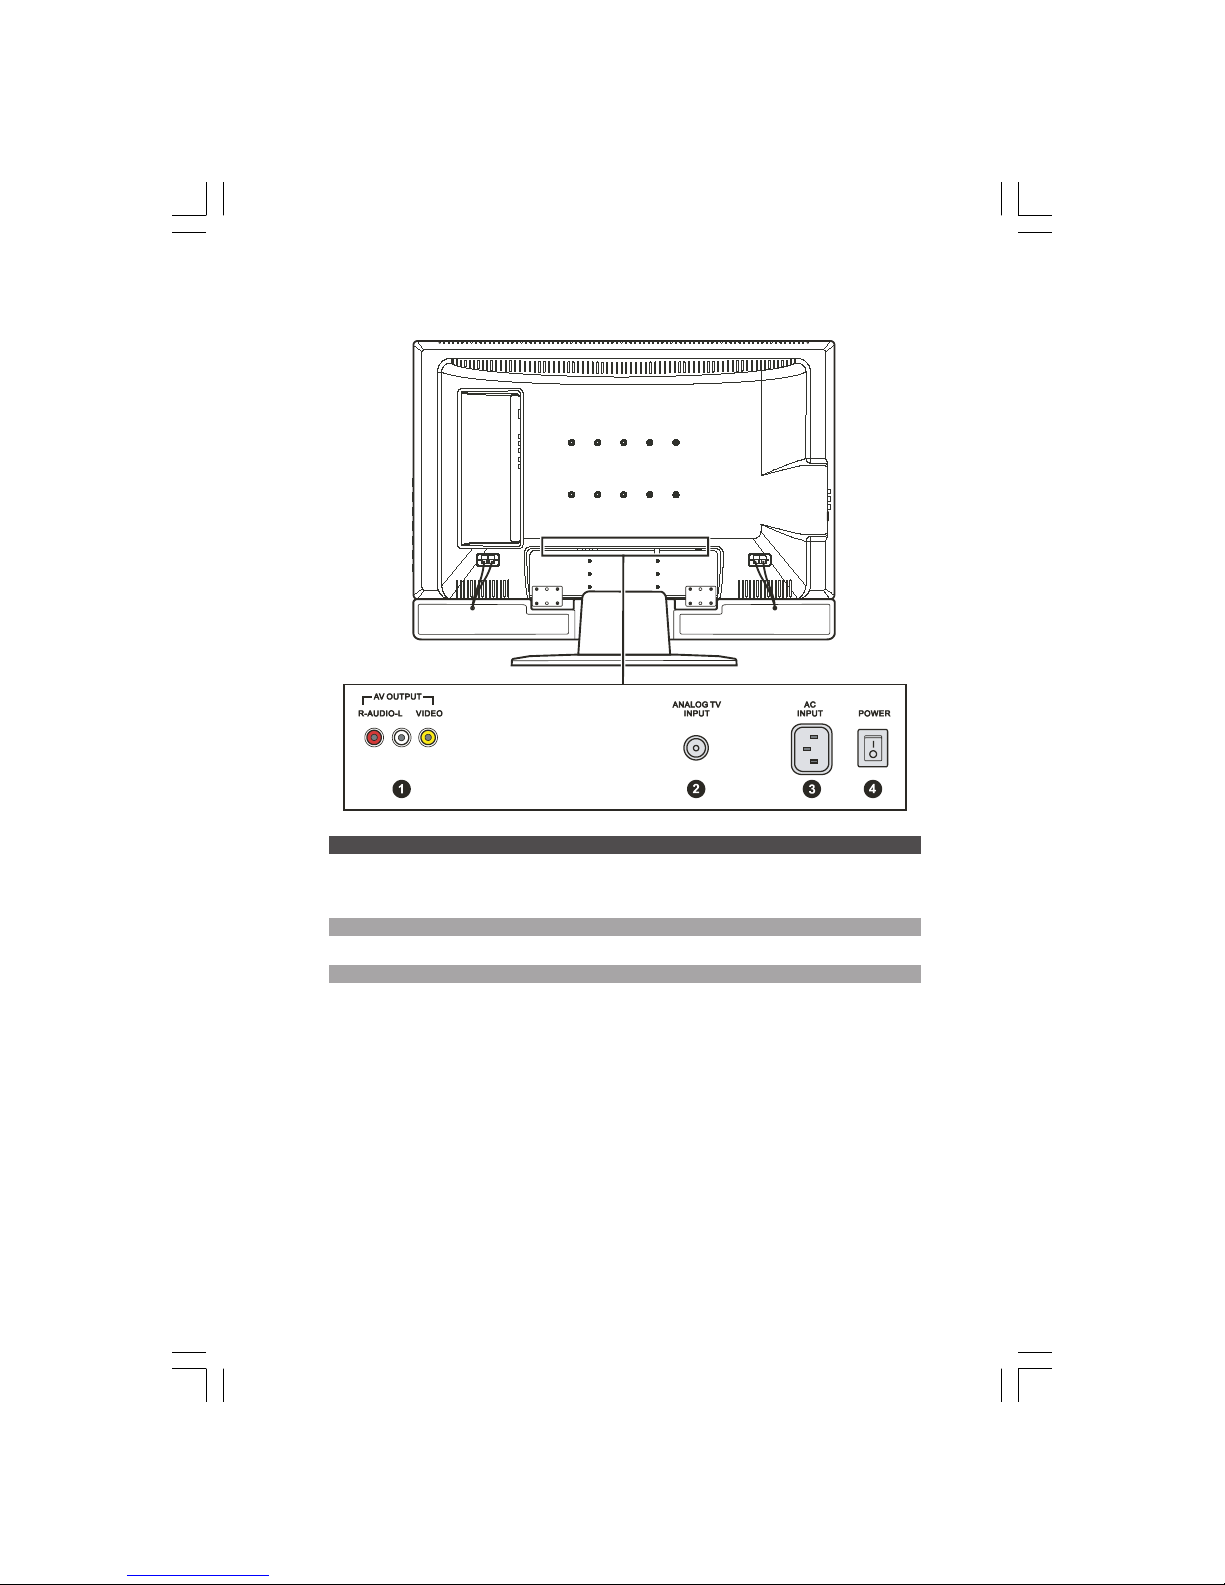
2.3 Rear Panel Inputs/Outputs
Ref. Component Description See Also
1 AV Out Connectors Connects to a variety of video equipment that supports Chapter 4
composite connection such as DVD players, VCR’s and
game consoles.
2 TV In Connector Connects to a UHF antenna or cable TV. Chapter 1
3 Power Connector Connects to an A/C outlet for powering the display. Section 1.3
4 Main Power Switch Turns the main power on and off. Section 1.4
Page 12
12
PRESTIGIO P323MW / P373MW
ENG
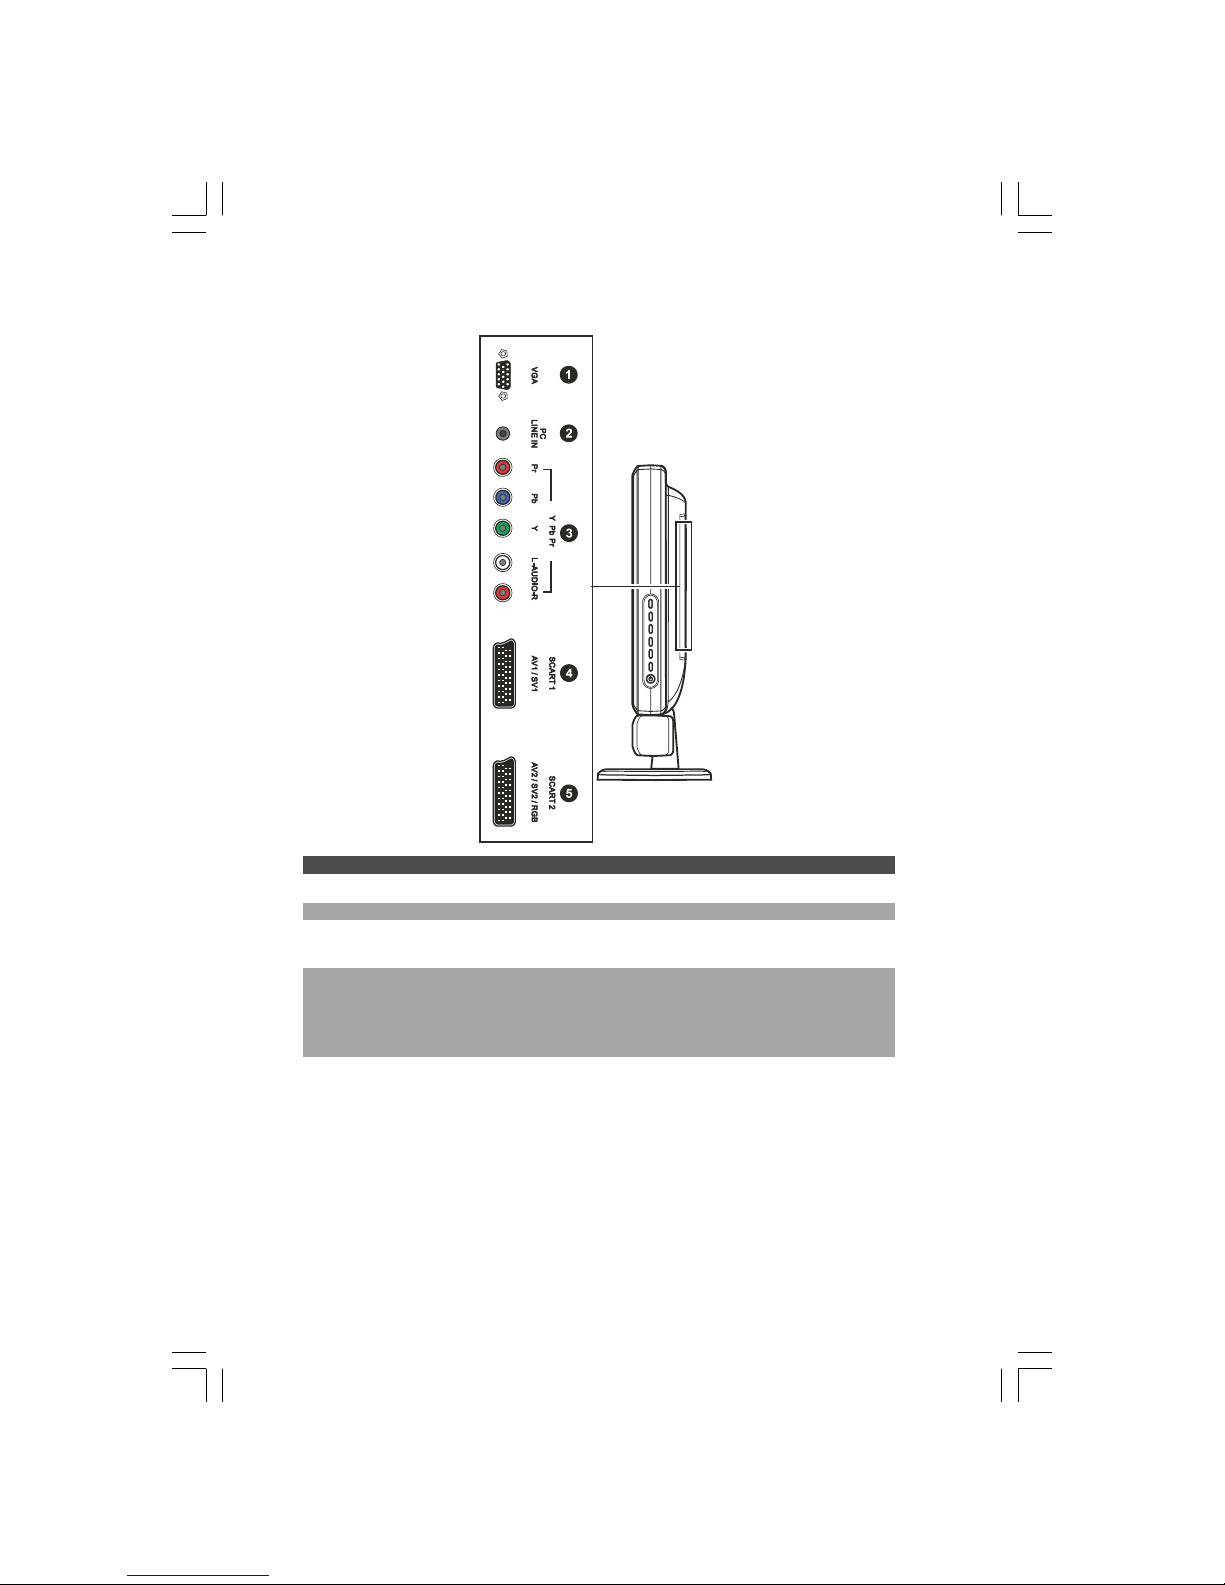
2.4 Rear Right-Side Inputs/Outputs
Ref Component Description See Also
1 VGA Connector Connects to the VGA port.
2 Line In Connector Connects to the audio out connector.
3 Y/Pb/Pr In Connectors Connects to video equipment such as DVD players and Chapter 4
digital set top boxes that utilize component video.
4 SCART 1 (Audio L/R, CVBS in/out, S-video in) Chapter 4
SCART 2 (Audio L/R, CVBS in/out, RGB)
Connectors Connects to video and audio equipment such as VCRs,
DVD players, digital set top boxes, and gaming systems
that utilize SCART video.
Page 13

13
PRESTIGIO P323MW / P373MW
ENG
2.5 Right-Side Panel Inputs/Outputs
Ref Component Description See Also
1 Headphone Connector Connects to a set of headphone.
2 AV3 In Connectors Connects to a variety of video equipment that supports Chapter 4
composite connection such as DVD players, VCR’s and
game consoles.
2.6 Left-Side Panel Controls
Ref Component Description See Also
1 CH \/ Goes to the next or previous channel. Section 3.2
CH /\ OSD active: selects OSD items. Chapter 6
2 VOL < Decreases or increases the volume. Section 3.2
VOL > OSD active: adjusts OSD setting values. Chapter 6
3 MENU Button Opens or closes the OSD menu. Chapter 6
4 SOURCE Button Switches to another input source
(TV, AV1, AV2, AV3, SV1, SV2, SCART2 RGB, VGA, and YPbPr).
5 Power Button Turns the TV ON and OFF (standby). Section 1.4
Page 14

14
PRESTIGIO P323MW / P373MW
ENG
2.7 Remote Control
Button Function See Also
Power Turns the TV on and off (standby). Section 1.4
Mute Toggles mute on and off. Section 3.2
SOURCE Switches to a different video input
source (TV, AV1, AV2, AV3, SV1, SV2,
SCART2 RGB, VGA, YPbPr).
SLEEP Sets the sleep timer (OFF, 5, 10, 30, Section 5.5
60, 90, 120 minutes).
CLOCK Shows the current time of teletext
information, or as a sub-page setting
key in teletext window.
EXIT Exits the OSD menu or teletext
window. Can also be used to stop
auto-searching of channel.
MENU Opens the OSD menu or returns Chapter 6
to the previous menu.
LIST Shows the teletext page that is
selected in the Favorite page menu.
OK Executes the selection in the OSD. Chapter 6
PICTURE Enters the Picture sub-menu Section 6.2
directly.
SOUND Enters the Sound sub-menu Section 6.3
directly.
DISPLAY Shows the current state.
STEREO Toggles the audio mode Section 3.2
between Mono or Stereo.
FORMAT Toggles the aspect ratio between Section 5.1
Widescreen (16:9), Normal (4:3),
Expanded (4:3), or Panorama.
Button Function See Also
Number Enter a TV channel number or Section 5.4
(0, 1 to 9) specify the page number in teletext.
Enters a password when parental
control are in use.
P>P Returns to the previously viewed
channel.
Page 15

15
PRESTIGIO P323MW / P373MW
ENG
Button Function See Also
P+ / P– Goes to the previous or next Section 3.2
channel.
Moves your selection up or down.
V+ / V– Increases or decreases the volume. Section 3.2
Moves your selection left or right.
Can also enter a sub-menu or cycle
through the available options.
Button Function See Also
TXT Opens the teletext window. Section 5.6
Toggles between teletext only
and both teletext and video.
SIZE Zooms in the teletext window. Section 5.6
HOLD Freezes the teletext window. Section 5.6
REVIEW Opens the hidden information in
the teletext window.
Red Executes the red function in Section 5.6
button the teletext window. Also
functions as delete key in the
program list.
Green Executes the green function in Section 5.6
button the teletext window.
Yellow Executes the yellow function in Section 5.6
button the teletext window.
Blue Executes the blue function in Section 5.6
button the teletext window.
Page 16

16
PRESTIGIO P323MW / P373MW
ENG
3 Watching TV
3.1 Before You Can Watch TV
Selecting Country
When using the LCD TV for the first time, you need to specify the country you are located. Once the country has been
set, it is not necessary to set it again in the future.
1. Press the MENU button to open the OSD main menu.
2. Press the P- button three times and press OK to open the System menu.
3. Press the P- button to select Country and press V- or V+ to select your country.
Page 17

17
PRESTIGIO P323MW / P373MW
ENG
Scanning TV Channels (UHF Antenna Only)
When using the LCD TV for the first time it is recommended that you scan all available TV channels and store them in
memory. Once the available channels have been memorized, it is not necessary to scan for available channels in the future.
1. Press the MENU button to open the OSD main menu.
2. Press the P- button twice and press OK to open the Tuning menu.
3. Press the P- button to select Search.
4. Press the V+ button to start the automatic search.
5. Press EXIT to stop the search.
You can search manually.
1. Press the P- or P+ button to select Frequency.
2. Press the V+ or V- button to add or minus the value of frequency. This value will be retained the next time you power
on your TV.
3.2 Basic TV Controls
Selecting TV Channels
You can select TV channels in three ways:
* Pressing P- or P+ on the remote control
* Pressing CH /\ or CH \/ on the right panel of the TV
* Pressing the number buttons on the remote control
* To select a 1-digit channel, press the digit.
* To select a 2-digit channel, press the first digit and then the second digit within 3 seconds.
Adjusting Volume
You can adjust the volume in two ways:
* Pressing or on the remote control
* Pressing VOL /\ or VOL \/ on the right panel of the TV
To mute the sound, press the mute button on the remote control. To end the mute, press the same button again.
Page 18

18
PRESTIGIO P323MW / P373MW
ENG
Selecting Mono/Stereo Mode
Your LCD TV can receive and decode alternative audio other than the main audio stream for the program. This feature
is called Multi-channel Television Sound (MTS). This LCD TV with MTS can receive mono sound and stereo sound. The
available modes are:
* Mono
For mono reception. Selecting this mode may help reduce noise or dropouts during weak stereo broadcasts.
* Stereo
For two-channel audio reception when viewing a program broadcasted in stereo.
You can use the remote control to switch between modes by pressing the SOUND button.
3.3 Basic TV Controls
Removing/Rearranging Channels
Removing Channels
After scanning for channels you may find that there is a channel that you do not want to view when scrolling through
available channels using the P+ or P- button. You can remove channels using the following instructions.
1. Press the LIST button to display the program list. Ten channels can be displayed per page. The left column shows the
channel number while the right column shows the program name.
2. Press the P+ or P- button to highlight the channel to be removed.
3. Press the “red” button to remove the channel from the list.
4. To delete another channel, repeat the two steps above.
Rearranging Channels
To rearrange channels in the program list, perform the following instructions:
1. Press the LIST button to display the program list.
2. Press the P- or P+ button to highlight one program to be moved. Then press V+ button.
3. Press the P- or P+ button to highlight the second program to be interchanged with. Then press the V- button. The
two-program sequence has been rearranged.
Page 19

19
PRESTIGIO P323MW / P373MW
ENG
4 Connecting External Devices
4.1 Understanding Video Connections
Your LCD TV is equipped with the latest technology for connecting video source devices such as DVD players, analogue
cable TV, digital set top boxes and gaming consoles. You can choose the appropriate connections depending on the
devices that you are connecting and the level of display quality you are trying to achieve.
Connector and Cable Description
Coaxial (RF) Analogue video and audio signals are transmitted via a single cable to
an F-type connector on the video source device.
Composite Video Composite video is the standard that connects almost all consumer video equipment
- TVs, laser disc players, VCRs, camcorders and gaming consoles. Composite video
combines the three basic elements of a video picture (colour, brightness, and
synchronization data) into a single combined (“composite”) signal.
Component Video Component video takes the advancement from composite (1-signal) to S-Video
(2-signals) a step further. It carries the Y, R-Y, and B-Y signals separately. Use
component video to take advantage of the superior picture provided by progressive
scan DVD sources.
SCART Video SCART is used for combined audio (usually in stereo) and video (VHS, S-VHS, and
RGB signals), making connections much simpler, by providing one plug that contains
all the necessary signals, and is standard across different manufacturers.
Page 20

20
PRESTIGIO P323MW / P373MW
ENG
4.2 Connecting a DVD Player
CAUTION: Disconnect all power sources before making any connections.
Using the Component Connection
1. Prepare the Y/Pb/Pr component cables and the audio cables for this connection.
2. Connect one end of the Y cable (green) to the Y connector (green) at the Y Pb Pr location on the LCD TV. Connect the
other end to the corresponding Y connector (green) on the DVD player.
3. Connect one end of the Pb cable (blue) to the Pb connector (blue) at the Y Pb Pr location on the LCD TV. Connect the
other end to the corresponding Pb connector (blue) on the DVD player.
4. Connect one end of the Pr cable (red) to the Pr connector (red) at the Y Pb Pr location on the LCD TV. Connect the
other end to the corresponding Pr connector (red) on the DVD player.
5. Connect the R (red) and L (white) audio cable ends to the L-Audio-R connectors located at the Y Pb Pr location on
the LCD TV. Connect the other ends to the corresponding left and right audio connectors on the DVD player.
6. To watch a DVD, turn on your LCD TV, press the SOURCE button to open the Source Select menu, press P- to scroll through
the source list and select Y Pb Pr as the input source. Press OK to confirm Y Pb Pr as your selection.
7. Turn on the DVD player.
NOTE: For more information, see the instructions supplied with your DVD player.
Using the Composite Connection
NOTE: If your DVD player has component output connectors it is recommended to use the
component connection described earlier to achieve best picture quality.
1. Prepare the audio and composite video cables for this connection.
2. Connect one end of the composite video cable (yellow) to the composite video connector (yellow) at the AV3 location
on the LCD TV. Connect the other end to the corresponding composite video connector (yellow) on the DVD player.
3. Connect the R (red) and L (white) audio cable ends to the R-Audio-L connectors at the AV3 location on the LCD TV.
Connect the other ends to the corresponding left and right audio connectors on the DVD player.
Page 21

21
PRESTIGIO P323MW / P373MW
ENG
4. To watch a DVD, turn on your LCD TV, press the SOURCE button to open the Main Source menu, press P- to scroll through
the source list and select AV3 as the input source. Press OK to confirm AV3 as your selection.
5. Turn on the DVD player.
NOTE: For more information, see the instructions supplied with your DVD player.
Using the SCART Connection
1. Prepare the SCART cable.
2. Connect one end of the SCART cable to the SCART connector at the SCART1/SCART2 locations on the LCD TV. Connect
the other end to the corresponding SCART connector on the DVD player.
3. To watch a DVD, turn on your LCD TV, press the SOURCE button to open the Main Source menu, press \/ to scroll through
the source list and select SV1 or SCART2 RGB as the input source. Press ENTER to confirm SV1 or SCART2 RGB as your
selection.
4. Turn on the DVD player.
NOTE: For more information, see the instructions supplied with your DVD player.
Page 22

22
PRESTIGIO P323MW / P373MW
ENG
4.3 Connecting a VCR, Camcorder, or Game Console
CAUTION: Disconnect all power sources before making any connections.
Using the Composite Connections
1. Prepare the audio and composite video cables for this connection.
2. Connect one end of the composite video cable (yellow) to the composite video connector (yellow) at the AV3 location
on the LCD TV. Connect the other end to the corresponding composite video connector (yellow) on the VCR / camcorder
/ game console.
3. Connect the R (red) and L (white) audio cable ends to the R-Audio-L connectors at the AV3 location on the LCD TV.
Connect the other ends to the corresponding left and right audio connectors on the VCR / camcorder / game console.
4. To use the connected device, turn on your LCD TV, press the SOURCE button to open the Source Select menu, press the
P- button to scroll through the source list and select AV3 as the input source. Press OK to confirm AV3 as your selection.
5. Turn on the VCR / camcorder / game console.
NOTE: For more information, see the instructions supplied with your VCR, camcorder, or game
console.
Page 23

23
PRESTIGIO P323MW / P373MW
ENG
Using the SCART Connection
1. Prepare the SCART cable.
2. Connect one end of the SCART cable to the SCART connector at the SCART1/SCART2 locations on the LCD TV. Connect
the other end to the corresponding SCART connector of the VCR / camcorder / game console.
3. To use the connected device, turn on your LCD TV, press the SOURCE button to open the Source Select menu. Press \/
to scroll through the source list and select SV1 or SCART2 RGB as the input source. Press ENTER to confirm SV1 or SCART2
RGB as your selection.
4. Turn on the VCR / camcorder / game console.
NOTE: For more information, see the instructions supplied with your VCR / camcorder / game
console.
Page 24

24
PRESTIGIO P323MW / P373MW
ENG
4.4 Connecting to Another Device’s Video/Audio Input Connector
CAUTION: Disconnect all power sources before making any connections.
You can send video and audio signals from the LCD TV to another LCD TV or video/audio recording device.
1. Prepare the audio and composite video cables for the connection.
2. Connect the composite video cable (with yellow-colored connectors): one end to the yellow AV output connector
on the LCD TV and the other end to the corresponding connector on the other LCD TV or video recording device.
3. Connect the R (red) and L (white) audio cables (not supplied): one end to the LCD TV and the other end to the other
LCD TV or audio recording device.
4. Turn on the other LCD TV or video/audio recording device.
NOTE: For more information, see the instructions supplied with the other LCD TV or video/audio
recording device.
Page 25

25
PRESTIGIO P323MW / P373MW
ENG
5 More Features
5.1 Changing the Aspect Ratio
The widescreen (16:9) design of your LCD TV allows you to view films in their original aspect ratio without distortion.
Standard definition TV programs are broadcast with an (4:3) aspect ratio. When 4:3 content is displayed on a widescreen
panel, black bars will appear to the left and right of the video image. If you want to eliminate the black bars and have
the video image fill the screen it is necessary to change the aspect ratio mode.
Original 4:3 shown in Wide screen Original 4:3 shown in Normal screen
To change the aspect ratio, you can use the remote control or OSD.
Using the Remote Control
Press the FORMAT button to toggle between 4:3 Expanded, 16:9, 4:3, or Panorama aspect ratios.
Using the OSD
1. Press the MENU button to open the OSD main menu.
2. Press OK to open the Picture Menu.
3. Press the P- button to select Form.
4. Press the V+ or V- button to select 4:3 Expanded, 16:9, 4:3, or Panorama.
5. Press OK to activate your selection.
Page 26

26
PRESTIGIO P323MW / P373MW
ENG
NOTE: The following are the allowable aspect ratio under various signal sources:
* TV or SCART: 4:3 Expanded, 16:9, 4:3, or Panorama
* PC: 16:9 or 4:3
5.2 Using Hold
The “Hold” feature allows you to temporarily freeze the picture or teletext page. This feature is helpful when you want
to write down information such as phone numbers, recipes, etc that appears on the screen.
To hold the picture, press the HOLD button. To resume live television press the HOLD button again.
5.3 Using Twin Picture
“Twin Picture” allows you to simultaneously view two pictures from two different sources on the same screen. PIP
(Picture-In-Picture) displays the sub picture in a small screen on top of the main screen.
NOTE: Only VGA or YPbPr signal source support PIP function.
Activation of twin picture occurs in two steps:
Part 1. Activating PIP mode
Part 2. Selecting the input source for the main and sub pictures
Part 1. Activating PIP Mode
You can use the OSD to activate PIP (small/medium/large window).
1. Press the MENU button to open the OSD main menu.
2. Press the P- button five times to select the last icon and press OK to open the Calibration Menu.
Page 27

27
PRESTIGIO P323MW / P373MW
ENG
3. Press the P- button to select PIP and then press OK to enter the PIP submenu.
Part 2. Selecting the Input Source
If no input source has been selected, the default source for the main picture is TV and the sub picture is AV1. To change
the input source:
1. Press the P- button to select PIP Source.
2. To select the input source for the sub picture, press the V+ or V- button to select a source from the list. Press OK to
activate your selection.
If you select TV as the PIP source, press P+ or P-, or input the channel number to change channels.
The following are the allowable PIP sources: TV, AV1, AV2, AV3, SV1, SV2, SCART2 RGB, VGA, YPbPr.
Page 28

28
PRESTIGIO P323MW / P373MW
ENG
Adjusting PIP Display and Sound Output
When using PIP, you can adjust the position, size, and allow sound output of the sub picture.
1. Press the MENU button to open the OSD main menu.
2. Press the P- button five times to select the calibration icon, then press OK to open the Calibration menu.
3. You can change the following items. (See Section 6.7 for more information.)
* Position
Top Left, Top Right, Bottom Right, or Bottom Left.
* Size
Toggles the size of the sub picture between Small, Medium, or Large.
* PIP Sound
Enable or disable PIP sound output.
5.4 Using Parental Control
“Parental Control” allows you to block programs that you feel are inappropriate for your viewing audience such as
programs containing violence, adult language and nudity.
Setting up Parental Control
1. Press the MENU button to open the OSD main menu.
2. Press the P- button three times and press OK to open the System menu.
3. In the System menu item, press the P- button to select Child Lock.
4. Press OK to enter the Child Lock submenu.
5. You will be asked to create the Parental Control password (4-digits). Enter a 4-digit sequence and press OK.
6. Confirm your password and press OK.
7. Under the Lock submenu, press V+ or V- button to select any of the following.
* No
No parental control is set.
* All
All type of viewing is set under parental control and you need to input the password to view any program.
Page 29

29
PRESTIGIO P323MW / P373MW
ENG
* TV
Parental control is set and you need to input the password when watching program with TV as your signal source.
* AV
Parental control is set and you need to input the password when watching program from all other types of signal source
except TV.
8. Press OK to activate your selection. Once set, you will be prompted to enter the password for viewing programs set
under Child Lock preset limits.
Viewing Blocked Program
When activated, parental control will pop up a window requesting a password for programming set beyond the
blocked level. To view the program, enter the correct password.
5.5 Setting the Sleep/Wake-up Timer
You can set up a timer for the LCD TV to automatically turn on/off after a set period of time.
NOTE: If you have pressed the DISPLAY button to view status information within five minutes of
auto shutoff, a number will appear in the corner of the screen indicating the remaining time (in
minutes).
You can use the remote control or OSD to set up the timer:
Using the Remote Control (Sleep Timer only)
Press the SLEEP button on your remote control to toggle between OFF, 5 Min, 10 Min, 30 Min, 60 Min, 90 Min, or 120
Min timers.
NOTE: The setting using your remote control will override your setting on the OSD’s System
menu.
Using the OSD (Sleep/Wake-up Timer)
1. Press the MENU button to open the OSD main menu.
2. Press the P- button three times to select the clock icon. Press OK to open the System menu.
3. Press the P- button to select Time. Press OK to open the Time submenu.
4. Press the V+ button to confirm if the current time is set correctly.
5. Press the P- button to select On Timer, then use the V+ or V- button to set the time for your TV to wake-up automatically.
6. Press the P- button to select Active, then use the V+ or V- button to activate the wake-up timer.
7. Press the P- button to select Off Timer, then use the V+ or V- button to set the time for your TV to sleep automatically.
8. Press the P- button to select Active, then use the V+ or V- button to activate the sleep timer.
Page 30

30
PRESTIGIO P323MW / P373MW
ENG
5.6 Using Teletext
NOTE:
* The teletext function can only work with TV or SCART signal source and at PAL mode.
* “P100” is displayed on the top-left portion of your screen if there is no teletext signal available
under PAL mode.
1. Press TXT to open the teletext window. Upon pressing TXT a second time allows you to display the teletext window
with video.
After opening the teletext window, the red/green/yellow/blue buttons would correspond to the function displayed
on the lower portion of your screen.
2. Press P>P to enter the Favourite menu set previously (see chapter 6 for details).
3. Press P+ or P- button to scroll through the page.
4. Press CLOCK to input the number of the submenu on the last line of your screen. Then press red button to subtract
the value or green button to add the value.
5. Press the number keys to select the page you want to view. Since there are no pages under 100, if you press 0 it will
automatically display “8–.” The maximum page is 899.
6. Press HOLD to stop refreshing the teletext page.
7. Press SIZE to zoom in to the top part of the page. Press SIZE the second time to zoom in on the bottom part of the
page. Pressing SIZE a third time will restore the normal view.
Page 31

31
PRESTIGIO P323MW / P373MW
ENG
6 Adjusting LCD TV Settings
6.1 Using the OSD
To adjust various settings of your LCD TV, use the on-screen display (OSD).
Opening the OSD Menu
Press the MENU button on the remote control or right side panel to open the OSD main menu as shown. The main menu
contains six options for Picture, Sound, Tuning, System, Favorite, and Calibration sub-menus.
Moving Around and Making Selections
To move around and make selections, use the buttons on the remote control or the right side panel of the LCD TV.
Remote Control Right Side Panel Function
MENU MENU Opens or closes the OSD menu.
When a sub-menu is active: closes the current menu and goes
back to the previous menu.
V- / V+ < / > In the OSD main menu: selects a sub-menu icon.
In a sub-menu: adjusts the value or switches the setting to the
next option.
P- / P+ \/ / /\ Navigates to an item in a sub-menu.
OK SOURCE In the OSD main menu: opens the sub-menu of the highlighted
icon.
In a sub-menu: enters the selection.
NOTE: Throughout the rest of this chapter the descriptions will be based upon remote control
operation. You can also use the right side panel buttons for the same purpose.
Changing the OSD Language
By default, the OSD language is set to English. You can switch the language to French, Spanish, etc. via the System submenu. (See Section 6.5 for more information.)
Page 32

32
PRESTIGIO P323MW / P373MW
ENG
6.2 Picture Menu
Press the PICTURE button or press MENU button to open the OSD main menu and press OK to open the Picture menu.
The Picture menu allows you to adjust display settings such as brightness, contrast, colour, sharpness, colour temperature, and form. Menu options may vary depending on the input source.
Press the P- or P+ button to select an item in this menu and make your changes. The following table describes all of the
items in this menu.
Item Description Operation
Brightness Adjust the background brightness level. V+ to brighten the screen.
V- to darken the screen.
Contrast Adjust the black and white contrast level. V+ to increase contrast level.
V- to decrease contrast level.
Colour Temperature Toggle the colour temperature between Warm, V+ or V- to select and OK to
Standard, or Cold. activate your selection.
Form Set the aspect ratio to Extended 16:9 (full screen), V+ to select Normal.
Extended 4:3, 4:3 (traditional TV screen), or non-linear. V- to select Wide.
OK to activate your selection.
Page 33

33
PRESTIGIO P323MW / P373MW
ENG
6.3 Sound Menu
Press the SOUND button. Or press the MENU button to open the OSD main menu, then press the P- button once to select
and press OK to open the Sound menu.
The Sound menu allows you to adjust sound effects.
Press the P- or P+ button to select an item in this menu and make your changes. The following table describes all of the
items in this menu.
Item Description Operation
Volume Adjust the volume. V+ to increase volume.
V- to decrease volume.
Treble Adjust the treble. V+ to increase high frequency sound.
V- to decrease high frequency sound.
Bass Adjust the bass. V+ to increase low frequency sound.
V- to decrease low frequency sound.
Balance Adjust the left and right audio balance. V+ to emphasize the right speaker.
V- to emphasize the left speaker.
Loudness Enable the loudness function. OK to activate the function.
A check mark indicates enabled.
AVC Enable the aptitude volume. OK to activate the function.
A check mark indicates enabled.
Headphone Enable sound output via headphone. OK to activate the function.
A check mark indicates enabled.
Page 34

34
PRESTIGIO P323MW / P373MW
ENG
6.4 Tuning Menu
Press the MENU button to open the OSD main menu. Press the P- button twice to select and press OK to open the Tuning
menu.
The Tuning menu allows you to set up TV-related functions.
Press the P- or P+ button to select an item in this menu and make your changes. The following table describes all of the
items in this menu.
Item Description Operation
Programme Select the TV program. V+ or V- to select and OK to activate your selection.
Name Set the name of the current program.
Channel Select the channel. V+ or V- to select and OK to activate your selection.
Frequency Fine-tune the current frequency. V+ or V- to select and OK to activate your selection.
Pict. System Select between PAL or SECAM. V+ or V- to select and OK to activate your selection.
Sound System Select between B/G, DK, I, or L. V+ or V- to select and OK to activate your selection.
Sources Select the TV signal input source: V+ or V- to select and OK to activate your selection.
TV (antenna) or Cable.
Search Scan all available channels. V+ to start scanning and EXIT to stop it.
Page 35

35
PRESTIGIO P323MW / P373MW
ENG
6.5 System Menu
Press the MENU button to open the OSD main menu. Press the P- button three times to select and press OK to open the
System menu.
The System menu allows you to set the system-related functions.
Press the P- or P+ button to select an item in this menu and make your changes. The following table describes all of the
items in this menu.
Item Description Operation
Language Toggle the OSD language between V+ or V- to select and OK to activate your selection.
the available 11 languages: English, French,
German, Italian, Polish, Portuguese, Spanish,
Finnish, Dutch, Danish, or Czech.
Country Toggle between the available 11 countries’ V+ or V- to select and OK to activate your selection.
channel signals.
Sys Sub Open the system submenu. V+ or V- to select and OK to activate your selection.
OSD Transparency: Adjust the OSD’s
transparency level.
Standby: Enter the Standby state after
powering on.
MAX Program: Set the maximum program
number.
Child Lock Open the parental control submenu.
Code: When you lock the parental control Press four number buttons to enter your password.
for the first time, you will be prompted to V+ or V- to select and OK to activate your selection.
enter a password.
Test: Allow you to test your password.
Lock: Set the input source (No, All, TV, AV
(SCART, VGA, YPbPr)) for password protection.
Page 36

36
PRESTIGIO P323MW / P373MW
ENG
Item Description Operation
Time Open the timer submenu.
Timer: Display/modify system time. Press four number buttons to enter the time.
On Timer: Set the timer for the TV to V+ or V- to select and OK to activate your selection.
automatically turn on.
Active: Enable the automatic power-on.
Off Timer: Set the timer for the TV to
automatically turn off.
Active: Enable the automatic power-off.
AV Out Select the TV signal output destination: V+ or V- to select and OK to activate your selection.
TV, AV1, AV2, or AV3.
Reset Reset OSD settings to the factory default. V+ or V- to select and OK to activate your selection.
NOTE: Be careful when using this function as you may lose all your previous settings and
scanned channels.
6.6 Favourite Menu
Press the Menu button to open the OSD main menu. Press the P- button four times to select and press OK to open the
Favourite menu.
The Favourite menu allows you to preset favourite channels for quick, one-button access.
Press the P- or P+ button to select an item in this menu and make your changes. The following table describes all of the
items in this menu.
Item Description Operation
Programme Shows the current program number. Press number buttons to change.
Name Shows the name of current program.
TTX-Page 1 Shows the first favourite page’s teletext information settings of
current channel.
TTX-Page 2 Shows the second favourite page’s teletext information settings of
current channel.
TTX-Page 3 Shows the third favourite page’s teletext information settings of
current channel.
TTX-Page 4 Shows the fourth favourite page’s teletext information settings of
current channel.
Page 37

37
PRESTIGIO P323MW / P373MW
ENG
6.7 Calibration Menu
Press the MENU button to open the OSD main menu. Press the P- button five times to select the calibration icon, then
press OK to open the Calibration menu.
The Calibration menu allows you to use twin-picture mode, i.e., simultaneously displaying of two pictures from two
different input sources on the same screen.
Press the P- or P+ button to select an item in this menu and make your changes. The following table describes all of the
items in this menu.
Item Description Operation
H. Position Adjust the OSD’s horizontal position. V+ to move toward the right.
V- to move toward the left.
The adjusted value will depend on the screen resolution.
V. Position Adjust the OSD’s vertical position. V+ to move upward.
V- to move downward.
The adjusted value will depend on the screen resolution.
Phase Adjust the A/D sampling phase. V+ or V- to select and OK to activate your selection.
PIP Open the PIP submenu. V+ or V- to select and OK to activate your selection.
Active: activate PIP.
PIP Source: select the sub picture input source.
Position: select sub picture placement between
Top Left, Top Right, Bottom Right, or Bottom Left.
Size: set the size of sub picture to Small, Medium,
or Large.
PIP Sound: allow sub picture sound output.
Page 38

38
PRESTIGIO P323MW / P373MW
ENG
7 Troubleshooting
Use the following information to solve common problems.
There is no power.
* Make sure the power cord is properly connected.
* Make sure that the main power switch is on.
Power is suddenly turned off.
* Make sure that the sleep timer is not enabled.
* Make sure that the power plug is properly connected.
The remote control is not working properly.
* Make sure that you use the remote control within the allowable distance and angle.
* Remove objects between the remote control and the remote control sensor.
* Make sure that the batteries are not weak.
* Make sure that the batteries are correctly installed.
There is no picture.
* Make sure that the main power switch and power button are turned on.
* Make sure that the selected video input source is connected to a working component.
* If your LCD TV is connected to your computer, make sure the computer is not in a suspend mode.
The colour is abnormal.
* Make sure that the input source cable is connected securely and correctly to your LCD TV.
* Adjust the settings to fit your colour preferences.
The picture is not clear.
* Make sure that the antenna cable is properly connected.
* If using an antenna, make sure there are no obstructions blocking the reception.
* If you use any kind of amplifier to boost the signal level, check to verify that it is operating properly.
Picture is cut off/with sidebar screen.
* Make sure the image position is correct.
* Make sure that the screen mode adjustments such as picture size are made correctly.
* Change the aspect ratio.
Strange colour, colour too bright, or colour misalignment.
* Adjust the colour tone within the OSD.
* Make sure that the contrast is not set too high.
* Check the input signal setting.
You can see a picture but hear no sound.
* Make sure that the volume is not turned down.
* Make sure that the sound is not muted.
* Make sure that your audio input source cables are connected securely and correctly.
Page 39

39
PRESTIGIO P323MW / P373MW
ENG
A Specifications
Flat Panel
Monitor Type
a-Si TFT Active Matrix
TFT LCD Panel
CMO
Display Type
Colour TFT LCD
Display Area
32” / 37”
Native Resolution
1366 x 768 WXGA (32” model)
1920 x 1080 WXGA (37” model)
Progressive Scan
Yes
Aspect Ratio
16:9 / 4:3
Brightness (typical)
550 nits
Contrast Ratio
1000:1 (32” model)
800:1 (37” model)
Lifetime of Backlight
60,000 hours
TV System Compatibility
AV: NTSC / PAL / SECAM
TV: PAL / SECAM
Audio
Speaker Drivers
2-Way Stereo (Tweeter and Mid Range)
Speakers
15 W + 15 W Detachable
Earphone
Yes
MTS/Stereo
Yes
Terminals
AV Input
Video
SCART x 2, Composite RCA x 1 (CVBS), Component RCA x 1
(Y Pb Pr)
Audio
L/R RCA x 2
AV Output
Video
Composite RCA x 1
Audio
L/R RCA x 1
Convenience
OSD Language
English, French, German, Italian, Polish, Portuguese, Spanish, Finnish, Dutch, Danish, and Czech
Picture Feature
PIP
Screen
Stand
Yes
Power
Source
90~240 V AC / 50~60 Hz
Power Consumption
220 W
Dimensions
32’’ model - Dimension (H x W x D)
585.25 mm x 806 mm x 105 mm (LCD TV )
248 mm x 500 mm x 260 mm (Stand)
15.75 mm x 806 mm x 90 mm (Speaker)
37’’ model - Dimension
1054(L) x 314 (W) x 834(H) mm with stand
32” model - Weight
15 kg (LCD TV)
3.4 kg (Stand)
1.9 kg (Speaker)
32” model - Weight
26.5 kg(net)
Page 40

40
PRESTIGIO P323MW / P373MW
ENG
Wall Mount / Remote
Wall Mount
Optional VESA-compliant
Remote Control
Yes
Cables / Cable Management
Cables Included
Power cord x 1
Environment
Operating Temperature
0 °C to 35 °C (32 °F to 95 °F)
Operating Humidity
10 % to 90 % (no condensation)
Storage Temperature
–20 °C to 60 °C (–4 °F to 140 °F)
Storage Humidity
10 % to 90 % (no condensation)
Regulatory Compliance
CE, CB
NOTE: Because we continually strive to improve our products we may change specifications and
designs without prior notice.
 Loading...