

Page 1

1
TABLE OF CONTENTS
Important safety intrstructions………………………………………………………………………………………………………………….。2
1. Introduction …………………………………………………………………………………………………………………………………..。4
1.1 General information …………………………………………………………………………………………………………………………….4
1.2 Features …………………………………………………………………………………………………………………………………………4
1.3 Check the list………………………………………………………………………………. ……………………………………………………5
2. Installing the monitor…………………………………………………………………………………………………………………………….5
2.1 Base installation…………………………………………………………………………………………………………………………………..6
2.2 Wall Mounting with VESA standard…………………………………………………………………………………………………………….7
2.3 Signal Cable Connection………………………………………………………………………………………………………………………….7
2.4Audio cable connection…………………………………………………………………………………………………………………………..7
2.5 Power cord Connection…………………………………………………………………………………………………………………………..7
2.6 Power on ………………………………………………………………………………………………………………………………………….8
2.7 Self test pattern……………………………………………………………………………………………………………………………………8
2.8 Adjust the pictures…………………………………………………………………………. ………………………………………………。….9
3. Operation ……………………………………………………………………………………………………………………………………。…9
3.1 Power ON /OFF Switch ………………………………………………………………………………………………………………………。.9
3.2 Power LED indicator…………………………………………………………………….. …………………………………………………。…9
3.3 OSD control keys…………………………………………………………………………. …………………………………………………。...10
3.4 OSD menu ……………………………………………………………………………………………………………………………………。..10
3.5 Safety mode……………………………………………………………………………………………………………………………………。。14
3.6 Timing guide…………………………………………………………………………………………………………………………………。..14
3.7 Plug play……………………………………………………………………………………………………………………………………。…16
3.8 Power management……………………………………………………………………. ……………………………………………. ……….16
3.9 Volume adjust…………………………………………………………………….…………………………………………………………….16
4 .specification……………………………………………………………………………………………………………………………………..17
5. Simple troubleshooting………………………………………………………………………………………………………………………….19
Page 2

2
Important Safety Instructions:
1. Read the manual carefully before using the monitor.
2. Save these user manual for later use.
3. Unplug the monitor from the power source when you clean the monitor. Don’t use liquid cleaners or aerosol cleaners.
Use cloth to clean it. If it can’t be done, please use LCD screen cleaners.
4. Don’t use attachments which are not recommended as they may cause hazards.
5. Please grasp the plug to unplug the connector from the wall outlet .Don’t pull the power cord to unplug it.
6. Don’t place anything on the power cord or step on it.
7. Don’t place the monitor near water source such as bathtub, washbowl, sink, laundry tub, swimming pool etc.
8. The slots are designed for ventilation, simultaneously to keep the machinery workable and protect it from overheating.
For the same reason,. please do not place the monitor on the bed, sofa, carpets or other similar surface. Don’t place the
monitor near or over heat source or place in built-in installation.
9. Keep 5 cm away from the wall or other goods.
10. This monitor can only be used the power source indicated on the label. If you have questions, please consult your
dealer.
11. As safety measure, this monitor is equipped with a three-wire ground style plug. If you can’t insert the plug into the
Page 3

3
outlet, please contact your electrician to replace your outlet. .Don’t defeat the safety purpose of the grounding-type
plug.
12. Please make sure that the outlet and power cord can afford the total electricity of the products.
13. Place the monitors in safe place where the cord will not be abused by persons working on it.
14. Follow all the warning and instructions illustrated on the manual.
15. Don’t overload the wall outlets and extend cords as it can result in fire or electric shocks.
16. Don’t remove or open the cover to service this monitor by yourself. It may expose you to dangerous voltage or other
hazards before all servicing to qualified service personnel.
17. Unplug this monitor from the outlets and refer servicing to qualified service personnel under the following conditions.
● The power cord is frayed or damaged.
● The monitor has been dropped or the cabinet has been damaged.
● When the monitor displays a distinct change it performance, this indicates a need for service.
18. The power cord is the main device to disconnect the power.
19. Unplug the power cord when you do not use it for long time.
20. Place the monitor in good ventilation and protect it from strong light, overheating and damp environment.
21. This monitor must be stored in temperature --20℃-55 ℃ .Otherwise, it may cause permanent damage.
Page 4

4
1. Introduction
General information
This monitor is a high-performance intelligent multi-scanning color monitor. It is with 20.1 inch TFT LCD panel and
MCU digital control low radiation and glary with built-in power supply. The shape is tiny and thin adapting to small
place, which can save your more places.
Features
● The best working mode: 1680*1050@60 HZ
● Viewable angle: H: 160 V: 160
● Active area: 473。76 mm* 296。10 mm
● Pixel pitch : 0.282 mm *0.2825mm
● Max brightness: 300cd/㎡
● Max contrast: 800:1
● Response time: 5MS
● Color : 16.7 M
● Power saving compliant with EPA ENERGY STAR and VESA DPMS.
● Auto color balance. When it is connected to different graphic adapter, the monitor can calibrate the white and black
Page 5

5
reference voltage.
● Plug & play, compatible with Windows 9* & ME&NT&2000&XP and VESA DDC1/2B.
Check the list
Please make sure that all of the following items are included before operating the monitor.
■ LCD monitor( include base)
■ Power cord, VGA signal cable ,DVI-D signal cable( optional), Audio cable(optional), three bolts(there are used to
connect the base and knighthead),Audio cable(optional)
■ User’s manual
If any of the above listed items are missing. Please contact your dealer for technical support.
2. Installing the monitor
Please consider the following advice before you install the monitor.
Position
Choose a place that reflects less to place your monitor.
Generally, there is a suitable angle with a window.
Highness
The peak of the monitor should be a little lower than your eyes when you sit down.
Page 6
6
Inclination
You will feel comfortable with the sloping screen.
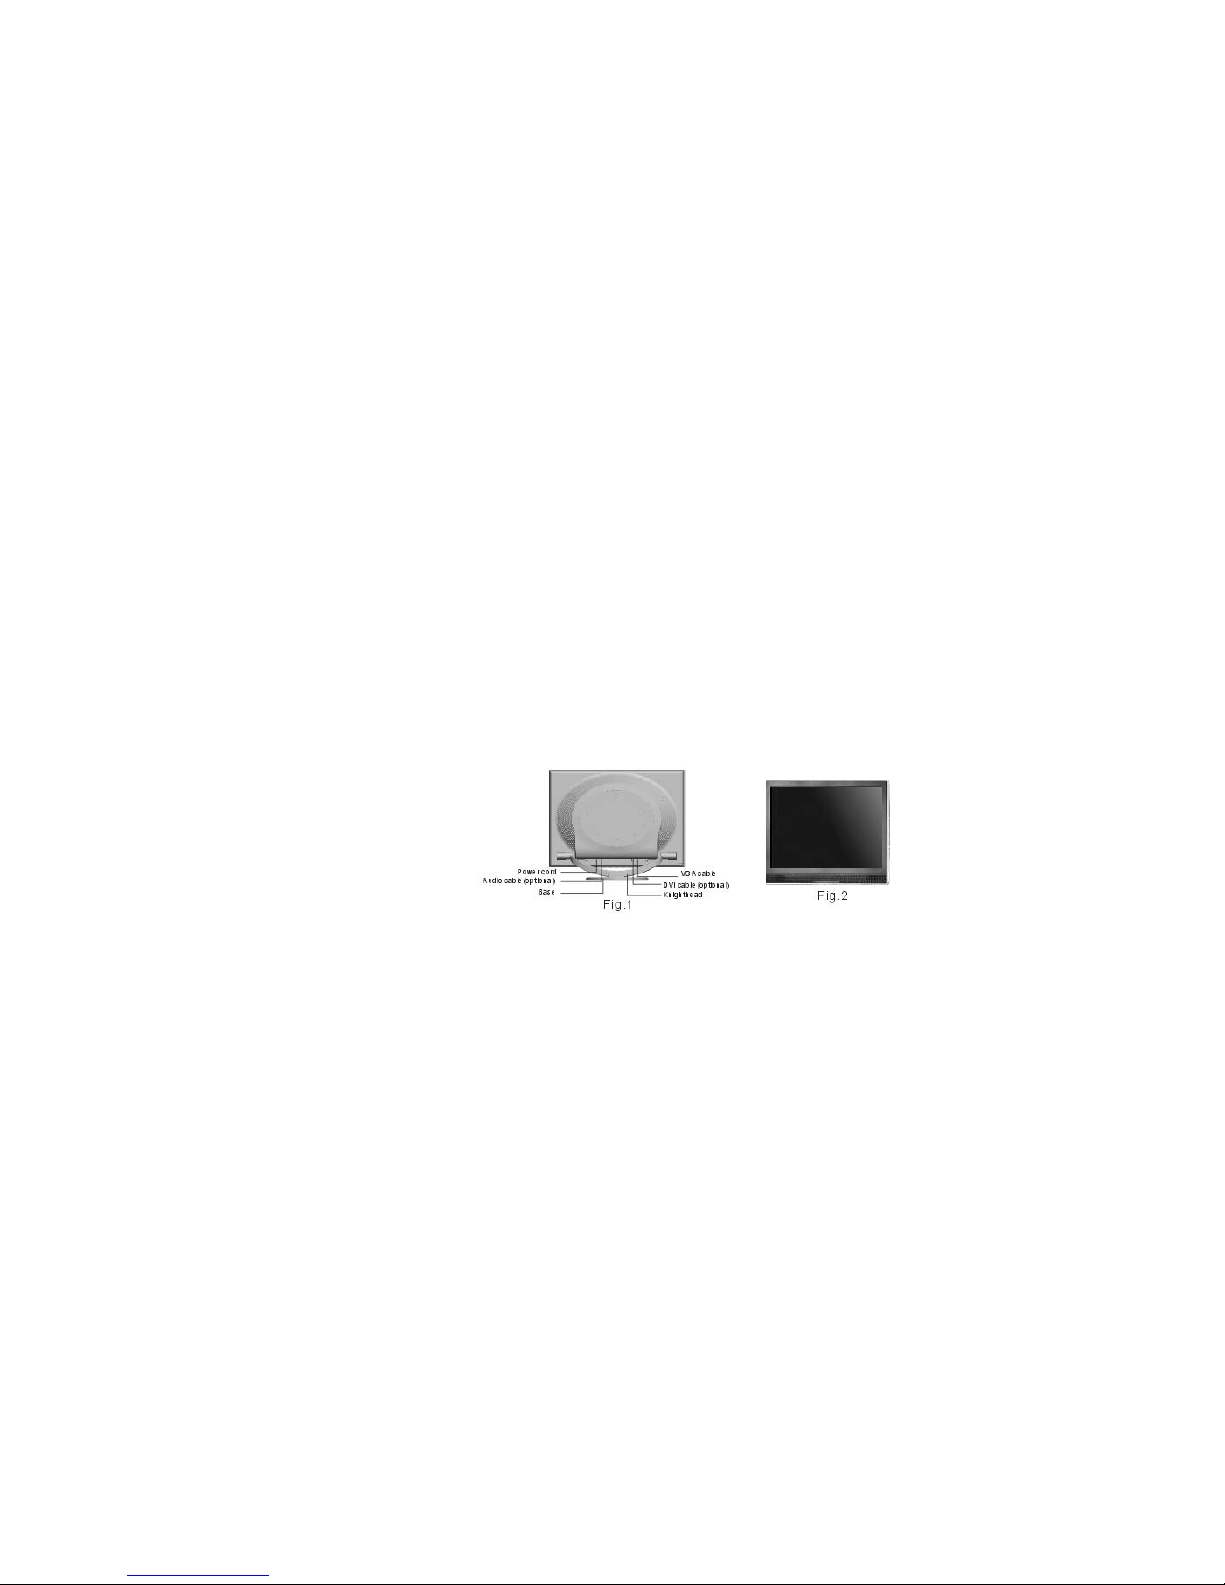
2.1 Base installation( Fig 1)
1. After taking the monitor out of the carton, carefully turn the monitor on front side.
2 .Align the three bollt holes on the base with the three bolt holes on the knighthead of the monitor and screw the bolts with
a screwdriver.
Page 7

7
2.2 Wall Mounting with VESA Standard(Fig 2)
1. Loose the two bolts with a screwdriver.Then the base and the knighthead can be taken off..In order to prevent the two
bolts from loose, it is better to assemble the fittings on the rear cover of the monitor.
2. Take off the omamental lips and clean up the signal cable, power cord, audio cable.
3. Fix the wall-mounting parts(optional parts according with VESA standard) on the rear cover to mount the monitor on the
wall.
2.3 Signal cable connection
Take off the omamental cover (operation method as Fig 3) and insert the signal cable VGA and DVI port
of a computer.Then lock up the cover with screws to assure full connection to the earth. Insert another
end of signal cable into the corresponding port(VGA or DVI port) snd lock up with screws.
2.4 Audio cable connection
Plug one side of the audio cable into the PC audio port, then plug the other side into the audio port of the monitor
2.5 Power cord connection
Plug one end of the powder cord into the input port of the monitor’s power supply and then insert the other end into the
socket of the electrical source. Assemble the ornamental cover to the rear cover of the monitor.
Page 8

8
2.6 Power on
Switch on the power to both the monitor and your computer. After the monitor is power on, the LED lights up green or blue.
If the LED becomes red and flashing, please check the video signal cable connection. If the LED is off, please press power
switch slightly.
2.7 Self test pattern
If there is no horizontal or vertical sync signal, your monitor will display Fig 4 to indicate no signal input. After a few
seconds, the monitors will come into waiting and saving power mode; if the monitor receives the video signal, it will return
to the normal mode.
2.8 Adjust the picture
In order to obtain the best visual display, you need to adjust it; please refer to chapter 3 “operation of the monitor”
Page 9

9
3. Operation
OSD control panel
Fig 5 is model elevation. Other models differ in key-press position and front panel.
3.1 Power on /off switch
This is a slight touch digital control key. it is used to turn the monitor on or off.
3.2 Power LED indicator
When the monitor is working, the power LED is green or blue. If the monitor is in saving power mode, the power LED will
be red and flashing. If you turn off the monitor, the power LED will be off. When the LED off, the monitor is off; but the
monitor is still electrified. In order to make security, you should unplug the power cord while you don’t use the monitor.
3.3 OSD Control keys
3.3.1 Auto key
This key is used to complete auto-adjusting function, it make the monitor to be the best visual display status only in VGA
mode.
3.3.2 +/- key
These two keys will complete navigate right or left and choose the control of the menu function . The adjustment value can
be set directly by +/- key.
Page 10

10
3.3.3 ← key
Confirmation key can show the menu and complete the confirmation function.
3.4 OSD menu
3.4.1 The meaning of the menu in VGA mode ( Fig 6):
1. Auto adjustment 2. Brightness. 3. Contrast 4. H-position 5. V-position
6. Clock 7. Phase 8. Signal source 9. Color adjustment
10. Volume 11. Sharpness 12. OSD position/ transparence 13. Recall
14. Language 15. Exit 16. Selected function name 17. Resolution
18. H-frequency 19. V-frequency 20. Progressive bar of adjustment
21. Percentage of adjustment 22. Customer LOGO 23. OSD display time
3.4.2 The meaning of the menu in DVI mode( Fig.7)
1. Brightness 2. Contrast 3. Sharpness 4. Volume 5. OSD menu display time
6. Transparence 7. OSD position 8. Signal source 9. 9300 K
10. 7800k
11. 6500 K 12.User 13. Recall 14. Language 15. Exit
16. Selected function name
Page 11

11
17. Resolution 18. H-frequency 19. V-frequency
20. Progressive bar of adjustment 21. Percentage of adjustment
22. Customer LOGO
3.4.3 Function table:
Display contents Function
Auto adjustment Automatically adjust to obtain the best setting
Brightness Adjust the brightness
Contrast Adjust the contrast
H-position Move the screen to ward left or right
V-position Move the screen to ward upward or downward
Clock Adjust the frequency of pixel
Phase Adjust the phase of pixel clock
Sharpness Adjust the sharpness of the picture
Page 12

12
Color Adjust the color of the picture
9300 9300 k Set 9300k color temperature
7800 7800k Set 7800k color temperature
6500 6500k Set 6500k color temperature
User User mode Set user mode
W-B Auto color balance Auto color balance
Volume Adjust the volume
OSD display time Adjust the OSD display time
OSD adjustment Adjust the parameter of OSD
OSD H-position Move the menu toward left or right
OSD V-position Move the menu toward upward or downward
OSD transparency Setting OSD transparency
Signal source Exchange signal mode between VGA and DVI
Recall Reset factory setting
Language Language selection
Page 13

13
Exit Exit the menu
3.4.4 Special functions
1. Color adjustment (
): when the function is selected, the monitor will come into
the sub-menu( Fig.8),there are five functions that can be selected: a, 9300 k; b, 7800K; C,
6500 k ; d: User; e: W-B Selecting User, you will enter user mode and you can make
adjustment to R/G/B values to obtain your satisfying color; Selecting W-B, it will enter
the color balance mode, and the monitor will automatically adjust the white-black color
reference voltage to obtain optimal color balance.
2. R/G/B adjustment(
): in “ USER” mode, monitor will automatically
enter R/G/B adjustment mode, push “←” key ,the relative options will flash, then adjust
it by“+/- “,then push ←”key again to exit.
3. Language
There are smany languages to select .
4. Position of OSD menu (
) when you select the item, you can adjust H-position
Page 14

14
and V-position of OSD menu and transparence (as Fig 9: VGA. Fig
10: DVI)
5. Sharpness adjustment (
) Adjust the sharpness of the picture on the
screen.
3.5 Safety mode
When the video signal exceeds the frequency range of the monitor, the
monitor MCU will stop horizontal and vertical scanning in order to protect
the monitor.
Fig 11 will be displayed on the screen. After a few seconds, the monitor will enter turn-off mode. You must restart the
computer and reset the frequency range.
3.6 Timing guide
S/N Mode Resolution V-frequency H-frequency Available Input Signal
1 VGA 720* 400 70HZ 31.5 KHZ Analog RGB
2 VGA 640* 480 60 HZ 31.5 KHZ Analog RGB,DVI
3 VGA 640* 480 72 HZ 37.9KHZ Analog RGB
Page 15

15
4 VGA 640* 480 75HZ 37.5 KHZ Analog RGB
5 SVGA 800* 600 60 HZ 37.9KHZ Analog RGB,DVI
6 SVGA 800* 600 72 HZ 48.1 KHZ Analog RGB
7 SVGA 800* 600 75HZ 46.9 KHZ Analog RGB
8 XGA 1024* 768 60HZ 48.4 KHZ Analog RGB,DVI
9 XGA 1024* 768 70HZ 56.5 KHZ Analog RGB
10 XGA 1024* 768 75HZ 60KHZ Analog RGB
11 XGA 1280*960 60HZ 60KHZ Analog RGB
12 XGA 1152* 864 75HZ 67.5 KHZ Analog RGB
13 SXGA 1280* 1024 60HZ 64KHZ Analog RGB,DVI
14 SXGA 1280* 1024 75 HZ 80KHZ Analog RGB
15 UXGA 1600*1200 60HZ 75KHZ Analog RGB,DVI
16 UXGA 1680*1050 60HZ 65HZ Analog RGB,DVI
Recommended mode: 1680*1050@ 60hz
Page 16

16
3.7 Plug & play
This monitor meets the standards of VESA DDC. When using video card with VESA DDC1/2B, it will auto-scan video
frequency, output power, function and other data to PC when computer is on. I t will go to proper connector mode and proper
resolution frequency.
3.8 Power management
This monitor complies with EPA energy star requirement and meets VESA DPMS standard. The following is the description
of the power indicator for the power saving mode (Fig.12) .
Mode Power indicator Power consumption
On Green or blue < 48 w
Stand by /suspend Red flashing < 2w
off off < 2w
(Fig. 12)
3.9
Volume adjust
Adjust the volume by OSD menu and software of the PC.
4. Specification
Page 17

17
Monitor type TFT LCD
Surface disposal Anti glary
Active area 473.76 MM*296.10MM
Viewable angle :
H: 160°
V: 160°
Max brightness
300cd/㎡
Max contrast 800:1
Response time 5ms
Max resolution 1680* 1050
Input resistance
75 3%
H-frequency 30KHZ-80KHZ
V-frequency 55HZ-75 HZ
Power supply for monitor 100v-240 VAC 60hz/50hz
Max consumption 48 w
Page 18

18
Input connector 15 pins D-sub or DVI-D
Power saving control Yes
Comply with EPA energy star standards Yes
Comply with European CE Yes
Plug & play Yes
Environment
Atmosphere pressure
86kpa~104 kpa
Operating temperature and humidity
5℃~ 40℃ 10% ~85%
Storage temperature and humidity
--20℃5~5℃ 5% ~95%
Dimension (L* W* H)
Unpacking 516* 74* 409 mm3
Packing 580* 165* 465mm3
Weight
Net weight 6.5 kg
Gross weight 8.0 kg
Page 19

19
Note: This specification is subject to change without notices.
5. Simple troubleshooting
Symptom Solution
1. No pictures / no LED Check if the power cord and the power plug are well
connected; check if the monitor is off.
2. No pictures/LED red flashing Check if the PC video card and signal cable are well
connected and check if the signal cable is well connected
with monitor.
3. Picture faintness, too big or too small
In OSD menu, select to make the monitor adjust
automatically.
4. Picture too dark Push “+ /-” key to adjust contrast and brightness.
5. Overheating Keep 5 cm away from other goods for ventilation. Don’t put
anything on the monitor.
6.Bright or dark spot It is normal phenomena. Eliminate the bright or dark spot in
Page 20

20
20 minutes after turning on the monitor.
7. Picture distortion and flicker Check the PC setting, select the proper resolution and adjust
refresh frequency.
8. Short of color Check if the signal cable pins are twisting or broken.
9. Noise signals at turning off There may be noise signals during turning off the monitor.
This is caused by electrical release and so it is normal.
 Loading...