

Page 1

User Manual
GEOVISION 5066 Mireo
GEOVISION 5068 Mireo
Page 2

Contents
Introduction......................................................
Shorthand.........................................................
Tappable Items................
Arrows ......................
The Basics: Finding and Navigating to a Destination
Simple Search and Navigation............................
Part 1. Getting Started
Touch Gestures.....................
Using Touch Gestures in Map View
Selecting an Item
Panning the Map
Tilting the Map
Rotating the Map
Zooming In / Out
Selecting a Point on the Map
Using Touch Gestures in Pages
Selecting, Deselecting and Toggling an Item
Scrolling a Page
The Map View......................................
The Control Bar....................................
The Search Button.........................
The Driving Options Button....................
The Route Options Button.....................
The Last Page Accessed Field...............
The Main Menu Button..............................
The Exit Application Button.....................
Page 3

The Status Bar..............................................
The GPS Signal Strength Indicator...............
The Current Speed
Indicator...........................
The Clock Display........................
The Battery Level Indicator........................
Smart Buttons and Menus
The Smart Orientation Button and Menu
The Rotation Mode Button
Panning Mode Mode Button
The 2D Mode Button
The 3D Mode Button
The Show North Button
The Select Place on Map Button
The Smart Zoom Button & the Multi-zoom Menu
The Smart Zoom Button
The Multi-zoom Menu
The Block View / View Preset 1 Button
The Area View / View Preset 2 Button
The City View / View Preset 3 Button
The Auto Zoom Button
Map View Location Icons and Buttons
Your Current Location Icon
The No GPS Signal Location Icon
Your Current Location Finder Button
The Start Point Icon
The Start Point Name Button
The Destination Icon
The Destination Name Button
The Via Point Icon
The Via Point Name Button
Page 4

Additional Via Points Icon
The Map Selection Point Icon
The Map Selection Point Name Button
The Favorite Place Point Icon
The The Favorite Place Point Name Button
The Search Result Point Icon
The Search Result Name Point Button
Page View Buttons and Icons.....................................
The Active Route Icon
The Inactive Route Icon
The Pause / Resume Route Button
The Favorite Place / Priority Favorite Place
Button
The Map Locator Button
The Home Icon
Part 2 Using the Application or: What happens when I press
this?
Using search..............................................................
Opening and Closing the Search Page
Defining Search Categories
Selecting a Country Map
Using the Keyboard Toggle Button
Using the Letter / Number / Symbol Toggle Button
Using the What Field
Using the Where Field
How to Delete a Single Space
How to Clear the Search Fields
How to Get a Complete List of Search Results
How to Narrow Your Search Results and View Their
Details
How to See a Search Result in Map View
How to Get Back to the Search Page or Map View
Page 5

Using the Location Details/Route Planning & Options Page
You Can Get to this Page in a Number of Ways
Using the Location Details Bar
Using the Route Planning Bar
Using the Place Bar
Getting out of this Page
Creating Smart Zoom Menu Presets..................
Using the Main Menu............................
How to Get to the Main Menu and Where to go
From There
Using Take Me Home
Using Route Options
Getting to the Trip Dashboard & Directions Page
Using the Current Trip Status and Control Bar
Using the Current Route Details Display Bar
Using the Location Details Bar
Using the Route Planning Bar
Using the Place Bar
Using the Route Options Bar
Reading the Dashboard
Using Directions
Using Favorites...................................
Creating a Favorite Place
Creating a Favorite Route
Getting to the Favorite Places and Favorite
Routes Pages
Using Favorite Places
Using Favorite Routes
Using History......................................
Getting to the Destinations and Trip Log Pages
Using Destinations
Using the Trip Log
Page 6

Using Settings.....................................
Getting to the Settings and About Page
Using the Settings Page
Selecting Your Language
Selecting Your Voice
Selecting You Distance and Speed Units
Selecting Additional Keyboards
Restoring to the Factory Settings
Using the About Page
About
Page 7

Mireo DON'T PANIC User Manual
Shorthand
Tappable Items
Tappable items will appear in purple throughout the manual.
Arrows
Take Me Home Cancel Current Route Yes. You'll see
sentences like these in Part 2 of the User Manual. This shortened
formulation represents much lengthier instructions that tell you
to open mulitiple nested screens in sequence, i.e., “Tap the Take
Me Home button. On the following screen, tap Cancel Current
Route. On the screen after that, tap Yes.”
Quick Start
Simple Search and Navigation
You want to get to certain address, but you don't have the time
right now to go through the user manual. Here's a quick and basic
way to start navigating immediately.
Finding and Navigating to a Destination
Page 8

Tap the Search icon on the Control Bar. Enter the address in the
What field. Tap the Search button. Tap on the Search Result. Tap
Navigate To and you will be automatically guided from your
present GPS location to your selected destination.
Part 1.
Getting Started
Below you will find some basic terminology (with pictures!) to
make things easier to understand.
Touch Gestures
Using Touch Gestures in Map View
Use your fingers to manipulate the map and page views in the
app.
Selecting an Item
Tap the screen surface once with a fingertip to select a button on
the Control Bar, a map icon, etc.
Panning the Map
Page 9
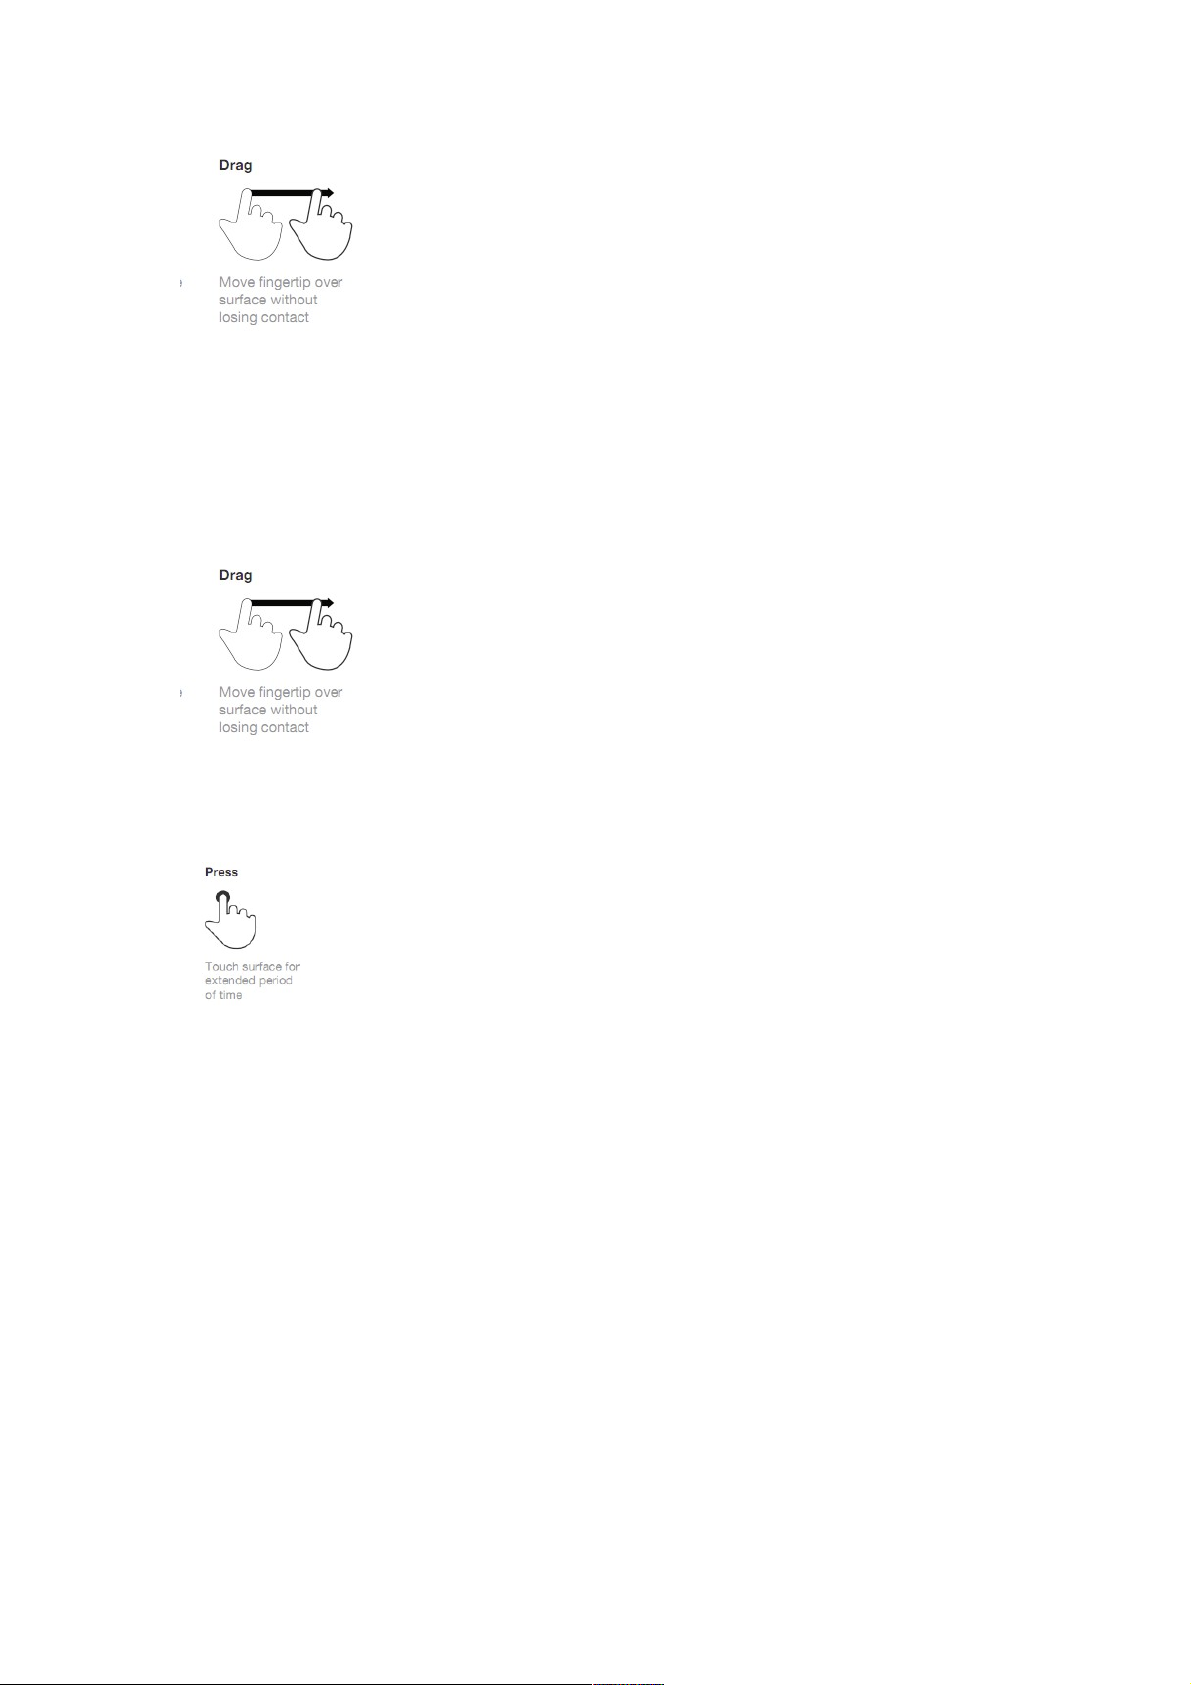
Swipe (move or quickly brush your fingertip across the screen
surface) to pan across the map.
Tilting the Map
Selecting a Point on the Map
Touch and continue pressing a point on the map with a fingertip
to select that point. A Map Selection Point icon will appear on
that spot.
NOTE: Pressing a point on the map with your finger will zoom in
the view.
Using Touch Gestures in Pages
Selecting, Deselecting and Toggling an Item
Page 10
Tap the screen surface once with a fingertip to select a button,
tab, list item, etc. Double tap to deselect or toggle applicable
items.
Scrolling a Page
Swipe (move or quickly brush your fingertip up and down the
screen surface) to scroll up and down a page.
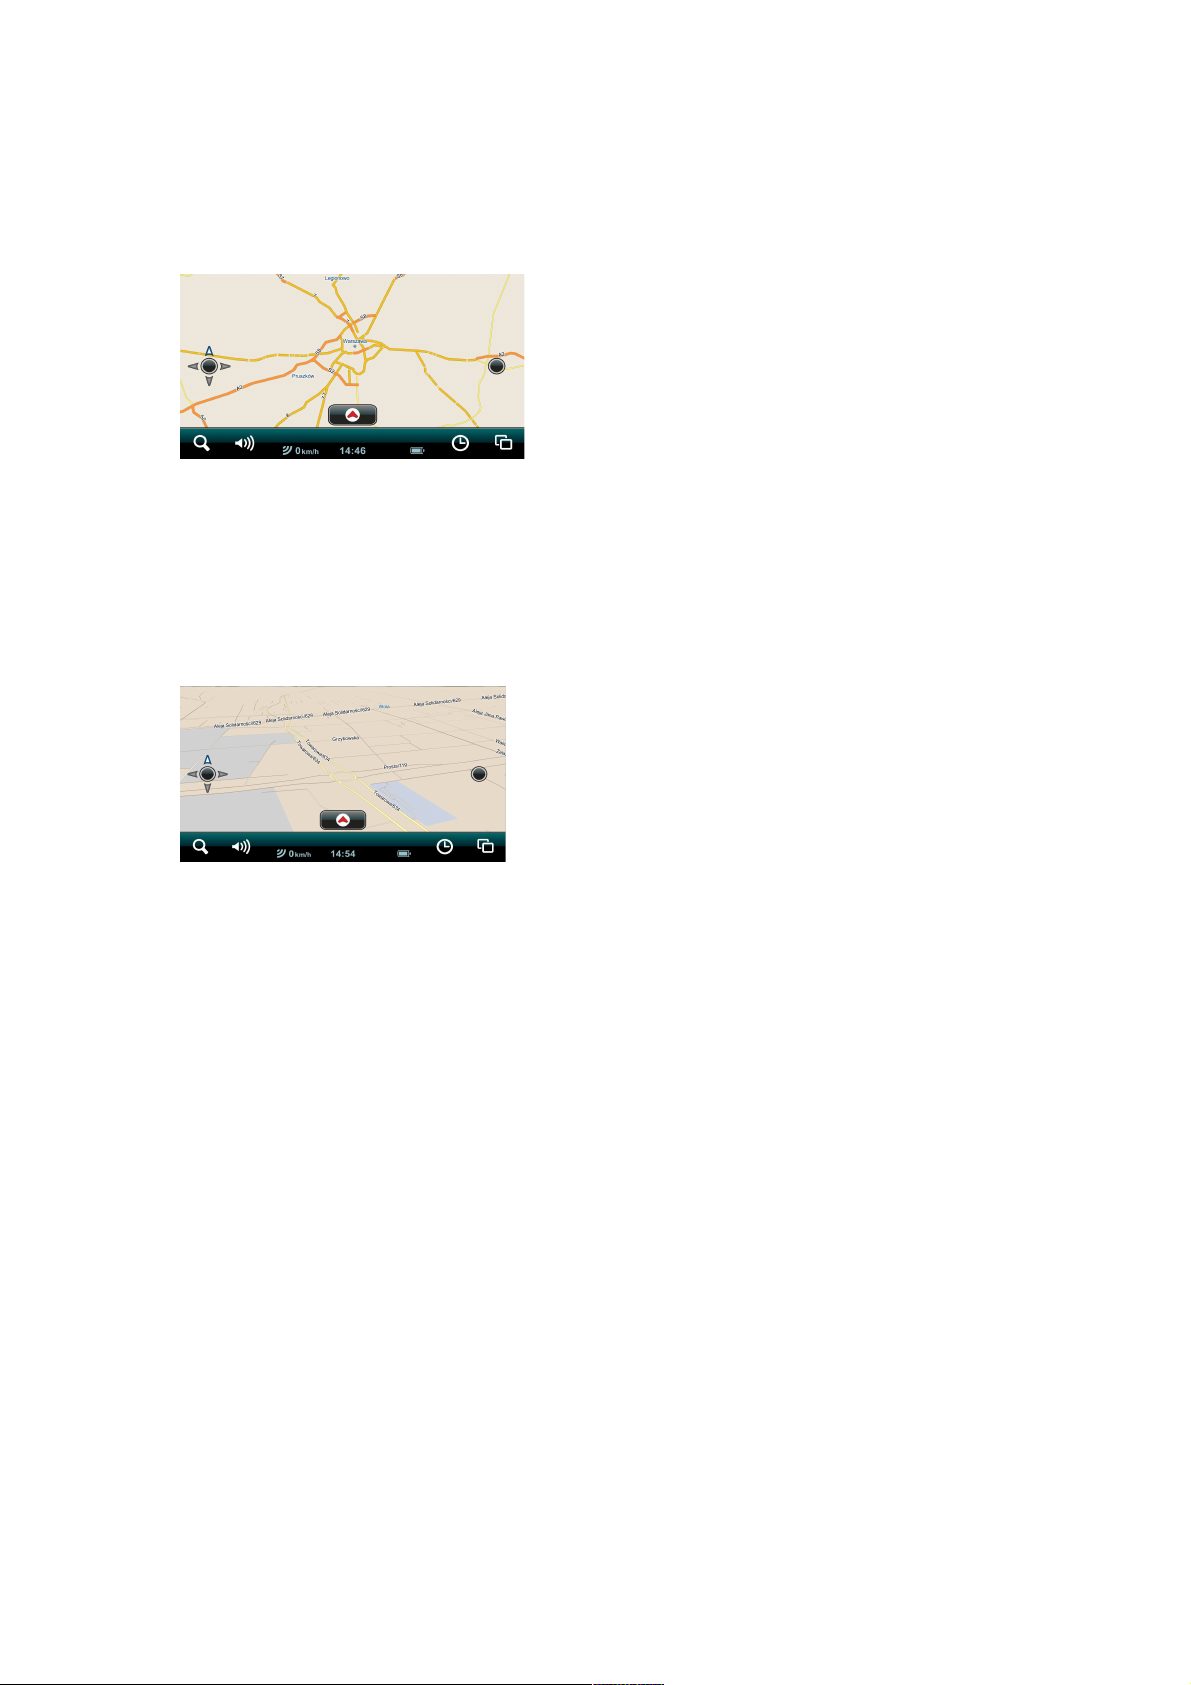
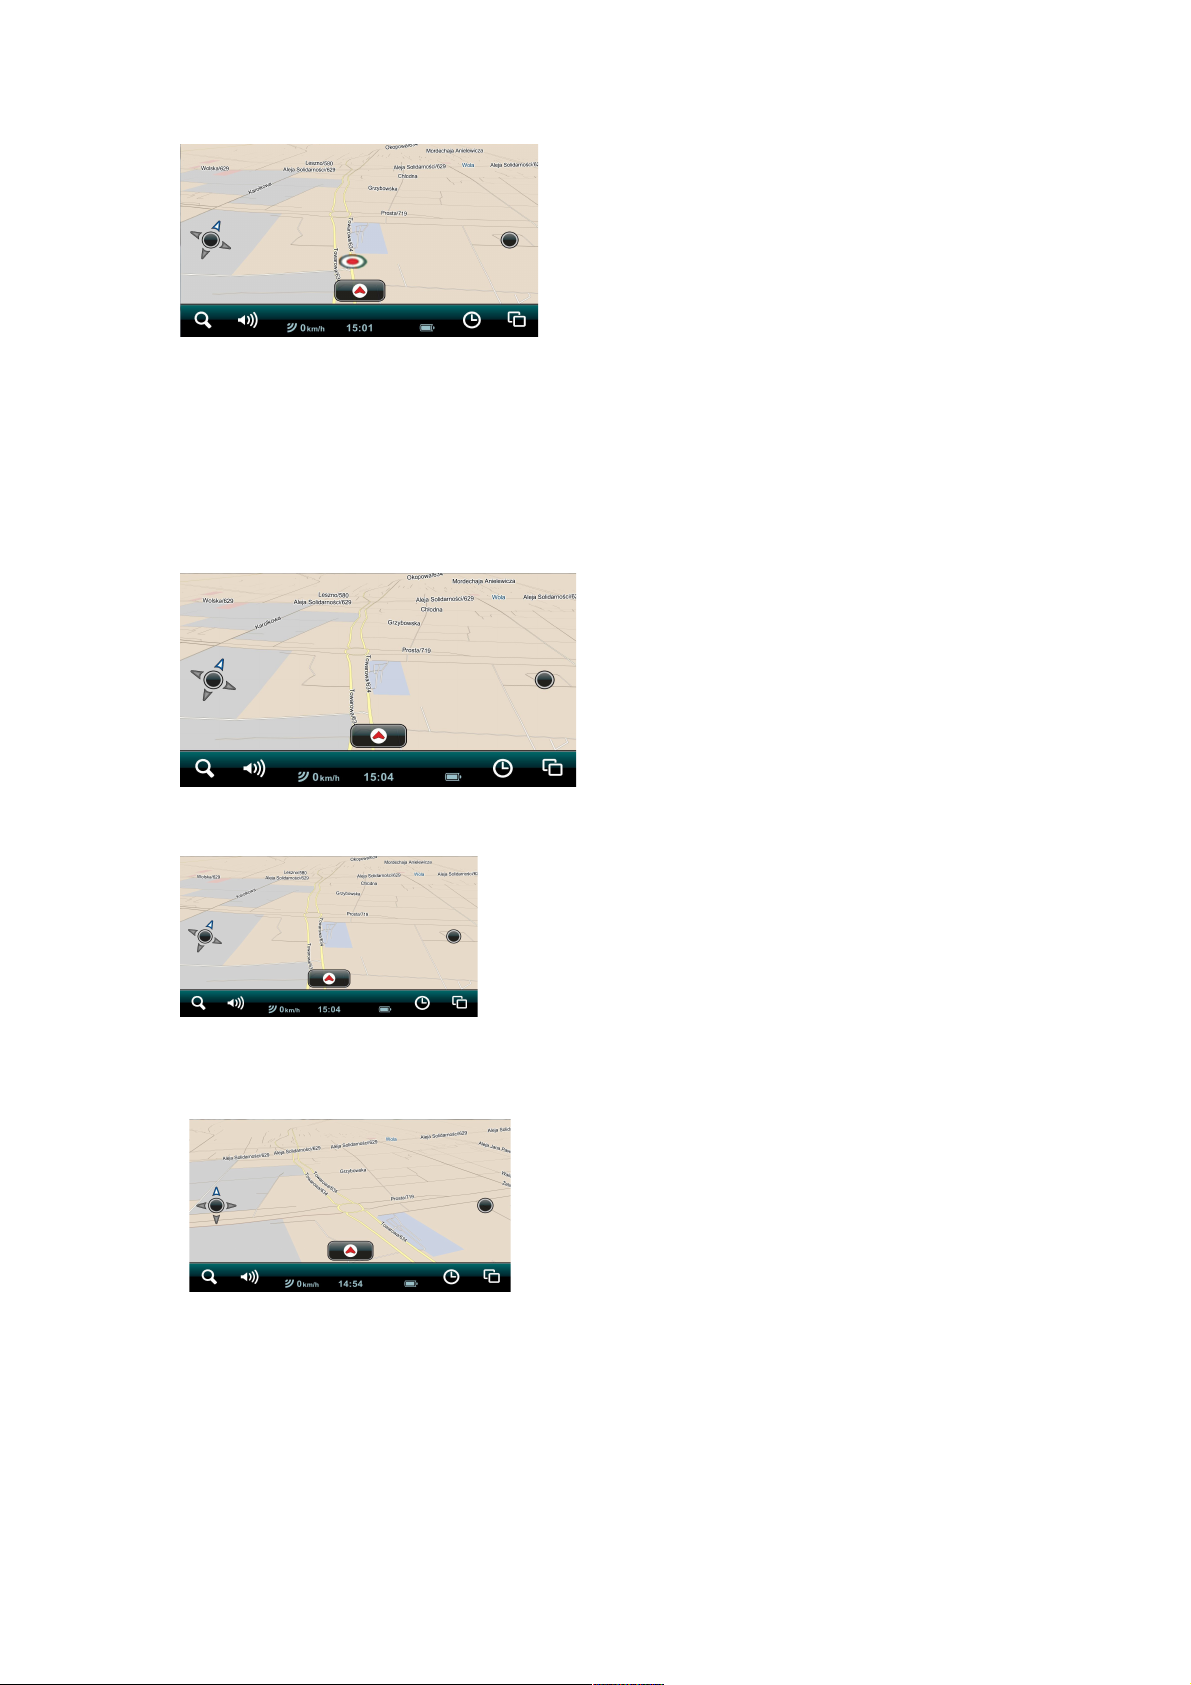
The Map View
This is the first screen you'll see once the app starts. Your GPS
will tell the software where you are and you'll see your location.
This is the app's default start screen and it's called Map View.
The Control Bar
Page 11
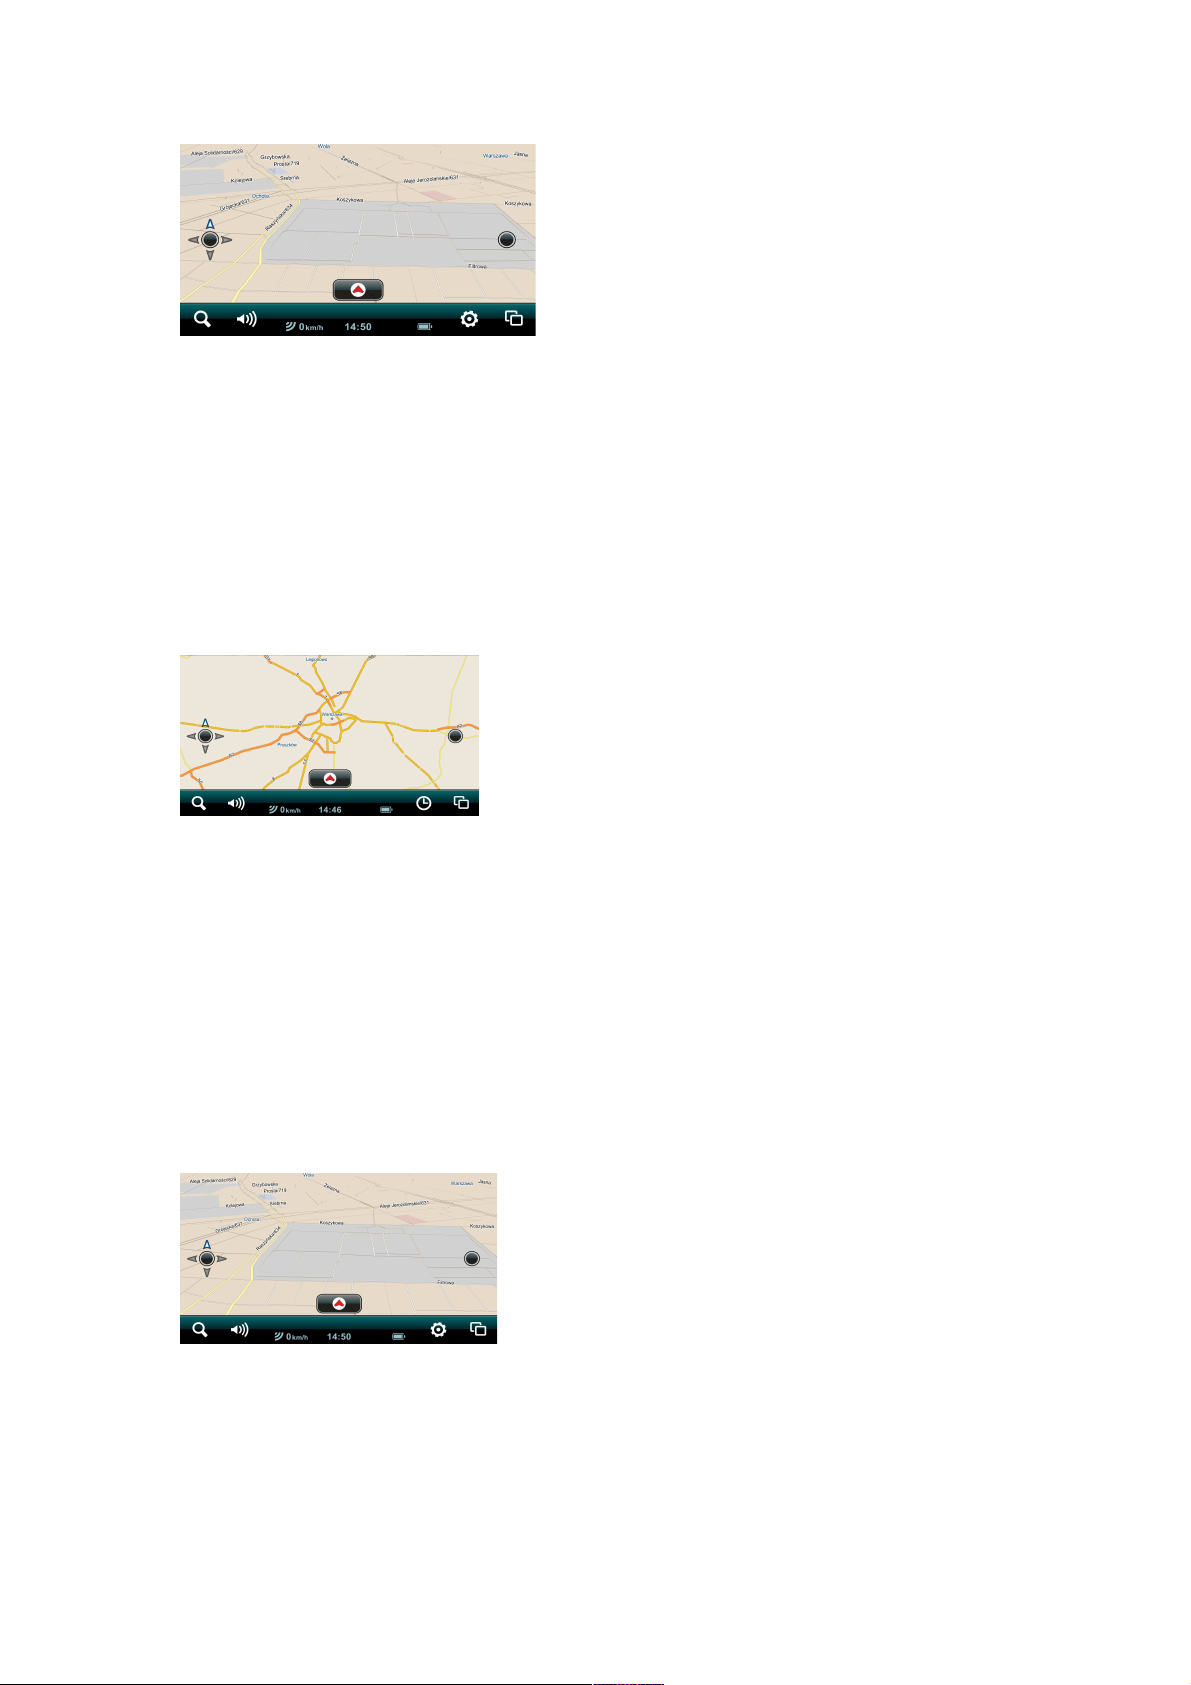
Located along the top and bottom of your screen (together with
the Status Bar) in Map View in portrait mode and just along the
bottom in landscape mode, the Control Bar features the Search
button, the Driving Options button, the Last Page Accessed field
and the Main Menu button.
The Search Button
Tapping the Search button takes you immediately to the Search
page. The Search icon is always present on the Control Bar no
matter where you are in the app. Tap it from anywhere in the
app to go directly to the Search page. You can instantly return to
the Map View by tapping the Close tab in the upper right-hand
corner of the Search page in portrait mode or Cancel in the far,
lower left-hand corner of the Search page when you’re in
landscape mode.
The Driving Options Button
Tapping the Driving Options button takes you to the Driving
Options page where you can choose your Alert Options: Speed
Alert, Safety Camera Alert, POI Along The Route. Scroll down to
the bottom of the page to the Map Display button. Tapping on it
takes you to the Select Map Display page where you can chose
Page 12
the Day, Night or Automatic display modes. Tapping the Close tab
in the upper right-hand corner returns you to the Map View.
The Last Page Accessed Field / Map View Button
This field displays the tappable menu category button of the last
Main Menu category page you accessed. Tapping it will take you
to that menu category page. When you are in a Main Menu
category page, the Last Page Accessed field switches the Map
View button which takes you instantly back to your previous Map
View.
The Main Menu Button
Tap the Main Menu button to access the Main Menu page where
you can access the Take Me Home, Route Options, Favorites,
History, Settings and Store buttons. Return to the Map View by
tapping the Map View button on the Control Bar or exit the
application completely by tapping the Exit Application button on
the Control Bar.
The Status Bar
The Status Bar features the GPS Signal Strength indicator, the
Current Speed indicator, the Clock display and the Battery Level
indicator.
The GPS Signal Strength Indicator
Page 13
This displays your GPS signal strength. Three yellow bars indicate
the maximum GPS signal strength (within a 5 meter accuracy).
Fewer yellow bars indicate a progressively weaker, less accurate,
GPS signal. Three red bars indicate the absence of a GPS signal.
The Current Speed Indicator
This icon indicates your vehicle's current speed.
The Clock Display
This one shows you the current time.
The Battery Level Indicator
An electrical plug inside the icon indicates that the battery is
being charged. A lightning bolt inside it lets you know the battery
is fully charged. A red battery icon warns you that you're nearly
empty.
The Smart Orientation Button and Menu
Page 14
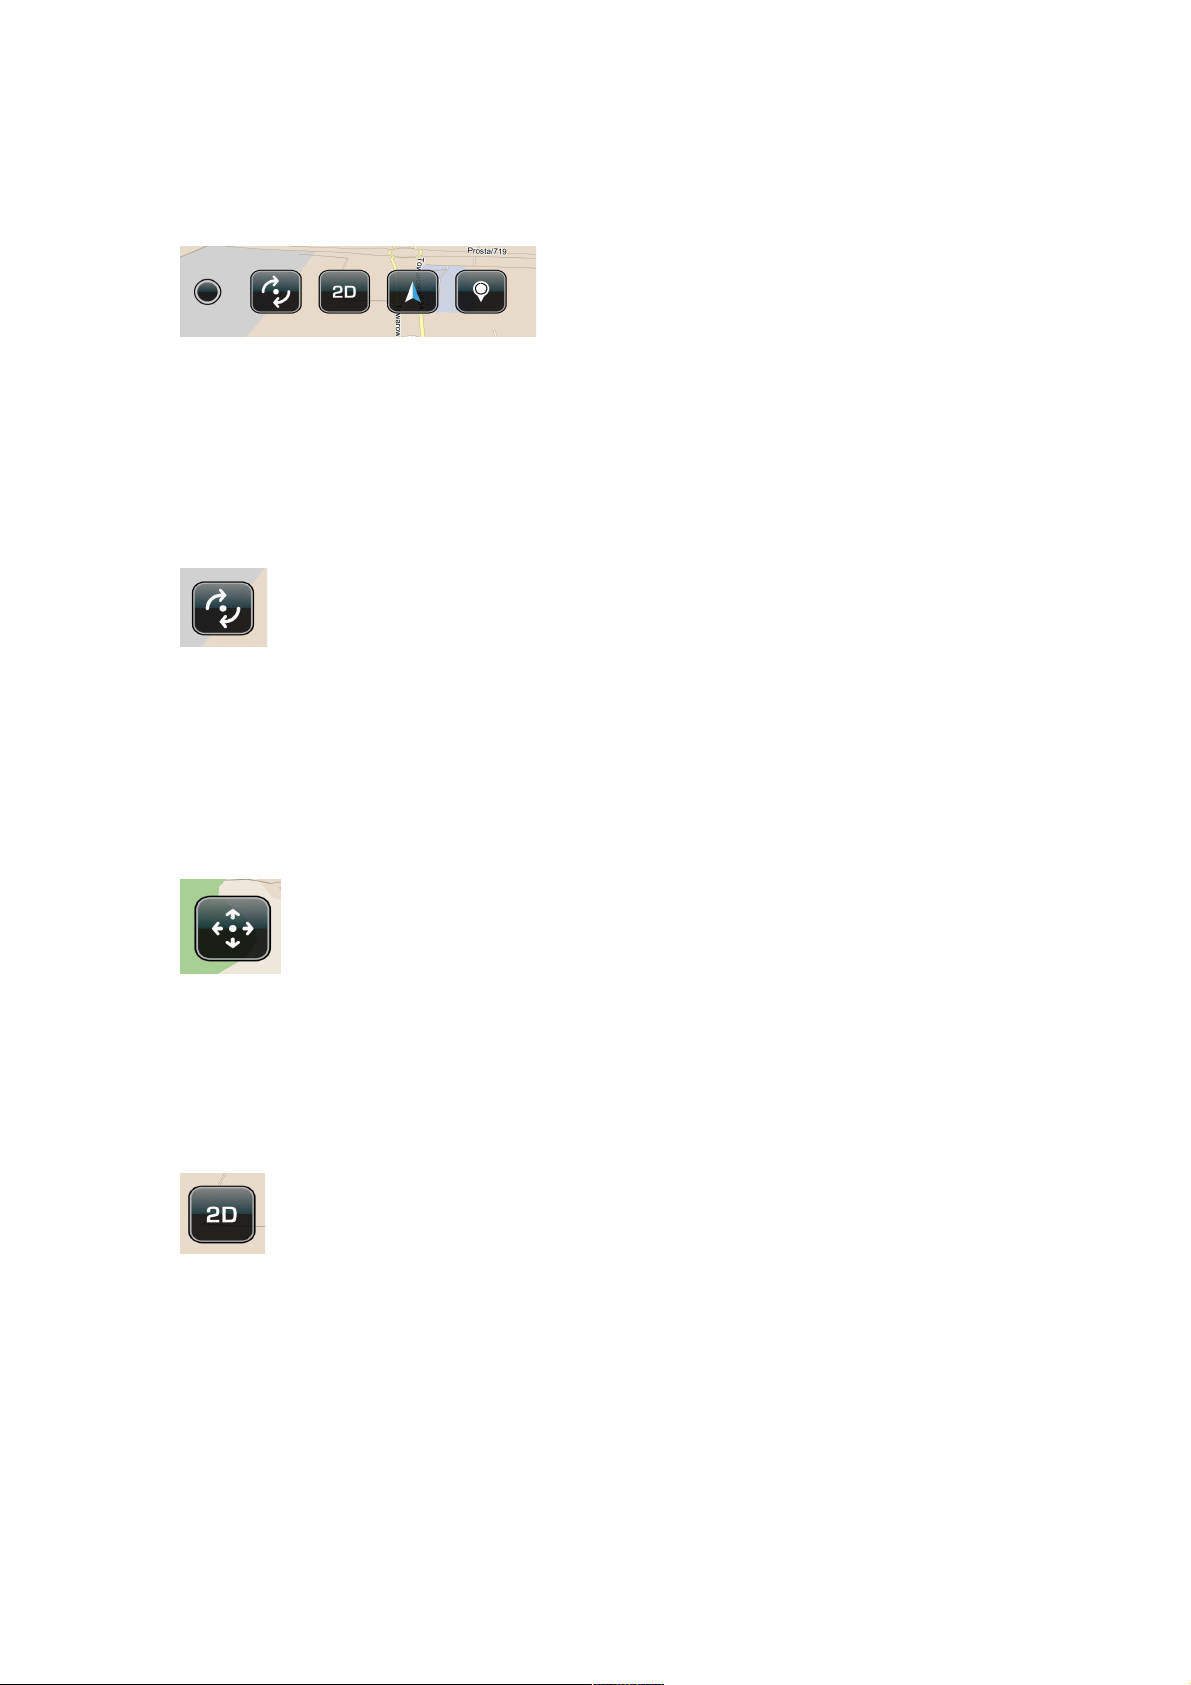
The Smart Orientation Menu Button
Tap the Smart Orientation Menu button once to access the Smart
Orientation Menu.
The Rotation Mode Button
Tap the Smart Orientation Menu button once to access the Smart
Orientation Menu. Tap the Rotation Mode button to toggle
between Panning and Rotation Modes.
The Panning Mode Button
Tap the Smart Orientation Menu button once to access the Smart
Orientation Menu. Tap the Panning Mode button to toggle
between Panning and Rotation Modes.
The 2D Mode Button
Tap the Smart Orientation Menu button once to access the Smart
Orientation Menu. Tap the 2D button once to toggle between the
two-dimensional (aerial) map view and the three-dimensional
(depth-perspective) map view.
The 3D Mode Button
Page 15

Tap the Smart Orientation Menu button once to access the Smart
Orientation Menu. Tap the 3D button once to toggle between the
three-dimensional (depth-perspective) map view and the twodimensional (aerial) map view.
The Show North Button
Tap the Smart Orientation Menu button once to access the Smart
Orientation Menu. Tap the Show North button to instantly rotate
your map view so that north is at the top of your screen.
The Select Place On Map Button
Tap the Smart Orientation Menu button once to access the Smart
Orientation Menu. Tap the Select Place On Map button, then
press and hold any point on the map. A street address, street
name or the GPS coordinates will appear in the Map Selection
Point Name button. Tap on the Map Selection Point Name button
to view its Details / Route Planning and Options page where you
can view the locations full information, navigate to it, add it as a
destination, set it as your start point, find the closest point of
interest, add it to your favorites or set it as home. Close the
Details / Route Planning and Options page by tapping the Close
tab.
The Smart Zoom Button and Multi-zoom Menu
Page 16

The Smart Zoom Button
In the Map View mode, tap the Smart Zoom button once to access
the basic Zoom In / Zoom Out function. Tap or continuously press
the Plus button to zoom in for a more detailed map view. Tap or
continuously press the Minus button to zoom out for a wider map
view. Tap on the Smart Zoom button again to access the Multizoom Menu.
The Multi-zoom Menu
Tap on the Smart Zoom button twice to access the Multi-zoom
Menu.
The Block View / View Preset 1 Button
Page 17

Once you're inside the Multi-zoom menu, tap on the Block View /
View Preset 1 button to instantly switch the map view of your
present GPS location to an even closer 3D view of a block within
a city, town or village around your current GPS location. All
street names are displayed. Tap the Smart Zoom button twice to
return to the Multi-zoom menu.
The Area View / View Preset 2 Button
When you're in the Multi-zoom menu, tap on the Area View /
View Preset 2 button to instantly switch the map view of your
present GPS location to a closer 3D view of an area, or
neighborhood within a city, town or village around your current
GPS location. Main thoroughfare and highway names are
displayed. Tap the Smart Zoom button twice to go back to the
Multi-zoom menu.
The City View / View Preset 3 Button
From the Multi-zoom menu, tap on the City View / View Preset 3
button
to instantly switch your present map view to a broad overview of
your current GPS location. You’ll see the entire city, town or
village and its surrounding settlements. Main highway and road
names leading to and from the locations are displayed. Tap the
Smart Zoom button twice to access the Multi-zoom menu again.
The Auto Zoom Button
Page 18

After you've accessed the Multi-zoom menu, tap on the Auto
Zoom button to switch the map view of your current GPS location
back to the 3D/2D Auto Zoom View. The Auto Zoom View function
is the default map view mode, which is essentially a relatively
close 3D street view that switches automatically to a 2D aerial
view when you approach a large intersection or roundabout (for
better navigating clarity), and then switches back to the 3D view
once you’ve passed it.
Map View Location Icons and Buttons
Your Current Location Icon
The Current Location icon represents your current GPS location in
Map View.
The No GPS Signal Location Icon
The No GPS Signal Location icon represents a current lack of GPS
signal. It signifies the last point on the map that the application
registered your GPS signal.
Your Current Location Finder Button
Any time you are away from your current GPS location in Map
View, the Current Location Finder button appears in the middle
Page 19

of the lower half of the screen. Tap on it once to instantly see
your current location in Map View.
The Start Point Icon
The Start Point icon represents your trip starting point in Map
View. Tapping the Start Point icon once transforms it into the
Start Point Name button. You can tap on the map to return the
Start Point icon.
The Start Point Name Button
The Start Point Name button shows your trip starting point's
name in Map View. Tapping the Start Point Name button takes you
to the item's Details / Route Planning / Options page. Tap the
Close tab to return to the Start Point Name button in Map View.
You can tap on the map to return the Start Point icon.
The Destination Icon
The Destination icon represents your trip destination in Map
View. Tapping the Destination icon once transforms it into the
Destination Name button. You can tap on the map to return the
Destination icon.
Page 20

The Destination Name Button
The Destination Name button shows your trip destination's name
in Map View. Tapping the Destination Name button takes you to
the item's Details / Route Planning / Options page. Tap the Close
tab to return to the Destination Name button in Map View. You
can tap on the map to return the Destination icon.
The Via Point Icon
The Via Point icon represents a programmed stop along your trip
route in Map View. Tapping the Via Point icon once transforms it
into the Via Point Name button. You can tap on the map to return
the Via Point icon.
The Via Point Name Button
The Via Point Name button shows your trip Via Point's name in
Map View. Tapping the Via Point Name button takes you to the
item's Details / Route Planning / Options page. Tap the Close tab
to return to the Via Point Name button in Map View. You can tap
on the map to return the Via Point icon.
Additional Via Points Icon
Page 21

The Additional Via Point icon represents additional programmed
stops along your trip route in Map View. The numbers increase
incrementally and chronologically as you add Via Points. Tapping
the Via Point icon once transforms it into the Via Point Name
button. You can tap on the map to return the Via Point icon.
The Map Selection Point Icon
The Map Selection Point icon represents a location you’ve chosen
by tapping the Map Selection Point button in the Smart
Orientation menu and pressing a point on the map in Map View.
Tapping the Map Selection Point icon once transforms it into the
Map Selection Point Name button. You can tap on the map to
return the Map Selection Point icon.
The Map Selection Point Name Button
The Map Selection Point Name button displays the name and
location of the map point you’ve chosen by tapping the Map
Selection Point button in the Smart Orientation menu and
pressing a point on the map in Map View. Tapping the Map
Selection Point Name button takes you to the item's Details /
Route Planning / Options page. Tap the Close tab to return to the
Map Selection Point Name button in Map View. You can tap on the
map to return the Map Selection Point icon.
The Favorite Place Point Icon
Page 22

The Favorite Place Point icon represents the location of a
Favorite Place in Map View that has not yet been defined as Start
Point, Destination, Via Point or Home. Tapping the Favorite Place
Point icon once transforms it into the Favorite Place Point Name
button. You can tap on the map to return the Favorite Place Point
icon.
The Favorite Place Point Name Button
The Favorite Place Point Name button shows you the name and
the location of the Favorite Place in Map View. Tapping the
Favorite Place Point Name button takes you to the item's
Details / Route Planning / Options page. Tap the Close tab to
return to the Favorite Place Point Name button in Map View. You
can tap on the map to return the Favorite Place Point icon.
*If you choose any of the options in Route Planning Bar (Navigate
To , Add As Via Point, Add as Destination, Set As Start on the
Details / Route Planning / Options page, the Favorite Place Point
Name button will change into the corresponding type of button
once you're back in Map View.
The Search Result Point Icon
The Search Result Point icon represents a search result’s location
in Map View that has not yet been defined as a start point,
destination, via point or home. Tapping the Search Result Point
icon once transforms it into the Search Result Point Name button.
You can tap on the map to return the Search Result Point icon.
Page 23

The Search Result Name Point Button
The Search Result Point Name button displays your search result’s
location and name in Map View. Tapping the Search Result Point
Name button takes you to the search results's Location Details /
Route Planning and Options page. Tap the Close tab to return to
the Search Result Point Name button in Map View. You can tap on
the map to return the Search Result Point icon.
*If you choose any of the options in Route Planning Bar (Navigate
To , Add As Via Point, Add as Destination, Set As Start on the
search result's Location Details / Route Planning and Options
page, the Search Result Point Name button will change into the
corresponding type of button once you're back in Map View.
Page View Buttons and Icons
The Active Route Icon
The Active Route Icon on the Route Details bar indicates that
your are currently, actively navigating that route (Active route
details and options can be viewed by tapping the Route,
Favorites or History buttons in the Last Page Accessed field on
the Control Bar in Map View or on the Main Menu page.)
The Inactive Route Icon
Page 24

The Inactive Route Icon on the Route Details bar indicates that
your are currently not navigating that route (Inactive route
details and options can be viewed by tapping the Route,
Favorites or History buttons in the Last Page Accessed field on
the Control Bar in Map View or on the Main Menu Page.)
The Pause / Resume / Record Route Button
Tapping the Pause / Resume / Record Route button on the Trip
Display bar lets you pause and resume a navigation session (The
Trip Display bar can be viewed by tapping the Route button in the
Last Page Accessed field on the Control Bar in Map View or on the
Main Menu Page.) You can record and save any route you drive by
first exiting any navigation sessions, then Route Pause /
Resume / Record Route.
The Favorite Place / Priority Favorite Place Button
The Favorite Place button appears as a blue-outlined star next to
any address when viewing it's details. You can tap on the Favorite
Place button next to the address to turn it into a Priority Favorite
Place button which is now represented by a solid yellow star. This
means that the address is now a Priority Favorite Place and will
be placed at the top of your Favorite Places list. Each subsequent
address that you name a Priority Favorite Place will be added to
very top of your Favorite Places list. (You can view this list by
tapping the Favorites button in the Last Page Accessed Field on
the Control Bar in Map View or on the Main Menu Page.)
The Map Locator Button
Page 25

The Map Locator button is always displayed next to addresses,
points-of-interest (POI) or GPS coordinates in both the
summarized info and fully-detailed info display modes. Tap on
the Map Locator button to instantly view that item's location in
Map View.
The Home Icon
The Home icon is located next to an address in both the
summarized info and fully-detailed info display modes and it
represents the item that you've designated as Home. This can be
your actual home address, your work location, your hotel while
on holiday, etc. You can set an address as home by tapping the
Set As Home button on its Details / Route Planning / Options
page. You need to have this option set to use the Take Me Home
button in the Main Menu.
Part 2.
Using the Application
Using Search
Opening and Closing the Search Page
The Search icon is always present on the Control Bar no matter
where you are in the app. Tap it from anywhere in the app to go
directly to the Search Page.
Page 26

To return to the Map View, tap the Cancel button in the far, lower
left corner of the Search Page when you’re in Landscape View
Mode or by tapping the Close button in the upper right corner
when the Search Page is in Portrait View Mode.
Defining Search Categories
The Search Category is set by default to “All”. By tapping on the
Search Category button, you can toggle between “Streets”,
“POI”, "Lon/Lat” and back to “All”.
Selecting a Country Map
The default search country is the one your Map View is currently
displaying. Tap the Select Country button to go to the Select
Country Page. Tap on the specific country map you want to
search. Tap the Close tab to save your selection and go back to
the Search page.
Using the Keyboard Toggle Button
Page 27

Tap the Keyboard Toggle button to instantly switch between
keyboards set to different languages and their corresponding
writing systems.
Using the Letter / Number / Symbol Toggle Button
Tap the Letter / Number / Symbol Toggle button to toggle the
keyboard inputs between letters, numbers and symbols.
Using the What Field
Tap in a name, street, address, POI or longitude coordinate in the
What field using the keyboard. A suggested result will appear in
the Suggested Result area automatically as you type.
Using the Where Field
Tap in a city or town or latitude coordinate using the keyboard to
narrow your search even further.
How to Delete a Single Space
Page 28

Tap the Delete Space button to delete a single letter, number or
space in either the What or Where fields.
How to Clear the Search Fields
Tap the Clear Field button to delete the entire contents of either
the What or Where field.
How to Get a Complete List of Search Results
Tap the Get Search Results button at any point in your search to
hide the keyboard and display a complete list of search results.
How to Narrow Your Search Results and View Their
Details
While viewing the results list, you can narrow your search even
further by tapping the Search Category button to toggle between
“Streets”, “POI”, "Lon/Lat” and “All”. Tapping directly on a
Search Result will show its Location Details / Route Planning and
Options page.
How to See a Search Result in Map View
Page 29

Tap on the Map Locator button to instantly view your search
result's location as a Search Result Name Point button in Map
View.
How to Reveal the Keyboard and Go to Map View
Tap on the What or Where field to reveal the keyboard and tap
on the Close button (or Cancel button in Landscape view) to go
the Map View.
How to use the Location Details / Route Planning
and Options Page
You Can Get to this Page in a Number of Ways
By tapping a Map View Location Name button or a Location Result
on any page in the app, it will take you to the Location Details /
Route Planning and Options page.
Page 30

For example: From Map View: Location Icon Location Name
Button Location Details / Route Planning and Options page
or...
From the Search Page: Search Result Location Details / Route
Planning and Options page or...
From Favorites: Main Menu / Control Bar Favorites
Location Location Details / Route Planning and Options page
...etc.
Using the Location Details Bar
The Location Details bar displays your location's full address, POI
symbol, GPS coordinates, etc.
Using the Route Planning Bar
Depending on whether your selected location is undefined,
previously defined (as a Destination, Start Point, Via Point or an
undefined Search Result or Map Location Point), or if it is already
part of a currently active or saved route, the Route Planning bar
presents you with a variety of active and inactive buttons:
Navigate To: instantly begins guiding you to the selected location
from your current GPS location.
Page 31

Remove from Trip: removes the selected location from your
current route.
NOTE: This option appears only after the selected location has
been set as a start point, via point or destination.
Add as Via Point: adds the selected location to your current route
as a via point.
NOTE: This option appears only when you are adding a third (or
higher) location to your trip route.
Add as Destination: sets the selected location as your destination
or replaces a previous destination with the selected location.
Set as Start: sets the selected location as your start point.
Using the Via Point Order Bar
NOTE: This bar only appears on the Location Details / Route
Planning and Options page when there are three or more
locations in your trip route.
Move Before Previous: moves the selected location towards the
beginning of your journey, i.e. just before the location preceding
it.
NOTE: moving the selected location before your start point will
make the selected location your new start point.
Move After Next: moves the selected location towards the end of
your journey, i.e. just after the location following it.
NOTE: moving the selected location after your destination will
make the selected location your new destination.
Using the Place Bar
Page 32

Depending on whether your selected Location is nameless,
named, categorized, a favorite or set as home, the Place bar will
present your with a number of buttons:
Find Closest POI: Find the closest Point Of Interest (POI) to your
selected location. Find Closest POI Closest POI Page - where
nearby Points of Interest (Hotel, Petrol Station, Restaurant, etc.)
are automatically listed according to their proximity to your
selected location. Tap on POI Location to go to its Location
Details / Route Planning and Options page.
To further refine your POI results: Select Category Select
Category Page where all POI are selected by default. Individually
select and deselect or Deselect All Categories. Close to go back
to the, now modified, Closest POI Page. Select Category will now
reflect your POI selection preference (i.e. Petrol Station,
Multiple, All, etc.)
Categories: Designate your selected location as Business, Family
or Friends.
NOTE: You can select multiple categories, one or none.
NOTE: This option only appears after you've saved a location as a
Favorite.
Add Name / Rename: Add or rename and save a name for your
selected location. Add Name or Rename Input Keyboard
Tap in a new name Save Location Details / Route Planning
and Options page. The new name appears in bold lettering as the
top line of your selected Favorite Location.
NOTE: This option appears only after you've saved a location as a
Favorite.
Add to Favorites: Add the selected location to your list of
Favorites.
Page 33

Remove from Favorites: Remove the selected location from your
list of Favorites.
NOTE: This option appears only after you've saved a location as a
Favorite.
Set as Home: Set the selected location as Home.
Remove Home Address: Remove the Home designation from the
selected location.
NOTE: This option appears only after you've saved a location as
Home.
Getting out of this Page
To exit the Location Details / Route Planning and Options page:
Map Locator Map View or Close which takes you back to
wherever it is that you came from (e.g., Route, History,
Favorites, Map View, etc.)
Creating Smart Zoom Menu Presets
You can create up to three custom View Presets. First, in the Map
View, zoom, tilt and pan the map view to your liking. Second, tap
the Smart Zoom button twice to access the Multi-zoom menu and
press and hold the 100, 10 or 1 button for a few seconds.
Page 34

The Save View bar will appear at the bottom of the screen asking
you to confirm or disregard your choice. Tap the Choose button
to confirm your choice or the Close button to exit without saving.
To restore the default City, Area and Block Views go Settings
Restore Defaults Yes
*Note: Selecting the Restore Defaults option will not only reset
your Multi-zoom Menu, but will restore everything in the
application to its original, factory setting.
Using the Main Menu
How to Get to the Main Menu and Where I Can Go From
There.
Open the Main Menu Page by tapping the Main Menu button. From
here you can continue to the six main menu buttons (Take Me
Home, Route, Favorites, History, Settings and Store) or tap the
Map View, Search or Close Application buttons on the Control Bar
to go the corresponding screens and pages.
Page 35

Using Take Me Home
Go Main Menu Take Me Home at any time to be guided from
your current location to your previously designated Home. If you
are in an active navigation session, the Cancel Current Route
window will appear. Select Yes to immediately start being guided
to your Home location.
NOTE: It's necessary to set a location as Home before you can
utilize the Take Me Home function.
Using Route Options
Note: The Trip page bars, buttons and displays covered in the
Using Route Options section are described as they would look if
you've previously set a route with a Start Point, Via Point and
Destination. If you need to set a route and don't know how,
follow the Quick Start and Simple Navigation instructions.
Getting to the Trip, Dashboard and Directions Page
Go Main Menu Route Trip page where you can view the
Current Trip Status and Control bar, Current Route Details Display
bar and the Route Options bar.
Go Main Menu Route Trip page Left tab Dashboard
page
Go Main Menu Route Trip page Right tab Directions
page
Using the Current Trip Status and Control Bar
Page 36

The Current Trip Status and Control bar on the Trip page displays
your estimated travel time, estimated route distance, actual
travel time and actual travel distance. You can pause your
navigation session at any time by tapping the Pause / Resume /
Record Route button. You can also use the Current Trip Status Bar
to record your driving when you are not in an active navigating
session by tapping the Pause / Resume / Record Route button
once. Tap it again to pause the recording of your drive.
Using the Current Route Details Display Bar
The Current Route Details Display bar on the Trip page shows you
your start point, via points and destination. It also shows the
estimated route distance and estimated travel time between
each stop. The Active Navigation Indicator shows whether your
navigation route is active (yellow) or inactive (white).
By tapping the Map Locator button next a location you can
instantly view the chosen location in the Map View.
By tapping the Map Locator button next to the Active Navigation
Indicator, Estimated Distance and Time Display, your entire route
will be displayed as a 2D aerial map view.
Tap on any Location on the Trip Page to access its Location
Details / Route Planning and Options page.
Using the Route Planning Bar
Page 37

Here you can view your entire trip by stops and stages.
To see the a location or portion of your route in Map View: Map
Locator Map View
Tap on any location to view its Location Details / Route Planning
and Options page to access the following.
So, Location Location Details / Route Planning and Options
page
Remove from Trip: removes the selected location from your
current route.
NOTE: This option appears only after the selected location has
been set as a start point, via point or destination.
Add as Via Point: adds the selected location to your current route
as a via point.
NOTE: This option appears only when you are adding a third (or
higher) location to your trip route.
Add as Destination: sets the selected location as your destination
or replaces a previous destination with the selected location.
Set as Start: sets the selected location as your start point.
Using the Via Point Order Bar
On the Location Details / Route Planning and Options page. Scroll
down to the Via Point Order bar.
Move Before Previous: moves the selected location towards the
begining of your journey, i.e. just before the location preceding
it.
Page 38

NOTE: moving the selected location before your start point will
make the selected location your new start point.
Move After Next: moves the selected location towards the end of
your journey, i.e. just after the location following it.
NOTE: moving the selected location after your destination will
make the selected location your new destination.
Using the Place Bar
On the Location Details / Route Planning and Options page. Scroll
down past the Via Point Order bar to the Place bar.
Depending on whether your selected Location is nameless,
named, categorized, a favorite or set as home, the Place bar will
present your with a number of buttons:
Find Closest POI: Find the closest point of interest to your
selected location. Find Closest POI Closest POI Page - where
nearby Points of Interest (Hotel, Petrol Station, Restaurant, etc.)
are automatically listed according to their proximity to your
selected location. Tap on POI Location to go to its Location
Details / Route Planning and Options page.
To further refine your POI results: Select Category Select
Category Page where all POI are selected by default. Individually
select and deselect or deselect all Categories. Close to go back
to the, now modified, Closest POI Page. Select Category will now
reflect your POI selection preference (i.e. Petrol Station,
Multiple, All, etc.)
Categories Choose Categories page Business, Family or
Friends. Close Location Details / Route Planning and Options
page.
NOTE: You can select multiple categories, one or none.
Page 39

NOTE: This option only appears after you've saved a location as a
Favorite.
Add Name / Rename: Add or rename and save a name for your
selected location. Add Name or Rename Input Keyboard
Tap in a new name Save Location Details / Route Planning
and Options page. The new name appears in bold lettering as the
top line of your selected Favorite location.
NOTE: This option appears only after you've saved a location as a
Favorite.
Add to Favorites: Add the selected location to your list of
Favorites.
Remove from Favorites: Remove the selected location from your
list of Favorites.
NOTE: This option appears only after you've saved a location as a
Favorite.
Set as Home: Set the selected location as Home.
Remove Home Address: Remove the Home designation from the
selected location.
NOTE: This option appears only after you've saved a location as
Home.
Using the Route Options Bar
Location Details / Route Planning and Options page Close
Trip page. Scroll down to the Route Options Bar Type and
Avoidance Route Type page.
You can select either Fastest or Shortest Route.
The Avoid bar lets you choose one, several or all avoidance
options: Highways, Toll Roads, Unpaved Roads and Ferries.
Page 40

NOTE: When available, a country or city-specific avoidance bar
will appears below the the Avoid bar.
Close Route Options Bar Reverse Route to go back exactly
the way you came. Your destination is now your start point and
your start point is now your destination.
Save Route saves your route to your list of Favorite Routes.
Scroll down to the bottom of the Trip page.
Start Shop Demo will begin a simulated turn-by-turn navigation
session in Map View.
From the Map View Control Bar, tap Route in the Last Page
Accessed field to go back to the Trip page.
Stop Shop Demo to stop the simulated turn-by-turn navigation
session in Map View.
From the Map View Control Bar, tap Route in the Last Page
Accessed field to go back to the Trip page.
Delete This Route Yes removes the current route as your
active navigation route, but does not remove it from your
Favorites.
Reading the Dashboard
Route Trip page Left tab Dashboard page
The Dashboard has no tappable buttons, but it tells you a lot of
useful information. It features a speedometer, compass,
altimeter, a precision GPS signal strength indicator and your
current GPS coordinates.
Page 41

Using Directions
Route Trip page Right tab Directions page
Here you can view your route directions as a list of turn-by-turn
textual descriptions with corresponding descriptive icons in
sequence, their corresponding Map View by tapping the Map
Locator button next to them or as an:
Individual Directional Description Individual Directional
Description Details page, which displays the descriptive icon,
textual directional description, estimated time and distance to
your next navigation instruction or use:
Map Locator Map View, where you can see the selected
directional description or Next or Previous to view the next or
previous directional description on its Individual Directional
Description and Details page or Close to go back to the Directions
page.
TIP: While in the Route pages, you can: tap the Map View button
on the Control Bar at any point to return to the Map View. Tap
the Search button on the Control Bar at any point to go to the
Search page. Tap the Main Menu button on the Control Bar at
any point to return to the Main Menu.
Using Favorites
Creating a Favorite Place
Page 42

From Search:
Tap on any Search Result or Map View Location to view its
Location Details / Route Planning and Options page. Scroll down
to the Place bar and tap Add To Favorites.
Map View Location Icon Location Name Button Location
Details / Route Planning and Options page. Scroll down to the
Place bar and tap Add To Favorites.
Creating a Favorite Route
Once you've created a route, you can save it as a Favorite Route:
Main Menu Route Save Route
Getting to the Favorite Places and Favorite Routes
Pages
Go Main Menu Favorites Places
Go Main Menu Favorites Places Right tab Routes
Using Favorite Places
Here you can view your favorite places in the order that you
saved them. You can bring a favorite to the top of the list by
tapping the blue-outline star Favorite button, turning it into a
Page 43

solid-yellow star Priority Favorite button. You can toggle between
the Favorite and Priority Favorite button by simply tapping on it.
Tap on Select Category to go the Select Category page where you
can narrow your favorite places list according to Business, Family
or Friends. Tap Close to go back to the Places page. The Select
Category button will read All, Business, Family or Friends,
depending on what you've chosen as your display criterion.
Tap on a location itself to go to its Location Details / Route
Planning and Options page.
Tap the Map Locator next to a favorite place to see it in Map
View.
Using Favorite Routes
Tap on a Favorite Route to view it in the Route page where you
can see the Route's Details Display Bar, which shows you your
start point, via points and destination. It also shows the
estimated route distance and estimated travel time between
each stop. The Navigation indicator shows you that your route is
currently inactive (white).
By tapping the Map Locator button next a location you can
instantly view the chosen location in the Map View.
In Map View tap Favorites in the Last Page Accessed field on the
Control Bar to go back to the Route Details Display bar on the
Route page.
By tapping the Map Locator button next to the Inactive
Navigation indicator, Estimated Distance and Time display, that
stage of your route will be displayed as a 2D aerial map view.
In Map View tap Favorites in the Last Page Accessed field on the
Control Bar to go back to the Route Details Display bar on the
Route page.
Scroll down the Route page to the Options bar where you can
make the favorite route your current route by tapping Set as
Current Route.
Page 44

You can remove the displayed route from your favorites by
tapping Remove on the Options bar.
Tap on any location on the Route page to access its Location
Details / Route Planning and Options page.
Using History
Getting to the Destinations and Trip Log Pages
Go Main Menu History Destinations
Go Main Menu History Destinations Right tab Trip Log
Using Destinations
View a list of all your destinations for the last 30 days. Tap on any
destination location to access its Location Details / Route
Planning and Options page.
Using the Trip Log
Page 45

The Current Trip bar shows you how far, long and the average
speed at which you've travelled on your current trip.
The Trips bar lists (up to the past 30 days) the dates of your trips
as Trip Date buttons that you can tap that will takes you each
specific Trip Date Details page. Your total travelled distance and
average speed for that date are displayed on the Trip Date button
as well.
Tap on any Trip Date button to go to that date's Trip Date Details
page where you can view Individual Trip Time bars. You can lock
any trip by tapping the Lock button. This will keep the locked
trip in your Trip Log while the other, unlocked ones, are erased
automatically after 30 days. Tap on any Location or Route to view
its Location Details / Route Planning and Options page.
Export any trip as a KML file by tapping the Export as KML button.
You can delete all of your Trip Logs, except of course the ones
you've previously locked, by tapping Delete All Logs.
Creating Settings
Getting to the Settings and About Page
Go Main Menu Settings Settings
Go Main Menu Settings Settings Right tab About
Using the Settings Page
Selecting Your Language
Page 46

Select Language Select Language Page Language
Selecting Your Voice
Select Voice Select Voice Page Voice
Selecting You Distance and Speed Units
Select Units Select Units Page Units
Selecting Additional Keyboards
Keyboards Additional Keyboards Page Keyboard(s)
Restoring the Factory Settings
Page 47

Restore Defaults Yes
Using the About Page
About
The About page displays Version, Copyright, Safety Agreement
and Installed Content (Base Map, User Interface Language Packs,
Voice, etc.) information.
 Loading...