

Page 1
Prestigio M
ultiPhone
PAP3500 Duo
User
www.prestigio.com
Manual
Page 2

2
Common information
Dear Customer, thank you for choosing Prestigio MultiPhone PAP3500 Duo. Before starting to use the
please read this manual
This manual contains safety information,
preinstalled software basic features and other useful information, which will help you to improve your use of
carefully
to discover all its features . Please save this manual and refer to it in the
if you have questions concerning your
technical specificat
device Android operating
system
device.
ions of Prestigio MultiPhone PAP3500
and
applications.
phone,
future
Duo,
the
Page 3

3
Table of content
Important Safety Instructions ...........................................................................................................................7
General instructions ......................................................................................................................................7
Safety instruction for using the touch screen ...............................................................................................8
Warranty Information........................................................................................................................................8
Package content ................................................................................................................................................9
Device overview ................................................................................................................................................9
1 Product Overview........................................................................................................................................................9
Technical Specifications...................................................................................................................................10
Charge the battery ..........................................................................................................................................12
Power on/off ...................................................................................................................................................12
Sleep mode and locking the screen.................................................................................................................12
Wake up from sleep mode...........................................................................................................................12
Unlocking the screen...................................................................................................................................12
Shutdown the screen to save battery power ........................................................................................................12
2 Getting Started ................................................................................................................................................................ 12
Turn on for the first time.................................................................................................................................13
Turning the phone on without SIM card .....................................................................................................14
Using the touchscreen ....................................................................................................................................15
Using the phone´s buttons ..............................................................................................................................16
Home screen ...................................................................................................................................................17
Using the onscreen keyboard..........................................................................................................................18
Enter text by typing .....................................................................................................................................18
Enter numbers, symbols and other characters ..........................................................................................19
Change the keyboard orientation ...............................................................................................................20
Change the keyboard language...................................................................................................................20
Working with menus .......................................................................................................................................20
Managing the notifications .............................................................................................................................21
Status bar ....................................................................................................................................................21
Status icons .................................................................................................................................................21
Notifications icons .......................................................................................................................................21
Notification panel........................................................................................................................................22
Applications.....................................................................................................................................................22
Open and close the Launcher......................................................................................................................22
Adding application to Home screen ............................................................................................................23
Opening and switching applications ...........................................................................................................23
Shortcuts .........................................................................................................................................................23
Replacing or deleting the shortcuts icons ...................................................................................................24
Customizing the home screen .........................................................................................................................24
Adding a widget to your Home screen.........................................................................................................24
Removing widget from your Home screen, resizing and selecting themes for widgets..............................24
Your Google account .......................................................................................................................................25
Resetting your Google Account password ..................................................................................................25
Additional accounts.....................................................................................................................................25
Contacts...........................................................................................................................................................26
Opening and searching your contacts.........................................................................................................26
Page 4

4
3 Communication ............................................................................................................................................................. 26
View details about a contact .......................................................................................................................27
Additional contact options ..........................................................................................................................27
Calling ..............................................................................................................................................................34
Placing and ending calls ..............................................................................................................................34
Disable phone calls......................................................................................................................................35
Working with the Call log ............................................................................................................................37
Placing an Internet (SIP) call ........................................................................................................................38
Listening to your voicemail .........................................................................................................................39
Options during a call....................................................................................................................................39
Managing multiple calls ..............................................................................................................................40
Messaging........................................................................................................................................................41
Open Messaging ..........................................................................................................................................41
Exchanging messages ..................................................................................................................................42
window ........................................................................................................................................................42
window ........................................................................................................................................................43
Changing messaging settings ......................................................................................................................44
window ........................................................................................................................................................44
window ........................................................................................................................................................44
Email ................................................................................................................................................................45
Opening Email and the Accounts screen window .......................................................................................45
window ........................................................................................................................................................45
window ........................................................................................................................................................45
Accounts ......................................................................................................................................................46
Account settings ..........................................................................................................................................51
Gmail ...............................................................................................................................................................55
Opening Gmail and your Inbox....................................................................................................................55
Switch accounts...........................................................................................................................................56
Use Gmail offline .........................................................................................................................................56
Reading your messages ...............................................................................................................................57
Changing Gmail settings ..............................................................................................................................64
Camera ............................................................................................................................................................65
Opening Camera and taking pictures or videos ..........................................................................................65
4 Entertainment ................................................................................................................................................................ 65
Changing Camera settings ...........................................................................................................................66
Gallery .............................................................................................................................................................68
Open Gallery and view your albums ...........................................................................................................68
Work with batches of pictures or videos ....................................................................................................69
Share an album............................................................................................................................................70
Get details about pictures in the album......................................................................................................70
Delete an album ..........................................................................................................................................70
Working with pictures .................................................................................................................................70
Working with videos....................................................................................................................................72
Music ...............................................................................................................................................................73
Transferring music files to your phone .......................................................................................................73
Opening Music and working with your library ............................................................................................73
Playing music ...............................................................................................................................................75
Working with playlists .................................................................................................................................77
Accessing the Internet.....................................................................................................................................78
Opening Browser.........................................................................................................................................78
Page 5

5
5 Web .........................................................................................................................................................................................78
Bookmarks...................................................................................................................................................80
View your Browser history ..........................................................................................................................81
Most visited web pages...............................................................................................................................82
Follow shortcuts for links, phone numbers and addresses.........................................................................82
Navigating within a webpage ......................................................................................................................82
Changing Browser settings ..........................................................................................................................84
Connecting to mobile networks ......................................................................................................................86
Determine what GSM network you’re using...............................................................................................86
Disable data when roaming ........................................................................................................................86
Edit or create a new GSM access point .......................................................................................................86
6 Connectingtonetworksanddevices.............................................................................................................................. 86
Connecting to Wi-Fi networks.........................................................................................................................87
Turn Wi-Fi on and connect to a Wi-Fi network ...........................................................................................87
Receive notifications when open networks are in range ............................................................................88
Add a Wi-Fi network....................................................................................................................................88
Forget a Wi-Fi network................................................................................................................................88
Connecting to Bluetooth devices ....................................................................................................................89
Turn Bluetooth on or off .............................................................................................................................89
Change your phone’s Bluetooth name .......................................................................................................89
Pair your phone with a Bluetooth device....................................................................................................89
Connect to a Bluetooth device ....................................................................................................................90
Disconnect from a Bluetooth device ...........................................................................................................90
Unpaired Bluetooth device.........................................................................................................................90
Connecting to a computer via USB .................................................................................................................90
Connect your phone to a computer via USB ...............................................................................................90
Disconnect your phone from the computer ...............................................................................................91
Safely remove an SD card from your phone ...............................................................................................91
Erase your phone’s USB storage or SD card ................................................................................................91
Sharing your phone’s mobile data connection ...............................................................................................92
Share your phone’s data connection via USB .............................................................................................92
Share your phone’s data connection as a portable Wi-Fi hotspot..............................................................92
Rename or secure your portable hotspot ...................................................................................................93
Connecting to virtual private networks ..........................................................................................................93
Add a VPN....................................................................................................................................................93
Connect to a VPN ........................................................................................................................................93
Disconnect from a VPN ...............................................................................................................................94
Edit a VPN ....................................................................................................................................................94
Delete a VPN ...............................................................................................................................................94
Working with secure certificates ....................................................................................................................94
Install a secure certificate from your phone’s USB storage or SD card ......................................................94
Clock ................................................................................................................................................................96
Viewing the date and time ..........................................................................................................................96
7 Tools ....................................................................................................................................................................................... 96
Setting alarms..............................................................................................................................................97
Changing Clock alarm settings ....................................................................................................................98
Calculator ........................................................................................................................................................98
Calendar ..........................................................................................................................................................99
Viewing your calendar and events ..............................................................................................................99
Open Calendar.............................................................................................................................................99
Page 6

6
Change your calendar view .........................................................................................................................99
Working in Agenda view ...........................................................................................................................100
Working in Day view..................................................................................................................................100
Working in Week view ..............................................................................................................................101
Working in Month view.............................................................................................................................101
Viewing event details ................................................................................................................................102
Creating and editing an event ...................................................................................................................102
Synchronizing and displaying calendars....................................................................................................104
Changing Calendar settings .......................................................................................................................105
GO widget......................................................................................................................................................106
Open GO widgets ......................................................................................................................................106
Changing widget settings ..........................................................................................................................106
Dual SIM settings ..........................................................................................................................................107
8 Settings .................................................................................................................................................................................. 107
Wireless & networks .....................................................................................................................................108
Call settings ...................................................................................................................................................111
Audio profiles ................................................................................................................................................112
Display settings .............................................................................................................................................113
USB connection settings................................................................................................................................114
Battery ...........................................................................................................................................................114
Location & security settings ..........................................................................................................................114
Applications settings .....................................................................................................................................115
Accounts & sync settings...............................................................................................................................116
Privacy settings..............................................................................................................................................117
Storage settings.............................................................................................................................................118
Language & keyboard settings ......................................................................................................................118
Accessibility settings .....................................................................................................................................119
Date & time settings......................................................................................................................................120
Schedule power on/off settings ....................................................................................................................120
About phone .................................................................................................................................................121
Page 7

7
Disclaimer
As the Prestigio products are constantly updated and improved, your device’s software may have a slightly
different appearance or modified functionality than presented in this User Manual. We make every effort to
ensure that the information and procedures in this user manual are accurate and complete. No liability can
and will be accepted for any errors or omissions.
Prestigio reserves the right to make any changes without further notice to any products herein.
About Android
An Android phone can perform many functions as a computer. You can also adjust it to better suit your needs,
to receive the information you want and have fun at the same time. You can add and delete applications, or
enhance them to improve functionality. In Android Market you can download a range of applications and
games from a constantly growing collection. You can also integrate applications on your Android phone with
your personal data and online accounts. For example, you can back up your track of your appointments and
engage in as much social networking as you like.
Applications
An application is a phone program that helps you perform a task. For example, there are applications to make
calls, take photos and download more applications.
Note: The colours and specifications shown/mentioned in the user manual may differ from the actual product.
Images shown are for representation purpose only.
Important Safety Instructions
Your Prestigio MultiPhone PAP3500 Duo is manufactured and designed for mobile using. Please, read the
following instructions carefully. It helps you to proper use your device without risk for someone's safety and
keep your MultiPhone in good working condition as long as it possible.
General instructions
1. Do not place objects on top of the MultiPhone as objects may scratch the screen.
2. MultiPhone should be kept away from extreme changes of temperature.
3. Protect it from direct sunlight or heat sources.
4. Protect the device from moisture and from dusty or smoky environment as it can harm the MultiPhone.
5. Keep your MultiPhone away from contact with active chemicals.
6. Do not place the MultiPhone on an uneven or unstable surface. Fall of the device can cause
damage to the LCD screen which is not covered with warranty.
7. Do not expose the MultiPhone to strong magnetic or electrical field.
8. Protect your MultiPhone from hits and extreme pressure.
9. Operation Temperature: This MultiPhone should only be used in environments with
ambient temperatures between 0°C (32°F) and 50°C (122°F).
10. Do not insert into MultiPhone devices or items not matching to standard sockets on it.
11. Be careful when you use MultiPhone in the rain. It is NOT a waterproof device.
12. Do not use your MultiPhone during driving. It may cause an accident.
13. Use only manufacturer approved chargers. Using non-original chargers may cause damage of the
device and be harmful to your health.
Page 8

8
14. The MultiPhone and the adapter may produce some heat during normal operation or charging. Do not
leave the MultiPhone on your pockets to prevent discomfort or injury from heat exposure.
15. Disconnect the MultiPhone from an electrical outlet after it is charged.
16. Do not use a pen or any sharp object to tap the screen. Clean the touch screen with a soft cloth. If
needed, dampen the cloth slightly before cleaning. Never use abrasives or cleaning solutions.
17. DO NOT disassemble the MultiPhone, only a Prestigio certified service technician should perform
repair.
18. Always power off the MultiPhone to install or remove external devices that does not support
hot-plug.
19. Your MultiPhone must be switched off during airplane take-off and landing.
Safety instruction for using the touch screen
Touch screen enables you to select items or perform function. To avoid any damage or malfunction, please
note following:
1. Do not press the touch screen with your fingertips or use sharp tools on the touch screen.
2. Do not allow the touch screen to come into contact with other electrical devices. Electrostatic discharges
can cause the touch screen to malfunction.
3. Do not allow the touch screen to come into contact with liquids. The touch screen may malfunction in
humid conditions or when exposed to liquids.
4. Leaving the touch screen idle for extended periods may result in afterimages (screen burn-in) or ghosting.
Turn off the touch screen when you do not use the device.
5. For optimal use of touch screen, remove the screen protection film before using your device.
6. Your touch screen has layer that detects small electrical charges emitted by the human body. For best
performance tap the touch screen with your fingertip. The touch screen will not react to touches from
sharp objects, such as stylus or pen.
Warranty Information
Prestigio MultiPhone 3500 DUO warranty period is 2 years. Warranty information could be found at
http://www.prestigio.com/support/warranty-terms
Page 9

9
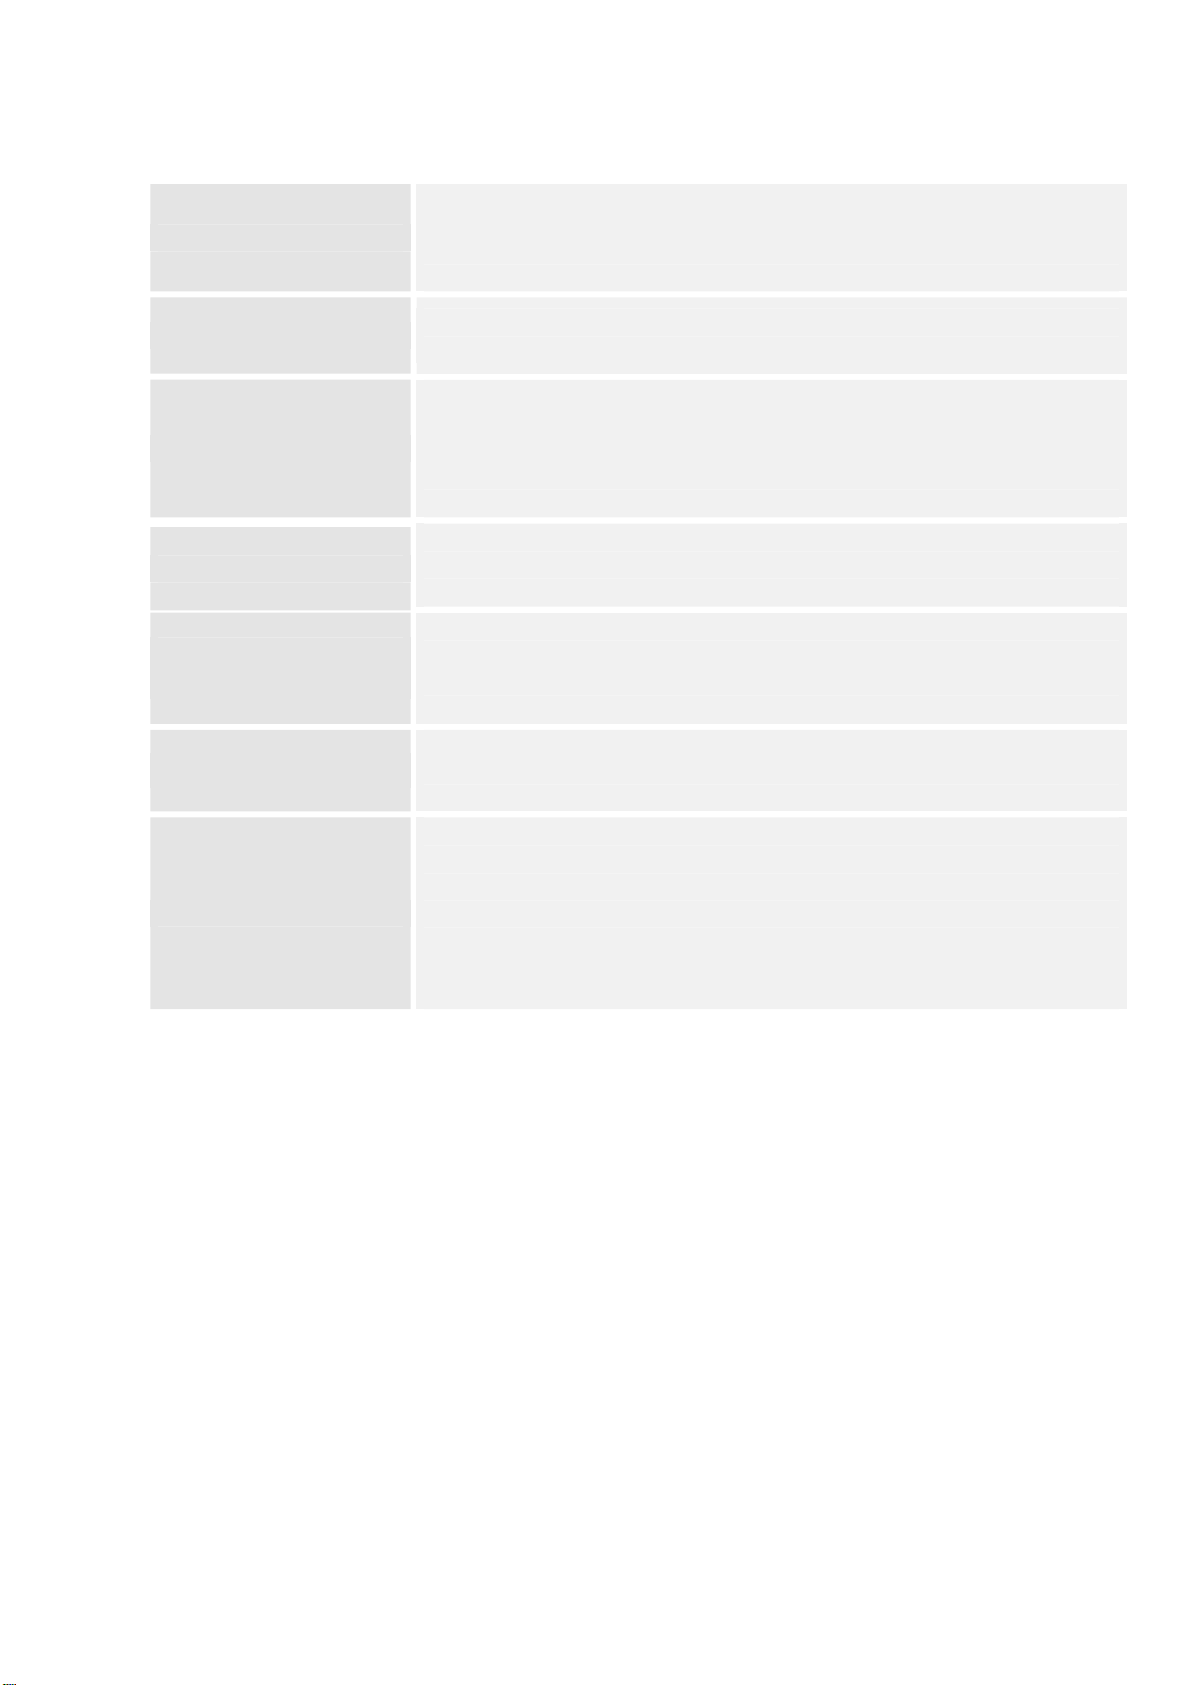
1
Earphone jack Earphone connection.
2 Menu
Display menu options
3 Home
Back to Home Screen
4 Back Back up to previous page
5 USB port
Micro USB cable connection
6 Vol+/Vol- button
Adjust the volume level
7 Camera Take photos
Listen to phone calls or
8 Speaker music
Turn on/off the device;
9 Power Suspend/Activate the device
1 Product Overview
1x
Prestigio MultiPhone PAP3500
Duo
1x
Quick Start Guide
AC
Adapter – 1x
USB Cable –
1x
Battery –
1x
Earphone – 1x
Micro SD card 4GB –
1x
Legal and Safety Notices – 1x
Warranty Card –
1x
Package content
Device overview
Page 10

10
Technical Specifications
Display
Display Size
3.50"
Display Resolution
320x480
Pixel Density
165 ppi
Display Technology
TN LCD
Display Color Depth
16M
Display Touchscreen
Capacity
Display Features
N/A
Processor
CPU
Qualcomm MSM7225A-AB
CPU Internal Clock Rate
1.00 GHz
CPU Core Quantity
1
GPU
Power VR SGX Series5
Memory
Internal Memory Size
512 MB
Installed RAM Storage Capacity
256 MB
Supported Flash Card
Micro SD
Installed Flash Card
4 GB
Software
Platform
Android
Operating System Version
Android 2.3
Camera
Camera Resolution
2.0 Mpixel
Camera Technology
N/A
Photo Resolution
1600x1200
Video resolution
640x480
Video Frame Rate
N/A
Camera Features
Color effects, Sharpness, Saturation
Flash
N/A
Front Camera
N/A
Interfaces
Bluetooth
Bluetooth 2.1
Wi-Fi
IEEE 802.11b/g/n
Wi-Fi Direct
N/A
Wi-Fi Hotspot
Yes
WiMax
N/A
Data interface
Micro USB
Audio
Audio 3.5 mm mini jack
HDMI
N/A
Page 11

11
Network
Bands
GSM 1800, GSM 900, WCDMA 2100
Protocols
EDGE, GPRS, HSDPA
GPS
GPS, A-GPS
Multimedia
Radio
Yes
TV-Tuner
N/A
Supported Audio Formats
MP3, eAAC+, AAC, AAC+
Supported Picture Formats
N/A
Supported Video Formats
MPEG-4, WMV, H.263, H.264
Supported eBook formats
N/A
Supported Documents format
N/A
Miscellaneous
Construction
Monoblock
Material
Plastic
External Colour
Black
SIM Card
Dual SIM
Sensors
Proximity Sensor, G-Sensor, Ambient Light Sensor
Included Accessories
Data Cable, Charging Device, Earphones
Package Type
Retail
Dimensions & Weight
Device
Height
116 mm
Width
11.9 mm
Depth
60 mm
Battery
Battery Capacity
1400 mAh
Battery Technology
Lithium Ion
Talk Time
6 hours
Standby Time
100 hours
Video Playback Time
N/A
Audio Playback Time
N/A
Warranty
Warranty Products returnable
Yes
Warranty Term (month)
24 months
Warranty Validation Criteria
Serial Number
Logistic
Pack Length (mm)
50 mm
Pack Width (mm)
80 mm
Pack Height (mm)
135 mm
Pack Weight Brutto (kg)
0.36 kg
Pack Weight Netto (kg)
0.12 kg
Pieces in pack
1
Packs in Box
20
Page 12
12
Power on
Press and ho ld the Power Button for few seconds. It will automatically enter the
Home screen after start-up screen.
Power off
Press and ho ld the Power Button and then tap on Power Off to power off the
device.
2 Getting Started
Charge the battery
Prestigio MultiPhone comes with a built-in lithium-ion polymer rechargeable battery and is designed to use
only manufacture-specified original batteries and accessories. You can see battery status on status bar of
MultiPhone in the upper right corner of the home screen. Android OS has battery charge detection system
and notify user if battery charge is low and device need to be connected to AC adapter. If you will see such
message, or your device couldn’t power on, connect original AC power adapter to charge your device. Plug
one end of the adapter into the power jack of the device and the other to the power socket. To extend the
battery operation life, wait for finish of charge process. Please, fully charge your new device after
unpacking.
Power on/off
Sleep mode and locking the screen
Sleep mode suspends your device to a low power state while the display is off in order to save battery
power. You will still be able to receive messages while the device is in Sleep mode.
Note: If the device in sleep mode more than 30 minutes, the device will automatically turn off to save
electricity.
Wake up from sleep mode
Unlocking the screen
Shutdown the screen to save battery
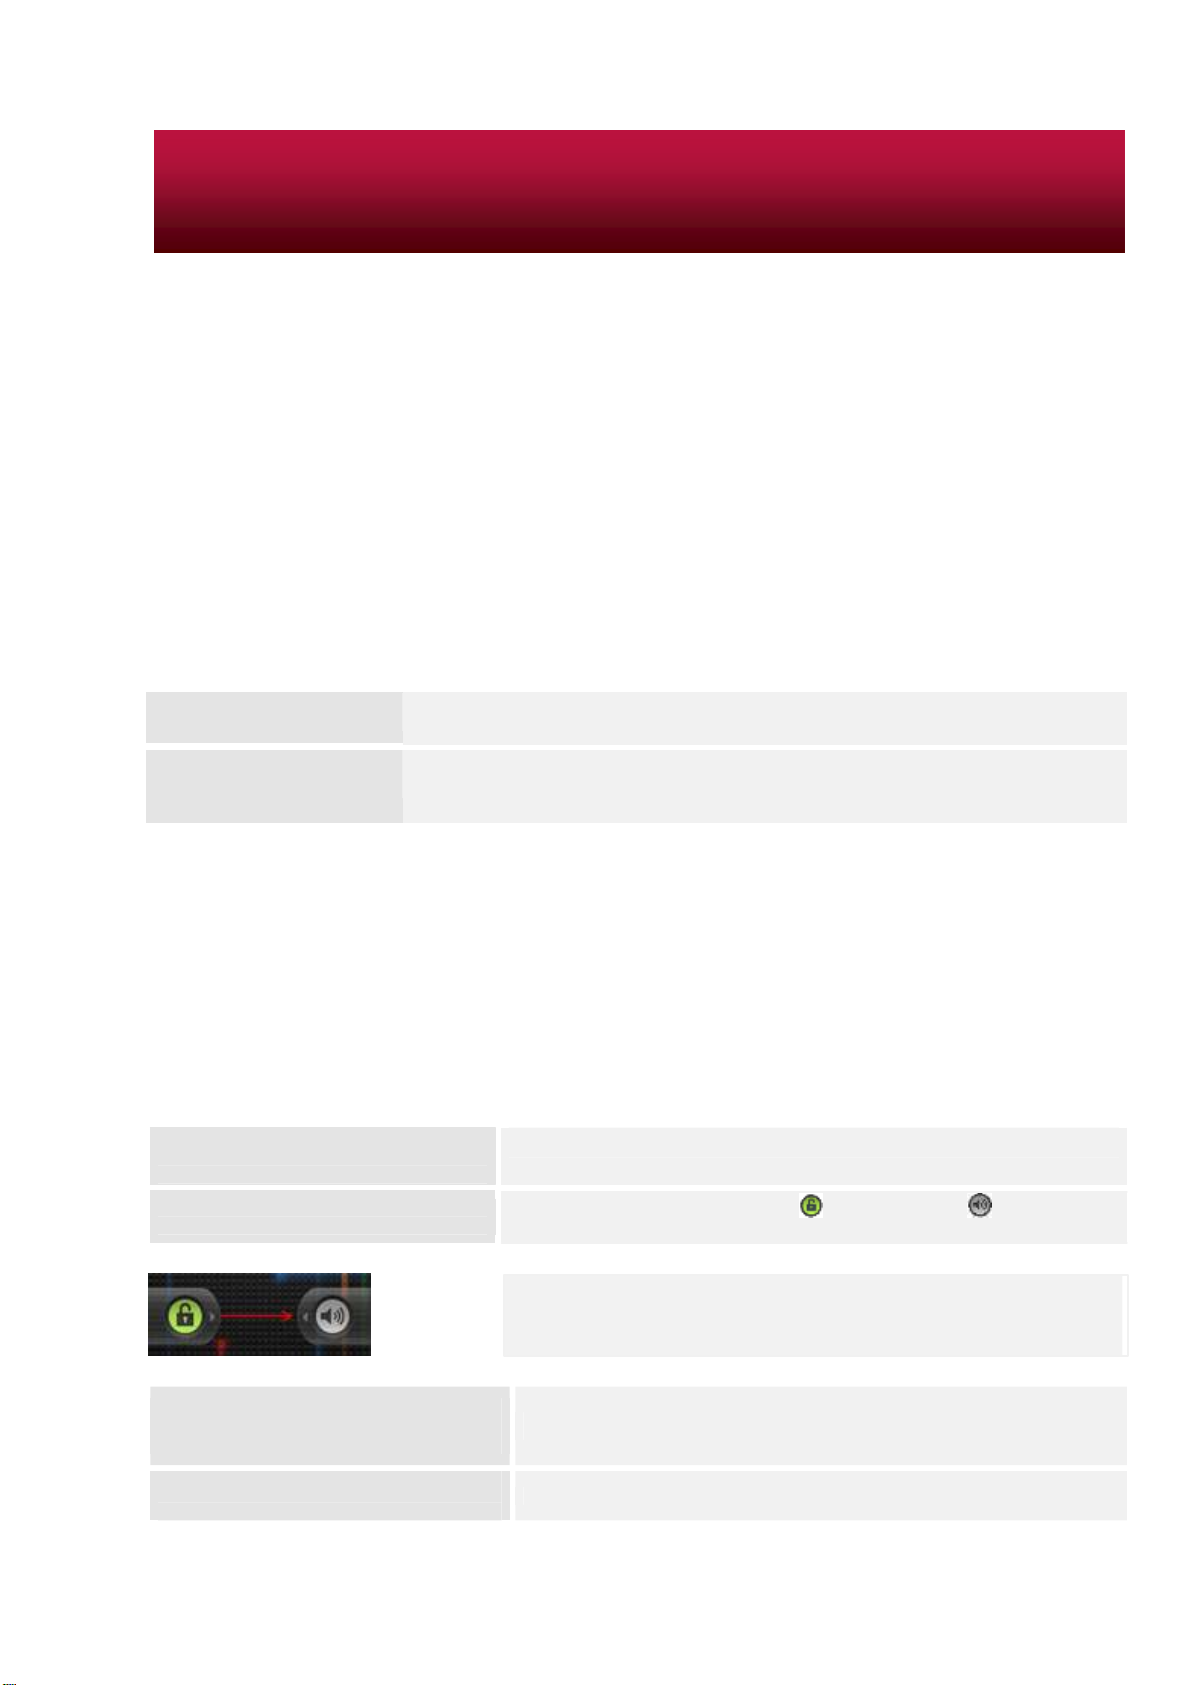
Activate the locked screen.
power
To wake up your device manually, press the Power Button. You will then
see that the device has locked the screen.
To unlock the screen, slide the icon towards the icon on the right.
After unlocking, the device will resume the screen before locking. Also
see the chapter
Short-press down the Power Button once
Short-press down the Power Button again
Settings/Location&security
settings/Screen unlock.
Page 13
13
Your device turns off the touch screen when you do not use it for a specified period. You can set the length of time
that the device waits before turning off the screen. See
Settings/Display/Screen
timeout.
You can also set customized pattern, PIN or password to unlock the screen. See Settings/Location & Security
settings/Change screen lock.
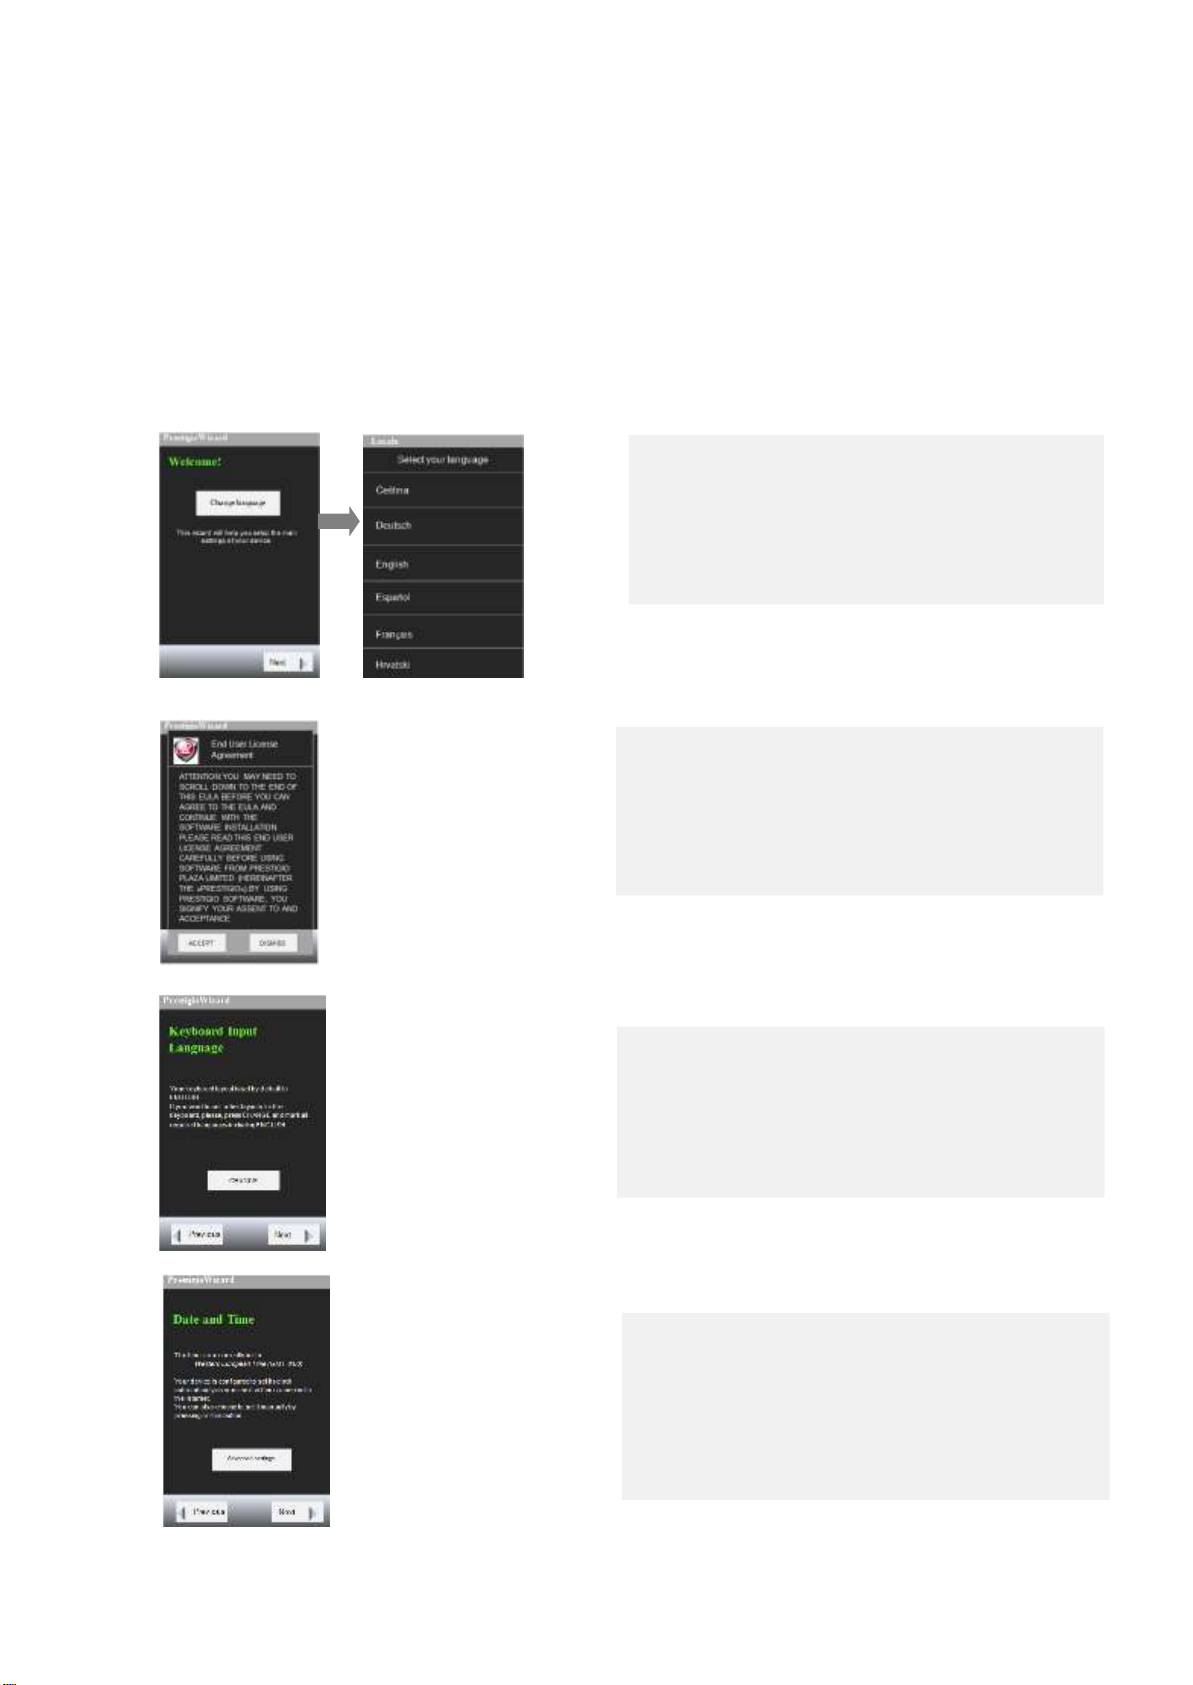
Turn on for the first time
When you turn on the MultiPhone for the first time, after the greeting screen, Prestigio Wizard will appear.
Tap on the Change language, scroll down through the
list to the desired language and tap on it to select it.
The screen will show the Prestigio Wizard in the
selected language. Tap on the icon Next to proceed.
The End User License Agreement will appear. Please
read it carefully and tap on the icon ACCEPT.
The screen Keyboard Input language will appear. If you
would like to change it, tap on CHANGE and pick the
desired language from the list, otherwise select Next on
the bottom of the screen.
The screen Date and Time will appear. The screen
enables you to set the date and time. Please select
Advance settings, if you would like to change the
currently selected time zone and other date &time
features. If the stated Time Zone is OK and you are
finished, tap on the icon Next on the bottom of the
screen.
Page 14
14
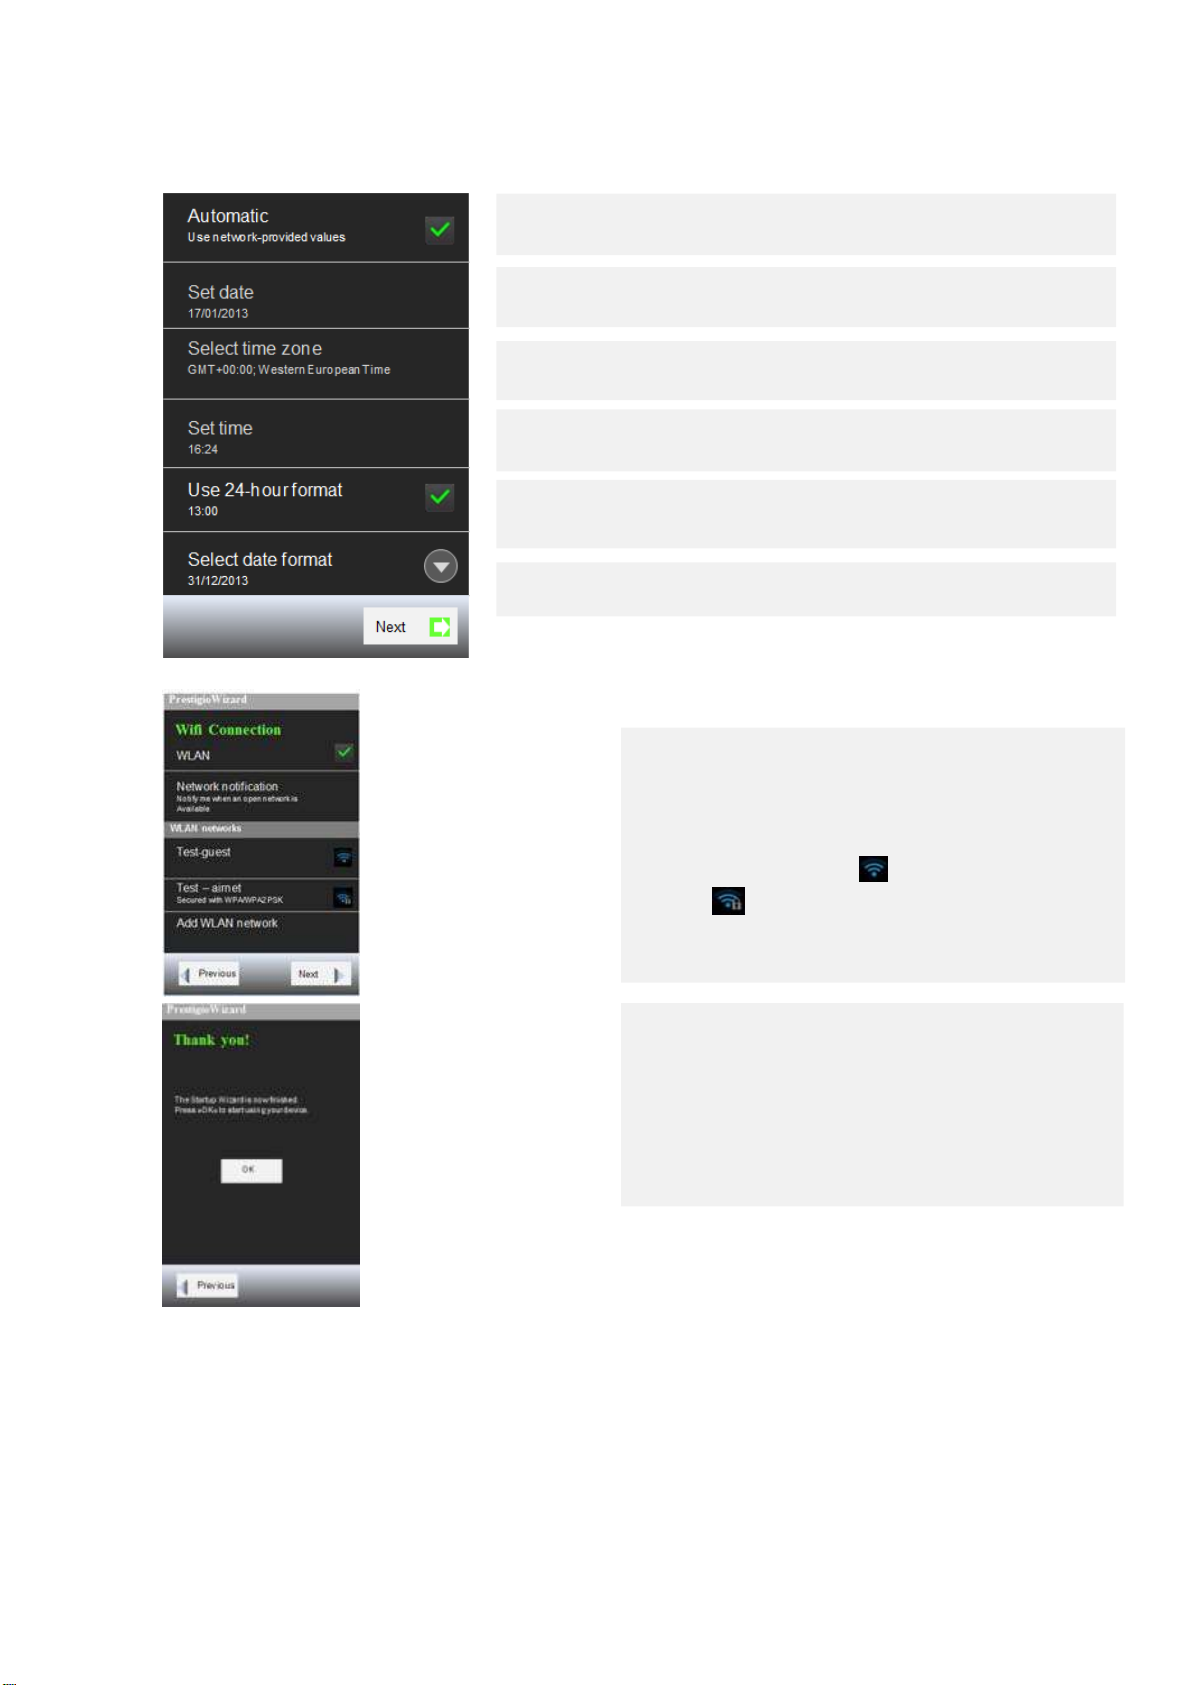
If you selected Advanced settings, the new screen will be shown, where you can set time, date and
different formats.
Uncheck to set the date, time and time zone on the phone manually,
rather than obtaining the current time from the mobile network.
If Automatic is unchecked, opens a dialog where you can manually set
the phone´s
date.
If Automatic is unchecked, opens a dialog where you can manually set
the phone´s time
If Automatic is unchecked, opens a dialog where you can set the
phone’s
Check to display the time using 24-hour time format – for example,
13:00 rather than 1:00
time.
zone.
pm.
Opens a dialog where you can select the format for displaying dates.
Turning the phone on without SIM card
If you don´t have a SIM card inserted in your mobile phone, you cannot connect to mobile networks for voice and
data services, but you can connect to Wi-Fi network to sign into your Google Account and to use all the features of
your phone, except placing a cell phone call.
When you are finished, tap on the icon Next on the bottom of the screen.
The next screen enables you, to set the Wi-Fi connections.
If you want to
network names and security settings of detected WLAN
networks are displayed in the
WLAN
The network can be open ( ), or a secure protected
network ( ).You can also add new WLAN networks.
See chapter Settings/Wireless & networks/ WLAN settings
/Add WLAN network.
When you are done, the last screen is shown and this is to
inform you, that your wizard settings are done and
use your device.
enable
Wi-FI, turn WLAN switch on. The
network to connect.
WLAN network
section; Tap a
you can
Page 15
15
Using the touchscreen
Tap:
Tap and hold:
Swipe or slide:
Drag:
Double-tap:
Pinch:
Rotate:
To act on items on the screen, such as application and setting icons, to type
letters and symbols using the on-screen keyboard, or press onscreen
buttons, you simply touch them with your finger.
Tap and hold the item on the screen by touching it and not lifting your finger
until an action occurs.
To swipe or slide means to drag your finger vertically or horizontally across
the screen. Quickly move your finger across the surface of the screen,
without pausing when you first touch it (so you don´t drag the item).
Tap and hold an item for a moment and then, without lifting your finger,
move your finger on the screen until you reach the target position.
Tap quickly twice on the webpage, map, or other screen to zoom. For
example, you double-tap section of the webpage in Browser to zoom in or
out that section to fit the width of the screen.
In some applications (such as Maps, Browser and Gallery) you can zoom in
and out by placing two fingers on the screen at once and pinching them
together (to zoom out) or spreading them apart (to zoom in).
For most screens, you can automatically change the screen orientation
from portrait to landscape by turning the device sideways. When entering
text, you can turn the device sideways to bring up a bigger keyboard. You
can turn this feature on and off, go to Settings/Display/Auto-rotate screen,
turn the function On.
Page 16
16
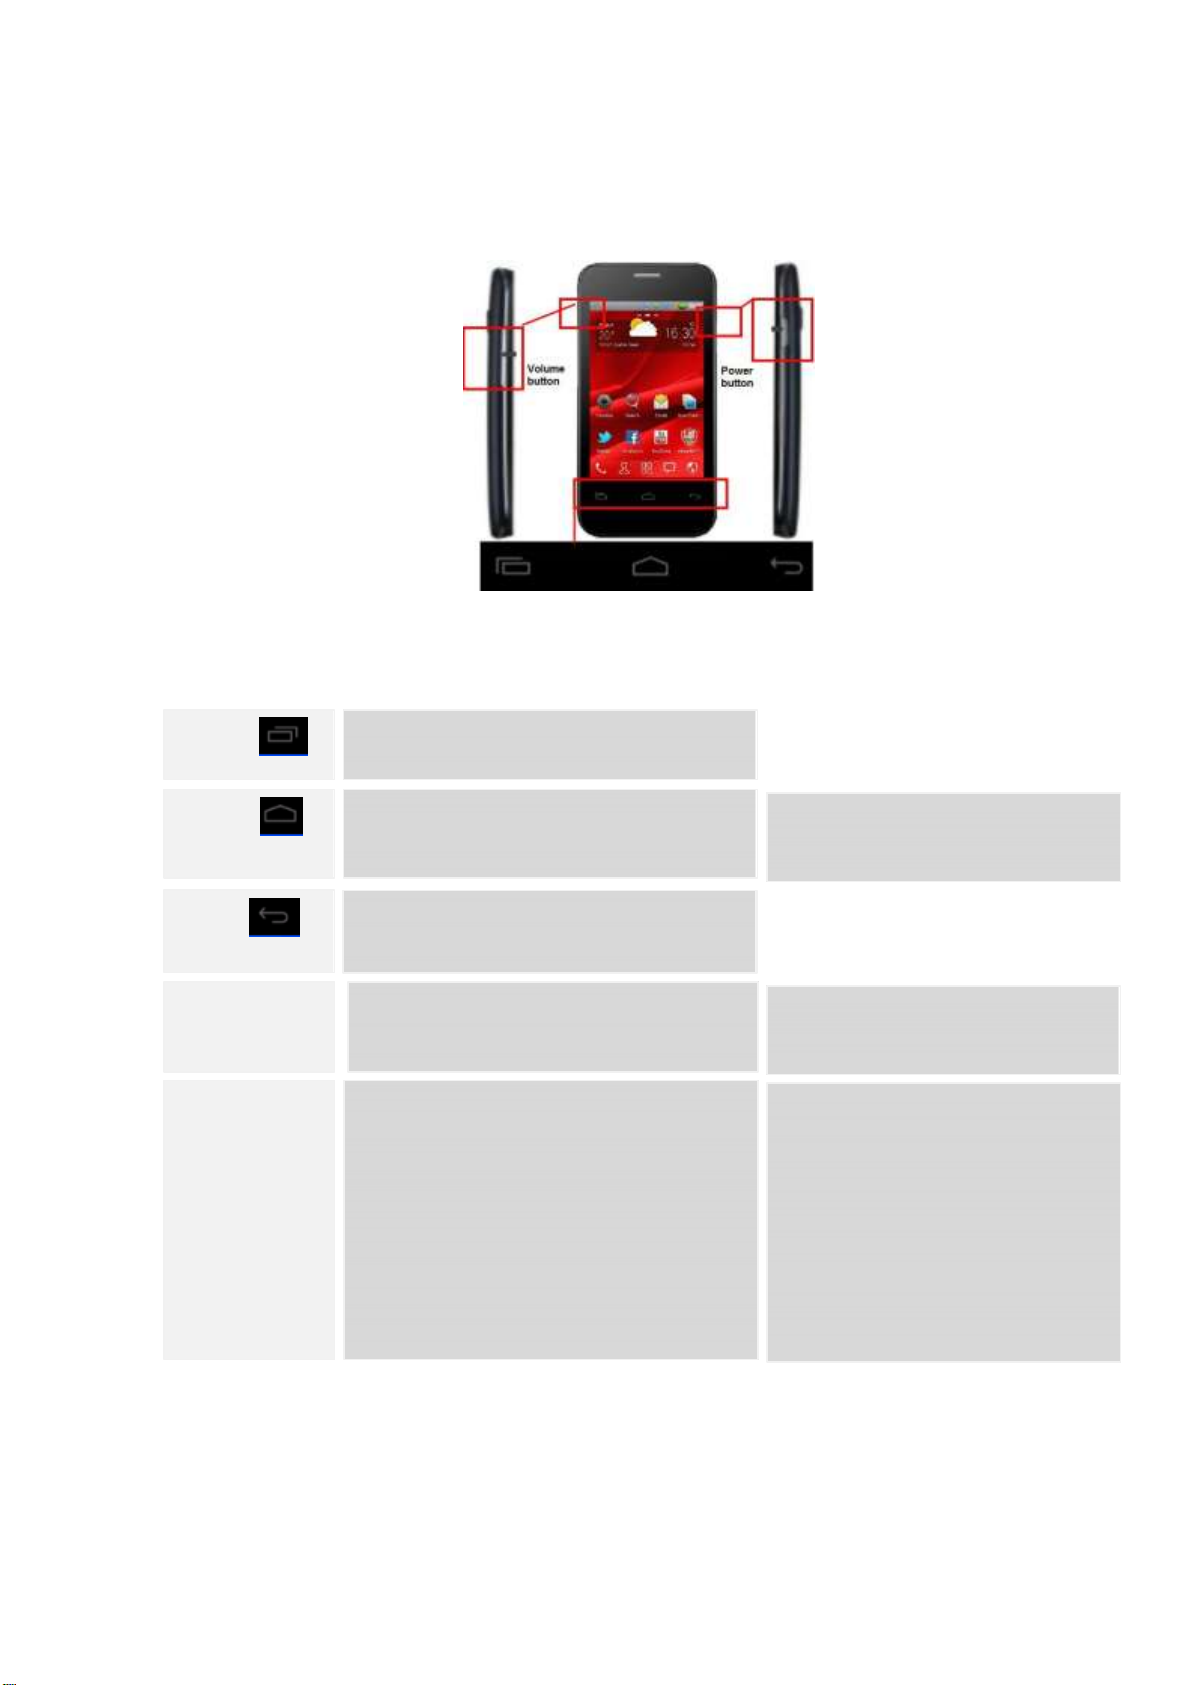
Using the phone´s buttons
Button Press Press & hold
Menu
Opens a menu with items that affect
the current screen or application.
Home
Back
Power
Volume
Opens the Home screen. If you’re viewing
the left or right extended Home screen, opens
the central Home screen.
Opens the previous screen you were
working in. If the onscreen keyboard is
open, closes the keyboard.
Turns off the screen.
Increases or decreases the call volume, during
call.
When the phone is ringing, silences the ringer.
On the Home screen when no call is in
progress, increases or decreases the ringtone
volume, or sets the phone to be silent or to
vibrate instead of ringing.
In other applications, controls the volume of
music, spoken directions, and other audio.
Opens the most recently used
applications screen.
Opens a menu with options for
Airplane mode, for Silent mode,
and for powering off the phone.
Quickly increases the ringtone
volume to maximum or minimum.
Page 17
17
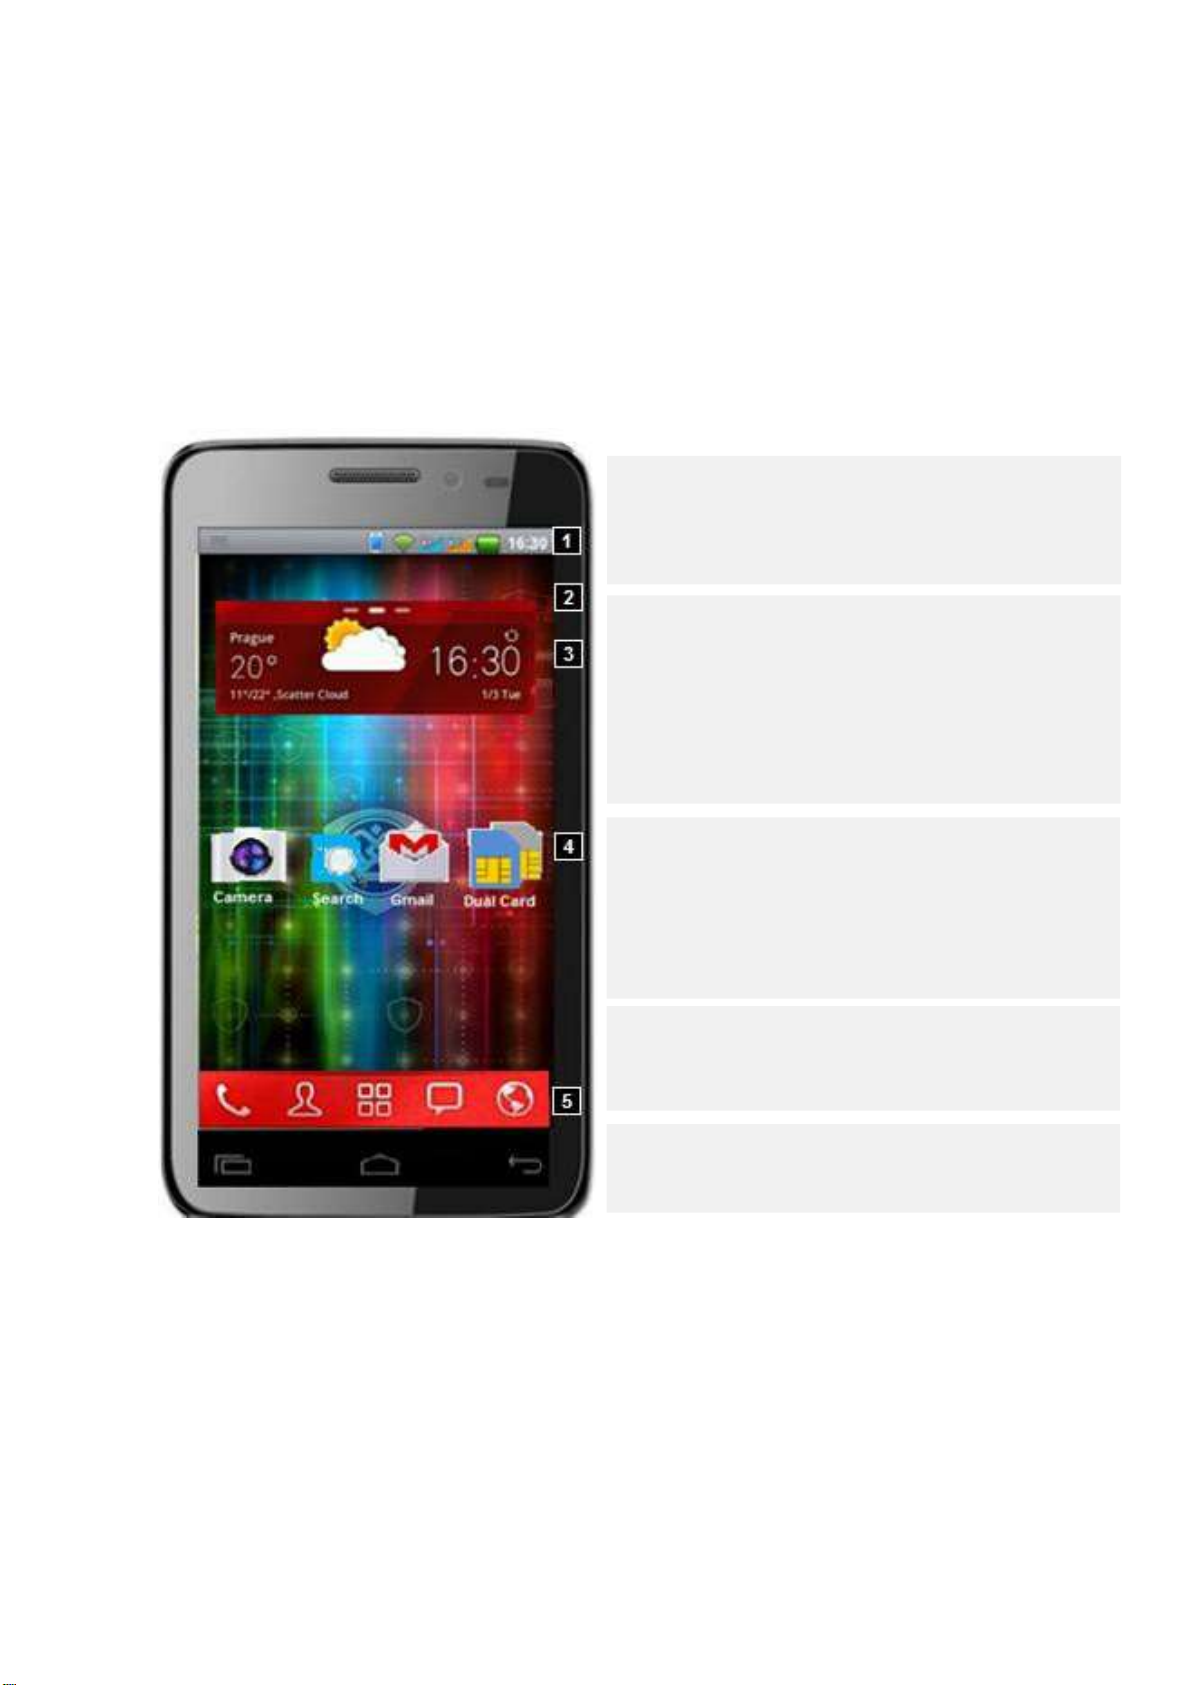
Home screen
Home screen is your starting point to access all the features on your phone. It displays application icons,
widgets, shortcuts and other features. You can customize the Home screen with different wallpaper and
display the items you want. See “Customizing the Home screen”.
1. Status bar - displays the time, information about the
status of your phone and icons for notifications that
you’ve received. To learn more, please see chapter
“Managing notifications”.
2. Browse Home screen –You can go to the extended Home
screen by sliding your finger horizontally across the
screen to go to the left or right side of the Home screen.
Extensions to the Home screen provide more space for
widgets, shortcuts and other items. Small lines at the top
of the screen indicate how many extensions are of the
Home screen and the highlighted lines show which
screen you´re currently viewing.
3. Widgets put at-a-glance important information and
media content up front on your Home screen. Some
widgets are already added to your Home screen for
your convenience. You can add more from the
available selection of widgets or download more
widgets. See more in chapter “Customizing the Home
screen”.
4. Shortcuts to applications –touch items on Home screen
to open them. See more in chapters “Customizing the
Home screen” and “Applications “.
5. Louncher and other shortcuts –touch the
Louncher icon to view all your applications. There are
also other shortcuts to Calls, Contacts, etc.
Page 18
18
Using the onscreen keyboard
Enter text using the onscreen keyboard. Some applications open the keyboard automatically. In others,
touch a text field where you want to enter text to open the keyboard.
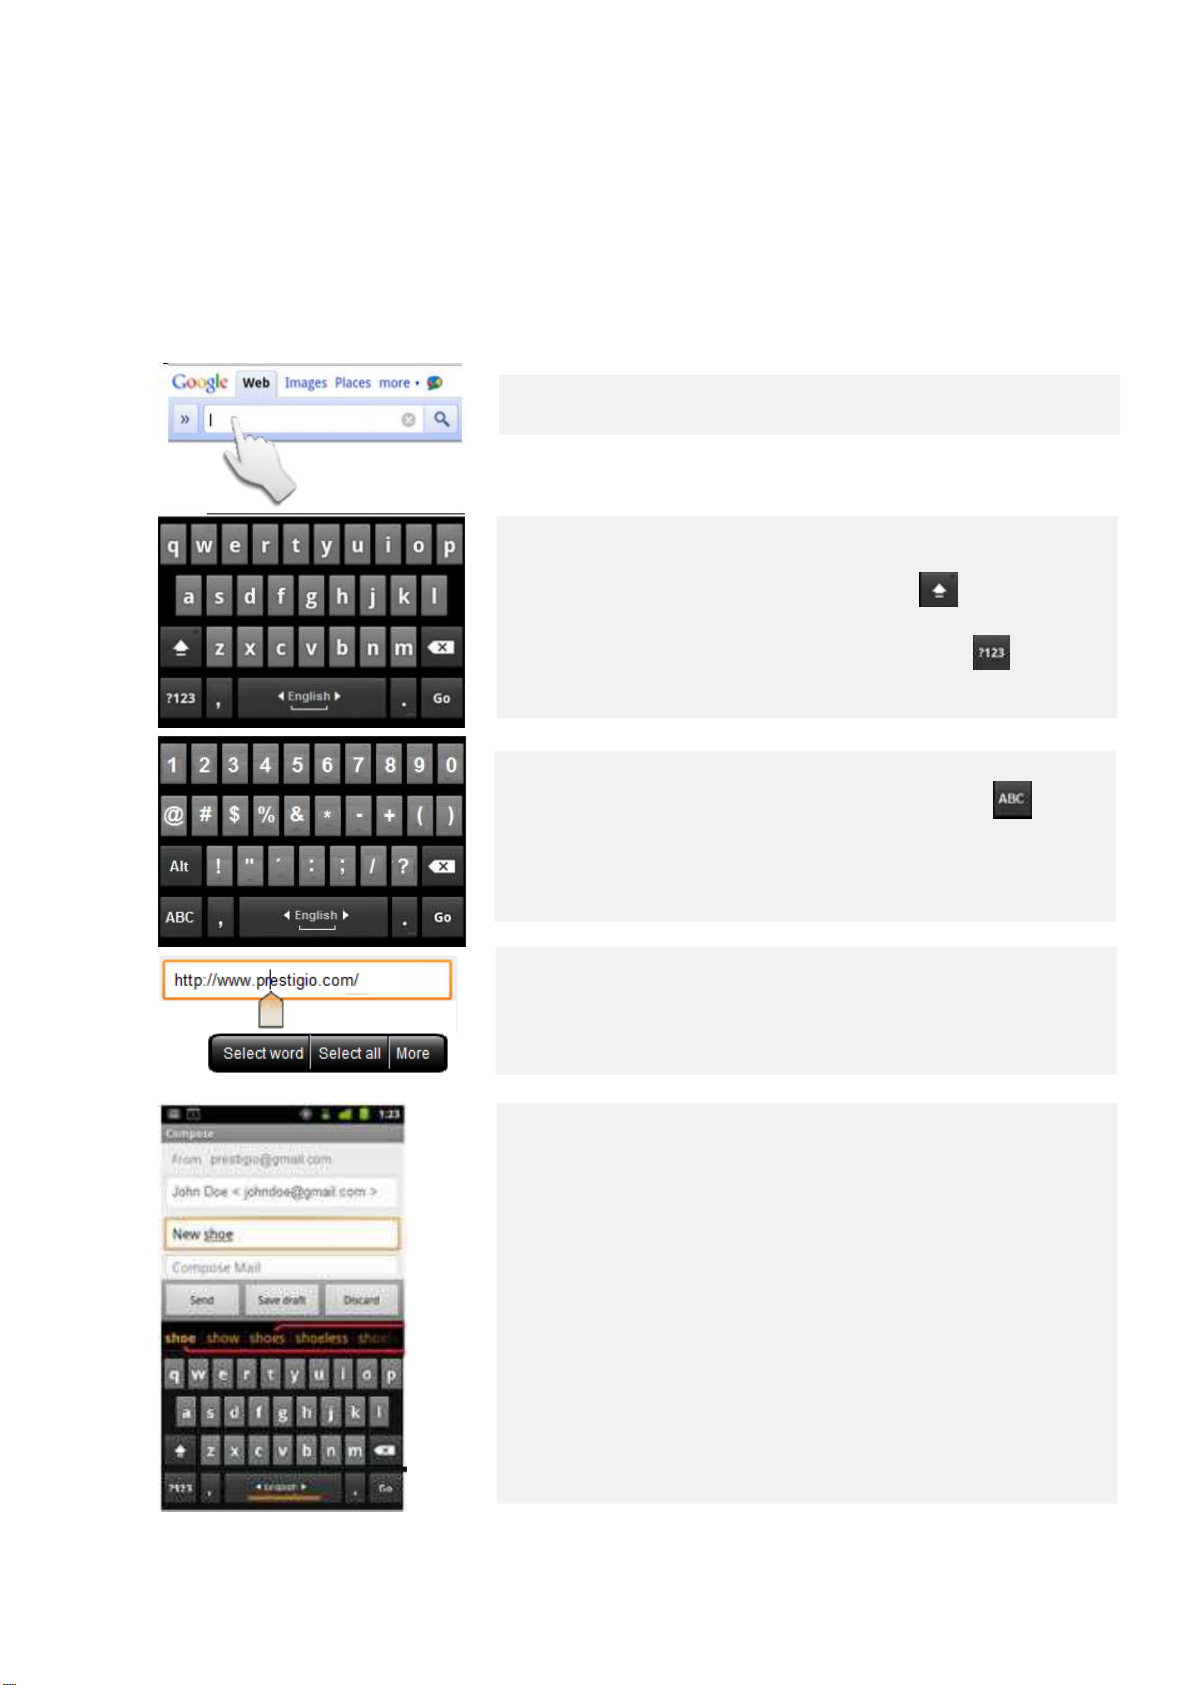
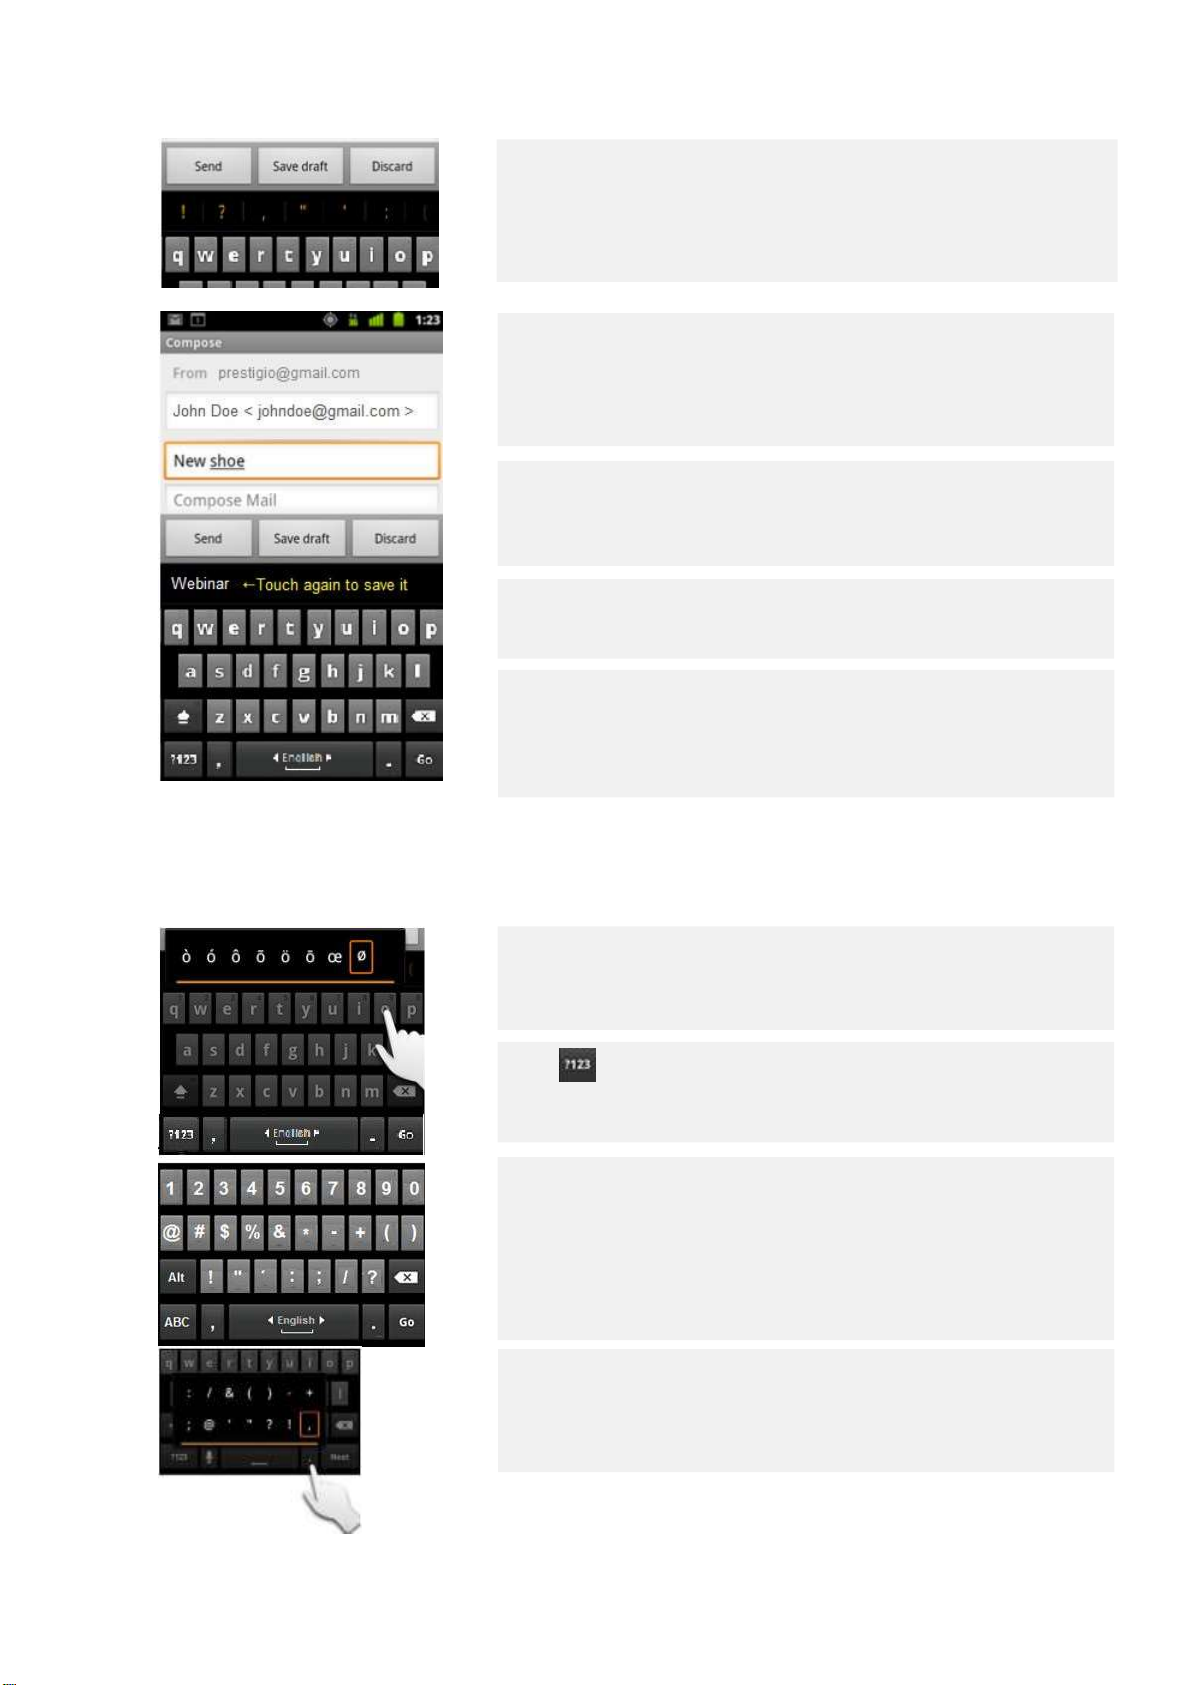
Enter text by typing
Touch a text field.
The onscreen keyboard opens.
To capitalize the next letter you type, tap once on button. Touch
and hold for all caps.
If you want to change characters to numbers, tap on the button.
If you want to change characters back to letters, tap on the
If you touch in a text field where there is already text entered, the
insertion point is set where you touch and the insertion point tab
appears. You can drag the insertion point by its tab to move the
insertion point to pick exactly where you want to add more text. You
can also select a word or more at a time and copy, cut or paste.
Touch the keys on the keyboard to enter text. What you type appears in
the text field and in the strip above the keyboard.
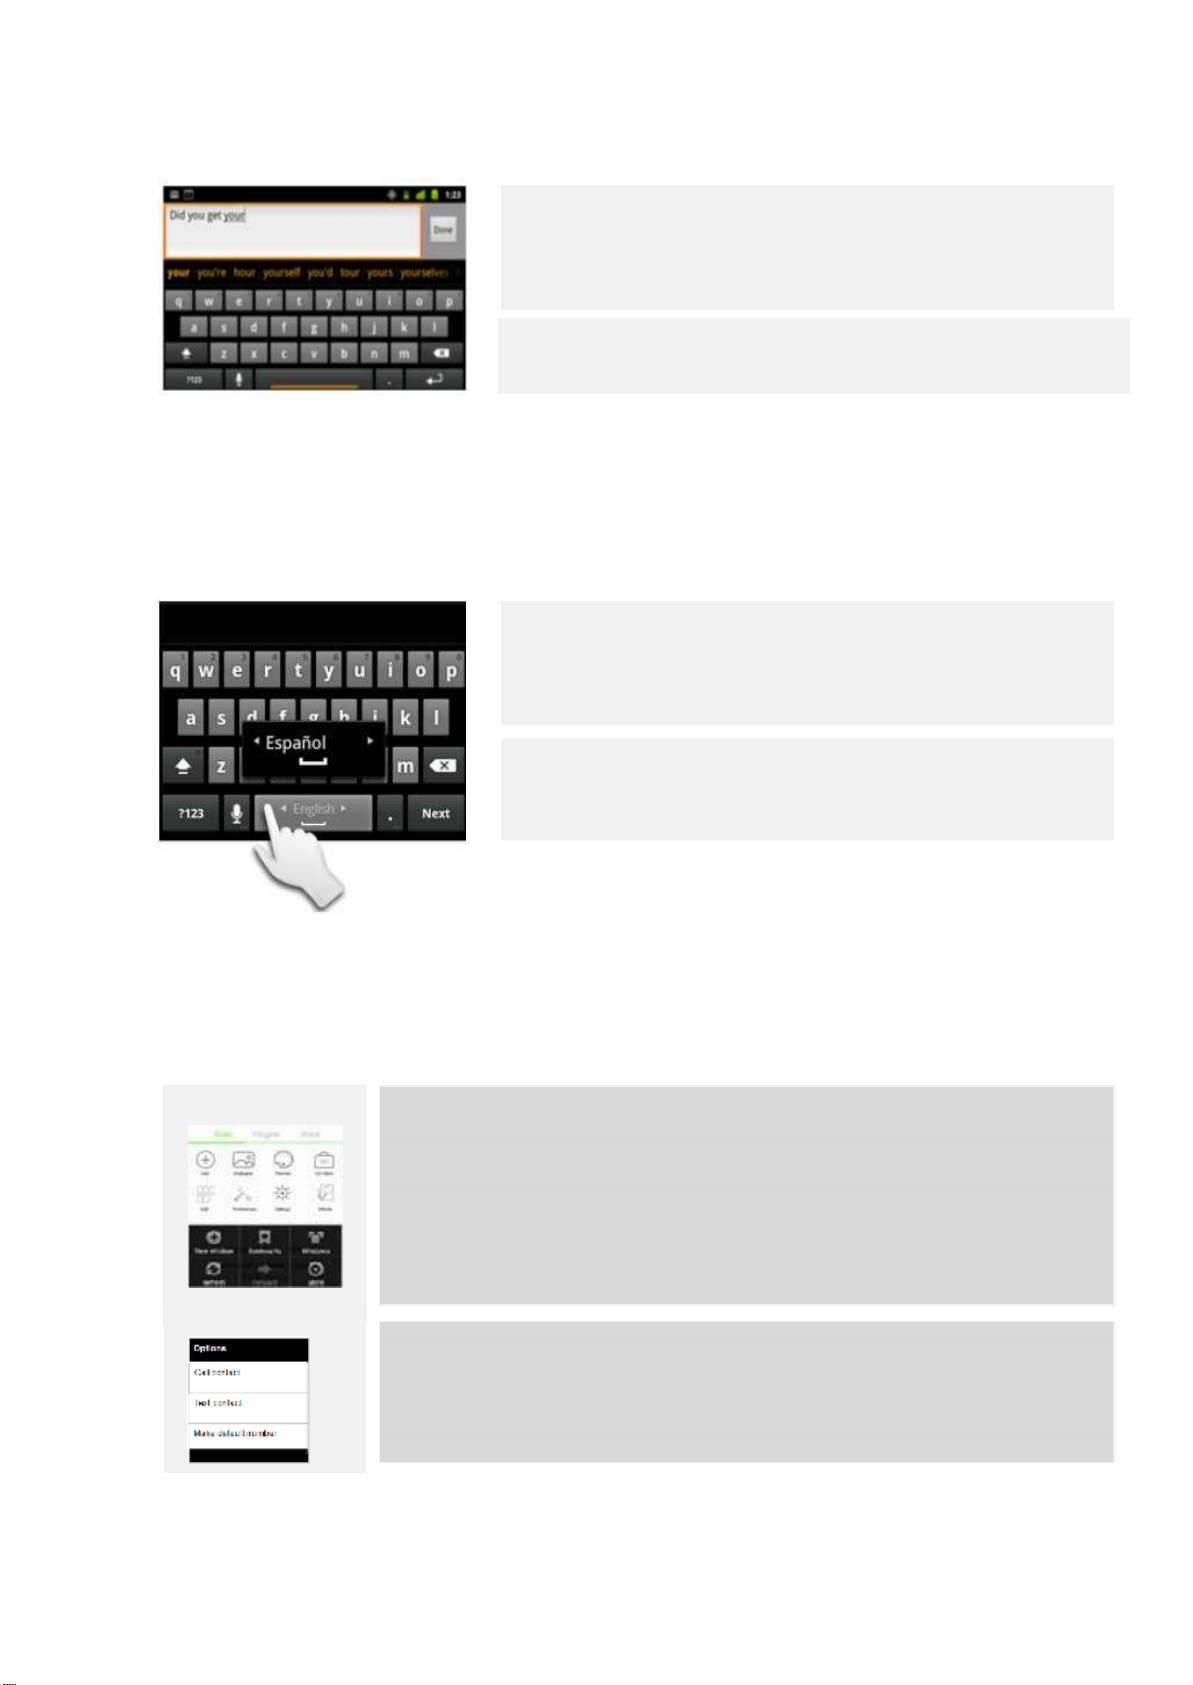
When the keyboard has a suggestion for what you might be typing, the
word you’re typing is underlined in the text field and the suggestions
appear in the strip above the keyboard.
The boldfaced suggestion at the left of the strip is the keyboard’s best
suggestion. You can drag the strip to the left to bring any additional
suggestions into view.
Press space or a punctuation mark to enter the boldfaced suggested
word.
Page 19
19
If you touch the space key, the suggestion strip offers a series of
punctuation marks you can touch to replace the space with.
If you touch a word that is not in the system or user dictionary, it’s
entered and you’re prompted to touch the word again, if you want to
add it to the user dictionary.
You can view, edit or delete the words that you add to the dictionary.
See “Language & keyboard settings”.
Use the Delete key to erase characters to the left of the cursor.
When you’re finished typing, press Back to close the keyboard.
Some applications add special keys to the keyboard that make it easier
to navigate from one text field to another.
Enter numbers, symbols and other characters
Touch and hold a vowel or the C, N or S key to open a small window
where you can drag onto the accented vowel or other alternate letter
or number you want to enter.
Press button to switch to numbers and symbols button.
Press Alt button on the symbols keyboard to view additional symbols;
press it again to switch
Touch and hold the Period button (.) to open a small window with a set
of common symbols.
back.
Page 20
20
Change the keyboard orientation
Turn the phone sideways or upright. The keyboard is redrawn to take
best advantage of the new phone orientation.
You can control whether the screen changes orientation automatically
when you turn the phone. See Settings/ Display /Auto-rotate screen.
Touch and hold the Period button (.) to open a small window with a set of
common symbols.
Change the keyboard language
If you’ve set more than one language in the Android Keyboard settings (see “Settings /Language &Keyboard /Android
keyboard)”), the current keyboard language is displayed on the Space key and you can switch languages.
Touch and hold the Space key. Without lifting your finger, move it to
the left or right until the language you want appears in the center of
the small window above the Space key.
Lift your finger. If you have many languages available, you may have to
repeat these steps to find the language you want.
Working with menus
There are two kinds of Android menus: options and context menus.
Options menus Options menus contain tools that apply to the activities of the current screen or
application, not to any specific item on the screen.
Open option menu by pressing the Menu button.
Not all screens have options menu; if you press on a screen that has no option menu,
nothing happens. Some screens have more options menu items, that can fit in the
main menu; in that case touch More to open a menu for additional items.
Context menus
Context menus contain tools that apply to a specific item on the screen. You open a
context menu by touching & holding an item on the screen. Not all items have context
menus.
If you touch & hold an item that has no context menu, nothing happens.
Page 21
21
Managing the notifications
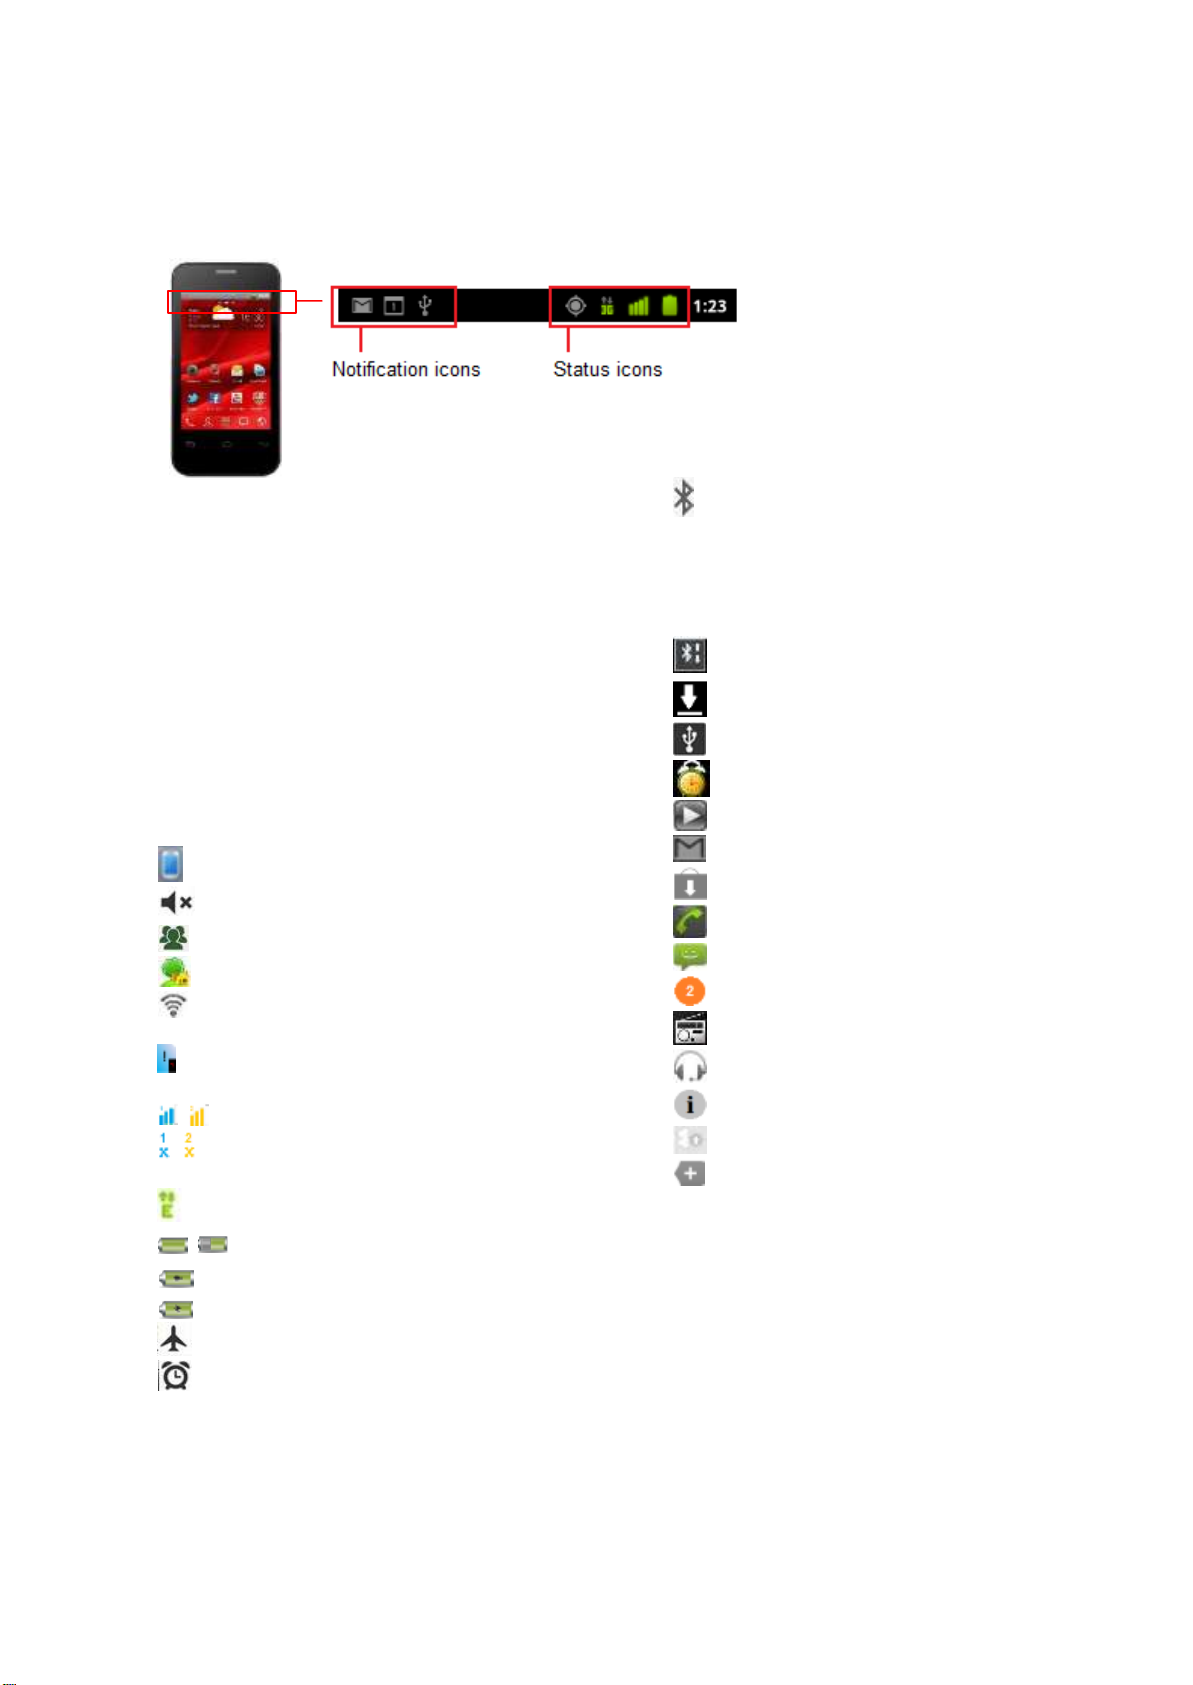
Status bar
Status icons
The following icons indicate the status of your phone.
Network status icons turn green if you have a Google
Account added to your phone and the phone is
connected to Google services, for syncing your Gmail,
Calendar events, contacts, for backing up your settings
and so on. If you don’t have a Google Account or if, for
example, you’re connected to a Wi-Fi network that is
not connected to the Internet, the network icons are
white.
SIM card missing (the red number
/ No signal (SIM1/SIM2)
G Connected to GPRS mobile network
General profile selected
Silent profile selected
Meeting profile selected
Outdoor profile selected
Connected
to a Wi-Fi network and
display the signal strength
below indicated if it´s SIM1 or SIM2)
/ Signal strength SIM1/SIM2
Connected to EDGE mobile network
/ Battery status
Battery empty, charge the battery
Battery charging
Bluetooth is on
Notifications
icons
File transfer via Bluetooth connection
File transfer failed / download complete
USB connected
Countdown alarm in progress
Audio file playing
New email
Gmail-Update found
Dialing, Incoming call
New text message
Number of new notifications
FM radio on
Earphones connected
New information
Updates available
If you have more notifications than can fit in
the status bar, a plus icon prompts you to open the
Notifications panel to view them all.
Airplane mode on
Activated alarm
Page 22
22
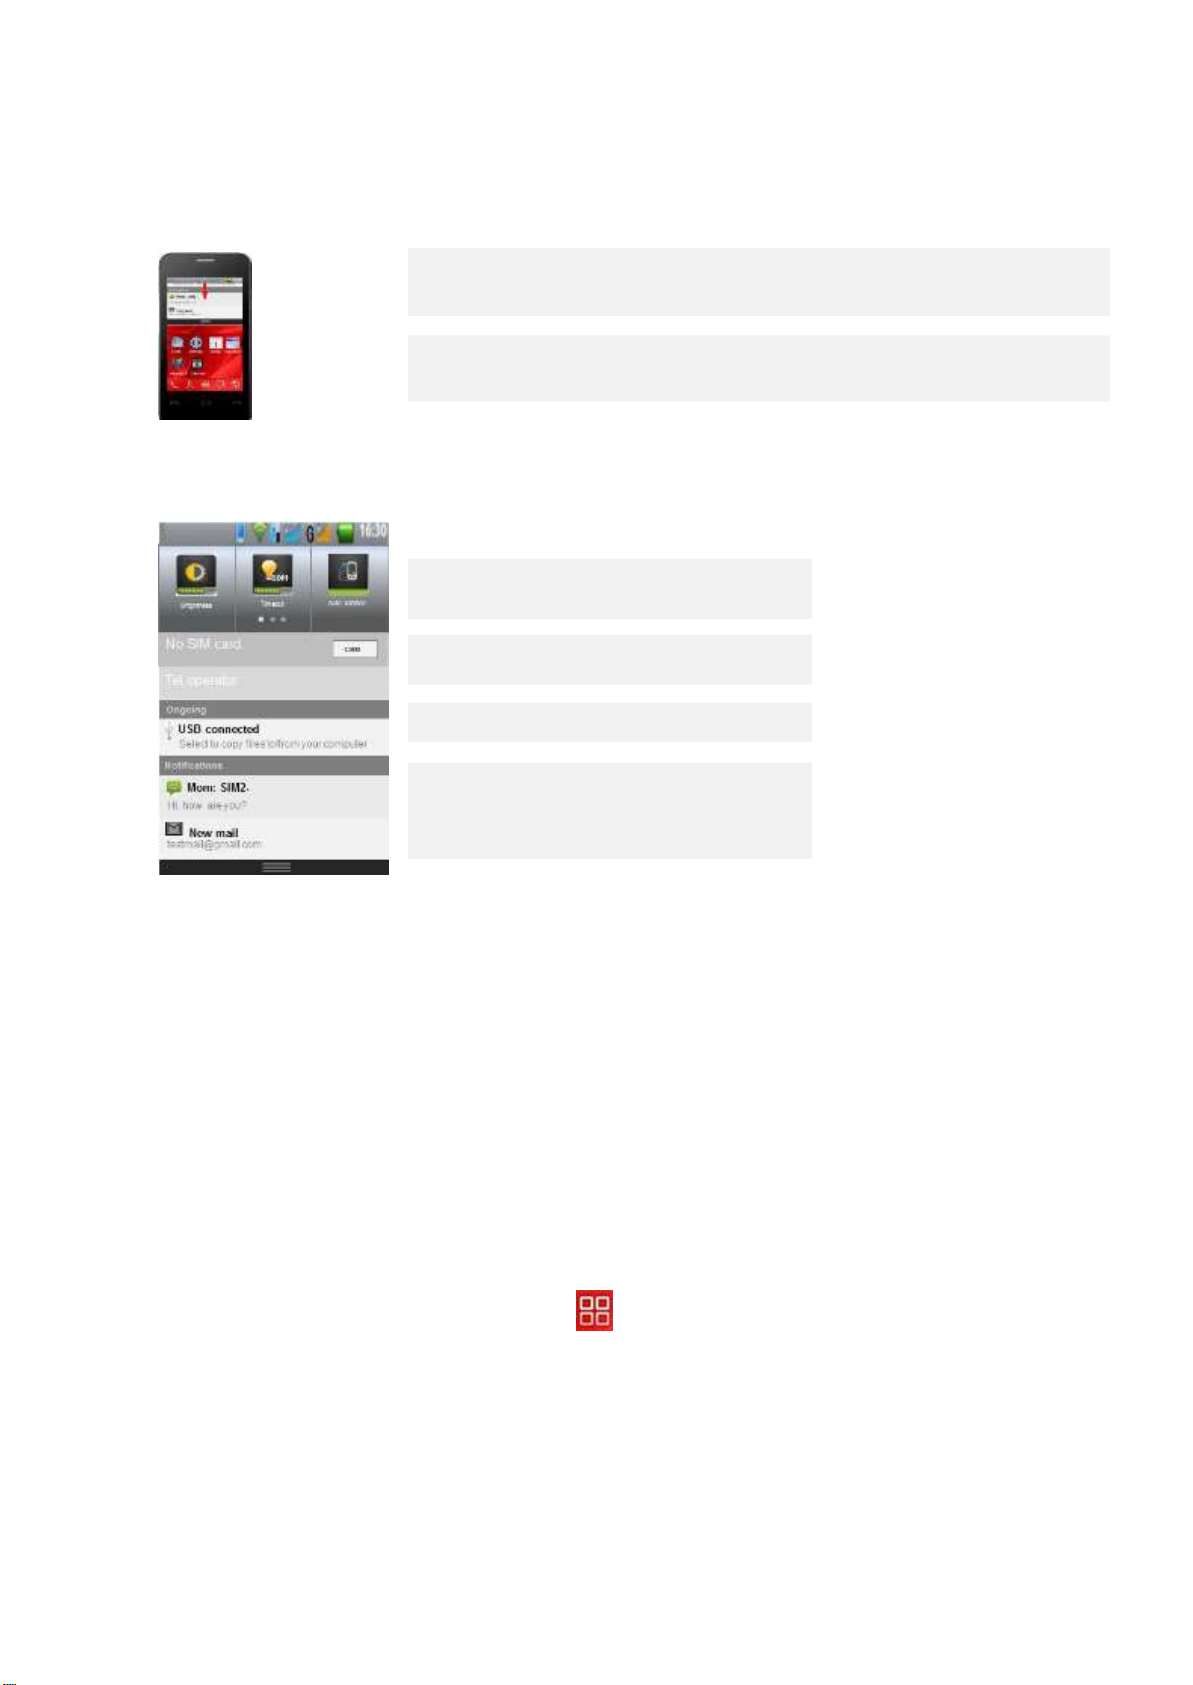
Notification panel
Open notification panel
When new notification icons displays in the status bar, press and hold the status
bar, then slide your finger downwards to open the
If you have several notifications, you can scroll down the screen to view more
notifications.
In the dropdown notification panel, there are also some other information. See picture below.
Notifications
panel.
Close the notifications panel
Shortcuts for quick access
SIM card 1and SIM card 2 status
Ongoing connections
New notifications (new email, new message,
download successful /failed, bluetooth
connections
Simply press the Back button on the device panel or slide back upwards.
Applications
Your Home screen has some application items. The Launcher has icons for all of the applications on your
phone, including any applications that you downloaded and installed from Android Market or other
sources.
Open and close the Launcher
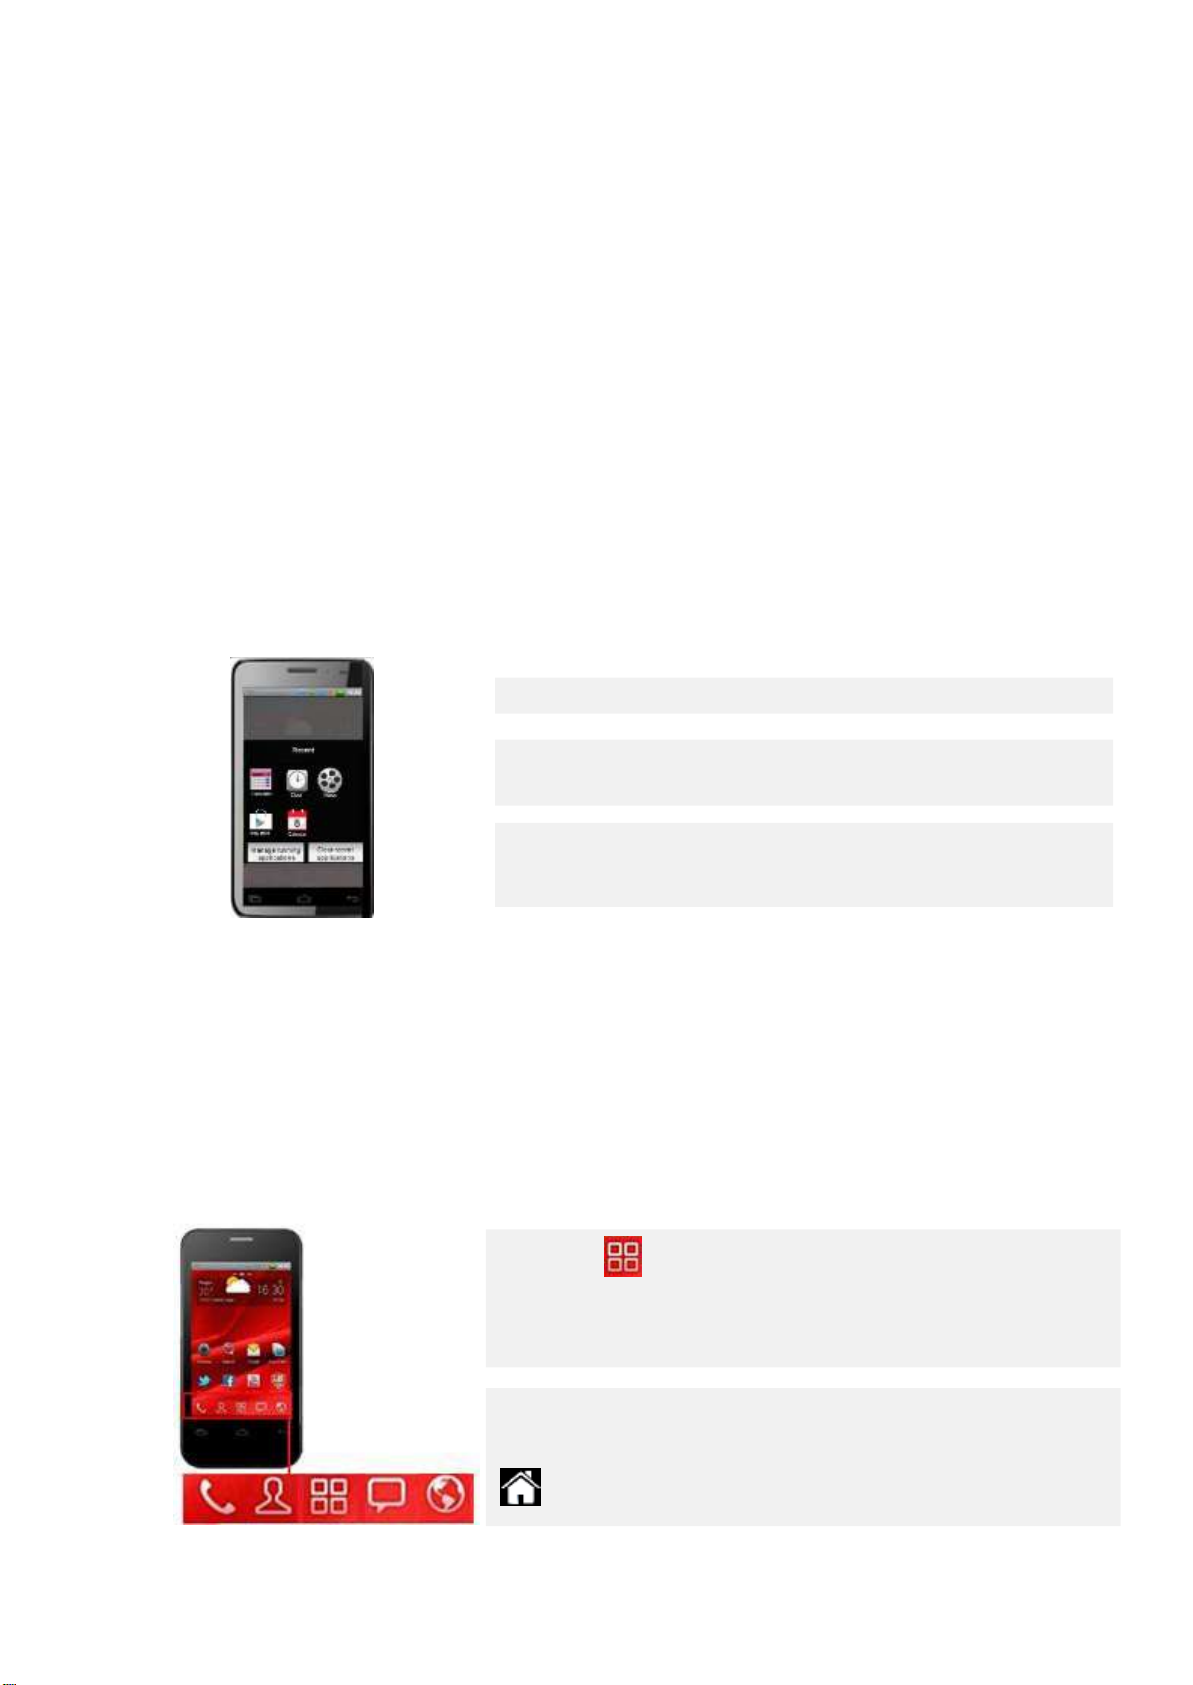
On the Home screen, touch the Launcher icon to open it. If you have more applications than can fit on
the Launcher in one view, you can slide the Launcher left or right to view more.
On the top of the screen are three icons: All, Recent and Running. Tapping on All will show you all your
applications, Recent will show you the recent applications you used and Running will show you which
applications are still running.
Page 23
23
Adding application to Home screen
You can add an application icon to the Home screen by touching and holding it on the Launcher screen
until it vibrates and then dragging it towards the Home icon on the bottom of the screen. All extended
Home screens will appear in small version. Choose the Home screen page you want to add the application
and lift your finger.
To close the Launcher tap the Home icon on the Launcher or the Home button. The Launcher closes
automatically if you touch an icon to open its application or if you move an icon from the Launcher to the
Home screen.
Opening and switching applications
To open an application, tap an application's icon on the Launcher or tap on application’s icon on the Home
screen.
Switch to a recently used application
Press & hold the Home
A small window opens with icons of applications that you’ve used
recently.
Touch an icon to open its application
OR
Press Back to return to the current application
When you open an application, the other applications you’ve been using don’t stop; they keep on running:
playing music, opening webpages and so on. You can quickly switch among your applications to work with
several at once.
button
The Android operating system and applications work together to ensure that applications you aren’t using
don’t consume resources unnecessarily, stopping and starting them as needed. For this reason, there’s no
need to stop applications unless you’re certain that one you downloaded is misbehaving.
Shortcuts
Tap the icon on the bottom of the screen to view all applications on
your device. You see all applications by sliding your finger horizontally
across the screen to go to the left or right side of this screen.
If you want to return back to Home screen, tab on the Home icon
on the bottom of the screen.
Page 24
24
Replacing or deleting the shortcuts icons
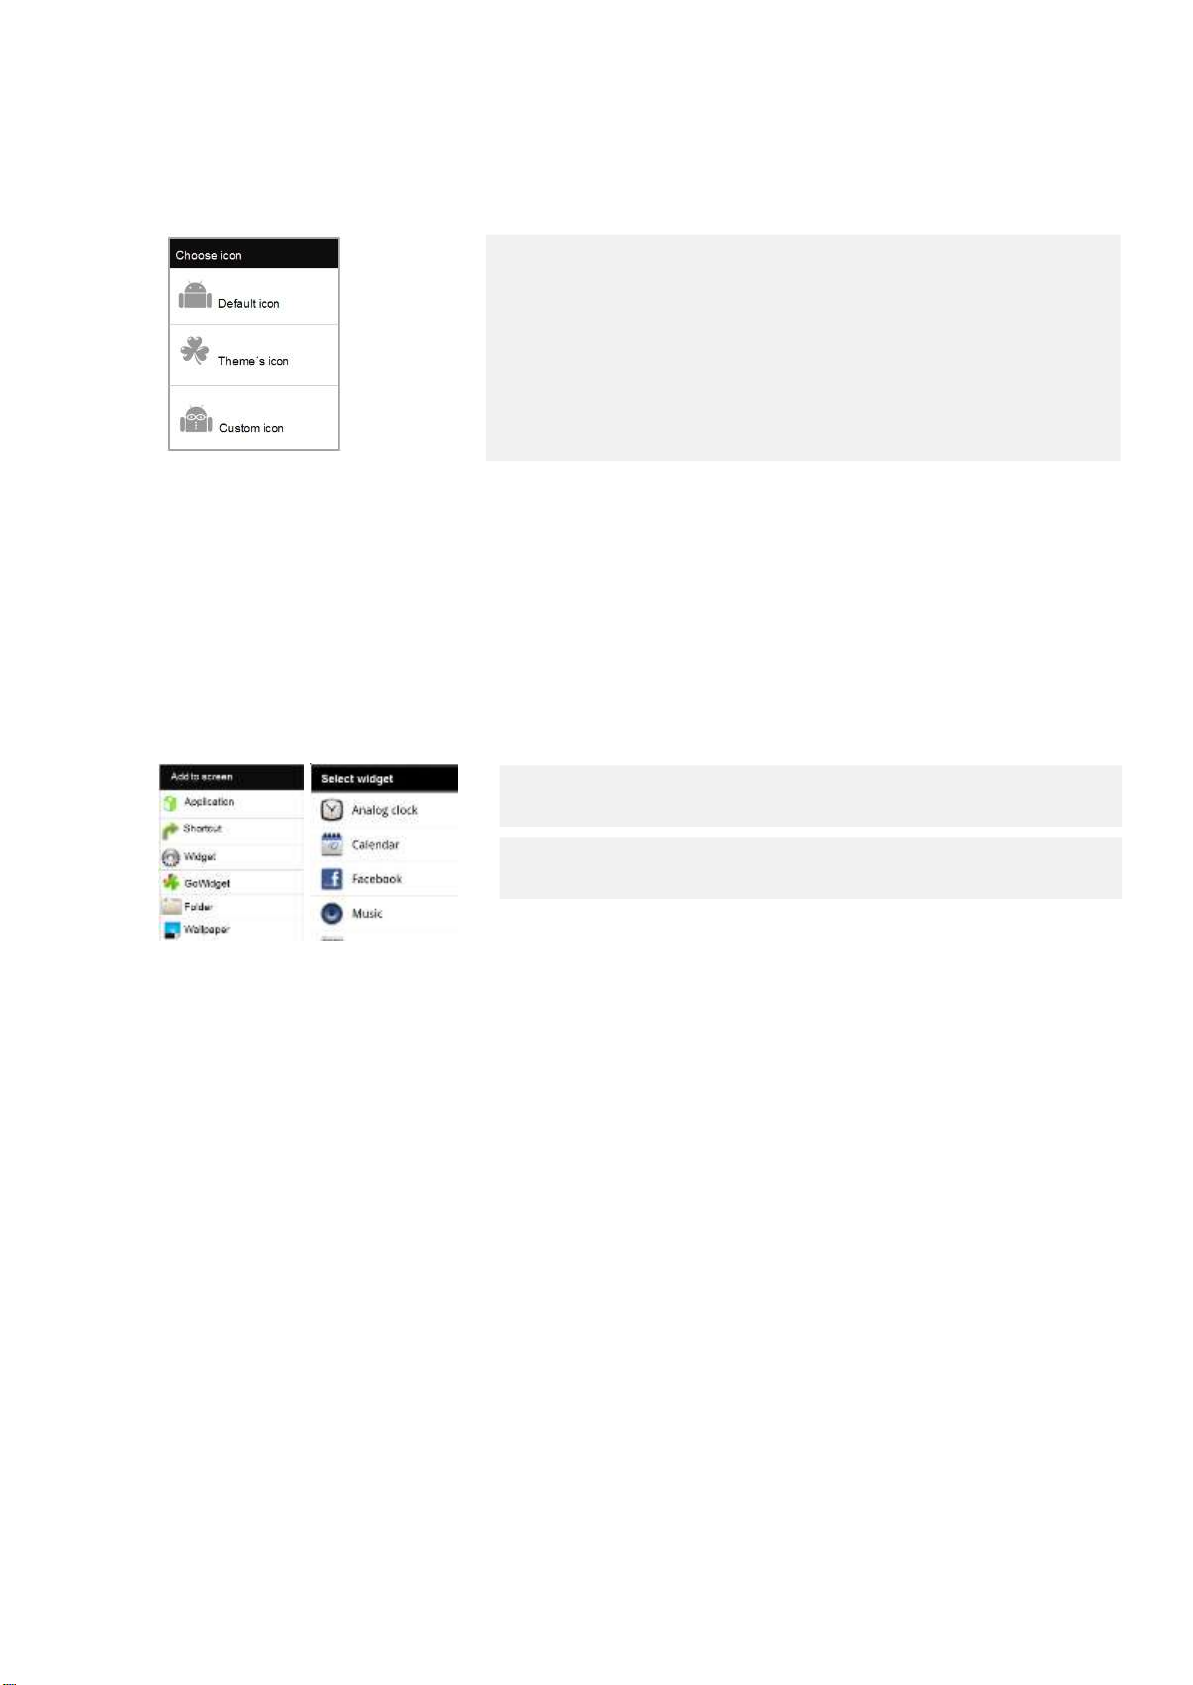
If you would like to replace the icon or delete it, hold the icon. New
window will appear. Choose Delete to delete the icon or touch Replace to
change the icon.
You can replace icons with a default icon, Theme´s or Custom icon.
Custom icon enables to pick your favorite photo from the gallery.
Customizing the home screen
Adding a widget to your Home screen
Tap and hold the home screen to enter into list Add to screen.
A list Select Widget appears. Select the widget you want to add to your
Note:
If there is not enough space to place a widget, choose another extended part of Home screen.
Removing widget from your Home screen, resizing and selecting themes for widgets
To remove, resize or change the theme for the widget, press and hold the widget until the icon shows.
Choose the desired action with tapping on it.
home screen.
Page 25

25
Your Google account
Sign into Google Account to use Gmail, Google Talk, Google Calendar and other Google Apps; to download
applications from Android Market; to back up your settings to Google servers; and to take advantage of
other Google services on your phone.
Important note:
If you want to restore your settings to this phone from another phone that was running Android
release 2.0 or later, you must sign into your Google Account now, during setup. If you wait until setup
is complete, your settings are not restored. If you don´t have a Google Account you are prompted to
create one. If you have an enterprise Gmail account through your company or other organization, your
IT department may have special instructions on how to sign into that account.
When you sign in, your contacts, Gmail messages, Calendar events and other information from these
applications and services on the web are synchronized with your phone.
If you don´t sign into Google Account during setup, you are prompted to sign in or to create a Google
Account the first time you start an application that requires one, such as Gmail or Android Market.
When you sign in you are prompted to enter your username and password, using the onscreen board.
For information about navigating the touchscreen and entering text, please see “Using the
touchscreen” and “Using the onscreen board”.
Resetting your Google Account password
If you have a Google Account but have forgotten your password, you must reset it before you can sign in.
Go to http://www.google.com, click Sign in, click on “Can´t access your account?” in the sign-in box and
then follow the instructions for resetting your password.
Additional accounts
After setup, you can add Google, Microsoft Exchange ActiveSync, conventional mail and other kinds of
accounts to your phone and sync some or all of their data, as described in “Accounts”.
Page 26

26
3 Communication
Contacts
Contacts give you quick and easy access to the people you want to reach. When you first time turn on your
phone and sign into your Google Account, any existing Google contacts are downloaded to your phone.
After that, your contacts are synchronized: any changes you make to your contacts on the phone or the
web are made in both places the next time you sync. Contacts from Exchange ActiveSync accounts are also
synced in this way.
Information about your contacts is shared with other applications, such a Gmail, Google Talk, Messaging,
Gallery (for sharing photos and videos) and so on.
If you have more than one account with contact information, Contacts joins duplicates into a single entry.
You can also manage that process manually.
Opening and searching your contacts
Here you can add, view and communicate with your friends and acquaintances.
Touch the Contacts icon on the Home screen or in the Launcher
among all applications .
All of your contacts are displayed alphabetically in a scrolling list. Each
contact is followed by the default phone number.
You can drag the list up or down to scroll it or slide your finger up or
down to scroll quickly. Either way, a tab briefly appears to the right of
the list, which you can drag up and down to scroll very quickly, while
displaying the letter of the alphabet for the contacts you’re scrolling
past.
You can search for a contact by name. Search for a contact
Tab in the Search box and start entering the name of the contact you’re
searching for. As you type contacts with matching names appear below
the search box.
Note: If you have a new phone and haven’t added any contacts yet, Contacts display a message with hints
on how to start adding contacts to your phone.
Page 27
27
Add new contacts on your phone and synchronize them with the contacts in your Google
Account, Microsoft Exchange ActiveSync account or other accounts that support syncing
contacts. (See more in “Add new contact”).
Choose if you want to delete 1 or more contacts from your list. See more in “Delete contacts.”
Choose to set how and which contacts you want to be displayed. See more in “Display
options”.
You can group your contacts into preinstalled system groups or you can make your own, new
contact group and rename it as you like. See more in “Group contacts”.
Check how many space you used for your contacts on your phone or SIM card.
Import or export your contacts from your phone, SIM card, SD card, etc.
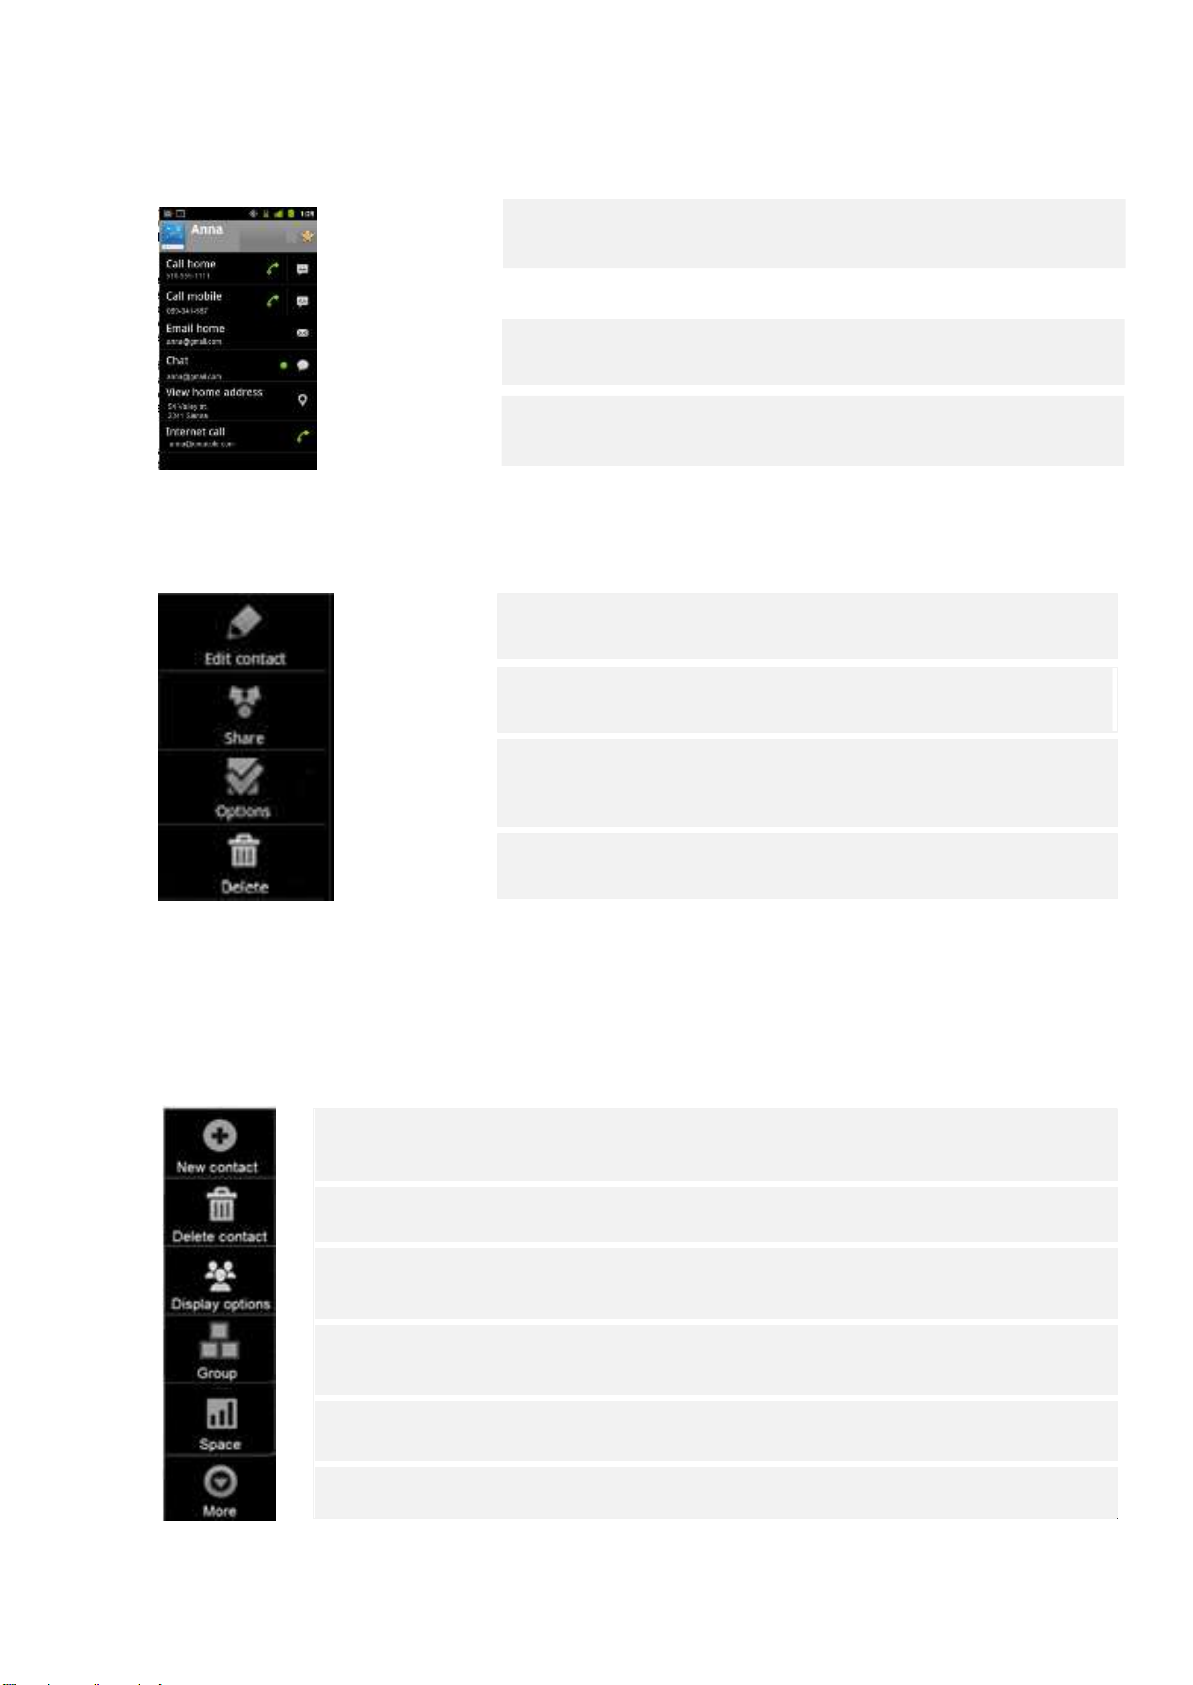
View details about a contact
Open your
Touch the contact whose details you want to view.
You can now see entries for communicating with the contact followed by
details.
contacts.
Touch a communication method to start dialing, texting or emailing the
contact by using the listed number, address and so on.
Press Menu to Edit, Share and Delete contact or see more options.
Edit the contact’s information (see “Editing contact details”).
Share contact via Bluetooth, Email, Gmail or message.
Set preferred ringtone for this contact or send calls directly to voicemail.
This means when this contact calls you, your phone doesn’t ring and the
caller is sent directly to your voicemail.
Press Back button to get back to the List of contacts and press Menu for additional contact options.
Additional contact options
Press the menu button while in contacts and additional options appear.
Delete all information about the contact.
Page 28
28
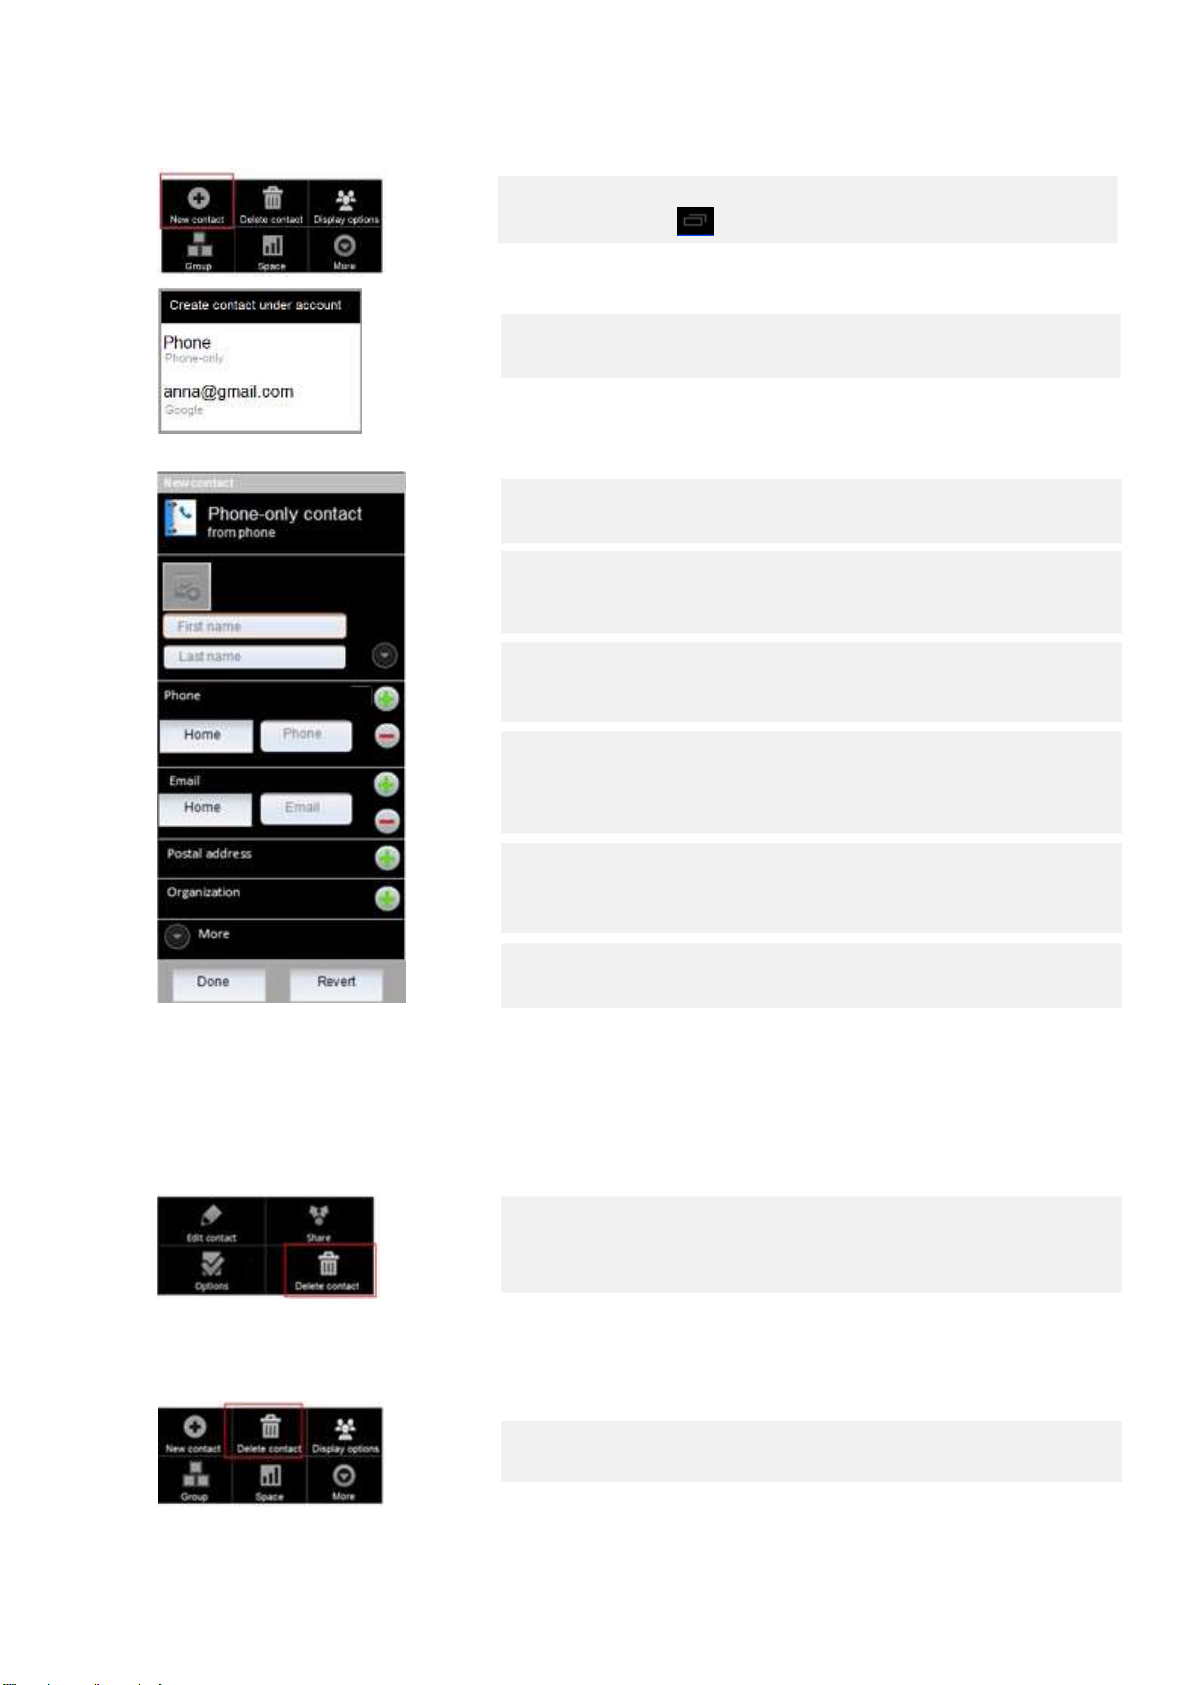
Add new contact
Open your contacts.
Press Menu button and touch New contact.
If you have more than one account with contacts, touch the account to
which you want to add the contact.
Enter the contact’s name. When you are done, click Next.
If you don´t want to add any more information click Done.
Touch a category of contact information, such as phone
numbers and email addresses, to enter that kind of information
about your contact. Scroll the page to view all categories.
Touch a category’s plus button to add more than one entry for
that category— for example to add both work and home
numbers.
Touch the button to the left of the item of contact information to open a
menu with preset labels, such as Mobile and Work for a phone number,
or touch Custom in the menu to create your own label.
Touch the Picture Frame icon to select a picture to display next to the
name in your lists of contacts and in other applications.
When you’re finished, touch Done.
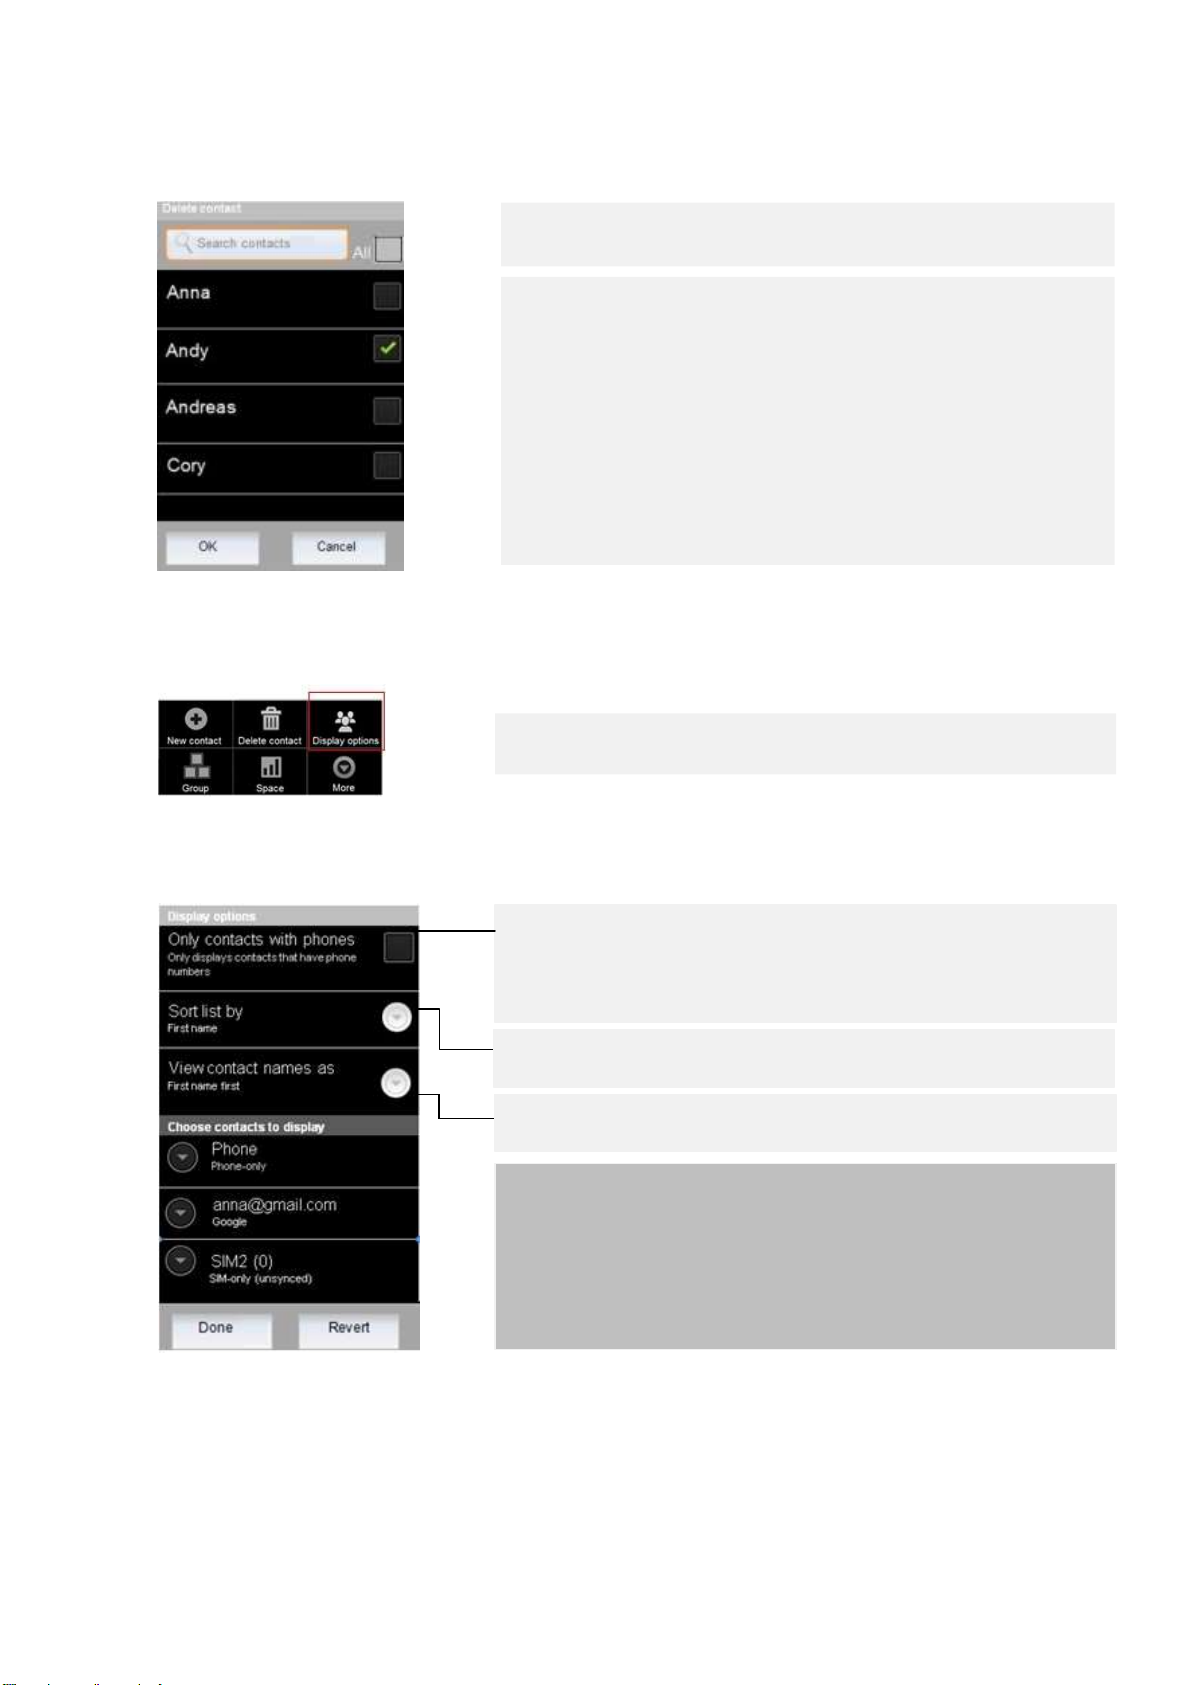
Delete contact
Delete 1 contact
Delete more contacts
Choose this option, if you wish to delete more contacts at once.
1. Open your contacts or favorites.
2. Touch the name of a contact in the list to view its details.
3. Press Menu and touch Delete contact.
4. Touch OK to confirm that you want to delete the contact.
1. Open your contacts or favorites.
2. Press Menu and touch Delete contact.
Page 29
29
New window opens:
View contact names as - to set whether you want to view contacts with
their last name or first name first.
Display options
New window Display options appear:
3. Tap on contacts you wish to delete or mark All to delete all contacts
4. Touch OK to confirm that you want to delete the contacts.
Note:
If you delete a contact from Google Contacts (or another account with
editable contacts), the contact is also deleted from Contacts on the web
the next time you sync your phone.
You can’t delete contacts from a read-only account, such as Facebook.
Instead, a dialog informs you that the contact will be hidden. To restore
hidden contacts from a read-only account, you must delete that account
from your phone and then add it again.
If the contact contains information from both editable accounts (such as
Contacts) and from a read-only account (such as Facebook), a dialog
informs you that the information from the read-only account will be
hidden, not deleted.
1. Open your list of contacts.
2. Press Menu and touch Display options.
Only contacts with
You can hide contacts that don’t have phone numbers. Set whether
contacts without phone numbers are displayed. If you use your list of
contacts only to call people, you can hide any contacts that don’t have
phone
numbers.
Sort list by - to set whether contacts are listed in order of their last
name or first name.
phones.
Choose contacts to display
Touch an account. Check or uncheck if you want to view all contacts of
this account. Touch
This action affects only the display of groups of contacts with this
screen. Your sync settings are not affected.
A message appears while your changes are made. If your change affects
a great many contacts this can take a short while.
Done
.
Page 30

30
Group contacts
New contact group
1 Open your contacts or favorites.
2 Touch Menu and touch Group.
New window Group appears.
3 Touch Menu and touch New contact group
4 Enter the name of your new group and touch Done.
Changing members in the group
Add new members or delete them from the group or move them to another group.
1 Open contacts or favorites, touch Menu and then Group.
2 Choose the group you would like to make changes in.
3 Touch
4 Touch Add new member or Delete.
5 Check member you wish to add/delete to/from your group.
6 When done, touch
Move member to another group
If you wish to move member to another group, touch Menu and choose Move. Choose the group you
would like to move contacts to and then choose the contacts with checking them. When done, touch OK.
Space
If you would like to check how many space you have left on your phone or SIM cards or how many contacts
you already have on phone and SIM, touch Contacts/Menu/Space.
Menu.
OK.
More
In this option you can Import/Export or share your contacts from SIM to phone or your computer.
If you have contacts stored in vCard format on an SD card, USB storage or SIM you can import them into
Contacts on your phone. You can export contacts in vCard format onto an SD card or USB storage to back
them up to a computer or other device. And you can send a contact via email, SMS or Bluetooth.
Page 31

31
1 Open your
2 Press Menu and touch More and then Import/Export.
contacts.
3 Select the option you would like to use.
4 If you selected Export to SD card, you can export all of the contacts
on your phone to your SD card as a group vCard file. You can then
copy this file to a computer or another device that can work with
files in this format, such as an address book application. See
“Connecting to a computer via USB”. In this case Contacts creates a
file with the .vcf extension on your SD card. This file contains all of
your contacts.
5 Gmail/Message compose screen opens, with the contact attached as
a vCard (.vcf) file. Address, write and send the
email/sms message.
6 If you have more than one account on your phone, touch the
account into which you want to import the contacts.
7 A list of the contacts on the selected option appears. Tap a contact,
so the check appears and touch OK or tab on All to import/export all
contacts.
Your favorite contacts
The Favorites tab contains the contacts you’ve starred as favorites followed by the short list of the contacts
you communicate with most frequently. Contacts you add to your favorites are also added to the Starred in
Android group in Contacts on the web.
1 Open your
2 Touch the Favorites
Adding a contact to your favorites
1 Open your
2 Touch a contact to view its details.
3 Touch the star to the right of the contact’s name. The star turns gold.
To remove a contact from your favorites list find your contact in Favorites tab and touch the gold star, so
that it turns grey.
contacts.
contacts.
tab.
Page 32

32
Change a contact’s default phone number
A default phone number appears below the contact’s name in the Contacts list. The default phone number
is used when you initiate a call or send a text message from the list by touching and holding a contact.
1 Open your contacts or
2 Touch the name of a contact in the list to view its details.
3 Touch & hold the phone number to use it as the contact’s default
phone
number.
4 Touch Make default number in the menu that opens. The default
phone number is marked with a checkmark.
Connecting quickly with your contacts
You can communicate with your contacts by choosing different applications such as phone application,
Messaging, Gmail or you can use the quick way in contacts application. This section describes ways to
initiate communication when viewing your list of contacts. The Contacts application shares your contacts
with many other applications, such as Gmail and Messaging.
Touch contact picture
1 Touch a contact’s picture to open Quick Contact for Android.
2 Touch the icon for the way you want to connect.
For phone numbers, you switch automatically to the Phone application
as the number is called. For other kinds of communication you switch
automatically to the appropriate application with the contact’s address
entered.
favorites.
The available icons depend on the information you have for the contact
and the applications and accounts on your phone.
Page 33

33
Contacts detailed screen
Connect to contact’s default number
1 Open your contacts or favorites.
2 Touch the contact with whom you want to communicate.
You can also just touch the Green Phone icon in Call log to call
the displayed number.
3 In the contact’s details screen, touch the way to start
communicating with the contact.
1 Open your contacts or
2 Touch & hold the entry for the contact to call.
3 Touch Call / Text in the menu that opens.
Note:
The actual menu item depends on the default number you set for your
contact, so it may be Call Mobile, Call Work and so on. You switch to the
appropriate application automatically as the option is touched.
favorites.
Page 34

34
Calling
Placing and ending calls
You can place calls with the Phone application. You can also place calls when working in the Call log (see
“Working with the Call log”) or in Contacts (see “Contacts”).
Open Phone
You can open the phone applications in three different places:
Touch the Phone icon at the
bottom of the Home screen
Touch the Phone application icon in
the Launcher.
If you’re already working with
Contacts or the Call log, touch the
Phone tab.
Place a call by dialing
Open
Phone.
Touch the keys on the Phone tab to enter the phone number.
If you enter a wrong number, touch to erase digits one by one. To
erase the entire number, touch & hold.
To dial an international number, touch & hold the 0 key to enter the
+ ) symbol. Then enter the international prefix for the country, followed
by the full phone number.
You can switch applications during a call—for example, to look up information by using the Browser. The
green phone icon appears in the Status bar while the call is underway.
Touch the green phone icon to dial the number that you entered.
plus (
Page 35

35
Press the Volume Up / Down button to adjust the call volume.
The duration of the
call.
Information from Contacts about the person you’re calling.
Touch to enter additional numbers during your call.
Touch End
button.
Disable phone calls (Airplane mode)
Some locations may require you to turn off your phone’s mobile, Wi-Fi and Bluetooth wireless connections.
You can turn off all these wireless connections at once by placing your phone in Airplane mode.
1 Press & hold the Power
2 Touch Airplane
3 You can also use the Settings application to turn Airplane mode on and
off and to configure other mobile and network settings.
See “Wireless &
mode.
networks”
button.
Page 36

36
Answering or rejecting calls
When you receive a phone call, the Incoming call screen opens with the caller ID and any additional
information about the caller that you have entered in Contacts.
All incoming calls are recorded in the Call log. See “Working with the Call log”. If you miss a call, you receive
a notification.
Add an entry’s number to your Contacts
Answer a call
Drag the green phone icon to the right.
If you were already on a call, the first call is placed on hold while you
answer the new call.
To silence the ringer before answering the call, press the Volume Down
button.
Decline a call and divert it to voicemail
Drag the red phone button to the left.
The caller is sent directly to your voicemail box to leave a message.
Reject a call with sms
If you touch Reject with sms, new screen with sms templates opens. You
can choose one of the templates or write your own text message to the
caller.
Touch & hold the
Touch Add to contacts in the menu that opens.
In the list of contacts that opens, touch Create new contact at the top or
scroll to find and then touch an existing contact to which you want to
add the
number.
For more information about creating and editing contacts, see
“Contacts”.
entry.
Page 37

37
Working with the Call log
The Call log is a list of all the calls you’ve placed, received or missed. It offers a convenient way to redial a
number, return a call or add a number to your Contacts.
Open the Call
Press the Call
Or, if you have the Phone or Contacts tab open, touch the Call log tab.
Calls are listed with the most recent at the top. Calls exchanged
sequentially with the same number are grouped. Scroll to view earlier
entries in the log.
log
button.
Touch the green phone icon at the right of the entry and dial a number
in the Call log.
Touch to open a group of calls exchanged sequentially with the same
Missed call
Incoming call
Outgoing call
Take other actions on a Call log entry
number.
You can also touch & hold the entry to open a menu with options for
communicating with that contact in other ways.
Switch between tabs to see all calls, incoming only, outgoing only or
missed calls only.
Touch a Call log entry to open a screen where you can call the contact
again, send the contact a message, add the number to your Contacts
and learn more about the original call.
Touch & hold a Call log entry to open a menu where you can call the
contact, view contact information, edit the number before you redial
and more.
Page 38

38
Clear the Call log
While viewing the Call log, press Menu and touch Clear call log.
You can
log to remove just that entry from the log.
also
touch & hold an entry in the log. Touch Remove from call
Call a favorite contact
Instead of opening Contacts, open Favorites icon. All procedures for calling are the same.
Placing an Internet (SIP) call
You can place calls via the Internet when connected to a Wi-Fi network, rather than via your mobile
network, if you have configured your phone to use an Internet calling account. Internet calling is based on
the Session Initiation Protocol (SIP) for voice calls on Internet Protocol (IP) networks. Adding an Internet
calling account and configuring your phone to use it are described in “Configuring Internet (SIP) calling”.
Call a contact’s Internet calling address
You must add (or have synced) a contact’s Internet calling address in Contacts to place an Internet call to
them.
.
Touch a contact’s Quick Contact icon and then touch the SIP icon .
OR
Touch a contact in Contacts or Favorites and in the screen that opens, touch Internet call.
OR
Touch an Internet call in the Call log.
Phone places the call, displaying the Internet calling address and Internet call on the Dialing screen. Once
you’re on the call, you can end the call, add other Internet calls and use the other Phone features in the
same way as you would for a mobile network call.
Call a phone number using Internet calling
If you have configured your phone to place all calls using Internet calling or to ask for each call, you simply
place calls to contacts with phone numbers as described in this chapter, whenever you are connected to a
Wi-Fi network: the call is placed using Internet calling instead of using your mobile network and the phone
displays Internet call.
Important note: Calling a phone number using Internet calling requires that your service provider supports
it and may incur additional charges. Be sure to check with your service provider for details.
Page 39

39
Listening to your voicemail
When you have a new voicemail message, the voicemail icon appears in the Status bar. If you have not
set up your voicemail number or if you need to change it, you can do that with the Call settings. See
“Settings/Call settings/Dual SIM settings/ SIM2/ Voicemail settings”.
Open the Notifications panel and touch New voicemail. See “Managing notifications”.
OR
Open Phone and touch the voicemail icon on the Phone tab.
Note: Typically, your carrier’s voicemail system guides you through the process of listening to and
managing your voicemail. The first time you call your voicemail, it also guides you through the process of
recording greetings, setting a password and so on.
Options during a call
When a call is in progress, you can put a call on hold, create a phone conference, mute your microphone
and more. See more below and see also chapter Managing multiple calls”.
Place a call on hold
Mute the microphone
during a call
Place a call on
Take the call off
Switch between the phone and a
Bluetooth
Mute the microphone during a
Turn the speakerphone on or
Touch the Hold icon. The current call screen indicates that you have a call on
hold. A Hold icon appears in the Status bar to remind you that you have a call
on hold. From any other application, you can open the Notifications panel
and touch the entry for the call on hold to return to the current call screen.
Take the call off hold by touching the Unhold button.
Touch Mute.
The Mute button lights up green to indicate that the microphone is muted.
The Mute icon appears in the Status bar to remind you that the
microphone is turned off. When viewing the current call screen, you can
unmute the microphone by touching the Mute icon again. The microphone is
unmuted automatically when the current call ends.
hold
hold
headset
call
off
Page 40
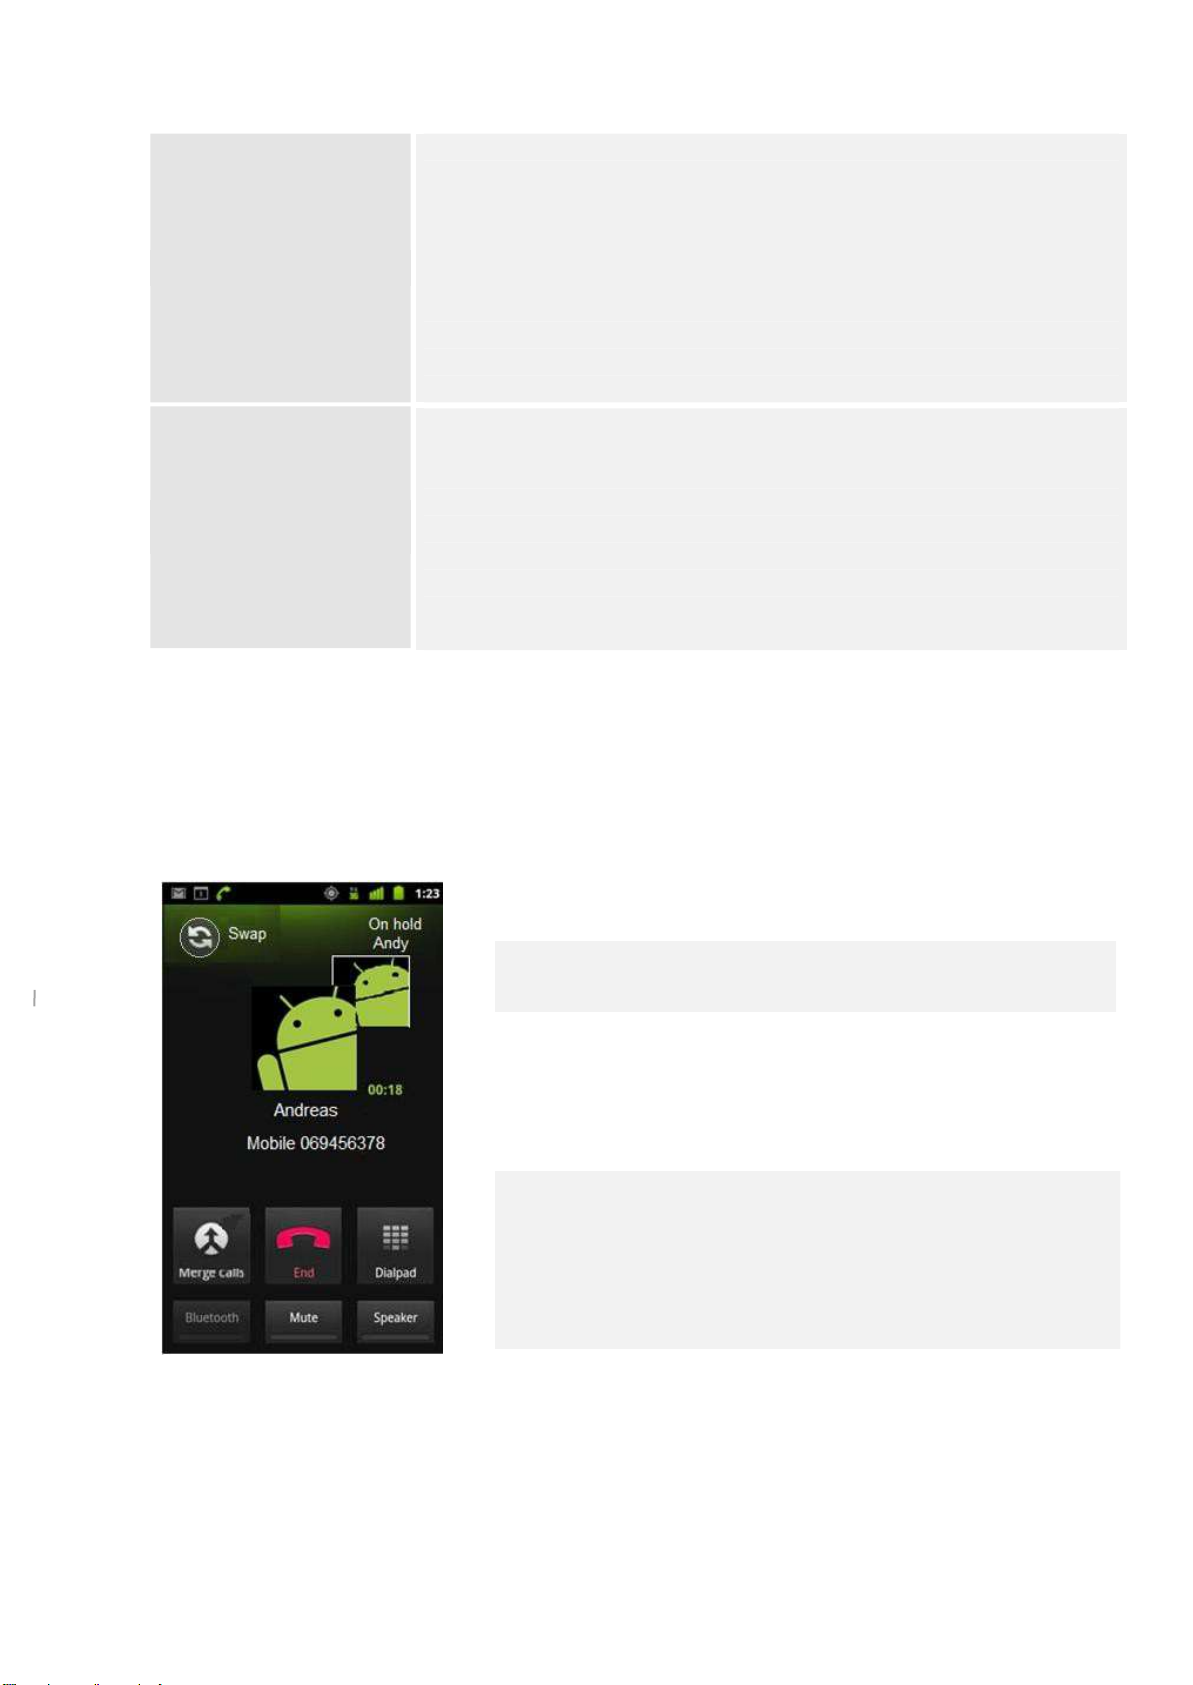
40
Turn the speakerphone on
or off
Touch Speaker.
The Speaker button lights up green to indicate that the speakerphone is on.
The Speaker icon appears in the Status bar and the sound from your call is
played through the phone’s speaker. When viewing the current call screen,
you can turn the speakerphone off by touching the Speaker icon again.
The speaker is turned off automatically when your current call ends.
Warning! To avoid damage to your hearing, do not hold the phone against
your ear when the speakerphone is turned on.
Switch between a
Bluetooth headset and the
phone
When a Bluetooth headset is paired and connected to your phone, you can
conduct all calls on the headset for hands-free conversation. For details
about configuring the phone to use a Bluetooth headset, see “Connecting to
Bluetooth devices”. When using the Bluetooth headset during a call, the
current call screen has a blue border and the Ongoing Call icon turns blue in
the Status bar. Touch the Bluetooth icon to switch from the headset to the
phone or vice versa.
Managing multiple calls
If you accept a new call when you’re already on a call, you can switch between the two callers or merge the two calls
into a single conference call. You can also set up a conference call with multiple callers.
Switch between current calls
1 Touch the Swap
2 The current call is put on hold and you join the other call.
Set up a conference
Contact your wireless service provider to learn whether they support
conference calls and how many participants you can include.
1 Place a call to the first participant.
2 When you’re connected, touch Add call.
3 The first participant is put on hold and you’re prompted to dial the
second
4 Place the next call, using the Phone tab, the Call log, or your contacts.
caller.
icon.
call
Page 41

41
5 When you’re connected, touch Merge calls.
6 The participant is added to the conference call. You can add as many
callers as your carrier supports.
7 During a conference call, touch Manage to drop a conference call
participant or to talk privately with one of the participants.
8 Touch End to end a conference call and disconnect all callers.
Messaging
You can use Messaging to exchange text messages (SMS) and multimedia messages (MMS) with your
friends on their mobile phones.
Open
Delete a message thread from the Messaging window
Messaging
1 Touch the Messaging icon on the Home screen, the Launcher or in the
contacts.
2 The Messaging window opens, where you can create a new message or
open an ongoing message thread.
3 Touch New message to start a new text or multimedia message.
4 Touch an existing message thread to open it.
Creating and responding to messages is described in “Exchanging
messages”.
Touch & hold the message
Touch Delete thread in the menu that opens.
You can also press Menu and touch Delete threads to delete all message
threads from the window.
thread.
Page 42

42
Exchanging messages
You can send text (SMS) messages of up to 160 characters to another mobile phone. If you keep typing
after the limit, your message is delivered as a series of messages (if supported by your carrier).
Multimedia (MMS) messages can contain text and a picture, a recorded voice, an audio file, a video, or a
picture slideshow. Messaging automatically converts a message into a multimedia message if you send
it to an email address instead of a phone number, add a subject or attach a media file.
Send a text me
On the Messaging screen, touch New message. Enter a mobile phone
number in the To field.
As you enter the phone number, matching contacts appear.
You can touch a suggested recipient or continue entering the phone
number.
You can also enter the name of a contact with a mobile number.
ssag
e
Touch the composition text box to start entering your message.
As you write the message, a counter appears below the “Send”
tell you how many characters are left to reach the 160 character limit
along with how many parts the message will be split into.
If you go over that limit, a new message is created, which is joined with
its predecessors when received.
To insert smiley, press Menu button and then touch Insert smiley to
open a scrolling list of smileys.
If you press Back while composing a message, it’s saved as a draft in
your Messaging window. Touch the message to resume composing it.
button to
Touch Send.
The Message window opens with your message after your name.
Responses appear in the window. As you view and send additional
messages, a message thread is created.
Create and send a multimedia message
Touch New message (See Send a text message).
Enter a mobile phone number or email address in the To field.
Touch the composition text box to start entering your message.
Press Menu and touch Add subject to add a message subject.
Press Menu and touch Attach to open a menu where you can touch the
kind of media file to attach to the message.
Page 43

43
If you touch Pictures, you’re prompted to touch a picture to attach it.
If you touch Capture picture, Camera opens so you can take a picture
and attach it.
If you touch Videos, you’re prompted to touch a video to attach it.
If you touch Capture video, Camcorder opens so you can shoot a video
and attach it.
If you touch Audio, you’re prompted to touch a ringtone to attach it.
If you touch Record audio, a screen opens where you can record a
spoken message and attach it.
If you touch Vcard you are prompted to add contact´s vCard.
If you touch Slideshow, a screen opens where you can assemble photos
into a slideshow of up to 10 slides to attach to the message.
Use the buttons in the Compose Message screen to preview or remove
the media attachment.
Touch Send MMS.
Respond to messages you receive
See your received messages in message window (touch Messaging icon).
When you receive a new message, notification and a new message icon
appears in the Status bar. Touch the new message notification and the
Message window opens where you can reply to the message.
If Auto-retrieve is unchecked, you must touch Download to view the
message. See “Changing Messaging settings”.
If the message contains a media file, touch Play to view, watch or listen
it. Touch & hold the media file to open a menu with an option for saving
the message on your SD card or USB storage.
Touch & hold a message to open a menu with number of options for
working with the message and its sender’s information.
See more below.
Page 44

44
Forward a message
Forward message to another contact or contacts.
Lock a message
You can lock a message so it won’t be deleted if you reach your storage limits
(see Storage settings). A lock icon appears to the right of the message. Unlock
a message by touching & holding it and then touching Unlock message. If you
try to delete a thread that contains a locked message, you’re asked to
confirm that you want to delete it.
View details about
message
See type of message, contact number and date and time, that message was
sent.
Changing messaging settings
You can change a number of Messaging settings.
To change Messaging settings, open the Messaging window, press
Menu and touch
Settings.
Storage settings
Check to delete older messages in a thread when the Text message limit or
Multimedia message limit is reached. Uncheck to keep all messages.
Set the number of messages to save per thread of text messages. When the
limit is reached, older messages are deleted if Delete old messages is checked.
Set the number of messages to save per thread of multimedia messages. When
the limit is reached, older messages are deleted if Delete old messages is
checked.
Text message (SMS) settings
Check to receive delivery reports for the messages you send.
Edit your message template you use, when you can answer your call for
example.
Check to add a signature to all sent messages.
If SMS signature is checked, you can edit the signature here. For example, write
“Sent from my Prestigio MultiPhone”.
Touch to open a window where you can work with messages stored on your
SIM card.
The SMSC address is pre-set in the SIM card by the mobile network operator
and it is needed to in order to use SMS messaging with your mobile phone. If
the address is missing, contact your network provider.
Select where you want to store your messages – on the phone or on the SIM
card.
Page 45

45
Multimedia message (MMS) settings
Check to receive a report on the messages you send.
Check to receive reports when your messages are read or deleted.
Uncheck to download only the heading of multimedia messages, which you can
then touch to open a menu to download the whole message. This is useful for
controlling how much data you download.
Uncheck to download only the header of multimedia messages when
connected to other carrier’s data networks. This is useful for avoiding
unexpected charges, if your contract has limits on data roaming.
Notification settings
Check to receive a notification whenever you receive a new message. See
“Managing notifications”.
Vibrate opens a dialog where you can set the phone to vibrate whenever you
receive a new message notification, only in Silent mode, or never.
Email
Use the Email application to read and send email from services other than Gmail. Email includes a wizard
that makes it easy to configure it for several popular email service providers.
Opening Email and the Accounts screen window
Use the Email application to read email from services other than Gmail.
Open email
Touch the Email icon on the Home screen or in the Launcher.
The first time you open Email, a setup wizard opens to help you add an
email account as described in “Adding and editing email accounts”. After
the initial setup, Email opens to the last screen you were viewing or, if
you have not used Email recently, it displays the contents of your
you have only one account) or the Accounts screen (if you have multiple
accounts).
You can also add a shortcut to your Home screen to an account’s Inbox,
so that you can open it directly from the Home screen.
If you already have installed email, the Inbox appears. If you have more
than one account an Email screen appears with all your accounts and
combined inbox. See below chapters.
Inbox (if
Page 46

46
Tab on Menu button. Below
options appear:
Refresh -- refresh your inbox
Compose – compose new email
Folders – see the folders you made
Accounts – see your combined inbox, if you have more than one account.
See more in chapter Accounts.
Accounts
The Accounts screen lists your Combined Inbox and each of your email accounts. If you have starred, draft,
or unsent messages in any of your accounts, the folders for those items from all accounts are displayed as
well.
Open the Accounts screen
1 Touch to open your Combined Inbox, with messages sent to all of your
accounts. See Combined inbox chapter below.
2 Touch to open a list of just your starred messages. If you click on starred
message, you can see to which account it was sent.
3 Touch to open just your drafts. If you click on a draft, you can see in
which account it was made.
4 Touch an account to open its Inbox. . The account from which you
send email by default is indicated with a checkmark.
5 Touch folder icon to open a screen listing the account’s folders.
6 Each folder and account on the Accounts screen displays the number
of unread messages in green , or number of starred messages and
drafts in gray .
Page 47

47
Combined inbox
If you have configured Email to send and receive email from more than one account, you can view all
messages sent to all accounts in your Combined Inbox.
Open the Accounts screen and touch Combined Inbox.
Messages in the Combined Inbox are color coded along their left sides,
by account, using the same colors that are used to color code your
accounts in the Accounts screen.
Unread messages are in
A previously read
Only some of your account’s recent email is downloaded to your phone.
To download earlier messages in batches for IMAP or POP3 accounts,
touch Load more messages at the bottom of the list of email. For
Exchange ActiveSync accounts, you can change how many days or
weeks of email to store on your phone; see “Adding and editing email
accounts”.
Reading your messages
You can read messages in your Combined Inbox or in the Inbox or other folders for individual accounts.
When you receive a new message, you also receive a notification in the Status bar, unless you’ve turned off
Email notifications using the Email Account settings, where you can also set whether Email notifications
vibrate the phone and pick a ringtone. See “Change an account’s settings”. When you touch an Email
notification, it opens the combined Inbox. Some attached images are displayed in the message; others
have buttons for opening them. Attachments you download are stored on your phone’s USB storage or SD
card, depending on your model of phone. Viewing, reopening and deleting your downloaded files is
described in “Managing downloads”. The Google Talk online status is shown next to the name of the
sender of each message. You can touch that status indicator to open Quick Contact or add new contact to
your Contacts list.
Touch an arrow to read the next or previous message in the folder.
The message opens in a screen with information about who sent it, the
date it was sent, and related information at the top, followed by the
contents of the message.
Sender’s Google Talk online
Open or save an
Touch to reply/Reply to all to or delete the message.
Press Menu button for more options: Forward and Mark as unread. See
more details in Managing messages in the next chapter.
attachment.
grey.
message.
status.
Page 48

48
Managing messages
You can reply to or forward a message that you receive. You can also delete messages and manage them in
other ways.
Reply to or forward a message
Mark a message as unread
While reading a message, touch Reply or Reply all.
OR
Press Menu and touch Reply, Reply all or Forward.
You can to return a read message to the unread state—for example,
to remind yourself to read it again later. You can also mark a batch
of messages as unread; see “Working with message in batches”
While reading a message, press Menu and touch Mark as unread.
You can delete a message from its folder. You can also delete a
batch of messages; see “Working with message in batches”.
Delete a message
While reading a message, touch Delete.
OR
Press Menu and touch Delete.
Star a message
Unstar a message
Note: For most kinds of accounts, deleted messages are moved to a
Trash folder, so you can retrieve them if you deleted them in error.
You can star an important message to make it easy to keep track of.
Once you star a message, a Starred folder is added to the Accounts
screen. You can also star a batch of messages (see “Working with
messages in batches”).
While reading a message, touch the star in its header.
OR
While viewing a list of messages in a folder, touch a message’s star.
The star turns gold.
You can open a folder that contains the starred messages from all
of your accounts or see folder Starred in Email screen.
Touch its star again. The star turns grey. If in Starred folder, the
checked mail is erased from the folder.
You can delete, star or mark an unread batch of messages at once.
Working with message in batches
In the Inbox or mailbox, check the messages that you want to work
with as a batch.
When you check one or more messages, the Mark unread, Add star
and Delete buttons appear at the bottom of the screen.
Touch Mark unread, Add star or Delete.
You can also press Menu and touch Deselect all. Your action affects
the entire batch of messages.
Page 49

49
Composing and sending email
You can send email to your contacts, other people or groups.
While in Email screen, Combined inbox or Inbox press Menu and touch
Compose.
Address the message. As you enter text, matching addresses are offered from
your Contacts. You can touch a suggested address or enter a new one.
Separate multiple addresses with commas.
Press Menu and touch Add Cc/Bcc to address a copy or blind copy of the
message.
Enter a subject for the message.
Enter the text of the message. For information about entering and editing text,
see chapters “Using the onscreen keyboard” and “Editing text”.
Press Menu and touch Attach to send a photo with the message.
Touch Send.
If you’re not ready to send the message, touch Save as draft to save it in a
Drafts folder. You can open the combined Drafts folder for all accounts on the
Accounts screen or just your account’s Drafts folder. See “Working with account
folders” below. Touch a draft message in a Drafts folder to resume working on it.
Your message is also saved as a
draft if you press Back before sending it.
Touch Discard to abandon a message, including any saved drafts. If you aren’t
connected to a network, for example, if you’re working in airplane mode, the
messages that you send are stored in your Outbox folder until you’re
connected to a network again. If it contains any messages, the Outbox is
displayed on the Accounts screen.
Working with account folders
Each account has Inbox, Outbox, Sent and Drafts folders. Depending on the features supported by your
account’s service provider, you may have additional folders
View an account’s folders
Open the Accounts
Touch an account’s folder
screen.
icon.
You can also open an account’s folders while viewing its Inbox or other
folder, by touching Menu and then touching Folders.
The account’s Folders screen opens with a scrolling list of the folders in
the account. Touch a folder to view a list of the messages it contains.
The account name is written in the right corner.
Green circles indicate the number of unread messages in the folder.
Touch a folder to open the messages it contains.
Page 50

50
Appending a signature to your messages
You can append one or a few lines of text to every message you send from an account, such as your name,
contact information, or even “Sent by Prestigio MultiPhone.”
1 Open the Accounts
2 Touch & hold the account whose settings you want to change. In
the menu that opens, touch Account settings. You can also
open the settings for an account while you’re viewing its inbox,
by pressing Menu and touching Account settings.
screen.
3 Touch
Signature.
4 Enter a
signature.
5 Touch OK.
6 When you’re finished changing settings, press Back.
Enter a signature to append to your messages; then touch OK.
Adding and editing email accounts
The first time you open Email, you are prompted to set up an email account. After that, you can configure
Email to send and receive email from additional accounts. The accounts that you configure are displayed in
the Accounts screen. See “Opening Email and the Accounts screen”. The Email setup wizard helps you set
up your account for many popular email systems, including those based on IMAP and POP3, so you can read
and work with the same email as you do on a computer in Thunderbird, Mac Mail, in a web browser, or
with another email application. If your service provider requires additional settings, or if your service
provider is unknown to Email, you can enter the necessary details manually, though you will typically need
to contact your email service provider to determine the right settings for your account.
You can also set up a Microsoft Exchange ActiveSync account (Exchange 2003 and 2007), so you can read
and work with the same email as you do on a computer using Microsoft Outlook. Email supports username
and password authentication for Exchange ActiveSync accounts and your IT administrator may set
additional security policies for the account (contact your IT administrator for more information).
Page 51

51
Add an email account
Open the Accounts screen. See “Opening Email and the Accounts screen”.
Press Menu and touch Add account.
1 Enter your email address and password. You can also check the option to use
the new account to send all outgoing messages.
2 Touch Next OR if you need to enter email account settings the wizard can’t
configure for you, touch Manual setup.
For some emails this is all you have to do. If the wizard determines that your
service provider requires additional information, or if you touched Manual
setup, you’re prompted to enter your email account details Enter any other
information requested by the type of account you’re adding and touch Done.
Enter a name for the account and touch Done. See details in Account settings.
Email starts downloading your email messages and you can start using it to
send and receive messages using the new account.
Delete or change an email account
Open the Accounts screen.
Press Menu and touch Accounts.
Touch & hold the account.
Delete account: Touch Remove account in the menu that opens.
Touch OK in the dialog to confirm that you want to delete the account.
Account settings
Change account settings: Touch Account settings
You can change the following settings for each email account when you create
it or at any later time. These settings apply only to the account you’re working
with.
The name of the account as it appears in the Accounts and Folders screens.
Your name as it appears to others when they receive email from you.
Opens a dialog where you can enter a signature to append to the messages you
send from this account. (See “Appending a signature to your messages”)
Opens a dialog where you can set how often Email checks for new email sent to
this account.
Opens a dialog where you set to see mail head only, whole mail or ignore all
attachments.
Use this account’s outgoing email server for the email you compose and send
when you are not currently viewing or working with email from a specific
account.
Page 52

52
Set whether you want to receive notifications when you receive new email sent
to this account.
Select a ringtone for sound when you receive an email notification for this
account.
Opens a dialog where you can set the phone to vibrate whenever you receive
an email notification for this account, only when the phone is in Silent mode or
never.
Opens a screen where you can configure settings for how you receive email for
this account. See “Incoming server settings”.
Opens a screen where you can configure settings for how you send email from
this account. (Microsoft Exchange ActiveSync accounts do not have separate
outgoing server settings.) See “Outgoing server settings”.
Incoming server settings
Your account’s incoming settings are different, depending on the kind of email service for the account:
Exchange ActiveSync, IMAP or POP3.
Settings for Microsoft Exchange ActiveSync accounts:
Domain\Username
If your Exchange ActiveSync server requires that you specify a
domain, enter it before the backslash. Otherwise, just enter your
username (the part before the @example.com in your email
address) after the backslash. (The backslash is optional if you’re just
entering your username; Email enters the correct syntax for
Password
domains and usernames when communicating with the server.)
The password for your email account.
Server
Use secure connection (SSL)
Accept all SSL certificates
The fully resolved hostname of the Exchange ActiveSync server, for
example, owa.example.com.
Check this option if your Exchange ActiveSync server requires you
to connect to the server securely or if you prefer to connect
securely.
Check this option if you want to accept a server certificate from
your Exchange ActiveSync server that is self-signed, out of date or in
some other way not accepted by the Email application.
Page 53

53
Settings for IMAP accounts:
Username
Depending on the requirements of your email service provider, use
your full email address or just your username (it means the part
before @example.com in your email address).
Password
The password for your email account.
POP3 server
The fully resolved domain name of your email service provider’s
POP3 server (for example, pop3.example.com)
Port
Set the Security type first to enter the typical server port number in
this field automatically OR enter a different port number if your
email service provider requires it.
Security type
Select the security type required by your email service provider.
Select the option Accept all certificates for your security type to
accept a server certificate from your POP3 server that is self-signed,
out of date or in some other way not accepted by the Email
application.
Delete email from server
Use to configure Email to cause your email service provider to
delete from its server any email you delete in the Email application
or to never delete email from the server.
Username
Password
IMAP server
Port
Security type
IMAP path prefix
Settings for POP3 accounts:
Depending on the requirements of your email service provider, use
your full email address or just your username (it means the part
before @example.com in your email address).
The password for your email account.
The fully resolved domain name of your email service provider’s
IMAP server. (for example, imap.example.com)
Set the Security type first to enter the typical server port number in
this field automatically OR enter a different port number if your
email service provider requires it.
Select the security type required by your email service provider.
Select option Accept all certificates for your security type to accept
a server certificate from your IMAP server that is self-signed, out of
date or in some other way not accepted by the Email application.
Leave blank unless instructed to enter a specific prefix by your
email service provider.
Page 54

54
Outgoing server settings
If you use an IMAP or POP3 account for receiving email, you typically use an SMTP server to send email
from that account. Microsoft Exchange ActiveSync accounts do not have separate outgoing server settings.
SMTP server
The fully resolved domain name of your email service provider’s
SMTP server (for example, smtp.example.com).
Port
Security type
Set the Security type first to enter the typical server port number in
this field automatically OR enter a different port number if your
email service provider requires it.
Select the security type required by your email service provider.
Select the option Accept all certificates for your security type to
accept a server certificate from your SMTP server that is self-signed,
out of date or in some other way not accepted by the Email
application.
Require sign-in
Check this option to enter a username and password for your SMTP
server, if your email service provider requires that you enter them
to send email.
Username
Password
Your username on the SMTP server (this may not be the same as
your username on the POP3 or IMAP server for incoming mail).
Visible only if Require sign-in is checked.
Your password on the SMTP server (this may not be the same as
your username on the POP3 or IMAP server for incoming mail).
Visible only if Require sign-in is checked.
Page 55

55
Gmail
Gmail is Google’s web-based email service. When you first set up your phone, you configured it to use an
existing Gmail Account or you created a new account. The first time you open the Gmail application on
your phone your Inbox contains the messages from your Gmail Account on the web.
Opening Gmail and your Inbox
When you open Gmail, your most recent conversations are displayed in your Inbox.
When you return to Gmail after using other applications, the last screen you were working with is
displayed.
Open Gmail
Touch the Gmail icon on the Home screen or in the Launcher.
See “Opening and switching applications”.
Your Inbox displays those conversations with the newest messages at the
top. All of your conversations are displayed in your Inbox unless you
delete, archive or filter them.
If you change your preferred inbox to the Priority Inbox in Gmail in the
web, you can also view it and set it as your default inbox in Gmail on your
phone. See “Working with Priority Inbox”.
The current Google Account is displayed at the top right of the Inbox. If
you have more than one account, touch the current account to switch
accounts as described in “Switch accounts”. Adding and working with
accounts is described in “Accounts”.
Conversations with new messages have bold subject lines. To read a
message in a conversation, touch its subject. See “Reading your messages”.
indicates messages sent directly to you.
indicates messages that you were Cc’d on.
Other messages were sent to you as part of a
If you are using Priority Inbox, messages in conversation lists may also
indicate whether Gmail or you have marked them as important (see
“Working with Priority Inbox”):
Important messages are marked with a yellow icon:
indicates important messages sent directly to you. indicates
important messages that you were Cc’d on. indicates
important messages that you received as part of a group.
group.
Page 56

56
Open your Inbox when Gmail is running
Press Back until you return to your Inbox.
OR
When reading a message, press Menu and touch Go to Inbox.
OR
When viewing a list of labeled conversations, press Menu and touch More > Go to Inbox.
If you have Priority Inbox set as your default inbox, your Priority Inbox opens instead of your Inbox (see
“Working with Priority Inbox”).
Switch accounts
Gmail displays conversations, messages and settings from one Google Account at a time. If you have more
than one account, you can open the Accounts screen to view how many unread messages you have in each
account and to switch accounts.
Adding and configuring accounts are described in “Accounts”.
From your Inbox, touch the current account at the top right of the screen
or press Menu and touch Accounts.
Each account is listed, along with the number of unread messages in your
Inbox or Priority Inbox, depending on which inbox is your default.
The default inbox for each account is also displayed (see “Working
with Priority Inbox”).
Touch the account that contains the email you want to read.
The account's Inbox or Priority Inbox opens, depending on the default
inbox you set.
Use Gmail offline
If you aren’t connected to a mobile data or Wi-Fi network (for example, if you're in Airplane mode), you
can use Gmail to read or reread the messages currently synced to your phone (see “Synchronizing your
conversations by label”) and to compose messages.
Messages that you send are stored on your phone with the Outbox label, until your connection is restored,
when they are sent automatically. You can view the messages stored with the Outbox label; see “Viewing
conversations by label”.
Page 57

57
Reading your messages
When viewing a list of conversations in your Inbox or in any list of labeled conversations, you open a
conversation to read its messages.
Gmail “pushes” new messages to your phone automatically: you don’t need to refresh your Inbox manually
(but see “Synchronizing your conversations by label”).
When you receive a new message, you also receive a notification in the Status bar, unless you’ve turned off
Gmail notifications using Gmail settings, where you can also set whether Email notifications vibrate the
phone and other settings (see “Changing Gmail settings”). If you’re using Priority Inbox as your default
inbox, you only receive notifications for important messages (see “Working with Priority Inbox”). When you
touch a Gmail notification, it opens the Inbox that contains the new message or, if you have new mail in
more than one account, it opens the Accounts screen.
Read a message
Touch a conversation that contains the message you want to read.
A conversation opens to the first new (unread) message or to the first starred message, if you’ve previously
starred a message in the conversation. See “Starring a message”.
The message header shows who sent the message, when, who it was sent to and other information. Icons
indicate whether the message has an attachment and the sender’s Google Talk online status. For more
information touch Show details. You can touch the message sender’s Quick Contact icon to open a list of
ways you can quickly contact the sender. See “Connecting quickly with your contacts”. When reading
messages in a conversation, you can use the buttons at the bottom of the screen to archive the entire
conversation (see “Archiving conversations”) or to delete it. If you delete a conversation, you can touch
Undo in the bar at the top of the screen to undelete it. (Conversations you delete from the Trash label are
not deleted in Gmail on the web.)
Use the left and right arrow buttons at the bottom of a message to open the next or previous conversation
in the Inbox.
Work with attachments
Gmail can display some kinds of attached images in a message. Others have a Preview or Download button
you can use. Depending on the applications installed on your phone, you may also be able to download and
read a variety of kinds of files, including spreadsheets (.xls), word documents (.doc), or PDF files (.pdf). Other
applications may add support for opening other kinds of file. Attachments you download are stored on your
phone’s USB storage or SD card. Image files are added to albums in Gallery. Viewing, reopening and deleting
this conversation has one label. Touch to view the sender and the first line of messages that you’ve already
read.
You can archive or delete the entire conversation or open the next or previous conversation. Touch to
quickly contact the sender by Google Talk, by phone or in other ways.
Page 58

58
Copy text from a message
You can copy text from messages you receive, so you can paste it into a message you compose or into text
fields in other applications.
Open a message and scroll the text you want to copy into view. See “Reading your messages”.
Press Menu and touch More > Select text.
Use your finger to drag across the text you want to copy.
The text you selected is copied to the clipboard. You can now use the techniques described in “Editing text” to paste
the copied text into a message you compose or into a text field in another application.
Reread a message
When you open a conversation, messages that you’ve already read are hidden in a tab that indicates the number of
hidden messages.
Touch the tab that indicates the number of previously read messages. The tab expands into tabs that list the sender
and the first line of each read message.
Touch an expanded tab to reread the message.
When reading a message or when its tab is selected, you can press Menu and touch Mark unread to return a read
message to the unread state—for example, to remind yourself to read it again later.
Compose and send a message
You can compose and send a message to one or more people or groups with Gmail or other email addresses. When
viewing the Inbox or other list of conversations, press Menu and touch Compose.
Set the address you want to send the email from.
The Gmail account you are sending the email from is displayed at the top
of the screen. If you have more than one Gmail account, you can touch the
displayed account to pick the one you want to send the message from.
Address the
Enter a subject for the message.
Enter the text of the message.
Touch the Send
If you’re not ready to send the message, touch the Menu and Save
Draft icon instead. You can read your drafts by opening messages with
the Draft label. See “Viewing conversations by label”.
You can also press Menu and touch Discard to abandon the message,
including any saved drafts.
If you aren’t connected to a network—for example, if you’re working in
Airplane mode—the messages that you send are stored on your phone
with the Outbox label until you connect to a network again.
message.
icon.
Page 59

59
Send a copy or blind copy of a message
You can send a copy or blind copy of a message to one or more addresses.
While composing a message, press Menu and touch Add Cc/Bcc to add Cc and Bcc fields you can enter
addresses in. These filed work the same way as field “To”.
Attach a photo to a message
While composing a message, press Menu and touch Attach to send a photo with the message.
See “Gallery” to learn more about working with photos.
Important note! Do not delete the original of an attachment before the message is completely sent (that is,
it has the Sent label, not the Outbox label) or the attachment will not be sent.
If you change your mind, touch the small box to the right of an attachment to remove it from your
message.
Replying to or forwarding a message
You can continue a conversation by replying to a message or by forwarding
it.
Touch the arrow button to Reply to message. A new window for
composing message appears. When you finish your reply (See more in
“Enter your reply” in the next page), press Reply button on the left up
corner.
If you wish to Reply to all or Forward the message touch the triangle
button and additional options will appear.
Choose one and send the
message.
Replying to or forwarding messages without changing the subject adds your reply to the current
conversation.
Changing the subject starts a new conversation. The message opens in a new screen where you can add or
remove addresses, edit the subject and add or remove text or attachments as described in “Composing and
sending a message”.
Enter your reply.
Uncheck to send your reply without including the original message. Touch to convert quoted text to text
only and interleave your response with the original. Touch to send your response or to save it as draft.
Touch to change whether you are replying, replying to all, or forwarding.
Page 60

60
Working with Priority Inbox
If you have configured Gmail on the web to show Priority Inbox, you can configure Gmail on your phone to
show it as well. You can also set Priority Inbox as your default inbox.
Open Priority Inbox
Priority Inbox is a list of conversations that Gmail or you have labeled important and that are also in your
Inbox: they are new or you haven’t archived them or moved them to another label by hand or with a filter.
Touch the label at the top of any conversation list and then touch Priority Inbox OR Touch Priority Inbox in
the Labels screen. See “Viewing conversations by label” OR Press Menu and touch the Go to Inbox menu
item, available on many Gmail screens, if Priority Inbox is your default inbox.
Set Priority Inbox as your default inbox
This setting is only available in Gmail on your phone if you have configured Gmail on the web to show
Priority Inbox.
Open your Inbox, press Menu and touch More > Settings > choose Gmail you want to set Priority Inbox in >
Check Priority Inbox.
Mark a conversation as important
Check one or a batch of conversations that are not marked important or open a conversation that is not
marked important.
Press Menu and touch the Mark important. The messages are added to your Priority Inbox and Gmail
learns about what conversations you consider important.
Mark a conversation as not important
Check one or a batch of conversations that are marked important or open a conversation that is marked
important.
Press Menu and touch the Mark not important.
The messages are removed from your Priority Inbox and Gmail learns about what conversations you
consider less important. If you opened the conversation from your Priority Inbox, you are returned to the
Priority Inbox immediately.
Working with conversations in batches
You can archive, label, delete or perform other actions on a batch of conversations at once in your Inbox or
in another labeled list of conversations.
In the Inbox or other conversation list, check the conversations that you want to work with as a batch.
When you check a conversation, the Archive, Delete and Labels buttons appear at the bottom of the
screen.
Touch Archive, Delete or Labels OR press Menu and touch Add star, Report spam, Mute, Mark read/Mark
unread or Deselect all.
If you are using Priority Inbox, you can also mark conversations important or not important in the menu
(see “Working with Priority Inbox”). Your action affects the entire batch of messages. If you delete a batch
Page 61

61
of conversations, you can touch Undo in the green bar at the top of the screen to undelete them. You can
Label a conversation
While reading a message touch Menu and then Change labels.
New dialog opens.
Check the labels you would like to assign to your message.
Touch OK.
Label a batch of conversations at
once
You can assign or change the labels of one or more conversations at
once.
In your Inbox or other conversation list, check the conversations to
label.
Touch the Labels button at the bottom of the screen.
In the dialog that opens, check the labels to assign to the
conversation. Touch OK.
also use Undo after muting, archiving and reporting spam.
If you never work with batches of messages, you can hide the checkboxes to leave more room for the
subjects of conversations. See “Changing Gmail settings”.
Check conversations to add them to the batch
Touch a button to act on the batch or press Menu to act on the batch in other ways.
Starring a message
You can star an important message to make it easy to locate again. Conversations with starred messages
display a star in your Inbox and other conversation lists. To view just conversations with starred messages,
see “Viewing conversations by label”.
Star a message
While reading a message, touch the star in its header.
OR
While viewing a list of messages in a conversation list, touch a message’s star.
The star turns gold.
Unstar a message
Touch its star again.
Unstar all messages in a conversation
Touch the conversation’s star in a conversation list.
Labeling a conversation
You organize conversations by labeling them. Gmail has several built-in labels. You can add your own labels
and assign them colors by using Gmail on the web (custom label colors you create on the web are not
supported in Gmail on the phone).
Viewing labeled conversations is described in “Viewing conversations by label”
Page 62

62
Change a conversation’s labels
When reading a conversation’s messages, press Menu and touch
Change labels.
You can also change the labels of a batch of conversations, in the
same way that you label a batch of conversations, by touching the
Labels button.
In the dialog that opens, check or uncheck the labels.
Touch OK.
Viewing conversations by label
When viewing your Inbox or another conversation list press Menu
and touch Go to labels.
Your labels are presented in a scrolling list.
Touch a label to view a list of conversations with that label.
The conversation list resembles your Inbox, but the label replaces
“Inbox” at the top left of the list. You work with labeled
conversation lists in the same way that you work with your Inbox.
Synchronizing your conversations by label
The Gmail webmail service has the resources to store all the messages you’ve ever sent or received; your
phone does not. To save space, Gmail downloads only some of your messages to your phone. You can set
which conversations’ messages are kept current on your phone, by label and what portion of those
conversations and by time.
Use the Settings application to control how and when applications synchronize their data. See “Accounts &
sync settings”.
Select which labels to synchronize
Open your Inbox.
Press Menu and touch More > Settings > Choose the account < Labels.
The Synchronization settings screen opens, displaying a list of your Gmail labels, for the account listed at
the top of the screen. Below each label is its current synchronization setting: Sync all, Sync 4 days or no
label (not synchronized).
Touch a conversation label whose synchronization settings you want to change.
A dialog for that conversation label opens, with three options:
Sync none - Don’t download any conversations that have only this label.
Sync 4 days - Download the previous 4 (or number of days you set) of conversations.
Sync all - Download all conversations with this label.
Set how many days to synchronize
Open your Inbox.
Press Menu and touch More > Settings > Labels.
Touch Number of days to sync.
Enter the number of days and touch OK.
Page 63

63
Reporting spam
The Gmail webmail service is quite effective at preventing spam (junk mail) from reaching your Inbox. But
when spam does make it through, you can help improve the Gmail service by reporting the conversation as
spam.
Report a conversation as spam
While reading the conversation's messages, press Menu and touch More > Report spam OR check one or a
batch of conversations in your Inbox or other conversation list, press Menu and touch Report spam.
When you report a conversation as spam, the conversation and all its messages are removed from your
Inbox. You can view the messages you’ve marked as spam by viewing messages with the Spam label. See
“Viewing conversations by label”.
Searching for messages
You can search for messages that contain one or more words in their contents or in their addresses,
subjects, labels and so on. When you search for messages, all of the messages in your Gmail account on the
web are included (except those labeled Trash or Spam), not just those that you’ve synchronized onto your
phone. For this reason, you must have a data connection to search for messages in Gmail.
You can also use the advanced search options that are described on the Gmail website.
In the Inbox, press Menu and touch Search, or press the Search button.
Enter the word or words to search for and touch the Go button on the onscreen keyboard or the
magnifying glass icon at the right of the search box OR touch words you searched for previously, in the list
below the search box.
A conversation list opens, displaying all of the conversations with messages that contain the words you
searched for. The words you searched for are displayed in the title bar.
You work with the conversations in this list just as you would with the conversations in your Inbox or any
other conversation list.
When you open a conversation in a search result list, the word you searched for is highlighted wherever it
occurs in the conversation’s messages.
Words you search for are stored by the phone and suggested for later Gmail searches. You can erase these
stored words with Gmail settings; see “Changing Gmail settings”.
Archiving conversations
You can archive conversations, to move them out of your Inbox without deleting them. Archived
conversations are assigned the All Mail label and they retain any other labels you’ve assigned to them. See
“Viewing conversations by label”. They’re also included in search results. If someone replies to a message
that you’ve archived, its conversation is restored to your Inbox.
While viewing a list of conversations, touch & hold a conversation and touch Archive in the menu that
opens
OR check one or more conversations in your Inbox or other conversation list and touch Archive OR touch
Archive at the bottom of the screen when reading a message.
Page 64

64
Appending a signature to your messages
You can append one or a few lines of plain text to every message you send from your phone, such as your
name, contact information, or even “Sent by Prestigio MultiPhone.” This signature is independent of any
signature you append to messages you send from Gmail on the web.
Open your Inbox or another labeled list of conversations.
Press Menu and touch More > Settings > Signature.
Enter a signature.
Touch OK.
Enter a signature to append to your messages; then touch OK.
Changing Gmail settings
You can change a number of settings for Gmail. Each Gmail account has its own settings, so your changes
affect only the current account. See “Switch accounts”.
Notification volumes and some synchronization settings are changed in the Settings application. See
“Settings”.
To change Gmail settings, open your Inbox, press Menu and touch More > Settings and select an account
you want to set. .
General Settings
Check to make Priority Inbox your default inbox, so it opens when you start
Gmail with new messages (instead of Inbox). See more in chapter “Working
with Priority Inbox”
Opens a dialog where you can enter text to append to every message you
send. See “Appending a signature to your messages”.
Opens a dialog where you can check which actions open a dialog asking you
to confirm that action: archiving, deleting, and sending messages.
When checked, replaces the Reply button in message headers with the
Reply all button, so you don’t need to touch the arrow to access it.
Set which screen opens when you delete or archive a conversation whose
messages you are viewing: the messages in the next/previous conversation,
or the Inbox or other conversation list you’re working with.
Opens a dialog where you can select the size of text in the messages you
read.
When checked, adds a check box to the left of each conversation, so you
can add it to a batch. See “Working with conversations in batches”.
Touch to remove the history of the words you’ve searched for previously in
Gmail in any account. See “Searching for message”.
Page 65

65
.
4 Entertainment
Camera
Camera is a combination camera and camcorder that you use to shoot and share pictures and videos.
Pictures and videos are stored on the phone’s SD card. Copy your pictures and videos to a computer, as
described in “Connecting to a computer via USB”. View your pictures and videos on the phone, edit them,
share them and so on with Gallery. See “Gallery”.
Opening Camera and taking pictures or videos
Take pictures and shoot videos with Camera. Camera’s many settings are described in “Changing Camera
settings”. Also view your pictures with the Gallery application, as described in “Gallery”.
Important note: Be sure to clean the protective lens cover with a microfiber cloth before taking pictures.
A lens cover with smudges from fingers can cause blurry pictures with a “halo” effect.
Open Camera
Touch the Camera icon in the Launcher or on the Home screen.
Camera opens, ready to take a picture or shoot a video.
Touch setting to change them.
Touch to preview your pictures or videos in Gallery.
Drag up to shoot videos; drag down to take photos
Touch to take a picture or shoot a video.
Take a picture
If necessary, drag the control to the Camera position.
Adjust your exposure, flash, and other settings if you wish. Or
leave them on automatic. See “Changing Camera settings”. The
preview image changes as you change the settings.
Frame your subject on screen.
Select Camera icon or zoom in or out by touching the Zoom icon
1x and then touching a zoom level.
Touch the onscreen Shutter icon.
The picture you just took is displayed for a moment, and then is
displayed as a thumbnail. Touch the thumbnail to view, share,
and work with your pictures in Gallery. See “Gallery”.
Page 66

66
Take pictures with digital zoom
Shoot a video
Zoom in or out of a scene before taking a picture.
Touch the onscreen Zoom icon 1x and then touch the amount of
zoom you want.
OR
Pinch the screen to zoom all the way in or out.
Pictures that you take with digital zoom may be smaller (in pixels)
than the size you set with the Picture Size setting. See “Camera
mode settings”.
If necessary, drag the control to the Video position.
Adjust the quality, color effect, flash, and other settings if you
wish. Or leave them on automatic.
See “Changing Camera settings”. The preview image changes as
you change the settings. Point the lens to frame the scene where
you want to start.
Touch the onscreen Start Video icon.
Camera starts shooting the video. The time remaining to shoot
counts down at the
left; when less than a minute is left, the countdown turns red.
Touch the Stop Video icon to stop shooting.
An image from your most recent video is displayed as a thumbnail
at the top right.
Touch the thumbnail to view, share, and work with your videos in
Gallery. See “Gallery”.
Changing Camera settings
Camera has automatic settings that you can use to take quick point-and-shoot photographs and videos. But
Camera also offers a number of ways to control your exposures, including controlling the focus, turning the
flash on and off and adjusting the white balance. You can even shoot negatives and other special effects.
When in Video mode, Camera includes settings for controlling picture and video quality and video length,
whether to store the location where you take your pictures and so on.
The settings in Camera depend on the features supported by your phone.
Change Camera settings
Open the Camera screen for taking pictures or shooting videos and touch the icon for the settings you want
to change.
The settings open over the screen.
Touch the setting category you want to control and then touch a setting.
Camera settings are described in “Camera mode settings”. Video settings are described in “Video mode
settings”.
Press Back to close the Settings menus.
Page 67

67
Camera mode settings
When in Camera mode, Camera settings are displayed on screen.
Settings Touch to open a scrolling list of settings:
Focus mode
Exposure
Touch to set Camera to use its Autofocus feature (Auto), or to more quickly
take pictures focused at infinity (Infinity) or close-ups (Macro).
Touch to adjust the exposure.
Scene mode
Picture size
Picture quality
Color effect
Restore to defaults
Touch to select a preset combination of camera settings designed
for special scenes, such as the beach or fireworks displays.
Touch the size (in pixels) of the pictures you take. For phones that support
this size, VGA is 640x480 pixels.
Touch the quality of the pictures you take (that is, the trade-off you prefer
between picture quality and file size that Camera uses when compressing the
photo into a file).
Touch a special effect for your shots, such as monochrome, sepia tone, or
negative.
Touch to restore all of Camera’s settings to their default values.
Store location
Check to include the location of each picture you take, using the phone’s GPS.
Location stored with photo
Location not stored with photo
White balance
Touch to select how Camera adjusts colors in different kinds of light, to achieve the most natural-looking
colors for your shots. Or allow Camera to adjust the white balance automatically.
Automatic
Incandescent
Daylight
Fluorescent
Cloudy
1x Zoom Touch to zoom from 1x to 4x.
Page 68

68
Video mode settings
As in Camera mode, Video mode settings are displayed on screen.
Settings Touch to open a scrolling list of settings:
Color effect
Touch a special effect for your videos, such as Monochrome, Sepia tone or
negative.
Restore to defaults
Touch to restore all of Camera’s settings to their default values.
White balance
Touch to select how Camera adjusts colors in different kinds of light, to achieve the most natural-looking
colors for your videos. Or allow Camera to adjust the white balance automatically.
Automatic
Incandescent
Daylight
Fluorescent
Cloudy
Flash mode Touch to illuminate your video by turning on the flash lamp.
Gallery
Use Gallery to view pictures and play videos that you’ve taken with Camera, downloaded, or copied onto
your SD card or USB storage (depending on your model of phone). You can also view pictures in Picasa web
album. You can perform basic editing tasks on pictures and set them as your wallpaper or contact picture.
You can also share your pictures and videos with friends, via email or messaging, or by
uploading them to the Picasa and YouTube web sites.
Open Gallery and view your albums
Touch the Gallery icon in the Launcher or on the Home screen.
OR
OR
Open Gallery from Camera by touching the thumbnail image at the top
right.
Open Gallery from Camera by pressing Menu and touching Gallery.
Gallery presents the pictures and videos on your SD card or USB storage (depending on your model of
phone), including those you’ve taken with Camera and those you downloaded from the web or other
locations.
If you have a Picasa account associated with a Google Account that you’ve added to your phone and if you
Page 69

69
have configured it to sync with Picasa, Gallery also presents your Picasa web albums. See “Configuring
account sync and display options”. If you have a great many pictures or videos on your SD card or USB
storage or in Picasa web albums, it may take Gallery a few minutes when you open it to discover and
organize them.
Touch to open
Touch in any view to return to the main Gallery screen.
Camera
An album of the photos and videos you took with Camera.
A Picasa web
Slide left or right to view more albums.
Peek into a stack by touching it with two fingers and spreading them
apart.
Touch an album to open it and view its contents.
The name of the album and source is written in left up corner
Drag the Album View switch to the right to view the contents of the
album in stacks OR drag the Album View switch to the left to view the
album contents in a chronological grid again.
Stacks are sorted by the date and location where you took them.
Touch an arrow in the scroll tool at the bottom of the screen to scroll
images screenful at a time.
Drag the scroll tool to the left or right to scroll more or less quickly. The
date of the images in view is displayed, so you can scroll by date.
You can also scroll through an album by swiping left or right.
Work with batches of pictures or videos
In addition to working with whole albums and with individual pictures, you can select one or more pictures
or videos in an album to work on them in batches—for example, to send a few pictures from an album to a
friend.
Open the album to view the pictures and videos to work with.
album
.
Press Menu twice.
Check or uncheck the items you want to work with.
You can uncheck all items you’ve checked by touching Deselect All at
the top right of the window.
Use the controls at the bottom of the screen to act on the checked
items. The controls available depend on the mix of items you’ve
selected.
Page 70

70
Share an album
You can share the entire contents of one or more albums. You can also share individual images or videos
from an album, as described in chapters “Working with pictures” and “Working with videos”.
Open the main Gallery window.
Press Menu twice.
Check or uncheck the albums you want to share.
Touch Share at the bottom of the screen. In the menu that opens, touch
the application to use to share the selected albums.
The application that you selected opens with the pictures from the
selected albums or links, attached to a new message. For information
about addressing and sending the message, see the section on that
application.
Important note: If you are sharing an album via Gmail, do not delete the original of an attachment
before the message is completely sent (that is, it has the Sent label, not the Outbox label), or the
attachment will not be sent.
Get details about pictures in the album
Read details about the pictures – title, type of picture, the date the pictures were taken, the name of the
album, latitude and longitude, if known.
While in the album, open a picture, press Menu, touch More and in the menu that opens, touch Details.
Delete an album
You can delete an album and its contents from your SD card or USB storage.
While viewing an album, press Menu twice.
Check or uncheck the albums you want to delete.
Touch Delete at the bottom of the screen. In the dialog that opens, touch Confirm Delete.
Working with pictures
Use Gallery to view pictures that you’ve taken with Camera, downloaded, copied onto your SD card or that
are stored in Picasa web albums. You can also edit the pictures on your phone and share them with friends.
Page 71

71
View and browse pictures
Open a Gallery album and touch a picture.
Turn the phone to view the picture in upright (portrait) or sideways
(landscape) orientation.
The picture is displayed (but not saved) in the new orientation.
Touch the picture to view the Zoom and other controls.
Touch a Zoom icon, double-tap the screen, or pinch two fingers together
or spread them apart to zoom in or out.
When the picture is zoomed in, drag the picture to view parts that are
not in view.
When the picture is zoomed to fit in the window, drag left or right to
view the next or previous picture in the album.
Touch a picture to view the controls and touch Slideshow and watch a
slideshow of your pictures
Rotate a picture
Touch a picture to view the controls and touch Menu > More.
A menu opens with tools for working with the picture.
Touch Rotate left or Rotate right.
The picture is saved with the new orientation.
Use a picture as a contact icon or as Home screen wallpaper
Touch the picture to view the controls and touch Menu >More >Set as.
Options are to set picture as:
Contact icon – if you select this option, you’re prompted to select the
contact to associate with the picture and then crop the picture.
Wallpaper - if you select this option, you’re prompted to crop the
picture.
Crop a picture
You can save a zoomed-in portion of a picture by cropping it. You can
only crop pictures that are on your SD card or USB storage (not those,
for example, in a Picasa web album).
Touch a picture to view the controls and touch Menu >More> Crop.
The cropping rectangle appears on top of the picture.
Use the cropping tool to select the portion of the picture to crop.
Drag from the inside of the cropping tool to move it.
Drag an edge of the cropping tool to resize it to any proportion.
Drag a corner of the cropping tool to resize it with fixed proportions.
Touch Save to save a copy of the picture as you cropped it.
The original uncropped version is retained.
Page 72

72
Delete a picture
You can delete a picture from your SD card or USB storage.
Touch a picture to view the controls and touch Menu.
Touch Delete.
Touch OK in the dialog that opens.
Working with videos
Use Gallery to play videos that you’ve taken with Camera and to share them.
Play
videos
Open a Gallery album and touch a video.
The video plays with the orientation (portrait or landscape) you shot it
in.
Opening albums is described in “Opening Gallery and viewing your
albums”.
Touch the video to view the playback controls.
Share a video
You can share a video by sending it in an email or with a multimedia (MMS) message.
MMS messages have size limits, typically 3MB, or approximately 1 minute of high quality video or 2
minutes of low-quality video. See “Changing Camera settings”. You can also share a video by uploading it to
the YouTube web site.
While viewing an album, press Menu twice.
Check the videos or pictures to share.
Touch Share.
In the menu that opens, touch the application to use to share the selected videos. The application you
selected opens with the video attached to a new message. If you selected YouTube, you’re prompted to
enter details about the video to upload.
For more information, see the section on that application.
Important note: If you are sharing one or more videos via Gmail, do not delete the originals before the
message is completely sent (that is, it has the Sent label, not the Outbox label), or the
attached videos will not be sent.
Delete a video
While viewing an album, press Menu twice.
Check the videos or pictures to delete.
Touch Delete.
Touch Confirm Delete.
Page 73

73
Music
Use Music to organize and listen to music and other audio files that you transfer to your SD card from your
computer.
Transferring music files to your phone
Music plays audio files that are stored on your phone’s SD card or USB storage so before you open Music,
you must copy audio files from your computer.
Music supports a wide variety of audio file formats, so it can play music that you purchase from online
stores, music that you copy from your CD collection and so on.
Music supports audio files in numerous formats, including MP3, M4A (iTunes application AAC, DRM-free),
AMR , MIDI and OGG Vorbis.
Copy music files from your computer
Connect the phone to your computer with a USB cable.
Warning! To prevent damage to your files, follow your computer’s instructions for unmounting
USB devices and the instructions in “Connecting to a computer via USB”.
Opening Music and working with your library
After you’ve copied some music onto your USB storage or SD card , as described in “Transferring music files
to your phone”, or downloaded music from another source, you can open Music and see your library of
music files, sorted in one of four ways.
New notification appears on your phone. Open and tap on notification.
Turn on USB
Open removable disk on your computer and click on Open folder to view
files.
On your computer open Media folder and open audio folder. Search for
your music in your computer and paste files in audio folder. You can also
create subfolders in audio folder and create playlists.
Turn off USB storage on your phone and disconnect the phone.
storage.
Page 74

74
Open Music and view your music library
Touch the Music icon in the Launcher or on the Home screen.
Music library screen opens, with tabs that you can touch to view your music library organized by Artists,
Albums, Songs, or Playlists.
Touch a tab to view your library in one of four ways.
Touch button to see how many song are on the album.
Delete a song from the SD card or USB storage
Note: When your phone is connected to a computer, you can also delete music files, as described in
“Transferring music files to your phone”.
Touch to see list of songs in the album.
Touch the summary of the current track to open the Playback screen.
You can return to the main Library screen from most other screens in
the Music application by pressing Menu and touching Library.
Touch & hold a song in a library list. In the menu that opens, touch
Delete.
OR
On the Playback screen, press Menu and touch Delete.
Page 75

75
Playing music
You can listen to music by using the phone’s built-in speaker, through a wired headset, or through a
wireless Bluetooth stereo headset that supports the A2DP profile.
Play music
Touch a song in your library to listen it.
OR
While viewing a list of tracks in an album, press Menu and touch Play
The Playback screen opens and the song you touched or the first song in the album or other playlist starts
to play. The tracks in the current playlist play in order until you reach the end of the playlist (unless you
choose a repeat option).
Control playback
The Playback screen contains several icons that you can touch to control the playback of songs, albums
and playlists:
Touch to pause playback.
all.
Touch to resume playback.
Touch to skip to the next track in the album, playlist or
shuffle.
Touch to skip to the previous track in the album, playlist or
shuffle.
Touch to open the current playlist.
Touch to play the current playlist in shuffle mode (tracks are
played in random order).
Touch to toggle repeat mode: Don’t repeat, Repeat the
playlist, or Repeat the current track.
Otherwise, playback stops only if you stop it, even when you switch applications or receive a phone call.
You can return to the Playback screen from other screens in the Music
application by pressing on the track on the bottom of the screen.
You can return to the Playback screen from any other application by
opening the Notifications panel and touching the ongoing music
notification.
Page 76

76
Control playback volume
In addition to the techniques for setting media volume described in “Sound settings”, you can control the
volume of music in the Music application.
Press the phone’s Volume Up/Down button.
A panel opens to show the current media volume; the indicator moves
as you adjust the volume.
Play your tracks in a party shuffle
When you turn on Party Shuffle, Music plays tracks in random order, until you turn Party Shuffle off.
Use a song as a ringtone
You can use a song as your phone ringtone, in place of one of the ringtones that come with the phone.
In the Playback or a Library screen, press Menu and touch Party shuffle.
Music creates a current playlist of a dozen tracks selected randomly and
starts playing them. When it finishes playing the first dozen tracks, it
adds another dozen and keeps playing.
View the current playlist that Party Shuffle is playing by touching the
Playlist icon on the Playback screen.
Add a track to the end of the Party Shuffle playlist by touching & holding
the name of a track in your library. In the menu that opens, touch Add
to playlist and then Current playlist.
The track is added to the end of the Party Shuffle playlist.
Stop Party Shuffle by pressing Menu and touching Party shuffle off.
Touch & hold a song in a library list. In the menu that opens, touch Use
as phone ringtone.
OR
On the Playback screen, press Menu and touch Use as ringtone.
Page 77

77
Working with playlists
You can create playlists to organize your music files into sets of songs, which you can play in the order you
set or in a shuffle mode.
Create a playlist
When viewing a list of songs in the library, touch & hold the first song you want to add to the new
playlist.
Touch Add to playlist.
Touch New.
Enter a name and touch Save.
The new playlist is added to the Playlist library.
You can also add the song that is playing in the Playback screen as the first song in a playlist by pressing
Menu and touching Add to playlist. Or touch Save as playlist to save all the songs in an album that
you’re playing as a playlist.
Add a song to a playlist
While viewing a list of tracks in the Library, touch & hold a song to add it to a playlist.
Touch Add to playlist.
Touch the name of the playlist to add the song to. The song is added to the playlist.
Remove a song from a
You can also add the song that is playing in the Playback screen to a playlist by pressing Menu and
playlist
touching Add to playlist.
Open a playlist.
Touch & hold a song and then touch Remove from playlist. The song isn’t deleted from your phone or
other playlists; it’s removed only from the playlist you’re working with.
Rename or delete a playlist
Open the Playlist library.
Touch & hold a playlist. In the menu that opens, touch Rename or Delete.
You can’t delete or rename the Recently Added playlist.
No songs are harmed by deleting a playlist.
Page 78

78
5 Web
Accessing the Internet
Use Browser to view webpages and to search for information on the web.
Opening Browser
Use Browser to surf the web. Some websites have two versions of their sites: full-size for computer-based
web browsers and another for mobile devices. They may allow you to switch back and forth. Full-size sites
are often harder to navigate on a mobile browser than sites designed for use on mobile devices.
Open Browser
Touch the Phone icon at the bottom of the Home screen or the Browser icon in the Launcher or on
Home screen.
Browser also opens when you touch a web link—for example, in an email or text message.
When you open Browser, the last webpage you were viewing is displayed. If you have not used Browser
recently, your Prestigio home page opens.
The web address (URL) of the current page is displayed at the top of the window, unless a mobile site
scrolls the URL bar off the top of the screen (if so but you can drag the page down or press Menu to see it
again).
Open a webpage or search the web
Touch the URL box at the top of the Browser screen.
Enter the address (URL) of a webpage. Or enter terms you want to
search for. As you enter text, your web search engine makes suggestions
of webpages and queries.
You can set the web search engine you want to use. See “Changing
Browser
Touch a suggestion or enter an address and touch the arrow icon.
If you touch a suggested page or enter an address and touch the arrow
icon , that webpage opens.
If you touch a suggested query, your web search engine opens with the
results.
settings”.
Page 79

Refresh the current page
Press Menu and touch Refresh.
The webpage is reopened, updating any content that has changed.
Stop opening a page
If a webpage is taking a long time to open, or if you change your mind, you can stop it from opening.
Touch the Cancel icon to the right of the URL
OR
Press Menu and touch Stop.
Get more information about the current page
Press Menu and touch More > Page info.
A dialog opens with the page’s title and full address (URL).
Set your home page
Your home page opens when you open a new Browser window and when you start Browser after
restarting your phone or after not using it for a while.
Browse to the page you want to set as your home page.
Press Menu and touch More > Settings > Set home page.
Touch Use current page. Or enter a different page’s address (URL). Touch OK
If you prefer to open new Browser windows without opening a webpage by default, leave this field blank.
This can make new Browser windows open more quickly.
Open new page in new window and working with multiple Browser windows
Press Menu and choose New window.
If you want to switch between both or multiple open windows, press
Menu and then Windows. New screen appears.
Choose the page you want to view.
To close windows touch the close button next to the page.
You can open up to eight Browser windows at once and switch among
them.
79
Page 80

80
Bookmarks
Working with bookmarks
You can bookmark webpages so that you can quickly return to them.
Bookmark a webpage
Open the webpage to
bookmark.
You can press Menu and touch More > Add bookmark.
Touch the bookmark icon at the top of the screen (or press Menu
and Bookmarks).
On the top of the Bookmarks screen, Touch Add. You can also press
Menu and touch Bookmark last-viewed page.
Edit the name and the address if necessary and touch OK.
OR
Open a bookmark
The bookmark is added to your list of bookmarks.
Touch the bookmark icon at the top of the screen.
OR
Press Menu and touch Bookmarks.
A window opens with a list of your bookmarks, sorted by
how often you visit them. Bookmarks are displayed in
thumbnail view by default. To see them as a list, press
Menu and touch List view.
Touch a bookmark to open it.
The bookmark opens in the current window.
If you prefer to open it in a new window, touch & hold
the bookmark and touch Open in new window in the
menu.
Page 81

81
Additional options
Touch and hold bookmark to see additional options.
Open a
bookmark.
Open a bookmark in new
Edit the name or address in the dialog that opens. Touch OK.
You can add a shortcut to your phone’s Home screen that you can touch
to open one of your bookmarks in a Browser window.
Touch the application you want to use to send the bookmark.
The application opens with the bookmark’s address entered.
Copy this link. Paste it in a new message or email. Click on Type to
compose window and touch paste.
Delete bookmark and touch OK.
Set this bookmarked page as your homepage.
View your Browser history
As you browse the web, Browser keeps track of the pages you visit, to help you find your way back later.
“Changing Browser settings” describes the setting that clears your history.
window.
Touch the bookmark icon at the top right of the screen.
Touch the History tab.
You can also press & hold the Back button when viewing a webpage to
open the History tab.
The pages you’ve visited are grouped chronologically. Bookmarked
pages have a gold star. Touch a star to add or remove that page from
your bookmarks.
Touch a time period to view the pages you’ve visited.
Touch & hold a page in the list to open a menu with options for opening
the page, adding it or removing it from you bookmarks, sharing page,
removing it from your history, and so on.
Touch a page in the history to reopen it.
Page 82

82
Most visited web pages
View your most frequently visited pages
Touch the bookmarks icon at the top right of the screen.
Touch the Most visited tab.
The pages you’ve visited most frequently are listed in order.
Bookmarked pages have a gold star. Touch a star to add or remove that
page from your bookmarks.
Touch & hold a page in the list to open a menu with options for opening
the page, adding it or removing it from you bookmarks, sharing page,
removing it from your history, and so on.
Touch a page to open
it.
Follow shortcuts for links, phone numbers and addresses
Browser recognizes links, as well as some phone numbers, addresses and similar information, as
information that you may want to act on directly.
Touch & hold a link to open a menu with shortcuts for opening, bookmarking, saving, and sending the link via
email.
Touch a phone number to open the Phone application with the number entered.
Navigating within a webpage
Webpages that are optimized for mobile devices typically open at a size appropriate for your phone. Often,
you can’t zoom or even scroll their contents. Webpages that aren’t designed specifically for mobile devices
typically open in overview mode—the page is zoomed out so you can get the big picture. You can change
how pages open, as described in “Changing Browser settings”.
Scroll a webpage
Slide your finger on the screen. Zoom in or out on a webpage
Note: You may not be able to zoom in or out on webpages designed for
mobile devices.
Slide your finger slightly on the screen to reveal the Zoom control.
Touch the plus or minus side of the Zoom control to zoom in or out.
To return to the default zoom level, double-tap again.
Quickly zoom into a section of a webpage
Double-tap on the section of the webpage you want to view.
The webpage zooms in so that you can read all the text in that section
by scrolling up and down.
If you adjust your zoom level in this view, Browser remembers your
preference while you stay on that page.
Page 83
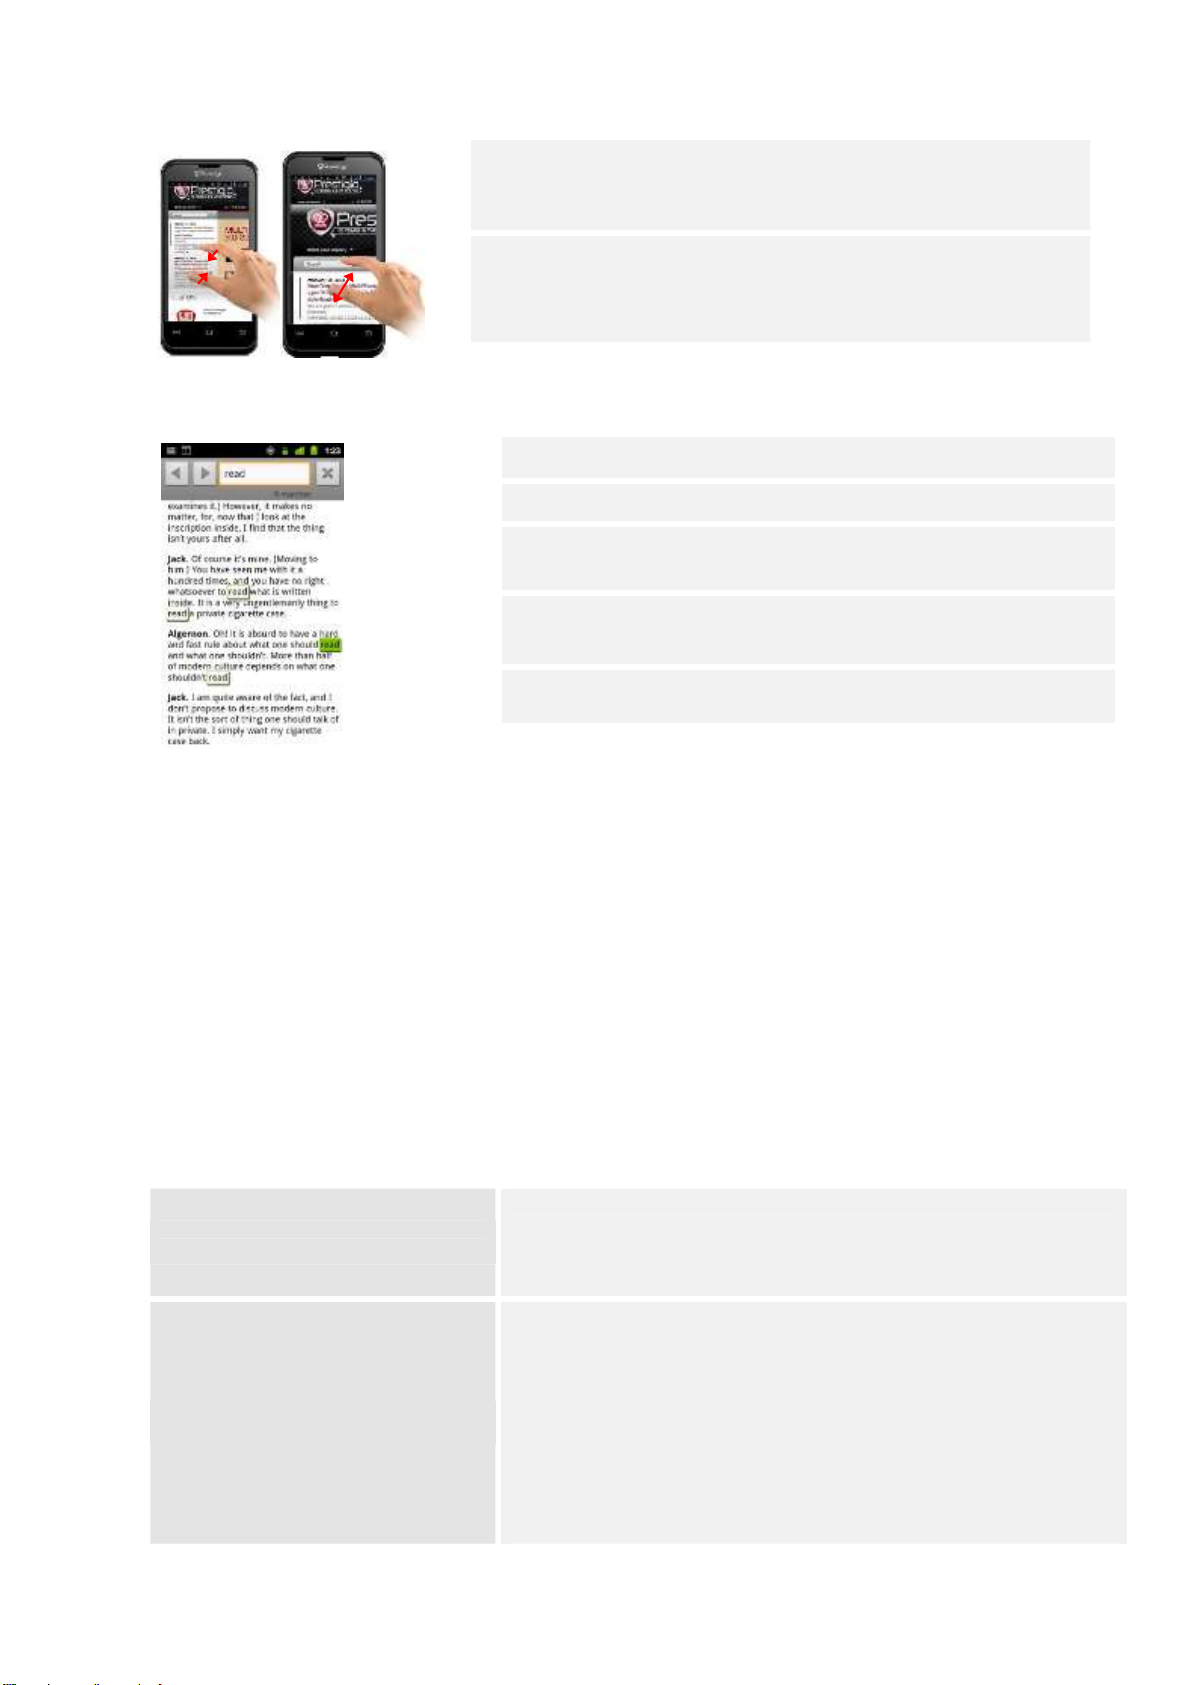
83
Find text on a webpage
Touch an area with two fingers at once and pinch them together to
zoom out; spread them apart to zoom in.
Double-tap after zooming in this way, to reflow a column of text to fit
the screen. If you have the Auto-fit pages setting checked, as described
in “Page content settings”.
Press Menu and touch More > Find on page.
Enter the text you’re looking for.
As you type, the first word with matching characters is highlighted on
the screen, and subsequent matches are boxed.
Touch the left or right arrow to scroll to and highlight the previous or
next matching word.
Touch to jump to the previous or next matching word.
Downloading files
You can download files and even applications from webpages. The files that you download are stored on
your phone's USB storage or SD card, depending on your model of phone. Viewing, reopening and deleting
your downloaded files is described in “Managing downloads”.
Allow installing applications from the web or email by default, your phone is configured to prevent you
from installing applications that you download from the web or receive with an email message.
Warning! Applications downloaded from the web can be from unknown sources. To protect your
phone and personal data, download applications only from trusted sources, such as Android Market.
Press Home, then press Menu and touch Settings > Applications. Check Unknown sources.
Touch OK in the dialog to confirm you want to allow downloading applications from sources other than
Market.
Download a file
Cancel a download
Touch & hold an image or a link to a file or to another webpage. In
the menu that opens, touch Save.
If the file is in a format supported by an application on the phone, it
is downloaded to your SD card or USB storage.
If you change your mind about downloading a file, or start
downloading one by accident, you can cancel the download in
progress.
Press Menu and touch More > Downloads.
Touch & hold an item in the list and in the menu that opens, touch
Cancel download or press Menu again and touch Cancel all
downloads.
Page 84

84
View the files you’ve downloaded
Press Menu and touch More > Downloads.
The Downloads application opens, with a list of the files you’ve
downloaded in Browser and other applications.
Changing Browser settings
You can configure a number of Browser settings, including several that you can use to manage your
privacy. To open the Browser settings screen, press Menu and touch More > Settings.
Opens a dialog where you can increase or decrease the size of the text
that Browser uses when displaying webpages.
Opens a dialog where you can increase or decrease the magnification level that
Browser uses when first opening a webpage.
Uncheck to open webpages displaying their top-left corners at 100% size.
Check to open webpages zoomed out, in an overview.
Opens a dialog where you can change the character-encoding standard that
Browser uses when displaying text on a webpage.
Check to prevent websites from opening windows unless you request it.
Uncheck to omit images when Browser displays a webpage. This speeds
webpage display, which can be useful if you have a slow connection, but many
websites make little sense with text alone.
Check to have Browser optimize the presentation of text and other elements of
webpages to fit your phone’s screen.
Check to display pages in landscape (horizontal) orientation on your screen,
regardless of how you are holding the phone.
Uncheck to prevent JavaScript from running on webpages. Many webpages
function correctly only if they can run JavaScript on your phone.
Uncheck to disable plug-ins from webpages.
Check to open new windows in the background when you touch & hold a link
and touch Open in new window. This is useful when you are working with
windows that take a long time to download and display.
Page 85

85
Opens a dialog where you can enter the URL of a page that you want to open
whenever you open a new Browser window. If you prefer to open new
Browser windows more quickly, by not opening any page by default, leave the
dialog blank.
The browser stores the text and images of the webpages you visit so that they
open more quickly when you revisit them. Touch Clear cache to delete
these temporary files.
The browser keeps track of the webpages you visit, so you can quickly find
them and open them again later. Touch Clear history to delete this record.
Many webpages store, read, and update files called cookies on your phone, for
your convenience. Uncheck to prevent webpages from storing cookies on your
phone.
Touch to delete all cookies from your phone.
Browser remembers what you enter in some form fields on a site and helps
you reenter that text the next time you use that form. Uncheck to disable this
feature.
Touch to delete all the information the Browser remembers about what you’ve
entered in forms.
Check to permit websites with location-specific content to ask whether you
want to share your location, using your phone’s location information. To
provide a website with your location, you must also have location sharing
enabled in the Settings application.
Opens a dialog where you can clear the permissions you’ve granted to websites
in the past, to access your location. If those websites want permission to access
your location again, you must grant it again.
Remember passwords Browser can remember your passwords for some
webpages that require you to sign in, to make it quicker to sign into those
pages on repeat visits. Uncheck to prevent Browser from storing passwords.
Touch to delete any passwords that Browser has stored.
Uncheck to prevent Browser from warning you about websites with common
security problems, such as outdated or invalid certificates.
Opens a dialog where you can select the web search engine you want to use
when you enter web addresses (URLs) or search terms in the URL box. The
search engines available depend on your location. The Microphone icon is
available in the URL box only when you are using the Google search engine.
Opens a screen where you can view advanced settings for particular websites.
Reset to default Touch to delete all Browser data, including your browsing
mm, cookies, passwords, and bookmarks, and to restore all the Browser
settings to their original values.
Page 86

86
6 Connecting to networks and devices
Your phone can connect to a variety of networks and devices, including mobile networks for voice and data
transmission, Wi-Fi data networks and Bluetooth devices, such as headsets. You can also connect your
phone to a computer, to transfer files from your phone and share your phone’s mobile data connection via
USB or as a portable Wi-Fi hotspot.
Connecting to mobile networks
When you assemble your phone with a SIM card from your wireless service provider, your phone is
configured to use your provider’s mobile networks for voice calls and for transmitting data. If your phone
does not connect to a network, contact your carrier for assistance. You may need to obtain the details of its
access point name (APN) or other details; see chapter “Edit or create a new GSM access point”.
The icons in the Status bar indicate which kind of data network you’re connected to and the voice and data
network signal strength. When you’re connected to slower networks, you may want to postpone using
your phone for data-intensive tasks until you are connected to a faster network again, or find a Wi-Fi
network to connect to. See “Connecting to Wi-Fi networks”.
Determine what GSM network you’re using
Press Settings to open the Settings application.
Touch Wireless & networks > Mobile networks > Dual SIM settings > select SIM > Access Point Names.
The name of the wireless service provider you’re currently registered with is selected in the list.
Disable data when roaming
You can prevent your phone from transmitting data over other carriers’ mobile networks when you leave
an area that is covered by your carrier’s networks. This is useful for controlling expenses if your cell plan
doesn’t include data roaming.
Press Settings to open the Settings application.
Touch Wireless & networks > Mobile networks > and uncheck Data roaming.
With Data roaming unchecked, you can still transmit data with a Wi-Fi connection. See “Connecting to
Wi-Fi networks”.
Edit or create a new GSM access point
If you and your GSM wireless service provider determine that you need to change the settings of your
current access point name (APN) or to create a new one, you must obtain the APN and detailed settings
from your provider.
Press Settings to open the Settings application.
Touch Wireless & networks > Mobile networks > Dual SIM settings > select SIM > Access Point Names.
Page 87

87
Touch an existing APN to edit it or press Menu and touch New APN.
Enter the APN settings that you obtained from your wireless service provider by touching each setting that
you need to edit.
When you’re finished, press Menu and touch Save.
If you created a new APN, touch it in the APNs screen to start using it.
Connecting to Wi-Fi networks
Wi-Fi is a wireless networking technology that can provide Internet access at distances of up to 100 meters,
depending on the Wi-Fi router and your surroundings.
To use Wi-Fi on your phone, you access a wireless access point, or “hotspot.” Some hotspots are open and
you can simply connect to them. Others are hidden or implement other security features, so you must
configure your phone so it can connect to them. There are numerous systems for securing Wi-Fi
connections, including some that rely on secure certificates or other schemes to ensure that only
authorized users can connect. For information about installing secure certificates, see “Working with
secure certificates”.
Turn off Wi-Fi when you’re not using it, to extend the life of your battery between charges.
The Status bar displays icons that indicate Wi-Fi status.
When you connect to a Wi-Fi network, the phone obtains a network address and other information it
needs from the network, using the DHCP protocol. To configure the phone with a fixed IP address and
other advanced settings, press Menu and touch Advanced. See “Advanced Wi-Fi settings screen”.
Turn Wi-Fi on and connect to a Wi-Fi network
If you’re adding a Wi-Fi network when first setting up your phone, Wi-Fi is turned on automatically, so you
can skip to step 4.
1. Press Settings to open the Settings application.
2. Touch Wireless & networks > Wireless & networks > Wi-Fi settings.
3. Touch Check Wi-Fi to turn it on.
The phone scans for available Wi-Fi networks and displays the names of those it finds. Secured
networks are indicated with a Lock icon. If the phone finds a network that you connected to
previously, it connects to it.
4. Touch a network to connect to it.
If the network is open, you are prompted to confirm that you want to connect to that network by touching
Connect.
If the network is secured, you’re prompted to enter a password or other credentials. (Ask your network
administrator for details.)
When you’re connected to a network, you can touch its name in the Wi-Fi settings screen for details about
the speed, security, address and related settings.
Page 88

88
Receive notifications when open networks are in range
By default, when Wi-Fi is on, you receive notifications in the Status bar when your phone detects an open
Wi-Fi network.
Turn on Wi-Fi if it’s not already on.
In the Wi-Fi settings screen, check Network notification.
You can uncheck this option to stop receiving notifications.
Add a Wi-Fi network
You can add a Wi-Fi network so the phone will remember it, along with any security credentials and
connect to it automatically when it is in range. You must also add a Wi-Fi network to connect to it, if the
network does not broadcast its name (SSID), or to add a Wi-Fi network when you are out of range of it.
To join a secured network, you need to contact the network’s administrator to learn what security scheme
is deployed on it and to obtain the password or other required security credentials. For more information
about installing secure certificates, see “Working with secure certificates”.
Turn on Wi-Fi if it’s not already on.
If you’re adding a Wi-Fi network when first setting up your phone, Wi-Fi is turned on automatically.
In the Wi-Fi settings screen, touch Add Wi-Fi network (at the bottom of the list of discovered networks).
Enter the SSID (name) of the network. If the network is secured, touch the Security menu and then touch
the type of security deployed on the network.
Enter any required security credentials.
Touch Save.
The phone connects to the wireless network. Any credentials that you entered are saved, so you are
connected automatically the next time you come within range of this network.
Forget a Wi-Fi network
You can make the phone forget about the details of a Wi-Fi network that you added— for example, if you
don’t want the phone to connect to it automatically or if it is a network that you no longer use.
Turn on Wi-Fi if it’s not already on.
In the Wi-Fi settings screen, touch & hold the name of the network.
Touch Forget network in the dialog that opens.
Page 89

89
Connecting to Bluetooth devices
Bluetooth is a short-range wireless communications technology that devices can use to exchange
information over a distance of about 8 meters. The most common Bluetooth devices are headphones for
making calls or listening to music, hands-free kits for cars and other portable devices, including laptops and
cell phones.
To connect to a Bluetooth device, you must turn on your phone’s Bluetooth radio. The first time you use a
new device with your phone, you must “pair” them, so that they know how to connect securely to each
other. After that, you can simply connect to a paired device.
Turn off Bluetooth when you’re not using it, to extend the life of your battery between charges. You may
also be required to turn Bluetooth off in some locations. Bluetooth is turned off in Airplane mode.
Status bar icons indicate Bluetooth status.
Turn Bluetooth on or off
Press Home, press Menu and touch Settings to open the Settings application.
Touch Wireless & networks.
Check or uncheck Bluetooth to turn it on or off.
Change your phone’s Bluetooth name
Your phone has a generic Bluetooth name by default, which is visible to other devices when you connect
them. You can change the name so that it is more recognizable.
Press Settings to open the Settings application.
Touch Wireless & networks > Bluetooth settings.
The Bluetooth settings screen opens.
If Bluetooth isn’t turned on, check Bluetooth to turn it on.
Touch Bluetooth name, enter a name and touch OK.
Pair your phone with a Bluetooth device
You must pair your phone with a device before you can connect to it. Once you pair your phone with a
device, they stay paired unless you want to unpair them.
Press Settings to open the Settings application.
Touch Wireless & networks > Bluetooth settings.
If Bluetooth isn’t turned on, check Bluetooth to turn it on.
Your phone scans for and displays the IDs of all available Bluetooth devices in range. If the device you want
to pair with isn’t in the list, make it discoverable. See the documentation that came with your device to
learn how to make it discoverable by your phone and for other instructions for pairing.
Page 90

90
If your phone stops scanning before you make the other device discoverable, touch Scan for devices.
Touch the ID of the other device in the list in Settings to pair them.
The devices pair with each other. If you’re prompted to enter a passcode, try entering 0000 or 1234 (the
most common passcodes), or consult the documentation that came with the device to learn its passcode. If
the pairing is successful, your phone connects to the device.
Connect to a Bluetooth device
Once paired, you can connect to a Bluetooth device—for example, to switch devices or to reconnect after
the phone and the device come back into range.
Press Settings to open the Settings application.
Touch Wireless & networks > Bluetooth settings.
If Bluetooth isn’t turned on, check Bluetooth to turn it on.
In the list of devices, touch a paired but unconnected device in the list.
If the device you expected isn’t displayed, touch Scan for devices.
When the phone and the device are connected, the device is displayed as connected in the list.
Disconnect from a Bluetooth device
1. Touch the device in the Bluetooth settings screen.
2. Touch OK to confirm that you want to disconnect.
Unpair a Bluetooth device
You can unpair a Bluetooth device to erase all pairing information about it.
1. Touch & hold the device in the Bluetooth settings screen.
2. Touch Unpair or Disconnect & unpair in the menu that opens.
Connecting to a computer via USB
You can connect your phone to a computer with a USB cable to transfer music, pictures and other files
between your phone and the computer. Your phone stores these files in internal USB storage or on a
removable SD card.
Warning! When connecting your phone to a computer and mounting its USB storage or SD card, you must
follow your computer’s instructions for connecting and disconnecting USB devices, to avoid damaging or
corrupting files. If you are using USB tethering, you must turn that off before you can use USB to transfer
files between your phone and computer. See “Sharing your phone’s mobile data connection”.
Connect your phone to a computer via USB
Use the USB cable that came with your phone to connect the phone to a USB port on your computer.
You receive a notification that the USB is connected.
Open the Notifications panel and touch USB connected.
Page 91

91
Touch Turn on USB storage in the screen that opens to confirm that you want to transfer files.
When the phone is connected as USB storage, the screen indicates that USB storage is in use and you
receive a notification.
Your phone’s USB storage or SD card is mounted as a drive on your computer. You can copy files back and
forth now. For more information, see the documentation for your computer.
During the time you make transfer of your information, you can’t access the USB storage or SD card from
your phone, so you can’t use applications that rely on them, such as Camera, Gallery and Music.
Disconnect your phone from the computer
Warning! Carefully follow your computer’s instructions to unmount the USB storage or SD card and
disconnect USB devices correctly to avoid losing information.
Unmount the USB storage or SD card on your computer.
Open the Notifications panel and touch Turn off USB storage.
Touch Turn off USB storage in the screen that opens.
Safely remove an SD card from your phone
If your phone has an SD card (rather than internal USB storage), you can safely remove the SD card from
your phone any time the phone is turned off, as described in your phone’s owner’s guide. If you need to
remove the SD card while the phone is on, you must unmount the SD card form the phone first, to prevent
corrupting or damaging the SD card.
Press Settings to open the Settings application.
Touch Storage > Unmount.
Touch can now safely remove the SD card from the phone.
Erase your phone’s USB storage or SD card
If your phone uses an SD card, you may need to erase a new one before you can use it with your phone.
You can also erase your phone’s USB storage or SD card, for example, if you are giving the phone or SD card
to someone else and want to erase your personal information from it. (See “Factory data reset” for
information on erasing all the data on your phone.)
Press Settings to open the Settings application.
Touch Storage > Erase.
On the screen that warns you that formatting will erase its contents, touch Erase.
Page 92

92
Sharing your phone’s mobile data connection
You can share your phone’s mobile data connection with a single computer via a USB cable: USB tethering.
You can also share your phone’s data connection with up to eight devices at once, by turning your phone
into a portable Wi-Fi hotspot. (Not all carriers and phones support these features.) When your phone is
sharing its data connection, an icon appears in the Status bar and as an ongoing notification in the
Notifications panel (see “Managing notifications”).
For the latest information about tethering and portable hotspots, including supported operating systems
and other details, visit www.android.com/tether .
Share your phone’s data connection via USB
If your computer is running Windows 7 or a recent distribution of some flavors of Linux (such as Ubuntu),
you typically don’t need to prepare your computer for tethering. But if you’re running an earlier version of
Windows or another operating system, you may need to prepare your computer to establish a network
connection via USB. For the most current information about which operating systems support USB
tethering and how to configure them, visit www.android.com/tether .
You can’t share your phone’s data connection and USB storage or SD card (depending on your phone) via
USB at the same time. If you are using your USB connection to copy files to or from your computer, you
must disconnect first. See “Connecting to a computer via USB”.
Use the USB cable that came with your phone to connect your phone to your computer.
Press Settings to open the Settings application.
Touch Wireless & networks > Tethering & Softap.
Check USB tethering.
The phone starts sharing its mobile network data connection with your computer, via USB connection. An
ongoing notification is added to the Status bar and Notifications panel.
Uncheck USB tethering to stop sharing your data connection. Or just disconnect the USB cable.
Share your phone’s data connection as a portable Wi-Fi hotspot
Press Settings to open the Settings application.
Touch Wireless & networks > Tethering & Softap.
Check WLAN softap.
After a moment, the phone starts broadcasting its Wi-Fi network name (SSID), so you can connect to it with
up to 8 computers or other devices. An ongoing notification is added to the Status bar and Notifications
panel.
When WLAN softap is checked, you can change its network name or secure it. See “Rename or secure your
portable hotspot”.
Uncheck WLAN softap to stop sharing your data connection via Wi-Fi.
Page 93

93
Rename or secure your portable hotspot
You can change the name of your phone’s Wi-Fi network name (SSID) and secure its Wi-Fi network.
Press Settings to open the Settings application.
Touch Wireless & networks > Tethering & Softap.
Ensure WLAN softap is checked.
Touch WLAN softap settings.
Touch Configure WLAN hotspot.
The Configure Wi-Fi hotspot dialog opens.
You can change the network SSID (name) that other computers see when scanning for Wi-Fi networks.
You can also touch the Security menu to configure the network with Wi-Fi Protected Access 2 (WPA2)
security, with a preshared key (PSK).
If you touch the WPA2 PSK security option, a password field is added to the Configure Wi-Fi hotspot dialog.
If you enter a password, you will need to enter that password when you connect to the phone’s hotspot
with a computer or other device. Or touch Open in the Security menu to remove security from your Wi-Fi
network.
Touch Save.
Connecting to virtual private networks
Virtual private networks (VPNs) allow you to connect to the resources inside a secured local network, from
outside that network. VPNs are commonly deployed by corporations, schools and other institutions so that
their users can access local network resources when not on campus, or when connected to a wireless
network. There are numerous systems for securing VPN connections, including some that rely on secure
certificates or other schemes to ensure that only authorized users can connect. For information about
installing secure certificates, see “Working with secure certificates”.
To configure VPN access from your phone, you must obtain the details from your network administrator.
Add a VPN
Press Settings to open the Settings application.
Touch Wireless & networks > VPN settings.
Touch Add VPN.
Touch the type of VPN to add.
In the screen that opens, follow the instructions from your network administrator to configure each
component of the VPN settings.
Press Menu and touch Save.
The VPN is added to the list on the VPN settings screen.
Connect to a VPN
Open the Settings application.
Touch Wireless & networks > VPN settings.
The VPNs you’ve added are listed on the VPN settings screen.
Touch the VPN to which you want to connect.
Page 94

94
In the dialog that opens, enter any requested credentials and touch Connect.
When you’re connected to a VPN, you receive an ongoing notification in the Status bar. If you are
disconnected, you receive a notification that you can use to return to the VPN settings screen so that you
can reconnect to it. See “Managing notifications”.
Disconnect from a VPN
Open the Notifications panel and touch the ongoing notification for the VPN connection.
Edit a VPN
Open the Settings application.
Touch Wireless & networks > VPN settings.
The VPNs you’ve added are listed on the VPN settings screen.
Touch & hold the VPN whose settings you want to edit.
In the dialog that opens, touch Edit network.
Edit the VPN settings you want.
Press Menu and touch Save.
Delete a VPN
Open the Settings application.
Touch Wireless & networks > VPN settings.
The VPNs you’ve added are listed on the VPN settings screen.
Touch & hold the VPN you want to delete.
In the dialog that opens, touch Delete network.
Touch OK in the dialog that asks you to confirm you want to delete the VPN.
Working with secure certificates
If your organization’s VPN or Wi-Fi networks rely on secure certificates, you must obtain the certificates and
store them in your phone’s secure credential storage, before you can configure access to those VPN or WiFi networks on your phone. If your network administrator instructs you to download the certificates from a
website, you’re prompted to set a password for the credential storage when you download the certificates.
For more information about working with credential storage, see “Location & security settings”.
Android supports DER-encoded X.509 certificates, saved in files with a .crt file extension (if your certificate
file has a .cer, .der, or other extension, you must change it to .crt or you won’t be able to install it).
Android also supports X.509 certificates saved in PKCS#12 key store files with a .p12 extension (if your key
store has a .pfx or other extension, you much change it to .p12 or you won’t be able to install it). When you
install a certificate from a PKCS#12 key store,
Android also installs any accompanying private key or certificate authority certificates contained in the key
store.
Install a secure certificate from your phone’s USB storage or SD card
Copy the certificate from your computer to the root of its USB storage or SD card (that is, not in a folder).
Page 95

95
See “Connecting to a computer via USB” for information about connecting your phone to a computer and
copying files.
Open the Settings application.
Touch Location & security.
Touch Install from SD card.
Touch the file name of the certificate to install.
Only the names of certificates that you have not already installed on your phone are displayed.
If prompted, enter the certificate’s password and touch OK.
Enter a name for the certificate and touch OK.
If you have not already set a password for your phone’s credential storage, you’re prompted to enter a
password for it twice and then touch OK.
You can now use the certificate that you installed when connecting to a secure network. For security, the
certificate is deleted from the USB storage or SD card.
Page 96

96
7 Tools
Clock
Clock displays the date and time. You can also use Clock to turn your phone into an alarm clock.
Viewing the date and time
Touch the Clock icon on the Home screen or in the Launcher.
Clock opens with the date and time displayed on your Home screen wallpaper.
When Clock is running, it switches to Screen-saver mode after a few minutes, moving the date and time
display on the phone screen. Simply touch the screen or a phone button to wake the phone up again.
To return to the Home screen, touch the Home icon on your phone.
The time when the next alarm is set.
Touch to dim the
The battery charge
The phone is plugged into a charger.
Touch icons to set an alarm, view a slideshow, select time zone or start
stopwatch.
screen.
level.
Page 97

97
Dim the Clock display
If you want to use your phone as a bedside clock, you can set the screen
brightness very low.
Touch the Dimmer icon to dim the clock. Touch the icon again to restore
normal brightness.
Touch & hold the Dimmer icon to switch to Screen-saver mode
immediately.
Touch the screen again restore the Clock screen.
Setting alarms
You can set an alarm by modifying an existing alarm or by adding a new one.
Set an alarm
Touch the Alarm icon at the bottom of the Clock screen .
Touch the icon next to an alarm to turn it on or off. Alarms that are set
are underlined in green.
Touch an existing alarm to change its time and other attributes
OR
touch Add alarm to add a new one.
When viewing the main Clock screen, you can also press Menu and
touch Add alarm to add a new alarm.
Touch to add an
Touch to turn an alarm on or
alarm.
off.
Touch to open a screen where you can set the alarm’s time and other
attributes.
Touch to return to the main Clock screen.
Touch Time to set the time of the alarm.
In the dialog that opens, you change the time by touching the + or buttons and the AM or PM buttons. Or touch a time to type the time
you want.
Touch Ringtone to select a ringtone for the alarm.
You can select a ringtone that comes with the phone or one that you
saved as a ringtone by using the Music application. See “Use a song as a
ringtone”
The ringtone plays briefly when you select it.
Touch Vibrate to have the phone vibrate, in addition to playing the
ringtone.
Touch Repeat to set the days when you want the alarm to sound.
If you don’t set a repeat, the alarm sounds only one time.
Touch Label to enter a name for the alarm.
When you’re finished, touch Done. At the time you set, the alarm
sounds.
Page 98

98
Changing Clock alarm settings
To change Clock alarm settings, touch the Alarm icon at the bottom of the Clock screen. In the Alarms
screen that opens, touch Settings.
Check to play alarms even when the phone is in Silent mode.
Opens a dialog where you can set the volume of alarms.
Opens dialogs where you can set how long Clock waits before
playing an alarm again and how many times to repeat the snooze.
Up / Down button when an alarm sounds. You can set the button behavior to
have no effect, to snooze the alarm, or to dismiss it.
Calculator
Use Calculator to solve simple arithmetic problems or use its advanced operators to solve more complex
equations.
Open and use the Calculator
Touch the Calculator icon on the Home screen or in the Launcher.
Enter numbers and arithmetic operators on the basic screen.
Drag the basic screen to the left to open the advanced screen.
Touch & hold the Calculator’s display to open a menu where you can
copy what you’ve entered and access other tools.
Touch Clear to delete the last number or operator you entered.
Touch & hold Clear to delete everything in the display.
Page 99

99
Calendar
Calendar on the phone works with the web-based Google Calendar calendaring service for creating and
managing events, meetings and appointments. It also works with the Microsoft Exchange ActiveSync
calendaring service. Calendar on the phone is optimized for the phone.
Viewing your calendar and events
Open Calendar to view events you’ve created or that others have invited you to. When you first set up your
phone, you configured it to use an existing Google Account, or you created a new account. The first time
you open the Calendar application on your phone, it displays any existing calendar events from your
Google Account on the web.
You can add additional accounts with Google Calendar or Microsoft Exchange calendars to your phone and
configure them to display in Calendar. See “Accounts”.
When you first set up Calendar to synchronize events on your phone, it includes events from the previous
month through one year in the future. Subsequently, Calendar keeps a year’s worth of future events
synchronized between your phone and the web, plus any later events that you add to your calendar using
Calendar on your phone.
Open Calendar
Touch the Calendar icon on the Home screen or in the Launcher.
Events from each account you’ve added to your phone and configured to synchronize calendars are
displayed in Calendar. Events from each calendar are displayed in a different color. For information about
which calendars are displayed on your phone, see “Synchronizing and displaying calendars”.
Calendar shows the current time (the red marker and horizontal line in some views) and the time for
events using your local time zone by default, as provided by the mobile network you’re connected to. If
you’re traveling, you can set a home time zone and use it in Calendar instead. See “Changing Calendar
settings”.
Change your calendar view
Press Menu and touch Agenda, Day, Week, or Month.
Each view displays the events in your calendar for the period of
time that you specify.
To view more information about an event in Agenda view, touch
the event.
To view the events of a day in Month view, touch a day.
To make new event, touch Menu/More and New event or press
Settings to change views or reminder settings.
Page 100

100
Working in Agenda view
Agenda view is a list of your events in chronological order. All-day and multiday events are listed at the
start of each day. Days without events are not shown.
Switch to Agenda view. Press Menu and touch Agenda.
Touch an
A screen with details about the event opens.
Touch an event to view its details.
Drag up or down to view earlier or later events.
event.
This event
While you viewing an event in agenda view touch Menu and Add
reminder, Edit event or Delete it.
repeats.
Working in Day view
Day view displays a chart of the events of one day, in a table of one-hour rows. A red line indicates the
current time. All-day and multiday events are displayed at the top. Part of the title of each event is
displayed in the rows that correspond to when it occurs.
May 18
May 20
Switch to Day view Press Menu and touch Day.
Swipe left or right to view other days.
Touch an event to view its details.
Touch & hold an event to open a menu with options for viewing, editing,
or deleting the event and for creating a new event at that time.
Add an event in Day view
Touch & hold a time slot or an event to create a new event at that time.
 Loading...