

Page 1

Combination Microwave
Oven
Instruction Manual
PC25
Page 2

Contents
Oven Parts......................................................................................2
Control Panel..................................................................................3
Installation.......................................................................................4
Electrical Connection......................................................................5
Important Safety Instructions..........................................................6
Cooking Utensils.............................................................................7
Other Helpful Instructions...............................................................8
Cleaning and Care..........................................................................8
Operating Procedure......................................................................9
Trouble Shooting...........................................................................14
1
Questions and Answers................................................................15
Technical Specifications................................................................17
Page 3
2
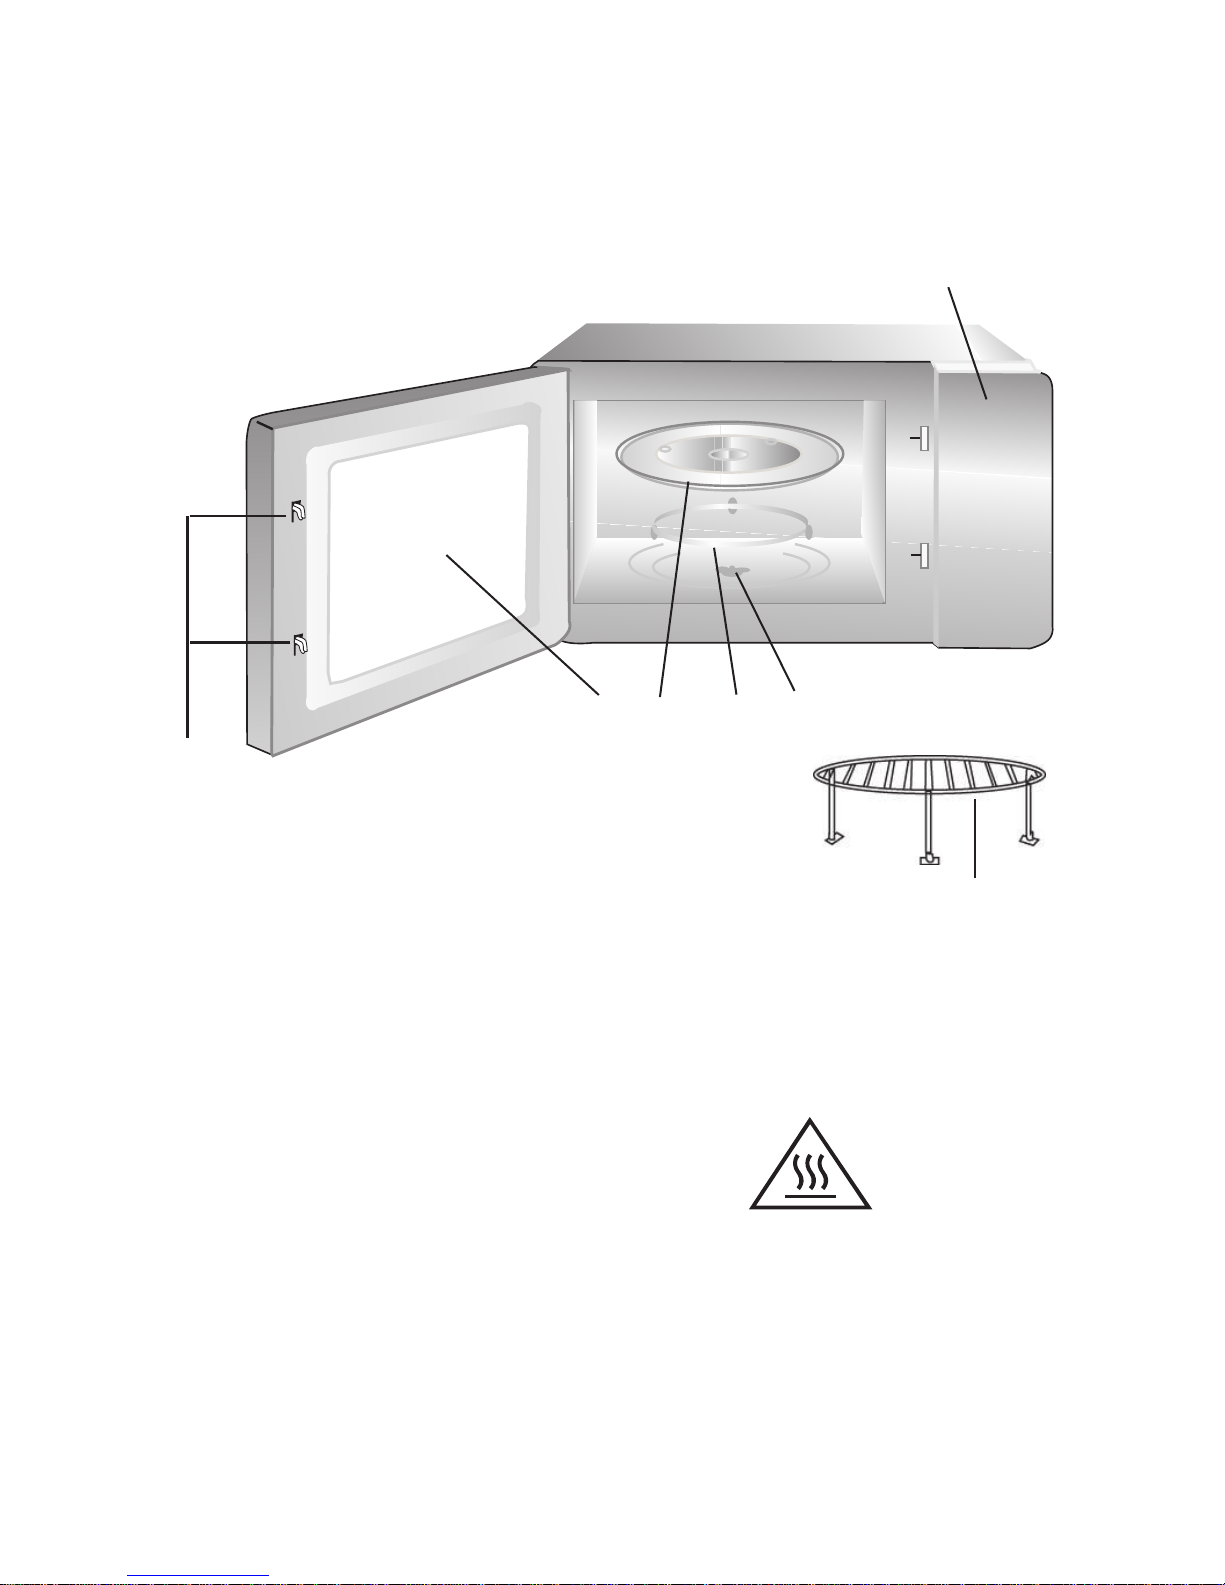
OVEN PARTS
1. Door safety Lock System
2. Oven Window
3. Shaft
4. Roller Ring
5. Glass Tray
6. Control Panel
7. Grill Rack
1
6
4 3
2
5
7
Page 4
3
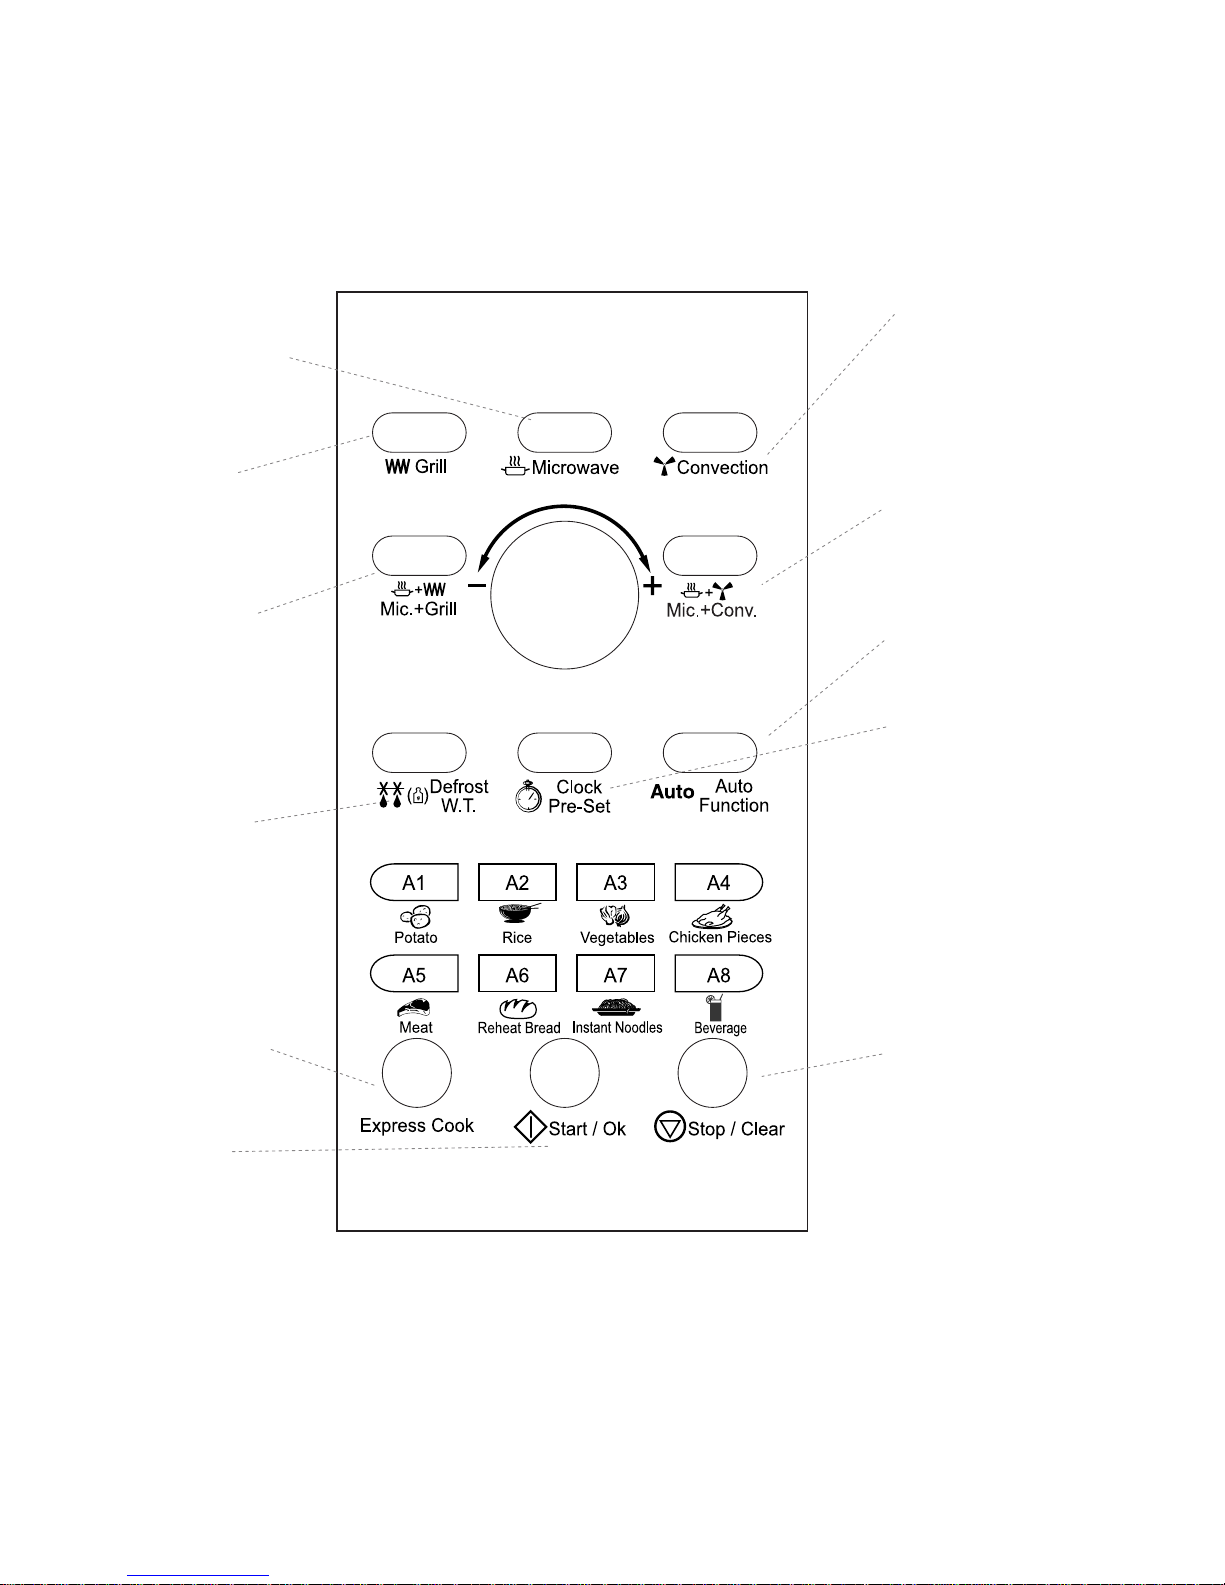
CONTROL PANEL
Auto Function button
Stop/Clear button
Convection
Microwave/Convection
combination button
Microwave button
Microwave/Grill
combination button
Grill button
Weight button
Express cook button
Start button
Clock/Pre-Set button
This button will set clock
or preset.
Use this button to choose
Use this button to
select one of combination way
To quickly set cooking
times for certain foods
This button will stop
cooking and clear
cooking settings.
To start cooking
Use this button one time,
add one minute to cook
instantly
Use this button to
select the auto defrost
Use this button to
select the function of
microwave & grill
Use this button to
select the function of grill
Use this button to
select microwave power
Page 5

4
PRECAUTIONS TO AVOID POSSIBLE EXPOSURE TO EXCESSIVE
MICROWAVE ENERGY
The oven cannot be operated with the door open due to the safety interlocks built in the door
mechanism which switch off cooking functions when the door is opened. Operating the oven
with the door open could result in harmful exposure to microwave energy. It is important not
to tamper with the door mechanism.
Do not place any object between the oven front face and the door or allow soil or cleaner
residue to accumulate on sealing surfaces.
Do not operate the oven if it is damaged. It is particularly important that the oven door closes
properly and that there is no damage to the (1) door (bent), (2) hinges and latches (broken
or loosened), (3) door seals and sealing surfaces.
The oven should not be adjusted or repaired by anyone except qualified personnel.
WARNING
When heating liquids, e.g. soups, sauces and beverages in your microwave oven, delayed
eruptive boiling can occur without evidence of bubbling. This could result in a sudden boil
over of the hot liquid. To prevent this possibility the following steps should be taken.
1. Avoid using straight-sided containers with narrow necks.
2. Do not overheat.
3. Stir the liquid before placing the container in the oven and again halfway through the heating
time.
4. After heating, allow to stand in the oven for a short time. Stir or shake the contents (especially
feeding bottles and baby foods) and carefully check the temperature before use.
INSTALLATION
1. Remove all packing materials and accessories.
2. Place the oven on a level surface a minimum of 85 cm above the floor with at least 30 cm
above and 10 cm rear space to allow adequate ventilation. The front of the oven should be
at least 8 cm from the edge of the surface to prevent tipping.
An exhaust outlet is located on the top of the oven. Blocking
the outlet can damage the oven.
3. Plug your oven into a standard voltage household outlet. Ensure that
the electrical circuit is at least 10 amps and that the oven is the only
appliance on the circuit.
NOTE: This appliance should not be used for commercial catering purposes.
Page 6
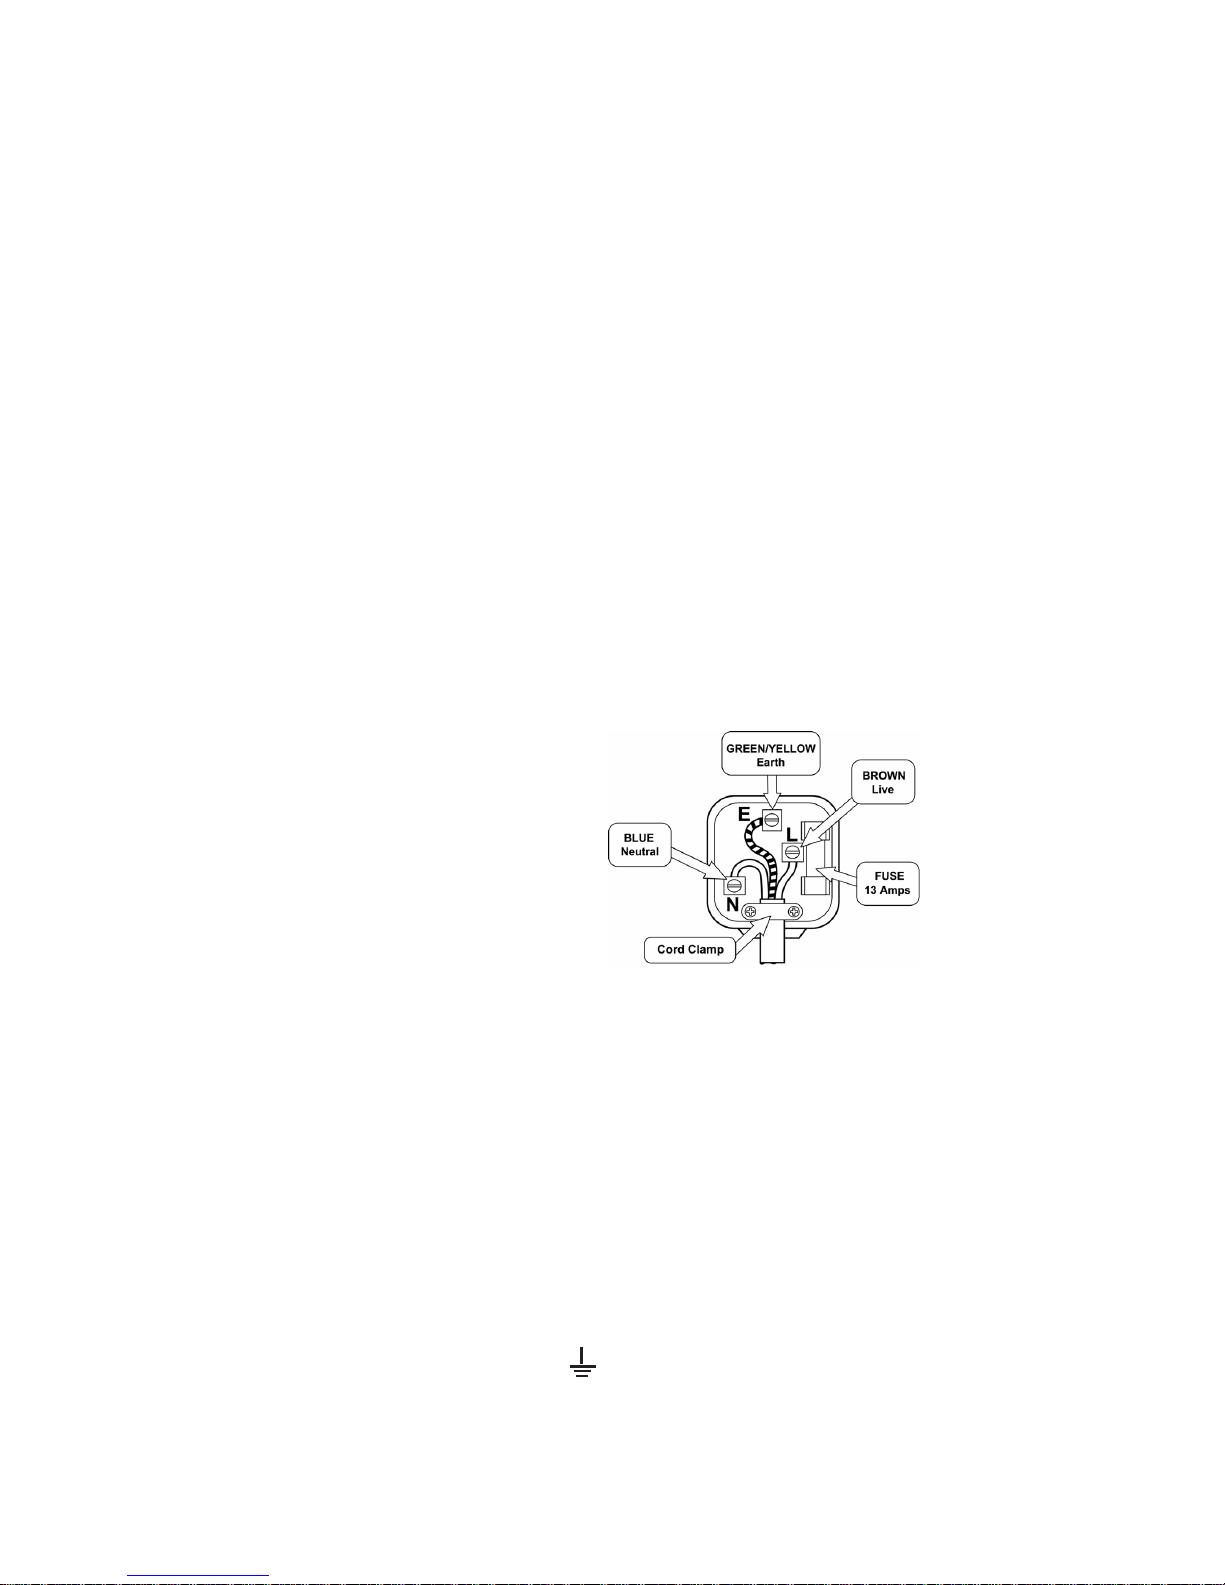
The blue wire must be connected to the terminal marked N or coloured black.
The brown wire must be connected to the terminal marked L or coloured red.
ELECTRICAL CONNECTION
For your safety please read the following information
Warning: This appliance must be earthed.
The appliance must be connected to a 220-240 volts 50 cycle AC supply by means of a three
pin socket, suitably earthed and should be protected by a 13 amp fuse in the plug or a15
amp fuse in the consumer unit.
The appliance is supplied with a rewireable 13 amp 3 pin plug fitted with a 13 amp fuse.
Should the fuse require replacement, it must be replaced with a fuse rated at 13 amp and
approved to BS1362.
If the mains plug is unsuitable for the socket outlet in your home or is removed for any other
reason, then the cut off plug should be disposed of safely to prevent the hazard of electric
shock.
There is a danger of electric shock if the cut off plug is inserted into any 13 amp socket outlet.
How to wire a 13 amp plug.
Important
The wires in the mains lead on this appliance are coloured in accordance with the following
code:
Green and Yellow - Earth
Blue – Neutral
Brown – Live
As the colours may not correspond with the markings identifying
the terminals in your plug proceed as follows.
The green and yellow wire must be connected to the terminal in the plug which is marked
with the letter E or with the earth symbol or coloured green and yellow.
5
Page 7

6
IMPORTANT SAFETY INSTRUCTIONS
Read carefully and keep for future reference
Do not operate the oven when empty. It is best to leave a glass of water in the oven when
not in use. he water will safely absorb all microwave energy if the oven is accidentally started.
Do not dry clothed in the oven. They may become carbonised or burned if heated too long.
Do not cook food wrapped in paper towels, unless your cookbook contains instructions for
the food you are cooking.
Do not use the oven for drying kitchen towels or paper products. They may burn.
Do not use wooden containers. They may heat up and char.
Do not use recycled paper products since they may contain impurities which may cause
sparks and / or fires when used in cooking.
Allow the turntable to cool before cleaning.
Small amounts of food require shorter cooking or heating time. If normal times are allowed
they may overheat and burn.
Before cooking, pierce the skin of fruit and vegetables.
Do not cook eggs in their shell. Pressure will build up inside the egg which will burst.
Do not attempt deep fat frying in your oven.
Remove plastic wrapping from food before cooking or defrosting. Note though that in some
cases food should be covered with plastic film, for heating or cooking, as detailed in microwave
cook books.
If smoke is observed, switch off or disconnect the oven from the power supply and keep
the oven door closed in order to stifle any flames.
When food is heated or cooked in disposable containers of plastic, paper or other combustible
materials, check the oven frequently due to the possibility of ignition.
WARNING : Liquids or other foods must not be heated in sealed containers since they are
liable to explode.
WARNING : Only allow children to use the oven without supervision when adequate instructions
have been given so that the child is able to use the oven in a safe way and understands the
hazards of improper use.
WARNING : If the oven door and door seal are damaged, the oven must not be operated
until it has been repaired by a qualified service technician.
WARNING : Do not attempt to tamper with, or make any adjustments or repairs to the door,
control panel, safety interlock switches or any other part of the oven. It is hazardous for
anyone to carry out any service or repair operation which involves the removal of any cover
which gives protection against exposure to microwave energy. Repairs should only be
undertaken by a qualified service technician.
Page 8

7
COOKING UTENSILS
1. The ideal material for a microwave utensil is transparent to microwave, it allows energy
to pass through the container and heat the food. Only use a temperature probe recommended
for this oven.
2. Microwave can not penetrate metal, so metal utensils or dishes with metallic trim should
not be used.
3. Do not use recycled paper products when microwave cooking, as they may contain small
metal fragments which may cause sparks and / or fires.
4. Round / oval dishes rather than square / oblong ones are recommended, as food I corners
tends to overcook.
5. Narrow strips of aluminium foil may be used to prevent overcooking of exposed areas.
But be careful you don't use too much and keep a distance of 1 inch (2.54cm) between
the foil and the cavity.The list below is a general guide to help you select the correct
utensils.
* Combination: applicable for both "microwave + grill", and "microwave + convection" cooking.
Notes:
Care should be taken when removing utensils or the glass turntable, as they may become
hot during cooking.
Only use a thermometer that is designed or recommended for use in the microwave
oven.
Ensure the turntable is in place when you operate the oven.
Page 9

8
OTHER HELPFUL INSTRUCTIONS
For best results and more enjoyable cooking, please read these comments thoroughly.
For Best Results:
1. When determining the time for a particular food, begin by using minimum time and checking
condition occasionally. It is easy to overcook food because microwaves cook very quickly.
2. Small quantities of food, or foods with low water content may dry out and become hard if
cooked too long.
Defrosting Frozen Food:
1. Foods that have been frozen can be place directly in the oven for thawing. (Be certain to
remove any metallic ties or wraps).
2. Defrost according to the Defrosting Tips found in this manual.
3. For areas of the food thawing faster than others, cover with small pieces of aluminium foil.
This helps slow down or stop the defrosting process.
4. Some foods should not be completely thawed before cooking. For example, fish cooks so
quickly that it is sometimes better to begin cooking while still slightly frozen.
5. It may be necessary to increase or decrease the cooking time in some recipes, depending
on the starting temperature of the food.
NOTE:
Air from the vent may become warm during cooking.
Browning:
There are a few foods which are not cooked long enough in the microwave oven to brown
and may need additional colour.
Coatings such as paprika, and browning agents such as Worcestershire sauce may be used
on chops, meat patties or chicken pieces.
Roasts, poultry or ham, cooked for 10-15 minutes or longer, will brown without extra additives.
CLEANING AND CARE
It is advisable to disconnect the electrical supply to the oven before cleaning is
undertaken
Interior walls
Remove any crumbs and food remains between the door and oven using a damp cloth. This
area has to be particularly well cleaned to ensure the door will close properly. Remove any
grease splashes with a soapy cloth then rinse and dry. Do not use abrasive cleaners which
may damage the surface of the oven.
Only warm soapy water must be used to clean stainless steel surfaces
Page 10

9
Roller rest
The roller rest should be removed and cleaned in hot soapy water at least once a week to
prevent grease restricting the rotation of the wheels.
Door
The door and door seals should be kept clean at all times. Use only warm soapy water rinse
then dry thoroughly.
DO NOT USE ABRASIVE MATERIALS, SUCH AS CLEANING POWDERS OR STEEL AND
PLASTIC PADS.
Metal parts will be easier to maintain if wiped frequently with a damp cloth.
Exterior
Clean with mild soap and warm water, rinse and dry with a soft cloth. Do not use abrasive
materials. Do not spill water in the vents. If the power lead becomes soiled wipe it with a
damp cloth.
Only warm soapy water must be used to clean stainless steel surfaces
OPERATING PROCEDUCE
Special points to note
1. Each time a pad is touched, a BEEP will sound to acknowledge the touch.
2. The interior light is only on when the microwave oven is operating.
3. The door can be opened at any time during operation. The oven will automatically
shut off.
4. The oven automatically cooks on full power unless set to a lower power level.
5. The display will show "0:00" when the oven is plugged in.
6. When cooking is complete the display will revert to the time of day.
7. When the stop/clear pad is touched during the oven operation, the oven stops
cooking and all information retained. To erase all information (except the time of day), touch
the stop/clear pad once more. If the oven door is opened during the oven operation, all
information is retained.
8. If the start pad is touch and the oven does not operate, check the area between the
door and door seal for obstructions and make sure the door is closed securely. The oven will
not start cooking until the door is completely closed or the program has been reset.
Setting the time of day
When the oven is first plugged in the display will show "0:00" to set the clock
1. Press the Clock/Pre-set pad and the hour figure "0" will flash.
2. Turn the rotary switch to set the correct hour.
3. Press the Clock/Pre-set pad again and the minute "00" figures will flash.
4. Turn the rotary switch to set the correct minute.
5. Press the Clock/Pre-set once again and the time of day is set.
Note: This is a 24 hour clock. When the oven is plugged in, "0:00" will appear in the display.
To reset the time of day repeat the steps 1 to 5 above.
Page 11
10
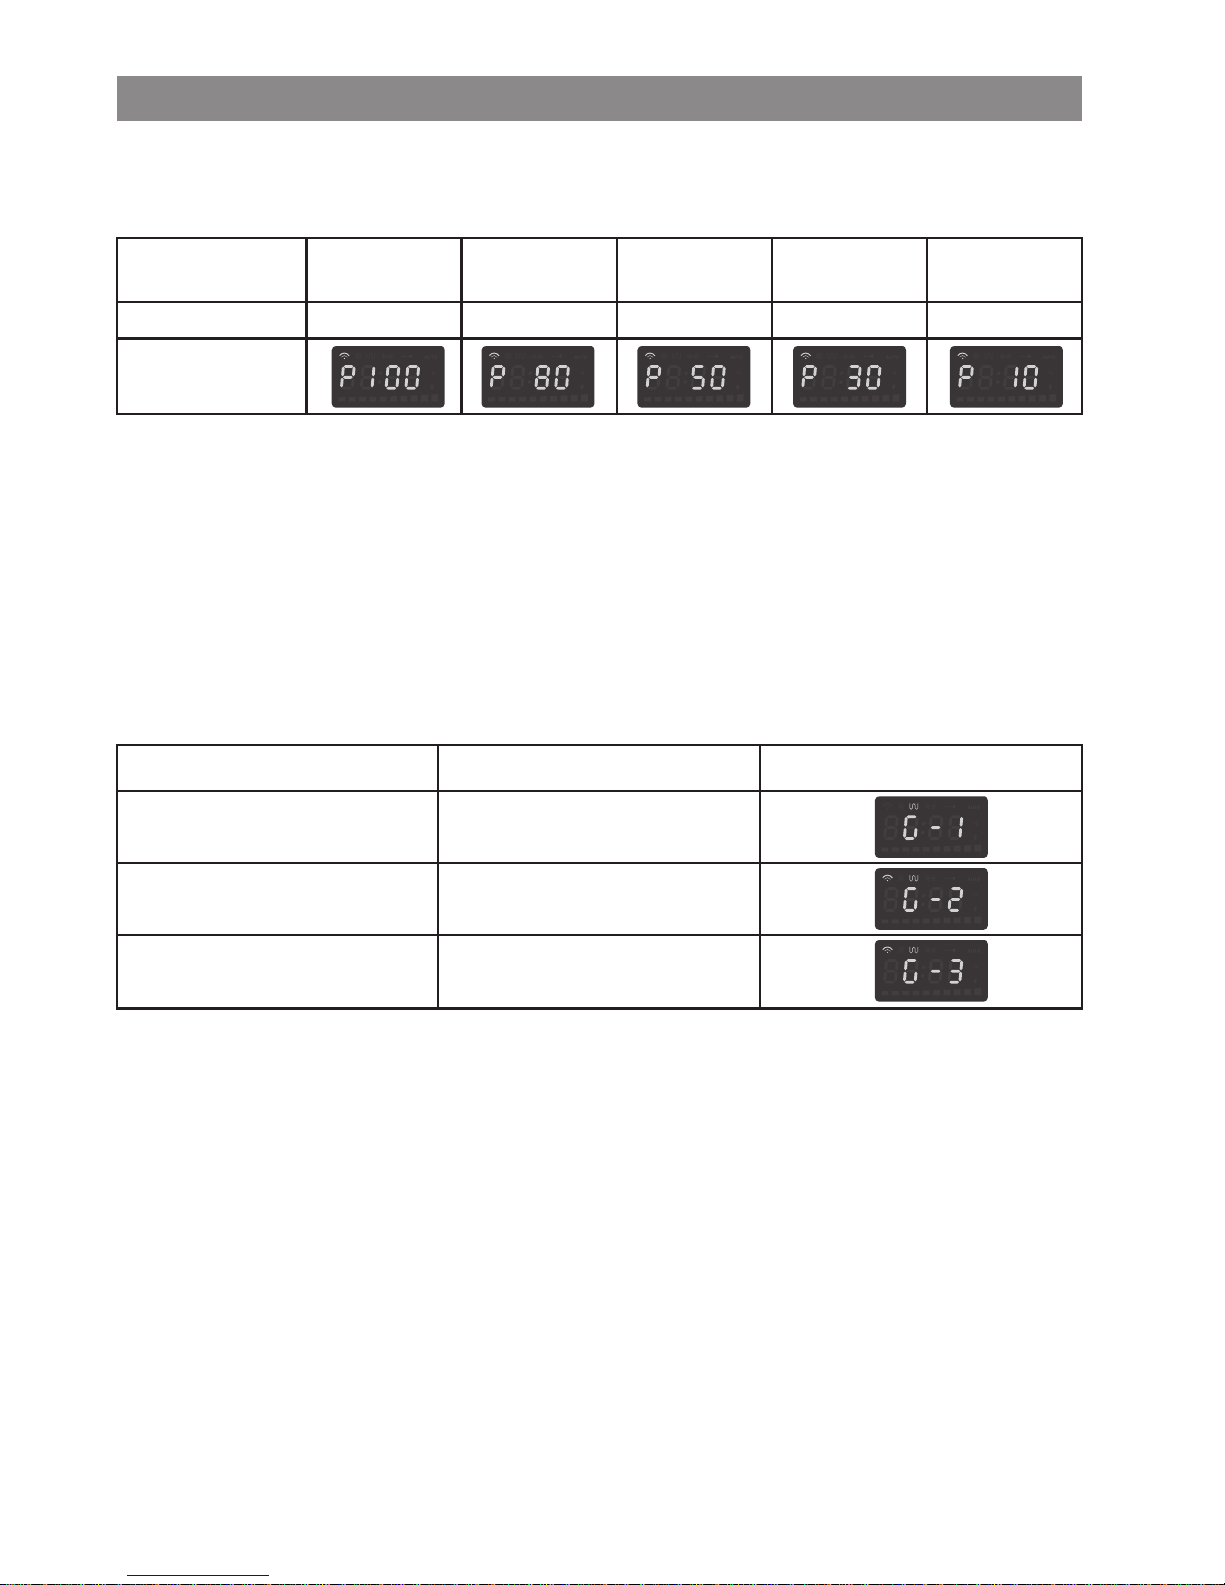
OPERA TION
1 2 3 4 5
Power level
High Mid-high Mid Mid-low Low
Button DisplayFunction
1. Power Level
Five power levels are available:
Display
2. Micro/Grill Combination Power Level
Press GRILL once
Press MIC.+Grill once
Press MIC.+Grill twice
Grill
Combination 1
Combination 2
3. Hot-air Convection
Ten temperatures are available for hot-air convection: 140∞C, 150∞C, 160∞C, 170∞C,
180∞C, 190∞C, 200∞C, 210∞C, 220∞C, 230∞C.
4. Microwave + Hot-air Convection Combination Cooking
Two
temperaturers for
combination cooking are available: 180∞C, 200∞C.
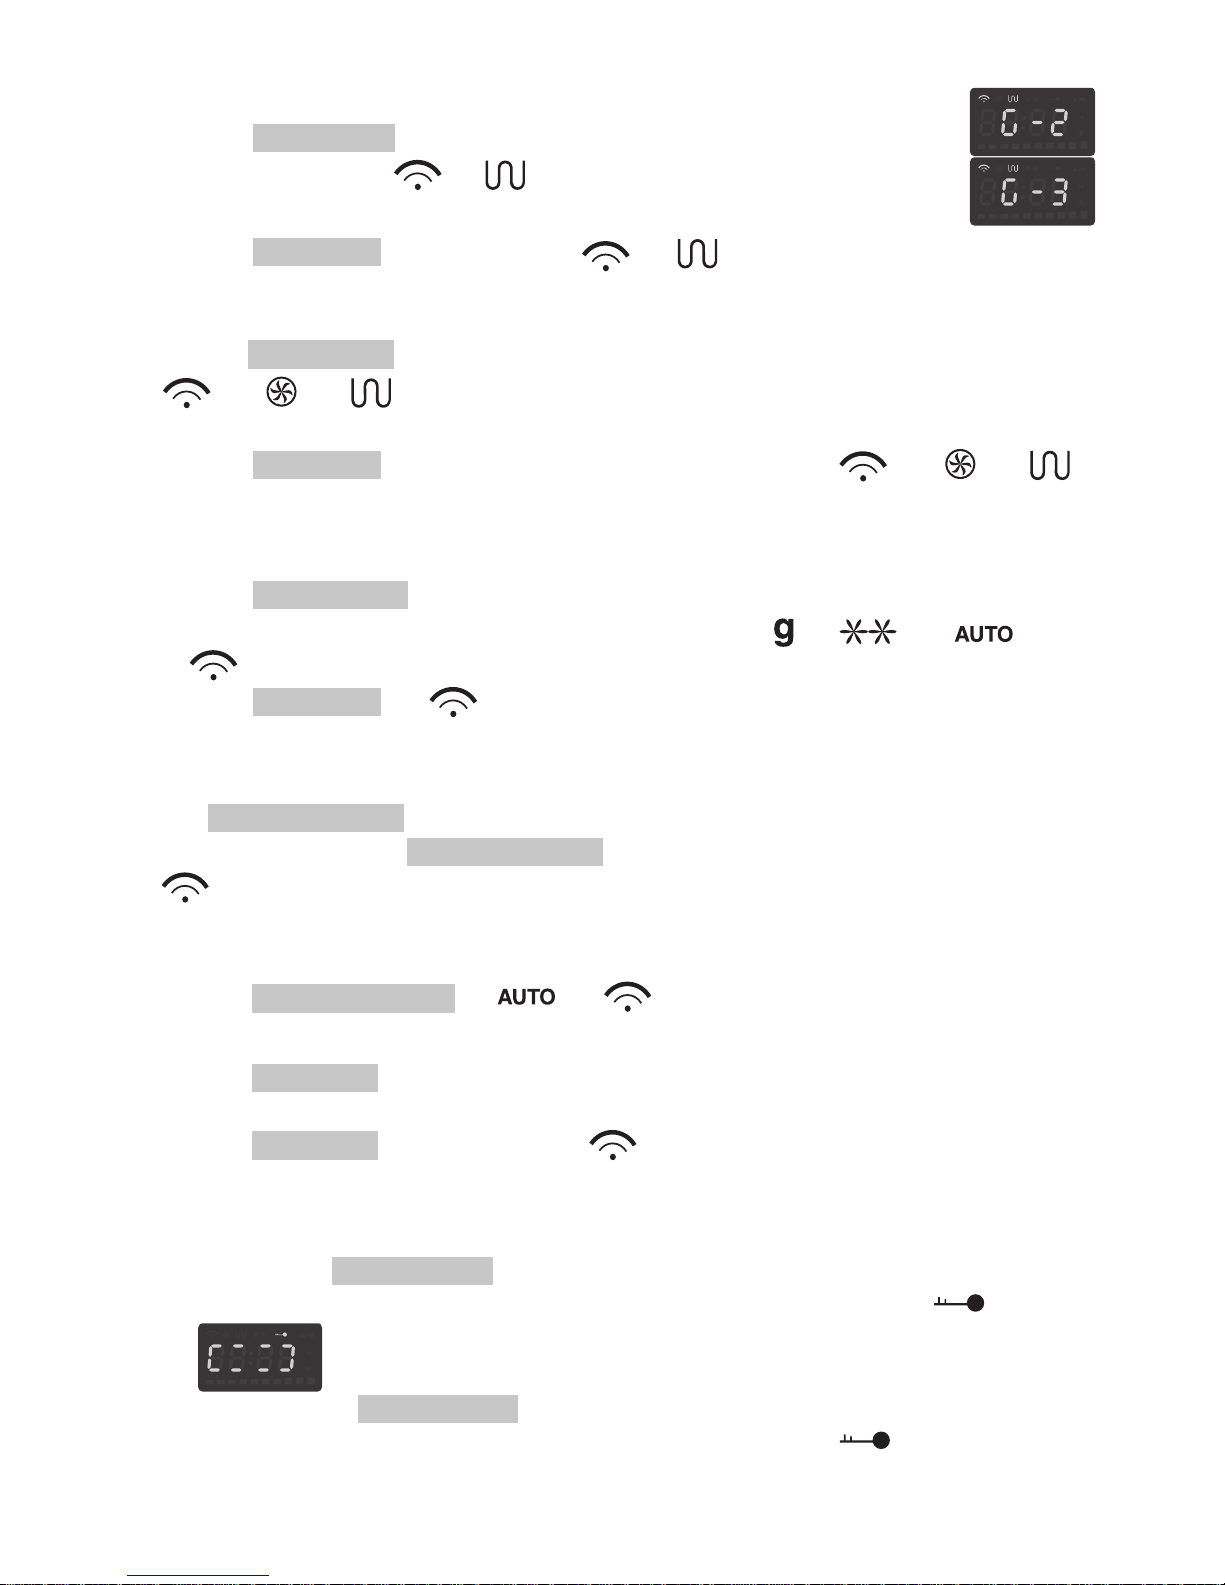
When G-2 is selected the microwave will operate for 10 seconds and then the grill will
operate for 20 seconds alternatively until the set cooking time is completed.
When G-3 is selected the microwave will operate for 15 seconds and then the grill will
operate for 15 seconds alternatively until the set cooking time is completed.
Page 12

11
5. Operation and Function
1) Microwave Cooking
(2). Turn the
rotary
switch to
set the cooking time required maximum 95 minutes
.
(3). Press " START/OK " to start cooking, " "
will flash in the display
.
2) Grill Cooking
(1). Press " GRILL " to choose grill function " "
and "G-1" will show in
the display
(2). Turn the
rotary
switch to
set the cooking time required. Maximum 95 minutes
.(3). Press " START/OK " to start grill cooking.
3). Hot-air Convection Cooking
A. With Preheating Function
(1). Press " CONVECTION " to choose hot-air convection cooking function.
" ", " ",
will show in the display and
"140" will flash in
the
display
which means the preheating temperature is 140°C.
(2). Turn the rotary switch to
set the preheating temperature required maximum
230°C. (If no other temperature is chosen, 140°C will be the heating temperature)
(3). Press " START/OK " to confirm the temperature set.
This will show in the display
(4). Press " START/OK " to start preheating. When the temperature is reached, the oven
will stop working and will beep 5 times. The display will show the preheating
temperature which will be flashing.
(5). Open the oven door and put food in, then close the door. Turn the
rotary
switch to
set the hot-air convection cooking time
required.
(6). Press " START/OK " to start cooking. Temperature indicator and " ", " " will be
flashing.
in the display
Note: The Maximum time of hot-air convection is 95 minutes.
(1). Press " MICROWAVE " repeatly to choose the power level 1~ 5, " " will show in the display.
B. Without Preheating
(1). Press " CONVECTION " to choose hot-air convection cooking function.
" ", " ", will show and "140" will flash in the display.
(2). Turn the rotary switch to set the temperature required. maximum 230°C.
(3). Press " START/OK " to confirm the temperature.This will show in the display
(4). Turn the rotary switch to set the cooking time required. Maximum 95 minutes.
(5). Press " START/OK " to start cooking. Temperature indicator and " ", " " will be
flashing.in the display
Page 13
12
4). Micro/Grill Combination Cooking
(1). Press " MIC.+GRILL " once or twice to choose combination function.
"G-2" or "G-3", and " ", " " will be show in the display.
(2). Turn the rotary switch to set the cooking time required.Maximum 95 minutes
(3). Press " START/OK " to start cooking, " ", " " will flash in the display
5). Microwave + Hot-air Convection Cooking
(1). Press " MIC.+CONV. "once or twice to choose combination function."C-1" or "C-2" and
. " ", " ", " " will show in the display.
(2). Turn the rotary switch to set the cooking time required.Maximum 95 minutes.
(3). Press " START/OK " to start cooking. Temperature indicator, " ", " ", " "
indicators will flash in the display.
6). Automatic Defrost
(1). Press " Defrost W.T. ", the display will show "dEF1";
(2). Turn the rotary switch to set the weight to be defrosted. " ", " ", " ",
" " will show in the display.
(3). Press " START/OK ", " " will flash, which means that the defrosting is beginning.
Press " EXPRESS COOK " to start speed cooking for 1 minute with full microwave power.
Each additional press on " " will prolong the cooking time for 1 minute.
" " will be
flashing
in the display.
(1). Press " AUTO FUNCTION ", " "," " will
show in the display
.
(4). Turn the
rotary
switch to choose
the correct weight
.
(5). Press " START/OK " to start cooking. " " will be flashing in the display.
(1).
To lock,
press " STOP/CLEAR " for 3 seconds, a long "beep" will be
heard denoting the entering into the children lock-out state and the key " "
" "
will show in the display
.
(2).
To unlock
, press " STOP/CLEAR " for 3 seconds, a long "beep" will be
heard denoting that the lock is released, and the key indicator " " will
disappear
from the display
.
EXPRESS COOK
(3). Press " START/OK " to confirm the subject. (A-1 or A-2------A-8 will
show in the display
)
(2). Turn the
rotary
switch to choose the subject. The display will show "A-1","A-2"....."A-8"
7). Speed Cooking
8). Auto-menu
9). Children Lock-out Function
Page 14

13
1). The maximum cooking time for "Microrowave", "Grill", "Convection", "Micro/Grill"
and "Micro/Conv" is 95 minutes.
2). Whilst on "Grill" halfway through the set time, two beeps will sound to remind you to turn
over the food you are grilling. If no action is taken within one minute the oven will continue
to operate on grill.
(1). Microwave power inquiring: In the process of microwave cooking, press " MICROWAVE "
button, current microwave power will be displayed. 3 seconds later the oven will turn
back to the former state.
(2). Hot-air Convection Temperature Inquiring: In the process of hot-air convection cooking,
press " CONVECTION " button, current temperature will be displayed. 3 seconds later
the oven will turn back to the former state.
(3). Micro/Grill Combination Cooking Inquiring: In the process of Micro/Grill combination
cooking, press " MIC.+GRILL " combination button, the display will show the current
combination. 3 seconds later the oven will turn back to the former state.
(4). Micro/Conv Combination Cooking Inquiring: In the process of Micro/Conv combination
cooking, press " Mic.+Conv. " button, the display will show the current combination.
3 seconds later, it will turn back to the former state
(5). Auto-menu Inquiring: In the process of Auto-menu, press " Auto Function " button, the
display will show the current subject. 3 seconds later the oven will turn back to the
former state.
10). State Inquiring
11). Specific Remarks
12). Clock/Pre-Set Function
(1) Set the Clock before proceeding;
(2) Input the cooking procedure; two stages can be set at most. Defrost shouldn't be set in
the multi-level program.
Example: If you want to cook the food with 80% microwave power for 10 minutes.
Do it as following:
a. Press " Microwave " to choose the 80% microwave power;
b. Turn the digital switch to adjust the cooking time of 10 minutes
(3) Press the " Clock/Pre-Set ", the hour figure will flash;
(4) Turn the coding switch to set the hour figure, the setting scope is 0-23;
(5) Press the " Clock/Pre-Set ", the minute figure will flash;
(6) Turn the coding switch to set the minute figure, the setting scope is 0-59;
(7) Press " Start/Ok " key to finish the pre-set cooking and the oven return to clock display
status.
Note:1) If the pre-set time is over but the oven door is closed, the microwave oven will
cook automatically after alarming twice,otherwice, the oven will cancel the setting
after alarming twice.
2) Clock must be set first. Otherwise, it will not function.
Page 15

14
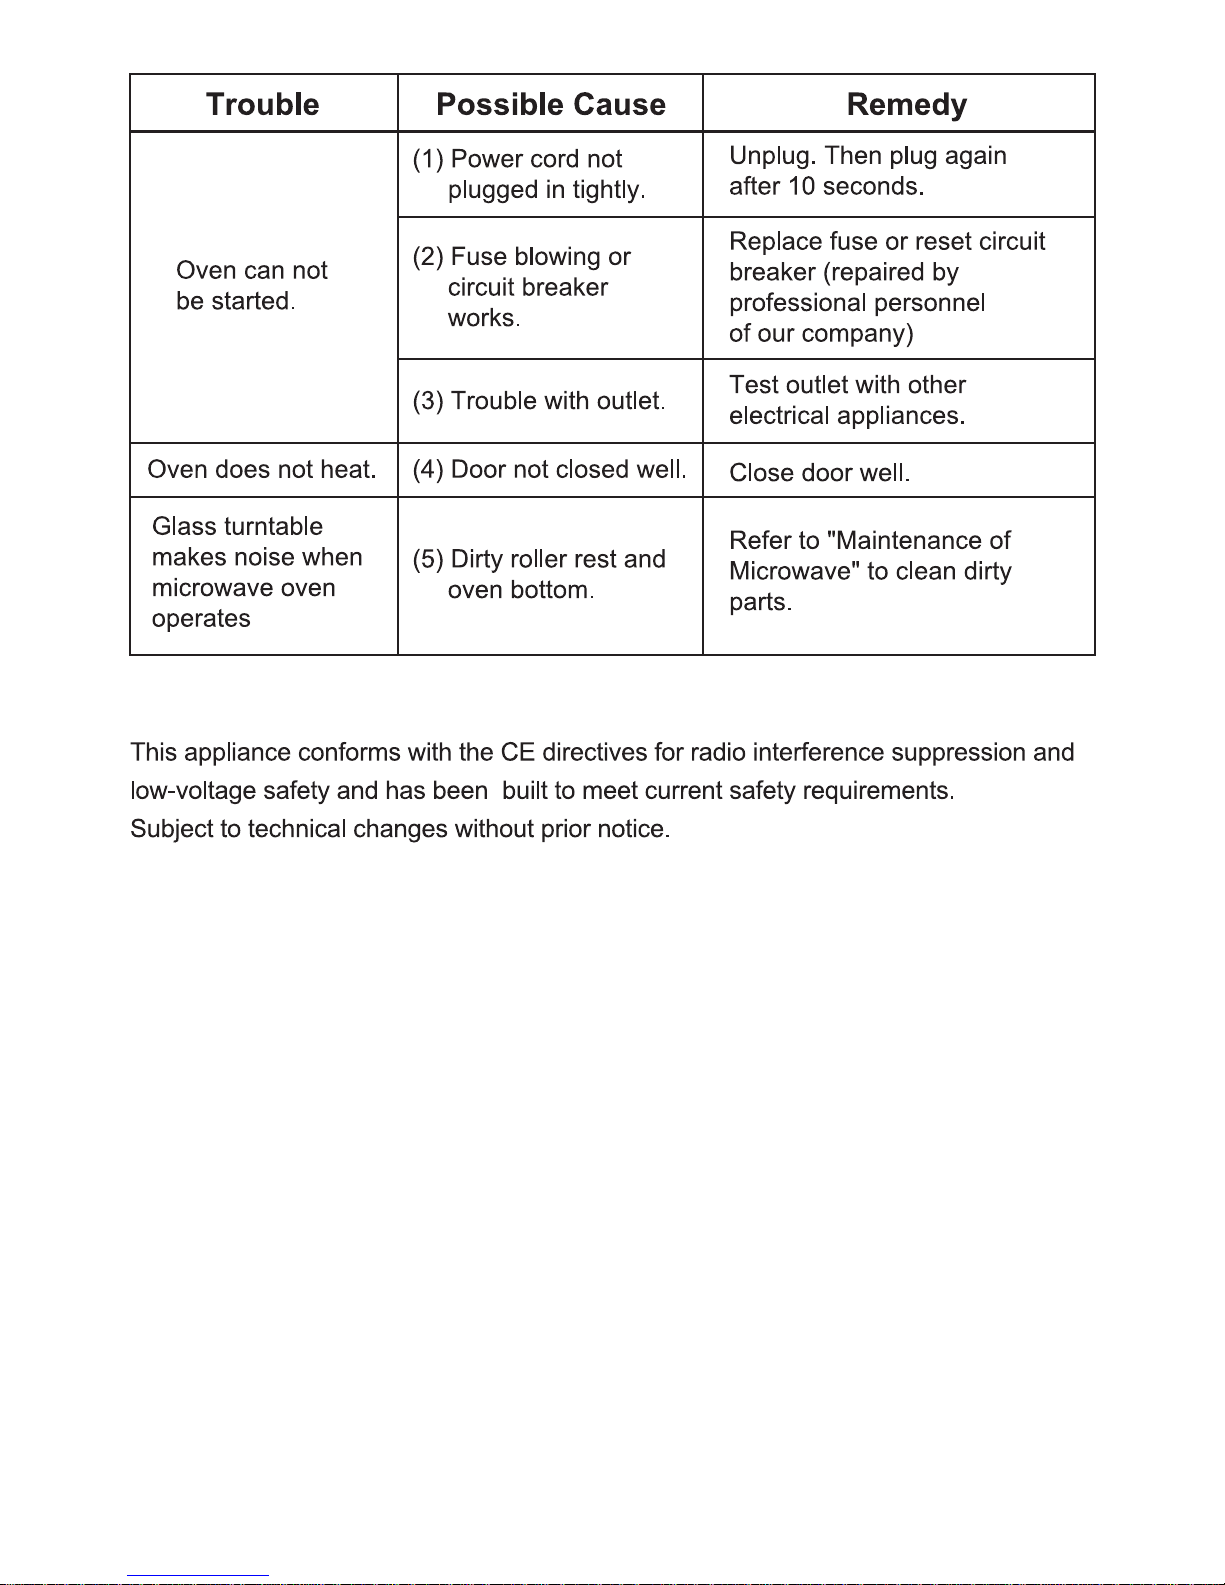
TROUBLE SHOOTING
Radio and TV reception may be interfered when
microwave oven is operation. It is similar to the
interference of small electrical appliances , like
mixer , vacuum cleaner,and electric fan.
It is normal.
Microwave oven interfering
TV reception
Dim oven light
In low power microwave cooking , oven light may
become dim . It is normal.
In cooking , seam may come out of food . Most will
come out from vents . But some may accumulate
on cool place like oven door . It is normal.
It does no damage to oven if it operates empty for
quite short time . But it should be avoided.
Steam accumulating on
door, hot air out of vents
Oven started accidentally
with no food in .
13). Multi-power Cooking
Two stages can be set under this function.
Defrost setting can only be set as the first stage cooking.
Auto menu setting cannot be set as either of the two stages under this function.
Example: to cook the food with 100% microwave power for 5 minutes+ grill for 10 minutes.
Do it as following:
1) Press " Microwave " once to choose 100% microwave power;
2) Turn the digital switch to adjust the cooking time of 100% microwave power;
3) Press " Grill " to choose grill function;
4) Turn the digital switch to adjust the cooking time of grill time;
5) Press " Start/Ok " to start cooking.
Page 16
15
QUESTIONS AND ANSWERS
Q. What is wrong when the oven light will not glow?
A. *Light bulb has blown.
* Door not closed.
Q. Why is steam coming out of the air exhaust vent and / or why is water dripping from the
bottom of the door?
A. Steam is normally produced during cooking operations. This microwave oven has been
made to vent this steam out of the side and top vents, occasionally this steam condenses
on the door and water then drips out at the bottom of the door. This is quite normal and
safe.
Q. Does microwave energy pass through the viewing screen in the door?
A. No. The metal screen reflects the energy to the oven cavity. the holes, or ports are made
to allow light to pass, they do not let microwave energy through.
Page 17

16
Q. Will the microwave oven be damaged if it operates while empty?
A. Yes. Never run it empty.
Q. Why do eggs sometimes pop?
A. When baking or poaching eggs, the yolk may pop due to steam build-up inside the yolk
membrane. To prevent this, simply pierce the yolk with a toothpick before cooking.
Never cook eggs without piercing their shells.
Q. Why is standing time recommended after the cooking operation has been completed?
A. Standing time is very important. With microwave cooking, the heat is in the food, not in
the oven. Many foods build up enough internal heat to allow the cooking
process to continue, even after the food is removed from the oven. Standing time for
joints of meat, large vegetables and cakes is to allow the inside to cook completely,
without overcooking the outside.
Q. Why do sparks and crackling (arcing) occur in the oven?
A. There may beseveralreasons why sparks and crackling (arcing) within the cavity happens.
* You have left a fork or other metal utensils in the oven.
* You are using dishes with metal parts or trim (silver or gold).
* You are using a large amount of metal foil.
* You are using a metal twist tie.
Variations in cooking times. Cooking guide times and heat settings are suggestions
only to help prevent over cooking, one of the most common problems in getting used
to a microwave oven. Variations in size, shape, weights and dimensions could require
longer or shorter cooking times. Use your own judgment to check whether the food has
been cooked properly just as you would do with a conventional oven.
Page 18

17
TECHNICAL SPECIFICATION
Input Power 230V~50Hz, 1450W
Output Power: 850W
Grill Power 1000W
Microwave Frequency: 2450MHz
Outside Dimensions: 307mm(H)x512mm(W)x441mm(D)
Oven Cavity Dimensions: 207mm(H)x335mm(W)x330mm(D)
Oven Capacity: 25Litres
Net Weight: Approx.19.0kg
Before You Call For Service
Refer to the following short checklist. You may find that the problem you are experiencing
has nothing to do with the microwave oven itself. A couple of quick checks may save you an
unnecessary service call.
Problem
The oven doesn't work at all.
Check the following
The mains plug is securely plugged into the power socket.
The door is firmly closed.
The cooking time is set on the timer selector control.
The fuse in the mains plug has not blown.
The mains circuit breaker in the home has not tripped.
Problem
"Arcing" or sparking in the oven interior.
Check the following
Any dishes, trays etc which are made of metal or have metal trims must not be used in the
microwave oven.
Metal skewers should be covered with food and make sure they don't touch the sides of the
oven interior when rotating. If "arcing" occurs again, remove skewers until food is cooked.
Remove any other metal cookware for the oven.
If a problem persists, contact your nearest Comet Service Centre or ring the Technical
Helpline on 0113 2793520
Waste electrical and electronic products must not be disposed of with
household waste. Please refer to the retailer from whom you purchased
this item for disposal instructions .
 Loading...