

Prestige P-950WESP Owner's Manual
128-6864
1 of 16
Released 7-8-03
OO
OO
O
WNER'SWNER'S
WNER'SWNER'S
WNER'S
MAMA
MAMA
MA
NUALNUAL
NUALNUAL
NUAL
P-950WESP
AM/FM/MPX RADIO WITH FOLD-DOWN
DETACHABLE FRONT PANEL,
COMPACT DISC PLAYER WITH ELECTRONIC SKIP PRO-
TECTION (ESP), CD CHANGER CONTROLS,
WIRELESS REMOTE CONTROL
AND QUARTZ CLOCK
T/F
EQ
LOCSCANMUTE
SEL
1
OPEN
JAZZ
MONOSTLOC
REG
LOUD
POP
CLAS
CD-R/RW PLAYBACK
POWER LEVEL METER
2
PAU SCN RPT3SHF
45
D.DN D.UP6MODE
P-950W
ME/CR
TP
AF TA EON
PTY
Sub. W
/Seek
/Track
Tune
ILL
PWR
MONO
BAND
AS/PS
LOUD
MULTI-COLOR FLOURESCENT DISPLAY
ESP

128-6864
2 of 16
INDEX
Page
Operating Instructions............................................................... 3 - 9
Setting the Clock ..........................................................................9
CD Player Error Codes.................................................................9
Specifications ..............................................................................10
CD Changer Controls..................................................................11
CD Changer Error Codes............................................................12
Wireless Remote Control Operation...........................................13
Care and Maintenance ...............................................................14
Handling Compact Discs ............................................................15
Notes on Discs ............................................................................15
Electronic Skip Protection...........................................................15
Warranty ..............................................................................Back Cover
128-6864
3 of 16
-3-
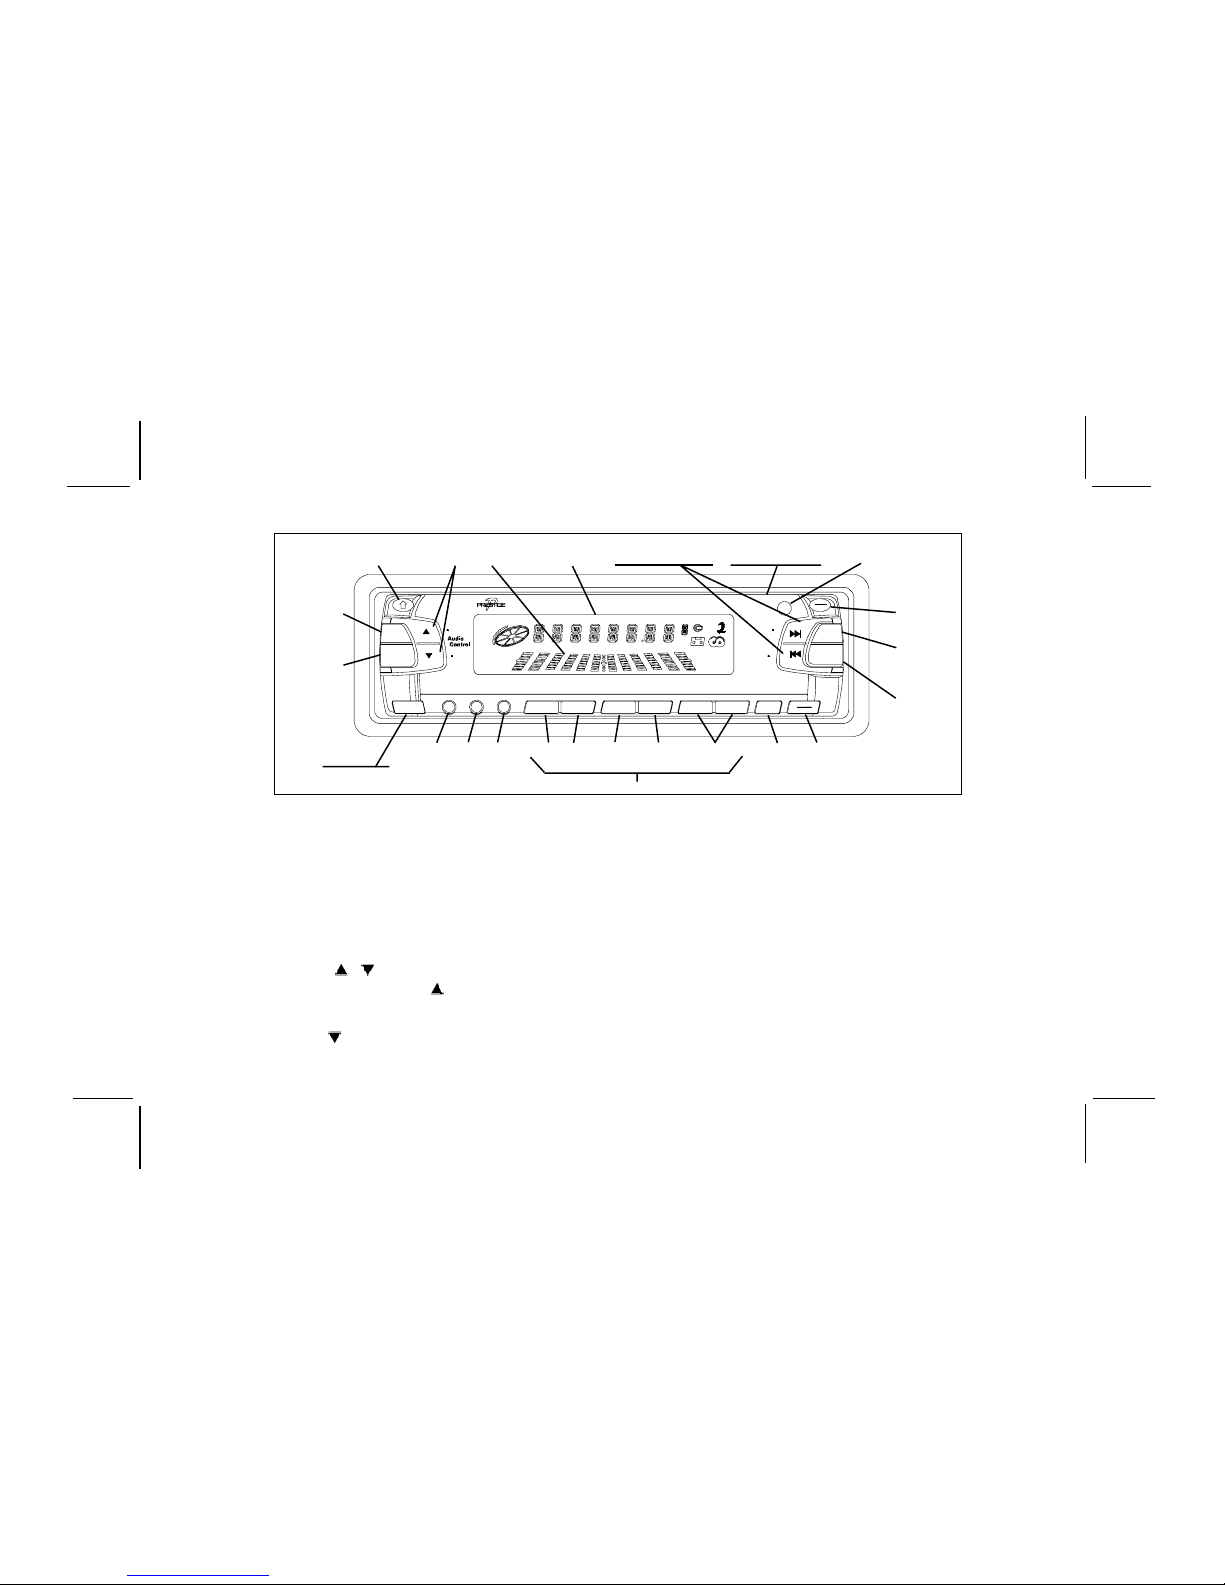
1 POWER ON-OFF/ILLUMINATION (PWR/ILL) BUTTON
Press this button to turn the un it on o r off. If the ignition switch is
“on”, the unit will also turn on automatically when a compact disc is
inserted, or if the MODE switch or BAND switch is pressed.
When the unit is on, each time the button is momentarily pressed
and released, the VFD display panel back-lighting intensity will
change from low-to-medium-to-high, and then back to low, thereby
providing three different intensity settings.
2 AUDIO CONTROL ( / ) BUTTONS
To increase the volume level, press the button. The volume will
increase and the level will be shown on the display panel from a
minimum of VOL 00 to a maximum of VOL 100. To decrease the
volume level, press the button. The display will automatically
return to the normal indication 5 seconds after the last volume
adjustment or when another function is activated. These control but-
tons are also used in conjunction with the Select (SEL) button
3 to
adjust the bass, treble, balance and fader levels as described in
4, 5, 6 and 7.
3 PUSH SELECT CONTROL BUTTON (SEL)
This button is used to select the audio function (volume, bass,
treble, balance, or fade) whose setting is adjusted using the AUDIO
CONTROL buttons
2. Pressing the SEL button once will set the
unit for bass adjustment (BAS will appear on the display panel)
and an audible beep will occur. Pressing the button additional times
will select treble adjusBtment (TRB on the display), balance (BAL),
or fader (FAD), each accompanied by a beep tone. The display will
automatically return to the normal indication 5 seconds after the
last adjustment or when another function is activated.
NOTE: Bass and Treble cannot be adjusted while the Equalizer
function
cu is in ROCK, CLAS or POP mode.
OPERA TING INSTRUCTIONS
15
9214
28
29
(BEHIND PANEL)
18
35
33
17
8
10
30
13
1
12
26
36
22
23
39
25
41
16
24
40
19, 27, 31, 32
11, 20, 21, 37, 38
3, 4, 5, 6, 7
34
T/F
EQ
LOCSCANMUTE
SEL
1
OPEN
JAZZ
MONOSTLOC
REG
LOUD
POP
CLAS
CD-R/RW PLAYBACK
POWER LEVEL METER
2
PAU SCN RPT3SHF
45
D.DN D.UP6MODE
P-950W
ME/CR
TP
AF TA EON
PTY
Sub. W
/Seek
/Track
Tune
ILL
PWR
MONO
BAND
AS/PS
LOUD
MULTI-COLOR FLOURESCENT DISPLAY
ESP

128-6864
4 of 16
4 BASS CONTROL
To adjust the bass level (Equalizer function inactive), first select
the Bass mode by pressing the SEL button
3 so the BAS indication
appears on the display panel. Within 5 seconds of choosing the
Bass mode, press the
AUDIO CONTROL 2 button to decrease
the bass response, or the
AUDIO CONTROL button to increase
it as desired. The level will be shown on the display panel from a
minimum BAS -10 to a maximum of BAS +10 (BAS 00 indicates
flat response). The display will automatically return to the normal
indication 5 seconds after the last adjustment or when another
function is activated.
5 TREBLE CONTROL
To adjust the treble level (Equalizer function inactive), first select
the Treble mode by pressing the SEL button
3 so the TRB
indication appears on the display panel. Within 5 seconds of
choosing the Treble mode, press the
AUDIO CONTROL button
2 to decrease the treble response or the AUDIO CONTROL
button to increase it as desired. The level will be shown on the
display panel from a minimum TRB -10 to a maximum of TRB +10
(TRB 00 indicates flat response). The display will automatically
return to the normal indication 5 seconds after the last adjustment
or when another function is activated.
6 LEFT/RIGHT BALANCE CONTROL
To adjust the left-right speaker balance, first select the Balance
mode by pressing the SEL button
3 so the BAL indication appears
on the display panel. Within 5 seconds of choosing the Balance
mode, press the
AUDIO CONTROL button 2 to adjust the
stereo balance to the left channel speakers or the
AUDIO
CONTROL button to adjust it to the right channel speakers. The
balance position will be shown on the display panel from BAL L10
(full left) to BAL R10 (full right). When the volume level between
-4-
the left and right speakers is equal, BAL 00 will be shown on the
display panel. The display will automatically return to the normal
indication 5 seconds after the last adjustment or when another
function is activated.
7 FRONT/REAR FADER CONTROL
T o adjust the front-rear speaker balance, first select the Fader mode
by pressing the SEL button
3 so the FAD indication appears on
the display panel. Within 5 seconds of choosing the Fader mode,
press the
AUDIO CONTROL button 2 to adjust the front-rear
speaker balance to the rear speakers or the AUDIO CONTROL
button to adjust it to the front speakers. The fader position will be
shown on the display panel from FAD R10 (full rear) to FAD F10
(full front). When the level between the front and rear speakers is
equal, FAD 00 will be shown on the display panel. The display will
automatically return to the normal indication 5 seconds after the
last adjustment or when another function is activated.
8 LOUDNESS CONTOUR (LOUD)
When listening to music at low volume levels, this feature will boost
the bass and treble ranges to compensate for the characteristics
of human hearing. Press and hold the BAND/LOUD button for 2
seconds to activate this feature; LOUD ON will appear on the display
for 5 seconds. Pressing the button again for 2 seconds will deactivate
the feature; LOUD OFF will appear on the display panel for 5
seconds.
9 AUDIO MUTE SELECTOR (MUTE)
Press this button momentarily to mute the volume from the system
(MUTE will appear blinking on the display panel). Pressing the
button again or activating any other button/function will return to
the volume level setting in use before the Mute function was
activated. During disc play, pressing this button will mute disc

128-6864
5 of 16
-5-
audio; however, disc play will continue and not be paused. During
this time, the indication will remain on the display panel to show
that a disc is still loaded in the unit.
bl AM/FM BAND SELECTOR (BAND)
Each time the BAND/LOUD button is pressed momentarily, the
radio band is changed. The indication AM, F1, F2 or F3 will appear
on the display panel according to your selection.
bm UP/DOWN TUNE/SEEK/TRACK ( / ) BUTTONS
T o manually select a radio station, press for longer than 0.5 second
either the UpTuning (
) button to advance the unit higher, or
press the Down Tuning (
) button to tune lower within the
selected band.
Pressing either button momentarily will activate the Automatic Seek
Tuning function. The radio will seek the next available station in
the selected direction and stop at that frequency. The Seek function
can be stopped by pressing the button again or activating any other
tuning function.
bn LOCAL (LOC) BUTTON
This feature is used to select the strength of the signals at which
the radio will stop during Automatic Seek Tuning. Pressing and
this button will select the Local setting (LOCAL will appear on the
display panel) and only strong (local) stations will be received.
Pressing the button again will select the normal Distant setting
(LOCAL will disappear from the display panel, and Dx will be
displayed instead) and the radio will stop at a wider range of signals,
including weaker (more distant) stations.
bo FM MONO/STEREO BUTTON (MONO)
During FM radio operation, this button is used to select mono or
stereo reception of the broadcast signal. Under normal reception
conditions, the unit should be left in the stereo mode as indicated
by the ST indication on the display panel when tuned to an FM
stereo signal. If the stereo signal is too noisy for comfortable
listening, press the MONO button to switch to mono reception (the
ST indication will disappear from the display panel, and MONO will
be displayed). T o return to stereo reception mode, press the button
again so that the ST indication reappears in the display.
bp LOCAL STATION SCAN (SCAN) BUTTON
Press this button momentarily to commence an scan of the nearby
local stations whose signal strengths are the strongest (the station
number will appear flashing on the display panel during station
search). Press the button again momentarily to stop the Scan
operation and remain on the current local frequency. To return to
one of the frequencies preset into the current band, press the desired
pre-set button.
bq STATION PRE-SET MEMORIES
T o set any of the 6 pre-set memories in each band, use the following
procedure:
1. Turn the radio on and select the desired band.
2. Select the first station to be pre-set using the Manual
TUNE or Automatic SEEK Controls
bm .
3. Press the pre-set button to be set and continue to hold it
in for approximately 2 seconds. The preset number,
followed by CH (channel), will appear on the display panel
 Loading...