

Prestige IQ Owner's Booklet

Owner’s Booklet
Blood Glucose
SYSTEM
Blood Glucose
SYSTEM
IQ
IQ
Owner’s Booklet

Our Commitment to you
Our goal is to provide you with quality healthcare products
and dedicated customer service. If you have any questions
about the use of our
PPrreessttiiggee SSmmaarrtt SSyysstteemm
®
®
products, visit
our web site at www.homediagnostics.com or please call:
1-800-803-6025
For Medical Assistance,
call your Doctor or Diabetes Healthcare Professional.
Congratulations on the purchase of your Prestige
Smart System
®
Blood Glucose Test System. You
now have a very simple and accurate way to test your
blood glucose (sugar) levels, anytime, anywhere.
Glucose testing is an important part of controlling
your diabetes. Studies show that keeping glucose
levels in control may lower the chance of developing
serious diabetes-related health problems such as
kidney problems and blindness. Regular testing lets
you know if your sugar is ‘too high’, ‘too low’, or
‘just right’, depending on what you and your
Healthcare Professional decide is ‘just right’ for you.
Do not use the
Prestige Smart System®IQ Meter in
any way not recommended in this Booklet.
1
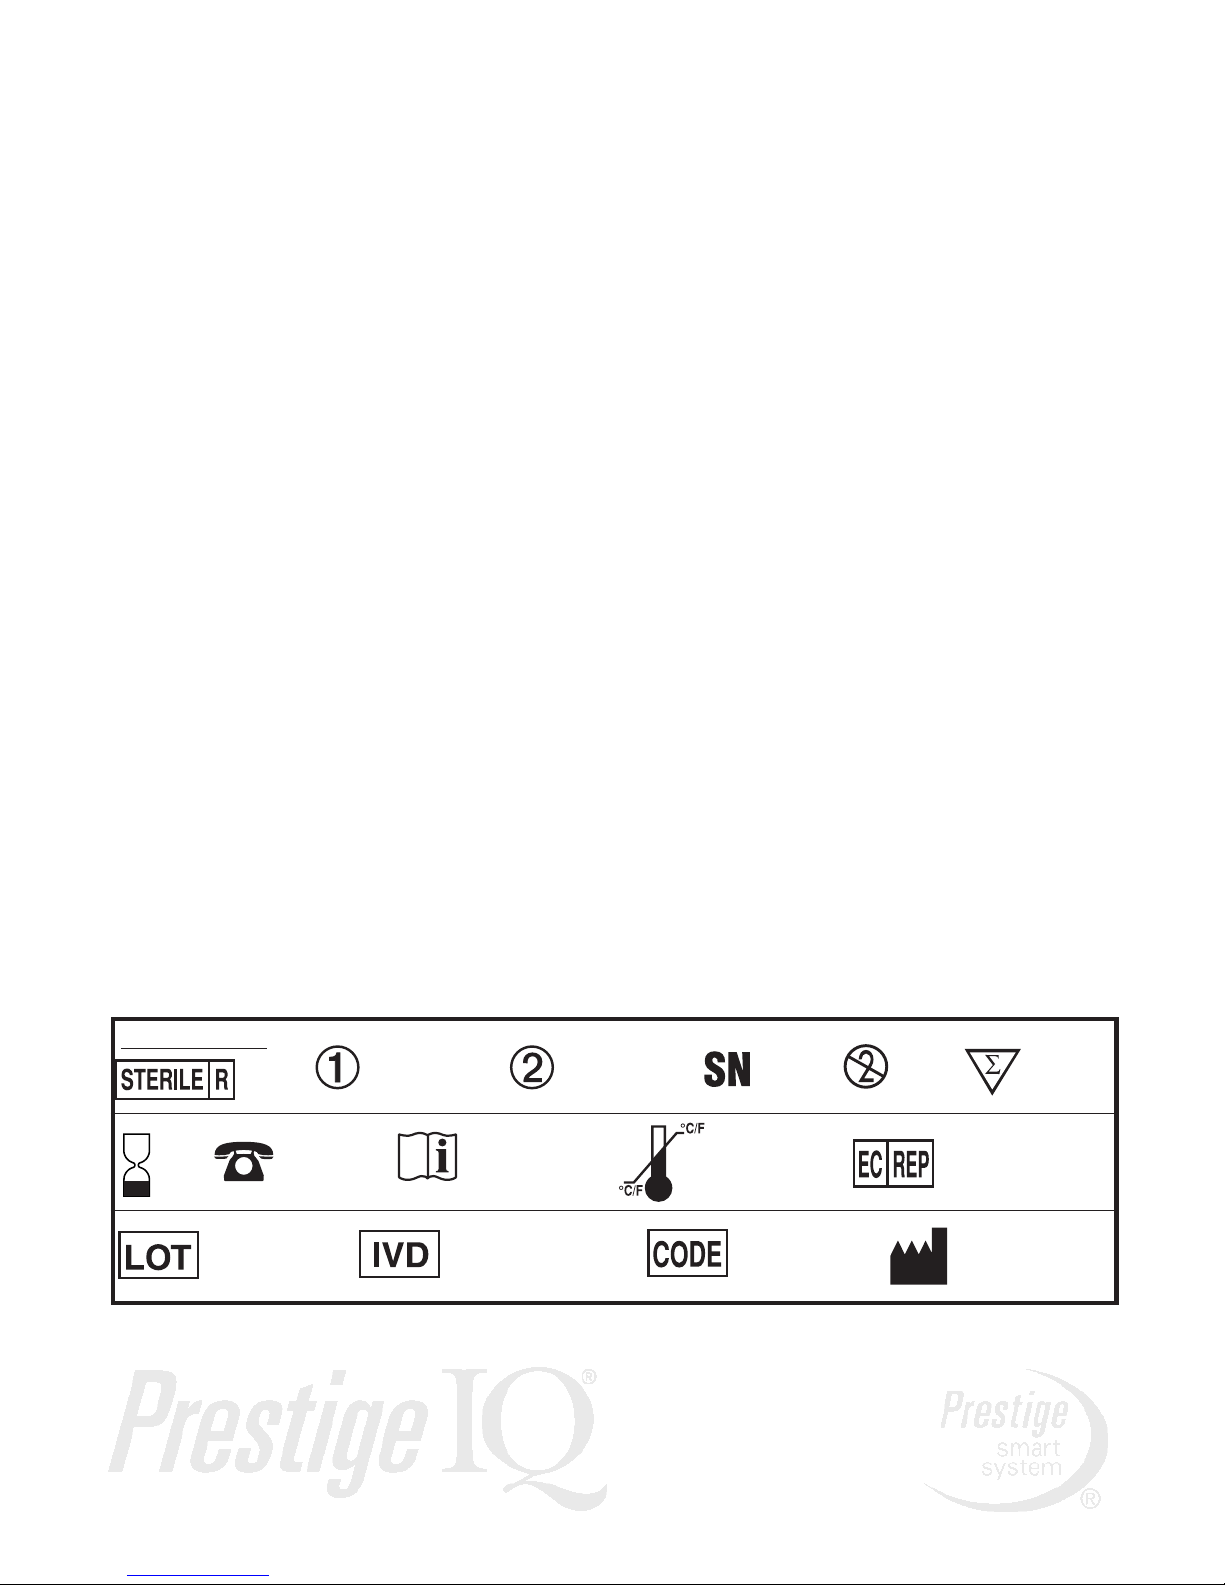
For
assistance
call
Use
By
date
Lot
number
For in vitro
diagnostic
testing only
Authorized
Representative
Sterile
Single
Use
Only
Low
Control
Range
SYMBOLS:
Code
number
Number
of Tests
Attention! Read
Instructions
for Use.
Storage
temperature
range
Manufactured
by
High
Control
Range
Serial
number
IMPORTANT:
1. Read ALL instructions before use.
2. Use only Prestige Smart System
®
Test
Strips and Prestige Smart System
®
blue
Glucose Control Solution when testing
with Prestige Smart System®IQ Meters.
3. Code your IQ Meter: Meter Code and Test
Strip Calibration Code MUST match to get
correct test results.
4. Check any results that “feel” wrong:
Repeat the test if your results seem much
higher or lower than you think they should be.
5. Work with your Diabetes Healthcare
Professional: Discuss your results with your
Diabetes Healthcare Professional.
6. Use only
W
Whhoollee
BBllooood
d
when testing with
the Prestige Smart System®: If you choose
to display results as plasma, the Meter uses
the whole blood value to calculate and then
display the plasma value.
7. The Prestige Smart System is not
recommended for diagnosing diabetes or
testing blood glucose in newborns.
2
TABLE OF CONTENTS
Section 1 The Prestige Smart System®. . . . 4-10
IQ Meter . . . . . . . . . . . . . . . . . . . . . . 4-5
Test Strip Vial . . . . . . . . . . . . . . . . . . . 6
Test Strip . . . . . . . . . . . . . . . . . . . . . . . 6
Meter Options . . . . . . . . . . . . . . . . 7-10
Section 2 CODE THE METER. . . . . . . . . . . . 11
Section 3 CHECK THE SYSTEM . . . . . . 12-18
Standard Strip Test . . . . . . . . . . . . 13-14
Glucose Control Test . . . . . . . . . . 15-18
Section 4 TEST WHOLE BLOOD . . . . . . 19-21
Section 5 IMPORTANCE OF TESTING. . . . 22
Section 6 METER MEMORY . . . . . . . . . . 23-25
Recalling Blood Test Results . . . . 23-24
Recalling Morning Average Value. . . 25
Section 7
CLEANING & MAINTENANCE
. . 26-27
Section 8 CHANGE METER BATTERY 28-29
Section 9 DISPLAY MESSAGES . . . . . . . 30-34
Section 10 TROUBLESHOOTING. . . . . . . 35-36
Section 11 METER SPECIFICATIONS . . . . . 37
References . . . . . . . . . . . . . . . . . . . . . . . . . . . . . . 38
Warranty . . . . . . . . . . . . . . . . . . . . . . . . . . . 39-40
3
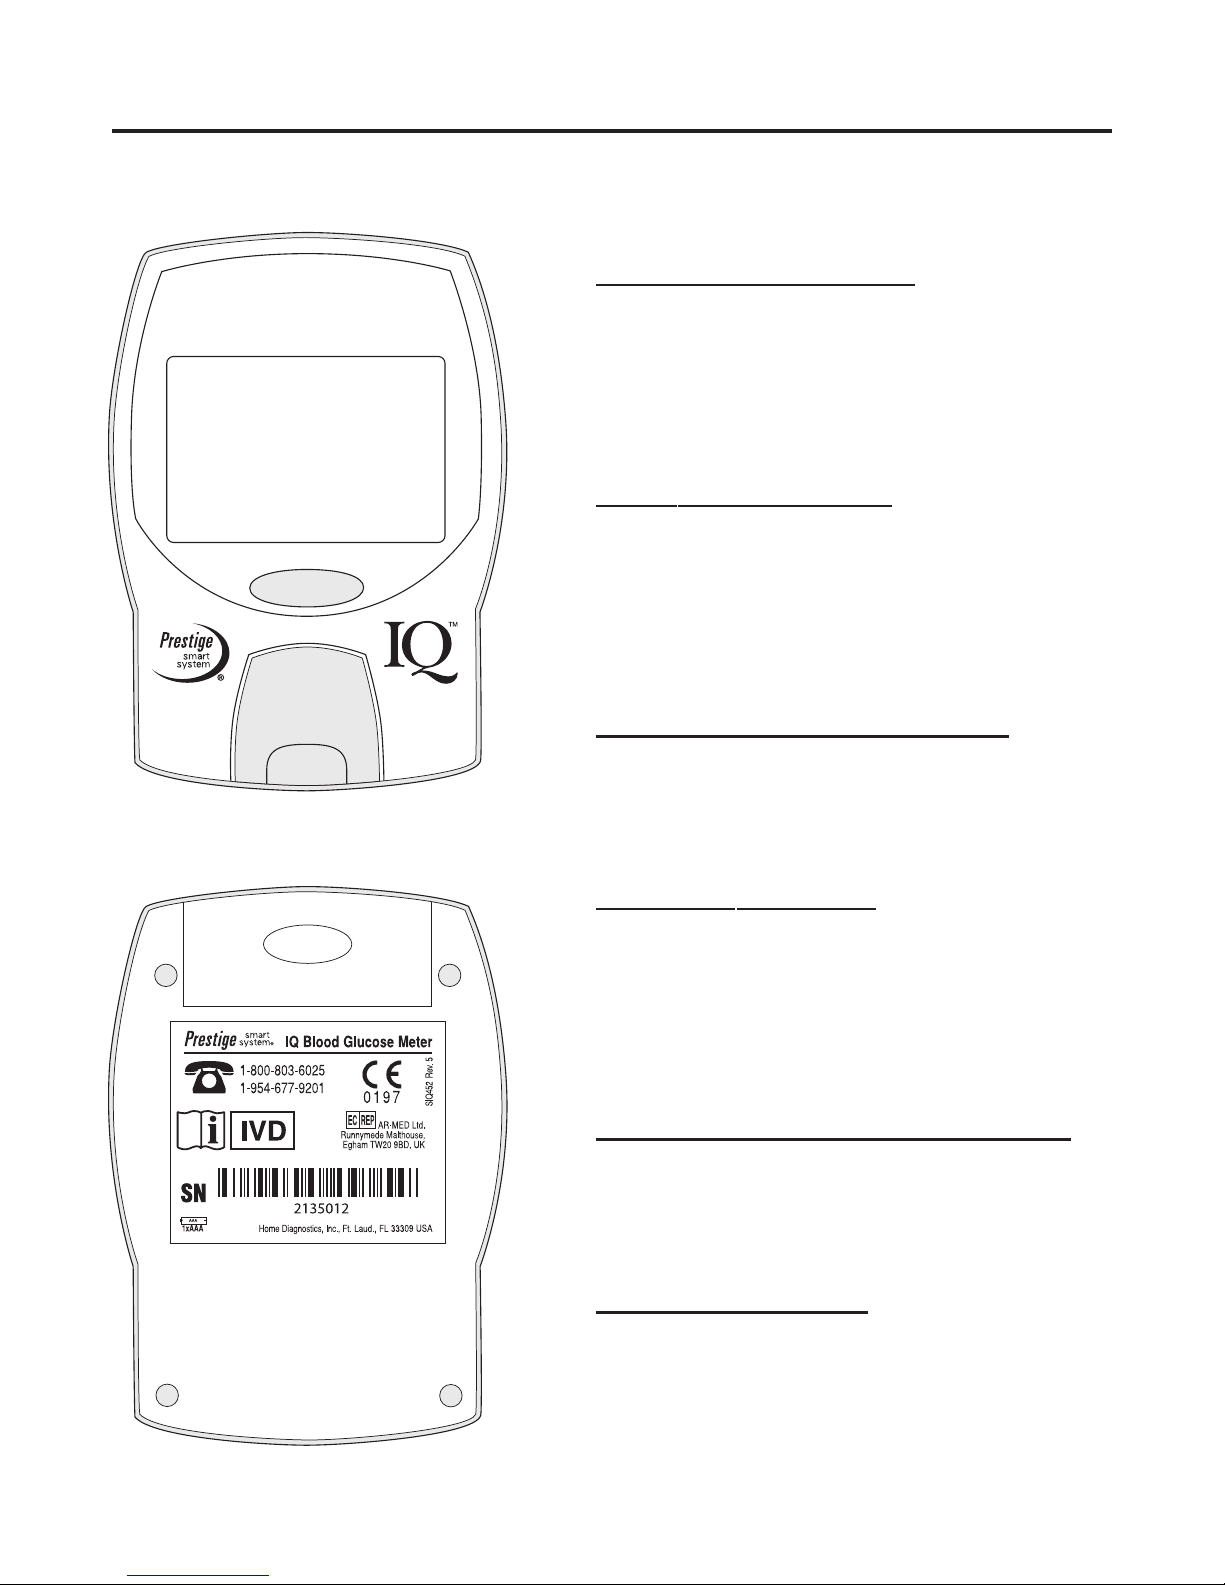
Back of Meter
Î
Ï
4
Front of Meter
·
¸
¹
Section 1 The Prestige Smart System
®
Prestige Smart System®IQ Meter
Display Screen:
Shows numbers, words and
symbols needed to operate
the Meter.
·
Power Button:
Turns Meter on and off.
Meter turns off after 3
minutes of non-use.
¸
Test Strip Platform:
Holds Test Strip or Standard
Strip in place during a test.
¹
Test Window:
Area under Test Strip
Platform that contains Meter
optics.
Î
Battery Compartment:
Holds one replaceable AAA
(1.5 volt) alkaline battery.
Ï
Meter Label:
Provides Meter name, serial
number and toll-free number
for assistance.
5
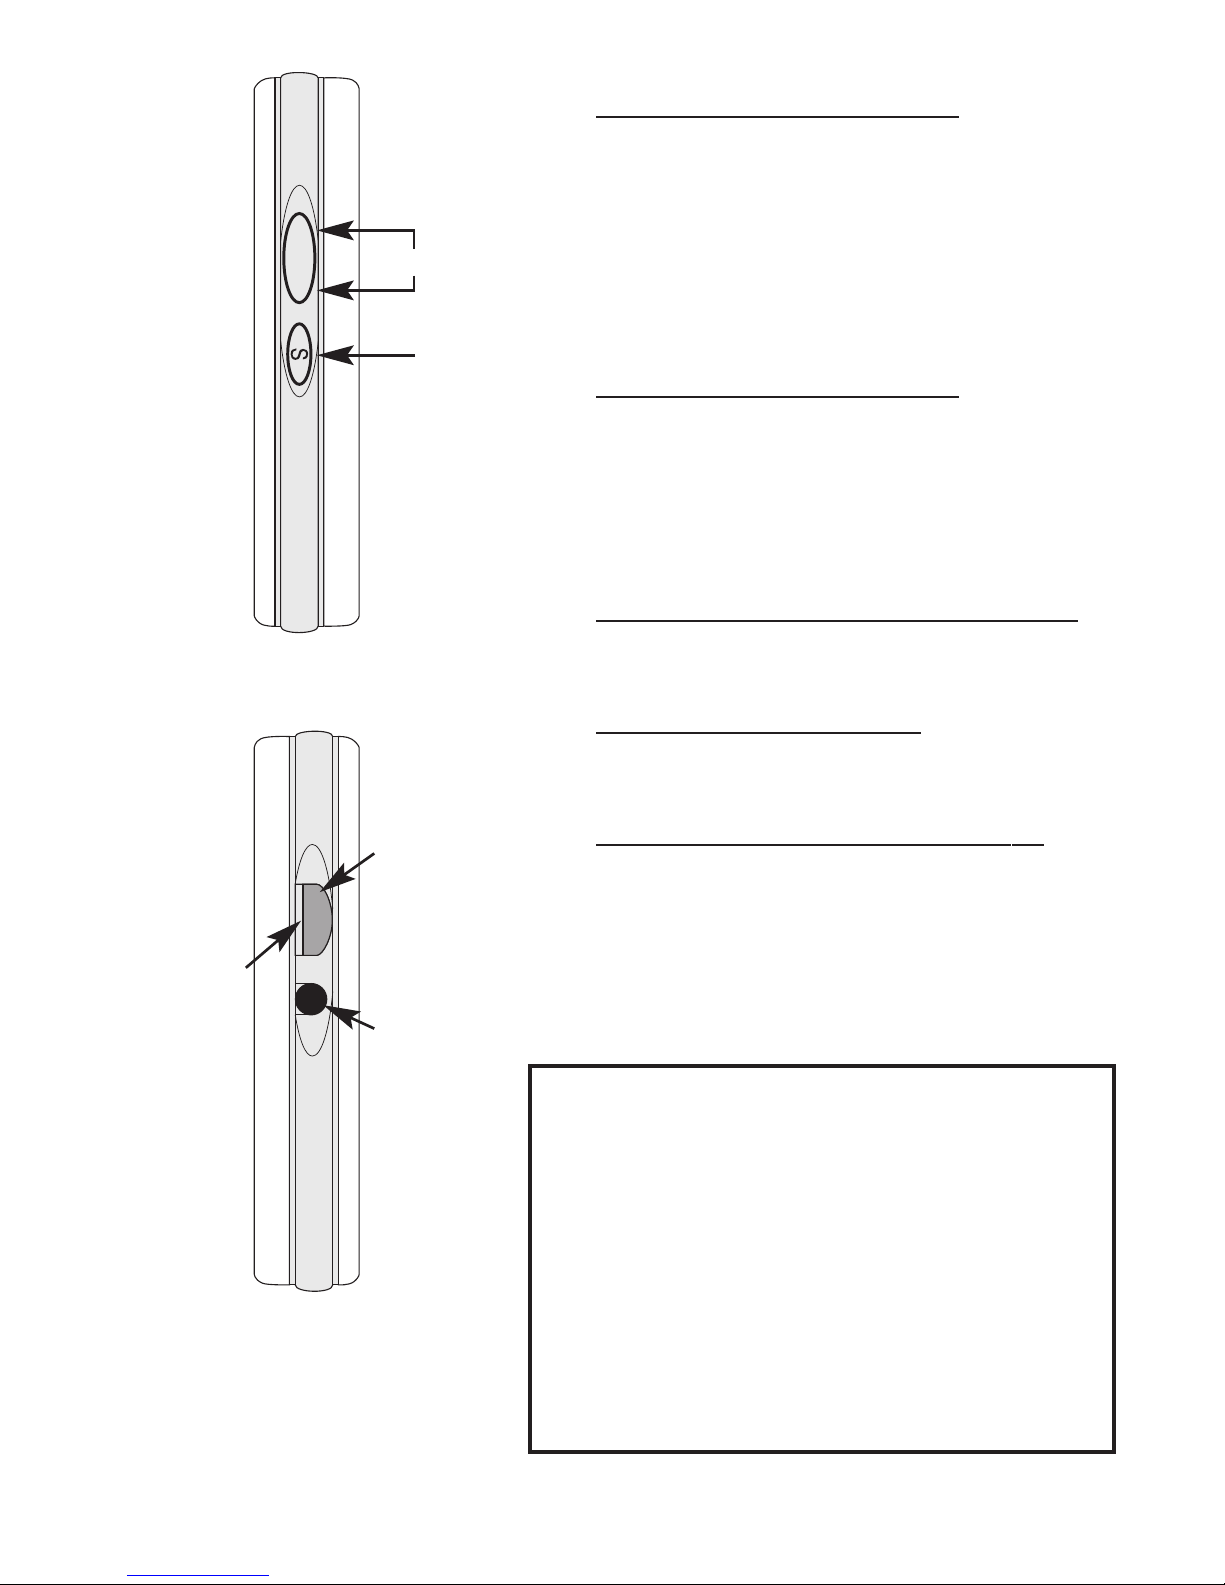
Right Side of Meter
¸
¹
Î
Left Side of Meter
Up
Down
·
Up/Down Button:
Used to view Meter options,
change Code Number, view
stored results or Morning
Average.
·
Select (S) Button:
Use to select options, access
Memory or Morning
Average.
¸
Standard Strip Holder:
Stores Standard Strip.
¹
Standard Strip:
Use for Standard Strip test.
Î
Communication Port:
Use to attach Prestige
Smart System
®
serial cable
to Meter.
WARNING!
UUssee oonnlly
y
Prestige Smart System
®
sseerriiaall ccaabbllee iinn ppoorrtt.. PPuuttttiinng
g
aannyytthhiinngg eellssee iinnttoo ppoorrtt mmaay
y
ddaammaaggee M
Meetteerr..
PPlleeaassee ccaalll
l
ffoorr mmoorree iinnffoorrmmaattiioonn aabboouut
t
uussee ooff tthhee CCoommmmuunniiccaattiioon
n
PPoorrtt.
.
·
¸
Front of Strip
Back of Strip
¹
Î
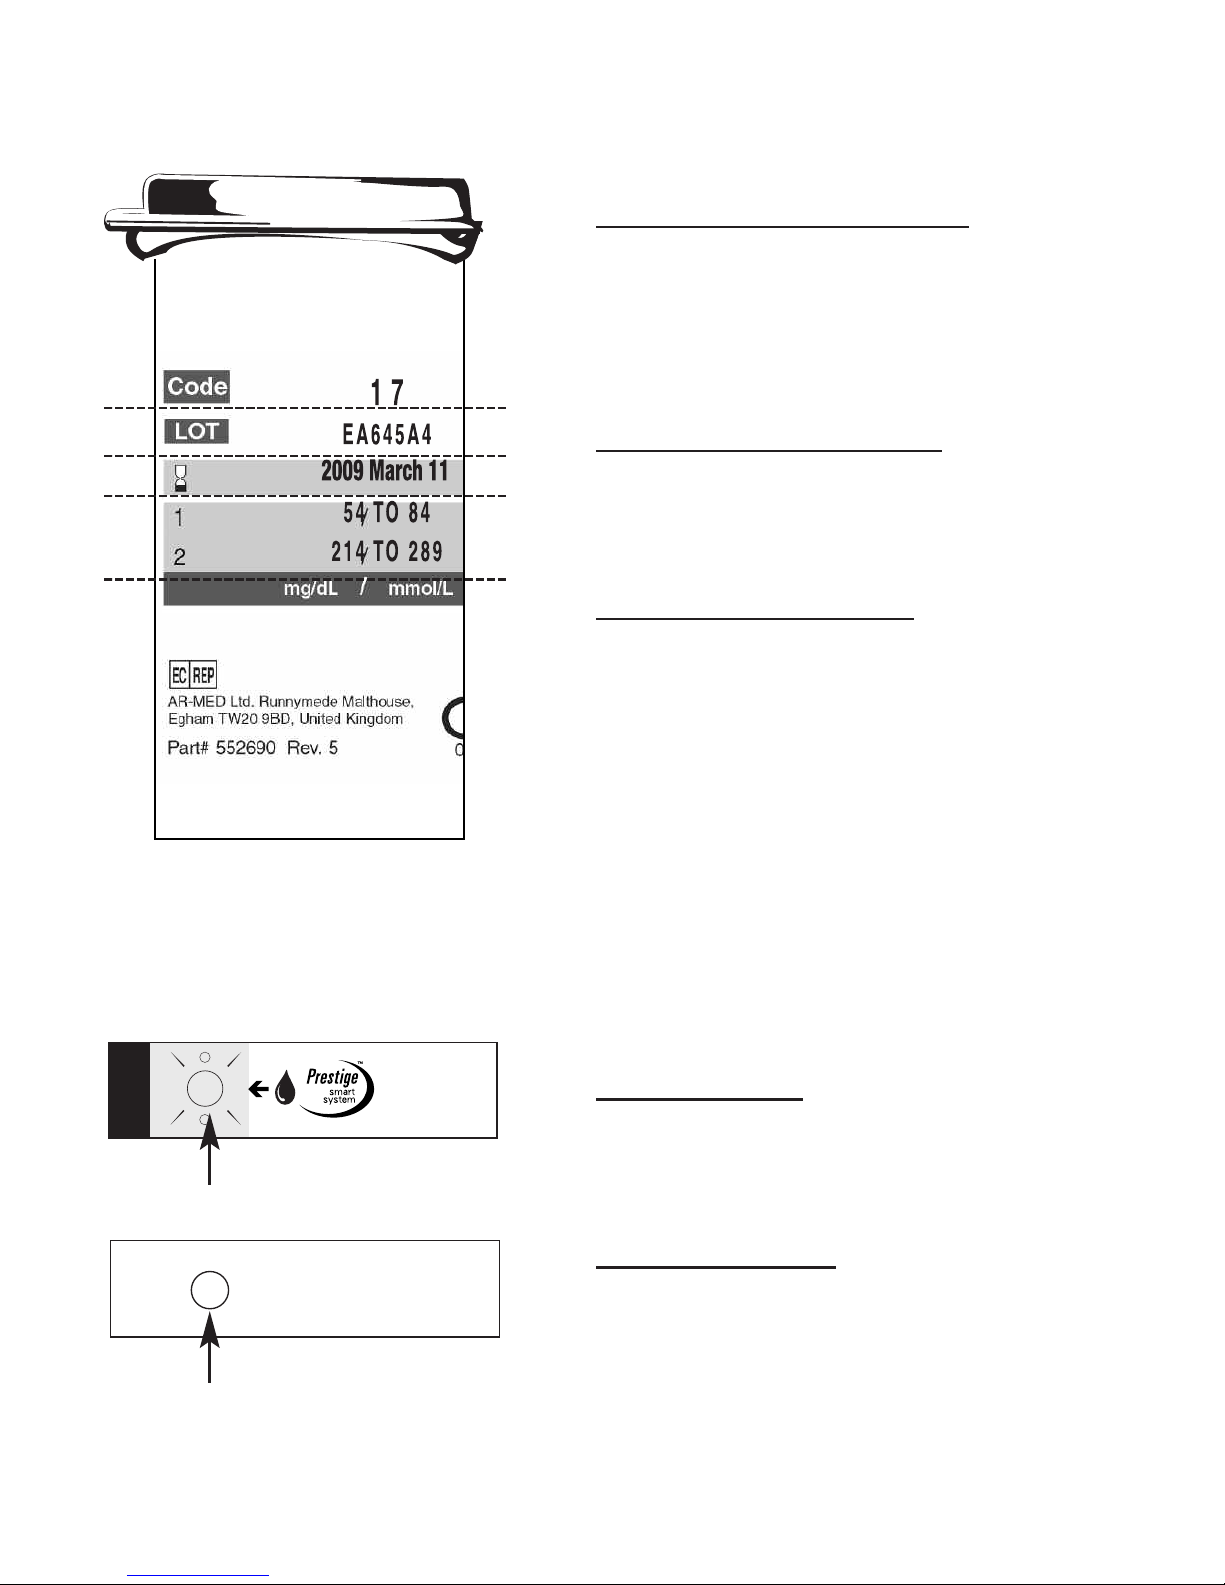
Prestige Smart System®Test Strip Vial Label
Calibration Code:
Meter Code must be matched
to this number for vial of
Test Strips being used.
·
Expiration Date:
Date after which Test Strips
cannot be used.
¸
Control Range:
Range of numbers in which
Glucose Control test results
must fall to be sure that
System is working correctly.
À
for Low,
Á
for High
Prestige Smart System®Test Strip
¹
Test Spot:
Apply blood or Glucose
Control solution here.
Î
Color Spot:
Changes color after blood or
Control solution is applied to
the Test Spot.
6

Meter Options
The Meter has the following options that can be
customized to your needs. Options are listed below
in the order that they appear in the Display.
Results as Whole Blood (blood): Whole blood is
blood that comes directly from finger. Use only
whole blood when testing.
Results as Plasma (plasma): Most laboratories use
plasma, a component of blood, for testing. Plasma
results are about 12% higher than whole blood
results.
1
When selecting this option, Meter uses the
whole blood value to calculate and display the
plasma result.
NNEEVVEERR uussee ppllaassmmaa ffoorr tteessttiinngg wwiitth
h
Prestige Smart System
®
.
.
mg/dL: Glucose unit of measure expressed as
milligrams per deciliter, used in U.S.
mmol/L: Glucose unit of measure expressed as
millimoles per liter, used in some countries outside
U.S. When selecting this option, choose either
Com
(comma: 6,1 mmol/L) or Per (period: 6.1 mmol/L).
7

Avg=14d: The average of all morning blood glucose
results for the last 14 days.
Avg=30d: The average of all morning blood glucose
results for the last 30 days.
12 hr: Time based on 12 hour clock (am/pm).
24 hr: Time based on 24 hour clock.
m-d-y: Date displayed as month-day-year
(03-11-2009).
d.m.y: Date displayed as day.month.year
(11.03.2009).
IIff yyoouu hhaavvee aannyy qquueessttiioonnss rreeggaarrddiinngg tthheessee OOppttiioonnss,
,
pplleeaassee ccaallll ffoorr aassssiissttaannccee.
.
8

Set Meter Options
1. Go to options. Press and hold
PPoowweer
r
Button
until Display flashes, then
release
PPoowweer
r
Button. Meter
beeps and displays “Set-up”
and then “Type”.
2. Set the options. Press top or bottom of the
UUpp//DDoowwn
n
Button to switch
between the selections
available. Press
SSeelleecctt ((SS)
)
Button to set the option.
Meter Options
Results as
Blood or Plasma
mg/dL or mmol/L
unit of glucose measure
Period or Comma
delimiter(mmol/L only)
14 or 30 day
Morning Average
12 or 24 hour clock
9
®
®
or
or
or
or
or
Up/Down Select (S)
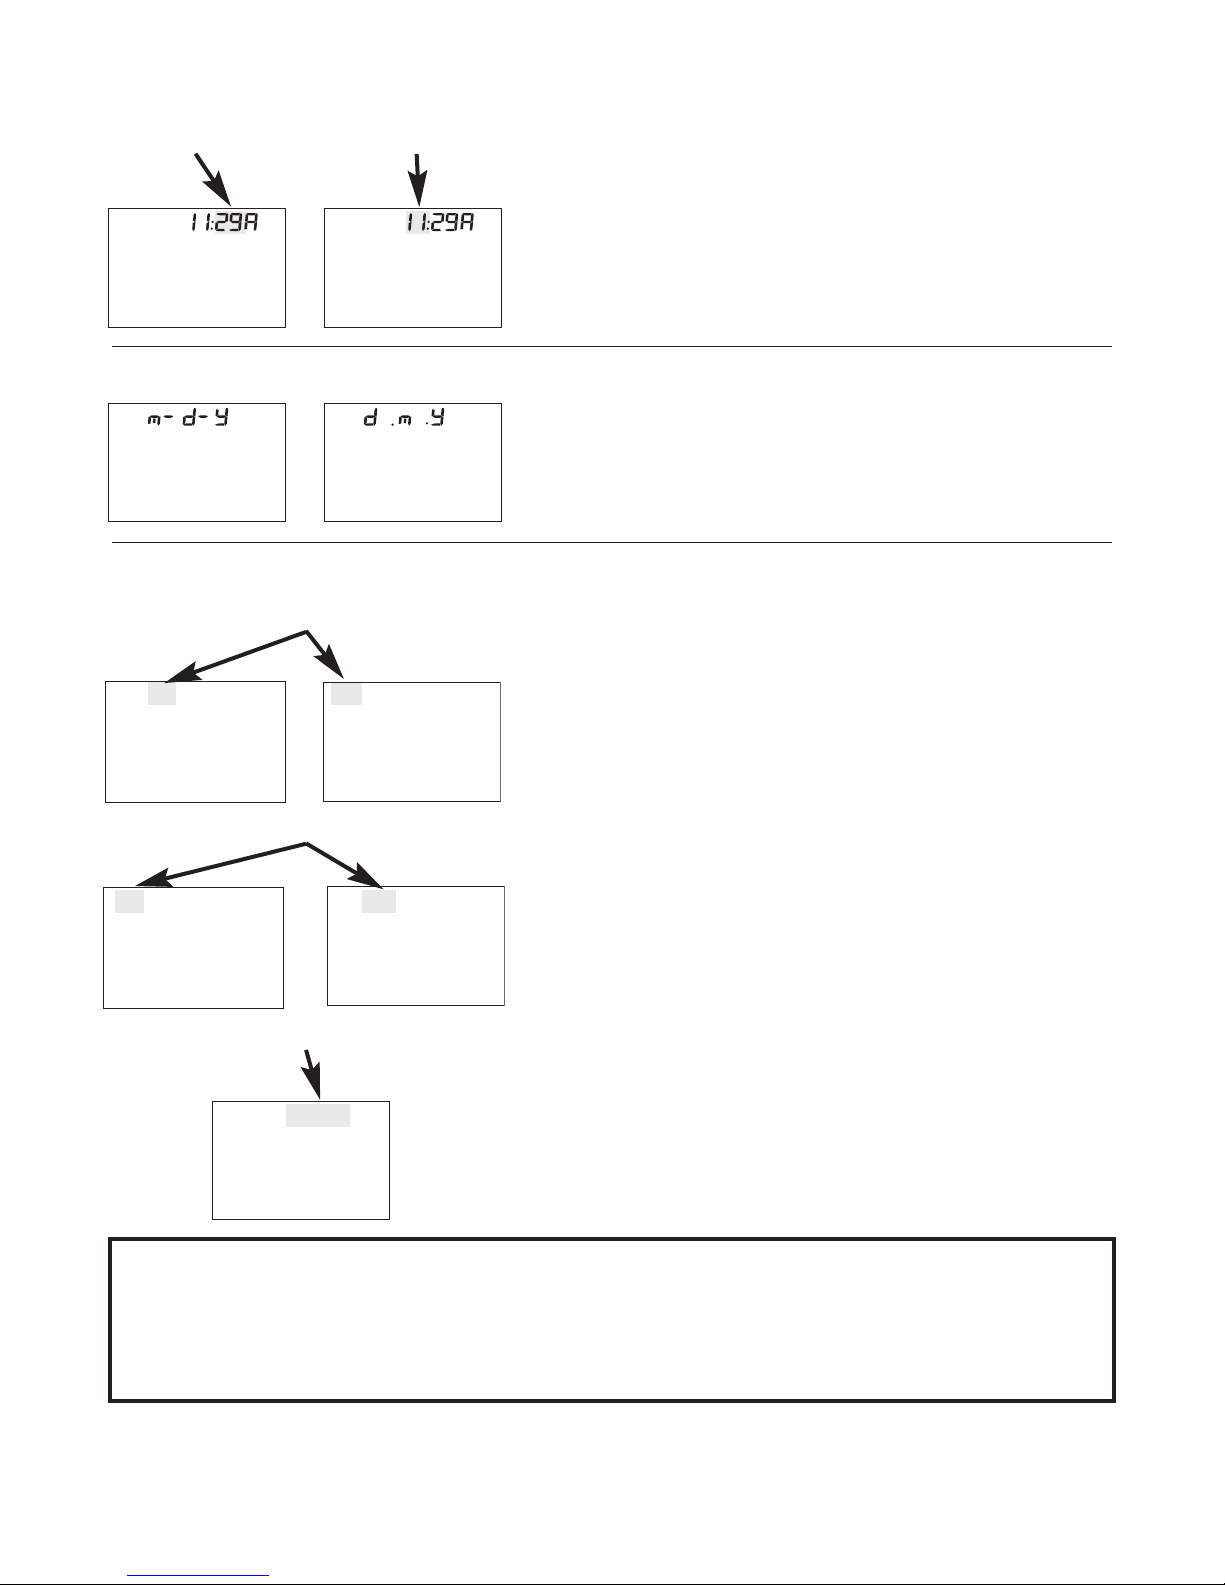
03-11-2009
03-11-2009
11-03-2009
11-03-2009
or
Day
03-11-2009
03-11-2009
11-03-2009
11-03-2009
or
Month
11-03-2009
11-03-2009
Year
3. Set Time. Press
UUpp//DDoowwn
n
Button to
change the flashing number.
Press
SSeelleecct
t
(S) to set.
4. Set Date Format. Press
UUpp//DDoowwn
n
Button to
switch between m-d-y and
d.m.y. Press
SSeelleecct
t
(S) to set.
5. Set Date. Press
UUpp//DDoowwn
n
Button to
change the flashing number.
Press
SSeelleecct
t
(S) to set. Turn
Meter off. Meter is now ready
to use for testing.
NNOOTTEE:: CChheecckk TTiimmee aanndd DDaattee aafftteerr eeaacchh bbaatttteerry
y
cchhaannggee.. RReesseett iiff nneecceessssaarryy.. AAllll ootthheerr M
Meetteerr
OOppttiioonnss rreemmaaiinn iinn M
Meemmoorryy aass sseelleecctteedd..
Minutes Hours
or
10

Section 2 Code The Meter
1. Gather supplies needed.
• Meter
• Test Strip Vial
2. Turn Meter on. Press and release
PPoowweer
r
Button.
3. Match Codes.
Compare Code shown in
Display to Code printed on
Strip vial being used. Codes
must match. If Codes DO
NOT match, go to Step 4.
((CCaalliibbrraattiioonn CCooddee NNuummbbeerrs
s
rraannggee ffrroomm 00 -- 2233)
)
4. Code Meter. Press top of
UUpp//DDoowwn
n
Button to increase number;
press bottom of Button to
decrease number. Meter
stores Code automatically.
11

Section 3 Check The System
There are two types of Quality Control tests to
assure that the System is working properly and
testing technique is good.
•
Standard Strip test uses a hard gray plastic strip
(Standard Strip). The Standard Strip does not
have a lot number or an expiration date, and can
be used with any Meter Code.
•
Glucose Control test uses a
ddaarrkk bblluue
e
liquid
(Glucose Control) that contains a known amount
of glucose. Glucose Control is available in both
Low
À and High Á levels.
These tests should be performed:
• When using the Meter for the first time
• When using a new vial of Test Strips
• When results do not ‘agree’ with how you feel
• When you suspect that results are incorrect
• To practice using the System
• After cleaning the Meter or replacing the Test
Strip Platform
((AALLW
WAAYYSS ppeerrffoorrmm tthhee
SSttaannddaarrdd SSttrriipp tteesstt)
)
.
W
WAARRNNIINNGG!!
BBootthh tthhee SSttaannddaarrdd SSttrriipp aannd
d
GGlluuccoossee CCoonnttrrooll tteessttss mmuusstt ggiivvee ““ccoorrrreecctt”” rreessuulltts
s
oorr bblloooodd gglluuccoossee rreessuullttss mmaayy nnoott bbee ccoorrrreecctt.
.
RReeffeerr ttoo SSeecc.. 1100,, TTrroouubblleesshhoooottiinngg GGuuiiddee.
.
12
 Loading...