

Page 1
Model : APS-OE2B
TRANSMITTER PROGRAMMING GUIDE
The transmitters included with the system have been pre-programmed
at the factory, with each button pre-assigned to control a specific
function of the system. Although the system in the vehicle has either
a 2 or 3 channel receiver, depending on the model, the transmitters
included with the system are capable of transmitting 3 distinct signals.
This allows you to program each transmitter to more than one vehicle
in two car families, and also allows you to change which button(s)
control certain functions of the system.
( Example: Transmitter channel 3 can be programmed to activate
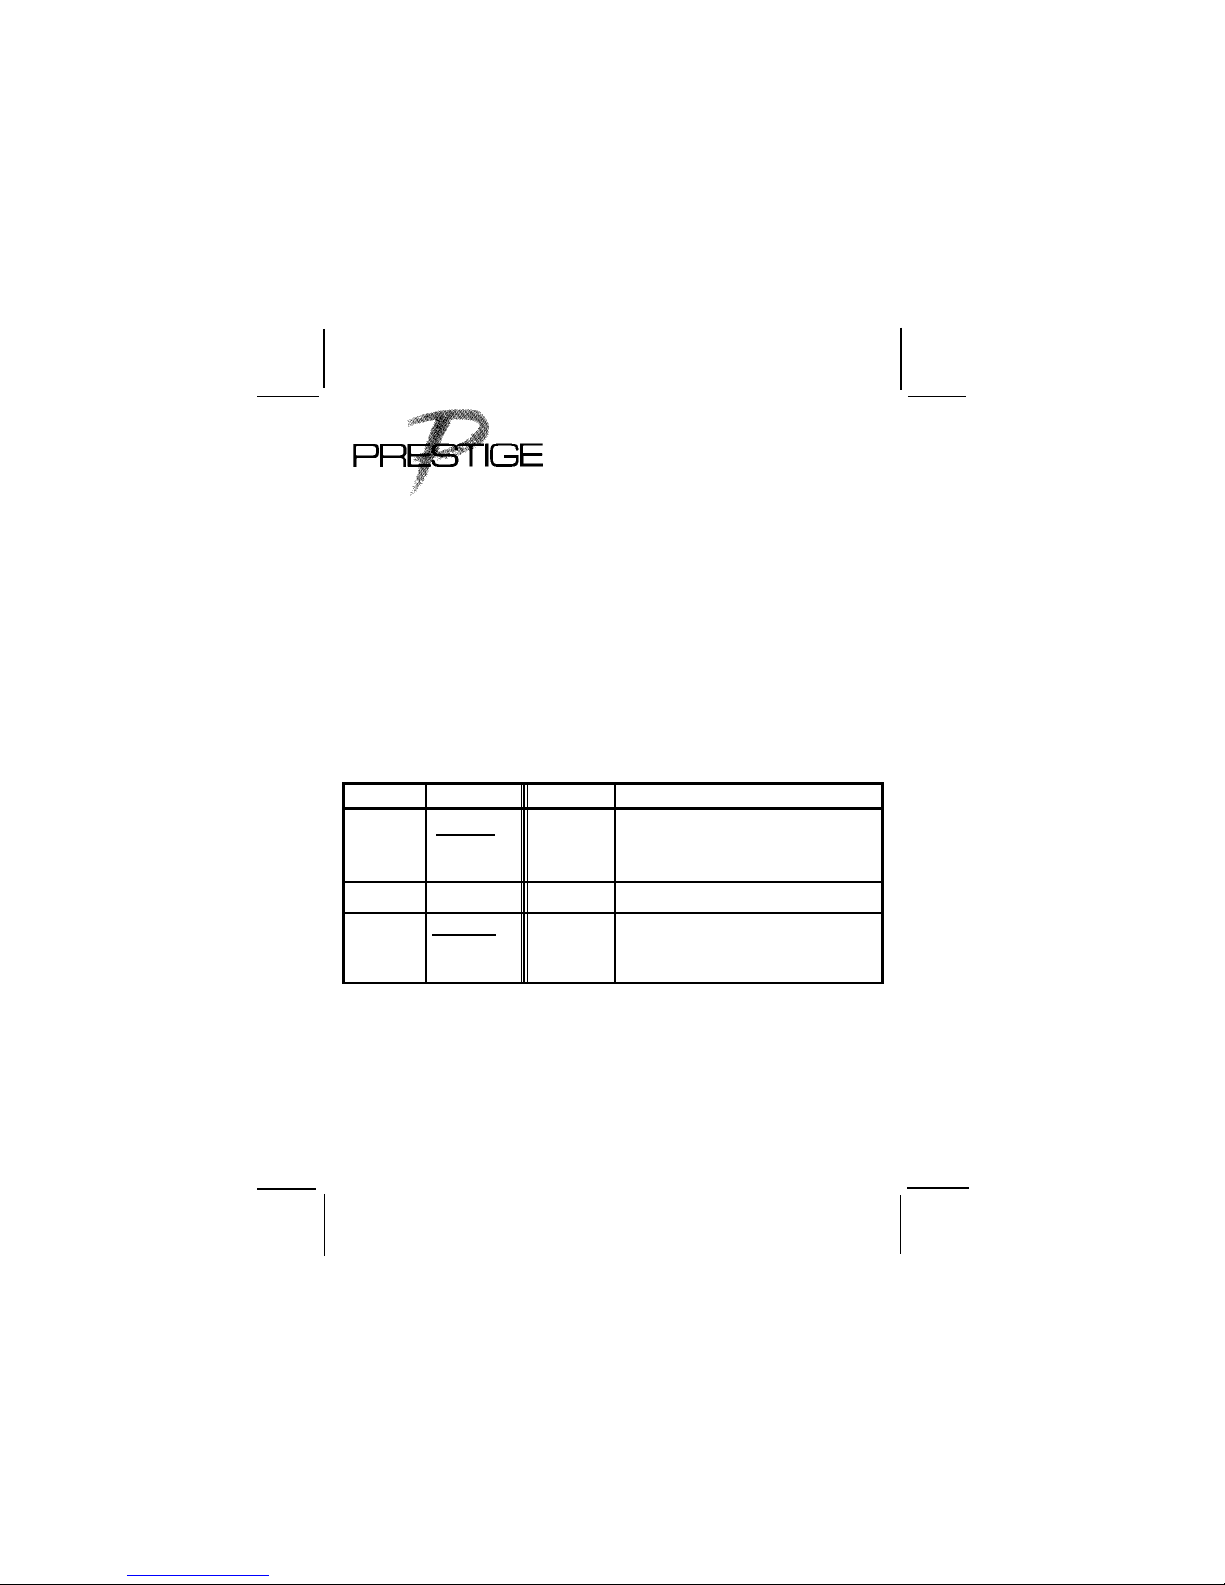
Receiver channel 2. ) Refer to the chart below for access to each of the
transmitter channels, and for the standard factory button assignments.
TRANSMITTER SYSTEM RECEIVER
CHANNEL BUTTONS CHANNEL FUNCTION
1 ARM 1 Remote Arm/Disarm
2 OPTION 2 * Pulsed Output for Accessories
3 ARM 3 * Switched Output for Accessories
Some of the more common accessories for these additional channels
are;
DISARM & or **Remote Lock/Unlock
**Remote Emergency Panic
DISARM * Second Vehicle Control
& OPTION
*AS 9154 Remote Garage Door Interface
*AS 9075 Remote car starter
*AS 9153 Remote window roll up
*AS 9256 Remote trunk release relay
** Only Available With Some Systems
Released 9-24-99
Rev A: References to the APS-33, 3-6-02.
128-5544A
1 OF 4
Page 2

PROGRAMMING THE TRANSMITTERS
It is important to remember that during programming, each individual
step of the procedure must be executed within 15 seconds of the
previous step.
When the 15 second time limit is allowed to expire, the system will
automatically terminate the programming mode. This is indicated by a
long chirp from the siren.
Additionally, the system will store codes from up to four different
transmitters. If a 5th transmitter is programmed to any receiver channel, then the first transmitter programmed to that channel will be erased
from the system's memory.
To program new or additional transmitters, the alarm must be
disarmed and the valet switch
1. Enter the vehicle, and turn the ignition key to the " on " position.
2. Flip the valet switch on - off - on - off - on - then off.
3. The dash LED will flash one time, and the sounding device will
beep one time, indicating the system is ready to accept programming
for receiver channel 1.
4. Press and hold the Arm/Disarm Icon button until the sounding device
emits a long beep, indicating the signal has been stored into memory.
5. If you have additional transmitters ( up to 4 ) that need to be
programmed, repeat step 4 for each transmitter.
APS-33 No Further Programming Required.
6. Activate the valet switch on then off.
7. The dash LED will flash two times, and the sounding device will
beep two times, indicating the system is ready to accept programming
for receiver channel 2.
8. Press and hold the Option transmitter button until the sounding device
emits a long beep, indicating the signal has been stored into memory.
9. If you have additional transmitters ( up to 4 ) that need to be programmed,
repeat step 8 for each transmitter.
10. Activate the valet switch on then off.
11. The dash LED will flash three times, and the sounding device
will beep three times, indicating the system is ready to accept
programming for receiver channel 3 (only available on certain mod
els).
must be in the " off " position:
128-5544A
2 OF 4
Page 3
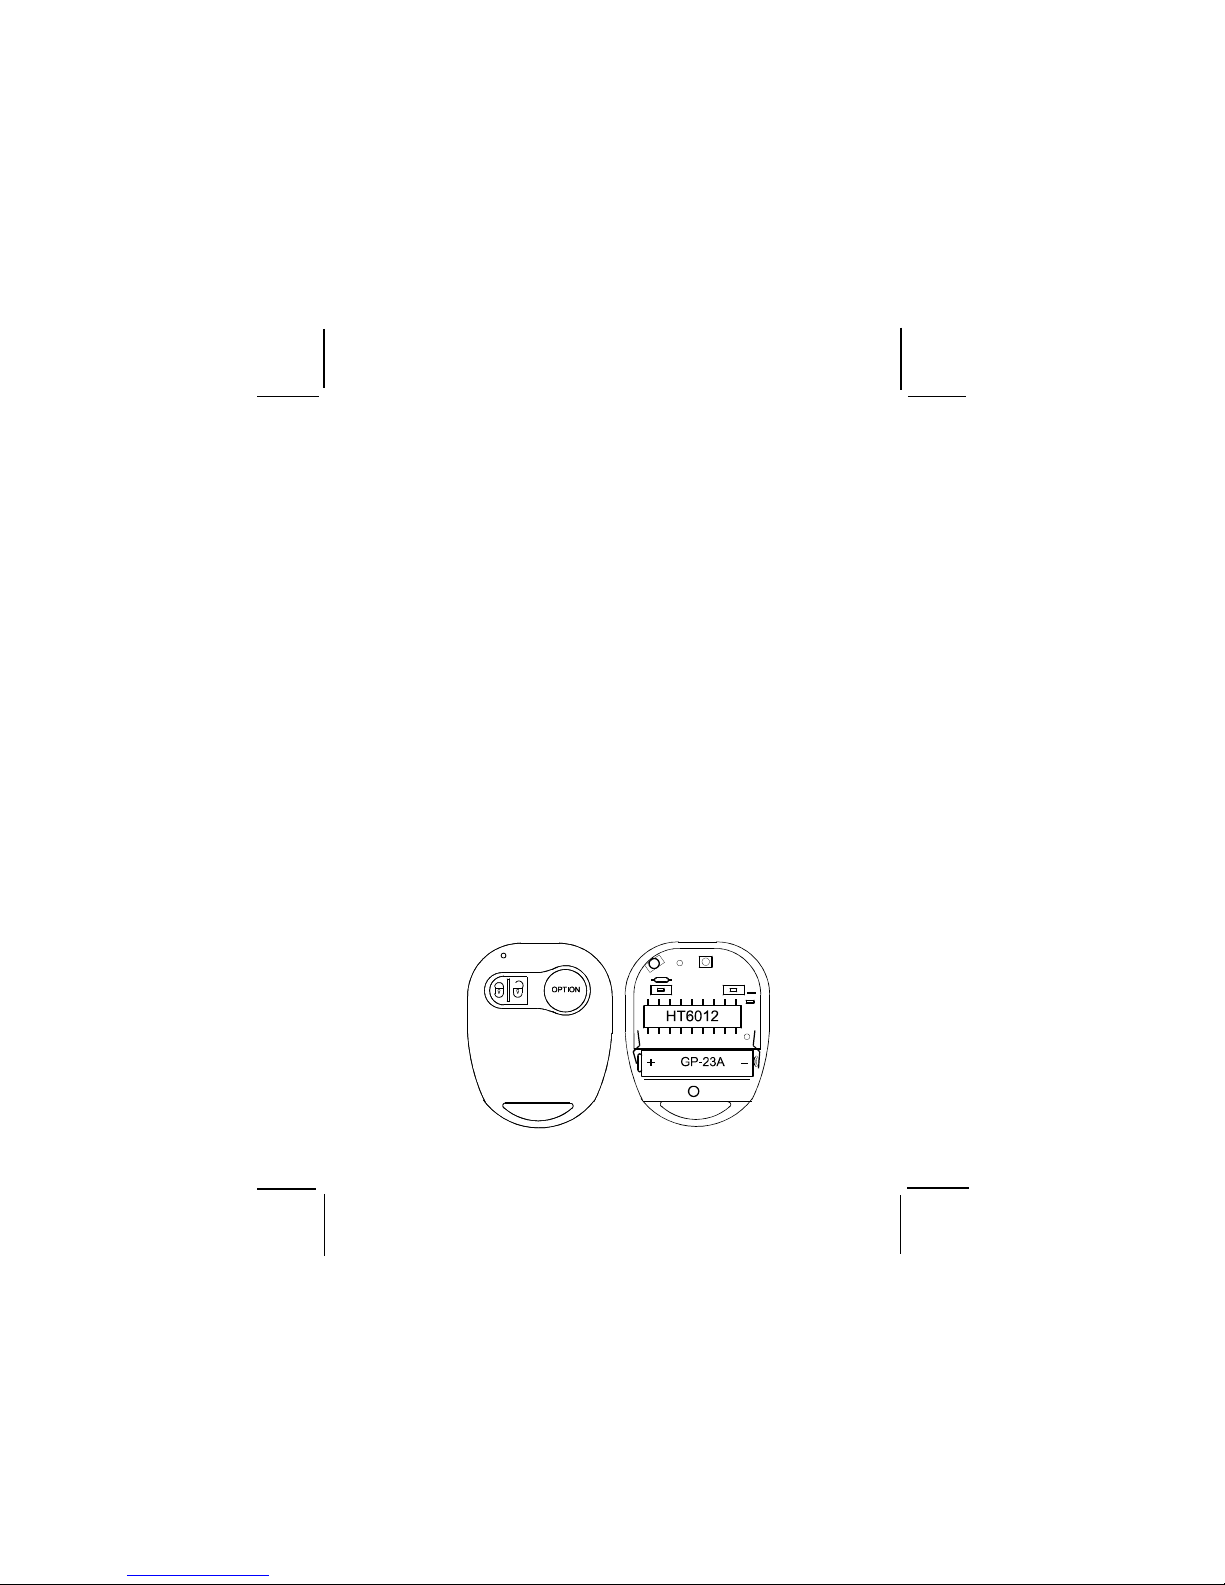
12. Press and hold the Arm/Disarm Icon and Option transmitter buttons simultaneously until the sounding device emits a long beep,
indicating the signal has been stored into memory.
13 . If you have additional transmitters ( up to 4 ) that need to be
programmed, repeat step 12 for each transmitter.
14. Turn the ignition key off. The sounding device will emit one short
beep followed by one long beep indicating the system has
terminated the program mode.
TRANSMITTER BATTERY REPLACEMENT
You will notice a decrease in transmitter range as the battery condition
deteriorates. Transmitter battery replacement is recommended at least
every 10 to 12 months, depending upon how frequently the transmitter is used.
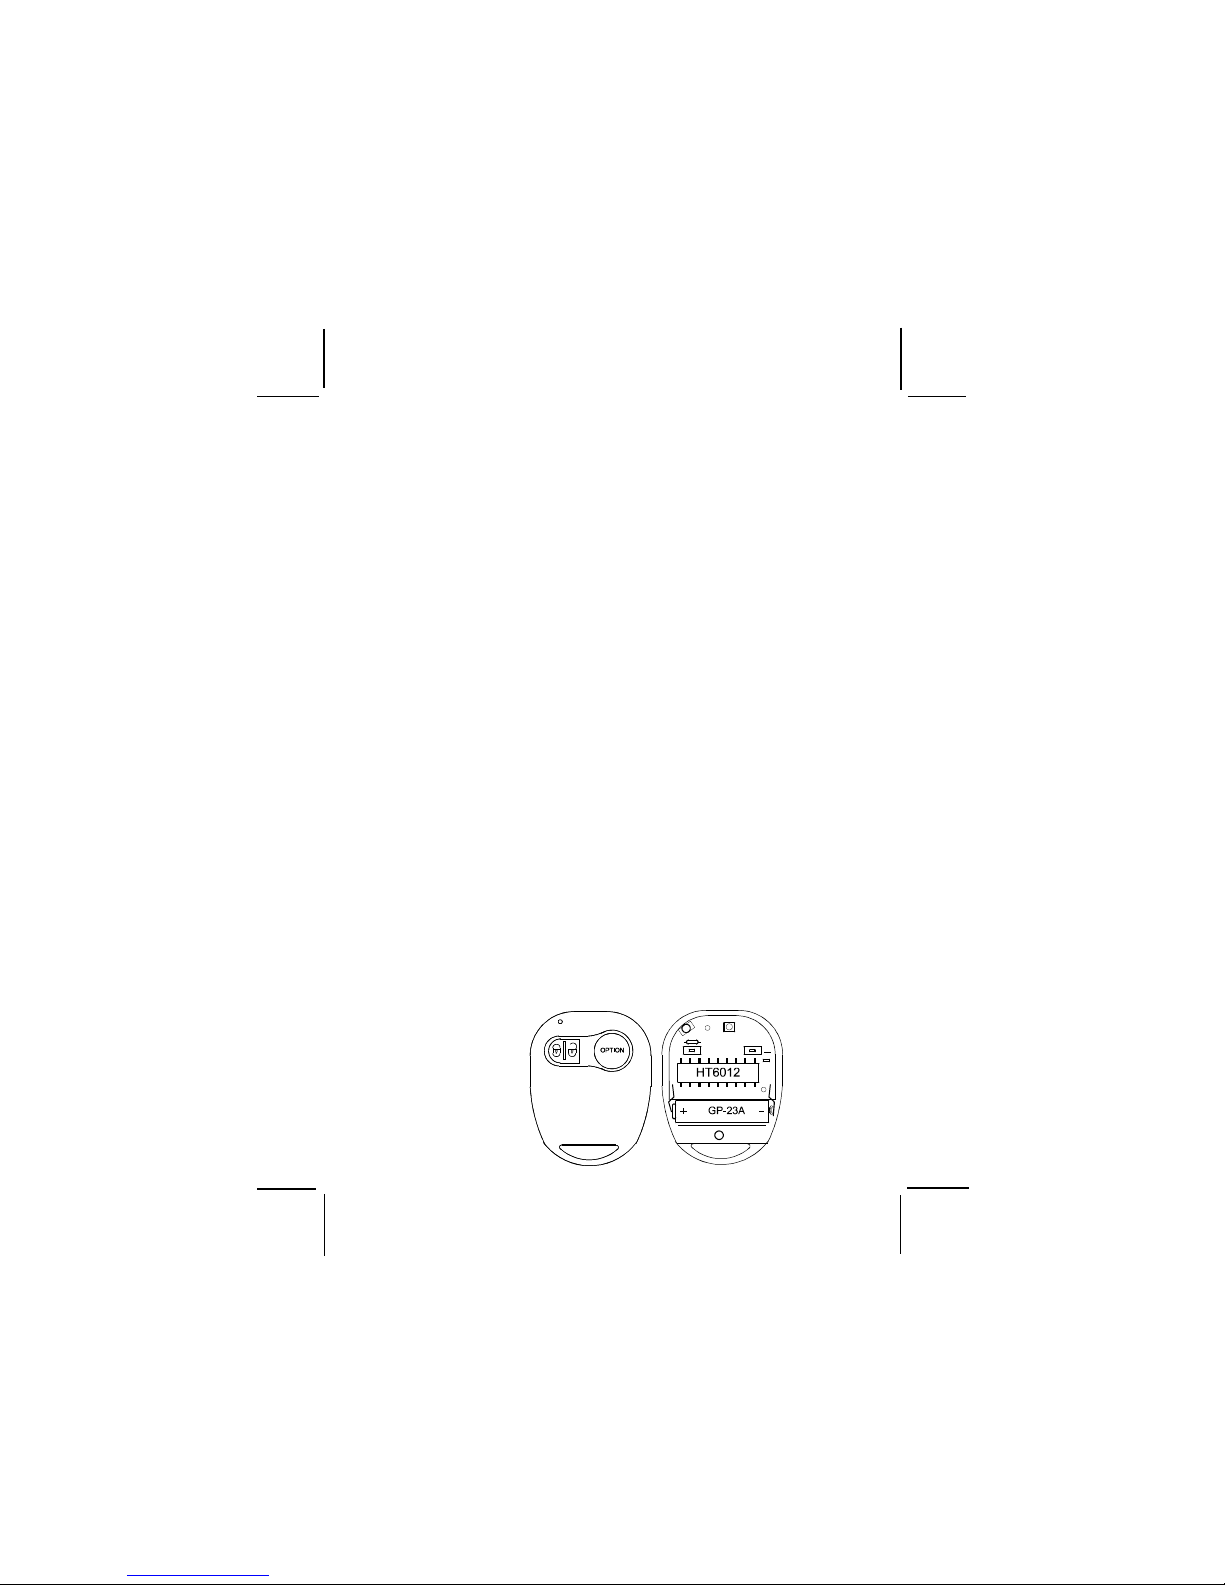
The transmitter has a small red LED built into the case. This LED can
be used to indicate battery condition. If the LED does not illuminate,
then the battery is discharged, and must be replaced.
To replace the transmitter battery,
1. Remove the small phillips head screw from the bottom cover of the
transmitter.
2. Carefully unsnap the top cover of the transmitter from the bottom cover.
3. Remove the discharged battery, making note of the location of the +
and - contacts, and replace with a new type GP 23A 12 volt battery.
4. Replace the transmitter cover, taking care not to damage the LED or
switches on the circuit board, and secure with the small phillips
head screw.
128-5544A
3 OF 4
Page 4
ORDER FORM FOR 2 BUTTON TRANSMITTER
MODEL NO. APS-OE2B
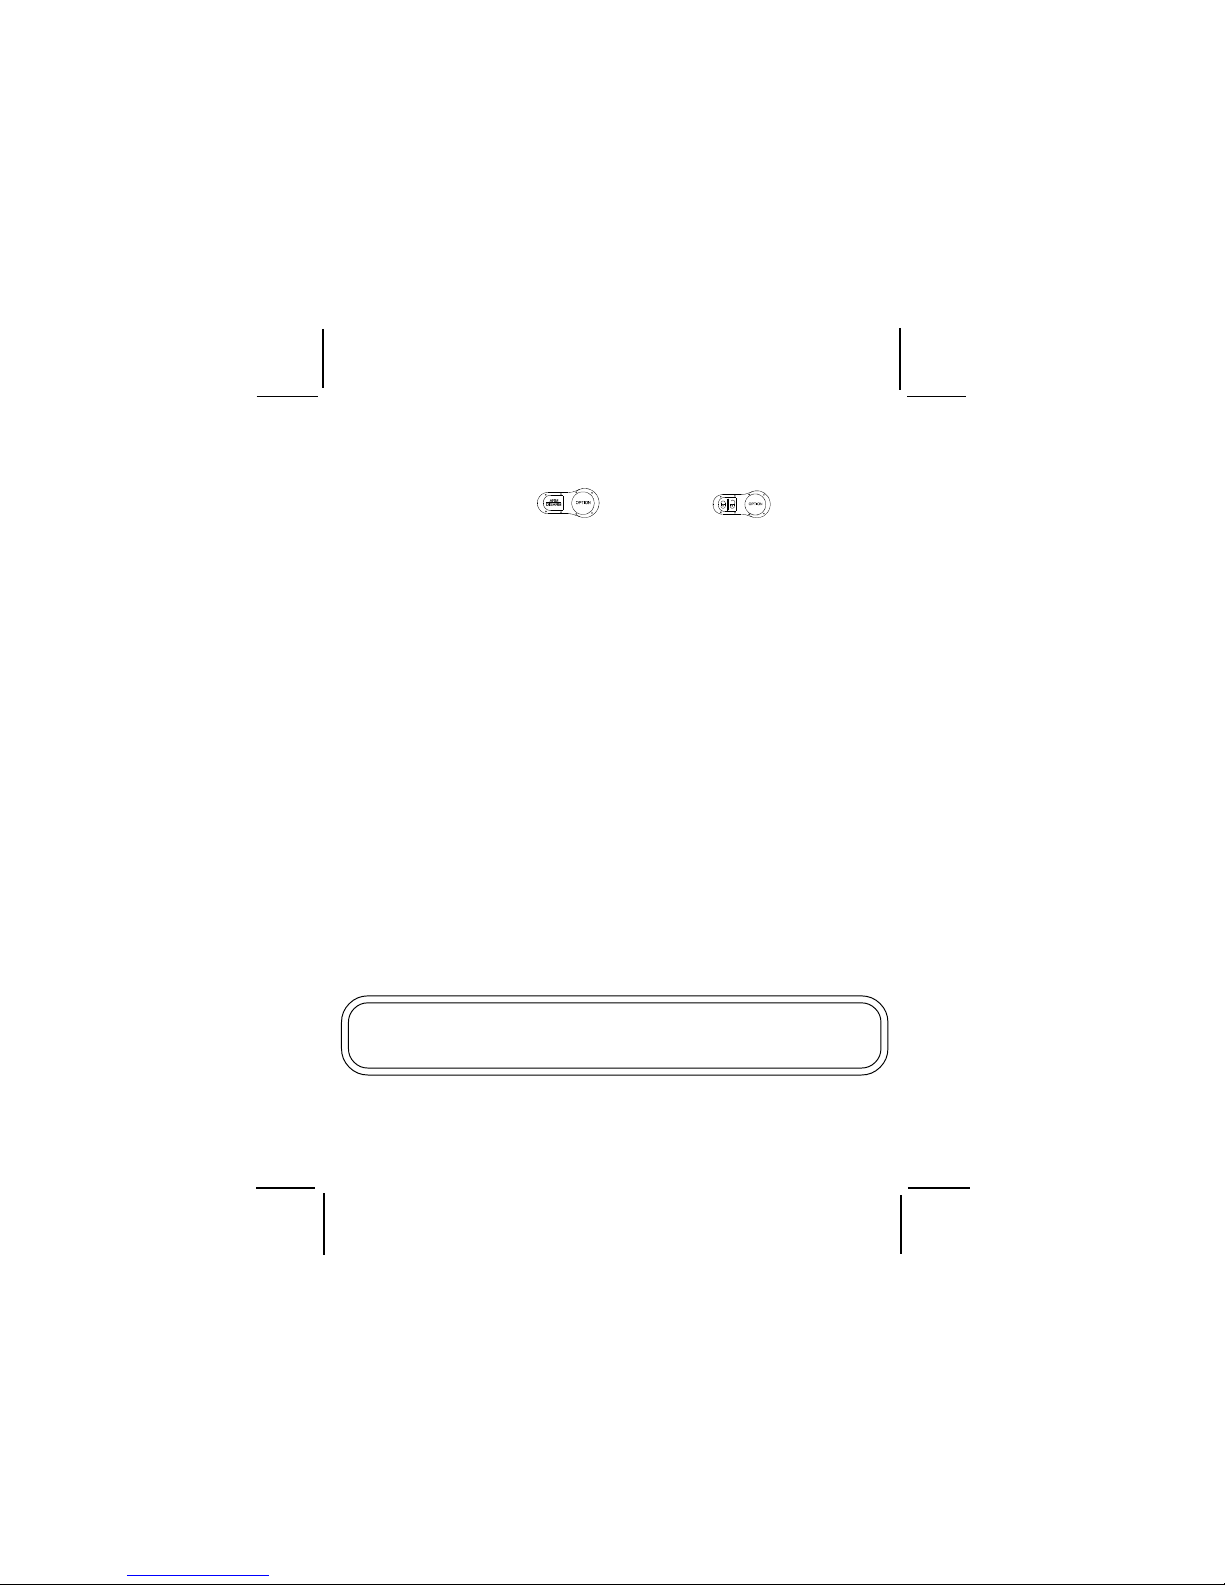
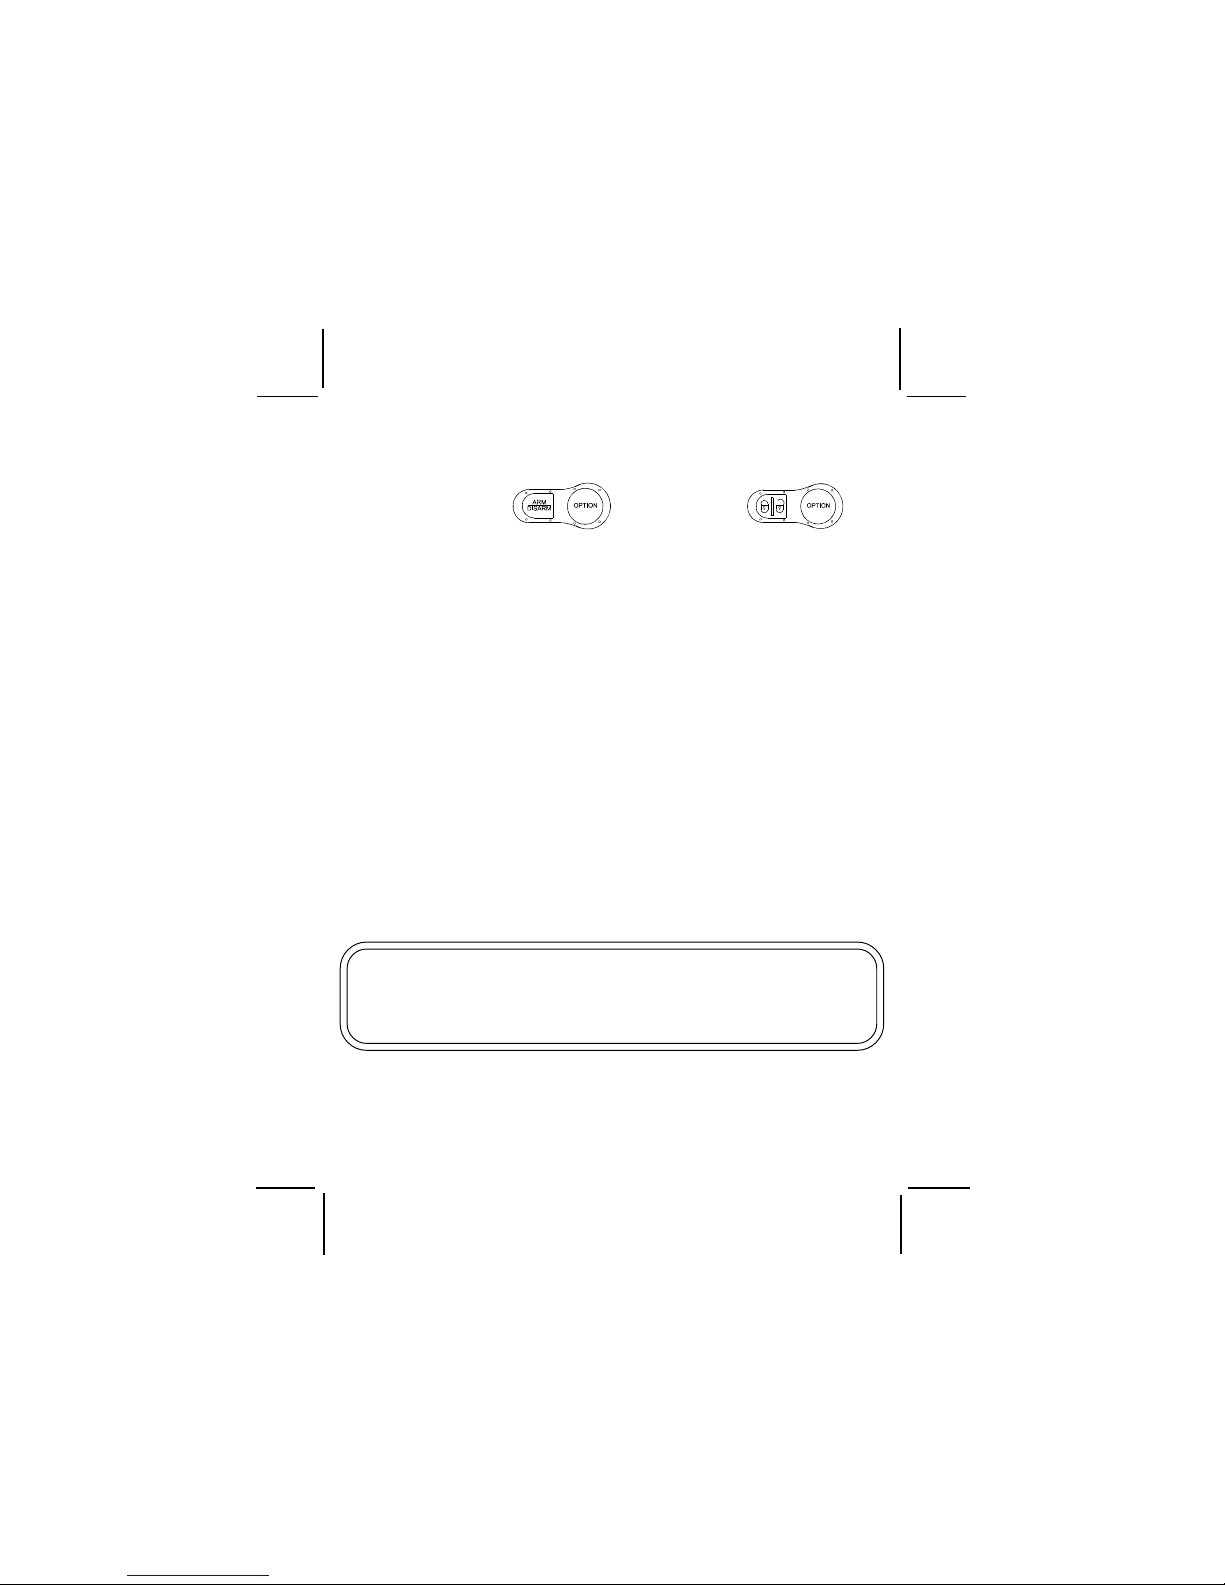
Please indicate which transmitter pad is used with your transmitter as shown,
PDOE2B-1 or PDOE2B-2
IMPORTANT : To help us expedite your order, please print all of the information
legibly, and mail this form and your payment according to the instructions below.
1. Name : _____________________________________________________
Address : ____________________________________________________
City : _____________________ State : _______ Zip Code : ____________
2. Telephone Number : ( _______ )_________________________________
3. Enter the total number of transmitters required here : ________________
4. The cost per transmitter is $ 65.00.
5. Enter the total amount enclosed here : ____________________________
( New York state residents must include the appropriate sales tax.)
6. Method of payment; check one of the boxes below.
Mastercard Visa Check or money order * ( do not send cash )
* Make checks payable to Audiovox Corporation
7. Credit Card Number : __________________________________________
8. Credit Card Expiration Date : _____________________
Credit card purchasers can order additional or replacement
transmitters by phone. Simply dial 1 - 800 - 645 - 4994, and follow
the instructions from the operator interface.
9. Mail this form, and your check, to ;
Audiovox Corporation, 150 Marcus Blvd., Hauppauge, N.Y., 11788
© 2000 Audiovox Corporation 128-5544A
Attn. : TRANSMITTER DEPARTMENT
128-5544A
4 OF 4
Page 5
Model : APS-OE2B
GUÍA PARA LA PROGRAMACIÓN DEL TRANSMISOR:
Los transmisores que vienen con este sistema fueron preprogramados
en fábrica y cada botón fue preasignado para controlar una determinada
función del sistema. Si bien el sistema del vehículo tiene un receptor
de 2 canales o de 3 canales, según el modelo de que se trate, los
transmisores incluidos con el sistema tienen la capacidad de transmitir
3 señales distintas, lo que le permite programa cada uno de los
transmisores para más de un vehículo en el caso de aquellas familias
que tengan dos automóviles y, además, le permite cambiar qué botón
o botones controlan ciertas funciones del sistema.
(Por ejemplo: El canal 3 del transmisor puede programarse para
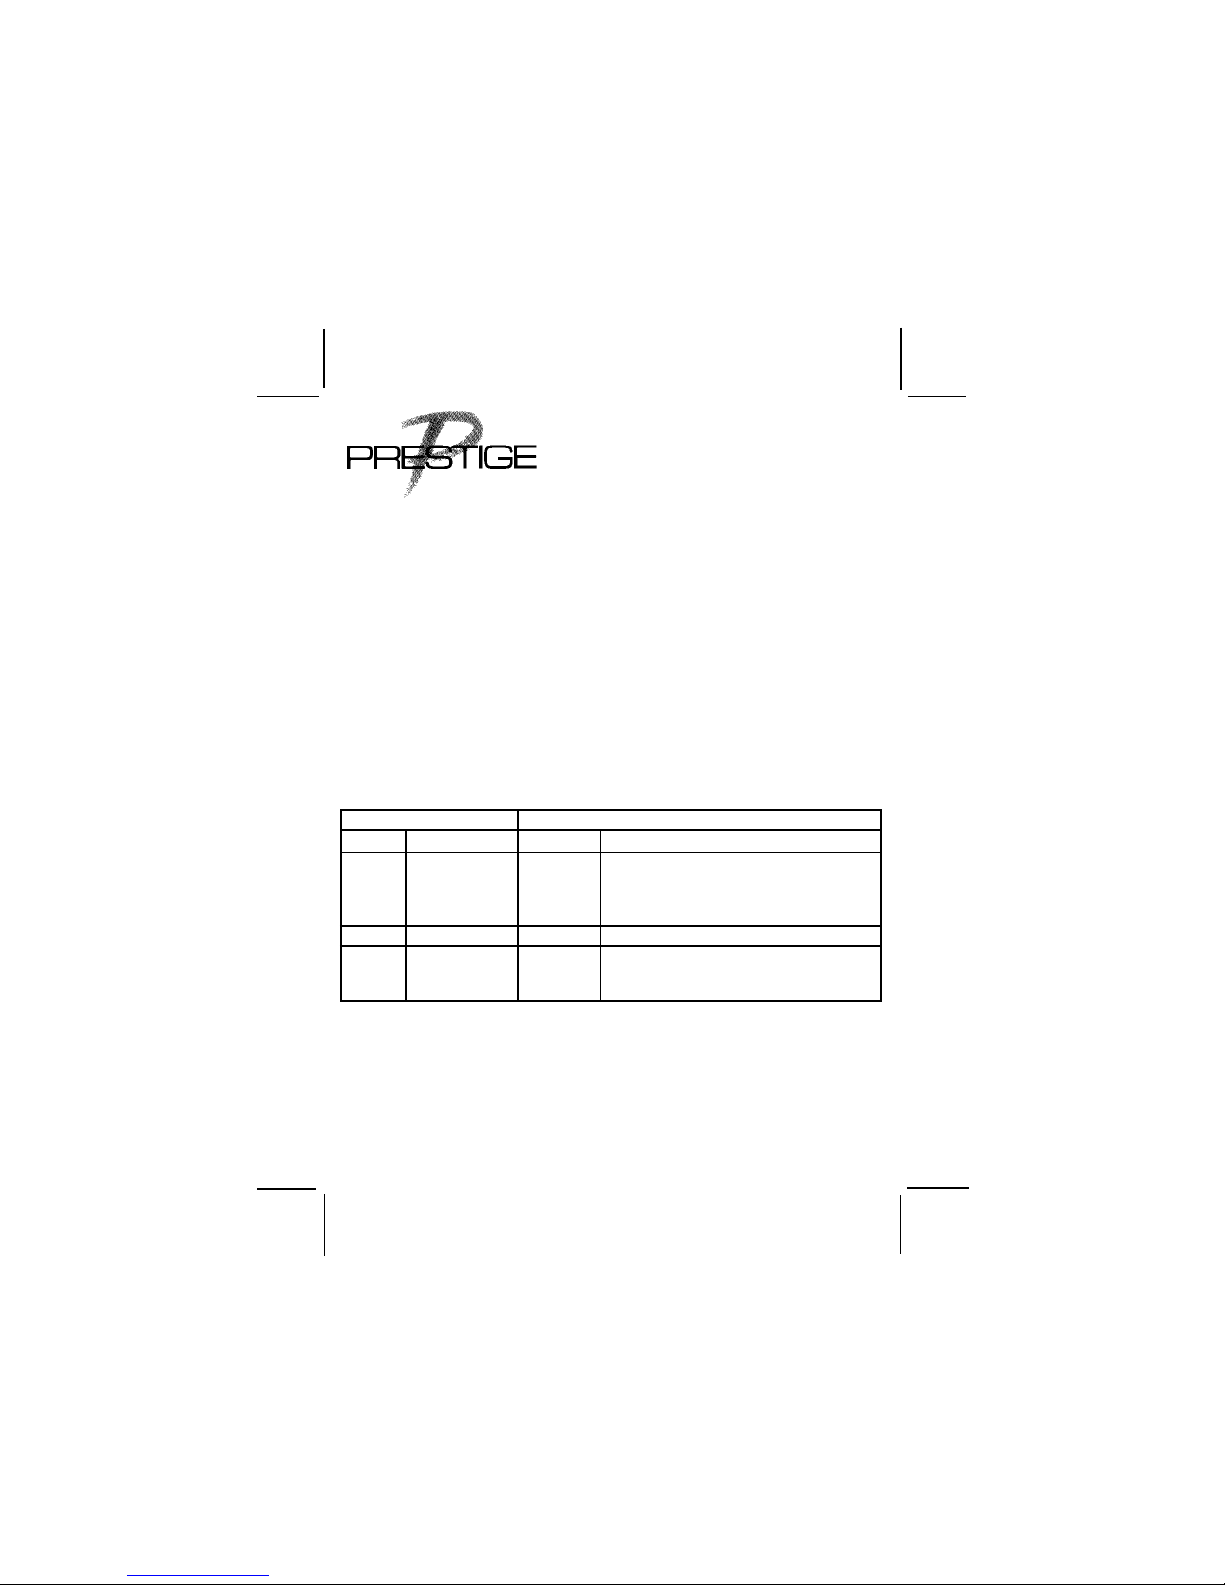
activar el canal 2 del receptor.) Consulte el cuadro que aparece a
continuación para tener acceso a cada uno de los canales del
transmisor y para obtener información sobre las asignaciones estándar
de fábrica de los botones.
TRANSMISOR RECEPTOR DEL SISTEMA
CANAL BOTONES CANAL FUNCIÓN
1 ACTIVAR 1 Activación / desactivación emota Y or
DESACTIVAR ** Trabado / destrabado remoto
2 OPCIÓN 2 * Salida pulsada para accesorios
3
ACTIVAR 3 * Salida conmutada para accesorios
DESACTIVAR * Control para el segundo vehículo
Y OPCIÓN
Algunos de los accesorios más comunes para estos canales
adicionales son:
* AS 9154 Interfaz remota para la puerta del garaje
* AS 9075 Arrancador remoto del automóvil
* AS 9153 Control remoto para subir las ventanillas
* AS 9256 Relé de desenganche remoto del baúl
** Solamente viene con algunos sistemas
** Control remoto en situación de pánico
o emergencia
Released 9-20-99.
Rev A: References to the APS-33, 3-6-02.
128-5544A
1 OF 4
Page 6

PROGRAMACIÓN DE LOS TRANSMISORES
Es importante recordar que durante la programación, cada uno de los
pasos individuales del procedimiento deben realizarse en un plazo de
15 segundos del paso anterior.
Cuando se deja pasar ese período de 15 segundos, el sistema
suspenderá automáticamente el modo de programación, lo que será
indicado por un chirrido largo de la sirena.
Además, el sistema guardará los códigos de hasta cuatro transmisores
distintos, como máximo. Si se programa un quinto transmisor para
cualquier canal del receptor, entonces el primer transmisor programado
a ese canal se borrará de la memoria del sistema.
Para programar transmisores nuevos o adicionales, se debe desactivar
la alarma y ponga el interruptor valet en la posición off:
1. Entre al vehículo y ponga la llave de contacto en la posición “on”.
2. Active el interruptor valet a la posición on – off — on – off – on y
luego off.
3. El indicador LED del tablero destellará una sola vez y el dispositivo
sonoro sonará una vez, es decir emitirá un solo chirrido, indicando
que el sistema está listo para aceptar la programación del canal
1 del receptor.
4. Oprima y mantenga apretado el botón con el ícono Arm/Disarm
(activar/desactivar) hasta que el dispositivo sonoro emita un
sonido largo, indicando que se ha guardado la señal en la
memoria.
5. Si tiene otros transmisores (hasta 4 como máximo) que sea
necesario programar, repita el paso 4 para cada uno de los
transmisores.
Programacion No Adicional APS-33 Requerida
6. Active el interruptor valet en la posición “on” y luego en “off”.
7. El indicador LED del tablero destellará dos veces y el dispositivo
sonoro sonará dos veces, indicando que el sistema está listo
para aceptar la programación del canal 2 del receptor.
8. Oprima y mantenga apretado el botón Option (opción) del
transmisor hasta que el dispositivo sonoro emita un sonido largo,
indicando que se ha guardado la señal en la memoria.
9. Si tiene otros transmisores (hasta 4 como máximo) que sea
necesario programar, repita el paso 8 para cada uno de los
transmisores.
10. Coloque el interruptor valet en la posición “on” y luego en “off”.
128-5544A
2 OF 4
Page 7
11. El indicador LED del tablero destellará tres veces y el dispositivo
sonoro sonará tres veces, indicando que el sistema está listo
para aceptar la programación del canal 3 del receptor (solamente
para algunos modelos).
12. Oprima y mantenga apretado los botones con el ícono Arm/Disarm
(activar/desactivar) y Option (opción) del transmisor,
simultáneamente, hasta que el dispositivo sonoro emita un sonido
largo, indicando que se ha guardado la señal en la memoria.
13. Si tiene otros transmisores (hasta 4 como máximo) que sea
necesario programar, repita el paso 12 para cada uno de los
transmisores.
14. Ponga la llave de contacto en la posición “off”. El dispositivo
sonoro emitirá un chirrido corto seguido por uno largo, indicando
que el sistema ha finalizado la programación.
Notará una disminución en el alcance del transmisor a medida que se
vaya deteriorando la condición de la pila. Se recomienda cambiar la pila
del transmisor como mínimo cada 10 a 12 meses, según la frecuencia
con que se use el transmisor.
El transmisor tiene un pequeño indicador LED rojo en la caja. Este
indicador LED puede usarse para indicar la condición de la pila. Si no
se enciende, entonces la pila está descargada y debe cambiarse.
Para cambiar la pila del transmisor:
1. Quite el tornillo con cabeza Phillips de la tapa inferior del transmisor.
2. Desenganche con cuidado la tapa superior del transmisor de la
tapa inferior del mismo.
3. Saque la pila descargada, teniendo en cuenta la ubicación de los
contactos + y – y cámbiela por una pila de 12 voltios GP 23A nueva.
4. Vuelva a colocar la tapa del transmisor, haciéndolo con cuidado
para no dañar el indicador L.E.D. o los interruptores del circuito
impreso y fíjela con el tornillo Phillips.
CAMBIO DE LA PILA DEL TRANSMISOR
128-5544A
3 OF 4
Page 8
FORMULARIO DE PEDIDO PARA EL TRANSMISOR DE 2 BOTONES
MODELO Nº APS-OE2B
Sírvase indicar qué modelo de transmisor usa de acuerdo con la
siguiente ilustración:
PDOE2B-1 ó PDOE2B-2
IMPORTANTE: Para ayudarnos a acelerar el envío de su pedido,
sírvase escribir con letra de molde y en forma legible toda la información
y envíe por correo este formulario y el pago de acuerdo con las
instrucciones que aparecen a continuación.
1. Nombre _____________________________________________
Dirección: ______________________________________________
Ciudad: _______________ Estado: _____ Código postal: ________
2. Número de teléfono: ( ____ ) ____________________________
3. Indique el número total de transmisores que necesita: ________
4. El costo por transmisor es $65.00
5. Indique el monto total que adjunta: ________________________
(Los residentes del Estado de Nueva York debe incluir el impuesto
a la venta correspondiente).
6. Método de pago: marque uno de los casilleros según corresponda.
Mastercard Visa Cheque o giro postal * (no envíe dinero en efectivo)
* Los cheques deben librarse a la orden de Audiovox Corporation
7. Número de tarjeta de crédito: ___________________________
8. Fecha de vencimiento de la tarjeta de crédito: ______________
Aquellas personas que compren con tarjeta de crédito
pueden pedir transmisores adicionales o de recambio
por teléfono. Simplemente llame al 1-800-645-4994 y
siga las instrucciones de la interfaz con el operador.
9. Envíe por correo el presente formulario, junto con su cheque, a:
Audiovox Corporation, 150 Marcus Blvd., Hauppauge, NY 11788
© 2002 Audiovox Corporation 128-5544A
Attn: TRANSMITTER DEPARTMENT
128-5544A
4 OF 4
 Loading...