

Prestel HD-PTZ512HM User Manual

Prestel HD-PTZ512HM
HD Video Conferencing Camera
User Manual
V1.0
(English)

Preface
Thanks for using this HD Video Conferencing Camera.
This manual introduces the function, installation and operation of the HD camera. Prior to
installation and usage, please read the manual thoroughly.
Precautions
This product can only be used in the specified conditions in order to avoid any damage to the
camera:
Don’t subject the camera to rain or moisture.
Don’t remove the cover. Otherwise, you may get an electric shock. In case of abnormal
operation, contact the authorized engineer.
Never operating under unspecified temperature , humidity and power supply.
Please use the soft dry cloth to clean the camera. If the camera is very dirty, clean it with
diluted neuter detergent; do not use any type of solvents, which may damages the surface.
Note
This is class A production. Electromagnetic radiation at the specific frequency may affect the
image quality of TV in home environment

Note
Electric Safety
Installation and operation must accord with electric safety standard.
Caution to transport
Avoid stress, vibration and soakage in transport, storage and installation.
Polarity of power supply
The power supply of the product is +12V, the max electrical current is 2A .Polarity of the power
supply plug drawing as follows.
Careful of installation
Do not grasp the camera head when carrying the camera. Don’t turn camera head by hand. Doing
so may result in mechanical damage.
Don’t apply in corrosive liquid, gas or solid environment to avoid damaging the cover which is
made up of plastic material.
To make sure no obstacle in rotation range.
Never power on before installation is not completed.
Don’t dismantle the camera
We are not responsible for any unauthorized modification or dismantling.
CAUTION!
The specific frequency of electromagnetic field may affect the image of the camera!
Supplied Accessories
When you unpack, check that all the supplied accessories are included:
Camera ......................................................... 1PCS
AC power adaptor .......................................... 1PCS
Power cord ..................................................... 1PCS
RS232 cable ................................ ................... 1PCS
Remote controller .......................................... 1PCS
User manual ................................................. 1PCS
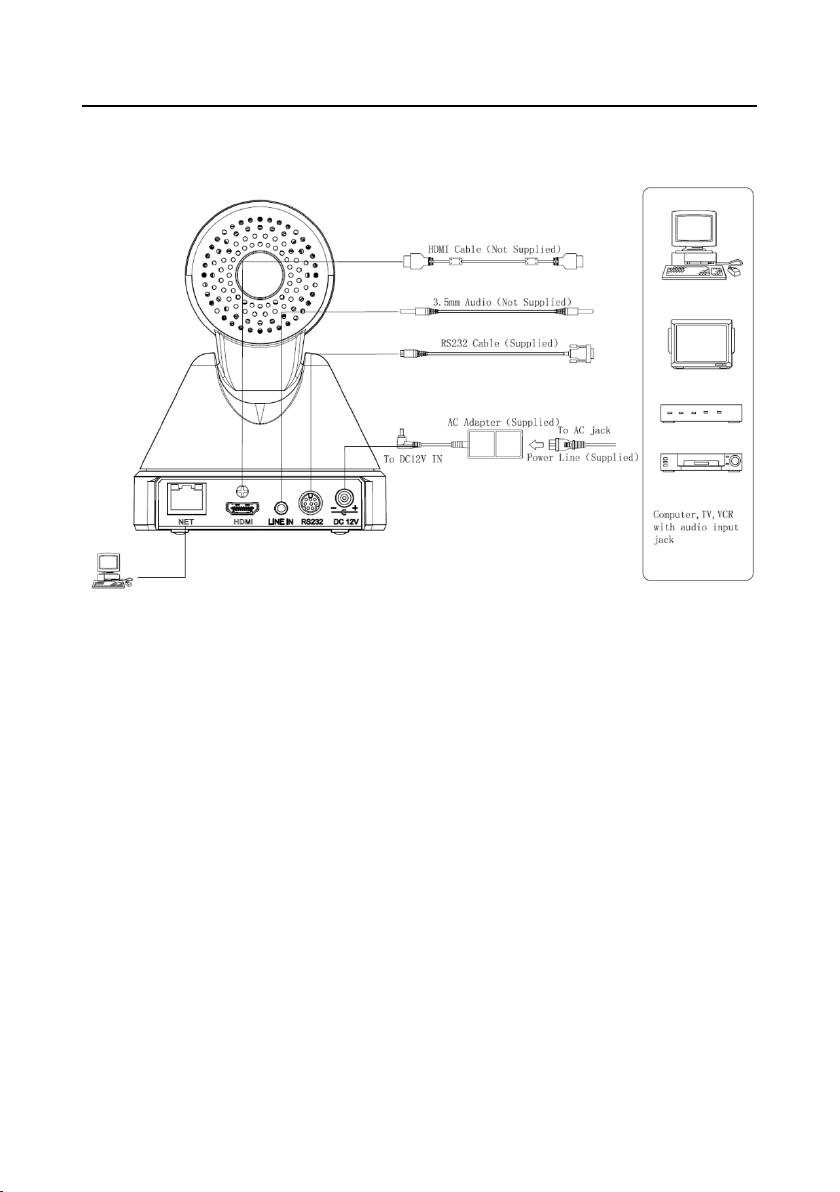
Quick Start
Step1. Please check connections are correct before starting
Step2.Connect the power on the rear panel of camera, the camera power indicator on the front panel
Step3. The camera starts to initialize after power-on, Pan-Tilt rotate to the maximum position of upper
right, then both horizontal and vertical to the middle position, the motor stops running, initialization
complete. (Note: If the position preset 0 has been stored, the position preset 0 will be called up after
initialization)

Features
Completely New Look
Designed with worm gear drive, completely new look, mini size, two colors for choosing from.
1080P Full HD
Apply Panasonic's 1/2.7 inch, 2.07 million effective pixels high quality HD CMOS sensor, can
reach maximum 1920 x 1080 high resolution and achieve quality image.
High frame rate
1080P output frame rate up to 60fps.
72.5 Wide-angle Lens + 32x Digital Zoom
Use 72.5° wide-angle high quality lens, support 12x optical zoom, and 32x digital zoom
(optional).
AAC Audio Encoding
Support AAC audio encoding, better sound quality and smaller bandwidth.
Low-light
High SNR of CMOS sensor combined with 2D and 3D noise reduction algorithm, effectively
reduce the noise, even under low illumination conditions, picture can still keep clean and clear.
HD Interface
Support HDMI output, effective transmission distance up to 150 meters (under 1080p30).
Remote Control
Using RS232 interface, all the parameters of the camera can be remote controlled by the
high-speed communications.
network Interface
Support network multi-channel audio and video stream output

Product Specification
Model
Name
HD Video Conferencing Camera
Camera
Sensor
1/2.7 inch, CMOS, Effective Pixel: 2.07M
Scanning Mode
Progressive
Lens
12x, f3.5mm ~ 42.3mm, F1.8 ~ F2.8
Digital Zoom
16x (optional)
Minimal Illumination
0.05 Lux @ (F1.8, AGC ON)
Shutter
1/30s ~ 1/10000s
White Balance
Auto, Indoor, Outdoor, One Push, Manual
Backlight Compensation
Support
Digital Noise Reduction
2D&3D Digital Noise Reduction
Video S/N
≥55dB
Horizontal Angle of View
72.5° ~ 6.9°
Vertical Angle of View
44.8° ~ 3.9°
Horizontal Rotation Range
±170°
Vertical Rotation Range
-30° ~ +90°
Pan Speed Range
1.7° ~ 100°/s
Tilt Speed Range
0.7° ~ 28°/s
H & V flip
Support
Image Freeze
Support
PoE
Support(optional)
Face Detection
Support (optional)
Local Storage
Support
Number of Preset
255
Preset Accuracy
0.1°
IPC Features
Video coding standard
H.265/H.264/MJEPG
Video Stream
First Stream, Second Stream
Prestel HD-PTZ512HM

First Stream resolution
1920x1080,1280x720,1024x576,960x540,640x480,640x360
Second Stream resolution
1280x720,1024x576,720x576,720x408,640x360,480x270,320x240,3
20x180
Video Bit Rate
128Kbps ~ 8192Kbps
Bit Rate Type
Variable rate, Fixed rate
Frame Rate
50Hz: 1fps ~ 50fps, 60Hz: 1fps ~ 60fps, 720p120: 120fp(supported
by S Model only), 640x480p240: 240fps(Supported by S Model
only, optional)
Audio encode standard
AAC
Audio Bit Rate
96Kbps, 128Kbps, 256Kbps
Support protocols
TCP/IP, HTTP, RTSP, RTMP, Onvif, DHCP, Multicast, etc.
Input/Output Interface
HD Output
1xHDMI: Version 1.3
Network interface
1xRJ45: 10/100/1000M Adaptive Ethernet ports
Audio interface
1-ch 3.5mm audio interface, Line In
Communication interface
1xRS-232: 8pin Min DIN, Max Distance: 30m, Protocol: VISCA/
Pelco-D/Pelco-P
Power jack
JEITA type (DC IN 12V)
Generic Specification
Input Voltage
DC 12V / PoE (802.3af) (optional)
Current Consumption
1.0A (Max)
Operating Temperature
-10°C ~ 40°C (14°F ~ 104°F)
Storage Temperature
-40°C ~ 60°C (-40°F ~ 140°F)
Power Consumption
12W (Max)
MTBF
>30000h
Size
169mm x 142mm x 164mm
Net Weight
1.35Kg (3.0lb)
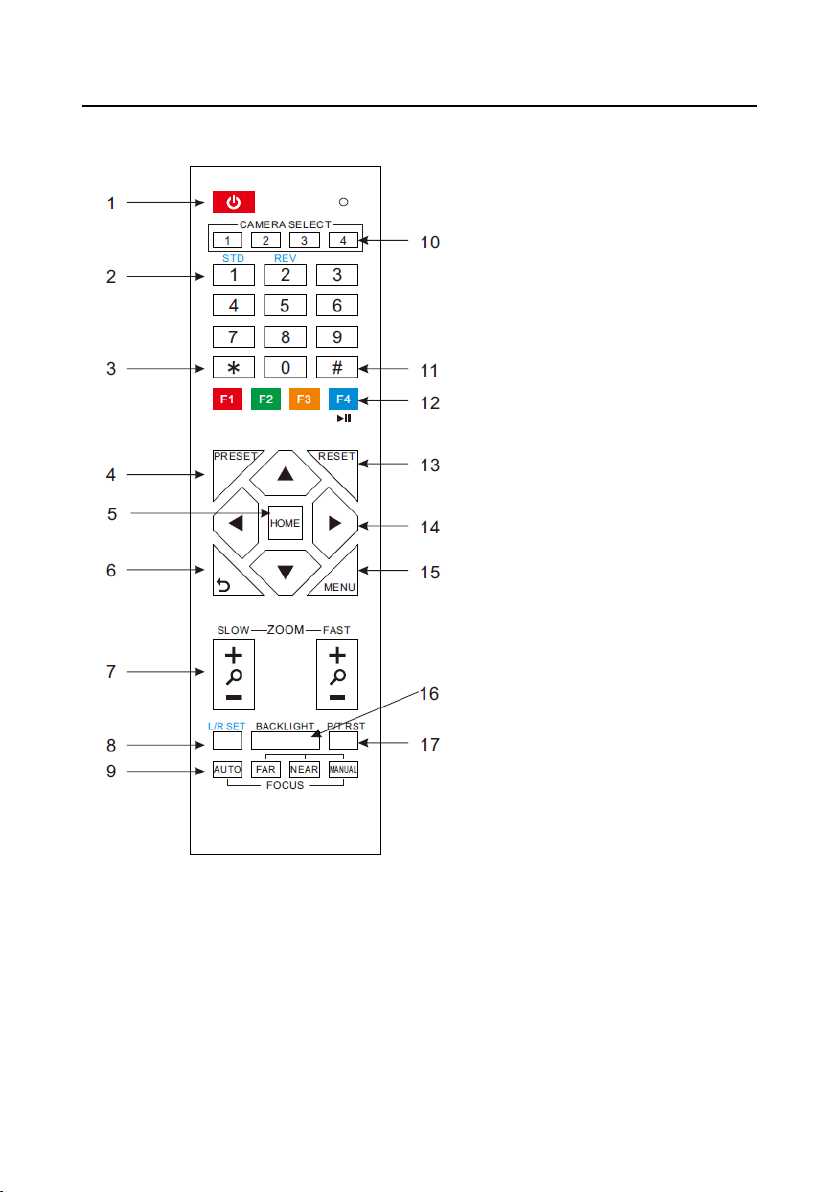
IR Remote Controller Explanation
1. Standby Button
Press this button to enter standby mode.
Press it again to enter normal mode. (Note:
Power consumption in standby mode is
approximately half of the normal mode)
2. Position Buttons
To set preset or call preset
3. *Button
Used with other buttons
4. Set/Preset Buttons
Set preset: Store a preset position
[SET PRESET] + Numeric button (0-9):
Setting a corresponding numeric key preset
position
5. Pan-Tilt control Buttons
Pressing the Pan-Tilt back to the middle
position
6. Back buttons
Press the OSD menu return to the superior.
7. Zoom Buttons
Slow Zoom: Zoom In [+] or Zoom Out [-]
slowly
Fast Zoom: Zoom In [+] or Zoom Out [-]
fast
8. Pan-Tilt L/R set
Press with 1 buttons and 2 buttons setting the direction of the Pan-Tilt
L/R Set +1[STD]: set the Pan-Tilt turn the same direction as the L/R Set
L/R Set +2[REV]: set the Pan-Tilt turn the opposite direction as the L/R Set
9. Focus Buttons
Used for focus adjustment.
Press [AUTO] adjust the focuses on the center of the object automatically. To adjust the focus manually.

Press [MANUAL] adjust the focus on the center
of the object manual
MANUAL button, and adjust it with [Far] (Focus
on far object) and [NEAR] (Focus on near object)
10. Camera Select Buttons
Press the button corresponding to the camera you
want to operate with the remote controller.
11. # Button
Used with other buttons
12. Set Camera IR Address Buttons
[*]+[#]+[F1]: Address1
[*]+[#]+[F2]: Address2
[*]+[#]+[F3]: Address3
[*]+[#]+[F4]: Address4
13. Clear Preset Buttons
Clear preset: Erase a preset position
[CLEAR PRESET] + Numeric button (0-9)
Or: [*]+[#]+[CLEAR PRESET]: Erase all the
preset individually
14. Pan/Tilt Control Buttons
Press arrow buttons to perform panning and tilting.
Press [HOME] button to face the camera back to
front
15. MENU
MENU: enter or exit OSD MENU
16. BLC (Backlight Compensation) Button
BLC ON/OFF: Press this button to enable the
backlight compensation. Press it again to disable
the backlight compensation.(NOTE: Effective
only in auto exposure mode)
Note: If a light behind the subject, the subject will
become dark. In this case, press the backlight ON /
OFF button. To cancel this function, press the
backlight ON / OFF button.
17. Pan/Tilt reset
Preset Pan/Tilt self-test.
18. Image freezing function
Manually freeze: Open the freezing function after
press the remote control [F4], display "Freeze" on
the left upper corner character, after 5 seconds
display disappear automatically. If you want to
cancel the freeze, press [F4] key and then can
return to normal, display "Unfreeze" on the left
upper corner, after 5 seconds display disappear
automatically.
Recalling the Preset image Freeze:By the OSD
Menu Setting "Recalling the Preset image Freeze"
function. After the function is opened, the screen
will stay in before Recalling the Preset when
Recalling the Preset, the screen can be switched to
the preset position screen until the camera points
to the preset position.
19. Shortcut Set
[*]+[#]+[1]: OSD menu default English
[*]+[#]+[3]: OSD menu default Chinese
[*]+[#]+[4]: Default IP address
[*]+[#]+[5]: Save OSD
[*]+[#]+[6]: Quickly recover the default
[*]+[#]+[8]: Look the camera version
[*]+[#]+[9]: Quickly set up inversion
 Loading...