

Presonus Audio electronic 1394 User Manual
User’s Manual
Version 1.0
PreSonus Audio Electronics, Inc., © 2005

OVERVIEW
PreSonus Limited Warranty
PreSonus Audio Electronics Inc. warrants this product to be free of defects in material and workmanship for a
period of one year from the date of original retail purchase. This warranty is enforceable only by the original
retail purchaser. To be protected by this warranty, the purchaser must complete and return the enclosed
warranty card within 14 days of purchase. During the warranty period PreSonu s shall, at its sole and absolute
option, either repair or replace, free of charge, any product that proves to be defective on inspection by PreSonus
or its authorized service representative. To obtain warranty service, the purchaser must first call or write
PreSonus at the address and telephone number printed below to obtain a Return Authorization Number and
instructions of where to return the unit for service. All inquiries must be accompanied by a description of the
problem. All authorized returns must be sent to the PreSonus repair facility postage prepaid, insured and
properly packaged. PreSonus reserves the right to update any unit returned for repair. PreSonus reserves the
right to change or improve the design of the prod uct at any time without prior notice. This warranty does not
cover claims for damage due to abuse, neglect, alteration or attempted repair by unauthorized personnel, and is
limited to failures arising during normal use that are due to defects in material or workmanship in the product.
Any implied warranties, including implied warranties of merchantability and fitness for a particular purpose, are
limited in duration to the length of this limit ed warranty. Some states do not allow limitations on how long an
implied warranty lasts, so the above limitation may not apply to you. In no event will PreSonus be liable for
incidental, consequential or other damages resulting from the breach of any express or implied warranty,
including, among other things, damage to property, damage based on inconvenience or on loss of use of the
product, and, to the extent permitted by law, damages for personal injury. Some states do not allow the
exclusion of limitation of incidental or consequential damages, so the above limitation or exclusion may not
apply to you. This warranty gives you specific legal rights, and you may also have other rights, which vary from
state to state. This warranty only applies to products sold and used in the United States of America. For
warranty information in all other countries please refer to your local distributor.
PreSonus Audio Electronics, Inc.
7257 Florida Blvd.
Baton Rouge, LA 70806
www.presonus.com
2

OVERVIEW
Table of Contents
1 Overview
1.1 Introduction.......................................................................................................................4
1.2 What is in the Box ............................................................................................................5
1.3 Front and Back Panel Layout ...........................................................................................6
1.4 Quick Start Up Guide .......................................................................................................9
2 Installation
2.1 Computer Requirements...................................................................................................14
2.2 Installation of INSPIRE 1394 Drivers and Software ...................................................... 15
3 Control Panel
3.1 Control Panel Operation...................................................................................................17
3.2 Win Shade View...............................................................................................................23
3.3 Monitor Mixer .................................................................................................................24
4 Applications
4.1 Sample Hook Up Diagram ...............................................................................................28
4.2 Multiple Unit Support.......................................................................................................29
5 Testing
5.1 Testing your INSPIRE 1394 with Cubase LE..................................................................30
6 Technical Information
6.1 Glossary of Terms ............................................................................................................31
6.2 Troubleshooting................................................................................................................35
6.3 Specifications....................................................................................................................37
3

OVERVIEW
1.1 INTRODUCTION
Thank you for purchasing the PreSonus INSPIRE 1394. PreSonus Audio Electronics has designed
the INSPIRE 1394 utilizing high-grade components to insure optimum performance that will last a
lifetime. The INSPIRE 1394 is very powerful, small footprint recording interface with the ability
to record and playback four inputs and two stereo outputs simultaneously at a 24-bit/96K sample
rate. With two PreSonus microphone preamplifiers and two instrument inputs on the front panel,
as well as one stereo phono input and two stereo analog outputs on the back panel, the INSPIRE
1394 is ready to go out of the box for quality computer recording with Cubase LE 48-track
recording software included. For further flexibility, the INSPIRE 1394 can be bus-powered by a
six-pin 1394 connector or externally powered by the included power supply. The INSPIRE 1394
gives you the power to make quality recordings in the palm of your hand.
We suggest that you use this manual to familiarize yourself with the features, applications and
correct connection procedure for your INSPIRE 1394 before trying to connect it to your computer.
This will hopefully alleviate any unforeseen issues that you may encounter during installation and
set up.
There is also a Glossary of Terms located in the back of this manual. Most of the technical terms
in this manual are defined in the Glossary for quick reference.
Thank you, once again, for buying our product and we hope you enjoy your INSPIRE 1394!
4
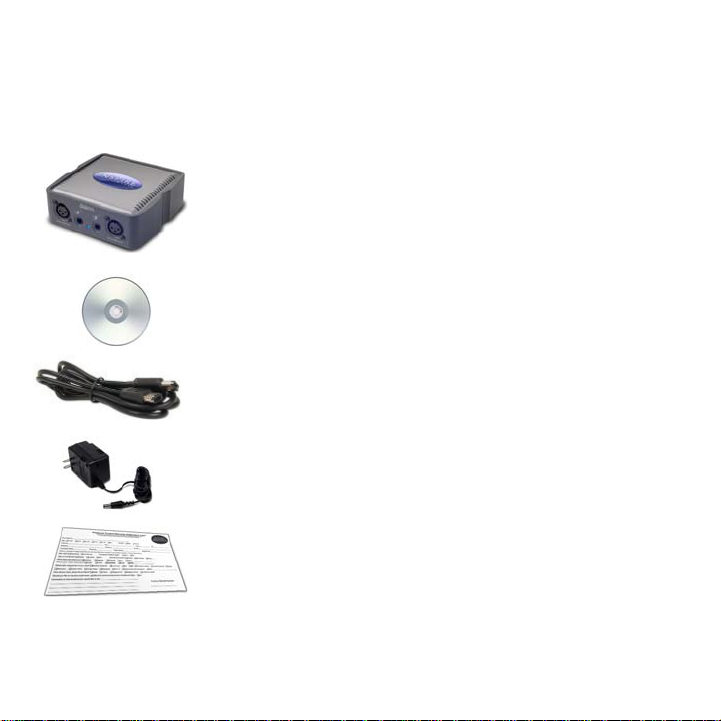
1.2 WHAT IS IN THE BOX
Your INSPIRE 1394 pac
kage contains the following:
• INSPIRE 1394 Interface
• CD-ROM containing driver software and user manual in PDF form.
• 1 6’ 6-pin to 6-pin IEEE 1394 (FireWire) cable
• 16VAC 1A Power Supply
• Warranty Card
OVERVIEW
5

.3 FRONT AND BACK PANEL LAYOUT 1
Front Panel
OVERVIEW
Your INSPIRE 1394 is equipped with two custom designed, digitally controlled, solid state
preamplifiers that can accept XLR microphone or 1/4" instrument inputs. For each preamplifier,
ither the XLR or 1/4" input may be used at a given time.
e
a. XLR Microphone Input. The XLR connector on channels 1 and 2 are for use with most
ondenser and dynamic microphones.
c
b. 1/4" Instrument Inputs (Channels 1 and 2): The 1/4" TRS connector on channels 1 and 2 are
or use with an instrument (guitar, bass, etc.).
f
6
c. Red-Blue Power/Sync Light. This light is a driver sync indicator, and lets you know if your
OVERVIEW
unit is receiving driver sync correctly. Proper driver sync prevents digital interfaces from having
pops, clicks, or distortion in the audio signal.
Blue – solid sync
Red – sync not present.
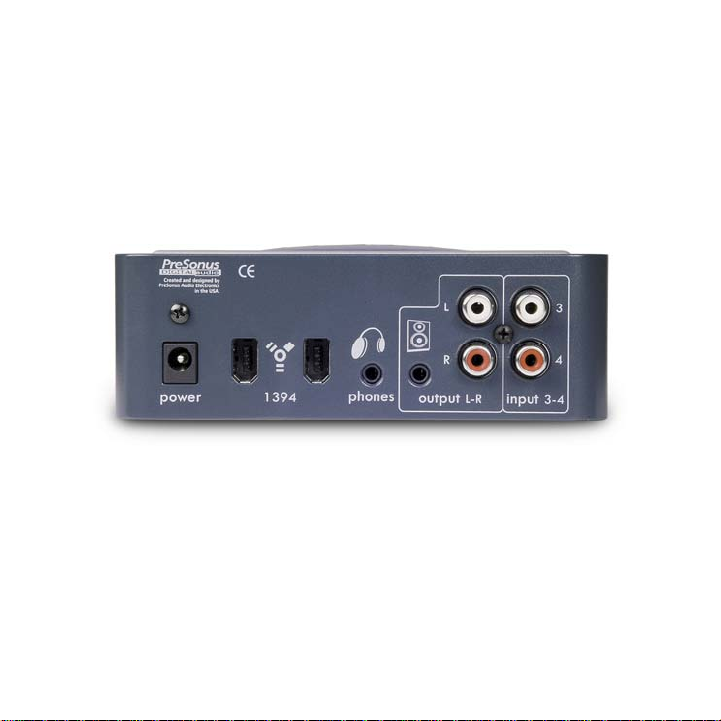
Back Panel
a. 16VAC Power Adaptor Input. This is where you plug the provided power supply into the
INSPIRE 1394. Please check the power supply to ensure that it is the correct voltage and plug type
for your country. Note that you can also power your INSPIRE 1394 with a six-pin 1394 port from
your computer instead of using the external power supply.
b. 1394 (FireWire) Ports. There are two 1394 ports on the back of the INSPIRE 1394. Both 1394
ports are standard 6 pin connectors. If your computer has a six-pin 1394 port you can power your
INSPIRE 1394 from the 1394 connector. If your computer has a 4 pin 1394 connector, then you
7

will need to get a single 4 to 6 pin 1394 cable to connect your INSPIRE 1394 to your computer,
OVERVIEW
and use the external power supply. (Refer to section 4.2 for Multiple Unit Support)
c. Headphone Symbol and 1/8” / 3.5mm Jack. Headphone output. This is where you connect
your headphones.
d. Speaker Symbol and 1/8” / 3.5mm Jack. Unbalanced line level output. This is where you
connect your computer speakers.
e. RCA Line Outputs. Unbalanced line level outputs. This stereo output can be used to connect to
your speakers or another device.
f. RCA Line Inputs (3 and 4). Unbalanced line level / phono inputs. This stereo input is used to
connect a turntable, keyboard, etc.
8

1.4 QUICK START UP GUIDE
OVERVIEW
We recommend you familiarize yourself with the entire INSPIRE 1394 user manual, however,
follow these instructions if you want to just dive in:
PC:
1.) Insert the INSPIRE 1394 Driver/Software CD in the CD drive of the computer. The installer
should auto-run. (If installation does not begin, browse the contents of the CD and run setup.exe)
2.) Follow the instructions in the installer closely, and when directed, connect your INSPIRE 1394
to your computer via a 1394 cable.
3.) You should see a blue sync light on the front panel of the INSPIRE 1394 at this point.
4.) Finish the installation as directed.
9

OVERVIEW
5.) Click on the Start Menu to navigate to All Programs / PreSonus INSPIRE 1394, and click on
Control Panel. This will open the INSPIRE 1394 Control Panel, from which you can digitally
control your INSPIRE 1394.
6.) If you intend to use Cubase LE, refer to the Cubase LE section below.
MAC:
1.) Connect the INSPIRE 1394 to your computer via a 1394 cable.
2.) You should see a blue sync light on the front panel of the INSPIRE 1394 at this point.
3.) Insert the INSPIRE 1394 Driver/Software CD in the CD drive of the computer.
4.) Browse the contents of the CD to find and copy the folder named ‘Macintosh’ to your hard
drive.
5.) Find the ‘Macintosh’ folder you copied from the INSPIRE 1394 driver CD. Look for the
Control Panel icon and double-click on it. This will open the INSPIRE 1394 Control Panel, from
which you can digitally control your INSPIRE 1394.
6.) If you intend to use Cubase LE, refer to the Cubase LE section below.
10
CUBASE LE :
OVERVIEW
Once you have installed the INSPIRE 1394 drivers, if you plan on using the CUBASE LE
software included with your INSPIRE 1394, insert the INSPIRE 1394 Driver/Software CD and
run the Cubase LE Installer. Make sure to keep your CD sleeve handy to reference the serial
number during installation. Then, launch Cubase LE.
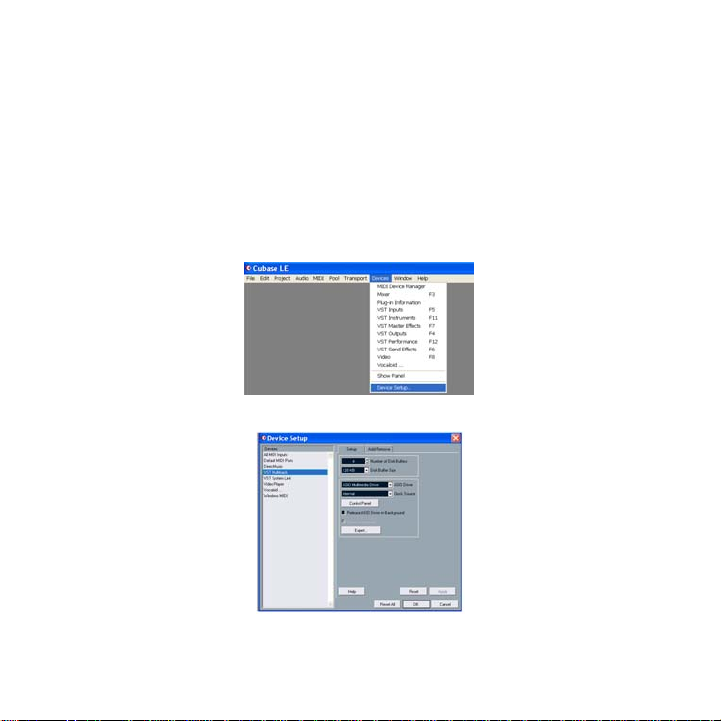
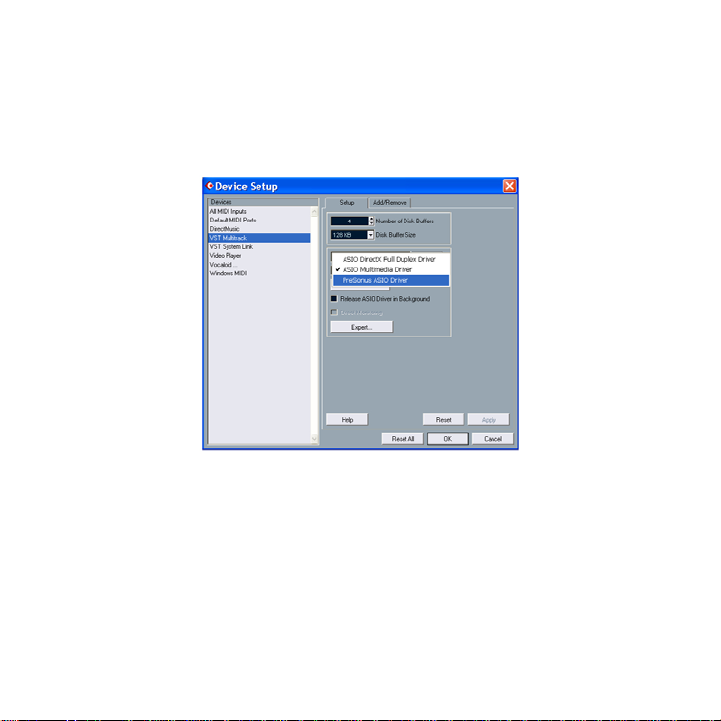
1.)To select the INSPIRE 1394 in Cubase LE, go to Devices -> Device Setup.
2.) Select VST multi-track.
11
OVERVIEW
3.) ASIO Driver (pull down menu) – select PreSonus
ASIO Driver.
12
 Loading...