


Refractive Index Meter II | PRIM II
USER HANDBOOK

Language Contents
1. English Language pg. 04
2. Chinese Language pg. 19
3. French Language pg. 34
4. German Language pg. 50
5. Italian Language pg. 66
6. Russian Language pg. 82
7. Spanish Language pg. 99
2

I. Disclaimers, Exclusions and
Limitations of Liability pg. 04
II. About this book pg. 05
III. About your Presidium Refractive Index
Meter II pg. 06
IV. IMPORTANT NOTICE pg. 08
1. GETTING STARTED with your Presidium
Refractive Index Meter II pg. 10
2. PERFORMING A TEST with your Presidium
Refractive Index Meter II pg. 14
3. READING TEST RESULTS with your
Presidium Refractive Index Meter II pg. 16
4. TAKING CARE of your Presidium Refractive
Index Meter II pg. 18
Contents
(English Version)
3

PLEASE READ AND NOTE PRESIDIUM WARRANTY
TERMS AND CONDITIONS as stated in the warranty
card. Presidium warranty for its testers are subject to
proper use by its users in accordance with all the terms
and conditions as stated in the relevant user handbook
and shall cover only manufacturing defects.
Due to continuous product improvement, Presidium
reserves the right to revise all documents including the
right to make changes to the handbook without notice and
without obligation to notify any person of such revisions
or changes. Users are advised to check Presidium’s
website at http://www.presidium.com.sg/ from time to
time.
Presidium shall not be responsible for any damage or
loss resulting from the use of this tester or handbook, and
under no circumstances shall Presidium, its manufacturer
or any of its subsidiaries, licensors, distributors, resellers,
servants and/or agents be liable for any direct or indirect
damages, resulting from the use of this tester.
TO THE MAXIMUM EXTENT PERMITTED BY
APPLICABLE LAW, under no circumstances shall
Presidium, its manufacturer or any of its subsidiaries,
licensors, distributors, resellers, servants and/or agents
be responsible for any special, incidental, consequential
or indirect damages howsoever caused.
The tester or Presidium Refractive Index Meter II
(PRIM II) referred to in this handbook is provided and/or
sold on an “as is” basis. Except as required by applicable
law, no warranties of any kind, either expressed or implied,
including, but not limited to, the implied warranties of
merchantability and tness for a particular purpose.
I. Disclaimers, Exclusions and Limitations of
Liability
4

Thank you for purchasing the Presidium Refractive Index
Meter II (“PRIM II” or “tester”).
This handbook is designed to help you set up your
tester and describes all you need to know about how to
use your tester accurately and take care of it in line with its
requirements. Please read these instructions carefully
and keep them handy for future reference.
This book also contains the terms and conditions in
relation to the use of the tester including the
Disclaimer, Exclusion and Limitation of Liability
clauses stated above in Section I
II. About this book
5

The Presidium Refractive Index Meter II detects the
quantity of light (intensity) reected from the surface of
cut and polished gemstone. This intensity reading is fed
into a microcontroller in which a calculation is performed
and converted to obtain the refractive index reading of the
gemstone
This tester was designed with the following
objectives:
• Reconrming the identity of colored gemstone using
Refractive Index
• Universal SI units
• Provide fairly consistent and reliable test results under
proper use;
The Presidium Refractive Index (R.I.) Meter II features
the following:
• Separates diamond, moissanite and gemstones in
seconds
• Refractive Index reading from 1.000 to ~ 3.000
• No waiting time between tests
• USB power inlet with International Voltage
Compatibility
• Low battery Indicator
• Automatic power off
• Online software updates
III. About your Presidium Refractive Index Meter II
6
Included in your package:
• Presidium Refractive Index Meter II
• Protective Carrying Case
• User Handbook
• Warranty Card
• Refractive Index Reference List
• USB Cable
• CD-ROM
3
2
6
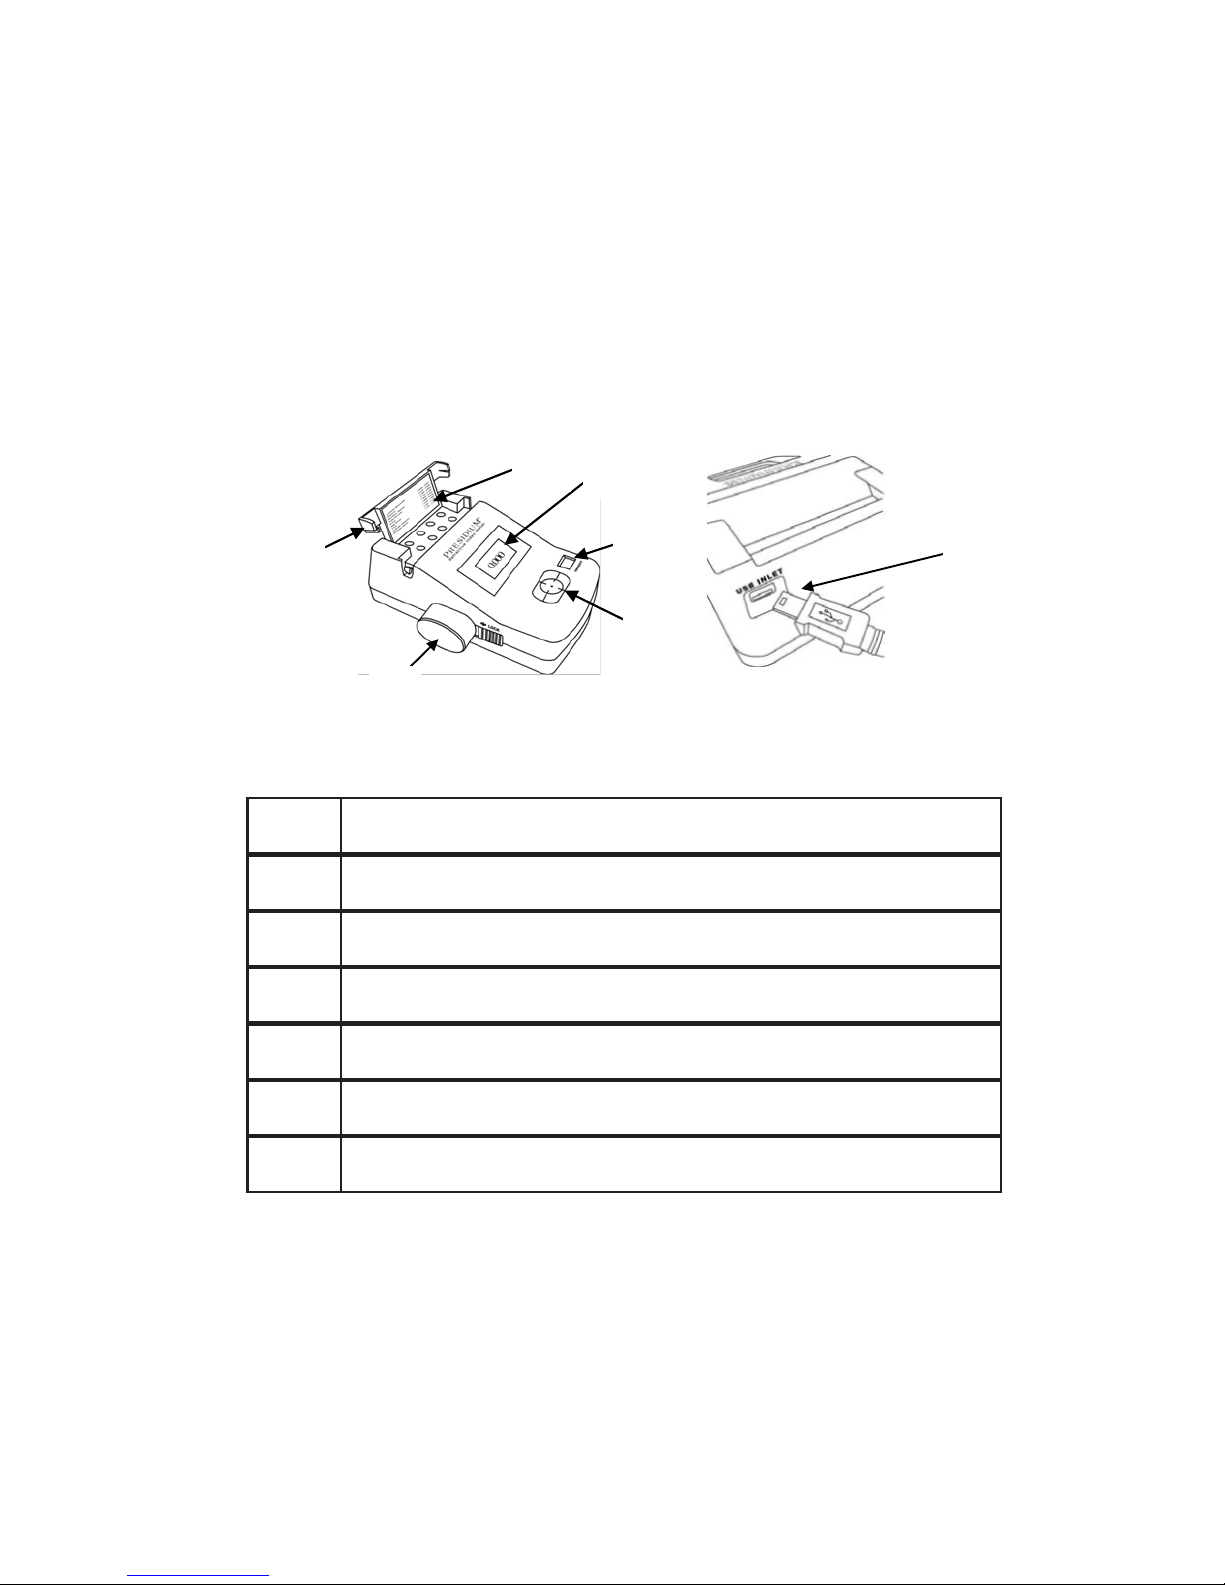
1
4
5
7
1 Display Window
2 Test pad
3 Cylinder
4 Refractive Index chart
5 Flap
6 On/Off button
7 USB Inlet & USB cable
7

• Keep the tester dry. Precipitation and all types of
liquids or moisture can contain minerals that will
corrode electronic circuits. If your tester gets wet,
remove the battery, and allow the tester to dry
completely before replacing it.
• Do not use, store or expose the tester in dusty and
dirty areas. Its moving parts and electronic
components can be damaged.
• Do not use, store or expose the tester in hot areas.
High temperatures can damage or shorten the life of
the tester, damage batteries, and warp or melt certain
plastics.
• Do not use, store or expose the tester in cold areas.
When the tester returns to its normal temperature,
moisture can form inside the tester and damage
electronic circuit boards.
• Do not attempt to open the tester other than as
instructed in this handbook.
• Do not drop, knock, or shake the tester. Rough
handling may break internal circuit boards and ne
mechanics.
• Do not use harsh chemicals, cleaning solvents, or
strong detergents to clean the tester.
• Do not paint the tester. Paint can clog the moving parts
and prevent proper operation.
IV. IMPORTANT NOTICE
8

If the tester is not working properly, kindly contact our
Customer Service at service@presidium.com.sg or
Presidium Instruments Pte Ltd
No. 6 Penjuru Lane
Singapore 609187
Singapore
(65) 6379 5000
Attn: Customer Service Executive
9

Powering up your Presidium Refractive Index Meter II
This tester can be powered either by the use of an AC
power via USB connection (optional item sold separately)
or through the use of batteries. If AC power is used,
connect one end of the USB cable to the tester (Fig. 1.1).
and the other end of adaptor into a suitable electrical
outlet. Please ensure that only the adaptor supplied by
Presidium is used.
If battery is used (1 x 9V battery), take note of the positive
(+) and negative (-) directions of battery when inserting
the battery into the tester (Fig. 1.2). The use of alkaline
batteries is preferred, as it should generally give
approximately two and a half hours of continuous
operation, while the use of ordinary batteries will give a
shorter working life.
1. GETTING STARTED with your Presidium
Refractive Index Meter II
Fig. 1.2
Fig. 1.1
10
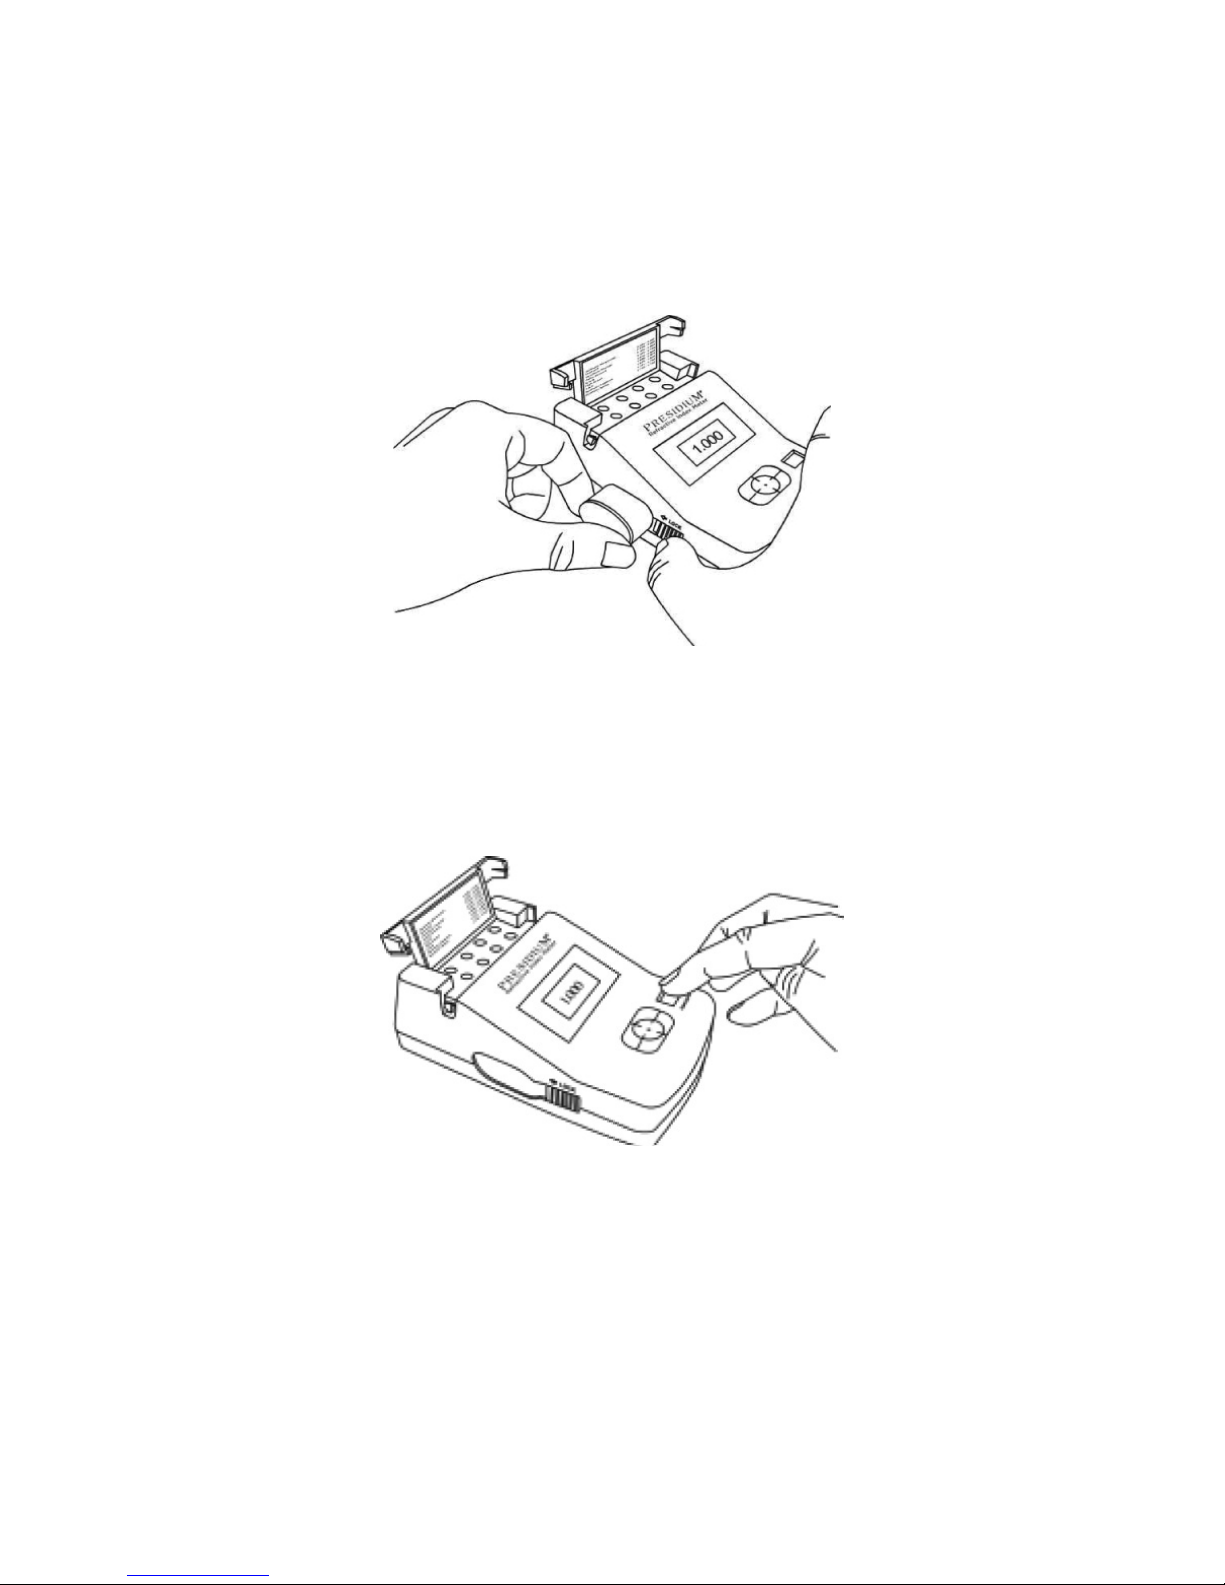
Fig. 1.3
Fig. 1.4
Turning on your Presidium Refractive Index Meter II
Remove Recessed Cylinder from the left hand side of
the housing by unlocking the latch (Fig. 1.3). Pull open
the Flap with your thumb and index nger, the Refractive
Index Chart will be visible. Remove the Protective Cover
from the Test Pad.
Press the ON/OFF button to turn on the unit (Fig. 1.4). To
ensure that the unit is functioning properly, cover the test
pad with Recessed Cylinder. The display should show
1.000.
11

Calibration
All testers have been calibrated during the manufacturing
process and no further adjustment or user intervention to
the unit is required.
Self-calibration should not be attempted. To minimize any
risks associated, users should contact Presidium at
service@presidium.com.sg or its service center for
assistance. In the event that users require the
manufacturer to re-calibrate the unit, the users will bear
the associated to/fro freight cost for the shipping of unit to
the service center.
Recommended testing conditions
The gemstone should be clean and dry before testing.
However, elaborate cleaning procedures are not normally
necessary.
The recommended testing temperature is 18°C – 27°C or
65°F- 80°F. Please allow the gemstone to adjust to room
temperature prior to testing. Exposure and/or operation of
the tester outside the room temperature would affect the
results and performance of the tester.
Battery information
Batteries generally can still be used, provided that the
“Low Batt” indicator does not light up.
Stop using the unit when the low battery indicator is
displayed to prevent inaccurate measurements.
Do not leave worn out batteries in the battery
compartment as the batteries may corrode, leak, and
damage the tester. Batteries should be removed when
the tester is expected to be stored for any extended
period of time.
12

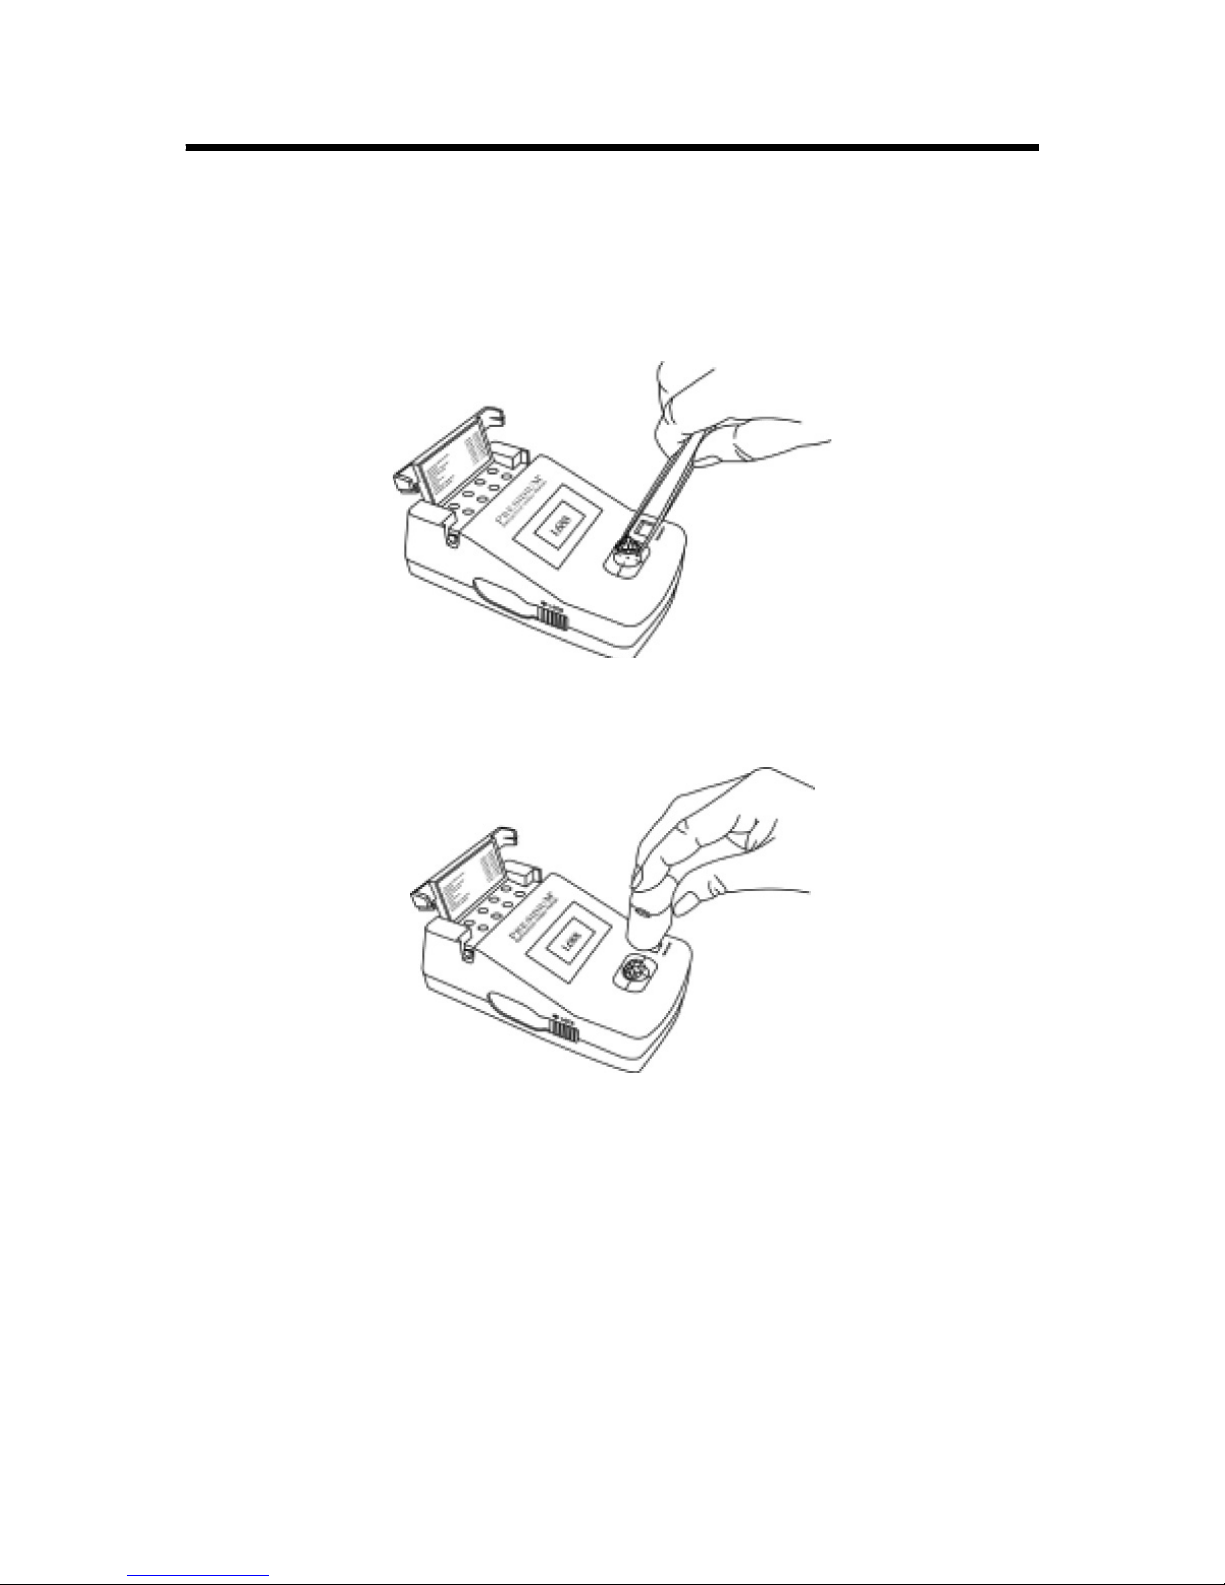
Cleaning your gemstone prior to testing
Prepare a clean tissue. Carefully retrieve the gemstone
with tweezers and place the gemstone face down on the
table (Fig. 1.5).
Gently rub the table of gemstone against the
tissue/jewellery cloth and place the gemstone on the
centre of the Test Pad. Do not use ngers to place the
gemstone on test pad as ngerprint will affect the test
results. (Fig. 1.6).
Fig. 1.5
Fig. 1.6
To prevent inaccurate readings, replace with new battery
if the “Low Batt” indicator lights up. A test should not be
performed when the battery power is low or weak.
Batteries do not have to be removed when the AC
adaptor is in use.
13
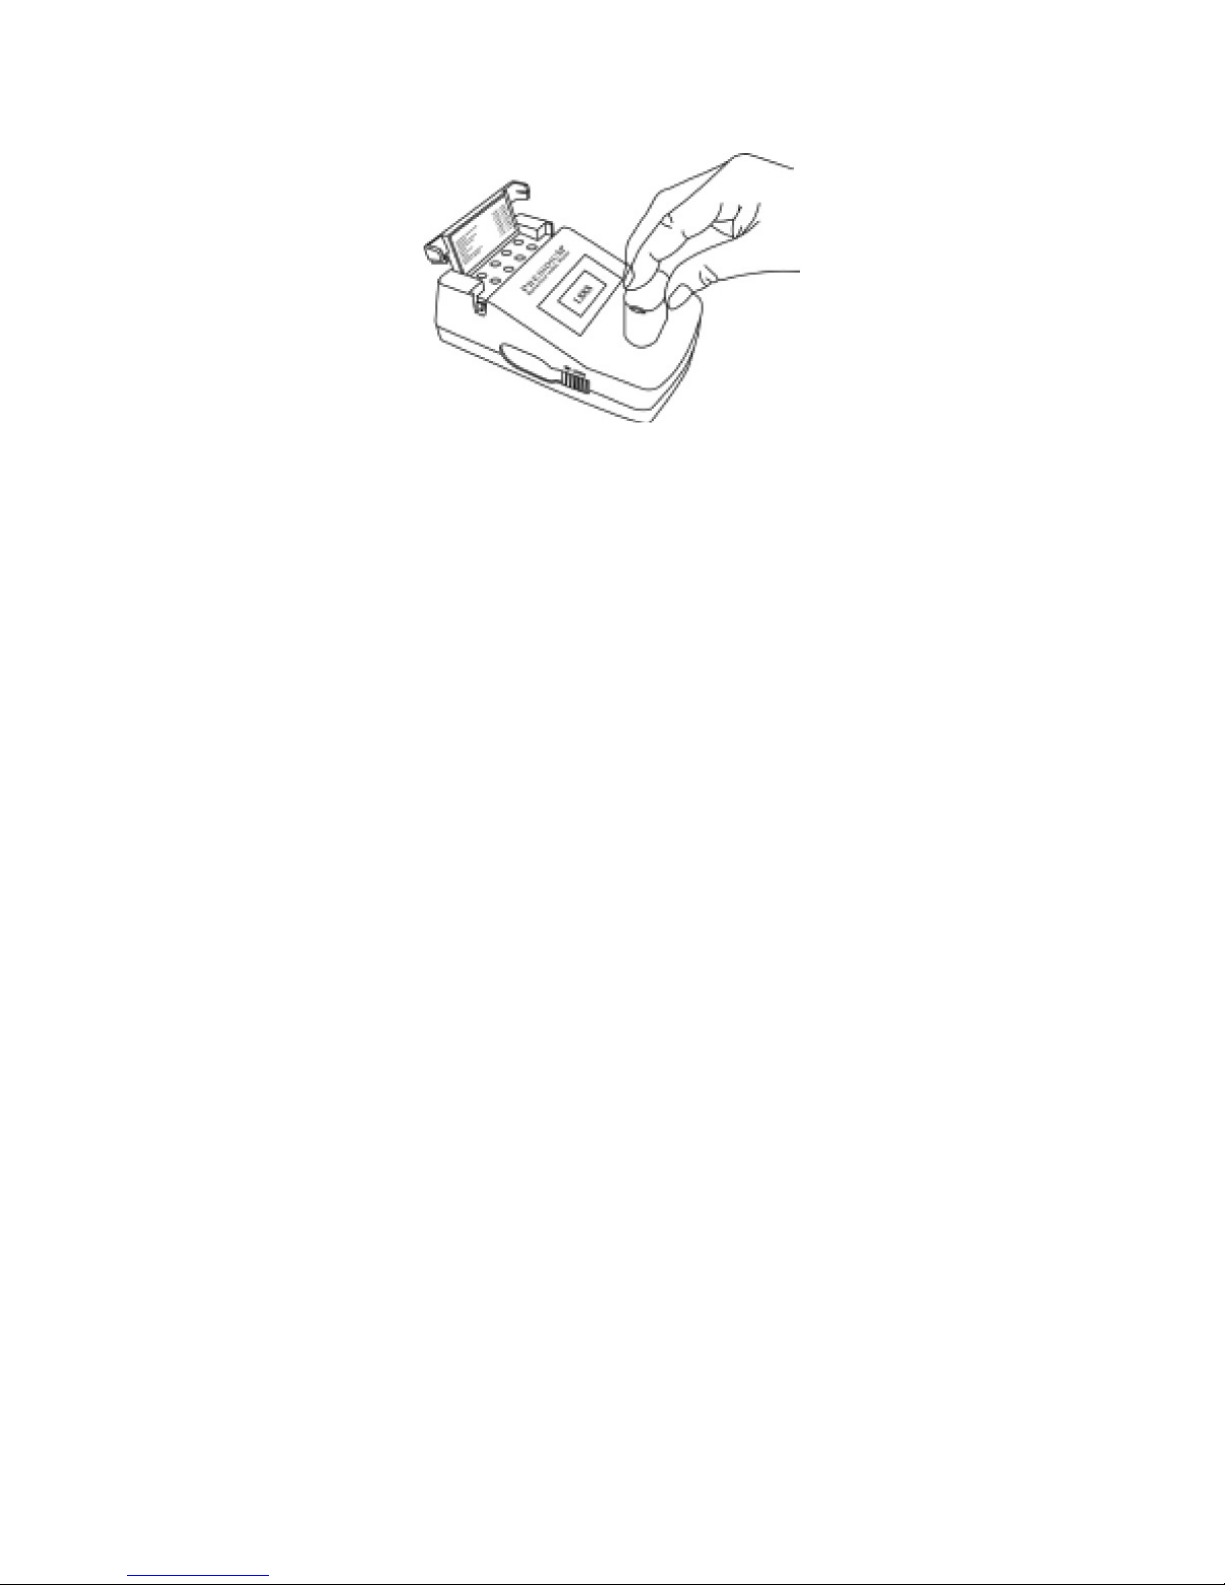
Remove the cylinder and place a well-cleaned, polished
gemstone at the centre of the pad. Make sure that the
gemstone is well centered to prevent reading error
(Fig. 2.1).
Cover the gemstone with the recessed cylinder (Fig. 2.2).
2. PERFORMING A TEST with your Presidium
Refractive Index Meter II
Fig. 2.1
Fig. 2.2
14
The display window (Fig. 2.3) will show the Refractive
Index of the gemstone.
Due to infra-red light source, it is essentials that the facet
placed over the test pad hole is at least 3mm in diameter.
PC Connectivity via USB cable
Presidium Refractive Index Meter II comes with a CD as
an extension to more functions. This CD is included in the
package. Instruction manual on using the extended
functions is included in the CD.
Fig. 2.3
15

The test results are indicated as follows:
• A Refractive Index Reference List is provided for
easy reference to end-user. This list comprises
common gemstones available in the market. The
gemstones are arranged according to descending
Refractive Index. Please refer to attached table.
• The list includes the range of refractive index of
gemstones with respective tolerance provided in
brackets.
• The tolerance in refractive index is due to the
tolerance from the photo-sensor used.
• Example: The refractive index for sapphire is 1.757
(-0.016) – 1.790. The reading in bracket refers to the
tolerance. In other words, the R.I. reading of sapphire
from the unit ranges from 1.741 – 1.790.
• In case of a borderline reading, clean the stone and
pad again before the next test and/or move stone
slightly off center. By repositioning the stone, a
distorted reection from a scratched area of the
surface may be avoided. Repeat the test.
3. READING TEST RESULTS with your Presidium
Refractive Index Meter II
16

Synthetic Spinel/Synthetic Sapphire and High Zircon/
GGG have overlapping Reectivity Index. If performing
a second test using the Presidium Gem Tester for further
separation, the results indicated will be as follows:
• Synthetic Sapphire: needle goes to a high position in
the red zone.
• Synthetic Spinel: Needle goes about halfway into the
red zone.
• High Zircon: Needle goes 2/3 into the red zone.
• GGG: Needle goes 1/3 into the red zone
17

• Always keep the Test Pad free from dust and replace
the Protective Cover immediately after use.
• Do not use the tester when “Low Batt” indicator
appears. Change to new batteries before performing
any test.
• Do not leave worn out or dead batteries in the battery
compartment as they may corrode, leak or damage
the tester. Batteries should be removed when the
tester is to be stored for an extended period of time.
Your tester is a product of extensive design and
craftsmanship and should be treated with care.
Thank you for taking time to go through the user
handbook which will enable you to understand your
recent purchase better.
Presidium also recommends that you register your warranty
by sending the warranty registration card to us or
registering online at http://www.presidium.com.sg/
4. TAKING CARE of your Presidium Refractive Index
Meter II
18

Presidium Refractive
Index Meter II
(PRIM II) 用户手册
19

I. 关于本手册 pg 21
II. 关于 Presidium Refractive Index
Meter II pg 22
III.重要说明 pg 24
1.开始使用 Presidium Refractive Index
Meter II pg 26
2.在 Presidium Refractive Index Meter II
上执行检测 pg 30
3.在 Presidium Refractive Index Meter II
上读取检测结果 pg 32
4.维护 Presidium Refractive Index
Meter II pg 33
目录
( Chinese Version )
20

感谢您购买 Presidium Refractive Index Meter II(简
称“PRIM II”或“检测仪”)。
本手册旨在帮助您设置检测仪,并且将介绍关于如何正确
地使用检测仪及按照要求对其进行护理的所有知识。 请
仔细阅读这些说明,将其放在方便之处以便将来参考。
I. 关于本手册
21
Presidium Refractive Index Meter II 可检测在经过切
割和打磨的宝石表面反射的光线质量(强度)。 这一强
度读数将输入微控制器,在其中进行计算和换算,以获得
宝石的折射率读数。
此检测仪的设计达到了以下目标:
• 利用折射率分辨有色宝石;
• 采用通用的国际度量单位
• 如正确使用,可得到相当一致且可靠的检测结果;
Presidium Refractive Index (R.I.) Meter II 具有以
下特性:
• 几秒钟内区分钻石、莫桑石和其他宝石
• 折射率读数范围为 1.000 至 3.000 左右
• 可连续检测,无须等待
• 有 USB 供电插口,兼容国际电压标准
• 低电量指示灯
• 可自动关闭电源
• 在线更新软件
包装物品:
• Presidium Refractive Index Meter II
• 保护性便携袋
• 用户手册
• 质保卡
• 折射率参照表
• USB 线
• CD-ROM
II. 关于 Presidium Refractive Index Meter II
22
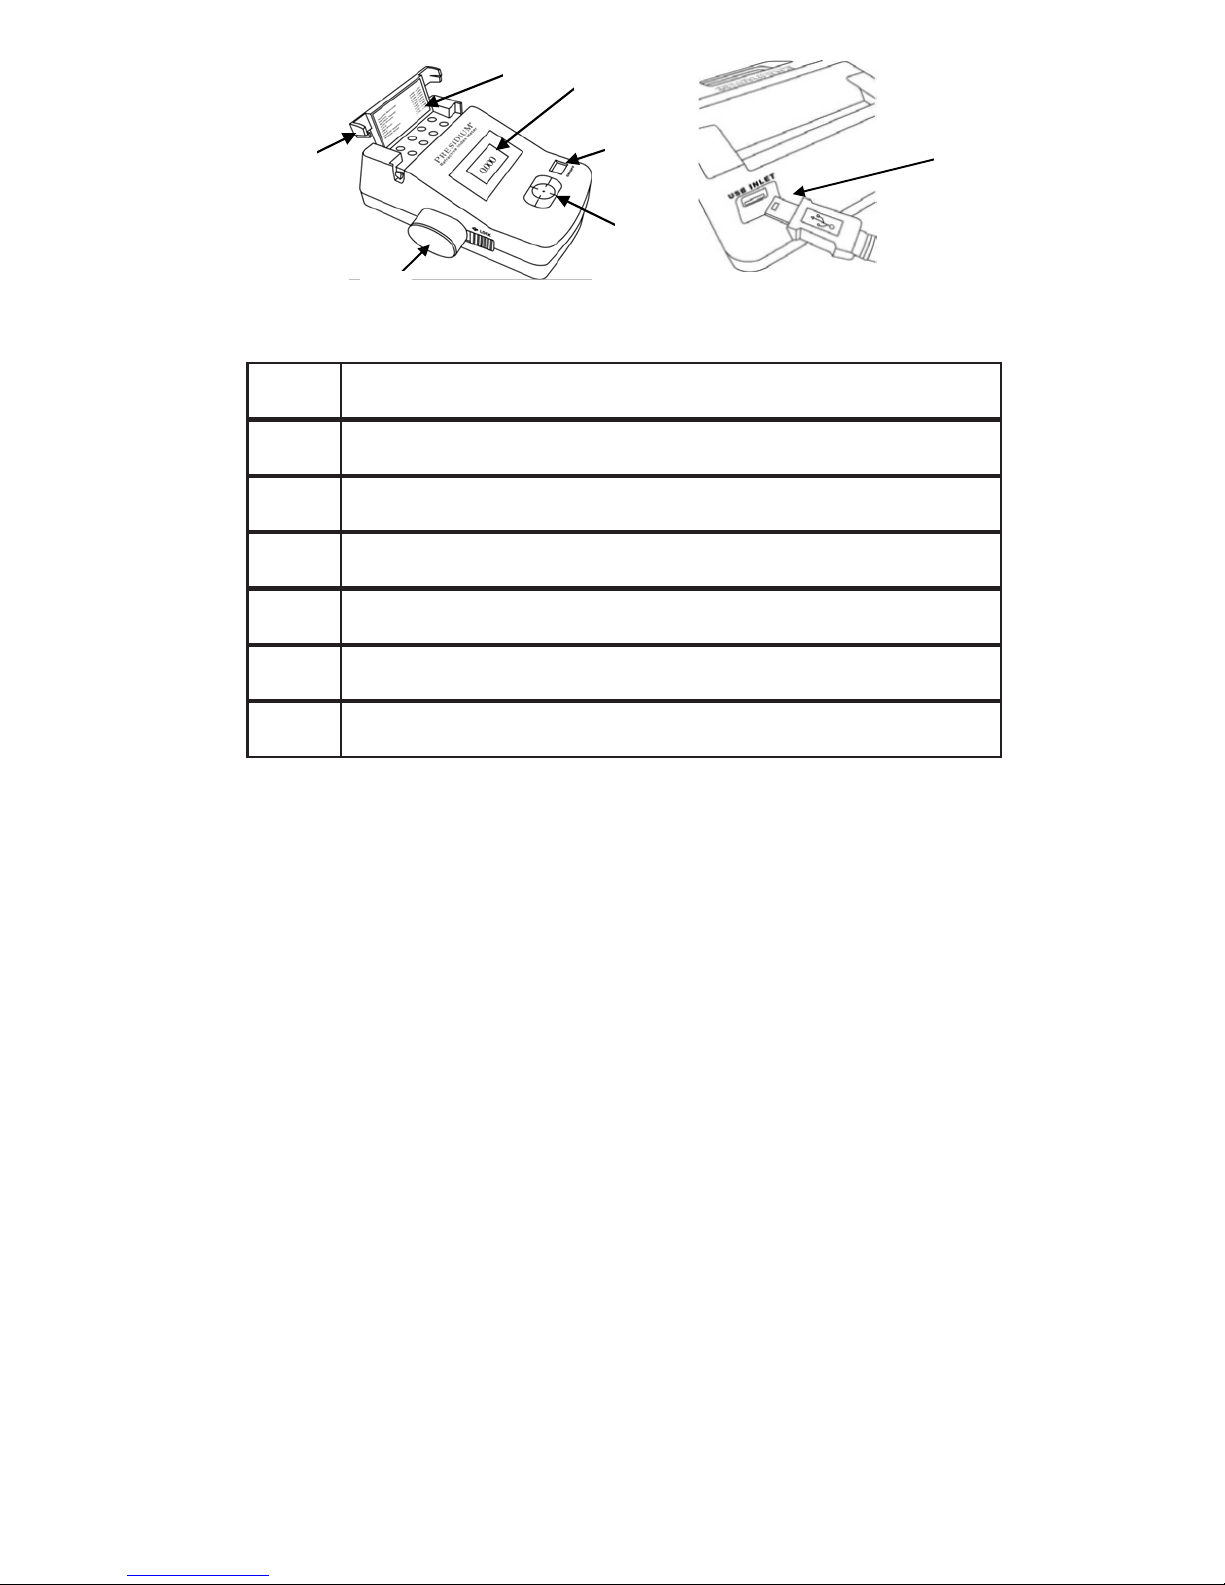
3
2
6
1
4
5
7
1
显示窗
2
检测台
3
小桶
4
折射率图表
5
活板
6
打开/关闭 (ON/OFF) 按钮
7
USB 插口和 USB 线
23

• 保持检测仪干燥。 雨水以及任何形式的液体或湿气
均可能含有对电子线路具有腐蚀性的矿物质。 如果
检测仪被打湿,请取出电池,让检测仪彻底晾干,
如仍然故障则需更换设备。
• 切勿在多灰尘和脏乱的环境中使用、存放或暴露
检测仪。这有可能损坏其活动部件或电子元件。
• 切勿在高温环境中使用、存放或暴露检测仪。 高温
有可能损坏或缩短检测仪的寿命、损伤电池以及
使某些塑料部件变形或熔化。
• 切勿在低温环境中使用、存放或暴露检测仪。 当检
测仪回到正常温度时可能在仪器内部形成湿气,
从而对电子线路板造成损害。
• 切勿尝试通过未在本手册中说明的方法来打开检测
仪。
• 切勿跌落、撞击或摇晃检测仪。 粗暴地使用可能导
致内部电路板和精密器械断裂。
• 切勿使用刺激性化学物质、清洁溶剂或强力洗涤
剂来清洗检测仪。
• 切勿给检测仪上漆。 油漆可能会阻塞活动部件,影
响其正常工作。
III. 重要说明
24

如果检测仪无法正常工作,请通过以下方式联系我们的客
户服务部门 - 电子邮件:service@presidium.com.sg
或者寄信至:
Presidium Instruments Pte Ltd
No. 6 Penjuru Lane
Singapore 609187
Singapore
(65) 6379 5000
Attn: Customer Service Executive
25

为 Presidium Refractive Index Meter II 供电
本检测仪既可通过 USB 连接(可单独选购的配件)使用
交流电源供电,也可使用电池供电。 如果使用交流电
源,请将 USB 线的一端连接检测仪,适配器的另一端直
接插入配套的电源插座中(图 1.1)。 请确保仅使用由
Presidium 提供的适配器。
如果使用电池(1 节 9V 电池),则在将电池放入检测仪
时应注意电池的正极 (+) 和负极 (-) 的方向(图 1.2)
。 推荐使用碱性电池,因为它一般可以保证约 2.5 个小
时的持续工作时间,使用普通电池的话其工作时间较短。
1. 开始使用 Presidium Refractive Index Meter II
图 1.2
图 1.1
26

图 1.3
图 1.4
打开 Presidium Refractive Index Meter II
拨开栓扣,将埋藏式小桶从机壳左侧取出(图 1.3)。
用拇指和食指拉开活板,将可看到折射率图表。 从测试
台上取下保护盖。
按下打开/关闭 (ON/OFF) 按钮打开检测仪(图 1.4)。
要确认设备是否工作正常,请用埋藏式小桶罩住检测台。
显示屏应该显示 1.000
27

校准
所有检测仪在制造过程中都经过校准,不需要对检测仪作
进一步调整或用户干预。
使用者不应该尝试自行校准。 为了尽量降低一切有关风
险,用户应该通过 service@presidium.com.sg 或服务中
心联系 Presidium 以寻求帮助。 如果用户需要制造商重
新校准检测仪,则用户应承担检测仪运至服务中心和返回
的相关运费。
推荐的检测条件
宝石接受检测前应清洁干燥。 但是通常不必执行复杂的
清洁程序。
建议的检测温度为 18°C – 27°C(65°F - 80°F)。
在检测前请让宝石调整至室温。 在室温范围外暴露和/或
操作检测仪都会影响检测结果和检测仪的性能。
电池信息
通常只要“低电量”指示灯不亮,电池就可继续使用。
切勿将用完的电池留在电池匣内,因为电池电解液可能出
现泄露,从而腐蚀和损坏检测仪。 如果预计要将检测仪
存放较长时间,应取出电池。
为防止读数不准确,如果“低电量”指示灯亮起,就应更
换新电池。 当电池的电量低或微弱时,不应执行检测
28
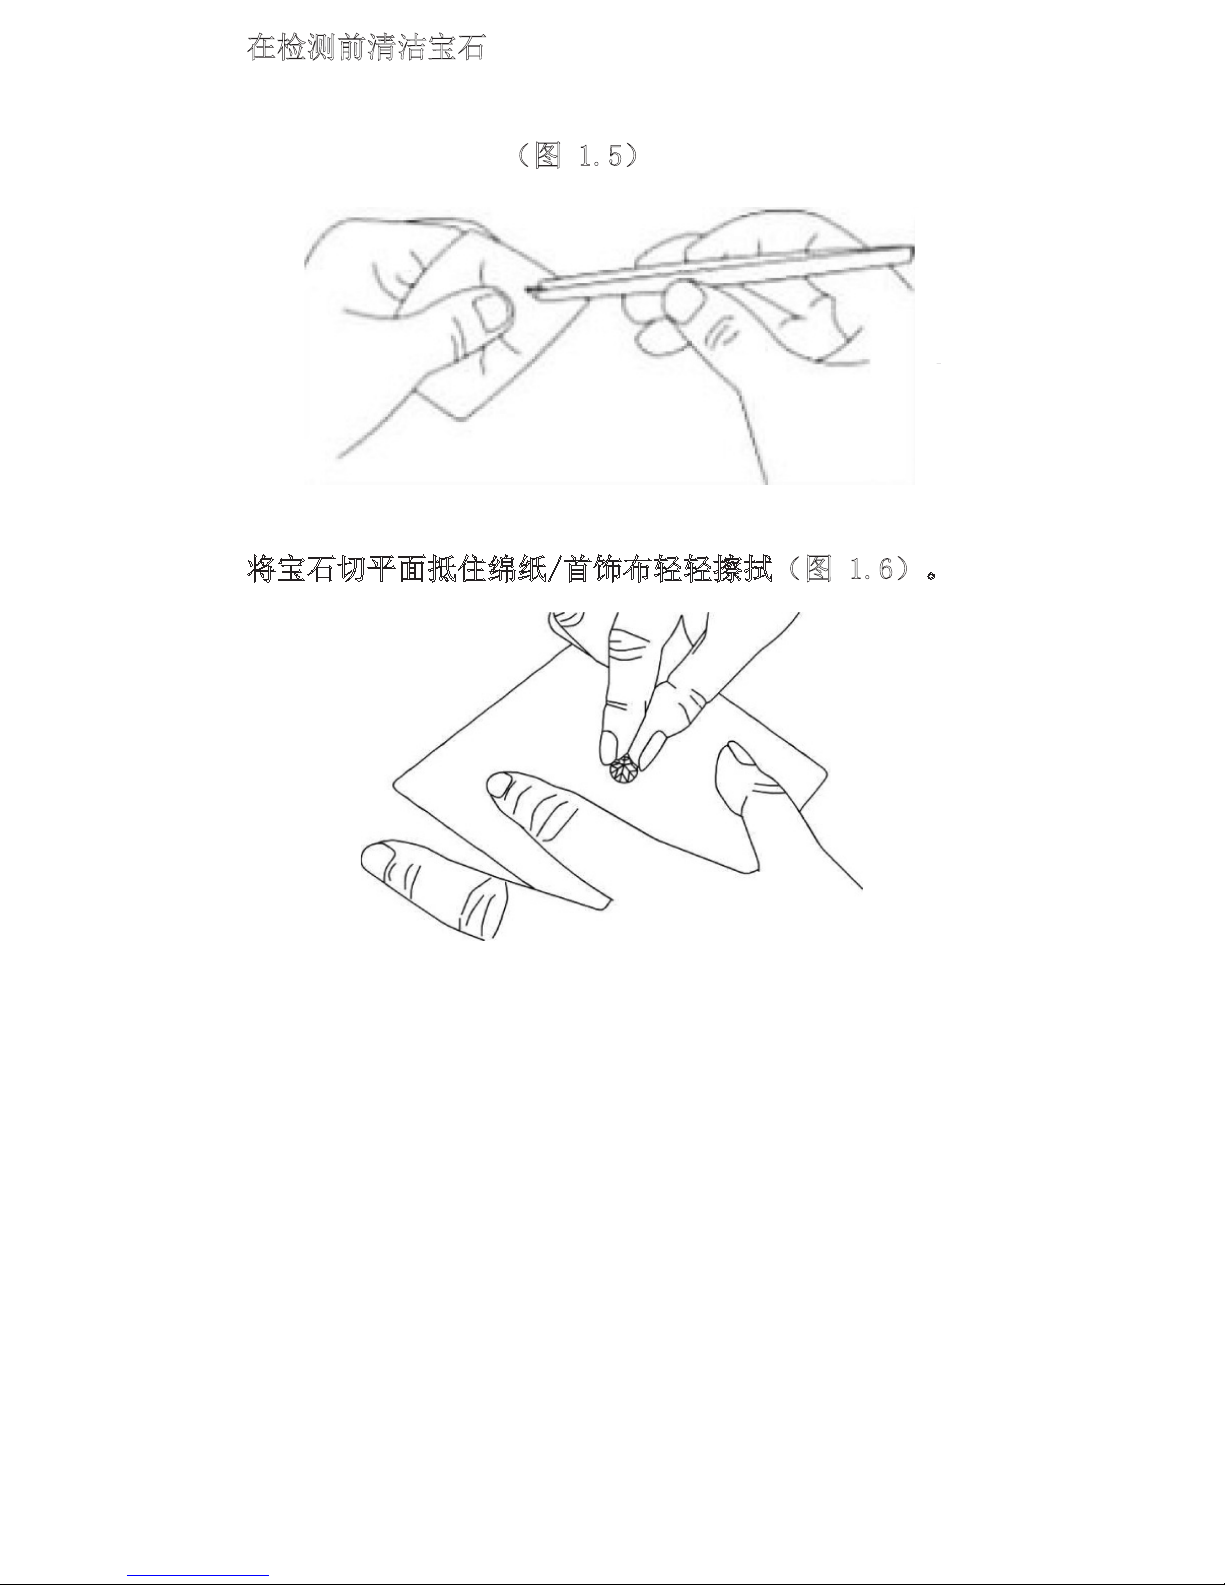
在检测前清洁宝石
准备一张干净的绵纸。用镊子小心地夹起宝石,将它的切
平面朝下放在纸上 (图 1.5)。
将宝石切平面抵住绵纸/首饰布轻轻擦拭(图 1.6)。
图 1.6
图 1.5
29
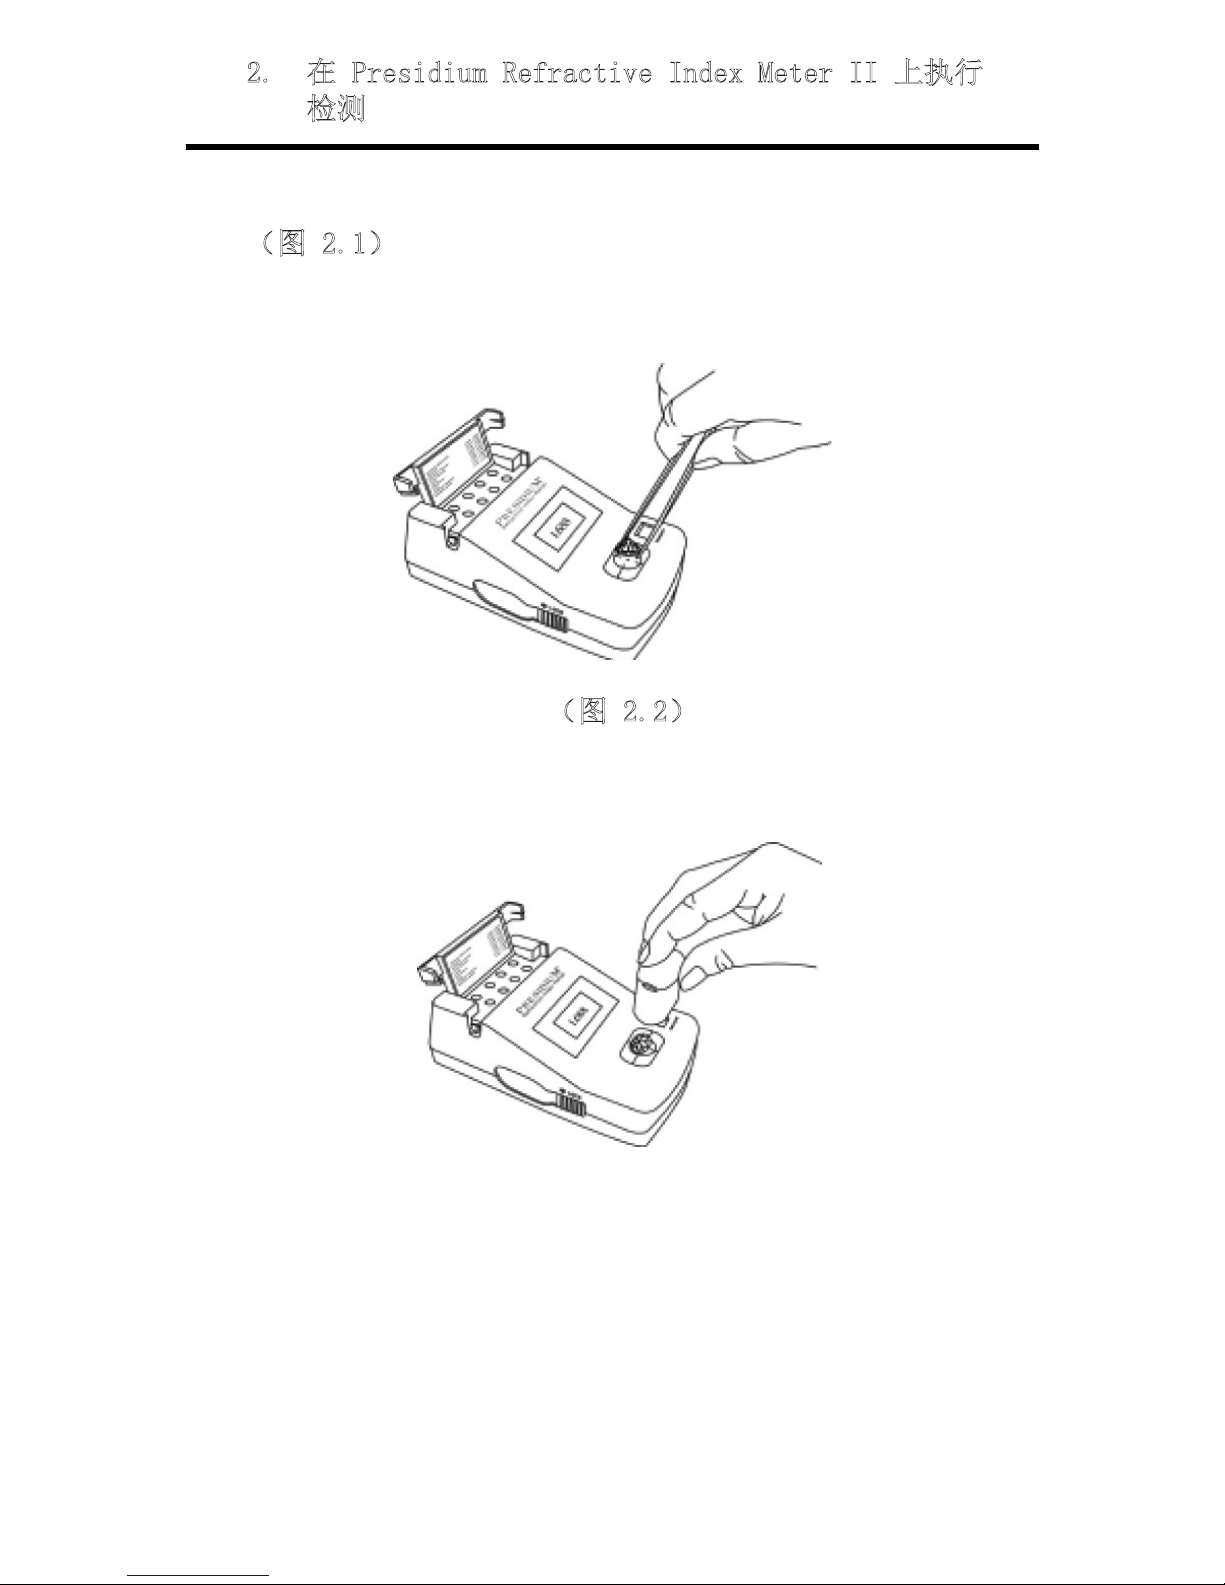
取下小桶,将经过适当清洁、擦亮的宝石放在检测台中央
(图 2.1)。
用埋藏式小桶罩住宝石(图 2.2),按住“Display”
(显示)按钮进行检测。 检测结果将显示在 LCD 显示
屏上
2. 在 Presidium Refractive Index Meter II 上执行
检测
图 2.1
图 2.2
30

显示窗口(图 2.3)将显示宝石的折射率。
通过 USB 线连接 PC
Presidium Refractive Index Meter II 附带一张 CD,以
提供更多功能。 此 CD 包含在包装中。 CD 中包含了有
关使用扩展功能的说明手册。
图 2.3
31

检测结果显示如下:
• 设备提供折射率参照表以方便最终用户参考。 此表
包括了市场上的常见宝石。 各种宝石按折射率从高
到低排列。 请参阅随附表格。
• 此表列出了宝石的折射率范围,并在括号中显示
相应的公差。
• 折射率的公差是设备使用的光敏感器的公差引起
的。
• 例如: 蓝宝石的折射率是 1.757 (-0.016) –
1.790。 括号中的读数指公差。 也就是说,检测仪
测出的蓝宝石 R.I. 读数范围是 1.741 – 1.790。
• 如果读数处于范围边界,请在再次检测前重新清
洁宝石和检测台,和/或将宝石从中央略微挪开。
改变宝石位置可避免表面刮伤部位导致的折射率
失真。 重复检测。
人造尖晶石/人造蓝宝石和高型锆石/GGG 的折射率范围有
重叠。 如果使用 Presidium Gem Tester 再次检测以进
一步鉴别,结果将显示如下:
使用 Presidium Gemstone Tester (PGT) 得到的检测
结果:
• 人造蓝宝石: 指针停留在红色区域中读数偏高的位
置。
• 人造尖晶石: 指针大约停留在红色区域的一半位
置。
• 高型锆石: 指针停留在红色区域 2/3 的位置。
• GGG: 指针停留在红色区域 1/3 的位置。
3. 在 Presidium Refractive Index Meter II 上读
取检 测结果
32

• 一定要避免检测台沾上灰尘,使用后应立即盖上保
护盖。
• 当“低电量”指示灯显示时不要使用检测仪。 应换
上新电池再执行任何检测。
• 切勿将用完的电池留在电池匣内,因为电池电解
液可能出现泄露,从而腐蚀或损坏检测仪。 如果
要将检测仪存放较长时间,应取出电池。
您的检测仪融合了大量的设计与工艺,因此应小心使用。
感谢您抽出时间阅读本用户手册,它会让您更好地了解您
新购买的产品。
Presidium 还建议您完成质保注册流程,可以通过将质保
注册卡寄送给我们,也可以通过 http://www.presidium.
com.sg/ 在线注册。
4. 维护 Presidium Refractive Index Meter II
33

Manuel de l’utilisateur
pour le Presidium
Refractive Index Meter
(PRIM II)
34

I. A propos de ce manuel pg. 36
II. Au sujet de votre Presidium Refractive
Index Meter pg. 37
III. AVIS IMPORTANT pg. 39
1. PREMIERE UTILISATION de votre
Presidium Refractive Index Meter pg. 41
2. TESTER votre Presidium Refractive
Index Meter I pg. 45
3. LECTURE DES RESULTATS DE TEST
sur votre Presidium Refractive Index Meter pg. 47
4. PRENDRE SOIN de votre Presidium
Refractive Index Meter pg. 49
Table des matières
(French Version)
35

Nous vous remercions d’avoir acheté le Presidium
Refractive Index Meter II (« PRIM II » ou « testeur »).
Ce manuel est conçu pour vous aider à congurer votre
testeur et décrit tout ce que vous devez savoir sur la
façon d’utiliser votre testeur de façon précise et de
prendre soin de lui en conformité avec le maniement
requis. Veuillez lire ces instructions attentivement et les
conserver pour toute référence future.
I. A propos de ce manuel
36

Le Presidium Refractive Index Meter II détecte la quantité
de lumière (intensité) rééchie sur la surface des pierres
taillées et polies. Les résultats de l’intensité sont transmis
à un microcontrôleur qui calcule et convertit les
indications an d’obtenir la mesure de l’index réfractif de
la pierre.
Ce testeur a été conçu avec les objectifs suivants :
• Reconnaître les pierres de couleur utilisant des index
de réfraction ;
• Unités universelles SI
• Donner des résultats de tests assez constants et
ables dans des conditions normales d’utilisation ;
L’indice de réfraction (I.R) Presidium Le Presidium
Refractive Index Meter II dispose de ce qui suit :
• Trie les diamants, moissanites et gemmes en
quelques secondes
• Mesure de l’index de réfraction de 1 000 à ~ 3 000
• Pas de temps d’attente entre les tests
• Entrée d’alimentation USB compatible avec divers
voltages internationaux
• Voyant de batterie faible
• Mise hors tension automatique
• Mise à jour des logiciels en ligne
II. Au sujet de votre Presidium Refractive Index
Meter II
37

3
2
6
1
4
5
7
1 Écran d'afchage
2 Surface de test
3 Cylindre
4 Liste des indices de réfraction
5 Rabat
6 Bouton MARCHE/ARRÊT
7 Prise et câble USB
Compris dans cet emballage :
• Presidium Refractive Index Meter II
• Étui de transport
• Manuel de l’utilisateur
• Carte de garantie
• Liste de référence des index de réfraction
• Câble USB
• CD-ROM
38

• S’assurer que le testeur est sec. Les précipitations et
tous les types de liquides ou l’humidité peuvent
contenir des minéraux susceptibles de détériorer les
circuits électroniques. Si votre testeur est humide,
retirez les piles et laissez l’appareil sécher
complètement avant de le remettre en place.
• Ne pas utiliser, ranger ou laisser le testeur dans des
endroits poussiéreux et sales. Ses pièces mobiles et
ses composants électroniques peuvent être
endommagés.
• Ne pas utiliser, ranger ou exposer le testeur dans des
locaux très chauds. Des températures élevées
peuvent endommager ou réduire la vie du testeur,
endommager les piles et déformer ou faire fondre
certains plastiques.
• Ne pas utiliser, ranger ou exposer le testeur dans des
endroits froids. Lorsque le testeur retrouve sa
température normale, l’humidité peut se former à
l’intérieur du testeur et endommager les circuits
électroniques.
• Ne tentez pas d’ouvrir le testeur autrement que de la
façon indiquée dans ce manuel.
• Vous ne devez ni laisser tomber, cogner, ou secouer
le testeur. Une manipulation brutale pourrait
endommager les circuits internes et les petites pièces
mécaniques.
III. AVIS IMPORTANT
39

• Ne pas utiliser de produits chimiques décapants, de
solvants de nettoyage ou de détergents puissants
pour nettoyer le testeur.
• Ne peignez pas le testeur. La peinture peut bloquer
les pièces mobiles et empêcher le bon
fonctionnement du testeur.
Si le testeur ne fonctionne pas correctement, veuillez
contacter le service clientèle de Presidium
service@presidium.com.sg ou :
Presidium Instruments Pte Ltd
No. 6 Penjuru Lane
Singapore 609187
Singapore
(65) 6379 5000
Attn: Customer Service Executive
40

Mise sous tension de votre Presidium Refractive
Index Meter II
Ce testeur peut être alimenté en utilisant soit, un
adaptateur secteur USB (vendu séparément, en option)
soit, des piles. Si le courant alternatif est utilisé,
connecter un bout du câble USB au testeur (Fig. 1.1) et
l’autre bout de l’adaptateur à une prise électrique
appropriée. Veuillez faire en sorte de n’utiliser que
l’adaptateur fourni par Presidium.
Si vous utilisez des piles (1 x 9V), veillez à les insérer
dans le testeur en respectant les repères positifs (+)
et négatifs (-) (Fig. 1.2). Il est préférable d’utiliser des
piles alcalines, puisque cela assure généralement deux
heures et demie de fonctionnement continu, alors que
l’utilisation de piles ordinaires en raccourcira la durée
1. PREMIERE UTILISATION de votre Presidium
Refractive Index Meter II
Fig. 1.2
Fig. 1.1
41

Fig. 1.3
Fig. 1.4
Mise sous tension de votre Presidium Refractive
Index Meter II
Enlevez le cylindre creux sur le côté gauche du boîtier
en libérant le ressort (Fig. 1.3). Soulevez le rabat avec
le pouce et l’index, la liste des indices de réfraction sera
visible. Enlevez la feuille de protection de la surface de
test.
Appuyez sur la touche MARCHE/ARRÊT pour allumer
l’appareil (Fig. 1.4). Pour vous assurer que l’appareil
fonctionne correctement, couvrez la surface de test avec
le cylindre. L’écran devrait afcher 1000.
42

Étalonnage
Tous les testeurs ont été étalonnés pendant le processus
de fabrication et aucun autre ajustage n’est nécessaire
pas plus que l’intervention de l’utilisateur.
Il ne faut pas tenter de procéder à l’étalonnage
soi-même. Pour éviter tout risque à cet égard, les
utilisateurs devraient contacter Presidium à service@
presidium.com.sg ou à son centre d’entretien pour se
faire conseiller. Au cas où les utilisateurs auraient besoin
de faire ré-étalonner l’appareil, ils partageront les frais de
transport nécessités par l’envoi de l’appareil au centre
d’entretien.
Conditions de fonctionnement recommandées
Les pierres devraient être propres et sèches avant d’être
testées. Il n’est pas cependant normalement nécessaire
d’effectuer un nettoyage approfondi.
La température recommandée pour le test est de 18°C
- 27°C ou de 65°F - 80°F. Veuillez laisser les pierres
s‘ajuster à la température de la pièce avant d’effectuer
le test. L’exposition du testeur et/ou son fonctionnement
hors de la température de la pièce affecterait ses
résultats et ses performances.
Informations sur les piles
Les piles peuvent toujours fonctionner en général à
condition que le voyant « Low Batt.» ne soit pas allumé.
Ne laissez pas de piles usagées dans le compartiment à
piles car les piles peuvent se corroder, fuir ou
endommager le testeur. Les piles devraient être enlevées
lorsque le testeur va être rangé et inutilisé pendant une
longue période.
43

Nettoyage de vos pierres avant de les tester
Préparez un mouchoir en papier propre. Prenez
délicatement la pierre avec des pinces et placez-la sur la
table la tête en bas (Fig. 1.5).
Frottez doucement la table de la pierre contre le papier/
tissu (Fig. 1.6).
Fig. 1.6
Fig. 1.5
Pour éviter des résultats erronés, remplacez les piles dès
que le voyant « Low Batt. » s’allume. Un test ne doit
pas être effectué lorsque les piles sont peu chargées ou
faibles.
Les piles ne doivent pas être enlevées lorsque
l’adaptateur secteur est en cours d’utilisation.
44

Enlever le cylindre et placer une pierre polie et bien
nettoyée au centre du pad. (Fig. 2.1).
Couvrir la pierre avec le cylindre creux (Fig. 2.2) presser
et appuyer sur le bouton « Afcher » pour le test. Le
résultat du test s’afchera sur l’écran LCD
2. REALISER UN TEST sur votre Presidium
Refractive Index Meter II
Fig. 2.1
Fig. 2.2
45

L’écran d’afchage (Fig. 2.3) afchera l’indice de
réfraction de la pierre.
Connectivité au PC via le câble USB
Le réfractomètre Presidium II est livré avec un CD qui
permet d’autres fonctions. Ce CD se trouve dans
l’emballage. La notice d’utilisation pour les diverses
fonctions supplémentaires se trouve sur le CD
Fig. 2.3
46

Les résultats des tests sont indiqués ainsi :
• L’utilisateur dispose d’une liste de référence des
index de réfraction. Cette liste comprend les pierres
couramment disponibles sur le marché. Les pierres
apparaissent selon leur indice de réfraction dans
l’ordre descendant. Veuillez consulter le tableau
ci-joint.
• La liste comprend la gamme des indices de
réfraction des pierres avec entre parenthèses, leur
tolérance respective.
• La tolérance en matière d’indices de réfraction est
due à la tolérance du photo senseur utilisé.
• Exemple : L’indice de réfraction du saphir est de
1.757 (-0.016) – 1.790. Les chiffes entre parenthèses
indiquent la tolérance. En d’autres mots, l’I.R du
saphir dans ce cas est compris entre 1.741 et 1.790.
• Dans le cas d’un résultat peu clair, nettoyez la pierre
et le pad encore une fois avant de refaire le test et/ou
excentrez légèrement la pierre sur La surface de test.
En replaçant la pierre, on peut éviter un vue
déformée due à une partie rayée de la surface.
Refaire le test
3. INTERPRETER LES RESULTATS DES TESTS sur
votre Presidium Refractive Index Meter II
47

Le spinelle synthétique/le saphir synthétique et le zircon
supérieur/GGG ont des index de réfraction qui se
chevauchent. Si l’on effectue un second test avec le
testeur de gemmes Presidium pour une autre
séparation, les résultats s’afcheront comme suit :
Résultats des tests utilisant le Presidium Refractive
Index Meter :
• Saphir synthétique : l’aiguille se trouve en haut de la
zone rouge.
• Spinelle synthétique : L’aiguille se trouve à peu près
au milieu de la zone rouge.
• Zircone supérieur : L’aiguille se trouve aux deux tiers
de la zone rouge.
• GGG : L’aiguille se trouve au tiers de la zone rouge.
48

• Toujours veiller à l’absence de poussière sur la
surface de test et replacer la feuille de protection
immédiatement après utilisation.
• N’utilisez pas le testeur lorsque le signal « Low Batt. »
apparait. Renouvelez les piles avant de faire tout test.
• Ne laissez pas de piles usagées ou vides dans le
compartiment à piles car elles peuvent se corroder, fuir
ou endommager le testeur. Les piles devraient être
enlevées lorsque le testeur va être rangé et inutilisé
pendant une longue période.
Votre testeur est un produit dû à une conception et une
technologie avancées et il doit être manipulé avec
précaution.
Merci d’avoir pris le temps de parcourir le manuel
d’utilisation qui vous permettra de mieux comprendre
votre récent achat.
Presidium recommande également de faire enregistrer
votre garantie en nous envoyant la carte de garantie ou
en l’enregistrant en ligne ici : http://www.presidium.com.
sg/
4. PRENDRE SOIN de votre Presidium Refractive
Index Meter II
49

Benutzerhandbuch für
Presidium
Refraktionsindex-
Messgerät II (PRIM II)
50

I. Über diese Anleitung pg. 52
II. Informationen über Ihr Presidium Refractive
Index Meter II pg. 53
III. WICHTIGER HINWEIS pg. 55
1. ERSTE SCHRITTE mit Ihrem Presidium
Refractive Index Meter II pg. 57
2. DURCHFÜHREN EINER MESSUNG mit
Ihrem Presidium Refractive Index Meter II pg. 61
3. ABLESEN VON MESSERGEBNISSEN
mit Ihrem Presidium Refractive Index
Meter II pg. 63
4. WARTUNG UND PFLEGE ihres Presidium
Refractive Index Meter II pg. 65
Inhalt
(German Version)
51

Vielen Dank für den Erwerb des Presidium Refractive
Index Meter II (“PRIM II” oder “Tester”).
Diese Anleitung soll Ihnen die Inbetriebnahme Ihres
Messgerätes erleichtern und enthält alle erforderlichen
Informationen zur korrekten Nutzung des Messgerätes
und seiner sachgerechten Pege. Bitte lesen Sie diese
Anleitung sorgfältig und bewahren Sie sie für einen
späteren Gebrauch an einem sicheren Ort auf.
I. Über diese Anleitung
52

Das Presidium Refractive Index Meter II erkennt die von
einem geschnittenen und polierten Edelstein reektierte
Lichtmenge (Intensität). Diese Intensität wird an einen
Mikrocontroller geliefert, in dem über eine Berechnung
der Wert in den Refraktionsindex des Edelsteins
umgewandelt wird.
Das Messgerät wurde mit folgender Zielsetzung
entworfen:
• Unterscheiden zwischen farbigen Edelsteinen über
den Brechungsindex;
• Universelle SI-Einheiten
• Bei sachgemäßer Verwendung hinreichend konsis
tente und zuverlässige Testergebnisse;
Das Presidium Refractive Index Meter II verfügt über
folgende Funktionen:
• Unterscheidet innerhalb von Sekunden Diamant,
Moissanit und Edelsteine
• Brechungsindex ablesbar von 1.000 bis ca. 3.000
• Keine Wartezeit zwischen den Messungen
• USB-Stromversorgung mit international kompatibler
Spannung
• Batteriestandsanzeige
• Automatische Abschaltung
• Online-Software-Updates
II. Informationen über Ihr Presidium Refractive
Index Meter II
53

Inhalt der Verpackung:
• Presidium Refractive Index Meter II
• Geschütztes Trageetui
• Benutzeranleitung
• Garantiekarte
• Referenzliste mit Brechungsindizes
• USB-Kabel
• CD-ROM
3
2
6
1
4
5
7
1 Anzeigefenster
2 Test-Pad
3 Zylinder
4 Tafel mit Brechungsindizes
5 Klappe
6 EIN/AUS-Taste
7 USB-Eingang & USB-Kabel
54

• Das Messgerät trocken halten. Niederschlag und
Flüssigkeiten oder Feuchtigkeit können Mineralien
enthalten, die auf elektrische Schaltkreise korrodi
erend wirken. Falls das Messgerät nass wird, ent
fernen Sie die Batterie und lassen Sie es vor der
weiteren Verwendung vollständig trocknen.
• Das Messgerät nicht in staubiger oder verschmutzter
Umgebung lagern oder betreiben. Die beweglichen
Teile und elektronische Bauelemente könnten beschä
digt werden.
• Das Messgerät nicht bei Hitze lagern oder betreiben.
Hohe Temperaturen können die Lebensdauer des
Messgerätes verkürzen oder das Gerät bzw. dessen
Batterien beschädigen – zusätzlich können
bestimmte Plastikteile des Gerätes sich verziehen
oder schmelzen.
• Das Messgerät nicht bei Hitze lagern oder betreiben.
Bei der anschließenden Erwärmung auf die
Normaltemperatur kann sich im Inneren des
Messgerätes Feuchtigkeit niederschlagen und die
elektronischen Bauteile beschädigen.
• Nicht versuchen, das Messgerät auf andere Weise
als in der Anleitung beschrieben zu öffnen.
• Nicht fallen lassen, stoßen oder schütteln. Rauer
Umgang kann zu Brüchen interner Schaltkreise und
der Feinmechanik führen.
III. WICHTIGER HINWEIS
55

• Keine aggressiven Chemikalien, scharfe
Reinigungsmittel oder Lösungsmittel zum Reinigen
des Messgerätes verwenden.
• Das Messgerät nicht lackieren oder bemalen. Lack
oder Farbe kann die beweglichen Teile verkleben
und den einwandfreien Betrieb verhindern.
Falls das Messgerät nicht korrekt funktioniert, wenden
Sie sich bitte an den Presidium-Kundendienst unter
service@presidium.com.sg ode
Presidium Instruments Pte Ltd
No. 6 Penjuru Lane
Singapore 609187
Singapore
(65) 6379 5000
Attn: Customer Service Executive
56

Einschalten des Presidium Refractive Index Meter II
Dieses Messgerät kann mithilfe eines Netzteils über
einen USB-Anschluss (separat erhältlicher Artikel)
betrieben werden oder über Batterien. Bei Verwendung
eines Netzteils verbinden Sie das eine USB-Kabel mit
dem Tester (Abb. 1.1) und schließen Sie das
Netzkabel des Adapters an eine Steckdose an. Bitte
achten Sie darauf, dass nur der von Presidium gelieferte
Adapter verwendet wird.
Achten Sie bei Batteriebetrieb (1 x 9 V-Batterie) beim
Einsetzen der Batterien in das Messgerät auf die richtige
Polung (+) und (-) (Abb. 1.2). Der Einsatz von
Alkalibatterien wird empfohlen – dadurch ergibt sich im
Gegensatz zu herkömmlichen Batterien mit geringerer
Kapazität eine kontinuierliche Laufzeit von etwa 2,5
Stunden.
1. ERSTE SCHRITTE mit Ihrem Presidium Refractive
Index Meter II
Abb. 1.2
Abb. 1.1
57

Abb. 1.3
Abb. 1.4
Einschalten des Presidium Refractive Index Meter II
Entfernen Sie den gewölbten Zylinder auf der linken
Gehäuseseite durch Entriegeln des Verschlusses
(Abb. 1.3). Ziehen Sie die Klappe mit Daumen und
Zeigenger auf, worauf die Tafel mit Brechungsindizes
sichtbar wird. Entfernen Sie die Schutzabdeckung vom
Test-Pad.
Drücken Sie die EIN/AUS-Taste, um das Gerät
einzuschalten (Abb. 1.4). Testen Sie die einwandfreie
Funktion des Gerätes, indem Sie das Test-Pad mit dem
gewölbten Zylinder abdecken. Das Display sollte 1,000
zeigen.
58

Kalibrierung
Alle Messgeräte wurden während der Herstellung
kalibriert und es sind keine weiteren Anpassungen oder
Einstellmöglichkeiten durch den Benutzer vorgesehen.
Eine selbst durchgeführte Kalibrierung sollte
unterbleiben. Um die mit der Kalibrierung verbundenen
Risiken zu minimieren, sollten Sie sich im Bedarfsfall mit
Presidium unter service@presidium.com.sg oder dem
Servicecenter des Unternehmens in Verbindung setzen.
Falls der Benutzer eine Neukalibrierung des Gerätes
wünscht, trägt der Benutzer die anfallenden Frachtkosten
zum/vom Servicecenter.
Empfohlene Testbedingungen
Der Edelstein sollte zur Materialprüfung sauber und
trocken sein. Aufwendige Reinigungsmaßnahmen sind
jedoch in der Regel nicht erforderlich.
Die empfohlene Prüftemperatur ist 18°C – 27°C bzw.
65°F – 80°F. Achten Sie darauf, dass sich der
Edelstein oder das Schmuckobjekt vor der Messung an
die Raumtemperatur angepasst hat. Wenn das
Messgerät bei Temperaturen außerhalb der
Raumtemperatur gelagert oder betrieben wird,
beeinusst dies die Messergebnisse und die Wirksamkeit
des Messgerätes.
Hinweise zum Batteriebetrieb
Die Batterien lassen sich im Allgemeinen verwenden, bis
die “Low Batt”-Anzeige aueuchtet.
Entnehmen Sie verbrauchte Batterien aus dem
Batteriefach, da Batterien korrodieren oder auslaufen
und das Messgerät beschädigen können. Entnehmen Sie
die Batterien auch, wenn das Instrument voraussichtlich
für einen längeren Zeitraum nicht verwendet wird.
59

Reinigen des Edelsteins vor der Messung
Bereiten Sie ein sauberes Tuch vor. Legen Sie den
Edelstein behutsam mit einer Pinzette auf einen Tisch
(Abb. 1.5)
Reiben Sie den Edelstein an dem Tuch (Abb. 1.6).
Abb. 1.6
Abb. 1.5
Um ungenaue Messungen zu vermeiden, sollten die
Batterien ersetzt werden, sobald die
Batteriestandsanzeige “Low Batt” aueuchtet Bei
niedrigem bzw. schwachem Batteriestrom sollten keine
Tests durchgeführt werden.
Bei Verwendung eines Netzteils müssen die Batterien
nicht entfernt werden.
60

Entfernen Sie den Zylinder und legen Sie einen gut
gereinigten, polierten Edelstein auf die Ablage (Abb. 2.1).
Decken Sie den Edelstein mit dem gewölbten Zylinder
ab (Abb. 2.2)
2. DURCHFÜHREN EINER MESSUNG mit dem
Presidium Refractive Index Meter II
Abb. 2.1
Abb. 2.2
61

Das Display-Fenster (Abb. 2.3) zeigt den
Brechungsindex des Edelsteins.
PC-Anschluss über USB-Kabel
Das Presidium Refractive Index Meter II wird mit einer
CD zur Funktionserweiterung geliefert. Diese CD
gehörtzum Liefererumfang. Eine Anleitung zur Nutzung
der erweiterten Funktionen ist auf der CD enthalten.
Abb. 2.3
62

Die Testergebnisse werden wie folgt angezeigt:
• Eine Liste mit Brechungsindizes liegt zur einfachen
Referenz bei. Diese Liste enthält Werte für
marktgängige Edelsteine. Die Edelsteine werden in
absteigender Reihenfolge des Brechungsindex
aufgelistet. Bitte betrachten Sie hierzu die
beiliegende Tafel.
• Die Liste enthält die jeweiligen Brechungsindizes der
Edelsteine mit entsprechenden Toleranzen in
Klammern.
• Die Toleranz des Brechungsindex beruht auf der
Toleranz des verwendeten Fotosensors.
• Beispiel: Der Brechungsindex von Saphir ist 1.757
(-0.016) – 1.790. Der Wert in Klammern bezieht sich
auf die Toleranz. Mit anderen Worten variiert der
Brechungsindex von Saphir bei dem Gerät von 1.741
– 1.790.
• Bei einer grenzwertigen Messung reinigen Sie den
Stein und die Ablage vor dem nächsten Test erneut
oder legen den Stein in einer abweichenden Position
hin. Durch die Neupositionierung des Steins wird
möglicherweise eine Verzerrung der Reektion durch
Oberächenkratzer vermieden. Wiederholen Sie den
Test.
3. ABLESEN VON MESSERGEBNISSEN Ihres
Presidium Refractive Index Meter II
63

Synthetischer Spinel/Synthetischer Saphir und High
Zircon/GGG haben überlappende Reektionszahlen.
Nach Durchführung eines zweiten Tests mit dem
Presidium Gem Tester zur weiteren Analyse werden
folgende Ergebnisse angezeigt:
Testergebnisse mit Presidium Refractive Index
Meter II:
• Synthetischer Saphir: die Nadel läuft bis zur
höchsten Position im roten Bereich.
• Synthetischer Spinel: Die Nadel läuft bis zur Hälfte
des roten Bereichs.
• High Zircon: Die Nadel läuft bis 2/3 in den roten
Bereich.
• GGG: Die Nadel läuft 1/3 in den roten Bereich.
64

• Halten Sie das Test-Pad stets frei von Staub und
setzen Sie die Schutzabdeckung sofort nach
Benutzung wieder auf.
• Verwenden Sie das Messgerät nicht, wenn die “Low
Batt”-Anzeige aueuchtet. Wechseln Sie vor dem
Durchführen eines Tests verbrauchte Batterien.
• Entnehmen Sie verbrauchte Batterien aus dem
Batteriefach, da Batterien korrodieren oder auslaufen
und das Messgerät beschädigen können. Entnehmen
Sie die Batterien auch, wenn das Instrument
voraussichtlich für einen längeren Zeitraum nicht
verwendet wird.
Das Messgerät ist ein Präzisionsprodukt und sollte
sorgfältig behandelt werden.
Vielen Dank für Ihre Aufmerksamkeit für diese
Benutzeranleitung, anhand derer Sie das erworbene
Produkt besser kennengelernt haben.
Presidium empehlt Ihnen, Ihre Gewährleistung auf das
Produkt durch Einsenden der Garantiekarte an uns zu
registrieren, oder sich online zu unter
http://www.presidium.com.sg/ zu registrieren.
4. PFLEGE UND WARTUNG des Presidium
Refractive Index Meter II
65

Guida per l’utente di
Presidium Refractive
Index Meter II (PRIM II)
66

I. Informazioni su questa guida pg. 68
II. Informazioni su Presidium Refractive Index
Meter II pg. 69
III. AVVISO IMPORTANTE pg. 71
1. OPERAZIONI PRELIMINARI con Presidium
Refractive Index Meter II pg. 73
2. SVOLGIMENTO DI UN TEST con Presidium
Refractive Index Meter II pg. 77
3. LETTURA DEI RISULTATI DI UN TEST su
Presidium Refractive Index Meter II pg. 79
4. MANUTENZIONE di Presidium Refractive
Index Meter II pg. 81
Indice
(Italian Version)
67

Grazie per aver acquistato Presidium Refractive Index
Meter II (“PRIM II” o “tester”).
Questa guida è stata creata allo scopo di aiutare l’utente
a impostare il tester e contiene tutte le informazioni
necessarie a garantire un utilizzo accurato e una
manutenzione in linea con i requisiti del tester. Leggere
attentamente queste istruzioni e tenerle a portata di
mano per futuro riferimento.
I. Informazioni su questa guida
68

Presidium Refractive Index Meter II rileva la quantità di
luce (intensità) riessa sulla supercie di una gemma
tagliata e lucidata. Questa lettura relativa all’intensità
viene inviata ad un microcontrollore che procede al
calcolo e alla conversione al ne di ottenere la lettura
dell’indice di rifrazione della gemma.
Questo tester è stato progettato con i seguenti
obiettivi:
• Distinguere le pietre colorate utilizzando l’indice di
rifrazione;
• Unità SI universali
• Fornire risultati di test generalmente costanti ed
afdabili, se utilizzato correttamente;
Presidium Refractive Index (R.I.) Meter II comprende
le seguenti funzioni:
• Separa i diamanti, la moissanite e le gemme in pochi
secondi
• Lettura dell’indice di rifrazione da 1.000 a ~ 3.000
• Nessun tempo di attesa tra i test
• Ingresso di alimentazione USB con compatibilità
elettrica internazionale
• Indicatore di batteria in esaurimento
• Funzione di spegnimento automatico
• Aggiornamenti software on-line
II. Informazioni su Presidium Refractive Index
Meter II
69

Inclusi in questa confezione:
• Presidium Refractive Index Meter II
• Custodia protettiva per il trasporto
• Guida dell’utente
• Certicato di garanzia
• Elenco di riferimento degli indici di rifrazione
• Cavo USB
• CD-ROM
3
2
6
1
4
5
7
1 Finestra del display
2 Tampone di test
3 Cilindro
4 Diagramma degli indici di rifrazione
5 Linguetta
6 Pulsante On/Off
7 Ingresso USB e cavo USB
70

• Tenere all’asciutto il tester. La pioggia e tutti i tipi di
liquidi o condensa possono contenere minerali in
grado di corrodere i circuiti elettrici. In caso di penet
razione di liquidi all’interno del tester, rimuovere la
batteria e lasciare asciugare completamente il tester
prima di reinserirla.
• Non utilizzare, conservare o esporre il tester ad/in
aree ricche di polvere e detriti. Le parti e i
componenti elettronici potrebbero restare
danneggiati.
• Non utilizzare, conservare o esporre il tester ad/in
aree con temperature elevate. Le temperature
elevate possono danneggiare il tester o accorciarne
la durata, danneggiare le batterie e deformare o
fondere determinati tipi di plastica.
• Non utilizzare, conservare o esporre il tester ad/in
aree con temperature ridotte. Quando la temperatura
del tester ritorna alla normalità, è possibile che al suo
interno si verichi la formazione di condensa,
danneggiando i circuiti elettronici.
• Non tentare di aprire il tester seguendo una
procedura diversa da quella illustrata all’interno di
questa guida.
• Evitare di far cadere, sottoporre a urti o scuotere il
tester. Il maneggiamento incauto potrebbe provocare
la rottura dei circuiti interni e dei meccanismi di
precisione.
III. AVVISO IMPORTANTE
71

• Non utilizzare prodotti chimici corrosivi, solventi
detergenti o detergenti aggressivi per pulire il tester.
• Non verniciare il tester. La vernice potrebbe ostruire
le parti e impedire il corretto funzionamento.
In caso di malfunzionamento del tester, contattare il
servizio clienti Presidium all’indirizzo di posta elettronica
service@presidium.com.sg o tramite corrispondenza
all’indirizzo:
Presidium Instruments Pte Ltd
No. 6 Penjuru Lane
Singapore 609187
Singapore
(65) 6379 5000
Attn: Customer Service Executive
72

Alimentazione di Presidium Refractive Index Meter II
Questo tester può essere alimentato per mezzo di
corrente CA con connessione USB (articolo opzionale
venduto separatamente) o tramite le batterie. Se si
utilizza la corrente CA, collegare un’estremità del cavo
USB al tester (Fig. 1.1) e l’altra estremità dell’adattatore
direttamente ad una presa elettrica idonea.
Utilizzare esclusivamente l’adattatore fornito da Presidium.
Se si utilizzano le batterie (1 batteria da 9 V), fare
attenzione alla posizione del polo positivo (+) e
negativo (-) quando si inserisce la batteria all’interno del
tester (Fig. 1.2). È consigliabile utilizzare batterie alcaline,
dal momento che le batterie di questo tipo forniscono
solitamente due ore e mezza di autonomia continua,
mentre le batterie normali offrono un’autonomia più ridotta.
1. OPERAZIONI PRELIMINARI con Presidium
Refractive Index Meter II
Fig. 1.2
Fig. 1.1
73

Fig. 1.3
Fig. 1.4
Accensione di Presidium Refractive Index Meter II
Estrarre il cilindro incassato dal lato sinistro
dell’alloggiamento sbloccando il meccanismo di
chiusura (Fig. 1.3). Aprire la linguetta utilizzando il pollice
e l’indice, sarà possibile vedere il graco degli indici di
rifrazione. Rimuovere la copertura protettiva dal tampone
di test
Premere il pulsante ON/OFF per accendere l’unità
(Fig. 1.4). Per assicurare il corretto funzionamento
dell’unità, coprire il tampone di test con il cilindro
incassato. Il display dovrebbe visualizzare il valore 1.000.
74

Taratura
Tutti i tester sono stati tarati in fase di produzione e non
richiedono ulteriori regolazioni o interventi dell’utente.
L’utente non è autorizzato a svolgere la taratura. Per
ridurre i rischi associati con questa operazione, gli utenti
possono contattare Presidium all’indirizzo
service@presidium.com.sg o il centro assistenza
Presidium per ottenere assistenza. Nel caso in cui gli
utenti richiedano al produttore di ripetere la taratura
dell’unità, essi dovranno assumersi i costi associati alla
spedizione dell’unità al/dal centro assistenza.
Condizioni di test consigliate
È consigliabile pulire e asciugare la gemma prima di
procedere al test. Tuttavia, solitamente non è necessario
seguire delle procedure di pulizia elaborate.
La temperatura di test consigliata è compresa tra 18°C
e 27°C o 65°F e 80°F. Attendere che la gemma si adatti
alla temperatura ambiente prima di procedere al test.
L’esposizione e/o l’utilizzo del tester ad una temperatura
diversa dalla temperatura ambiente inuenzerebbe i
risultati e la performance del tester.
Informazioni sulla batteria
Solitamente è possibile continuare ad utilizzare le
batterie, a patto che l’indicatore “Batt. in esaur.” sia
spento.
Non lasciare le batterie esaurite nel vano delle batterie
dal momento che potrebbero corrodersi o danneggiare il
tester. Rimuovere le batterie quando si prevede di riporre
il tester per un periodo di tempo prolungato.
75

Pulizia della gemma prima di procedere al test
Preparare un fazzoletto pulito. Raccogliere con cautela la
gemma utilizzando delle pinzette e collocarla a faccia in
giù sul piano di lavoro (Fig. 1.5).
Stronare delicatamente la sezione piana della gemma
contro il fazzoletto/il panno per gioielleria (Fig. 1.6).
Fig. 1.6
Fig. 1.5
Per impedire l’ottenimento di letture inaccurate, dotare
l’unità di nuove batterie all’accensione dell’indicatore
“Batt. in esaur.”. Evitare di svolgere un test quando
le batterie hanno un livello di carica ridotto o prossimo
all’esaurimento.
Quando si utilizza l’adattatore CA non è necessario
rimuovere le batterie.
76

Rimuovere il cilindro e collocare una gemma
accuratamente pulita e lucidata al centro del tampone
(Fig. 2.1).
Coprire la gemma con il cilindro incassato (Fig. 2.2).
2. SVOLGIMENTO DI UN TEST con Presidium
Refractive Index Meter II
Fig. 2.1
Fig. 2.2
77

La nestra del display (Fig. 2.3) mostrerà l’indice di
rifrazione della gemma.
Connettività PC tramite cavo USB
L’unità Presidium Refractive Index Meter II viene fornita
insieme ad un CD contenente varie funzioni aggiuntive.
Questo CD è incluso nella confezione. Il manuale di
istruzioni relativo all’utilizzo delle funzioni aggiuntive è
incluso nel CD.
Fig. 2.3
78

I risultati dei test vengono visualizzati nel modo
seguente:
• L’unità comprende un elenco di riferimento degli
indici di rifrazione che consente all’utente nale di
controllare facilmente gli indici di rifrazione. Questo
elenco comprende le gemme più comuni disponibili
sul mercato. Le gemme sono organizzate in ordine
decrescente in base all’indice di rifrazione. Fare
riferimento alla tabella allegata.
• Questo elenco comprende l’intervallo di indici di
rifrazione delle gemme con le rispettive tolleranze
inserite tra parentesi.
• La tolleranza dell’indice di rifrazione dipende dalla
tolleranza del sensore fotograco utilizzato.
• Esempio: l’indice di rifrazione dello zafro è 1.757
(-0.016) – 1.790. La lettura tra parentesi corrisponde
alla tolleranza. In altre parole, la lettura R.I. dello
zafro registrata dall’unità è compresa tra 1.741 e
1.790.
• In caso di ottenimento di letture prossime al limite,
pulire nuovamente la pietra e il tampone prima di
ripetere il test e/o spostare leggermente la pietra dal
centro del tampone. Riposizionando la pietra, è
possibile evitare il riesso distorto di un’area grafata
della supercie. Ripetere il test.
3. LETTURA DEI RISULTATI DI UN TEST su
Presidium Refractive Index Meter II
79

Lo spinello sintetico/zafro sintetico e lo zircone alto/
GGG hanno indici di rifrazione identici. Nel caso in cui
si esegua un secondo test utilizzando Presidium Gem
Tester per un ulteriore distinzione, i risultati indicati
saranno i seguenti:
Risultati del test utilizzando Presidium Gemstone
Tester (PGT):
• Zafro sintetico: l’ago si sposta in una posizione
elevata nella zona rossa.
• Spinello sintetico: l’ago si sposta in prossimità del
centro nella zona rossa.
• Zircone alto: l’ago si sposta per 2/3 nella zona rossa.
• GGG: l’ago si sposta per 1/3 nella zona rossa.
80

• Tenere il tampone di test al riparo dalla polvere e
ricollocare il coperchio protettivo immediatamente
dopo l’uso.
• Non utilizzare il tester in caso di visualizzazione del
messaggio “Batt. in esaur.”. Dotare l’unità di nuove
batterie prima di procedere al test.
• Non lasciare le batterie esaurite nel vano delle
batterie dal momento che potrebbero corrodersi o \
danneggiare il tester. Rimuovere le batterie quando
ci si accinge a riporre il tester per un periodo di
tempo prolungato.
Il tester è frutto di accurata progettazione e scrupolosa
realizzazione e deve essere maneggiato con cautela.
Grazie per aver dedicato il tempo necessario a leggere la
guida dell’utente contenente informazioni utili a
comprendere meglio il prodotto appena acquistato.
Presidium consiglia inoltre di registrare la garanzia
inviandoci la scheda di registrazione della garanzia o
registrandosi on-line all’indirizzo http://www.presidium.
com.sg/
4. MANUTENZIONE di Presidium Refractive Index
Meter II
81

Руководство для
пользователей,
рефрактометр
Presidium Refractive
Index Meter II (PRIM II)
82

I. Руководство для пользователей pg. 84
II. Рефрактометр Presidium Refractive Index
Meter II pg. 85
III. ВАЖНЫЕ ИНСТРУКЦИИ ПО ТЕХНИКЕ
БЕЗОПАСНОСТИ pg. 87
1. НАЧАЛО РАБОТЫ, рефрактометр
Presidium Refractive Index Meter II pg. 89
2. ПОРЯДОК РАБОТЫ, рефрактометр
Presidium Refractive Index Meter II pg. 94
3. РЕЗУЛЬТАТЫ ТЕСТИРОВАНИЯ,
рефрактометр Presidium Refractive
Index Meter II pg. 96
4. ТЕХ. ОБСЛУЖИВАНИЕ, рефрактометр
Presidium Refractive Index Meter II pg. 98
Содержание
(Russian Version)
83

Благодарим за покупку рефрактометра Presidium
Refractive Index Meter II («PRIM II» или
«контрольно-измерительного прибора»).
Данное руководство предназначено для того, чтобы
помочь Вам настроить свой контрольно-измерительный
прибор, а также предоставить информацию
о том, что Вы должны знать для правильного
использования контрольно-измерительного прибора
и его обслуживания в соответствии с требованиями.
Внимательно прочитайте данные инструкции
и сохраняйте их в легкодоступном месте для
использования в будущем.
I. Руководство для пользователей
84

Рефрактометр Presidium Refractive Index
Meter II определяет значения световой энергии
(интенсивности света), отражаемой от поверхности
тесаного и полированного драгоценного камня.
Для получения значения показателя преломления
драгоценного камня данное значение интенсивности
света передается в микроконтроллер, где происходит
подсчет и преобразование.
Данный контрольно-измерительный прибор
предназначен для следующих целей:
• Определение цветных камней при помощи
показателя преломления света
• Перевод мер в единицы международной системы
(СИ)
• Предоставление предельно непротиворечивых и
надежных результатов проверки при использовании
прибора по назначению;
Рефрактометр Presidium Refractive Index (R.I.)
Meter II характеризуется следующим:
• Мгновенно определяет бриллиант, муассанит и
драгоценные камни
• Величина показателя преломления от 1.000 до ~
3.000
• Отсутствие времени ожидания между проверками
• Кабель USB отвечает требованиям международных
стандартов
• Индикатор разрядки аккумулятора
• Автоматическое выключение
• Обновление программного обеспечения в онлайн
режиме
II. Рефрактометр Presidium Refractive Index
Meter II
85

Комплектация:
• Рефрактометр Presidium Refractive Index Meter II
• Защитный кожух
• Руководство для пользователей
• Гарантийный талон
• Таблица показателей преломления
• Кабель USB
• Компакт-диск
3
2
6
1
4
5
7
1 Панель индикации
2 Контактная площадка для тестирования
3 Колпачок цилиндрической формы
4 Таблица показателей преломления
5 Откидная крышка
6 Кнопка «On/Off» (ВКЛ./ОТКЛ.)
7 Порт USB и кабель USB
86

• Храните контрольно-измерительный прибор
в сухом месте. Атмосферные осадки и все типы
жидкости или влага могут содержать минералы,
которые способствуют коррозии электронных
схем. Если на прибор попала вода, то выньте из
него аккумулятор. После того, как прибор
тщательно просушили, заново вставьте
аккумулятор.
• Запрещается использовать, хранить или
устанавливать контрольно-измерительный прибор
в пыльных и грязных местах. Подвижные детали и
электронные компоненты могут быть повреждены.
• Запрещается использовать, хранить или
устанавливать контрольно-измерительный прибор
в жарких помещениях. Высокая температура
может повредить или сократить срок службы
контрольно-измерительного прибора, испортить
аккумулятор и деформировать или расплавить
некоторые пластмассовые детали.
• Запрещается использовать, хранить или
устанавливать контрольно-измерительный прибор
в холодных помещениях. При нагревании
контрольно-измерительного прибора до
нормальной температуры внутри прибора может
конденсироваться влага. Это может повредить
электронные платы.
• Открывайте крышку контрольно-измерительного
прибора только таким способом, который указан в
руководстве.
III. ВАЖНЫЕ ИНСТРУКЦИИ ПО ТЕХНИКЕ
БЕЗОПАСНОСТИ
87

• Запрещается ронять, ударять о поверхность или
трясти контрольно-измерительный прибор. Грубое
обращение с прибором может привести к поломке
внутренних микросхем и точной механики.
• Запрещается использовать агрессивные
химические вещества, растворители или
сильнодействующие моющие средства для очистки
контрольно-измерительного прибора.
• Запрещается красить контрольно-измерительный
прибор. Краска может блокировать подвижные
детали и препятствовать правильному
функционированию прибора.
В случае возникновения каких-либо сбоев при
эксплуатации весов свяжитесь со службой
технической поддержки компании Presidium по
электронной почте service@presidium.com.sg или по
адресу:
Presidium Instruments Pte Ltd
No. 6 Penjuru Lane
Singapore 609187
Singapore
(65) 6379 5000
Attn: Customer Service Executive
88

Подключение рефрактометра Presidium Refractive
Index Meter II к источнику питания
Данный контрольно-измерительный прибор может
работать как от сети переменного тока посредством
подключения USB кабеля (дополнительный блок,
который продается отдельно), так и от аккумулятора.
В случае использования источника переменного тока
подсоедините кабель USB к порту на контрольноизмерительном приборе, а вилку шнура питания
вставьте в подходящую розетку электрической сети
(Рис. 1.1). Убедитесь в том, что используется только
сетевой адаптер, который поставлен компанией
Presidium.
В случае использования аккумуляторных батареек
(одна аккумуляторная батарейка 9V) обратите
внимание на положительный значок (+) и
отрицательный значок (-) при размещении батареек в
батарейном отсеке весов (Рис. 1.2.). Рекомендуется
использовать щелочные батарейки, поскольку они
обеспечивают непрерывную эксплуатацию прибора
на протяжении около двух с половиной часов.
Если используются обычные батарейки, то прибор
работают непродолжительное время.
1. НАЧАЛО РАБОТЫ, рефрактометр Presidium
Refractive Index Meter II
Рис. 1,1
89

Рис. 1.2
Рис. 1.3
Включение рефрактометра Presidium Refractive
Index Meter II
Снимите колпачок цилиндрической формы, расположенный
на левой боковой панели корпуса прибора, отжав фиксатор
(Рис. 1.3). Откройте крышку, удерживая ее большим и
указательным пальцами. Снимите защитный кожух с
контактной площадки для тестирования.
Рис. 1.4
Нажмите кнопку [ON/OFF] («ВКЛ./ОТКЛ.») (Рис.1.4),
чтобы включить прибор. Чтобы убедиться, что прибор
работает надлежащим образом, закройте тестовую
площадку колпачком цилиндрической формы. На
дисплее высветиться 1.000.
90

Калибровка
Калибровка всех контрольно-измерительных
приборов производится во время производственного
процесса и какие-либо последующие регулировочные
работы или какое-либо вмешательство пользователя
в работу прибора не требуются.
Запрещается самостоятельно проводить калибровку
прибора. Чтобы минимизировать какие-либо
связанные с этим риски, пользователи должны
связаться с компанией Presidium по электронной
почте service@presidium.com.sg или с ее центром
технического обслуживания для получения
необходимой помощи. В случае если пользователь
требует, чтобы производитель провел повторную
калибровку прибора, то пользователь оплачивает
расходы, связанные с транспортировкой прибора в
центр технического обслуживания и обратно.
Рекомендуемые условия для поверки
Поверхность драгоценного камня должна быть чистой
и сухой перед проверкой. Однако обычно не требуется
проведение тщательной процедуры очистки.
Рекомендуемая температура для поверки - 18°C –
27°C или 65°F – 80°F. Перед проведением поверки
необходимо, чтобы драгоценный камень прогрелся/
остыл до комнатной температуры. Включение и/или
эксплуатация контрольно-измерительного прибора
при температуре воздуха, отличающейся от
комнатной температуры, может повлиять на
результаты и качество работы прибора.
91

Очистка драгоценного камня перед поверкой
Приготовьте чистую ткань. Аккуратно возьмите
камень при помощи пинцета и положите его лицевой
стороной на стол (Рис.1.5).
Информация по эксплуатации аккумулятора
Аккумулятор можно использовать до тех пор,
пока на экране высветиться индикация разрядки
аккумулятора.
Не оставляйте использованные батарейки
в батарейном отсеке, поскольку они могут
коррозировать, потечь или нанести ущерб
прибору. Аккумулятор необходимо вынуть, если
предполагается, что прибор будет храниться на
протяжении длительного периода времени.
Чтобы избежать получения неточных показаний
прибора, вставьте новую аккумуляторную батарейку,
если на дисплее загорится индикатор разрядки
аккумулятора. При слабости или недостаточной
емкости аккумуляторных батареек нельзя проводить
поверку.
Если используется адаптер переменного тока,
аккумуляторные батарейки могут оставаться внутри
прибора.
Рис. 1.5
92

Рис. 1.6
Осторожно протрите площадку камня тканью/
салфеткой для ювелирных изделий (Рис. 1.6).
93

Уберите колпачок цилиндрической формы и
поместите в центр тестовой площадки хорошо
очищенный, полированный драгоценный камень
(Рис. 2.1).
Накройте камень колпачком цилиндрической формы
(Рис. 2.2).
2. ПОРЯДОК РАБОТЫ, рефрактометр Presidium
Refractive Index Meter II
Рис. 2.1
Рис. 2.2
94

На панели индикации (Рис. 2.3) высветиться
показатель преломления драгоценного камня.
Подключение к ПК при помощи кабеля USB
Прибор Presidium Refractive Index Meter II поставляется
с компакт-диском, позволяющим расширить
функциональные возможности. Данный компакт-диск
входит в комплектацию прибора. Компакт-диск содержит
пособие по использованию расширенных функций.
Рис. 2.3
95

Результаты тестирования показывают следующее:
• Справочная таблица показателей преломления
предоставлена для быстрой сверки конечным
пользователям. В данную таблицу включены
имеющиеся на рынке распространенные
драгоценные камни. Драгоценные камни
расположены в порядке убывания показателя
преломления. Используйте прилагаемую таблицу.
• Таблица содержит список показателей реломления
драгоценных камней с соответствующими
допустимыми отклонениями, указанными в
скобках.
• Отклонения показателей преломления
предоставлены в соответствии с отклонениями
используемого фотодатчика.
• Например: Показатель преломления сапфира -
1.757 (-0.016) – 1.790. Значение в скобках
выступает как отклонение. Другими словами
показатель преломления сапфира при
использовании данного прибора будет в пределах
от 1.741 до 1.790.
• В случае получения результата, близкого к
предельным значениям, то перед последующей
проверкой проведите очистку камня и снова
положите на тестовую площадку и/или сдвиньте
камень немного от центра площадки. Посредством
изменения положения камня можно избежать
искаженное отражение от поцарапанной площадки
поверхности. Повторите проверку снова.
3. РЕЗУЛЬТАТЫ ТЕСТИРОВАНИЯ, рефрактометр
Presidium Refractive Index Meter II
96

Синтетический шпинель/Синтетический сапфир и
циркон c «высоким показателем дисперсии»/гадолиниигаллиевый гранат имеют «перекрывающийся»
параметр преломления. При проведение второй
проверки при помощи прибора Presidium Gem Tester для последующей идентификации камня будут
получены такие результаты:
Результаты проверки при использовании прибора
Presidium Gemstone Tester (PGT):
• Синтетический сапфир: Стрелка отклониться вверх
в красный сектор.
• Синтетический шпинель: Стрелка отклониться
приблизительно на половину шкалы в сторону
красного сектора.
• Циркон с высоким показателем дисперсии: Стрелка
отклониться на 2/3 шкалы в сторону красного
сектора.
• ГГГ (гадолинии-галлиевый гранат): Стрелка
отклониться на 1/3 шкалы в сторону красного
сектора.
97

• Тестовая площадка прибора должна всегда быть
чистой. После окончания работы с прибором сразу
закройте тестовую площадку защитным кожухом.
• Запрещается использовать прибор при появлении
на дисплее индикации разрядки аккумулятора.
Вставьте новый аккумулятор перед проведением
какой-либо проверки.
• Не оставляйте использованные батарейки
в батарейном отсеке, поскольку они могут
коррозировать, потечь или нанести ущерб
прибору. Аккумулятор необходимо вынуть, если
предполагается, что прибор будет храниться на
протяжении длительного периода времени.
Данный прибор являются продуктом
колоссального труда проектировщика и
производителя и должен эксплуатироваться с
величайшим бережным отношением.
Благодарим Вас, что Вы уделили время для
прочтения руководства для пользователей.
Это позволит Вам лучше понять ценность
приобретенного товара.
Компания Presidium также рекомендует Вам,
чтобы Вы зарегистрировали свою гарантию
посредством отсылки регистрационной
гарантийной карточки или зарегистрировались
в онлайн режиме на веб-сайте http://www.pre-
sidium.com.sg/.
4. ТЕХ. ОБСЛУЖИВАНИЕ, рефрактометр
Presidium Refractive Index Meter II
98

Manual del usuario
para el Presidium
Refractive Index Meter
II (PRIM II)
99

I. Acerca de este manual pg. 101
II. Acerca de su Presidium Refractive Index
Meter II pg. 102
III. AVISO IMPORTANTE pg. 104
1. PRIMEROS PASOS con su Presidium
Refractive Index Meter II pg. 106
2. REALIZAR UNA PRUEBA con su
Presidium Refractive Index Meter II pg. 111
3. LECTURA DE LOS RESULTADOS DE LA
PRUEBA con su Presidium Refractive Index
Meter II pg. 113
4. CUIDADO de su Presidium Refractive Index
Meter II pg. 115
Contenido
(Spanish Version)
100
 Loading...