


ELD
DRIVER GUIDE
June 21, 2018

Contents
Getting Started with PrePass ELD .......................................................................................................4
Enroll in the PrePass ELD Program ............................................................................................................ 4
For a Carrier – Enroll in the ELD Service................................................................................................ 4
For a Driver – Get Driver Login Information ......................................................................................... 4
For Owner-Operators ............................................................................................................................ 4
Install the Adapter .................................................................................................................................... 4
Mount Your Mobile Device ....................................................................................................................... 4
Download the Application ........................................................................................................................ 4
Set Up a Bluetooth Connection ................................................................................................................ 5
Apple iOS ............................................................................................................................................... 5
Android ................................................................................................................................................. 5
Launch and Sign into the Application ....................................................................................................... 6
Starting a Trip ...................................................................................................................................7
Connecting the App to a Paired OBD Device ............................................................................................ 8
Logging Your Pre-Trip Inspection ............................................................................................................ 11
(Optional in the App) .............................................................................................................................. 11
Adding a Co-Driver (Optional) ................................................................................................................. 12
During a Trip .................................................................................................................................... 13
Change Duty Status ................................................................................................................................. 13
Stopped Driving – Automatic Detection ................................................................................................. 16
Co-Driver Features ........................................................................................................................... 16
Changing Drivers ..................................................................................................................................... 16
Continuing a Trip ............................................................................................................................. 17
Ending your Day (Go Off-Duty) ......................................................................................................... 19
Ending a Trip ........................................................................................................................................... 19
Reviewing and Modifying Your Logs ................................................................................................. 20
Modifying a Log ....................................................................................................................................... 21
End-of-Day Log Certifying ................................................................................................................. 24
Inspections ...................................................................................................................................... 25
Roadside Inspection Information ............................................................................................................ 25

Share Logs With Inspection Officer ......................................................................................................... 27
Inspection Screen ................................................................................................................................ 27
Manual Data Reload ........................................................................................................................ 29
System Icons / Indicators ................................................................................................................. 31
Alerts............................................................................................................................................... 32
Location Alert .......................................................................................................................................... 32
Bluetooth Not On Alert ........................................................................................................................... 33
Start Pairing Alert .................................................................................................................................... 34
Unsuccessful Connection Alert ............................................................................................................... 35
Change Connected Device Alert ............................................................................................................. 36
Disconnection Alert ................................................................................................................................. 37
Troubleshooting the OBD Bluetooth Connection ............................................................................... 38
Customer Service ............................................................................................................................. 38
Appendix A – Quick Start Guide ........................................................................................................ 39
Appendix B – Quick Status Change Guide .......................................................................................... 40

Getting Started with PrePass ELD
1
Enroll in the PrePass ELD Program
For a Carrier – Enroll in the ELD Service
To add the PrePass ELD service to your existing PrePass account or to create a new PrePass account,
please contact 1-800-PrePass (1-800-773-7277). A PrePass team member will establish a Fleet Manager
account and provide instructions for ordering your On-Board Diagnostics (OBD) device(s) and adding
drivers to your account.
For a Driver – Get Driver Login Information
The Fleet Manager, created at the time of enrollment, is responsible for providing each driver his or her
PrePass ELD login information. Please contact your Fleet Manager for driver login information.
For Owner-Operators
Owner-Operators will need both a Fleet Manager account and a driver account. The Fleet Manager
account will be used to administer drivers on the Admin portal. The driver account is used to log in and
use the mobile app.
Install the Adapter
Instructions to install the adapter will be included with the compliant OBD hardware. Please follow the
instructions provided with the device to ensure proper setup. Software pairing instructions as well as
troubleshooting information is provided in the “Launch and Sign into the Application” section later in
this guide.
Mount Your Mobile Device
Securely mount your device in an accessible location to ensure safety and application performance.
Confirm that the device is plugged into a power source.
Download the Application
Install the Application on any compatible Android or Apple mobile tablet or smartphone1. You must have
a data plan linked to the device to send and receive data. Please check the correct App Store page to
ensure that your device and operating system version are compatible with the ELD app.
For Android devices:
1. Download the PrePass ELD app from
Google Play.
2. Look for the app on your screen and
open the application.
3. Tap INSTALL.
Android version 4.4 or higher (API level 19+) iOS 7+
Version 7.0. © 2018 HELP Inc. All Rights Reserved. 4
For Apple (iOS) devices:
1. Download the PrePass ELD app from
the Apple App Store.
2. Look for the app on your screen.
3. Tap GET and then INSTALL.

Set Up a Bluetooth Connection
(Pairing Your Phone to Your OBD Adapter)
Apple iOS
1. On your iOS device, tap Settings > Bluetooth. Stay on this screen until
you complete all of the steps to pair your OBD adapter.
2. Place your adapter in discovery mode and wait for it to appear on your
iOS device. If you don't see it or aren't sure how to make it discoverable,
check the instructions that came with it or contact the manufacturer.
3. On your phone screen, tap your adapter’s name to pair. You might
need to enter the PIN or passkey. If you aren't sure what your PIN or
passkey is, check the documentation for your adapter.
When pairing is complete, you can use the Bluetooth adapter with your
mobile device. You can pair multiple Bluetooth accessories with your iOS
device. Just follow the steps above to pair additional accessories.
Android
To connect via Bluetooth, first turn on your phone or tablet's Bluetooth.
When you use a new Bluetooth accessory, pair it with your phone or
tablet. After pairing, devices can connect with each other automatically.
Important: On a tablet that people share, each person can change the
overall Bluetooth settings.
Note: Some of these steps work only on Android 8.0 and up. Depending
on your OS version, these instructions may vary. Consult your phone
user guide if you cannot find your Bluetooth settings icon.
To turn Bluetooth on or off:
1. Open your device's Settings app.
2. Tap the Bluetooth icon.
3. Turn Bluetooth on or off.
At the top of your screen, a Bluetooth icon shows when Bluetooth is on.
Version 7.0. © 2018 HELP Inc. All Rights Reserved. 5
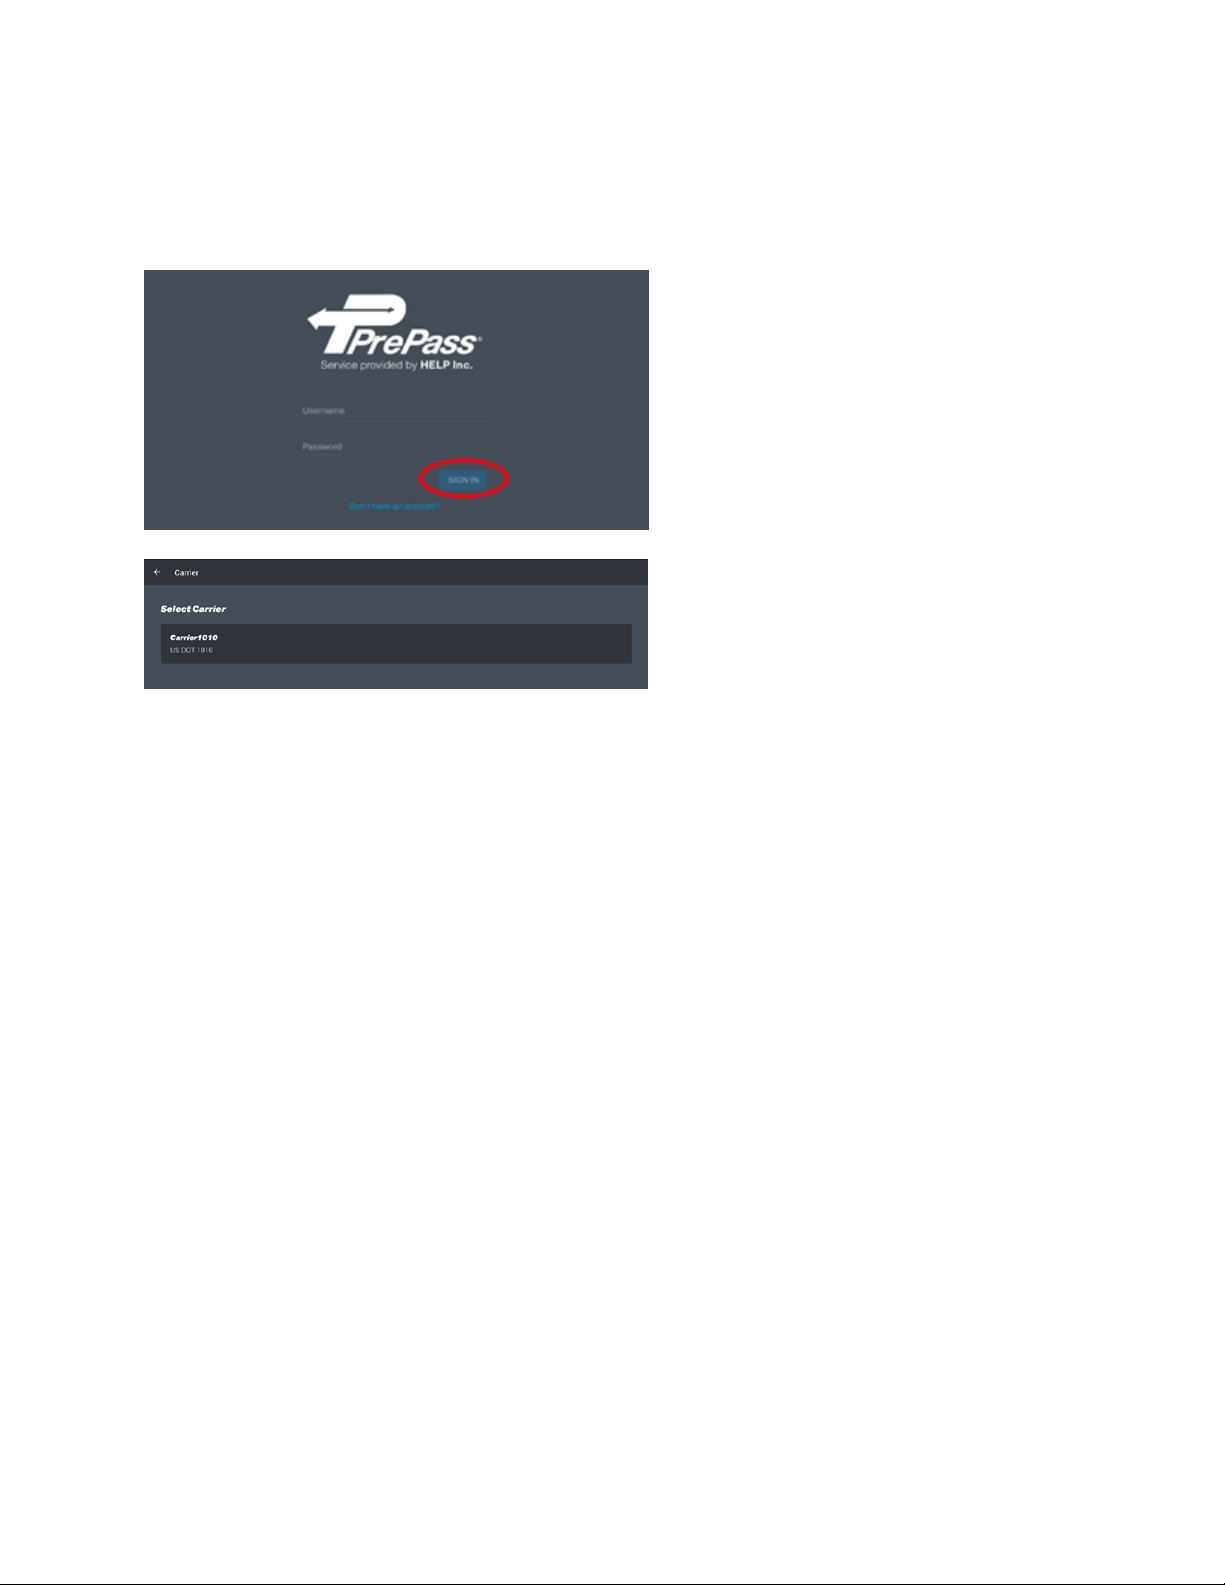
Launch and Sign into the Application
Enter your Username and Password and
tap SIGN IN.
Don’t have an account? Call
1-800-PrePass (1-800-773-7277).
Don’t have a driver login? Contact your
Fleet Manager for assistance.
If you drive for more than one USDOT,
you will be prompted to select the
appropriate USDOT in the Select Carrier
field.
Sign in using your driver login information. Make sure that the vehicle is running before you attempt to
connect.
Version 7.0. © 2018 HELP Inc. All Rights Reserved. 6
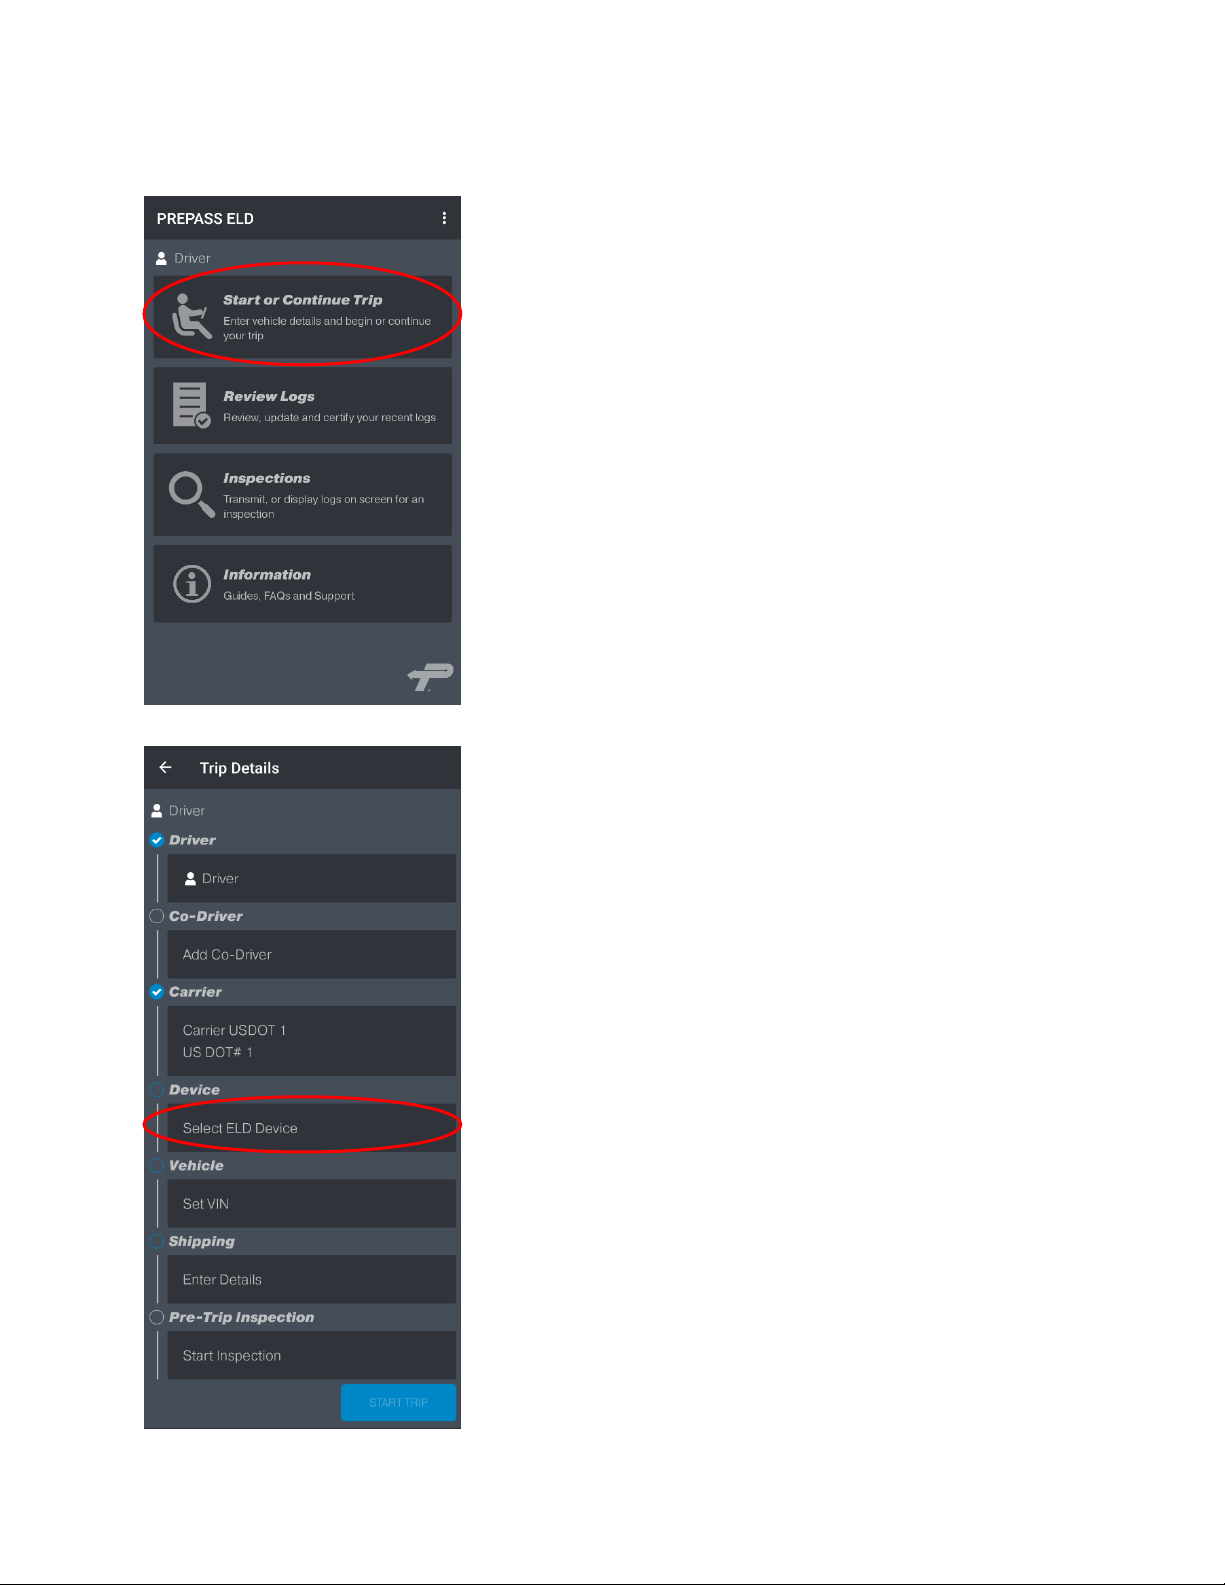
Starting a Trip
The Driver and Carrier field is populated
based on your login credentials.
Note: Co-Driver and Pre-Trip are
optional.
Note: If you are a Co-Driver, see the
Adding a Co-Driver section for more
details.
In the Device field to connect to an OBD
device, tap Select ELD Device.
Note: Follow the instructions in the
“Connecting the App to a Paired OBD
Device”.
Tap Start or Continue Trip to enter your
vehicle details and begin your trip.
Version 7.0. © 2018 HELP Inc. All Rights Reserved. 7

Connecting the App to a Paired OBD Device
Tap the ELD Device that you want to use
for your trip.
Note: The OBD must be paired in the
device operating system’s Bluetooth
settings or it will not display. For further
details, see the pairing instructions above.
Note: Having trouble? See the
Troubleshooting section at the end of the
guide.
Automatic VIN Retrieval
If your truck’s Engine Control Module
(ECM) supplies the truck’s VIN, you will be
asked to confirm the VIN that was
retrieved.
Tap YES and the VIN will be saved.
If the VIN is not correct, tap NO to be
taken to the List of available VINs screen
where you can manually enter the correct
VIN.
Version 7.0. © 2018 HELP Inc. All Rights Reserved. 8
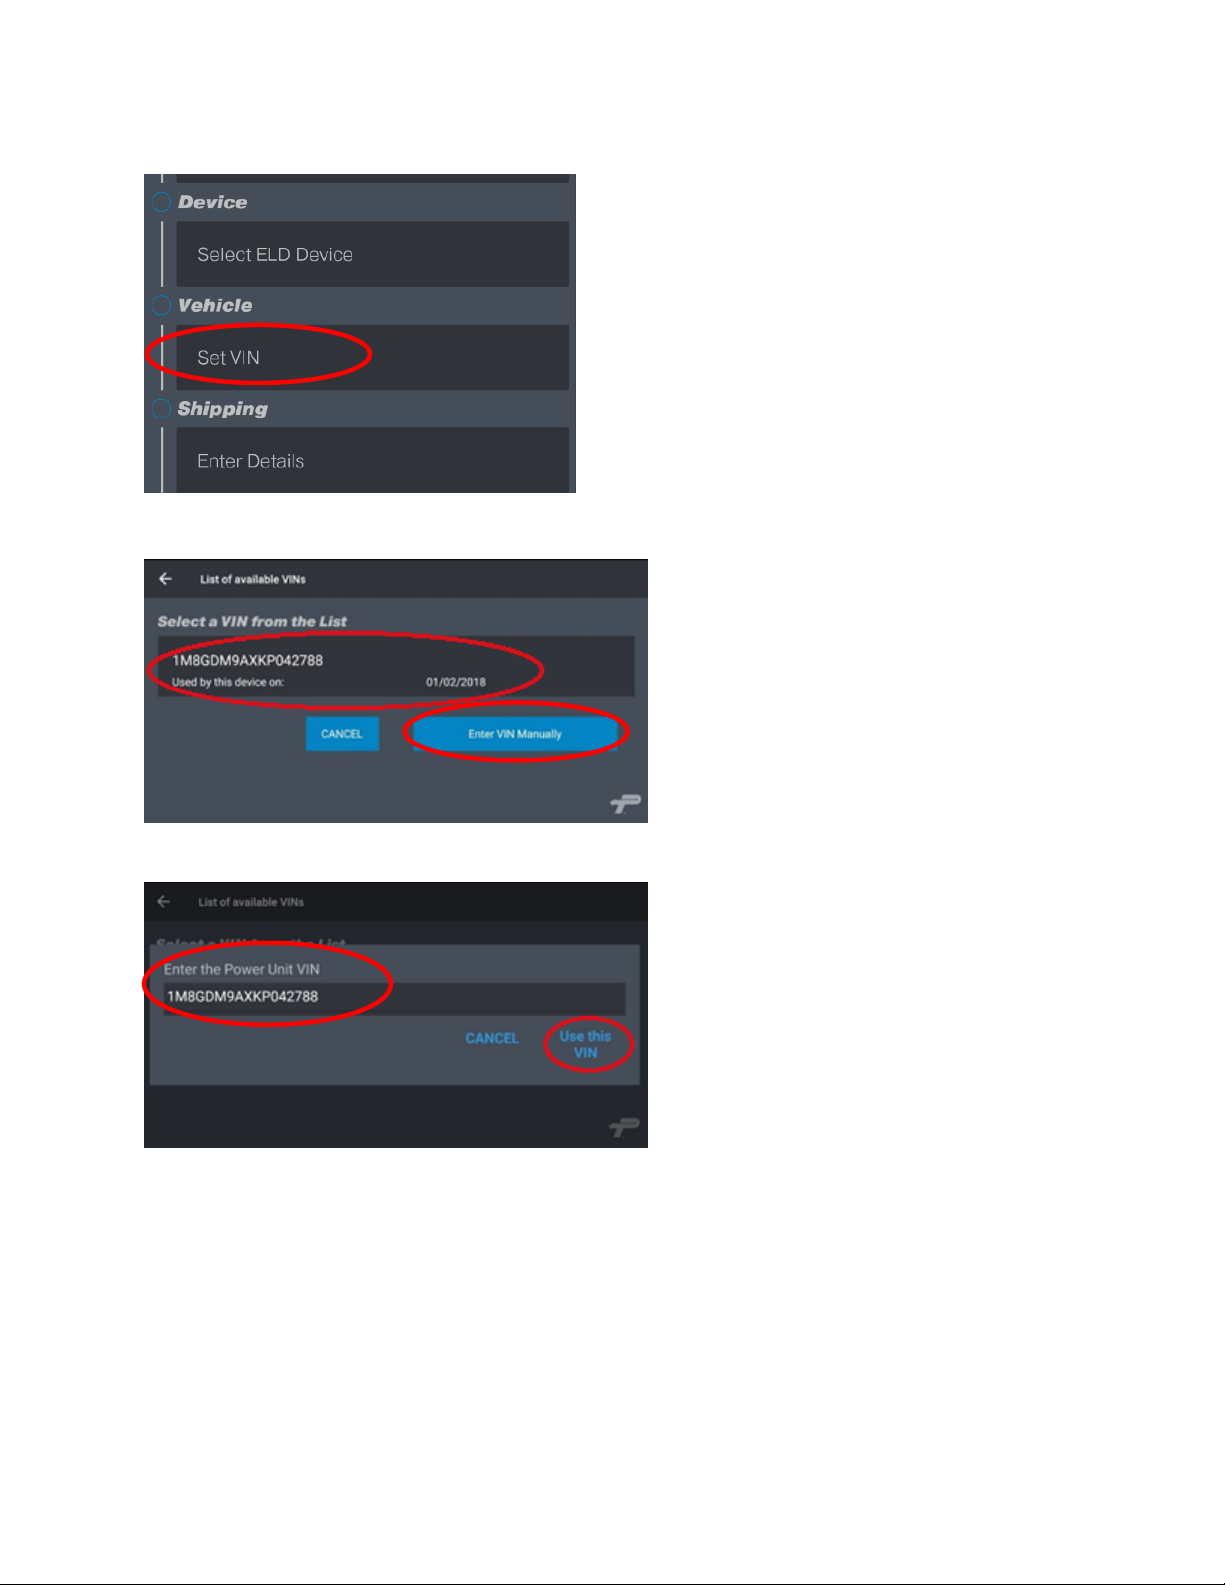
Manual VIN Entry
If your truck’s ECM does not supply the
truck’s VIN, tap Set VIN.
Select your VIN from the list.
Note: If there are no VINs in the list, or if
your VIN is not included, tap Enter VIN
Manually.
Manually enter your VIN using the
number listed on your Cab Card or
registration form. Then tap Use this VIN.
To be accepted, the VIN must:
1. Be 17 characters long.
2. Not contain the letters “O” (oh),
“I” (eye) or “Q” (queue).
3. Pass the standard VIN validation
test.
Version 7.0. © 2018 HELP Inc. All Rights Reserved. 9
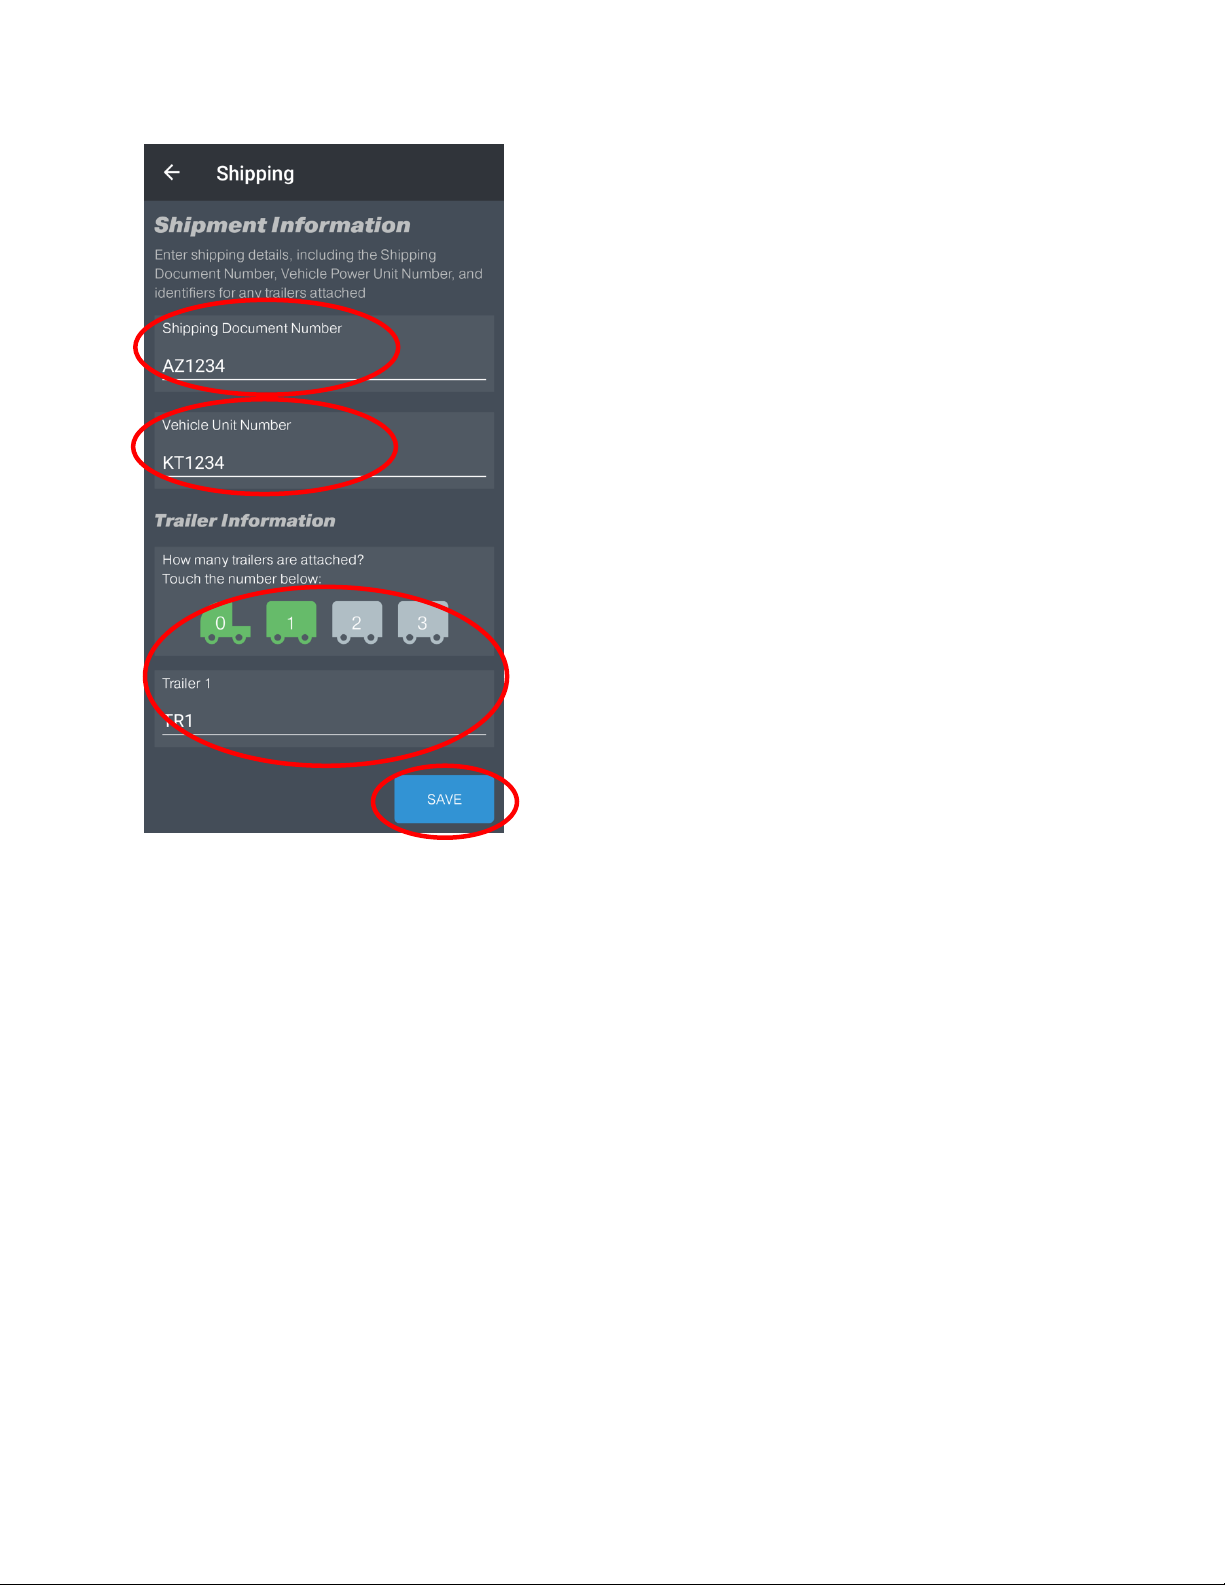
Shipping Information
Enter you Shipping Document Number
and Vehicle Unit Number (CMV Power
Unit).
Note: If you do not have shipping
information, you must enter a minimum
of two characters in both the Shipping
Document Number and Vehicle Unit
Number fields (i.e., 00).
In the Trailer Information section, tap on
the number of trailers that are attached.
When you tap on a trailer number, the
trailer field will appear. Enter the
required information and tap SAVE.
Note: The default trailer number is zero
(0).
Version 7.0. © 2018 HELP Inc. All Rights Reserved. 10
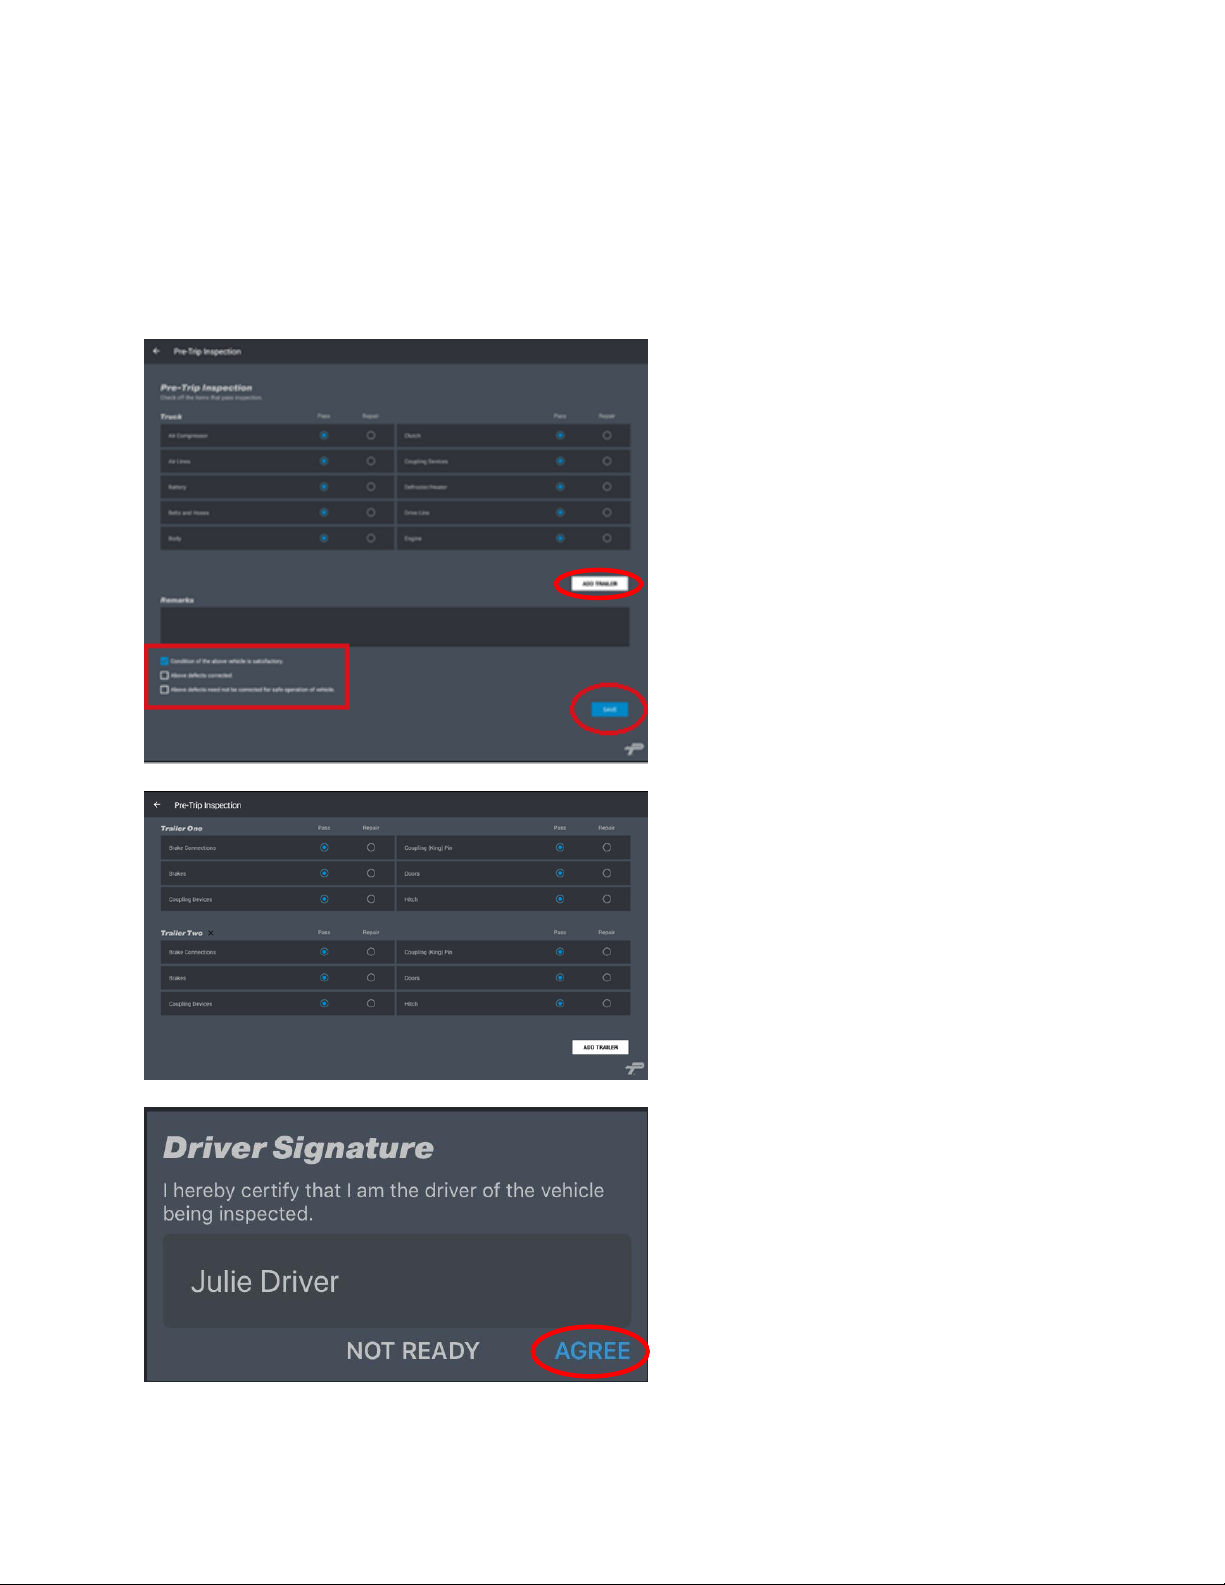
Truck
Complete the Pre-Trip Inspection form by
indicating whether or not each item
passes inspection or requires repair.
To add a trailer, tap ADD TRAILER and
complete the form.
Enter any notes in the Remarks box.
At the bottom of the form, place a check
(√) in the appropriate box and tap SAVE.
After tapping SAVE, the Driver Signature
box opens with the driver’s name prepopulated.
Tap AGREE to confirm and certify the
driver’s name.
Trailer
Complete the Trailer Pre-Trip Inspection
form by indicating whether or not each
item passes inspection or requires repair.
Note: Drivers can add up to three trailers.
Logging Your Pre-Trip Inspection
(Optional in the App)
Although logging the required pre-trip inspections in the app is not mandatory, the PrePass ELD gives
drivers a convenient option for recording their inspection findings.
Version 7.0. © 2018 HELP Inc. All Rights Reserved. 11
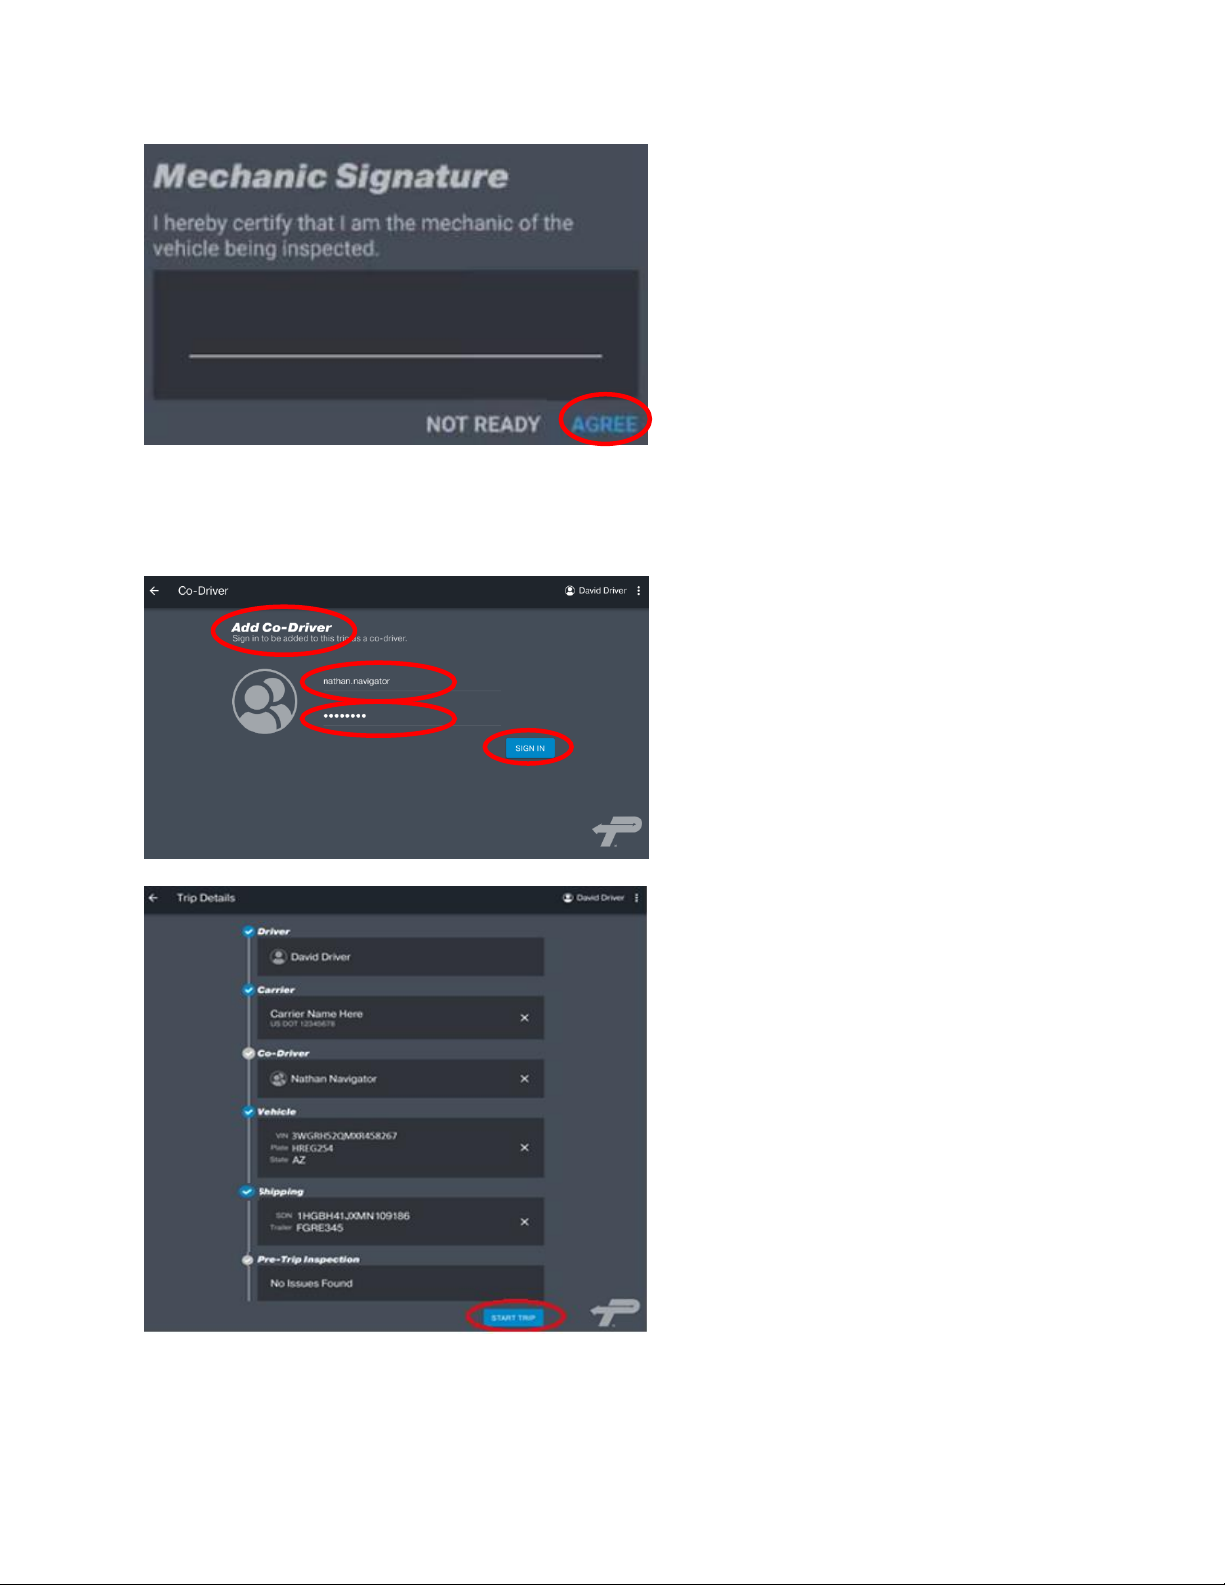
If all items passed inspection in the
previous step, this box (Mechanic
Signature) will not appear.
Note: If you don’t have a mechanic,
leave this blank and tap AGREE.
Otherwise, have your mechanic review
and certify your inspection findings.
To add a co-driver, tap Add Co-Driver.
Have the co-driver enter their Username
and Password and tap SIGN IN.
Your co-driver is now logged in, but is
NOT currently assigned as the driver.
Note: For more details, see the Co-Driver
Features section in the guide.
Once the Trip Details screen is complete,
tap Start Trip.
Adding a Co-Driver (Optional)
Version 7.0. © 2018 HELP Inc. All Rights Reserved. 12
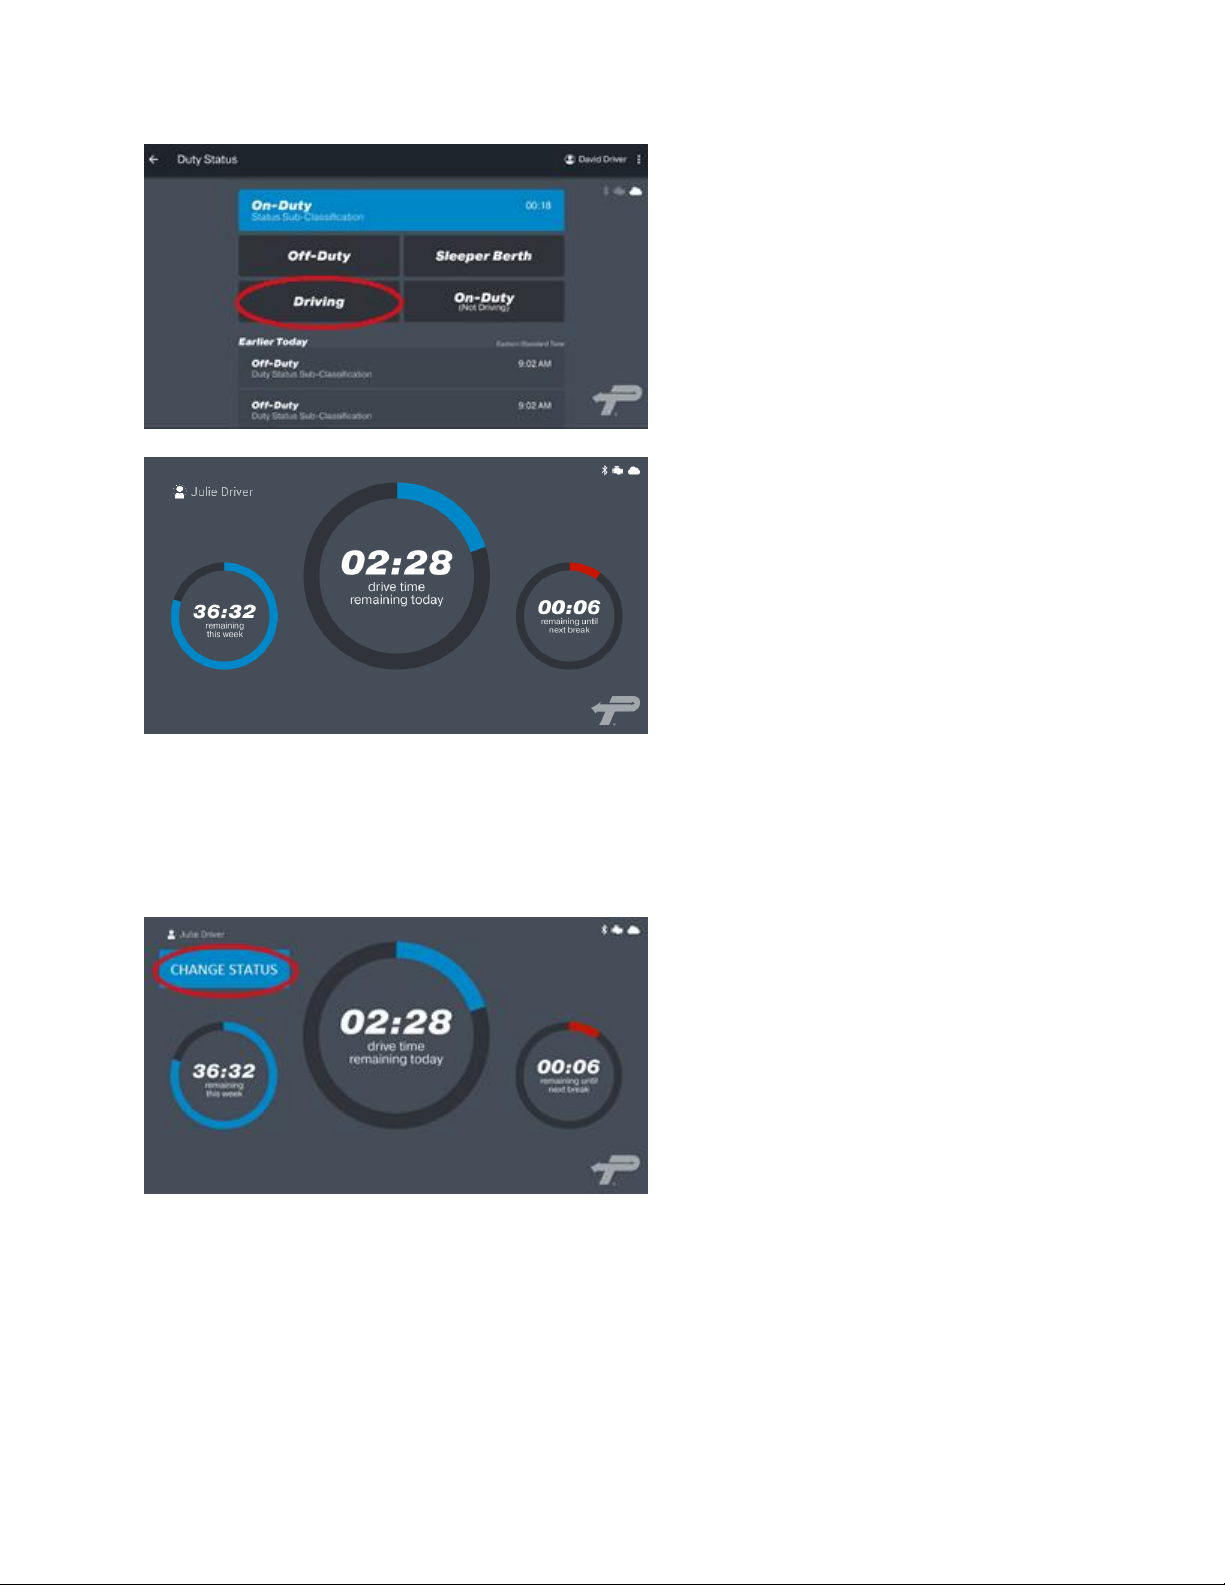
The Duty Status screen will open.
If you are ready to drive, tap Driving.
When you are connected to a vehicle, the
app will automatically record driving
status as On-Duty Driving once the
vehicle is going five MPH or greater.
If the vehicle has not moved in a short
period of time, the CHANGE STATUS
button will appear in the upper left
corner of the screen. Once the vehicle
starts moving again, the button will
disappear.
ONLY tap the CHANGE STATUS button if
you ready to change your status.
Note: If you do not change your driving
status to On-Duty > Driving, the ELD app
will automatically change your status
after approximately one minute of driving
more than five MPH.
It will also display the Driving Mode
screen.
During a Trip
Change Duty Status
Version 7.0. © 2018 HELP Inc. All Rights Reserved. 13

If you tap CHANGE STATUS, the Duty
Status box will open and say Driving.
Select one of the duty statuses that
appear below the blue On-Duty box.
Tap Off-Duty to go off-duty.
Tap On-Duty (Not Driving) to remain on
duty without driving.
Note: Drivers should always change their
duty status before they turn off their
truck to ensure accurate logs.
If you have Personal Use permissions, tap
Off-Duty.
Note: Refer to FMCSA proposed
regulatory guidance about using a CMV
for personal conveyance.
Tap Personal Use of CMV.
Tap SAVE.
Version 7.0. © 2018 HELP Inc. All Rights Reserved. 14

If you have Yard Moves permissions, tap
On-Duty (Not Driving).
Tap Yard Moves.
Tap SAVE.
Version 7.0. © 2018 HELP Inc. All Rights Reserved. 15

Stopped Driving – Automatic Detection
Tap the driver Person Icon on the upper
left corner of the screen.
After the vehicle has stopped moving for
approximately five minutes, the app will
detect that and will show a Stopped
Driving? message.
Tap either CONTINUE DRIVING or YES,
I’VE STOPPED.
If you do not respond within 60 seconds,
the app will automatically change the
duty status to On-Duty (Not Driving).
Co-Driver Features
Changing Drivers
Version 7.0. © 2018 HELP Inc. All Rights Reserved. 16

If you want to change drivers, tap
CHANGE DRIVERS.
The trip details will now show that the
drivers have changed roles.
Note: Logs and Inspection Data will be
switched and available in the Review Logs
and Inspections areas in the app.
Tapping the Co-Driver’s name will take
you to that driver’s Review Log section,
where their logs can be adjusted or
certified even if they are not active as the
Driver.
If you are on any status other than On-
Duty Driving, when you resume driving,
tap Start or Continue Trip.
Continuing a Trip
Version 7.0. © 2018 HELP Inc. All Rights Reserved. 17

The Trip Details screen will open.
Ensure that the required fields have a
blue check (√). If not, reselect them.
Note: Co-Driver and Pre-Trip are
optional.
Tap CONTINUE TRIP.
The Duty Status screen will open.
If you are ready to drive, tap Driving.
Note: If you do not change your driving
status to On-Duty > Driving, the app will
automatically change your status after
approximately one minute of driving
more than five MPH. It will then display
the Driving Mode screen.
Version 7.0. © 2018 HELP Inc. All Rights Reserved. 18

Ending your Day (Go Off-Duty)
When you are done driving for the day,
tap Off-Duty in the Trip Duty Status
section.
Note: For more details, see Change Duty
Status in the Start Trip section above.
Note: The ELD app cannot automatically
place a driver in Off-Duty status. DRIVERS
ARE RESPONSIBLE FOR THEIR DUTY
STATUS CHANGES. If you forget, you can
add a manual duty status using the
Review Logs app feature.
When switching loads, tap END TRIP and
update your shipping data.
Note: A “trip” is considered a vehicle and
load combination. A trip can last as long
as required to haul a load.
Note: You are not required to “end a
trip”, but you are required to ensure that
the vehicle and the load for each trip are
accurate. End Trip is a feature of the app
that helps identify a load or vehicle
change.
Ending a Trip
Version 7.0. © 2018 HELP Inc. All Rights Reserved. 19

Reviewing and Modifying Your Logs
To review, update and certify your logs,
tap Review Logs.
Note: Logs that still need to be certified
are flagged in blue on the Home screen.
Note: You must certify your daily logs,
even if you have no activity for that day.
In Review Logs, tap the Day to review.
Review the log for accuracy and
completeness and certify it when ready.
FMCSA regulations specify that all certified ELD applications must allow drivers to edit their own logs.
Drivers have the responsibility to make the final determination on their log entries, and they must
certify that their logs are correct.
Version 7.0. © 2018 HELP Inc. All Rights Reserved. 20

Modifying a Log
If you want to insert a duty status or
make an entry or a correction, tap ADD
ENTRY.
Note: Automatically recorded driving
time cannot be edited.
Select one of the duty statuses.
Tap SAVE.
Version 7.0. © 2018 HELP Inc. All Rights Reserved. 21

-
Enter notes in Reasons for adding/editing
event.
Note: Manual entries MUST have notes.
Regulations require that drivers explain
why they are changing their status.
Tap DONE.
If you have personal use permissions, you
can select Regular Off-Duty or Personal
Use of CMV.
Version 7.0. © 2018 HELP Inc. All Rights Reserved. 22

The Start Time scroll bar appears.
Select a Start Time and tap SAVE.
To certify your log, tap CERTIFY LOG.
Version 7.0. © 2018 HELP Inc. All Rights Reserved. 23

End-of-Day Log Certifying
To start the certification, tap Review
Logs. Trip Logs will display. Tap the log
that you want to certify.
Note: A green check mark (√) next to a
log on the Trip Logs screen indicates that
the log is certified.
If you are ready to certify your logs, tap
CERTIFY LOG.
In the Certify Log signature box tap
AGREE.
If you are not ready to certify your log,
tap ADD ENTRY. See the Edit Logs section
for more information.
Note: If you make any edits to a log, you
will need to recertify it.
At the end of each day, you must certify your driving logs. All drivers must certify their daily logs every
24-hour period.
Version 7.0. © 2018 HELP Inc. All Rights Reserved. 24

Inspections
To access the eight-day USDOT roadside
inspection information, log into the
application and tap Inspections.
The graphic section of a full day’s log
appears.
Pick the trip date to review. Use the
arrows to scroll to the correct date.
Note: FMCSA regulations require that a
driver must be able to show his or her
logs to an inspector on their device
screen.
Roadside Inspection Information
Version 7.0. © 2018 HELP Inc. All Rights Reserved. 25

Here is a sample of log detail. All ELD events are stamped with Time, General Location, Odometer and
Time
Location
Odometer
Eng hours
Event type/status
Origin
Comment
11/20/2017
15:20
48841
1102.3
Off Duty
Driver 11/21/2017
8:43 0
0
Logout
Auto 9:06 0
0
Login
Auto 10:27
48840
1102.2
Clear YM, Pers Use
Auto 10:27
2.5 miles NW of Tempe, AZ
48840
1102.1
ODND
Auto
On-Duty(Not Driving)
10:28
2.5 miles NW of Tempe, AZ
48840
1102.2
Driving
Auto
Driving
10:35
3.4 miles WNW of Tempe,
AZ
48841
1102.3
Driving
Auto
Driving
10:43
2.9 miles NW of Tempe, AZ
48843
1102.4
Driving
Auto
Driving
12:40 0
0
Login
Auto 12:45
2.9 miles NW of Tempe, AZ
48849
1103.4
Driving
Auto
Driving
13:02
3.4 miles WNW of Tempe,
AZ
48852
1103.6
SB
Driver
Sleeper Berth
13:02
3.4 miles WNW of Tempe,
AZ
48852
1103.6
ODND
Driver
On-Duty(Not Driving)
13:04
3.4 miles WNW of Tempe,
AZ
48852
1103.7
Driving
Driver
Driving
13:16
48853
1103.9
Clear YM, Pers Use
Auto
13:16
2.5 miles NW of Tempe, AZ
48853
1103.9
ODND
Auto
On-Duty(Not Driving)
13:38 0
0
Logout
Auto 15:06 0
0
Login
Auto
15:32
48857
1104.8
Login
Auto
15:34
48857
1104.8
Clear YM, Pers Use
Auto 15:34
2.5 miles NW of Tempe, AZ
48857
1104.8
ODND
Auto
On-Duty(Not Driving)
15:37
2.5 miles NW of Tempe, AZ
48857
1104.9
Driving
Driver
Driving
16:10
48865
1105.4
Clear YM, Pers Use
Auto 16:10
2.5 miles NW of Tempe, AZ
48865
1105.4
ODND
Auto
On-Duty(Not Driving)
16:14
2.5 miles NW of Tempe, AZ
48865
1105.5
SB
Driver
Sleeper Berth
16:19
2.5 miles NW of Tempe, AZ
48865
1105.6
ODND
Driver
On-Duty(Not Driving)
16:24
48865
1105.7
Diagnostic
Auto
16:24
48865
1105.7
Diagnostic
Auto
16:25
2.5 miles NW of Tempe, AZ
48865
1105.7
Driving
Driver
Driving
16:51
48868
1106
Clear YM, Pers Use
Auto
16:51
2.5 miles NW of Tempe, AZ
48868
1106
ODND
Auto
On-Duty(Not Driving)
16:51
2.5 miles NW of Tempe, AZ
48868
1106
Off Duty
Driver
Off-Duty
Engine Hours when connected with the vehicle.
All logs start with the last known duty status that was recorded from the previous day worked.
Version 7.0. © 2018 HELP Inc. All Rights Reserved. 26

Share Logs With Inspection Officer
While on the Inspections screen, tap the
menu button (three dots) in the upper
right corner.
This will display the following options:
Sign Out, Share Logs and Cancel.
Tap Share Logs.
Inspection Screen
Version 7.0. © 2018 HELP Inc. All Rights Reserved. 27

This will open the Share Logs page.
The Inspection Officer will give you
information to type into the Notes field.
Once done, tap SEND to send your logs to
FMCSA, where the inspector can retrieve
them.
Note: If you are unable to send your logs,
you will need to show them on your
device screen to the inspector.
NOTE: FMCSA regulations require that you keep eight days of blank paper logs, as backup, with the
vehicle at ALL times.
NOTE: Your mobile device must be connected to the internet to electronically submit files.
NOTE: If your ELD is showing a diagnostic error code, you must maintain paper logs until the error is
resolved.
Version 7.0. © 2018 HELP Inc. All Rights Reserved. 28

Manual Data Reload
On the Home Page, tap Information.
On the Information page, tap Reload ALL
Data.
You will be asked to verify your internet
connection. If you have a good quality
connection, tap Continue.
In the event of a prolonged disconnection from the internet, or if connection errors cause data transfers
to fail, you can safely reload a master copy of your data to your device. This master copy is maintained in
the cloud by PrePass. Performing a manual data reload does not destroy any data on your device.
Version 7.0. © 2018 HELP Inc. All Rights Reserved. 29

While the reloading is in process, you will
see a status screen.
When the process is complete, you will
see this screen.
If the screen shows Sync Complete, tap
Done.
You will see this screen if the reload is not
successful.
Tap Done.
Try the reload process again at a later
time. If you have multiple unsuccessful
reload attempts, contact PrePass ELD
support.
Version 7.0. © 2018 HELP Inc. All Rights Reserved. 30

System Icons / Indicators
Co-driver: Tap the double-person icon to review logs, make manual changes to log entries
and certify logs. Note: Only the co-driver can do this while the vehicle is in motion.
Bluetooth: Indicates if you are connected to your OBD device. A black Bluetooth icon
indicates that you are not connected.
Engine: A black engine icon means that the app is not connected to the engine. A red engine
icon means that there is an error condition. If the engine icon is red, tap the icon and an error
message will display. See image below. A white engine icon means the application is
connected to the engine and there are no errors.
Cloud: A white cloud means that the app is connected to the internet. A black cloud means no
internet connectivity. However, the app continues to operate even if connectivity is lost. Once
an internet connection is re-established, logs will synchronize.
A red engine icon means that there is an
error condition.
The engine icon will turn red if the ELD
detects a positioning compliance
malfunction, which can be triggered if you
turn off Location Services or deny the
PrePass ELD application permission to use
Location Services.
The message shown in red – By turning
off location services or denying location
service permissions, you may be out of
compliance with FMCSA regulations - will
appear if you tap on the red engine icon.
Version 7.0. © 2018 HELP Inc. All Rights Reserved. 31

Alerts
This alert appears when you launch the
ELD app on Apple devices.
Always tap Always Allow.
Location Alert
Version 7.0. © 2018 HELP Inc. All Rights Reserved. 32

Bluetooth Not On Alert
This alert appears when your device’s
Bluetooth is turned off.
Tap OK to clear the message.
Turn on your Bluetooth to proceed.
Version 7.0. © 2018 HELP Inc. All Rights Reserved. 33

Start Pairing Alert
This alert appears when you begin the
pairing process.
Tap OK to clear the message.
Press the blue button on the OBD device
to proceed.
Version 7.0. © 2018 HELP Inc. All Rights Reserved. 34

Unsuccessful Connection Alert
This alert appears when the pairing
attempt was unsuccessful.
Tap OK to clear the message.
Try the pairing process again.
Version 7.0. © 2018 HELP Inc. All Rights Reserved. 35

Change Connected Device Alert
This alert appears when the app detects
that you are already connected to one
device, but you are trying to pair with
another one.
Tap YES to change devices.
Tap NO to stay paired with the original
device.
Version 7.0. © 2018 HELP Inc. All Rights Reserved. 36

Disconnection Alert
This alert appears when the app detects
that you are trying to disconnect from the
OBD device.
Tap YES to disconnect.
Tap NO to stay connected.
Version 7.0. © 2018 HELP Inc. All Rights Reserved. 37

Troubleshooting the OBD Bluetooth Connection
Installation instructions will be included with the OBD device. Please follow the instructions closely to
ensure proper installation.
1. Bluetooth must be active on your device and paired through the device operating system (see
pairing instructions above). On your tablet or smartphone, go to Settings > Bluetooth. Tap the
Bluetooth icon and make sure that it is turned on.
2. Make sure that the Bluetooth adapter is on (indicator light is green) and that the adapter and/or
cable is firmly connected to the truck’s diagnostic port. If you are unsure of where to connect
the device in the cab, please refer to the manufacturer’s instructions.
3. If you are using two different devices, make sure that your other device is not paired to the
adapter. If the adapter will not go into pairing mode, unplug the adapter and plug it back in. Try
to pair the adapter to the device again.
4. Location services must be enabled on the mobile device.
5. Internet connectivity (mobile data plan) must be available.
If the adapter does not pair after following these steps, please contact PrePass at 1-800-PrePass
(1-800-773-7277), Option 7. Then pick Option 3 for Technical Support.
Customer Service
For any application or account-related customer service issues, call 1-800-PrePass (1-800-773-7277) or
email support@prepass.com.
For issues with the OBD device or adapter, contact the equipment supplier or manufacturer.
Version 7.0. © 2018 HELP Inc. All Rights Reserved. 38

Appendix A
PrePass ELD Qui ck Start Guide
Important Note: Drivers are responsible for changing their duty status and maintaining their logs.
If you need to amend your Duty Status, you can add manual Duty Status changes in the Review Logs section. All drivers must certify their logs at the
end of each day. (See the Change Status Guide for more information). Drivers can view their logs in the Inspections tab.
Step 1
Complete the required Vehicle and Shipping
information. Completing The Pre-Trip
Inspection information is optional. Tap
START TRIP.
Step 4
The Driving Mode screen opens.
This screen remains open and active
while in Driving status.
Step 2
The Duty Status screen opens.
Step 5
If the vehicle is stopped for several
seconds, the Change Status button
appears.
ONLY tap this if you are done driving and
ready to change your status.
Once the vehicle starts moving again, the
button will disappear.
Step 3
Tap Driving to start driving.
Step 6
If you tap the Change Status button, the
Duty Status bar screen opens.
Tap the Duty Status bar to change
your status.
Step 7
The Status Options boxes open.
Tap the appropriate status.
Note: A trip is considered a load. A trip
can last as long as required to haul a
load. When switching loads, tap End
Trip and update your shipping data.
Step 8
If you stop driving and exit the application,
when you are ready to resume driving, tap
Continue Trip and repeat the above
process.
040618

Appendix B
Did you forget to change your duty status?
If you forget to change your duty status, you can amend your driver logs.
Please note: Manual entries must include notes. Inspection officers will examine manual entries closely because those entries
won’t show odometer and engine hours for the time(s) that the manual events occurred.
On the Home screen,
tap Inspections.
Tap ADD ENTRY. The Duty Status options
Find the log you need to edit. Tap <PREPASS ELD to return to the Home screen to
add a manual driver log entry.
appear.
Tap the correct (1 of 4)
Duty Status.
Add notes (required). Tap
DONE.
On the Home screen, tap
Review Logs.
If you have special
permissions, tap the correct
one (see page 2 for more
info). Otherwise, tap None.
Select the correct Start
Time. Tap SAVE.
To add another edit, tap
ADD ENTRY. Otherwise,
tap CERTIFY LOG.
Review the edited log.
040618

To add another duty
status, repeat the
previous steps.
Basic Log Example
This image is an example of a very basic log.
To view your log graphs, tap Inspection on the application Home screen.
Example: Displays a onehour Off-Duty break status
on trip timeline.
Example: Displays a one-hour Off-Duty status on trip log graph screen.
Editing Log Entries
You cannot amend
automatic duty status events
that were added by the ELD
software. You can add
manual entries between
automatic status events to
adjust your daily log as
needed.
To edit and delete manually
entered
duty status events,
tap the event, select edit and
then either select a new
status and time or delete the
entry.
Automatic ELD events are stamped with Time, General Location, Odometer and Engine Hours
when connected with the vehicle.
It is critical to change your duty status in the application every time your duty status changes.
All logs start with the last known duty status
Manual entries that are created when the application is disconnected from the vehicle will
not record miles, hours or location information. Be as accurate as possible and record
detailed notes when making manual entries.
that was recorded.
Personal Use Option
If you have Personal Use
special permissions, tap
Off-Duty.
Then tap Personal Use.
Yard Moves Option
If you have Yard Moves
special permissions, tap
On-Duty (Not Driving).
Then tap Yard Moves.
 Loading...